#mini blender tutorial
Explore tagged Tumblr posts
Visit Tumblr Blog
Explore Tumblr blogs with no restrictions, modern design and the best experience.
Last Seen Tumblr Blogs


Fun Fact
Tumblr Inc. has $15.1M in annual revenue.
Note
Hello there! I'm Eden :D I LOVE your renders! I've been rendering for well over a year at this point, however I only stuck to the super basic stuff since it took me a year before that to even know how to do it at all. I've wanted to up my game and get to where you are now. I'm SO SORRY if this question was asked already (I haven't gotten too far in your posts yet), but;
How do you personally edit your renders? I understand you use photoshop, but how do you do it exactly? Your renders have that kind of digital art style, like you drew them yourself. Feel free to be as descriptive or brief as you'd like!
Hi Eden!!! Thank you so much! 🥹😍♥️
I've followed you back and glad we're moots! I'd love to see some of your work!
I'm not sure if I've answered this before but I'm happy to answer it again! Also I haven't advertised it in a while (and I really need to try to get up a new tut, maybe soon), but my alt account is a Render School where I post tutorials, with plans to post editing tutorials in the future!
But honestly as far as my editing, I really don't do much.
Actions are my secret weapon, and I have a few favorites/go-tos I'll link! A few are by simmers and a few are just action sets. I'm in a family of photographers, so I have access to a wealth of resources for my editing.
Sonder set by @intramoon
Cold Water set by @intramoon
Retro Prime photoshop actions
Indie camera photoshop actions
But my "secret weapon," as it were, and the set of actions that I think most helps me accomplish that digital art style is a set of actions that are sadly expensive and hard to find now.
My favorite set is by Totally Rad! and I think in recent years it's been folded in to this Pixel Sugar product on their website. I know that's a steep price point but it's possible you can find it around the corners of the Internet for less, or if you can't, you might be able to find "dupes" of the better ones, which imo are:
Technicolor dream world
Super Fun Happy
Bullet Tooth
Grandma's Tap Shoes
As for my method, I know a lot of simmers paint over their renders, and I've done that a few times but find I'm too impatient tbh. My goal is always to have to do only minor touchups over my renders and some color/vibe adjustments before the finished product. My "raw" files are always exactly what blender spits out for me, unaltered in any way except to resize them for Tumblr.
To get that digital art style, I'd recommend rendering with alpha details if you don't already. If your computer can't handle alpha cc in the game, DM me and I can give you some pointers (sneak peek info for a future tut lmao) on how to accomplish it without bogging down your game.
When I go into photoshop I adjust the brightness and contrast, as I tend to personally prefer high contrast pieces that contain dark subject matter but you can still see the details. Then I'll paint/blur/clone/adjust anything that needs it, then I'll "stack" and adjust a handful of actions before applying edge blur and vignette and any other color adjustments (levels, curves, etc).
That's a very oversimplified rundown of what I do, but really overall my editing process is simple. The bulk of my work happens in blender itself. I find that the more time I take to perfect the lighting and shadows and angles in blender, the less frustrating the editing process and the happier I am with the end result. So, that said, be sure you're spending a lot of time in blender getting the light and shadows to be exactly where you need/want them to be before running it.
I know this is a bit long I'm sorry! If any of it is super confusing or you'd like a more in-depth look at any of it please let me know! I do plan to do editing tutorials for my side blog, but the latter half of this year has kind of run over me like a train, and for now I'm just trying to get by day by day. But I'm happy to help if you have more specific questions!
& thank you again!! ♥️
#replies#thank you so much this literally made my day#I was having a bad one too ugh I needed this#mini blender tutorial#tutorial ish#sims 4 blender tutorial#sims 4 render tutorial#sims 4 editing tutorial#I can't tell yall how happy it makes me when yall love my work#legit holding back tears#♥️♥️♥️
39 notes
·
View notes
Text

Month 11, day 8
So hey hahaha anyone remember this tutorial project I was doing 5ever ago? The one with all those objects I was modeling over and over and over again to get modeling practice and all that?
Finally decided to take it back up again :)
I skipped the whole modeling part since I did get my practice in with that part of the tutorial and went straight to the UV unwrapping lessons (which I already knew how to do lol) and now we're on texturing (which I... mostly know how to do. I mean I've made all those procedural textures but this is mostly using images to texture the objects which is a whole different beast so I'm learning a lot but also skipping parts I already know)
But yeah! Yay, learning things and practice on the things I already know! :D
#the great artscapade of 2024#art#my art#blender#blender render#blender 3d#cycles render#cg fast track#I think the worst part is that because the current version of Blender doesn't play nice with AMD graphics cards I can't use EEVEE#and the tutorials are all in EEVEE#*le sigh* I really want to get that new mac mini that Apple just announced bc it should be able to handle Blender no sweat#but alas#money )':
9 notes
·
View notes
Text

RHODE COLLECTION FEAT. OFF-LINE x BERGDORFVERSE
Mini Heart Tag Set & Gold-Plated T Sunglasses is a part of Off-Line x Bergdorfverse x Bradford Rhode collaboration.
Get the clothes by @offlinesims HERE
Get the bag & shoes by @bergdorfverse HERE

💎MINI HEART TAG SET /// GAME EDITION
/// New Meshes /// 4 Swatches /// Unisex T/E /// 7 Packages
/// HQ Compatible /// BG Compatible
/// All LODs /// Custom Thumbnails /// Disallowed for Random
☀️GOLD-PLATED T SUNGLASSES /// GAME EDITION
/// New Meshes /// 2 Swatches /// Unisex T/E /// Slider Compatible
/// HQ Compatible /// BG Compatible
/// All LODs /// Custom Thumbnails /// Disallowed for Random
///↓DOWNLOAD↓///
PATREON [PUBLIC RELEASE: JUN 24]
------------------------------------------------------------------------------
💎MINI HEART TAG SET & GOLD-PLATED T SUNGLASSES /// BLENDER EDITION* [SHOWN ON COVER]
/// Render Ready /// Adjustable Models
/// Files was made in Blender 4.4 using Cycles Materials
/// HQ Textures /// Material Nodes for Customization
/// How-To-Use Tutorial Included
///↓DOWNLOAD↓///
PATREON
-------------------------------------------------------------
BRADFORD'S SOCIAL MEDIA:
INSTAGRAM /// PINTEREST /// PATREON
-------------------------------------------------------------
*WHAT IS BLENDER EDITION?
Blender Edition is a special edition that has more texture space (usually 2048x2048) and can be used only in Blender due to different UV Mapping. This edition allows you to create renders with more quality and flexibility than models exported from the game itself.
Archive with this edition contains .blend file, diffuse textures, normal maps and tutorials on how to use it.
IMPORTANT NOTE:
Blender Editions will be available to Platinum and Diamond members only + Patreon Shop. Early Access doesn't apply to Blender Edition since this edition weren't made for the game and is basically a separate 3D Model.
#sims 4 cc#sims 4#sims 4 custom content#sims 4 accessories#sims 4 jewelry#sims 4 earrings#sims 4 necklace#sims 4 bracelet#sims 4 sunglasses#ts4cc
113 notes
·
View notes
Text
This is another short tutorial lost when I accidentally deleted my Tumblr. It is a very simple guide on how to edit poses so they fit fat Sims, using a custom rig extracted from SimRipper and Blender. It's designed for people who've never made a pose before and who usually wouldn't, but would just LOVE to have poses actually fit their Sims. In a way it's basically like a really quick and dirty pose tutorial I guess. It only explains the dead basics of posemaking needed to edit a pose, not to actually make one from scratch. I hope this helps some people.
If you want to learn how to make poses from scratch, this is the tutorial that will explain everything.
28 notes
·
View notes
Text
Thanks for all the love on the last Set 🩷🩷
I am working on the next original set, I already posted a WIP sometime ago and I have made some progress since then

(please don't look outside the window)
Before I start my resume/rant I'll put a read more so anyone who's not interested doesn't have to scroll for 5 minutes to get away from my bad English
Okay, so first things first, this week started with a National Blackout here in Spain so that meant no blender time on Monday :( but I also reached 50K downloads on MTS so yay ♥️♥️
So, since I'm only a human I can't make complex sets every week I'm trying to squeeze some simple projects in between them so I don't disappear for weeks while making them.
That means this week is time for a small release, It will be available on Friday, is already finished and tested.
Technically I think it is the first request I made, an anon asked for the door from the Keep it clean Venus closet (lovestruck DLC) so I made it.

NGL I had some issues with it at first but now it's completely functional.
I might release a little door tutorial on my ko-fi with the essentials and the problems that I've run into while making doors and windows (and how to solve them)


I promise you it doesn't do that anymore
The next mini project I have is the separated arches and windows from the base game doors. I have not made much progress on it since it's a little bit boring and repetitive but I'll try to have it ready for the 9th of May.
Okay, time for the interesting part, the next original set. As you could see on the first image it's going to be a living room. I don't know yet how many objects it will have in total, right now I have :

TV stand (80% finished)
Side table ✅
Coffe table ✅
Modular sofa Plain version (75% finished)
Modular sofa Corduroy version (50% finished)
Modular sofa chaise longue plain / corduroy (0% finished)

Those are a 100% part of the set, if they don't come out on part 1 they would be released on the next one.
I have also made some rug swatches from some IKEA rugs but I'm not sure how I'm feeling about them, but yeah a nice rug to tie all together would be a very nice addition to the set.
Finally, to complete the set I want to make some pillows and a blanket to be able to decorate the sofa because it's pretty plain on its own. That way even if you use it in multiple builds it doesn't have to look the same. I will probably use some of the cushions we already have in game as a base but I want to make them like already at the right high and I have to investigate how to remove the collision (?) to make the placement fast & easy without move objects on. I always try to make everything work without it.
The last thing I want to talk about are the smiley lamps I made, that I haven't published yet but you can find in the last screenshots I made.
My doubts with them is that I don't know if I should publish them on its own or make them part of a bigger set. I will end up publishing them eventually, but right now there's no release date.
Anyway if you are still reading, thank you so much for bearing with me and any feedback is welcome. If you want the smiley lamps more than the arches I can release them on Friday 9th.
8 notes
·
View notes
Text
Patreon Incoming
Hello!
I am going to send out the link to my Patreon in the next few days. I have never done one before so I am experimenting. Essentially first tier folks (Jujubes - $2) will get access to process sketches, timelapses, and drawing tutorials.
Second tier(Jarhead - $6) will have access to a Modern AU, accessory designs, Blender process updates as well as Jujubes perks, as well as opportunity to vote on possible GenderSwapped!AvatarAU mini-comic topics.
I'll release the link shortly, but I am excited to try out Patreon!
Designing tier icons rn:
29 notes
·
View notes
Note
Hi! I'm thinking of making my own ball jointed dolls, but don't know where to start. What are some beginner tips?
As far as sculpting goes, my main focus so far as been on object heads with only very very recently branching out into a tail (which looks pretty good imo for a first pass lol). I am hoping to eventually model my own body to go with my object heads, though, and have a doll that is 100% my own. Right now I print a lot of Kabbits cause I love them - they're made by AelithArt, who also has shared quite a few tutorials.
Some of Aelith's tutorials are linked below (he uses zbrush, which is a paid subscription. I've heard zbrush mini is free, though) (also hopefully these links will take you to the respective playlists):
youtube
youtube
If you don't like Zbrush or are having trouble getting Zbrush Mini to download or something, Blender is also popular and it's a free to use program. It's definitely got a learning curve but there are tons of tutorials on YouTube. I don't have any I specifically use, unfortunately, as the most I've used it for so far is for smoothing and a friend showed me how to do that over Discord.
Another friend has suggested just studying the joints and such of doll artists you admire and seeing how they built their dolls (one of my favorite parts of the Kabbits is the knees, personally)
I also got this on Etsy - https://www.etsy.com/listing/594358549/online-video-class-how-to-design-a-bjd?ref=hp_active-mission-recs-rv-1-1
Which is another Youtube course about designing a BJD pattern, essentially designing your doll. You can actually find a lot of classes like this through Etsy that may come as PDFs or special Youtube links. Those ones tend to cost money, though. I believe the one I got was about 15-16 US dollars. Not bad, but it's the very beginning of the process and does not get into the actual modeling aspect; it's just the planning stage. That seller DOES have more tutorials available that get into the modeling stage, but they're much more expensive and I believe she focuses on actual sculpting and casting in resin. I still use resin, but I 3D print my stuff.
If you can find a good, active discord community, that's also great, honestly. I'm really glad I joined Aelith's cause it's been a pretty positive experience and there's quite a few knowledgeable people in there who have all been very supportive.
Aaah, I hope this helped some?? I'm not always great at organizing my thoughts for this kind of thing and my own resources are actually kind of limited.
29 notes
·
View notes
Text
Someone asked what my process was to make the Rickbot comic, so I thought I'd make a separate post to show it. The process was kinda all over the place and spread over many months from December 2022 up till June 2023, so I'll try my best to make it understandable. And if you have any questions feel free to ask them!
The idea
So it all started with the idea of; What if Rickbot came back? And then the idea immediately made me think of two things;
How would Rickbot react?
Why is he brought back?
Which ended up with these two scenarios in my mind;
A. Rickbot awakens and he's not happy B. Rick tells the reason he's activated again
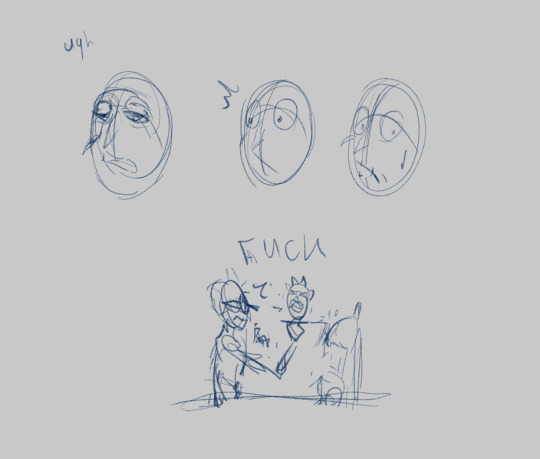
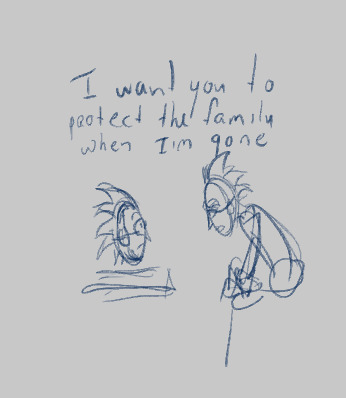
These were the very first scenes that started it all.
So then the question became, how do I go from point A to point B?
I would take moments from the show as reference for how they would act in these scenarios. And I'd take inspiration from manga and other comics of how I wanted the dialogue to flow and what the comic layouts would look like. In this case I knew a lot of dialogue would be involved cause these guys talk a lot! But I also didn't want the panels to feel too crowded and rushed so I limited myself to the amount of dialogue per panel.
Right now I'm writing it down like it was very planned, but for me this was often a very subconscious thing I did. I just thought up scenarios while I was taking walks or daydreaming in the shower etc. And sometimes these very specific moments would pop up that I would write down or draw out later.
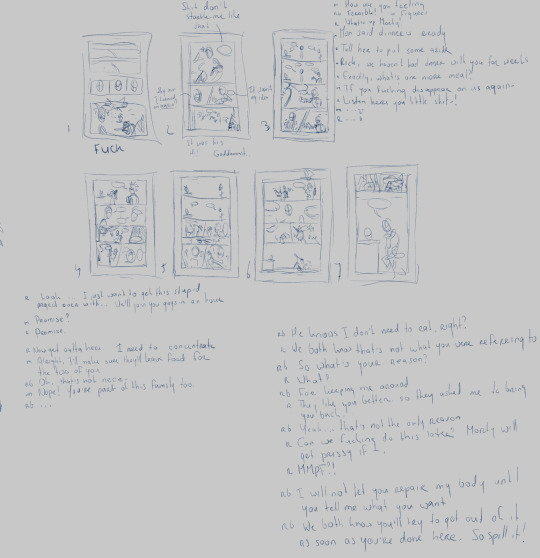

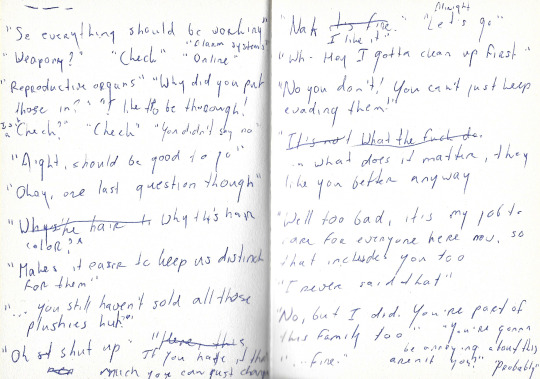
I would make mini thumbnails of how I wanted the pages to go and write the dialogue next to it. At this point I'm mainly thinking of what I want characters to say and how I want the story to flow. Sometimes I make multiple versions of the same scenario to see how it flows better.
At times I even only write down dialogue and then make the thumbnails for them later. I have a tiny a6 sketchbook for little thumbnails and ideas like this. These were often moments were I didn't know where I wanted to take the comic yet, so I would separate the two to keep it more organized for myself.


As you might have noticed, not everything is the same in the final comic. I always fine-tune or change stuff up as I go. Sometimes things don't flow as well as I thought they did or some dialogue feels awkward or unnecessary.
Sketching
Once all the pages were planned and I have a good idea of how the story would go I opened a new Clip Studio Paint file and used the comic feature to set that up.

I would then copy the thumbnails I made in the page files and exported a thumbnail draft of the whole comic and 'read' through it to see how it flowed.
After I was satisfied I finally started sketching the pages.


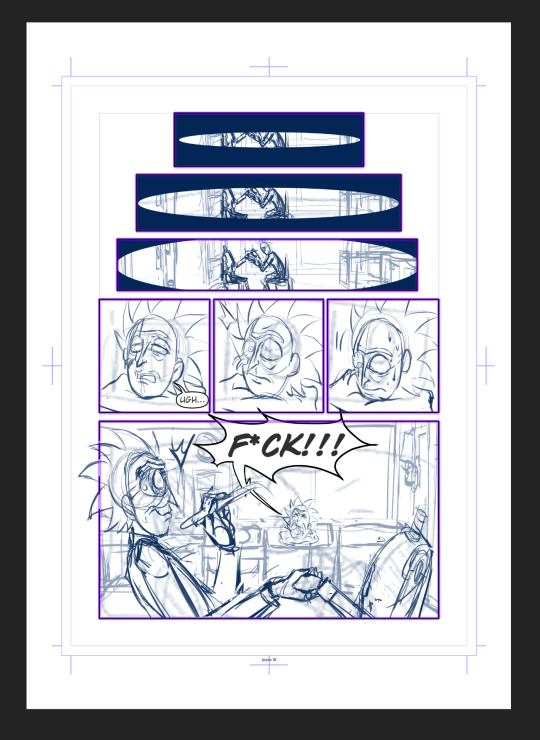
Most of the pages stayed the same from the thumbnail, aside from some poses or expressions here and there. But I would also change up stuff I wasn't satisfied with.
For example, initially the Prime panel looked like the left one, but I didn't like how the pose flowed with the text balloons. There was a lot of empty space as well. So I decided to redo it to the one on the right.

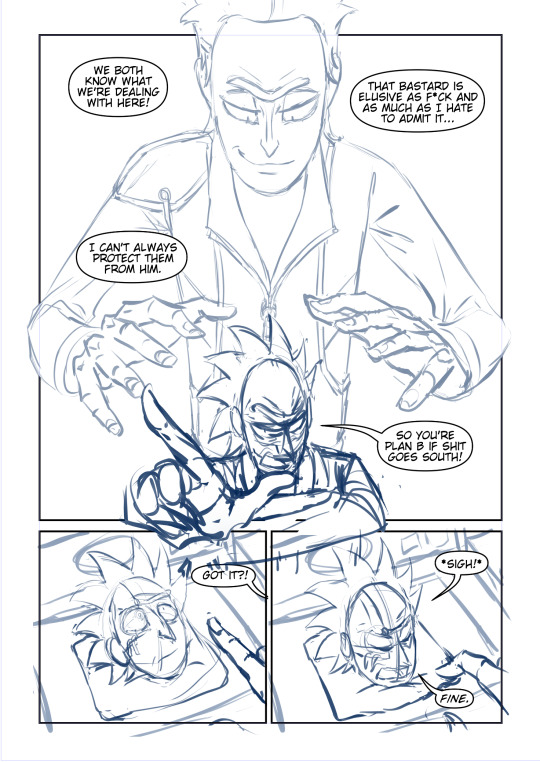
Even now for the final version I'm thinking of resizing Rick a bit more. These kind of changes just happen throughout the process.
The backgrounds
I knew the comic would only take place in the garage, so to save myself a lot of time I decided to make it in 3d.
First I decided to sketch out the four walls of the garage as planes;


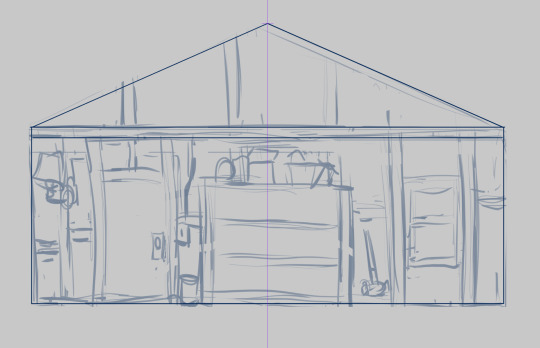

Then I imported those in Blender. I did some simple 3d modeling to get the basic shapes for the counters and the cabinet et voila! 3d sketch version of the garage!

I know this is a very watered down explanation, but trying to explain how I did it would take a whole new tutorial. And there are many other ones out there that explain it much better than I could. I was lucky that I already have some Blender experience cause of past works I've done for school and stuff.
But if you got the time to delve into it I would recommend it! For this here you only need to know the basics. Also Blender is free to download :)
This has saved me a lotttt of time drawing the same backgrounds over and over again!
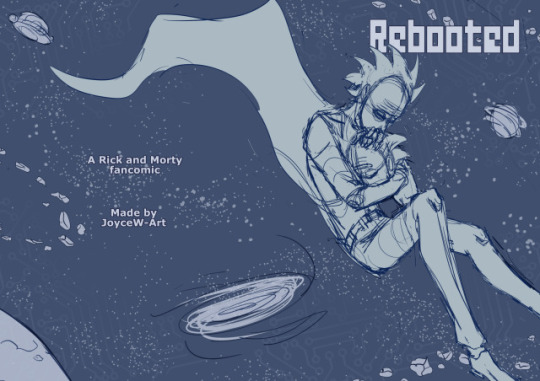
Cover
Lastly I did the cover. That one has also gone through multiple versions. I had a vague idea of what I wanted, but I wasn't happy with the execution so I redrew that one as well.

So that's the whole process so far. I do I wanna continue the comic once I got the energy to work on it again. Gonna do some test pages first to see what kind of rendering I wanna go for. Not sure if'll be in black and white, color or a combo...we'll see.
I hope this helps! And if you have any questions don't be afraid to ask them.
112 notes
·
View notes
Text

Mini Blender Tutorial: Appending Hair & Clothes onto Posed Sims
I'm so sorry this has taken me so long.
Quite a while ago, @baobeisims requested this tutorial, and I'm sorry it's taken an age but I'm in the final stretch of planning before my wedding and it's got me stressed up to my eyeballs.
But without further ado, let's go!
Step 1: Import your sim into blender and pose
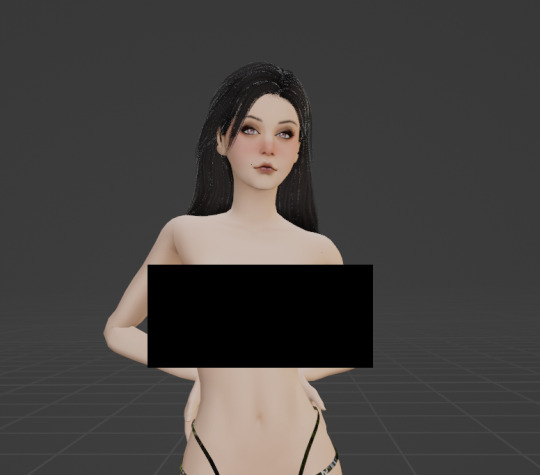
For this tutorial, I'm going to use my lovely Lilith! When appending clothing, it's best to use a mostly naked/fully naked sim. It can be hella weird having nude ripped sims on your computer but trust me, it'll make this process SO MUCH EASIER and your end results better if you don't have clothing on your sims. Why is this? Any clothing applied to your sim in game is permanently attached to their mesh in blender. Meaning you cannot delete off any piece of clothing that's already there. Because of this, I recommend fully nude sims free of any clothing, jewelry or other accessories. However, fully nude sims aren't Tumblr friendly so I'm using a topless, underwear-d Lilith 🤣
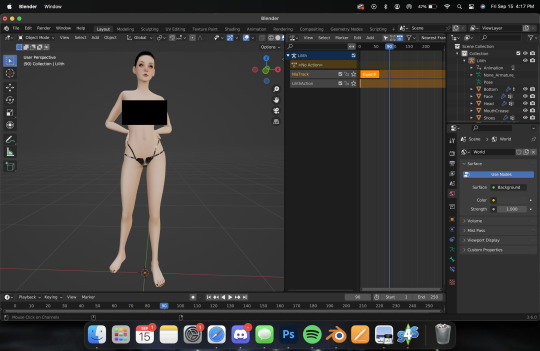
Here's Lilith, imported, nodes adjusted, and posed. I won't cover how to do this here, as I already have in THIS TUTORIAL (3 parts, all linked). So let's get on to the fun
Step Two: Adding Hair
Adding hair and clothing works the exact same way as appending a prop to your sim, with a few additional steps. Like with props, export the mesh and texture for your hair, then append them in blender. For this tutorial, I'm using Lamz' Katrina hair. Just like with anything else, append all of the studio meshes:

Once you import them, it'll look a bit messy.

But that's ok we're going to fix it! Like with any appended object, delete the bone_bone_shape and the rig, so. you're only left with your sim and the studio meshes. Add in your texture nodes and adjust like we do with any object. It should look like this:

Link the materials and join the meshes into one, and you should have something like this:
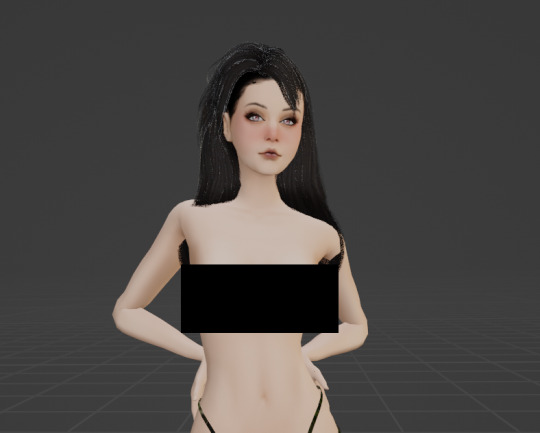
But as you can see, the hair isn't aligned. To fix this, navigate to the Modifiers tab (like we did with jewelry/props) and set the object to your sim, like this:
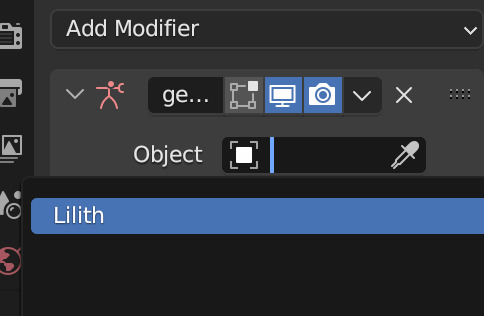
Now her hair should be... actually on her head! 😂
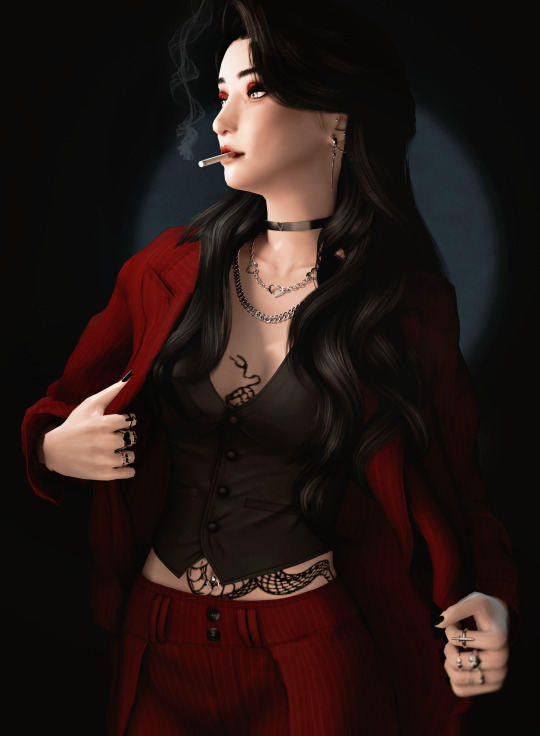
Let's add some clothing then I'll show you some handy tricks I use to achieve more realism in my renders. I'm going to use the same dress I used in her render here to keep things simple. It's Evellsims' Trapped Dress.
Step Three: Adding Clothing
We'll follow the exact same steps we did with the hair. Export the mesh and texture from Sims 4 Studio and append in blender.

Just like before, it's not in line and needs the nodes adjusted. Follow the same exact steps, adjust the nodes, link materials, join, and append. After following all those steps you should have something like this:

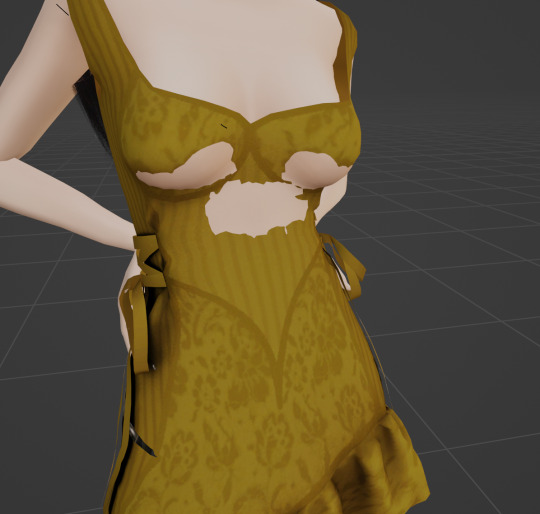
You might be wondering why I still have a censor bar here... That's because appending clothing doesn't automatically take the same shape as your sim's body like it does in cas. (I can't show it cause Tumblr but... her tits are out 🤣 just trust me) Different framed sims will require more or less work depending on their body shape. Curvy sims will require a lot, whereas petite ones like Lilith may only require a little bit of manipulation. Additionally, some poses and clothing aren't as compatible as you'd hope. Fabric can do some weird things, so sometimes you'll have to do more or less manipulation and it's a bit of a tossup. This makes appending clothing in blender a massive job, but for certain projects it works way better than dressing your sim in cas, particularly when you want to manipulate the clothing in some way (by mimicking a breeze, or gravity, etc) or if you're a masochist like me and you want to always do more work.
Step Four: Sculpting Hair & Clothes
By far my favorite part of the render process (even though it's tedious as fuck and takes an age) is sculpting. I use sculpting to fix clothing and hair and mimic gravity and weather. Here are a few examples of what sculpting can do (other than simply making clothes fit):


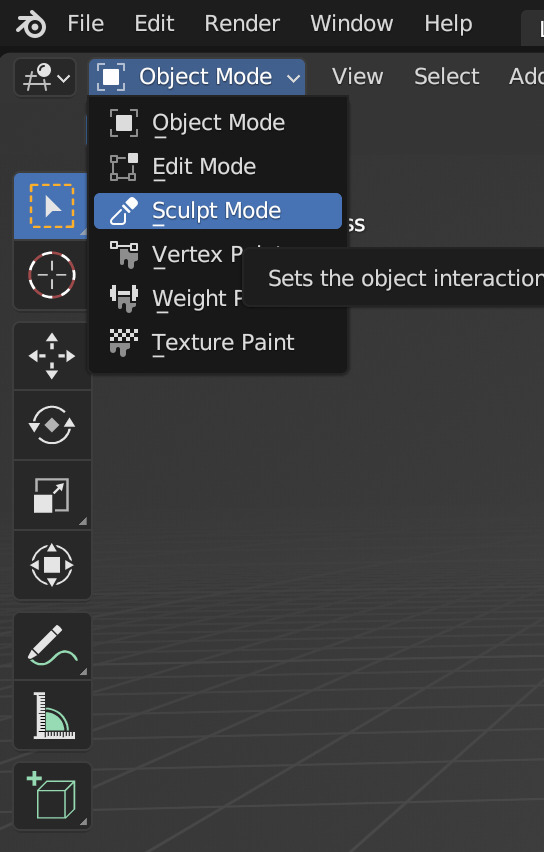
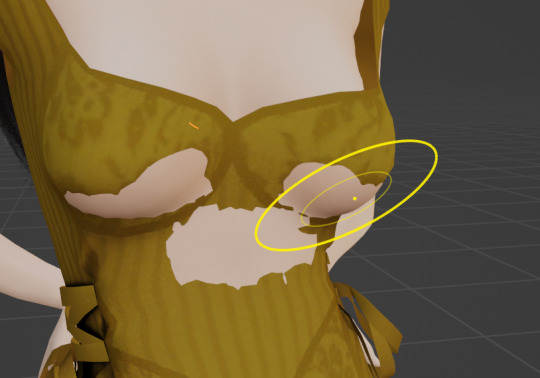
To use the sculpt tool, select from this dropdown:
From the new sidebar tools, select Elastic Deform, here:

I've covered the Tumblr-sensitive bits so you can see what you'll be working with. It's not unusual to have gaps in the clothing that need filling or adjusting, like this:
Using the sculpting tool set to elastic deform, you just have to click and drag the fabric to where you want it. Be sure you're editing the clothing mesh and not your sims body! Always select the mesh you want to sculpt from your outliner panel so you don't accidentally click and drag your sims skin! Here's a before and after, make sure you're putting your cursor against the right angles.
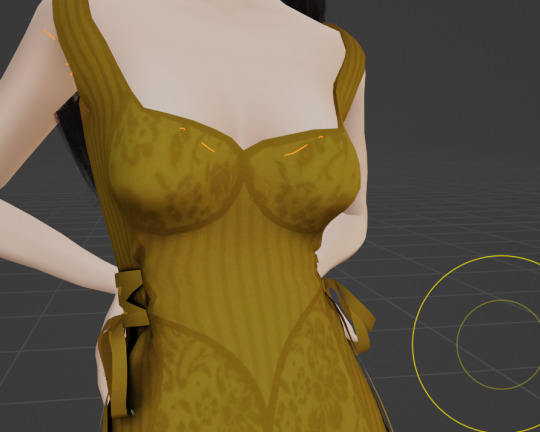
There are a few gaps on the back of her dress too. Here they are before and after sculpting:

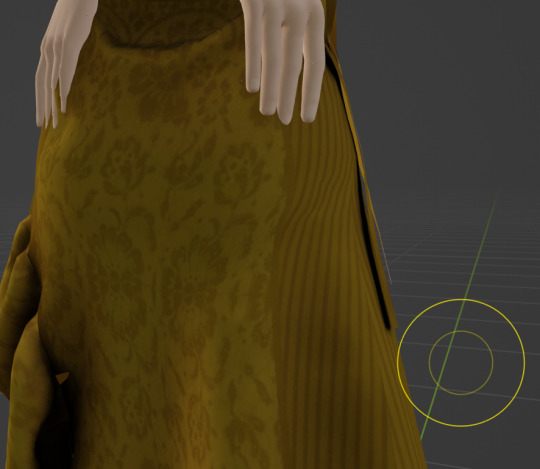
It takes some time and practice to get good at this, but once you do there's no limit to what you can accomplish! There are other methods that yield similar results (like shrink-wrap, but I've never gotten it to work for me) but this is my favorite and what I'm most used to. You can sculpt any mesh, so go wild!
That's all I have for today.
Homework:
Your homework is to append hair and clothing in blender and post the final result! Tag me in it too I'd love to see! & As always if you have any questions please feel free to send them through to me either with an ask or the help desk!
#salemsims tutorial#render school tutorial#sims 4 render tutorial#sims 4 blender tutorial#render tutorial#blender tutorial#tutorial
67 notes
·
View notes
Text
The stream starts to Mikey in a chef outfit, but he isn't in a kitchen this time.
"Shell-o Everyone! Welcome to the stream. Today, by popular vote in our Discord, were playing one of the Papa's Games! Specifically we're starting with Papa's Freezeria Deluxe." Mikey explains while getting the game on the screen.
"I wanted to start with Papa's Pizzaria, but Freezeria won the poll. Now I'm just glad Dee was able to set up a good emulator so I can play these games." He grumbles as he moves over to the Character Creator.
After setting up his character and naming them Mikan, they watch the opening cutscene.
"Starting up a Summer Job of a tropical island, ooh that fine print saying I pay for all the upgrades~. And will be left to run the shop on my own with next to no training." Mikey says with some sarcasm, "Running a fancy milkshake place all on my lonesome."
"Alright let's start the tutorial... wow that's complicated for a tutorial! Glad for the order ticket." Mikey starts the mini games, and chooses the correct flavors, "Okay careful with the whip cream and drizzle. What are those purple things? So weird. Order up!"
The little score screen shows he just barely missed 100%.
"Guess the toppings were a little off? Well second order, let's go."
Again just short of 100%.
"Okay, a different minigame? And I win extra decorations for playing! I get dress up my character and customize the lobby area! I will buy every piece of furniture and clothes I can!"
A couple customers later~
"Oh a Closer? They're even more harder on the scoring their order... joy! Well let's get these done so I can customize the lobby like I forgot to do."
After some near perfect scores, and a weird minigame later~
"These little letter probably have to bo with events later like, I gotta theme the lobby to match right? Well onto the next day." Mikey watch as he gets a new customer and ingredients, "Nick, okay. Maui Meringue, and Cloudberry weird things to put on a milkshake. That's a whip cream right?"
Mikey starts on the orders when he looks over at chat while waiting for the blender, and checks the lobby, "Oh I forgot to check the upgrades! Oh a gold envelope? So I get a fixed recipe with special bonuses if I get a good score on this? Sweet!"
.....
"Okay, end of the day, and finished the minigame now to get some upgrades!"Mikey announced.
Before he could the 'Choose a Special' part of the tutorial pops up.
"Oh, choose the special, put up some of the decorations I just got first, and Shop" Mikey loked through the options, but only had enough for the doorbell which will tell him when a customer enters the shop. He browsed through the decorations part of the shop for a couple minutes.
"Okay, let's continue!"
~~~~~~~~~~~~~~~~~
A few new customers, ingredients, and days later. Not to forget a new Coworker, who would act as a waiter/delivery person named Shelly.
Also trying out the food truck mode for a few minutes.
"Okay, bought the Auto Icecream dispenser, now next day..Now Celebrating Starlight Jubilee? Kinda looks like the Fouth of July. Holiday related toppings and the characters where costumes. WAIT I should've dressed up me and Shelly for this!" Mikey facepalm, and with a dramatic sigh continues, "After I finish the day.
The stream went on for a good hour, with Mikey muttering about the customers saying the topping were off by the width of a grain of sand.
And wishing he could clean the stuff he accidentally dropped out of the cup, because the full 100% service day was still out of his reach.
Though the audience was interested to hear him get close to going Dr. Delicate Touch on his keyboard a few times.
---------------------
Masterpost
I was going to make this longer, but the person I was watching for reference did a 3 hour stream as a part 1.
#vturtles!#vtuber au#rottmnt au#rottmnt michelangelo#rottmnt mikey#rise michelangelo#rise mikey#rottmnt fanfic#tmnt fanfic#tmnt#teenage mutant ninja turtles#rottmnt#rise of the teenage mutant ninja turtles#tmnt 2018#rise tmnt#rise of the tmnt#tmnt rise
13 notes
·
View notes
Text
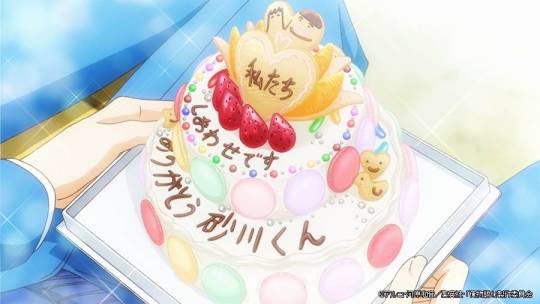
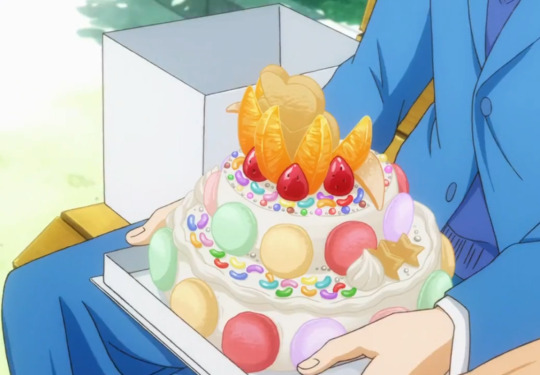
Process - Sunakawa Cake 🎂
A little breakdown of how I made my 3D recreation of the "thank you sunakawa" cake from Ore Monogatari ~

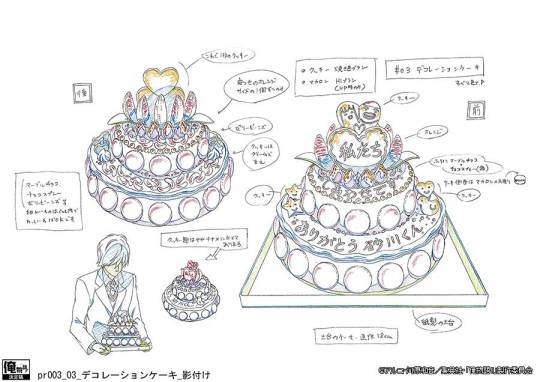
1. Collecting reference
Aside from referencing stills from the anime, I came across the official cake sketch from Madhouse's website! It was really helpful in identifying all the toppings on the cake and other details.
Next was collecting real-life references of all the ingredients I needed to make and taking notes of the shapes, textures and variety.
2. Modelling & Texturing
I go back and forth between modelling and texturing, and jump all over the place so I'll break things down based on the toppings/elements:
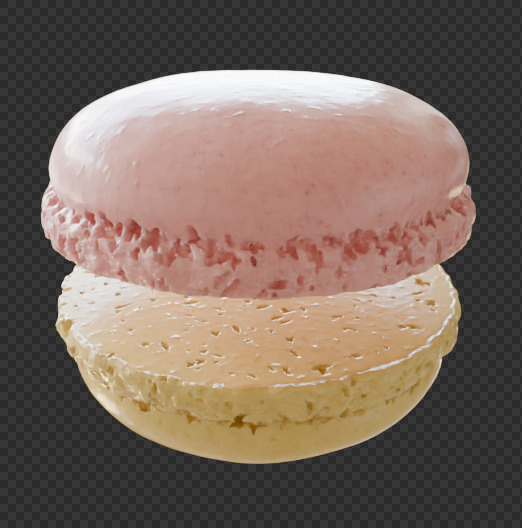
A. Macaron
I referenced Canosie Lab's macaron tutorial here, tweaking the process a little bit; using one mesh instead of two and using particles to distribute the boolean meshes. I ended up with LOTS of vertices, so I made a lower poly version of the macaron and used those to avoid bogging down the computer. As for the texture, I used Blender's procedural nodes, utilizing mostly the noise texture node.

Above: The first row are the lower poly versions of the macaron and the second row are the original meshes with around 200,000 vertices each o_o
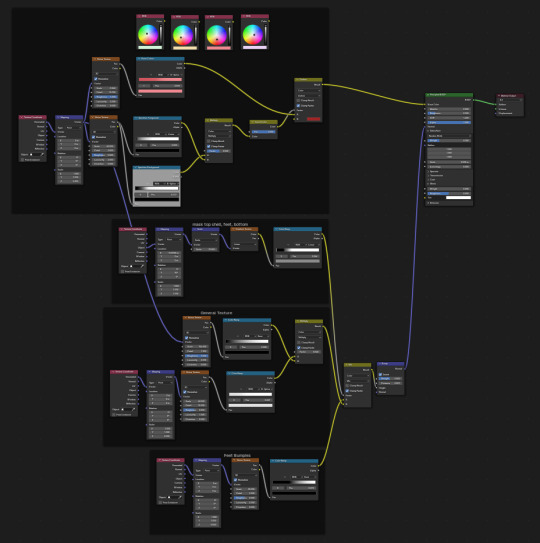
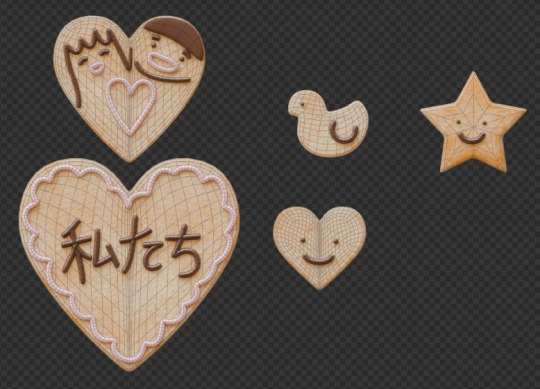
B. Cookies
There's not much to it here; I just modeled the cookies and used procedural textures I've made for a previous project (I'll post that project soon!!!)
The icing is made using bezier curves with some bevel depth. I used the draw tool to draw on the cookies. I did the same for the writings on the cake.
C. Strawberries
I've previously made strawberries for another project so I just used those but baked them to a lower poly mesh first. I used Canosie Labs' strawberry tutorial as reference :) I initially used a scaled down version of the regular-sized strawbs, but decided to make a proper mini strawberry 🍓


Left: with scaled down regular strawberries, Right: proper mini strawberries.

I made them super shiny with lots of subsurface scattering to make them look juicy and gummy-like -- not the most realistic but I think they look cuter like this :>
D. Orange slices
The orange slices were the most challenging to make! Did a lot of trial and error to get that pulpy texture oranges have but I managed using a combination of voronoi nodes :") If you look at the pictures below, you can see how the orange looked in the beginning vs. at the end after I refined it some more.
They look fine from a distance but a little janky up close; maybe I'll do a breakdown one day once I figure out a proper node setup.

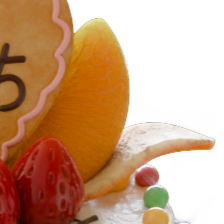
Above: before & after
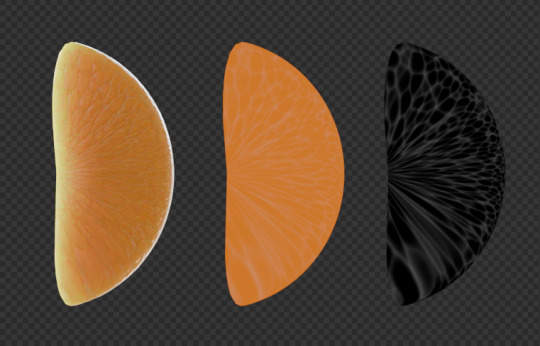
Left to right: rendered, colour only, B/W
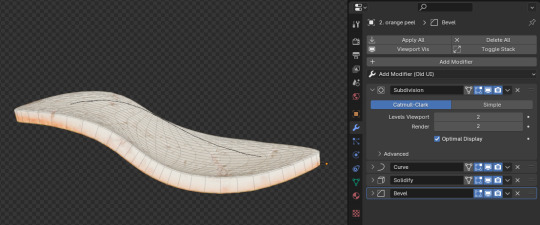
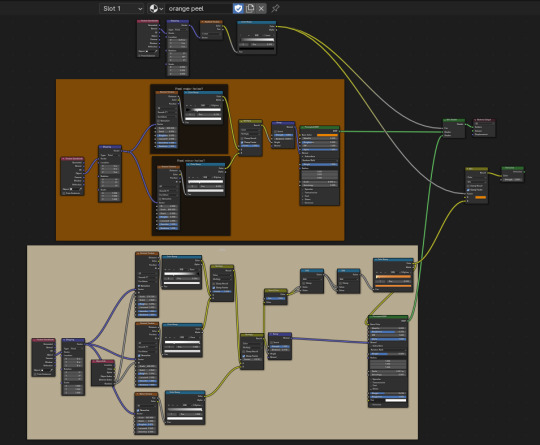
E. Orange peel
A simple plane with a solidify and curve modifier. What's most important here is the texture! I used two different shaders (one for the pith another for the peel) combined using a mask.
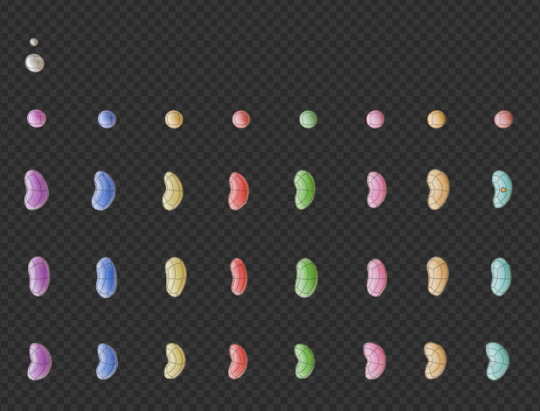
F. Jelly beans & choco marbles
A tweaked subdivided square for the jelly beans and subdivided icosphere for the choco marbles. The two use pretty much the same shaders but the jelly beans have more subsurface scattering.
H. Cake
After placing all the toppings, I sculpted the cake (using the multires modifier) a little bit to model the cream that's displaced.

#ore monogatari#sunakawa makoto#process#3d modeling#artists on tumblr#blender#blender 3d#3d model#cake#b3d#3d art#3d render#3d#digital art
30 notes
·
View notes
Note
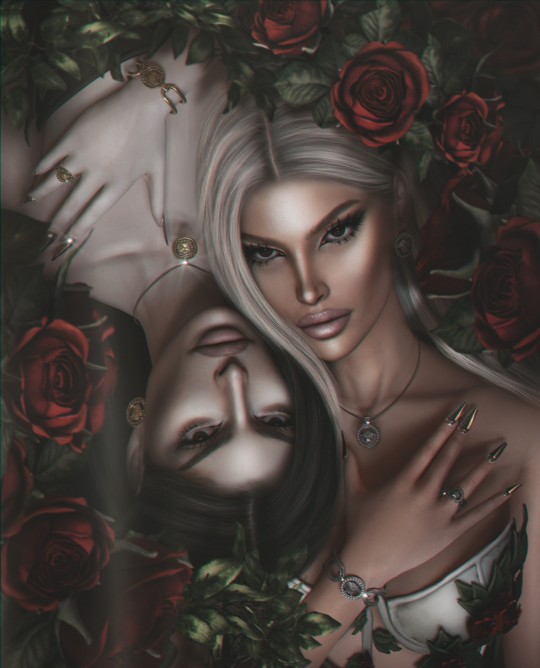
Hello, I hope you're doing well. I had a question about how you were able to get that glowing outline on your death flower's hand?
Thank you <3
Hello! I'm doing well & hope you are too (:
The glowing outline/skeleton hand for my death flower sim is a bit of blender magic and is not achievable in game!
But basically I separated the mesh for my sim's body, "cutting" the hand and half of the chest away from the rest and applying a different texture to it. Then I added in a skeleton body & parented it to my sim's rig as well, so it would sit under the skin.
A full tutorial may come later (if there's enough interest) but here's some closeup screenshots of just her hand.
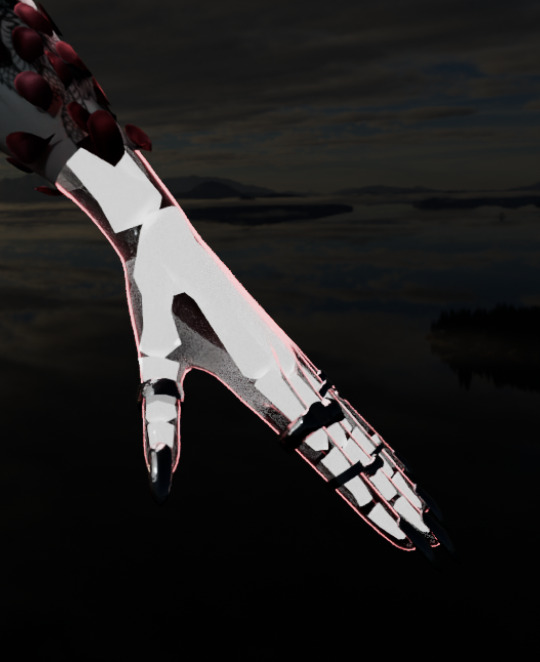
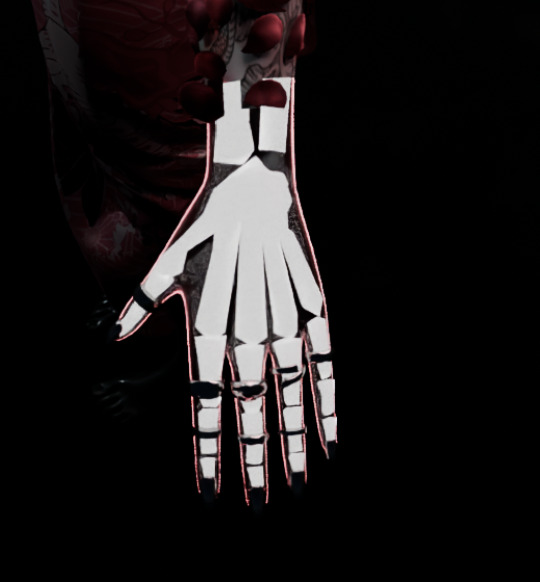
I set the skeleton hand to glow and admittedly I used and adjusted a material from blenderkit for the cut out hand (in this case a material called "green glowing toon shader", which I obviously adjusted to be pink lmao). Both node trees are below:
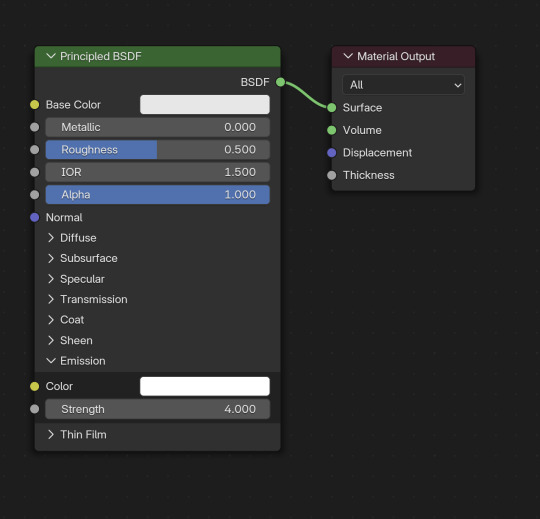
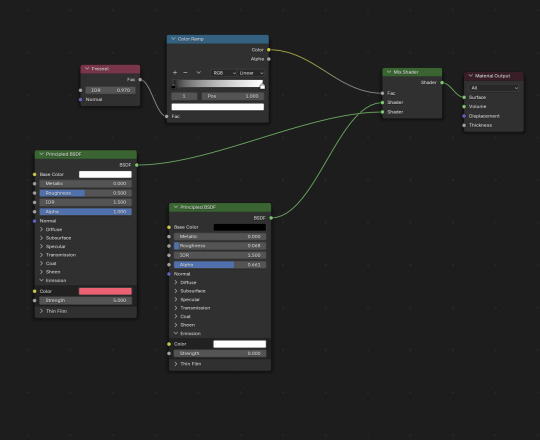
As long as all of these pieces are parented to your sim's rig, they'll pose as normal!
I hope this helps! <3
#replies#ask replies#ts4 blender mini tutorial#sims 4 blender mini tutorial#sims blender mini tutorial#ts4 blender#sims 4 blender#sims blender
9 notes
·
View notes
Text
youtube
I made a quick mini tutorial on shape keys in Blender. Showed morphing a cube to sphere as an example! Many more tutorials on my channel :)
Many more tutorials on youtube channel if you want to subscribe https://www.youtube.com/@DestinedToLearn/playlists
3 notes
·
View notes
Text

MEDUSA '95 MINI COLLECTION - GAME EDITION
Includes two sets
New meshes
HQ/BG compatible
All LODs
Custom thumbnails
Disallowed for random
DOWNLOAD:
PATREON [PUBLIC RELEASE: JUL 28]
------------------------------------------------------------------------------
MEDUSA '95 MINI COLLECTION - BLENDER EDITION [SHOWN ON COVER]
New meshes
HQ textures [4096x2048]
Material Nodes for customization
Tutorials included
DOWNLOAD:
PATREON
220 notes
·
View notes
Note
hi!! would you consider sharing or doing a mini-tutorial on how you made manual morphs? i would LOVE to just make the morphs myself
Hi!
Well, actually I'm only doing morphs by hand when it's necklaces (and that last madlen boots I converted) because it was possible to fiddle with it without messing things up since no EA body seams are involved.
For clothing, my process is quite chaotic. (it's what I ended up doing on my madlen numia conversion)
I use Mesh Toolkit to convert from .obj to .wso and assign bones and make morphs.
Then I convert the morphed .wso to .obj again so I can adjust the fat morph on blender (because it's always the fat morph that gets distorted af).
Then I re-convert the resulting .obj and use it as reference to re-morph it with Mesh Toolkit (because I then can fix the EA seams in the raw mesh before making the morphs with the Toolkit).
Oh, and I use the Sculpt mode on Blender for that! In my opinion, is more intuitive to fiddle with that, than with proportional editing.
As and example, here I'm fiddling with a choker. Note that in this case I have to better adjust the spikes, but you can see how easy it is to adjust the whole thing to the neck.
The tools I use the most are Grab and Elastic Deform.

(i'm also planning on doing a tutorial of converting necklaces without using milkshape, but then I'll have to overcome my shyness about not only speaking in a video, but maybe speaking in another language? oh well)
22 notes
·
View notes
Text
BLUE'S DISCORD SERVER!
Oh boy, a Discord link. Come join us in The Blue Mini Cooper!
This is a server dedicated to artists. Come share art, enjoy the collection of tutorials, get some constructive feedback, chat and hang with friends, or nerd out over some games or tech- there's a place for everyone.
If you're trying to learn Blender, this would be a great place for you to! Theres a forum post dedicated to ALL areas of Blender. So far there's 20, full of free tutorials and resources. Folks say its super helpful.
Anyways, if this sounds up your alley, it would be great to have you there! We're looking for active artists and folks looking for a good chill time.
Please note, this invite is available for 25 uses, unlimited time. This is to control bots. If you join, please make an intro so I know you're not a bot! Bots will be kicked.
If the invite runs out of quantity, just send me a message and I'll get you an invite.
See ya there!
2 notes
·
View notes