#photoshop for sims cc making
Text


Momma Julie on Cupid's Corner looking for a second chance at love!
// Don't ask how Marcella and I were able to convince our mother to set her up on a dating app just know the matches are coming in HOT.
Cupid's corner main app psd : is my personal edit that I am working on to release for photoshop.
However you can download the awesome matches psd HERE from @cilkey
#i freaking love this#it was hard making the psd for photoshop but i think it turned out good lol#trendingsims#the sims 4#simblr#ts4 roleplay#sims 4 aesthetic#simstory#s4 roleplay#cc finds#my sims#sims 4 gameplay#sims 4 screenshots#sims community#the sims#the sims community#show us your sims#sims 4 edit#cupids corner#sims 4 cas#ts4 gameplay#my gameplay#sim 4 gameplay
9 notes
·
View notes
Text

The wonderful @walnuthillfarm gave me permission to convert all their Sims 4 horse coat brushes to Photoshop, and so I'm delighted to share this with all of you! It includes appaloosa spots, roaning, dapples, stripes, and more.
All brushes were made by Maeve, I just converted them & sorted them into folders for ease of finding things. This includes all brushes made as of September 30th, 2023 - if/when Maeve makes more, I'll update the .abr file.
For most of these brushes, I really suggest you edit the brush dynamics to add size, angle, and roundness jitter to create more variation for texturing your horse coats. Play around with things to find what works best for you! I'm using them to create custom coats in Photoshop, but they'd also be very useful for normal non-Sims horse painting activities as well.
[[DOWNLOAD @ SFS (No Adfly!)]]
#the sims 4#ts4#ts4 horse cc#ts4 equestrian cc#photoshop brushes#horses#not technically cc but stuff to make cc
43 notes
·
View notes
Text

I just wanted to see if I can even attempt to make a skin. It's just a test I'm not perfect in the slightest
I was watching this video
which the comment lead me to this which I found a bit easier to do when getting things to match with the mesh head.
Any feedback is greatly appreciated !
8 notes
·
View notes
Photo
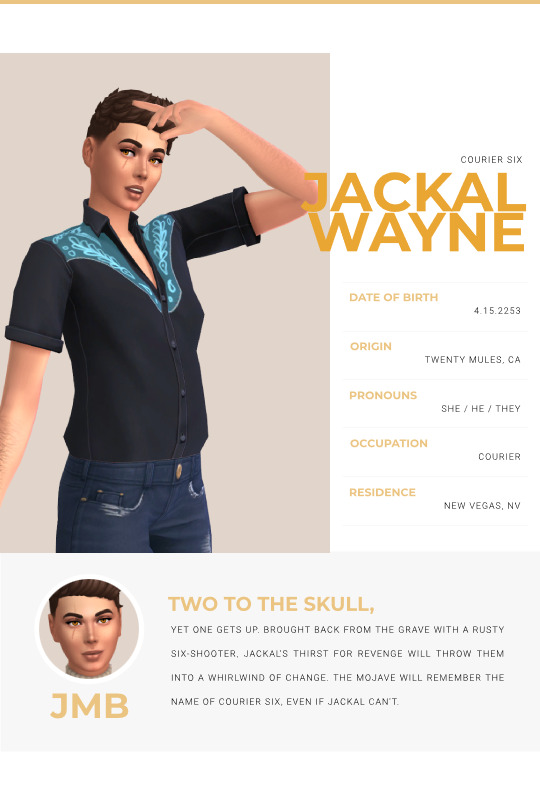
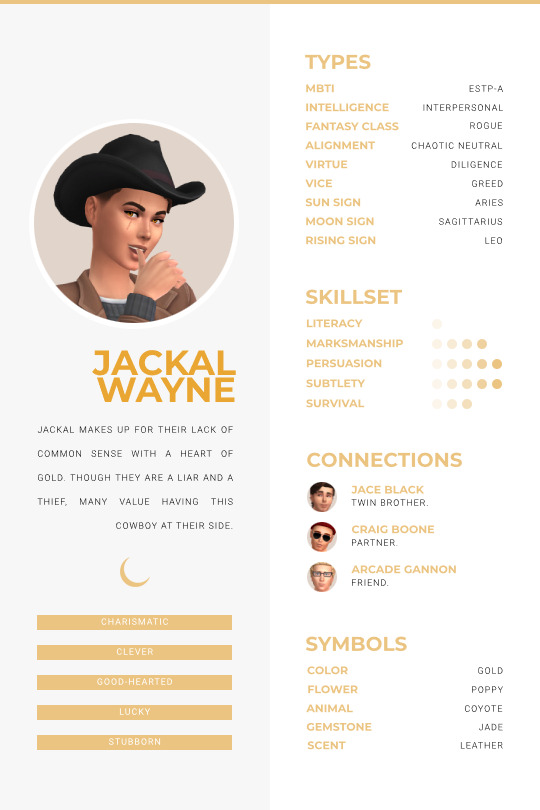
So... I’ve gotten really into the Sims 4 lately and I needed a way to show off all my Fallout OCs that I’ve made in it. I used a template by @actiasteeth that can be found here! The Sims CC I used is under the cut :)
cowboy shirt | eyes | facial scar | cas lighting | cas bg
Also shout out to JustACat78 on the Sims gallery for making a stellar Arcade so I didn’t have to lol
#fallout new vegas#fallout oc#fnv oc#fnv#sims 4 oc#idk if anyone will care about this but whatever i had fun#my carpal tunnel has made it real hard to draw lately#so sims and photoshop have been nice creative outlets that hurt less#i used some cc to make jace as well but i will probably do a graphic just for him#or just post some screenshots at some point#my edits#oc: jackal
28 notes
·
View notes
Text


✧ LIZBETH HAIR : BY PEACHYFAERIE ✧
✧ omg... he's finally in his hair creation era...
✧ from the very start of making cc back in 2020, i knew i eventually wanted to make hairs! i was just SO intimidated by the whole process. at the time, i had no 3D modeling knowledge, much less how to weight paint or anything like that. however, over the past 4 years i've slowly built up my knowledge about creation, using various tutorials along the way, and i finally have a hair i'm very happy with!
✧ this style definitely leans more maxis match (it uses textures from the game) but it's definitely more in the mix side of things since i go for more of a strand-like appearance (?) instead of more thick clumps!
✧ the style is for all genders and i have a version for all ages! in addition, i have a duotone overlay, a root overlay, and a streaks overlay (not pictured), with all on separate layers in the ring category so you can mix and match for more customizability! these overlays were created for maximum compatibility in mind, so they should be applicable for most, if not all, of my future releases as well!
✧ in terms of palette, it has all 24 EA/maxis colors PLUS 32 swatches from my new custom "faerie fields" palette that i'll be using for all my hairs and eyebrows going forward! i did lose my gradients and have to remake them, so the photoshop gradients might look a bit different from these ones, but it's the same general idea. feel free to use them for your recolors! use swatch 13/dirty blonde as a base!
───── ✧ ─────
✧ info:
───── ✧ ─────
‣ lizbeth hair
‣ 56 swatches || all ages || all genders || 38k polys || hat compatible (not recommended due to clipping issues) || all maps
‣ v2 has the heart strands on top of the head, v1 does not
‣ peachyfaerie root/duotone/streaks overlay
‣ 56 swatches || all ages || all genders || ring category
───── ✧ ─────
✧ all cc:
‣ CUSTOM THUMBNAIL
‣ NOT HQ TEXTURES - the file size was simply unreasonable for 56 HQ swatches and there was not really a significant visual difference, so i simply did standard texture sizes
───── ✧ ─────
‣ download: patreon (early access)
‣ public release: 08/27/24
───── ✧ ─────
✧ find me somewhere else!
‣ twitter/x
‣ instagram
‣ tumblr
‣ ko-fi
───── ✧ ─────
✧ tou
‣ do not reupload my cc
‣ do not claim my cc as your own
‣ do not lock my cc or recolors behind permanent paywalls
‣ do not reupload to simsdom/simsfinds
‣ do recolor my cc (and tag me! i want to see!)
‣ do recolor my cc (and tag me! i want to see!)
‣ do convert my cc to other sims games/ages
‣ do convert my cc to other games for personal use
───── ✧ ─────
#the sims 4#ts4cc#custom content#sims 4#s4cc#cc finds#cc#maxis match#alpha cc#maxis mix#the sims 4 custom content#my custom content#sims 4 cc#the sims cc#ts4#the sims 4 cc#ts4 hair#ts4 maxis match hair#maxis match hair#sims 4 maxis match
431 notes
·
View notes
Text
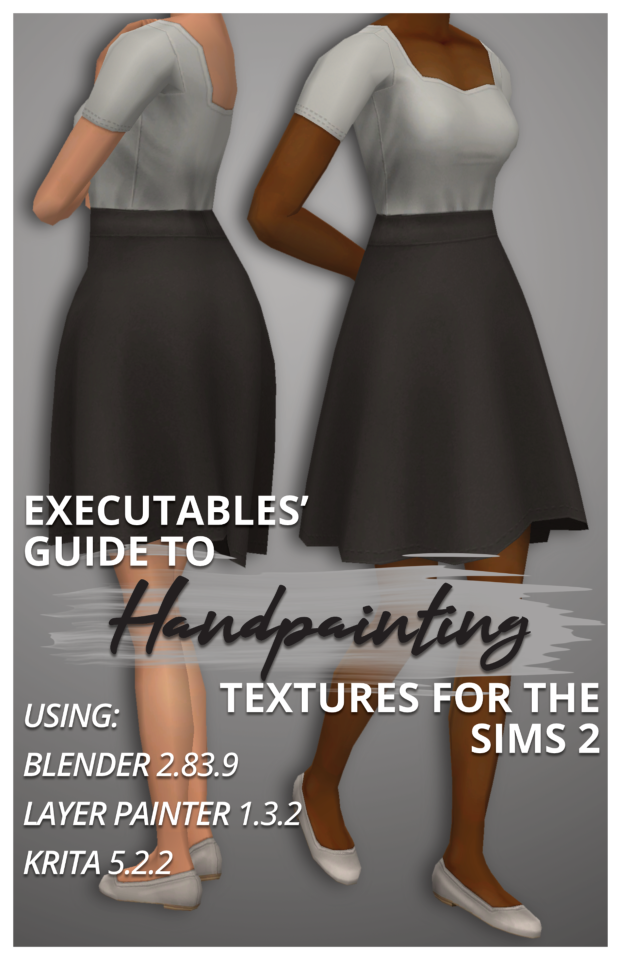
Executables' Guide to Handpainting Textures for The Sims 2 | Download PDF (67 pages)
Have you ever wondered how to paint clothing textures from scratch?
I've been using paid software like Milkshape, Photoshop, and 3D Coat Textura to texture Sims 2 models for years, but I've managed to translate my process to completely free open-source software!
I've broken down the entire process from start to finish for complete beginners (who may never have made a clothing recolour package before), but more experienced CC creators can skip around as needed using the PDF bookmarks.
You don't need a graphics tablet– but you may want one once you've played around with this! :)
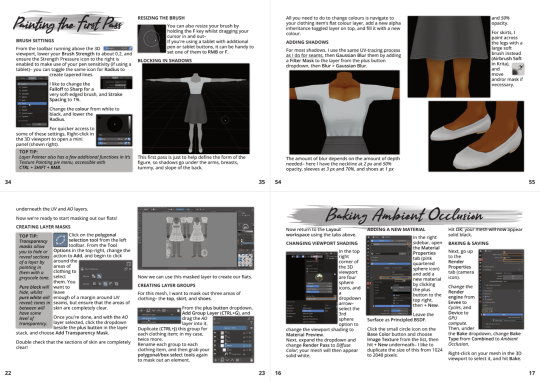
The clothing shown on the cover is also downloadable through the document.
Hope this inspires you to make something! :D
#The Sims 2#TS2 Download#Tutorial#PDF#If you'd prefer video format tutorials let me know! Everything is already captured :)
264 notes
·
View notes
Text
Tidy CAS 2.1 - CAS category organizers

Last update: Version 2.1 / December 11, 2023
💜 How does it work?
This CC creates basically an empty CAS item with the whole purpose to mark when a new category starts. This can be useful if you have a lot of skin details for example and don't know which ones work together as EA has not separated the parts (e.g. forehead crease, freckles) into separate categories. This CC is not meant to be applied to a Sim and has no texture or model.
Original idea by @sparrowcc
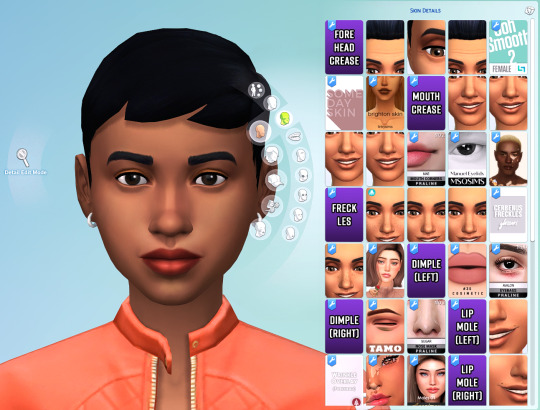

BGC
Categories: Earrings + piercings, head skin details, occult cheek scars, body scars, body accessories, tattoos, body skin details, body medical weareables
Available for all ages, genders and occults
Comes in a lot of different colors
Known issue: Does not show up before EA pack items in left brow ring, left arm scar, left wrist , left index finger, tattoo left lower arm. Please only contact me about it if you have an actual solution.
Photoshop file to create your own!

💜 Download + TOU
Do not re-upload the original
If you want to upload your modified version, please credit me
Do not claim as your own
「✦ Simfileshare ✦」//「✦ Google Drive ✦」 // 「✦ Curseforge ✦」
Make sure to only pick one version!
💜 Recolor files
You don't like any of the colors, want to make it a bit more fancy or choose another font + style?
Then here you go, my .psd file with all backgrounds and all text layers for you to edit in Photoshop.
「✦ Simfileshare ✦」 // 「✦ Google Drive ✦」
And here is a short tutorial on how you can quickly modify all the text layers and how you can change out my original images with your edited ones:
Tutorial
Also: Check out what versions of TidyCAS others created!
Hope you enjoy! ~♥
You like my CC?
You can buy me a coffee on my Ko-fi ^-^
@love4sims4 @maxismatchccworld @emilyccfinds @sssvitlanz @mandy-ccfinds @mmoutfitters
#s4cc#ts4cc#yorucc#ts4#thesims4cc#customcontent#sims4casorganizer#casorganizer#castool#alwaysfreecc#tidycas
4K notes
·
View notes
Text
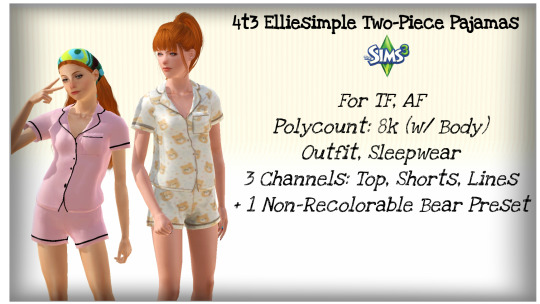
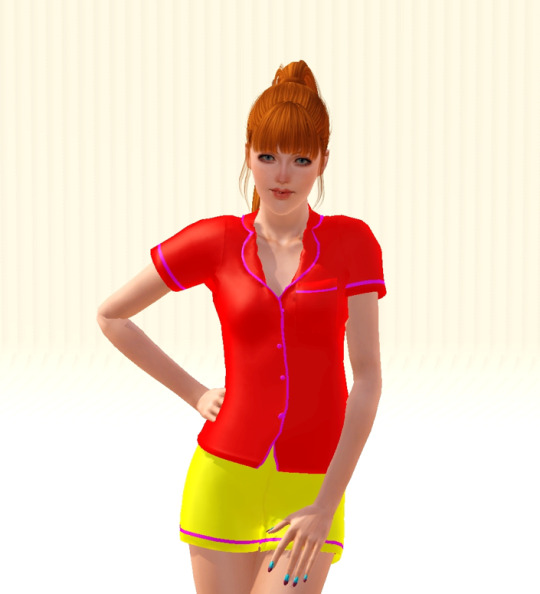
4t3 Elliesimple Two-Piece Pajamas
UPDATE: SEE HERE FOR NEW NOVEMBER 2023 RE-CONVERSION; THE LINK IS THE SAME!
Finally, my first successful conversion...! Hopefully...
I have a pair of pajamas in real life just like this set, and I wanted to bring it to The Sims 3! In addition, I felt teens had limited clothing options, so I made sure to convert it for them, too!
I'm definitely a huge perfectionist, so I feel like I have to get everything right when I make/convert something. I hope there aren't any serious / overt issues with the CC!
Ages: Teen, (Young) AdultPolycount (with Body): 8kFull Outfit, in Sleepwear CategoryThree Channels: The Top, Bottom, and the Lines2 Presets + 1 Non-Recolorable Bear Preset*
Begrudingly* so, I've added one (and only one) swatch; if I was any good at Photoshop, I would have made the patterns on it an overlay, but there are small dots and a few other details that made it even more difficult to remove the white background, and the magic wand tool haaaates me. It's cute anywayyyy!
Picture of RGB Mask:
It looks wonky in CAS, but fine in-game!

All credits go to Elliesimple! Original download page!
Download: SFS
or
Download: Simblr.CC
@katsujiiccfinds @xto3conversionsfinds @pis3update
CC Used:
Acc Nails: Long Nails by LorandiaSims3
Hair, Ponytail: Anto Milano, Retexture by Ifca-Sims
Hair, Long Wrap: Simpliciaty Ruby, Retexture by Ifca-Sims, Mary Jane DR
Eyes, Default: Simtanico's Dragon Age: Inquisition V2 Eyes (DAIV2) I've edited them to add the teeth replacements from OEM!
Eyelashes and Various Makeup by S-Club
Eyelash Mesh Terminator by Slamyy (S-Club's eyelash remover just removes the eyelash texture from face overlays, not the actual mesh, and thus can conflict with other face overlay defaults, such as eyes or teeth. Also helps with the Mac x64 issue).
Skins: Kurasoberina Primer Default and Ephemera Natural Light
Background is Kewai-Dou's camera photoshoot set! :)
843 notes
·
View notes
Text
replies
updated the folder with some cabinets! also, i lightened the black swatch because it was a bit voidish before
a separate object! you can dl them here
hi! that bassinet is outdated, but i fixed the link for the deco version (to use with the invisible bassinet mod). you can also download my updated one if you like
i'm open to making a thermostat! ATS4 has a bunch that are perfect for older homes though. if you don't like any of those you can always shoot me a reference pic
the ones i posted most recently are here
they're live edit objects, so you need the cheat. you can find them in sculptures. also make sure to download the 10mb one, that's the one that the others texture reference
recoloring objects to match is the bane of my existence (photoshop actions never work for me???), but i will put it on the list <3 they need more colours anyhow, i keep getting frustrated that they don't match
making cc is super intimidating when you first get into it, for sure. i broke a sweat doing my first recolor lol
i've got a post about good resources for beginners here
fortunately, with so many people in the community sharing their knowledge, it's a lot easier to get into modding/cc making than it used to be. and when you get stuck, the Sims 4 Studio forums are your friend!
also, i'm always happy to answer questions via DM if it's something you can't figure out

i will make some! i found the perfect CC for what you want, but of course it was behind an ad paywall *sigh*
edit: got past the paywall hehe
this is the cc, if you're interested ^^^ and here's a nice sensible SFS link
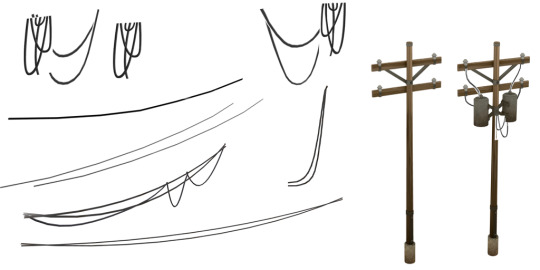
also, speaking of wires, here are the telephone poles for you @luvlyysimmer. batuu wires + edited telephone poles from snowy escape (added rust, changed wood texture). they're live edit objects, in sculptures category: dl folder
hi! it's CC - a custom background replacing one of the base game mattes. some of them are city living mattes recolored to be warmer, and others i found on google and edited to be transparent
you lose the magic when you zoom out though lol
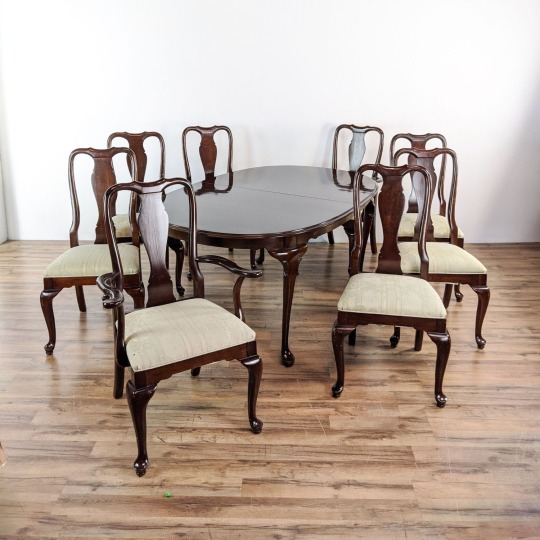
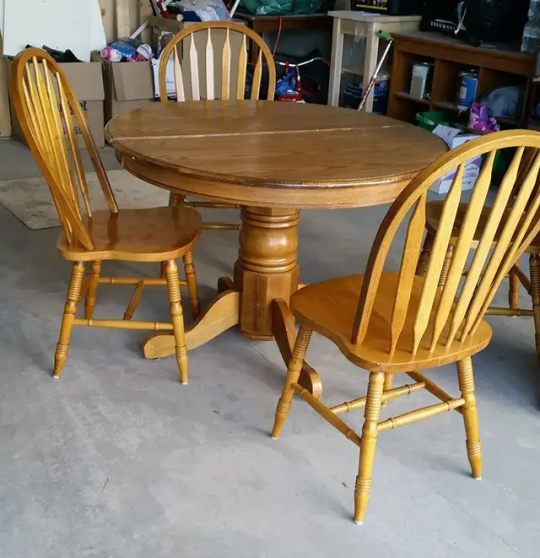
my parents had the one on the left but i like the one on the right better bc it's more versatile. both make me itchy and i love them
i have a dining set like this on the list. also i promised someone awhile ago banquette seating, so i'm doing that too
i want the TS3 trim so bad in ts4 but i don't know how to make half-wall trim. i got it in S4 Studio but she's a mess in game
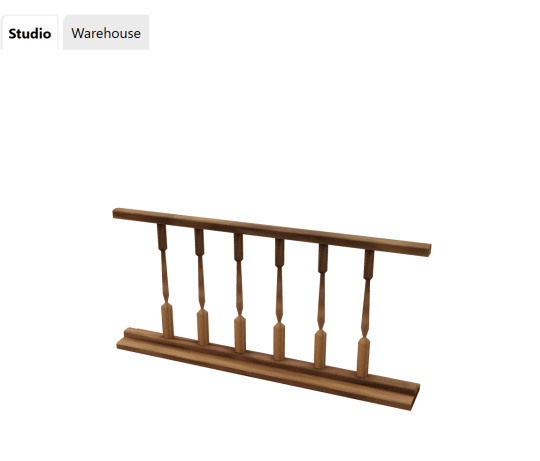
i know it's possible to do, as syboulette has custom trims, but i'm stuck rn. will keep you posted if i figure it out!!
273 notes
·
View notes
Text
youtube
NEW VIDEO TUTORIAL 🩷
After almost two years it's time for a new and improved version of my "How to make CAS CC" video. This time I will explain how to create a frankenmesh out of a jumpsuit and a dress for adult Sims! It's VERY beginner friendly so if you weren't successful yet with starting to make CC, maybe this one will give you the help you need!
All the topics I cover in this video below the cut:
00:00 Intro
01:00 Software
01:36 Downloading & Installing Sims 4 Studio
01:56 Downloading & Installing Blender 4.2
02:10 Downloading & Installing GIMP
02:20 Introducing Sims 4 Studio
03:03 S4S | Gathering assets to work with
04:09 S4S | Textures
05:12 Project Folder
05:34 S4S | Gathering assets to work with
07:10 Introducing Blender
10:17 Blender | Edit mode (Select, Delete, Wireframe)
12:38 Blender | Append second mesh (Proportional Editing, UV overlapping)
18:23 Blender | Join two meshes (Material, Merge)
20:03 Blender | Cleaning up the mesh (UV editing, Merge, Rip)
22:14 Blender | Cut number
22:43 GIMP | Making a texture (Select, Delete, Healing, Smudge)
24:52 Photoshop | Making a texture (but make it easy)
25:15 GIMP & Blender | Preview of the texture
25:43 GIMP | Making color swatches (Layers, Lighting, Fill tool)
28:33 S4S | Introducing the CAS area
29:15 S4S | Creating a package file
30:25 S4S | Importing all our assets
31:17 GIMP | Creating a shadow texture
32:24 S4S | The specular map
32:39 GIMP & Browser | Creating a normal map
35:58 S4S | Vertices & Polygons, LODs
37:02 Blender | Creating LODs
38:20 S4S | Categories (Tags, Allow for random, Gender restrictions)
39:36 S4S | Tuning tab (not covered)
39:47 Sims 4 | Results & Outro
114 notes
·
View notes
Text

❄️ 𝐓𝐡𝐞 𝐖𝐢𝐧𝐭𝐞𝐫𝐬 𝐓𝐰𝐢𝐧𝐬 ❄️
Custom Thumbnail
2 New Skins
Disclaimer
Please before adding any items to your mods folder make sure your not adding any duplicate files. Always sort through any cc folder before adding it to your mods folder.
Credits
Photoshop, Sims 4 Studio & Thisisthem
TBZSimz face skin using thisisthem skin body

❄️𝐃𝐎𝐖𝐍𝐋𝐎𝐀𝐃, 𝐏𝐔𝐁𝐋𝐈𝐂 𝟓.𝟐𝟒.𝟐𝟒 ❄️

Do Not Share My Content (Always Free After 2-3 Weeks except Blender content)
Recolors Allowed Do Not Include My Mesh
Do Not Use/Altar My Mesh To Make Your Own Content
DO NOT CONVERT TO ANY OTHER GAMES
Do NOT Share IN Discords, Facebook Groups or Give Away In CC Folders.
STOP PUTTING MY CONTENT IN FOLDERS AND PUTTING THEM BEHIND A PAYPALL
IF THERE ARE ANY ISSUES PLEASE BE SURE TO LET ME KNOW VIA MY IG DMS!!!!
❀ 𝐉𝐎𝐈𝐍 𝐌𝐘 𝐃𝐈𝐒𝐂𝐎𝐑𝐃 ❀
170 notes
·
View notes
Photo


rotten to the core 🍎🔮
info and download below the cut
a dump of my descendants-inspired sims! yes i was too old for these movies, but i watched them with my little sister when they came out and always had a soft spot for them. we just rewatched them together and i got inspired! enjoy 🖤 (ftr, i did try to make ben, but he is my fave and i did not do him justice whatsoever so i left him out 💀)
do not change their skin color or body type dramatically. do not claim as your own. tag me if you use them, i’d love to see!
- one outfit each
- cc included
- these pics were taken with lithium cas reshade, this cas lighting (4), and edited in photoshop
(i did my best to check all cc tou but pls let me know if i made any mistakes)
download: google drive
let me know if there are any problems!
#ts4 edit#sims 4 edit#sims 4#ts4#sim dump#sims 4 download#ts4 download#ts4 sim dump#sims 4 sim dump#ts4 sim download#sims 4 sim download#my sims#disney descendants#jay descendants#carlos descendants#mal descendants#evie descendants#descendants fanart#descendants#lush.ts4dl
2K notes
·
View notes
Text

THE SIMS 3 TUTORIAL
HOW TO CREATE DEFAULT REPLACEMENT MOD
USING CUSTOM MESH & TEXTURE FOR SIMPLE OBJECT
⚠️ Tumblr has 30 pictures limit, so I cannot include too many pictures. If you want to zoom in the pictures, click the pictures to enlarge, or save the pictures into your PC, zoom the pictures on picture viewer or zoom in the pictures on your mobile phone. ⚠️
----------------------------------------------------
I create this tutorial to make easier to follow because there are older tutorials available before but scattered on internet and usually only say "Export to replace s3asc" without explaining how to export the edited object properly.
My method is using TSR Workshop instead of exporting the object using Sims 3 Object Export/Import plug in because exporting to replace the s3asc using that plug in always giving error notification "ERR: Model has 1 groups; original had 0" and cannot be exported.
For beginners who are very new using s3pe and haven't created default replacement mod before, better start from simple object first.
Simple objects I mean in-game object that has single MODL and single texture with no morphs, no GeoStates, no presets, no CAS colour channels, and easily cloned from OBJD on catalogue. Usually as utensils that Sims holding in their hand, not buy/build objects. For example: Pencil, pan, fork, spoon.
----------------------------------------------------
Tools to prepare:
s3oc
s3pe
Milkshape 3D for bone assignment (Version I use 1.8.5 beta, discontinued by its developer, therefore feel free to download the full version with its license key provided).
Sims 3 Object Export/Import 1.01 by Wesley Howe (Milkshape plug-in. Download msS3ObjPluginsV101.rar )
TSR Workshop (Older version for TS3 only version 2.0.88)
TSR Workshop plug-ins for export.import TSRW Object.
3D Program (Blender/Maya/3dsMax)
Editing images software (Photoshop, make sure you have to install .dds plugin by Nvidia. For free software alternative, you can use GIMP with its .dds plugin)
This tutorial will not teach you how to:
Meshing object ❌
Create alpha texture ❌
Change thumbnails in-game ❌
Install programs and plug-ins ❌
This is how I created Chinese chopsticks replacement mod using custom mesh and texture.
In summary, this tutorial has 10 steps:
Step 1. Clone the Object using s3oc
Step 2. Open S3PE to Copy the Original Resource Code and Export the Files
Step 3. Export the Original Mesh as Base Mesh to .obj format
Step 4. Create Your Custom Mesh
Step 5. Bone Assignment & Create Group
Step 6. Create custom Texture
Step 7. Import the .wso of Edited Mesh on TSR Workshop & Export the package
Step 8. Export MODL file from Package saved from TSR Workshop
Step 9. Finalizing in s3pe & Replacing the Original file with Edited File & Correcting the Code As Same As Default Code
Step 10. Test the CC in your game.
-----------------------------------
✳️ Step 1. Clone the Object using s3oc
Before cloning the object, check the Game Folder for in-game object file location. Settings > Game Folders...
Take a look if the Base Game or Expansion Pack for object file you want to clone is in the right folder. For example, my The Sims 3 game are all bought from Steam, so the location is D:\SteamLibrary\steamapps\common\The Sims 3
If you want to clone object from Expansion Pack, make sure input the folder location. For example, the location for World Adventures EP is D:\SteamLibrary\steamapps\common\The Sims 3\EP1

If you are done, close the pop-up box. You can continue click Cloning then choose Normal Object...
Wait until you get the whole catalogue. Click Search...

For example, I clone object from World Adventures Expansion Pack. You can clone object from Base Game or other Expansion Packs as long it is considered as "utensil" that Sim holding on hand. For example: "Pencil" or "Pan"
Search for text: chopsticks
or if you want to clone object from Base Game, search: utensil
Tick check marks for Resource Name, Object Name, Object Desc then click "Search button"
Search result gives you results with name "chopsticks". Here is the object we are looking for: UtensilChopsticks
We need the OBJD file to clone. OBJD = Object Data.

Click "Clone or Fix" at the right bottom. Then you see the next page to determine if you want to clone with renumber or not. If you want to make default replacement, then do not check the Renumber box. Keep it blank.
Tick check box means the s3oc will generate new resource code for new item. Not tick the check means the s3oc will overwrite the same resource code, it is to replace object you cloned in-game.
I am personally a detailed person, so I usually tick as many as I want: tick "Deep clone" "Missing String Tables" and "Include Thumbnail" to include more details. Then click "Start" to proceed.

It will give you file name [CreatorName]_ObjectName_Number
Then save your package file in "DBPF Package" format in your project folder. Always make folder for any file to make everything organized.
✳️ Step 2. Open S3PE to Copy the Original Resource Code and Export the Files
Open S3pe, locate your package file you cloned from s3oc. Find the MODL of Utensil Chopsticks, Right-Click, "Details..."

On Resource Details, click "Copy TGI" to copy the Resource Code. Type, Group, and Instance will automatically be copied on clipboard. Then open Notepad, Right-Click to "Paste".
Click GRID on bottom of the s3pe (I mark it red on picture), it will give you pop-up box with Data Grid. Click "Resources", it will be highlight blue and there's 3 dots button appeared on the right side. Click the 3 dots button. It will give you TGI Block List Editor.
Inside MODL's TGI Block List Editor only has IMG. You may wondering why, but that's how the game coded. Type, Group, Instance of _IMG inside TGI Block List Editor should be the same as _IMG on the package.
Copy the TGI, Group, Instance to your Notepad.

After you copied code of MODL, do the same for the texture image (_IMG), but only copy the code from Resource Details. You cannot edit TGI Block List Editor for _IMG as the Grid button for _IMG is greyed out.
The main task is the code of your edited mesh and texture should be the same as the code you copied now from original package you cloned with s3oc.
Keep the code on notepad. You will need this code later.
Export the MODL file. Right-Click, "Export to s3asc". The file appears in long string such with name for example: S3_01661233_08000001_B619DB2238C3430B%%+MODL_filebase
Do not rename the file. Save.

Export the texture file. Right-Click "Export > To File..." The file will be saved in .dds format. Do not rename the file. Save.

✳️ Step 3. Export the Original Mesh as Base Mesh to .obj format
Open Milkshape. Import the s3asc file you saved before.
More steps click spoiler tag "Read More / Keep Reading" below
File > Import > Sims 3 Object Import v 1.01 by Wesley Howe

Locate the s3asc file, then the original chopsticks mesh appears.
Click the "Joints" tab. It has 4 codes. Check box "Draw vertices with bone colors" It will show Bone Assignment colors on the original mesh. Yellow on top chopstick and light blue on bottom chopstick. The colours are to make the object has rig and movement following the Sim's interaction.

Take a look at the 4 codes on Joints Tab. You can play around to see which colour of the code will appear, after that copy paste the code to Notepad to make it easier to comprehend.
Click Select from Tools menu, Select Options: Face. On "Right/Left/Top/Bottom 2D View", Left-click make selection of one part of chopsticks. While the part of object being selected (Red), click Joints then Choose "Assign".
0x96239247 --> Yellow
0xFEAE6981 --> Purple
0xCD68F001 --> Light Blue
0xD0DECA8E --> Red
Your edited mesh must have the exact same Bone Assignment colour later. Check again if the code and colour are correct.

You can save object mesh as .obj to other 3D software such as Blender or any other 3D software.
✳️ Step 4. Create Your Custom Mesh
Use the original .obj as base model. While you can create longer mesh or any edited version as you wish.
Make sure the scale and position of the edited mesh is same as base original mesh, because the edited mesh will be used on Sim's hand.

If you are done editing the mesh, export the UVmap.
You can export the uvmap in higher resolution, as long as it is Power of 2. 64x64, 128x128, 256x256, 512x512, 1024x1024, 2048x2048, 4096x4096. I export in 1024x1024 pixels to make the size of texture larger and have more details.
Then export the mesh object in .obj format.
✳️ Step 5. Bone Assignment & Create Group
Open Milkshape. Import the original mesh.
Check the Groups Tab. Original mesh has 1 group, "group 00". Group 00 means it is the main mesh. There is no shadow beneath the object.

Import the edited mesh as .obj file.

My edited mesh has one single name "default" name on the Group Tab. While edited mesh may have a lot of file name scattered on Group Tab. Regroup the file name to simplify your edited mesh into one single name. Select > Regroup.
The main task is replacing the EA's original mesh with your edited mesh.
Before you delete anything, you must do Bone Assignment first to the edited mesh you created.
Your edited mesh does not have Bone Assignment, so it appears white.
Remember the 4 codes you copied earlier in Notepad.

Copy Bone Assignment from original mesh to your edited mesh.
This case, your want to Bone Assign Yellow colour.
Select > Face to select one part of chopsticks of your edited mesh. On Joints Tab, double click the appropriate code 0x96239247 in blue highlight then the code box on the right side of "Rename" will appear 0x96239247. Make sure the code is correct. Then you can click "Assign".

Your edited mesh will appear in Yellow colour. Then do the same for another part of chopsticks.
Select another part of chopsticks of your edited mesh. On Joints Tab, double click the appropriate code 0xCD68F001 in blue highlight then the code box on the right side of "Rename" will appear 0xCD68F001. Click "Assign".

Your edited mesh will appear in Light Blue colour.
Then what's the other code for? With colour purple and red?
Leave them. Let the codes have the same exact codes as appear in original mesh and let the colours only assigned Yellow and Light Blue. The colours are to determine rig for interaction in-game, which only use Yellow as upper part of chopstick and Light Blue as bottom part of chopstick.
You can safely delete the original mesh with name group00 until it remains your only your edited mesh.

Rename your edited mesh to group00. Type group00 on the box then click "Rename" on the left side.

Export to TSRW Object in .wso format. .wso is format with bone assignment on object attached.

Save your .wso in your project folder.
✳️ Step 6. Create custom Texture
Import original texture you exported from s3pe to your editing image software.
Look at the original texture made by EA. 32x64 pixels. It is very low resolution, blurry and stretched, because the texture should be compressed as low as possible by game designer. As player you want it has higher detail to look realistic as possible and your PC of course can handle high resolution content, sure you can make the resolution much higher than EA's.

Import the UVMap you saved from 3D software. For example, UVmap I imported has 1024x1024 resolution. Add your custom texture. Then save it to .dds format in the same name as original texture. Save in separate folder, name it "Edited Texture" to keep it separated from original texture.
✳️ Step 7. Import the .wso of Edited Mesh on TSR Workshop & Export the package
Open your TSR Workshop.
Create New Project > New Import >Next...

Then Browse original mesh by EA in package format in your project folder.
On Open file box, you cannot see .package file because the filter is .wrk (TSR Workshop Project). Choose the .package dropdown.

Then you can see .package file.
Open the .package. After the file is located, then Next. On Project Details I usually skip without giving name of Project Name and Title. Next.
You must have seen green land with white blank sky.
Where's the mesh? It is actually there... just being zoomed in too close. You need to zoom out by scrolling down mouse.
You can see the original chopsticks mesh by EA. You can save the project file in .wrk format. After you save the file, import the .wso of your edited mesh. Mesh tab > High Level detail. Click green arrow folder icon to import. Then your edited mesh will appear replacing the original EA mesh.

As you see, the texture is messed up because the texture is still using original EA's texture. But then you check Textures tab and it has blank dropdown...
I cannot change the texture on this TSR Workshop!
Don't worry, we can replace the texture on s3pe later.
No need to change anything other than importing mesh. Click Edit > Project Contents to save as package.
You will see pop up box with number or files DDS, FTPT, LITE, MODL, OBJD, OBJK, etc. Export > To. package. Give name such as "EditedChopsticks_TSRW"

✳️ Step 8. Export MODL file from Package saved from TSR Workshop
Open S3PE, File > Open package "EditedChopticks_TSRW" that you saved from TSR Workshop.
Export MODL. Right-Click, export. It gives you file name with [StringOfNumber] .model .
Save it on project folder. Keep it organized and separated from original MODL. Name the folder "Edited MODL". Do not rename the file.
✳️ Step 9. Finalizing in s3pe & Replacing the Original file with Edited File & Correcting the Code As Same As Default Code
Open s3pe, File > Open original package that you cloned from s3oc. [CreatorName]_ObjectName_Number
Find the MODL. Right-Click > Replace...
Locate to your edited MODL with filename .model .
Then click Open.
The original MODL of the package should be replaced with your edited mesh.
Do the same for the texture.
Locate to your edited texture with filename .dds
Then click Open.
The original texture of the package should be replaced with your edited texture.
Take a look at MODL's Type, Group, Instance. It has the same code as original MODL in the original package cloned with s3oc (because it has been replaced)
Don't forget to see the code inside TGI Block List Editor.
Repeat step 2 how to check the code. Right-Click on MODL/IMG > Details... and click GRID > Resources > TGI Block List Editor.
The Type, Group, Instance of the _IMG are different compared from IMG from original package clone, which means that is the evidence of edited mesh replaced the original.
Rename the Instance with default/original Instance you copied on notepad from Step 2. Type, Group, Instance should be the same as default/original Type, Group, Instance.

Open notepad with resource code you copied from Step 2. Make sure the Type, Group, and Instance are all the same.
If the codes are the same, then your edited mesh and texture will overwrite the default mesh and texture with the same code in the game. Save, Commit, Save the package.
Check again if the texture is replaced properly. Right-Click on _IMG > ViewDDS.
ALTERNATIVES!
Yes, you can delete unwanted files in your edited package, to keep the package clean. Simply Right-Click>Deleted.
The only files needed in package are: MODL, _IMG, _KEY
They are the only files with your edited mesh/texture including codes to overwrite the default codes.
You can Start new fresh blank s3pe. Right-Click>Import from file...
Locate your edited MODL and _IMG (texture) file.
On Resource Details box, tick mark "Use resource name" > OK.
Make sure all the Type, Group, and Instance of MODL and _IMG including in the TGI Block List Editor are all the same as the code in original package.

Save the package.
✳️ Step 10. Test the CC in your game.
Put the package to your CC folder in your The Sims 3 document folder to see if the CC is working or not.
If the CC is working as your intended, with your custom mesh and texture, then test the animation. Are the chopsticks animation working as the same as original EA's? If the animation are working well too, then congratulations!

Your default replacement are working. Give applause to yourself. 👏
-------------------------------------
QUESTIONS!
Q:
Can I use this tutorial for making default replacement for buy/build object?
A: This tutorial covers basic method of using TSR Workshop and replacing the default codes (Type, Group, Instance), so you will understand the basic principle of doing default replacement mod.
Keep in mind that different object has different case. Buy / build object has MLOD (not just MODL) more than one, texture images more than one, has presets, and CAStable colour channels.
The TGI Block List Editor for buy/build object has a lot of codes, so have to spend a lot of time to do trial-and-error to make the default replacement working properly, because a lot of times the texture doesn't work (still using default EA's texture), or when the object appears right with your edited mesh and texture, after you choose the presets, the object reverts back to your edited mesh with default EA's texture.
Q:
Help! The texture is black! / still using same EA's texture when tested in the game!
A: The texture codes must be not the same. Check the Type, Group, Instance of _IMG. Do the codes are the same like codes in original package? Check the TGI Block List Editor for MODL, is the _IMG inside has the same Type, Group, Instance as in original package.
Q:
Help! The object disappears when tested in the game!
A: You must be replacing OBJD in your package. Do not replace OBJD. Just MODL and texture only.
#tutorial#the sims 3#the sims 3 tutorial#thebleedingwoodland#the sims 3 default replacement mod#modding#s3pe#s30c#TSR Workshop
77 notes
·
View notes
Text
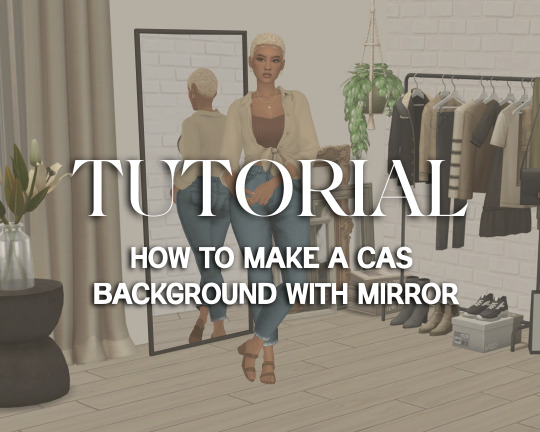
Tutorial: How to Make a CAS Background With Functional Mirror
Overview
This is something that has been highly requested so I hope this tutorial will be helpful for the sims 4 cc community!
This tutorial will have 2 parts for creating 2 different types of CAS "room" backgrounds. Part 1 (The Easy Way) uses a template I created for you to use your own 2D images/screenshots with a simple rectangular mirror. Part 2 (The 3D Room) will result in a better quality background, but it’s not a beginner friendly project so I don’t recommend trying it if you’ve never made any cc before. I will not cover the basics of cc making here, only what’s relevant to making a CAS bg using my template specifically. The Sims 4 Studio forum has a ton of great tutorials for everything else.
In my own research & experimentation, I noticed that (as far as I can tell) EVERY other CAS room with a functional mirror seems to be derived originally from LittleDica's CAS room [link] I want to acknowledge credit to LittleDica for their CAS background which I studied as a reference. But to be clear this tutorial and my templates are NOT derived from another creators' work; I created mine from scratch and it took a lot of time and effort. My version is much more simple and more compatible with Sims 4 Studio because there are no extra mesh groups or diffuse maps. I also made a great effort to make the reflection in the mirror more realistic for the size of the room. I hope you will be able to use this resource to create your own beautiful CAS backgrounds! ♥
Also in case you missed it, you can download my CAS background used in the preview [here] (it is slightly different from the template package.)
Requirements:
Sims 4 studio
Image editor (Ideally photoshop)
my templates (attached below)
—————
Part 01: The Easy Way
The easiest way to create a CAS background with mirror is to use my attached templates.
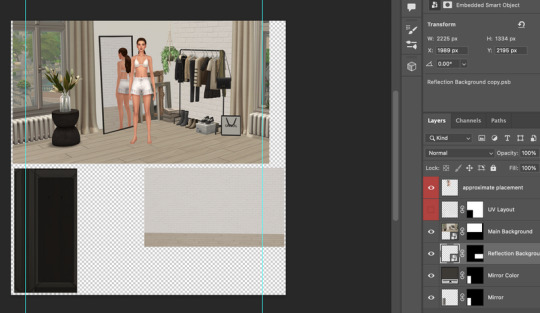
The PSD template is the best option, but for those of you that don’t have Photoshop, there is a PNG version as well.
You will need 2 images; one for the main background, and one that will be reflected in the mirror. The large top area is the main background, and the smaller rectangle at the bottom is what will be reflected in the mirror behind your sim.
In the image editor, paste your images and resize them to fit into the outlined areas.
For framing your screenshots, it’s important to understand that the mirror is actually just floating in space in front of a flat background. That means you’ll have to fake the perspective a bit and that may require some trial and error to get right. I recommend taking multiple screenshots at a variety of angles so you have options to work with. Use the model sim as a guide to help you with placing your background image. (Don’t forget to hide the model sim and UV layout when you’re done!)
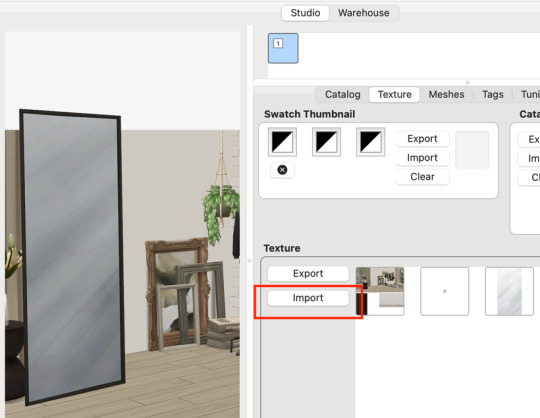
Save as .PNG or .DDS and import it into the template package in Sims 4 Studio.
That’s it! My goal was to make it super easy for you. Remember to only use one CAS background in your mods folder at a time since it's an override. Also note that it is not compatible with 'cas blob remover' since the instance for the dropshadow is now used as the mirror.
TOU — PLEASE READ:
I give permission to the Sims community to use my template files and modify them as needed to create your own CAS backgrounds. This took months of work, researching and experimenting, so please respect the effort I put into creating this resource by agreeing to these simple terms:
Don’t re-upload my files.
Don’t claim my work as your own.
If you use my templates for your cc, please share credit with my username (Lijoue) and link to my Patreon page.
If you make any money from cc created with my templates, please consider making a donation via my Patreon. It is greatly appreciated.
download template files here
Part 02: The 3D Room
to be continued…
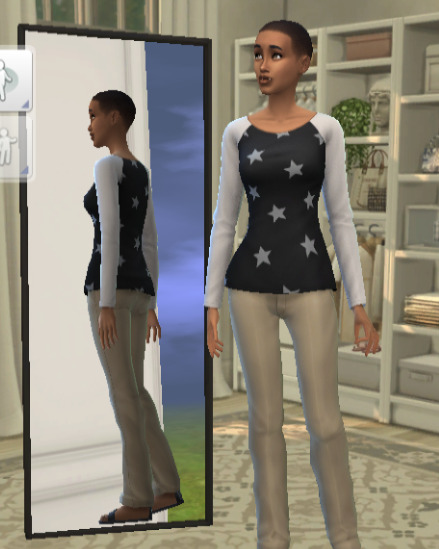
This part will take more time to finish because there’s a lot more steps involved in creating a 3D CAS room. In the meantime, the template should be enough of a starting point for those of you that already know how to make cc objects, since I already handled the hardest parts. Just understand that the mirror reflection is not automatically calculated, meaning that if you move the mirror in the mesh, you will need to change the Mirror Plane Normal and Mirror Plane Offset in S4Studio Warehouse to match the new angle or position. Otherwise it may look unrealistic or worse, it could reflect the eerie wasteland world that the CAS room is set in. (pictured below)
#sims 4 creator#sims 4 tutorial#the sims cc#ts4 maxis cc#maxis match cc#sims 4 maxis match#ts4 tutorial#sims 4 studio#ts4 custom content#ts4 cc#cas backgrounds#sims 4 cas
170 notes
·
View notes
Text
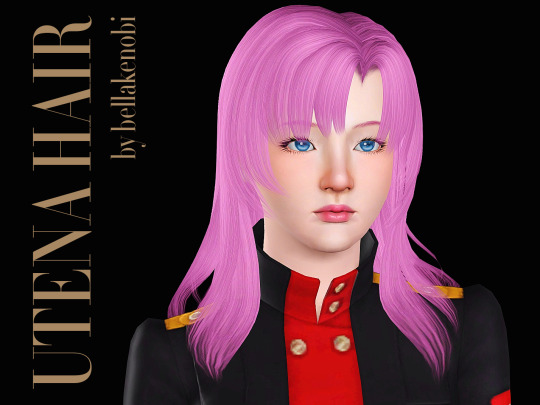
Utena Hair
It's alive!!!
Revolutionary Girl Utena is my favorite anime of all time, and when I stumbled upon a hair cards tutorial on youtube, instead of testing it with a easy simple bob, of course I went to do something complicated as Utena's hair. And here it is 😊 I'm quite astonished I was able to put this together, even with its own issues etc.
For female, teen - elder, not valid for random
EA highlights
No morphs, but won't clip in fat sims
Polycount: 6k lod0
Known issue: it has some tiny transparency issues on the sides and in the back, mainly caused by the undersides, because you know, one does not simply makes a hair for The Sims 3 '-'
Download at:
Mod The Sims | Simblr.cc | Sim File Share | Mediafire
Credits: Mesh by yours truly, texture Pooklet with hand painted alpha by me, control by Anubis.
Read my TOU here.
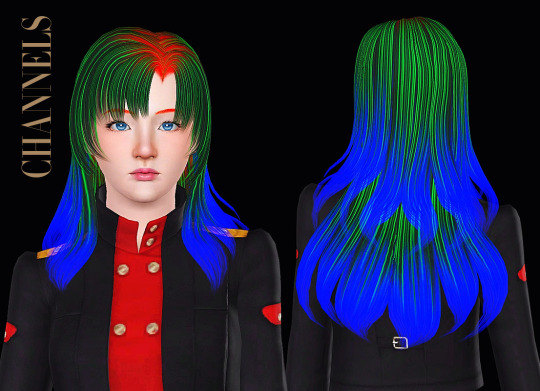
Control Preview and links to the stuff used on the hair below the cut.
Stuff I used to create this hair:
Blender, Milkshape (ugh), Photoshop CC 2015, DABOOBS, Dynamic Hairy Brushes by Arrsistable,
Tutorials that helped me to create this hair:
- Blender 3.0 Easy Hair Cards with Curves by ELIZA
- Hair Creation Start to Finish by @CardinalSims
- Smooth Bone Assignment in Blender by RedSimmer
#sims 3#ts3#simblr#the sims 3#s3cc#sims 3 download#sims 3 hair#utena#shoujo kakumei utena#revolutionary girl utena#sims 3 anime cc#s3 female hair#bellakenobi hairs#bellakenobi hair
141 notes
·
View notes
Text
Updating... The Tattooer (ver. 3.4)!

Finally! Took me a while, huh. This is the updated version of the Tattooer project. It skips some steps, making the workflow much, much faster! Huge thanks to @applewatersugar for his
suggestion on how to bake textures while preserving the transparency. This is kind of a repost of the original Tattooer post, but it actually has some new stuff and a few changes here and there, so please take a look if you want to learn how to use this new version.
This is a series of Blender template files already set up to quickly bake textures from The Sims 4 to The Sims 2. The different Blender files will allow you to:
-Bake body textures from TS4 to TS2 (Female)
-Bake body textures from TS4 to TS2 (Male)
-Bake body textures from TS4 (Female) to TS2 (Male)
-Bake body textures from TS2 (Female) to TS2 (Male) [Bonus!]
-New! Bake face textures from TS4 to TS2 (Unisex) [Bonus!]
-Bake head textures from TS4 to TS2 (Face + Scalp) (Unisex) [Still experimental]
Check the file names to see which one is which, and the resolution of the baked texture it will give.
Everything you see in the render above was 100% converted using those Blender files.
Download here! SFS / GD
Update: Version 3.4.1 (27/08/2023) Fixed some issues on the shoulders for the AF-body-4t2-1024 and AF-body-4t2-2048 templates. Now the top straps on most converted underwear/swimwear should look right.
Update: Same version (13/12/2023) As requested, added a new spanish version of the included pdf guide!
These templates were made mainly to bake and convert tattoos, but there’s more you can do with them if you get creative. I have to say, these are NOT perfect. Results may vary depending on what you are trying to convert, so! With that in mind, this is all the stuff you will be able to convert almost seamlessly from TS4 to TS2:
-Tattoos.
-Other body details such as body hair, scars, freckles, supernatural/occult details…
-Body painted underwear and swimwear, as well as some other clothing that’s mostly painted on the body.
-Socks, stockings and maybe leggings.
-Even skintones! In some areas they will look weird, so I recommend editing and blending them with other existing TS2 skins.
-Makeup, eyebrows and beards. In the old version this was just a proof of concept, but now I’ve added a new Face file template which gives some pretty decent results!
-Hair scalps. Very useful when converting some hairs! Although keep in mind part of that texture might also need to be baked on the face mesh, you know, that hairline makeup stuff.
Got your attention? Nice! Editing some of the textures from TS4 to match the UV mapping in TS2 using a 2D editing program can be incredibly hard. That’s where texture baking in Blender comes to the rescue!
You will need to download Blender, at least version 3.4, but you could always use a newer version. It is only incompatible with versions older than 3.4.
-You can download Blender for free here.
-You will also need Sims 4 Studio to extract the original Sims 4 CC textures you want.
In the first version of these Blender files, there was a necessary step using Photoshop, but that’s no longer needed. However, there’s still a tiny extra step which requires resizing the newly baked texture on some of the high resolution templates, so you might need a 2D editing program like Photoshop. More on that later.
So, before we begin, let’s clear out some questions you might have. What the heck is this texture baking thing and what does it do? Well, let’s imagine you have a video projector and point an image into a blank wall. Then you pick up some brushes and start painting and copying that projected image in that wall. Texture baking is kinda like that when it comes to 3D models. You align two models and match them as closely as you can in shape and form, and once you adjust some parameters and values, Blender does the rest for you: it will give you a new texture for a new model with a different UV map. These files I’m sharing have everything already set up, so it’s a matter of plopping in that Sims 4 texture and you will get that new texture for TS2 in just a few clicks.
This tutorial assumes you know literally nothing about how to use Blender, so if you feel uncomfortable with it, worry no more! This will guide you with pictures showing where you need to click and explaining what is happening. For Sims 4 Studio and Photoshop the process might be a bit less detailed, but still this should be pretty beginner friendly. For this tutorial, I will use some tattoos as an example (properly credited at the end of the post). Alright, enough with the rambling. Let’s get started!
·EXTRACTING TEXTURES IN SIMS 4 STUDIO:
First things first, you will need to extract as pngs all the textures you want to convert from TS4 using Sims 4 Studio. It should be pretty straightforward. Just open the packages and export the Diffuse textures. Keep them organized in a folder for easy access.
·BAKING THE TEXTURES IN BLENDER:
PRELIMINARY STEP 1: CONFIGURING BLENDER’S GRAPHICS SETTINGS:
Open your preferred Blender file depending on what you’re going to bake and the desired resolution (in this example I’m going to use the AF-body-4t2-1024 file). Before we start messing around in Blender, there’s one thing you should set up. It is a onetime step, and once it’s done, you won’t need to do it again. So, does your computer have a dedicated graphics card? If you don’t know or you’re not sure, just skip to the next step. Configuring Blender so it uses your graphics card instead of your CPU will make the baking render much faster, so it is recommended you set it up correctly.
If your computer has a dedicated graphics card, click File (1) > Preferences (2) > and on the window that pops up click System (3) > and select CUDA and make sure your graphics card is there and tick it (4). I have an Nvidia Graphics card but your case may vary. Once you’re done, click on the tiny button on the bottom left corner and Save Preferences (5).

PRELIMINARY STEP 2: CHOOSING THE RENDERING DEVICE:
Click on the tiny camera button on the right, called Render Properties (1), and on Device (2) select GPU Compute if it’s not already selected. If you’re not sure if you have a graphics card or not, just select CPU. Then select the Material Properties tab (3) and Save your changes, either by pressing Ctrl + S, or clicking File (4) > Save (5). You might need to do this second step with the other Blender files, but once you have it done and saved, you won’t need to do this again. Okay, time to get into the good stuff!

·STEP 1: LOADING YOUR TS4 BASE TEXTURE:
In the Material Properties tab, click the folder icon that says Open (1) and on the window that pops up, navigate through your folders and select your first texture. To navigate easily, the 3 buttons on the top right (2) are for the display mode. They will show your files in list mode, vertical and horizontal, and the one on the right will display the file thumbnails, pretty useful if you want to easily preview your textures here. The icons on the left side (3) will let you go one folder back and forward, go to the parent directory, and refresh the folder in case you just dropped something new in there. Double click on the image you need and that will load the texture into the Sims 4 body model, named “ts4 body”.

·STEP 2: SETTING UP YOUR SELECTION AND BAKING THE TEXTURE:
On the top right of the screen, you will see the names of the 2 models in the scene. Hold the Ctrl key in your keyboard and left click on the “ts2 body” model (1). If you did it correctly, you should see “ts2 body” in a yellowish orange color, and right down below, “ts4 body” should look more like a red orange. If not, try again by clicking first on ts4 body, and then while holding Ctrl click again on ts2 body. Then switch to the Render Properties tab by clicking the tiny camera icon (2) and click Bake (3). Depending on your screen resolution, you might need to scroll down a bit with your mouse to see the Bake button. Wait a few seconds for it to finish. You will see the progress percentage down on the bottom of your screen. Don’t panic if you notice your computer fans start ramping up, that’s completely normal! As I said in the beginning, using your GPU will bake the textures much faster than the CPU.

·STEP 3: SAVING YOUR NEW TS2 TEXTURE:
Once it’s finished, switch to the UV Editing Mode by clicking “UV Editing” on the top of your screen. And there it is: your new texture! You might have to scroll up your mouse wheel a bit to zoom in and see it in all its glory on the left side of the screen. We’re still not done yet though. You need to save it to yet another new folder (always try to keep your stuff organized!).

You can save it by pressing Shift + Alt + S, or clicking on Image* (1) and then Save As… (2). That will pop a window where you’ll need to navigate again and save it somewhere. Give it a proper name (3) and hit Enter to save it… well, Enter doesn’t always work for me for some reason, so if that happens just click Save As Image (4). And that’s it! You’ve successfully converted your baked texture. Congrats!

·STEP 4: GOING BACK TO STEP 1:
Alright! If you’re done with your textures, you can close Blender without saving and call it a day. But let’s say you want to keep baking other swatches. In order to go back to step 1 and start the process once again, click Layout (1), go back to the Material Properties tab (2), select “ts4 body” (3) and click on the folder icon (4) to open and load your next swatch.

Then it’s just a matter of repeating the process from step 2. When you’re ready to move on, close Blender without saving. If you see a small check telling you it will save some images, make sure you uncheck it, so you will be able to use it again in the future from the starting point with no issues. I don’t think it really matters if you accidentally save your progress in these files, but I like to keep it clean and fresh so I can do the process where I left it from the beginning next time I open it. And in case you mess up and save somewhere, you can always just delete the .blend file and download the template files again.
In case you’d like a video tutorial on how to use these files, the amazing @platinumaspiration recorded this fantastic video showcasing the process! You can watch it here.
One final note: some of the baking .blend files save the textures with a resolution of 2048x2048 pixels, as clearly stated at the end of their file name. That’s way too overkill, because TS2 only properly supports up to 1024x1024 for most of its textures and you should always resize your final product to that max resolution (or lower if needed). I just made those 2048 versions because there might be some really tiny and slim details on some tattoos that might look a little too blurry when baked into a 1024 resolution texture, so for those cases use that if you want and then resize them using your 2D editing software of choice.
In Photoshop, in the Resample mode of the Image Size menu, there are a few options to choose. For the fine details, I like the Nearest Neighbor (hard edges) option, which, even if it looks a bit pixelated, it still preserves most of the texture and quality.

For anything else, I would just directly bake them using the 1024 versions in Blender (512 for the face and scalp).
And for the folks who feel comfortable playing around in Blender, this is just the beginning! Texture baking opens a LOT of possibilities, so feel free to move stuff around and edit the models to your liking! If you notice the baked textures look warped or stretched somewhere, or don’t like where some textures are placed in the S2 body, poke around that area moving stuff and then give it another try. The main objective of the baking process is keeping both overlapping models as close in shape as possible. You may also edit and save new copies of the templates, or make new ones from scratch using mine as a reference (keep a close look on those Baking settings and values, I think they work pretty well) and share them if you want to. Go ham, do whatever you want with them! I still have plans on making templates to convert body textures from Sims 3 to Sims 2, but for now it’s not on my priorities, so we’ll see when that happens.
Whew! Hope none of this was too confusing. Need help or have any issues with these? Please ask/message me here and I’ll be glad to help when I’m able to!
Credits for the CC used in the render demonstration:
-Skin by Sims3Melancholic.
-Eyes by Northern Siberia Winds.
-Eyebrows by PeachyFaerie.
-Tattoos by xtc.
-Top by SerenityCC.
And the Tattoo I used for the tutorial can be found here, by ValhallanSim.
Last but not least, a huge thanks to all the people who somehow contributed to make this project and update possible, either by doing initial testing, finding issues to fix, or teaching me new Blender tricks to make the workflow way faster and easier. So thanks again to @elvisgrace @moyokeansimblr and @applewatersugar on Tumblr! <3
And thank you for reading! Hope you have fun playing with this (not so) new toy hehe.
#tattooer project#tattooer update#ts2 tutorial#ts2 resources#ts2 blender#ts2 overlays#ts2 texture baking#4t2 conversion tutorial#this took me so LONG to update#im really sorry for the delay :(
335 notes
·
View notes
Last Seen Blogs

niyiadeoshun
Niyi Adeoshun

keiiiooo
Untitled

louisxbenjamin-blog
Louis Benjamin

peace-love-happyness
My Safe Place

willreadforcoffee
Will Read for Coffee