#ps tutorials on tumblr and youtube are free
Text
petition to A) use pictures of the same size when putting them in photoset and B) not fucking including other people's graphics and gifs in them
the rise of twilight aesthetic posts that just slap rando google pics with other people's gifs together is alarming!!! and the note counts on them are even more alarming
#these posts shouldnt get beyond 2 notes#idc that you cant photoshop or whatever#use free software or get a crack and watch some tutorials#but don't use other people's shit#there are so many people making the most amazing aesthetic posts just out of freely accessible pictures#u dont need to repost other's art in your name k thx bye#~#ps: literally dm me and I will give you my dl links to all twilight movies AND photoshop#ps tutorials on tumblr and youtube are free#you'd literally be all set and ready to go in like 1-2 hours
0 notes
Note
How do you make your gifs?
Hello hello! I love talking about gifmaking, so thank you for giving me the chance to ramble.
Instead of a detailed step-by-step walkthrough, I will link tutorials and resources written by the wonderful Tumblr creators on here along the way. Everyone has their method and preferences, and there’s no right or wrong way to make gifs. I’m going to share techniques and resources I picked up along the way that work best for me—they may or may not be suited to your preferences, but I hope you’ll find some helpful things here.
(Warning: screenshot/image heavy)
USEFUL TUTORIALS AND RESOURCES
Here are some tutorials and resources that I found very useful when I got back into gifmaking:
Gifmaking tutorial using video timeline by @hope-mikaelson is identical to my own process
Gifmaking and coloring tutorial by @kitty-forman, whose process is very similar to my own
Giffing 101 by @cillianmurphy, an incredibly detailed tutorial that covers everything you need, including a step-by-step guide to using HandBrake
Gifmaking and coloring tutorial with 4K HDR footage by @sith-maul, another incredibly detailed tutorial with many useful tips
Gifmaking tutorial by @jeonwonwoo, incredibly comprehensive and covers so many aspects of gifmaking from basics, sharpening, captioning, and text effects
Gifmaking/PS tips and tricks by @payidaresque
Action pack by @anyataylorjoy, the Save action is especially a true life-saver
@usergif and @clubgif are amazing source blogs with many tutorials on gifmaking, color grading, and gif effects, can’t be thankful enough for the members for their work curating and creating for these blog!
TOOLS
Adobe Photoshop CS6 or higher, any version that supports video timeline. @completeresources has many links to download Photoshop, have a look!
Photopea is a free alternative to Photoshop, but it has a slightly different UI, check out these tutorials for gifmaking with Photopea
HandBrake or any other video encoder, especially if you’re working with .MKV formats
4Kvideodownloader for downloading from YouTube, Vimeo, Instagram, etc.
OBS Studio or any other similar screen capturing software. To prevent duplicate frames in gifs that prevents your gifs from looking smooth, try to match the recording frame rate (FPS) with the source.
IMPORTING FOOTAGE AND WORKING IN VIDEO TIMELINE
I work exclusively in video timeline instead of importing video frames to layers or loading files into stack. For videos that don’t require converting/encoding using HandBrake, especially ones that are already in .MP4 format, I tend to open the video directly on Photoshop, and trim the videos around directly.
As mentioned above, this gifmaking tutorial using video timeline is exactly how I make gifs. I find it more efficient, especially if you’re making multiple gifs from the same video/the same scene with little to no change in lighting conditions You can simply slide around sections of gifs you want to save, and they will all be the same length.
Another thing also covered in the tutorial linked is the ability to change video speed in video timeline mode. Right click on the video and set the speed before proceeding with cropping/resizing. This is also very useful when you’re making blended gifs where you need the footage to have the same length.
Slowing footage down.
As mentioned in this post, changing the FPS before slowing down the gif results in smoother gifs. Doubling the frame rate before slowing down your gifs usually yields the best result.
Speeding footage up.
I love using this to speed up slow motion B-rolls to make the speed slightly more natural. It will result in nice, smooth gifs:

(B-roll footage, normal broadcast speed)
(200% speed)
Subject won’t stay in frame?
Another feature of the video timeline mode. Keyframes are your best friend. This tutorial by @kangyeosaang covers everything you need to know about panning gifs. I use this technique regularly, it’s a life-saver.
COLORING
Here are some coloring tutorials I found very useful:
Coloring tutorial by @brawn-gp beloved, their coloring style is second to none
Mega coloring tutorial by @yenvengerberg, for stylized /vibrant coloring
Understanding Channel Mixer by @zoyanazyalensky
Coloring rainbow gifs by @steveroger, which delves deep into Channel Mixer
I tend to go for neutral-saturated coloring in general, especially for minimalist gifsets with no effects (blending/isolated coloring/overlays etc.), but the possibility is endless for stylized coloring. Here’s what my adjustment layers look like for the example gifs above.
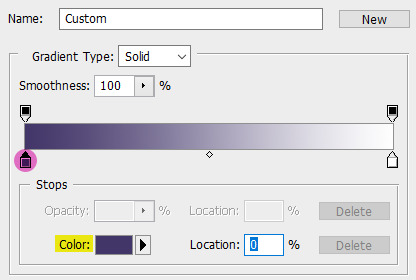
The base footage for this Charles gifset is incredibly desaturated. I started with a Curves layer to bring contrast to the gif, as well as do some color-correcting to bring the base footage to a more neutral tone. To bump contrast, I also like to add a black and white Gradient Map layer with a Soft Light blending mode at 10%-30% opacity:
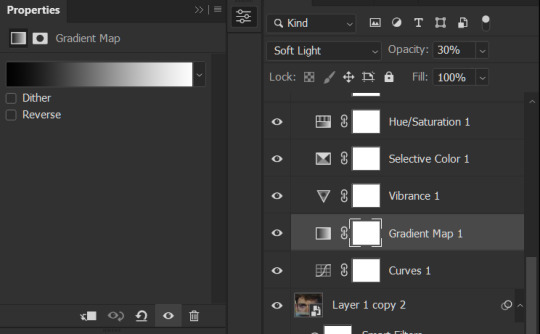
The Vibrance layer is then used to lift the saturation of the base footage, with the Selective Color, Hue/Saturation, and Channel Mixer layers to help remove the green/yellow tint to his skintone.
An underrated adjustment layer/preset in my opinion is the Color Lookup. You can layer in pre-loaded .LUT color grading presets to help speed up your process. For this gif, it’s simply a base preset Soft Warming Look to achieve a warm, pink-tinted tone.
In hindsight I feel like this gifset is too saturated, his skintone is skewing very red/pink, I could’ve bumped down the lightness of the reds with a Selective Color layer or a Hue/Saturation layer. Try to err on the side of neutral for skintones. Experiment with layer orders—there’s no right or wrong! Remember that each layer build up on the one before it.
The base footage of the Jalen gif is already quite nicely color-graded, but it’s still muddy and underexposed. As with the Charles gif, I started with a Curves layer to bring the gif to a better baseline contrast. Then I focus on brightening the gif with the Brightness/Contrast and Exposure layers.
The Hue/Saturation and Selective Color layers are to color-correct Jalen’s skin tone—it’s something I spend most of my time coloring gifs and focus a lot on, especially when color grading BIPOC skintones. Putting a Vibrance layer, upping the Vibrance and Saturation, and calling it a day would make his skintone skew very, very yellow/orange.
Focus on the reds and yellow for skintone, play around with the Saturation and Lightness sliders, use the Hue slider with caution.
It can be tricky to achieve the right skin tone when working with sports footage vs the higher quality, higher dynamic range footage of films or TV shows, but I try to keep it as close to the subject’s natural skintone as possible.
Here are some of tutorials with tips and tricks on coloring BIPOC:
How to fix orange-washed characters by @zoyanazyalensky
How to prevent pink-washing and yellow-washing by @jeonwonwoo
Coloring tutorial by @captain-hen
Changing lighting conditions?
Fret not—this is why I love working in video timeline. I’ll take this gifset as an example: it’s a deceptively difficult one to color. The footage is 720p and the sunlight shifts throughout the video, so matching across gifs was tricky.
My solution was to split the clips in sections with consistent lighting, and apply adjustment layers to the individual sections before applying general color grading layers on top of everything.
We can make use of the Fade Transition effect for sections where the lighting changes within the gif section we want to color.

(without vs with Fade on the Brightness/Contrast layer)
The difference is subtle in this example, but the brightness in the right gif is noticeably more consistent throughout. You can also add the Fade Transition effect to the beginning for a fade in, of course.
SHARPENING AND OPTIMIZING GIF QUALITY
This tutorial by @anya-chalotra covers everything you need to know about optimizing gifs for Tumblr.
Sharpening.
Sharpening is essential to making crisp gif images. Here’s another ask I answered re: my own sharpening settings and maximizing gif quality.
(base footage, unsharpened)

(color graded, unsharpened)
(color graded, sharpened)
The final gif is sharpened with Smart Sharpen, 500% at 0.3px and 10% at 10px (my standard sharpening settings).
Here are some tutorials and resources on sharpening:
Sharpening process by @anya-chalotra
Sharpening tutorial with added gaussian blur by @haleths
Sharpening action by @daenerys-stormborn
Size your gifs for Tumblr correctly.
This is essential: full width gifs are 540px wide.Two side-by-side gifs should be 268px wide. Here’s a handy post on gif size guide for Tumblr.
Incorrectly sizing your gifs will take away the quality of your gifs: undersizing your gifs will especially make them grainy, blurry, and /or pixelated, and won’t display correctly on many people’s desktop theme. Oversizing usually isn't as dramatic as undersizing, but it will make the gifset glitch when displayed, and the file size will be unnecessarily bloated.
Work with HD footage if possible.
Media fandoms (films/TV shows) are luckier than us in the sports trenches—we have to work with what we have. Broadcast footage is usually subpar: lacks contrast, pixelated, very desaturated, the list goes on. But it’s possible to still make high quality gifs from subpar footage. Here are a couple of tutorials to mask low source footage quality:
low quality video ➜ “HD” gifs tutorial by @nickoffermen
Sharpening low quality footage by @everglow-ing
(This gifset I made is from a 480p footage with horrendous lighting conditions and colors, and the end result is decent I’d say)
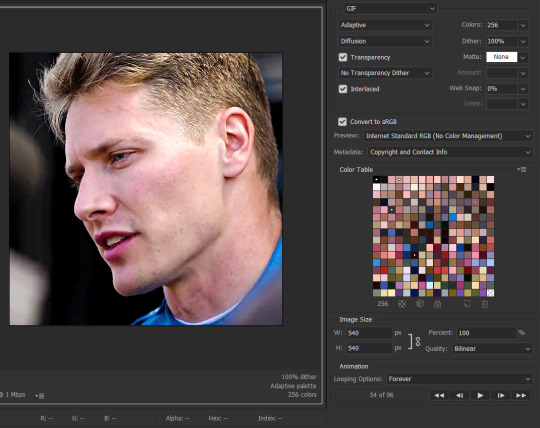
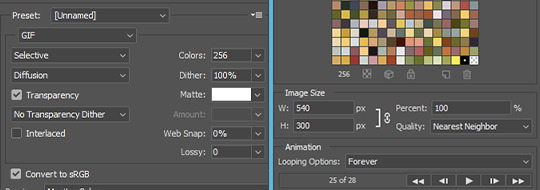
Save for Web (File > Export > Save for Web (Legacy) or Ctrl + Alt + Shift + S) settings.
I default to Adaptive + Diffusion but also use Adaptive + Pattern from time to time. Any combination of Adaptive or Selective + Diffusion or Pattern will give you a good result. In my experience some gifs will need the Selective color table for the colors to display correctly.
Here are my default settings:
SAVING AND EXPORTING FOR TUMBLR
Converting to frames and adjusting the gif speed.
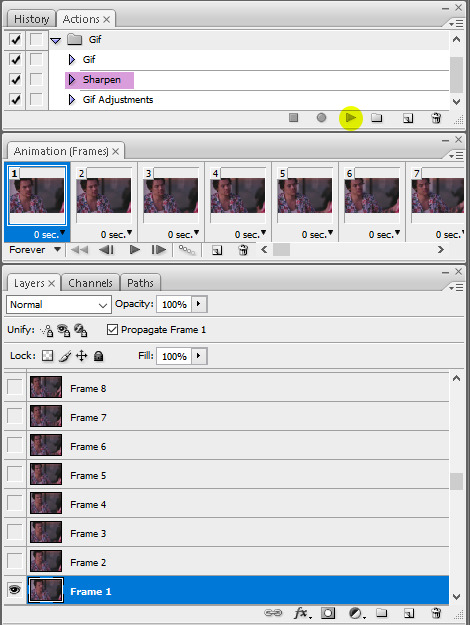
If possible, avoid exporting your gif and reopening it to adjust the frame speed. I used to do this sometimes when I’m lazy, I have to admit, but this is where this Action as mentioned at the beginning comes in very handy. It converts all visible layer into smart object, then converts it back to frame animation.
Step-by-step:
1. Select all layers
2. Right click > Convert to Smart Object
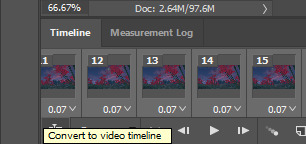
3. Go to the Timeline menu (≡) > Convert Frames > Flatten Frames into Clips
4. Go to the Timeline menu again (≡) > Convert Frames > Convert to Frame Animation
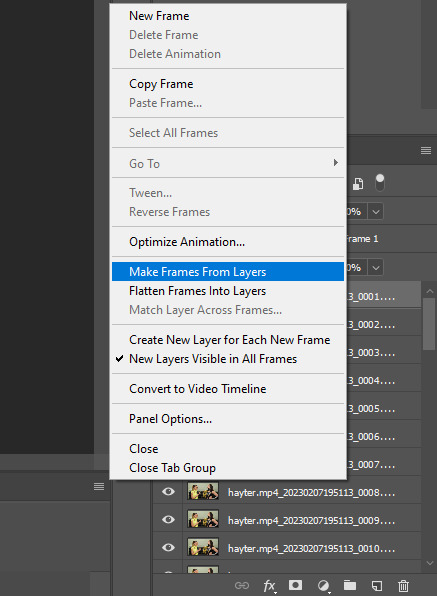
5. In the same menu (≡), select Make Frames from Layers
6. Delete the first frame (it’s a duplicate) then set your frame speed

Now you can adjust the frame speed before exporting it (Save for Web).
Pay attention to the source framerate.
The frame delay of 0.05 s is usually the default to make gifs for TV shows and films, and it is preferred by most gifmakers. This stems from the fact that most movies and TV shows are 24 or 25 FPS. This may not be the case for all source videos: you might get 30 FPS footage, and sports or gaming footage can be 50 or 60 FPS. Gif speed also depends on the FPS of your original file. Play around with gif speed and see what feels most natural to you.
My rule of thumb is the frame delay Photoshop gives you + 0.01 s. For example, 50 FPS footage will give you 0.02 s frame delay (25 FPS gives you 0.04, 30 FPS gives you 0.03, etc.), so set it to 0.03 s. I usually err on the side of a faster frame delay for smoothness in in-game sports footage, anything else (interviews, press conferences, B-rolls) can get away with being slowed down. Again, experiment and see what you think looks best!
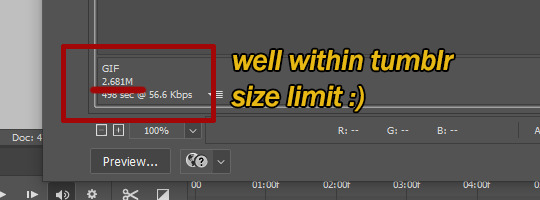
Keep gifs under the Tumblr file size limit (10 MB).
Cut down the number of frames. My gifs are usually around 60-70 frames for 540px full-width gifs, but depending on the coloring, sometimes you can get away with more. 268px gifs can go up to 200+ frames.
Crop your gifs. Remember to keep full-width gifs at 540px wide, but if necessary, you can crop the height. My go-to sizes are 540x540, 540x500, 540x450, and 540x400.
Amp up the contrast of your gifs. Flat colors like black cut down gif size.
The Grain filter or Noise filter, though beautiful for aesthetics or simply necessary sometimes to mask low source footage quality/pixelating, may bloat your gif size.
Play your gifs back before exporting.
Pay attention to duplicate frames or glitches, you might need to get rid of them!
Hope this is helpful! Don’t hesitate to send an Ask or DM if you need any help, I will happily answer all your questions and send over PSDs. (I’m also on Discord—just shoot me a message if you need my tag!) Happy creating :]
#tutorial#PS asks#gif tutorial#Photoshop tutorial#I guess this is more of a resource link dump than tutorial but. Hey. Why reinvent the wheel...#Sorry for the late answer I hope you see this Anon :]#completeresources#allresources#userxoames#userbarbi#usernrzr
1K notes
·
View notes
Text


It's been requested so here it is: my gif tutorial! I hope to make this very simple as I've made gif making very simple for myself with the help of .atn made by myself and others. More under the cut!
First, what you'll need.
Photoshop (here's a link to a masterlist of free photoshop resources from birdysources)
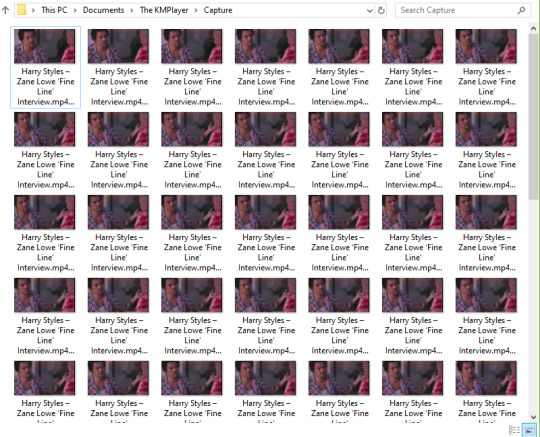
KMPlayer, to get your screencaps.
These PS actions. (My gifmaking one, and this sharpening action from insomniacgifs.)
Some understanding of how to color gifs (I'll be linking my psd shown here, as well as including the process of making one.)
Next, how to get the videos that you want to gif.
I personally source my videos from Youtube, Twitter, and streaming services. (Firefox browser is your best friend, as it doesn't black out the screen that some services have.) If a Youtube Video Downloader isn't working, or if I'm capturing my own footage, I use the Xbox Game Bar's recording feature (windows + alt + r) to capture footage. There's also applications like OBS Studio. For Twitter, I use twittervideodownloader.com
Now, making the gif.
I use Photoshop CC 2018, but any PS with a timeline will work. But first, we gotta take our screencaps. Open your video in KMPlayer, and press alt+v. This will open up this second screen

These are my settings, with an easily accessible folder that I save my frames to. Find the scene you want to clip, and hit start & play your video, then stop when you have the frames you want.
Next up we're going to open up Photoshop. I changed my keyboard shortcuts so all I've got to do is hit ctrl+alt+o, but for you guys, you gotta go to File -> Scripts -> Load Files Into Stack

Select your screencaps of the scene you want to gif. Now that Tumblr allows gifs up to 10MB, the amount of caps you want is totally up to you. I stick to around 45-50, but sometimes there's a scene I need that's up to 150+ caps, and it still fits under the size limit. It all depends on the dimensions and coloring of your gif. I'm loading up 51 frames as the sharpening .atn deletes the final frame of your gif once it reverts back to frames, so I'll have an even 50 framed gif.
Your PS should look like this. Here comes the gif making itself. You want to hit Create Frame Animation at the bottom, where your timeline is. If your timeline isn't already open, click your Window tab up top, and find timeline in the dropdown.

After you hit Create Frame Animation, you want to Make Frames From Layers, which you'll find when you click the three lines on your timeline.
Then, reverse your frames.
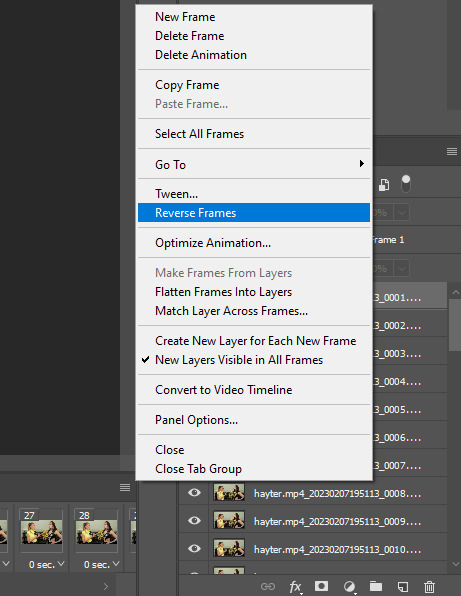
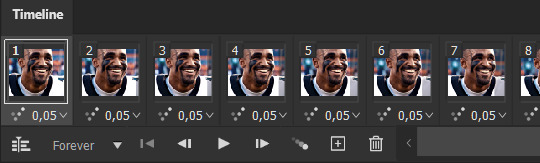
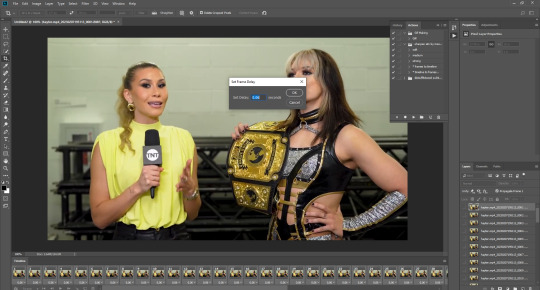
Finally, Select All Frames, click the arrow on the frames, and change the frame delay to .06 seconds.
Way to go! You've made a gif! Now, if you're like me, you'll get tired of having to do that over & over when making a gifset. So, I recorded and uploaded an .atn, which means all you gotta do is load up your frames, hit play on the .atn, and your gif is good to go. I'll link it again so you don't have to lose your place in the tutorial.
So you've made your gif, now what? Now we crop, sharpen, color, and save for the web. Let's get to it.
Tumblr dimensions can be tricky, but they're easy to remember. (I even made a little graphic for it!)

For my tutorial, my Jamie gif will be 268 x 268 :)

Here is my unsharpened, unedited gif of Jamie Hayter. I believe this clip was snagged from YouTube, but it's been awhile since I saved it. I use insomniacgifs' gif sharpening atn, as I hate manually sharpening gifs. So let us run that real quick. (I'll be using the Strong option. Don't forget to delete the final frame.)
Onto coloring! The example I whipped up for this tutorial is super simple, so let's go!
I typically edit the curves first. I'm not sure why, just something I picked up from my photo journalism class back in HS.

Next, I add a little brightness. (+10)

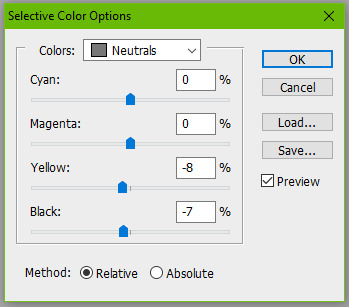
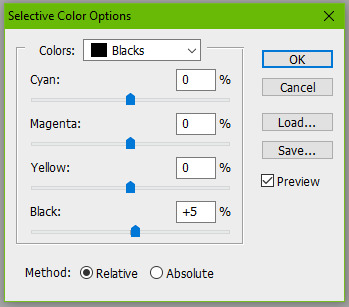
Then, I mess with Selective Color, just a bit. (Neutrals, Black +10. Blacks, Black +5.)
Now, I don't know exactly what Channel Mixer does, but it's fun. Here's my settings.


Some Saturation (+5)

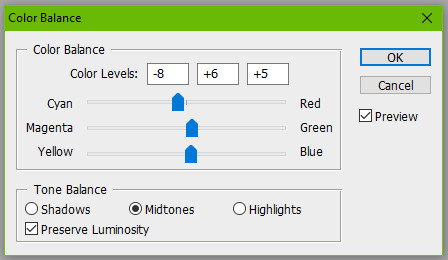
And lastly, I edit the Color Balance!

Aaaaand here's my final product! I also uploaded this as a PSD for you to save and use yourself!

Once your gif is all done, we need to save it properly. File -> Export -> Save for Web (Legacy). Here are my settings.

Note: Make sure your looping options is set to forever so your gif doesn't loop once and freeze!
And that's it! I hope this helped, and if you have any questions, my ask box is open!
#tutorial#gif tutorial#photoshop tutorial#wweedit#wrestlingedit#aewedit#*tutorial#griff.gif#she's here!!#long post
209 notes
·
View notes
Photo
So recently I made this gif and @clotpolesonly asked me for a tutorial... Here we go!
Full explanation under the cut, but for the purposes of this tutorial i’m gonna assume you
Know how to GIF
Know how to color
Know how to do research (specifically wrt “what does VHS footage look like”)
STEP 1: MAKING A GIF
Make a GIF (as in, take screencaps or a screenrecording and plug ‘em into PS or whatever software you use) until you have just the frames in front of you. I recommend a 4:3 dimension since that’s what VHS tapes used to look like, but you can play a bit loose and fast with that.
Also, because of the heaviness of the glitching/filters required for VHS gifs, I’d say a gif anywhere between 30 and 65 frames is alright. Anything bigger than that and you’ll really start stretching Tumblr compression.
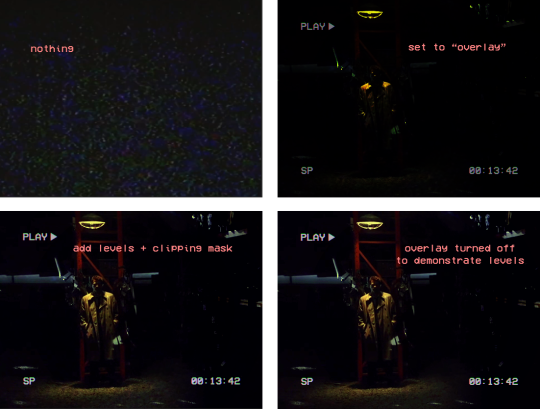
STEP 2: MAKING THE COLORING
For this, I’d recommend looking up some old VHS footage and trying to recreate its look. There’s whole playlists on Youtube (like this one) with hours of VHS footage, so just skip through that to get a feel for it.
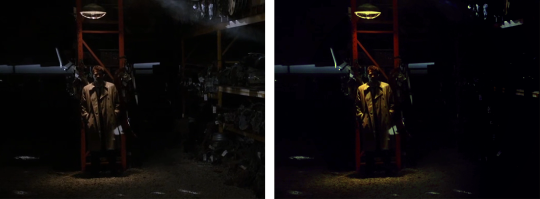
I went with a very dark/heavily saturated look for this, but depending on the setting, VHS tapes can look very washed out. An example from another VHS gif I made:

STEP 3: THE TEXT
I knew I wanted specifically animated text for this, so I couldn’t exactly use an overlay to get the text I wanted (the timestamp on the gif corresponds with the timestamp of the actual episode). So, how do you create a VHS text overlay yourself? Trial and error, mostly. Here’s how I did it.
3.1 Find a font
I downloaded the VCR OSD Mono Font from dafont, but there are others out there if you wanna look at a different one!
3.2 Type the text
So generally, a VHS tape will have three things on screen that are evenly spaced out on the screen. These are the play icon, SP, and the timestamp.
I typed all of these myself including the sideways triangle, which I set to the Arial font. You can type a sideways triangle by pressing alt+16. All fonts were set to 21pt.
These are evenly spaced along the sides, all with 1.73cm distance. However, this looks way too clear for a VHS.
3.3 Blending Options Fuckery
In order to fog everything up a little, I put all the text layers into a group and then duplicated that group three times. If you right click on a group, you get a pop-up. At the top of that pop-up is the “blending options” option.
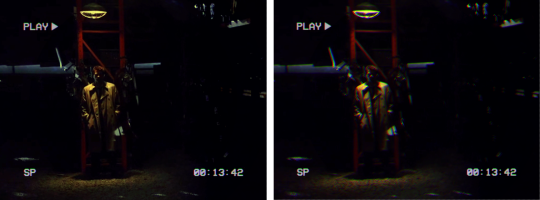
I set each of the three duplicated groups to only have one channel turned on (either red, green or blue).

However, you won’t actually see the other colored text until you nudge ‘em a little. In this case, I moved the red text 1px to the left, the green text 1px to the top, and the blue text 1px to the right. Then you should see this sort of glitchy effect!
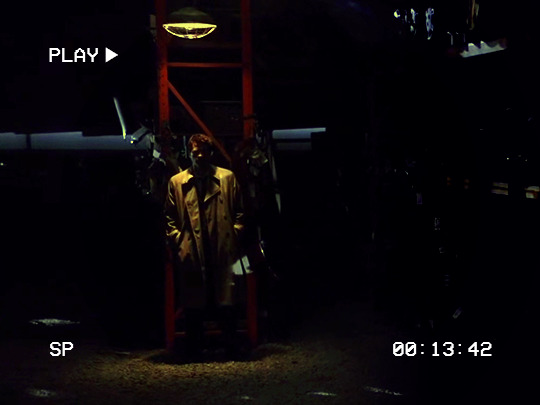
Because I decided in the end that this was still a bit too clear for me, I put all of these groups in another group, and then set that to 70% opacity. This is the end result:
3.4 Moving timestamp
This gif specifically has a moving timestamp. This was done by creating different text layers that are turned on/off on certain frames. These text layers should also be included in the blending options thing from the above step.

STEP 4: OVERLAY
Key to a VHS gif is finding an overlay you like to add the noise/dust that you see in the gif. For this one specifically, I used this overlay but there are a lot of overlays out there! Feel free to look around.
4.1 Adding the overlay to your gif
So I have that overlay downloaded as an MP4 video. The first step is converting it into frames, as you would for a regular gif. The gif I want to paste the overlay onto is 64 frames, so I select 64 frames of the overlay, go to the menu (pictured below), and click on “copy frames.”
Next, I select all the frames of my base gif, then go to the same menu and select “paste frames.” You’ll get a pop-up asking how you want to paste, and it’s crucial that you select Paste over selection.
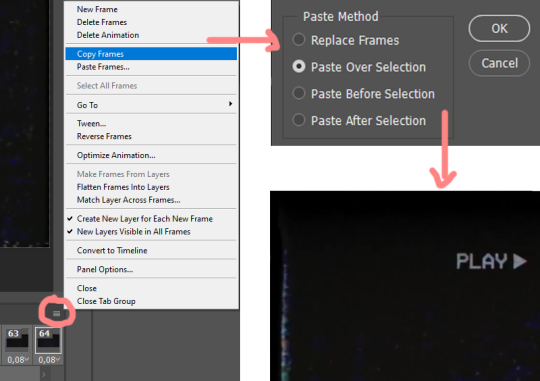
You’ll end up with something that looks like the image in the bottom right, but you can easily resize that by going to edit -> free transform or pressing ctrl/cmd+t. MAKE SURE you have all the overlay frames group and resize the entire group when doing this, otherwise you’ll end up with just a couple of resize frames.
4.2 Making the overlay into an overlay
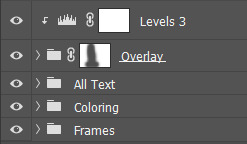
The first step is to set the blending mode to “overlay.” However, this’ll DRASTICALLY increase the contrast of your image when you do it (see below). That’s what I always add a levels layer + a clipping mask to the overlay.
You can add a clipping mask to something by holding the alt key and clicking on the border between two layers. This makes it so that the levels layer is editing ONLY the layer directly underneath it, instead of all layers below it.
The exact settings of the levels layer are a bit trial and error-y, but for this gif I used 1 — 2.74 — 125.
If your overlay is too extreme for your tastes, you can always fiddle with the opacity until it looks right to you!
4.3 Editing the overlay
I personally found the overlay to be a bit too extreme in the lighter parts of the gif. That’s why I add a layer mask to the group with the overlay frames, and masked out the lighter parts with a 30% grey. If you were to mask it out with black, the overlay would stop showing up entirely, which I didn’t want.
CONGRATS! WE’RE AT THE HALF-WAY POINT. Grab yourself a snack or some water and take a breather, ‘cause we’re not done yet!
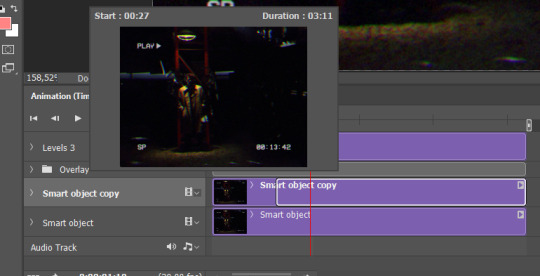
STEP 5: CONVERTING TO TIMELINE & SMART OBJECTS
It’s now time to leave the individual frames behind and transform your gif into an animation timeline. You can do this by clicking on the same menu icon as you did for copying/pasting frames, then selecting Convert to Timeline. BEFORE you do this, make sure you’ve set your timing to whatever you prefer. I usually set it to 0,08 seconds.
Next, right click the “Frames” group and select “convert to smart object.” This’ll allow you to add smart filters onto your gif frames and lets you duplicate them without having to worry about which frames are turned on/off.
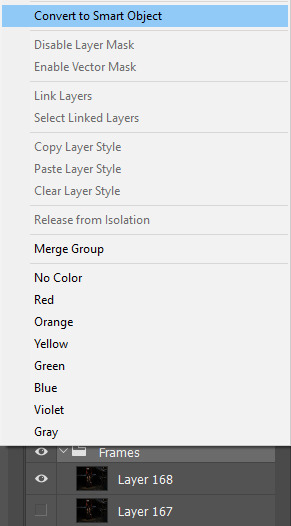
Now we’re gonna recreate the glitchy effect for the text with the gif frames. Duplicate the Frames smart object three times, then once open “blending options” and deselect the relevant channels.
For this gif, I moved the red frames left by 2px, I moved the green frames up by 1px, and I moved the blue frames down by 1px and right by 2px.
Next, select ALL LAYERS except the overlay group + the corresponding levels layer. That means the text group, the coloring group AND all 4 frames layers. Then, right click, and convert to smart object again.
You should now have just 1 smart object and the overlay+levels layer left.
Add the relevant smart filters to the smart object. Usually, this is where you’d sharpen a gif, but VHS tends to look blurry. My settings for VHS gifs are usually
Gaussian blur: 0.3
Add noise: 3.5
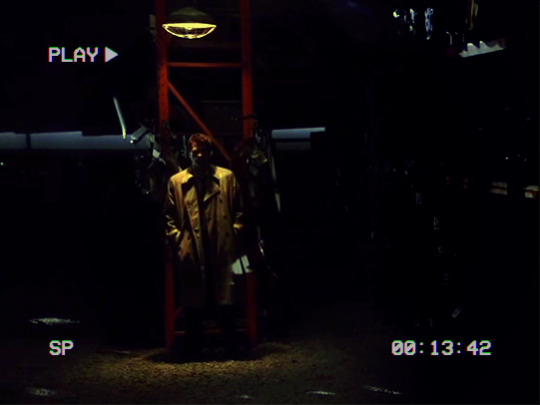
IF YOU DON’T WANT TO ADD A GLITCH, THIS IS WHERE YOUR JOURNEY ENDS! Glitches look cool in my opinion, but they’re not for everyone. If you chose to export your gif now, it’d look something like this:
STEP 6: GLITCH
So there are lots of different kinds of glitches out there, but for this gif I’m gonna use two glitches that are more subtle: minor distortion and brightening.
6.1 Minor distortion glitch
First, duplicate your smart object until there are 2 smart objects on your timeline. Select the duplicate smart object and choose a random point on your timeline to have the glitch effect start. Click and drag the start of your smart object to where you want the glitch to start.
Repeat this process for when you want the glitch to end. You can edit this later if you want, this is just to get a feel for the glitch.
Edit the smart filters for the duplicate layer to get rid of the “noise” layer, and set the gaussian blur layer to 1.0.
Next, I add a shear filter You can find this by going to filter -> distort -> shear. I know that I want the glitch to only affect the top part of the gif, so I make sure the shear filter is both subtle AND only affects the top half.
Then I free transform the layer. I’m using the “play” icon as my guideline, so I temporarily add a new layer and draw a line that hits the top of the icon.
I free transform the layer vertically to stretch it out, making sure to move the layer so that the top of the play icon hits the line. In this gif, I stretched it to about 130%.
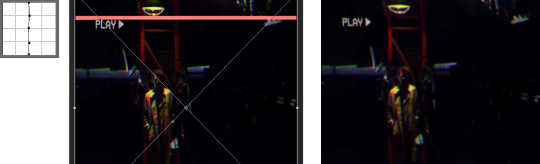
The right image is the result. Make sure to delete the guideline line you drew!
6.1.1. Animating the layer mask
The next step is ading a layer mask. Add a layer mask to the smart object, then unlink it by click the chain icon next to it. This’ll allow you to move the mask independently from the layer.
I know that I want the glitch to affect only the top half, so I mask out the entire layer except for the very top. I also feather the layer mask by 2px to make sure the transition isn’t too harsh.
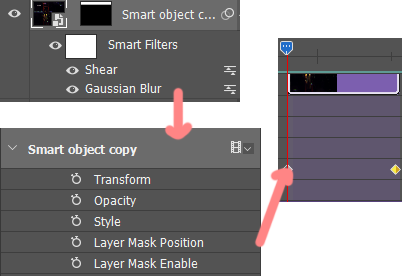
Next, click on the dropdown arrow next to the duplicate layer’s name on the timeline to reveal a menu. The relevant thingy here is “layer mask position.” Click on the stopwatch next to layer mask position to create your first keyframe: this is the start of your animation.
Next, go to the when you want your glitch to end and click on the DIAMOND left of the stopwatch to create the next keyframe. While having the new keyframe selected, click on your mask and drag it down to your desired location.
And that’s it! Fiddle around with the exact timing for it until it looks just right. You can drag the start and end of the duplicate layer to be longer and shorter, and you can drag the keyframes around as much as you wish.
For this gif, I also added a 0->50->100 opacity fade in AND fade out in order to make the effect appear a bit smoother. this works similarly to layer mask position, just with opacity instead.
You can also stop here if you wanted, however I felt my gif was a bit too boring still, so I added another glitch.
6.2 Brightening Glitch
For this brightening glitch I added an invert adjustment layer between the smart object and the overlay, then dragged it down to my desired length.

Then I set its blend mode to “divide”. This makes it so that it only brightens the gif. Next, I animated its opacity using keyframes. I set the invert layer to stretch 4 frames only, and set the keyframes to:
Frame 1: 35% opacity
Frame 2: 70% opacity
Frame 3: 70% opacity
Frame 4: 35% opacity
Aaaaaand that’s it! The finale result came out looking like this:
Thanks for reading my tutorial! I hope everything made sense. If not, feel free to come to my askbox and ask for any advice.
I wanna stress that this process is a result of both extreme trial and error and cobbling together multiple different tutorials that are usually only applied to still images — some of the terms and methods might not make sense to someone who’s a Photoshop genius, but I tried my best to make it as clear as possible.
#gif tutorial#ps tutorial#photoshop#completeresources#allresources#cowboycoven#eyestrain#glitch#blog
462 notes
·
View notes
Note
hello! i want to start making gifs, but i don't really know where to start. what are some programs you use and any tips?
hello hello ! ah amazing we can always use more content creators <3 i'll try to point you in the right direction to get started ! under the cut bc it's long:
⏤ my first app recommendation is 4k video downloader which will let you download videos in their highest quality from youtube. i recommend starting with content like music videos as they are usually available in 1080p (the minimum high quality you want - anything less and it can be really tough to get your gifs looking smooth) and up to 4k (pretty much the best quality you'll get), and it's easy to pick out shots you like to start messing around.
⏤ when i was first learning to gif, the only other app i used was photoshop. i started with a free trial to see if i would get the hang of it and now i pay for a monthly adobe subscription, but there are definitely cracked versions out there for download - you just have to find them (check the links at the bottom of this post) 👀
i honestly don't remember what tutorial specifically i followed to get the steps down, but here is one and here is another i found with a quick search that i think are good for a beginner. if those don't work for you, you can google "how to make gifs in photoshop" and you'll be able to find a ton and choose one that suits your learning style (i prefer written step-by-step, but if videos are easier for you, there are a lot of choices out there).
⏤ as far as coloring goes, it'll take time to figure out using adjustment layers and your own style. i really like this tutorial on how selective color works and remember using it when i was first starting. that same blog has a lot of other giffing resources you can look through, too: all ps tutorials
⏤ once i had the hang of just using ps, i learned how to use vapoursynth which is a python script program that will help you resize your gifs and keep them looping smoothly. it also can denoise and sharpen your gifs if you want. the reason i don't recommend starting with it is because i think it looks overwhelming at first, but once you get the hang of it, it's simple to use and makes a big difference especially when it comes to cropping. ultimately it's totally up to you if you want to try and learn it all up front or not.
this guide has all the information you'll need to install it depending on operating system, and also has guides for how to use it. it is MUCH harder to set up on a mac than windows, especially new macs, just fyi. if you are planning to gif ts files (for stage performance sets) you will need vapoursynth imo, but otherwise it's not at all a necessity, just a recommendation. i also used this tutorial to help me learn to use it.
general tumblr tips i wish i knew starting out:
⏤ the appropriate sizing for gifs on tumblr is as follows: your width should be 540px for one gif in a row, 268-268px for 2 gifs in a row, and 177-178-177px for a row of 3 (middle has to be 178 or it'll be blurry. i have no idea why. this site is insane). your length can be whatever you want but certain things just look better & if you aren't resizing in VS, then you're at the mercy of your videos dimensions when it comes to cropping them down.
⏤ the mb limit for gifs is 10 but if you're using beta post editor it's actually 9.5, and tumblr will compress the heck out of your gifs that are larger than 5mb, so just keep that in mind, i recommend only make bigger gifs with SUPER high quality videos.
other helpful resources:
⏤ this awesome post compiled by another wonderful cc friend here has links to programs and specific resources for hq kpop files
⏤ a helpful open network tag list to use for getting your gifs seen
i think that about covers it ... sorry this is a LOT of info but i hope it makes it easier to narrow down where to start. if there's anything else i can help you with, just let me know and i'll do my best !
#erimail#i hope this helps :<< pls let me know if there's anything i can explain better !#it can be overwhelming at first but if you really want to learn it's super fun and worthwhile so don't be discouraged#we're here to support you !#chuuchuutrainnn#gif help#.resource tag
26 notes
·
View notes
Note
hello! i absolutely adore your gifsets and you've honestly inspired me to start gifmaking. may i ask for any tips you may for gifmaking or what programs to use for a beginner gifmaker?
ty so much that’s so sweet 😭 but honestly i'm just winging it skjfnkj i open photoshop and simply hope for the best! there's a few good tutorials floating around tumblr (this one has some good basic information, including how to sharpen, etc)
(if you have no experience with photoshop at all i would highly recommend going to youtube and watching a couple of videos covering the basics/explaining what every tool in order to familiarize yourself! it can be overwhelming (or it was for me, at least) in the beginning, and until you find your rhythm, it will really help to have a reference.)
my personal process is using potplayer to get screencaps to make gifs. this is how i first learned and i started doing it again at the end of last year because my other method (cutting clips from videos then importing into photoshop that way) always felt a little dull/fuzzy and personally i think screencaps provide a clearer image! but! you can work with straight video if you're patient + good at ps. i am neither
my steps:
open potplayer (download here)
get to the part of the video you want to cap. pause it, then hit control + g on your keyboard to bring up the screencapture menu. i have a folder just called "potplayer" where my caps go. my settings:

("10,000" is just so i make sure i get all the caps i want. i hit stop once it's moved past what i want to gif on screen.)
open photoshop
file > scripts > load files into stack. this can take a while depending on how many frames you're loading in at once. when it's done, go to window > timeline > create frame animation. in the corner of the timeline box will be four horizontal bars; click on it, and use make frames from layers, then hit reverse.
this is where i start editing. first, i crop; make sure you're cropping to tumblr dimensions, i.e. 540px for a single column, 268px for two. (i never put three gifs side by side, and i can’t seem to find an up-to-date post that confirms the size for it, but i think it’s 178px, if you’re curious). my most common ratios are 540x540, 540x500, 540x338, 540x304. depends on the scene, what i'm giffing, if there's dialogue, etc. for a lot of my dialogue sets, like here, i use 540x338; for these john-117 gifs, i used 540x540. it’s all about what looks best to you, what you want to achieve, etc. i never use 540x540 for dialogue, i reserve it for movie sets or just “x as y” sets.
next comes coloring, which is the most painful part of the process. most of the time i really just spam color balance because i’m a mess, but it’s what works for me since i prefer vibrancy for gifs. it can help you change colors and create nice sets like these when used alongside selective color; you can either enhance what’s already there, or change the colors entirely. take, for example, this john set: there were some nice colors to work with already:

i didn’t have to add too many adjustment layers to make it vibrant!
the purple john set required a little more work (and the purple adjustment layer was gifted to me by @aldensutton because i suck at making purple in ps, it always turns pink)

it really just comes down to practice and finding what works for you/what you’re giffing. here and here are two tutorials you can use as starting places from people who seem to know a lot more than me. googling “giffing coloring tutorials for photoshop tumblr” will bring up more. you can also find premade psds across various photoshop blogs on tumblr; i make all of mine myself these days, but i used to use a lot from this creator as bases. searching any kind of “free psd” “gif psd” should yield some good results in the tumblr search - just remember you will need to manipulate them regardless for what you’re giffing. no two shows are alike. no two scenes from a single show are alike. this is where it can become really frustrating.
once you’re satisfied with your coloring, though, it’s time to sharpen. the first tutorial i linked goes a little bit into the basics of how to sharpen, but it’s not my method, which is inconsistent and different for every gif. i don’t know about other people, but i just sharpen the frames, not the adjustment layers, which is probably dumb but <3 to sharpen, you go to the same menu you used when creating frames from layers. choose “convert to video timeline”, then select all the frames of the gif, group them using ctrl+g, then convert to smart object, then go to filter > sharpen > smart sharpen. my base sharpening is always 500 for amount, 0.3 for radius, and 0 for reduce noise. sometimes i double up on 500, sometimes i sharpen again at just 200 or 150, depending on what looks best. there’s also this method that i like for certain gifs. sharpening is very important for giffing.
for some gifs i will add noise, but that depends on my personal preference and isn’t something i’ll get into since it’s not standard/is just a personal aesthetic i enjoy.
i suppose i should mention that for dialogue, you select text tool then click in the left-hand corner, then drag to create a box that your text will show up in. it’s the easiest way to center/ensure text aligns on all frames. all you have to do is lower it to the bottom half of the gif. my font preference is arial rounded mt bold; font size depends on the size of the gif.
once everything is cropped, colored, and sharpen, you save by going to file > export > save for web. my export settings change somewhat from from gif to gif:

and that’s pretty much it! at least for what i can offer. i learned just by doing, trying things out, getting frustrated, etc... sknfkj i also get a LOT of help from @aldensutton as i mentioned before, she provides a lot of insight and opinions for me, and has really helped me to where i am now <3 it just takes a lot of trial and error to find what works best for you. it took me a while to get to where i am now; i feel like the gifs i was making just a year ago are so terrible, honestly. i can try to help further if you need it, there’s undoubtedly some things i missed, and there’s tons of blogs on tumblr that provide photoshop help, run by people far more knowledgeable than me! once again ty so much for the compliment <33 i hope you have fun gifmaking! it really is fun for me
10 notes
·
View notes
Photo

For the anon who asked if I had a tutorial on how I make gifs! I made one that covers just about everything about my gif-making process 💖
A summary of things included in this tutorial:
How to rip videos from nearly everywhere
How to make a basic gif using videos
How to slow down a gif
How to color gifs

Stuff you need:
Windows 10 (for the built-in screen-recording program*) / Xbox Game Bar
Photoshop CS6 or higher
VLC Media Player
PC/laptop
*I like to use the Xbox game bar because it's straightforward and doesn't require any technical shit to make it work. It's plug and play! But if you don't have this, here are some alternatives:
OBS Studio - used for streaming and screen recording, free and open source! lots of tutorials on Youtube for beginners
VLC Media Player - all purpose media player and Youtube video-ripper, also free and open source
You’re gonna have to look elsewhere for OBS and VLC tutorials but they're not terribly hard to get used to. It's just gonna take a little extra work to make gifs that way.
I. Get a video of the thing you want to gif
High quality vids make high quality gifs so I like to source them directly from HD/Bluray digital copies as much as possible. This is how I do it 90% of the time:
1. Open the source video in my media player (I use VLC)
2. Open the Xbox Game Bar
3. Record a short clip from the source vid
I prefer to do this because it's easier to work on a short clip with a small file size in Photoshop.
If I can't download the videos, I rely on screen-recording from wherever it's available (Youtube, Streamable, Twitter, Instagram, etc.). Any video that can play in a browser is fair game.
How to use the Xbox Game Bar to record your screen
you don't need a microsoft or xbox account to use it
can record videos from media players and almost any video that plays in a web browser (not sure if this works with Netflix on a browser though)
How to use VLC Media Player to rip videos directly from Youtube
doesn't always work but it allows you to find the exact address of a Youtube vid and save it on your PC like you would with pictures
most videos aren't high quality when ripped like this but when I got nothing else to rip from, I can't be choosy ¯\_(ツ)_/¯
II. Make a standard gif file
youtube
1. Open PS. Drag/drop your video in PS. The 'Timeline' window should appear on your workspace. If it doesn’t, go to Window > check 'Timeline' near the bottom of the menu
2. Make a new file with the usual tumblr dimensions (Width: 540px for 1 column posts/ 268-268px for 2/ 177-178-177px for 3, Height: up to you)
3. Drag and drop the vid in the new file then close the video file.
4. On your new file in the Timeline window, click on 'Create Video Timeline'
5. In the Layers window, right-click on the video layer and select 'Convert to Smart Object'
6. Resize the video.
7. You can move the start/end bars on the Timeline so it only includes the part of the clip you want to gif. Skip this step for now if you plan to change the speed of your gif.
8. Save your new file. You don't have to keep the PSD and source video in the same folder but I recommend you do.
III. Adjust the speed
youtube
1. Double click exactly on the thumbnail graphic of the video layer--not the layer name or the gray area around it! It should open a new window with 'Layer 1.psb' as the filename.
2. Right-click on this video's Timeline. It should show a small tab that allows you to change the speed of your gif. 60-70% gives it a noticeable slow-mo effect.
3. Since we slowed the clip down, we have to lengthen it. Drag the arrow at end of it all the way to the right until the you can't extend it further.
4. Press ctrl + s to save the changes in 'Layer 1.psb' and then close that window for now.
5. Go back to your main file (LALO 01.psd in my example) and adjust the length of the clip on this Timeline like you did on 'Layer 1.psb'.
6. Readjust the start/end bars on the Timeline so they line up with the part you want to gif.
III. Make it pretty
youtube
There is one effect that makes a gif instantly prettier and that is Smart Sharpen. Look for 'Filter' on the top menus. Click on the video layer, click on Filter > Sharpen > Smart Sharpen.
If the scene you clipped is well-lit and if you are not doing anything fancy, this might be all you need to do. But if not, you can find every tool for color adjustment in the Layers window:

These are the ones I use often:
For adjusting brightness/contrast: Levels and Selective Color
For color correction: Color Balance, Selective Color, Photo Filter and Vibrance
For cleaning up artifacts and reducing noise in nighttime/dark scenes: I use Selective Color and turn up the black anywhere from +5 to +15
IV. Save the gif
youtube
I usually do a bunch of tweaks here and there before I save the final gif. I go back to adjust the speed, to recolor or change the length of the gif, whatever I feel needs retouching.
1. Press Alt + Shift + Ctrl + S all at the same time or click File > Export > Save For Web.
2. I use these settings:
3. Check that the file size doesn't exceed 10mb
4. Click ‘Save’. And we’re done!

#my gifs#photoshop#photoshop tutorial#gif tutorial#tutorials#might as well tag this#better call saul#breaking bad#brba bcs gifs#my tutorials
213 notes
·
View notes
Note
I've been wanting to this but I've been too shy for too long hahahaha
I've been making verivery content for a while but I really want to improve my gif sets, and your gifs are mighty beautiful TT_TT may I ask for advice? Like do you use your laptop or your phone? Do you use photoshop??
oh feel free to ask me anything ! :D and yes of course ! gifmaking is actually fairly complex on tumblr ;-; so i'll try my best to include the basics and all the important stuff !
for gifmaking i use photoshop 2018 and so i use a laptop >.< i’ve seen a lot of asks where people ask about what apps gifmakers use... and to put it nicely ... there is no easy way to get nice gifs T-T the reason gifmakers on tumblr have such nice gifs, is bc there’s a lot of patience, learning, and practice involved in creating gifs for this platform... you can’t just plug in a video clip to a gif converter and expect it to spit out an hd gif for you ... unfortunately ...
before beginning i’ll recommend this tutorial ! it’s the tutorial i used when i was first learning... and my best advice is to have lots of patience ;;;; tumblr is a hard platform to make gifs for and learning how to make nice gifs will not happen overnight
Photoshop and other resources
i personally downloaded ps 2018 and that works fine for me but i’ve noticed that ps cs5 or earlier tends to have a broken ‘import frames to layers’ action so i’d suggest newer versions for gifmaking ! to download i basically looked up youtube videos and checked comments to make sure the tutorials actually worked,,, but if you want you can try these posts ! (1, 2) i’m not sure if they work but usually there’s a lot of posts made on tumblr + other sites for downloading it for free !
About video processing programs
i also use avisynth to process my frames... this might be a really complex bit to learn and it’s not 100% necessary so i’d say you can skip over it when you’re first learning photoshop and everything but if you are interested ! basically programs like avisynth and vapoursynth reduce the video file size down to tumblr’s preferred image size without reducing the quality as much as resizing in photoshop does :o ! additionally it helps process torrents (these are the ts and tp files for live performance stages that are super hd !) but again it’s somewhat complicated i’d recommend this tutorial for download and use if you ever want to ! (vapoursynth additionally has sharpening and denoising options, but since i’ve never used vs it’d be easier to look up a vs tutorial than to ask me >.<)
Where to get videos
this part is CRITICAL !! for gifmaking,,, you could be the best gifmaker on this whole site but if you have a video with poor quality... no matter what,,, your gifs will not come out nicely T-T so when downloading any vlives or youtube videos, they should be at least 1080p in quality ! or as high quality as possible ! this is bc you need to reduce the file size down by a lot for tumblr’s dimensions and this means you need the best quality :o ! i typically just screenrecord videos these days bc downloading whole hour long vlives / long youtube videos is a strain on my laptop hhh ;;; for live perfo stages you should always download torrents to use but this means you need video processing programs like i said above >.< there’s a resource here to help find them !
these are the basic tools you’ll need hhhh there’s a lot more including sizing, sharpening, coloring, frame rate delay, exporting, saving, etc... and i don’t want to make this too long but !
essentially tumblr has size dimension restrictions for image files, a pixel too big or too small will cause tumblr to stretch or compress your gifs making them blurry... the dimensions are optimally:
a.) 540pixels (width) for one gif in a row
b.) 268pixels (width) for two gifs in a row
c.) 177pixels / 178pixels / 177pixels for three gifs in a row
for sharpening many people use topaz etc. and i’ll point you to other tutorials if you want to use it but tbh ! i use photoshop’s smart sharpen options and those work just fine for me... (plus topaz takes forever to render and i h8 its guts so)
coloring - okay so this is probably THE MOST time consuming part for gifs for me.... idk if you’ve noticed but lots of times, gifmakers’ gifs have pretty colors and nice lighting when you compare to the original video ! that’s bc we add layer adjustments in photoshop to make them look nice ! these include brightness, saturation, exposure, vibrancy, etc. but knowing how to use adjustments is a whole post on its own >.< there’s lots of coloring tutorials out there as well if you want me to direct you to them !
for frame rate delay, i use 0.05 seconds for 30fps (so your normal videos) and 0.03 for 60fps (if none of that made sense that’s okie ! it’s just basically how fast you set frames to play in your gif !)
when exporting - tumblr has a 10mb gif limit but honestly anything above 8mb starts making me anxious or takes too long to load .... so most my gifs are like ... 3-7mb only
but yea these are just some basic tips and stuff ?? i’m sorry it took me so long to respond and it wasn’t as nicely organized as it could be... there are a lot of really good gif tutorials out there ! you just have to look a little ! if you have any additional questions tho feel free to let me know ! i just didn’t have the heart to type out the literal process i have to go through everyday when making just one gif :p i’m sure a lot of gifmakers can relate haha,,,, happy gifmaking !~
#one day when i'm about to d*e i will release a comprehensive gif tutorial#but for now .... even i am astounded still on how much work making content is sigh#me and my cc moots should be getting paid .... ngl T_T#bonknanab#asks#🌱.text#resources#the way this doesn't even go over sharpening all that well sigh ....#there's just so much#and sorry if this sounds?? like salty in any way LMAO#idk how many times i've seen asks where people are like ??? what app do you use on your phone#and bro .... there is no app it is all my blood sweat tears and avisynth#like the frustration i feel#when people repost and are like ? what's up it's just a video anyone could make gifs#and i'm like ??? then make your own and stop reposting mine ???#sigh#anyway i hope this was helpful ;;;;#i've been gifmaking for a while and even now i'm like ... but do my gifs actually look ok#or am i making it up in my head and they're ugly ;((#fjhdgkfjghdkf#do people even want to hear gif things from me LOL
18 notes
·
View notes
Text
gif tutorial ✨🎥
I got a few requests to make a gif tutorial so here it is. hope it helps :) It’s quite long so I’ll put it all under a read more. If you have any questions, feel free to ask or PM me directly for help!
Alright....sooo, I don’t remember the last time I made a gif tutorial on this site, but I figured I would even though I use the same method a lot of gif makers have been using for years. I have never strayed from this process and I’ve been making gifs on this site for a decade.
There are a couple methods to making gifs. You can import your video directly into photoshop and cut your gif there. OR you can use a separate video player that has a screencapping tool, then import all your frames into photoshop; this is the method I use and it’s how I’ve adapted and perfected my giffing skills over time.
This post will be long, but I want to be as detailed as I can and explain it step by step. It’s really NOT difficult once you get the hang of it, which is probably why I’ve always done it this way.
Disclaimer: There are three programs I use and I highly suggest you look for reliable links yourself if I’m not able to provide one. I use pretty old versions of KMPlayer and Photoshop (I’ll explain why later), so be careful where you go looking for downloads. There are some photoshop downloads here, but I can’t vouch for them.
Let’s start :)
DOWNLOADING VIDEOS
I use a program called 4k Video Downloader to rip HD videos from Youtube. 1080p is the way to go, but obviously that’s not always possible. It’s ridiculously easy, all you do is click the “Paste Link” button and it’ll download your video. Clicking the “Smart Mode” button will let you set the default quality and the folder you want all your videos to be saved to.
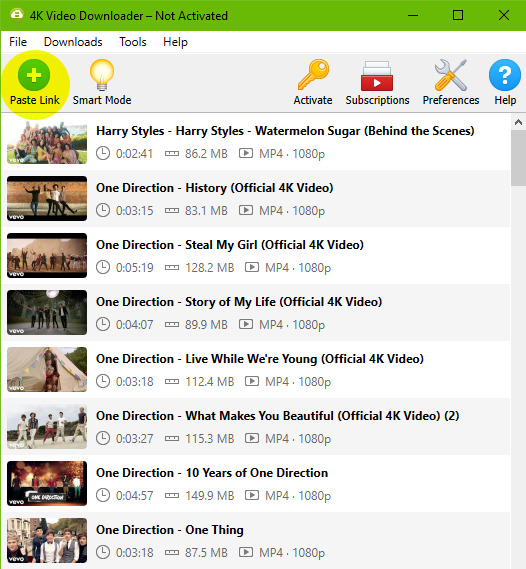
As you can see, here are all the videos I’ve downloaded recently for my gif posts. You can clear this download history list at any time.
SCREENCAPPING
After your video is done downloading, I open the video in KMPlayer. Now, I use an OLD version of this program because this was exactly how I learned to do this back in the day. You can find old versions online, I don’t really know exactly which version mine is because I’ve had it forever, but it’s the old school one that looks like this.
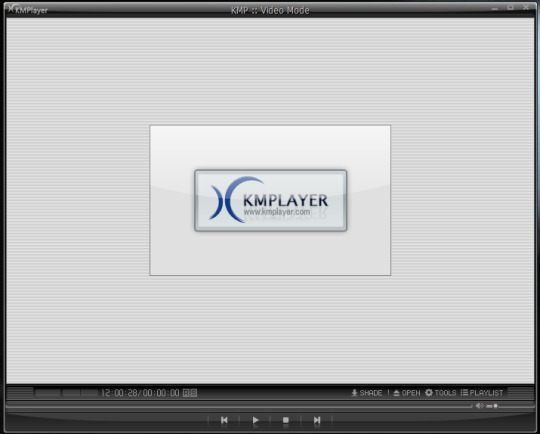
When you open the video, it might stretch the player to full screen so I always adjust it by dragging the corner of the player inward so it shrinks to a more medium size. This will also make your screencaps not so GIANT, which will take longer to load into photoshop.
Anyways, you’re gonna open your video and right click anywhere on the video to select Capture > Frame Extract... (or Ctrl+G on Windows). This window will come up. Make sure all your settings look like this to ensure a really smooth gif.

The first thing you should do is click that little “G” button next to the window size at the bottom. That’ll lock in the dimensions of however big you’ve made your video window, and if you stretch it you’ll see these numbers change. If you start capping without remembering to push that and you make your window smaller/bigger, your caps might be a wacky size or look stretched and you’ll have to go back and do it again. Also note the extracting location at the top. All your caps will go directly to a default folder titled “Capture”.
Once all the settings are ready, go to your desired section of the video, pause it, and hit “Start”. Play the video, pause the video when you’ve got all your caps, then hit “Stop”.
Locate your “Capture” folder and doublecheck you got all the caps you want. This is where I take a moment to delete any caps I don’t want in my gif, that way you don’t bother loading them into photoshop and making it take longer than it needs to.
MAKING THE GIF
You’re gonna open whatever version of Photoshop you’re using. I hilariously still use CS3 to make gifs because the next script I’m gonna run doesn’t work in the free download that I have of CS5, but that’s what you get sometimes when you don’t pay for stuff. Hopefully whatever more recent version of PS you use, you have no problems.
Go to File > Scripts > Load Files Into Stack...
This window will come up.
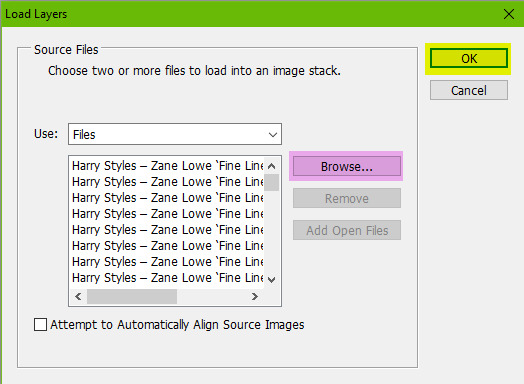
Hit “Browse” and locate your capture folder. Highlight all your caps and press OK. You’ll see them all come up in a list as shown above. Press OK again. Your caps will start to load into one big stack of layers. This will take a minute or so.
When it’s all loaded in, you’ll see them all stacked in your Layers window (Windows > Layers). You’re gonna open your animations timeline (Windows > Animation) and click the little drop down button in the top right corner of the window and select “Make Frames From Layers”.
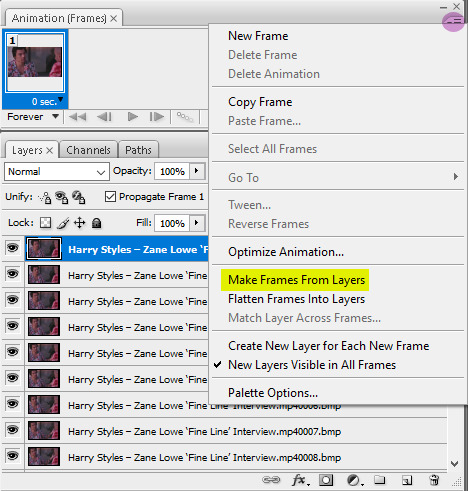
Click that drop down menu again and hit “Reverse Frames”. Click that drop down menu again and hit “Flatten Frames Into Layers” (this is so our sharpening action will work later). Click the drop down menu again and select “Select All Frames”. All your frames will be highlighted. This is where you’ll set your animation speed. Under each frame you’ll see “0 sec.” Click on that and select “Other”. Type in your desired speed. I usually go for 0.04 if it has a lot of frames. For less frames, 0.05 or 0.06. This is honestly entirely up to your preference. I actually made myself a photoshop action doing all these repetitive steps so it saves me a few precious long seconds of clicking around over and over. I just run the action after my caps are loaded. If you make gifs a lot, I recommend it.
Next it cropping. The reason I don’t crop right away after the files are loaded into a stack is because I like to see where the subject in the gif moves before I decide where I need to crop. I don’t want to accidentally cut anything off. The subject might sway in and out of frame or be off center if I crop it blindly before seeing exactly where the object moves around. So I’ll play the gif first to see exactly where to crop.
Anyways, you’re gonna set your desired width x height of your gif. I’m making this a big gif so you can see the details better. 540 px is Tumblr’s width for big horizontal gifs. If you’re making a photoset with two gifs side by side the width for Tumblr is 268 px.
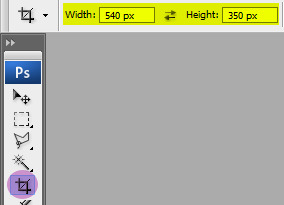
Go ahead and crop your gif. It’ll resize itself as well. Play the gif back so you can see if anything gets cut off or it’s not where you want it. You can undo the crop and do it again until you’re satisfied.
Here is what my gif looks like animated and cropped.

As you can see, it plays nice and smoothly due to our screencap settings from before in KMPlayer and with our set gif speed (I used 0.05 here).
Next is sharpening the gif. I use a sharpening action that can quickly sharpen up to 120 frames. You can download it here. Open the action by going to File > Open and locating the file. It’ll be added to your Actions window. (Window > Actions if you can’t see it.) In order for it to run correctly, you have to have the first frame selected on your animation window, as well as “Frame 1″ in the layers window. Just like this:
Click the play button on the action and wait a few seconds for all the gifs to finish being sharpened. For any gif with less than 120 frames (which I hope is always, good God) a pop-up will come up when it reaches the end of the frames asking you if you want to stop. Click “Stop”.
Tip: If you think you want to delete more frames, run the sharpening action before you do it. Otherwise you’ll have to flatten your frames into layers again. The first frame and the “Frame 1″ layer should always be the same (the little eye will appear to the left of the layer to let you know it’s visible when you have that specific frame selected) otherwise the action won’t work.
Here is what my gif looks like now that it’s sharpened.
COLORING THE GIF
This is where all the fun (or pain) comes in. All your coloring will be done by using Adjustment Layers (Layers > New Adjustment Layer). I usually go in the same order of adjustments, but this is where personal style comes in and you do no have to do it in the same order I do. You can practice with this part all you want and see how you like to do it.
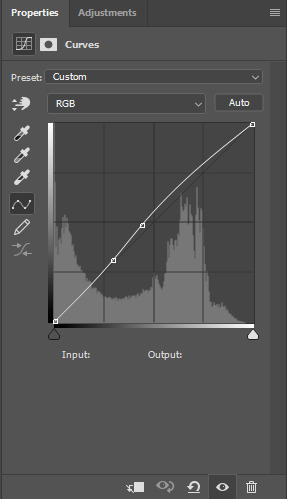
I start with brightening the gif first and fixing the white balance if a scene needs it. I chose this video specifically so you could see this next handy trick that a lot of people don’t even know about. It’s a dark scene and the white balance makes the subject look quite blue.
I can fix this by starting with a Curves layer. By clicking the third eyedropper tool, you can go and click on a white point in your gif (in this case, I clicked on a white square on his shirt) and bumped up the input number a bit for a little contrast (optional). My curves look like this. Click OK.
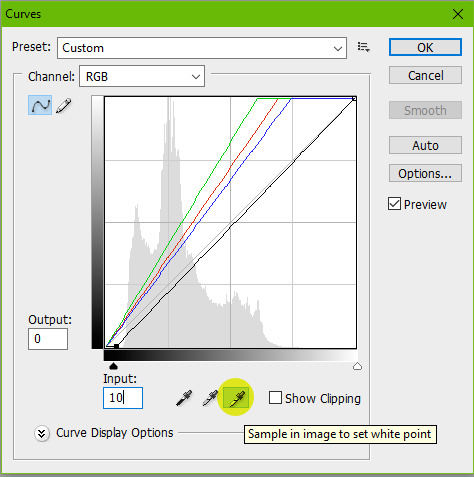
My gif now looks like this.

It’s much better, right? The white eyedropper tool will become a lifesaver sometimes, but it’s not always needed.
Next, I go in with a Levels adjustment to do some more brightening. This is all up to preference, but you can play around with this. I typically like to add more contrast with this layer. I just adjust the sliders until I’m satisfied.
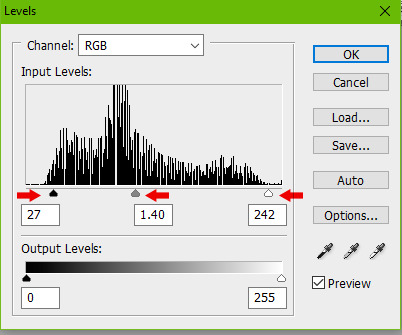
Here is my gif now.
Onto yet another brightening layer. Brightness/Contrast. A couple teeny tiny more positive numbers and I now have this.
Next is Selective Color. I wish I could explain this in a way that makes sense, but this is the layer that takes a bit of practice getting down and boils down to how you like the colors in your gif to look. I personally don’t like a lot of yellow in mine, so I focus a lot on the Yellow and Black sliders in each specific tab. I start in the Reds, then Yellows, Whites, Neutrals, then bump up the Blacks a tiny bit.
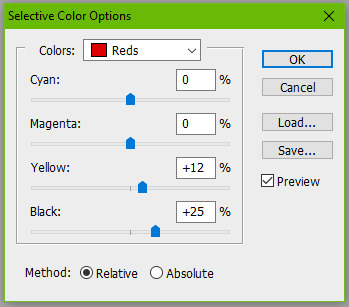
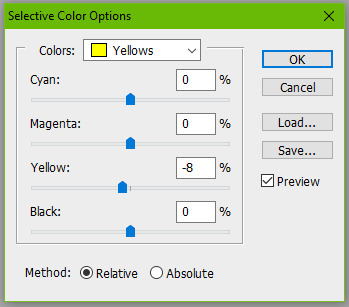

Here is my gif now. It’s a bit more cool toned, which is what I like.
Next I’ll go in with a Color Balance layer and play with the Midtones and Shadows.
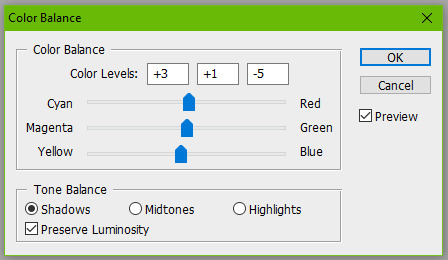
Here it is now.
This is usually my last step unless I want to adjust the brightness again (which I do), so I might go back into my Curves and Levels layers to bump it up.
And you can totally stop there, but I would like to mention a few more optional layers to add depending on your gif. If I wanted more saturation, I would add a Hue/Saturation layer at this point, but I think it’s colorful enough so I’m not going to.
Another layer you can use is Gradient Maps.
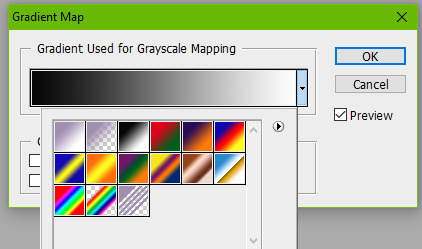
Setting a black and white gradient map overtop your gif and setting the layer to Soft Light and lowering the opacity to your heart’s desire (you might need to go to the little drop down menu in your animation timeline and hit “Match Layers Across Frames”) can give your gif a very contrast-y look like this.
Or you can change the black color to something else for a different tone, like a dark blue.
Here is my final gif.
If you want to add a caption to your gif, you can do so with your font of choice (Arial and Calibri are good) and add Stroke or a Drop Shadow to it by going to Layer > Layer Style. You can make sure the text is perfectly centered by clicking on your top frame layer under all your coloring adjustments, hitting Select > All, then clicking your text layer again and going to Layer > Align Layers To Selection > Horizontal Centers. Then hit Select > Deselect and go to your little drop down menu in your animation timeline and click “Match Layers Across Frames”.
Here is what it looks like with a caption.
SAVING YOUR GIF
Go to File > Save for Web & Devices...
A big window will come up where you can preview your finished gif by pressing the play button on the right hand side. In the bottom left corner will tell you what size your gif is. Tumblr’s gif limit is a whopping 10 MB, so we’re good.
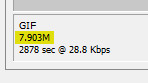
Your gif settings should look something like this.
We always want to keep all colors at 256 (the highest). Lowering this number will make our gif file size smaller, but also decrease the quality of the gif itself. If your file size is more than 10 MB, I recommend going back and deleting some frames or making some more curve adjustments. Some users also like to set their gif to “Adaptive” instead of “Selective”. This is up to you.
Click Save and you’re done!
#this took me all day and half the gifs dont even move when you view this post on my desktop theme#LOVE THAT#please view this on the mobile view
221 notes
·
View notes
Note
hi ngoc! how do you make your wonderful gifs? i wanna learn from my favorite gif blog owo
hi hi! sorry this is late but thank you so much ;-; idk how you want me to answer this but i’ll try to make this detailed as possible and try to explain what my thought process is!
programs/sites that i use:
photoshop cc 2020: i have a mac and this is how i dl’ed ps. this is essential and you can make gifs with just ps but i use other programs it easier for me and to make the process faster
vapoursynth: this is what i use to cut, resize, denoise, and sharpen. i rely on vps heavily
4k video downloader: used to dl youtube videos (i use the free version
twitter video download: to dl twitter videos
naver vlive: to dl vlives
kpop24hrs, 4sashi, twitter and more for .ts files
process:
i’m going to assume you know how to make gifs? so i will just explain what it is that i do, if not, follow this tutorial if you are a beginner :D
i find the video that i want then dl it before finding the timestamp that i want and entering that into vps; these are my usual settings

i prefer my gifs to have a nice balance of sharpness and smoothness. i dont like oversharpened or overly smooth gifs where lines aren’t defined so my finesharp is always half the amount of my knlm filter. this is for regular high definition youtube videos tho! for performance gifs, i use a different setting

as you can see the knlm filter is much higher and this is bc most performance stages are filled with so many colors and that’s a nightmare for ps and denoising it much further will help the quality of your gifs. another thing is the addition of the first line which is used for .ts files which are interlaced
although i said these are my usual settings, every video is different with lighting and quality so i always play it by ear. i tweak my settings to what fits the video best
next step is to run it through the vps editor and import it into ps
as soon as i have it in ps, i change the frame delay either from 0.03 to 0.04 or from 0.4 to 0.5. for performance gifs, i go from 0.02 to 0.3 most of the time

it’s up to your preference but i think 0.3 is too fast. more often than not, i just increase the frame delay by 0.01 and it makes it look so much better! timing also plays a huge part in improving your gif quality
next thing is to color! everyone’s coloring is different and catered to their own preferences but for me, i prefer warm tones with magentas, reds, and yellows. i also add a lot more contrast (this makes your gif much more hd), darken the lighting, and make it more vibrant


i won’t go into detail about how i color (then this would be too long) but i can definitely make another post about coloring if you would like!) i think we can both agree the second gif looks a LOT better

these are the layers i use every single time; you can say this is my base psd but i dont save psds because i use the same layers but with different settings each time. i prefer to color every set than have a designated psd bc every video is different and psds usually work for one video only
last but not least, time to export the gif. export settings can also help improve the quality of your gifs. when i first started, i researched a lot on what export settings were the best. i have tried pattern before but im not a big fan of it. i use selective + diffusion. if you want more info on export settings, i suggest this post (this is what i used when i started)


after all that is done, upload to tumblr dot com and hope for the best
i hope this helped you out in some way 💖
23 notes
·
View notes
Note
So 👀 you have inspired me to think about making gifs and/or edits 👀 and I don’t know shit about either. Care to throw some tips at ya girl? 👀 I ain’t even know what the first gah damn step is
I’m really flattered that I’ve inspired you 🥺 I’d be happy to help you get started!
HOW I MAKE A GIF 101:

1. The first step is acquiring the software needed to create gifs—which means you need Photoshop. I use Photoshop CC and it costs $10 a month with the plan I have. There’s also cracked versions available, but from what I hear they might not be as reliable at times and can be buggier. It’s up to you if you want the cracked or legitimate version. Either way I’m not judging you 😂
2. Gifs are made from video footage, so to begin the process you’ll need footage on your computer. The higher the quality the better. Since I make gaming edits, I record from my PS4 using the share button. I privately upload onto youtube and download them onto my computer. I can also plug a flashdrive into my PS4, but I don’t have a decent one. If the footage is captured on my computer then I don’t have to go through the hassle. You might a screen recording software. I have a PC and with windows 10 I can record by pressing the windows key, alt, and R.
When you have those two things, you’re ready to make a gif! Here are the actual steps to my process. (please note, this is just a tutorial on how to make a basic gif. I’m not going in-depth on my coloring processes and what filters I use and such.)
(I apologize for my screenshots being the best 😖)
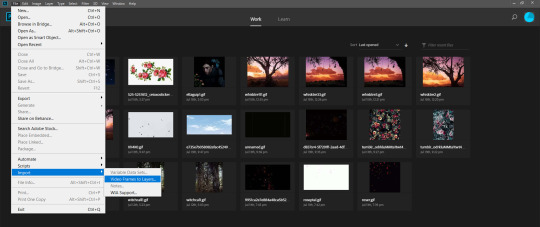
The first thing you do once you open PS is to go to File, and then from the drop-down menu click Import, and from there Video Frames to Layers. So what we’re doing here is opening up the footage in PS and loading it into frames. Next, a file explorer window will pop up.
(Yes laugh. I have a folder for heart memes and Arthur. Mind your own business 😂)
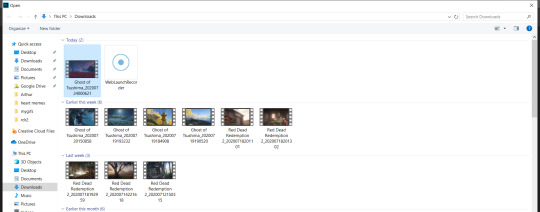
So since I download my uploads off of youtube, they are stored in my downloads folder, so I go there to find them and select the clip I want. For today’s example I’ll do a clip from Ghost of Tsushima. Click open.
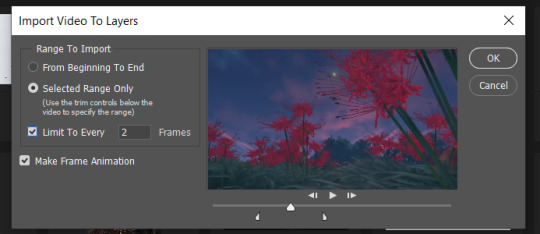
This will be your next screen. Here it’s asking to select a range from which to make layers. You’ll notice two beginning and ending slider bars you can use to crop between what part of the video you want to gif. Also note the setting I have of limiting to every 2 frames. Click OK.

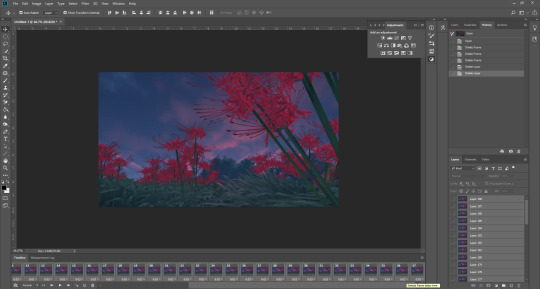
Once that loads, your screen should look like this. If it doesn’t, go to the Window tab in the header bar above and make sure Adjustments, History, Layers, and Timeline are checked off. You can customize your workspace layout however you wish.
So now you have a timeline bar that let’s you play through the frames. Make sure on the bottom left you change Once to Forever. This controls how much the timeline will loop. During my process I play through it and look for where I actually want my gif to start and end, so I do delete frames as needed. When I’m satisfied with the range, I select all of my frames (there’s a short cut in the hamburger menu ≡ up to the right of the timeline bar, click it and find select all frames) and I select all of my layers in the layers window on the right (click first frame and hold the shift key until you select the last frame).
With everything selected, I now change the frame delay. If you notice on the bottom on each individual frame there’s a decimal number and a downwards arrow. This is the time that elapses before the next frame plays and so on and so forth. I click that arrow and a menu will pop up. Typically, most gifs have a frame delay of 0.05, but I personally find that too fast for game gifs so I set mine to 0.07. Again, everyone is different, you use what works for you. Anyways if you want to set the delay to 0.05 click Other... from that menu.


Then just type in the amount you want and click OK.
Now it’s time for the real work to begin. On the bottom left of your timeline panel, click square with the icon of a stack of bars with a slider. This will convert the gif into a video timeline.

Shit’s gonna look like this now ^
Next, go to the Filter menu from the header bar and select Covert to Smart Filters
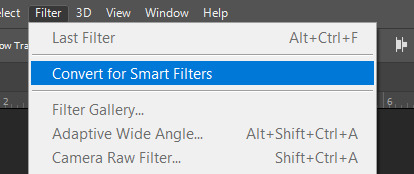
Once it’s converted, go back to the Filter menu and go to Sharpen.

Select Smart Sharpen.
A new window will pop up.

Everyone uses different settings, but I typically go with Amount at 500% and Radius at 0.3. This is something you can experiment with, each gif may require different levels of sharpening. I know 150% is another popular option for the amount. Choose whatever you think looks best and makes the image clearer. Sharpening is a very important step.
Now, you’re free to experiment with coloring using the adjustments panel. I’ll typically tinker around with Brightness/Contrast, Levels, Curves, Vibrance, Color Balance, Photo Filter, and Selective Color. I do all of my colorings from scratch and just go by what I think looks good, trusting my eye. Once you’re satisfied with how everything turned out, here’s the next step:
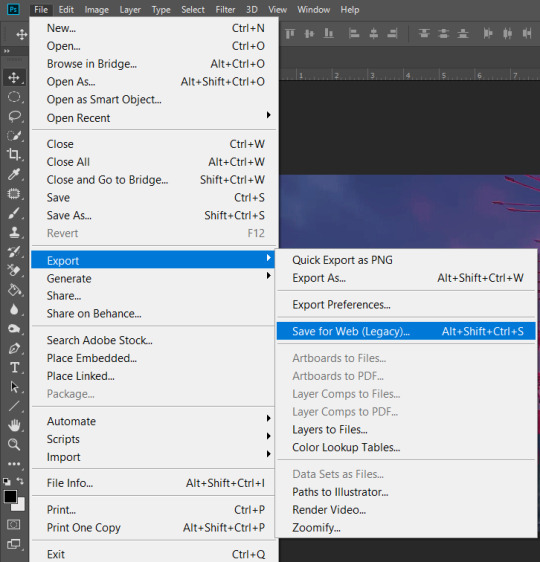
Go to the File menu, choose Export, and then Save for Web (Legacy).
Now comes the waiting. You can resize the gif before this step by going to the Image menu on top, and then Image size, and type in the dimensions you want. I personally don’t do this because it creates a transparent border around the gif? and it fucks with the specific filters I frequently use and makes it turn out ugly? So that’s why this step takes time for it load.
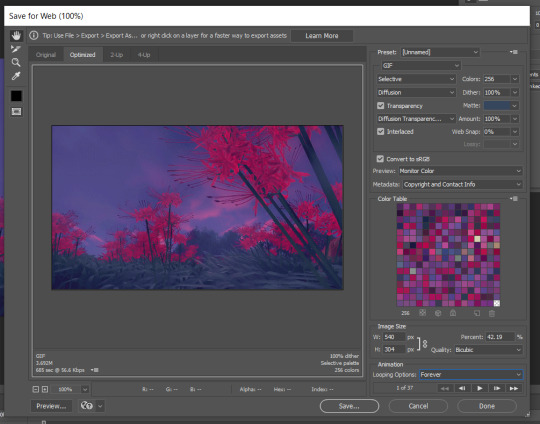
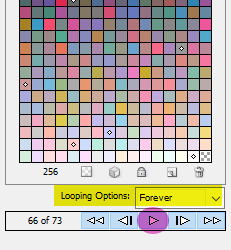
In the Image Size box here I type in the dimensions I want. Usually I always do a width of 540, your typical rectangular gif. Hit enter and it will start to resize again. Please note that the Animation box I have the Looping Option set to Forever. That’s very important. Again, everyone is gonna use different settings here based on what they think looks best. I use Quality: Bicubic, Selective coloring and Diffusion dithering. Some people using Pattern dithering and Adaptive coloring.
Once your gif is all ready you can click save. This window will also tell you the size of the gif in that left corner. And that’s it. That’s how you make a gif.
It’s a trial and error process and it takes so much practice. You’re gonna get frustrated, it’s gonna take awhile to learn your way around photoshop, and you’re gonna have to look things up sometimes. There’s many great resource blogs on tumblr for this as well, but for the most part I learned by doing and experimenting.
I know this was long but I hope I explained the process well? Feel free to shoot me more questions if not, I’m always down to help out with this.
Good luck! ♥
24 notes
·
View notes
Photo
hello hello so i’m no expert in graphic designing, making edits, whatever you wanna call it, but i thought i’d share some tips on how you can start!
please note that this is just a very broad guide & not everything mentioned has to be followed, it’s your own journey ✨
*i am speaking from personal experience and every designer has their own style & method on how they work
INSPIRATION:
tumblr’s a very creative platform and there’s a ton of incredible works out there that can spark inspiration! if we’re sticking strictly to tumblr, i like to dig around the following tags:
#army gfx: self explanatory, but content created by bts’ army
#bts gfx or btsgfx: interchangeable to the previous one, but it doesn’t hurt to go through a second tag. the second is a blog that’s dedicated to reblogging content under that tag (makes for easier tracking on the newest posts)
#carat gfx or caratgfx: content created by seventeen’s carat & a blog that’s dedicated to reblogging content under that tag
#svt gfx or svtgfx: an alternative tag & gfx blog
#monsta x gfx: this tag is a mix of gifs & graphics, but you’ll still find gems here
#nct gfx or nctgfx: content created for nct
nctinc: a network for content created for nct
#skgfx or skgfx: content created for stray kids & a blog that’s dedicated to reblogging content under that tag
#stray kids gfx: an alternative tag
if you want to explore other platforms, i’d recommend checking out the following:
#graphicdesign: instagram has a plethora of great still graphics, branding concepts, ui/ux designs, etc.
dailywebdesign: this instagram account shares a lot of web designs for different concepts & ideas
kalypsodesigns: this instagram account shares lots of tips & advice in very easy to understand posts/collections
behance: this is a great place owned by adobe that features different projects from so many designers. what’s great about behance is that designers can list which softwares they’ve used in order to make their project and some may include a very detailed step-by-step on how the final project came to be (very insightful)
dribbble: another great platform to see professionally done projects, but opposed to being owned by adobe this is just a global community & a network of designers
RESOURCES — softwares:
once you’ve gotten your inspiration and that initial drive to work, now what? you’ll most likely have to have a software of preference to work on (either photoshop, illustrator, canva, or etc.) i know that adobe softwares aren’t ideal for everyone, but i’m aware that they do sell them for a discounted price if you’re a student and such and if necessary, crack the free trial file, but these are some links:
5 photoshop alternatives: a youtube video that shows 5 alternatives & walks you through the different softwares (i haven’t personally used any of these softwares except for pixlr)
adobe photoshop: a great photo editing software that can double for minimal animation (giffing)
adobe illustrator: a great software for illustrating (duh) and can be used for your foundation if you’re making vectors (vectors can be used & edited in photoshop, premiere pro, indesign, and xd) [*when starting fresh, learning illustrator first can be more beneficial since it’s easier to apply techniques & skills into photoshop, opposed to vice versa since illustrator can then seem pretty daunting to users more familiar with photoshop]
canva: a user friendly & beginner friendly tool/website if you want to start. they provide templates, stock images, vectors, fonts for non-designers & designers to simply drag-and-drop and create
download photoshop: this is a short reddit thread (march, 2019) that has a few ways on how to download ps for free (i know a few people personally that have cracked their photoshop and it still works!)
RESOURCES — fonts:
there’s a whole lot of places that has neat fonts and here’s a few of them:
dafont: this has a huge collection of custom fonts that you can easily download & use, really easy filtering system so that you can find what kind of font you want to use
google fonts: another huge collection of custom & free licensing fonts
whatfont: this is a chrome extension that shows you what font a page is using, that way you don’t have to read through the page source lol
font squirrel: yet another library of high-quality free licensing fonts
1001 fonts: similar in interface as the last one listed; free fonts that can used for commercial use
fontspace: lots of unique fonts and has a neat “random” tab that’ll send you to a random font
RESOURCES — colour palettes:
i’ve gotten lots of comments & compliments for the colour palettes that i use and here’s a few of the places that i get them from:
color hunt: lots of trendy, curated palettes with a really neat filtering system (sort through their popular colours, seasons, tones, and from new to popular palettes)
coolors: is an app & website that quickly generates a new palette every time you refresh it, you can also lock a colour down as you generate a new one if you want to keep that shade. you can also link it to your adobe softwares so that it’s easier to access your palettes
mr.pugo: an instagram account that features really pretty palettes; swatches, gradients, different shades, etc.
colourlovers: a community of people that submit palettes, patterns, colours
palettab: a chrome extension to help you discover colour schemes
colours.cafe: another instagram account that shares various palettes with the hex, rgb, hsl, cmyk, and pantone codes
Author’s Note:
editing, making graphics, creating — whatever you’re doing, it’s a really challenging task, but don’t beat yourself up if you find yourself stumped & can’t achieve what you had envisioned. if you find yourself lacking the knowledge in order to do something, take the time to watch or read a tutorial on how to do it, you may apply those skills in the future on another project. there’s no such thing as a “bad edit” or “bad project”, they’re just stepping stones in order for you to brush up on your skills. practice makes perfect, and while there’s also no such thing as a “perfect” project, the more you practice & work, the easier you’ll find editing.
every designer has their own style and that’s the hardest part of being a graphic designer. when starting out, you may heavily rely on someone else’s design, but please remember: there is a difference between being inspired by someone’s work and blatantly copying their entire work. after a while, you’ll be able to find what you’re comfortable doing and be able to craft your own style: minimalistic, branding, web design, 3d, illustrations, ux/ui, bold, soft, harsh, pastel, etc.
the only limit is your imagination & your screen is your canvas.
please let me know if there’s anything that i’ve missed & feel free to reach out if you have any questions! it doesn’t have to be me, i know that many content creators are more than willing to answer questions about their art.
good luck and feel free to tag me so that i can see your works! 💖
216 notes
·
View notes
Note
hey! if u don't mind me asking, what do u use to make ur gifs? I wanna start making gifs and I really like yours lol
oh i don’t mind at all! the programs i use are instagiffer and photoshop cs6. most of my work is done with instagiffer, but if i want to add text and compress a gif, that’s what i use photoshop for! the more often you make gifs, the easier it gets. you can also see your improvement over time if you have a folder and tumblr tag to organize all your stuff!
here are some tutorials for both programs (and other stuff) that i saved over time!! :D
this one’s a tumblr color text tutorial if you wanna get fancy
instagiffer and ps cs5 tutorial
general instagiffer tutorial
join two gifs together in photoshop
text on different frames
cropping and resizing
centering text
another text tutorial
most of the time, the font i use whenever i add text is called arial rounded mt bold at size 16pt (sometimes 18 bc i forget to change it lmao) with a drop shadow, and a color stroke that’s 2px wide. the font i use for any minecraft gifs is minecraftia w/ the same settings, but you can use whatever font you want, as long as it’s easy for anyone to read.
for downloading videos from youtube i use odownloader and clipconverter if i want just a specific clip
you can look thru my gif tag as inspiration, if you want to!
if you have any more questions, please feel free to send more asks! i love getting questions like these! it’s so much fun!!! :D
#text tutorial#photoshop tutorial#ps tutorial#gif tutorial#instagiffer#ref#wooooooooooooooooooo this was really fun to gather#thanks for the ask!! <3#booo-crew
8 notes
·
View notes
Note
hi i'm the same anon from before asking about the gifs~ if u could go into more detail plspls! i actually have vapoursynth but i lost motivation to make gifs bc it's so slow on my laptop for some reason and it takes forever to just make a set of gifs hhh :(
of course angel !!! i totally get it about losing motivation, i actually have the opposite problem, my avisynth runs really fast but my ps is so slow T_T and i’m sorry i can’t help with the vapoursynth as i don’t have it so idk anything about it’s files and stuff, perhaps you could try uninstalling and redownloading?? or looking up any tutorials in case a file is missing or smth?? 🙇🏻♀️ but yea i’ll go into some more detail on my process and stuff below the cut ~ and if you have any other questions feel free to ask 💓💞
1. download the video. it depends on what site it’s on what app i use to download. for youtube videos i use 4kdownloader, for vlives i use soshistagram and for anything else (i.e. twitter/instagram) i use just random downloaders i find from google
2. send it through avisynth. my settings are normally 30 fast, debilinear. and i also crop in avisynth but tbh my cropping setting vary So Much, i just stick to the tumblr width requirements and change the height to my preference/depending on the gif!!
3. import into photoshop. at this point i also have any psd i made that i want to put onto the gif loaded. i also edit the speed of the gif because when it is imported it’s more often than not way faster than i like. i tend to have my speed on .04-.05
4. add my psd/make my coloring. i would either layer the psd over and edit to my liking or if i feel like i can just make a coloring from scratch then i will go ahead with that. i don’t give out my psds, but i know blogs like chaoticresources and completeresources have really good psds and such that you can use!!
5. sharpen + (occasionally) topaz. i then convert the whole gif into a smart filter, add my sharpening and topaz denoise/clean if i want to (i don’t do it as much anymore)
6. export !!!
#i hope this helped !!!#also i know that blogs like chaoticresources have really good tutorials on giffing without vapoursynth !!!!#anonnie#britt answers#answered
3 notes
·
View notes
Note
Hello I was wondering how do you make gifs? I wanted to get into making them and you were one of my inspirations. I just have no idea where to start. If you can provide tips that would be amazing. Thank you.
Hi there! First of all thank you for this message! It’s so sweet that my gifs have inspired you ♡ I can give you a couple of tips, but if you’ve never giffed before or would find it helpful anyway for a full on tutorial feel free to message me and I’ll do that for you - I’ve got plenty of time on my hands! I use photoshop, but some people use other programs I think if photoshop isn’t available for you.
Tips:
Try to find the best quality video you can. For me, with videos from 50+ years ago this isn’t always easy, but sometimes a little digging can bring up different versions with better quality. If you can’t find a good quality one, sometimes it’s still worth giffing - if you keep the dimensions small (e.g. 160x250 / 300x250 pixels) if you’re doing 2 or more gifs per set, it kind of compresses the quality so it’s not too bad. You can sharpen gifs but if it’s low quality anyway it will still have some pixelation. For sourcing clips, I use YouTube mostly, or sometimes screen record from documentaries/other video sources.
The current gif size limit on tumblr is 3MB I believe. The length of your gif (seconds) or the amount of colour can affect the file size of your gifs. I think dimensions also contributes to the size, so if your gif is 500px it might be larger than if you did the same gif in 250px. As far as I know, the only way to check is when you’re about to save. So sometimes you have to go back and chop/adjust your gif.
Playback speed of your gifs is also important, you don’t want it to be too slow or too fast (unless you actually do, then that’s fine!). The setting you use depends on the video. Some old videos that I come across can be slow, while others can be fast. It takes a bit of trial and error to see which speed setting is best. Sometimes I go through the whole process of editing a gif and the saved gif is too fast, so I have to go back again. If I have to do this I open a new PS sheet and copy my filters over, so when I go back and sort the speed on my gif, I don’t have to do the filters from scratch. Typically I set my playback speed to about 0.06 for each frame. But have a little play around and see what works best for you! Also, if your video clip is short (maybe less than 4 seconds) sometimes you may want to slow the speed down a little so the loop speed isn’t super fast.
I hope this helps but I’d be more than happy to do a tutorial for you if you want more of a step by step guide. Just let me know! ♡
2 notes
·
View notes
Photo
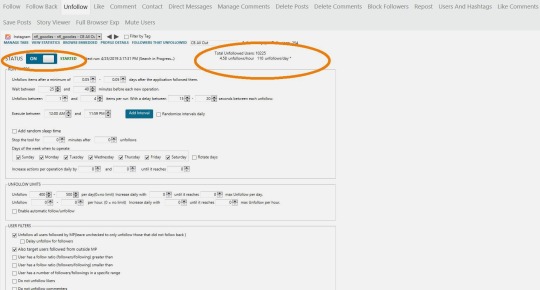
How to unfollow everyone on Instagram in 2020
How do I unfollow everyone on Instagram?
Every once in awhile we get an email from our readers asking how to unfollow everyone on Instagram. Some even want to know the best Instagram unfollow app so that they can attempt to mass unfollow everyone on Instagram in an instant. Instead of responding to the emails individually, we thought it would be more convenient if we’d create a comprehensive guide on how to unfollow everyone on Instagram. We should first look at some of the reasons you’d want to unfollow everyone on Instagram before exploring the best instagram unfollow app
Reasons for unfollowing everyone on Instagram Start a clean slate Sometimes you just really need a clean slate, you’ve followed the same people for 6 years, seen the same old content. You feel you’ve outgrown the content the people that you follow post, frankly, it gets monotonous and boring. This may be your cue to unfollow everyone on Instagram.
Clean up timeline You may not want to unfollow everyone on Instagram. But you may have users who frequently post undesirable content, unfollowing such users can help clean up your timeline.
You’ve reached your follow limit Instagram allows you to follow a maximum of 7500 users for each account. In order to be able to follow more people, you’ll need to unfollow some of the users you are following in order to make room to follow others.
You’ve changed your business model If you are running a business account and you’ve changed your business model, it would make sense to unfollow users from your previous niche, in order to make room for following new users in the new niche you’ve ventured into.
You’re unable to view posts from close friends and family When following too many users on Instagram, your feed can easily get clogged by posts from people you don’t have a close relationship with, so much so that you won’t be able to view posts from people you actually care about. In such a case the easy thing to do would be to unfollow everyone else except those you would wish to keep around.
Related: Who unfollowed me on Instagram ? A tutorial on how to find out who unfollowed you on Instagram . How to know if you need to unfollow everyone on Instagram Here’s what your follower/following ratio says about you (the number represents the ratio of your following compared to the number of followers you have – 400 is <0.5x of 1,000, 500-1,000 is 0.5-1x of 1,000, etc.):
<0.5 Spammer: You are inexperienced with Instagram automation tools and are spamming followers in hope for follows back.
0.5-1 Suspicious: You are likely to be using Instagram automation tools, but are following the wrong people or have poor quality content leading to poor follow back rates.
1-2 Normal: You have some success with Instagram automation, but need to focus on other strategies to drive more engagement.
2-10 Micro-Influencer: Users that are either master of Instagram automation or has incredible content to grow their account.
10+ Influencer: Likely to be micro-celebrities or rising stars that are popular on other social media channels.
If you’re in the <0.5 Spammer or 0.5-1 Suspicious bracket and you want to add some credibility to your channel, you need to mass unfollow on Instagram.
Who should you include when performing a mass unfollow on Instagram? Here’s a composition of followers that may necessitate you to unfollow everyone on Instagram
Inactive accounts Bot/Fake accounts Those who haven’t followed you back The conventional way of unfollowing everyone on Instagram 1. Sign in to Instagram and then press the “Profile” button. 2. Press the “following” box that displays the number of people you’re following on Instagram. 3. Press the green “Following” button next to the first person on the list to stop following that person. Make sure the button becomes a blue Follow button. 4. Repeat the previous step for up to 200 people that Instagram displays in the list. 5. Sign out of Instagram or continue to use it but don’t follow or unfollow anyone. Wait about an hour and then repeat the previous steps to unfollow another 200 people until you’ve unfollowed everyone on your list. As obviously noted the above process is tedious and frankly, nerve-wracking, don’t worry we have a simpler method Apps to unfollow everyone on Instagram There are many unfollow app in the market today that claim to have this functionality including the option to remove followers on Instagram , caution, however, should be observed, Instagram has made several upgrades that may result in a ban if you tried unfollowing everyone on Instagram. As a matter of fact, an attempt to unfollow 500 users at a go may plunge you into a blocked or banned account. There is however a Social Media Automation tool that has stood the test of time and is frankly unrivaled. JARVEE is an intelligent tool that mimics normal human behavior and runs on autopilot. This is to say that, after successfully setting up, you sit back while JARVEE does the job for you.
Go here and download a free trial of this advanced social media automation tool for free. The trial period is 5 days which is time enough to unfollow everyone on Instagram. (No credit card details required)
PS: JARVEE also supports Facebook, Google+, Twitter , Pinterest , Tumblr, LinkedIn, and Youtube platforms.
Once you’ve registered and installed the tool, use the details sent to your email to log in to the app. Here you are going to add your Instagram account (s)-depending on the downloaded package you can automate as many Instagram accounts as possible. To add your account on JARVEE , click on SOCIAL PROFILE on the left Menu bar. Now click on ADD PROFILE and select INSTAGRAM . Fill in your Instagram login details and click VERIFY. Once your account is VALIDATED , you can now click on TOOLS on the left Menu bar. Here you will see all the accounts that you have added on JARVEE. To set up auto unfollow, click on the name of the account whose users you want to unfollow. A new interface will appear with all the features available for Instagram. Since we are only interested in auto unfollowing, you’re going to click on the UNFOLLOW tab. Here you have a myriad of options to go with At this point, you need to decide whether you want to unfollow everyone or a select group of people. Manual Way to Unfollow People On Instagram
In order to unfollow everyone on Instagram manually, follow these steps:
Tap your profile icon on the Instagram application. Click on the “Following ” section and see the list of people who you follow. Whoever you want to unfollow, click on the “ Following ” section which is written next side of the name of the person. Confirm your request with Y/N questions. Unfollow everyone on Instagram Since Instagram will not allow you to mass unfollow instantly, we’re going to spread the unfollowing task over the 5 days trial period. Ideally, you’ll need to allocate the number of users you wish to unfollow proportionately to the 5 days trial period. For instance, if you need to unfollow 500 users, then you’ll have JARVEE unfollow 100 users per day.
To achieve this, copy the setting as illustrated in the image below when you’re done toggle the status button to start the unfollow operation.
Unfollow a select group of people In this section, you’re going to decide on the users you DO NOT intend to unfollow. You’re going to achieve this by placing their user names in a WHITELIST . You may also wish not to unfollow users that have interacted with your content. This will help keep your engagement going. Just make sure to check the two boxes that say ‘ do not unfollow likers ‘ and ‘ do not unfollow commenters ‘
Under USER FILTERS, there’s an option to use the WHITELIST . Make sure you have it checked and place the user names of the users you’d like to continue following. Once this is done, you can now toggle the STATUS button to start the process.
Other apps include, but are not limited to: #1. Cleaner for Instagram [Android] This is a multi-function app for Instagram. Using this app you can delete multiple photos at a time, Mass Block & Unblock, Mass Unfollow etc.
To Mass Unfollow, Follow the steps:
Step 1: First Download & Install : Cleaner for the Instagram app on your Android device.
Step 2: Launch this app and login with your Instagram account username and password.
Step 3: Tap on ‘Following’ from the bottom bar and go with the ‘Quick Select’ blue button. Here you will many options to select the ‘following’ users. Just Tap on ‘Select All’ to unfollow all at once
Step 4: Now Simply Tap on ‘Flash’ blue floating icon and Tap on the ‘Unfollow’ option, as shown in the above image.
Also Read: How To View & Download Instagram Profile Picture [Full Size]
#2. Mass Unfollow for Instagram [iOS Devices – iPhone/iPad] ‘Mass Unfollow for Instagram’ is one of the best tools for iOS Devices to clean up your Instagram account. Using this tool you do the following task:
Bulk block/unblock/unfollow users Bulk delete posts Bulk unlike posts & more… It’s very simple to use this tool. First Download & Install: Mass Unfollow for Instagram App on your iOS device (iPhone/iPad). Login in this App with your Instagram Credentials. After that simply select the users from ‘Following’ tab at the bottom bar and Unfollow all in a tap. #3. Unfollow for Instagram – Non-followers & Fans [Android] ‘Unfollow for Instagram’ is a simple Instagram Manager tool that shows you all the users who don’t follow you back and give you an option to unfollow singe or multiple users in a single tap.
To Mass Unfollow , First Download & Install: Unfollower for Instagram App on your Android device. Then Login with Instagram Username and password. It will scan your Account and tell you Followers/non-followers stats. To unfollow the users who don’t follow you back, tap on ‘Non-Followers’ Tab. Now simply tap on ‘Unfollow’ button from the bottom bar to unfollow all non-followers. Download Link: Unfollow for Instagram
#4. Cleaner for Ins [iOS Devices – iPhone & iPad] This is another best tool to clean up your Instagram account on your iOS devices. Steps are similar to the above ones. So Download this app from the below-given link and Unfollow Tons of people with a single tap.
#5. Unfollowers for Instagram – Follow Cop [Android] Follow Cop is an ultimate and elegant utility tool to manage your Instagram account. It gives you details of your Followers, Non-followers, Recent Followers etc from your account. Also, you can Mass Unfollow [upto 15 people in a click] from your Instagram Account.
Steps are similar to the above ones. Download this app from the link given below and start to Clean up your Instagram account is FREE.
That’s it.
Feel free to reach us in the comment section or on email for any assistance.
Recommended: How To Grow Your Business on Twitter in 2019 .
https://socialtipster.co/unfollow-everyone-on-instagram/?utm_source=rss&utm_medium=rss&utm_campaign=unfollow-everyone-on-instagram
#smm #socialmediamanager
1 note
·
View note
Last Seen Blogs

ig-mom
16th

goldennails
Goldennails

ig-diary-blog
pOSITIVITY :D

whatwouldlexado-blog
What would Lexa do?

roizcriteriodigital
Denunciamos las injusticias vengan de donde vengan