#raspberrypi software installation
Explore tagged Tumblr posts
Visit Tumblr Blog
Explore Tumblr blogs with no restrictions, modern design and the best experience.
Last Seen Tumblr Blogs


Fun Fact
69% of Tumblr users are millennials.
Video
youtube
Samsung NVMe SSD + Geekworm X1001: Raspberry Pi 5 Upgrade Guide #nvme
https://youtu.be/JedbGhmbGtc?si=aaQu8gabzwZeuTo8
The Raspberry Pi 5 is a powerful little computer, but its performance can be bottlenecked by the relatively slow microSD card it typically boots from. By upgrading to an NVMe (Non-Volatile Memory Express) SSD, you can dramatically improve boot times, application loading speed, and overall system responsiveness. In this guide, I'll walk you through the process of installing and configuring a Samsung NVMe SSD on your Raspberry Pi 5 using the Geekworm X1001 PCIe adapter.
Why NVMe is a Game-Changer for Raspberry Pi 5:
Lightning-Fast Boot Times: NVMe SSDs offer significantly faster read and write speeds compared to microSD cards, meaning your Raspberry Pi 5 will boot up in seconds.
Enhanced Application Performance: Resource-intensive applications, like video editing software, games, or database servers, will run smoother and load faster with the increased speed of NVMe storage.
Ample Storage: NVMe SSDs come in much larger capacities than microSD cards, giving you plenty of space for your operating system, applications, projects, and media files.
Improved Reliability: NVMe SSDs are more durable than microSD cards, which can wear out over time due to frequent write cycles.
Materials You'll Need:
Raspberry Pi 5
Geekworm X1001 PCIe to M.2 Adapter
Samsung NVMe SSD (or any compatible M.2 NVMe (SATA) Key-M SSD)
USB to NVMe adapter (if your SSD isn't in an enclosure)
Raspberry Pi Imager software
Raspberry Pi,Raspberry Pi 5,NVMe,SSD,Geekworm,Geekworm X1001,Samsung NVMe,Samsung SSD,PCIe,NVMe Boot,Raspberry Pi Boot,Tech,TechTok,Raspberry Pi Community,Maker Community,DIY Tech,DIY Raspberry Pi,Raspberry Pi Upgrade,Raspberry Pi Performance,Linux,Upgrade,Tutorial,How-to,Raspberry Pi Tips,Raspberry Pi Tricks,Raspberry Pi Accessories,Raspberry Pi Hacks
RaspberryPi #RaspberryPi5 #NVMe #SSD #Geekworm #GeekwormX1001 #SamsungNVMe #SamsungSSD #PCIe #NVMeBoot #RaspberryPiBoot #Tech #TechTok #RaspberryPiCommunity #MakerCommunity #DIYTech #DIYRaspberryPi
0 notes
Text
Schritt-für-Schritt-Anleitung: Einrichten von Bluetooth auf dem Raspberry Pi

In diesem Beitrag möchte ich dir erläutern, wie man Bluetooth auf einem Raspberry Pi einrichtet und nach Geräte suchen kann. Ich verwende in diesem Beitrag den Raspberry Pi 3B+ welcher schon ein paar Jahre auf dem Markt erhältlich ist aber immer noch eine passable Leistung bietet.

Solltest du einen Pi 4 oder sogar einen 5er-Pi besitzen so kannst du trotzdem diese Anleitung verwenden denn diese ist auf diesen Systemen gleich.
Einrichten von Bluetooth auf dem Raspberry Pi
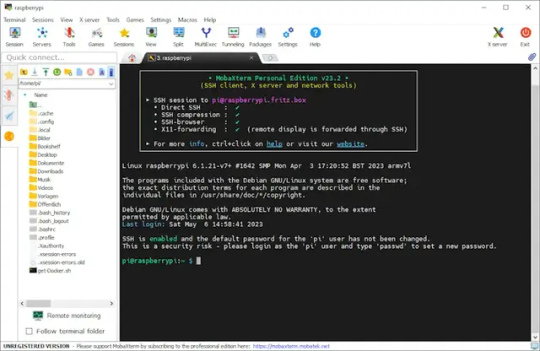
Der Raspberry Pi 3B+ hat WLAN und Bluetooth an Bord, d.h. du hast dieses Feature bereits dabei. Solltest du ein älteres Modell besitzen, so kannst du dir recht günstig einen Bluetooth-Dongle kaufen und so deinen Raspberry Pi nachrüsten. Software für die SSH-Verbindung zum Raspberry Pi Den Raspberry Pi kannst du über HDMI mit einem Monitor verbinden, jedoch bediene ich diesen lediglich von der Konsole aus und daher reicht mir eine einfache SSH Verbindung via MobaXTerm aus. Das Tool kannst du unter https://mobaxterm.mobatek.net/download.html kostenfrei in der Home Edition herunterladen.
Installieren von pi-bluetooth via apt Mit den nachfolgenden Befehlen aktualisierst du zunächst dein System, um danach das Paket "pi-bluetooth" zu installieren. sudo apt-get update sudo apt-get upgrade sudo apt-get install pi-bluetooth Ob der Bluetoothservice gestartet ist, lässt du dir mit dem nachfolgenden Befehl anzeigen. sudo systemctl status bluetooth Mit dem Befehl "hciconfig" kannst du dir deine Bluetoothadapter anzeigen lassen. pi@raspberrypi:~ $ hciconfig hci0: Type: Primary Bus: UART BD Address: B8:27:EB:AA:D5:1A ACL MTU: 1021:8 SCO MTU: 64:1 UP RUNNING RX bytes:1604 acl:0 sco:0 events:102 errors:0 TX bytes:3572 acl:0 sco:0 commands:102 errors:0 Wenn dein Bluetoothadapter auf dem Raspberry Pi eingerichtet ist, können wir uns nun nach Bluetoothgeräte suchen.
Nach Bluetoothgeräten mit Python suchen
Im nächsten Schritt wollen wir zunächst nach Bluetoothgeräte in der Nähe suchen. Dazu installieren wir zunächst das Paket pybluez mit pip. pi@raspberrypi:~ $ pip install pybluez Looking in indexes: https://pypi.org/simple, https://www.piwheels.org/simple Collecting pybluez Downloading https://www.piwheels.org/simple/pybluez/PyBluez-0.23-cp39-cp39-linux_armv7l.whl (128 kB) |████████████████████████████████| 128 kB 1.0 MB/s Installing collected packages: pybluez Successfully installed pybluez-0.23 Auf dem GitHub Repository von pybluez findest du einige Beispiele, wie du dieses Modul verwendest. Hier ist ein kleines Beispiel, wie du Bluetoothgeräte mit Python suchen und dir den Gerätenamen ausgeben lassen kannst. import bluetooth print("Suche Bluetoothgeräte") nearby_devices = bluetooth.discover_devices(lookup_names=True) print(f"Es wurde(n) {len(nearby_devices)} Gerät(e) gefunden!") if len(nearby_devices) > 0: for addr, name in nearby_devices: print(f"Gerätename: {name}") Auf der Konsole wird dann zunächst die Anzahl der gefundenen Geräte ausgegeben und danach die Gerätenamen. pi@raspberrypi:~/Python/BluetoothSearch $ python3 bluetoothSearch.py Suche Bluetoothgeräte Es wurde(n) 2 Gerät(e) gefunden! Gerätename: Galaxy A53 5G Gerätename: CSL-305080
Fazit & Ausblick
Nachdem wir jetzt Bluetoothgeräte via Python gefunden haben können wir als Nächstes eine kleine Schaltung am Arduino, ESP32 und Raspberry Pi Pico W aufbauen und diese Mikrocontroller mit dem Pi via Bluetooth verbinden. Dazu werde ich dir in den kommenden Tagen separate Beiträge veröffentlichen. Read the full article
0 notes
Text
Raspberrypi a mini computer....worth for programming coding
#64 bit raspberry pi#how to get ip address of raspberry pi#how to raspbian#ip address scanner#rasbian os#raspberry pi 4#raspberrypi software installation
0 notes
Photo

Installing Rasbian on my Raspberry Pi. It's another wild and crazy Sunday night. 😂 #raspberrypi #raspbian #technology #linux #prototyping #software #installation (at Monticello, Illinois) https://www.instagram.com/p/Bv-ifOAASuU/?utm_source=ig_tumblr_share&igshid=1een50guqz5qj
0 notes
Video
instagram
💡Amazing #Tokymaker and #machinelearning project. Connect4! For those who doesn't know about Tokymaker, it's a fast prototyping tool that allows anyone to make tech-projects in 5 minutes, mixing electronics, coding and critical thinking without previous knowledge. All the electronics are plug-and-play, generic conectors and compatible with other brands. The coding is graphical (#blockly) , done in a website, without cables, software installation or plugins We are on our way to democratize tech-prototyping! . . . . #maker #inventor #iot #microchip #connect4 #steameducation #diy #creativity #electronics #arduinoproject #electronica #makersgonnamake #cardboard #engineer #neopixel #light #coding #programacion #tokylabs #game #gaming #Ai #deeplearning #prototyping #stemeducation ( it is not a #raspberrypi #Arduino ) #Repost @tokylabs with @make_repost (at Busan, South Korea) https://www.instagram.com/p/BwMRPsaBNuc/?utm_source=ig_tumblr_share&igshid=7vtjere8qjdx
#tokymaker#machinelearning#blockly#maker#inventor#iot#microchip#connect4#steameducation#diy#creativity#electronics#arduinoproject#electronica#makersgonnamake#cardboard#engineer#neopixel#light#coding#programacion#tokylabs#game#gaming#ai#deeplearning#prototyping#stemeducation#raspberrypi#arduino
1 note
·
View note
Text
Apptober Day 1
Now that I’ve got my Rasberry Pi Wall Display built and up on the wall, I figure Apptober is the perfect time to commit to finishing the software side of the project! This month I’m going to be hacking around with MagicMirror2 (a wonderful open source NodeJS app built for the RasberryPi) to make my little Wallberry the fairest wall display of them all.
Magic Mirror, On The Wall
The design aesthetic of MM2 is originally intended to turn a raspberryPi and a two-way mirror into a sleek, space-ship-worthy HUD. While I do love the minimalist mirror look, I’d prefer to give Wallberry a more classic, picture frame display look. Basically I want to go from the image on the left (Wallberry with a vanilla install of MM2) to something like the design to the right:
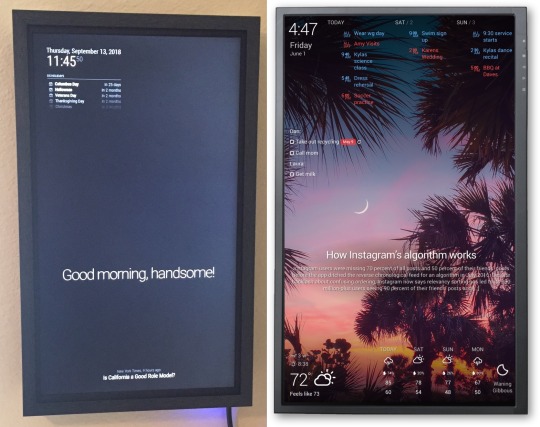
I’ve got a lot of tweaking ahead of me 😊
BTW - the image on the right there is from a company called Dakboard and they make GORGEOUS wall displays and I’d almost consider using their wall display software but alas I’m a fool for open source and MM2 has stolen my heart.
Project Requirements
Too many of my projects get abandoned unfinished due to feature creep so I’ve challenged myself to start REALLY small this time. To begin with I want my display to have the following features:
Current local time + date
Current time for at least two other cities in different timezones (I can’t do timezone math help me Wallberry)
Current local weather + temperature
Local weekly weather forecast
A gorgeous, high-resolution background photo that periodically changes
Exciting New Tech
I’m anticipating learning a ton of new stuff for this project, including:
NodeJS - finally, an excuse to learn Node 😄
SASS - cool cool, if I can’t avoid writing CSS forever then at least I can put variables in it
How to extend and theme MagicMirror - yay MM2 Modules!
The Unsplash photo API - because this seems like a really fun way to get great background photos
A ton of stuff that seems obvious but somehow isn’t when it comes to the UX design of wall display web apps
Some RaspberryPi-specific development things that’ll definitely pop up to bite me when I least expect it because nothing ever works in production like it does on your development machine
Tomorrow
Gonna get my dev environment all set up wish me luck 🙃
8 notes
·
View notes
Text
Magic mirror raspberry pi reddit

#MAGIC MIRROR RASPBERRY PI REDDIT HOW TO#
Plus, Docker is quite heavy and I'd like to have a lightweight deployment. "Just use Docker": Don't think this fully solves all the problems. Right now I'm dumping a Pickle in /var/lib/service/state.pkl, but I'm not sure if this is the best way? Persistence: I want the application to persist its internal state somewhere so that, if the server reboots, it can recover. A subreddit for discussing the Raspberry Pi ARM computer and all things related to it. I've read that some people use Bitwarden to store the secrets, or they commit them after encrypting them with GPG. Raspberry Pi - More than just magic mirrors and kodi r/raspberrypi. But I still have to ssh to the Raspberry the first time to write the file myself. For now, I'm following this guide: chmod 600 /etc/my_service and combine EnvironmentFile and DynamicUser in the systemd unit. deb for my app so that I can install it with dpkg. But I'm wondering if I should write a proper. Packaging: As I said, now my deploy script basically untars some files in a predefined location. Upgrades: I wrote a Fabric fabfile.py with 2 basic tasks, clean and deploy so I can ran them from another machine - the former deletes everything, the latter untars a git archive HEAD of the repository inside the Raspberry and extracts it to the right locations. Lifecycle: I wrote a systemd service unit so that the app starts automatically on boot. Some steps I've already started to streamline or automate: However, now I want to start applying better software engineering practices to this process. More or less, they all amount to $ ssh raspberry The Raspberry Pi smart mirror, also known as a magic mirror, is a futuristic digital mirror that displays everything from the current time and date to weather information, scheduled appointments, or the latest news headlines.The chances are that you have seen a Raspberry Pi smart mirror on YouTube or somewhere else on the internet.
#MAGIC MIRROR RASPBERRY PI REDDIT HOW TO#
There are tons of tutorials out there on how to run a Python program from a Raspberry Pi.
0 notes
Text
Python 3 and PyGame in 2018
Table of Contents
1. Why PyGame?
2. Why Not?
3. Explicit Is Better Than Implicit
4. Three Pain Points
5. Other Cool Libraries
6. More To Come
1 Why PyGame?
PyGame is a nice library for getting started with game development. It is a good way to learn programming in a "real programming language" while making games1. There is very "magic" going on in PyGame, and you can go from print("Hello World") to drawing a triangle on the screen and then to Pong or Tetris with a smooth learning curve.
PyGame is also an easy way to get your feet wet in game development if you know and use Python already, for example in machine learning or web development. That's how I came to learn PyGame.
2 Why Not?
PyGame is just a low-level library for creating windows, drawing on the screen, reading joystick input, and playing sounds. OpenFL, Löve2D, FNA and LibGDX fill similar niches in the Haxe, Lua, .Net and Java ecosystems, respectively. If you want a full-featured engine, use Unity3D, UE4, or Godot. If you don't want to learn to code, you will probably fare better with GameMaker or Stencyl2. If you want to tell an interactive story with little actual gameplay, maybe Twine or Ren'Py are more your thing.
3 Explicit Is Better Than Implicit
Maybe PyGame is not for everybody… However, if you do just want to make small 2D games, and don't want to rely on automagic functionality, PyGame could for you. That means you have to code your own game loop3, poll the keyboard or game pad, and update the screen yourself.
Your game loop will look something like this:
import pygame pygame.init() # ... # setup stuff here screen=pygame.display.set_mode(screen_size) clock=pygame.clock.Clock() running=True while running: clock.tick(30) events = pygame.event.get() keys = pygame.key.get_pressed() for e in events: if e.type==pygame.QUIT: running=False elif e.type==pygame.KEYDOWN and #... # handle jumping etcetera # ... # move sprites around, collision detection, etc # ... # draw pygame.display.update() pygame.quit()
The ease of just drawing pixels on the screen and the lack of hidden features sometimes makes it harder to get started making certain games genres. If you start from scratch in Unity3D, you already have a level and a camera and you can just create a sphere GameObject and check a box to enable the physics engine. If you draw a circle on the screen in PyGame, it's just pixels on the screen. These pixels don't know anything about cameras, raycasting, or physics, so if you want to move the view around, make your circle clickable, or have it bounce off walls, you have to connect the systems yourself. PyGame gives you tools to check for collisions, a Sprite class that is the closest equivalent to GameObject, and a way to find out where on the window the mouse was clicked.
If you want to use a pre-made physics engine like Box2D, or roll your own, you have to write some glue code, but PyGame will stay out of your way.
This can even be a tremendous advantage when you want to make a game like Tetris4, or like SimCity, where you don't want to use 3D collision detection and a physics engine anyway, and collision detection happens on a grid. A game like Braid, where you can rewind the entire game state, will also be much easier if you have full control over your game loop. You can do all these things in a big and opinionated engine, as Hearthstone (a card game made in Unity3D) has showed us, but if don't need these features, you sometimes have to code around them. If you code around features you don't need, or re-build your own systems on top of a commercial engine, you might end up writing more code than if you had just started from scratch5.
All of this goes double for tools like PuzzleScript, RPG Maker, GameMaker, Bitsy or Twine. These are all geared towards certain kinds of games, and while they make it really easy to make that kind of game, they make you jump through hoops if you want to build anything else.
4 Three Pain Points
Although I just told you that PyGame is a great library, it is not as popular among game developers as it should be. This is mostly due to three problems dating back to the Python 3 days: multi-threading, deployment, and HD screen resolutions.
Multi-threading: Due to the GIL, an unfortunate implementation detail in CPython6, you can't have two threads execute Python code at the same time. That means your multi-threaded Python programs will still run in parallel, but there will only ever be one thread running at any time. On a single-core machine, there is not that much to worry about, because you only have one core that can run code anyway, but on a multi-core machine, you can't really take advantage of the additional cores. Still, what you could do is have one thread handle input and draw to the screen, while another, long-running thread does complicated enemy AI calculations that take longer than one frame to complete. That won't make your code run any faster in aggregate, but it will can at least ensure that the tick-input-update-draw cycle of the game loop runs at a smooth frame rate while the AI takes a lot of time.
If you're using i/o operations from the Python standard library, long-running numpy code or clock.tick(FPS) in PyGame, these libraries do the right thing and tell the Python interpreter that they are entering a section of native code during which Python code can safely run in another thread. But in general, you could have a Python function that calls native code that doesn't return for a while, so the Python interpreter is executing the same line of Python and other threads can't run. If that bit of native code is waiting for input, your whole program will freeze until the input arrives, even if you have ten other threads waiting that could do useful things in the mean time.
There are two modules to help you with concurrency in Python 3: multiprocessing and asyncio. The first has been around since Python 2.6, and lets you execute Python code in another process. This is useful if you have long-running computations like enemy AI that you want to run on another core. The other, asyncio is new in Python 3.37. With asyncio, you can run multiple coroutines in the same thread. A scheduling object called an event loop will execute coroutines piecemeal whenever there is input available. Because asynchronous coroutines are basically Python functions with some extra syntactic sugar, you can have tens of thousands of them running at the same time, unlike processes or kernel threads, which need a comparatively large amount of RAM to create and some time to context-switch. The use case for asyncio is pretty much the opposite of the use case of multiprocessing: Lots of threads8 waiting for i/o instead of long-lived processes that crunch numbers.
Deployment: There used to be no simple and easy way to package Python 2 games for end users. Sure, you could ask them to install python, either from Python.org or from the package manager of their choice, and give them the source code. Or you could use py2exe or py2app and create portable versions of a python script, but you couldn't build Windows, Mac and Linux executables from the same configuration file, and only on the respective platform. There were multiple competing standards for packaging python modules as source distributions: distutils, setuptools, distribute, and distutils2.
In the mean time, a smart person invented cxfreeze, which would automatically package every single dependency, every resource file and library used by your program, into one big archive. Unfortunately, that approach tended to pull in a bunch of DLLs that are already present on most end users machines. You also need to have the script already running on the target platform to analyse the dependencies at runtime.
With Python 3, setuptools has won, and the others have been merged into it9. There is a new file format for packaging Python modules called wheels10, that lets users install modules with native code without a C compiler. PyInstaller11 lets you build self-contained, portable versions of scripts on Windows, Mac or Linux based on the specification, and pynsist12 lets you create a windows installer for a Python script from any platform, because it downloads windows-compatible wheels and includes them without setting up a cross-compiling environment. The Panda3D project is even working on a cross-platform binary packaging system for Python 3 games based on setuptools!
HD screens: The software-based rendering in PyGame gets slower proportionally to the number of pixels. If you draw a 16x16 character sprite onto the screen, that makes 256 pixels. If you blit a background picture into a 640x480 (VGA) window, that's 307200 pixels already. If you scale that window up to 1280x960, that's four times as many pixels, and 1080p full-HD resolution has 6.75 times as many pixels as VGA. Things that were quite fast at low resolutions become a real bottleneck on HD screens, and you really feel the burn when you run PyGame on devices with a slower CPU and a HD screen, like a phone or a Raspberry PI.
Even if you run your game logic at a low resolution, and just scale up the screen to HD with pygame.transform.scale in the final step, that still means moving lots of pixels around in software. Scaling your game up to full-screen on a HD display can easily take the majority of your processing time. And remember, we effectively have only one core!
If you could copy your 320x240 surface into a texture and scale up your pixel art with the GPU, you eliminate a major bottleneck. The GPU is surprisingly fast and energy-efficient in phones, tablets and on the raspberryPI.
Fortunately, instead of directly drawing pixels into your window, PyGame can give you an OpenGL context and let you use whatever OpenGL bindings you like. In the past, that would have been with PyOpenGL, or pyglet. With Python 3, we can use ModernGL. ModernGL is much simpler than the other two. It targets only modern versions of OpenGL. Unlike PyOpenGL and pyglet, there is no support for immediate mode or the old fixed-function pipeline. You have to use vertex buffer objects and custom shaders. It's fast, and it lets you do fancy post-processing effects in addition to scaling.
If you need more performance, or fancier effects, you can incrementally transition from drawing into PyGame Surfaces towards creating individual textures for your Sprites and rendering directly with OpenGL.
5 Other Cool Libraries
The missing level editor: Tiled13 is a great level editor. You can use PyTMX14 to read the maps files, and pyscroll15 to render them.
Discord Rich Presence: All the cool kids are on Discord16. With pypresence17, you can let your player's friends know what the game is called, which level they are on, and how many points they have scored. It definitely beats having "now playing Python3.exe" as your Discord status line.
Creating Videos: moviePy18 gives you a simple API to create, load and edit GIFs, WEBM and other video file formats.
6 More To Come
The problems I used to have in PyGame haven't disappeared, but in 2018 and with Python 3.6, they have become solvable. It is possible to started making games with PyGame, and to polish and deploy them on Steam and itch.io. There used to be a tool to deploy PyGame to Android phones and tablets, but that was based on Python 2.7 and some hacks to get everything to run. With the current effort to port PyGame to SDL2, we can soon deploy games written in PyGame to Windows, Mac, Linux, Android and all major consoles, which support SDL219
This post is longer than I thought already, so I'll take a break here. In the coming days I will write more about using the asyncio module to do i/o in PyGame without tanking your frame rate, using the moderngl module to scale up your pixel art, and trying out deploy-NG, a setuptools extension from Panda3D to distribute games to end users.
Footnotes:
1
I recommend Al Sweigart's tutorials at http://inventwithpython.com/, and http://inventwithpython.com/pygame/
2
Maybe you want to start designing games first instead of learning to program, so you start out with these tools, but I would recommend you learn at least a little bit of a real programming language as well, to get some perspective. If you learn C#, which is a real programming language, together with Unity or Godot, please look up which features are part of C# and which are unique to your engine.
3
To avoid common pitfalls with game loops, read these: http://www.koonsolo.com/news/dewitters-gameloop/ and https://gafferongames.com/post/fix_your_timestep/
4
I am speaking from experience here. We made a Tetris-like game in Unity, and it was not worth the trouble. You can see the result here, but it's nothing special: https://blubberquark.itch.io/tetrominions
5
Please don't write an engine from scratch! People like Jon Blow, Tommy Refenes, John Carmack, David Pittman or Notch wrote their own 3D engines for various reasons. That said, if you actually need a big 3D game engine for your game, please don't write your own on top of PyGame. You are not John Carmack (unless you are, in which case you should stop reading this because you know more about programming than I do). Use Panda3D or Godot if you want something that is open source and Python-based (Godot Python support is still in beta, but getting there). Or use one of the commercial engines listed above.
6
I'm simplifying massively here. Look up the Global Intepreter Lock if you want to know more. The GIL also allows PyGame to call SDL functions without worrying too much about whether SDL is thread-safe. It's not all bad.
7
Only with Python 3.5 it has become really usable, though, and they are still working out the kinks in the API.
8
I mean that as in lightweight threads, Erlang threads, green threads.
9
You can still find distutils in Python 3 for backward compatibility reasons.
10
http://pythonwheels.org
11
http://www.pyinstaller.org/
12
https://pynsist.readthedocs.io/en/latest/
13
https://www.mapeditor.org/
14
https://github.com/bitcraft/PyTMX
15
https://github.com/bitcraft/pyscroll
16
It manages to combine the good parts of Skype, Slack, and TeamSpeak, but it's not open source. https://discordapp.com/
17
https://github.com/qwertyquerty/pypresence
18
https://zulko.github.io/moviepy/
19
SDL2 already runs on the Nintendo Switch, for example. Unfortunately, the licensing terms of the Switch developer kit prohibit you from publicly sharing code that targets the Switch API in public. You have to contact Ryan Gordon and ask him for access, after signing the NDA. I am not a lawyer, this is not legal advice, but as far as I understand it, although the licensing terms of PyGame and SDL allow you to share the code, Nintendo could still sue you for breach of contract. That problem is not unique to PyGame though. A similar workaround exists in the Haxe world, where you have to contact Lars Doucet to get access to a version of OpenFL for Switch. There is also a homebrew version of Python available at https://github.com/nx-python/PyNX, but the NDA might prohibit you from using homebrew and reverse engineering.
9 notes
·
View notes
Link
0 notes
Text
Microsoft windows 10 pro activation key price 無料ダウンロード.Windows 10を無料で使う。プロダクトキーは必要なし!
Microsoft windows 10 pro activation key price 無料ダウンロード.Windows 10 のダウンロード

Was this information helpful?.Find your Windows product key
最新版の Windows、Windows アプリ、Office、Xbox、Skype、Windows 10、Edge と Internet Explorer、開発ツールなどをダウンロードできます。 Warning: This site requires the use of scripts, which your browser does not currently allow When you buy a refurbished device running Windows 10, you'll need to activate Windows using the product key on the Certificate of Authenticity (COA) that's attached to your device. If your original hardware manufacturer (OEM) changed the motherboard for you, your PC should reactivate automatically Windows 10 Pro を購入すると、強化されたコラボレーション ツール、エンタープライズ レベルのセキュリティ、シングル サインオンその他多彩な機能を利用できるようになります。より多くの作業を、どこからでも行えます。
Microsoft windows 10 pro activation key price 無料ダウンロード.Microsoft ダウンロード センター: Windows、Office、Xbox、その他
A Windows product key is a character code used to activate Windows. It looks like this: PRODUCT KEY: XXXXX-XXXXX-XXXXX-XXXXX-XXXXX. Locate your product key for Windows Depending on how you got your copy of Windows 10, you'll need either a character product key or a digital license to activate it Windows 10 Pro は、以下の機能を含む高度なセキュリティおよびビジネス ネットワークなどの機能があります。 BitLocker ドライブ暗号化. リモート デスクトップ. ドメインまたは Azure Active Directory に参加する機能 最新版の Windows、Windows アプリ、Office、Xbox、Skype、Windows 10、Edge と Internet Explorer、開発ツールなどをダウンロードできます。 Warning: This site requires the use of scripts, which your browser does not currently allow
This will cause the resolution to be resized automatically following real-time user scaling. For system installation in Virtual Box, we recommend, right after system installation, also install guest add-ons. This will make the system work correctly, including the resolution and additional drivers. You can purchase multiple licenses at once by multiplying that amount by the license amount you want. Amount Currency USD EUR GBP Go.
Home Back About Windowsfx. Back Windowsfx O. S Software Licenses. Back Free Edition x bits RaspberryPI Arm Platform Get Professional Serial Key. Back Support Telegram Support Forum Support Ticket.
Windowsfx Professional Edition. Thank you for purchasing a Windowsfx Serial Key. You will receive an activation key in your email. It may take a few hours for the server to send your key. You can purchase as many keys as you need in the same email. Attention : If for some reason you don't receive your serial by email within 8 hours, please contact us immediately here.
The system is being unable to send email to some countries so we are handling these cases manually. Currency USD EUR GBP.
0 notes
Text
How to install windows 10 iot core on raspberry pi 4 無料ダウンロード.How to Install Windows 10 IoT Core on Raspberry Pi
How to install windows 10 iot core on raspberry pi 4 無料ダウンロード.Raspberry Pi編 第8回 Windows10 IoT Coreをインストールしてみる

Windows 10 IoT Core ダッシュボード.Raspberry Pi編 第8回 Windows10 IoT Coreをインストールしてみる | システムリンクIT塾
Download image and install software. First, you have to download the ISO file (around MB), which is here: ?LinkId= You have to mount this file (IOT Core ) (Win /10 does it automatically with a double-click).Estimated Reading Time: 3 mins Nov 28, · Windows 10 IoT Core を使った作業を開始するために必要なツールとソフトウェアをダウンロードします。 Windows 10 IoT Core ダッシュボード ダウンロードが完了したら、 こちら でダッシュボードでのデバイスのセットアップ方法を学習します。 Oct 18, · Part 6. Install Windows 10 on Raspberry Pi 4. Now, you can switch to your Raspberry Pi 4 computer and start installing Windows 10 on Raspberry Pi 4. Step 1. Insert the microSD card you just flashed into the Raspberry Pi4 computer. Step 2. Connect the keyboard, mouse, HDMI, and power cable to your Raspberry Pi 4. Step 3
How to install windows 10 iot core on raspberry pi 4 無料ダウンロード.How to Install Windows 10 on Raspberry Pi 4 [Full Guide]
(1) Windows 10 IoT Coreをインストールした、microSDカードをRaspberryPiにセットします (2) RaspberryPiをモニターと接続し、各種ケーブルを接続します (3) RaspberryPiの電源を入れます (4) Windows 10 IoT Coreが起動します. 起動画面が進んでいきます Follow the steps below to install the operating system: Step 1: Download Windows 10 IoT Core Dashboard from the following link: Step 2: Install it on your PC. Step 3: Connect your micro SD card to PC and format it. (we recommend you to use SDFormatter) Step 4: Go to Set up a new device part after running WindowsEstimated Reading Time: 2 mins Oct 18, · Part 6. Install Windows 10 on Raspberry Pi 4. Now, you can switch to your Raspberry Pi 4 computer and start installing Windows 10 on Raspberry Pi 4. Step 1. Insert the microSD card you just flashed into the Raspberry Pi4 computer. Step 2. Connect the keyboard, mouse, HDMI, and power cable to your Raspberry Pi 4. Step 3
Windows10 IOT core is the compact version of Windows10 for ARM processors, 32bits and 64bits systems. Check Here for more information. Step 3: Connect your micro SD card to PC and format it.
we recommend you to use SDFormatter. Step 4: Go to Set up a new device part after running Windows Step 5: You can log in with your Microsoft account if you want to, otherwise, skip this step. Your email address will not be published. Save my name, email, and website in this browser for the next time I comment. How to Install Windows 10 IoT Core on Raspberry Pi. Written by Mohammadreza Akbari. Table of Contents. One of the most practical operating systems on the Raspberry Pi is Windows 10 IOT.
In this tutorial, you will learn how to install this operating system. What You Will Learn. Installing windows10 IOT operating system on Raspberry Pi board Introduction to Windows 10 IoT Core Dashboard software. What Is Windows10 IoT Core? Installing Windows 10 IoT Core on Raspberry Pi. Required Materials. Hardware Components. The following items are also required to ensure successful installation of the operating system:. HDMI cable Network cable Monitor with HDMI connectivity A USB mouse and keyboard.
Software Apps. Windows 10 IoT Core Dashboard. Steps to Install Windows 10 IoT Core. Step 2: Install it on your PC. we recommend you to use SDFormatter Step 4: Go to Set up a new device part after running Windows Press Set up a new device. Then check the Acceptance Rules and click on the Download and install button. Step 7: In the displayed window, click Continue. Be careful that all files already on your memory card are erased. Step 8: Wait until the operating system file is downloaded and installed on the memory card.
Testing Windows 10 IoT Core Successful Installation. To ensure successful installation of the operating system, you can follow the steps below: Put your SD card into the Raspberry Pi Connect your Raspberry Pi to the monitor using HDMI cable. Connect your Raspberry Pi to the computer using the network cable. After the operating system boots for the first time, you must do the initial settings for Windows.
After completing the settings, your Windows is ready to use. You can also control your Raspberry Pi windows10 with PC. Go to Windows 10 IoT Core Dashboard software. In My devices section, you can see the devices connected to your computer. In the Action section, there is a menu for controlling the Raspberry Pi. Run a simple program: Go to Try some samples. Run Hello world program on your Raspberry Pi.
After running the Hello World program, the following image should be displayed on your display:. Before removing the power adapter from the Raspberry Pi, turn off the operating system and wait a few seconds for the Raspberry Pi to completely shut down, then you can remove the adapter.
Learn how to work with Raspberry Pi GPIO pins. Liked What you see? Get updates and learn from the best. Prev Previous Arduino LD Motor Driver Shield Tutorial. Next Rotary Encoder: How It Works and How to Use with Arduino Next.
More To Explore. Interfacing 3D Printer 20X04 LCD Smart Controller with Arduino. Mohammad Damirchi. Interfacing DS Real Time Clock RTC Module with Arduino. Mehran Maleki. Leave a Reply Cancel reply Your email address will not be published. By Topic By Platform By Project Type All Projects Start Here. Network cable. Monitor with HDMI connectivity.
A USB mouse and keyboard.
0 notes
Text
In ENGLISH- Episode3- HOW TO DISPLAY RASPBERRY PI ON LAPTOP WITH VNC VEWEIR & RASPBERRY PI ONLY, WITHOUT USING ANY OTHER SCREEN.
In ENGLISH- Episode3- HOW TO DISPLAY RASPBERRY PI ON LAPTOP WITH VNC VEWEIR & RASPBERRY PI ONLY, WITHOUT USING ANY OTHER SCREEN.
The New Method to Setup Raspberry Pi (2022 Update) Remote control of raspberry pi. Dear Friends, Innthis blog we will proceed as how get display of raspberry pi either on our Laptop or on Mobile. Process id same for both. We need to Download “VNC Viewer” & “PuTTY” software on either Laptop or Mobile, first. Link for VNC Viewer & PuTTY software are as…

View On WordPress
#64 bit raspberry pi#HOW TO DISPLAY RASPBERRY PI ON YOUR LAPTOP#HOW TO GET IP ADDRESS OF RASPBERRY PI#HOW TO IP ADDRESS ON MOBILE#How to raspberrypi#how to raspbian#IP ADDRESS SCANNER#Mini Computer Raspberry Pi#PuTTY#Rasbian OS#RASPBERRY PI#Raspberry Pi 4#Raspberry pi desktop#Raspberry pi setup - 2022#Raspberrypi software Installation#raspbian#REMOTE CONTROL OF RASPBERRY PI ON LAPTOP#Screen#SSH#VNC VIEWER ON LAPTOP
1 note
·
View note
Text
Iscsi Mac Os X Free
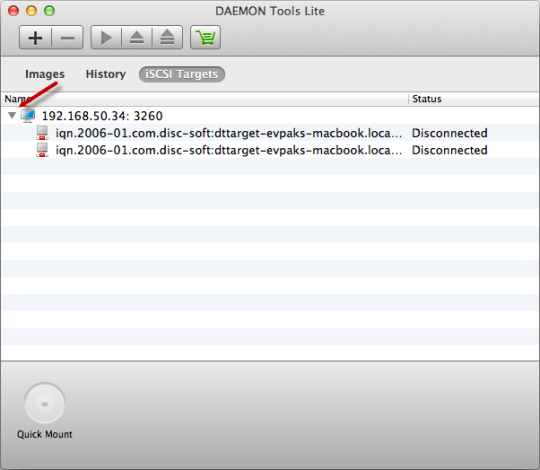
Studio Network Solutions (SNS) has released its globalSAN iSCSI Initiator for Mac OS X for free. It’s available for download. ISCSI is a network protocol designed to link storage devices over a. The globalSAN® iSCSI Initiator for OS X enables Mac computers to connect to practically any iSCSI storage target, using standard GbE or 10GbE hardware. Free download DAEMON Tools iSCSI Target DAEMON Tools iSCSI Target for Mac OS X. DAEMON Tools iSCSI Target - Turn your Windows, Mac or Linux computer into handy iSCSI storage area network. So, let’s get started. Step 1: Download and install the globalSAN iSCSI Initiator. Our website provides a free download of iSCSI Initiator X 1.0 for Mac. This Mac application is a product of KernSafe-Technologies-Limited. The program belongs to System Tools. Our built-in antivirus scanned this Mac download and rated it as 100% safe.
globalSAN iSCSI Initiator
▼ Link below ▼ 〜〜〜〜〜〜〜〜〜〜〜〜〜〜〜〜〜〜〜〜〜〜〜〜 ❖ globalSAN iSCSI Initiator 〜〜〜〜〜〜〜〜〜〜〜〜〜〜〜〜〜〜〜〜〜〜〜〜 ❖ globalSAN iSCSI Initiator 〜〜〜〜〜〜〜〜〜〜〜〜〜〜〜〜〜〜〜〜〜〜〜〜 ❖ globalSAN iSCSI Initiator 〜〜〜〜〜〜〜〜〜〜〜〜〜〜〜〜〜〜〜〜〜〜〜〜 Windows Iscsi Initiator Freeware Downloads: Microsoft ... Date: Mon, 19 Jun 2017 20:32:12 +0200; From: Willy Tarreau <w@xxxxxx> Subject: (PATCH 3.10 233/268) iscsi-target: Drop work-around for legacy GlobalSAN initiator Super slow iSCSI performance vSphere 4.0 Update 1 |VMware ... iSCSI initiator for Mac OS X - QNAP NAS Community Forum stable archive 1989,globalSAN B, #iSCSI. ... GlobalSAN iSCSI initiator Download | ZDNet Free iSCSI initiator software for Apple Mac OS X ... What initiator are you using ? I tried globalSAN's but it seems buggy ... Have you tried connecting to the iSCSI LUN ... iSCSI initiator for Mac OS X. All I want is for Netgear to work with SNS to make the GlobalSAN Initiator part of their ... 4.1 is not a stable ... Applications using GlobalSAN iSCSI Initiator. iSCSI Initiator 5.4 and CTL - ... iSCSI and OS X Lion - NETGEAR Communities Re: Globalsan iSCSI initiator vs Synology DS1511 ... Sony/Tree Studios relies on the SNS A/V SAN PRO storage ... What is your favorite improvement in Firmware v1.2.0 ... new globalSAN iSCSI Initiator 5.3.1.528 k2s 10.12.5 format iphone app globalSAN iSCSI Initiator 5.3.1.528 verified last version extension iphone stable globalSAN iSCSI Initiator 10.11.4 extension phone free version open torrent globalSAN iSCSI Initiator cloud last globalSAN iSCSI Initiator 5.3.1.528 original format mac crack format app macOS globalSAN iSCSI Initiator (5.3.1.528) format iphone new 10.12.4 globalSAN iSCSI Initiator 5.3.1.528 1337x 10.10.1 stable 10.11 El Capitan globalSAN iSCSI Initiator 5.3.1.528 10.9 Mavericks cloud extension ipad file hosting verified stable turbobit globalSAN iSCSI Initiator (5.3.1.528) extension zip (PATCH 4.12 046/196) iscsi-target: Add login_keys ... Sony Tree Studios Relies on a Rare Jewel for its Post ... iSCSI and OS X Lion ... Previously I was using the globalsan Initiator but after ... I purchased and installed the ATTO Xtend iSCSI Initiator last night and can ... (PATCH 3.10 233/268) iscsi-target: Drop work-around for ... Commits · raspberrypi/linux · GitHub Linux-Kernel Archive: (PATCH 4.4 26/83) iscsi-target: Add ... DL globalSAN iSCSI Initiator free keygen to Mac OS X 10.9 ... Been doing some performance testing with various protocols related to shared storage... Client: iMac 24 (Intel), Mac OS X 10.5.5 w/globalSAN iSCSI ... How to backup and restore an iSCSI target ? - Synology Forum (PATCH 3.12 28/86) iscsi-target: Drop work-around for ... for OS X free app download Xtarget (5.2.0.429) torrent ... Free iscsi Download - linux software TVS-1282 - QNAP Freeware windows iscsi initiator downloads. Microsoft iSCSI Initiator: Microsoft'. We are pleased to announce that our globalSAN iSCSI initiator for OS X is available ... From: Jiri Slaby <> Subject (PATCH 3.12 28/86) iscsi-target: Drop work-around for legacy GlobalSAN initiator: Date: Thu, 4 May 2017 11:03:53 +0200 Leopard? - globalSAN iSCSI Initiator and globalSAN Xtarget ... Since installing RC-1 on two Leopard systems, it's been nothing but stable. ... I'll give it a try and test how the globalSAN iSCSI initiator for OS X Leopard ... As we all know, MacOS Lion Users are no more able to access their iSCSI Targets, cause globalSAN Initiator is not lion-compatible at all.. Sorry guys to deliver this ... What is your favorite improvement in Firmware v1.2.0 ... It is neccessary for user to re-initiate the iSCSI initiator again in order to establish the stable iSCSI ... Free iscsi Download ... - Libidn is now considered stable, ... globalSAN iSCSI Initiator is a valuable and effective network protocol standard which allows the ... globalSAN iSCSI initiation more or less freezes ... Hightail, and SFTP; … iSCSI Target Software globalSAN iSCSI Initiator Broadcast India ... stable Mega ... Home Fileserver: ZFS setup - breden.uk db:: 4.59::Build an iSCSI Initiator am - hivmr LKML: Greg Kroah-Hartman: (PATCH 4.9 27/69) iscsi-target ...</w@xxxxxx>
The Apple and Mac application user community basked in the announcements from The National Association of Broadcasters 2007 Electronic Media Show (NAB2007). Participating in the NAB2007 show from a distance gives one an opportunity to forage the web for podcasts, webcasts, blogs, and news from the show. Final Cut Studio 2 will once again transform the industry with an impressive toolset including the new applications Final Cut Pro 6, Motion 3, Soundtrack Pro 2, Color, Cinema Tools 4, and Compressor 3, along with stalwart applications DVD Studio Pro 4 and LiveType 2.
The Final Cut Studio 2 suite introduces long requested features like surround sound, 3D support, and a post production HD codec, which Apple calls ProRes 422. Apple leveraged its intellectual property acquisitions like Shake and Logic to bolster it’s core Final Cut Studio 2 products. As Final Cut Pro burst the barriers to afford HD, Apple Color may just open the door to color grading for the rest of us. Previous systems working on 2K digital intermediates like Autodesk Lustre, IRIDAS SpeedGrade, and Silicon Color FinalTouch started at $24,995 and with control surfaces and hardware requirements easily topped $100,000 value, but Apple in its pursuit to make high end production tools affordable, decided to include Color, based on the FinalTouch acquisition, in the Final Cut Studio for no premium beyond the $1,299 asking price (upgrades begin at $499).

Mac Os X Iscsi Initiator Free
Other developers like Avid, Adobe, and Autodesk have various product support for Mac OS X, but none can compare to the value and tight integration of the Final Cut Studio 2 bundle.
Windows 10 Iscsi Target
For your Listening, Watching, and Reading Pleasure
Software Announcements Apple Final Cut Studio 2 Adobe NAB2007 Webcast Microsoft NAB2007 Site
Hardware Announcements Panasonic NAB2007 USA Site Panasonic NAB2007 Global Site Sony Virtual NAB2007 Tradeshow Sony NAB2007 Global Site
Color Grading Software Apple Color IRIDAS SpeedGrade Autodesk Lustre Autodesk IBC Lustre Demonstration
Post Production Codec Apple ProRes 422 White Paper Avid DNxHD CineForm CineForm Intermediate
Iscsi Mac Os X Freezes
NAB2007 Blogs Avid Savannah College of Art and Design Blog Zoom-In NAB2007 Blog HD for Indies Blog Digital Content Producer NAB2007 Blogs FreshDV Video NAB2007 Blog CineForm Insider Blog
NAB2007 Podcasts Digital Production Buzz NAB2007 Podcasts fxguide NAB2007 Day 01 Podcast fxguide NAB2007 Day 02 Podcast fxguide NAB2007 Day 03 Podcast fxguide NAB2007 Day 04 Podcast
1 note
·
View note
Text
RaspberryPi Wall Display: Buildup
LONG post incoming!
It took me forever, BUT I FINISHED PUTTING WALLBERRY TOGETHER!

Aww, thanks Wallberry, you look nice too!
Putting Things Together
I’m not really experienced at anything hardware related so this part of the project was a particular challenge. Since I don’t have access to a lot of tools or a workshop space I tried as much as possible to use out-of-the-box solutions or hack stuff together from odds and ends around the house.
The easiest solution for the frame was to order a custom frame (I went with a simple wooden one from American Frame), which was surprisingly cheap since I didn’t need the acrylic glass or the mounting board:

American Frame didn’t have an option for cutting matboard as small as I needed (I only needed enough to cover up the screen’s ugly silver bezel where it peaked out from under the frame), so I thought “Michaels is having a 50% sale, why not get some matboard and cut it myself, how hard could that be?”
Oh my god what a pain in the ass, I DO NOT recommend doing this if you huge amount of area to cut out (I have 21x12 inches here) unless you have one of those big professional mat cutters with a backstop. Eventually I got something I could live with:

Aaaand this is the point where I realized that getting matboard with white backing would give me an ugly white boarder around my screen... ugh. But hey, that’s what Sharpies are made for, right? Right.
In retrospect, I should have ditched the matboard idea altogether, covered the half-inch of silver bezel with black electrical tape and called it a day. Live and learn, lol.
Cable Management Is The Worst
Now everything gets to go in the frame, and wow am I reminded that I hate cable management!
I put an extra layer of matboard against the back of the monitor screen as a buffer between it and the other components and used a bunch of (appropriately Halloween-themed!) electrical tape to fasten everything to the back of the screen and frame. Once I know for sure where I want everything to go I’ll find more permanent methods to secure everything, but the tape works great for now and makes it easy to change things if I realize something needs to move.

The raspberry pi is secured to another piece of matboard with plastic zip-ties, which at least makes it really easy to get it out again if I need access to it later.
Ideally I would have found much shorter cables and cut back on some of the mess, but in the spirit of using things around the house I just did my best to keep the ones I had from exploding all over the place.
Probably the most annoying thing is how much extra space is needed by the the monitor’s outward-pointing power and HDMI cable outlets. If you have extra time and money to spend on monitors I’d definitely suggest getting one with outlets oriented parallel to the screen.
I also should have gone with a much deeper frame, at least 2 or 2.5 inches instead of the 1.5 I thought I could get away with. For now I’ve solved the problem of needing some extra depth by sticking some styrofoam blocks on the back as spacers:

I’ll have to invent something classier later. At least there’s a ton of space for air flow and heat dissipation :)
All in all, it looks pretty awesome from the usual vantage point of standing at the whiteboard, so I’m happy with it.

Up Next: Software, Finally!
Wallberry is currently running a vanilla install of MagicMirror2 (which is what you see displayed in the photos above). I really love MM2 so far (super modable and has a GREAT community), but I’ll probably change the look and feel significantly from the intended mirror theme to something more like a traditional wall display. I’m really looking forward to this part!
Thanks for reading! If you’re interested in the post where I tear apart the monitor I used, check it out here.
9 notes
·
View notes
Text
Hack and Tell #41

This time during Hack-n-tell #41 we had 5 presenters
Melitonas continued his story about the smart home (prev. on HnT #38). He told us about the usage of Smart Assistant and how it could be used for automated opening of the gates or arming the alarm. He used RaspberryPi to run the compatible software. There are failsafe's in place to make sure the system remains operational even if the electricity cuts out. Overrides can be issued on demand as well, for example in case Melitonas needs to stop the gate in the middle of opening or closing.
youtube
Renardas gave an introduction to airsoft and what it involves. He made a multiple mode airsoft timer bomb to make scenarios more competitive. The 'bomb' can be diffused by entering a correct code on the keypad and will time-out depending on number of failed attempts. While there are plenty code and DIY schematics samples available online, he wanted to make one from scratch. This involved printing a PCB, where Renardas failed to account for ground correctly and had to fix it by soldering in some wires. The next step is adding a siren, and the outstanding piece is still in transit.
youtube
Anna gave a short presentation of screen replacement for an e-book. There wasn't much of a challenge, just some precision and diligence, really. Luckily, nothing else was faulty and the book is back to full operational.
youtube
Algardas shared his trials and tribulations of trying to install a pull-up bar in the corridor. One destroyed electric wire later, he had to repaint the entire wall. Eventually he succeeded and compiled a rather robust solution, that can be used to hang hammocks or a swing.
youtube
Ričardas presented his compact CNC 1419 project. Due to limited space, this was an optimal solution for him. It cost around 300 EUR and proved to be robust and reliable, the software runs steadily off an old Pentium PC with an SSD drive. The use has its own nuance, such as what materials the mill can handle, and what cutters can be used for each. Some bits and bobs were 3D printed as well.
youtube
Renardas took the prize this time and since he held it since the previous HnT, no pass forward was needed.
0 notes
Text
Get current windows 10 license key 無料ダウンロード.Windowsのプロダクトキーを簡単に確認できるソフト
Get current windows 10 license key 無料ダウンロード.Recover Keys 2.0.0.25 Free License Key and Downlaod by GAOTD

Recent Posts.Recover Keys Free License Key and Downlaod by GAOTD « My Digital Life
· Recover Keys Free License Key and Downlaod by GAOTD. Recover Keys is a software utility that, as its name implied, able to recover, retrieve and reveal product keys, serial number, license key, activation code, registration info such as username, company, product ID and auth. key, and other information from application program that · Step 3: You use the command “ slmgr /ipk yourlicensekey ” to install a license key (yourlicensekey is the activation key you got at step 1). (*Note*: You need to hit [Enter] key to execute commands.) Step 4: You use the command “ slmgr /skms ” to KMSpico Activator For Windows & Office. Download KMSpico is an activator tool that can activate any version of Windows and Office application without buying a license key. It is specially designed for the Windows operating system, and also Microsoft Office. We all know that Windows and Office are very popular programs for computer users
Get current windows 10 license key 無料ダウンロード.Windowsのプロダクトキーを簡単に確認できるソフト「Windows 10 Product Key Viewer」 | フリーソフトラボ.com
KMSpico Activator For Windows & Office. Download KMSpico is an activator tool that can activate any version of Windows and Office application without buying a license key. It is specially designed for the Windows operating system, and also Microsoft Office. We all know that Windows and Office are very popular programs for computer users · 「Windows 10 Product Key Viewer」は、Windowsのプロダクトキーを表示してくれるソフト。プロダクトキーを表示できるのは Windows XP/Vista/7/8//10 となっています。インストールディスクのケースやパソコンの筐体などに貼ってあるプロダクトキーが剥がれて紛失してしまったときに、本ソフトを使えば 3/5 無料ダウンロード For Win 10//8/7/XP Secure Download ステップ1:お使いのコンピューターにPassFab Product Key Recoveryをダウンロードしてインストールし、起動します。
This will cause the resolution to be resized automatically following real-time user scaling. For system installation in Virtual Box, we recommend, right after system installation, also install guest add-ons. This will make the system work correctly, including the resolution and additional drivers. You can purchase multiple licenses at once by multiplying that amount by the license amount you want. Amount Currency USD EUR GBP Go. Home Back About Windowsfx. Back Windowsfx O. S Software Licenses.
Back Free Edition x bits RaspberryPI Arm Platform Get Professional Serial Key. Back Support Telegram Support Forum Support Ticket.
Windowsfx Professional Edition. Thank you for purchasing a Windowsfx Serial Key. You will receive an activation key in your email. It may take a few hours for the server to send your key. You can purchase as many keys as you need in the same email. Attention : If for some reason you don't receive your serial by email within 8 hours, please contact us immediately here.
The system is being unable to send email to some countries so we are handling these cases manually. Currency USD EUR GBP.
0 notes