#react router params
Explore tagged Tumblr posts
Visit Tumblr Blog
Explore Tumblr blogs with no restrictions, modern design and the best experience.
Last Seen Tumblr Blogs


Fun Fact
Tumblr was attacked by a cross-site scripting worm deployed by the Internet troll group GNAA on Dec 3, 2012.
Text
React Router Tutorial for Beginners
#React #reactjs
React Router is a popular routing library for the React.js library. It allows developers to easily create Single Page Applications (SPAs) with multiple views, by providing a way to handle routing and rendering of components based on the URL. In this article, we’ll cover the basics of React Router and how to use it to build a basic SPA. What is Routing? Why use React Router? Installing React…

View On WordPress
#browserrouter#React#react router#react router dom#react router dom link#react router dom redirect#react router dom v6#react router example#react router history#react router link#react router npm#react router params#react router query params#react router redirect#react router switch#react router v6#react routing#reactjs#route react#useparams
0 notes
Photo

React Location just launched 🚀 It's a brand new router created by @tannerlinsley that provides “powerful, enterprise-grade routing for React apps.” ✅ Async Loaders & Elements ✅ 1st-class Integrated Search Params API ✅ Nested Layouts ✅ Lots more 👀 https://t.co/mExVVOF5sD
0 notes
Text
To Better Understand React Router
As I worked through phase 2 at Flatiron school, studying React, I felt it helped me understand JavaScript better. I made my way through this phase and was able to comprehend more about it than I expected. I was able to complete my final project and do my final review. During this review I found out I knew less about React than I thought, and I am thankful that my reviewer was able to point this out to me. This way I could go back and learn what I need to, to be able to know how React really works. I struggled with describing what React Router is and how it works when I was asked. So I would like to discuss what I have learned and have this blog as a reference to look back on if a reminder is needed.
To start, I now know React Router is a client-side routing library, "...React are libraries with prewritten code snippets that we can use and reuse to build applications." - Khan, Shahzad, et al. So it is this prewritten code that you can use for routing to different components within your application. It is client-side because the client/user handles when and where the routing takes place. React Router actually contains components and hooks that do that job and that is the prewritten code. Both these components and hooks work with the components you have created in your code. How they do this is with conditional rendering components based on the URL. If the current URL matches with what your components path is then it will display it. Also, uses JavaScript for programmatic navigation, programmatic meaning, "of, relating to, resembling, or having a program" - Merriam-Webster. If there is a link clicked to a certain page, it then changes the URL for that page, and updates/displays that page without requesting for a new HTML document. Or, it can also change the URL, and display a new page without the user clicking on a link. As mentioned before, it manages all of these tasks and actions with the prewritten components and hooks. I will now discuss some and how they work.
You first need to have react-router-dom installed in order to use React Router. Then it must be imported like so:

BrowserRouter is a component and is also the base for your whole app's routing. Doing that declares how you will be using React Router. You would want to wrap this around your whole app component, so that it can contain all the other components and hooks. You could also just use Router instead of Browser Router to shorten it up.
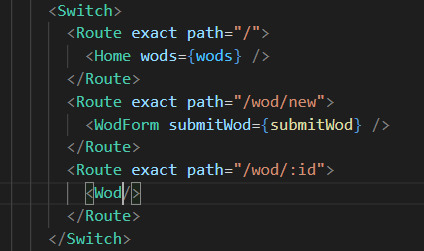
Next, you have your Route and Switch component for handling routing to your components. Route is given a path attribute which is given a certain URL, and it says if the current URL matches the path render the child component, your component. You then want to wrap all of your Route components within your Switch component. This is because if not, any of the routes that match the current URL all will render. Switch says to only render the first Route that matches, so yes the order you put them in is important. If it was not used a good example of what could happen is it would always render a home page because its URL usually is similar to the other's. It is recommended to move that Home component to the bottom of the others. The Switch definitely gives more predictable behavior. To keep from also rendering components with URL partial matches you can give your Route component an attribute of exact. This will only render if the URL matches exactly with the path. Some of my code for example:
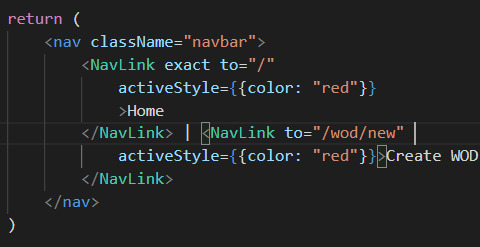
Using Link and NavLink components are what is going to make these Routes conditionally rendered. These both render a link or <a> to the DOM, when it is clicked, it changes the URL, re-renders Routes, and then displays the component whose path matches that new URL. Link is good for standard hyperlinks, where NavLink is better for a navigational bar. What makes it good for the bar is that you can add styling attributes to it. Like adding an active style to show which link is currently selected.
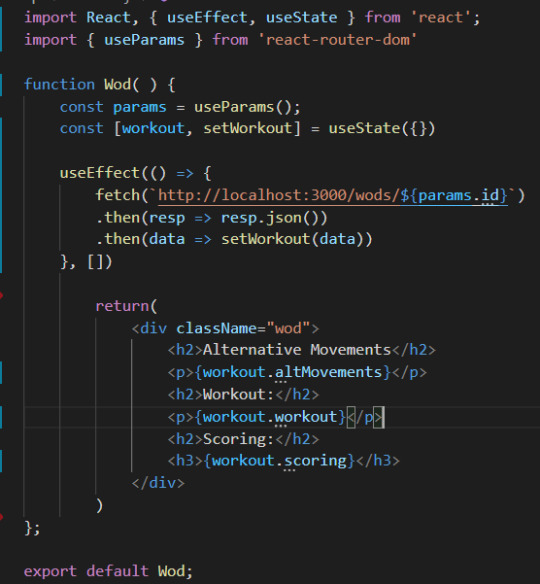
There is as well two hooks that can be used to get parts of a URL dynamically, the useRouteMatch and useParams hooks. This can be useful for when you have a component that gets rendered multiple time with different dynamic info. Or as well as nested information. For both hooks you want to create a variable; const match = useRouteMatch() and const params = useParams(). useRouteMatch returns an object with info about currently matched route and is good for nested info. useParams returns key/value pairs of the URL's parameters and is good for grabbing one specific component out of many. This is done usually by the components id. In my code below Wod stands for workout of the day. My Wod component gets rendered for each workout that comes from my JSON file. I used params to grab the to match the components path and single out specific workouts. So then it will only display that workout and the info that goes with it.
Finishing it off, we have a hook that can help give your app programmatic navigation. The hook is called useHistory and it can navigate the user to a new page based on any event that gets triggered, not just a click. For example, if the user logs out you can have it redirect them to the log in or home page. There is, as well, a component that is good for conditional rendering. The Redirect component does as it sounds, redirects the user to a new location. You can use this to redirect the user to the home page if a certain component is not found when an event is triggered, and other uses for it as well.
To conclude, having gone back and reading through lessons at Flatiron I know have a better understanding of React Router, and the hooks and components that make it up. I am thankful to my reviewer for assigning me to this, because now I feel more confident in using React. I also now know how to take better notes and plan to really make sure I understand all the material by the time of my next review. I hope this may help others if not just only me! Have fun coding all!
Sources:
“Programmatic.” Merriam-Webster.com Dictionary, Merriam-Webster, https://www.merriam-webster.com/dictionary/programmatic. Accessed 16 Sep. 2021.
Khan, Shahzad, et al. “What Is a JavaScript Library?” General Assembly Blog, General Assembly, 31 Mar. 2021, generalassemb.ly/blog/what-is-a-javascript-library/.
0 notes
Text
React url’den dinamik değişken göndermek, params

Uyeleri listelediğimde (1 durum)( tıkladıgım üyenin id’sini baska bir komponente (2 numara ile gösterilen )url ile gönderip olarada yakalamak istiyorum amac bu. Tıkladıgım id urlde gözükecek şunun gibi http://localhost:3001/edit/1
1. App js (updateuser diye bir component yaptık detay sayfası olarak dusunebilirz)componenti import ediyoruz
import UpdateUser from './components/updateUser'
ve router içinde url yapısını şu şekilde ayarlyoruz. (/edit/1 dersek UpdateUser componenti çıkacak)
<Route exact path='/edit/:id' component={UpdateUser} />
2. Users compomentinden de id göndereceğiz. Linki import etmeniz lazım onları artık söylemiyorum normal routerin özelliği anlattık
Sonra şu alttaki butonu ekliyoruz. id değişkenini edit/değişkenneyseo seklinde gönderiyor.
<Link to={`edit/${id}`} className="btn btn-dark"> Detay </Link>
3. Updateuser diye bir komponent olustuyoruz. Burası da id urlden yakaladığımız sayfa
import React, {Component} from 'react'; class UpdateUser extends Component { render() { console.log(this.props.match.params.id) return ( <div> <h3>Update</h3> <p>Gelen değer {this.props.match.params.id}</p> </div> ); } } export default UpdateUser;
0 notes
Text
An Introduction To React With Ionic
About The Author
I love building software for the web, writing about web technologies, and playing video games. More about Jerry …
Mobile app development using hybrid frameworks has come a long way since initial release in 2008. With the improvements being made to the JavaScript engine and improved processing power available to mobile phones, the major concern people had when they considered developing their apps using the hybrid approach — namely, performance — has all but been eliminated, and cross-platform frameworks have seen a surge in popularity.
We’re going to build a mobile application that pulls data from the Marvel Comics API; the data will show Marvel comics and you’ll be able to choose your favorites. At the end, we’ll create a native build of the project on Android.
The Ionic Framework is an open-source UI toolkit for building fast, high-quality applications using web technologies with integrations for popular frameworks like Angular and React. Ionic enables cross-platform development using either Cordova or Capacitor, with the latter featuring support for desktop application development using Electron.
In this article, we will explore Ionic with the React integration by building an app that displays comics using the Marvel Comics API and allows users to create a collection of their favorites. We’ll also learn how to integrate native capabilities into our app with Capacitor and generate builds for a native platform.
If you have not worked with Ionic in the past, or you’re curious to find out how Ionic works with React, this tutorial is for you.
Prerequisites
Before you can start building apps with the Ionic Framework, you will need the following:
Node.js (at least v10) installed on your computer
working knowledge of React
familiarity with the Hooks API
some experience with TypeScript
a native IDE, Android Studio for Android, or XCode for iOS
a Marvel developer account with an API key. You can get one here
Here’s a picture of what we’ll be building:
Marvel comics client app (Large preview)
Installing Ionic CLI
Ionic apps are created and developed primarily through the Ionic command line interface (CLI). The CLI offers a wide range of dev tools and help options as you develop your hybrid app. To proceed with this guide, you will need to make sure the CLI is installed and accessible from your terminal.
Open a new terminal window and run the following command:
npm install -g @ionic/cli
This will install the latest version of the Ionic CLI and make it accessible from anywhere on your computer. If you want to confirm that the install was successful, you can run the following command:
ionic --version
This command will output the installed Ionic version on your computer and it should be similar to this:
6.4.1
You can now bootstrap Ionic apps for the officially supported framework integrations — Angular and React — using any of the prebuilt templates available.
Starting An Ionic React Application
Creating an Ionic React application is easy using the CLI. It provides a command named start that generates files for a new project based on the JavaScript framework you select. You can also choose to start off with a prebuilt UI template instead of the default blank “Hello world” app.
To get started, run the following command:
ionic start marvel-client tabs --type=react --capacitor
This command will create a new Ionic React app using the tabs template. It also adds a Capacitor integration to your app. Capacitor is a cross-platform app runtime that makes running web apps natively on iOS, Android, and desktop easy.
Navigate your terminal to the newly created directory and run start the server.
cd marvel-client ionic serve
Now point your browser to http://localhost:8100 to see your app running.
Note: If you have used create-react-app (CRA) before, your current project’s directory structure should feel very familiar. That’s because, in order to keep the development experience familiar, Ionic React projects are created using a setup similar to that found in a CRA app. React Router is also used to power app navigation under the hood.
Creating A React Component
You are going to create a reusable React component in this step. This component will receive data and display information about a comic. This step also aims to help demonstrate that Ionic React is still just React.
Delete the files for the ExploreContainer component from src/components and remove its imports from the .tsx files in the src/pages directory.
import React from 'react'; import { IonContent, IonHeader, IonPage, IonTitle, IonToolbar } from '@ionic/react'; import ExploreContainer from '../components/ExploreContainer'; import './Tab1.css'; const Tab1: React.FC = () => { return ( <IonPage> ... <IonContent> <IonHeader collapse="condense"> <IonToolbar> <IonTitle size="large">Tab 1</IonTitle> </IonToolbar> </IonHeader> <ExploreContainer name="Tab 1 page" /> </IonContent> </IonPage> ); }; export default Tab1;
In your Tab1.tsx file, also remove the content within the <IonContent></IonContent> tag.
Next, create a file named ComicCard.tsx in your src/components directory. Then, open the file in your editor and add the following contents:
import React, { FC } from 'react'; import { Comic } from '../interfaces/comic'; import { IonImg, IonCard, IonCardTitle, IonCardSubtitle, IonCardHeader } from '@ionic/react'; type Props = { comic: Comic; } const ComicCard: FC = (props): JSX.Element => { const { comic } = props; return ( <IonCard> <div style= > <IonImg src={`${comic.thumbnail.path}.${comic.thumbnail.extension}`} /> </div> <IonCardHeader> <IonCardSubtitle> {comic.title} </IonCardSubtitle> <IonCardTitle> <h3> {comic.series.name} </h3> </IonCardTitle> </IonCardHeader> </IonCard> ); } export default ComicCard;
Your ComicCard component receives props containing details of a comic and renders the information using an IonCard component. Cards in Ionic are usually composed using other subcomponents. In this file, you are using the IonCardTitle and IonCardSubtitle components to render the comic title and series information within a IonCardHeader component.
Consuming The Marvel API
To use your newly created component you would have to fetch some data from the Marvel API. For the purpose of this guide, you are going to use the axios package to make your HTTP Requests. You can install it by running the following command:
yarn add axios
Next, add the following folder to your src directory:
# ~/Desktop/marvel-client/src mkdir -p services
Then, cd into the services directory and create a file named api.ts:
# ~/Desktop/marvel-client/src/services touch api.ts
Finally, open the file and add the following contents:
import axios from 'axios'; import { DataContainer } from '../interfaces/data-container'; import { Comic } from '../interfaces/comic'; const API_KEY = '813xxxxxxxxxxxxxxxxxx'; const api = axios.create({ baseURL: 'https://gateway.marvel.com:443/v1/public', headers: { 'Content-Type': 'application/json', }, }); api.interceptors.response.use((response) => { if (response.status === 200) { return response.data.data; } }); export function getComics(): Promise<DataContainer<Comic>> { return api.get('/comics', { params: { apikey: API_KEY, limit: 10, hasDigitalIssue: true, }, }); }
Be sure to replace the value of API_KEY with your own API key. If you don’t have one, you can request one by signing up at the Marvel developer website. You also need to set up your account to allow requests from your local development server by adding localhost* to your Marvel authorized referrers list (see the image below):
Marvel Account. (Large preview)
You now have an axios instance configured to use the Marvel API. The api.ts file has only one export, which hits the GET /comics endpoint and returns a collection of comics. You are limiting the results to only those that are available digitally. You will now proceed to use the API Service in your application.
Open the Tab1.tsx file and replace the contents with the following:
import React, { FC, useState, useEffect } from 'react'; import { IonContent, IonHeader, IonPage, IonTitle, IonToolbar, IonSpinner, IonGrid, IonRow, IonCol } from '@ionic/react'; import './Tab1.css'; import ComicCard from '../components/ComicCard'; import { Comic } from '../interfaces/comic'; import { getComics } from '../services/api'; const Tab1: FC = () => { const [comics, setComics] = useState(null as Comic[] | null); const [loading, setLoading] = useState(false); const fetchComics = () => { setLoading(true); getComics().then((response) => { if (response && response.results) { setComics(response.results); } }).finally(() => { setLoading(false); }); }; useEffect(() => { fetchComics(); }, []) return ( <IonPage> <IonHeader> <IonToolbar> <IonTitle>Home</IonTitle> </IonToolbar> </IonHeader> <IonContent> {(loading) && ( <div className="ion-text-center ion-padding"> <IonSpinner name="crescent" /> </div> )} {(comics) && ( <IonGrid> <IonRow> {comics.map((comic) => ( <IonCol key={comic.id} sizeXs="12" sizeSm="6" sizeMd="4" sizeLg="3" sizeXl="2"> <ComicCard comic={comic} /> </IonCol> ))} </IonRow> </IonGrid> )} </IonContent> </IonPage> ); }; export default Tab1;
The file above is an example of a page in Ionic. Pages are components that can be accessed with a route/URL. To ensure transitions between pages work properly, it is necessary to have the IonPage component be the root component in your page.
IonHeader is a component meant to exist at the top of a page. It’s not required for all pages, but it can contain useful components like the page title, the IonBackButton component for navigating between pages, or the IonSearchBar. IonContent is the main content area for your pages. It’s responsible for providing the scrollable content that users will interact with, plus any scroll events that could be used in your app.
Inside your component, you have a function called fetchComics() — called once inside the useEffect() hook — which makes a request to get comics from the Marvel API by calling the getComics() function you wrote earlier. It saves the results to your component’s state via the useState() hook. The IonSpinner component renders a spinning icon while your app is making a request to the API. When the request is completed, you pass the results to the ComicCard component you created earlier.
At this point your app should look like this:
App home page. (Large preview)
In the next step, you will learn how to use Capacitor plugins in your app by enabling offline storage.
Creating a Personal Collection of Marvel Comics
Your app looks good so far, but it isn’t very useful as a mobile app. In this step you will extend your app’s functionality by allowing users to ‘star’ comics, or save them as favorites. You will also make information about the saved favorites available to view offline by using the Capacitor Storage plugin.
I’m a big fan of The Collector. (Large preview)
First, create a file named util.ts in your src directory:
# ~/Desktop/marvel-client/src touch util.ts
Now, open the file and paste the following contents:
import { Plugins } from '@capacitor/core'; import { Comic } from './interfaces/comic'; const { Storage, Toast } = Plugins; export const updateFavourites = async (comic: Comic): Promise => { const saved = await Storage.get({ key: 'savedFavourites' }); const favourites: Comic[] | null = (saved && saved.value) ? JSON.parse(saved.value) : null; if (!favourites) { const comics = [comic]; await Storage.set({ key: 'savedFavourites', value: JSON.stringify(comics), }); return Toast.show({ text: 'Added to favourites', }); } const copyOfFavourites = favourites.slice(); const { id } = comic; const isSavedIndex = copyOfFavourites.findIndex((c) => c.id === id); if (isSavedIndex !== -1) { copyOfFavourites.splice(isSavedIndex, 1); await Storage.set({ key: 'savedFavourites', value: JSON.stringify(copyOfFavourites), }); return Toast.show({ text: 'Removed from favourites', }); } else { copyOfFavourites.unshift(comic); await Storage.set({ key: 'savedFavourites', value: JSON.stringify(copyOfFavourites), }); return Toast.show({ text: 'Added to favourites', }); } }; export const getFavourites = async (): Promise<Comic[] | null> => { const saved = await Storage.get({ key: 'savedFavourites', }); return (saved && saved.value) ? JSON.parse(saved.value) : null; }; export const checkFavourite = async (id: number): Promise<boolean> => { const saved = await Storage.get({ key: 'savedFavourites', }); const favourites: Comic[] | null = (saved && saved.value) ? JSON.parse(saved.value) : null; if (favourites) { const isSavedIndex = favourites.findIndex((c) => c.id === id); if (isSavedIndex !== -1) { return true; } } return false; };
The Storage plugin provides a key-value store for simple data, while the Toast plugin provides a notification pop-up for displaying important information to a user.
The updateFavourites() function in this file takes a single argument, a Comic object, and adds it to the device storage if it doesn’t exist, or removes it from the device storage if it was already saved. getFavourites() returns the user’s saved comics, while checkFavourites() accepts a single argument, a Comic resource ID, and looks it up in the saved comics, returning true if it exists, or false otherwise.
Next, open the ComicCard.tsx file and make the following changes to allow your app’s users to save their favorite comics:
import { star, starOutline } from 'ionicons/icons'; import * as utils from '../util'; type Props = { comic: Comic; } const ComicCard: FC<Props> = (props): JSX.Element => { const { comic } = props; const [isFavourite, setIsFavourite] = useState(false); const checkFavourite = (): void => { utils.checkFavourite(comic.id).then((value: boolean) => { setIsFavourite(value); }); } useEffect(() => { checkFavourite(); }); return ( <IonCard> ... <IonCardHeader> ... </IonCardHeader> <IonCardContent> <IonButton onClick={(): void => { utils.updateFavourites(comic).finally(() => { checkFavourite(); }); }} > <IonIcon icon={(isFavourite) ? star : starOutline} color="light" /> {(isFavourite) ? 'Remove' : 'Add' } </IonButton> </IonCardContent> </IonCard> ); }
Your ComicCard component now has a IonButton component that, when clicked, calls the updateFavourites() function you wrote earlier. Remember that the function acts like a toggle, removing the comic if it was already saved, or else saving it. Don’t forget to add the imports for the new Ionic components, IonButton, IonCardContent and IonIcon, just added to this component.
Now for the final part of this step, where you will be rendering saved comics in their own page. Replace the contents of the Tab2.tsx file with the following:
import React, { useState } from 'react'; import { IonContent, IonHeader, IonPage, IonTitle, IonToolbar, IonGrid, IonRow, IonCol, useIonViewWillEnter } from '@ionic/react'; import './Tab2.css'; import { Comic } from '../interfaces/comic'; import { getFavourites } from '../util'; import ComicCard from '../components/ComicCard'; const Tab2: React.FC = () => { const [comics, setComics] = useState(null as Comic[] | null); const loadComics = (): void => { getFavourites().then((result) => { if (result) { setComics(result); } }) }; useIonViewWillEnter(() => { loadComics(); }); return ( <IonPage> <IonHeader> <IonToolbar> <IonTitle>Favourites</IonTitle> </IonToolbar> </IonHeader> <IonContent> {(comics) && ( <IonGrid> <IonRow> {comics.map((comic) => ( <IonCol key={comic.id} sizeXs="12" sizeSm="6" sizeMd="4" sizeLg="3" sizeXl="2"> <ComicCard comic={comic} /> </IonCol> ))} </IonRow> </IonGrid> )} </IonContent> </IonPage> ); }; export default Tab2;
This page is quite similar to the Tab1 page but, instead of making an API request to get comics, you are accessing locally saved data. You are also using the Ionic life cycle hook, useIonViewWillEnter(), instead of a useEffect() hook, to make a call to the function that reads saved comics and updates the component’s state. The useIonViewWillEnter() hook gets called just as the page being navigated to enters into view.
Your application now makes use of a few native plugins to improve its functionality. In the next step, you will learn how to generate a native project for Android and create a native app using Android Studio.
Note: You can delete the files related to *Tab3* and remove the import and related *IonTab* component in the *App.tsx* file.
Generating A Native Project
Ionic comes with support for cross-platform app runtimes such as Capacitor and Cordova. These frameworks help you to build and run apps developed using Ionic on a native device or emulator. For the purpose of this guide, you will be using Capacitor to generate native project files.
Before proceeding to adding a platform, you will need to generate a production build of your application. Run the following command in your project’s root directory to do so:
ionic build
Now let’s add Capacitor to your project and generate the assets required to build a native application. Capacitor provides a CLI which can be accessed in your project by using npx or from the ionic CLI as shown below:
Using npx
npx cap add android
This command adds the android platform to your project. Other possible platform values are ios and electron.
Using ionic
Since you initialized your project using the --capacitor flag earlier, Capacitor has already been initialized with your project’s information. You can proceed to adding a platform by running the following command:
ionic capacitor add android
This command will install the required dependencies for the android platform. It will also generate files required for a native Android project and copy over the assets you built earlier when running ionic build.
If you have installed Android Studio, you can now open your project in Android Studio by running:
ionic capacitor open android
Finally, build your project:
Generate an APK. (Large preview)
Conclusion
In this guide, you have learned how to develop hybrid mobile applications using Ionic Framework’s React integration. You also learned how to use Capacitor for building native apps, specifically for the Android platform. Check out the API docs as there are a lot more UI components available to be used in Ionic apps that we didn’t explore. You can find the code on GitHub.
References
(ks, ra, yk, il, og)
Website Design & SEO Delray Beach by DBL07.co
Delray Beach SEO
source http://www.scpie.org/an-introduction-to-react-with-ionic/ source https://scpie.tumblr.com/post/617303473044799488
0 notes
Text
An Introduction To React With Ionic
About The Author
I love building software for the web, writing about web technologies, and playing video games. More about Jerry …
Mobile app development using hybrid frameworks has come a long way since initial release in 2008. With the improvements being made to the JavaScript engine and improved processing power available to mobile phones, the major concern people had when they considered developing their apps using the hybrid approach — namely, performance — has all but been eliminated, and cross-platform frameworks have seen a surge in popularity.
We’re going to build a mobile application that pulls data from the Marvel Comics API; the data will show Marvel comics and you’ll be able to choose your favorites. At the end, we’ll create a native build of the project on Android.
The Ionic Framework is an open-source UI toolkit for building fast, high-quality applications using web technologies with integrations for popular frameworks like Angular and React. Ionic enables cross-platform development using either Cordova or Capacitor, with the latter featuring support for desktop application development using Electron.
In this article, we will explore Ionic with the React integration by building an app that displays comics using the Marvel Comics API and allows users to create a collection of their favorites. We’ll also learn how to integrate native capabilities into our app with Capacitor and generate builds for a native platform.
If you have not worked with Ionic in the past, or you’re curious to find out how Ionic works with React, this tutorial is for you.
Prerequisites
Before you can start building apps with the Ionic Framework, you will need the following:
Node.js (at least v10) installed on your computer
working knowledge of React
familiarity with the Hooks API
some experience with TypeScript
a native IDE, Android Studio for Android, or XCode for iOS
a Marvel developer account with an API key. You can get one here
Here’s a picture of what we’ll be building:
Marvel comics client app (Large preview)
Installing Ionic CLI
Ionic apps are created and developed primarily through the Ionic command line interface (CLI). The CLI offers a wide range of dev tools and help options as you develop your hybrid app. To proceed with this guide, you will need to make sure the CLI is installed and accessible from your terminal.
Open a new terminal window and run the following command:
npm install -g @ionic/cli
This will install the latest version of the Ionic CLI and make it accessible from anywhere on your computer. If you want to confirm that the install was successful, you can run the following command:
ionic --version
This command will output the installed Ionic version on your computer and it should be similar to this:
6.4.1
You can now bootstrap Ionic apps for the officially supported framework integrations — Angular and React — using any of the prebuilt templates available.
Starting An Ionic React Application
Creating an Ionic React application is easy using the CLI. It provides a command named start that generates files for a new project based on the JavaScript framework you select. You can also choose to start off with a prebuilt UI template instead of the default blank “Hello world” app.
To get started, run the following command:
ionic start marvel-client tabs --type=react --capacitor
This command will create a new Ionic React app using the tabs template. It also adds a Capacitor integration to your app. Capacitor is a cross-platform app runtime that makes running web apps natively on iOS, Android, and desktop easy.
Navigate your terminal to the newly created directory and run start the server.
cd marvel-client ionic serve
Now point your browser to http://localhost:8100 to see your app running.
Note: If you have used create-react-app (CRA) before, your current project’s directory structure should feel very familiar. That’s because, in order to keep the development experience familiar, Ionic React projects are created using a setup similar to that found in a CRA app. React Router is also used to power app navigation under the hood.
Creating A React Component
You are going to create a reusable React component in this step. This component will receive data and display information about a comic. This step also aims to help demonstrate that Ionic React is still just React.
Delete the files for the ExploreContainer component from src/components and remove its imports from the .tsx files in the src/pages directory.
import React from 'react'; import { IonContent, IonHeader, IonPage, IonTitle, IonToolbar } from '@ionic/react'; import ExploreContainer from '../components/ExploreContainer'; import './Tab1.css'; const Tab1: React.FC = () => { return ( <IonPage> ... <IonContent> <IonHeader collapse="condense"> <IonToolbar> <IonTitle size="large">Tab 1</IonTitle> </IonToolbar> </IonHeader> <ExploreContainer name="Tab 1 page" /> </IonContent> </IonPage> ); }; export default Tab1;
In your Tab1.tsx file, also remove the content within the <IonContent></IonContent> tag.
Next, create a file named ComicCard.tsx in your src/components directory. Then, open the file in your editor and add the following contents:
import React, { FC } from 'react'; import { Comic } from '../interfaces/comic'; import { IonImg, IonCard, IonCardTitle, IonCardSubtitle, IonCardHeader } from '@ionic/react'; type Props = { comic: Comic; } const ComicCard: FC = (props): JSX.Element => { const { comic } = props; return ( <IonCard> <div style= > <IonImg src={`${comic.thumbnail.path}.${comic.thumbnail.extension}`} /> </div> <IonCardHeader> <IonCardSubtitle> {comic.title} </IonCardSubtitle> <IonCardTitle> <h3> {comic.series.name} </h3> </IonCardTitle> </IonCardHeader> </IonCard> ); } export default ComicCard;
Your ComicCard component receives props containing details of a comic and renders the information using an IonCard component. Cards in Ionic are usually composed using other subcomponents. In this file, you are using the IonCardTitle and IonCardSubtitle components to render the comic title and series information within a IonCardHeader component.
Consuming The Marvel API
To use your newly created component you would have to fetch some data from the Marvel API. For the purpose of this guide, you are going to use the axios package to make your HTTP Requests. You can install it by running the following command:
yarn add axios
Next, add the following folder to your src directory:
# ~/Desktop/marvel-client/src mkdir -p services
Then, cd into the services directory and create a file named api.ts:
# ~/Desktop/marvel-client/src/services touch api.ts
Finally, open the file and add the following contents:
import axios from 'axios'; import { DataContainer } from '../interfaces/data-container'; import { Comic } from '../interfaces/comic'; const API_KEY = '813xxxxxxxxxxxxxxxxxx'; const api = axios.create({ baseURL: 'https://gateway.marvel.com:443/v1/public', headers: { 'Content-Type': 'application/json', }, }); api.interceptors.response.use((response) => { if (response.status === 200) { return response.data.data; } }); export function getComics(): Promise<DataContainer<Comic>> { return api.get('/comics', { params: { apikey: API_KEY, limit: 10, hasDigitalIssue: true, }, }); }
Be sure to replace the value of API_KEY with your own API key. If you don’t have one, you can request one by signing up at the Marvel developer website. You also need to set up your account to allow requests from your local development server by adding localhost* to your Marvel authorized referrers list (see the image below):
Marvel Account. (Large preview)
You now have an axios instance configured to use the Marvel API. The api.ts file has only one export, which hits the GET /comics endpoint and returns a collection of comics. You are limiting the results to only those that are available digitally. You will now proceed to use the API Service in your application.
Open the Tab1.tsx file and replace the contents with the following:
import React, { FC, useState, useEffect } from 'react'; import { IonContent, IonHeader, IonPage, IonTitle, IonToolbar, IonSpinner, IonGrid, IonRow, IonCol } from '@ionic/react'; import './Tab1.css'; import ComicCard from '../components/ComicCard'; import { Comic } from '../interfaces/comic'; import { getComics } from '../services/api'; const Tab1: FC = () => { const [comics, setComics] = useState(null as Comic[] | null); const [loading, setLoading] = useState(false); const fetchComics = () => { setLoading(true); getComics().then((response) => { if (response && response.results) { setComics(response.results); } }).finally(() => { setLoading(false); }); }; useEffect(() => { fetchComics(); }, []) return ( <IonPage> <IonHeader> <IonToolbar> <IonTitle>Home</IonTitle> </IonToolbar> </IonHeader> <IonContent> {(loading) && ( <div className="ion-text-center ion-padding"> <IonSpinner name="crescent" /> </div> )} {(comics) && ( <IonGrid> <IonRow> {comics.map((comic) => ( <IonCol key={comic.id} sizeXs="12" sizeSm="6" sizeMd="4" sizeLg="3" sizeXl="2"> <ComicCard comic={comic} /> </IonCol> ))} </IonRow> </IonGrid> )} </IonContent> </IonPage> ); }; export default Tab1;
The file above is an example of a page in Ionic. Pages are components that can be accessed with a route/URL. To ensure transitions between pages work properly, it is necessary to have the IonPage component be the root component in your page.
IonHeader is a component meant to exist at the top of a page. It’s not required for all pages, but it can contain useful components like the page title, the IonBackButton component for navigating between pages, or the IonSearchBar. IonContent is the main content area for your pages. It’s responsible for providing the scrollable content that users will interact with, plus any scroll events that could be used in your app.
Inside your component, you have a function called fetchComics() — called once inside the useEffect() hook — which makes a request to get comics from the Marvel API by calling the getComics() function you wrote earlier. It saves the results to your component’s state via the useState() hook. The IonSpinner component renders a spinning icon while your app is making a request to the API. When the request is completed, you pass the results to the ComicCard component you created earlier.
At this point your app should look like this:
App home page. (Large preview)
In the next step, you will learn how to use Capacitor plugins in your app by enabling offline storage.
Creating a Personal Collection of Marvel Comics
Your app looks good so far, but it isn’t very useful as a mobile app. In this step you will extend your app’s functionality by allowing users to ‘star’ comics, or save them as favorites. You will also make information about the saved favorites available to view offline by using the Capacitor Storage plugin.
I’m a big fan of The Collector. (Large preview)
First, create a file named util.ts in your src directory:
# ~/Desktop/marvel-client/src touch util.ts
Now, open the file and paste the following contents:
import { Plugins } from '@capacitor/core'; import { Comic } from './interfaces/comic'; const { Storage, Toast } = Plugins; export const updateFavourites = async (comic: Comic): Promise => { const saved = await Storage.get({ key: 'savedFavourites' }); const favourites: Comic[] | null = (saved && saved.value) ? JSON.parse(saved.value) : null; if (!favourites) { const comics = [comic]; await Storage.set({ key: 'savedFavourites', value: JSON.stringify(comics), }); return Toast.show({ text: 'Added to favourites', }); } const copyOfFavourites = favourites.slice(); const { id } = comic; const isSavedIndex = copyOfFavourites.findIndex((c) => c.id === id); if (isSavedIndex !== -1) { copyOfFavourites.splice(isSavedIndex, 1); await Storage.set({ key: 'savedFavourites', value: JSON.stringify(copyOfFavourites), }); return Toast.show({ text: 'Removed from favourites', }); } else { copyOfFavourites.unshift(comic); await Storage.set({ key: 'savedFavourites', value: JSON.stringify(copyOfFavourites), }); return Toast.show({ text: 'Added to favourites', }); } }; export const getFavourites = async (): Promise<Comic[] | null> => { const saved = await Storage.get({ key: 'savedFavourites', }); return (saved && saved.value) ? JSON.parse(saved.value) : null; }; export const checkFavourite = async (id: number): Promise<boolean> => { const saved = await Storage.get({ key: 'savedFavourites', }); const favourites: Comic[] | null = (saved && saved.value) ? JSON.parse(saved.value) : null; if (favourites) { const isSavedIndex = favourites.findIndex((c) => c.id === id); if (isSavedIndex !== -1) { return true; } } return false; };
The Storage plugin provides a key-value store for simple data, while the Toast plugin provides a notification pop-up for displaying important information to a user.
The updateFavourites() function in this file takes a single argument, a Comic object, and adds it to the device storage if it doesn’t exist, or removes it from the device storage if it was already saved. getFavourites() returns the user’s saved comics, while checkFavourites() accepts a single argument, a Comic resource ID, and looks it up in the saved comics, returning true if it exists, or false otherwise.
Next, open the ComicCard.tsx file and make the following changes to allow your app’s users to save their favorite comics:
import { star, starOutline } from 'ionicons/icons'; import * as utils from '../util'; type Props = { comic: Comic; } const ComicCard: FC<Props> = (props): JSX.Element => { const { comic } = props; const [isFavourite, setIsFavourite] = useState(false); const checkFavourite = (): void => { utils.checkFavourite(comic.id).then((value: boolean) => { setIsFavourite(value); }); } useEffect(() => { checkFavourite(); }); return ( <IonCard> ... <IonCardHeader> ... </IonCardHeader> <IonCardContent> <IonButton onClick={(): void => { utils.updateFavourites(comic).finally(() => { checkFavourite(); }); }} > <IonIcon icon={(isFavourite) ? star : starOutline} color="light" /> {(isFavourite) ? 'Remove' : 'Add' } </IonButton> </IonCardContent> </IonCard> ); }
Your ComicCard component now has a IonButton component that, when clicked, calls the updateFavourites() function you wrote earlier. Remember that the function acts like a toggle, removing the comic if it was already saved, or else saving it. Don’t forget to add the imports for the new Ionic components, IonButton, IonCardContent and IonIcon, just added to this component.
Now for the final part of this step, where you will be rendering saved comics in their own page. Replace the contents of the Tab2.tsx file with the following:
import React, { useState } from 'react'; import { IonContent, IonHeader, IonPage, IonTitle, IonToolbar, IonGrid, IonRow, IonCol, useIonViewWillEnter } from '@ionic/react'; import './Tab2.css'; import { Comic } from '../interfaces/comic'; import { getFavourites } from '../util'; import ComicCard from '../components/ComicCard'; const Tab2: React.FC = () => { const [comics, setComics] = useState(null as Comic[] | null); const loadComics = (): void => { getFavourites().then((result) => { if (result) { setComics(result); } }) }; useIonViewWillEnter(() => { loadComics(); }); return ( <IonPage> <IonHeader> <IonToolbar> <IonTitle>Favourites</IonTitle> </IonToolbar> </IonHeader> <IonContent> {(comics) && ( <IonGrid> <IonRow> {comics.map((comic) => ( <IonCol key={comic.id} sizeXs="12" sizeSm="6" sizeMd="4" sizeLg="3" sizeXl="2"> <ComicCard comic={comic} /> </IonCol> ))} </IonRow> </IonGrid> )} </IonContent> </IonPage> ); }; export default Tab2;
This page is quite similar to the Tab1 page but, instead of making an API request to get comics, you are accessing locally saved data. You are also using the Ionic life cycle hook, useIonViewWillEnter(), instead of a useEffect() hook, to make a call to the function that reads saved comics and updates the component’s state. The useIonViewWillEnter() hook gets called just as the page being navigated to enters into view.
Your application now makes use of a few native plugins to improve its functionality. In the next step, you will learn how to generate a native project for Android and create a native app using Android Studio.
Note: You can delete the files related to *Tab3* and remove the import and related *IonTab* component in the *App.tsx* file.
Generating A Native Project
Ionic comes with support for cross-platform app runtimes such as Capacitor and Cordova. These frameworks help you to build and run apps developed using Ionic on a native device or emulator. For the purpose of this guide, you will be using Capacitor to generate native project files.
Before proceeding to adding a platform, you will need to generate a production build of your application. Run the following command in your project’s root directory to do so:
ionic build
Now let’s add Capacitor to your project and generate the assets required to build a native application. Capacitor provides a CLI which can be accessed in your project by using npx or from the ionic CLI as shown below:
Using npx
npx cap add android
This command adds the android platform to your project. Other possible platform values are ios and electron.
Using ionic
Since you initialized your project using the --capacitor flag earlier, Capacitor has already been initialized with your project’s information. You can proceed to adding a platform by running the following command:
ionic capacitor add android
This command will install the required dependencies for the android platform. It will also generate files required for a native Android project and copy over the assets you built earlier when running ionic build.
If you have installed Android Studio, you can now open your project in Android Studio by running:
ionic capacitor open android
Finally, build your project:
Generate an APK. (Large preview)
Conclusion
In this guide, you have learned how to develop hybrid mobile applications using Ionic Framework’s React integration. You also learned how to use Capacitor for building native apps, specifically for the Android platform. Check out the API docs as there are a lot more UI components available to be used in Ionic apps that we didn’t explore. You can find the code on GitHub.
References
(ks, ra, yk, il, og)
Website Design & SEO Delray Beach by DBL07.co
Delray Beach SEO
source http://www.scpie.org/an-introduction-to-react-with-ionic/
0 notes
Text
An Introduction To React With Ionic
About The Author
I love building software for the web, writing about web technologies, and playing video games. More about Jerry …
Mobile app development using hybrid frameworks has come a long way since initial release in 2008. With the improvements being made to the JavaScript engine and improved processing power available to mobile phones, the major concern people had when they considered developing their apps using the hybrid approach — namely, performance — has all but been eliminated, and cross-platform frameworks have seen a surge in popularity.
We’re going to build a mobile application that pulls data from the Marvel Comics API; the data will show Marvel comics and you’ll be able to choose your favorites. At the end, we’ll create a native build of the project on Android.
The Ionic Framework is an open-source UI toolkit for building fast, high-quality applications using web technologies with integrations for popular frameworks like Angular and React. Ionic enables cross-platform development using either Cordova or Capacitor, with the latter featuring support for desktop application development using Electron.
In this article, we will explore Ionic with the React integration by building an app that displays comics using the Marvel Comics API and allows users to create a collection of their favorites. We’ll also learn how to integrate native capabilities into our app with Capacitor and generate builds for a native platform.
If you have not worked with Ionic in the past, or you’re curious to find out how Ionic works with React, this tutorial is for you.
Prerequisites
Before you can start building apps with the Ionic Framework, you will need the following:
Node.js (at least v10) installed on your computer
working knowledge of React
familiarity with the Hooks API
some experience with TypeScript
a native IDE, Android Studio for Android, or XCode for iOS
a Marvel developer account with an API key. You can get one here
Here’s a picture of what we’ll be building:
Marvel comics client app (Large preview)
Installing Ionic CLI
Ionic apps are created and developed primarily through the Ionic command line interface (CLI). The CLI offers a wide range of dev tools and help options as you develop your hybrid app. To proceed with this guide, you will need to make sure the CLI is installed and accessible from your terminal.
Open a new terminal window and run the following command:
npm install -g @ionic/cli
This will install the latest version of the Ionic CLI and make it accessible from anywhere on your computer. If you want to confirm that the install was successful, you can run the following command:
ionic --version
This command will output the installed Ionic version on your computer and it should be similar to this:
6.4.1
You can now bootstrap Ionic apps for the officially supported framework integrations — Angular and React — using any of the prebuilt templates available.
Starting An Ionic React Application
Creating an Ionic React application is easy using the CLI. It provides a command named start that generates files for a new project based on the JavaScript framework you select. You can also choose to start off with a prebuilt UI template instead of the default blank “Hello world” app.
To get started, run the following command:
ionic start marvel-client tabs --type=react --capacitor
This command will create a new Ionic React app using the tabs template. It also adds a Capacitor integration to your app. Capacitor is a cross-platform app runtime that makes running web apps natively on iOS, Android, and desktop easy.
Navigate your terminal to the newly created directory and run start the server.
cd marvel-client ionic serve
Now point your browser to http://localhost:8100 to see your app running.
Note: If you have used create-react-app (CRA) before, your current project’s directory structure should feel very familiar. That’s because, in order to keep the development experience familiar, Ionic React projects are created using a setup similar to that found in a CRA app. React Router is also used to power app navigation under the hood.
Creating A React Component
You are going to create a reusable React component in this step. This component will receive data and display information about a comic. This step also aims to help demonstrate that Ionic React is still just React.
Delete the files for the ExploreContainer component from src/components and remove its imports from the .tsx files in the src/pages directory.
import React from 'react'; import { IonContent, IonHeader, IonPage, IonTitle, IonToolbar } from '@ionic/react'; import ExploreContainer from '../components/ExploreContainer'; import './Tab1.css'; const Tab1: React.FC = () => { return ( <IonPage> ... <IonContent> <IonHeader collapse="condense"> <IonToolbar> <IonTitle size="large">Tab 1</IonTitle> </IonToolbar> </IonHeader> <ExploreContainer name="Tab 1 page" /> </IonContent> </IonPage> ); }; export default Tab1;
In your Tab1.tsx file, also remove the content within the <IonContent></IonContent> tag.
Next, create a file named ComicCard.tsx in your src/components directory. Then, open the file in your editor and add the following contents:
import React, { FC } from 'react'; import { Comic } from '../interfaces/comic'; import { IonImg, IonCard, IonCardTitle, IonCardSubtitle, IonCardHeader } from '@ionic/react'; type Props = { comic: Comic; } const ComicCard: FC = (props): JSX.Element => { const { comic } = props; return ( <IonCard> <div style= > <IonImg src={`${comic.thumbnail.path}.${comic.thumbnail.extension}`} /> </div> <IonCardHeader> <IonCardSubtitle> {comic.title} </IonCardSubtitle> <IonCardTitle> <h3> {comic.series.name} </h3> </IonCardTitle> </IonCardHeader> </IonCard> ); } export default ComicCard;
Your ComicCard component receives props containing details of a comic and renders the information using an IonCard component. Cards in Ionic are usually composed using other subcomponents. In this file, you are using the IonCardTitle and IonCardSubtitle components to render the comic title and series information within a IonCardHeader component.
Consuming The Marvel API
To use your newly created component you would have to fetch some data from the Marvel API. For the purpose of this guide, you are going to use the axios package to make your HTTP Requests. You can install it by running the following command:
yarn add axios
Next, add the following folder to your src directory:
# ~/Desktop/marvel-client/src mkdir -p services
Then, cd into the services directory and create a file named api.ts:
# ~/Desktop/marvel-client/src/services touch api.ts
Finally, open the file and add the following contents:
import axios from 'axios'; import { DataContainer } from '../interfaces/data-container'; import { Comic } from '../interfaces/comic'; const API_KEY = '813xxxxxxxxxxxxxxxxxx'; const api = axios.create({ baseURL: 'https://gateway.marvel.com:443/v1/public', headers: { 'Content-Type': 'application/json', }, }); api.interceptors.response.use((response) => { if (response.status === 200) { return response.data.data; } }); export function getComics(): Promise<DataContainer<Comic>> { return api.get('/comics', { params: { apikey: API_KEY, limit: 10, hasDigitalIssue: true, }, }); }
Be sure to replace the value of API_KEY with your own API key. If you don’t have one, you can request one by signing up at the Marvel developer website. You also need to set up your account to allow requests from your local development server by adding localhost* to your Marvel authorized referrers list (see the image below):
Marvel Account. (Large preview)
You now have an axios instance configured to use the Marvel API. The api.ts file has only one export, which hits the GET /comics endpoint and returns a collection of comics. You are limiting the results to only those that are available digitally. You will now proceed to use the API Service in your application.
Open the Tab1.tsx file and replace the contents with the following:
import React, { FC, useState, useEffect } from 'react'; import { IonContent, IonHeader, IonPage, IonTitle, IonToolbar, IonSpinner, IonGrid, IonRow, IonCol } from '@ionic/react'; import './Tab1.css'; import ComicCard from '../components/ComicCard'; import { Comic } from '../interfaces/comic'; import { getComics } from '../services/api'; const Tab1: FC = () => { const [comics, setComics] = useState(null as Comic[] | null); const [loading, setLoading] = useState(false); const fetchComics = () => { setLoading(true); getComics().then((response) => { if (response && response.results) { setComics(response.results); } }).finally(() => { setLoading(false); }); }; useEffect(() => { fetchComics(); }, []) return ( <IonPage> <IonHeader> <IonToolbar> <IonTitle>Home</IonTitle> </IonToolbar> </IonHeader> <IonContent> {(loading) && ( <div className="ion-text-center ion-padding"> <IonSpinner name="crescent" /> </div> )} {(comics) && ( <IonGrid> <IonRow> {comics.map((comic) => ( <IonCol key={comic.id} sizeXs="12" sizeSm="6" sizeMd="4" sizeLg="3" sizeXl="2"> <ComicCard comic={comic} /> </IonCol> ))} </IonRow> </IonGrid> )} </IonContent> </IonPage> ); }; export default Tab1;
The file above is an example of a page in Ionic. Pages are components that can be accessed with a route/URL. To ensure transitions between pages work properly, it is necessary to have the IonPage component be the root component in your page.
IonHeader is a component meant to exist at the top of a page. It’s not required for all pages, but it can contain useful components like the page title, the IonBackButton component for navigating between pages, or the IonSearchBar. IonContent is the main content area for your pages. It’s responsible for providing the scrollable content that users will interact with, plus any scroll events that could be used in your app.
Inside your component, you have a function called fetchComics() — called once inside the useEffect() hook — which makes a request to get comics from the Marvel API by calling the getComics() function you wrote earlier. It saves the results to your component’s state via the useState() hook. The IonSpinner component renders a spinning icon while your app is making a request to the API. When the request is completed, you pass the results to the ComicCard component you created earlier.
At this point your app should look like this:
App home page. (Large preview)
In the next step, you will learn how to use Capacitor plugins in your app by enabling offline storage.
Creating a Personal Collection of Marvel Comics
Your app looks good so far, but it isn’t very useful as a mobile app. In this step you will extend your app’s functionality by allowing users to ‘star’ comics, or save them as favorites. You will also make information about the saved favorites available to view offline by using the Capacitor Storage plugin.
I’m a big fan of The Collector. (Large preview)
First, create a file named util.ts in your src directory:
# ~/Desktop/marvel-client/src touch util.ts
Now, open the file and paste the following contents:
import { Plugins } from '@capacitor/core'; import { Comic } from './interfaces/comic'; const { Storage, Toast } = Plugins; export const updateFavourites = async (comic: Comic): Promise => { const saved = await Storage.get({ key: 'savedFavourites' }); const favourites: Comic[] | null = (saved && saved.value) ? JSON.parse(saved.value) : null; if (!favourites) { const comics = [comic]; await Storage.set({ key: 'savedFavourites', value: JSON.stringify(comics), }); return Toast.show({ text: 'Added to favourites', }); } const copyOfFavourites = favourites.slice(); const { id } = comic; const isSavedIndex = copyOfFavourites.findIndex((c) => c.id === id); if (isSavedIndex !== -1) { copyOfFavourites.splice(isSavedIndex, 1); await Storage.set({ key: 'savedFavourites', value: JSON.stringify(copyOfFavourites), }); return Toast.show({ text: 'Removed from favourites', }); } else { copyOfFavourites.unshift(comic); await Storage.set({ key: 'savedFavourites', value: JSON.stringify(copyOfFavourites), }); return Toast.show({ text: 'Added to favourites', }); } }; export const getFavourites = async (): Promise<Comic[] | null> => { const saved = await Storage.get({ key: 'savedFavourites', }); return (saved && saved.value) ? JSON.parse(saved.value) : null; }; export const checkFavourite = async (id: number): Promise<boolean> => { const saved = await Storage.get({ key: 'savedFavourites', }); const favourites: Comic[] | null = (saved && saved.value) ? JSON.parse(saved.value) : null; if (favourites) { const isSavedIndex = favourites.findIndex((c) => c.id === id); if (isSavedIndex !== -1) { return true; } } return false; };
The Storage plugin provides a key-value store for simple data, while the Toast plugin provides a notification pop-up for displaying important information to a user.
The updateFavourites() function in this file takes a single argument, a Comic object, and adds it to the device storage if it doesn’t exist, or removes it from the device storage if it was already saved. getFavourites() returns the user’s saved comics, while checkFavourites() accepts a single argument, a Comic resource ID, and looks it up in the saved comics, returning true if it exists, or false otherwise.
Next, open the ComicCard.tsx file and make the following changes to allow your app’s users to save their favorite comics:
import { star, starOutline } from 'ionicons/icons'; import * as utils from '../util'; type Props = { comic: Comic; } const ComicCard: FC<Props> = (props): JSX.Element => { const { comic } = props; const [isFavourite, setIsFavourite] = useState(false); const checkFavourite = (): void => { utils.checkFavourite(comic.id).then((value: boolean) => { setIsFavourite(value); }); } useEffect(() => { checkFavourite(); }); return ( <IonCard> ... <IonCardHeader> ... </IonCardHeader> <IonCardContent> <IonButton onClick={(): void => { utils.updateFavourites(comic).finally(() => { checkFavourite(); }); }} > <IonIcon icon={(isFavourite) ? star : starOutline} color="light" /> {(isFavourite) ? 'Remove' : 'Add' } </IonButton> </IonCardContent> </IonCard> ); }
Your ComicCard component now has a IonButton component that, when clicked, calls the updateFavourites() function you wrote earlier. Remember that the function acts like a toggle, removing the comic if it was already saved, or else saving it. Don’t forget to add the imports for the new Ionic components, IonButton, IonCardContent and IonIcon, just added to this component.
Now for the final part of this step, where you will be rendering saved comics in their own page. Replace the contents of the Tab2.tsx file with the following:
import React, { useState } from 'react'; import { IonContent, IonHeader, IonPage, IonTitle, IonToolbar, IonGrid, IonRow, IonCol, useIonViewWillEnter } from '@ionic/react'; import './Tab2.css'; import { Comic } from '../interfaces/comic'; import { getFavourites } from '../util'; import ComicCard from '../components/ComicCard'; const Tab2: React.FC = () => { const [comics, setComics] = useState(null as Comic[] | null); const loadComics = (): void => { getFavourites().then((result) => { if (result) { setComics(result); } }) }; useIonViewWillEnter(() => { loadComics(); }); return ( <IonPage> <IonHeader> <IonToolbar> <IonTitle>Favourites</IonTitle> </IonToolbar> </IonHeader> <IonContent> {(comics) && ( <IonGrid> <IonRow> {comics.map((comic) => ( <IonCol key={comic.id} sizeXs="12" sizeSm="6" sizeMd="4" sizeLg="3" sizeXl="2"> <ComicCard comic={comic} /> </IonCol> ))} </IonRow> </IonGrid> )} </IonContent> </IonPage> ); }; export default Tab2;
This page is quite similar to the Tab1 page but, instead of making an API request to get comics, you are accessing locally saved data. You are also using the Ionic life cycle hook, useIonViewWillEnter(), instead of a useEffect() hook, to make a call to the function that reads saved comics and updates the component’s state. The useIonViewWillEnter() hook gets called just as the page being navigated to enters into view.
Your application now makes use of a few native plugins to improve its functionality. In the next step, you will learn how to generate a native project for Android and create a native app using Android Studio.
Note: You can delete the files related to *Tab3* and remove the import and related *IonTab* component in the *App.tsx* file.
Generating A Native Project
Ionic comes with support for cross-platform app runtimes such as Capacitor and Cordova. These frameworks help you to build and run apps developed using Ionic on a native device or emulator. For the purpose of this guide, you will be using Capacitor to generate native project files.
Before proceeding to adding a platform, you will need to generate a production build of your application. Run the following command in your project’s root directory to do so:
ionic build
Now let’s add Capacitor to your project and generate the assets required to build a native application. Capacitor provides a CLI which can be accessed in your project by using npx or from the ionic CLI as shown below:
Using npx
npx cap add android
This command adds the android platform to your project. Other possible platform values are ios and electron.
Using ionic
Since you initialized your project using the --capacitor flag earlier, Capacitor has already been initialized with your project’s information. You can proceed to adding a platform by running the following command:
ionic capacitor add android
This command will install the required dependencies for the android platform. It will also generate files required for a native Android project and copy over the assets you built earlier when running ionic build.
If you have installed Android Studio, you can now open your project in Android Studio by running:
ionic capacitor open android
Finally, build your project:
Generate an APK. (Large preview)
Conclusion
In this guide, you have learned how to develop hybrid mobile applications using Ionic Framework’s React integration. You also learned how to use Capacitor for building native apps, specifically for the Android platform. Check out the API docs as there are a lot more UI components available to be used in Ionic apps that we didn’t explore. You can find the code on GitHub.
References
(ks, ra, yk, il, og)
Website Design & SEO Delray Beach by DBL07.co
Delray Beach SEO
source http://www.scpie.org/an-introduction-to-react-with-ionic/ source https://scpie1.blogspot.com/2020/05/an-introduction-to-react-with-ionic.html
0 notes
Text
Exploring Recursive Routes with React
I’ve recently recovered from a big headache - my latest project required some nested routes. Basically, I had a big container that held some smaller containers, and each of those smaller containers held a bunch of items, each of which I wanted to see rendered on its own page. If this is confusing to you - yes, I agree.

My first attempts at routing, linking, and redirecting to these nested urls were pretty messy. I was getting some weird url params as I clicked through my app that were making it difficult to get anything in my app working properly. So, I decided I should revisit this topic to gain a better understanding. I made a brand-spanking-new React app with only one goal in mind - conquering recursive routes. Here’s what I’ve discovered...
The missing link - the secret key - the thing that makes it all come together
The key to understanding nested params is React’s <Route /> component. Any render method that you pass to <Route /> has the same three props:
match
location
and history
Match is what we really care about.
Have a plan
Your routes should live at the top-most tier of your application, which for me, was App.js. I needed to import a few things at the top of my Index.js file to get this working...

Notice that my <App /> component is nested within a <Router></Router> component... now I can set up my initial routes in App.js. First, I want to add

to the top of my file.
My app will use some nested data to render specific information at specific urls. Here’s what my data looks like...

This is right at the top of my App.js file, where I have access to it and can pass it down as props to all of my child components. My goal is to have a home page that has a link to the three rooms in my home (the kitchen, living room, and bedroom). When I click on any of those room links, my url will change (”/:id”) and I’ll see rendered on the page that particular room, with a list of furniture that that room contains. Each piece of furniture will be another link to that piece’s show page (”/:id/:f_id). Sounds easy enough, right?


Because I have a pretty good idea of what I want to render, and where, I’ll go ahead and set up my routes. Notice that within each <Route/>’s render method I’m passing in props - remember that the match prop is the key to making this whole thing come together.
Before we move on, let’s take a quick second to see what that magical match props is...

Aha! The match prop has a key, params, that shows some pretty good stuff - including my current url. Interesting, interesting...
Let’s start with our simplest component first... our Home page.

On my Home page I simply want to iterate through my rooms (this.props.rooms.map) and render each room on the page, using a <Room/> component. Notice that I’m passing through the props (from the App.js file) down to the <Room/> component.

Now this is where those match props really come in handy!!! Each room’s name is now a link. React’s <Link/> component needs a path (to link to of course) and we can tack our current room info (this.props.room.id) onto the end of our previous url (this.props.match.url) to create our first nested route. Yaaasss!!!

Uh-oh. But now if we check the routes we set in app, the route for “/:id” is expecting to render a <RoomShow/> component, which we haven’t yet made.
So... let’s make it!

Now things are getting a little bit tricky, but it’s nothing that we can’t handle - to find the current room that we’re in we’ll iterate through this.props.rooms to find the room that matches our current url (this.props.match.params.id). Then, we can use that information to render our current room, and iterate through that room’s furniture to create a list.

Here, we see that each piece of furniture is rendered as a link, and again, we’re using this.props.match to create a path for our link. Cool.
Checking our routes again, we see that our final route (”/:id/:f_id”) is expecting a <FurnitureShow /> component to render.

Our furniture show page is nothing to write home about (all we’re really doing is rendering the name), but... it’s working!!!

Now sit back, click away, and bask in the glory of your success.
0 notes
Text
[Course] Next.js Universal JavaScript
This is a brand new course, but this is what you kind people have said about my previous work WHO IS THIS FOR? Developers who are tired of configuration, build tools, spagetti code and who want to focus on building amazing web apps with the latest features. The Next.js framework for react requires zero configuration to get started, and you'll be building your universal JavaScript applications in minutes. You will be expected to be familiar with JavaScript and be comfortable with basic React and JSX concepts. We'll also be using the latest JavaScript features including async/await. WHAT YOU'LL LEARN ZERO CONFIGURATION START Universal server side rendering in a matter of minutes! STYLING From custom error pages to SCSS imports, use the workflow that works for you DATA DRIVEN Fetch data from databases, gotchas and clean URLs OPTIMIZATION Learn how to fine tune what code you run and understand your bundles RELEASING TO THE WEB Strategies for both to Node servers and to static CDN hosted services like Netlify AUTHENTICATION Learn strategies for keep uses signed in, and protected content safe. COURSE MATERIAL Getting started with Next Next: What, why and how (07:03) Our first fully universal JavaScript app (06:03) How routing works (03:46) Link component (04:46) Linting configuration (02:12) Customising the style Common Layout component (06:59) Serving static assets & controlling the Head (05:43) Customising the base document template (03:34) Using Router for progress loading bars (05:30) Custom 404 and error pages (08:37) Data driven pages Data fetching in the client & server (11:30) Capturing query strings for data fetching (07:35) Custom server for "clean", query-less URLs (09:22) Gotcha: lost query params (03:31) Gotcha: live server reloading (06:56) Environment variables (08:03) Gotcha: Debugging a hanging request (04:34) Styles CSS in JavaScript: styled-jsx (04:14) Importing SCSS & scoped imports (08:39) Optimization tasks Targetting the client side only (08:49) Dynamic module imports (13:15) Analyizing server & client bundles (08:17) Polyfills: understanding browser support (09:28) Deployment strategies Dynamic: Zeit's now (05:08) Static deployment with Netlify (09:02) CDN hosted client & dynamic API (03:45) Authentication Higher Order Components with Next (07:23) "withUser" provider & decoding JWT (09:57) Universal user loading technique with cookies (12:43) app.js for simplified and common layouts (07:57) Moving withUser to common execution using _app.js (11:06) source https://ttorial.com/nextjs-universal-javascript
0 notes
Photo

Dealing with Asynchronous APIs in Server-rendered React
If you've ever made a basic React app page, it probably suffered from poor SEO and performance issues on slower devices. You can add back traditional server-side rendering of web pages, typically with NodeJS, but this isn't a straightforward process, especially with asynchronous APIs.
The two main benefits you get from rendering your code on the server are:
increased performance in load times
improving the flexibility of your SEO.
Remember that Google does wait for your JavaScript to load, so simple things like title content will change without issue. (I can't speak for other search engines, though, or how reliable that is.)
In this post, I'll discuss getting data from asynchronous APIs when using server-rendered React code. React code has the entire structure of the app built in JavaScript. This means that, unlike traditional MVC patterns with a controller, you don't know what data you need until the app is rendered. With a framework like Create React App, you can quickly create a working app of very high quality, but it requires you to handle rendering only on the client. There's a performance issue with this, as well as an SEO/data issue, where traditional templating engines you can alter the head as you see fit.
The Problem
React renders synchronously for the most part, so if you don't have the data, you render a loading screen and wait for the data to come. This doesn't work so well from the server, because you don't know what you need until you've rendered, or you know what you need but you've already rendered.
Check out this stock-standard render method:
ReactDOM.render( <provider store={store}> <browserrouter> <app></app> </browserrouter> </provider> , document.getElementById('root') )
Issues:
It's a DOM render looking for a root element. This doesn't exist on my server, so we have to separate that.
We don't have access to anything outside our main root element. We can't set Facebook tags, title, description, various SEO tags, and we don't have control over the rest of the DOM outside the element, especially the head.
We're providing some state, but the server and client have different states. We need to consider how to handle that state (in this case, Redux).
So I've used two libraries here, and they're pretty popular, so hopefully it carries over to the other libraries you're using.
Redux: Storing state where your server and client are synced is a nightmare issue. It's very costly, and usually leads to complex bugs. On the server side, ideally, you don't want to do anything with Redux apart from just enough to get things working and rendering correctly. (You can still use it as normal; just set enough of the state to look like the client.) If you want to try, check out the various distributed systems guides as a starting point.
React-Router: FYI, this is the v4 version, which is what is installed by default, but it's significantly different if you've got an older existing project. You need to make sure you handle your routing server side and client side and with v4 --- and it's very good at this.
After all, what if you need to make a database call? Suddenly this becomes a big issue, because it's async and it's inside your component. Of course, this isn't a new issue: check it out on the official React repo.
You have to render in order to determine what dependencies you need --- which need to be determined at runtime --- and to fetch those dependencies before serving to your client.
Existing Solutions
Below, I'll review the solutions that are currently on offer to solve this problem.
Next.js
Before we go anywhere, if you want production, server-side-rendered React code or universal app, Next.js] is where you want to go. It works, it's clean, and it's got Zeit backing it.
However, it's opinionated, you have to use their toolchain, and the way they handle async data loading isn't necessarily that flexible.
Check out this direct copy from the Next.js repo documentation:
import React from 'react' export default class extends React.Component { static async getInitialProps ({ req }) { return req ? { userAgent: req.headers['user-agent'] } : { userAgent: navigator.userAgent } } render () { return <div> Hello World {this.props.userAgent} </div> } }
getInitialProps is the key there, which returns a promise that resolves to an object that populates props, and only on a page. What's great is that's just built in to their toolchain: add it and it works, no work required!
So how do you get database data? You make an api call. You don't want to? Well, that's too bad. (Okay, so you can add custom things, but you have to fully implement it yourself.) If you think about this, though, it's a very reasonable and, generally speaking, good practice, because otherwise, your client would still be making the same API call, and latency on your server is virtually negligible.
You're also limited in what you have access to --- pretty much just the request object; and again, this seems like good practice, because you don't have access to your state, which would be different on your server versus client anyways. Oh, and in case you didn't catch it before, it only works on top-level page components.
Redux Connect
Redux Connect is a very opinionated server-side renderer, with a decent philosophy, but if you don't use all the tools they describe, this might not be for you. There's a lot to this package, but it's so complex and not yet upgraded to React Router v4. There's a lot of setup to this, but let's take the most important part, just to learn some lessons:
// 1. Connect your data, similar to react-redux @connect @asyncConnect([{ key: 'lunch', promise: ({ params, helpers }) => Promise.resolve({ id: 1, name: 'Borsch' }) }]) class App extends React.Component { render() { // 2. access data as props const lunch = this.props.lunch return ( <div>{lunch.name}</div> ) } }
Decorators aren't standard in JavaScript. They're Stage 2 at the time of writing, so use at your discretion. It's just another way of adding higher-order components. The idea is pretty simple: the key is for what to pass to your props, and then you have a list of promises, which resolve and are passed in. This seems pretty good. Perhaps an alternative is simply this:
@asyncConnect([{ lunch: ({ params, helpers }) => Promise.resolve({ id: 1, name: 'Borsch' }) }])
That seems doable with JavaScript without too many issues.
react-frontload
The react-frontload repo doesn't have a lot of documentation, or explanation, but perhaps the best understanding I could get was from the tests (such as this one) and just reading the source code. When something is mounted, it's added to a promise queue, and when that resolves, it's served. What it does is pretty good, though it's hard to recommend something that's not well documented, maintained or used:
const App = () => ( <frontload isServer > <component1 entityId='1' store={store}></component1> </frontload> ) return frontloadServerRender(() => ( render(<app></app>) )).then((serverRenderedMarkup) => { console.log(serverRenderedMarkup) })
Continue reading %Dealing with Asynchronous APIs in Server-rendered React%
by Roger Jin via SitePoint http://ift.tt/2yt21uU
0 notes
Text
3 Examples React Native Router Flux for beginners
Here is a list of 3 example React Native Router Flux for beginner who want to learn React native.
1.Using React-Native-Router-Flux with Redux
“If you’re coming to React Native from a web background like me, you’re probably familiar with React-Router. While looking for solutions on handling routing in my React Native applications, I came across React-Native-Router-Flux(RNRF) as a great solution. It’s built on React Native’s ExperimentalNavigation API — a still unstable feature that you won’t have to worry about keeping your app up to date with.”
>>> Learn more
2,React Native Router
react-native-router-flux is a routing package that allows you to:
Define scene transitions in one central location
Without having to pass navigator objects around, and allow you to
Call transitions anywhere in your code with a simple syntax (e.g. Actions.login(username, password) or Actions.profile(profile) or even Actions.profile(123) – all params will be part of this.props for given Scene component).
>>> Learn more
3. React Native Basics: Using react-native-router-flux
“A core component of any app is navigating between different routes/screens/scenes. I’ve analyzed different navigation solutions in the past but this week I wanted to spend some time doing common routing tasks using a package I’ve used a lot lately, react-native-router-flux. Today we’ll walk through setting up your routes, routing between scenes in a “normal” way, setting up tabs, and using a modal.”
>>> Learn more
Compilation by Atom ID @Reactsharing.com
0 notes
Text
React Project(WODs)
This post will be about my final project, using React, of phase 2 at Flatiron school. I have had a lot of fun learning React and feel as though it almost better helped me understand JavaScript. At the same time though there were parts that I struggled with as well. Specifically, working with POST requests and forms, at first, challenged me for awhile.
Furthermore, for my project I created a web page that lists out different WODs, workout of the day, also includes alternative movements for the workout and even create your own WOD. Created the frontend using create-react-app to get the starting code. Then used a JSON server template provided by Flatiron for the backend. Within my frontend there is six components, App, Navbar, WodForm, Home, WodDescription, and Wod. App being the top component of all the others. App consists of all my fetch requests, GET and POST, state for JSON data, and renders out the Navbar, WodForm, Wod, and Home components, this is also all wrapped by router and gives all the routes to each of these.
My Navbar component uses NavLink to display links to both the Home page and Create WOD page. I gave them both an activeStyle so that when you are on that page the NavLink text turns red for that page. Next, is my Home component which takes the JSON data as a prop called wods. I created a variable to map through wods, which then renders the WodDescription component, and passes down each wod to it. My Home component is what displays WodDescription. WodDescription takes the wod and displays the workout, and how it will be scored. There is also a button that will take you to that specific WOD with alternative movements, if say, they are too difficult or heavy. I used the useHistory hook in order for it take you to that specific WOD that the button is on. Also, I had to incorporate string interpolation with wod.id in accordance with history.push.
My Wod component, as mentioned before, will display only the one WOD whose id matches with the url id. It will show the alternative movements, as well as, the workout and how it will be scored. I also had to pass wods down as a prop from the app, but I instead used find() method. Which returns the value of the first element in the provided array that matches the testing function. Within that method I used the useParams hook to compare its id, which is the URL’s id, and find the wod that has a matching id. I did also have to use parseInt() on the params because it was a string and I needed it to be an integer.
To complete this post, I will explain my WodForm component where I worked on one of the more challenging coding parts with React, for me. As I mentioned earlier all my fetch requests are done within my App component. So, I passed down my POST request to the WodForm component. This component is made up of a formData state variable, a handleChange function, handleSubmit function, and a form for submitting and POSTing this new WOD. The inputs use the handleChange function to get what the user types for both the workout and how it will be scored. Give these inputs a value of data.whicheverkeyitis. The form is given an onSubmit equal to the handleSubmit function. The handleSubmit function calls the POST request function and passes down the formData. This POST request then adds this workout to all the other already existing workouts set in the state. All in all, this is my project and I enjoyed watching the code work and do what I wanted it to in the browser, that is always a really good feeling!
0 notes
Link
SitePoint http://j.mp/2t4EVbs
A few weeks ago, I came across a developer sharing one of his side projects on GitHub: a Trello clone. Built with React, Redux, Express, and MongoDB, the project seemed to have plenty of scope for working on fullstack JS skills.
I asked the developer, Moustapha Diouf, if he’d be interested in writing about his process for choosing, designing, and building the project and happily, he agreed. I hope you’ll find it as interesting as I did, and that it inspires you to work on ambitious projects of your own!
Nilson Jacques, Editor
In this article, I’ll walk you through the approach I take, combined with a couple of guidelines that I use to build web applications. The beauty of these techniques is that they can be applied to any programming language. I personally use them at work on a Java/JavaScript stack and it has made me very productive.
Before moving on to the approach, I’ll take some time to discuss how:
I defined my goals before starting the project.
I decided on the tech stack to use.
I setup the app.
Keep in mind that since the entire project is on GitHub (madClones), I’ll focus on design and architecture rather than actual code. You can check out a live demo of the current code: you can log in with the credentials Test/Test.
If you’re interested in taking your JavaScript skills to the next level, sign up for SitePoint Premium and check out our latest book, Modern JavaScript
Defining the Goals
I started by taking a couple of hours a day to think about my goals and what I wanted to achieve by building an app. A to-do list was out of the question, because it was not complex enough. I wanted to dedicate myself to at least 4 months of serious work (it’s been 8 months now). After a week of thinking, I came up with the idea to clone applications that I like to use on a daily basis. That is how the Trello clone became a side project.
In summary, I wanted to:
Build a full stack JavaScript application. Come out of my comfort zone and use a different server technology.
Increase my ability to architect, design, develop, deploy and maintain an application from scratch.
Practice TDD (test driven development) and BDD (behavior driven development). TDD is a software practice that requires the developer to write test, watch them fail, then write the minimum code to make the test pass and refactor (red, green, refactor). BDD, on the other hand, puts an emphasis on developing with features and scenario. Its main goal is to be closer to the business and write a language they can easily understand.
Learn the latest and the hottest frameworks. At my job, I use angular 1.4 and node 0.10.32 (which is very sad I know) so I needed to be close to the hot stuff.
Write code that follows the principle of the 3R’s: readability, refactorability, and reusability.
Have fun. This is the most important one. I wanted to have fun and experiment a lot since I was (and still am) the one in charge of the project.
Choosing the Stack
I wanted to build a Node.js server with Express and use a Mongo database. Every view needed to be represented by a document so that one request could get all the necessary data. The main battle was for the front-end tech choice because I was hesitating a lot between Angular and React.
I am very picky when it comes to choosing a framework because only testability, debuggability and scalability really matter to me. Unfortunately, discovering if a framework is scalable only comes with practice and experience.
I started with two proof-of-concepts (POCs): one in Angular 2 and another one in React. Whether you consider one as a library and the other one as a framework doesn’t matter, the end goal is the same: build an app. It’s not a matter of what they are, but what they do. I had a huge preference for React, so I decided to move forward with it.
Getting Started
I start by creating a main folder for the app named TrelloClone. Then I create a server folder that will contain my Express app. For the React app, I bootstrap it with Create React App.
I use the structure below on the client and on the server so that I do not get lost between apps. Having folders with the same responsibility helps me get what I am looking for faster:
src: code to make the app work
src/config: everything related to configuration (database, URLs, application)
src/utils: utility modules that help me do specific tasks. A middleware for example
test: configuration that I only want when testing
src/static: contains images for example
index.js: entry point of the app
Setting up the Client
I use create-react-app since it automates a lot of configuration out of the box. “Everything is preconfigured and hidden so that you can focus on code”, says the repo.
Here is how I structure the app:
A view/component is represented by a folder.
Components used to build that view live inside the component folder.
Routes define the different route options the user has when he/she is on the view.
Modules (ducks structure) are functionalities of my view and/or components.
Setting up the Server
Here is how I structure the app with a folder per domain represented by:
Routes based on the HTTP request
A validation middleware that tests request params
A controller that receives a request and returns a result at the end
If I have a lot of business logic, I will add a service file. I do not try to predict anything, I just adapt to my app’s evolution.
Choosing Dependencies
When choosing dependencies I am only concerned by what I will gain by adding them: if it doesn’t add much value, then I skip. Starting with a POC is usually safe because it helps you “fail fast”.
If you work in an agile development you might know the process and you might also dislike it. The point here is that the faster you fail, the faster you iterate and the faster you produce something that works in a predictable way. It is a loop between feedback and failure until success.
Client
Here is a list of dependencies that I always install on any React app:
Package Description redux Predictable state container. react-redux Binds Rreact and Redux together. redux-thunk Middleware that allows you to write an action that returns a function. redux-logger Logger library for Redux. react-router Routing library lodash Utility library chai (dev) BDD, TDD assertion library for node. sinon (dev) Standalone test spies, stubs and mocks. enzyme (dev) Testing utility for React. nock (dev) HTTP mocking and expectations library for Node.js. redux-mock-store (dev) A mock store for testing your Redux async action creators and middleware.
Some people might tell you that you do not always need redux. I think any descent app is meant to grow and scale. Plus tools you get from using redux change your development experience.
Server
Here is a list of dependencies that I always install on any Express app:
Package Description lodash joi Object schema description language and validator for JavaScript objects. express-valiation Middleware that validates the body, params, query, headers and cookies of a request. boom HTTP-friendly error objects. cookie-parser Parse Cookie header and populate req.cookies. winston Async logging library. mocha (dev) Test framework for Node.js & the browser chai (dev) chai-http (dev) HTTP response assertions. sinon (dev) nodemon (dev) Watches and automatically restarts app. istanbul (dev) Code coverage.
Building the App
I start by picking a screen that I want to develop and list down all the features the user has access to. I pick one and start the implementation.
After a screen and/or feature is developed, I take some time to reflect on the added code and refactor if needed.
Example: The Home Screen
Let’s illustrate everything that I said above with an example. I develop all of my screens and features by considering the front-end and the back-end as two separate entities. I always start with the front-end, because it helps me know exactly what needs to be displayed. It is then very easy to head to the server and implement the database model and add the business logic.
First, I write down a feature description and add a bunch of scenarios to it. Here’s an example for the purpose of the article:
Feature: In the home view, I should see my name in the header and a list of my boards. Scenario: I can see my name in the header Given I am on the home Then I should see my user name in the header
With this basic scenario in mind, let’s look at how I’d work on the home view.
Client-side
Using the Component-Driven Development (CDD) methodology, combined with BDD, helps split views into small components, making sure they are decoupled and reusable.
First of all, I build a static page with mocked data written in plain text and I style the page with CSS.
Second, I test that:
The component renders correctly
Props logic is handled correctly
Event listeners (if any) are triggered and call the appropriate methods
The component receives state from the store
Finally, I create a Header User component and container and refactor the data that I mocked earlier in the Redux module initial state.
Since I am using the ducks structure, I can focus on one view at a time. If I notice that two views share the same data I can lift up my state and create a higher module that holds all that data. The final Redux state of the app consists of all the data I mocked.
Once all my scenarios pass, I look at my component and refactor it if I notice that it is very similar to another component that I already created. I can either start by refactoring the old component before adding the new one or I can just add the new component so that I can fail fast and think about a more elegant solution later.
I did not waste my time guessing or thinking about what the user needed to see. I can just build my view then decide on what data needs to be displayed. It is easier to react to the design and think while building rather than trying to think in advance about what needs to be displayed. In my experience, it sometimes adds a lot of overhead and unnecessary meetings. As long as you keep reusability in mind you will be fine.
Server-side
The Redux store model that I come up with is crucial, because I use it to design my database and then code my business logic. Due to the work done on the view, I know the homepage needs to fetch the user’s name and boards. I noticed that I have personal boards and organization boards which means that I can separate these two entities and have two different schemas. The main goal is to work with normalized data and have all the heavy lifting done by the server so that I do not have to think about it.
CRUD (create, read, update, delete) is the basic set of operations any app needs, but I do not blindly add them to all of my routes. Right now, what I need to do is fetch data, so I just implement read. I can then write a Mongo query that adds a user to my database later.
Conclusion
I hope you enjoyed my approach to building full-stack applications. My main advice is never be afraid to do big refactors. I can’t count the number of times I changed my app file structure just because I knew it would not be scalable: details like the folder name, the folder depth, the way they are grouped by feature always make the difference.
I am never afraid to make mistakes because they help me learn: the faster I fail, the faster I learn, the faster I grow. If I make 100 mistakes and I learn from them, then I know 100 different ways of avoiding those errors again.
When I notice something that I don’t like, I fix it right away or in the next few days. Since I test my code, I can quickly tell whether or not I am breaking functionality that works.
Einstein said that “once you stop learning you start dying” and I believe that once you stop making mistakes you stop learning. Fail, learn and keep living.
What are my future plans?
I keep working on my project because it is always a work in progress. Just like a real app, it is in continuous change. My plans are to:
Move my monolith project to a mono repo with a server based around microservices. I came up with the decision while working on my HipChat clone. I noticed that I was duplicating a lot of code for the same authentication logic: microservices were the obvious choice. Ctrl-C, Ctrl-V are not your friend in programming.
Deploy micro services on Kubernetes.
Move the HipChat clone to the mono repo and build an app with Vue.js.
Start looking into Electron and React Native.
Add continuous integration (CI) and deployment with Travis.
Learn TypeScript.
How do I manage to keep up?
I have a very strict routine:
Monday through Thursday: practice algorithms on HackerRank and GeeksforGeeks, write documentation for my weekend work, learn new languages, read technical books, and listen to podcasts.
Friday through Sunday: work on new features and/or fix bugs on my apps
I don’t spend all of my free time working on these. During weekdays, 1-2 hours per day is rewarding enough. The weekend, though I do not restrict myself. As long as I have time, I’ll work on the project: I could be writing code, experimenting with a tool or just reading documentation.
Coding is an art and a craft and I take pride in writing the least code possible that works, while keeping it performant and elegant.
Read next: The Anatomy of a Modern JavaScript Application
http://j.mp/2sv4aqq via SitePoint URL : http://j.mp/2c7PqoM
0 notes
Text
Optimizing React Applications for Search Engines
When I first started learning and using React I always had the same thought in the back of my mind, "How do I ensure SEO with this thing?" React is a front-end JavaScript framework, much like Angular, Backbone, or Ember, so how do ensure SEO for a dynamic web application that is primarily rendered within the browser? This question came up again when I was porting a Broadleaf eCommerce application to React. The following are a few of the things I learned through the process of ensuring my React web application was SEO-friendly.
Server-side rendering
The first part of the problem I needed to solve was to find a way that Google's web crawler could crawl the webpage without having to run JavaScript and make network calls. Many front-end single-page applications tend not to fair well in this category. The whole idea around the single-page application is that the client does the work of rendering the app. My goal was to figure out how to render the page for the initial request, as well as any of the application state, so that the first request would be fully crawlable even if JavaScript were turned off. This can be fairly complicated to implement so I won't go into too much detail as others have explained it much better than I could (see redux and react-router documentation).
Rendering head meta-data on client/server
Server-side rendering is great and all, but how do I ensure my Homepage has different metadata than my Category pages? Also, how do I ensure that both the client and the server render the same head data for a page? Typically, for a server-side template engine, you can simply include the metadata within your returned template from your controller. However, for React you need to load the metadata in through Ajax. For my application, I decided to use Redux for storing my page metadata and I managed my page-specific head data in Broadleaf.
On the Broadleaf side, I have a custom endpoint that accepts a pageType and pathname, e.g. CATEGORY and /hot-sauces. Using these two values I can determine the Category and the corresponding metadata for that category. I then send back this head response JSON to my React application. I won't go into too many details for this side since it is really just a simple ad-hoc REST endpoint.
On the React side, I have a reducer and actions that handle dispatching the request and receiving the new head data. My setup is that each route has a function responsible for loading the data for that page, including the head data. I set up this function to run both server and client-side before the app is rendered. The result is that the Redux state is populated with the correct head data both client and server-side. Rendering the data into the head of the page could be complicated if I built it all myself, but thankfully there are several npm packages built around rendering head metadata for React apps. I decided to choose react-helmet.
If you are unfamiliar with React and Redux you may want to skip to the next section, otherwise we are going to briefly go into the details on how we set this up.
ACTION CREATORS
First, we need to start off by writing our action creators. For this we create a new file headActions.js, and our first task is to define the our action types:
// define our action types export const HeadActionTypes = { REQUEST_HEAD : `REQUEST_HEAD`, // request our head data RECEIVE_HEAD : `RECEIVE_HEAD` // receive our head data }
Now that we have defined out action types we need to define our action creators that will create the actions for the types above.
/** * Creates an action that specifies a request for head data. * @param {String} pageType the type of the page, e.g. CATEGORY or page * @param {Object} location the location we are grabbing head data for * @return {Object} the action */ function requestHead(pageType, location) { return { type : HeadActionTypes.REQUEST_HEAD, // the pageType will be used to specify the entity type on the backend pageType, // the pathname will be used to determine the proper head metadata pathname : location.pathname, } } /** * Creates an action that handles receiving head data * @param {String} pageType the type of the page * @param {Object} location the location for the head * @param {Object} head the head data * @return {Object} the action */ function receiveHead(pageType, location, head) { return { type : HeadActionTypes.RECEIVE_HEAD, // the pageType will be used to specify the entity type on the backend pageType, // the pathname will be used to determine the proper head metadata pathname : location.pathname, head } }
Now, we need to create a more complicated action that does the following: 1. Check to see if we should fetch head data 2. Dispatch request action 2. Callout to our Head REST endpoint 3. Dispatch receive action with response
/** * Checks to see if the head data for this pathname already exists in the state or if * we are already fetching the head data for this pathname. */ function shouldFetchHead(state, pathname) { return !state.headByPath[pathname] || !state.headByPath[pathname].isFetching } /** * Creates a thunk action that dispatches the request, fetches the data, then * dispatches receiving the data for the given location. This is the primary * method that our containers will use to fetch the correct metadata. * @param {String} pageType the page type * @param {Object} location the location * @return {function} thunk function */ export function fetchHead(pageType, location) { return (dispatch, getState) => { if (!shouldFetchHead(getState(), location.pathname)) { return undefined // (1) if we don't need to fetch head data, return } // (2) dispatch the requestHead to notify we are fetching data dispatch(requestHead(pageType, location)) // (3) fetch the head data return fetch(`/head/${pageType}?pathname=${location.pathname}`, { headers : { 'Content-Type' : `application/json` } }) // convert to json .then(response => response.json()) // (4) dispatch the receiveHead to notify we are done fetching data .then(head => dispatch(receiveHead(pageType, location, {head}))) } }
This should be the last of the action creators needed, next we take on setting up the reducers.
REDUCERS
We require two reducers for handling the head actions. The first is responsible for taking the head response for a page and reducing it to an object with attributes page type, pathname, and head data. The second calls upon the first and is responsible for organizing the head states by pathname, which will allow us to cache the head data for multiple URLs. Our goal is to have our head state organized like the following JSON structure:
headByPath : { '/' : { isFetching : false, head : { title : 'The Heat Clinic', ... }, pageType : 'PAGE', pathname : '/', }, '/hot-sauces' : {...} }
We now need to create a new file named headReducer.jsand will start by creating out first reducer.
import {HeadActionTypes} from '../actions/headActions' import merge from 'lodash/merge' /** * Handles reducing the action into the head state * @param {Object} [state={ isFetching : false, head : {}, pageType : null, pathname : null, }] the initial head state * @param {Object} action the action to be reduced * @return {Object} the reduced state */ function head(state = { isFetching : false, head : {}, pageType : null, pathname : null, }, action) { switch(action.type) { case HeadActionTypes.REQUEST_HEAD: return merge({}, state, { isFetching : true, pageType : action.pageType, pathname : action.pathname, }) case HeadActionTypes.RECEIVE_HEAD: return merge({}, state, { isFetching : false, pageType : action.pageType, pathname : action.pathname, head : action.head, }) default: return state } }
Now that we have a reducer to reduce the actions into the head state, we need to organize our head state by pathname.
/** * Handles reducing the action into the head state by pathname * @param {Object} [state={}] the initial state * @param {Object} action the action to be reduced * @return {Object} the reduced state */ export function headByPath(state = {}, action) { switch(action.type) { case HeadActionTypes.REQUEST_HEAD: case HeadActionTypes.RECEIVE_HEAD: return merge({}, state, { // we ensure the head state is organized by pathname [action.pathname] : head(state[action.pathname], action) }) default: return state } }
Now we have our reducers and our actions set up. The next step is creating our container for rendering the head data into the page.
CONTAINER
import React, {PropTypes} from 'react' import {connect} from 'react-redux' import Helmet from 'react-helmet' import merge from 'lodash/merge' class HeadContainer extends React.Component { constructor(props) { super(props) } render() { return ( <Helmet {...this.props.head}/> ) } } /** * We map the head state to our components props. * * @param {Object} state the global state * @param {Object} ownProps our component's base props * @return {Object} our component's new props */ function mapStateToProps(state, ownProps) { let {location} = ownProps let defaultProps = { head : { defaultTitle : `The Heat Clinic` } } return merge(defaultProps, state.headByPath[location.pathname]) } export default connect(mapStateToProps)(HeadContainer)
Now that we have our container, we need to ensure all of our routes render it. This can be done using a layout component or by simply adding it to each route's component.
FETCHING HEAD STATE
Now that we have our container rendering, we need to add support for fetching the head state for our routes. To do this, we just need to use connect to inject our fetchHead action into our router components and then ensure we load this data on both the server and the client.
RENDERING ON SERVER
Lastly, since we don't have a dom on the server we need to modify our index file to contain the head attributes. Here is my way of handling this:
function renderHtml(html, initialState) { let head = Helmet.rewind() return new Promise((resolve, reject) => { resolve(` <!DOCTYPE html> <html ${head.htmlAttributes.toString()}> <head> ${head.title.toString()} ${head.meta.toString()} ${head.base.toString()} ${head.link.toString()} ${head.script.toString()} ${head.style.toString()} </head> <body> <div id="mount">${html}</div> <script type="text/javascript" charset="utf-8"> window.__INITIAL_STATE__ = ${JSON.stringify(initialState)} </script> <script src="/bundle.js"></script> </body> </html> `) }) }
Above we call Helmet.rewind() to get the head attributes in JSON format and then render those attributes within the head and HTML tags.
SEO-Friendly URLs
One of the things I needed to ensure was that my React had SEO-friendly dynamic URLs. Even more than that, I had to ensure that the routing could be dynamically determined from the Broadleaf RESTful API. This would require me to create a custom endpoint to determine which routes to use by pathname in Broadleaf and setting up my router in React to allow for asynchronous routing. On the Broadleaf side this was pretty simple, I just created a custom routing endpoint that responded with a page type for a given pathname. On the React side this was a little bit more complicated. Thankfully, I was using react-router, which allows for asynchronous routing. I set up my child routes to be tied to the result of that request to my routing endpoint within Broadleaf. If the pathname matched a category route, I chose the category routes; if it was a content managed page, I chose the page routes, etc. The end result is that the routing for my application was dynamic and asynchronously loaded from Broadleaf. This gives a lot of power to the admin user to influence the URL structure of their pages without having to open up an IDE.
Closing thoughts
Learning how to ensure SEO for this project boosted my confidence in working with React. I initially had doubts about how it would meet certain criteria, but in the end I found it to be an effective solution. While there are several aspects of SEO I didn't get to, I'm confident they are all easily solvable.
0 notes
Text
React Route With Params Location for route cannot be found
React Route With Params Location for route cannot be found
Upon finding a solution for an issue I was having I came across another issue. After adding a route param on to my route, react router doesn’t recognize it anymore.
Component rendering new route
import React, { Component } from 'react' import { hashHistory } from 'react-router' class Name extends Component { constructor() { super(); this.state = {username: ''}; this.onClickFunction =…
View On WordPress
0 notes
Text
The Hooks of React Router
React Router 5 embraces the power of hooks and has introduced four different hooks to help with routing. You will find this article useful if you are looking for a quick primer on the new patterns of React Router. But before we look at hooks, we will start off with a new route rendering pattern.
Before React Router 5
// When you wanted to render the route and get router props for component <Route path="/" component={Home} />
// Or when you wanted to pass extra props <Route path="/" render={({ match }) => <Profile match={match} mine={true} />}>
When using the component syntax, route props (match, location and history) are implicitly being passed on to the component. But it has to be changed to render once you have extra props to pass to the component. Note that adding an inline function to the component syntax would lead to the component re-mounting on every render.
After React Router 5
<Route path="/"> <Home /> </Route>
Note that there is no implicit passing of any props to the Home component. But without changing anything with the Route itself, you can add any extra props to the Home component. You can no longer make the mistake of re-mounting the component on every render and that's the best kind of API.
But now route props are not being passed implicitly, so how do we access match, history or location? Do we have to wrap all components with withRouter? That is where the hooks steps in.
Note that hooks were introduced in 16.8 version of React, so you need to be above that version to use them.
useHistory
Provides access to the history prop in React Router
Refers to the history package dependency that the router uses
A primary use case would be for programmatic routing with functions, like push, replace, etc.
import { useHistory } from 'react-router-dom'; function Home() { const history = useHistory(); return <button onClick={() => history.push('/profile')}>Profile</button>; }
useLocation
Provides access to the location prop in React Router
It is similar to window.location in the browser itself, but this is accessible everywhere as it represents the Router state and location.
A primary use case for this would be to access the query params or the complete route string.
import { useLocation } from 'react-router-dom'; function Profile() { const location = useLocation(); useEffect(() => { const currentPath = location.pathname; const searchParams = new URLSearchParams(location.search); }, [location]); return <p>Profile</p>; }
Since the location property is immutable, useEffect will call the function every time the route changes, making it perfect to operate on search parameters or current path.
useParams
Provides access to search parameters in the URL
This was possible earlier only using match.params.
import { useParams, Route } from 'react-router-dom'; function Profile() { const { name } = useParams(); return <p>{name}'s Profile</p>; } function Dashboard() { return ( <> <nav> <Link to={`/profile/ann`}>Ann's Profile</Link> </nav> <main> <Route path="/profile/:name"> <Profile /> </Route> </main> </> ); }
useRouteMatch
Provides access to the match object
If it is provided with no arguments, it returns the closest match in the component or its parents.
A primary use case would be to construct nested paths.
import { useRouteMatch, Route } from 'react-router-dom'; function Auth() { const match = useRouteMatch(); return ( <> <Route path={`${match.url}/login`}> <Login /> </Route> <Route path={`${match.url}/register`}> <Register /> </Route> </> ); }
You can also use useRouteMatch to access a match without rendering a Route. This is done by passing it the location argument.
For example, consider that you need your own profile to be rendered at /profile and somebody else's profile if the URL contains the name of the person /profile/dan or /profile/ann. Without using the hook, you would either write a Switch, list both routes and customize them with props. But now, using the hook we can do this:
import { Route, BrowserRouter as Router, Link, useRouteMatch, } from 'react-router-dom'; function Profile() { const match = useRouteMatch('/profile/:name'); return match ? <p>{match.params.name}'s Profile</p> : <p>My own profile</p>; } export default function App() { return ( <Router> <nav> <Link to="/profile">My Profile</Link> <br /> <Link to={`/profile/ann`}>Ann's Profile</Link> </nav> <Route path="/profile"> <Profile /> </Route> </Router> ); }
You can also use all the props on Route like exact or sensitive as an object with useRouteMatch.
Wrapping up
The hooks and explicit Route comes with a hidden advantage in itself. After teaching these techniques at multiple workshops, I have come to the realization that these help avoid a lot of confusion and intricacies that came with the earlier patterns. There are suddenly far fewer unforced errors. They will surely help make your router code more maintainable and you will find it way easier to upgrade to new React Router versions.
The post The Hooks of React Router appeared first on CSS-Tricks.
The Hooks of React Router published first on https://deskbysnafu.tumblr.com/
0 notes