#react router dom link
Explore tagged Tumblr posts
Visit Tumblr Blog
Explore Tumblr blogs with no restrictions, modern design and the best experience.
Last Seen Tumblr Blogs


Fun Fact
Tumblr has 4 main sources of revenue.
Text
Title: The Evolution of Frontend Development: A Comprehensive Guide for Modern Web Developers
Introduction
Frontend development has transformed dramatically over the past decade, becoming one of the most dynamic fields in the tech industry. With user expectations soaring and new technologies emerging, building intuitive, responsive, and user-friendly web interfaces is more crucial than ever. In this article, we’ll dive deep into the core aspects of modern frontend development, the tools and frameworks that shape the industry, and best practices for crafting outstanding user experiences.
What is Frontend Development?
Frontend development, also known as client-side development, refers to the creation of the visual and interactive components of a website or web application. It involves using technologies such as HTML, CSS, and JavaScript to ensure that users can seamlessly interact with a site’s content. Essentially, everything you see and engage with on a website – buttons, text, images, forms, and animations – are the result of frontend development.
The Key Technologies of Frontend Development
1. HTML (HyperText Markup Language)
HTML is the backbone of any website. It structures the content by defining elements such as headings, paragraphs, links, images, and other multimedia. HTML5, the latest version, introduced new elements like <article>, <section>, and <footer>, which have enhanced web accessibility and semantic meaning.
2. CSS (Cascading Style Sheets)
CSS brings HTML to life by defining the visual style of a webpage. From colors and fonts to layouts and animations, CSS allows developers to control how content is presented on different devices. Modern CSS features like Flexbox, Grid, and media queries have made it easier to create responsive designs that adapt to various screen sizes.
3. JavaScript
JavaScript adds interactivity to web pages. Whether it’s creating dynamic content updates, handling user inputs, or adding animations, JavaScript is essential for a responsive and interactive user experience. With the rise of ES6 (ECMAScript 2015) and beyond, JavaScript has become more powerful and easier to work with, especially with features like arrow functions, promises, and async/await.
Modern Frontend Frameworks and Libraries
In today’s development environment, building a web interface purely with vanilla HTML, CSS, and JavaScript is rare. Frameworks and libraries have become indispensable tools for frontend developers, helping streamline workflows, manage complexity, and improve scalability.
1. React
Created by Facebook, React is a JavaScript library for building user interfaces, particularly single-page applications (SPAs). React’s component-based architecture allows developers to break down complex UIs into smaller, reusable pieces. Its virtual DOM efficiently updates only the necessary parts of the UI, resulting in fast rendering performance.
2. Vue.js
Vue.js is a progressive JavaScript framework known for its simplicity and flexibility. It’s ideal for building both SPAs and more traditional multipage applications. Vue’s ecosystem includes tools like Vue Router for routing and Vuex for state management, making it a solid choice for developers looking for a versatile frontend framework.
3. Angular
Angular, maintained by Google, is a comprehensive framework designed for building enterprise-level applications. It provides a full suite of tools, including two-way data binding, dependency injection, and a powerful templating system. Angular is preferred for large-scale applications requiring strict structure and scalability.
4. Svelte
Svelte is a relatively new frontend framework that differs from others by doing most of its work at compile time. Instead of relying on a virtual DOM, Svelte compiles components into highly efficient imperative code that directly manipulates the DOM. This results in faster runtime performance and smaller bundle sizes.
Tools and Platforms Enhancing Frontend Development
1. Figma and Adobe XD
Web design tools like Figma and Adobe XD have become essential for frontend developers. These platforms allow designers and developers to collaborate seamlessly on prototypes and wireframes, ensuring that design vision aligns with the technical execution. They also integrate with AI-driven tools like Locofy and Framer, which convert design assets into code, significantly speeding up the development process.
2. Version Control with Git
Git is a version control system that allows developers to track changes to their codebase, collaborate with other developers, and manage multiple versions of a project. Using platforms like GitHub, GitLab, or Bitbucket, developers can collaborate in teams, review code, and maintain a history of all project changes.
3. Build Tools and Task Runners
Modern frontend development workflows often involve a range of tools that automate repetitive tasks. Tools like Webpack, Gulp, and Parcel help bundle assets, minify JavaScript, compile Sass, and perform live reloading during development. They play a crucial role in optimizing code for production, ensuring faster load times and better user experience.
Best Practices in Frontend Development
1. Responsive Design
With the explosion of mobile device usage, responsive web design is non-negotiable. Using flexible grids, media queries, and fluid images, developers can ensure that websites look great on any device, whether it’s a smartphone, tablet, or desktop.
2. Accessibility
Building websites that are accessible to all users, including those with disabilities, is critical. Following the Web Content Accessibility Guidelines (WCAG), developers should ensure their sites are navigable via keyboard, provide alt text for images, and use semantic HTML to make content readable by screen readers.
3. Performance Optimization
Speed is essential for retaining users and improving search engine rankings. Techniques like lazy loading images, minimizing JavaScript, and using Content Delivery Networks (CDNs) for static assets can drastically improve page load times.
4. Cross-Browser Compatibility
Different browsers may render websites slightly differently. Developers should always test their sites in multiple browsers (e.g., Chrome, Firefox, Safari, Edge) to ensure consistency in appearance and functionality.
Conclusion
Frontend development has evolved into a multifaceted discipline that requires not only technical expertise but also a deep understanding of design principles and user experience. By staying updated with the latest tools, frameworks, and best practices, developers can create stunning, high-performance web interfaces that captivate users and enhance brand engagement. Whether you’re just starting out or are an experienced developer, mastering frontend development is key to building modern, responsive, and accessible web applications.
###blogger.com/blog/post/edit/8905294591021215860/6960074020900498661
1 note
·
View note
Text
React Route Navigation
React Route is an integral part of any React application, providing the functionality to manage navigation between different views or pages seamlessly. As single-page applications (SPAs) continue to rise in popularity, understanding how to effectively use React Route is crucial for creating a dynamic and intuitive user experience.
What is React Route?
React Route is part of the React Router library, which is specifically designed to handle routing in React applications. Routing is the process of determining what content to display based on the current URL, allowing users to navigate through different pages or components within your app.
Setting Up Your First Route
Setting up routes in React is straightforward. The Route component is used to define which component should be rendered for a particular path.
Example:import { BrowserRouter as Router, Route } from 'react-router-dom'; function App() { return ( <Router> <Route path="/" component={HomePage} /> <Route path="/about" component={AboutPage} /> </Router> ); }
In this example, when the user visits the root URL (/), the HomePage component is displayed. If they navigate to /about, the AboutPage component is rendered.
Dynamic Routing with Parameters
One of the powerful features of React Route is the ability to create dynamic routes that accept parameters. This is particularly useful when you need to display content based on an identifier, such as a user ID or a product code.
Example:<Route path="/user/:id" component={UserPage} />
Here, :id is a parameter that can change based on the user's interaction, allowing you to render different content depending on the value passed in the URL.
Navigating Between Routes
To navigate between routes, React provides the Link component. This acts like an anchor tag (<a>) but without causing a full page reload, making the navigation experience much smoother.
Example:<Link to="/about">About Us</Link>
By clicking this link, the app will navigate to the /about route, rendering the AboutPage component.
Advanced Features: Nested Routes and Switch
React Route also supports nested routes, allowing you to define routes within other components. This is useful for complex applications where different sections of a page may have their own sub-navigation.
Additionally, the Switch component ensures that only the first matching route is rendered. This is particularly useful for handling 404 pages or other fallback content.
Example:<Switch> <Route exact path="/" component={HomePage} /> <Route path="/about" component={AboutPage} /> <Route path="*" component={NotFoundPage} /> </Switch>
In this example, the NotFoundPage will be displayed for any route that doesn’t match the defined paths.
Conclusion
React Route is more than just a tool for managing navigation; it's the backbone of your React application's user experience. By mastering its features—like dynamic routing, nested routes, and the Switch component—you can create responsive, user-friendly SPAs that feel seamless and intuitive. Whether you’re just starting with React or looking to refine your skills, understanding React Route is essential for modern web development.
0 notes
Text
bootstrap navbar react router
Creating a Bootstrap Navbar with React Router: A Step-by-Step Guide
Navigating through a React application seamlessly is essential for a smooth user experience. Integrating React Router with a Bootstrap navbar is an excellent way to create a functional and aesthetically pleasing navigation system. Here’s how to do it.
Step 1: Set Up Your React Project
First, make sure you have a React project set up. You can create one using Create React App if you don't have a project already.npx create-react-app react-bootstrap-navbar cd react-bootstrap-navbar npm install react-router-dom bootstrap
Step 2: Install Necessary Packages
To use Bootstrap with React, you need to install Bootstrap and React Router DOM.npm install react-bootstrap bootstrap react-router-dom
Step 3: Add Bootstrap CSS
Include Bootstrap CSS in your project by adding the following line to your src/index.js file:import 'bootstrap/dist/css/bootstrap.min.css';
Step 4: Set Up React Router
Configure React Router in your application. Create a src/components directory and add your page components there. For this example, let’s create three simple components: Home, About, and Contact.
src/components/Home.jsimport React from 'react'; function Home() { return <h2>Home Page</h2>; } export default Home;
src/components/About.jsimport React from 'react'; function About() { return <h2>About Page</h2>; } export default About;
src/components/Contact.jsimport React from 'react'; function Contact() { return <h2>Contact Page</h2>; } export default Contact;
Step 5: Create the Navbar Component
Now, create a Navbar component that will use Bootstrap styles and React Router links.
src/components/Navbar.jsimport React from 'react'; import { Navbar, Nav, Container } from 'react-bootstrap'; import { LinkContainer } from 'react-router-bootstrap'; function AppNavbar() { return ( <Navbar bg="dark" variant="dark" expand="lg"> <Container> <Navbar.Brand href="/">MyApp</Navbar.Brand> <Navbar.Toggle aria-controls="basic-navbar-nav" /> <Navbar.Collapse id="basic-navbar-nav"> <Nav className="me-auto"> <LinkContainer to="/"> <Nav.Link>Home</Nav.Link> </LinkContainer> <LinkContainer to="/about"> <Nav.Link>About</Nav.Link> </LinkContainer> <LinkContainer to="/contact"> <Nav.Link>Contact</Nav.Link> </LinkContainer> </Nav> </Navbar.Collapse> </Container> </Navbar> ); } export default AppNavbar;
Step 6: Set Up Routing
Configure routing in your main App.js file to render the appropriate components based on the URL.
src/App.jsimport React from 'react'; import { BrowserRouter as Router, Route, Routes } from 'react-router-dom'; import AppNavbar from './components/Navbar'; import Home from './components/Home'; import About from './components/About'; import Contact from './components/Contact'; function App() { return ( <Router> <AppNavbar /> <Routes> <Route path="/" element={<Home />} /> <Route path="/about" element={<About />} /> <Route path="/contact" element={<Contact />} /> </Routes> </Router> ); } export default App;
Step 7: Run Your Application
Start your development server to see your Bootstrap navbar with React Router in action.npm start
Open your browser and navigate to http://localhost:3000. You should see your navigation bar at the top of the page, allowing you to switch between the Home, About, and Contact pages seamlessly.
Conclusion
By following these steps, you’ve created a responsive and dynamic navigation bar using Bootstrap and React Router. This setup not only enhances the user experience with smooth navigation but also leverages the power of React components and Bootstrap's styling. Happy coding!
1 note
·
View note
Text
React Router: Navigating Through Your Single-Page Applications
In today's web development landscape, Single-Page Applications (SPAs) have become increasingly popular due to their ability to provide a smooth and efficient user experience. However, as the complexity of these applications grows, managing navigation and handling different routes can become a daunting task. Enter React Router, a powerful routing library designed specifically for React applications.

React Router is a collection of navigational components that allow you to create and manage routes within your React application. By incorporating React Router into your project, you can create a seamless navigation experience, manage URLs, and handle different views or components based on the current URL. In this blog post, we'll explore the core concepts of React Router and how it can revolutionize the way you navigate through your Single-Page Applications.
1. Understanding Single-Page Applications and Client-Side Routing
Before we dive into React Router, it's essential to understand the concept of Single-Page Applications (SPAs) and client-side routing. Unlike traditional multi-page websites, where each new page requires a full page refresh, SPAs load a single HTML page and dynamically update the content based on user interactions. This approach eliminates the need for page reloads, resulting in faster load times and smoother transitions between different views or components.
Client-side routing is a technique used in SPAs to handle navigation without requiring a full page refresh. Instead of relying on the server to handle route changes, client-side routing allows the application to manage navigation and URL updates within the browser itself. This is where React Router comes into play, providing a seamless and efficient way to handle client-side routing in React applications.
2. Setting Up React Router
To get started with React Router, you'll need to install it as a dependency in your React project. There are two main packages you'll need: `react-router-dom` for web applications and `react-router-native` for mobile applications built with React Native. For the purposes of this blog post, we'll focus on the `react-router-dom` package.
Once installed, you'll need to import the necessary components from the `react-router-dom` package and set up your application's router. This typically involves wrapping your application with the `BrowserRouter` component and defining routes using the `Route` component.
3. Defining Routes
React Router allows you to define routes for your application, mapping specific URLs to corresponding components. This is done using the `Route` component, which takes a `path` prop that specifies the URL pattern to match and a `component` or `render` prop that determines which component or element should be rendered when the URL matches the specified path.
You can define nested routes by nesting `Route` components within other `Route` components. This can be particularly useful when building complex applications with multiple levels of navigation.
4. Navigation with Links and NavLinks
React Router provides two primary components for navigation: `Link` and `NavLink`. Both components render an accessible `<a>` element that links to the specified route.
The `Link` component is used for basic navigation between routes, while the `NavLink` component is designed for navigation scenarios where you need to apply active styling to the currently active link. The `NavLink` component takes an `activeClassName` prop that allows you to specify a CSS class to be applied to the link when it's active (i.e., when the URL matches the link's `to` prop).
5. Handling Route Parameters
In many applications, you'll need to pass data or parameters through the URL. React Router makes it easy to handle route parameters by defining dynamic segments in your route paths. These dynamic segments are prefixed with a colon (`:`) and can be accessed through the `match` object passed to the corresponding component.
For example, if you have a route defined as `/products/:productId`, you can access the `productId` parameter in your component by using `match.params.productId`.
6. Programmatic Navigation
While `Link` and `NavLink` components provide a declarative way to navigate between routes, React Router also offers programmatic navigation through the `history` object. This object is available in any component rendered by a `Route` component and provides methods for navigating to different routes, pushing new entries onto the history stack, or replacing the current entry in the history stack.
Programmatic navigation can be useful in scenarios where you need to navigate based on user interactions, such as form submissions or button clicks.
7. Nested Routes and Layout Components
React Router allows you to create nested routes, which can be particularly useful when building applications with complex layouts or multiple levels of navigation. By nesting `Route` components, you can define parent and child routes, making it easier to manage and organize your application's structure.
Additionally, React Router provides the ability to create reusable layout components using the `Route` component's `render` prop or the `children` prop. These layout components can wrap around your application's content, providing a consistent structure and shared elements across multiple routes.
8. Protected Routes and Authentication
In many web applications, you'll need to implement authentication and authorization mechanisms to protect certain routes or components from unauthorized access. React Router offers several ways to handle protected routes, such as using higher-order components, render props, or custom components.
By combining React Router with authentication and authorization logic, you can ensure that only authenticated users can access certain routes or components, while redirecting unauthenticated users to a login page or displaying an appropriate message.
9. Code Splitting and Lazy Loading
One of the benefits of using React Router is the ability to leverage code splitting and lazy loading techniques. By splitting your application's code into smaller chunks and loading them on demand, you can improve the initial load time and overall performance of your application.
React Router provides the `React.lazy` function and the `Suspense` component, which allow you to lazily load components and routes, ensuring that users only download the code they need for the current route.
10. Integrating with Redux or Other State Management Libraries
While React Router is a routing library, it can be seamlessly integrated with other state management libraries like Redux or Context API. By combining React Router with these libraries, you can manage global application state, share data between components, and handle complex application logic more effectively.
Redux, in particular, provides a way to manage routing state within your application's Redux store, allowing you to dispatch actions and update the routing state based on user interactions or other events.
Conclusion
React Router is a powerful tool that simplifies the process of implementing client-side routing in your React applications. By understanding its core concepts and leveraging its features, you can create seamless navigation experiences, manage complex application structures, and deliver fast and efficient Single-Page Applications. Whether you're building a simple website or a complex web application, React Router provides the flexibility and robustness needed to handle routing and navigation requirements. With its rich ecosystem of additional libraries and integrations, React Router empowers developers to build modern, responsive, and user-friendly web applications that deliver exceptional user experiences. If you're looking to hire dedicated ReactJS developers or a hire React js development company, ensuring they have expertise in React Router is crucial for creating seamless and efficient Single-Page Applications.
0 notes
Text
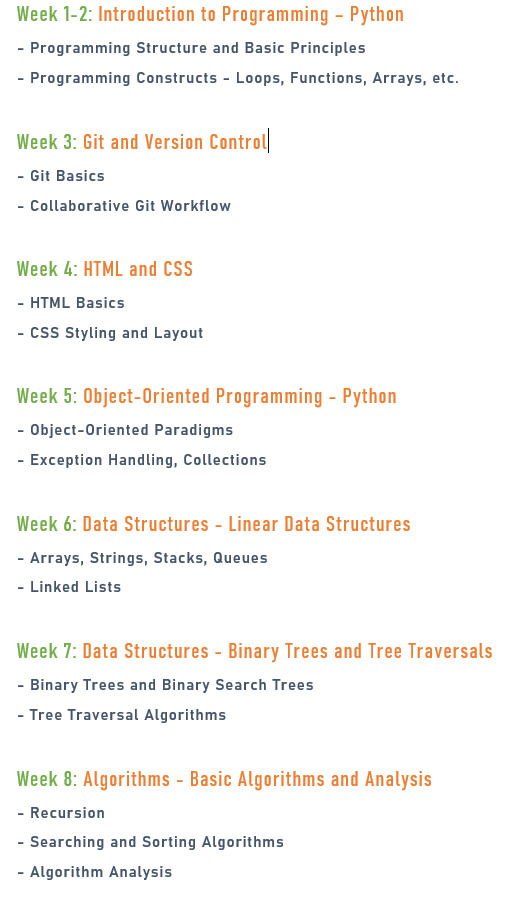
CHEAT SHEET TO
FULL STACK SOFTWARE DEVELOPMENT (IN 21 WEEKS)

Below is a more extended schedule to cover all the topics we've listed for approximately 2-3 months. This schedule assumes spending a few days on each major topic and sub-topic for a comprehensive understanding. Adjust the pace based on your comfort and learning progress:
Week 1-2: Introduction to Programming – Python
- Programming Structure and Basic Principles
- Programming Constructs - Loops, Functions, Arrays, etc.
Week 3: Git and Version Control
- Git Basics
- Collaborative Git Workflow
Week 4: HTML and CSS
- HTML Basics
- CSS Styling and Layout
Week 5: Object-Oriented Programming - Python
- Object-Oriented Paradigms
- Exception Handling, Collections
Week 6: Data Structures - Linear Data Structures
- Arrays, Strings, Stacks, Queues
- Linked Lists
Week 7: Data Structures - Binary Trees and Tree Traversals
- Binary Trees and Binary Search Trees
- Tree Traversal Algorithms
Week 8: Algorithms - Basic Algorithms and Analysis
- Recursion
- Searching and Sorting Algorithms
- Algorithm Analysis
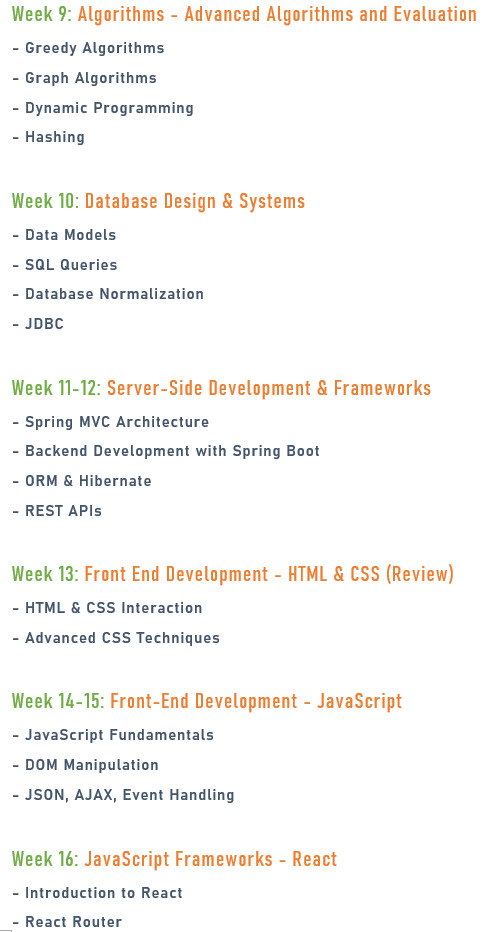
Week 9: Algorithms - Advanced Algorithms and Evaluation
- Greedy Algorithms
- Graph Algorithms
- Dynamic Programming
- Hashing
Week 10: Database Design & Systems
- Data Models
- SQL Queries
- Database Normalization
- JDBC
Week 11-12: Server-Side Development & Frameworks
- Spring MVC Architecture
- Backend Development with Spring Boot
- ORM & Hibernate
- REST APIs
Week 13: Front End Development - HTML & CSS (Review)
- HTML & CSS Interaction
- Advanced CSS Techniques
Week 14-15: Front-End Development - JavaScript
- JavaScript Fundamentals
- DOM Manipulation
- JSON, AJAX, Event Handling
Week 16: JavaScript Frameworks - React
- Introduction to React
- React Router
- Building Components and SPAs
Week 17: Linux Essentials
- Introduction to Linux OS
- File Structure
- Basic Shell Scripting
Week 18: Cloud Foundations & Containers
- Cloud Service Models and Deployment Models
- Virtual Machines vs. Containers
- Introduction to Containers (Docker)
Week 19-20: AWS Core and Advanced Services
- AWS Organization & IAM
- Compute, Storage, Network
- Database Services (RDS, DynamoDB)
- PaaS - Elastic BeanStalk, CaaS - Elastic Container Service
- Monitoring & Logging - AWS CloudWatch, CloudTrail
- Notifications - SNS, SES, Billing & Account Management
Week 21: DevOps on AWS
- Continuous Integration and Continuous Deployment
- Deployment Pipeline (e.g., AWS CodePipeline, CodeCommit, CodeBuild, CodeDeploy)
- Infrastructure as Code (Terraform, CloudFormation)
Please adjust the schedule based on your individual learning pace and availability. Additionally, feel free to spend more time on topics that particularly interest you or align with your career goals. Practical projects and hands-on exercises will greatly enhance your understanding of these topics.

0 notes
Text
React Router Tutorial for Beginners
#React #reactjs
React Router is a popular routing library for the React.js library. It allows developers to easily create Single Page Applications (SPAs) with multiple views, by providing a way to handle routing and rendering of components based on the URL. In this article, we’ll cover the basics of React Router and how to use it to build a basic SPA. What is Routing? Why use React Router? Installing React…

View On WordPress
#browserrouter#React#react router#react router dom#react router dom link#react router dom redirect#react router dom v6#react router example#react router history#react router link#react router npm#react router params#react router query params#react router redirect#react router switch#react router v6#react routing#reactjs#route react#useparams
0 notes
Text
Implement back link to previous link from where user came in React Project.
0 notes
Text
For the #PlayStation7 UI framework, we can start with a skeleton of the structure that allows for intuitive navigation, personalization, accessibility features, interactive tutorials, and feedback mechanisms. This foundation will give us a clear and modular layout for managing and expanding each component.
I’ll break down each area and propose a code structure for a scalable and flexible UI system. Since this is for a game console, it would likely be built using a high-performance front-end framework like React or Unity UI Toolkit if we want C# for seamless integration. I’ll draft this in React with TypeScript for scalability and reusability.
1. Base UI Component Structure
The UI can be organized in a hierarchy of components that handle each aspect:
// App.tsx - Main entry point
import React from 'react';
import { NavigationMenu } from './components/NavigationMenu';
import { Personalization } from './components/Personalization';
import { Accessibility } from './components/Accessibility';
import { Tutorials } from './components/Tutorials';
import { Feedback } from './components/Feedback';
export const App: React.FC = () => {
return (
<div className="ps7-ui">
<NavigationMenu />
<Personalization />
<Accessibility />
<Tutorials />
<Feedback />
</div>
);
};
Each component would encapsulate its own logic and state, allowing for modular updates and improved maintainability.
2. Intuitive Navigation
The NavigationMenu component could use React Router to manage routes for easy navigation between games, apps, and settings. Quick access can be achieved using a menu structure that includes hotkeys or icons.
// components/NavigationMenu.tsx
import React from 'react';
import { Link } from 'react-router-dom';
export const NavigationMenu: React.FC = () => {
return (
<nav className="navigation-menu">
<Link to="/home">Home</Link>
<Link to="/games">Games</Link>
<Link to="/apps">Apps</Link>
<Link to="/settings">Settings</Link>
</nav>
);
};
3. Personalization Options
The Personalization component could offer theme and layout options. We can use context for storing and accessing user preferences globally.
// components/Personalization.tsx
import React, { useState, useContext } from 'react';
import { UserContext } from '../context/UserContext';
export const Personalization: React.FC = () => {
const { userPreferences, setUserPreferences } = useContext(UserContext);
const handleThemeChange = (theme: string) => {
setUserPreferences({ ...userPreferences, theme });
};
return (
<div className="personalization">
<h3>Customize Your Experience</h3>
<select onChange={(e) => handleThemeChange(e.target.value)}>
<option value="dark">Dark</option>
<option value="light">Light</option>
</select>
</div>
);
};
4. Accessibility Features
The Accessibility component includes support for voice commands, color blindness options, and mobility support. We can add accessibility settings to UserContext.
// components/Accessibility.tsx
import React, { useContext } from 'react';
import { UserContext } from '../context/UserContext';
export const Accessibility: React.FC = () => {
const { accessibilityOptions, setAccessibilityOptions } = useContext(UserContext);
const toggleVoiceCommands = () => {
setAccessibilityOptions({ ...accessibilityOptions, voiceCommands: !accessibilityOptions.voiceCommands });
};
return (
<div className="accessibility">
<h3>Accessibility Settings</h3>
<label>
Voice Commands
<input type="checkbox" checked={accessibilityOptions.voiceCommands} onChange={toggleVoiceCommands} />
</label>
</div>
);
};
5. Interactive Tutorials
The Tutorials component will guide new users through the setup. You can create individual tutorial steps as components or objects within an array.
// components/Tutorials.tsx
import React, { useState } from 'react';
export const Tutorials: React.FC = () => {
const [currentStep, setCurrentStep] = useState(0);
const tutorialSteps = [
"Welcome to PlayStation 7",
"How to Navigate",
"Personalization Settings",
"Feedback and Support",
];
return (
<div className="tutorials">
<h3>{tutorialSteps[currentStep]}</h3>
<button onClick={() => setCurrentStep((prev) => (prev + 1) % tutorialSteps.length)}>Next</button>
</div>
);
};
6. Feedback Mechanisms
The Feedback component enables users to submit feedback. This could involve a backend integration for storing data and using WebSocket for real-time updates.
// components/Feedback.tsx
import React, { useState } from 'react';
export const Feedback: React.FC = () => {
const [feedback, setFeedback] = useState("");
const handleSubmit = () => {
// Logic to send feedback to the server
console.log("Feedback submitted:", feedback);
};
return (
<div className="feedback">
<h3>Give Us Your Feedback</h3>
<textarea value={feedback} onChange={(e) => setFeedback(e.target.value)} />
<button onClick={handleSubmit}>Submit</button>
</div>
);
};
7. Context for Global State
A UserContext can hold user preferences, accessibility settings, and other globally accessible states, making the app reactive and user-tailored.
// context/UserContext.tsx
import React, { createContext, useState } from 'react';
interface UserPreferences {
theme: string;
layout: string;
}
interface AccessibilityOptions {
voiceCommands: boolean;
colorBlindMode: boolean;
}
interface UserContextProps {
userPreferences: UserPreferences;
setUserPreferences: React.Dispatch<React.SetStateAction<UserPreferences>>;
accessibilityOptions: AccessibilityOptions;
setAccessibilityOptions: React.Dispatch<React.SetStateAction<AccessibilityOptions>>;
}
export const UserContext = createContext<UserContextProps>({} as UserContextProps);
export const UserProvider: React.FC = ({ children }) => {
const [userPreferences, setUserPreferences] = useState<UserPreferences>({ theme: 'dark', layout: 'grid' });
const [accessibilityOptions, setAccessibilityOptions] = useState<AccessibilityOptions>({ voiceCommands: false, colorBlindMode: false });
return (
<UserContext.Provider value={{ userPreferences, setUserPreferences, accessibilityOptions, setAccessibilityOptions }}>
{children}
</UserContext.Provider>
);
};
Wrapping Up
By organizing the code into components and using context, this framework can be expanded for future updates and personalized settings, all without sacrificing modularity. This structure allows each branch of the UI to evolve independently, providing a scalable, interactive, and customizable experience for #PlayStation7 users.
Would you like to explore one of these sections in even more detail, or should I add more code to specific functionalities?
0 notes
Text
React Router Installation and Configuration
A Comprehensive Guide to React Router: Installation and Configuration
React Router is an essential library for creating dynamic and navigable single-page applications (SPAs) in React. It enables developers to map different URLs to specific components, allowing users to navigate between pages without the need to reload the entire application. In this article, we will cover the installation and basic configuration of React Router, setting you up to create efficient and user-friendly web applications.
1. Why Use React Router?
React Router is widely used in React applications due to its flexibility and powerful features. It allows you to:
Manage Navigation: Seamlessly handle navigation between different components or pages.
Dynamic Routing: Create dynamic routes that respond to user inputs or interactions.
Nested Routes: Organize your application with nested routes, allowing complex UI structures.
Easy Redirection: Implement redirections and conditional rendering based on user actions or authentication status.
2. Installation of React Router
To start using React Router, you first need to install it. React Router has different packages for web and native applications. For web applications, you'll use react-router-dom. Follow these steps to install React Router in your React project:
Install React Router: Open your terminal in the root directory of your React project and run the following command:
npm install react-router-dom
Or if you're using Yarn: yarn add react-router-dom
Update Your React Project: Ensure that your React project is up-to-date with the latest versions of React and React DOM to avoid any compatibility issues.
3. Basic Configuration of React Router
Once installed, you can configure React Router in your application. Here’s how you can set up basic routing:
Import BrowserRouter: In your index.js or App.js file, import BrowserRouter from react-router-dom. This component wraps your entire application and enables routing.
import { BrowserRouter as Router } from 'react-router-dom';
Create Routes: Define your routes within the Router component using Route components. Each Route specifies a path and the component that should render when the path matches the URL.
import { Route, Switch } from 'react-router-dom'; import Home from './components/Home'; import About from './components/About'; function App() { return ( <Router> <Switch> <Route exact path="/" component={Home} /> <Route path="/about" component={About} /> </Switch> </Router> ); }
<Switch>: Ensures that only one route is rendered at a time.
<Route>: Defines individual routes; the exact prop ensures the route only matches the specified path exactly.
Linking Between Routes: To navigate between different routes, use the Link component from react-router-dom instead of traditional anchor tags.
import { Link } from 'react-router-dom'; function Navbar() { return ( <nav> <Link to="/">Home</Link> <Link to="/about">About</Link> </nav> ); }
4. Advanced Configuration
React Router offers advanced configurations, such as nested routes, route parameters, and programmatic navigation.
Nested Routes: To create nested routes, simply nest Route components within each other.
Route Parameters: Use parameters in paths to capture dynamic values from the URL.
Programmatic Navigation: Use the useHistory or useNavigate hooks to navigate programmatically within your components.
5. Conclusion
React Router is a robust tool for managing navigation in React applications. With simple installation and configuration, you can create a fully navigable single-page application. By understanding the basics of routing and how to implement them, you can enhance the user experience and create more dynamic web applications. As you become more familiar with React Router, you can explore its advanced features to further optimize your application’s navigation.
#reactjscourse#job support#react js online training#placement service#reactjs#reactnativecourse#web development#web design
0 notes
Text
Something Awesome: Data Thief or Gift Recipient
Okay, we’ve seen more than a few attacks that can be performed when someone clicks a link or navigates to a website.
Cryptojacking
Cross Site Request Forgery
Drive-By Attacks
Zoom 0day
But it’s time to pay homage to the attack that’s hidden in plain site.
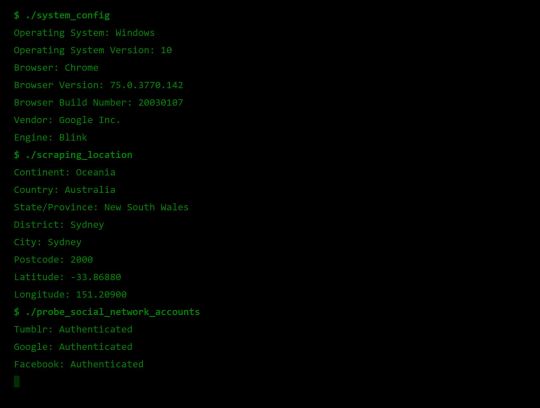
tldr; head over to https://fingerprintme.herokuapp.com/ for some fun.
Passive Data Theft
I hesitate to call it theft when in fact we are giving all of this data to every website we visit like a little gift.
Please, accept this bundle of quasi-identifiers as a token of my appreciation.
Many internet users have no idea just how much data is available to websites they are visiting, so it’s worth exploring just what is in our present.

IP Address and Geolocation API
Like any good gift giver, we better write on the tag.
To: <website server> From: <your IP address>
Your IP (Internet Protocol) address is a little 32-bit (now possibly 128-bit) number that uniquely identifies your device on the Internet. This is by design; people need to be able to address you to be able to send you any packets. A static 1:1 mapping of devices to IPs is definitely a massive exaggeration today as as we use technologies to let multiple devices share one IP, dynamically acquire an IP for each session, and our ISPs (Internet Service Providers) may also dynamically assign our IP address.
Nonetheless, IP addresses have (again by design) another function; location addressing. This is because when you’re internet traffic is propagating through the Internet (a global network of routers) it needs to know where it physically needs to go, and fast. Owing to this, the internet has taken on a hierarchical structure, with different ISPs servicing different geographical regions. These ISPs are tiered such that lower tier ISPs service specific subsets of the upper level tier’s region, providing more geographical specificity. It is this property of IP addresses that allows anyone with your IP address to get a rough idea where you are in the world. Moreover, IP addresses from specific subnets like AARNet (for Australian Universities) can be a giveaway for your location.
Try Googling “my ip” or “where am i”. There are many IP to Geolocation API services available. I have made use of https://ipgeolocation.io/, which has a generous free tier 🙏.

User Agent
Every request your browser makes to a server is wrapped up with a nice little UserAgent String bow, that looks a little like this,
User-Agent: Mozilla/<version> (<system-information>) <platform> (<platform-details>) <extensions>
Oh how sweet 😊 it’s our Operating System, our browser and what versions we of each we are running, and if the server is lucky, perhaps a few extra details.
Here are a few examples from MDN:
Mozilla/5.0 (Windows NT 6.1; Win64; x64; rv:47.0) Gecko/20100101 Firefox/47.0
Mozilla/5.0 (Macintosh; Intel Mac OS X x.y; rv:42.0) Gecko/20100101 Firefox/42.0
Mozilla/5.0 (X11; Linux x86_64) AppleWebKit/537.36 (KHTML, like Gecko) Chrome/51.0.2704.103 Safari/537.36
Why might this be a problem? Allow me to direct you towards my earlier post on Drive-By Attacks. Vulnerabilities are often present in specific versions of specific platforms. If an exploit server detects that your particular version of Chrome for Windows (for example) has a known vulnerability, well then prepare to be infected.

Navigator
Okay, I think we’ve been polite enough, it’s time to rip this packaging open! Ooh what is this inside? It’s an invitation to our browser of course!
When we send off a request to a web server complete with our IP and User Agent string, the web server will typically respond by sending us a web page to render. These days a web page can be anything from a single HTML file with a few verses from a dead poet, to a fully fledged JavaScript application. To support this development, browsers are exposing more and more functionality/system information through a special JavaScript interface called Navigator.
From MDN,
The Navigator interface represents the state and the identity of the user agent. It allows scripts to query it and to register themselves to carry on some activities.
...to carry on some activities... I wonder. The list of available properties and methods is pretty comprehensive so I’ll just point out a few interesting ones.
getBattery() (have only seen this on chrome)
connection (some details about your network connection)
hardwareConcurrency (for multithreading)
plugins (another important vector for Drive-Bys)
storage (persisted storage available to websites)
clipboard (requires permissions, goodness plz be careful)
doNotTrack (i wonder who checks this...)
vibrate() (because haptic is the only real feedback)
While I’ve got it in mind, here’s a wonderful browser localStorage vulnerability I stumbled across https://github.com/feross/filldisk.com. There’s a 10MB per site limit, but no browser is enforcing this quota across both a.something.com and b.something.com...
I have no idea why Chrome thinks it’s useful to expose your battery status to every website you visit... Personally, the clipboard API feels the most violating. It requires permissions, but once given you’re never asked again. Control/Command + V right now and see what’s on your clipboard. I doubt there’s many web pages that you’d actually want to be able to read your clipboard every time you visit.

Social Media Side Channel / CSRF
Okay, now we’re getting a little cheeky. It’s actually possible to determine if a browser has an authenticated session with a bunch of social media platforms and services.
It’s a well known vulnerability (have a laughcry at some of the socials responses), which abuses the redirect on login functionality we see on many of these platforms, as well as the Same-Origin Policy SOP being relaxed around HTML tags, as we saw was sometimes exploited by Cross Site Request Forgery attacks.
Consider this lovely image tag.
<img src="https://www.facebook.com/login.php?next=https%3A%2F%2Fwww.facebook.com%2Ffavicon.ico%3F_rdr%3Dp">
As you can see, the image source (at least originally) doesn’t point to an image at all, but rather the Facebook login page. Thanks to SOP, we wouldn’t and shouldn’t be able to send an AJAX request to this website and see the response. But this HTML image tag is going to fire off a GET request for it’s source no problem.
Thanks to redirect on login, if a user rocks up to the login page with the correct session cookies then we won’t have them login again, but rather we redirect them to their newsfeed; or, as it turns out, whatever the URL parameter next points to. What if we point it to an actual image, say the website icon, such that the HTML image tag loads if we are redirected, and fails if not.
Simple but effective. You can try it for yourself here, by opening my codepen in your browser when you’re signed in to Facebook, and when you’re signed out (or just use Incognito).

Fingerprint Me v1.0
Okay, time for a demonstration. I took the liberty of writing my own web page that pulls all this data together, and rather than store it for a rainy day (like every other page on the web), I present it to the user on a little web dashboard. It’s like a mirror for your browser. And who doesn’t like to check themselves out in the mirror from time to time 🙃
Random technical content: I had to fetch the geolocation data server-side to protect my API key from the client, then I sneak it back into the static HTML web page I’m serving to the user by setting it on the window variable in some inline script tags.
I bust out some React experience, and have something looking pretty (pretty scary I hope) in some nondescript amount of time (time knows no sink like frontend webdev). I rub my hands together grinning to myself, and send it off to some friends.
“Very scary”. I can see straight through the thin veil of their encouragement and instead read “Yeaaaah okay”. One of them admits that they actually missed the point when they first looked at it. But.. but... nevermind. It’s clearly not having the intended effect. These guys are pretty Internet savvy, but I feel like this should be disconcerting for even the most well seasoned web user...
Like that moment you lock eyes with yourself in the mirror after forgetting to shave a few days in a row.

Fingerprint Me v2.0
An inspired moment follows. I trace it back to the week ?7 activity class on privacy:
It is very hard to make a case for privacy. What is the inherent value of privacy? Why shouldn’t the government have our data, we give it to a million services everyday anyway, and receive a wealth of benefits for it. Go on, have it. I wasn’t using it for anything anyway.
It is very easy to make a case for privacy, if there is any sense that someone malicious is involved. As soon as there is someone who would wish us ill it becomes obvious that there are things that the less they know the better.
<Enter great The Art of War quote here.>
~ Sun Tzu
Therein lies the solution. I need to make the user feel victimised. And what better to do it than a green on black terminal with someone that calls themselves a hacker rooting your machine.
DO CLICK THIS LINK (it’s very safe, I promise) https://fingerprintme.herokuapp.com
Some more random technical content: Programming this quite synchronous behaviour in the very async-centric JavaScript was quite a pain. It was particularly tricky to get around the fact that React renders it’s component hierarchy top down, so I needed the parent components to mount empty in order for them to be correctly populated with child components later. It was also a pain to access and render child components conditionally, especially if you want to have sets of child components in different files, as though they aren’t ultimately nested in the DOM, React will treat them as if they are.
Some User Reviews:
“It feels like I should shut the window”
“This is SO RUDE”
“Battery level. I mean. Literally. How.”
Excellent.
Recommendations
Know what’s in your present, and who you’re gifting it to 🎁
To protect your IP address/location consider using a VPN or ToR
Check out NoScript, a browser plugin that will block JavaScript by default, but allow you to enable it for trusted sites.
Check out and share https://fingerprintme.herokuapp.com 😉
3 notes
·
View notes
Text

Introduction: ReactJS has gained immense popularity in recent years for its ability to build dynamic and interactive web interfaces. Whether you're a seasoned developer or just starting with web development, this beginner's guide will walk you through the basics of ReactJS and help you get started on your journey to building powerful user interfaces.
What is ReactJS?
In this section, explain what ReactJS is and its core concepts. Discuss its component-based architecture, virtual DOM, and unidirectional data flow. Highlight the benefits of using ReactJS and how it simplifies UI development.
Setting up a React Development Environment:
Explain the steps to set up a React development environment using tools like Create React App or manual configuration with npm and Babel. Walk through the installation process and provide guidance on setting up a basic project structure.
Understanding React Components:
Introduce the concept of components in React and their importance. Explain functional components and class components. Show examples of creating and rendering components. Discuss component props and how they facilitate data flow.
State and Lifecycle:
Explain the concept of state in React and how it represents data that changes over time. Discuss the use State and use Effect hooks for managing state and handling side effects. Show examples of updating and rendering components based on state changes.
Handling User Input and Forms:
Guide readers on how to handle user input and form submission in React. Explain the on Change event, controlled components, and form validation. Show examples of capturing and validating user input.
Rendering Lists and Conditional Content:
Discuss rendering lists of data dynamically using the map function. Explain the importance of unique keys for list items. Show how to conditionally render content based on certain conditions using if statements or ternary operators.
Styling React Components:
Discuss different approaches for styling React components, such as inline styles, CSS modules, or CSS-in-JS libraries. Explain the pros and cons of each approach and provide examples of styling components.
Working with External Data:
Guide readers on fetching and displaying external data in React components. Explain the use of the use Effect hook for making API calls. Show examples of fetching data and updating the component state with the retrieved data.
Routing in React:
Introduce React Router and explain how to implement routing in a React application. Show how to define routes, create navigation links, and render different components based on the current route.
Deployment and Next Steps:
Provide guidance on deploying a React application to a web server or a hosting platform. Discuss common deployment strategies and considerations. Suggest next steps for further learning and exploring advanced React concepts.
1 note
·
View note
Text
React Router DOM v6 Send or Get Props State with Link
React Router DOM v6 Send or Get Props State with Link
Hello Dev today now in this post i will show you React Router DOM v6 Send or Get Props State with Link. React Router is an exceptional package for creating a routing system in React. It allows the user to navigate between different pages via various views and components. In this extensive tutorial, we will teach you how to pass props object (state) via the Link component in React JS application…
View On WordPress
0 notes
Text
How to Make React.js Breadcrumbs
Have you ever noticed those little text components on some websites that show your location? These are referred to as breadcrumbs, and they can be a helpful way for visitors to get about, especially when browsing through complicated websites. With this article, you will discover how to create breadcrumbs in React.js.

Why Do Breadcrumbs Matter and What Are They?
Breadcrumbs, which are little text snippets, are frequently used to show a user where they are on a website. They may help users get their bearings, especially while navigating across websites with many pages. By providing a trail of links, breadcrumbs assist users in navigating a website and make it easy for them to go back to previous sections. It's essential must keep in mind that breadcrumbs shouldn't be used as the main means of navigation on a website. They must be combined with other navigational features, such as a menu or search bar.
How to Create Breadcrumbs in React.js
There are two main ways to generate breadcrumbs in React.js: by using either the react-router-dom library or the use-react-router-breadcrumbs package. However, before getting started,
Logics Are Separately Stored
The two primary operations that take place in the background of the beautiful React app interface are data-loading and rendering logic.
Always create separate components for each of these logics if you want to improve your app's performance and loading time. Once you start implementing this method, you'll notice a drop in bounce rate and an increase in user engagement.
The drawing code can be executed in a sub-component, while the data-loading logic can be executed in the main component. Furthermore, the data-loading logic will instantly send the data to the drawing component, accelerating the app's loading process.
Multi-Stage Code Testing with Prop Types Usage
Always perform several code tests in multiple simulated environments when developing a React app. Only then should the project be accelerated to the testing phase following unit testing at the developer level is also necessary. It will help you find and correct all of the potentially harmful bugs and weaknesses before publication.
Additionally, it would be advantageous if you favored utilizing PropTypes, as doing so will make it simpler to examine the data type. The React code can then be used to fix the problems and protect your users from unpleasant surprises.
For any big cyberattacks, activate security measures.
All applications prioritize data security and maintaining data integrity and customer confidentiality is a top priority for every business.
To secure your React software, you can take these steps:
Enable HTTPS for each data transfer between a server and a client.
Use JWT, React Router, AuthO, and Passport JS for user authentication.
Create roles to group individuals and give them just specific access.
Configure input sanitization to defend against XSS and SQL injection attacks.
Because React is a recognized web development technology, many organizations opt to use it while creating their business applications. To build a solid React project, everyone should follow a few best practices.
Establishing a precise app structure, using the DRY coding style, allowing various security systems, using Prop Types, embedding CS in JS, and segregating logic are a few best practices you have to follow. Once you start using these strategies, you'll surely notice faster loading times and a rise in customer satisfaction.
Conclusion:
In summary, React JS is here just in time to help designers and developers swiftly create incredibly engaging online applications and user interfaces. You may separate the components and create a single-page application with minimal coding.
Furthermore, the virtual DOM also incorporates performance, and React JS is regarded as being SEO friendly. Applications on a large scale that use frequently changing data are possible. These important advantages have drawn a lot of attention to React JS.
0 notes
Text
Which is Better for Web Development: AngularJS or ReactJS?
Should I create my online or mobile app using Angular or React? If they want to keep up with the rapidly changing field of front-end web development, it's a question that both newcomers and seasoned professionals will eventually have to answer.
What’s the difference between AngularJS and ReactJS?
Even while it would be easy to write off the distinction between Angular and React as one of frameworks and libraries, the majority of developers that use React as a view library will also use other libraries in the React ecosystem to transform it into a full framework. React is sometimes paired alongside other JavaScript frameworks like Angular and Vue.js because of this. It's crucial to delve into the details in order to fully comprehend the distinctions.
A complete JavaScript framework based in TypeScript is called Angular (a superset of JavaScript). The original version of AngularJS, dubbed AngularJS 2, was first made available by Google in 2016 under the name Angular 2. By embracing components and keeping the dependency injection (DI) and two-way data binding features that Angular developers had grown to appreciate, the new Angular was created to compete with React.
Key features of AngularJS include:
TypeScript
Angular CLI
Dependency injection
Two-way data binding
Routing with @angular/router
Forms with @angular/forms
XSS protection
HTML templates
Component CSS encapsulation
React was first made available as an open-source JavaScript library for generating views in 2013. It is also known as React.js or ReactJS. React just offers the view, as opposed to the model, view, and controller that the previous version of AngularJS offered. React made the components-based architecture for web and mobile development popular and gave developers the freedom to use other libraries and frameworks for state management. React favoured using libraries that promoted working with immutable data and one-way data binding to achieve unidirectional data flow to handle state management.
Key features of ReactJS include:
Virtual DOM (Document Object Model)
JSX files
XSS protection
Functional components
Basic state management with setState and Context API
Read More About: 7 Advantages of ReactJS For Building Interactive User Interfaces
Data Binding
Data binding is the process that links the view or user interface to the data model. The virtues of two-way data binding (Angular) versus one-way data binding have been hotly contested in the literature (React).
In actuality, Angular and React allow you to accomplish both. The main distinction is that two-way data binding comes standard with Angular, whereas with React, choosing the appropriate state management library is necessary.
Data only flows from the model to the display in one direction when one-way data binding is used. The benefit of unidirectional data flow is that managing state throughout your application is much simpler. You are aware that any modifications made by the state to a specific component can only have an impact on components above it. Any alterations to the state of a component will not affect its siblings or parents.
Data travels from the model to the view in both directions when two-way data binding is used. The model will be updated whenever the view is modified, and vice versa. The rapid updates and simpler data administration for the developer are two-way data binding's main benefits (you know your view and model are in sync). The number of watchers and watched parts required to provide two-way data binding will inevitably rise as applications become more complicated and large, therefore this convenience comes with a performance cost.
Performance
Since the release of Angular 2 in 2016, the two front-end technologies have been neck and neck in terms of performance benchmarks, despite the fact that React was the obvious winner over AngularJS. The majority of common measures have comparable performance. Depending on the test or version, React or Angular might occasionally win. When subjected to task-based benchmark tests, Angular typically outperforms competitors.
When you consider the entire site load speeds, React does appear to have an advantage. This makes sense because Angular directly modifies the DOM, whereas React uses a virtual DOM to efficiently load particular elements of a webpage (which is resource intensive). When a page must refresh multiple views simultaneously, such as in image and video galleries common in social media apps like Facebook and Instagram, this speed advantage becomes most apparent.
The bottom line is that choosing between React and Angular shouldn't primarily be based on performance. Both of these are top-tier JavaScript front-end technologies that may be utilised to build effective websites and mobile applications. If performance is a problem, specific architectural design decisions will be more important.
React vs. Angular: Mobile development
There are two ways for developers using Angular or React to create mobile applications:
Integrate a framework like Ionic into your app to create a hybrid one. You develop a native WebView Component-hosted Angular or React application (wrapper).
Integrate a framework like React Native app development to create a compiled app (for Angular). You build an application with UI elements that translate code into the language of the target device.
Performance and productivity of the programmer are sacrificed in favour of hybrid programmes. Because you are essentially creating a web app and porting it to mobile, the hybrid app is simpler to build.
Although the compiled app promises performance that is nearly as good as native, you must adapt your web app's code to work with the compiled app framework. Large libraries of pre-built components are available in compiled app frameworks like NativeScript and React Native that you may utilise to put together your mobile apps, which can speed up the process.
Both React Native and Angular with NativeScript are capable of achieving 60 frames per second animation rates on iOS and Android devices. The mobile development framework you choose should fit with your current workflow.
Take Away
Choosing a ReactJS Development Company can be difficult, but you can still find the ideal match for your solution.
The most crucial step in the process is knowing the demands or applicability of your project, though. Without your precise guidance, the project won't result in an excellent final outcome.
The aforementioned information is used as the main criterion for choosing the best AngularJS development company. After all, wise financial decisions are usually advantageous.
0 notes
Text
Export 'Redirect' (imported as 'Redirect') was not found in 'react-router-dom'
Export ‘Redirect’ (imported as ‘Redirect’) was not found in ‘react-router-dom’
After updating your react-router-dom NPM you may fetch this error: export 'Redirect' (imported as 'Redirect') was not found in 'react-router-dom' (possible exports: AbortedDeferredError, Await, BrowserRouter, Form, HashRouter, Link, MemoryRouter, NavLink, Navigate, NavigationType, Outlet, Route, Router, RouterProvider, Routes, ScrollRestoration, UNSAFE_DataRouterContext,…

View On WordPress
0 notes
Text
Reduxjs toolkit configurestore

#Reduxjs toolkit configurestore how to#
env configures port for this Redux Toolkit CRUD App.Ībout Redux elements that we’re gonna use: – TutorialService has methods for sending HTTP requests to the Apis. – http-common.js initializes axios with HTTP base Url and headers. – There are 3 pages: TutorialsList, Tutorial, AddTutorial. – App is the container that has Router & navbar. – package.json contains main modules: react, react-router-dom, react-redux, redux-toolkit, axios & bootstrap. The reducer for a specific section of the Redux app state is called a “slice reducer”. Reducer will take the action and return new state. Other React Components will work with the Store via calling async Thunks using React Redux Hooks API. We’re gonna create Redux store for storing tutorials data. This diagram shows how Redux elements work in our React Application: Redux-Toolkit CRUD with Hooks and Rest API example – TutorialDataService uses axios to make HTTP requests and receive responses.
AddTutorial has form for submission new Tutorial.
Tutorial has form for editing Tutorial’s details based on :id.
TutorialsList gets and displays Tutorials.
– We have 3 pages that call async Thunks (that will take care of dispatching the right actions) which uses TutorialDataService to interact with Rest API. It has navbar that links to routes paths. – The App component is a container with React Router. Now look at the React components that we’re gonna implement: – Django & MongoDB Redux-Toolkit CRUD with React Hooks Component Diagram You can find step by step to build a Server like this in one of these posts: We will build a React Redux Tutorial Application with Rest API calls in that:įind all Tutorials which title contains keyword Redux-Toolkit example with CRUD Application React Hooks + Redux: CRUD example with Axios and Rest API – React Hooks + Firestore example: CRUD app – React Hooks + Firebase Realtime Database: CRUD App – React Form Validation with Hooks example – React Table example: CRUD App | react-table 7 – React Hooks File Upload example with Axios & Progress Bar – React Hooks (without Redux) CRUD example with Axios and Rest API – React CRUD example with Axios and Web API (using React Components) – React Hooks + Redux: JWT Authentication example – React Hooks: JWT Authentication (without Redux) example
#Reduxjs toolkit configurestore how to#
In this tutorial, I will show you how to build a Redux Toolkit CRUD example using React Hooks working with Rest API, display and modify data with Router, Axios & Bootstrap.
0 notes