#useparams
Explore tagged Tumblr posts
Visit Tumblr Blog
Explore Tumblr blogs with no restrictions, modern design and the best experience.
Last Seen Tumblr Blogs


Fun Fact
Tumblr was the first site to host the blog for President Barack Obama in 2011.
Text
Concept of React Router
React Router is a powerful library that enables seamless navigation and routing in React applications. Understanding the core concepts of React Router is essential for building dynamic, user-friendly single-page applications. This guide covers the fundamental concepts and provides practical examples to help you master React Router.
Core Concepts of React Router
1. Router Component
The Router component is the foundation of React Router. It wraps your entire application and enables routing functionality.
BrowserRouter: Uses the HTML5 history API to keep your UI in sync with the URL.
HashRouter: Uses the hash portion of the URL (i.e., window.location.hash) to keep your UI in sync with the URL.
import { BrowserRouter } from 'react-router-dom';
function App() { return ( ); }
export default App;
2. Route Component
The Route component is used to define a mapping between a URL path and a component. It renders the specified component when the URL matches the path.
import { Route, Routes } from 'react-router-dom';
function App() { return ( } /> } /> } /> ); }
function Home() { return
Home Page
; }
function About() { return
About Page
; }
function Contact() { return
Contact Page
; }
3. Link Component
The Link component is used to create navigational links in your application. It works similarly to an HTML anchor tag but prevents full-page reloads.
import { Link } from 'react-router-dom';
function Navbar() { return ( Home About Contact ); }
4. useNavigate Hook
The useNavigate hook allows you to programmatically navigate to different routes.
import { useNavigate } from 'react-router-dom';
function Home() { const navigate = useNavigate();
const goToAbout = () => { navigate('/about'); };
return (
Home Page
Go to About ); }
5. Dynamic Routing
Dynamic routing allows you to pass parameters through the URL. This is useful for creating pages that depend on dynamic data, such as user profiles or product details.
import { useParams } from 'react-router-dom';
function App() { return ( } /> ); }
function User() { const { id } = useParams(); return
User ID: {id}
; }
6. Nested Routes
Nested routes allow you to define routes within other routes. This is particularly useful for layouts that require sub-sections, such as dashboards.
function Dashboard() { return (
Dashboard
} /> } /> ); }
function Profile() { return
Profile Page
; }
function Settings() { return
Settings Page
; }
7. Protected Routes
Protected routes restrict access to certain parts of your application based on authentication status.
import { Navigate } from 'react-router-dom';
function ProtectedRoute({ element, isAuthenticated }) { return isAuthenticated ? element : ; }
function App() { const isAuthenticated = false; // Replace with actual authentication logic
return ( } /> } /> } />} /> ); }
8. Handling 404 Pages
Handling 404 pages ensures that users are informed when they navigate to an undefined route.
function NotFound() { return
404 Not Found
; }
function App() { return ( } /> } /> } /> ); }
Diagram: Basic React Router Flow
graph LR A[BrowserRouter] --> B[Routes] B --> C[Route path="/"] B --> D[Route path="/about"] B --> E[Route path="/contact"] B --> F[Route path="*"] C --> G[Home] D --> H[About] E --> I[Contact] F --> J[NotFound]
Conclusion
Mastering React Router is crucial for building efficient and user-friendly React applications. By understanding and utilizing its core concepts—such as Router, Route, Link, and dynamic routing—you can create a seamless navigation experience for your users. Explore these concepts further and practice implementing them to enhance your React development skills.
Hope you liked the article on React Router for any query visit: https://reactmasters.in/ or free demo sessions kindly contact us at Mob:+91 84660 44555
0 notes
Text
React Router Tutorial for Beginners
#React #reactjs
React Router is a popular routing library for the React.js library. It allows developers to easily create Single Page Applications (SPAs) with multiple views, by providing a way to handle routing and rendering of components based on the URL. In this article, we’ll cover the basics of React Router and how to use it to build a basic SPA. What is Routing? Why use React Router? Installing React…

View On WordPress
#browserrouter#React#react router#react router dom#react router dom link#react router dom redirect#react router dom v6#react router example#react router history#react router link#react router npm#react router params#react router query params#react router redirect#react router switch#react router v6#react routing#reactjs#route react#useparams
0 notes
Text
Passing URL parameters to a route using useParams in react-router-dom version 6
https://vikasprogramming.blogspot.com/2021/12/passing-url-parameters-to-route-using-useParams-react-router-dom-v6.html
#ReactJs redux useLocation useNavigate react-router react-router-dom javascript vikasprograming programming web development programming webde#route#routing#useParams
0 notes
Photo

React router with hooks ( useHistory useParam useLocation ) ☞ https://bit.ly/2AKAZVP #reactjs #javascript
1 note
·
View note
Video
youtube
Liked on YouTube: React Bangla Tutorial 45 : react routing | dynamic routing using useParams https://www.youtube.com/watch?v=g5B0Vq3jHbA
0 notes
Text
Routing using react-router-dom v6 in React.js
Routing using react-router-dom v6 in React.js
Hi, in this tutorial, we will talk about Routing using react-router-dom in React.js. We will cover BrowserRouter, Routes, Link, Dynamic Route, Outlet, useParams & useNavigate Hooks. Routing using react-router-dom The complete source code for a particular project is available on GitHub. I used to use Reach-router earlier for all my projects as it was a small, simple router for React…

View On WordPress
0 notes
Text
100%OFF | Full Stack Development: React (React Hooks) and Spring Boot

Welcome to the world’s best Online resource for Learning React and Spring Boot.
React is one of the Most Popular and Most Loved front-end library for building User Interfaces.
On the other hand, Spring is one of the Most Popular and Widely used Java framework for building enterprise web applications.
Spring Boot is a tool to create Spring-based applications quickly and easily. In fact, it is the go-to approach for building Microservices in Java.
Everyone wants to learn React and Spring Boot, this is because companies switching from Angular to React and already companies using React in their production applications. So this is the Best time to learn Full stack development with React and Spring Boot.
How about bringing this together and build a full-stack application with React and Spring Boot?
Isn’t it awesome!
Let’s find out in this course.
We will create a Full-stack Notes application from the group up and all the way up to deploy to the Production server.
Along the way, you will learn –
Creating a spring boot application in the Spring tool suite IDE
Creating REST endpoints for an API
Adding style to react components
Adding bootstrap to react application
Adding a validation to HTML form
Learn how to use hooks such as useState(), useEffect(), useHistory(), useParams() and man more
Learn how to perform the database operations such as Create, Read, Update and Delete
Learn how to integrate React with Spring boot
Most importantly you will learn how to deploy React and Spring boot application to a live webserver
You can show your work to friends and colleagues
I will keep adding more and more features to this course so that you can learn how to scale the application over a period of time.
If you are interested in learning React and Spring Boot, then check out the free preview lectures and enroll in the course.
Who this course is for:
Anyone who wants to learn full stack development with React and Spring boot
Anyone who wants to learn building the RESTful API with Spring boot
Anyone who wants to learn integrating React and Spring boot
Anyone who wants to learn deploying React applications to live server
Anyone who wants to learn deploying Spring boot application to live server and connect to production database
[ENROLL THE COURSE]
0 notes
Text
To Better Understand React Router
As I worked through phase 2 at Flatiron school, studying React, I felt it helped me understand JavaScript better. I made my way through this phase and was able to comprehend more about it than I expected. I was able to complete my final project and do my final review. During this review I found out I knew less about React than I thought, and I am thankful that my reviewer was able to point this out to me. This way I could go back and learn what I need to, to be able to know how React really works. I struggled with describing what React Router is and how it works when I was asked. So I would like to discuss what I have learned and have this blog as a reference to look back on if a reminder is needed.
To start, I now know React Router is a client-side routing library, "...React are libraries with prewritten code snippets that we can use and reuse to build applications." - Khan, Shahzad, et al. So it is this prewritten code that you can use for routing to different components within your application. It is client-side because the client/user handles when and where the routing takes place. React Router actually contains components and hooks that do that job and that is the prewritten code. Both these components and hooks work with the components you have created in your code. How they do this is with conditional rendering components based on the URL. If the current URL matches with what your components path is then it will display it. Also, uses JavaScript for programmatic navigation, programmatic meaning, "of, relating to, resembling, or having a program" - Merriam-Webster. If there is a link clicked to a certain page, it then changes the URL for that page, and updates/displays that page without requesting for a new HTML document. Or, it can also change the URL, and display a new page without the user clicking on a link. As mentioned before, it manages all of these tasks and actions with the prewritten components and hooks. I will now discuss some and how they work.
You first need to have react-router-dom installed in order to use React Router. Then it must be imported like so:

BrowserRouter is a component and is also the base for your whole app's routing. Doing that declares how you will be using React Router. You would want to wrap this around your whole app component, so that it can contain all the other components and hooks. You could also just use Router instead of Browser Router to shorten it up.
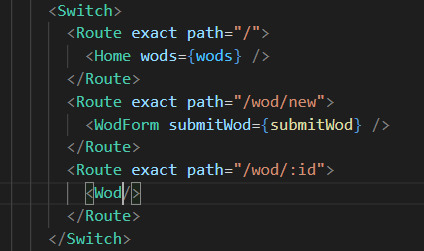
Next, you have your Route and Switch component for handling routing to your components. Route is given a path attribute which is given a certain URL, and it says if the current URL matches the path render the child component, your component. You then want to wrap all of your Route components within your Switch component. This is because if not, any of the routes that match the current URL all will render. Switch says to only render the first Route that matches, so yes the order you put them in is important. If it was not used a good example of what could happen is it would always render a home page because its URL usually is similar to the other's. It is recommended to move that Home component to the bottom of the others. The Switch definitely gives more predictable behavior. To keep from also rendering components with URL partial matches you can give your Route component an attribute of exact. This will only render if the URL matches exactly with the path. Some of my code for example:
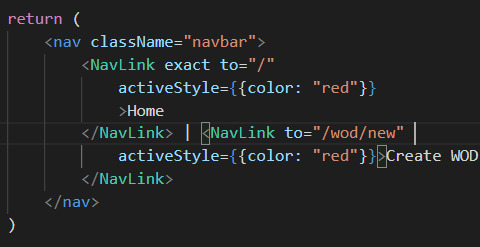
Using Link and NavLink components are what is going to make these Routes conditionally rendered. These both render a link or <a> to the DOM, when it is clicked, it changes the URL, re-renders Routes, and then displays the component whose path matches that new URL. Link is good for standard hyperlinks, where NavLink is better for a navigational bar. What makes it good for the bar is that you can add styling attributes to it. Like adding an active style to show which link is currently selected.
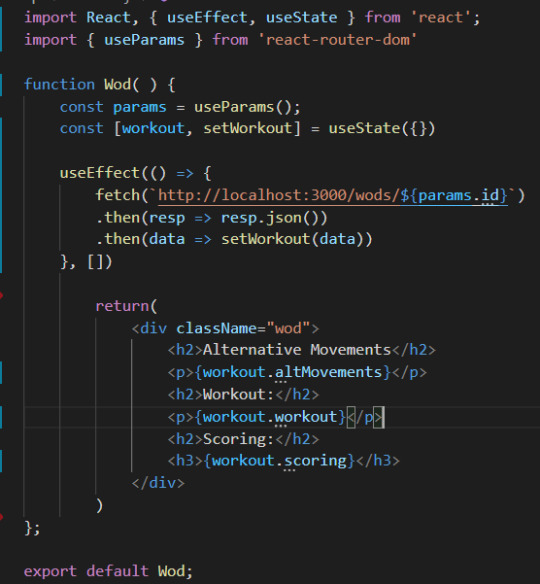
There is as well two hooks that can be used to get parts of a URL dynamically, the useRouteMatch and useParams hooks. This can be useful for when you have a component that gets rendered multiple time with different dynamic info. Or as well as nested information. For both hooks you want to create a variable; const match = useRouteMatch() and const params = useParams(). useRouteMatch returns an object with info about currently matched route and is good for nested info. useParams returns key/value pairs of the URL's parameters and is good for grabbing one specific component out of many. This is done usually by the components id. In my code below Wod stands for workout of the day. My Wod component gets rendered for each workout that comes from my JSON file. I used params to grab the to match the components path and single out specific workouts. So then it will only display that workout and the info that goes with it.
Finishing it off, we have a hook that can help give your app programmatic navigation. The hook is called useHistory and it can navigate the user to a new page based on any event that gets triggered, not just a click. For example, if the user logs out you can have it redirect them to the log in or home page. There is, as well, a component that is good for conditional rendering. The Redirect component does as it sounds, redirects the user to a new location. You can use this to redirect the user to the home page if a certain component is not found when an event is triggered, and other uses for it as well.
To conclude, having gone back and reading through lessons at Flatiron I know have a better understanding of React Router, and the hooks and components that make it up. I am thankful to my reviewer for assigning me to this, because now I feel more confident in using React. I also now know how to take better notes and plan to really make sure I understand all the material by the time of my next review. I hope this may help others if not just only me! Have fun coding all!
Sources:
“Programmatic.” Merriam-Webster.com Dictionary, Merriam-Webster, https://www.merriam-webster.com/dictionary/programmatic. Accessed 16 Sep. 2021.
Khan, Shahzad, et al. “What Is a JavaScript Library?” General Assembly Blog, General Assembly, 31 Mar. 2021, generalassemb.ly/blog/what-is-a-javascript-library/.
0 notes
Text
How to implement nested Routes in React Router V5
How to implement nested Routes in React Router V5
Nested routes in React are not as complex as you might think, especially, with React Router V5. Routes are nothing but React components. Therefore, just like any other component, they render anywhere in a React application including in child components. Note: If you are new to React Router, please read this post before you processed. React Router uses hooks in Nesting routes 1.) useParams 2.)…

View On WordPress
0 notes
Text
How To Test Your React Apps With The React Testing Library
In this article we will discuss about the automatic testing of written software projects with some types of common testing process. First of all we will build to- do list app by Test-Driven Development (TDD) approach. Here I will use combination of RTL and Jest which were pre- installed in any new project created by Create-React-App (CRA).
At first you need to know the working process of new React project and how to set up and explore it and how to work with yarn package manager (or npm). One should know about Axios and React- Router.
Testing of Code
To hand over a software to the customer you should confirm that whether it satisfy all the specification or not as customer expectance.
Not only at the time of shipping, testing our code is essential for lifetime. There are many reason behind it:
We may update some parts of our application by changing the code.
A third party may interfere in this.
The browser which run the application may undergo breaking changes.
Some function may stop due to unexpected reason.
For this reason testing is important throughout lifetime of a project. Types of Automated Testing
Unit test
This test verify the unit of our application which works isolately. For example it test particular function for known input and expected output.
Smoke test
It check the system whether up and running or not. For example in a React app we just need to render our main app components which would fairly render the browser.
Integration test
It check two or more module works together or not. For example server and database work together or not.
Functional test
The test is done to verify functional specifications of the system.
Acceptance test
This test is done by business owner whether for the system verification.
Performance test
It verify how the system work under load which specify how fast app load in a browser.
Importance of React Testing Library?
The most common React Testing options are Enzyme and React Testing Library (RTL).
RTL
It is very simple that the user need not to care whether you use redux or context for state management. They just fix your app in certain way you want. It just need to usual testing of app.
Advantages
It is very easy to use.
New React project comes with RTL and Jest configured.
Testing is done of your choice
Project Setup
To open a terminal follow the command:
# start new react project and start the server npx create-react-app start-rtl && cd start-rtl && yarn start
While a project running open separate terminal to run yarn test and then press a. Run all the project in watch mode which indicates that when detect changes it automatically run the file. In terminal picture is looked like
Green line means in the test we are passing with flying colours.
CRA sets up RTL and Jest are for sample test.
Jest is javascript testing network to running the test. It is not listed in package.json but can be find from yarn.lock.
Jest provide huge range of functionality like assertions, mocking, spying, etc.
There are some packages for testing specifications like:
testing-library/jest-dom: provides custom DOM element matchers for Jest.
testing-library/react: provides the APIs for testing React apps.
testing-library/user-event: provides advanced simulation of browser interactions
Testing And Building The To-Do List Index Page
The components specifications for the system are:
A loading indicator
Display the title of 15 to do list while returns to the APIs call.
To creat a file src/TodoList.js enter the content.
import React from "react"; import "./App.css"; export const TodoList = () => { return ( <div> </div> ); };
Isolation testing is done before incorporating into the app
Testing is also done to check any accidental fight fire.
To create a new file in src/TodoList.test.js enter the code.
import React from "react"; import axios from "axios"; import { render, screen, waitForElementToBeRemoved } from "./custom-render"; import { TodoList } from "./TodoList"; import { todos } from "./makeTodos"; describe("<App />", () => { it("Renders <TodoList /> component", async () => { render(<TodoList />); await waitForElementToBeRemoved(() => screen.getByText(/Fetching todos/i)); expect(axios.get).toHaveBeenCalledTimes(1); todos.slice(0, 15).forEach((td) => { expect(screen.getByText(td.title)).toBeInTheDocument(); }); }); });
The source of to do which can be used in list
const makeTodos = (n) => { // returns n number of todo items // default is 15 const num = n || 15; const todos = []; for (let i = 0; i < num; i++) { todos.push({ id: i, userId: i, title: `Todo item ${i}`, completed: [true, false][Math.floor(Math.random() * 2)], }); } return todos; }; export const todos = makeTodos(200);
This function generated complete list, from where it is choosen by true and false.
Unit test should be done under few seconds where APIs calls are impractical.
To avoid APIs calls mocking should be done where original version is replaced by fake version.
Jest automatically provide mocking functions in the box.
To mock the Axios create a file src/_mocks_/axios.js and enter the below content:
Jest originally find the mock folder instead of find the original one.
Here we carried out a passing and a failings test.
Testing And Building The Single To-Do Page
To creating the list one should make it simplier
To add components create a file by src/TodoItem.js and content should added like
import React from "react"; import { useParams } from "react-router-dom"; import "./App.css"; export const TodoItem = () => { const { id } = useParams() return ( <div className="single-todo-item"> </div> ); };
The file is the const { id } = useParams() line which is attached from react-router-dom that lets us read URL parameters.
Here the situation is little different from the other because the user when click on the link
After satisfying we want to hold first item in the to-do list. To prevent collision with other URL, we use the global mock with Jest’s mockImplementationOnce.
The test is finished by adding position where it is expected.Here we expected to see our name and who created this, but it is not sure about to-do status. Here we can create a switch block, if it is not work we can throw it like an error.
Conclusion
To understand this you need to write tests for React app, no matter how small it is. For better implementation you can use CRA’s testing docs and RTL’s documentation. For small tests make sure that all the components should render. You can continuously add more tests over that time.
We will be happy to answer your questions on designing, developing, and deploying comprehensive enterprise web, mobile apps and customized software solutions that best fit your organization needs. As a reputed Software Solutions Developer we have expertise in providing dedicated remote and outsourced technical resources for software services at very nominal cost. Besides experts in full stacks We also build web solutions, mobile apps and work on system integration, performance enhancement, cloud migrations and big data analytics. Don’t hesitate to
get in touch with us!
0 notes
Text
The Hooks of React Router
React Router 5 embraces the power of hooks and has introduced four different hooks to help with routing. You will find this article useful if you are looking for a quick primer on the new patterns of React Router. But before we look at hooks, we will start off with a new route rendering pattern.
Before React Router 5
// When you wanted to render the route and get router props for component <Route path="/" component={Home} />
// Or when you wanted to pass extra props <Route path="/" render={({ match }) => <Profile match={match} mine={true} />}>
When using the component syntax, route props (match, location and history) are implicitly being passed on to the component. But it has to be changed to render once you have extra props to pass to the component. Note that adding an inline function to the component syntax would lead to the component re-mounting on every render.
After React Router 5
<Route path="/"> <Home /> </Route>
Note that there is no implicit passing of any props to the Home component. But without changing anything with the Route itself, you can add any extra props to the Home component. You can no longer make the mistake of re-mounting the component on every render and that's the best kind of API.
But now route props are not being passed implicitly, so how do we access match, history or location? Do we have to wrap all components with withRouter? That is where the hooks steps in.
Note that hooks were introduced in 16.8 version of React, so you need to be above that version to use them.
useHistory
Provides access to the history prop in React Router
Refers to the history package dependency that the router uses
A primary use case would be for programmatic routing with functions, like push, replace, etc.
import { useHistory } from 'react-router-dom'; function Home() { const history = useHistory(); return <button onClick={() => history.push('/profile')}>Profile</button>; }
useLocation
Provides access to the location prop in React Router
It is similar to window.location in the browser itself, but this is accessible everywhere as it represents the Router state and location.
A primary use case for this would be to access the query params or the complete route string.
import { useLocation } from 'react-router-dom'; function Profile() { const location = useLocation(); useEffect(() => { const currentPath = location.pathname; const searchParams = new URLSearchParams(location.search); }, [location]); return <p>Profile</p>; }
Since the location property is immutable, useEffect will call the function every time the route changes, making it perfect to operate on search parameters or current path.
useParams
Provides access to search parameters in the URL
This was possible earlier only using match.params.
import { useParams, Route } from 'react-router-dom'; function Profile() { const { name } = useParams(); return <p>{name}'s Profile</p>; } function Dashboard() { return ( <> <nav> <Link to={`/profile/ann`}>Ann's Profile</Link> </nav> <main> <Route path="/profile/:name"> <Profile /> </Route> </main> </> ); }
useRouteMatch
Provides access to the match object
If it is provided with no arguments, it returns the closest match in the component or its parents.
A primary use case would be to construct nested paths.
import { useRouteMatch, Route } from 'react-router-dom'; function Auth() { const match = useRouteMatch(); return ( <> <Route path={`${match.url}/login`}> <Login /> </Route> <Route path={`${match.url}/register`}> <Register /> </Route> </> ); }
You can also use useRouteMatch to access a match without rendering a Route. This is done by passing it the location argument.
For example, consider that you need your own profile to be rendered at /profile and somebody else's profile if the URL contains the name of the person /profile/dan or /profile/ann. Without using the hook, you would either write a Switch, list both routes and customize them with props. But now, using the hook we can do this:
import { Route, BrowserRouter as Router, Link, useRouteMatch, } from 'react-router-dom'; function Profile() { const match = useRouteMatch('/profile/:name'); return match ? <p>{match.params.name}'s Profile</p> : <p>My own profile</p>; } export default function App() { return ( <Router> <nav> <Link to="/profile">My Profile</Link> <br /> <Link to={`/profile/ann`}>Ann's Profile</Link> </nav> <Route path="/profile"> <Profile /> </Route> </Router> ); }
You can also use all the props on Route like exact or sensitive as an object with useRouteMatch.
Wrapping up
The hooks and explicit Route comes with a hidden advantage in itself. After teaching these techniques at multiple workshops, I have come to the realization that these help avoid a lot of confusion and intricacies that came with the earlier patterns. There are suddenly far fewer unforced errors. They will surely help make your router code more maintainable and you will find it way easier to upgrade to new React Router versions.
The post The Hooks of React Router appeared first on CSS-Tricks.
The Hooks of React Router published first on https://deskbysnafu.tumblr.com/
0 notes
Text
https://www.batuta.com/%D8%AD%D8%AC%D8%B2-%D9%81%D9%86%D8%A7%D8%AF%D9%82/%D9%86%D8%AA%D8%A7%D8%A6%D8%AC?hotelCheckin=10/07/2017&hotelCheckout=14/07/2017&rooms=[{%22adults%22:3,%22children%22:0,%22age1%22:0,%22age2%22:0,%22age3%22:0}]&hotelLocationText=%D8%A5%D8%B3%D8%B7%D9%86%D8%A8%D9%88%D9%84%D8%8C%20%D8%AA%D8%B1%D9%83%D9%8A%D8%A7&hotelLocation=918F4E54-A951-4458-9019-5EC91D8F2AC5&Locale=ar&filters={}&eanSort=OVERALL_VALUE&HotelId=&hasRatings=True&locationLongitude=0&locationLatitude=0&RegionId=&UmbId=31540&business_traveler=0&useParams=true
0 notes
Text
React Project(WODs)
This post will be about my final project, using React, of phase 2 at Flatiron school. I have had a lot of fun learning React and feel as though it almost better helped me understand JavaScript. At the same time though there were parts that I struggled with as well. Specifically, working with POST requests and forms, at first, challenged me for awhile.
Furthermore, for my project I created a web page that lists out different WODs, workout of the day, also includes alternative movements for the workout and even create your own WOD. Created the frontend using create-react-app to get the starting code. Then used a JSON server template provided by Flatiron for the backend. Within my frontend there is six components, App, Navbar, WodForm, Home, WodDescription, and Wod. App being the top component of all the others. App consists of all my fetch requests, GET and POST, state for JSON data, and renders out the Navbar, WodForm, Wod, and Home components, this is also all wrapped by router and gives all the routes to each of these.
My Navbar component uses NavLink to display links to both the Home page and Create WOD page. I gave them both an activeStyle so that when you are on that page the NavLink text turns red for that page. Next, is my Home component which takes the JSON data as a prop called wods. I created a variable to map through wods, which then renders the WodDescription component, and passes down each wod to it. My Home component is what displays WodDescription. WodDescription takes the wod and displays the workout, and how it will be scored. There is also a button that will take you to that specific WOD with alternative movements, if say, they are too difficult or heavy. I used the useHistory hook in order for it take you to that specific WOD that the button is on. Also, I had to incorporate string interpolation with wod.id in accordance with history.push.
My Wod component, as mentioned before, will display only the one WOD whose id matches with the url id. It will show the alternative movements, as well as, the workout and how it will be scored. I also had to pass wods down as a prop from the app, but I instead used find() method. Which returns the value of the first element in the provided array that matches the testing function. Within that method I used the useParams hook to compare its id, which is the URL’s id, and find the wod that has a matching id. I did also have to use parseInt() on the params because it was a string and I needed it to be an integer.
To complete this post, I will explain my WodForm component where I worked on one of the more challenging coding parts with React, for me. As I mentioned earlier all my fetch requests are done within my App component. So, I passed down my POST request to the WodForm component. This component is made up of a formData state variable, a handleChange function, handleSubmit function, and a form for submitting and POSTing this new WOD. The inputs use the handleChange function to get what the user types for both the workout and how it will be scored. Give these inputs a value of data.whicheverkeyitis. The form is given an onSubmit equal to the handleSubmit function. The handleSubmit function calls the POST request function and passes down the formData. This POST request then adds this workout to all the other already existing workouts set in the state. All in all, this is my project and I enjoyed watching the code work and do what I wanted it to in the browser, that is always a really good feeling!
0 notes
Text
How To Test Your React Apps With The React Testing Library
In this article we will discuss about the automatic testing of written software projects with some types of common testing process. First of all we will build to- do list app by Test-Driven Development (TDD) approach. Here I will use combination of RTL and Jest which were pre- installed in any new project created by Create-React-App (CRA).
At first you need to know the working process of new React project and how to set up and explore it and how to work with yarn package manager (or npm). One should know about Axios and React- Router.
Testing of Code
To hand over a software to the customer you should confirm that whether it satisfy all the specification or not as customer expectance.
Not only at the time of shipping, testing our code is essential for lifetime. There are many reason behind it:
We may update some parts of our application by changing the code.
A third party may interfere in this.
The browser which run the application may undergo breaking changes.
Some function may stop due to unexpected reason.
For this reason testing is important throughout lifetime of a project. Types of Automated Testing
Unit test
This test verify the unit of our application which works isolately. For example it test particular function for known input and expected output.
Smoke test
It check the system whether up and running or not. For example in a React app we just need to render our main app components which would fairly render the browser.
Integration test
It check two or more module works together or not. For example server and database work together or not.
Functional test
The test is done to verify functional specifications of the system.
Acceptance test
This test is done by business owner whether for the system verification.
Performance test
It verify how the system work under load which specify how fast app load in a browser.
Importance of React Testing Library?
The most common React Testing options are Enzyme and React Testing Library (RTL).
RTL
It is very simple that the user need not to care whether you use redux or context for state management. They just fix your app in certain way you want. It just need to usual testing of app.
Advantages
It is very easy to use.
New React project comes with RTL and Jest configured.
Testing is done of your choice
Project Setup
To open a terminal follow the command:
# start new react project and start the server npx create-react-app start-rtl && cd start-rtl && yarn start
While a project running open separate terminal to run yarn test and then press a. Run all the project in watch mode which indicates that when detect changes it automatically run the file. In terminal picture is looked like
Green line means in the test we are passing with flying colours.
CRA sets up RTL and Jest are for sample test.
Jest is javascript testing network to running the test. It is not listed in package.json but can be find from yarn.lock.
Jest provide huge range of functionality like assertions, mocking, spying, etc.
There are some packages for testing specifications like:
testing-library/jest-dom: provides custom DOM element matchers for Jest.
testing-library/react: provides the APIs for testing React apps.
testing-library/user-event: provides advanced simulation of browser interactions
Testing And Building The To-Do List Index Page
The components specifications for the system are:
A loading indicator
Display the title of 15 to do list while returns to the APIs call.
To creat a file src/TodoList.js enter the content.
import React from "react"; import "./App.css"; export const TodoList = () => { return ( <div> </div> ); };
Isolation testing is done before incorporating into the app
Testing is also done to check any accidental fight fire.
To create a new file in src/TodoList.test.js enter the code.
import React from "react"; import axios from "axios"; import { render, screen, waitForElementToBeRemoved } from "./custom-render"; import { TodoList } from "./TodoList"; import { todos } from "./makeTodos"; describe("<App />", () => { it("Renders <TodoList /> component", async () => { render(<TodoList />); await waitForElementToBeRemoved(() => screen.getByText(/Fetching todos/i)); expect(axios.get).toHaveBeenCalledTimes(1); todos.slice(0, 15).forEach((td) => { expect(screen.getByText(td.title)).toBeInTheDocument(); }); }); });
The source of to do which can be used in list
const makeTodos = (n) => { // returns n number of todo items // default is 15 const num = n || 15; const todos = []; for (let i = 0; i < num; i++) { todos.push({ id: i, userId: i, title: `Todo item ${i}`, completed: [true, false][Math.floor(Math.random() * 2)], }); } return todos; }; export const todos = makeTodos(200);
This function generated complete list, from where it is choosen by true and false.
Unit test should be done under few seconds where APIs calls are impractical.
To avoid APIs calls mocking should be done where original version is replaced by fake version.
Jest automatically provide mocking functions in the box.
To mock the Axios create a file src/_mocks_/axios.js and enter the below content:
Jest originally find the mock folder instead of find the original one.
Here we carried out a passing and a failings test.
Testing And Building The Single To-Do Page
To creating the list one should make it simplier
To add components create a file by src/TodoItem.js and content should added like
import React from "react"; import { useParams } from "react-router-dom"; import "./App.css"; export const TodoItem = () => { const { id } = useParams() return ( <div className="single-todo-item"> </div> ); };
The file is the const { id } = useParams() line which is attached from react-router-dom that lets us read URL parameters.
Here the situation is little different from the other because the user when click on the link
After satisfying we want to hold first item in the to-do list. To prevent collision with other URL, we use the global mock with Jest’s mockImplementationOnce.
The test is finished by adding position where it is expected.Here we expected to see our name and who created this, but it is not sure about to-do status. Here we can create a switch block, if it is not work we can throw it like an error.
Conclusion
To understand this you need to write tests for React app, no matter how small it is. For better implementation you can use CRA’s testing docs and RTL’s documentation. For small tests make sure that all the components should render. You can continuously add more tests over that time.
We will be happy to answer your questions on designing, developing, and deploying comprehensive enterprise web, mobile apps and customized software solutions that best fit your organization needs. As a reputed Software Solutions Developer we have expertise in providing dedicated remote and outsourced technical resources for software services at very nominal cost. Besides experts in full stacks We also build web solutions, mobile apps and work on system integration, performance enhancement, cloud migrations and big data analytics. Don’t hesitate to
get in touch with us!
0 notes