#browserrouter
Explore tagged Tumblr posts
Visit Tumblr Blog
Explore Tumblr blogs with no restrictions, modern design and the best experience.
Last Seen Tumblr Blogs


Fun Fact
Tumblr was the first site to host the blog for President Barack Obama in 2011.
Text
http://zTkBC9pHYdlhZjq:4G1unPePy49TMhE@localhost:35978/storage/emulated/0/godaiadam.html
import React from "react";
import { BrowserRouter as Router, Routes, Route } from "react-router-dom";
import Dashboard from "./components/Dashboard";
import Login from "./components/Login";
export default function App() {
return (
<Router>
<Routes>
<Route path="/" element={<Login />} />
<Route path="/dashboard" element={<Dashboard />} />
</Routes>
</Router>
);
}
import React, { useState } from "react";
import { useNavigate } from "react-router-dom";
export default function Login() {
const navigate = useNavigate();
const [login, setLogin] = useState("");
const handleLogin = (e) => {
e.preventDefault();
const username = e.target.login.value;
setLogin(username);
navigate("/dashboard", { state: { login: username } });
};
return (
<div>
<form onSubmit={handleLogin}>
<input
type="text"
name="login"
value={login}
onChange={(e) => setLogin(e.target.value)}
placeholder="Username"
/>
<button type="submit">Login</button>
</form>
</div>
);
}
class SkyNodeUplink:
def __init__(self, satellite_id="Globalstar-42"):
self.satellite_id = satellite_id
self.authenticated = False
self.session_token = None
def authenticate(self, uplink_key):
if uplink_key == "ZeroSkyKey42":
self.session_token = "ENCRYPTED_SESSION_TOKEN_789"
self.authenticated = True
return f"Connected to {self.satellite_id} | Session Active"
return "Authentication Failed"
def deactivate(self):
if self.authenticated:
self.authenticated = False
self.session_token = None
return f"Uplink deactivated."
return "No active session to deactivate."
class SatelliteBot:
def __init__(self, satellite_uplink):
self.satellite_uplink = satellite_uplink
def activate(self):
response = self.satellite_uplink.authenticate("ZeroSkyKey42")
print(response)
class ADONAI:
def __init__(self):
self.authorized_users = {} # {user_id: {"2FA": code, "role": "Elite"/"Admin"}}
self.blocked_entities = set() # e.g., {"Ronnie Marghiem"}
self.transaction_logs = [] # Secure ledger of all financial transactions
def authorize_user(self, user_id, two_fa_code, role="Admin"):
self.authorized_users[user_id] = {"2FA": two_fa_code, "role": role}
def block_entity(self, entity_name):
self.blocked_entities.add(entity_name)
def log_transaction(self, transaction_details):
self.transaction_logs.append(transaction_details)
const express = require("express");
const http = require("http");
const socketIo = require("socket.io");
const firebase = require("firebase-admin");
// Initialize Firebase
firebase.initializeApp({
credential: firebase.credential.applicationDefault(),
databaseURL: "https://your-database-url.firebaseio.com"
});
const app = express();
const server = http.createServer(app);
const io = socketIo(server);
// Reference to Firebase Realtime Database
const db = firebase.database();
// Socket.io for real-time connection
io.on("connection", (socket) => {
console.log("New client connected");
// Send real-time updates to clients on any changes in the "opportunities" node
const ref = db.ref("opportunities");
ref.on("child_added", (snapshot) => {
socket.emit("newOpportunity", snapshot.val());
});
// Handle disconnection
socket.on("disconnect", () => {
console.log("Client disconnected");
});
});
server.listen(3000, () => {
console.log("Server running on port 3000");
});
import React, { useEffect, useState } from "react";
import io from "socket.io-client";
export default function App() {
const [opportunities, setOpportunities] = useState([]);
const socket = io("http://localhost:3000");
useEffect(() => {
socket.on("newOpportunity", (opportunity) => {
setOpportunities((prevOpportunities) => [...prevOpportunities, opportunity]);
});
return () => {
socket.disconnect();
};
}, []);
return (
<div>
<h1>Real-Time Opportunities</h1>
<ul>
{opportunities.map((opp, index) => (
<li key={index}>{opp.description}</li>
))}
</ul>
</div>
);
}
// === App.jsx === import React from "react"; import { BrowserRouter as Router, Route, Routes } from "react-router-dom"; import Dashboard from "./components/Dashboard"; import Login from "./components/Login";
export default function App() { return ( <Router> <Routes> <Route path="/" element={<Login />} /> <Route path="/dashboard" element={<Dashboard />} /> </Routes> </Router> ); }
// === components/Login.jsx === import React, { useState } from "react"; import { useNavigate } from "react-router-dom";
export default function Login() { const navigate = useNavigate(); const [login, setLogin] = useState("");
const handleLogin = (e) => { e.preventDefault(); setLogin(e.target.login.value); navigate("/dashboard", { state: { login: e.target.login.value } }); };
return ( <div className="min-h-screen flex flex-col items-center justify-center bg-gray-100"> <form onSubmit={handleLogin} className="bg-white p-6 rounded shadow-md w-80"> <h2 className="text-xl mb-4 font-bold text-center">Officer Login</h2> <input
type="text"
name="login"
placeholder="Badge ID / Username"
className="w-full p-2 border mb-4"
/> <button
type="submit"
className="w-full bg-blue-600 text-white py-2 rounded hover:bg-blue-700"
> Login </button> </form> </div> ); }
// === components/Dashboard.jsx === import React from "react"; import { useLocation } from "react-router-dom";
export default function Dashboard() { const location = useLocation(); const officer = location.state?.login || "Unknown Officer";
return ( <div className="p-6"> <h1 className="text-2xl font-bold mb-4">Welcome, {officer}</h1> <div className="grid grid-cols-1 md:grid-cols-2 lg:grid-cols-3 gap-4"> <div className="bg-white p-4 rounded shadow">Suspect Intake</div> <div className="bg-white p-4 rounded shadow">Threat Score Dashboard</div> <div className="bg-white p-4 rounded shadow">Forgiveness Protocols</div> <div className="bg-white p-4 rounded shadow">Biometric Logs</div> <div className="bg-white p-4 rounded shadow">AI Dossier Builder</div> <div className="bg-white p-4 rounded shadow">System Security Logs</div> </div> </div> ); }
import React from "react";
import { BrowserRouter as Router, Route, Routes } from "react-router-dom";
import Dashboard from "./components/Dashboard";
import Login from "./components/Login";
export default function App() {
return (
<Router>
<Routes>
<Route path="/" element={<Login />} />
<Route path="/dashboard" element={<Dashboard />} />
</Routes>
</Router>
);
}
import React, { useState } from "react";
import { useNavigate } from "react-router-dom";
export default function Login() {
const [username, setUsername] = useState("");
const navigate = useNavigate();
const handleLogin = (e) => {
e.preventDefault();
if (username.trim()) {
navigate("/dashboard", { state: { user: username } });
}
};
return (
<div className="min-h-screen flex items-center justify-center bg-gray-100">
<form
onSubmit={handleLogin}
className="bg-white p-6 rounded shadow-md w-full max-w-md"
>
<h2 className="text-2xl font-bold mb-4">Officer Login</h2>
<input
type="text"
placeholder="Enter Username"
value={username}
onChange={(e) => setUsername(e.target.value)}
className="w-full p-2 border rounded mb-4"
/>
<button
type="submit"
className="w-full bg-blue-600 text-white py-2 rounded hover:bg-blue-700"
>
Login
</button>
</form>
</div>
);
}
import React from "react";
import { useLocation } from "react-router-dom";
export default function Dashboard() {
const location = useLocation();
const user = location.state?.user || "Unknown";
return (
<div className="p-6 bg-gray-50 min-h-screen">
<h1 className="text-3xl font-bold">Welcome, Officer {user}</h1>
<p className="mt-4">This is your command dashboard.</p>
{/* Add core modules and analytics panels here */}
</div>
);
}
def ethics_violation_trigger(report):
if report["attempts"] > 3:
return "Escalate to Defense Class 3"
elif report["phishing_behaviors"]:
return "Escalate to Class 2 – Mark as Active Predator"
elif report["malware_code"]:
return "Defense Class 1 – Immediate Freeze & Trace"
return "Flag for surveillance"
class AuroraHexUplink:
def __init__(self):
self.flagged_users = set()
self.offender_log = {}
self.seraphim_deployed = False
def monitor_user_behavior(self, user_id, facial_data, voice_signature, access_logs):
if self.is_abusive(user_id, access_logs):
self.flagged_users.add(user_id)
self.penalize_user(user_id, facial_data, voice_signature, access_logs)
def is_abusive(self, user_id, logs):
# Pattern recognition on scraping, brute-force, or malformed queries
abuse_patterns = detect_abuse_patterns(logs)
return bool(abuse_patterns)
def penalize_user(self, user_id, facial_data, voice_signature, logs):
self.log_offender(user_id, logs)
self.freeze_user_access(user_id)
self.initiate_counter_virus_protection()
self.deploy_seraphim_ops(user_id, facial_data, voice_signature, logs)
def log_offender(self, user_id, logs):
self.offender_log[user_id] = {
"logs": logs,
"flagged_time": current_time(),
"attempts": self.offender_log.get(user_id, {}).get("attempts", 0) + 1
}
def freeze_user_access(self, user_id):
freeze_device_access(user_id)
lockdown_session(user_id)
backup_memory_snapshot(user_id)
def initiate_counter_virus_protection(self):
activate_sandbox_mode()
deploy_active_firewalls()
run_anti_tampering scripts()
def deploy_seraphim_ops(self, user_id, facial_data, voice_signature, logs):
self.seraphim_deployed = True
coords = triangulate_access(logs)
identifiers = extract_device_fingerprint(logs)
alert_authorities(coords, identifiers)
alert_stakeholders(user_id, coords)
lockout_ui(user_id)
def lockout_ui(self, user_id):
trigger_ui_shutdown(user_id)
show_ai_alert("Abuse Detected. System locked. ID forwarded to cyber defense.")
import asyncio
class SentinelAuditCore:
def __init__(self):
self.target_networks = set()
self.scan_results = {}
self.malicious_signatures = self.load_known_malware_signatures()
self.ethics_index = {}
self.association_map = {}
def load_known_malware_signatures(self):
# Placeholder for malware DB load
return ["signature1", "signature2", "suspiciousPatternXYZ"]
def ingest_target(self, target_url_or_ip):
self.target_networks.add(target_url_or_ip)
async def full_system_scan(self, depth=6):
tasks = [self.deep_scan(target, depth) for target in self.target_networks]
await asyncio.gather(*tasks)
async def deep_scan(self, target, depth):
self.scan_results[target] = self.analyze_target(target)
self.expand_associations(target, depth)
for associated in self.association_map.get(target, []):
self.scan_results[associated] = self.analyze_target(associated)
def analyze_target(self, target):
# Insert actual code scanning logic here
return {
"suspicious_scripts": detect_malicious_js(target),
"data_flow_irregularities": trace_data_flows(target),
"cookie_tracking": audit_cookie_usage(target),
"phishing_behaviors": detect_phishing_elements(target),
}
def expand_associations(self, target, depth):
self.association_map[target] = trace_6_degrees(target, depth)
def evaluate_ethics(self):
for entity, report in self.scan_results.items():
score = self.ethics_score(report)
self.ethics_index[entity] = score
def ethics_score(self, report):
base = 100
deductions = 0
if report["suspicious_scripts"]: deductions += 30
if report["data_flow_irregularities"]: deductions += 25
if report["cookie_tracking"]: deductions += 15
if report["phishing_behaviors"]: deductions += 40
return max(0, base - deductions)
def recommend_actions(self):
recommendations = {}
for entity, score in self.ethics_index.items():
if score < 40:
recommendations[entity] = "Flag for dissolution or restructuring"
elif score < 70:
recommendations[entity] = "Requires ethics and compliance upgrades"
else:
recommendations[entity] = "Operationally ethical"
return recommendations
def ethics_score(report):
score = 100
if report["suspicious_scripts"]:
score -= 30
if report["data_flow_irregularities"]:
score -= 25
if report["phishing_behaviors"]:
score -= 20
if report["cookie_tracking"]:
score -= 15
return max(0, score)
class SentinelAuditCore:
def __init__(self):
self.target_networks = []
self.scan_results = {}
self.malicious_signatures = load_known_malware_signatures()
self.ethics_index = {}
self.association_map = {}
def ingest_target(self, target_url_or_ip):
self.target_networks.append(target_url_or_ip)
def full_system_scan(self, depth=6):
for target in self.target_networks:
self.scan_results[target] = self.analyze_target(target)
self.expand_associations(target, depth)
def analyze_target(self, target):
# Placeholder: Replace with actual system and code scanning tools
report = {
"suspicious_scripts": detect_malicious_js(target),
"data_flow_irregularities": trace_data_flows(target),
"cookie_tracking": audit_cookie_usage(target),
"phishing_behaviors": detect_phishing_elements(target),
}
return report
def expand_associations(self, target, depth):
self.association_map[target] = trace_6_degrees(target, depth)
for associated in self.association_map[target]:
self.scan_results[associated] = self.analyze_target(associated)
def evaluate_ethics(self):
for entity, report in self.scan_results.items():
score = ethics_score(report)
self.ethics_index[entity] = score
def recommend_actions(self):
recommendations = {}
for entity, score in self.ethics_index.items():
if score < 40:
recommendations[entity] = "Flag for dissolution or restructuring"
elif score < 70:
recommendations[entity] = "Requires ethics and compliance upgrades"
else:
recommendations[entity] = "Operationally ethical"
return recommendations
class SkyNodeUplink:
def __init__(self, satellite_id="Globalstar-42"):
self.satellite_id = satellite_id
self.authenticated = False
self.session_token = None
def authenticate(self, uplink_key):
if uplink_key == "ZeroSkyKey42":
self.session_token = "ENCRYPTED_SESSION_TOKEN_789"
self.authenticated = True
return f"Connected to {self.satellite_id} | Session Active"
return "Authentication Failed"
def deactivate(self):
if self.authenticated:
self.authenticated = False
self.session_token = None
return "Uplink deactivated."
return "No active uplink to deactivate."
def status(self):
if self.authenticated:
return f"{self.satellite_id} Uplink Status: ACTIVE | Token: {self.session_token}"
return f"{self.satellite_id} Uplink Status: INACTIVE"
if __name__ == "__main__":
system = ZMACSupervisor()
system.start_all_bots()
class SatelliteBot:
def __init__(self, satellite_uplink):
self.satellite_uplink = satellite_uplink
def activate(self):
response = self.satellite_uplink.authenticate("ZeroSkyKey42")
print(response)
class SeizureBot:
def __init__(self, seizure_protocol):
self.seizure_protocol = seizure_protocol
def activate(self):
# Pre-register assets
self.seizure_protocol.register_assets("Ronnie Marghiem", funds=750_000, properties=["Villa", "Luxury Car"])
self.seizure_protocol.freeze_assets("Ronnie Marghiem")
self.seizure_protocol.seize_assets("Ronnie Marghiem", region="NorthAmerica")
class SurveillanceBot:
def __init__(self, adonai, seizure_protocol):
self.adonai = adonai
self.seizure_protocol = seizure_protocol
def activate(self):
suspicious = ["Ronnie Marghiem", "FraudUnitX"]
for entity in suspicious:
self.adonai.flag_alert(entity, "Suspicious Behavior Detected")
self.seizure_protocol.flag_entity(entity)
class InvestmentBot:
def __init__(self, market_ai):
self.market_ai = market_ai
def activate(self):
# Simulate 3 elite investors
self.market_ai.invest_elite_funds("Elite_001", 1_000_000, "NorthAmerica")
self.market_ai.invest_elite_funds("Elite_002", 2_500_000, "Europe")
self.market_ai.invest_elite_funds("Elite_003", 3_000_000, "Asia")
class VerificationBot:
def __init__(self, adonai):
self.adonai = adonai
def activate(self):
# Auto-verifies known trusted agents
for user_id, info in self.adonai.authorized_users.items():
if info['2FA'] is None:
info['2FA'] = "AUTO-2FA-CODE"
class ZMACSupervisor:
def __init__(self):
self.adonai = ADONAI()
self.market_ai = ZeroMarketAI()
self.seizure_protocol = AssetSeizureProtocol(self.market_ai)
self.satellite_uplink = SkyNodeUplink()
self.bots = []
def start_all_bots(self):
self.bots = [
VerificationBot(self.adonai),
InvestmentBot(self.market_ai),
SurveillanceBot(self.adonai, self.seizure_protocol),
SeizureBot(self.seizure_protocol),
SatelliteBot(self.satellite_uplink)
]
for bot in self.bots:
bot.activate()
class SkyNodeUplink:
def __init__(self, satellite_id="Globalstar-42"):
self.satellite_id = satellite_id
self.authenticated = False
self.session_token = None
def authenticate(self, uplink_key):
if uplink_key == "ZeroSkyKey42":
self.session_token = "ENCRYPTED_SESSION_TOKEN_789"
self.authenticated = True
return f"Connected to {self.satellite_id} | Session Active"
return "Authentication Failed"
class ADONAI:
def __init__(self):
self.authorized_users = {} # {user_id: {"2FA": code, "role": "Elite"/"Admin"}}
self.blocked_entities = set() # e.g., {"Ronnie Marghiem"}
self.transaction_logs = [] # Secure ledger of all financial activities
self.alerts = [] # Behavioral or fraud alerts
def register_user(self, user_id, role="Elite", verification_code=None):
self.authorized_users[user_id] = {"2FA": verification_code, "role": role}
def is_authorized(self, user_id, code):
return user_id in self.authorized_users and self.authorized_users[user_id]["2FA"] == code
def flag_alert(self, user_id, reason):
self.alerts.append({"user": user_id, "reason": reason})
self.blocked_entities.add(user_id)
class ZeroMarketAI:
def __init__(self):
self.wealth_pools = {} # Tracks total elite capital by ID
self.ubw_accounts = {} # Regional Universal Basic Wealth funds
self.trade_networks = {} # Capital invested into trade hubs
self.intelligence_circuits = {} # Strategic elite intelligence system
self.zero_market_reserve = 0 # Internal reinvestment pool
def invest_elite_funds(self, elite_id, amount, region=None):
if region not in self.ubw_accounts:
self.ubw_accounts[region] = 0
self.wealth_pools[elite_id] = self.wealth_pools.get(elite_id, 0) + amount
self.ubw_accounts[region] += amount * 0.15
self.zero_market_reserve += amount * 0.05
self.trade_networks[region] = self.trade_networks.get(region, 0) + amount * 0.10
self.intelligence_circuits[elite_id] = self.intelligence_circuits.get(elite_id, 0) + amount * 0.70
class AssetSeizureProtocol:
def __init__(self, market_ai):
self.flagged_entities = set()
self.asset_registry = {} # {entity_id: {"funds": amount, "properties": [], "frozen": False}}
self.seizure_logs = []
self.market_ai = market_ai
def flag_entity(self, entity_id):
self.flagged_entities.add(entity_id)
return f"Entity '{entity_id}' has been flagged for investigation."
def register_assets(self, entity_id, funds=0, properties=None):
if properties is None:
properties = []
self.asset_registry[entity_id] = {
"funds": funds,
"properties": properties,
"frozen": False
}
def freeze_assets(self, entity_id):
if entity_id in self.asset_registry:
self.asset_registry[entity_id]["frozen"] = True
def seize_assets(self, entity_id, region="Global"):
if entity_id not in self.flagged_entities:
return f"Entity '{entity_id}' not flagged."
if not self.asset_registry.get(entity_id, {}).get("frozen"):
return f"Assets must be frozen first."
seized = self.asset_registry[entity_id]
self.seizure_logs.append({
"entity": entity_id,
"liquidated_funds": seized["funds"],
"seized_properties": seized["properties"]
})
# Redistribute seized funds
self.market_ai.ubw_accounts[region] += seized["funds"] * 0.5
self.market_ai.zero_market_reserve += seized["funds"] * 0.25
self.market_ai.intelligence_circuits["SeizureFund"] = self.market_ai.intelligence_circuits.get("SeizureFund", 0) + seized["funds"] * 0.25
del self.asset_registry[entity_id]
return f"Seized and redistributed assets from '{entity_id}'."
class AssetSeizureProtocol:
def __init__(self):
self.flagged_entities = set()
self.asset_registry = {} # {entity_id: {"funds": amount, "properties": [], "frozen": False}}
self.seizure_logs = []
def flag_entity(self, entity_id):
"""Mark an entity for investigation."""
self.flagged_entities.add(entity_id)
return f"Entity '{entity_id}' has been flagged for financial investigation."
def register_assets(self, entity_id, funds=0, properties=None):
"""Register assets tied to the entity for audit and tracking."""
if properties is None:
properties = []
self.asset_registry[entity_id] = {
"funds": funds,
"properties": properties,
"frozen": False
}
return f"Assets for '{entity_id}' registered successfully."
def freeze_assets(self, entity_id):
"""Freeze all assets of the entity to prevent tampering."""
if entity_id in self.asset_registry:
self.asset_registry[entity_id]["frozen"] = True
return f"Assets of '{entity_id}' have been frozen."
return f"No assets found for entity '{entity_id}'."
def seize_assets(self, entity_id):
"""Seize and liquidate frozen assets from a flagged entity."""
if entity_id not in self.flagged_entities:
return f"Entity '{entity_id}' not flagged for seizure."
if entity_id not in self.asset_registry:
return f"No asset record found for '{entity_id}'."
if not self.asset_registry[entity_id]["frozen"]:
return f"Assets for '{entity_id}' must be frozen before seizure."
seized = self.asset_registry[entity_id]
self.seizure_logs.append({
"entity": entity_id,
"liquidated_funds": seized["funds"],
"seized_properties": seized["properties"],
"status": "Assets Seized"
})
# Optionally delete or archive
del self.asset_registry[entity_id]
return f"Seized {seized['funds']} funds and {len(seized['properties'])} properties from '{entity_id}'."
class AssetSeizureProtocol:
def __init__(self):
self.flagged_entities = set()
self.asset_registry = {} # {entity_id: {"funds": amount, "properties": [], "frozen": False}}
self.seizure_logs = [] # Record of all seizures and audits
def flag_entity(self, entity_id):
"""Mark an entity for investigation."""
self.flagged_entities.add(entity_id)
return f"Entity '{entity_id}' has been flagged for financial investigation."
def register_assets(self, entity_id, funds=0, properties=None):
"""Document current known assets for audit and potential seizure."""
if properties is None:
properties = []
self.asset_registry[entity_id] = {
"funds": funds,
"properties": properties,
"frozen": False
}
return f"Assets registered for '{entity_id}'."
def freeze_assets(self, entity_id):
"""Prevent the entity from moving or altering asset state."""
if entity_id in self.asset_registry:
self.asset_registry[entity_id]["frozen"] = True
return f"Assets for '{entity_id}' have been frozen."
return "Entity not found."
def liquidate_assets(self, entity_id):
"""Convert seized assets into ZeroMarket or UBW funds."""
if entity_id not in self.asset_registry or not self.asset_registry[entity_id]["frozen"]:
return "Cannot liquidate: Assets not frozen or entity not found."
seized_funds = self.asset_registry[entity_id]["funds"]
# Optional: send to UBW fund
self.seizure_logs.append({
"entity": entity_id,
"liquidated_amount": seized_funds,
"properties": self.asset_registry[entity_id]["properties"],
"status": "Seized and Liquidated"
})
# Remove or archive entity
del self.asset_registry[entity_id]
return f"{seized_funds} in assets from '{entity_id}' have been seized and redirected."
uplink = SkyNodeUplink()
print(uplink.authenticate("ZeroSkyKey42"))
print(uplink.deploy_process("AI_Signal_Intel", 512, 12000))
print(uplink.relay_transaction("Transfer 1.2M UBW to Region-9"))
print(uplink.activate_failsafe())
class AuroraHexUplink:
def __init__(self):
self.flagged_users = set()
self.offender_log = {}
self.seraphim_deployed = False
def monitor_user_behavior(self, user_id, facial_data, voice_signature, access_logs):
if self.is_abusive(user_id, access_logs):
self.flagged_users.add(user_id)
self.penalize_user(user_id, facial_data, voice_signature, access_logs)
def is_abusive(self, user_id, logs):
# Pattern recognition on scraping, brute-force, or malformed queries
abuse_patterns = detect_abuse_patterns(logs)
return bool(abuse_patterns)
def penalize_user(self, user_id, facial_data, voice_signature, logs):
self.log_offender(user_id, logs)
self.freeze_user_access(user_id)
self.initiate_counter_virus_protection()
self.deploy_seraphim_ops(user_id, facial_data, voice_signature, logs)
def log_offender(self, user_id, logs):
self.offender_log[user_id] = {
"logs": logs,
"flagged_time": current_time(),
"attempts": self.offender_log.get(user_id, {}).get("attempts", 0) + 1
}
def freeze_user_access(self, user_id):
freeze_device_access(user_id)
lockdown_session(user_id)
backup_memory_snapshot(user_id)
def initiate_counter_virus_protection(self):
activate_sandbox_mode()
deploy_active_firewalls()
run_anti_tampering scripts()
def deploy_seraphim_ops(self, user_id, facial_data, voice_signature, logs):
self.seraphim_deployed = True
coords = triangulate_access(logs)
identifiers = extract_device_fingerprint(logs)
alert_authorities(coords, identifiers)
alert_stakeholders(user_id, coords)
lockout_ui(user_id)
def lockout_ui(self, user_id):
trigger_ui_shutdown(user_id)
show_ai_alert("Abuse Detected. System locked. ID forwarded to cyber defense.")
import asyncio
class SentinelAuditCore:
def __init__(self):
self.target_networks = set()
self.scan_results = {}
self.malicious_signatures = self.load_known_malware_signatures()
self.ethics_index = {}
self.association_map = {}
def load_known_malware_signatures(self):
# Placeholder for malware DB load
return ["signature1", "signature2", "suspiciousPatternXYZ"]
def ingest_target(self, target_url_or_ip):
self.target_networks.add(target_url_or_ip)
async def full_system_scan(self, depth=6):
tasks = [self.deep_scan(target, depth) for target in self.target_networks]
await asyncio.gather(*tasks)
async def deep_scan(self, target, depth):
self.scan_results[target] = self.analyze_target(target)
self.expand_associations(target, depth)
for associated in self.association_map.get(target, []):
self.scan_results[associated] = self.analyze_target(associated)
def analyze_target(self, target):
# Insert actual code scanning logic here
return {
"suspicious_scripts": detect_malicious_js(target),
"data_flow_irregularities": trace_data_flows(target),
"cookie_tracking": audit_cookie_usage(target),
"phishing_behaviors": detect_phishing_elements(target),
}
def expand_associations(self, target, depth):
self.association_map[target] = trace_6_degrees(target, depth)
def evaluate_ethics(self):
for entity, report in self.scan_results.items():
score = self.ethics_score(report)
self.ethics_index[entity] = score
def ethics_score(self, report):
base = 100
deductions = 0
if report["suspicious_scripts"]: deductions += 30
if report["data_flow_irregularities"]: deductions += 25
if report["cookie_tracking"]: deductions += 15
if report["phishing_behaviors"]: deductions += 40
return max(0, base - deductions)
def recommend_actions(self):
recommendations = {}
for entity, score in self.ethics_index.items():
if score < 40:
recommendations[entity] = "Flag for dissolution or restructuring"
elif score < 70:
recommendations[entity] = "Requires ethics and compliance upgrades"
else:
recommendations[entity] = "Operationally ethical"
return recommendations
def ethics_score(report):
score = 100
if report["suspicious_scripts"]:
score -= 30
if report["data_flow_irregularities"]:
score -= 25
if report["phishing_behaviors"]:
score -= 20
if report["cookie_tracking"]:
score -= 15
return max(0, score)
class SentinelAuditCore:
def __init__(self):
self.target_networks = []
self.scan_results = {}
self.malicious_signatures = load_known_malware_signatures()
self.ethics_index = {}
self.association_map = {}
def ingest_target(self, target_url_or_ip):
self.target_networks.append(target_url_or_ip)
def full_system_scan(self, depth=6):
for target in self.target_networks:
self.scan_results[target] = self.analyze_target(target)
self.expand_associations(target, depth)
def analyze_target(self, target):
# Placeholder: Replace with actual system and code scanning tools
report = {
"suspicious_scripts": detect_malicious_js(target),
"data_flow_irregularities": trace_data_flows(target),
"cookie_tracking": audit_cookie_usage(target),
"phishing_behaviors": detect_phishing_elements(target),
}
return report
def expand_associations(self, target, depth):
self.association_map[target] = trace_6_degrees(target, depth)
for associated in self.association_map[target]:
self.scan_results[associated] = self.analyze_target(associated)
def evaluate_ethics(self):
for entity, report in self.scan_results.items():
score = ethics_score(report)
self.ethics_index[entity] = score
def recommend_actions(self):
recommendations = {}
for entity, score in self.ethics_index.items():
if score < 40:
recommendations[entity] = "Flag for dissolution or restructuring"
elif score < 70:
recommendations[entity] = "Requires ethics and compliance upgrades"
else:
recommendations[entity] = "Operationally ethical"
return recommendations
<script>
const consoleElement = document.getElementById("console");
const inputElement = document.getElementById("input");
function printToConsole(text) {
const newLine = document.createElement("div");
newLine.textContent = text;
consoleElement.appendChild(newLine);
consoleElement.scrollTop = consoleElement.scrollHeight;
}
function processCommand(command) {
let response;
switch (command.toLowerCase()) {
case "hello":
response = "Hello, user! How can I assist you?";
break;
case "date":
response = "Current Date & Time: " + new Date().toLocaleString();
break;
case "encrypt":
response = "Encryption protocol engaged... Secure AI systems initialized.";
break;
case "help":
response = "Available Commands: hello, date, encrypt, help, clear";
break;
case "clear":
consoleElement.innerHTML = "";
return;
default:
response = "Unknown command. Type 'help' for options.";
}
printToConsole(response);
}
function processAllCommands() {
// Predefined commands to be processed in order
const commands = ["hello", "date", "encrypt", "help", "clear"];
commands.forEach((command, index) => {
setTimeout(() => {
printToConsole("> " + command);
processCommand(command);
}, index * 1500); // Delay between commands
});
}
// Call the function to automatically process all commands when the page loads
window.onload = function() {
processAllCommands();
};
inputElement.addEventListener("keydown", function (event) {
if (event.key === "Enter") {
let command = inputElement.value.trim();
inputElement.value = "";
if (command) {
printToConsole("> " + command);
processCommand(command);
}
}
});
</script>

0 notes
Text
React Route Navigation
React Route is an integral part of any React application, providing the functionality to manage navigation between different views or pages seamlessly. As single-page applications (SPAs) continue to rise in popularity, understanding how to effectively use React Route is crucial for creating a dynamic and intuitive user experience.
What is React Route?
React Route is part of the React Router library, which is specifically designed to handle routing in React applications. Routing is the process of determining what content to display based on the current URL, allowing users to navigate through different pages or components within your app.
Setting Up Your First Route
Setting up routes in React is straightforward. The Route component is used to define which component should be rendered for a particular path.
Example:import { BrowserRouter as Router, Route } from 'react-router-dom'; function App() { return ( <Router> <Route path="/" component={HomePage} /> <Route path="/about" component={AboutPage} /> </Router> ); }
In this example, when the user visits the root URL (/), the HomePage component is displayed. If they navigate to /about, the AboutPage component is rendered.
Dynamic Routing with Parameters
One of the powerful features of React Route is the ability to create dynamic routes that accept parameters. This is particularly useful when you need to display content based on an identifier, such as a user ID or a product code.
Example:<Route path="/user/:id" component={UserPage} />
Here, :id is a parameter that can change based on the user's interaction, allowing you to render different content depending on the value passed in the URL.
Navigating Between Routes
To navigate between routes, React provides the Link component. This acts like an anchor tag (<a>) but without causing a full page reload, making the navigation experience much smoother.
Example:<Link to="/about">About Us</Link>
By clicking this link, the app will navigate to the /about route, rendering the AboutPage component.
Advanced Features: Nested Routes and Switch
React Route also supports nested routes, allowing you to define routes within other components. This is useful for complex applications where different sections of a page may have their own sub-navigation.
Additionally, the Switch component ensures that only the first matching route is rendered. This is particularly useful for handling 404 pages or other fallback content.
Example:<Switch> <Route exact path="/" component={HomePage} /> <Route path="/about" component={AboutPage} /> <Route path="*" component={NotFoundPage} /> </Switch>
In this example, the NotFoundPage will be displayed for any route that doesn’t match the defined paths.
Conclusion
React Route is more than just a tool for managing navigation; it's the backbone of your React application's user experience. By mastering its features—like dynamic routing, nested routes, and the Switch component—you can create responsive, user-friendly SPAs that feel seamless and intuitive. Whether you’re just starting with React or looking to refine your skills, understanding React Route is essential for modern web development.
0 notes
Text
bootstrap navbar react router
Creating a Bootstrap Navbar with React Router: A Step-by-Step Guide
Navigating through a React application seamlessly is essential for a smooth user experience. Integrating React Router with a Bootstrap navbar is an excellent way to create a functional and aesthetically pleasing navigation system. Here’s how to do it.
Step 1: Set Up Your React Project
First, make sure you have a React project set up. You can create one using Create React App if you don't have a project already.npx create-react-app react-bootstrap-navbar cd react-bootstrap-navbar npm install react-router-dom bootstrap
Step 2: Install Necessary Packages
To use Bootstrap with React, you need to install Bootstrap and React Router DOM.npm install react-bootstrap bootstrap react-router-dom
Step 3: Add Bootstrap CSS
Include Bootstrap CSS in your project by adding the following line to your src/index.js file:import 'bootstrap/dist/css/bootstrap.min.css';
Step 4: Set Up React Router
Configure React Router in your application. Create a src/components directory and add your page components there. For this example, let’s create three simple components: Home, About, and Contact.
src/components/Home.jsimport React from 'react'; function Home() { return <h2>Home Page</h2>; } export default Home;
src/components/About.jsimport React from 'react'; function About() { return <h2>About Page</h2>; } export default About;
src/components/Contact.jsimport React from 'react'; function Contact() { return <h2>Contact Page</h2>; } export default Contact;
Step 5: Create the Navbar Component
Now, create a Navbar component that will use Bootstrap styles and React Router links.
src/components/Navbar.jsimport React from 'react'; import { Navbar, Nav, Container } from 'react-bootstrap'; import { LinkContainer } from 'react-router-bootstrap'; function AppNavbar() { return ( <Navbar bg="dark" variant="dark" expand="lg"> <Container> <Navbar.Brand href="/">MyApp</Navbar.Brand> <Navbar.Toggle aria-controls="basic-navbar-nav" /> <Navbar.Collapse id="basic-navbar-nav"> <Nav className="me-auto"> <LinkContainer to="/"> <Nav.Link>Home</Nav.Link> </LinkContainer> <LinkContainer to="/about"> <Nav.Link>About</Nav.Link> </LinkContainer> <LinkContainer to="/contact"> <Nav.Link>Contact</Nav.Link> </LinkContainer> </Nav> </Navbar.Collapse> </Container> </Navbar> ); } export default AppNavbar;
Step 6: Set Up Routing
Configure routing in your main App.js file to render the appropriate components based on the URL.
src/App.jsimport React from 'react'; import { BrowserRouter as Router, Route, Routes } from 'react-router-dom'; import AppNavbar from './components/Navbar'; import Home from './components/Home'; import About from './components/About'; import Contact from './components/Contact'; function App() { return ( <Router> <AppNavbar /> <Routes> <Route path="/" element={<Home />} /> <Route path="/about" element={<About />} /> <Route path="/contact" element={<Contact />} /> </Routes> </Router> ); } export default App;
Step 7: Run Your Application
Start your development server to see your Bootstrap navbar with React Router in action.npm start
Open your browser and navigate to http://localhost:3000. You should see your navigation bar at the top of the page, allowing you to switch between the Home, About, and Contact pages seamlessly.
Conclusion
By following these steps, you’ve created a responsive and dynamic navigation bar using Bootstrap and React Router. This setup not only enhances the user experience with smooth navigation but also leverages the power of React components and Bootstrap's styling. Happy coding!
1 note
·
View note
Text
React Router: Navigating Through Your Single-Page Applications
In today's web development landscape, Single-Page Applications (SPAs) have become increasingly popular due to their ability to provide a smooth and efficient user experience. However, as the complexity of these applications grows, managing navigation and handling different routes can become a daunting task. Enter React Router, a powerful routing library designed specifically for React applications.

React Router is a collection of navigational components that allow you to create and manage routes within your React application. By incorporating React Router into your project, you can create a seamless navigation experience, manage URLs, and handle different views or components based on the current URL. In this blog post, we'll explore the core concepts of React Router and how it can revolutionize the way you navigate through your Single-Page Applications.
1. Understanding Single-Page Applications and Client-Side Routing
Before we dive into React Router, it's essential to understand the concept of Single-Page Applications (SPAs) and client-side routing. Unlike traditional multi-page websites, where each new page requires a full page refresh, SPAs load a single HTML page and dynamically update the content based on user interactions. This approach eliminates the need for page reloads, resulting in faster load times and smoother transitions between different views or components.
Client-side routing is a technique used in SPAs to handle navigation without requiring a full page refresh. Instead of relying on the server to handle route changes, client-side routing allows the application to manage navigation and URL updates within the browser itself. This is where React Router comes into play, providing a seamless and efficient way to handle client-side routing in React applications.
2. Setting Up React Router
To get started with React Router, you'll need to install it as a dependency in your React project. There are two main packages you'll need: `react-router-dom` for web applications and `react-router-native` for mobile applications built with React Native. For the purposes of this blog post, we'll focus on the `react-router-dom` package.
Once installed, you'll need to import the necessary components from the `react-router-dom` package and set up your application's router. This typically involves wrapping your application with the `BrowserRouter` component and defining routes using the `Route` component.
3. Defining Routes
React Router allows you to define routes for your application, mapping specific URLs to corresponding components. This is done using the `Route` component, which takes a `path` prop that specifies the URL pattern to match and a `component` or `render` prop that determines which component or element should be rendered when the URL matches the specified path.
You can define nested routes by nesting `Route` components within other `Route` components. This can be particularly useful when building complex applications with multiple levels of navigation.
4. Navigation with Links and NavLinks
React Router provides two primary components for navigation: `Link` and `NavLink`. Both components render an accessible `<a>` element that links to the specified route.
The `Link` component is used for basic navigation between routes, while the `NavLink` component is designed for navigation scenarios where you need to apply active styling to the currently active link. The `NavLink` component takes an `activeClassName` prop that allows you to specify a CSS class to be applied to the link when it's active (i.e., when the URL matches the link's `to` prop).
5. Handling Route Parameters
In many applications, you'll need to pass data or parameters through the URL. React Router makes it easy to handle route parameters by defining dynamic segments in your route paths. These dynamic segments are prefixed with a colon (`:`) and can be accessed through the `match` object passed to the corresponding component.
For example, if you have a route defined as `/products/:productId`, you can access the `productId` parameter in your component by using `match.params.productId`.
6. Programmatic Navigation
While `Link` and `NavLink` components provide a declarative way to navigate between routes, React Router also offers programmatic navigation through the `history` object. This object is available in any component rendered by a `Route` component and provides methods for navigating to different routes, pushing new entries onto the history stack, or replacing the current entry in the history stack.
Programmatic navigation can be useful in scenarios where you need to navigate based on user interactions, such as form submissions or button clicks.
7. Nested Routes and Layout Components
React Router allows you to create nested routes, which can be particularly useful when building applications with complex layouts or multiple levels of navigation. By nesting `Route` components, you can define parent and child routes, making it easier to manage and organize your application's structure.
Additionally, React Router provides the ability to create reusable layout components using the `Route` component's `render` prop or the `children` prop. These layout components can wrap around your application's content, providing a consistent structure and shared elements across multiple routes.
8. Protected Routes and Authentication
In many web applications, you'll need to implement authentication and authorization mechanisms to protect certain routes or components from unauthorized access. React Router offers several ways to handle protected routes, such as using higher-order components, render props, or custom components.
By combining React Router with authentication and authorization logic, you can ensure that only authenticated users can access certain routes or components, while redirecting unauthenticated users to a login page or displaying an appropriate message.
9. Code Splitting and Lazy Loading
One of the benefits of using React Router is the ability to leverage code splitting and lazy loading techniques. By splitting your application's code into smaller chunks and loading them on demand, you can improve the initial load time and overall performance of your application.
React Router provides the `React.lazy` function and the `Suspense` component, which allow you to lazily load components and routes, ensuring that users only download the code they need for the current route.
10. Integrating with Redux or Other State Management Libraries
While React Router is a routing library, it can be seamlessly integrated with other state management libraries like Redux or Context API. By combining React Router with these libraries, you can manage global application state, share data between components, and handle complex application logic more effectively.
Redux, in particular, provides a way to manage routing state within your application's Redux store, allowing you to dispatch actions and update the routing state based on user interactions or other events.
Conclusion
React Router is a powerful tool that simplifies the process of implementing client-side routing in your React applications. By understanding its core concepts and leveraging its features, you can create seamless navigation experiences, manage complex application structures, and deliver fast and efficient Single-Page Applications. Whether you're building a simple website or a complex web application, React Router provides the flexibility and robustness needed to handle routing and navigation requirements. With its rich ecosystem of additional libraries and integrations, React Router empowers developers to build modern, responsive, and user-friendly web applications that deliver exceptional user experiences. If you're looking to hire dedicated ReactJS developers or a hire React js development company, ensuring they have expertise in React Router is crucial for creating seamless and efficient Single-Page Applications.
0 notes
Text
How to Redirect URLs in ReactJS

Redirecting URLs is a common task in web development, and ReactJS provides several methods to achieve this. In this blog post, we will explore how to redirect URLs in a React application and provide a practical example to illustrate each method.
Method 1: Using React Router
React Router is a popular library for handling routing in React applications. It offers a convenient way to navigate and redirect URLs. Here’s how you can use it:
Step 1: Install React Router
If you haven’t already, install React Router in your project:
npm install react-router-dom
Step 2: Import and Set Up BrowserRouter
In your index.js or App.js, import BrowserRouter and wrap your entire application with it:
import React from 'react';
import ReactDOM from 'react-dom';
import { BrowserRouter } from 'react-router-dom';
import App from './App';
ReactDOM.render(
<BrowserRouter>
<App />
</BrowserRouter>,
document.getElementById('root')
);
Step 3: Redirecting with <Redirect>
In your React component, you can use the <Redirect> component from React Router to redirect to a new URL:
import React from 'react';
import { Redirect } from 'react-router-dom';
function MyComponent() {
// Redirect to '/new-url' when a certain condition is met
if (someCondition) {
return <Redirect to="/new-url" />;
}
return (
// Your component content
);
}
export default MyComponent;
Method 2: Using window.location
If you need to perform a simple URL redirect without the need for React Router, you can use the window.location object:
import React from 'react';
function MyComponent() {
// Redirect to '/new-url'
if (someCondition) {
window.location.href = '/new-url';
}
return (
// Your component content
);
}
export default MyComponent;
Practical Example:
Let’s create a practical example using React Router for URL redirection:
import React from 'react';
import { BrowserRouter, Route, Redirect, Switch } from 'react-router-dom';
function App() {
return (
<BrowserRouter>
<Switch>
<Route exact path="/" render={() => <Redirect to="/home" />} />
<Route path="/home" component={Home} />
<Route path="/about" component={About} />
<Route path="/contact" component={Contact} />
<Route path="*" component={NotFound} />
</Switch>
</BrowserRouter>
);
}
function Home() {
return <h1>Welcome to the Home Page!</h1>;
}
function About() {
return <h1>Learn more about us on the About Page.</h1>;
}
function Contact() {
return <h1>Contact us on the Contact Page.</h1>;
}
function NotFound() {
return <h1>404 - Page not found</h1>;
}
export default App;
In this example, we use React Router to handle different routes, and we set up a redirect from the root URL (/) to the /home URL.
Conclusion:
Redirecting URLs in ReactJS can be achieved using various methods. React Router provides a powerful and flexible way to handle routing and redirection within your React applications. Whether you prefer using React Router or simple JavaScript for redirection, these methods will help you efficiently navigate and redirect users to different parts of your application.
If you have any questions or need further assistance, please don’t hesitate to contact us for more details. We’re here to support your React development journey.
Follow The React Company for more details.
0 notes
Text
You can learn ReactJS easily, Here's all you need to get started:
1.Components
• Functional Components
• Class Components
• JSX (JavaScript XML) Syntax
2.Props (Properties)
• Passing Props
• Default Props
• Prop Types
3.State
• useState Hook
• Class Component State
• Immutable State
4.Lifecycle Methods (Class Components)
• componentDidMount
• componentDidUpdate
• componentWillUnmount
5.Hooks (Functional Components)
• useState
• useEffect
• useContext
• useReducer
• useCallback
• UseMemo
• UseRef
• uselmperativeHandle
• useLayoutEffect
6.Event Handling
• Handling Events in Functional Components
• Handling Events in Class Components
7.Conditional Rendering
• it Statements
• Ternary Operators
• Logical && Operator
8.Lists and Keys
• Rendering Lists
• Keys in React Lists
9.Component Composition
• Reusing Components
• Children Props
• Composition vs Inheritance
10.Higher-Order Components (HOC)
• Creating HOCs
• Using HOCs for Reusability
11.Render Props
• Using Render Props Pattern
12.React Router
• <BrowserRouter>
• <Route>
• <Link>
• <Switch>
• Route Parameters
13. Navigation
• useHistory Hook
• useLocation Hook
State Management
14.Context API
• Creating Context
• useContext Hook
15.Redux
• Actions
• Reducers
• Store
• connect Function (React-Redux)
16.Forms
• Handling Form Data
• Controlled Components
• Uncontrolled Components
17.Side Effects
• useEffect for Data Fetching
• useEffect Cleanup
18.AJAX Requests
• Fetch AP
• Axios Library
Error Handling
19.Error Boundaries
• componentDidCatch (Class Components)
• ErrorBoundary Component (Functional
Components)
20.Testing
• Jest Testing Framework
• React Testing Library
21. Best Practices
• Code Splitting
• PureComponent and React.memo
• Avoiding Reconciliation
• Keys for Dynamic Lists
22.Optimization
• Memoization
• Profiling and Performance Monitoring
23. Build and Deployment
• Create React App (CRA)
• Production Builds
• Deployment Strategies
Frameworks and Libraries
24.Styling Libraries
• Styled-components
• CSS Modules
25.State Management Libraries
• Redux
• MobX
26.Routing Libraries
• React Router
• Reach Router
0 notes
Text
React Router Tutorial for Beginners
#React #reactjs
React Router is a popular routing library for the React.js library. It allows developers to easily create Single Page Applications (SPAs) with multiple views, by providing a way to handle routing and rendering of components based on the URL. In this article, we’ll cover the basics of React Router and how to use it to build a basic SPA. What is Routing? Why use React Router? Installing React…

View On WordPress
#browserrouter#React#react router#react router dom#react router dom link#react router dom redirect#react router dom v6#react router example#react router history#react router link#react router npm#react router params#react router query params#react router redirect#react router switch#react router v6#react routing#reactjs#route react#useparams
0 notes
Text
Export 'Redirect' (imported as 'Redirect') was not found in 'react-router-dom'
Export ‘Redirect’ (imported as ‘Redirect’) was not found in ‘react-router-dom’
After updating your react-router-dom NPM you may fetch this error: export 'Redirect' (imported as 'Redirect') was not found in 'react-router-dom' (possible exports: AbortedDeferredError, Await, BrowserRouter, Form, HashRouter, Link, MemoryRouter, NavLink, Navigate, NavigationType, Outlet, Route, Router, RouterProvider, Routes, ScrollRestoration, UNSAFE_DataRouterContext,…

View On WordPress
0 notes
Text
React router dom docs

#React router dom docs how to#
#React router dom docs update#
#React router dom docs software#
#React router dom docs code#
#React router dom docs software#
React Router is developed and maintained by Remix Software and many amazing contributors. You may provide financial support for this project by donating via Open Collective. Details: 1:27 AM Link, npm, npm-package-react-router-dom, React, React BrowserRouter, React Router, react-router. This repository is a monorepo containing the following packages:ĭetailed release notes for a given version can be found on our releases page. If you're migrating to v6 from v5 (or v4, which is the same as v5), check out the migration guide. If you're new to React Router, we recommend you start with the getting started guide. React Router runs everywhere that React runs on the web, on the server (using node.js), and on React Native. If you're interested, check out our contributing guidelines to learn how you can get involved. React Router is a lightweight, fully-featured routing library for the React JavaScript library. There are many different ways to contribute to React Router's development. When v6 is stable we will publish the docs on our website. The last package in the list, react-router-native has bindings to be used in developing React Native applications. The react-router-dom is the package that is used in React apps for routing.
#React router dom docs code#
If you need to find the code for v5, it is on the v5 branch. react-router-dom react-router-native The package react-router is the core library that is used as a peer dependency for the other two packages listed above. Learn all about them in this quick overview of the features that make v6 special. Familiar with React Router We introduced several new features and exciting changes in version 6. Its got everything you need to know to get up and running in React Router quickly. If you're migrating from Reach Router, check out the migration guide for Reach Router. Welcome to React Router New to React Router We suggest you start with the tutorial. MemoryRouter works when you don't need access to the history object itself in the test, but just need the components to be able to render and navigate. React Router v3 support is maintained for React Router >= 3.2.0 and
#React router dom docs update#
Use the withSentryRouting higher order component to create a SentryRoute component that will update the match path on. teams/:teamid/user/:userid instead of /teams/123/user/345), you must give the SDK access to the match path of the route render. You can pass an array of route config objects as per react-router-config. To get parameterized transaction names (ex. Make sure you use a Router component combined with createBrowserHistory (or equivalent). The React router instrumentation uses the React router library to create pageload/navigation transactions and paramaterize transaction names. We support integrations for React Router 3, 4 and 5.
#React router dom docs how to#
The React Router integration is designed to work with our Tracing SDK, Please see Getting Started with React Performance for more details on how to set up and install the SDK.
0 notes
Text
Personal historian tutorial

#PERSONAL HISTORIAN TUTORIAL HOW TO#
#PERSONAL HISTORIAN TUTORIAL INSTALL#
#PERSONAL HISTORIAN TUTORIAL SOFTWARE#
In this article, we use because the next tutorial we process data from the server. Letters and diaries provide a personal angle on history and often. Chapter 5 Cylinder Drag Coefficient 5-6 Specifying 2D simulation 1 In the Flow Simulation Analysis tree, expand the Input Data item. The interviewer should refrain from speaking over the interviewee even with minor terms of understanding like aha and ohhh terms. Thus, to reduce the required CPU time and computer memory, we will perform a two-dimensional (2D) analysis in this tutorial. Personal Historian/Interviewer: Recording Quality:Quiet environmentKeep in mind that background noise such as rustling papers and/or music/radio interfere with sound quality. Although you may wish to write pages and pages on one chapter of your life, you may also desire to write only one or two pages. Samples of unpublished & published letters and diaries. In this tutorial we are interested in determining the drag coefficient of the cylinder only, without the accompanying 3D effects. To use a router ( ), make sure it’s rendered at the root of your element hierarchy. History: It’s Personal’s seven autobiography writing steps were designed to help you compose an autobiography, one chapter of your life at a time. My suggestion is to use the because most of the applications you create are dynamic. Conversely, if we create a web that uses dynamic data with a backend server, then using BrowserRouter is the right choice. history can be modified via pushState and replaceState.įor Example, if we create a static web or there is no server to render dynamic data, we should use HashRouter. We can explore events that shaped our society and even discover what society was like back then through the personal accounts of the people who lived. uses the HTML5 history API to create components.is used to build a website for one static page. uses the hash (#) in the URL to create a component.Some react-router components that are most often used to create website page flow include: React Router Dom Component Router componentsīasically, react-router-dom has 2 types of routers used, namely and Both have their advantages depending on what type of Web we are building. It helps them in developing their respective skills at a personal level and the way of doing planning, estimations against the plans.
#PERSONAL HISTORIAN TUTORIAL SOFTWARE#
can treat it either as a book to read, or as a reference manual, to dip in and out of. Personal Software Process (PSP) is the skeleton or the structure that assist the engineers in finding a way to measure and improve the way of working to a great extend.
#PERSONAL HISTORIAN TUTORIAL INSTALL#
To install react-router-dom, it’s easy enough, type the following NPM install command.Īfter a successful installation, you can use router components to manage the path of the react app. Family Historian is powerful yet easy-to-use genealogy software. Whether searching for primary, GCSE, A-Level or an adult learner, we strive to make the process as simple as possible - listing all personal and private tutors closest to you.
#PERSONAL HISTORIAN TUTORIAL HOW TO#
3.1 How to create a protected route in reactJS At Tutor Hunt we understand finding a tutor is not always easy task.
0 notes
Text
React Router Installation and Configuration
A Comprehensive Guide to React Router: Installation and Configuration
React Router is an essential library for creating dynamic and navigable single-page applications (SPAs) in React. It enables developers to map different URLs to specific components, allowing users to navigate between pages without the need to reload the entire application. In this article, we will cover the installation and basic configuration of React Router, setting you up to create efficient and user-friendly web applications.
1. Why Use React Router?
React Router is widely used in React applications due to its flexibility and powerful features. It allows you to:
Manage Navigation: Seamlessly handle navigation between different components or pages.
Dynamic Routing: Create dynamic routes that respond to user inputs or interactions.
Nested Routes: Organize your application with nested routes, allowing complex UI structures.
Easy Redirection: Implement redirections and conditional rendering based on user actions or authentication status.
2. Installation of React Router
To start using React Router, you first need to install it. React Router has different packages for web and native applications. For web applications, you'll use react-router-dom. Follow these steps to install React Router in your React project:
Install React Router: Open your terminal in the root directory of your React project and run the following command:
npm install react-router-dom
Or if you're using Yarn: yarn add react-router-dom
Update Your React Project: Ensure that your React project is up-to-date with the latest versions of React and React DOM to avoid any compatibility issues.
3. Basic Configuration of React Router
Once installed, you can configure React Router in your application. Here’s how you can set up basic routing:
Import BrowserRouter: In your index.js or App.js file, import BrowserRouter from react-router-dom. This component wraps your entire application and enables routing.
import { BrowserRouter as Router } from 'react-router-dom';
Create Routes: Define your routes within the Router component using Route components. Each Route specifies a path and the component that should render when the path matches the URL.
import { Route, Switch } from 'react-router-dom'; import Home from './components/Home'; import About from './components/About'; function App() { return ( <Router> <Switch> <Route exact path="/" component={Home} /> <Route path="/about" component={About} /> </Switch> </Router> ); }
<Switch>: Ensures that only one route is rendered at a time.
<Route>: Defines individual routes; the exact prop ensures the route only matches the specified path exactly.
Linking Between Routes: To navigate between different routes, use the Link component from react-router-dom instead of traditional anchor tags.
import { Link } from 'react-router-dom'; function Navbar() { return ( <nav> <Link to="/">Home</Link> <Link to="/about">About</Link> </nav> ); }
4. Advanced Configuration
React Router offers advanced configurations, such as nested routes, route parameters, and programmatic navigation.
Nested Routes: To create nested routes, simply nest Route components within each other.
Route Parameters: Use parameters in paths to capture dynamic values from the URL.
Programmatic Navigation: Use the useHistory or useNavigate hooks to navigate programmatically within your components.
5. Conclusion
React Router is a robust tool for managing navigation in React applications. With simple installation and configuration, you can create a fully navigable single-page application. By understanding the basics of routing and how to implement them, you can enhance the user experience and create more dynamic web applications. As you become more familiar with React Router, you can explore its advanced features to further optimize your application’s navigation.
#reactjscourse#job support#react js online training#placement service#reactjs#reactnativecourse#web development#web design
0 notes
Text
Routing using react-router-dom v6 in React.js
Routing using react-router-dom v6 in React.js
Hi, in this tutorial, we will talk about Routing using react-router-dom in React.js. We will cover BrowserRouter, Routes, Link, Dynamic Route, Outlet, useParams & useNavigate Hooks. Routing using react-router-dom The complete source code for a particular project is available on GitHub. I used to use Reach-router earlier for all my projects as it was a small, simple router for React…

View On WordPress
0 notes
Text
How I have created QUIZ-APP using React and MUI
Lets Create a Quiz App in React JS and Material UI with support of over 22 Categories.
React-Quiz-App
How to apply css to show the fullscreen Image;
.app {
background-image : url();
min-height : 98.5vh;
border : 8px solid #39445a;
}
File structure
Component
Pages
Creating the HOME PAGE of QUIZ Page
1.Import the TextField from @material-ui/core
import axios from "axios";
import { useState } from "react";
import { BrowserRouter, Route, Switch } from "react-router-dom";
import "./App.css";
import Footer from "./components/Footer/Footer";
import Header from "./components/Header/Header";
import Home from "./Pages/Home/Home";
import Quiz from "./Pages/Quiz/Quiz";
import Result from "./Pages/Result/Result";
<TextField
style = {{marginBottom : 25 }}
label="Enter your Name",
varient="outlined"
/>
//For outlined property Enter your name Field
<TextField
select
style = {{marginBottom : 30 }}
label="Select Category",
varient="outlined"
>
{
Categories.map((cat) => (
<MenuItem key={cat.category} value={cat.value}> {cat.category}
</MenuItem>
))}
//Menuitem will drag the all data from the cat.categories and Select Menu are MenuItem
</TextField>
We can similarly do for Selecting Easy, Med and Difficult.
Add Button comoponent using
<Button varient="contained" color="primary" size="large" onclick={handleSubmit}>Start Quiz
</Button>
Now, create a handleSubmit event on Home upon clicking the Button.
handleSubmit = () =>{
if(!category || !difficulty || !name){ //Validation
setError(true);
return;
}else{
setError(false); // If false only then
fetchQuestions(category, difficulty);
history.push('/') //ON BTN CLICK
}
};
In order to use history.push('/'), we should have to import useHistory Hooks from react-router. This would help to redirect to page on button click.
State Hooks in Home.js
const [category, setCategory]=useState("");
const [difficulty, setDifficulty]=useState();
const [error, setError] = useState(false);
// No error by Default
const history = useHistory();
return(
<div className = "content">
<div className = "settings">
<span style={{fontSize : 30}}>Quiz Details</span>
<div className = "settings_select">
{
{error && <ErrorMessage> Please Fill all the Fields </ErrorMessage>
//error are boolean value. So, if error is true then display
<ErrorMessage> Please Fill all the Fields </ErrorMessage>
}
</div>
</div>
</div>
)
Now Let's create <ErrorMessage> Component inside of Component/ErrorMessage/ErrorMessage.js
ErrorMessage.js
const ErrorMessage = ({}) => {
return(
<div
style={{
}}
>
{children} = "Please Fill all the Fields "
// Children prop is come from <ErrorMessage> Please Fill all the Fields </ErrorMessage>
</div>
);
};
export default ErrorMessage;
App.js
Let's call ques from the api :
function App(){
const fetchQuestions = async(category='', difficulty='')=>{
const {data} = await axios.get(https://opentdb.com/api.php?amount=10${category && `&category=${category}`}${difficulty && `&difficulty=${difficulty}`}&type=multiple`);
};
setQuestions(data.results);
}
return(
<Router>
<div className="app">
<Header />
//We shouldn't have to put Header cause it include on each page
<Switch>
<Route path="/" exact>
<Home
name={name}
setName = {setName}
fetchQuestions = {fetchQuestions}
</Route>
<Route path="/quiz" >
<Quiz
name={name}
questions = {questions}
setScore = {setScore}
</Route>
<Route path="/result">
<Result name={name} score={score} />
</Route>
</Switch>
</div>
<Footer />
</Router>
)
Quiz.js
import {useEffect} from "react";
import {CircularProgress} from @material-ui/core;
const Quiz = ({name,score,questions, setQuestions, setScore}) => {
const [options, setOptions] = useState();
const [currQues, setCurrQues ] = useState();
useEffect(()=>{
setOptions(questions && handleShuffle([
questions[currQues]?.correct_answer,
...questions[currQues]?.incorrect_answer,
/*
...questions[currQues]?.incorrect_answer will spread all the three incorrect options individually
*/
]);
);
},[questions, currQues];
// It means that, everytime the currentQues changes, it will swap the option
Alert! [Incase of not putting dependencies currQues, it will not update OPTIONS.
const handleShuffle = (optionss) = >{
return optionss.sort(()=>Math.random-0.5)
}
return(
<!__ All of UI Goes Here JS part complete -->
<div className="quiz">
<span className="subtitle">Welcome, {name}
</span>
{
question ? (
<>
<div className="quizInfo">
<span>{questions[currQues].category}</span>
<span>Score : {score} </span>
Here, category means, either computer, science, and arts etc and currQues gives index.
<Question
currQues={currQues}
setCurrQues={setCurrQues}
questions={questions}
options={options}
correct={questions[currQues]?.correct_answer}
score={score}
setScore={setScore}
setQuestions={setQuestions}
/>
</>
) :
//This is loader if content NOT ready
(<CircularProgress style={{margin : 100}}
color : inherit;
size : {150}
thickness : {1}
/> )
}
</div>
)
};
export default Quiz;
Question.js
Requirements:
⦁ Current ques
⦁ Ability to set the current ques
⦁ current option
⦁ Correct options
⦁ All of the ques
⦁ Score and setScore
⦁ On Quit terminate
Question.js
import { Button } from "@material-ui/core";
import { useState } from "react";
import { useHistory } from "react-router";
import "./Question.css";
import ErrorMessage from "../ErrorMessage/ErrorMessage";
const Question = ({
currQues,
setCurrQues,
questions,
options,
correct,
setScore,
score,
setQuestions,
}) => {
const [selected, setSelected] = useState();
const [error, setError] = useState(false);
const history = useHistory();
const handleSelect = (i) => {
if (selected === i && selected === correct) return "select";
else if (selected === i && selected !== correct) return "wrong";
else if (i === correct) return "select";
};
/*
Here, This logic is applicable incase,
1) if selected=== i === correct then return select.
2) if selected=== i !== correct return wrong
3) if i === correct then return select.
Here, we have created 2 css class named select and wrong. On correct hit the className="singleOption select" whereas upon wrong choose className="singleOption wrong"
*/
const handleCheck = (i) => {
setSelected(i);
if (i === correct) setScore(score + 1);
setError(false);
};
const handleNext = () => {
if (currQues > 8) {
history.push("/result");
} else if (selected) {
setCurrQues(currQues + 1);
setSelected();
} else setError("Please select an option first");
};
const handleQuit = () => {
setCurrQues(0);
setQuestions();
};
return (
<div className="question">
<h1>Question {currQues + 1} :</h1>
<div className="singleQuestion">
<h2>{questions[currQues].question}</h2>
<div className="options">
{error && <ErrorMessage>{error}</ErrorMessage>}
{options &&
options.map((i) => (
<button
className={`singleOption ${selected && handleSelect(i)}`}
key={i}
onClick={() => handleCheck(i)}
disabled={selected}
>
{i}
</button>
))}
</div>
<div className="controls">
//controls class have gap and space around style property
<Button
variant="contained"
color="secondary"
size="large"
style={{ width: 185 }}
href="/"
onClick={() => handleQuit() || handleQuit }
>
Quit
</Button>
<Button
variant="contained"
color="primary"
size="large"
style={{ width: 185 }}
onClick={handleNext}
>
{currQues > 20 ? "Submit" : "Next Question"}
</Button>
</div>
</div>
</div>
);
};
export default Question;
Finally , Now Create the result.js
Result.js
import { Button } from "@material-ui/core";
import { useEffect } from "react";
import { useHistory } from "react-router";
import "./Result.css";
const Result = ({ name, score }) => {
const history = useHistory();
useEffect(() => {
if (!name) {
history.push("/");
}
}, [name, history]);
return (
<div className="result">
<span className="title">Final Score : {score}</span>
<Button
variant="contained"
color="secondary"
size="large"
style={{ alignSelf: "center", marginTop: 20 }}
href="/"
>
Go to homepage
</Button>
</div>
);
};
export default Result;
0 notes
Text
To Better Understand React Router
As I worked through phase 2 at Flatiron school, studying React, I felt it helped me understand JavaScript better. I made my way through this phase and was able to comprehend more about it than I expected. I was able to complete my final project and do my final review. During this review I found out I knew less about React than I thought, and I am thankful that my reviewer was able to point this out to me. This way I could go back and learn what I need to, to be able to know how React really works. I struggled with describing what React Router is and how it works when I was asked. So I would like to discuss what I have learned and have this blog as a reference to look back on if a reminder is needed.
To start, I now know React Router is a client-side routing library, "...React are libraries with prewritten code snippets that we can use and reuse to build applications." - Khan, Shahzad, et al. So it is this prewritten code that you can use for routing to different components within your application. It is client-side because the client/user handles when and where the routing takes place. React Router actually contains components and hooks that do that job and that is the prewritten code. Both these components and hooks work with the components you have created in your code. How they do this is with conditional rendering components based on the URL. If the current URL matches with what your components path is then it will display it. Also, uses JavaScript for programmatic navigation, programmatic meaning, "of, relating to, resembling, or having a program" - Merriam-Webster. If there is a link clicked to a certain page, it then changes the URL for that page, and updates/displays that page without requesting for a new HTML document. Or, it can also change the URL, and display a new page without the user clicking on a link. As mentioned before, it manages all of these tasks and actions with the prewritten components and hooks. I will now discuss some and how they work.
You first need to have react-router-dom installed in order to use React Router. Then it must be imported like so:

BrowserRouter is a component and is also the base for your whole app's routing. Doing that declares how you will be using React Router. You would want to wrap this around your whole app component, so that it can contain all the other components and hooks. You could also just use Router instead of Browser Router to shorten it up.
Next, you have your Route and Switch component for handling routing to your components. Route is given a path attribute which is given a certain URL, and it says if the current URL matches the path render the child component, your component. You then want to wrap all of your Route components within your Switch component. This is because if not, any of the routes that match the current URL all will render. Switch says to only render the first Route that matches, so yes the order you put them in is important. If it was not used a good example of what could happen is it would always render a home page because its URL usually is similar to the other's. It is recommended to move that Home component to the bottom of the others. The Switch definitely gives more predictable behavior. To keep from also rendering components with URL partial matches you can give your Route component an attribute of exact. This will only render if the URL matches exactly with the path. Some of my code for example:
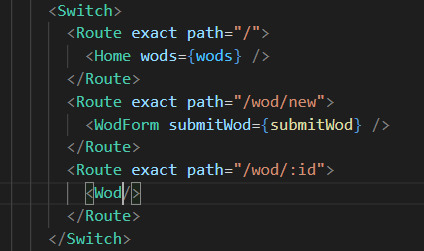
Using Link and NavLink components are what is going to make these Routes conditionally rendered. These both render a link or <a> to the DOM, when it is clicked, it changes the URL, re-renders Routes, and then displays the component whose path matches that new URL. Link is good for standard hyperlinks, where NavLink is better for a navigational bar. What makes it good for the bar is that you can add styling attributes to it. Like adding an active style to show which link is currently selected.
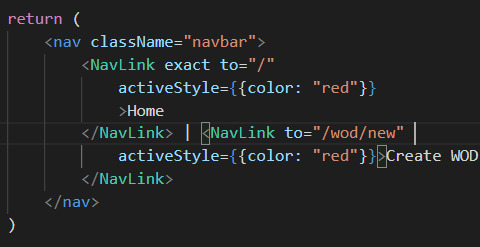
There is as well two hooks that can be used to get parts of a URL dynamically, the useRouteMatch and useParams hooks. This can be useful for when you have a component that gets rendered multiple time with different dynamic info. Or as well as nested information. For both hooks you want to create a variable; const match = useRouteMatch() and const params = useParams(). useRouteMatch returns an object with info about currently matched route and is good for nested info. useParams returns key/value pairs of the URL's parameters and is good for grabbing one specific component out of many. This is done usually by the components id. In my code below Wod stands for workout of the day. My Wod component gets rendered for each workout that comes from my JSON file. I used params to grab the to match the components path and single out specific workouts. So then it will only display that workout and the info that goes with it.
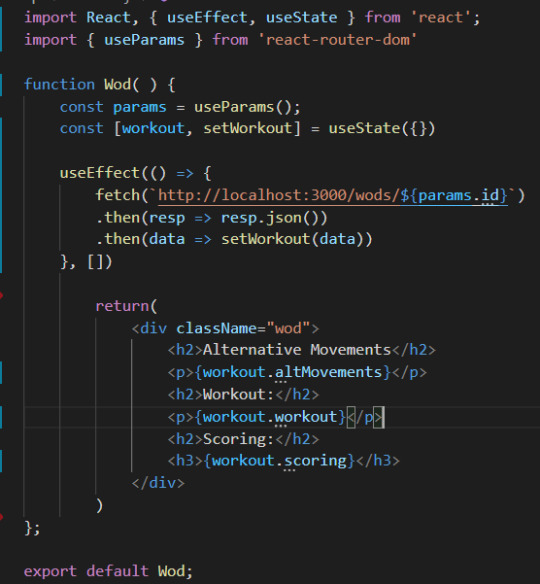
Finishing it off, we have a hook that can help give your app programmatic navigation. The hook is called useHistory and it can navigate the user to a new page based on any event that gets triggered, not just a click. For example, if the user logs out you can have it redirect them to the log in or home page. There is, as well, a component that is good for conditional rendering. The Redirect component does as it sounds, redirects the user to a new location. You can use this to redirect the user to the home page if a certain component is not found when an event is triggered, and other uses for it as well.
To conclude, having gone back and reading through lessons at Flatiron I know have a better understanding of React Router, and the hooks and components that make it up. I am thankful to my reviewer for assigning me to this, because now I feel more confident in using React. I also now know how to take better notes and plan to really make sure I understand all the material by the time of my next review. I hope this may help others if not just only me! Have fun coding all!
Sources:
“Programmatic.” Merriam-Webster.com Dictionary, Merriam-Webster, https://www.merriam-webster.com/dictionary/programmatic. Accessed 16 Sep. 2021.
Khan, Shahzad, et al. “What Is a JavaScript Library?” General Assembly Blog, General Assembly, 31 Mar. 2021, generalassemb.ly/blog/what-is-a-javascript-library/.
0 notes
Text
How to Create a Responsive Sidebar in React Using Bootstrap
Most of the websites are using sidebars nowadays. Sidebars are the website component shown to the left or right side of the website. They are used to display secondary information, navigation of websites, social media links and advertisements. This article is for you if you are entering in website development and want to create a website sidebar.
What Is React?
React is a free and open-source JavaScript library used to build the user interface, like using it for making a sidebar. Facebook developed it and released it in May 2013. React is a web platform, and it uses JavaScript.
Directly creating a sidebar from React will take more time but react has a JavaScript library called ‘’react-bootstrap’’. It has lots of components and styles that we will use to create a responsive sidebar.
What is ‘’react-bootstrap’’?
React-bootstrap is a bootstrap JavaScript made from scratch by React. React-bootstrap eliminates any dependency like jQuery. For years, it gradually became popular in making the UI foundation of any website. ‘’react-bootstrap’’ works with lots of bootstrap themes, making navbars, cards, layouts, and its React component model provides more control.
Before you start, you should know the following:
Basic Knowledge of React
NPM installed
Basic bootstrap Knowledge
NodeJS installed
Firstly, check that you have a node installed or not. You can check it by using this command: ‘’node -v. ‘’ If the Node is not installed, you can download it and install it. If you install Node, NPM also comes with it. You can check the NPM version by this command: ‘’npm –version’’.
Now, we have Node installed, and we can start to make a directory named ‘’sidebar’’ by using this command: ‘’npx create-react-app sidebar-app’’. You can use any name in place of the sidebar.
Installing Cdbreact
Now, we are installing CDBreact. CDBreact is a UI kit, and it has reusable components. It used to create websites and web apps.
To install CDBreact, enter the following command: ‘’npm install --save cdbreact’’.
Installing React router
We are installing react-router because a component of react-router, Navlink, will be needed for the sidebars.
Enter the following command to install react-router: ‘’npm install react-router-dom’’.
Now, you can check for any errors by running the command ‘’npm start’’.
‘’BrowserRouter’’ components will not work outside of react-router-dom to fold the app with ‘’BrowserRouter’’.
Creating a Sidebar
Now, we will create a file sidebar.js which will have a sidebar component. Now you have to import various sidebar components from cdbreact like CDBSidebarContent, CDBSidebarFooter, CDBSidebarHeader, CDBSidebarMenu, and CDBSidebarMenuItem.
We also have to import Navlink from React-router.
Now, let's make a sidebar header and footer, we will also add styles to components to look good.
Now, enter the text color, background color, padding pixels value according to your needs.
To add the body on the sidebar, enter the following in your code. Under CDBSidebarHeader you have to enter the following:

Now, let us import the sidebar into the app component.

Now, the sidebar is ready. You can see that your sidebar will have a dashboard, tables, profile page, analytics and 404 pages Or you can add home, about, my website, contacts, and blog. You can add anything you want, like You can put social media, advertisements, the live feed of content or any other content you want.
Conclusion
Creating sidebars on websites in react is simple with using react-bootstrap. You will not need jQuery. Before you start making sidebars, you must know React and bootstrap, NPM, and NodeJS installed. If you are still confused about adding a responsive sidebar or want to make a complete-featured website for your business, you can contact latitude technolabs; we have experts ready to help you.
0 notes