#reactjs ui
Explore tagged Tumblr posts
Visit Tumblr Blog
Explore Tumblr blogs with no restrictions, modern design and the best experience.
Last Seen Tumblr Blogs


Fun Fact
The Tumblr office adopted Tommy, an 11-year-old Pomeranian.
Text
JavaScript Fundamentals
I have recently completed a course that extensively covered the foundational principles of JavaScript, and I'm here to provide you with a concise overview. This post will enable you to grasp the fundamental concepts without the need to enroll in the course.
Prerequisites: Fundamental HTML Comprehension
Before delving into JavaScript, it is imperative to possess a basic understanding of HTML. Knowledge of CSS, while beneficial, is not mandatory, as it primarily pertains to the visual aspects of web pages.
Manipulating HTML Text with JavaScript
When it comes to modifying text using JavaScript, the innerHTML function is the go-to tool. Let's break down the process step by step:
Initiate the process by selecting the HTML element whose text you intend to modify. This selection can be accomplished by employing various DOM (Document Object Model) element selection methods offered by JavaScript ( I'll talk about them in a second )
Optionally, you can store the selected element in a variable (we'll get into variables shortly).
Employ the innerHTML function to substitute the existing text with your desired content.
Element Selection: IDs or Classes
You have the opportunity to enhance your element selection by assigning either an ID or a class:
Assigning an ID:
To uniquely identify an element, the .getElementById() function is your go-to choice. Here's an example in HTML and JavaScript:
HTML:
<button id="btnSearch">Search</button>
JavaScript:
document.getElementById("btnSearch").innerHTML = "Not working";
This code snippet will alter the text within the button from "Search" to "Not working."
Assigning a Class:
For broader selections of elements, you can assign a class and use the .querySelector() function. Keep in mind that this method can select multiple elements, in contrast to .getElementById(), which typically focuses on a single element and is more commonly used.
Variables
Let's keep it simple: What's a variable? Well, think of it as a container where you can put different things—these things could be numbers, words, characters, or even true/false values. These various types of stuff that you can store in a variable are called DATA TYPES.
Now, some programming languages are pretty strict about mentioning these data types. Take C and C++, for instance; they're what we call "Typed" languages, and they really care about knowing the data type.
But here's where JavaScript stands out: When you create a variable in JavaScript, you don't have to specify its data type or anything like that. JavaScript is pretty laid-back when it comes to data types.
So, how do you make a variable in JavaScript?
There are three main keywords you need to know: var, let, and const.
But if you're just starting out, here's what you need to know :
const: Use this when you want your variable to stay the same, not change. It's like a constant, as the name suggests.
var and let: These are the ones you use when you're planning to change the value stored in the variable as your program runs.
Note that var is rarely used nowadays
Check this out:
let Variable1 = 3; var Variable2 = "This is a string"; const Variable3 = true;
Notice how we can store all sorts of stuff without worrying about declaring their types in JavaScript. It's one of the reasons JavaScript is a popular choice for beginners.
Arrays
Arrays are a basically just a group of variables stored in one container ( A container is what ? a variable , So an array is also just a variable ) , now again since JavaScript is easy with datatypes it is not considered an error to store variables of different datatypeslet
for example :
myArray = [1 , 2, 4 , "Name"];
Objects in JavaScript
Objects play a significant role, especially in the world of OOP : object-oriented programming (which we'll talk about in another post). For now, let's focus on understanding what objects are and how they mirror real-world objects.
In our everyday world, objects possess characteristics or properties. Take a car, for instance; it boasts attributes like its color, speed rate, and make.
So, how do we represent a car in JavaScript? A regular variable won't quite cut it, and neither will an array. The answer lies in using an object.
const Car = { color: "red", speedRate: "200km", make: "Range Rover" };
In this example, we've encapsulated the car's properties within an object called Car. This structure is not only intuitive but also aligns with how real-world objects are conceptualized and represented in JavaScript.
Variable Scope
There are three variable scopes : global scope, local scope, and function scope. Let's break it down in plain terms.
Global Scope: Think of global scope as the wild west of variables. When you declare a variable here, it's like planting a flag that says, "I'm available everywhere in the code!" No need for any special enclosures or curly braces.
Local Scope: Picture local scope as a cozy room with its own rules. When you create a variable inside a pair of curly braces, like this:
//Not here { const Variable1 = true; //Variable1 can only be used here } //Neither here
Variable1 becomes a room-bound secret. You can't use it anywhere else in the code
Function Scope: When you declare a variable inside a function (don't worry, we'll cover functions soon), it's a member of an exclusive group. This means you can only name-drop it within that function. .
So, variable scope is all about where you place your variables and where they're allowed to be used.
Adding in user input
To capture user input in JavaScript, you can use various methods and techniques depending on the context, such as web forms, text fields, or command-line interfaces.We’ll only talk for now about HTML forms
HTML Forms:
You can create HTML forms using the <;form> element and capture user input using various input elements like text fields, radio buttons, checkboxes, and more.
JavaScript can then be used to access and process the user's input.
Functions in JavaScript
Think of a function as a helpful individual with a specific task. Whenever you need that task performed in your code, you simply call upon this capable "person" to get the job done.
Declaring a Function: Declaring a function is straightforward. You define it like this:
function functionName() { // The code that defines what the function does goes here }
Then, when you need the function to carry out its task, you call it by name:
functionName();
Using Functions in HTML: Functions are often used in HTML to handle events. But what exactly is an event? It's when a user interacts with something on a web page, like clicking a button, following a link, or interacting with an image.
Event Handling: JavaScript helps us determine what should happen when a user interacts with elements on a webpage. Here's how you might use it:
HTML:
<button onclick="FunctionName()" id="btnEvent">Click me</button>
JavaScript:
function FunctionName() { var toHandle = document.getElementById("btnEvent"); // Once I've identified my button, I can specify how to handle the click event here }
In this example, when the user clicks the "Click me" button, the JavaScript function FunctionName() is called, and you can specify how to handle that event within the function.
Arrow functions : is a type of functions that was introduced in ES6, you can read more about it in the link below
If Statements
These simple constructs come into play in your code, no matter how advanced your projects become.
If Statements Demystified: Let's break it down. "If" is precisely what it sounds like: if something holds true, then do something. You define a condition within parentheses, and if that condition evaluates to true, the code enclosed in curly braces executes.
If statements are your go-to tool for handling various scenarios, including error management, addressing specific cases, and more.
Writing an If Statement:
if (Variable === "help") { console.log("Send help"); // The console.log() function outputs information to the console }
In this example, if the condition inside the parentheses (in this case, checking if the Variable is equal to "help") is true, the code within the curly braces gets executed.
Else and Else If Statements
Else: When the "if" condition is not met, the "else" part kicks in. It serves as a safety net, ensuring your program doesn't break and allowing you to specify what should happen in such cases.
Else If: Now, what if you need to check for a particular condition within a series of possibilities? That's where "else if" steps in. It allows you to examine and handle specific cases that require unique treatment.
Styling Elements with JavaScript
This is the beginner-friendly approach to changing the style of elements in JavaScript. It involves selecting an element using its ID or class, then making use of the .style.property method to set the desired styling property.
Example:
Let's say you have an HTML button with the ID "myButton," and you want to change its background color to red using JavaScript. Here's how you can do it:
HTML: <button id="myButton">Click me</button>
JavaScript:
// Select the button element by its ID const buttonElement = document.getElementById("myButton"); // Change the background color property buttonElement.style.backgroundColor = "red";
In this example, we first select the button element by its ID using document.getElementById("myButton"). Then, we use .style.backgroundColor to set the background color property of the button to "red." This straightforward approach allows you to dynamically change the style of HTML elements using JavaScript.
#studyblr#code#codeblr#css#html#javascript#java development company#python#study#progblr#programming#studying#comp sci#web design#web developers#web development#website design#ui ux design#reactjs#webdev#website#tech
400 notes
·
View notes
Text
2 notes
·
View notes
Text
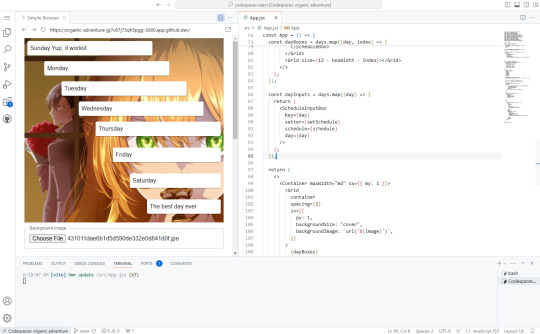
Progress! We got some basic stuff put together for layout and data entry, plus we learned how to load images client side in JS/MUI/React!
Frankly, this was an extremely productive 2.5h session. It's no "Code Bullet Makes a Game Clone in 60 minutes", but also the goal here wasn't speed, it was learning. And BOY did I get some of that done.
2 notes
·
View notes
Text
How can I control render blocking in an HTML and React.js application? Render blocking can significantly impact the performance of your HTML and React.js application, slowing down the initial load time and user experience. It occurs when the browser is prevented from rendering the page until certain resources, like scripts or stylesheets, are loaded and executed. To control render blocking, you can employ various techniques and optimizations. Let's explore some of them with code examples.
#libraries#web design#website#reactjs#web development#web developers#html css#ui ux design#tumblr ui#figma#blue archive#responsivedesign#responsive website#javascript#coding#developer#code#software#php script#php programming#phpdevelopment#software development#developers#php#php framework#jquery
17 notes
·
View notes
Text


2 notes
·
View notes
Text
3 notes
·
View notes
Text
NodePrix is a leading software development company offering top-notch services in web development, mobile app development, custom software solutions, and digital marketing. With expertise in technologies like Node.js, Python, React, and WordPress, we deliver innovative, scalable, and secure solutions to help businesses succeed globally. Partner with us for tailored digital growth!
#web design & development company#professional app development company#web development company in india#Laravel Development Services#Python development services#wordpress development services#reactjs development services#Flutter App Development Company#app development company#ui ux design development services#ui ux design company#custom software development services#best SEO company in india
0 notes
Text
ReactJS Development
React isn’t just a library - it’s a revolution. It powers platforms like Facebook, Airbnb, and Netflix — and it could be the foundation of your next big thing.
At Prishusoft, we build React-powered interfaces that are fast, flexible, and feel amazing to use. From single-page apps to complex frontends, React helps us deliver clean, scalable code that evolves with your business.
Want a UI that moves like magic and performs like a pro? React is the answer. We’ll show you why.
Explore how we build with ReactJS: https://www.prishusoft.com/reactjs-development

0 notes
Text
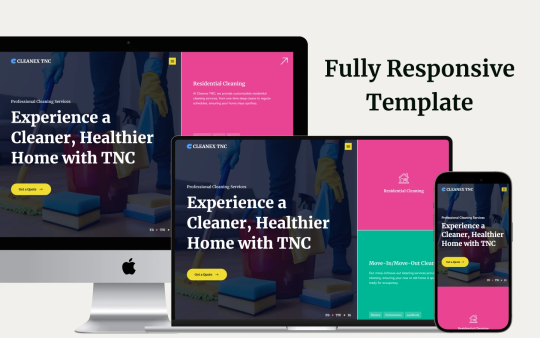
Revolutionizing Cleaning Business Webflow Websites with Cleanex TNC
In today's digital era, having an optimized and professional website is crucial for every business, especially in the cleaning service industry. Whether you are running a home cleaning service, commercial cleaning, or janitorial business, your website plays a vital role in attracting customers and establishing credibility. This is where Cleanex TNC comes in—a modern, highly customizable Webflow template designed specifically for cleaning businesses.

Why Choose Cleanex TNC?
A well-designed website should not only look aesthetically pleasing but also offer functionality, responsiveness, and seamless user experience. Cleanex TNC is a premium Webflow template that helps cleaning service providers establish a strong online presence without the need for extensive coding knowledge.
1. User-Friendly Design & Navigation
A clutter-free, easy-to-navigate website can make a significant difference in user retention and conversion rates. Cleanex TNC comes with a sleek, intuitive interface that ensures visitors can find the information they need with ease. The template is structured to guide potential clients through your services, pricing, and contact details effortlessly.
2. SEO-Optimized & Fast-Loading Pages
Speed and SEO play a crucial role in search engine rankings. Cleanex TNC is built with SEO best practices, ensuring that your site ranks higher on Google and attracts organic traffic. The optimized code and fast-loading pages enhance user experience and reduce bounce rates, which directly impacts conversions.
3. Mobile-Responsive & Cross-Browser Compatibility
In a mobile-first world, having a fully responsive website is non-negotiable. Cleanex TNC ensures a seamless browsing experience across all devices—whether it’s a smartphone, tablet, or desktop. Additionally, the template is compatible with all major browsers, ensuring consistent performance across different platforms.
4. Engaging & Customizable Sections
One of the key advantages of Cleanex TNC is its flexibility. The template offers various sections that can be easily customized to reflect your brand identity. You can modify:
Service Pages: Clearly outline your cleaning services, packages, and pricing.
Testimonial Sections: Showcase client feedback to build trust and credibility.
Call-to-Action (CTA) Buttons: Encourage visitors to request a quote or book a service instantly.
Gallery & Portfolio: Display before-and-after images to highlight the effectiveness of your services.
5. Built-in Contact & Booking Forms
Having an easy-to-use contact form is essential for customer engagement. Cleanex TNC includes an integrated booking system, allowing clients to schedule services directly from your website. This feature improves convenience and streamlines the booking process, enhancing customer satisfaction.
6. Blog & Content Marketing Ready
A blog section can help you engage your audience and improve your website’s SEO. With Cleanex TNC, you can share cleaning tips, industry news, and business updates to keep visitors informed and encourage repeat visits. Content marketing is a powerful tool for establishing your brand as an authority in the cleaning industry.
7. Conversion-Driven Design
From strategically placed CTA buttons to well-structured service pages, Cleanex TNC is designed to drive conversions. The professional layout and engaging visuals help build trust, ultimately increasing inquiries and bookings.
How to Get Started with Webflow Cleanex TNC?
Setting up your cleaning business website with Cleanex TNC is simple and hassle-free. Just follow these steps:
Purchase & Download: Get access to the template from the official Webflow marketplace.
Customize the Design: Modify colors, fonts, images, and content to align with your brand.
Add Your Services & Pricing: Clearly outline what you offer and at what cost.
Optimize for SEO: Ensure your site is optimized with relevant keywords and meta descriptions.
Launch & Promote: Publish your site and start marketing your services online.
Final Thoughts
A professional website is no longer a luxury but a necessity for cleaning businesses. Cleanex TNC simplifies the process of building a high-performing website that not only looks great but also drives customer engagement and conversions. If you’re looking for a ready-to-use Webflow template that meets all the industry standards, Cleanex TNC is the perfect choice. Get started today and elevate your cleaning business to new heights!
#web ui#uidesign#ui ux design#ui ux development services#web development#website#wordpress development#web developers#websitedevelopment#webflow#webflowtemplate#webflow development services#webflowdesign#coding#html#html css#javascript#reactjs#web developing company#cleaning services#cleaning business#house cleaning#home cleaning#cleaning tips#organization#cleaning technology#ui ux company#website design#website desing bd#website development
1 note
·
View note
Text
React Chip Component
0 notes
Text


react components i’ve made for the digital tavern
0 notes
Text
The Importance of Hands-On Projects in a Full Stack Developer Course
The journey to becoming a skilled full stack developer is exciting but demands a blend of theoretical understanding and practical application. This is where hands-on projects play a pivotal role in any Full Stack Developer Course. They not only solidify the concepts but also prepare students to tackle real-world challenges effectively. Let’s explore why practical projects are a game-changer in full stack development training.
Bridging the Gap Between Theory and Practice
A robust Full Stack Developer Course in Pune often covers an extensive curriculum, including front-end technologies like HTML, CSS, and React Js, as well as back-end frameworks like Node.js and databases such as MongoDB. However, understanding these topics in isolation is insufficient. Hands-on projects provide the opportunity to integrate these components into cohesive applications, mimicking real-world scenarios. For instance, while learning a React Js course in Pune, building an interactive UI fosters a deeper understanding of component structures and state management.
Boosting Problem-Solving Skills
Hands-on projects compel students to think critically and solve complex problems. In a classroom setting, concepts like API integration or database management might seem straightforward. However, applying these skills in a project reveals practical challenges that demand innovative solutions. For those enrolled in a UI UX Design Course in Pune, projects can also emphasize user-centric thinking, pushing learners to create designs that are both functional and aesthetically pleasing.
Creating a Strong Portfolio
Employers value practical experience over theoretical knowledge. Completing a Full Stack Developer Course in Pune with hands-on projects allows students to build a portfolio showcasing their expertise. Projects like developing e-commerce platforms, social media applications, or dynamic dashboards demonstrate versatility and technical proficiency. This portfolio can be a deciding factor in landing coveted roles in the tech industry.
Enhancing Collaboration and Teamwork
Many courses, such as those offered by Testing Shastra, encourage group projects to simulate real-world development environments. These projects teach students how to collaborate with team members, use version control systems like Git, and manage tasks effectively — skills that are essential for professional success.
Hands-On Projects in UI/UX Design
For those interested in a UI UX Design Course in Pune, practical projects are equally crucial. Creating prototypes, conducting user research, and testing designs help students understand the importance of user feedback and iterative improvement. These experiences align with industry expectations and prepare students for roles in UI/UX design.
Why Choose Testing Shastra?
If you’re looking for a comprehensive Full Stack Developer Course in Pune, Testing Shastra stands out as a trusted name. Their industry-aligned curriculum, expert mentors, and emphasis on hands-on learning make them a preferred choice. Whether it’s mastering React Js in Pune or excelling in UI UX Design, their practical approach ensures you’re job-ready upon course completion.
Key Highlights of Testing Shastra:
Experienced Instructors: Learn from professionals with real-world experience.
Comprehensive Curriculum: Covering full stack development, React Js, and UI/UX design.
Project-Based Learning: Gain practical exposure through diverse projects.
Career Support: Assistance with resume building, portfolio creation, and job placements.
Investing in hands-on projects during your learning journey not only boosts your confidence but also sets you apart in a competitive job market. With Testing Shastra’s guidance, you’ll be well-prepared to thrive as a full stack developer or UI/UX designer.
To know more about Testing Shastra,
Contact details,
Visit website: https://www.testingshastra.com/ Address: 1st floor Office №6&7 FTP №884/7, Bhalekar Chawl, Erandwane, Pune, Maharashtra 411004. Email: [email protected] Get directions:
0 notes
Text
How to install bootstrap in React.js? Installing Bootstrap in React.js: A Step-by-Step Guide.
Bootstrap is a popular CSS framework that provides a plethora of pre-designed components and styles to help developers create responsive and visually appealing web applications. Integrating Bootstrap with React.js can enhance your project's user interface and save you valuable development time. In this tutorial, we'll walk you through the process of installing Bootstrap in a React.js application.
#reactjs#bootstrap#javascript#developer#web development#web developers#web design#website#html#code#codeblr#coding#pythor p chumsworth#responsivedesign#tumblr ui#ui ux design#java development company#developers#software#python#sql
2 notes
·
View notes
Text
Leverage advanced ReactJS web development services to build dynamic, high-performance web applications tailored to your business needs. Our custom solutions empower businesses with scalable, efficient, and user-friendly interfaces designed to enhance user experiences and drive growth. With expertise in ReactJS, we deliver seamless integrations, robust architecture, and innovative features that align with your goals. Get in touch to transform your digital presence with solutions that set you apart in a competitive landscape.
#reactjs developers#react developer for hire#react development outsourcing#react js developers#react js developers for hire#react js developer#reactjs developer for hire#react js development company in india#reactjs development company india#reactjs developer#react developers#what is a react developer#react js ui developer#reactjs web development services
0 notes
Text
2 notes
·
View notes