#rectangle and cirlce
Explore tagged Tumblr posts
Visit Tumblr Blog
Explore Tumblr blogs with no restrictions, modern design and the best experience.
Last Seen Tumblr Blogs


Fun Fact
In 2020, 27% of US Tumblr users had an annual household income of over $100,000.
Text


#timsteph#dc#sketchy etchy etch#dooooodle#stephanie brown#tim drake#SPOILER#robin#i love their character designs#sun draws#its so ugly theyre so SCRUNKLY#rectangle and cirlce
18 notes
·
View notes
Text
does anyone remember this one brand of rice crackers? they're gluten free, thin cirlces, and had a vaguely cheese flavored white powder on them. the package was like oreos in the sense they were in a stiff plastic holding container wrapped in a plastic packaging(but the packages were more of a long rectangle i think). I believe the brand name was an asian sounding word, possibly starting with an O, an A, or an S, but I'm not sure. And the package was yellow with a picture of a kid that looked like this(i think the sun was stylized like that but i remember there being a sun):

I haven't seen them in like ten years, but i vividly remember the flavor and have been craving them recently
1 note
·
View note
Text
shapes that represent/connote emotions
(week 31/1/24- 7/2/24 T&T)

Shapes in graphic design trigger psychological responses in viewers, influencing their emotions, thoughts, and perceptions.
Understanding the meaning of different shapes helps designers evoke specific feelings and convey messages effectively.
Common shapes and their meanings:
Squares & Rectangles: Stability, reliability, security (can be seen as boring without careful use)
Triangles: Balance, stability, movement, direction (upward direction suggests progress)
Circles, Ovals & Ellipses: Unity, protection, friendliness, ease (commonly used for small icons)
Pentagons, Hexagons & Octagons: Complexity, organization (used in infographics and icons)
Abstract Shapes: Can represent anything and evoke various meanings by combining elements of other shapes
Successful designers consider factors like age, gender, culture, and preferences when choosing shapes to optimize their impact.
This was a useful resouce and line of research since I was able to look at different shapes and their meaning and how they can make people feel. This is exactly what im trying to achieve from the project, well at least be able to get people to see the connotation by seeing lots of elements that ammount to meaning a certain emotion.
I'm trying to create a simple system so having one basic shape and morphing it in some way may be easier. circles: they're friendly and neutral, safe, so the opposite of this is going inwards when using 3d shapes, so a hole/pit, sadness, alternatively, using a cirlce base cone (triangle) pointing down/ outwards in an agreessive way make this less progress and the opposite, agression, and abstract shapes can create unease when paired with colour.
0 notes
Link
0 notes
Note
hi there! i'm so sorry if you've been asked this already, but how do you make an icon template with those block quotes? i don't want anything fancy, just 3-4 lines of a solid color. can you show us how if you can? i wanna learn :( thank you! (i have photoshop)
hi there ! of course, it’s quite simple if you’ve learned the basics ( and from that point forward it’s also pretty easy to make something more fancy if you ever wanna switch it up. )
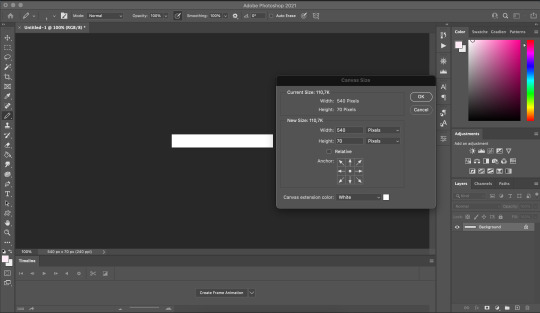
first off, we need our empty canvas. right now, i’ve prepared one with a size of 540x70px but you can honestly choose whatever sizes you like. just note that it’s easiest you keep the width at 540px because it’s the size of the images on the dash. you can still change it if you want, but your icons might not look like you want them too ― especially on mobile.
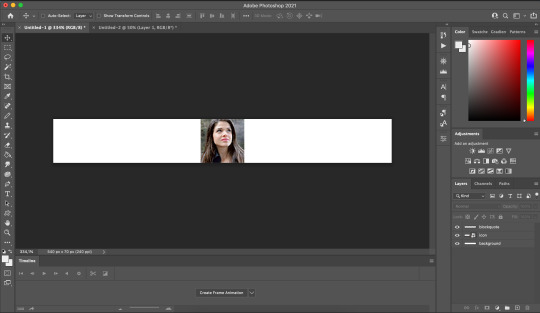
anyway, next i’m just gonna put an icon into it ( either pre-prepared with a coloring already applied to it or a base icons ). we don’t really have to do anything with it just yet, so you could also skip this step at first, but i like to put it there already to kinda get a better feel for the dimensions. it’s automatically gonna be put in the middle of the canvas so let’s just leave it here and move on to the next step that’s gonna be us making the actual blockquotes.
click on the little plus (+) icon in the down right corner to create a new layer. you can name it blockquotes or something similar if you want because that’s where we gonna put our blockquotes. you can either use the pencil or the rectangle tool ( again, it comes down to preference ) and make them whatever color you want. tip that if you want them to have the same color as the blockquotes tumblr uses, the hex code is #ededed.
while on the designated blockquote layer, just create a vertical line in the color of your choice. again it’s up to you how far away from the edge you wanna make it, if you want it to reach all the way down or whatever. it’s best to keep them at a width of 2px but if you want them bigger or smaller that works as well. repeat this step to make however many lines you need but keep the distance between each line the same so it won’t look too asymmetrical ... unless that’s what you’re going for.

we’re almost done, and the last thing to do is slide the icon to where you want it, resize it, make a border for it ― again, it’s your choice how much you wanna go out on this step. technically, we’re done yet and if you save your icon ( make the background layer invisible by clicking on the little eye icon in the layer menu and save it as a png for it to have no background ) it will look similar to this :

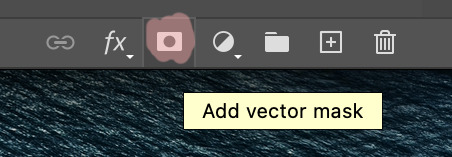
technically, that’s all we need to do right now but i’m also gonna show you how to make an easy to use template out of it which you can just pop multiple icons into. to do this, we’re gonna create a mask with the rectangular marquee tool. use this to select a rectangle the same size of your icon and create a group by clicking the little folder icon on the bottom right. make sure you’ve selected the new group and create a vector mask ( the rectangle icon with the cirlce in the middle. )
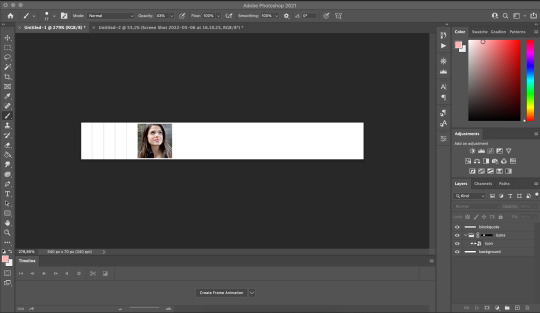
and with that we have our basic blockquote icon template. just save it and you can use it to make however many icon you like. i’m also gonna lead you to this tutorial i’ve made a while ago on how to make many icons all at once.
i hope this helps :)
#answered questions.#guide.#photoshop help#photoshop tutorial#rp help#rph#okay to reblog !#( as always : click on the picture to get better quality and see everything more easily )
133 notes
·
View notes
Text
Illustrator Character Tutorial
Reflect tool
joining anchor points
smart guides
broken handles
path finder tool to create 3d shapes from 2d shapes, and shading
Penguin (bought to in workbook form today by accesable recorded online tutorials and incredbile PRJ file saving of past Miriam. Woo!)

1. with eclipse tool selected, hold down SHIFT and draw a cirlce.
2. with select tool A selected, draw a rectangle over the lower section of your circle and hit CTRL/CMMND X to cut this section, and CTRL/CMMND V to paste it

Turn on smart guides by hitting CTRL/CMMND U this will help you easily align your half circles with each other.

now turn off smart guides again.
To select to end points together we can use two methods. 1. is to use A selection tool and draw a box 2. is to click one anchor point, hold SHIFT and click the other

Once selected, press CTRL/CMMND J and that will join them together.
DO this on both sides.

Press + which is your add anchor point tool and add a new anchor point onto the bottom right curve. With A selection tool, we can click and drag this new anchor point out to begin our tail.

Next we are going to ajust the anchor points and their handles to get a nice shape.
Select end anchor point to show handles. With the upper handle selected, hold down SHIFT to help move it to a perfectly verticle poisition, and snap that handle into the anchor point so that there is only a lower handle left.

Now clean up our curves by adjusting anchor point positions and handle lengths whilst holding down SHIFT (so that we stick to a verticle or horizontal direction)
From this

To this

Holding down SHIFT and C to use the anchor point tool we can add the top handle back into the tail end. This time instead of snapping it into the anchor point we will hold down OPTION/ALT (after first clicking V and tapping anywhere, and then A to select the anchor) and bring the handle down to a 90 degree angle to the lower one.

Add in three more anchor points using + tool onto the top right curve of your shape

V select and click anywhere, A select the middle of the three new anchor points and drag it out. THen holding OPTION/ALT you can ajust the handles on that, and the surrounding two anchor points to get this shape:

Back dwon on the tail, add in three more anchor points and drag out the middle one like so:

using OPTION/ALT to break handles, we can turn our end curves into points.
Adjust handles untill you hjave a nice shape. (In this case I ended up taking out the top added anchor point that i put in, and adjusting the handle on the original placed anchor that was above it to create the curve I wanted.
It’s best to take out any redundant anchor points.)

Now we have a slightly penguinish outline

SHIFT X swaps the fill and the stroke colours around (no stroke and black fill)
Draw a beak with the pen tool
Draw an eye with the eclipse tool.
if you hold SPACE while dragging out your eclipse tool, you can reposition your circle before you commit to placing it down.
Hold down OPTION/ALT and click and drag the eye to make a duplicate. Let go of your click first.

Now for the foot.
Just like you did in sdtep one, create an eclipse, (this time with a stroke and no fill) ,
A select the bottom half, CTRL/CMMND X cut, and CTRL/CMMND V paste

CMMND/CTRL U to turn on smart guides and allighn, select both ends and join like before also:

Drag her down. Now she’s a leg

Click and drag Pen tool holding down SHIFT to create handles, and draw this shape, making sure you have your smart guides on so that your first and last anchor point are runniong the same horizontal

ajust if you want..
V select, and click O for reflect tool. click once in the bottom left anchor point to place the reflect guide (thats the little blue guy bellow)

Holding down OPTION/ALT tap once on the anchor point on the other side and this will duplicate and reflectso you have a whole foot. Now it’ll be fairly obvious if your shape is shit.

With A select tool, highlight and join your unjoined anchor points by hitting CMMND/CTRL J

squash its and move over to leg

3 notes
·
View notes
Photo


S & M
*~Supplies Needed~*
Tube of choice i am using the art of Danny Lee you can buy Here
(Please do not use this tube without a license to do so!!!)
Scrap Kit used "Black Heart" By Toxic Desirez you can find her kits Here
Template 179 By Kristin Here
Mask of choice i used mask by Kristin Here
*~Filter Used~* Xero Unplugged X EyeCandy4000 *~Font Used~* 48ver lost Let us Start! Open up the template shift + d to duplicate it and close out the original. Start at bottom with top black square mark and open paper 10 and paste as a new layer. Then move up to bottom black square mark and open paper 10 and paste as a new layer. Go to rectangle mark and open paper 9 and paste as a new layer. Move up to top red circle mark and open paper 16 and paste as a new layer. Then go to Xero - Fritillary With these settings: 5 - 30 - 10 - 0 Now bottom red circle mark and open paper 16 and paste as a new layer. Then go to Xero - Fritillary With these settings: 5 - 30 - 10 - 0 On to top round rectangle mark and open paper 7 and paste as a new layer.. Then to bottom round rectangle mark and open paper 7 and paste as a new layer. Go to circle mark and go to xero - frtillary With these settings: 5 - 30 - 10 - 0 Choose a lyric you like and that fits the tube and paste it into cirlce layer. Elements: Now open frame 2 and paste as a new layer. Open collar resize 40% and paste were you want it. Open butterfly resize to 30% and paste were you like it. Open flower 1 resize to 30% and paste it were you want it. Open sparkles and paste it as a new layer on bottom round rectangle. Open frame 1 and paste as a new layer on top of bottom round rectangle. Open a new canvas 750 X 650 and flood fill with black and add mask of choice. Now add tube of choice,signature and copyright!
#danny lee#s & m#rihanna lyrics#psp tag#psp tags#pspfun#paintshopfun#tutorial#psp tutorial#my tutorials#tag tutorial#tag show off
1 note
·
View note
Text
Hướng dẫn tải và cài đặt AutoCAD 2019 32/64bit full crack 2022

Có gì tốt trong chức năng của autocad 2019 này ? Thay đổi kết quả và thay đổi 4k Autocad 2019 quyết định tỉ mẫn cập nhật kết quả toàn bộ với hình ảnh 2d. Thêm nữa các chức năng như thu phóng / pan, sắp xếp vẽ, lớp ... đã được cải tạo lên. Biểu tượng của autocad đã khiến khách hàng bất thần về sự trợ giúp của chúng đối với màn hình độ phân giải màn hình cao 4k, cũng là các tab / biểu trưng ribbon, thanh điều kiện, hơn 5000 biểu trưng không giống nhau trong autocad 2019 đều được đổi mới 4k – đây còn là những gì autodesk phỏng đoán được sự phổ quát của chúng trong lĩnh vực công nghiệp. Lượt xem và lượt xem Chế độ xem được lấy tên trong bản vẽ và ngày nay bạn đã có khả năng xem từ bất cứ chế độ xem đó. Bằng cách này bạn hãy dựa theo kích cỡ giấy của tab bố cục đang sử dụng để dự báo cho tỉ lệ khung nhìn một giải pháp tối ưu. Autocad 2019 đã thay đổi chế độ xem mới, chuyện này thực sự cần kíp để căn chỉnh kích cỡ, làm đổi thay tỉ lệ của chế độ xem đơn giản hơn. Web autocad Năm vừa qua, quãng thời gian autocad 2018 chào đời và đơn vị sản xuất nói vô số về chuyện hiện đại hóa autocad web. Cho đến khi autocad 2019 được gợi mở ra sự mới mẻ nổi bật cho các trình tự việc mới 100%. Chính xu hướng autocad web đã xây dựng một nền tảng cho nhiều thứ tốt hơn thế. Cái quan trọng của autocad web là vì sự phân phối bởi chuỗi máy vi tính để bàn, nó là bản máy vi tính chạy trong trình duyệt web của autocad. độ xuất sắc của autocad web vượt ngoài tầm chờ đợi của bạn : dùng cụm mây sửa đổi, hợp tác các tài liệu tham khảo ngoài hay giao tiếp với các thuộc tính đối Tượng, kể cả là vẽ phác thảo bằng object snaps và object snap giám soát ...hãy gọi đây chính là sự tham vọng của autocad lúc xây dựng một bản máy vi tính để bàn chạy trong trình duyệt web. Không hoàn chỉnh các lệnh như bạn đã thấy trong windows tuy nhiên autocad 2019 cũng đang nỗ lực để chỉnh trang các lệnh ưu việt nhất, và bạn cũng sẽ thấy nó chạy ổn định không thua gì các lệnh bạn đã thử làm việc trong windows. Thử xem nào ! chúng ta sở hữu rất nhiều các lệnh trên app web autocad : arc, polyline, điền, phát triển, trim, công cụ, hàng , sao chép, bù cho, revcloud ( cụm mây sửa đổi ) , kích cỡ, mtext, định lượng, rectangle, cirlce, mleader ( nhiều thủ lãnh ) , quay. Autodesk đã đánh dấu sự thay đổi thời gian tới cho sự biến chuyển autocad web, chúng ta sẻ không nhận thấy tẻ nhàm tí nào đâu.
0 notes
Text
How to Hand
A lot of people ask me how I make my hands, and thus the need for this tutorial arises!
(note, this comes from lots of research, other tutorials, and looking at my own hands)
1:Get your base down, which for the purpose of this tutorial is in orange and is a basic rectangleish shape.

2: See those cirlces and that triangle? That’s where your fingers and thumb go. Let’s go ahead and first define the knuckles and go ahead with the thumb (because it’s easy)

3: Now to add the fingers! Remember that each finger has three parts and thus (depending on how skinny your hands are) need definition. For the sake of this tutorial I am drawing my own hand and so my fingers are kinda spindly.

Looks kinda weird and crooked? That’s perfect, because no hand is going to be perfect like in anime or whatever. Now let’s try a side angle!
1: Remember the weird rectangle? That’s actually a 3d shape and should be treated as such. Your hands curve and bend depending on what their doing, so remember to translate that in your base.

2: Add your fingers! Remember that all of these things are 3d and if they look too close together, they probably are.

It’s all about trial and error. Something not looking right? Maybe try a different angle or maybe reposition your fingers!
418 notes
·
View notes
Photo

Sadly Daily CSS Images has now closed down, the programmer running it has deemed it too costly, and has shut dow the website, which is a huge shame as I feel I was learning so much there.
Luckily lots of the images are still online, so with a bit of digging, I can track down the prompts and continue.
And so this week was Food Week. I recently went home and saw some of the toys that my step-sister is into, including a lot of little collectable foods with cute faces, so I’ve tried to emulate that, for the first two at least. I also discovered a website of CSS patterns which can be edited and set as div backgrounds, so they have featured this week.
Also I’d been learning a bit of jQuery and added that once or twice.

Day 11: Pizza - https://codepen.io/alittleredpanda/pen/prWdyq
This may or may not have been heavily influence by a certain children’s collectable. The bun was made by an egg shape (which I use quite a lot for roundish shapes) and the cheese and sauce were made from a semi-circle, and border-edges and circles to make the wavy edge. The peppers and pineapple are also border-edges, and the basil leaves are squished crcles. If you prefer a meat topping, click the cheese to change it.

Day 12: Burger - https://codepen.io/alittleredpanda/pen/prdPad
This was quite fun to work out, as it was made of lots of different parts. The bun was made with my favourite egg shape again, and the lettuce was done like the cheese in the pizza bun. The tomatoes are all ovals with shadows to give them depth. The cheese was bits of border-edge pieced together to make the right shape. And the burger was a rectangle with a curved edge.

Day 13: Taco - https://codepen.io/alittleredpanda/pen/PKOxRO
I wasn’t really sure where to go with this one, as it involves a lot of organic, bumpy shapes. In the end I went for a turtle, with a semi-circle shell. The lettuce is just a few circles, the tomatoes are circles with a darker edge and the face is a cirlce, with one pointed edge.

Day 14: Cheesecake - https://codepen.io/alittleredpanda/pen/dzmzER
The cake part of this was very simple. It’s two rectangles with a curved top and bottom, placed on top of each other, with an oval on top to simulate a 3D shape. The drips are each rectangles with curved edges, with border-edges between them for the curves. They are animated to drip at different rates, which looks pretty cool. The cream on top is an oval with two border-edges arranged on top. It took far too long to organise it properly and make it look nice. I’ve since thought of a better way to do it, but I’m not going to mess with it just yet.

Day 15: Pie - https://codepen.io/alittleredpanda/pen/RZyPpM
I wanted to try and make something a little more interesting than just a basic pie, and found an image of a lovely fruit pie with an interesting crust on top. I had to arrange the stripes so that it looks like they’re crossing over each other, and added another ring around the edge to cut them all off, giving a neat edge.
#daily css images#dailycssimages#food#cutefood#css#web dev#web design#jquery#learning#learning programming
0 notes
Text
Dive If YOU Care To DARE, Water’s DEEP, I’ll Just Leave It THERE.
On an #island of my own, I'll tell you how it goes, Tryina stay afloat but my ranger always grows like creative little toes that don't look like toes but macaroni friends Ike Gulligan I had to you know with island is la-la-la-la-land.
Land, #land land, La, La, #La La-lling into land land landing on YOUR aroused erected stem, breathe fast, shores crash, waves Chardonnay and chandelier splash play out our oxygen in evaporated #invisible squirts YOU never knew YOU thought YOU breathe, on an island of my own once again, come again don’t give a fuck about anything but the shit that fills my enlightened grumbling roaring sing for your survival songs seduce sweet salty shards of splash cannonball in and NEVER look back, no regrets was tattooed in cursive on YOUR ass the day you became a pirate with that ass, wear that ass babe wear that ass show some skin sweat those glands work our eyes and wear your eye patch, have one bum blast bare hanging lactate your boobs loose to tease the care I obsessively abuse to care and to spoil deeply down feel The YOU I’ll only ever meet unique like my God who made this world with oil for that please please please me please Off to get splooshed and splashed on, played with by an artists hands fingers molded passion crafted to the bone feeling your skins clay for its own improvising the creation of energy flow emptying a heavy heavy glow gravity got to mold the feelings you Bloom, get nuder under fast fast fast fast fast, last shit stranded lost landed on an island of my own, ima turn this place to gold, eclectic funk Loving deep funking #treasure Gold thank quality God for YOUR charm and bold Greatness YOU ARE soooo Yo I can’t come up with anything that fits the description GOD don’t fit & fit cause HE’S so damn great & magnificence’s MAGNIFICENCE is shy of it’s thread so we’ll sew OUR see’s it back togethers when we locate our heads and eyes & lids to blink the tops of jars forever falling fell off into #HEAVENS Catch 22 Infinite cliff when we read OUR Heads & Hearts so well we combined our intention gifts to choose the righteous path of God of Love to only ever create and give, eradicating hate and evil and ALL the stuff that is bad in this crazy trip, trip, trip up the dip trip more often don’t dare fib just be honest theres nothing wrong with the beauty of YOUR innocent beautiful #souls delight and desires, indulge my friend YOU are magnificent and the only reason God made for Himself, to be magnificent indulge and praise HIM, get high act right like a conscious gentlemen, be kind, giving in time money heart mind and benevolence, get high don’t act a fool be yourself and shine sun shine cause in the well you hold down deep inside where the passage of the road the wHOLE tunnels flooding dives through the channels of your throat and the the tongue that YOU divide when YOU’RE playing having fun with your perfect romantices oopposite circle ying-yang-young-masculine-feminime-cirlce-triangle-square-rectangle the energy through the well that bellows your thoughts echo’s speak of only good never bad of others you know or don’t know you know now you know so you responsible brother float, you got the boat and the water and the coat to cover you well when you get a little cold so don’t get too comfortable, don’t get too comfortable, don’t ever get too comfortable, cause the only way to grow is out of YOUR comfort zone, stay horny and thirsty and wide and passionate never let die, the fire that thunders the sounds of inside the tunnels of the channels change flooding filled up slide squirting still bursting its lies and sides that matter matter fill matter matter matter sighed matter doesn’t matter matter matter anyway matter what does matter matter matter matter way, way, way , way, way ,way ,way, way down the well well well wise wild awesome wishing well, I throw my coins down and my spells, swallow my words and all my felts and sounds and singing melody friends that come out of inside my chest to be my friend and say “Hello, Salo, Soul, Sounds Magnificent” then the splash of downing circles goes back down tubes that fed the full whack tunnel of hope that light teases above it, taunting it taunting it, pointing at it and tasting it’s ignorance, oh if only they’d open up their minds and hearts and saw to believe what they’d never believe to see then maybe we can start to accept individuality and try to connect the nonsese we all spend our minds trying to bend the shit that is pretend is not pretend in the end in the end reality is not YOUR friend fantasy is the infinite delicious luscious WH 0 LE. Splash #Salo #Splash #For #Me
Take #a #Dip #and #Splash #For #Me
PLEASE 🍦🌊🥐🍾🍸⛵️⚓️ HERE THERE there here hear hear.
0 notes
Photo


Trick or treat
*~Supplies Needed~*
Tube of choice i am using the art of Elias Chatzoudis you can buy Here
(Please do not use this tube without a license to do so!!!)
Scrap Kit used "Trick or treats" By Bibi you can find the kit Here
Template Halloween template 7 By Kristin Here
*~Filter Used~* Xero-Unplugged XEyeCandy4000
*~Font Used~* Andyfish
Let us Start!
Open up the template shift + d to duplicate it and close out the original.Remove circle 1 layer. Make circle right active and open paper 4 and paste as a new layer.
Then go to vanderlee-unplugged x- interlace with these settings: 1-50-50-1-0-50 Make circle left active and open paper 4 and paste as a new layer.Then go to vanderlee-unplugged x- interlace with these settings: 1-50-50-1-0-50 Make left square active and choose a pink from paper 4 flood fill with it.Then go to Xero- Fritillary with these settings: 5-30-25-35 Make right square active choose a pink from paper 4 flood fill with it.Then go to Xero- Fritillary with these settings: 5-30-25-35 Make cirlce 2 active and choose a blue color from paper 4 and flood fill with it. Make rectangle active and flood fill with purple color from paper 4.
Then go to Xero- Fritillary with these settings: 5-30-25-35 Now make pixel words layer active and make text black. Then make dotted circle 2 active and make it black as well.
Open tube of choice and paste it as a new layer on to circle 2.
Open element 7 and paste it as a new layer on dotted circle layer.
Open element 74 and paste on to both circle right and left.
Open element 11 and paste it on both sides of the tube.
Open element 26 and paste it of top of left and right squares.
Open element 6 resize to 77% and paste as a new layer on top of the tubes waist.
Open element 54 and paste as a new layer on top of rectangle.
Open element 70 and paste on to rectangle on both sides of the tube.
Open element 72 and paste it on top of rectangle and duplicate and mirror it.
Now add copyright and signature and we are done
#elias chatzoudis#halloween#trick or treat#tutorial#psp tutorial#tag tutorial#my tags#psp tag#psp tags#pspfun#paintshopfun#tag show off
1 note
·
View note