#rp tutorials
Explore tagged Tumblr posts
Visit Tumblr Blog
Explore Tumblr blogs with no restrictions, modern design and the best experience.
Last Seen Tumblr Blogs


Fun Fact
Tumblr was attacked by a cross-site scripting worm deployed by the Internet troll group GNAA on Dec 3, 2012.
Note
¿oodrías hacer un tutorial de cómo difuminar el marco de las fotos tipo así, por favor?

holii, ahí te grabe uno. no se si me explique bien, pero de esa manera es muy fácil para mi. solo le pones filtros a una foto de color, los que le puse son para difuminarlos (depende del gusto de cada uno de como ajustarlos) luego le pones la foto arriba y con la flechita de al lado del candado la superpones y ya esta.
(ignoren lo de capcut 💔💔)
si no quieres que la foto quede tan visible, por así decirlo, le bajas la opacidad (lo marcado en rojo)

espero que te sea de ayuda. cualquier duda que tengas, puedes escribirme por aquí o por mi ig 👊🏻!!
#fakeland#rp moodboard#tropical moodboard#kpop moodboard#tropical#kpop#moodboard#random moodboard#argentina#brasil#my edit#photo edit#editblr#edit#short bios#kpop bios#messy bios#messy icons#messy layouts#messy moodboard#instagram#tutorial
297 notes
·
View notes
Text

𝐌𝐈𝐋𝐀𝐍𝐎𝐓𝐄 𝐓𝐔𝐓𝐎𝐑𝐈𝐀𝐋 ( estimated set up time: 10-20 mins )
For all you visual-based roleplayers out there, I just have to share this amazing "idea board" site I found Milanote! this is a tutorial so you can make something similar to the video above! It’s perfect for organizing your character ideas, worldbuilding, or even plotting out entire storylines. I can see it as a potential replacement for a minimalist based carrd! Here’s the Milanote website to check out, and here’s an example of a live board to give you a feel for how it works. please like or reblog if this helped you!
( 1 ) Sign Up or Log In
Visit app.milanote.com.
If you’re new, click “Sign Up” to create a free account.
( 2 ) Create a New Board
Once logged in, you’ll see the Dashboard.
Click on the ���+ New Board” button to start a new project.
( 3 ) Add Content to Your Board
Add Notes: Drag the Note icon from the toolbar or double-click anywhere on the board to write ideas or plans.
Add Images: Drag images from your computer or click Upload Files to bring visuals into your board.
Add Links: Paste a URL directly, or use the Link option to organize references.
Organize with Columns: Use columns to categorize content
Create Checklists: Add checklists to track tasks or progress.
( 4 ) Organize and Style
Drag and Drop: Move items freely to arrange them however you like.
Connect Items: Use arrows to link related elements for better visualization.
Color Coding: Use colors to highlight or differentiate ideas and sections.
( 5 ) Collaborate
Click “Share” at the top-right corner to invite collaborators.
Assign tasks, add comments, and share feedback in real time.
231 notes
·
View notes
Note
Hola, quería preguntarte si sabes hacer links para ig de este estilo: http://creep!ng_0nly**4~you((darl!ng. y en caso de que sí, si podías hacer tuto 🥺 por favor.
holis!! aquí hice un tuto super rapidito en video :3
igual lo explico x aquí :3
primero tienes que tener la frasesita para tu link ya lista, la escribes jugando con las letras, números y símbolos para que se vea bien y hasta que te guste, luego para terminar el link solo debes de poner el puntito al final del link, le das a listo y tu link ya quedó.
(acabo de cachar que me equivoqué escribiendo y puse 3e siendo q solo era el tres jwbwjbfkwb pero se entiende igual, eso no afecta en na al link solo q quedas como tonoto)

‼️tengo entendido que los links de este estilo pueden hacerse directo en ig solo en iphone y si es que tienes android puedes hacerlo en unicode TT, si es que tienes android xfis avísame y yo no tengo ningún problema en explicarte mejor como hacerlo en android 😭
178 notes
·
View notes
Text
MY GO-TO'S FOR EDITING.
I’ve decided to put together a masterlist of the resources I use, since I get asked about them pretty often. If you're somebody who can’t commission resource makers or you’re just wanting to get into editing or creating commissions yourself, I hope this helps.
pinterest. IMPORTANT NOTICE IF YOU UTILIZE THIS: avoid usings people's art; if you can get permission from an artist to use a piece, that's another discussion. Be warned there may also be ai mixed in, which I've personally got a good eye for spotting; i prefer to go by images i've seen long before the ai craze, since i've been on there for a while. your best bet is looking through miscellenous character boards. From there, you can choose images to blend or even make pngs out of, to give unique flare to your edits.
remove.bg + photokit. if you're looking to save time or don't have a way to cutout images manually ( i sometimes like to use my art tablet if I want to be really precise ), these are good ways to make pngs out of images you find, as opposed to png sites. i prefer this because ive caught adware on png sites before, plus there's also a lot of ai on those as well.
for screencaps, i use google images or youtube, since the quality is higher than anything on pinterest...though, psds are what normally cover up quality issues, from what i've learned. then again, it might depend on the psd. IMPORTANT NOTE IF YOU UTILIZE THIS: If you’re using google Images, searching for actual screencaps might lead you to blogs or websites dedicated to capping—many of which ask for credit if you use their content. Also, avoid reposting people's edits or gifs, since those will inevitably show up when searching faceclaim names and similar tags. on the off chance you find free-to-use faceclaim content, be sure to credit if/when asked !
photopea. it's a great alternative for those of us who can't be assed to learn adope, nor can afford it .
I know it doesn't look like much, but this is genuinely my go-to formula. I don't think there's any need for anything over the top. That said, if you guys have better alternatives or anything to add, feel free—this is just based on my own experience.
ADDITIONAL EDITING TIPS: If you find yourself stumped creatively or unsure how to approach using these, I’d recommend breaking down the character or setting you’re working with in terms of aesthetic. What are some keywords or imagery you associate with that muse ? Take a character like h/arry p/otter, for example—focus on individual visuals, important symbols, and signature colors. For him, I’d think of round glasses, lightning bolts, owls, candles, spell books, brooms, etc. Then, take each of those elements and explore them individually. I’d maybe start by looking up “owls” on Pinterest; from there, I might find images that can be turned into pngs. Repeat that process with every vibe or detail that comes to mind. You don’t have to limit yourself to making pngs either—feel free to experiment by blending different images together and building a look from there.
ADDITIONAL UPDATES/RECOMMENDATIONS:
Screencapped ( * will need an account )
VLC Media Player ( * good for screencaps / things you've downloaded from youtube )
#re: editing resources#free to reblog!#for the other anon i got#roleplay help#roleplay resources#roleplay community#rp graphics#rp resources#editing resources#editing tutorial#ish
81 notes
·
View notes
Text
𝐠𝐢𝐟 𝐦𝐚𝐤𝐢𝐧𝐠 𝐭𝐮𝐭𝐨𝐫𝐢𝐚𝐥 by nami ♡
i know that there is a loooot of gif making tutorials on this website but i want to share my way of doing my packs! for this tutorial you'll need basic photoshop cs6 knowledge and a lot of patience lol. this tutorial is very simple and fast, but my inbox and messages are open to any questions. if this post helped you, please please reblog!!
what you will need:
y2meta: youtube download site.
mkvdrama: for dramas.
obs studio: if you need to screenrecord.
potplayer: video player.
gif making action by me: it will help you save a lot of time.
ㅤㅤㅤㅤㅤㅤ
ㅤㅤㅤㅤㅤㅤ𝗦𝗧𝗘𝗣 𝟭.𝟬: configuration stuff (the boring step)
after downloading potplayer, you will open your video of choice and hold ctrl+g, it will open something like this.
make sure the format is jpeg (you can choose png too, but it will take more time to capture the frames)
for the frames, you can choose how many frames you want to capture. i let it capture until i manually stop, so it's 99.999. but you can put 60, 80, etc.
for the image size, let it be the original size.
ㅤㅤㅤㅤㅤㅤ
ㅤㅤㅤㅤㅤㅤ𝗦𝗧𝗘𝗣 𝟭.𝟭: the capture folder.
for this next step, you click the configure folder option:
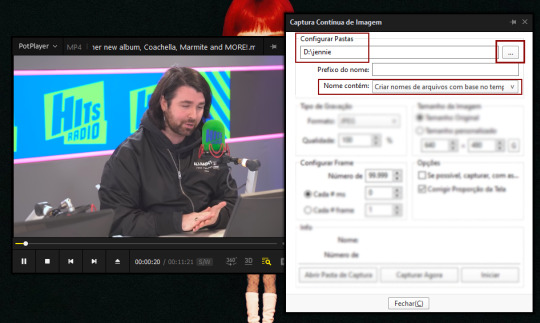
create a new folder and select it. the images you capture will apear on that folder.

ㅤㅤㅤㅤㅤㅤ
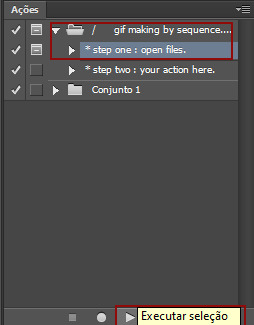
ㅤㅤㅤㅤㅤㅤ𝗦𝗧𝗘𝗣 𝟭.𝟮: photoshop !
after dowloading my gif making action, open your photoshop and open the action. it will look like this:
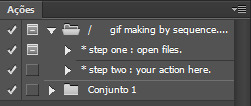
you can download any free sharpening action and put it on the step two option!
ㅤㅤㅤㅤㅤㅤ
ㅤㅤㅤㅤㅤㅤ𝗦𝗧𝗘𝗣 𝟮.𝟬: capturing the frames!
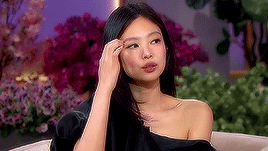
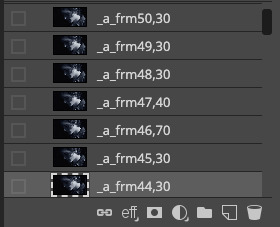
after doing all of that, let's get to work! first, open your video of choice. mine is an interview of jennie, as you can see. after that, select the part of the video you want to capture and hold ctrl+g. once you're ready to capture the frames, click start.

i clicked start, let the video play and clicked stop when i wanted to stop. usually i do this basing on whos on the screen: for this example, i click start when jennie is talking and stopping once the interviewer appear.
after that, open you capture folder, it will look like this:
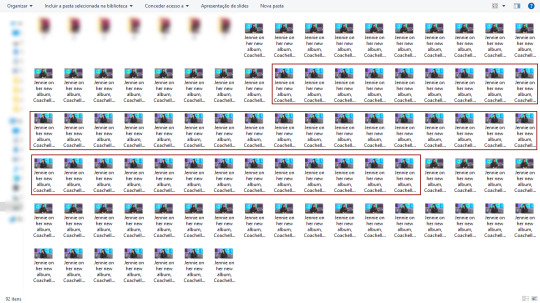
as you can see, it starts with the interviewer and ends with the interviewer so i don't miss any frames! jennie's frames are inside the red rectangle!
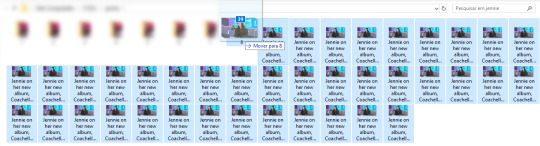
now you just delete the interviewer frames, select all of jennie's frames and move to another folder inside our capture folder, like this:
ㅤㅤㅤㅤㅤㅤ
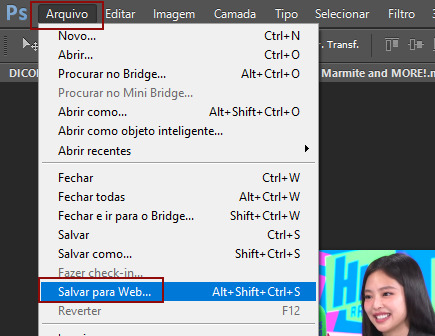
ㅤㅤㅤㅤㅤㅤ𝗦𝗧𝗘𝗣 𝟯.𝟬: photoshop timeeeee.
open your photoshop and click the step one of my action,
this will pop on your screen:
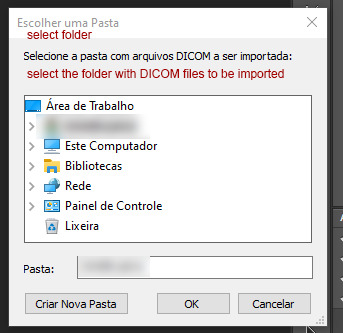
now you will open your capture folder, mine looks like this:

now you click OK and let photoshop do his work. once it's done, this is what you're going to work with:

now, for the fun part! adjust your gif to your liking and press play to check if everything's ok. make sure you click that chain thingy up there so your image doesn't get weird angles.
this is how my gif is looking like until now:

pretty, right? NO! lets sharpen and edit!!!!!!!
ㅤㅤㅤㅤㅤㅤ
ㅤㅤㅤㅤㅤㅤ𝗦𝗧𝗘𝗣 𝟰.𝟬: THE OTHER FUN PART!!! COLORING!!!
first, choose your gif action of liking and apply it to the gif. i'll be using mine! this is what it looks like with sharpening only:

it's getting better... BUT LET'S COLOR IT!
usually i do curves > vibrancy > color balance if needed. it looks like this:

i normally like more natural and vibrant colors to my gifs, so this is perfect for me! all done :]
ㅤㅤㅤㅤㅤㅤ
ㅤㅤㅤㅤㅤㅤ𝗦𝗧𝗘𝗣 𝟱.𝟬: saving for web.
after that sharpening and editing, follow these steps:
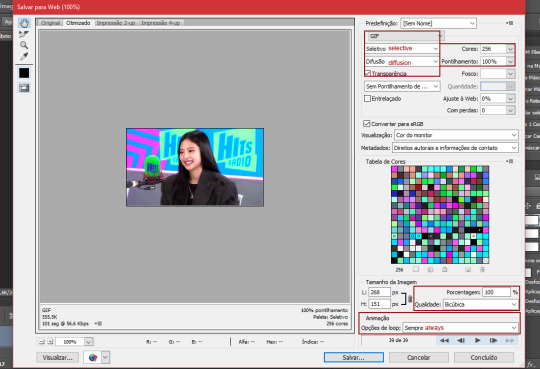
set your configs like mine (if you want to, this is up to you!) and set the loop to always. after that, just save to your gif folder and its done!
this is how my gif looks:

ㅤㅤㅤㅤㅤㅤthat's it! a tutorial that nobody asked but i wanted to make! feel free to ask me any questions you have!
ㅤㅤㅤㅤㅤㅤmeus brs, as fotos estão todas em português e o google tradutor pode ajudar vocês, mas se mesmo assim vocês tiverem alguma dúvida, me chamem!
love y'all. ♡
#rp help#rp h#rph#rp br#gif making tutorial#gif tutorial#mine by taylor swift#ive been wanting to do this for so long lol
57 notes
·
View notes
Text
*✶ please please please

a template by cozysip.
by clicking in the source link you’ll find 02 different dash icon templates made by me from scratch. credit is not needed , but do not claim as your own ! if you enjoy this or you use it, please reblog or like this post . thank you !
#01. PSD TEMPLATES : mine.#template#free template#rp template#psd template#free psd#dash icon#dash icons#dash icons template#icon template#icon psd#psd#rpc#rph#graphic tutorial#free graphics
279 notes
·
View notes
Note

"More mini-me's?"
>[Chance chuckles, taking one of the stickers and sticking them on the plushie he had previously gotten.]
"Are these some sort of merchandise based on me or something?"
#((ooc: i need a tutorial drop rn :0#gamble.with.our.time🕶️#signed.letters✉️#forsaken#forsaken au#forsaken roblox#forsaken rp#roblox forsaken#homicidal porkchops#homicidalporkchops#forsaken chance#chance forsaken
34 notes
·
View notes
Note
How to do Deviantart-inspired stamps like you? ☆⌒(ゝ。∂)🍡
I downloaded stamp borders from https://graphic--horde.tumblr.com/ ‘s stamp tutorial (I recommend you go check it out cause they explain it better than I.)
i imported my photo into Ibispaint and made sure the background was transparent.


it should look like this.
3. I import the photo I want and move it to the layer behind my frame.

4. I clean up the edges so they don’t stick out, but that’s optional.

5. I save as transparent png and that’s all.

After that, you can copy and paste and post and do whatever with your new stamp. Yay💖

(Btw, my example stamp is of big man hugging a salmonoid in splatoon rp in roblox. Ty to the big man who hugged me. Very welcoming.)
#stamps#stamps tutorial#splatoon stamps#splatoon stamp#Big man#big man splatoon#big man stamp#Big man roblox#Splatoon rp roblox#Salmonoid#salmonoid stamp#Hug#Stamp tutorial
59 notes
·
View notes
Text
a quick guide on how to plot in a rp group
Hello friends. As I journeyed through different groups I noticed a trend in interactions with writers and trying to plot with them for their characters. It seemed like there was a disconnect on what plotting means and that was making answering plot calls really difficult and frustrating. I wanted to whip together a quick guide with actionable items to help with plotting! However, I think it's important to also note that plotting doesn't have to be deep — they can something simple that leaves a lot up to chemistry. Even "random" interactions can be used for plotting purposes for people that really work well off of chem. Everyone is different, and both plots and chem are great ways to write together!
plots vs connections
One of the biggest mistakes that I've seen with plotting is that people mistake plots for connections and vice versa. A Plot is an actionable item that you can use to write the characters doing something. It can be a broad character arc, or several points of conflict or interaction that generates threads. True plots make it easy to generate a thread from some context to what we think will start the interaction between the two characters.
examples: one character took another character's coffee order. one character caught another character from falling. one character likes art and the other doesn't and they went to a museum.
A Connection is how the characters know each other. This can be familial relationships, platonic relationships, romantic relationships, and so on.
examples: they met at a coffee shop. they went to the same festival. they are exes. they're cousins.
Often, connections are a great place to start, as the plot can be built off from the connection. However, if it's left at just the connection (such as, they're cousins!) it can be hard to create a thread or interaction from the connection. If the characters are cousins, or they did meet at a coffee shop, what's their relationship like? How did that first coffee interaction go? Or do you want to write that coffee interaction based off chemistry? Either way, those questions help you plot!
tips on ways to maximize plotting
Read the other character's bio or about. If you don't have one for your character, make one so that people can use these content pieces as a way to start to think about their character in context to yours. Most people are pretty good at figuring out a connection, but have an issue taking it to the actionable idea. Think about general interactions you have had with people in your life, or something you've witnessed, one of those could be starting point for a thread!
Create a wanted plots page that has some simple interactions you'd like to explore. People might not read it, but then you've at least got ideas for people who might be struggling as well to think of how to plot with your character.
Check out the wanted plots tags, there's tons of great ideas for unique plots that you could use and adapt for other plots.
Think about what parts of your character that excites you. What quirks or strengths do they have that make for interesting interactions with people? I find that starting here often helps to build threads I am excited for — chemistry based ones!
Use the yes, and or the no, but methods to build in conversations with other writers. Meaning that if someone comes up with something you think could work, agree with it and then build off of it. If the idea doesn't work, however, come up with something else that is more in character that could work.
Don't be afraid to send something off the wall, and don't be afraid to turn something down that doesn't work, just be willing to build off those ideas!
If you're into chemistry over plotting, think of places a starter or thread could be at and what the two characters could be doing. This could be in addition to a connection you've selected.
I hope these tips have helped, and I wish you the very best on your rp plotting adventures!
83 notes
·
View notes
Text
˚꒰ 🏹 DISCORD FORUMS TUTORIAL♡
i'm not sure if people have seen or tested out the forums on discord but i thought i'd make a tutorial on how i use it for roleplaying since i found it super fun and helpful for organization purposes!
so what are forums? discord describes it as "a space for organized discussions". much like threads, the discussions can be contained in one post which makes it easy to keep your topics in order. the part that i find most useful is that you can organize your post by tags and filter through them! now in order to get forums in your server, you will have to enable 'Community' on your server. so let's start!

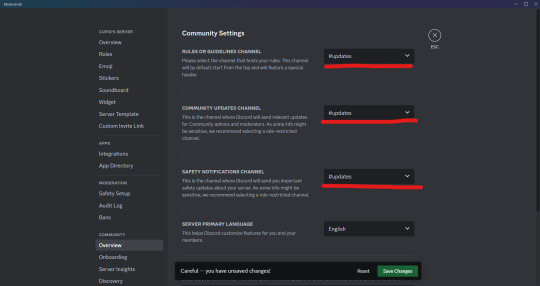
♡ . ) first thing you'll do is open your server setting. there will be an 'Enable Community' that you can click on and it will take you to a page like this
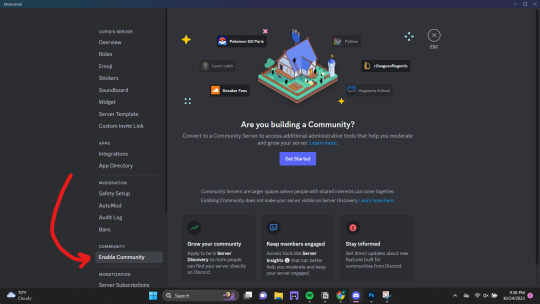
♡ . ) once you click 'Get Started' it will take you through a series of questions and system settings. you will need at least one "default channel" where discord will send automated updates. this channel is necessary if you want to use forums.

if you continue with the default settings, discord will automatically create two channels for you: one titled 'rules' and another titled 'moderators-only'. the announcements made whenever there's an update as mentioned above will be sent to the latter.
NOTE FROM CUPID ! i personally like to make a single channel titled something like 'updates' and keep it locked. this can be done before or after enabling community, you will just need to change the settings to go to the new channel first.
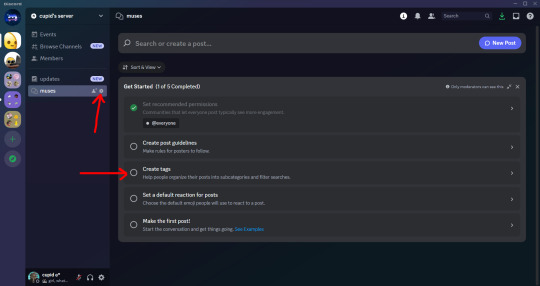
♡ . ) once you have community enable, you're free to make all the forums you want! when you go to create a new channel, 'forums' will show up as an option like this

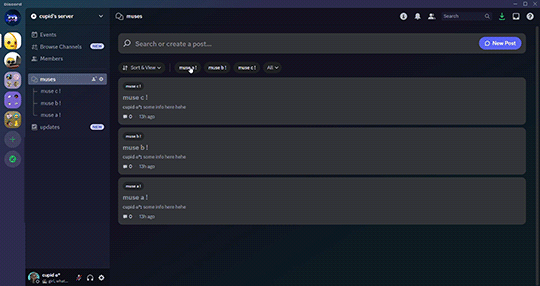
for this example, i'm going to show how i set up my muses' profiles for 1x1 writing server like a roster, but you can also do this for single muse / threads / sms / etc.
♡ . ) when you click into the forums channel you created, you will see a landing page like this. there are instructions on how to navigate the channel as well so feel free to read those as well! the first thing i like to do is create tags. you can open that setting by clicking either of these buttons.
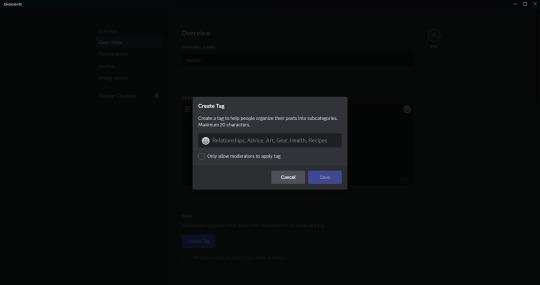
(navigate to the 'Tags' section and click 'Create Tag' if you need to) it will open a popup box like this. i like to create a tag for every muse that i want to add to my roster and you're able to add 20 tags!
when you're finished, they will be listed as you see below. there are other options in forums settings that you can play around with including a 'default reaction' emoji, 'slowmode', layout and sorting option, age restriction and 'hide after inactivity'. all these are based on preference!

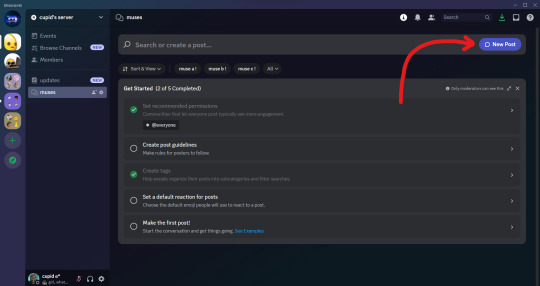
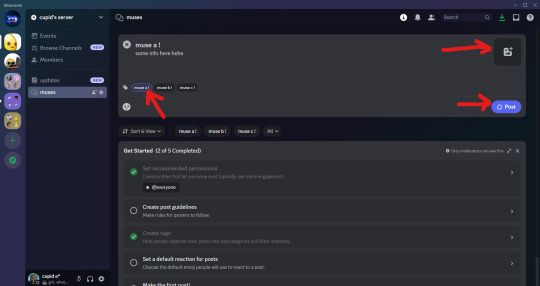
♡ . ) once you've saved your setting changes, you can leave this page and are now able to make your posts by clicking 'New Post' on the upper right hand corner.
this is where you're pretty much able to do whatever suits your style including formatting how you like and adding photos, all you need to make sure to do is add the corresponding tag to the post! once you're finished making it look how you want, you can click 'Post'
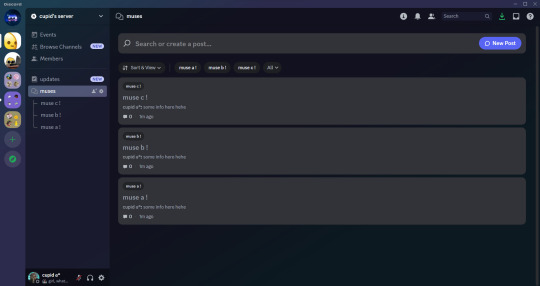
they will appear in the channel like this!
♡ . ) and by clicking on a post, you will be able to open it in a side view like this. if you want to see the post in full view, you will click the three dots in the upper right hand corner of the side view and then choose 'Open in Full View'.
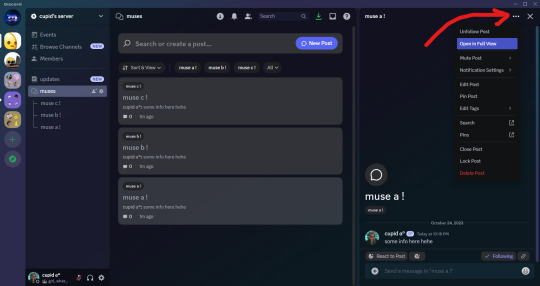
you're now able to add more messages within the post! for me, i like to add stats of my muses and headcanons that may be useful when i thread.
NOTE FROM CUPID ! one set back i found is that you are not able to use threads within a forum post so it may get a bit cluttered depending on what you send in a forum post. so if you are wanting multiple different sections for one topic, i suggest creating a forum instead. for example, if you are wanting to add musings, faceclaim pics, headcanons and stats all for one muse, i would create a single forum post just for that muse instead to avoid having important info getting lost!
and that pretty much covers how i use forums for discord rp! i encourage you to play around with it to find a style and format that best works for you. and if you have any questions, you're more than welcome to send it to my inbox. happy writing everyone♡♡♡
232 notes
·
View notes
Text
ㅤㅤㅤ✧ᅠ—ᅠ⋆ᅠTUTORIAL: COMO FAZER GIFS MAIS RÁPIDO!
é, eu disse que ia fazer um vídeo sobre isso, mas a preguiça de editar falou mais alto... eu até cheguei a gravar, mas ficou muito longo e acho que seria mais rápido fazer esse post mesmo, então aqui está! demorou, mas chegou!
para seguir esse tutorial, vocês vão precisar do adobe premiere pro, adobe photoshop e da extensão do premiere after codecs, que conseguem baixar de graça no google.

— BAIXANDO OS VÍDEOS OU EPISÓDIOS.
antes de tudo você precisa ter o vídeo que vai gifar salvo no seu computador, né? então escolha o vídeo ou série e faça o download! aqui estão as formas que eu faço pra baixar o que preciso:
savefrom net para vídeos do youtube.
locoloader para episódios de drama que estão no site bilibili.
extensão stream recorder para gravar episódios de novelas do globoplay.
até hoje não tive nenhum problema com esses métodos, e todos abrem normalmente no premiere. a qualidade geralmente é normal, nada muito tchan nem muito mé, dá pra fazer gifs tranquilamente. a única coisa mais complicadinha é que você tem que reproduzir o episódio pra gravar com o stream recorder, mas isso é bom que você assiste a novela kkkkk.
— CORTANDO AS CENAS NO PREMIERE.
aqui é a parte que mudou totalmente minha maneira de fazer gifs. antes eu transformava tudo em screencap, depois separava as partes do fc que eu queria, e aí tinha que abrir arquivo em pilha no photoshop. nessa brincadeira, levava uma semana ou mais pra fazer 50 gifs, e eu enjoava na metade.
mas usando o premiere isso se torna muito mais rápido!!!! você só precisa separar algumas horinhas (no máximo 2, dependendo da sua máquina) para cortar as cenas, e depois separar as que o fc aparece no próprio premiere usando as cores de rótulo que ele disponibiliza. quando eu tava trabalhando, tinha no máximo 4 horas pra ficar no pc por noite, e conseguia fazer isso tudo em um dia só. muito prático
primeiro, abra o premiere! é igual o photoshop mesmo, nada muito diferente (instale o aftercodecs antes seguindo o passo a passo do site). clica em criar projeto, dá um nome, e aí vai aparecer essa tela:

(quem rir do ativar o windows vai ser torturado por mim no inferno hein) (já vou ensinar a colocar o after codecs ali na tela)
agora, pegue o vídeo que você baixou e jogue ali na linha do tempo. vai ficar assim:

(não consegui abrir o download de law school porque deu um erro, eu tinha baixado de outra forma kkkk mas tinha outro vídeo salvo então deu certo depois)
agora clica com o botão direito do mouse em cima do bloco de vídeo! (baixei sem o áudio já, mas pra tirar o aúdio é só fazer a mesma coisa mas clicar em desvincular primeiro) aí vai clicar em detecção de edição de cena. vai abrir uma janelinha e aí é só clicar em analisar:


vai abrir essa janelinha. basicamente, essa ferramenta vai cortar o vídeo sempre que houver um corte de cena automaticamente, então sempre que tiver uma mudança de plano/cena, deixar de mostrar um ator pra mostrar outro, vai ter um corte e tudo vai ficar separado bonitinho. isso vai levar um tempinho dependendo do tamanho do vídeo, mas você pode deixar rodando em segundo plano e ir responder suas dívidas no rp! ou, como eu faço, fazer colar de miçanga kkkkkk.

depois que o app analisar e cortar o vídeo inteiro, vai ficar tudo separadinho. aí você usa a setinha azul pra ir vendo as cenas e separando as que você vai gifar. uma dica que eu dou é usar as cores de rótulo do premiere! só clicar com o botão direito em cima da cena selecionada e escolher uma cor pra cada fc, e deixar o íris (que costuma ser a cor padrão da faixa inteira) pra quando aparecer mais de um fc na cena. aí você arrasta o clipe pra faixa de cima e, depois de separar todas as cenas, vai em rótulo de novo e em selecionar grupo de rótulos. isso faz todos os clipes com o mesmo rótulo/cor do que você clicou ficarem selecionados.
e outra dica!!! clica com o botão direito em cima do contador de minutagem do vídeo e troca pra contar quadros. o after codecs gratuito só exporta até 500 quadros, mas gifs com mais de 200 quadros não abrem direito no photoshop e ficam muito pesados. então passa cortando os clipes com mais de 200 quadros. dá pra ver quantos quadros cada clipe tem passando o mouse em cima. pra cortar, só escolher o ícone da navalha e clicar em cima do clipe onde você quer cortar.


selecionou todas as cenas do mesmo fc? então é hora de usar o after codecs. pra deixar ele aparecendo igual no print que eu mostrei lá em cima, você vai em janela > extensões > after codecs, aí você coloca a janelinha onde achar melhor. eu prefiro ali junto de "origem". com a janela do after codecs aberta e todas os clipes que vão virar gifs selecionados, vai em add markers for selected clips. você vai ver os marcadores aparecendo e quando acabar, o próprio premiere vai te falar quantos gifs você vai ter no final!

agora clica em exportar. vai aparecer uma tela nova. em formato, escolha after effects e coloque o nome do seu fc e onde você vai salvar os clipes. aí clica em video settings. no formato dessa janela, coloca mp4 e depois clica em open aftercodecs settings!

as únicas coisas que você vai mexer aqui é quality, arrastando a setinha azul até o final em 100%, e marcar a opção multirender em workflow. aperta ok e pronto! o premiere vai exportar clipe por clipe pra pasta que você escolheu, e aí acaba a parte mais chata e longa do tutorial! pode fechar o premiere e abrir o photoshop.

— HORA DE FAZER OS GIFS!
cenas cortadas, exportadas, tudo lindo. chegou a hora que todo mundo esperava! abra seu photoshop, prepare sua action ou psd, e vamos ao trabalho.
na hora de abrir as cenas, vá em arquivo > importar > quadros de vídeo para camadas. seleciona a primeira cena e abra normalmente. infelizmente, não dá pra abrir mais de um arquivo por vez, então tem que ir um por um mesmo. vai aparecer isso aqui, aí só clicar em ok mesmo:

às vezes pode dar esse erro aqui, mas aí é só apertar ok e abrir de novo!

abrindo bonitinho, você pode modificar a velocidade dos quadros e o tamanho. imagino que a maioria das pessoas já sabe mais ou menos como fazer isso, mas você pode me pedir um tutorial mais detalhado se precisar. como já tem muita imagem no post, vou pular essa parte, ok? vou só descrever o que eu faço agora.
seleciono todos os quadros e mudo o intervalo de tempo da animação. tenho uma regra bem básica que é: até 25 quadros, coloco 0,1; 25 até 30 quadros, 0,09; 30 até mais ou menos 40 quadros, 0,08; acima de 40 até 85, 0,07; de 85 até 150 quadros, 0,06; e por aí vou diminuindo o tempo.
seleciono todas as camadas também, e converto a linha do tempo de quadros para vídeo. depois converto as camadas para objeto inteligente. e faço o corte demarcado. o tamanho que eu uso geralmente é 268x146 ou 269x147. lembra de desmarcar a opção de excluir pixels cortados!
arrumo a camada de objeto inteligente dentro do corte pra ficar bonitinho com o famoso ctrl+t, e jogo o meu psd padrão em cima. aí arrumo a coloring direitinho até ficar satisfeito. só com isso já dá pra salvar o gif com ctrl+shift+alt+s, do jeito que você tá acostumado a fazer.
passo opcional: eu gosto de usar action de sharpening, então seleciono a camada do psd e o objeto inteligente, crio outro objeto inteligente e rodo a action. aí é só salvar!
eu sou uma pessoa bem vagabunda hoje em dia, então consigo fazer 150 gifs em uma madrugada de boa. mas, se você tem um tempo limitado, dá pra fazer até 50 gifs por noite, que foi o número que eu fiz quando ainda tava trabalhando. em 3 dias terminei o pack da giselle, inclusive.
espero que o tutorial tenha sido proveitoso pra você, e que consiga fazer muitos gifs dos fcs que gosta. e vamos cobrar dos gringos!!! não sou a favor de cobrar de brasileiros, já que a gente sabe como nossa economia é fodida (e por isso que só compartilho conteúdos gratuitos aqui), mas arrancar dinheiro de gringo tá liberado. aqui alguns exemplos de gifs que fiz seguindo esse tutorial:


49 notes
·
View notes
Note
Hola, ¿Cómo haces los links en ig? Si es en Android mejor
holis!! los links para ig los hago con la app unicodepad que solo está disponible para android y las fonts yo las hago con messletters (aquí el link) pero las mismas de messletters las pueden encontrar en stylish text :3

estas son las apps (la calidad cmo las weas kfbsj)
ahora voy a hacer un link así simplon e intentaré explicar lo mejor que pueda TT
para empezar debes de tener claro que es lo que quieres poner en el link y que vaya acorde con la temática de tu perfil :3
en este caso yo voy a usar esta frase: ͏𝑙𝑒𝑛𝑔𝑢𝑎𝑗𝑒 ﹙ ❤︎ ﹚ 𝑑𝑒𝑙 𝑎𝑙𝑚𝑎
aquí tu tienes que copiar y pegar la frase en unicode y borrar los espacios para reemplazarlos por este
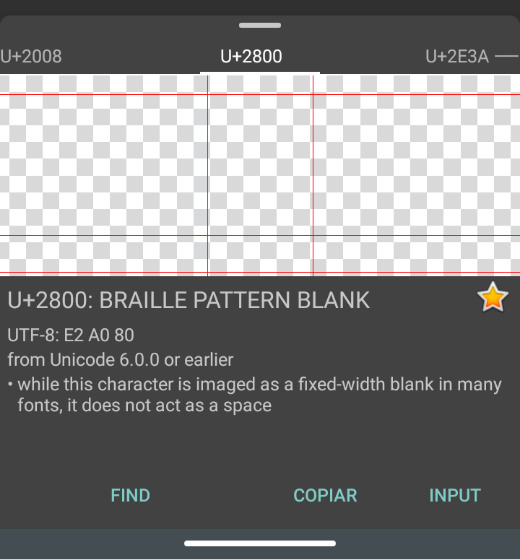
tienes que fijarte bien que si escribes algo con la font normal del teclado tiene que ser exclusivamente con las letras de unicode (a menos que las pegues de otro lado, lo mismo para los emojis y los símbolos.
cuando termines toda la estructura de tu link tienes que poner un punto (del mismo unicode) y luego ir al principio del link a poner http:// o https:// (como prefieras).
http://𝑙𝑒𝑛𝑔𝑢𝑎𝑗𝑒⠀⠀❨❤︎❩⠀⠀𝑑𝑒𝑙⠀𝑎𝑙𝑚𝑎.⠀⠀
y así es como queda el link puesto en una cuenta

TIP: a mi a veces cuando estoy haciendo links me arroja error en ig cuando los quiero poner, entonces para arreglarlo vuelvo a unicode y agrego dos espacios más del mismo de la foto y ahí si me deja ponerlo.
espero haber explicado bien y que te haya servido esta mini y super rapidita guía para hacer links :3
aclarar que este tipo de links solo se puede hacer en android (por el tema de unicode) y para ponerlo en ig también tienes que tener android !!
96 notes
·
View notes
Text
PHOTOPEA TUTORIAL / PHOTO FILTER FOR SKIN TONES:
a tutorial on HOW TO BRING OUT SKIN TONES if an image is 'too gray' (faded) or has too much of one (likely over saturated) color! this technique can easily be applied to icons that already have a border ! just put your focus on the base image / icon ! this works on relatively anything, including poc and non-poc. WHAT YOU WILL NEED: photopea...and your desired your base image(for example, i'll be showcasing inconsistent or otherwise dark/faded scene lighting, like twilight and saw). DISCLAIMER: not all lighting/images are the same, nor are psd colorings. while some colorings may be designed to bring out reds/yellows(which is the filters we'll be using in this specific example), others may mute them and you may have to improvise with whatever color the psd you're using is designed to focus on. this is just a general idea, you will have to explore as you see fit. it's all going to depend on your personal taste !
by the end of this, you should be able to manage results like this !

cool, huh?....anyway, on with the mechanics !
EXAMPLES:

[ BEFORE PSD ] [ SYNOPSIS ]
#01 / LEFT IMAGE ABOVE: too much green, becomes muted with psd and doesn't show variety. #02 / RIGHT IMAGE ABOVE: the colors are very faded in this scene, and the pink focused psd in question made the image seem gray. we will start with EXAMPLE #01. i will be using the same PSD on both, a custom psd i made and focuses on reds/pinks.

as you'll see above the PSD has now been applied...but now it's kinda boring :// (there's nothing wrong if you don't mind how it is above, everyone's got their aesthetic choice—HOWEVER, we're aiming to add skin tone...)
once you have your image open, you'll want to go to image>adjustments>photo filter; i went ahead highlighted it in yellow for easy finding !

since this psd DOESN'T mute reds/yellows, (and those are usually the base of most/general skin tone combinations) i applied both a yellow and red filter. now, these colors i'll be using in this example, because they're in my default colors on the photo filter option—you can totally choose lighter or darker variants of these colors, or like i said, a different color altogether based on how the PSD you're using works. the toggle setting doesn't have to be exact to this example either—this is just what worked best on this image combined with the chosen PSD ! // RIGHT IMAGE IS THE FINAL RESULT AFTER APPLYING THE RED FILTER AFTER THE YELLOW.


repetition on a different example . . .


this scene in particular is very faded, and the red feels a little blotchy/over saturated here...so i'll show you an EXTRA STEP you can use ! in saying this, you don't have to do exactly this; you can even choose to go ahead with selective color to fix your image, without doing the filters, if you find that suitable. but i'll be showing you the magic of selective color to balance out the red toned overlay.

same concept as before, just a different selection: image>adjustments>selective color. think of selective colors as "balancing" the colors. it does have a toggle selection for each color, which is super helpful, including diminishing or adding white highlights. given the PSD colors, naturally, i'll be focusing on yellow and red.


it's now got a general skin tone and red is not as blotchy !
[ FINAL RESULTS / CONSISTENCY WITH PSD APPLIED ]

this is a great hack i use quite a bit, it's great for maintaining consistency in your icons when the lighting is working against you...hope this was comprehensible and helpful, happy editing !
#* RE - RELEASE#* MY TUTORIALS.#sorry i didnt realize i forgot to reupload this one!#long post /#FREE TO REBLOG !#rp community#icon tutorial#rp icon tutorial#psd tutorial#roleplay coloring#roleplay help#roleplay resources#roleplay community#roleplay graphics#coloring psd#psds#icon psd#psd#roleplay psd#rp graphics#rp psd#rp resources#tutorial#editing tutorial#rpc tutorial#editing resources#psd coloring
254 notes
·
View notes
Text
Tutorial: ¿Cómo hacer gifs sin PS y no morir en el intento?
¡Holi! Hoy les traemos este tutorial que creemos que les puede ser muy útil si no tienen photoshop (como una brujita de este coven jaja). Eso sí, se usan al menos tres sitios web o apps distintos, así que sobre aviso no hay engaño.
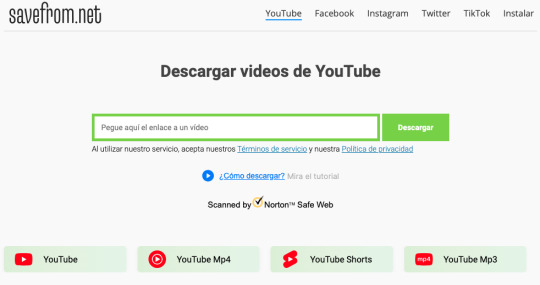
Usaremos un descargador de videos online (el que sea de tu confianza y preferencia), Canva y Photopea. Otra opción que recomiendo es descargar VideoProc Converter, pero no es necesario para este tutorial.
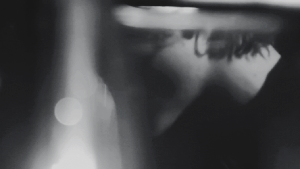
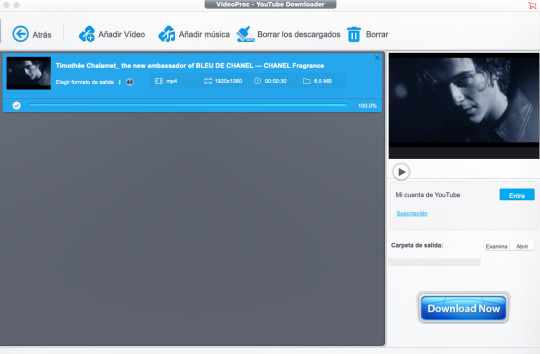
Yo usaré este video de Timothée Chalamet para hacer este gif:
PASO 1. Primero, debes elegir tu video de donde harás el gif. Recomendamos videos de Youtube o Dailymotion de calidad muy buena (mínimo 720p). El consejo es que veas el video entero para que identifiques los segundos que quieres convertir a gif.
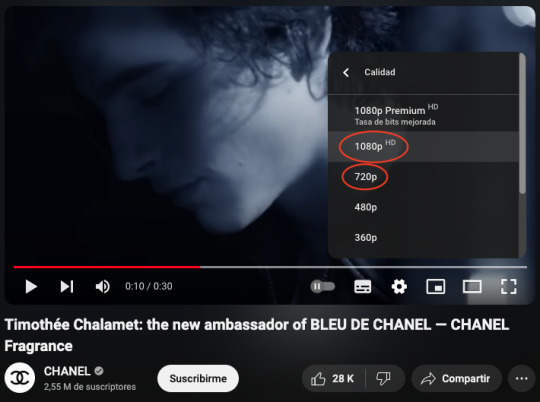
PASO 2. Descarga el video ya sea en línea (una simple búsqueda de "youtube downloader" y listo) o en VideoProc y guárdalo.
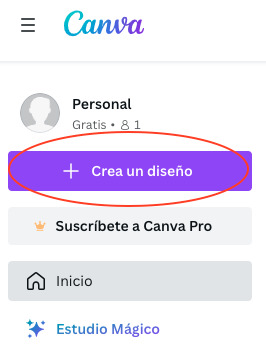
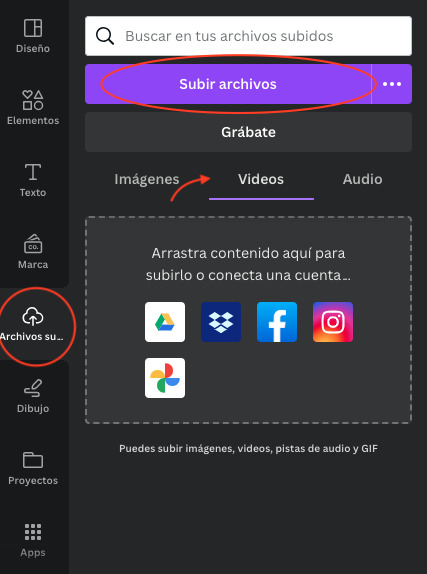
PASO 3. Vamos a Canva (si no tienes cuenta, tendrás que registrarte). Das click en "Crea un diseño" y eliges Video. Una vez que se abra tu proyecto, ve a la pestaña "Archivos subidos" > Videos y sube tu video.

PASO 3.1. En este punto podrás cortar la escena que deseas convertir a gif. Recomendamos no pasarse de los 10 segundos o será demasiado pesado.
También puedes agregarle algún filtro o jugar con los colores y tonalidades. El consejo es que intentes equilibrar el tono en caso de que los colores sean muy cálidos o fríos, o sean tipo Twilight con filtro verde, pero nada más. Esto para no saturarlo y que se vea de baja calidad.
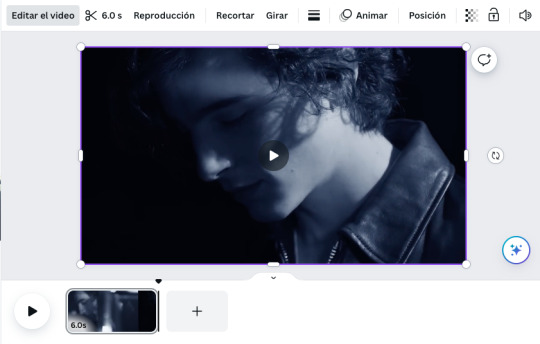
En este caso, lo dejaré en 6 segundos y le quitaré el tono azulado.
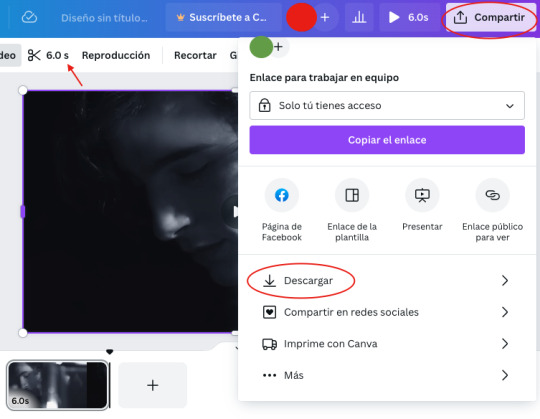
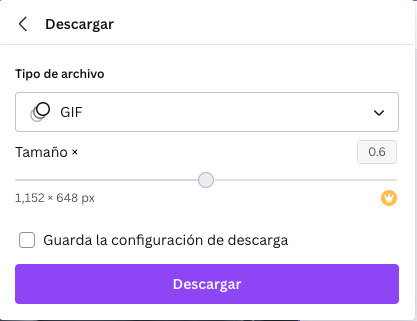
PASO 4. Una vez que tengas tu clip, da click en "Compartir", luego más abajo en "Descargar" y, por último, en tipo de archivo, elige "GIF". Automáticamente, Canva lo guardará con las medidas 1152 x 648 pixeles. Pero a menos que necesites un gif más grande, esa medida es suficiente. Descarga y guarda tu gif.
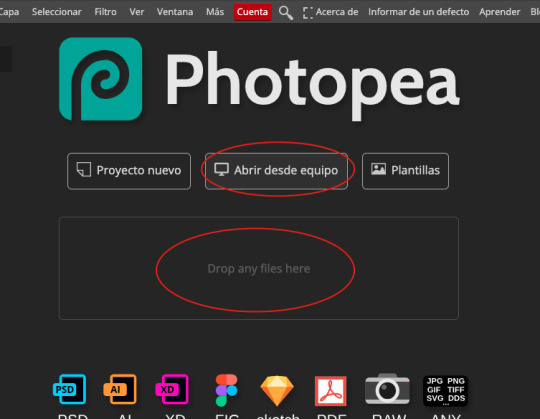
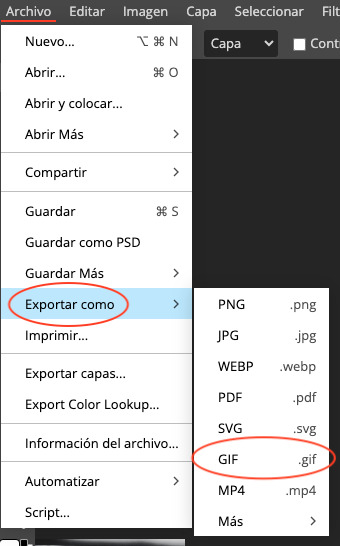
PASO 5. Ahora vamos a Photopea, que es lo más cerca que existe a Photoshop. Aquí podrás cortar tu gif a la medida y agregar PSD's, colorings, textos, etc.
Mi gif de Tim de 6 segundos tiene 149 capas (por eso les recomendamos mantenerlo lo más corto posible), así que eliminaré las capas que no tengan demasiado movimiento entre una y otra. Puede ser dejar 1 y eliminar 1, cada 2 o cada 3; depende de qué tanto movimiento haya en la escena.
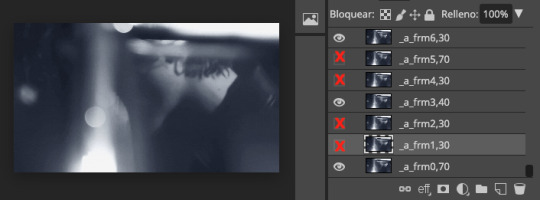
Decidí dejar 1 capa y eliminar 2, quedando así con 50 capas. También agregué un coloring.
PASO 6. Cuando tengas tu gif como te gusta, das click en Archivo > Exportar como > GIF. Al momento, surgirá una ventana donde podrás jugar con la calidad, la velocidad y el número de repeticiones (por defecto está en repetición infinita y recomiendo dejarlo así). También podrás elegir si quieres que se reproduzca en reversa o tipo boomerang.
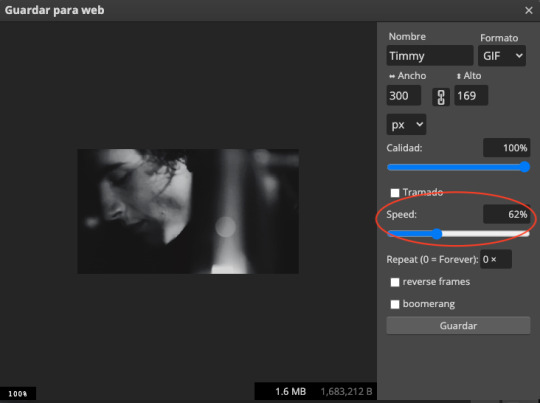
En este caso, bajé la velocidad pues al eliminar un tercio de las capas, el gif se reproducía muy rápido para mi gusto.
¡Listo! Tu gif está terminado ✨.
Pero, Coven, ¿por qué no sólo hiciste el gif directamente en Photopea? Ah, excelente pregunta. Quizá no he encontrado la opción, pero me pareció mucho más complicado sin la línea del tiempo como la que tiene PS. Además, no sé si es igual de eficiente la herramienta de Importar videos a capas, así que preferí tomar el camino largo 😅.
Esperamos que este tutorial les sirva. Intentamos que las instrucciones sean simples y claras, pero si les quedan dudas nuestro inbox está abierto.
72 notes
·
View notes
Text
⚠️ DON’T START DISCOURSE ABOUT RPF IN THE NOTES!! YOU WILL BE BLOCKED IF YOU DO SO ⚠️
Do you ship it?
Reason:
“They gave us their own ship name and they are always freaky when they are together”
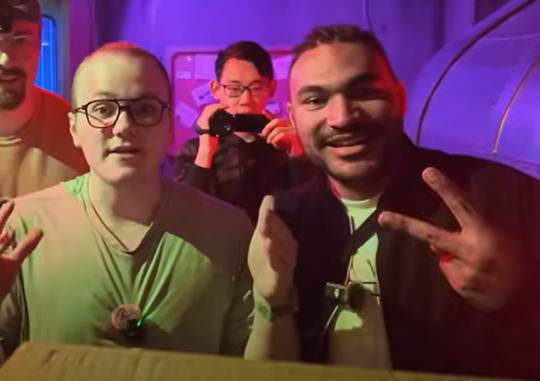
Mod reason: I never thought the day would come…… but here we are….. no name smp rpf my beloved!!!!! it’s a really small smp with only 6 people (only 4 are really active in it tho) and the favorite hobby of everybody in that group is to flirt with each other in one way or another. but yeah, as the submitter said, jay and especially skip are ALWAYS saying some freaky shit <3 also im gonna need you to tell me what video they brought up a ship name bc i definitely missed that one
#do you ship this rpf ship#rpf#real person fiction#rps#real person shipping#shipping#shipping poll#jaymoji#skip the tutorial#openoreo#youtubers#mcyt#no name smp#mod ships#<- yall are lucky for this too bc if you look up “skip the tutorial jaymoji” there’s no irl pics of them together#but i knew that they’ve interacted a decent amount irl so i went and grabbed my own pic#you’re welcome everyone
11 notes
·
View notes
Text
Anyone know how to un-bolt a bolted shut door?
60 notes
·
View notes