#wip tutorial
Explore tagged Tumblr posts
Visit Tumblr Blog
Explore Tumblr blogs with no restrictions, modern design and the best experience.
Last Seen Tumblr Blogs


Fun Fact
When “GIF” was named word of the year in 2012, Oxford Dictionaries U.S.A. credited Tumblr for pushing the word.
Text
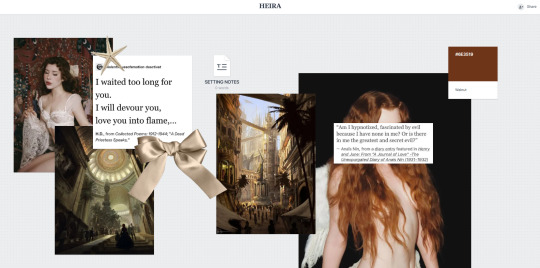

𝐌𝐈𝐋𝐀𝐍𝐎𝐓𝐄 𝐓𝐔𝐓𝐎𝐑𝐈𝐀𝐋 ( estimated set up time: 10-20 mins )
For all you visual-based roleplayers out there, I just have to share this amazing "idea board" site I found Milanote! this is a tutorial so you can make something similar to the video above! It’s perfect for organizing your character ideas, worldbuilding, or even plotting out entire storylines. I can see it as a potential replacement for a minimalist based carrd! Here’s the Milanote website to check out, and here’s an example of a live board to give you a feel for how it works. please like or reblog if this helped you!
( 1 ) Sign Up or Log In
Visit app.milanote.com.
If you’re new, click “Sign Up” to create a free account.
( 2 ) Create a New Board
Once logged in, you’ll see the Dashboard.
Click on the “+ New Board” button to start a new project.
( 3 ) Add Content to Your Board
Add Notes: Drag the Note icon from the toolbar or double-click anywhere on the board to write ideas or plans.
Add Images: Drag images from your computer or click Upload Files to bring visuals into your board.
Add Links: Paste a URL directly, or use the Link option to organize references.
Organize with Columns: Use columns to categorize content
Create Checklists: Add checklists to track tasks or progress.
( 4 ) Organize and Style
Drag and Drop: Move items freely to arrange them however you like.
Connect Items: Use arrows to link related elements for better visualization.
Color Coding: Use colors to highlight or differentiate ideas and sections.
( 5 ) Collaborate
Click “Share” at the top-right corner to invite collaborators.
Assign tasks, add comments, and share feedback in real time.
231 notes
·
View notes
Text
gonna show u guys a little opalescent highlight hack i threw together today
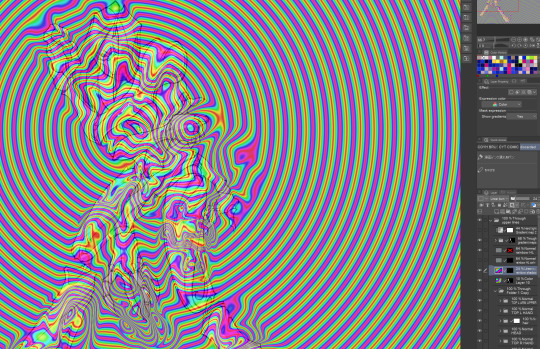
rainbow gradient above your main figure (i usually have all my main figure folders/layers in one big folder, so i can clip gradient maps + adjustments to it!). liquify tool to push the colors around a bit. STAY WITH ME I KNOW IT LOOKS STUPID RN I'M GOING SOMEWHERE WITH THIS
THEN: set it to add/glow (or the equivalent in ur drawing program), lower the opacity a bit, and apply a layer mask. then u can edit the mask with whatever tools you like to create rainbow highlights!!
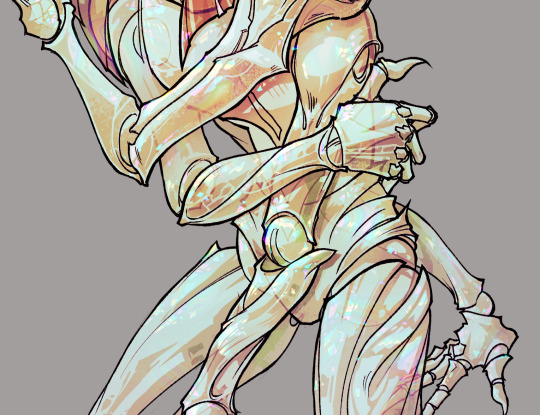
in this case i'm mostly using the lasso fill tool to chip out little facets, but i've also done some soft airbrushing to bring in larger rainbow swirls in some areas. it's pretty subtle here, but you can see it better when i remove the gradient map that's above everything, since below i'm working in greyscale:

more granular rambling beneath the cut!
u could also just do this with a brush that has color jitter, but what i like about using layer masks for highlight/shading layers is how simple and reversible it makes everything. i can use whatever brushes i want, and erasing/redoing things is super low stakes, which is great when i often approach this stuff with a super trial-and-error approach.
example: have u ever thrown a gradient w multiple colors over an entire piece, set it to multiply etc, and then tried to erase it away to carve out shadows/highlights? it's super frustrating, bc it looks really good, but if u erase something and then change ur mind later, u basically would have to like. recreate the gradient in the area u want to cover up again. that's how i used to do things before figuring out layer masks!! but masking basically creates a version of this with INFINITE undo bc u can erase/re-place the base layer whenever u want.
anyway, back to rambling about this specific method:
i actually have TWO of these layers on this piece (one with the liquified swirls shown above, and another that's just a normal concentric circle gradient with much broader stripes) so i can vary the highlights easily as needed.
since i've basically hidden the rainbow pattern from myself, the colors in each brushstroke i make will kind of be a surprise, which isn't always great -- but easily fixable! for example, if i carve out a highlight and it turns out the rainbow pattern in that area is way too stripey, i can just switch from editing the mask to editing the main layer and blur that spot a bit.
also, this isn't a full explanation of the overall transparency effect in these screencaps! there's other layer stuff happening below the rainbow highlights, but the short version is i have all this character's body parts in different folders, each with their own lineart and background fill, and then the fill opacity is lowered and there's multiply layers clipped to that -- blah blah it's a whole thing. maybe i'll have a whole rundown on this on patreon later. uhhh i think that's it tho! i hope u get something useful out of this extremely specific thing i did lmao
12K notes
·
View notes
Text
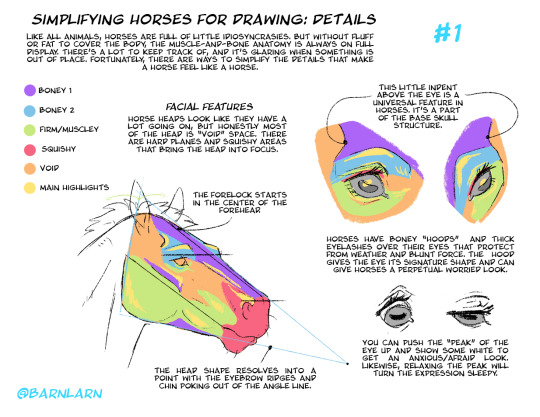
Working on another poster! Here's part 1: facial structure and eyes. Nose and ears up next.
Simplifying Horses for Drawing Part 1
#art#tutorials#horse#horse drawing#horses#tips#drawing tips#anatomy#drawing reference#wip#horse heads
3K notes
·
View notes
Text
Heres a quick turorial on how i make the snarl mask. If anyone needs a better explanation i can make another video, but for now i hope this helps.
#tutorial#mask#mask tutorial#cardboard#cardboard art#cardboard mask#cardboard sculpture#animal art#werewolf#snarling#snarl#snarling werewolf#werewolf mask#wolf#snarling wolf#werewolf shark#wip
2K notes
·
View notes
Text
Needle Felt Siffrin Build Log: (oct 6 - nov 20, 2024)


Credits goes wholely to @insertdisc5 for creating ISAT and siffrin's design! I am just here to attempt to make cool fanart (and get more people to play isat.. my devious plans are going great so far :3) As always, this isn't a tutorial- it is just a log about how i go about approaching a sculpture and I hope this collection of resources can help others make their own sifs!!
PSA: this has some spoilers for endgame CGs/sprites on my references image board ( also might see it in the backgrounds of my process pics). And bc this is needle felting, you will see some sharp needles! beware!
my inspiration was the intro cutscene where Sif eats the star, so my main goal was to adhere to the style of ISAT as closely as possible while transfering it to 3D space. And I knew i also wanted to try making the cloak for stopmotion purposes, so my process was tailored towards having control over the fabric with wire inlaid within the cloak (more on that later).
I ended up not sticking eyebrows on top of siffrin's bangs lol but anyways, first order of business is Gather Reference! v important. pureref is free and an awesome program. I also do some sketches to visualize the pose and important details i wanted to include in the sculpt.
behold the isat wiki gallery page! tawnysoup wrote an awesome ISAT style guide that absolutely rings true in 3d space too!! adrienne made a sif hair guide here!! (sorry i couldnt find the original link, but it's on the wiki). It says ref komaeda hair so that's what i looked at, along with other adjacent hairstyles! I also like doing drawovers on in progress photos to previs shapes n stuff to get a better idea of the end result.
Also if you're like me and struggle with translating stuff into 3D space, take a look at how people make 3d models and figurines! sketchfab is also a great resource! I looked at the link botw model by Christoph Schoch here for hair ref. (I used Maya, but there's a blender version too ! you can pose characters too if your model has been rigged!)


Face:
Started off blocking out the main shapes of eyelids and iris, and then filling in the colour details in the iris and the star highlights before moving onto adding thin black outlines and eyelashes. I didn't take many in-progress photos cause i kept ripping stuff out to redo them many many times, sorry!! This eye took about 3 hrs bc i just wasn't happy with it!! Sometimes it do be the vibe to give up, go to bed and see how it looks in the morning (more often than naught, it looks fine and it was the "dont trust yourself after 9pm" speaking)

The Mouth:
Couldn't decide if i even wanted to add a mouth as per usual with all my humanoid sculptures.. but i did some drawover tests first to see what expression i liked and to try to visualize it from multiple angles. (I was also testing the placement of stars on the hat brim here)

And then I redid the mouth like 3 times cause the angle just wasn't right (this went on for about the course of a week yay!)
Hair: woe baldfrin be upon ye


I made the hair strands individually first, and then since Sif has some of the hair at the back dyed black, i covered some of the tips with black wool (manually) (I think it would go much faster if i just took a marker to it, but hahaha i love pain and detailing!! )
And then the rest of it was positioning strands with sewing pins layer by layer, always looking at it from different multiple angles- sometimes tailoring the angle or swoop of individual hair flippies. At one point I thought the back looked too cluttered, but the hat covers a lot of it anyways!! yay for hiding mistakes! (imo this is a similar process to how cosplayers style wigs, but on a smaller scale and the same level of time consuming)
As always, look to your reference for guides, and I always do a whole bunch of drawovers over in progress photos to ascertain what was working and what wasn't.
Hat:
A trick to get a super pointy tip, make another tip seperately while keeping the connection point unfelted, and then combine the two to make super pointy hat!! (this also helps if you made the hat too short and need it to be taller. ask me how i know)

The embroidery on the hat brim was done in a hoop and then invisible stitched to the felted top portion. Technically you don't need a hoop but it helps keep the fabric tension, so you avoid puckers in your embroidery. You can also use iron-on stabilizer if your fabric is loose weave or particularly thin. this is the tutorial i used for the stars embroidery! particularly the fly stitch one, french knots, and the criss-cross stitches. highly recommend needlenthread for embroidery stitches and techniques! i learned all my embroidery from this single site alone.

For fabric, I think I used a polycotton i had in my stash,, unsure of the actual fiber content bc i bought it a long time ago. I used DMC Satin floss which was nice and subtle shiny but frayed a lot so it was kind of a pain to stitch with... but keep a short thread length and perservere through it!! After the embroidery was done, I folded up the raw edges and invisible sewed it to the top portion of the hat.
General shape:
Ok general structure of the body is this: wire armature body covered with black wool -> cloak lining & wire cage -> edge of lining is invisibly sewn to the main cloak at the hem -> head

Don't be afraid to mess around with the pattern, it's essentially a pizza with a slice taken out of it to form a steep cone shape!! Use draft paper before cutting into felt to save material! (i think i made like 3 cloaks before i was happy with the shape lol).
You can also hide the seam of the cloak and collars by gently messing up the fibers of the felt with your fingers or a felting needle btw! you can also sandpaper the seams according to Sarah Spaceman in this vid (highly recommend them for their in depth cosplay/crafting builds holy smokes), though since sif cloak is at such a smol scale, I just blended the seam with my felting needle.
For the lining wire cage section, I sewed in wire around the cloak, so the main rotation point is at the top neck area under the collar. These paddles are used to keep whatever pose I need the cloak to be in for stopmotion purposes. Then after the wire is done, I invisibly sewed the lining to the cloak at the hem (same technique as the hat brim to the lining there).
In hindsight, I should've used a thinner fabric for the lining, but i only had sheer white in my stash so had to go with double felt, thus resulting in a really bulky lining but oh well!

Heels:
started with the general boot shape, then tacking on the diamond shape heel stack and also diamond shape sole bc we're committed to the bit here. I skewer the boot onto the armature which also conveniently hides the connection point into the base to keep the whole thing upright and also I can rotate the boot to tweak the angle if needed.

Pins:
I kinda just trial and error'd jewellery wire with pliers into the pin shapes. They're itty bitty!! had a whole bunch of fails before i got two nice ones. A hot tip is to use needle nose pliers and wrap the wire around the tip to get a smooth circle shape!

Base:
I smoothed out the edge of a circular wood base with a dremel, and then used wood stainer to get the black colour. It ended up kinda looking like I took a sharpie to it, but whatever.... now i have a whole ass can of black wood stainer........ I then made a rough mountain of black wool and stuck the feet armature in. And now he's standing!!

Normally at this point when I'm done felting everything, to get a smooth finish, I'd take a small pair of scissors and carefully snip away any flyaway fibers, but this time, I just left them fluffy cause i think that's what sif would do :3c
Photoshoot:
Normally I do shoots using daylight but it was winter so the sun was nonexistent. So I broke out the home lighting setup aka dollarstore posterboard for a nice smooth background, and then hit it with the overhead Fill, side Fill 2, and Rim light, and use white paper/posterboard for bounce light if one side feels too dark. But if things are overexposed, you can move the light sources away until the harshness dims down. I'm using a Olympus mirrorless camera (handed down to me by my sibling so i dont remember the model exactly), which can connect to my phone as a remote so I can avoid shaking the camera when i take photos. Pretty nifty for stopmotion purposes! (yes my camera stand is a stack of notebooks, a tissuebox and some eva foam under the lens, don't judge me)


Stopmotion animation:
I'm still figuring stopmo out on my part, but my process was straight ahead animation ... move the cloak a cm, take a pic.... move another cm, click.... and repeat until i get a version I was happy with. My ref was the cloak animation from Gris (beautiful game btw). The 2d star animation was also done straight ahead using procreate, exported in png with a transparent background, and finally stitched together with the stopmotion footage in photoshop.

My turnarounds are also stopmotion! also secret hack, the turntable is a fidget spinner sticky tacked to a cake platter.
And i think that's all! i mainly wanted to share how I go about thinking about taking a 2d concept and moving it to 3D. I also didn't go in depth into how to actually do the needle felting bc I don't think I''d be very helpful I'm a very good teacher by telling yall to just keep stabbing until it looks right (i'm self taught for this hobby),,, if anyone wants it though, i can share a bunch of tutorials and other felters' process that helped me learn more needle felting!
Hopefully this was helpful to someone! Feel free to send asks if ya got any questions or if anything needs clarification! Or show me your works! I love seeing other people's crafts :3
here have a cookie for making it this far 🥐
#in stars and time#siffrin#isat#isat siffrin#isat fanart#needle felt#soft sculpture#know that i am devouring all the nice words yall leave in the tags/comments of my posts :holding back tears:#I hesitate to call this a tutorial bc this is just how i fumble my way through crafting anything lmao#the only reason I know how long I worked on a project are timestamps on wip photos and however long the day's video essay or letsplay is#sorry time is immaterial when i get into crafting mode#reason why this log is so late is bc after i finish a project i'm perpetually hit with the ray of 'i dont ever want to look at this again'#hence why photos never get edited#AND THIS POST SAT IN MY DRAFTS FOR 2 MONTHS DUE TO BLOODBORNE BRAINROT SORRY#done is better than perfect!!!#sorry i dont control the braincell#sorry for using a million exclaimation points! i am not good at this.. conveying my anxiety in written form!!! my toxic trait
1K notes
·
View notes
Text
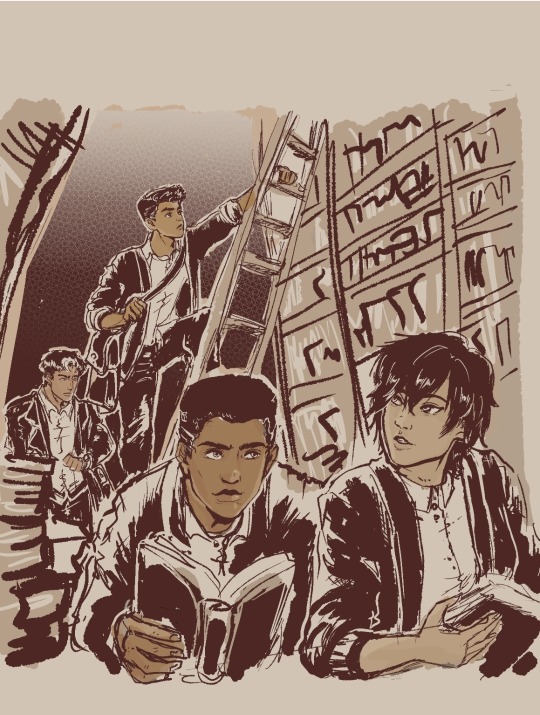
'Dead Poets Society' gang
Headcanon that these four drop poetry and literature quotes on their conversations unprompted.
Jason 'English-major-I-only-visit-the-manor-for-the-library' Todd-Wayne
Damian 'I-master-liberal-arts-unlike-you-plebs-PHD-holder' al Ghul-Wayne
Cassandra 'I-learn-English-thru-Shakespeare-as-god-intended' Cain-Wayne
Duke 'only-title-holder-of-vigilante-poet-and-will-cuss-you-just-as-poetically' Thomas-(future) Wayne
#My background is ass#I promise to practice but omg i am losing motivation coz its too ugly#started putting some on coloring that i started being happy about it#But my background is level toddler i hate it#the patience and discipline to make my lines straight and clean is nonexistent gdi...why did past me choose library gdi#Just writing some Duke in my fics and this image of them all just made me wanna do art...Duke is a poet and writes stories u kno?#Duke is not a wayne yet...and is not dead yet...but with how comics goes then its just a matter of time lol#They're all in school here...Cass and Jason are college watching over their juniors in high school#everyone use cardigans but Jason like his leather so no thanks lol#Duke and Cass in outsiders are cute#jason todd#dc comics#damian wayne#fanart#robin#cassandra cain#duke thomas#inking & background study#Damian is now 14!!!! He's getting old...he's like a baby yesterday omg#I need to stop obsessing over this so i posted a WIP so i can continue writing my fic!!! argh#Im gonna watch youtube tutorials again on drawing bookshelves coz i cannot do this without guidance
653 notes
·
View notes
Text
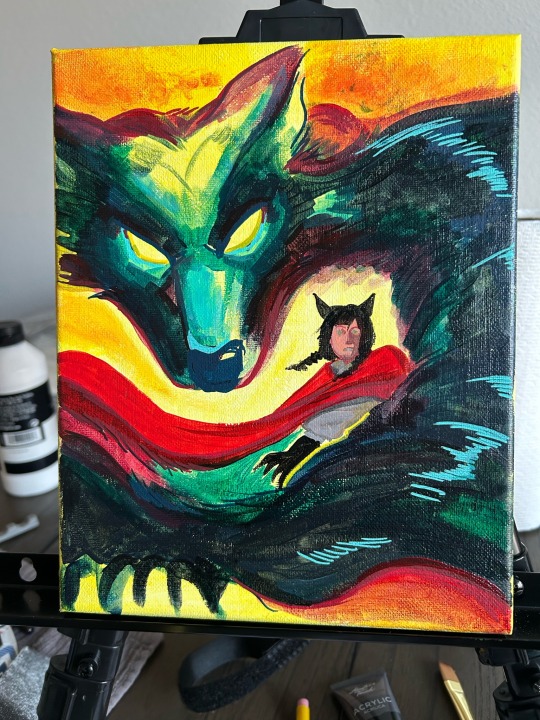
Hello, painting is hard and I don’t know what I’m doing, but at least there’s paint on a canvas lol
#wip#should I have watched a tutorial or something first?#probably#if I don’t jump head first and fuck up first and foremost#I probably wouldn’t start at all#the way to beat perfectionism is to just run headfirst into it screaming and crying#the first one will be rough but maybe the next one will be better?
199 notes
·
View notes
Text

WIP
Can you see them ? 🥹
#digital art#drawing#good omens#crowley#ineffable husbands#aziracrow#aziraphale#wip#tutorial#art wip#learning to draw#practice#procreate#background#it could have been us
234 notes
·
View notes
Text
Fixing bad normals along seams in blender
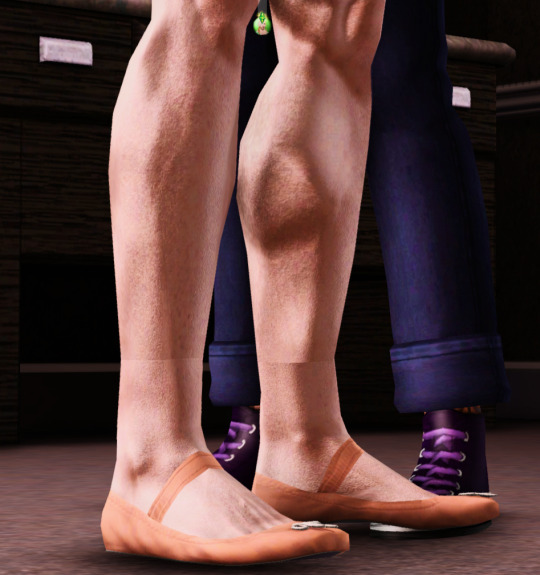

I struggled. Is it the shoes? The skirt's legs? Lets fix the shoes... Ok it is the legs, shoes are fine with other stuff! Lets redo the legs... Nope didn't work. New WRK project? Nope. Redoing the MTK process ... Nope.
Let's just say i ended up with 3 wrk projects, 8 wso's, and a scrambled brain.
I ended up asking @justmiha97, who had a solution - a while ago he used it and might not work, but it did! So I wrote it down for myself and others.
Tutorial here
You need:
- Obj files/meshes of top/feet/bottom/head (depending on your cc) with all morphs, these should be thoroughly checked to have good normals and preferable unscathed fresh from EA, as they are what the seams of your item have to align with. I used the EA feet (Geom and morphs exported from TSRW) and my edit of JVSmith's torso (for its preg morph) for this skirt.
- Smugtomato geom tools
- Any version of blender that has the data transfer modifier & that works with geom tools (I use 3.6)
101 notes
·
View notes
Note
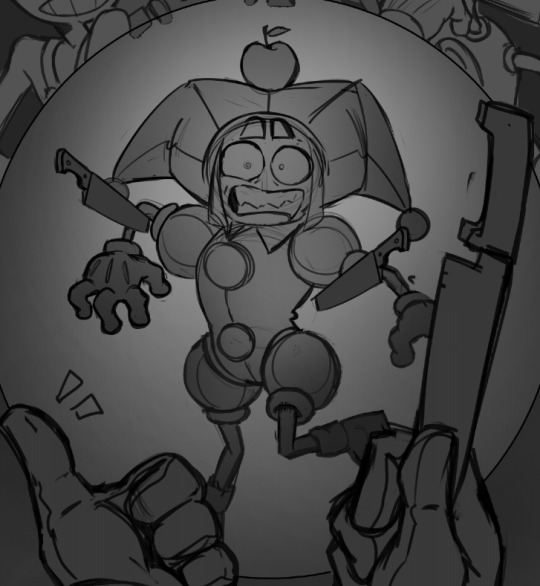
Ziku, do you have any advice for the color technique? I really like how you apply shadows and lights.
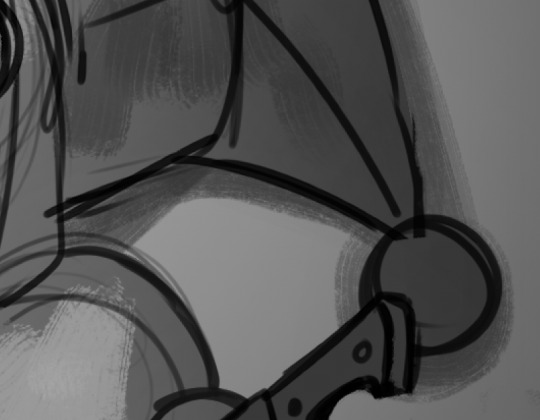
My advice? start with grayscales.
using grayscales helps you distinguish the proper lighting without having to worry about the colors. It's also why I'm able to do the 1-hour pomnis: I could place the colors after I'm done with the lighting placement.
my process is this:
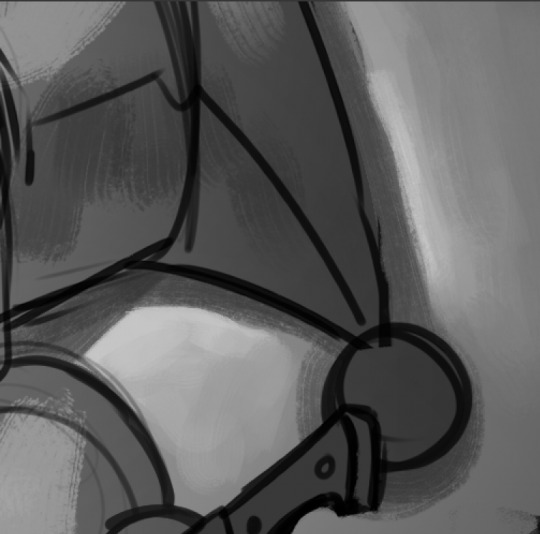
I first start off using airbrush, softly shading areas that don't get hit with light often.
I then proceed to roughly put of where should light hit with a light shade of gray, and how it affects the surrounding area with darker greys. The closer a solid object is to another, the harder the edges of the shadows are. I embrace the imperfection of my strokes, and do not perfect them at this stage since it would be a waste of time.

fun fact: you can make hard edges look more defined by placing a very light shade of gray. This is how I achieve the illusion of lighting hitting something on my art :)
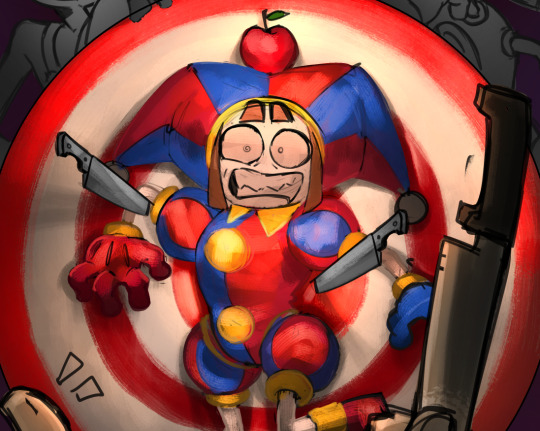
once I'm done with the values, I move to coloring. I keep the strokes as loose as I did the lighting placements, because again. Imperfections HELPS. Glossy things like eyes, teeth and the apple are colored a bit darker, to make the shine pop later.
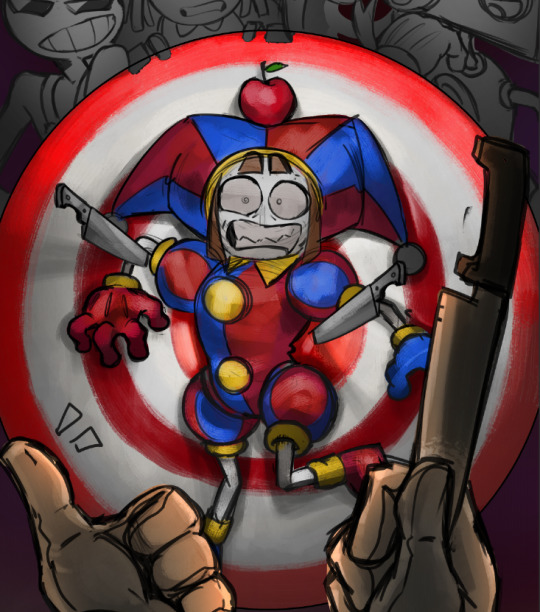
Apply a multiply layer above the colors between 15-30% depending (for this piece it's set to 26%), it's up to you if you want the multiply layer to be cooler colors, or warmer. I chose a saturated orange coloring for mine.

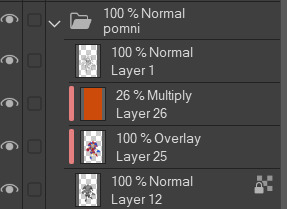
now this is my favorite part: glow dodge. Set to 100% and above every other layer except lineart, light dap it around using an airbrush where the light hits the most.

This part is mostly optional, since this is where I "clean up" the lineart by locking the layer, then color dropping the edges to "erase" most of the lines.
you don't have to do this, it's just easier for me for the rendering stage since it won't get in the way.
You can also go ahead and combine every layer (grayscales + colors + lineart and etc.) afterwards. This one is important.
all that's left to do now... is to render your painting.
and you render,
and you fucking trust the process even though Pomni looks like a stoned as fuck vampire with a receding hairline,
and you render. (and add more glow dodge for the glossy objects)

When I finish a painting, I actually apply a difference layer above it all to give it some flare,
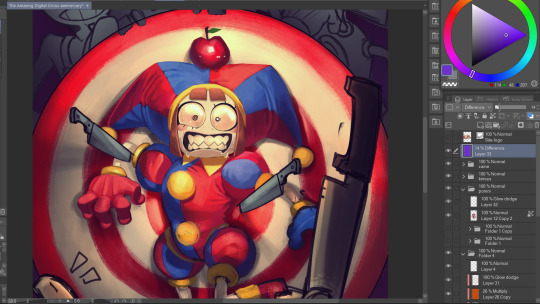
to which after that I'll do a render noise, chromatic aberration, tone curve and posterization for final touches.
That is all :)
#thanks for the ask!#ziku's insane rambles#tadc#pomni#tutorial-ish#the amazing digital circus#art wip#this is my tadc anniversary piece btw
285 notes
·
View notes
Text


Attempt on the mock fit for the vest!! This is the first time I'm doing a bigger clothes-related sewing project so I'm really hoping it goes well
Apollo Justice one day soon I shall be you <3
feat my really dirty mirror
#the little gap in the lapels might end up being too big but thatll be okay i think#im gonna add the pockets and stuff later#ive looked up a tutorial and theyre called welt pockets#man. i plan to make the pants as well#we'll see how successful i am#i do technically have backup pants (in a wrong shade of red) so my goal is to at the very least get the vest and tie done#(and the bracelet and badge ofc)#wip#my art#my cosplay#apollo justice#ace attorney
79 notes
·
View notes
Text
Would anybody be interested in seeing some process posts for my art??
For example my scarecrow went from this to:

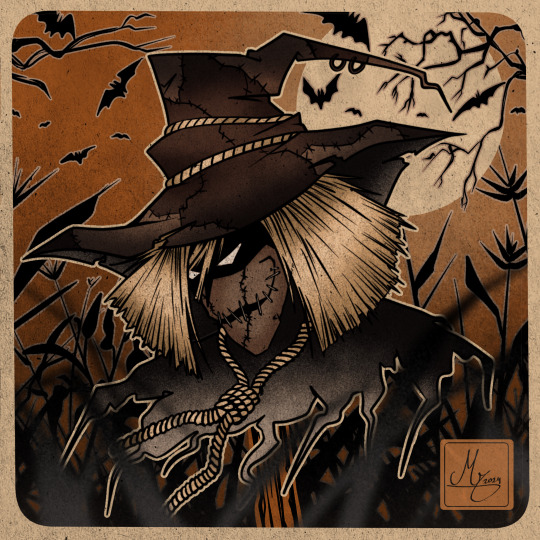
Or i could maybe make small tutorials with little tips??? I dont like editing in video format, but the blog type posts on tumblr seem fun to make!
Let me know in the comments🫶
#drawing progress#tutorial#???? i guess#would you like actual tutorials???#jonathan crane#digital art#batman#batman fanart#fanart#art wip#sketch#batman rogues
76 notes
·
View notes
Text
Merry Christmas to those who celebrate. Here's a preview for a new AU I've been working on for a while now.
... Except I put all the pages in one layer
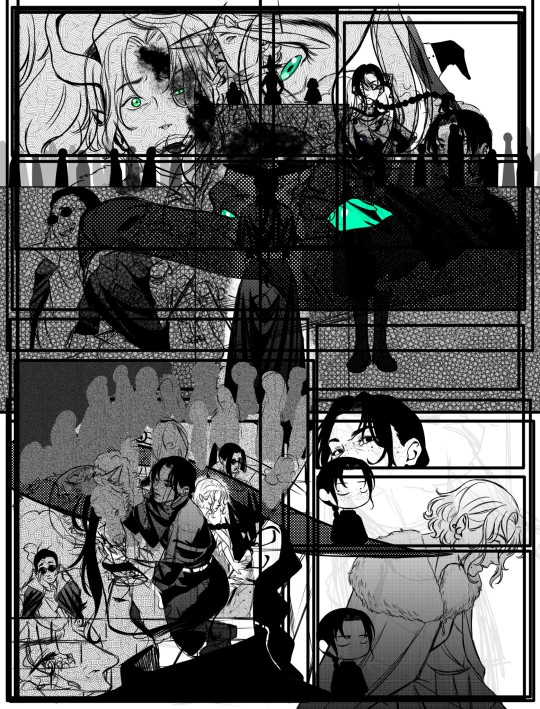
Initially i was gonna show the sketches but i thought it'd be fun to show it like this. Can you guess what's happening?
#wip#i accidentally found the tones/fillers while working on a commission#(no i don't take tutorials because i dont have the attention span for them)
722 notes
·
View notes
Text
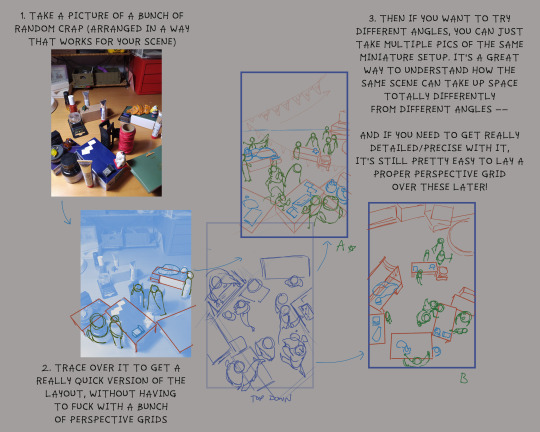
snagging from this week's wip pile for a quick shortcut/hack! i've seen ppl using still life photos as basically a random landscape generator before, but i'll also often do this if i just. don't feel like finding or taking actual to-scale reference of a scene i need to figure out
it's not totally effortless -- sometimes i find it p difficult to gauge how one of these little dioramas will Actually translate once you've traced over/simplified it, and i end up having to go back and try a few different arrangements. but i will do anything to skip a grid dude
#tips#tutorials#resources#i don't remember which of those tags i actually use#oh well!#process#sketchbook#wip
364 notes
·
View notes
Text
Since I’ve posted this elsewhere to better explain the mechanics for those that didn’t fully understand the tutorial I posted, I thought I’d post here as well. I also go over the ear mechanics on this.
Basically play around and see what works, but I hope this helps if you’re still struggling.
#art#animal art#mask#wolf#wip#cardboard art#cardboard mask#cardboard sculpture#cardboard#cardboard craft#werewolf#snarling werewolf#werewolf snarl#wolf snarl#snarling wolf#werewolf mask#wolf mask#tutorial#explanation
628 notes
·
View notes
Text
youtube
The long awaited double knitted twisted rib bind off method is finally here! Big shout out to the genius in my fibre community who developed this method for me and graciously allowed it to be shared. Happy knitting!
#craft#crafts#wip#maker#knit#knitting#knitting tutorial#tutorial#bind off method#knit bind off#double knitting bind off#twisted rib speciality bind off#Luck bind off method#bind off twisted rib#double knit#double knitting#double knitting tutorial#hand knit#knitting methods#knitting yarn#knitspiration#hand knitted#knitblr#knitters of tumblr#knit tutorial#Youtube
86 notes
·
View notes