#sketchup basics
Explore tagged Tumblr posts
Visit Tumblr Blog
Explore Tumblr blogs with no restrictions, modern design and the best experience.
Last Seen Tumblr Blogs


Fun Fact
Average visit duration of Tumblr.com is 10 mins and 25 secs.
Video
youtube
How to Quickly Create Curved Wall Model?(Detailed Commentary Version)
#youtube#sketchup modeling#sketchup plugins#3d modeling#sketchup basics#3d design#interior design#sketchup tutorials#modeling tutorials
0 notes
Text
Are you a beginner in SketchUp trying to master the art of random extrusion and movement? Look no further, as this article will guide you through the basics of creating and manipulating 3D objects with ease.
Introduction
SketchUp is a powerful 3D modeling software used by professionals and beginners alike to create intricate designs and models. One of the key features of SketchUp is the ability to randomly extrude and move 3D objects, allowing users to create complex shapes and designs with ease.
What is random extrusion and movement in SketchUp?
Random extrusion and movement refer to the process of taking a 2D shape and giving it depth by pulling it in the third dimension. This process allows users to create complex and irregular shapes that are not possible with traditional 2D software.
Why is random extrusion and movement important?
Random extrusion and movement are important because they allow users to create complex shapes and designs that are not possible with traditional 2D software. This process enables architects, engineers, and designers to create more detailed and realistic models, ultimately leading to better designs and products.
Getting started with SketchUp
Before we dive into random extrusion and movement, it’s important to understand the basics of SketchUp. SketchUp has a user-friendly interface that is easy to navigate, making it a great choice for beginners. To get started with SketchUp, follow these steps:
Download SketchUp from the official website and install it on your computer.
Launch SketchUp and choose a template that best suits your project.
Familiarize yourself with the interface by exploring the toolbar and menu options.
Read more
4 notes
·
View notes
Text
Top 5 AutoDesk Software Every Student Should Master

In today’s competitive world, having expertise in design and engineering software can set students apart in various industries like architecture, mechanical engineering, interior design, and animation. AutoDesk is one of the leading software providers, offering a range of tools that help students and professionals enhance their technical skills. If you are looking for an AutoDesk course in Yamuna viharor an AutoDesk course in Uttam Nagar, mastering these essential AutoDesk software can open doors to exciting career opportunities.
1. AutoCAD – The Foundation of Design and Drafting
AutoCAD is one of the most widely used software in engineering, architecture, and construction. This powerful tool is essential for creating precise 2D and 3D drawings. If you are considering an AutoCAD training institute in Yamuna Vihar or an AutoCAD course in Yamuna Vihar, learning AutoCAD will provide you with a strong foundation in drafting and design. Many students enroll in AutoCAD classes in Yamuna Vihar to enhance their technical drawing skills, which are crucial for careers in civil engineering, mechanical design, and architecture.
2. Revit – The Future of Building Information Modeling (BIM)
Revit is a must-learn software for students interested in architecture, structural engineering, and MEP (Mechanical, Electrical, and Plumbing) design. It helps in creating intelligent 3D models with detailed information about the building components. If you are searching for Revit training in Yamuna Vihar or a Revit course in Yamuna Vihar, then mastering Revit can help you build a successful career in the AEC (Architecture, Engineering, and Construction) industry. Many students opt for Revit classes in Yamuna Vihar to gain hands-on experience in building modeling.
3. 3Ds Max – The Key to Stunning 3D Visualizations
For students aspiring to work in gaming, film production, or interior designing, 3Ds Max is an excellent choice. This software is widely used for 3D modeling, animation, and rendering. Many students enroll in 3Ds Max training in Yamuna Vihar to learn advanced visualization techniques. If you are looking for 3Ds Max coaching in Yamuna Vihar or a 3Ds Max training institute in Yamuna Vihar, you can develop expertise in architectural walkthroughs, product modeling, and animation.
4. SolidWorks – Essential for Mechanical Design and Product Development
SolidWorks is widely used in mechanical engineering and industrial product design. This software allows designers to create 3D models and perform simulations to analyze product performance. If you are considering a Solid Works training institute in Yamuna Vihar or a Solid Works course in Yamuna Vihar, learning SolidWorks can be a valuable addition to your skillset. Many students take Solid Works coaching in Yamuna Vihar to gain practical knowledge of 3D modeling and mechanical design.
5. Google SketchUp – Ideal for Interior Designers and Architects
Google SketchUp is an easy-to-use 3D modeling tool that is widely used in interior design and architectural planning. Students interested in interior design can benefit from a Google SketchUp course in Yamuna Vihar or Google SketchUp training in Yamuna Vihar to learn the fundamentals of 3D modeling and visualization. Google SketchUp coaching in Yamuna Vihar is also available for those who want to enhance their rendering and presentation skills.
How to Build a Strong Portfolio as an AutoDesk Fresher
Having a well-structured portfolio is crucial for freshers looking to establish a career in design, architecture, or engineering. Here are some essential tips:
1. Showcase Diverse Projects
A strong portfolio should include various projects that demonstrate your proficiency in AutoCAD training in Uttam Nagar, Revit training institute in Uttam Nagar, and 3Ds Max training in Uttam Nagar. Employers and clients look for candidates with a wide range of skills.
2. High-Quality Renders and Visualizations
If you have completed an AutoCAD course in Uttam Nagar or a 3Ds Max training institute in Uttam Nagar, ensure that your portfolio includes high-quality renders and detailed models. This will make your work stand out.
3. Include Step-by-Step Project Descriptions
Explain your design process in detail, mentioning the software used. For example, if you completed an AutoCAD coaching institute in Uttam Nagar or a Revit architecture academy in Uttam Nagar, describe how you applied your skills in real-world projects.
4. Keep Your Portfolio Well-Organized
If you are showcasing work done during your Revit architecture training institute in Uttam Nagar or AutoCAD coaching center in Uttam Nagar, ensure that your portfolio is professionally structured. Use clear headings and maintain a consistent design format.
5. Update Your Portfolio Regularly
Technology is constantly evolving, and new techniques emerge frequently. Students who have taken Interior Designing training in Uttam Nagar or Solid Works training in Uttam Nagar should update their portfolio with the latest industry trends to stay relevant.
Why Choose a Professional AutoDesk Training Institute?
If you are serious about a career in design, engineering, or architecture, enrolling in a professional AutoDesk training institute in Uttam Nagar can provide you with the right skills and hands-on experience. Here’s why:
Expert Guidance: Learn from experienced professionals who have industry knowledge.
Practical Learning: Gain hands-on experience through real-world projects.
Certification: A recognized certification from a reputed AutoDesk course in Uttam Nagar can boost your resume.
Career Support: Institutes provide placement assistance and career guidance to help students secure jobs.
Final Thoughts
Mastering AutoDesk software is essential for students looking to build a successful career in design, architecture, animation, and engineering. Enrolling in an AutoDesk training institute in Uttam Nagar or an AutoDesk course in Uttam Nagar can help you gain practical knowledge and industry-recognized certifications. Whether you choose to specialize in AutoCAD training in Uttam Nagar, Revit training in Uttam Nagar, or 3Ds Max training in Uttam Nagar, having expertise in these tools will open doors to excellent career opportunities. Start your learning journey today and shape your future in the world of design and technology!
Suggested links :-
AutoCAD Course
AutoCAD Institute
AutoCAD Institute
#autocad training#autocad#autocad basics#autocad tips#autocad skills#sketchup#what is autocad#autocad training institute in yamuna vihar#autocad training institute in uttam nagar
0 notes
Text

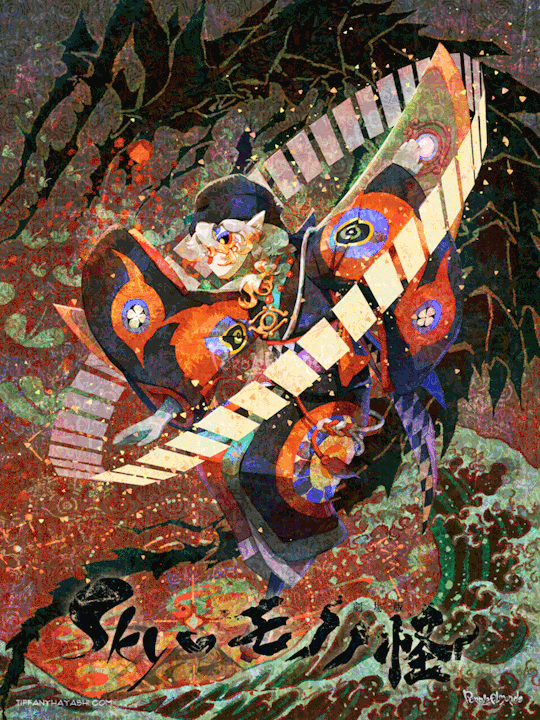
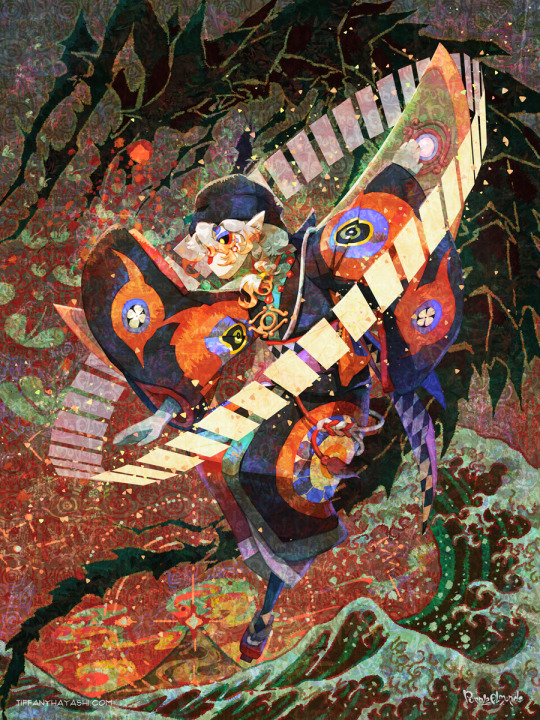
Continuing to fire on all cylinders to make this Sky 🤝Mononoke collab a reality! 🐲⚖️🌊
Process GIFs and artist commentary below the cut. ⬇️
Left: Process GIF Middle: Just the background, cos I really like how it looks! Right: Illustration without the collab logo
And here are my notes on my inspirations and references. There's a lot of 'em, so instead of embedding relevant images one by one I put them in a callout sheet! For accessibility, I also included transcript (with bonus ramblings) below each sheet.

Ofuda circle modeled in Google Sketchup 2017, then lightly transformed in Photoshop to flare out. I tried my best to hand-draw these, but it the results came out really clunky and stiff. I figured if Mononoke shamelessly utilizes 3D in their show, I can too!
Krill and sky kid composition roughly inspired by the Ayakashi DVD cover illustration. On the surface level, the krill's black-and-red color scheme mirrored that of the bake-neko. Not to mention, in the world of Sky, the krill would be the best fit of a mononoke-like entity. The red background is also a nod to the red skies seen during a shard eruption in Sky.
Sky kid gesture based on the Festival Spin Dancer's Tier 3 poses and the Medicine Seller's iconic pose in the Zakishiwarahi episode as inspiration. This was the idea which springboarded this illustration into existence. I wanted to do my take of the Medicine Seller's pose, but in a more dynamic manner: rotate the pose to a profile position and set the ofuda in a diagonal, flared out arrangement.
Cape inspired by tenbin design featured in the 2024 Mononoke movie. This one's an interesting one - I wanted the cape to be a stiff material that doesn't "flap" when in flight - similar to the Aurora wing capes. It ended up looking like a kite of sorts, which I'm not entirely opposed to! I haven't had the opportunity to showcase the back view of this cape design, but I envision it having some mechanical aspects to it - the "wing" which are flared out in this illustration fold in like moth wings, and a little bell is attached to the "tail" part and it jingles a little whenever the sky kid flaps!
Bandana is based on the Scaredy Cadet's hairstyle from the Season of Assembly. Mask design utilizes the 2023 Days of Style mask and the Nintendo Pack mask as bases. Pretty self-explanatory. I basically went onto the Sky wiki and found the cosmetics that most closely matched what I was looking for. Then if necessary, I went to the Office space to do photoshoots to get the appropriate camera angles for them all.
Seasonal pendant inspired by the classic Medicine Seller's necklace and the eye motif featured in the 2024 Mononoke movie. Possibly the only one-to-one homage to the classic Medicine Seller design here, but his garnet necklace was too good of a match to the seasonal pendant. A side tangent: does the new Medicine Seller possess a necklace, let alone a mirror? So far all the shots of him don't feature it. Fascinating.

Dark dragon krill anatomy references a custom figurine crafted by @/escaflowne_n07 on Twitter. Until I found this, I was honestly at a loss finding reference for this - be it on the internet or during in-game photoshoots. The lighting on the krill in-game focused on its menacing silhouette rather than its structure. And not to mention, getting a close-up shot almost always set off the dark creature's aggro. I have no idea how this guy found the references to put this model together - well done!
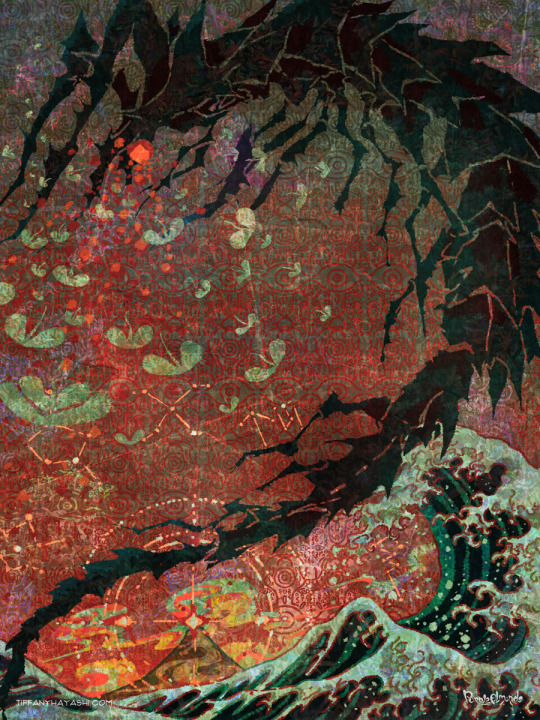
Mantas, elder constellations, and sun dog references murals in the Cave of Prophecy. Krill aside, the overall illustration was leaning a little too much towards Mononoke so I tried finding opportunities to insert more Sky into it. Added bonus is that now there's storytelling in the background: during a shard eruption, a giant krill rises from the frothing waves of dark water to hunt down a flock of mantas.
Clouds behind the sun dog reference the ones featuring heavily in the Umibozu episode. This illustration has a lot of ocean theming, so I figured this would be appropriate.
Rendering style of the background is lightly inspired by the 2007 Mononoke illustration. Mainly having a 2D inked style to contrast with the more polished render of the sky kid. Funnily enough, this was a tertiary inspiration, which lead to the discovery in the next point!
Dark water waves and sun dog composition heavily references Hokusai's "The Great Wave". The waves were modified to be bottle-green of the Golden Wasteland's dark waters. The sun dog is in the spot where Mt. Fuji is in the original composition. these were all hand-drawn by the way! I merely emulated the style of the source material. As a side note, I also borrowed the spotted sea spray rendering for the krill's red spotlight.
Background pattern taken from the ofuda design featured in the 2024 Mononoke movie poster. Mainly to add some gritty texture to the sky. I worked pretty hard to replicate this ofuda design as a high-res asset so I wanted to use it more!
#モノノ怪#mononoke 2024#mononoke 2007#kusuriuri#medicine seller#thatskygame#sky cotl#sky children of the light#thatgamecompany#thatskygame fanart#sky cotl fanart#crossover#purplealmonds#2023#🔕
518 notes
·
View notes
Text

My "flat" edit of Brittney Lee's concept art shown at D23!
The base for this edit is this photo posted on the site youloveit and is originally 1934 x 1503 pixels. Every single photo I've seen of the concept art is taken at a slight angle. This one was by far the least oblique photo I could find plus it has basically nothing obscuring the view of the beautiful art! I did a 3x upscale of it using Gigapixel and to flatten it I used the photo editing/aligning function in SketchUp, resulting in a near perfect front-view perspective with very little distortion.
I used the same technique previously on the complete Frozenverse map found at Fantasy Springs.
You can grab the final 7200 x 3137 png-version here!
#frozen#frozen 2#frozen 3#frozen 3 spoilers#anna#elsa#olaf#frozen concept art#brittney lee#d23#d23 expo#disney frozen#frozen edit
84 notes
·
View notes
Text
Finally making a pinned post, since it's long overdue
Hello! I've been on tumblr longer than anyone probably should, and therefore I am Old, probably a lot older than you. Minors absolutely do not interact with this blog, please--while most of what I talk about is safe for work, I am not shy about discussing adult materials, and I am extremely uncomfortable with anyone under the age of 18 interacting with me or my works at all, even if it's just likes. All I ask is that you respect that, please and thank you.
I primarily talk about my tav, Thyneron, and his relationship with the Emperor, but I am a huge fan of Forgotten Realms in general, so you'll see a lot of love for all the bg3 characters, as well as other DnD works, such as the Legend of Drizzt, Honor Among Thieves, etc
I wrote a novel length fanfiction about Thyneron's journey through BG3 which can be found here on AO3, and I make comics, the tags for which can be found at the top of this page.
A brief F.A.Q.:
What hardware/software do you use to draw with?
Clip Studio Paint and a HUION drawing tablet. I also occasionally use Sketchup for modeling backgrounds/scenery to make the perspective process smoother.
Do you mind if I use he/him pronouns for the Emperor?
Firstly, please do whatever you like and feel comfortable with! I personally prefer to use it/its pronouns for it, but I will occasionally use masculine pronouns as well. I am not in any way, shape, or form offended when people use other pronouns for it.
On a similar note, post ceremorphosis Thyneron also switches to its pronouns, but even I still broadly use he/him for it. I will not be offended if you use either for him in any stage of his life.
How the hell do you pronounce Thyneron?
Thih-nerin, basically like "thin erin" rolled into a single word.
21 notes
·
View notes
Text
in bloom for you i describe oscar’s flat as like clean… definitely not fancy bc i imagine it to be just like his wardrobe basic and functional with no frufrus
but i love frufrus 🥺 and my dream is to have enough free time to play house and build an iso of his living room or bedroom, filled with all the little things that remind me of him
but i’d never find the sketchup models for it and i fully don’t have the patience to model it all myself lol
#i think i need to get good on blender for this#…or maybe i just let go and do it in the sims#op81#oscar piastri
14 notes
·
View notes
Note
For the artist meme~ 1, 29, 30 🩵
1. Art programs you have but don't use
Uuuuuh... I have art programs that I don't use anymore? I used to draw on Gimp, Photoshop, and Paint Tool Sai, before jumping on Procreate. Since then it's been exclusively Procreate.
For 3d stuff, I dabbled in Blender3D for some time but I never had a good enough computer to keep up. Now I use the free version of Shapr3D and SketchUp.
But basically, when I stop using a program for too long I just delete it. I don't like clustered desktop ^^"
29. Media you love, but doesn't inspire you artistically
Already answered in the previous one but mostly Assassin’s Creed. I've written a lot for it but I've only ever done 2 or 3 fanarts of it. Which is a bit weird coz I love the artistic direction but I just... don't draw for it. Dunno why.
30. What piece of yours do you think is underrated
.w. Hm... I don't know? I don't really look at numbers much so I don't really know which pieces haven't received as much love as others (the only thing I know is that bullying Leona makes the biggest numbers lmao).
But hm, maybe the "Genuine cane user Azul". I'd love to see this agenda spread more among the fandom lol I should draw much more of it so people have no choice but to convert to it.
Sorry if it's a bit over the place :') And thanks for asking!!
[ASK GAME]
10 notes
·
View notes
Text

Some process stuff for #webcomicday! For the most recent chapters I've been doing the initial layouts and rough sketches digitally, then printing them out in light blue to do the final pencils, inks, and watercolor ink washes on paper.
Tamuran is an epic fantasy comic about an assortment of shapeshifters, outcasts, monsters, and other thoroughly unqualified people attempting to save a cursed kingdom. It's recommended for readers aged older teen and up.
Full process step images and details below the cut.
Layout/thumbnail sketch. Figuring out the movie-directing, storytelling elements and what goes where on the page. This one's a bit of a montage as Effire (the cobra) is traveling through a more desolate section of the palace and talking telepathically with his partner Morgen, who's back in their room.

Rough digital sketch stage. Also some perspective rulers and grids for guidelines. Sometimes I'll build a basic 3D model in Sketchup if I have a room or a set that I'm going to use a lot and need to keep consistent (like Morgen's rooms), but I didn't need anything that involved for the one-off storage room shots here.

Final pencils. I print out the rough sketch in light cyan on Canson watercolor paper and then refine the lines over it (the blue printer ink lifts out when I soak the paper to prep it for painting).

Inks. Diluted Deleter #4 ink, dip pens with maru and G nibs. A lot of the texture details will disappear in the shading, but they're fun to do anyway.

Watercolor ink washes and some white gel pen for the finishing touches. After I scan and adjust it I can also fix anything that needs fixing - like how I initially drew Morgen's hunting knife a bit too long in the fifth panel.

17 notes
·
View notes
Text
Unleash Your Creative Potential: Join the Best Graphic Design Courses in Andheri at Reliance Animation Academy

Reliance Animation Academy in Andheri is where creative journeys begin and careers take flight. In today’s visually-driven world, design is no longer just decoration—it’s the language of brands, the driver of engagement, and the core of digital storytelling. Whether it’s the logo of your favorite startup or the animation in your favorite reel, design is shaping everything.
If you’re passionate about visuals, creativity, and building a meaningful career, this is the right place to start. With hands-on training, real-world assignments, and expert mentorship, the academy’s industry-relevant graphic design courses in Andheri prepare you to succeed in today’s digital-first economy.
Why Graphic Design Courses in Andheri Are a Smart Career Move in 2025
Graphic design has evolved from an optional skill into a business essential. In 2025, brands don’t just want good design—they need it to thrive.
Here’s why more students, freelancers, and professionals are enrolling in graphic design programs:
Digital-first businesses rely on consistent design for social media, websites, and marketing campaigns
Packaging and branding directly influence purchasing decisions
Motion graphics dominate online platforms, from ads to entertainment
Startups, influencers, and creators use visuals to build trust and credibility
Global freelance and remote design opportunities are increasing every day
With the right training, portfolio, and mindset, you can be part of this creative revolution—starting now.
Key Skills You’ll Learn in Graphic Design Courses in Andheri
At Reliance Animation Academy in Andheri, design education goes far beyond software. The programs are structured to make you think like a designer, solve real problems, and communicate visually with impact.
You’ll learn to:
Creative Thinking & Ideation Develop the ability to translate abstract ideas into purposeful designs that solve real-world challenges.
Master Professional Design Tools Work hands-on with:
Adobe Photoshop
Illustrator
InDesign
CorelDRAW
Figma & Adobe XD for UI/UX
After Effects for motion graphics
Understand Visual Design Principles Learn the fundamentals of color theory, typography, layout design, and composition to create aesthetically balanced and functional visuals.
Explore Motion Graphics & Animation Enhance your static visuals with animation and transitions—perfect for digital storytelling, advertising, and social media content.
Develop Communication & Client Skills Present your work confidently, incorporate feedback effectively, and collaborate on real-time design projects.
Design Courses Offered at Reliance Animation Academy in Andheri
The academy provides specialized, job-ready courses that combine creative thinking with technical skills. Whether you’re a beginner or looking to specialize further, there’s a course for you.
Advanced Program in Web Design & UI/UX
Learn to create responsive websites and user-friendly app interfaces
Tools covered: Figma, Adobe XD, HTML/CSS basics
Ideal for those targeting roles in web and digital product design
Advanced Program in Motion Graphics
Dive into motion design, kinetic typography, transitions, and video editing
Build content suitable for advertising, YouTube, OTT platforms, and more
Certificate Program in 3D Interior Visualization Pro
Learn to produce realistic architectural walkthroughs and renders
Master software like 3ds Max, V-Ray, and SketchUp
Perfect for architects, interior designers, and visualizers
Certificate Program in Graphics Pro
Gain end-to-end skills in graphic design, branding, layout, packaging, and digital ads
Suitable for freshers or professionals wanting a structured upskilling path
Certificate Program in Digital Photography Pro
Get in-depth knowledge of DSLR photography, lighting setups, image composition, and editing
Tailored for fashion, event, lifestyle, and product photography careers
All courses are supported with real-world projects and portfolio-building assignments to ensure students graduate job-ready.
Why Choose Reliance Animation Academy in Andheri
The academy isn’t just about teaching design—it’s about nurturing designers. With a focus on experiential learning and professional readiness, here’s what makes it stand out:
Mentors with real-world experience in design, media, and animation
Practical, studio-style classrooms and equipment
Real assignments that simulate agency work
Career support, placement guidance, and one-on-one feedback
A vibrant community of learners, creators, and mentors
Reliance Animation Academy doesn’t just give you a certificate—it prepares you for the real world.
Career Opportunities After Completing Graphic Design Courses in Andheri
Once you complete your training, a wide range of creative careers becomes accessible to you. Depending on your chosen specialization, you can explore roles like:
Graphic Designer – for marketing agencies, branding firms, or corporate creative teams
UI/UX Designer – designing digital products for startups and enterprises
Motion Graphics Artist – animating ads, explainer videos, or YouTube content
3D Visualizer – working on high-end visuals for real estate and architectural firms
Freelance Illustrator or Photographer – offering your services locally or globally
These roles aren’t limited by geography. With a strong portfolio and the right skills, you can work with clients from anywhere in the world.
Who Can Enroll in Graphic Design Courses in Andheri
You don’t need prior experience or an art background to get started. These programs are built for learners at all stages.
Best suited for:
Students (10th or 12th pass) exploring creative careers
College students seeking practical skills and certifications
Working professionals looking to switch to a creative industry
Freelancers or hobbyists aiming to turn passion into income
Entrepreneurs wanting to design their own brand assets
Whether you’re starting fresh or reskilling after years, the academy offers you a guided, practical learning path.
How to Get Started at Reliance Animation Academy in Andheri
Starting your creative journey is simple:
Visit the campus or apply online
Schedule a free counseling session
Choose a course that aligns with your interests
Submit required documents
Begin your classes and start building your professional design portfolio
EMI payment options and scholarships are available for eligible students. The team ensures a smooth and supportive admission process from day one.
Why This Is the Perfect Time to Join Graphic Design Courses in Andheri
Design is no longer an optional skill—it’s the language of marketing, branding, and communication in the digital age. With short attention spans and visual-first content dominating every platform, the demand for skilled designers continues to grow.
By enrolling now, you can:
Start building a high-quality, job-ready portfolio
Train with expert mentors and real industry tools
Learn by doing—through practical assignments and client-style projects
Explore freelance or full-time roles in India and abroad
Get ahead of the competition by gaining real skills, faster
Contact Reliance Animation Academy in Andheri
Website: www.relianceacademyandheri.com Phone: +91 93213 30003 Email: [email protected] Location: 2nd Floor, B-Wing, Crystal Plaza, New Link Road, Opp. Infinity Mall, Andheri West, Mumbai – 400053 Google Maps: Click to Navigate
2 notes
·
View notes
Note
I know this might be a bit odd but do you have any tips for making good floor plans like you posted bc I want to make a floor plan but I STRUGGLE
The secret is actually The Sims!

I started by researching blueprints for Norse cabins. These were the two I had saved on my phone but I spent a LOT of time looking for ones that I liked and would suit Seb and Ram's needs.


Next I made a super messy sketch incorporating the elements that I liked (not my best artwork but I didn't have a pencil lol)

Then I created the house in Sims 4- this was obviously my favourite part because I LOVE to build and decorate! I appreciate the visual aid. The build tool made it easy to tweak the floor plan and play with the design, AND it had the added benefit of helping me overcome some logistical hiccups in the story (such as "oh shit I forgot the fridge! Wait how do they do laundry? We need another bathroom, oops.")
Here are some of my favourite details from the build: the Seb and Ram sized towels in the pool; the little kitchen and hideous wallpaper; and the his and hers desk spaces.


Finally I brought the overhead image it into CSP to outline and add all the details! I took a course many (MANY) years ago that included SketchUp, so I have a basic familiarity with floor plans and the symbols. Nothing official, but enough to make me dangerous.
I will eventually make this available on the gallery if folks are interested! I need to switch the bedrooms around first, but the game takes forever to load on my old PC... it is painful lol.
6 notes
·
View notes
Text
How to install and use IrfanView in Linux - Tutorial
How to install and use IrfanView in Linux - Tutorial
Updated: May 30, 2022
My Windows to Linux migration saga continues. We're still a long way off from finishing it, but it has begun, and I've also outlined a basic list of different programs I will need to try and test in Linux, to make sure when the final switch cometh that I have the required functionality. You can find a fresh bouquet of detailed tutorials on how to get SketchUp, Kerkythea, KompoZer, as well as Notepad++ running in Linux, all of them using WINE and successfully too, in my Linux category.
Today, my focus will be on IrfanView, a small, elegant image viewer for Windows, which I've been using with delight for decades now. It's got everything one needs, and often more than the competitors, hence this bold foray of using it in Linux despite the fact there are tons of native programs available. But let's proceed slowly and not get too far ahead of ourselves. After me.
As I said, it's majestic. A tiny program that does everything. It's fast and extremely efficient. When I posted my software checklist article, a lot of Linux folks said, well, you should try XnView instead. And I did, honest, several times, including just recently, which we will talk about in a separate article, but the endeavor reminded me of why I'd chosen IrfanView all those years back. And those reasons remain.
Then, I did play with pretty much every Linux image viewer out there. None is as good as IrfanView. It comes down to small but important things. For instance, in IrfanView, S will save a file, O will trigger the open dialog. Esc quits the program. Very fast. Most other programs use Ctrl + or Shift + modifiers, and that simply means more actions. I did once try to make GwenView use the full range of Irfan's shortcuts, but then I hit a problem of an ambiguous shortcut, wut. I really don't like the fact that hitting Esc takes you to a thumbnail overview mode. But that's what most programs do.
WINE configuration
The first step is to have WINE installed on your system. I am going to use the exact same method outlined in the SketchUp Make 2017 tutorial. I have the WINE repositories added, and I installed the 6.X branch on my system (at the time of writing).
IrfanView installation
Download the desired 32/64-bit version of the program and then install it. The process should be fast and straightforward. You will be asked to make file type association. You can do this, or simply skip the step, because it doesn't make any difference. You need to associate IrfanView as the default image viewer, if this is your choice, through your distros' file type management utility, whatever it may be.
And the program now works! In Plasma, on top of that, you can also easily pin the icon to the task manager.
Plugins and existing configuration(s)
Much like with Notepad++, you can import your existing workspace from a Windows machine. You can copy plugins into the plugins folder, and the IrfanView INI files into the AppData/Roaming folder. If you don't have any plugins, but you'd like to use some, then you will need to download the IrfanView plugins bundle, extract it, and then selectively, manually copy the plugins into the WINE installation folder. For instance, for the 64-bit version of the program, this is the path:
~/.wine/drive_c/Program Files/IrfanView/Plugins
As a crude example, you may want to make IrfanView be able to open WebP files. In that case, you will need to copy the WebP.dll file into the folder above, and relaunch the program. Or you can copy the entire set of IrfanView plugins. Your choice, of course.
Conclusion
And thus, IrfanView is now part of our growing awesome collection of dependable tools that will make the Windows to Linux migration easier. I am quite sure the Linux purists will be angry by this article, as well as the other tutorials. But the real solution is to develop programs with equivalent if not superior functionality, and then, there will be no reason for any WINE hacks.
If you're an IrfanView user, and you're pondering a move to Linux, then you should be happy with this guide. It shows how to get the program running, and even import old settings and plugins. I've been using IrfanView in Linux for many years, and there have been no problems. That doesn't say anything about the future, of course, but then, if you look at what Windows was 10 years ago, and what it is now, it doesn't really matter. Well, that's the end of our mini-project for today. See you around. More tutorials on the way!
Cheers.
3 notes
·
View notes
Text
legitimately i rlly think we should b teaching Basic Computer/Internet/Information literacy in schools like. not specialized stuff like obv when i took design in high school i learned to use photoshop or learned sketchup or autocad in CMT but Basic Stuff. finding things online. recognizing hoaxes. factchecking. sourcing. basic basic coding like youd use in a forum or very basic webpage. and not as an elective
#bcuz the way the internet is rn isnt doin anyone any favours ppl need to learn how to like. do things.#find things. avoid things!!!#u shouldnt b reliant on companies or corporations or the same 4 websites!!! go find some wierd shit fr
4 notes
·
View notes
Text
Unit 9 Reflective Journal - Lim Lin Year 2 Production Arts for Screen
For the final unit in our second year, we were given the option to choose between a film or game related project. There would be an introduction to SketchUp and AutoCAD for the film project with the final outcome being a set plan and 3D model, while an introduction to Maya and Unreal Engine is given for the game project with the outcome of a combat interaction using the game software. I chose to do the game project as I wanted to improve in 3D animation and needed to learn fundementals in Maya and Unreal Engine. As I want to enter the game industry after graduation, having knowledge in these software would greatly benefit the works I could produce in my portfolio. We were given a introduction to the basics of Maya animation through the graph editor.


After using the graph editor to animate a sphere, we then animated a walk cycle with a premade model of Homer Simpson to familiarise ourselves with using the graph editor to edit keyframes. This exercise helped to show the basics of a walk cycle which can be edited more efficeintly using the graph editor, as compared to animating in Blender, the option to select and adjust individual curves helped in creating a smoother cycle, well as learning how to adjust gradients of the curve for more fluid movement.

For the animations we would later use for the combat interaction, the AZRI model was used. After adding constraints from the hand to the sword, it was possible to create animations for combat with the weapon attatched.

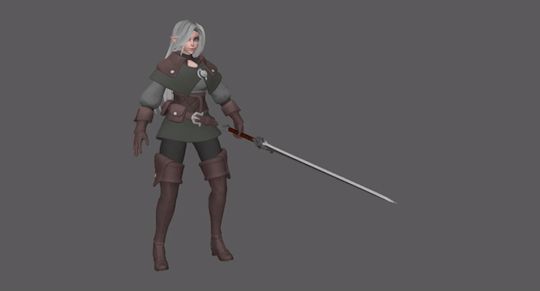
Using the AZRI model, we were shown how to animate the movements needed for the combat interactions. After doing a walk cycle and idle movement, we were then shown how to animate a run cycle and sword swings.


I tried animate hair movement in the first sword swing, but did not have time to do so for the other AZRI animations.
The sword swings and run cycles were difficult to animate as I was unsure of the timing of the actions, especially on how to make the sword movement look more impactful.

For the run cycle, I struggled to make the arm movement look natural, and for the hair to move with the character's head. As such, the end result looked choppy and stiff.
In our introduction to Unreal Engine, we were shown how to use the third person template. While working on the animations on Maya, we instead used premade animations and models on Mixamo.
Using the mixamo animations, we were taught how to use blueprints and create blend spaces for character movement.


Afterwards, we were shown how to export Maya models to FBX for Unreal Engine. After importing the animations, we repeated the steps on the Mixamo models to the AZRI model.


I then downloaded the Urban Warrior model made by Marc with K.
Model: @OtyMark Rig: @kaiakim_art
Using this model, I tried animating the character movements using the AZRI model and Mixamo animations as reference.


For these animations, I tried to animate the cape behind the character as the player would only see the back view of the model for majority of the gameplay. On hindsight, I should have picked a different model for the playtest as it was difficult for the cape to move fluidly. Even with the run cycle that had more movement with the cape, the result did not look good in the actual gameplay.
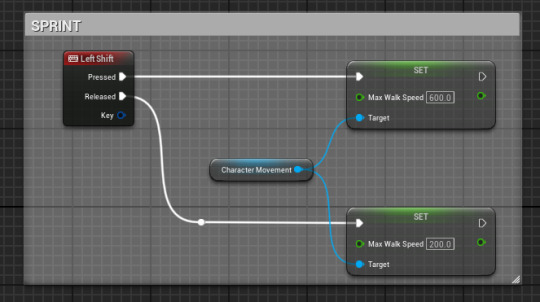
We were also shown how to make an event for the player to sprint on the map by pressing the shift key, and how to use sockets with the skeleton of the mesh. The attack range can also be previewed when testing the game.

After creating the animation blend space, blueprint and montage for the warriot character, a combat test was then done on Unreal Engine then recorded on OBS.
However, even though the imported model was working in the viewport, after importing the animations, there was a glitch on the back of the model's neck. I tried to reimport the mesh and animations but was unable to remove the stretched areas.
Overall, this unit helped us to understand these industry standard software better and I was able to be more familiar with using the graph editor for animation. If I had more time, I would have tried to animate the cape more realistically as well as the other accessories. I hope to conitnue working with Maya next year as it is a powerful software that can be utilised greatly for animation, and to light and render scenes better as I was unable to do so this unit.
ESSAY:
A company I would like to work for is Fortiche Production SAS, a French animation studio best known for their animations in partnership with Riot games. It currently has three locations in France and Spain, with its headquarters in Paris. The studio was founded in 2009 and started with commercials for companies such as Panasonic and MTV. The studio’s incorporation of 2D and 3D elements continue to be shown in music videos produced for artists such as Gorillaz. It is through this creative direction that video game studios began hiring Fortiche to work on game trailers in the form of short films and music videos.
The reason why I want to work for them is because the art direction behind their trailers and music videos have been the inspiration behind my personal projects for years. I first discovered their works through the game League of Legends, as the studio has been creating animations based on the game. Recently, the company has received further recognition for the award-winning Netflix series Arcane. The show has received a critical success for both its retelling of the lore behind in-game characters, and its painterly stylisation of 3D animation. Not only has Arcane given the franchise a wider audience who discovered the characters through the show, it also��pioneered a new approach in stylisation along the Spider-Verse movies. The dark and mature themes of the League franchise is also reflected in its environment and character designs which has also influenced my art style. As such, if possible, I would like to work as a 3D generalist or 2D illustrator for their productions. This relates to my overall aspirations as I would like to work in the gaming industry after graduation and would like to specialise in 3D environments.
Based on their previous job postings on both their website and LinkedIn, the company mostly advertises positions available for mid to senior level artists who already have years of experience in the industry. If I were to submit an application, it would have to be done through the “unsolicited application” section of the website. As stated on their page, the studio would require links to the applicant’s LinkedIn profile and portfolio website. The application would be directed to HR for an interview if successful, then interviews from direct managers and creative tests. The applicant is also encouraged to send a demo reel and CV that showcases their skills and experience. While it may not be possible to receive and offer from this company at my current level, I would like to try to apply for a position in the future. Aside from this company, there are also other studios such as Goodbye Kansas Studios and M2 Animation that specialise in game trailers and cinematics. As most of the companies require knowledge in software such as Maya and Houdini, I would need to continue practicing fundamentals on the software I am comfortable with such as Blender, then build on this knowledge on industry standard software, as well as working on digital illustrations that can be used for professional work.
CV pdf: Lim Lin CV.pdf
Portfolio website: https://limlin2563.wixsite.com/digitalvfxportfolio
0 notes
Text
How To Start a Business with Interior Design Course in Bangalore

Interior design is not just about decorating rooms. It is about creating beautiful and comfortable spaces where people love to live and work. Today, many people want their homes and offices to look stylish. This has made interior design a fast-growing industry.
If you are someone who loves designing spaces, colors, furniture, and layouts, then this is a great time to learn interior design and start your own business.
One of the best ways to start your journey is by joining an Interior Design course in Bangalore at Eduleem a leading interior design institute with hands-on training and complete business support.
Why Interior Design is a Great Career Option
Interior design is a creative and rewarding career. People hire interior designers to make their homes, shops, and offices look nice and work well.
After learning interior design, you can:
Work as a professional designer
Start your own design studio or business
Take freelance projects
Work with architects or real estate companies
Sell design products or services
The best part is, you can be your own boss.
How Eduleem Helps You Start an Interior Design Business
Eduleem is one of the top Interior design institutes in Bangalore. It helps students not only learn design skills but also gives knowledge on how to start and run a design business.
Here’s how Eduleem prepares you:
1. Practical Course Structure
At Eduleem, the Interior Design courses in Bangalore are designed in a simple and practical way. You will learn everything step-by-step.
You will study:
Design basics
Space planning
Color theory
Lighting design
Furniture layout
Wall and flooring design
2D & 3D software tools (like AutoCAD, SketchUp)
Project planning and budgeting
This knowledge helps you confidently take on real client projects.
2. Business Skills and Training
To run your own business, you need more than just design skills. That’s why Eduleem also trains you in:
How to talk to clients
How to take and understand project requirements
Quoting project costs
Time and team management
Vendor coordination
Marketing your services on social media
You learn all this in a very simple and easy way.
3. Real-Life Projects
At Eduleem, you will also work on real design projects. You’ll learn how to design a home, office, or shop by actually doing it. These projects go into your portfolio, which helps you show your work to future clients.
4. Expert Trainers
Eduleem has friendly and expert trainers who work in the interior design industry. They guide you throughout the course and give advice on how to take your first business steps.
You can ask questions, get feedback, and learn from their experience.
5. Flexible Learning Options
You can choose from weekday or weekend classes. Eduleem offers both online and offline options. Whether you are a student, working professional, or homemaker, you can easily learn at your own pace.
6. Career Support and Mentoring
After the course, Eduleem offers full support to help you start your business or career. You will get:
Business guidance
Portfolio building
Internship options
Freelance leads
One-on-one mentoring
This is perfect for students who want to become entrepreneurs.
Steps to Start an Interior Design Business After Course
Starting your business after doing an Interior Design course in Bangalore is simple if you follow these steps:
Step 1: Build Your Portfolio
Showcase your best work. You can use your course projects, mood boards, and 3D models. A good portfolio helps attract clients.
Step 2: Choose Your Services
Decide what type of design services you want to offer:
Home interiors
Commercial spaces
Modular kitchens
Renovation
Space planning
Start small, and grow slowly.
Step 3: Register Your Business
Choose a business name, and register it. You can start as a freelancer or open a design studio.
Step 4: Use Social Media
Use Instagram, Pinterest, and Facebook to share your designs. Social media is a great way to get free marketing and find clients.
Step 5: Talk to Vendors and Contractors
Build a network of carpenters, electricians, painters, and material suppliers. This helps you manage projects smoothly.
Step 6: Take Projects
Start with small projects like designing one room or a kitchen. Slowly, you will get bigger projects through word-of-mouth and client references.
Why Bangalore is Best for Learning Interior Design
Bangalore is a city full of new homes, offices, cafes, and startups. Everyone wants creative interiors. This makes it the perfect place to learn and start a design business.
By joining a good Interior design course in Bangalore, you can connect with industry experts, visit live sites, and get real-time experience.
Why Eduleem is the Right Choice
Among many options, Eduleem stands out as a top interior design institute in Bangalore because of: ✅ Simple and practical teaching ✅ Real project training ✅ Business and freelance support ✅ Expert mentors ✅ Placement and career guidance
Whether you want a job or your own business, Eduleem helps you achieve your goals step by step.
Admission Open Now
If you are ready to follow your passion and become your own boss, now is the time to start.
Join Eduleem’s Interior Design courses in Bangalore and begin your journey into the creative world of interior design and entrepreneurship.
Contact Details | Eduleem
📞 Phone: +91 9606457497 📧 Email: [email protected] 🌐 Website: www.eduleem.com
You can call, email, or visit the website for more course details, fee structure, and batch timings.
Final Thoughts
Becoming an interior designer is not just a job, it’s a creative business opportunity. With the right training and support from Eduleem, you can learn design, build confidence, and start your own interior design business.
Choose the right interior design course in Bangalore, get trained by experts, and take your first step towards becoming a successful designer and entrepreneur.
Let your creativity shine with Eduleem!
0 notes
Text
6 Month Interior Design Course in Bangalore | Job-Oriented Training

Are you dreaming of becoming an interior designer? Do you want a short and practical course to start your career quickly? If yes, a 6-month interior design course is the right choice for you. In this blog, we will tell you everything about the 6-month Interior Design course in Bangalore and why Eduleem is the perfect place to learn.
Why Choose a 6-Month Interior Design Course?
A 6-month course is ideal for people who want to:
Learn fast and start working soon
Get hands-on experience
Focus on practical skills
Build a strong design portfolio
This course gives you the skills you need to start your career without spending years in college.
Why Bangalore Is a Great Place to Study Interior Design
Bangalore is a city full of creativity, design, and modern lifestyles. The demand for good interior designers is growing in Bangalore. From homes and offices to shops and cafes, interior designers are needed everywhere.
So, if you are planning to join an interior design course in Bangalore, you are making a smart decision. The city has many opportunities for freshers and professionals.
What Will You Learn in a 6-Month Course?
A 6-month interior design course is short but powerful. At Eduleem, the course is designed in a way that helps you learn everything you need. You will learn:
Basics of Interior Design
Color Theory
Space Planning
Furniture Design
Lighting Design
Materials and Textures
AutoCAD and SketchUp (Design Software)
Real-time project work
You will also work on real projects, which helps you learn how to deal with clients, plan spaces, and manage design work.
Why Choose Eduleem for Interior Design Course in Bangalore?
Eduleem is one of the best institutes for interior design courses in Bangalore. Many students choose Eduleem because:
The trainers are experienced and industry experts
The course is job-oriented and practical
You will work on live projects
Placement support is available after the course
The institute provides modern classrooms and labs
Weekend and weekday batches are available
Whether you are a student, homemaker, or working professional, Eduleem offers flexible timings so you can easily attend classes.
Career Opportunities After the Course
After finishing the 6 month interior design course in Bangalore at Eduleem, you can apply for:
Junior Interior Designer
Interior Design Assistant
3D Visualizer
Space Planner
Freelance Designer
You can also start your own small design studio or work as a freelancer.
What Makes Eduleem Special?
100% practical training
Friendly trainers who support you
Real industry exposure
Affordable course fee
Personal attention in small batch sizes
Job-oriented learning methods
Many students who completed the interior design course in Bangalore from Eduleem are now working in top design firms or running their own businesses.
Is This Course Right for You?
This course is perfect if:
You love decorating and organizing spaces
You are creative and have a good eye for detail
You want to make a career in interior design
You prefer short-term and job-focused training
How to Enroll at Eduleem?
Admission is open now. You can call or visit Eduleem to book your seat. Seats are limited so early registration is advised.
Contact Details:
Phone: +91 9606457497
Email: [email protected]
Website: www.eduleem.com
Final Thoughts
If you are looking for a 6-month interior design course in Bangalore, Eduleem is the best place to start. With expert training, practical classes, and career support, your dream of becoming a successful interior designer can come true. Don't wait. Start your interior design journey today with Eduleem.
0 notes