#so at least 15 grams of salt
Text
Okay I have had enough salt to be probably medically inadvisable for people without my particular health issues and am feeling moderately better*! I also have another question:
How do you choose a mattress when you are buying one?
I think I've only ever had hand-me-down mattresses from my siblings or mattresses my parents bought when I was little (idk, I just know I was uninvolved in the obtaining), and I am thinking a new mattress might help my Slept Wrong Injuries be at least less bad, if not stop them entirely, but idk how to choose one. My dad said I'd know when I laid on the mattress but my current mattress doesn't feel bad, but clearly is? So idk that I'll be able to tell
*back to my usual "muscle issue flareup" level instead of "maybe it's worth seeing how bad muscle relaxers make my blood pressure" level lol
#the person behind the yarn#I am probably sitting at...about 7000mg of salt so far today? 6 or 7k#no not salt. sodium.#so at least 15 grams of salt#and I'm aiming for probably at least 1000mg more of sodium before I sleep#I am also getting other electrolytes just in much more reasonable quantities lol#salt wasting syndrome! it sneaks up on ya!#anyway mattresses: how to choose#other than not one of those fiberglass ones#for anyone new here wondering what the heck I meant about muscle relaxers and blood pressure#I am prone to very very low blood pressure. I take a few meds (including salt) for it#but ANYTHING that can cause low blood pressure WILL cause low blood pressure for me#far past the point it's supposed to lower blood pressure#including beta blockers! yoga! weighted blankets!#benadryl does lower my blood pressure too but I only take it when my allergies are raising my blood pressure#so it kinda cancels out? otherwise I could not take the benadryl#so muscle relaxers are probably a Bad Idea for me
15 notes
·
View notes
Text
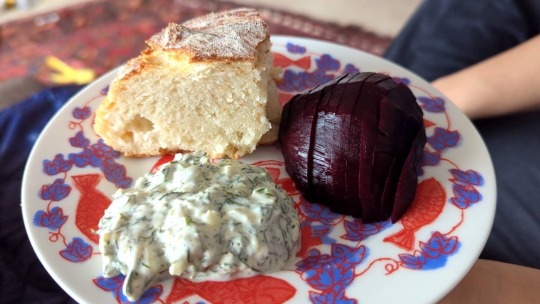

Veggie lunch! Featuring @baronmagikcarp's delicious peasant bread (halved), roasted beets with dill sauce, and green beans with almonds. Recipes behind the cut. Yes, emotionally I still feel like some kind of fuzzy mold growing inside a forgotten tupperware but this was very tasty and fun to eat.
The bread looks like it has a very dense crumb (my yeast may be dead or dying; time to check!), but the texture was extremely pleasant and doughy. It was delicious and very crusty! My husband said it was the highlight of the meal, and I ate so much I feel slightly sick, but I still want more.
Beets: Wash, wrap tightly in foil, and roast at 210C until slightly soft. (This took at least an hour? I did it yesterday.) Chill, peel, slice, serve with dill sauce.
Dill sauce: Greek yogurt, fresh dill, green onion (supposed to be chive but they are still in winter hibernation), garlic, lemon, salt, pepper, and a little bit of mayo for fat. Mix it up. Taste continuously.
Green beans: While salted water is boiling, snip off bean ends and snap in half. Boil about 30 seconds, strain, and run under cold water until cold. Toast almonds in a skillet and add to green beans with melted butter, lemon juice, and salt and pepper to taste.
Peasant Bread (Thanks again, @baronmagikcarp!)
Make: Two 14-ounce loaves
4 cups (512 grams) unbleached all-purpose flour
2 teaspoons kosher salt
2 teaspoons sugar
2 1/4 teaspoons instant yeast
2 cups lukewarm water
Softened unsalted butter for greasing
1) In bowl, whisk together dry ingredients
2) Add water, mix with rubber spatula until absorbed and sticky dough ball forms
3) Cover and let rise for 1 to 1 1/2 hours
4) Set rack in middle of oven and preheat to 425 F
5) Grease two 1-quart oven safe bowls
6) Using two forks, deflate the dough by releasing it from the sides of the bowl and pulling towards center
7) Separate into two pieces and transfer to bowls to rise for 10 to 20 minutes uncovered
8) Transfer to oven and bake for 15 minutes, reduce heat to 375 F and bake for 17 to 20 minutes more, remove to cooling rack (if pale, cook for 5 minutes more), let cool for 15 minutes.
Note from shoku-and-awe: I had to make the following modifications knowing my oven and because either my yeast is dead or my kitchen is cold/inhospitable even when it feels warm. (I've generally had difficulties baking since we moved here, both with yeast and sourdough alike.)
My dough had barely risen after nearly 90 minutes, so I proofed it at 40C for maybe an hour and it still did not seem to need deflating in Step 6. I did score it, though!
Since my oven is weak, I baked it covered in a pre-heated pot for 15 minutes, then uncovered it and went for another 20.
#also i ate the beets with my hands like gollum#so my fingers look like my childhood friend's who had raynauds#it made me so nostalgic! i hope she is well!#easy recipes#make again
28 notes
·
View notes
Text

I know too much about nutrition labels and I'm losing my mind over the pink sauce.
1. let's start with the upsettingly obvious. 3g total carbohydrates but 4g fiber and 11g sugar? fiber and sugar are carbohydrates, so if that's correct then there are 15g carbohydrates at least (most foods have more total carbohydrates than fiber + sugar because there's also starch ect)
2. the first ingredient on this list that has ANY fiber is garlic. it's the fifth ingredient. the serving size is one tablespoon. one tablespoon of straight garlic has 0.2g fiber. one tablespoon of straight garlic *powder* has 0.9g fiber. there is no fucking way that this sauce has anywhere close to 4g fiber
3. speaking of the serving size being a tablespoon - it's also 14.4 grams. this is weirdly accurate considering it's difficult to convert tablespoons to grams and any normal label would have used milliliters instead. but i digress. there's a total of 16 grams of macronutrients listed (fiber + sugar + fat - we are ignoring the mysterious 3g of total carbs). that doesn't fit into a 14.4 gram serving size, especially not because water is the first ingredient and water has zero macronutrients.
4. the second ingredient is sunflower oil, which is 100% fat. every gram of oil that you add to something = 1 gram of fat added. but there's only 1 gram of fat in a 14.4 gram serving size. so the second ingredient - oil- is no more than 7% of the sauce. Let's say honey is another 6%, but everything else is just seasoning. this sauce is almost entirely water. with no emulsifiers or thickeners to be seen (for comparison, ranch contains xanthan gum and modified corn starch which can thicken any liquidy concoction) this "sauce" would be exactly the consistency of water.
5. not to mention that raw honey is third on the list, so there should be less sugar than fat. nope. there's 11 grams of sugar. pitaya might add to the sugar content, but we know it has to be less than 1g and probably significantly less because it's the 6th ingredient on the label. I'd guess there's max 2g sugar total if 1g of fat is correct. did she list her ingredients in random order or did she just make up macronutrients?
6. speaking of ingredients, there's no coloring listed on the label. either she thinks the public will be fooled into believing this color can be achieved by a sprinkle of Himalayan pink salt, or she is not aware that food dye counts as an ingredient. It's possible the pitaya added some color but that would be closer to purple or magenta than bubblegum, so i call bullshit.
7. there's not a single iron-containing ingredient on this list. *six ounces* of pitaya contains 0.1mg of iron, but that's it. there's no way on god's green earth that a concoction of primarily water with a splash of oil has 0.5mg of iron. actually, iron is hard to get and 0.5mg of iron in one tablespoon would be an exceptionally high-iron food. one CUP of spinach has 3.7mg of iron - so 0.2mg per tablespoon. did she cook this in a cast iron pan with a metal spatula?
8. 4% potassium is also way too high. potassium is weird so i won't do math on it, but both oil and honey have zero potassium for sure. there's nothing else I can see that jumps out at me as a high-potassium food. garlic and pitaya may have some, but again, potassium is hard to get! a sports drinks might have 4% of potassium if you're lucky. a serving of himilayan pink salt has 15mg of potassium - such a negligable amount that it's still listed as 0% of your DV. many processed foods do have weirdly high potassium levels, but that's because potassium, such as potassium sorbate, is added in as a preservative. but without "potassium" actually listed on the label, nothing and I mean nothing contains 190!! mg of potassium per TABLESPOON.
9. I can't believe I almost forgot. 1 gram of fat - 9 calories. 15 grams of mystery carbs - 60 calories. 69 calories (nice). where is she getting 90 calories from?
conclusion: not a single number on this label is possibly correct. there's a 100% chance that she made up random numbers and said yeah that looks believable and a 200% chance that she's never paid attention to a nutrition label in her life.
and what really drives me crazy is that if you're measuring ingredients carefully, and especially if you're using very basic ingredients that should have clear-cut nutrition information (like fucking oil and honey) it is NOT hard to do some basic arithmetic to put together accurate nutrition information for the final product. this is the most ridiculous shit I've seen in my life.
#pink sauce#this shit drives me crazy#ive seen too many nutrition labels in my life and this one makes me want to tear my hair out
498 notes
·
View notes
Text
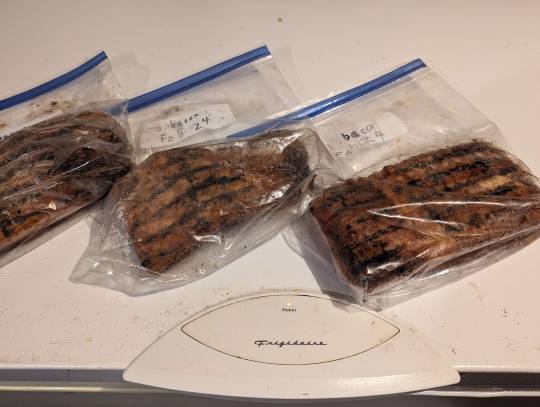
The cheapest I usually find bacon near me these days is 4 to 5$ a pound (usually gotta spring for the 3 pound package too).
Pork belly at Costco has stayed steady at 3.50$, and sometimes goes on sale for 3.00. You do have to buy a whole belly though, at least 10 pounds.
A 1 kilo bag of the curing salts was 15$ or so (I almost called it pink salt, but that means the Himalayan sourced sodium chloride now). I also use it for corned beef. I use like 20 grams at a time so I'm just over half way through it after several years.
Wood chips for smoking are cheap too.
So basically, home made bacon saves me a lot of money asterisk. (Asterisk: because I already own commercial grade/size cambro type containers and the spare fridge space to cure it in, and a temperature controlled smoker, and a chest freezer to keep the extra.)
Though bacon does have a big thing going for it in terms of "save money by making it at home." Even the worst I've fucked it up—and I messed up a lot of batches: mixes of uneven curing and overcooking—was still edible, tasty even. Never had to toss forty smackers of meat because I biffed something.
(On the other other hand, I think the nitrite levels in home cured stuff is higher because commercial operations have better control over curing and smoking to compensate.)
#food#original#vime's boots theory#alton brown has a recipe that doesn't call for added nitrates or nitrites#I also get to smoke it with a hickory+apple blend that works really well but I don't usually see commercially where it's either or
10 notes
·
View notes
Note
Macarons (NOT MACAROONS I STG)
150 grams super-fine almond flour ((1 ⅓ cup) see note)
150 grams powdered sugar (1 ¼ cups)
110 grams egg whites (room temperature (about 3 egg whites/110ml/just under ½ cup) see note)
⅛ teaspoon table salt
Pinch cream of tartar (optional (I typically use ⅛ teaspoon))
95 grams granulated sugar (scant ½ cup)
1 teaspoon vanilla extract
Food coloring (optional)
Your favorite frosting (see note 3)
___________
Before you begin: If you are a beginner, Please ensure that all of your equipment (bowls, spatulas, beaters, etc.) are completely clean, dry, and grease free. Rubber, silicone, and plastic are not ideal for whipping meringue, so I recommend avoiding these materials and using glass or metal bowls when whipping the egg whites.
All good?
Alright, continue.
___________
Start
English (US)
Line 3 standard-sized cookie sheets with parchment paper and set aside.
Sift almond flour and powdered sugar into a medium-sized mixing bowl
Pour egg whites into a separate large, clean, dry mixing bowl. Use an electric mixer to beat on medium speed until foamy (about 30 seconds).
Add salt and cream of tartar and stir on medium-speed for 30 seconds (it’s OK if the cream of tartar isn't totally broken up)
With mixer on medium-speed, add about 1 Tablespoon of granulated sugar and beat for about 30 seconds, then add the next Tablespoon. Repeat until all sugar has been added.
Once all sugar has been added, add vanilla extract and food coloring (if using)
Continue to beat on medium to medium-high speed until mixture reaches thick, fluffy, stiff peaks. Meringue should be thick enough that the electric beaters leave tracks in their wake. When you lift the beaters straight out of the meringue, the peaks that form should not be soft or fold over on themselves, they should hold their shape firmly and stay straight without bending.
Add about a third of the almond flour/powdered sugar mixture to the meringue and use a spatula to fold until combined. Repeat with the next third of the mixture, and then the last.
Continue to fold the batter, moving your spatula in sweeping motions, scraping down the sides and bottom of the bowl and cutting through the middle of the batter and turning your bowl as you go. Use your spatula smoosh the mixture against the side of the bowl periodically to help deflate it. Continue to fold until the batter flows smoothly and falls from the spatula in a smooth ribbon. You should be able to make a figure-8 with the batter and it should hold its shape for about 10-15 seconds before the edges relax back into the batter.
Pour the batter into a large pastry bag fitted with a round tip (I like the Ateco 804).
Pipe batter onto prepared baking sheets, holding the piping bag straight up and down and squeezing until you have 1 ½" circles of batter. Flick your wrist in a "C" motion at the end of piping each shell to complete the macaron and minimize peaks. Space macarons at least 1 ½” apart on baking sheet.
Rap each pan very firmly on your countertop 4-5 times to release any air bubbles and preheat oven to 325F (160C)
Let macarons rest until a skin forms on the surface (if you run the pad of your finger over the top it should feel dry and not sticky or tacky). This is typically about 30-60 minutes but may take more or less time depending on individual kitchen conditions
Bake one tray at a time in center rack of oven for 10 minutes, turning the pan around halfway through the baking time. When finished baking, the feet should look dry and if you lightly press down on the top of a macaron it shouldn’t give.
Allow macaron shells to cool completely before pairing off the shells and sandwiching them around your favorite frosting. For best results, allow macarons to mature in the refrigerator in an airtight container for 24 hours (and then allowing to sit at room temperature for at least 15-30 minutes before serving)
And enjoy!
-🍽
Holy fuck.. Thanks mate. Ill be sure to indulge in some.
2 notes
·
View notes
Text
Biscuit of Defense
Who wants another round of me taking an awful historical recipe and turning it into something you’d willingly put in your mouth?
Dylan Hollis made K2 Defense Biscuits last week. He opined “These are the very definition of sustenance.” and “like a dog biscuit - but I would take these over hardtack.” (I will be doing hardtack at a later date, because I am apparently a masochist.)
Now, let’s be clear: the K-ration biscuit was made under very specific requirements, including some that intentionally preclude it being good. In fact, it’s specifically not supposed to be good. The recipe was - as is normal for the time period and wartime footing - made up of almost exclusively non-perishable foods. Today, we are spoiled with the lack of spoilage, but refrigeration than was expensive and difficult. By contrast, I can use perishable foods to my heart’s content.
From what I can tell, these biscuits were more like biscuits as we’d think of them, but also sorta like crackers - they were a normal staple of the era, the hard biscuit which was itself descended from hardtack. It’s shelf-stable, filling, and has a neutral flavor which means it can as easily be crumbled into stew, as covered with jam.
But also, they were actually meant to be bad. The Logan bar - emergency chocolate - was to taste “a little better than a boiled potato”. They wanted to assure soldiers wouldn’t needlessly break into these rations in search of a snack.
So, in this, I’d say the K2 defense biscuit succeeded. It was edible, it was not actively offensive, but you’d not choose to eat it if you could avoid it.
The recipe as given is thus:
K2 Defense Biscuits
Ingredients
· 25 grams sugar
· 25 grams mild treacle
· 50 grams lard
· 70 grams milk powder
· 200g graham flour
· 15g wheat germ
· 1/2tsp salt
· 1/4tsp bicarbonate
1) Preheat oven to 350°F
2) Combine sugar, treacle, lard, and milk powder. Knead in flour, wheat germ, salt, and bicarbonate.
3) Roll out, cut into biscuits, poke holes in top. Bake for about 15 minutes.
(It’s worth noting that Dylan was scaling down a much larger recipe, and he’s Bermudan, so he used metric.)
So, since I’m not trying to make a Biscuit For All Seasons, but rather something more pleasant to eat alone, my first thought was to make it sweeter and richer. Also, lard would make me violently ill, so I replaced the lard with twice as much margarine; if you can handle butter I bet that’s even better. Since it’s not 1944 I don’t have “treacle” but I do have honey, which I used instead, and twice as much. I also added twice as much sugar.
The original K1 Defense Biscuit had cinnamon, so I figured that would be a welcome addition, along with a bit of nutmeg.
I have no idea what the sodium bicarbonate was meant to accomplish - it needs acid, and there is none in this recipe, so I switched to baking powder, and increased it to 1/2 tsp. The idea isn’t really to make it light, but at least light enough it won’t break your teeth.
Lastly, I do not have graham flour. I do not know where I could get graham flour. It is not 1944, and graham flour is a thing of the past. I used whole wheat flour.
My resultant recipe:
K2 Defense Biscuits, Improved
Ingredients
· 50 grams sugar
· 50 grams honey
· 100 grams margarine or butter, melted
· 70 grams milk powder (one packet)
· 200g wheat flour
· 15g wheat germ
· 1/2tsp salt
· ½ tsp baking powder
· 1 tsp cinnamon
· ½ tsp nutmeg
· Milk to made dough workable
1) Preheat oven to 350°F
2) Combine flour, milk powder, wheat germ, salt, cinnamon, nutmeg, and baking powder. Combine sugar, honey, and margarine in a separate bowl. Mix and knead together until formed into a firm dough. If the dough will not hold together add milk until it does.
3) Roll out, cut into biscuits, poke holes in top. Bake for 10-15 minutes.

The result was... not terrible. It’s not exactly a cookie, but I’d take it camping. frosting, or maybe nutella, would be a wonderful improvement. It’s honestly about the same as many cheaper “digestive biscuits”. But what it most reminds me of? Metamucil fiber bars. And with as much wheat flour and wheat germ, it’s probably pretty similar. These might be a welcome addition to modern MREs (Meals that Refuse to Evacuate).
I think I might have been able to make them somewhat better with the addition of an egg, and maybe more sugar or honey, but these weren’t bad.
2 notes
·
View notes
Text
3 Curiosities about Uruguay
Hey friends! I can’t believe that I’ve already been here two weeks; I’m trying not to blink because I know that the time is going to fly by. Since I’ve been here, I’ve noticed a lot about Uruguay that I would’ve never found out if I weren’t studying here. So here are 3 curiosities about Uruguay that I think you should know too!
No salt! In 2015, the Uruguayan Ministry of Health stated that the national consumption of sodium in Uruguay is about 9 grams per person, which is double what the World Health Organization recommends. Over 30 percent of the population suffered from hypertension. Uruguay also had the largest percentage of obese children in the region. To combat this, the Ministry of Health set a law to ban saltshakers in restaurants and schools. Ketchup and mayo also aren’t provided unless you ask for it. I went to a McDonalds the other day, and there was even a decree in the restaurant that said something to the effect of “we prohibit the use of salt in our food to protect the health of our citizens”. Unfortunately, I couldn’t find any updated statistics about the current overall health of the population, but here’s a link to the article I used for reference. It also covers the opinions of local chefs and restaurant owners.
Assault On Salt: Uruguay Bans Shakers In Restaurants And Schools : The Salt : NPR
2. Let’s take La Bondi. In Uruguay, the only type of public transportation is the bus, or La Bondi. Because my university is a 40-minute walk from my house, I take the Bondi to class. When I got here, I immediately bought an STM Card (bus pass) and loaded it. One trip is 42 pesos ($1 USD and some change), but if you take another route within the hour, the Bondi won’t charge you. There are a couple of different apps that I use to track the routes: Moovit and ComoIr. These send you push notifications about when your line is arriving and where to walk to once you get off at the stop. A weird thing that I like about the Bondi is that you have to hail it for the driver to make a stop. I feel like such a local when I stick my hand out in the street! My only bone to pick with the buses here is that they aren’t always reliable. I’ve been late to class a couple of times because the bus arrived 15 minutes later than expected. Overall, though, I enjoy taking it because it’s a change of pace compared to driving my car everywhere in the States.
3. El Derecho Laboral. I’m taking a class called “Derecho de Empresa”, or “Right of Business”, and I’ve learned so much about the federal laws in Uruguay that ensure that employees aren’t over-working, that they receive benefits and adequate vacation time, etc. To my understanding, Uruguay has laws written in their Constitution stating that employees can’t work more than 40 hours per week, and they have to have at least 2 weeks of vacation time no matter how long they’ve worked there. Also, employers are allowed to hire employees via a “trial contract”, where the employee works at a firm for 90 days, and if it’s not the right fit, the employer is allowed to “fire” them; the employer must give the employee severance if they let the employee go. This course is helping me learn more about the U.S. legal system and how Uruguay has more set laws that protect employees. Maybe the U.S. could learn a thing or two!


3 notes
·
View notes
Text
Salade gerookte zalm en kappertjes (Jumbo) (1 person recipe)

source: partly this link partly copycat from what they sell fresh in the supermarket, I'm not gonna pay €6,50 for that.
Materials:
Jar with a lid to make dressing in
Skillet
Ingredients:
Salad dressing
Olive oil, 1 tbsp
Vinegar, 0.5 tbsp
Crème fraîche, 6,25 grams
Dille, 1 tsp
S&P (freshly ground if possible)
Salad
Lettuce (veldsla), 15 grams
Cherry tomato
Cucumber
Onion (red), fresh or pickled
Spring onion
Egg (boiled)
Salmon (smoked), 50grams
Capers, 1 tsp
Pine nuts, 1 tsp
Method:
Make the dressing (a few hours before)
Add the dill and olive oil to a jar with lid and let marinate for a few hours.
Add in the vinegar and salt and pepper and close the jar. Shake really well until an emulsion forms (oil + water -> milky liquid).
Add the crème fraîche and stir until it's all smooth.
Make the salad
To a cold skillet/baking pan, add the pine nuts. Turn on the heat and stir shake the pan every 30 secs or so, until the pine nuts are roasted a pretty brown color.
Boil an egg. Standard hardboiled egg is "start with cold water in a pan, add egg, bring to a boil, boil for 7 minutes, drain, fill pan with cold water and let it sit for a minute, peel".
Cut up all the veggies (lettuce, spring onion, tomato, cucumber). If using fresh onion, slice that up too. Drain capers (assuming you got them from a jar).
Cut salmon in strips or however you find most useful.
Add all veggies to a plate. Add the salmon and pine nuts on top, then pour the salad dressing over it.
Notes:
I haven't made it yet but plan to do so soon.
assuming I use 1/4 cucumber and 1/4 of a package of 250 grams cherry tomatoes, the cheapest bag of lettuce (the whole bag), 1/2 onion, 1 bio egg from a carton of 10, the cheapest-per-kilo smoked salmon at Jumbo, 12,5 grams of pine nuts (1/8 of the cheapest bag), 10 grams of crème fraîche and fresh dill, then this would cost me €5.22. Which, yeah, you pay for the convenience, but I also use the most expensive eggs and a ton of pine nuts.
This has no carbs at all, which makes it gluten free, but also makes it less filling. I would add some sort of pasta, or croutons at least.
0 notes
Text
Rösti mit pilzen

Rösti-style potatoes with mushrooms and cheese, accompanied by caulifower and braised red cabbage on Friday 10 November 2023
A YouTube video for this recipe popped up on my mother's feed recently, and we both decided that we had to try it. I don't usually like YouTube recipes: they are too oily or too sugary. But this one struck a chord. We tried it and we were very happy that we did.
This served three people comfortably with vegetables. The red cabbage gave everything the perfect forest-like autumnal feel.
Next time, I would make two smaller rösti and make it more like a sandwich than an omelette, but this is the given method.
Rösti
500 grams potatoes, grated and left to drain for at least 30 minutes
1 egg
2 tablespoons flour
Salt and pepper
Filling
500 grams sliced mushrooms
1 large onion, chopped
15 grams butter
Olive oil
Brie
Grate the potatoes and set them aside in a sieve or colander to drain.
Meanwhile, heat a large frying pan over a high heat and toss in the mushrooms. Cook until they begin to take on plenty of colour and release their liquid. The add a splash of oil and the onions, with some salt and pepper, and cook until the onions are soft and brown. Add the butter so that things caramelise.
When the mushrooms are done, turn off the heat.
Squeeze out the potatoes very well and then mix with the egg, flour, and some salt and pepper. In a lidded pan, heat a splash of oil. Spread out the potato mix across the base of the pan and cook, covered, over a low heat for five minutes.
Flip over the potato pancake and cook for a further five minutes on the other side, again with the lid on the pan.
Lay some Brie strips over one half of the pancake, followed by all of the mushrooms and top with a little more cheese. Turn the uncovered half of the pancake over onto the cheesey mushroom side, and cover and cook for about three minutes. Turn out onto a platter and serve.
0 notes
Text
Yield: About 8 large cookies
½ cup (8 tablespoons)/115 grams unsalted butter, very soft
2 packed tablespoons dark brown sugar
1 heaping tablespoon gochujang
1 cup/200 grams granulated sugar
1 large egg, at room temperature
½ teaspoon coarse kosher salt or ¾ teaspoon kosher salt (such as Diamond Crystal)
¼ teaspoon ground cinnamon
1 teaspoon vanilla extract
½ teaspoon baking soda
1½ cups/185 grams all-purpose flour
In a small bowl, stir together 1 tablespoon butter, the brown sugar and gochujang until smooth. Set aside for later, at room temperature.
In a large bowl, by hand, whisk together the remaining 7 tablespoons butter, the granulated sugar, egg, salt, cinnamon and vanilla until smooth, about 1 minute. Switch to a flexible spatula and stir in the baking soda. Add the flour and gently stir to combine. Place this large bowl in the refrigerator until the dough is less sticky but still soft and pliable, 15 to 20 minutes.
While the dough is chilling, heat the oven to 350 degrees and line 2 large sheet pans with parchment.
Remove the dough from the refrigerator. In 3 to 4 separately spaced out blobs, spoon the gochujang mixture over the cookie dough. Moving in long circular strokes, swirl the gochujang mixture into the cookie dough so you have streaks of orange-red rippled throughout the beige. Be sure not to overmix at this stage, as you want wide, distinct strips of gochujang.
Use an ice cream scoop to plop out ¼-cup rounds spaced at least 3 inches apart on the sheet pans. (You should get 4 to 5 cookies per pan.) Bake until lightly golden at the edges and dry and set in the center, 11 to 13 minutes, rotating the pans halfway through. Let cool completely on the sheet pan; the cookies will flatten slightly and continue cooking as they cool. The cookies will keep in an airtight container at room temperature for up to 2 days.
#i am psyched to try this#and soon#recipes to try#baking#cookies#butter#brown sugar#gochujang#sugar#egg#cinnamon#vanilla
195 notes
·
View notes
Text
Flavors of India: Delicious Indian Vegetable Recipes to Try Today
India's rich culinary heritage boasts a myriad of flavors, colors, and textures, making it a paradise for food enthusiasts. One of the key elements that contribute to the sumptuousness of Indian cuisine is the use of fresh vegetables. In today's fast-paced world, convenience is key, and online platforms have made it easier than ever to access quality ingredients. Whether you're in the heart of Bangalore or elsewhere, exploring the flavors of India has never been more convenient. Join us on a journey through some mouthwatering Indian vegetable recipes that you can try today without worrying about vegetable chopping because you can order Chopped Vegetables Online in Bangalore.
Top 3 Recipes to Cook with Vegetables
Every region in India have at least one dish full of vegetables and that is why include one dish from each five region, east, west, north, south, and center of India, that are easy to cook and can be tried today-
Mix Veg:
Mix veg is that one dish, which is cooked in every household everywhere in India. It is full of nutrients, and vitamins as there are many veggies goes in it. So let’s go ahead and learn what ingredients go in it and how to cook it for delicious taste-

Ingredients:
A lot of veggies as the name suggests such as cauliflower, green beans, carrots, green peas, spinach, potatoes, mushrooms, tomatoes, onions, and more of your choice. Spices such as red chili powder, dry mango powder, garam masala powder, mustard seeds, turmeric, coriander powder, asafetida, cumin seeds, and salt.
How to Cook:
First, cut all the vegetables like onion, carrot, capsicum, cauliflower, baby corn, and beans into small pieces and keep them aside. Heat oil in a pan. Add asafoetida, cumin seeds, and mustard seeds. Let them cook for a minute. Then add chopped onion and cook for a few minutes until they turn golden. Add all the vegetables like carrots, capsicum, cauliflower, baby corn, beans, and peas. Add salt, red chili powder, dry mango powder, coriander powder, and turmeric, and mix well. Add water to prevent the vegetables from becoming too dry and to cook them quickly. Cover the pan with a lid for 6-8 minutes. Then add garam masala and cook for another 5 minutes. Turn off the heat and garnish with chopped coriander leaves. Serve.
Pav Bhaji:
Pav bhaji is one of the most beloved legacy and tastiest dishes from Maharashtra and it is consumed in every part of India with the same craze and love. Fresh, and buttery pav with the goodness of bhaji is the perfect food to solve food cravings-

Ingredients:
Vegetable oil, chopped garlic, chopped green chile peppers, chopped onions, grated fresh ginger, chopped tomatoes, finely chopped cauliflower, chopped cabbage, green peas, grated carrots, boiled and mashed potatoes, pav bhaji masala, salt, lemon juice, butter, finely chopped onion, finely chopped green chile peppers, and chopped fresh cilantro.
How to Cook:
First, heat oil in a wok on medium heat. Add garlic and green chile and cook for 30 seconds. Then, add onions and ginger and cook until onions are brown. Add tomatoes and cook until pasty. Add cauliflower, cabbage, peas, carrots, and potatoes. Season with pav bhaji masala. Cover and cook for 15 minutes, stirring occasionally. Add salt and lemon juice. Toast pav and spread with butter. Serve with chopped onion, green chile, and cilantro.
Undhiyu:
Undhiyu is a popular Gujarati curry made with a variety of fresh vegetables and dhokli muthiya. It is a must-have dish during festivals like Uttarayan (kite flying festival), Diwali, and special occasions like weddings.

Ingredients:
Ingredients for Muthiya (dhokli):
Gram Flour (besan), chopped Fenugreek Leaves, Red Chilli Powder, Turmeric Powder, Baking Soda, Sugar, Lemon Juice, Salt, and Oil.
For Masala:
Grated Coconut (fresh or dry), Roasted Peanut Powder, Sesame Seeds, finely chopped Coriander Leaves, Green Chilli Ginger Garlic Paste, Sugar, Lemon Juice, and Salt.
For Curry:
Brinjal, Baby Potatoes (or large pieces of potato), Surti Papdi, strings removed, Valor Papdi, strings removed, Tuvar Lilva, chopped Yam or Sweet Potato, optional, Green Peas, Asafoetida (hing), optional, Red Chilli Powder, Cumin-Coriander Powder, Turmeric Powder, Garam Masala Powder, optional, and Salt Cooking Oil, and Water.
How to Cook:
To make Methi Muthiyas, you will need gram flour, fenugreek leaves, red chili powder, turmeric powder, baking soda, sugar, lemon juice, oil, and salt. In a medium bowl, mix all the ingredients using a spoon. Add water as needed to make a soft dough, as shown in the photo. If the dough becomes sticky, don't worry. Simply add a few teaspoons of gram flour and mix well. Grease your hands with oil and carefully shape the dough into small oval-shaped muthiyas, making around 10-12 of them. Heat oil in a pan over medium heat to deep frying the muthiyas. Fry 3-4 muthiyas at a time, depending on the size of the pan, over low-medium heat until they turn lightly golden brown and crispy on the outside. Avoid frying them on high heat, as they may remain uncooked on the inside. Use a slotted spoon to remove the muthiyas from the oil and transfer them to a plate lined with a paper napkin to absorb excess oil. Your Methi Muthiyas are now ready to be enjoyed.
To make the stuffing masala, gather all the ingredients in a bowl. Mix them using a spoon and taste it. It should have a strong spicy, slightly sweet, mildly sour, and salty flavor. If needed, add more seasonings.
Collect all the vegetables needed for the undhiyu. Peel the potatoes and remove the stems from the brinjal. Make a criss-cross cut on the top of the brinjal and potato, being careful not to separate the segments. Fill the vegetables with the prepared masala. Heat oil in a pressure cooker over medium heat. Add asafoetida and sauté. Add surti papadi, valor papdi, tuvar lilva, green peas, yam, and salt. Mix well and cook for 2-3 minutes. Add red chili powder, turmeric powder, cumin-coriander powder, and 1 garam masala powder. Mix well and cook for 3 minutes. Add the stuffed brinjal and potato. Sprinkle some salt over it. Add water. Place fried dhokli methi muthiya on top. Close the lid and cook over medium heat for 3 whistles. Turn off the heat. Open the lid after the pressure has naturally released (10-15 minutes).
Feeling Hungry? Ready to Cook and Eat?
As we conclude our gastronomic journey through the flavors of India, it's evident that online platforms have revolutionized the way we access and use fresh ingredients. Whether you're in Bangalore or beyond, the convenience of ordering from an online cut vegetable delivery in Bangalore or a chopped vegetable store online in Bangalore allows you to experiment with these delicious Indian vegetable recipes with ease. Embrace the diversity and richness of Indian cuisine by exploring these recipes today, and relish the authentic flavors that fresh, high-quality ingredients can bring to your table.
0 notes
Text
Crispy Vegan Tandoori Tofu – Air Fryer/ Oven/ Grill/ Tawa Recipe
Ingredients:
Firm tofu
Yogurt
Tandoori masala powder
Red chili powder
Turmeric powder
Cumin powder
Coriander powder
Garam masala powder
Ginger-garlic paste
Lemon juice
Kasuri methi (dried fenugreek leaves)
Salt
Oil
Onion rings and lemon wedges for garnishing
Preparing tofu:
Ah, tofu, our protein-packed star! But before it gets its tandoori makeover, we need to give it a little spa treatment. Place that block of extra-firm tofu on a clean surface and let’s press out that extra moisture. We’re talking about gently placing some heavy objects on it for around 30 minutes. It’s like tofu meditation, making it nice and firm for our recipe.
Now, once our tofu has achieved its zen-like state, let’s cube it up. It’s like preparing little sponges that are about to soak up all those amazing flavors we’re about to introduce.
Marinating the Tofu:
Time to let the marination magic happen! Grab a big bowl and add in the hung curd, besan (gram flour), ginger-garlic paste, turmeric powder, red chili powder, roasted cumin powder, chaat masala, garam masala, kasuri methi (dried fenugreek leaves), lemon juice, salt, and a splash of oil. Mix, mix, mix! It’s a party of spices in here, and they’re all getting along fabulously.
Now, gently invite the tofu cubes, bell peppers, and onion to join the marinade fiesta. Toss them all around with care, making sure each piece is lovingly coated. Cover the bowl, tuck it into the refrigerator, and let the flavors mingle for at least 30 minutes. It’s like they’re all having a dance-off in there.
Air fryer instructions:
Alright, now that our marinated tofu and veggies are all besties, it’s time for the next step. And yes, it involves skewers! Soak those toothpicks or bamboo skewers in water for about 15 minutes – we don’t want them to catch fire during their big performance.
If you’ve got an air fryer, preheat that bad boy to 390°F (200°C). Skewer up the marinated goodness and place them in the air fryer basket, giving them some space to breathe. Oh, and don’t forget to give them a little oil massage (brush or spray) so they don’t feel left out. Cook for 5 minutes, flip, cook for another 3 to 4 minutes, and voilà, crispy tandoori perfection!
Oven instructions:
No air fryer? No problem! You’ve got options. For the oven method, preheat it to 400°F (200°C). Line a baking sheet with parchment paper, arrange those skewers, oil them up, and bake for 15 minutes. Then, if you’re feeling fancy, broil for 2 to 3 minutes for that lovely charred effect. Fire brigade not included!
Outdoor grill instructions:
Outdoor grilling? Awesome! Preheat the grill, line it with foil for easy cleanup, and let those skewers sizzle away. Flip them halfway through the 10-12 minute cooking time, and watch them transform into smoky wonders.
Stovetop Tawa Instructions:
Stovetop tawa, we haven’t forgotten you! Heat up that beauty over medium-high heat, and lightly oil it up. Lay down those skewers, give them a little oil love, and cook until golden brown from both sides. It’s like a flavorful tandoori tango on a pan.
If you want More Details About This Recipe Like Garnish Suggestion And Expert Tips Please Visit Our Bio
#keto#ketobaking#ketodiet#ketogenic#ketolife#healthyfood#healthy#nutrition#healthy living#healthy eating#nutrients
0 notes
Text
𝗦𝘂𝗽𝗲𝗿 𝗖𝗵𝗼𝗰𝗼𝗹𝗮𝘁𝗲 𝗖𝗵𝗲𝘄𝘆 𝗖𝗼𝗼𝗸𝗶𝗲 𝗥𝗲𝗰𝗶𝗽𝗲!
As always you can replace certain ingredients to suit dietry requirements and as always, my baking is a 'wing it' style!
𝗜𝗻𝗴𝗿𝗲𝗱𝗶𝗲𝗻𝘁𝘀
• ½ cup granulated sugar (100 g)
• 1 cup brown sugar (220 g), packed
• 1/2 teaspoon salt
• ½ cup melted unsalted butter (115 g)
• 1 egg
• 1 egg yolk
• 1 teaspoon Vanilla Extract
• 2 cups all-purpose flour (250 g)
• ½ teaspoon baking soda
• 4 oz milk or semi-sweet chocolate chunks(110 g)
• 4 oz dark chocolate chunk(110 g), or your preference
I used the Google conversion from cups to grams.
𝗣𝗿𝗲𝗽𝗮𝗿𝗮𝘁𝗶𝗼𝗻
1) In a large bowl, whisk together the sugars, salt, and butter until a paste forms with no lumps.
2)Whisk in the egg and vanilla, beating until light ribbons fall off the whisk and remain for a short while before falling back into the mixture.
3) Sift in the flour and baking soda, then fold the mixture with a spatula. Be careful not to overmix - if you mix (or roll out) cookie dough too much, you'll add excess air to the dough, causing it to rise and then fall flat in the oven. Overmixing the dough can also lead to excess gluten development, resulting in dense cookies (which is what happened with these cookies but they still taste good!)
4) Fold in the chocolate chunks, then chill the dough for at least 30 minutes. For a more intense toffee-like flavor and deeper colour, chill the dough overnight. The longer the dough rests, the more complex its flavour will be.
5) Preheat oven to 350°F (180°C).
6) Line a baking sheet with parchment paper.
7) Scoop the dough with an ice-cream scoop onto a parchment paper-lined baking sheet, leaving at least 4 inches (10 cm) of space between cookies and 2 inches (5 cm) of space from the edges of the pan so that the cookies can spread evenly.
8) Bake for 12-15 minutes, or until the edges have started to barely brown.
9) Cool before serving but to be fair warm cookies are legit 🤌
What's your fave cookie flavour?
#cookie recipe#eat what you love#baking with kids#online mummy group#food flat lay#chocolate cookie Recipe#cooking101#recipe share#cookblogshare#feed feed baking#baking is fun#yourblendedfamily#kids activities#buzz feast#love to bake#baking from scratch#baking at home#dessert inspo#martha bakes#food vlog#baking video#baking reel#bakebakebake#baking blog#dessertbae#dailyfoodfeed#thekitchn#pudding ideas#junkfoodclub#baking
0 notes
Text
15 Ayurveda-Based Tips For Skin And Body Care During Summers
The sun is our body’s most powerful source of vitamin D, which helps us absorb calcium and phosphorus. However, too much exposure to sunlight and extreme heat, especially during summers, can do more harm than good. According to Ayurveda, hot weather increases the heat or Pitta in our body leading to dehydration, exhaustion, heat stroke, diarrhea and damage to the skin, of which tanning is the least concerning! Therefore, it is important to take steps to keep our body cool and not aggravate our Pitta dosha during this period of intense heat. By incorporating the following Ayurveda-based summer skincare and body care tips, you can keep your skin and body protected and healthy this summer season. These Ayurvedic summer skin care and body care tips will also help balance the internal doshas as per Ayurveda, and increase your health and vitality. To make it further simpler for you, we have listed our recommendations for Ayurvedic summer skin care products to keep your skin glowing and
Skin Care Routine For Summers
The skin is the largest organ of our body and bears the onslaught of different weather conditions throughout our life. The hot and sultry weather during summers can be quite unkind to the skin if one does not take measures to protect it. Excess sebum and sweat makes your skin oily, clogs pores and leads to acne breakouts. When exposed to the sun, your skin produces excess melanin to protect the cells from damage caused by UV rays and this causes tanning of the skin. In extreme cases, the powerful rays of the sun can cause sunburn, rashes, redness, wrinkles, age spots and even skin cancer in the long term. So, it is obvious that we need to extra care of our skin during the hot summer months to keep it healthy and glowing. Follow these tips to tailor your summer skincare routine and use the right products to help protect, nourish, or heal your skin.

1. Lighten up your skincare routine: Swap heavier products that you may have used during the winter months with gentle, natural and non-comedogenic products. Use minimal make-up (only if needed), and let your skin breathe. Most make-ups tend to clog pores which then allow bacteria to grow. The Parama Naturals' Turmeric All-Day Lite Face Oil (or the Lavender-Turmeric All-Day Lite Face Oil) are a great hack for a radiant glowing skin without any added make-up. Just apply a few drops on your freshly cleansed face. Its quick absorbing and non-comedogenic. It brings an instant radiant glow to your face, and get you ready for your meeting, a party or just ready to roam around all day long without worrying about the sun! Else you can use it as a base before applying make-up so as to give your skin a protective coat of anti-bacterial turmeric. This protective coat against the ravages of environment, pollution and chemicals in other products will ensure a healthy skin.
2. Cleanse: Sweating is considered a very good thing for keeping the skin healthy. Sweating allows the accumulated toxins to come out. In summer, with continuous sweating, there can be a build-up of salts on the skin surface when the sweat dries up. So wash your face, multiple times a day if need be, to remove accumulated sweat. Clean, cool water or lukewarm water is the best option. Ayurveda recommends using plain milk or yoghurt as a face wash. You could add a little chickpea flour (besan) or flour made from green gram (moong dal) and turmeric (haldi) or wild turmeric (amba haldi) to it for a deep cleanse. This ubtan is good for a full body wash as well. One can use just a pinch of the Parama Naturals' Enriching Exfoliator Face and Body Scrub on wet skin instead like a soap-free cleanser. Vetiver and sandalwood add a cooling refreshing feel to the face-cleanse.
In case there is grime, opt for a mild, alcohol- and chemical-free soap or face wash that doesn't strip off natural oils from the skin. Try Parama Naturals' Cold-processed Turmeric Soap made of Virgin Cold-pressed Coconut Oil, Cold-pressed Oils of Sesame and Castor, Unrefined Kokum Butter, Turmeric Extract to cleanse, nourish and hydrate your skin without depleting it of its natural oils. It is PH Balanced, hypoallergenic, contains no artificial colors or fragrances and is suitable for all skin types.
3. Exfoliate: Use a gentle, natural scrub once a week (one made with turmeric, sugar or red lentils, for example) to exfoliate dead skin cells and reveal brighter skin. Dead skin cells can settle in the pores and cause black-heads or acne. You must try Parama Naturals' Enriching Exfoliator Face and Body Scrub enriched with natural nutrients for refreshing, cleaning, exfoliating, and skin-polishing. It is suitable for all skin types.
4. Moisturize: Evaporation of moisture from the skin due to heat or being enclosed in air-conditioned rooms can both dry out your skin. So it is as imperative to moisturize your skin during summers as any other time of the year. Use a light, non-comedogenic moisturizer daily to keep your dry skin soft and supple. Ayurveda recommends abhyanga or an oil massage daily with coconut oil or sesame oil before a bath. Coconut oil helps in lightly moisturizing dry skin while its anti-microbial properties helps fight bacteria that causes acne. It is also soothing in the summer heat. Sesame oil is deep-penetrating and soothing too. Just be sure to apply organic, virgin or extra-virgin cold-pressed oils on cleansed skin.
At Parama Naturals, we appreciate that it is sometimes difficult to incorporate this in one's busy schedule. So use our Turmeric Face and Body Oil or the All-Day Lite Face Oil immediately after a bath on a moist skin (in the same way that you would apply a moisturizer) to keep your skin moisturized, soft and protected throughout the day.
The All-Day Lite Face oil is also available in a Lavender-Turmeric variant with extra soothing benefits and uplifting notes of Lavender. These are suitable for all skin types.
5. Protect yourself, especially from the sun: Stay indoors as far as possible, especially between 11:00 am to 4:00 pm when the sun is at its peak. Shield yourself with protective clothing, a wide-brimmed hat, umbrella/ parasol, shades and sunscreen if and when you need to be outdoors. But if you must step out, use a natural sunscreen or sun protection. While the market is flooded with high-SPF sunscreens, most of them are chemical-based and may have long-term side-effects. Ayurveda recommends natural and mild sunscreens like Turmeric, Coconut oil, Sesame oil, Almond oil, Aloe Vera etc. to protect your skin from the harsh rays of the sun. Just add a pinch of turmeric to a mixture of sesame and coconut oils and apply this natural, home-made sunscreen on exposed skin just before stepping out in the sun. Reapply every couple of hours and you're good to go. Coconut oil with Turmeric also helps soothe and heal sunburn or any skin inflammation. Parama Naturals' face and body oils are the perfect blend of natural sunscreen agents like Turmeric oil and Sesame oil to keep your skin protected from the harsh rays of the sun and also to soothe dry/sunburnt/inflamed skin.
Protect your lips too: With dry air and heat and a dehydrated body, the lips need care too. Use a lip balm and also as a protective coat before applying lipstick. Try Parama Naturals' Multipurpose Butter for Lips, Face, Body and Hair to protect them from extra dryness.
6. Pack in cool nutrients: Use face packs or lepas made of natural cooling ingredients like turmeric, multani mitti (fullers earth), kaolin clay, sandalwood, coconut, etc. to cleanse, cool and nourish your skin. A hair pack made of cooling Mehendi, coconut oil and yoghurt helps nourish and hydrate your scalp and hair.
7. Eye-care is critical: Eyes get the brunt of the summer heat. Redness in the eyes is an indicator of external hot winds or temperatures or internal body heat affecting the eye layers. Always wear sunglasses to protect the sensitive skin around the eyes from the harmful rays of the sun. Cool your eyes by placing cotton pads dipped in chilled Rose water or slices of cool cucumber. Alternatively, you can freeze ice cubes of rose water or cucumber juice to soothe tired eyes. Use a little of the home-made sunscreen under the eyes. At night, before sleeping, apply a drop of the Parama Naturals' Night Repair Oil under and around each of the eyes. It can be applied on the eye-lids as well. This will not only cool and soothe the area but also work on dark circles, fine lines and crow's feet.
8. Remember the Feet: Scrub your feet to exfoliate. Apply sunscreen and moisturizer on your feet too, especially if you are wearing open-toed footwear. Use our unique Solid Perfume Deodorant to keep your underarms, body and feet smelling fresh throughout the day.
9. Misting: Use a spray bottle to carry some chilled rose water and use it to mist your face throughout the day or whenever your face feels sweaty or sticky. Rose water refreshes you instantly with its cooling, aromatic properties and makes your skin glow naturally. One can also soak vetiver roots in water in a copper or earthen pot. This water can also be used as a refreshing mist. And it is also cooling to drink. One can also add a drop of ones favourite essential oil like lavender or rose to a bottle of water, and use it to spray yourself for a refreshing feel. Or a drop of Turmeric Essential Oil for a calming and protective coat to brace yourself from the ravages of pollution.
10. Keep your head cool with oil : Even if you're not the types to regularly apply hair oil, it is a great idea to start now. Apply just a few drops of oil on your scalp, near the roots of the hair. One does not need to apply it along the length of the hair which would make it sticky or need to be washed off. Instead, it will get absorbed in the roots to nourish them to prevent hair loss during the dry summer months, when there is a likelihood of "vata" accumulation and it will encourage healthy growth. It will also condition your crowning glory, which is likely to get excessively dry during the hot dry summer months. And last but not the least, it will keep the head cool. Try the Parama Naturals' Herb-enriched Nourishing Hair Oil, which is non-greasy and quick absorbing and can be used as a post-wash serum too.
Lifestyle Changes For Body Care
11. Drink up: With rising temperature, you tend to sweat more, and this can leave you feeling dehydrated and weak. Replenish the lost body fluids by drinking at least 2-3litres of water throughout the day. Drinking water also helps to flush the toxins from the body. Buttermilk(chaas), curd, yoghurt, lemonade, coconut water, watermelons, and fresh juices made of vegetables and fruits not only help you stay hydrated but maintain the electrolyte balance in the body. Sattu (a drink made using Black chickpea flour and water), Panna made from raw mangoes and Khus (vetiver), Rose sherbet (made from dried rose petals) and Kokum (garcinia indica) sherbets are the perfect tried and tested, local beverages that protect you from the summer heat. Sabja seeds from the tulsi (holy basil) plant can be soaked for 5-10 minutes before adding to a refreshing rose drink with water or milk or butter milk, as they provide extra cooling to the body during the heat. Avoid hot drinks, alcohol, fizzy drinks or ice-cold water as they disturb the digestive fire. Use water stored in an earthen pot (matka) to quench your thirst instead. A small bundle of cleansed vetiver (khus) roots can also be placed in the earthen pot and the water drunk. It is very cooling and refreshing.
12. Eat Light: Our digestion gets affected when the weather heats up, so eat light, freshly-prepared meals. A well-balanced and light diet is easy to digest and helps us stay healthy and hydrated. Try to include plenty of seasonal fruits and vegetables in your diet. Water-intensive gourds are one of the best vegetables for this season. Cooling salads, eaten with digestive spices like chat masala or light dressings are great. Fruits like watermelon and cantaloupes are very refreshing. Remember to add a few digestive herbs and spices to fruits too. Steer clear of extremely salty, sour, sugary, spicy, deep-fried, pickled and/or canned/packed food.
13. Dress comfortably: You may cover your body to avoid exposure to the sun but do so by wearing loose clothes made of lighter fabrics like cotton, which let your skin breathe and absorb sweat thus keeping the body temperature in check.
14. Exercise Daily: To keep yourself fit and active, follow a regular, non-rigorous exercise routine. preferably early in the morning when it is relatively cool. Hydrate your body adequately during and after the exercise routine. Remember to follow up with a quick shower to wash off the sweat and the grime, and also to cool the heated body.
15. Rest your body: While the longer days in summer give you a longer time frame to work, it is advisable to balance it with an adequate amount of rest. Since the nights are shorter now, a short power-nap in the middle of the day can re-energize you. Do not over-exert your body and sleep well at night. For a good night's sleep, have a refreshing shower (with water at body temperature). Wear cool and loose night clothes. Try the Parama Naturals' Zingiber Body Oil for a light foot massage just before sleep.
Lastly, remember that an aggravated Pitta during the hot and sweltering summer months can also flare up emotions like anger, frustration, irritability and impatience. Apart from following the above tips to pacify the pitta dosha, you could try a few simple yogic exercises, meditation and breathing techniques like Pranayama to help you manage your emotions better. A balanced, calm and relaxed mind will keep you healthy and glowing on the outside as well.
So breeze through the summer months with ease and comfort simply by tweaking your lifestyle to suit the weather and integrating these summer skincare tips. Do let us know in the Comments section if you found the tips provided in this blog useful or If you have any queries regarding Parama Naturals' products.
0 notes
Text
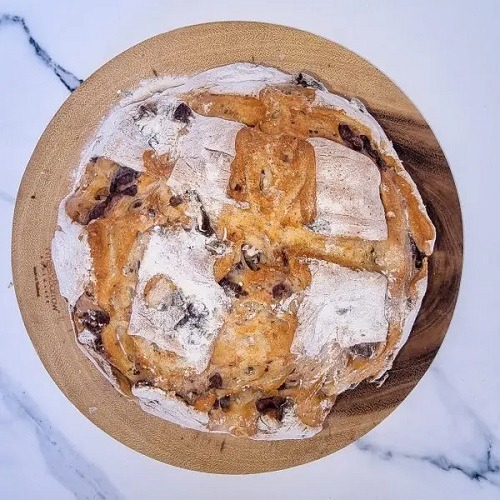
Olive and Rosemary Bread
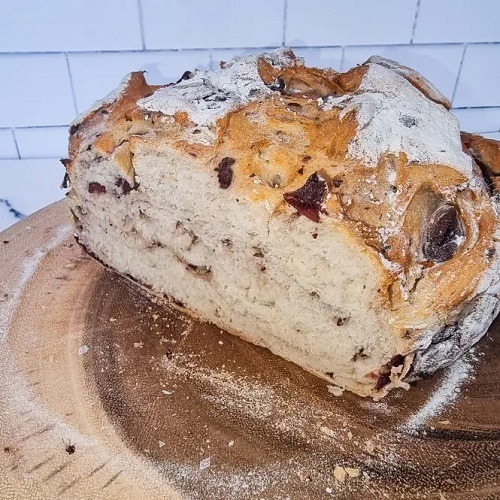
I’ve always shied away from making bread. In my head, it was all too hard. The idea of letting it sit for hours and even overnight just didn’t work for me. I knew there had to be a simpler way to make fresh bread, quickly.
So, I came up with what I believe is a simple version and super tasty. Now the artisan bread makers may call my bread a baker’s sin – so sorry in advance to all the bakers if this recipe is not the right way to make bread.
With my busy schedule, this bread recipe is perfect for our family. In fact, I make it weekly now and we don’t buy bread very often. How good is that!
Prep time: 15 minutes
Cook time: 15 minutes
Total time: 30 minutes
Serves: Makes approx 20 biscuits!
Ingredients
500 grams of flour of your choice – either a white baker’s flour or wholemeal, spelt or a combination of them
1 teaspoon salt – we like to use Himalayan or sea salt
1 – 2 teaspoons chopped rosemary – you may like more if you are after a strong rosemary flavour. Fresh or dry herbs will work
½ cup black kalamata olives, chopped – you can use green olives too (yum)
1 teaspoon garlic powder – you can substitute for onion powder or keep it plain if you prefer
2 ½ teaspoons dry yeast – make sure once you open a brand-new packet you keep it in the fridge
1 ½ cups warm water
Method
In a large mixing bowl combine flour, yeast, and salt and mix well. Then pour in the water and with your hands combine to form a ball of dough. You don’t want your dough to be very firm. In fact, it’s best if it is a little bit sticky.
Dust some flour on your bench and place your dough onto the bench coating it in the flour.
Hand mix into the dough the chopped olives and rosemary. A great technique here is to simply fold the dough repeatedly until the olives and rosemary are eventually mixed through. There is no need to knead this dough just a gentle few folds will suffice.
Shape your dough into a round ball and then place it back into the bowl and cover well with cling wrap or a tea towel. Let your dough sit for at least two hours (the longer the better) to grow. It needs to at least double in size.
Ideally, bake your bread in a dutch oven. If you don’t own one never fear, I’ve made my bread in any type of pan or baking dish and it works well there too.
Once your dough has at least doubled in size place it in your dutch oven or baking tray. Score the top of your bread with a knife creating three to four lines across and then horizontal.
Let the dough sit in the dutch oven or tray for another half hour – covering it with a tea towel. This allows it to grow a little more. Bake in the oven for 30 – 40 minutes at 190 degrees.
If using a dutch oven bake first 20 minutes with the lid on and then remove.
Remove from oven, let cool, then slice up and enjoy!
Equipment you Need
Large mixing bowl
Dutch oven or baking tin of some sort – any shape will work. Even a cake tin
Baking Paper or silicone mat
Mixing spoon
Measuring Cups
Cooling rack
So why do I love this vegan recipe so much? I like this bread so much is that it’s full of flavor, it has a delicious, hearty, rustic taste with a soft centre and crusty outside. The bread smells heavenly as it bakes – always a bonus.
There may be some vegan cooking schools that teach bread making. Out our vegan cooking classes, Brisbane we don’t bread making, but we are delighted to share our recipes here with you for free.
There are numerous types of flour that make delicious crusty breads – wholemeal, spelt, rye, etc. These types of flour are often healthier and supply more protein, fibre, multivitamins, and minerals
Regular Flour is the standard in most other recipes. However, it’s not as healthy and has a lower protein content.
Whole wheat flour or wholemeal is made from white flour that replaces the part of the grain lost when the husk, endosperm, bran, and germ are removed to produce refined white flour. Wholemeal flours are more nutritious than white flours because they contain the entire grain. You can also use Spelt Flour – spelt is a type of wheat, usually known as a superfood, and can be used as an alternative to ordinary flour in any recipe that traditionally calls for wheat flour. Spelt is an ancient form of wheat that has been cultivated for thousands of years and has been used medicinally for over 2,500 years..
The other great thing about this recipe is that you can add in whatever fillings you want instead of olives. If you think you want a garlic flavour by adding garlic powder or maybe some seeds in the bread like pepita, pumpkin seeds will be amazing – just do it!
Check out our vegan cooking classes in Brisbane to learn how to make incredible vegan dishes to pair with your freshly baked bread.
Frequently Asked Questions
How much bread does it make?
A standard-size loaf tin or 25cm round time.
How long will it last?
As it’s preservative free the bread will last up to 3 – four days wrapped and kept on the bench. Keep in the fridge to last a couple more days.
Can you freeze?
Yes absolutely. Recommend slicing first then wrapping in a plastic bag and placing in the freezer
0 notes
Text
Zucca in Agrodolce
From VIA CAROTA by Jody Williams and Rita Sodi

Zucca in Agrodolce
Squash Marinated with Onions and Currants
Any number of squash varieties are well suited for this uniquely Venetian marinade. Butternut is sweet and silky in texture, while red kuri has dense flesh and a subtle chestnut flavor with an edible skin. Arrange in a single layer so the marinade and spices flavor every slice.
Serves four
1 small butternut or red kuri squash (1 ¼ pounds/570 grams)
extra-virgin olive oil
salt
1 medium red onion, thinly sliced (about 1 cup sliced)
2 dried bay leaves
1 cinnamon stick
1/2 cup/120 ml aged sherry vinegar
1/2 cup/120 ml water
1/4 cup/about 30 grams currants
1 tablespoon/12 grams sugar
3 tablespoons/30 grams pine nuts, lightly toasted
Preheat the oven to 400F. Cut the squash in half lengthwise. Rub the squash halves all over with olive oil, salt them well, and set on a baking pan. Roast until the squash halves are blistered in places and soft, 35 to 40 minutes. When cool enough to handle, scrape out the seeds with a spoon.
Place a medium skillet over medium-low heat and lightly coat the bottom with olive oil (about 1 tablespoon). Add the onions, bay leaf, and cinnamon stick. Cook until the onions are beginning to soften, about 5 minutes. Stir in the vinegar, water, currants, sugar, and 1 1/2 teaspoons/4 grams salt. Raise the heat to medium-high and simmer until the liquid is reduced by half, 2 to 3 minutes. Turn off the heat and stir in the pine nuts. Slice the squash about 2 inches/5 cm thick and arrange on a platter.
Spoon the marinade over the squash, distributing onions, currants, and pine nuts over the slices. Let stand for at least 15 minutes, or refrigerate for up to 24 hours. Consider making this ahead of time to let the flavors mingle. Serve at room temperature.
From Via Carota: A Celebration of Seasonal Cooking from the Beloved Greenwich Village Restaurant by Jody Williams and Rita Sodi, with Anna Kovel. Copyright ©2022 by Jody Williams and Rita Sodi. Excerpted by permission of Alfred A. Knopf, a division of Penguin Random House LLC. All rights reserved. No part of this excerpt may be reproduced or reprinted without permission in writing from the publisher.
0 notes
Last Seen Blogs

mudraconis-blog
Mudacronis

yuwan5683
Untitled

kozyndan
kozyndan

verurteiltbestrafftzuwerden
C'est l'amour fou

yen-sids-tournament
There is fighting in the kingdom!