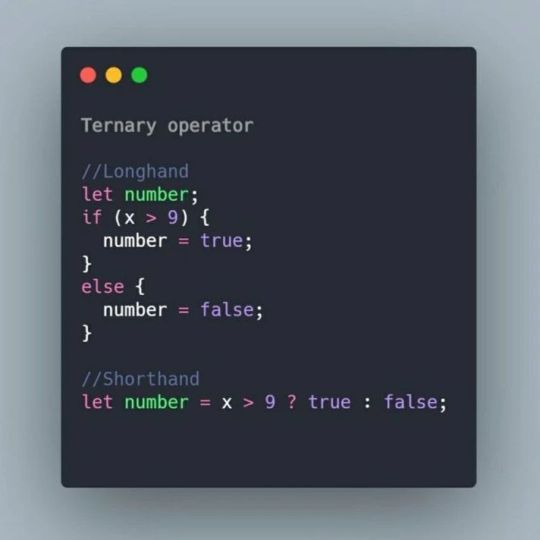
#ternary operator in javascript
Explore tagged Tumblr posts
Visit Tumblr Blog
Explore Tumblr blogs with no restrictions, modern design and the best experience.
Last Seen Tumblr Blogs


Fun Fact
The KCSC sent more than 20K requests to delete posts related to prostitution and porn to Tumblr from January to June 2017.
Text
purecode ai company reviews | Conditional Rendering
Conditional rendering in JSX allows you to render components or elements based on specific conditions. This can be achieved using JavaScript logical operators like && (logical AND) or the ternary operator ? : for more concise expressions
#Conditional Rendering#JavaScript logical operators#the ternary operator#more concise expressions#purecode ai company reviews#purecode#purecode software reviews#purecode ai reviews#purecode company#purecode reviews
0 notes
Text
CSS Stuff I’m Excited After the Last CSSWG Meeting
New Post has been published on https://thedigitalinsider.com/css-stuff-im-excited-after-the-last-csswg-meeting/
CSS Stuff I’m Excited After the Last CSSWG Meeting
From June 11–13, the CSS Working Group (CSSWG) held its second face-to-face meeting of the year in Coruña, Spain, with a long agenda of new features and improvements coming to language. If 2023 brought us incredible advances like out-of-the-box nesting, container and style queries, or the has: selector, then 2024 is going to be even more packed with even more ground-breaking additions. Whether a new feature like inline conditionals is just starting or long-term projects are wrapping up, 2024 is already filled with exciting developments — and we’re still in July!
I wanted to share what I think are some of the most interesting and significant features coming to CSS that were examined in the meeting. However, I don’t want you to take the following as an exact recap of the discussions. Instead, I want to bring up the broader topics coming to CSS that had a spotlight at the last meeting. In reality, the features examined have been cooking up for even years and the discussions are geared towards specific cases and new enhancements, rather than defining a whole specification; a work that would be impossible in one meeting.
You can see the exact issues discussed on the CSSWG meeting agenda.
Feature 1: What if we get if()?
Since CSS custom properties gained reliable support around 2016, there have been many attempts to apply certain styles depending on a custom property value without, of course, appealing to JavaScript. One of the earliest workarounds for conditional styles was posted by Roman Komarov back in 2016 in “Conditions for CSS Variables”. From there, many other hacks have been documented for making conditional declarations in CSS (including this extremely clever one by Ana Tudor here on CSS-Tricks). In fact, you can find a full list that discusses and compares those workarounds by CSSWG member Lea Verou in her recent article, “Inline conditionals in CSS, now?”.
What’s for sure is that the community has craved a conditional way to apply styles using custom properties. Nowadays, we have a specification for Style Queries that’s capable of the task, but they come with limitations not related to browser support. The biggest of those limitations? We can’t directly style the container that’s queried, so we need some sort of wrapper element around that wrapper in HTML.
<div class="news-container" style="--variant: info"> <p>Here is some good <strong>news</strong></p> </div>
…in addition to writing the style query:
.news-container container-name: news-container; @container news-container style(--variant: info) p color: blue; border: 1px solid blue;
What if() might look like
On the CSSWG side, there have been discussions about adding an if() function as far back as 2018. It was June 13 of this year — yes, six years later — that the CSSWG resolved to begin working on if() for CSS. As good as it may look, don’t expect to see if() in a browser in at least two years! (That’s Lea’s unofficial estimate.) We’ll likely need to wait even longer for enough browser support to begin using it reliably in production. The spec draft is only barely getting started and many things have to pass a test first. For context, the CSS variables working draft began in 2012 and only received wide browser support in 2016.
Syntax-wise, if() is probably going to borrow the ternary operator from JavaScript and other programming languages, structured like this:
if(a ? b : c)
…where a is the custom property we are checking and b are c are the possible conditional return values. To check for styles, an inline style(--my-property: value) would be used.
.forecast background-color: if(style(--weather: clouds) ? var(--clouds-color): var(--default-color));
Even if ? isn’t used in CSS and : has a different meaning everywhere else, I think this syntax is the one most people are familiar with, not to mention it also allows seamless conditional chaining.
.forecast background-color: if( style(--weather: clouds) ? var(--clouds-color): style(--weather: sunny) ? var(--sunny-color); style( --weather: rain) ? var(--rain-color): var(--default-color) );
Future if() improvements
Although these probably won’t make it in the initial release, it’s interesting to see how if() might change between now and sometime further in the future:
Support for other inline conditionals. We are supposed to check for custom properties using the style() query, but we may as well check for media features with an inline media() query or if a user agent supports a specific property with an inline support().
.my-element width: if(media(width > 1200px) ? var(--size-l): var(--size-m));
Using conditional inside other CSS functions. In future drafts, we may use ternaries inside other functions without having to wrap them around if(), e.g. just as we can make calculations without calc() if we are inside a clamp() or round() function.
Feature 2: Cross-document view transitions
Last year, the View Transition API gave us the power to create seamless transitions when navigating between web pages and states. No components or frameworks, no animation libraries — just vanilla HTML and CSS with a light sprinkle of JavaScript. The first implementation of View Transitions was baked into browsers a while back, but it was based on an experimental function defined by Chrome and was limited to transitions between two states (single-page view transitions) without support for transitioning between different pages (i.e., multi-page view transitions), which is what most of us developers are clamoring for. The possibilities for mimicking the behavior of native apps are exciting!
That’s why the CSS View Transitions Module Level 2 is so amazing and why it’s my favorite of all the CSS additions we’re covering in this article. Yes, the feature brings out-of-the-box seamless transitions between pages, but the real deal is it removes the need for a framework to achieve it. Instead of using a library — say React + some routing library — we can backtrack into plain CSS and JavaScript.
Of course, there are levels of complexity where the View Transition API may fall short, but it’s great for countless cases where we just want page transitions without the performance cost of dropping in a framework.
Opting into view transitions
View transitions are triggered when we navigate between two pages from the same-origin. In this context, navigation might be clicking a link, submitting a form, or going back and forth with browser buttons. By contrast, something like using a search bar between same-origin pages won’t trigger a page transition.
Both pages — the one we’re navigating away from and the one we’re navigating to — need to opt into the transition using the @view-transition at-rule and setting the navigation property to auto
@view-transition navigation: auto;
When both pages opt into a transition, the browser takes a “snapshot” of both pages and smoothly fades the “before” page into the “after” page.
Transitioning between “snapshots”
In that video, you can see how the old page fades into the new page, and it works thanks to an entire tree of new pseudo-elements that persist through the transition and use CSS animations to produce the effect. The browser will group snapshots of elements with a unique view-transition-name property that sets a unique identifier on the transition that we can reference, and which is captured in the ::view-transition pseudo-element holding all of the transitions on the page.
You can think of ::view-transition as the :root element for all page transitions, grouping all of the parts of a view transition on the same default animation.
::view-transition ├─ ::view-transition-group(name) │ └─ ::view-transition-image-pair(name) │ ├─ ::view-transition-old(name) │ └─ ::view-transition-new(name) ├─ ::view-transition-group(name) │ └─ ::view-transition-image-pair(name) │ ├─ ::view-transition-old(name) │ └─ ::view-transition-new(name) └─ /* and so one... */
Notice that each transition lives in a ::view-transition-group that holds a ::view-transition-image-pair that, in turn, consists of the “old” and “new” page snapshots. We can have as many groups in there as we want, and they all contain an image pair with both snapshots.
Quick example: let’s use the ::view-transition “root” as a parameter to select all of the transitions on the page and create a sliding animation between the old and new snapshots.
@keyframes slide-from-right from transform: translateX(100vw); @keyframes slide-to-left to transform: translateX(-100vw); ::view-transition-old(root) animation: 300ms ease-in both slide-to-left; ::view-transition-new(root) animation: 300ms ease-out both slide-from-right;
If we navigate between pages, the entire old page slides out to the left while the entire new page slides in from the right. But we may want to prevent some elements on the page from participating in the transition, where they persist between pages while everything else moves from the “old” snapshot to the “new” one.
That’s where the view-transition-name property is key because we can take snapshots of certain elements and put them in their own ::view-transition-group apart from everything else so that it is treated individually.
nav view-transition-name: navigation; /* ::view-transition ├─ ::view-transition-group(navigation) │ └─ ::view-transition-image-pair(navigation) │ ├─ ::view-transition-old(navigation) │ └─ ::view-transition-new(navigation) └─ other groups... */
You can find a live demo of it on GitHub. Just note that browser support is limited to Chromium browsers (i.e., Chrome, Edge, Opera) at the time I’m writing this.
There are many things we can look forward to with cross-document view transitions. For example, If we have several elements with a different view-transition-name, we could give them a shared view-transition-class to style their animations in one place — or even customize the view transitions further with JavaScript to check from which URL the page is transitioning and animate accordingly.
Feature 3: Anchor Positioning
Positioning an element relative to another element in CSS seems like one of those no-brainer, straightforward things, but in reality requires mingling with inset properties (top, bottom, left, right) based on a series of magic numbers to get things just right. For example, getting a little tooltip that pops in at the left of an element when hovered might look something like this in HTML:
<p class="text"> Hover for a surprise <span class="tooltip">Surprise! I'm a tooltip</span> </p>
…and in CSS with current approaches:
.text position: relative; .tooltip position: absolute; display: none; /* vertical center */ top: 50%; transform: translateY(-50%); /* move to the left */ right: 100%; margin-right: 15px; */ .text:hover .tooltip display: block;
Having to change the element’s positioning and inset values isn’t the end of the world, but it sure feels like there should be an easier way. Besides, the tooltip in that last example is extremely fragile; if the screen is too small or our element is too far to the left, then the tooltip will hide or overflow beyond the edge of the screen.
CSS Anchor Positioning is yet another new feature that was discussed in the CSSWG meetings and it promises to make this sort of thing much, much easier.
Creating an anchor
The basic idea is that we establish two elements:
one that acts as an anchor, and
one that is a “target” anchored to that element.
This way, we have a more declarative way to associate one element and position it relative to the anchored element.
To begin we need to create our anchor element using a new anchor-name property.
Changing our markup a little:
<p> <span class="anchor">Hover for a surprise</span> <span class="tooltip">Surprise! I'm a tooltip</span> </p>
We give it a unique dashed-indent as its value (just like a custom property):
.anchor anchor-name: --tooltip;
Then we relate the .tooltip to the .anchor using the position-anchor property with either fixed or absolute positioning.
.toolip position: fixed; position-anchor: --tooltip;
The .tooltip is currently positioned on top of the .anchor, but we ought to move it somewhere else to prevent that. The easiest way to move the .tooltip is using a new inset-area property. Let’s imagine that the .anchor is placed in the middle of a 3×3 grid and we can position the tooltip inside the grid by assigning it a row and column.
The inset-area property takes two values for the .tooltip‘s in a specific row and column on the grid. It counts with physical values, like left, right, top and bottom, as well logical values depending on the user’s writing mode, like start and end, in addition to a center shared value. It also accepts values referencing x- and y-coordinates, like x-start and y-end. All these value types are ways of representing a space on the 3×3 grid.
For example, if we want the .tooltip to be positioned relative to the top-right edge of the anchor, we can set the inset-area property like this:
.toolip /* physical values */ inset-area: top right; /* logical values */ inset-area: start end; /* mix-n-match values! */ inset-area: top end;
Lastly, if we want our tooltip to span across two regions of the grid, we can use a span- prefix. For example, span-top will place the .tooltip in the grid’s top and center regions. If instead we want to span across an entire direction, we can use the span-all value.
One of the problems with our anchor-less example is that the tooltip can overflow outside the screen. We can solve this using another new property, this time called position-try-options, in combination with a new inset-area() function.
(Yes, there is inset-area the property and inset-area() the function. That’s one we’ll have to commit to memory!)
The position-try-options property accepts a comma-separated list of fallback positions for the .tooltip when it overflows outside the screen. We can provide a list of inset-area() functions, each holding the same values that the inset-area property would. Now, each time the tooltip goes out off-screen, the next declared position is “tried”, and if that position causes an overflow, the next declared position is tried, and so on.
.toolip inset-area: top left; position-try-options: inset-area(top), inset-area(top right);
This is a pretty wild concept that will take some time to grok. CSSWG member Miriam Suzanne sat down to discuss and tinker with anchor positioning with James Stuckey Weber in a video that’s well worth watching.
youtube
Geoff Graham took notes on the video if you’re looking for a TL;DW.
There are still many aspects to anchor positioning we aren’t covering here for brevity, notably the new anchor() function and @try-position at-rule. The anchor() function returns the computed position of the edge of an anchor, which provides more control over a tooltip’s inset properties. The @try-position at-rule is for defining custom positions to set on the position-try-options property.
My hunch is that using inset-area will be plenty robust for the vast majority of use cases.
The CSSWG is a collective effort
Earlier I said that this article wouldn’t be an exact retelling of the discussions that took place at the CSSWG meetings, but rather a broad representation of new specs coming to CSS that, due to their novelty, were bound to come up in those meetings. There are even some features that we simply hadn’t the time to review in this roundup that are still subject to debate (cough, masonry).
One thing is for sure: specs aren’t made in some vacuum over one or two meetings; it takes the joined effort of tens of amazing authors, developers, and user agents to bring to life what we use every day in our CSS work — not to mention the things we will use in the future.
I also had the opportunity to talk with some amazing developers from the CSSWG, and I found it interesting what their biggest takeaways were from the meetings. You might expect if() is at the top of their lists since that’s what is buzzing in socials. But CSSWG member Emilio Cobos told me, for example, that the letter-spacing property is essentially flawed and there isn’t a simple solution for fixing it that’s copasetic with how letter-spacing is currently defined by CSS and used in browsers. That includes the fact that converting normal properties into shorthand properties can be dangerous to a codebase.
Every tiny detail we might think of as trivial is carefully analyzed for the sake of the web and for the love of it. And, like I mentioned earlier, this stuff is not happening in a closed vacuum. If you’re at all interested in the future of CSS — whether that simply keeping up with it or getting actively involved — then consider any of the following resources.
#2023#2024#agent#agents#amazing#anchor positioning#animation#animations#API#apps#Article#Articles#background#Behavior#Blue#box#browser#buttons#change#chrome#chromium#clamp#clouds#codebase#Collective#Color#Community#complexity#container#cooking
0 notes
Link
Ternary operator in JavaScript is used to shorten your code, convert a full-fledged if statement into a single line of code.
0 notes
Text
How to Use the Ternary Operator JavaScript
#web development#front end web development#web development roadmap#web development guide#learn web development#app development#backend web development#full stack web development#software development#development#web development tutorial#web development projects#web development tutorial for beginners#what is web development
1 note
·
View note
Text
You can learn ReactJS easily, Here's all you need to get started:
1.Components
• Functional Components
• Class Components
• JSX (JavaScript XML) Syntax
2.Props (Properties)
• Passing Props
• Default Props
• Prop Types
3.State
• useState Hook
• Class Component State
• Immutable State
4.Lifecycle Methods (Class Components)
• componentDidMount
• componentDidUpdate
• componentWillUnmount
5.Hooks (Functional Components)
• useState
• useEffect
• useContext
• useReducer
• useCallback
• UseMemo
• UseRef
• uselmperativeHandle
• useLayoutEffect
6.Event Handling
• Handling Events in Functional Components
• Handling Events in Class Components
7.Conditional Rendering
• it Statements
• Ternary Operators
• Logical && Operator
8.Lists and Keys
• Rendering Lists
• Keys in React Lists
9.Component Composition
• Reusing Components
• Children Props
• Composition vs Inheritance
10.Higher-Order Components (HOC)
• Creating HOCs
• Using HOCs for Reusability
11.Render Props
• Using Render Props Pattern
12.React Router
• <BrowserRouter>
• <Route>
• <Link>
• <Switch>
• Route Parameters
13. Navigation
• useHistory Hook
• useLocation Hook
State Management
14.Context API
• Creating Context
• useContext Hook
15.Redux
• Actions
• Reducers
• Store
• connect Function (React-Redux)
16.Forms
• Handling Form Data
• Controlled Components
• Uncontrolled Components
17.Side Effects
• useEffect for Data Fetching
• useEffect Cleanup
18.AJAX Requests
• Fetch AP
• Axios Library
Error Handling
19.Error Boundaries
• componentDidCatch (Class Components)
• ErrorBoundary Component (Functional
Components)
20.Testing
• Jest Testing Framework
• React Testing Library
21. Best Practices
• Code Splitting
• PureComponent and React.memo
• Avoiding Reconciliation
• Keys for Dynamic Lists
22.Optimization
• Memoization
• Profiling and Performance Monitoring
23. Build and Deployment
• Create React App (CRA)
• Production Builds
• Deployment Strategies
Frameworks and Libraries
24.Styling Libraries
• Styled-components
• CSS Modules
25.State Management Libraries
• Redux
• MobX
26.Routing Libraries
• React Router
• Reach Router
0 notes
Text
Finding factorial using Ternary operator.
Hello, everyone....
I'm going to briefly discuss a code in JavaScript, which was invoked to find the factorial of a number.
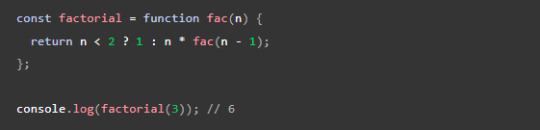
starting with the keyword const, const is used to define a variable as fixed, in general, we are allocating a fixed location of memory to the variable. 'factorial' is the name of our variable (variables are used to store our data just like a container).
Now we created a function using the keyword 'function' followed by the function name 'fac' and in parentheses, there comes the parameter (typically the values we give our functions to perform operations on)
The body of the function is all we need to focus on for now, 'return' is to return the value. ternary operator (syntax -> condition? true: false) checks if n is less than 2. If n is less than 2 1 will be the return value, else n*fac(n-1). Here comes the recursive functional call, for every n, greater than 2 the n is multiplied by itself and a factional call of the previous value of n.

so, it evaluates to 1*2*3 = 6. This is how recursion works and the final value is calculated by backtracking the tree. The last line of code is to print the value on the console.
Thank You <3!
0 notes
Text
Start Your JavaScript Journey with WebTutor
In the world of web development, JavaScript has emerged as an essential programming language. Its versatility, ease of use, and ability to interact with HTML and CSS make it a powerful tool for creating dynamic and interactive websites. In this blog, we will explore the fundamental concepts of JavaScript, from its basic syntax and output to variables, operators, and more. Whether you're a beginner or a seasoned developer, there's something for everyone to learn and apply. Additionally, we'll introduce you to an excellent resource, webtutor.dev, where you can further enhance your JavaScript skills.
JavaScript Output
JavaScript allows developers to communicate with users by generating output in various ways. The most common method of output is using the console.log() function. It prints messages or data to the browser's console, which is useful for debugging and understanding what's happening in your code.
JavaScript Syntax
The syntax of JavaScript is quite user-friendly and similar to many other programming languages. Here are a few key points to remember:
Statements: JavaScript code is made up of statements, which can be declarations, assignments, function calls, loops, etc.
Case Sensitivity: JavaScript is case-sensitive, so variables myVar, myvar, and MYVAR are considered different.
Semicolons: While optional, it's a good practice to end statements with semicolons to avoid potential issues.
Whitespace: JavaScript ignores whitespace, so you can use spaces, tabs, and newlines for code formatting.
JavaScript Comments
JavaScript Comments are essential for code documentation and explanation. JavaScript supports both single-line and multi-line comments. Single-line comments start with //, and multi-line comments are enclosed between /* and */.
JavaScript Variables
Variables in JavaScript are used to store data values. They are declared using the let or const keyword. let allows reassignment, while const creates a constant that cannot be reassigned.
JavaScript Operators
Operators are symbols used to perform operations on variables and values. JavaScript supports various types of operators:
Arithmetic Operators: Used for basic arithmetic operations like addition, subtraction, multiplication, etc.
Comparison Operators: Used to compare values and return true or false based on the comparison.
Logical Operators: Used to combine multiple conditions and determine the overall truth value.
Assignment Operators: Used to assign values to variables.
Ternary Operator: A shorthand way of writing conditional statements.
Conclusion
JavaScript is the backbone of modern web development, enabling you to create dynamic and interactive websites that engage users effectively. By mastering JavaScript's syntax, output, comments, variables, and operators, you will have a strong foundation to build upon. Remember, continuous learning is the key to staying relevant and growing as a developer.
So, start your JavaScript journey today, and do not forget to visit webtutor.dev for an enriching learning experience that will take your skills to new heights. Happy coding!
#JavaScript Output#JavaScript Syntax#JavaScript Comments#JavaScript Variables#JavaScript Operators#Learn JavaScript Output#Learn JavaScript Syntax#Learn JavaScript Comments#Learn JavaScript Variables#Learn JavaScript Operators#Learn online JavaScript Output#Learn online JavaScript Syntax#Learn online JavaScript Comments#Learn online JavaScript Variables#Learn online JavaScript Operators
0 notes
Text
Understanding React Conditional Rendering for Dynamic User Interfaces
React Conditional Rendering is a feature in React that enables developers to display different components or elements based on specific conditions. It works similar to JavaScript conditions, allowing you to perform different actions depending on the current state of your React application. By using conditional rendering, you can create dynamic and interactive user interfaces that adapt and respond to different scenarios.

What is React Conditional Rendering?
React Conditional Rendering is a powerful feature in React that allows developers to create dynamic and interactive user interfaces (UI). In the simplest terms, ‘conditional rendering in React’ refers to displaying different components or elements based on certain conditions.
Just like in JavaScript, you can use conditions in your React code to perform different actions based on different conditions. This concept is commonly referred to as ‘React conditional render’.
The Working Principle of React Conditional Rendering
React utilizes the JavaScript conditional operators like IF-ELSE, ternary, and logical AND to create ‘conditional rendering react’. React components return different elements from the render function depending on the current props and state of the application.
For instance, let’s consider a simple scenario where we want to display a welcome message to logged-in users, and a login button to those who are not logged in. Here, ‘conditional rendering in React’ comes into play. Based on the condition, whether the user is logged in or not, we instruct React what to display – the welcome message or the login button.
The Power of React Conditional Rendering
React conditional rendering multiple conditions’ is also possible, which means you can render based on more than one condition. This makes your application much more dynamic and adaptable to complex scenarios. You could render a component if the user is authenticated and if they have specific privileges, for instance.
React allows conditions to be checked multiple times before rendering certain components, often referred to as ‘react conditional rendering’. This flexibility enables greater control over complex and dynamic application states.
In conclusion, React conditional rendering is a powerful tool that developers can use to create more interactive and responsive applications, bringing a whole new level of dynamism to your React apps.
Why Conditional Rendering is Necessary in React Applications?
Conditional rendering react’ is an indispensable tool for developing dynamic, user-friendly applications. Here, we will delve into why conditional rendering is so crucial in React applications.
Enhancing User Interface with React Conditional Render
React is highly popular due to its capability to build intuitive and responsive user interfaces. This is where ‘react conditional render’ shines. By using conditional rendering in react, you can tailor the UI based on specific conditions, thereby creating a personalized user experience.
For instance, displaying user-specific data, hiding or showing navigation elements based on user roles, or toggling between light and dark modes, all these are achievable with conditional rendering.
Managing Complex Scenarios with React Conditional Rendering Multiple Conditions
React conditional rendering multiple conditions’ is an essential feature that allows developers to handle complex UI changes seamlessly. This approach offers the capability to render components based on multiple conditions, thereby bringing a whole new level of dynamism and adaptability to your applications.
For example, you may want to render a component only if a user is authenticated and holds specific privileges. This scenario requires checking multiple conditions, showcasing the power of conditional rendering in react.
Greater Control with React Conditional Rendering
The ability to check conditions multiple times before rendering a certain component, commonly referred to as ‘react conditional rendering’, offers developers greater control over the application’s UI and behavior. This proves to be especially useful when dealing with multiple dependencies that can affect the UI rendering.
Conditional Rendering for Performance Optimization
React conditional render isn’t just about UI changes. It also plays a role in optimizing application performance. By rendering only what’s necessary based on certain conditions, React apps can avoid unnecessary rendering and thus save valuable processing power, leading to smoother and faster applications.
In conclusion, conditional rendering in React is not just a handy feature; it’s essential in creating responsive, user-friendly applications. It provides developers the tools to create dynamic UIs, manage complex scenarios, optimize performance, and overall, gives them greater control over how and when components are rendered.
How does React Conditional Rendering Work?
Consider an example of how to use the sign-in/signout button. The sign-in and sign-out buttons will be separate components. If the user signs in, sign-out the component will be used to display the sign-out button. This scenario is called conditional rendering.
In react we have different ways to do Conditional rendering. They are as follows:
If/else
Ternary operator
Logical && operator
Switch case operator
Prevent rendering with null
Conditional Rendering with enum
Immediately-Invoked Function Expressions (IIFE)
Subcomponents
High Order Components (HOCs)
1) If/else
It is a simple way of rendering in react using if/else. The syntax of if/else is the same as javascript, but in react a return statement needs to be defined for each if / else declaration, which makes the code repetitive and not simple to read and modify.
import React from 'react'; class ConditionalRendering extends React.Component{ constructor(props){ super(props); this.state ={ IsLoggedIn : false } } render(){ if(this.state.IsLoggedIn){ return
Welcome User
} else{ return
You need to login
} }; } export default ConditionalRendering;
2) Ternary operator
Ternary operators can be used to replace if/else and also in cases where two blocks alternate given a certain condition.
Syntax: Condition? statement 1: statement 2
If the condition is true then statement 1 will be rendered otherwise statement 2 will be rendered
render() { const isLoggedIn = this.state.isLoggedIn; return (
Welcome {isLoggedIn ? ‘Back’ : ‘Please login first’}.
); }
3) Logical && operator
This operator is used for checking the condition. If the given condition is true, it will return the element right after &&, and if the condition is false, React will ignore and skip it.
Syntax
{ condition && // whatever written after && will be a part of output. } import React from 'react'; import ReactDOM from 'react-dom'; Function ExampleofLogocal() { return(
{ (15> 8) && alert(‘This alert will be shown!’) }
); }
4) Switch case operator
Switch case operator is used when we have multiple condition renderings. Rendering is applied based on different states.
function NotificationMsg({ text}) { switch(text) { case 'Hi All': return ; case 'Hello': return ; default: return null; } }
5) Prevent rendering with null
If you want to conceal a component, you can render its rendering method null, there is no need to render an empty element as a placeholder. One important thing to keep in mind when returning null is that even though the component doesn’t show up, its life-cycle techniques are still being fired.
renderInputField() { if(this.state.mode === 'view') { return null; } else { return (
); } }
6) Conditional Rendering with enum
An enum is used in multiple conditional rendering. It is perfect for mapping different states and more than one condition.
function NotificationMsg({ text, state }) { return (
{{ info: , warning: , }[state]}
); }
7) Immediately-Invoked Function Expressions (IIFE)
IIFEs are functions that are executed immediately after they are defined, there is no need to call them explicitly.
We have to define the function in the following way
( function myFunction(/* arguments */) { // ... }(/* arguments */) ); Or in this way ( function myFunction(/* arguments */) { // ... }(/* arguments */) );
8) Subcomponents
we use React, where the suggested methods are things such as dividing your app’s logic into as many parts as possible and using functional programming rather than imperative programming.
It would, therefore, be a great choice to move the conditional rendering logic to a sub-component that makes different things based on its props.
render () { const view = this.state.mode === 'view'; return (
Text: {this.state.text}
{ view ? : ( ) }
); }
9) High Order Components (HOCs)
A higher-order component is a function that takes a current element and returns a fresh one with some added features
function higherOrderComponent(Component) { return function EnhancedComponent(props) { if (condition) { return ; } return ; }; }
How to Manage Application State for Conditional Rendering?
The magic of ‘conditional rendering react’ lies in the management of application state. By understanding and controlling the state, we can control what components are rendered under specific circumstances. This article will provide an overview of managing application state for ‘react conditional render’.
Understanding State in Conditional Rendering in React
State in React is a built-in feature that allows components to create and manage their data. This data can influence what is rendered in the UI. When the state changes, React updates the component’s render output, leading to ‘conditional rendering in react’.
For example, you might maintain a ‘isLoggedIn’ state. If ‘isLoggedIn’ is true, you might render a ‘Logout’ button. If false, a ‘Login’ button might be rendered instead.
Leveraging React Conditional Rendering Multiple Conditions with State
By using multiple states in your components, you can perform ‘react conditional rendering multiple conditions’. This feature allows you to have even more complex logic and control over what is rendered in your UI.
Suppose you have an ‘isAdmin’ state in addition to ‘isLoggedIn’. In this case, you can render different components based on whether the user is logged in, whether the user is an admin, or both.
Implementing React Conditional Rendering with State
State management is also crucial when implementing ‘react conditional rendering’. In this case, you check the state multiple times within the render method.
For example, consider an app where you need to render different components based on whether a user is authenticated and whether a page is loaded. You can check the ‘isAuthenticated’ state and render accordingly, and then check the ‘isLoaded’ state and render some more JSX.
Strategies for State Management for React Conditional Render
There are several strategies and libraries to help manage state in React applications:
Local component state: This is the built-in state management feature of React. Each component can have its own state and rerender whenever this state changes.
Context API: This is also built-in in React and allows you to share state between multiple components without passing props down manually at every level.
Redux: This is a third-party library that offers a more structured approach to state management and is often used in larger applications.
MobX: This is another third-party library that focuses on simplicity and scalability, offering a more straightforward and less boilerplate-intensive alternative to Redux.
Understanding and leveraging these tools can give you greater control over ‘conditional rendering in react’ and help you build more dynamic, responsive applications. Remember, effectively managing application state is the key to mastering React conditional rendering.
How to Use Props to Cause React Conditional Rendering?
In ‘conditional rendering react’, both state and props play significant roles. Just as the state determines how a component behaves, props also influence how a component is rendered. In this context, let’s understand how to use props for ‘react conditional render’.
Role of Props in Conditional Rendering in React
In React, props (short for properties) are inputs to components and can be used to pass data from one component to another. ‘Conditional rendering in react’ often depends on these props. For instance, you might pass a ‘isLoggedIn’ prop to a component and render different elements based on its value.
Using Props in React Conditional Rendering Multiple Conditions
In addition to state, props can also be used for ‘react conditional rendering multiple conditions’. Consider a scenario where a parent component passes multiple props to a child component. Based on the values of these props, the child component can decide what to render.
For example, you might have a ‘UserStatus’ component that receives ‘isLoggedIn’ and ‘isAdmin’ props. Depending on the combination of these prop values, you could render different messages.
Props and React Conditional Rendering
Just like with state, props can play a significant role when you need to implement ‘react conditional rendering twice’. This is useful when you want to perform different render operations in a single component based on the values of different props.
Imagine a ‘UserProfile’ component that receives ‘user’ and ‘isLoading’ props. First, you can check ‘isLoading’ to decide whether to show a loading spinner. Then, after loading is complete, you can check the ‘user’ prop to render user-specific information.
Example of Using Props for React Conditional Render
Here’s a simple example of how you might use props for conditional rendering in a React component:
function WelcomeMessage({ isLoggedIn }) {
return (
<div>
{isLoggedIn ? <h1>Welcome back!</h1> : <h1>Please log in.</h1>}
</div>
);
}
In this component, we are using a prop ‘isLoggedIn’ to conditionally render a welcome message or a login prompt.
In conclusion, using props for conditional rendering in React allows you to create highly dynamic and reusable components. Whether you’re dealing with single or multiple conditions, or need to perform multiple render operations within a single component, props can provide the flexibility you need to make your components adapt to a variety of scenarios.
#conditional rendering in React#using props for conditional rendering in React4#React Conditional Render#React Conditional Render using state#React Conditional Rendering
0 notes
Text
Vue js - how to use ternary operator in vue
Vue js – how to use ternary operator in vue
In this blog we will learn about how to use the ternary operator in vue js I will show you how to use ternary with v-model in vuejs. we can easily use the ternary operator for conditions in Vue js.
Before moving forward let’s know something about the ternary operator.In computer programming, ?: is a ternary operator that is part of the syntax for basic conditional expressions in…

View On WordPress
#or operator in vue js#ternary operator in javascript#ternary operator in nuxt js#v for conditional#v if ternary#vue js add class based on condition#vue js data binding#vue ternary operator in html
0 notes
Text

Ternary Operator Mastery | Purecode
Moving on, we’ll discuss the ternary operator, a powerful tool for writing more concise conditional logic. It’s like an if-else statement, but shorter, quicker, and just as effective.
#Ternary Operator#Mastery#purecode#purecode ai company reviews#purecode software reviews#purecode ai reviews#purecode company#purecode reviews
0 notes
Text
tutorial time
Here's a fun project you can build in no time at all: a stopwatch.

First, let's set up the HTML: after you <link> off to the stylesheet and connect to the <script>, the <body> only needs one thing: a <button>.

I'll let you style it how you want, but as long-time readers might imagine, I went with lots of box-shadow. Anyway, on to the JavaScript!

Above, we add a click listener to that <button>, which triggers a function, below.
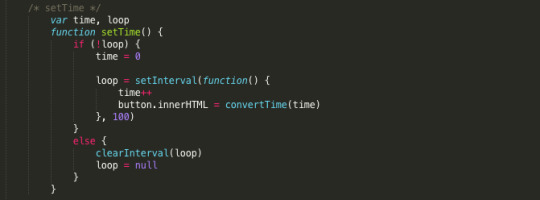
When a user clicks, there are two possibilities: either we haven't started looping yet, or we're about to stop that loop (with clearInterval()). And the loop itself isn't too complex: just increment a global variable every tenth of a second.

To make that number human-readable, we need to separate out the whole minutes and whole seconds (using division, modulo, and Math.floor()) from the remaining tenths.

Then we use a ternary operator to determine the need for a leading zero (to get 01:02.3 instead of 1:2.3). Feed that back into the <button>, and you've good a stopwatch. Now do it again, but time yourself this time!
tl;dr: x++ is a shortcut for x = x + 1; % gives you the remainder after division; the ? : construction is a cool tool when defining variables
project: timeStopper
#code#coding#projects#html#javascript#css#time#timer#stopwatch#tutorial#math#modulo#ternary operator
6 notes
·
View notes
Photo

Ternary Operators of Javascript in Python. https://ift.tt/2XKXHc9
0 notes
Photo
technique of the day Ternary operator Javascript #javascript #html #programming #css #coding #java #python #developer #programmer #webdeveloper #webdevelopment #code #coder #php #webdesign #software #softwaredeveloper #computerscience #codinglife #reactjs #technology #frontend #development #programmers #js #web #softwareengineer #programmingmemes #linux #javascriptdeveloper https://www.instagram.com/p/Cn3_ZP7PMwI/?igshid=NGJjMDIxMWI=
#javascript#html#programming#css#coding#java#python#developer#programmer#webdeveloper#webdevelopment#code#coder#php#webdesign#software#softwaredeveloper#computerscience#codinglife#reactjs#technology#frontend#development#programmers#js#web#softwareengineer#programmingmemes#linux#javascriptdeveloper
27 notes
·
View notes
Photo

Refresher on how to write the Ternary Operator in Python, Java, JavaScript, C, and PHP. Follow @initialcommit for more programming content. Check out our website https://initialcommit.io for programming articles, books, live sessions, and how to create your own code-oriented website. #initialcommit #ternary #operator #python #pythonprogramming #java #javaprogramming #javascript #cprogramming #php #programming #coding #learnprogramming #learncoding #softwaredevelopment https://www.instagram.com/p/CAQCC73lYtl/?igshid=8ul1xnwrb1bp
#initialcommit#ternary#operator#python#pythonprogramming#java#javaprogramming#javascript#cprogramming#php#programming#coding#learnprogramming#learncoding#softwaredevelopment
0 notes
Text
You don't have to use the ternary operator every single time you want an if statement. Readability is just as important as functionality.
And yes this applies to both #javascript and #csharp
It's okay for some things but if it looks like a paragraph...
2 notes
·
View notes
Text
JavaScript Features You Need to Know to Master React

When it comes to web development, React has emerged as a powerhouse for creating dynamic and interactive user interfaces. However, to truly master React, you need a solid grasp of the underlying JavaScript features that empower its functionality.
In this comprehensive guide, we'll explore the JavaScript features you must know to excel in React development. From the fundamentals to advanced concepts, this article will equip you with the knowledge and insights to become a proficient React developer.
JavaScript Features You Need to Know to Master React
JavaScript, as the foundation of React, provides a range of features that are integral to understanding and effectively utilizing React. Let's delve into these features in detail:
1. ES6 Syntax and Arrow Functions:
Understanding the modern ES6 syntax is essential for efficient React coding. Arrow functions, in particular, help simplify code structure and improve readability.
2. Component-Based Architecture:
JavaScript's ability to create reusable components aligns seamlessly with React's component-based architecture. This promotes modular and organized code, making maintenance and updates smoother.
3. State and Props:
JavaScript's concept of state and props is at the core of React's dynamic nature. State allows components to manage and track changes, while props facilitate data flow between components.
4. Destructuring and Spread Operators:
Destructuring objects and using spread operators in JavaScript streamline the handling of data within React components, enhancing code efficiency.
5. JSX (JavaScript XML):
JSX, an extension of JavaScript, enables developers to write HTML-like code within their JavaScript. This makes rendering components in React more intuitive and readable.
6. Event Handling:
JavaScript's event handling capabilities empower React components to respond to user interactions effectively. This includes handling onClick, onChange, and other events seamlessly.
7. Conditional Rendering:
JavaScript's if-else statements and ternary operators align perfectly with React's conditional rendering, allowing components to display content based on specific conditions.
8. Lifecycle Methods:
Understanding JavaScript's lifecycle methods, such as componentDidMount and componentWillUnmount, is crucial for managing component behavior and optimizing performance in React.
9. Fetch API and Asynchronous Programming:
JavaScript's asynchronous programming capabilities, coupled with the Fetch API, enable seamless data fetching and updating within React applications.
10. LocalStorage and SessionStorage:
Leveraging JavaScript's localStorage and sessionStorage facilitates client-side data storage, which can be advantageous for saving user preferences in React applications.
11. Higher-Order Components (HOCs):
JavaScript's functional programming capabilities enable the creation of HOCs in React, enhancing code reusability and making it easier to manage complex component structures.
12. Context API:
JavaScript's context allows for global data sharing across components in React applications, reducing the need to pass props down the component tree.
13. Promises and Async/Await:
JavaScript's Promise-based asynchronous programming, along with the modern async/await syntax, simplifies handling asynchronous operations in React.
14. Immutability and Pure Functions:
Understanding immutability and pure functions in JavaScript ensures that state management in React remains predictable and avoids unintended side effects.
15. Error Handling with Try/Catch:
JavaScript's try/catch blocks offer a structured approach to handling errors in React applications, enhancing stability and user experience.
16. Routing with React Router:
JavaScript's versatility complements React Router's seamless navigation, allowing developers to create dynamic, multi-page applications.
17. RESTful API Integration:
JavaScript's capabilities for making HTTP requests align well with React's need for integrating RESTful APIs, enabling data exchange between the frontend and backend.
18. Event Delegation:
JavaScript's event delegation strategy optimizes event handling within React's virtual DOM, contributing to improved performance.
19. Web Accessibility (A11y):
JavaScript's support for manipulating the DOM aligns with React's commitment to web accessibility, ensuring applications are usable by individuals with disabilities.
20. Webpack and Babel Integration:
JavaScript's versatility shines when integrated with tools like Webpack and Babel, enhancing the development and deployment of React applications.
21. Closures and Scoping:
Understanding JavaScript's scoping rules and closures is essential for maintaining clean code and preventing variable conflicts in React applications.
22. Memoization:
JavaScript's ability to optimize function calls through memoization contributes to React application performance by reducing unnecessary re-renders.
23. Error Boundaries:
JavaScript's error handling capabilities align with React's ErrorBoundary component, offering a way to gracefully manage errors and prevent app crashes.
24. Hooks:
JavaScript's functional programming nature is well-suited for React's hooks, allowing developers to manage state and side effects in functional components.
25. TypeScript Integration:
While not exclusive to JavaScript, integrating TypeScript enhances React development by providing static typing, reducing potential runtime errors.
FAQs:
How do I start learning JavaScript for React?
Begin by mastering JavaScript fundamentals like variables, data types, and control structures. Then, explore ES6 features, such as arrow functions and destructuring, to enhance your code quality.
Can I use JavaScript libraries with React?
Absolutely. React's flexibility allows you to integrate various JavaScript libraries for specific functionalities, such as data visualization (D3.js) or state management (Redux).
What's the significance of the Virtual DOM in React?
The Virtual DOM is a JavaScript representation of the actual DOM. React uses it to efficiently update and render components, reducing the need for direct manipulation of the real DOM.
Is it necessary to learn all these JavaScript features to master React?
While not mandatory, understanding these features significantly empowers your React development journey. They provide the foundation for writing clean, efficient, and scalable React applications.
How does JavaScript's event-driven nature enhance React?
JavaScript's event-driven paradigm aligns with React's component-based architecture, allowing developers to create responsive and interactive user interfaces by handling user actions.
Can I use JavaScript features in both frontend and backend development?
Absolutely. JavaScript is a versatile language used in both frontend (browser) and backend (Node.js) development. Understanding its features benefits you in various application areas.
Conclusion:
As you embark on your journey to master React, remember that a strong foundation in JavaScript is paramount. The features and concepts we've explored in this article lay the groundwork for creating exceptional React applications. By harnessing JavaScript's capabilities, you'll build responsive, dynamic, and user-friendly interfaces that leave a lasting impact. Stay curious, keep practicing, and dive deeper into these features to become a true React expert.
Read the full article
0 notes