#testing tools tutorials
Explore tagged Tumblr posts
Visit Tumblr Blog
Explore Tumblr blogs with no restrictions, modern design and the best experience.
Last Seen Tumblr Blogs


Fun Fact
Tumblr has 4 main sources of revenue.
Text

My OC, Uni-T.
#her name is unity love but that's not her actual name#she doesn't know how human names work#neither of them do#they just named themselves things#her stage name is universe thunderstorms#so to her it makes sense#oc art#original character#my art#I spent like three hours making this cause I wanted to paint it in a really cute painterly way#failed miserably as usual no matter how many tutorials I watch my tools just suck and I have a serious children's hospital level+#color theory problem that doesn't go away#so I got neck pain for nothing#and this was supposed to be a FUN drawing for me to TEST stuff out#never test things#I wish I knew how to paint tbh#sighhhhhhhhhhhhhhhhhhhhhhhhhhhhh#wmp.txt
7 notes
·
View notes
Text
This page wasn’t just about showing my IP it had some neat tools too. I could check if my IP’s on any blacklists (phew, mine wasn’t!), which is apparently a thing if you’re flagged for spam or something. They also had a speed test link, which I tried because my Netflix was lagging. Plus, there was a bit about checking if my browser’s leaking info, like WebRTC stuff (no clue what that is, but I followed their steps). It felt like a toolbox for curious folks like me who want to dig deeper without needing a tech degree. Technical Shala’s got that “learn as you go” vibe.
#IP tools#blacklist check#internet speed test#WebRTC leak#browser privacy#network diagnostics#IP security#online tools#tech tutorials#user-friendly#Technical Shala#internet troubleshooting.
0 notes
Text
youtube
MAKING SLIME WITH BALLOON VS PIPING BAG #shorts #boomslime @Boomslime46
#balloon vs piping bag#DIY slime#slime experiment#slime hacks#how to make slime#slime tutorial#fun slime ideas#slime texture test#easy slime recipes#slime comparison#slime battle#slime ASMR#satisfying slime videos#kids slime activities#Sie crafts#slime DIY at home#slime making tips#slime tools comparison#creative slime ideas#slime with balloon#slime with piping bag#balloon vs piping bag slime#DIY slime experiment#slime making hacks#Youtube
0 notes
Text
How to Get the Make-up Test by Shishi: Which Type Are You filter on TikTok?
How to Get the Dress to Impress Filter on TikTok TikTok is never short of filters that make us feel stylish, creative, or just plain fabulous. One of the latest hits is the “Dress to Impress” filter by @allangregorio. With over 21.7K videos and counting, this filter is stealing the spotlight for anyone looking to slay their TikTok game. Even creators like @kitrykkk are rocking it effortlessly,…
#@allangregorio filter#clean girl test#Dress to Impress filter#Dress to Impress game#Dress to Impress tips#Dress to Impress tutorial#glow-up TikTok#good or bad girl#how to use tiktok filters#Roblox avatar design#Roblox creativity#Roblox customization#Roblox Dress to Impress#Roblox dress-up games#Roblox fashion#Roblox fashion competition#Roblox fashion show#Roblox games 2025#Roblox outfit ideas#Roblox style challenges#Roblox trending games#test filter#TikTok#tiktok challenge#TikTok content tips#TikTok creator tools#TikTok fashion#tiktok filter#tiktok filters#TikTok glow-up challenge
0 notes
Text
Lenosed A781 Flash File
Lenosed A781 Android Tablet Without Password Or Paid customer care latest update version tested Flash File firmware original care stock rom. No Need Unlocktool Or Cm2 Just Use Smart Phone (Sp) Flash Tool And Mediatek Usb Vcom Driver. today i am share for you Lenosed A781 firmware without password or free download or paid file. you searching but i say just download my Lenosed A781 tested flash…

View On WordPress
#download-firmware#firmware-downloads#stock-firmware#stock-firmware-download#symphony helio 80 flash tool driver firmware tutorial#symphony helio 80 frp reset tool file without box#symphony helio 80 hw1 v9 care firmware#symphony helio 80 tested cm2 firmware#technology
0 notes
Text
CREEPED VISUAL NOVEL Link, tutorial, extra art, Q&A, some chatter


The CREEPED Prologue is completely free and browser-ready. Gameplay is about 10 minutes. Please read the "tutorial" and notes before playing!
Follow Y/N and their dog, Max, through their grandparents' farm and a mysterious forest filled with...less than fortunate people!
PLAY HERE; works best on PC
This visual novel is powered by GOOGLE SLIDES! It has 0 programming and was created by one person in a little over a month, so please bear with any "bugs" and clunkiness!
TUTORIAL
>Click using mouse/trackpad >Go slowly to not break game >Do not use arrow or space keys
EXTRA NOTES:
>Works best on PC/Browser, I haven't tested the full game on mobile yet >In general, clicking the PNGs on the textbox (Apple, Teddy Bear, Hatchet, etc) will lead you to the right page >If you land on a page that tells you to "go back," that's when you should click the back-arrow key. If your cursor disappears, it doesn't register the click correctly >I recommend moving your cursor periodically to avoid it disappearing and sending you to the wrong page
EXTRA ART
some WIPS and the original sprite-style i was gonna choose LOOOOOOOL


Q&A
Q: Is this an x reader? A: This is a reader-insert, but it's not romantic and I try to keep it as neutral and unidentifiable as possible! Q: What's the plot? A: GENERALLY AND WITHOUT SPOILERS, your dog gets you into trouble and you're just looking to help him!
Q: Who is in the prologue? A: Tim, Brian, Toby, and Kate! More will be added in future chapters.
Q: When will future chapters be posted? A: Not sure! This took me about a month to do, and half was spent over winter break. I will try to get chapter 1 posted before summer, but I am a full-time student, employed, have extracurriculars, etc etc
ok thats all i only remember 4 questions feel free to ask more LMAO
CHATTER(because you know i can talk forever)
ok i just wanted to be able to talk about how the process was with this and how i feel about the results and whatnot...
ive been wanting to make a google slides visual novel since i was like 13 LOL it hit the point where i was repeatedly told i should just learn to code but i was like NOOOOO ITS GOTTA BE GOOGLE SLIDESSSS which is totally stupid but hey. i think that gives it some sort of simple charm that reminds me of being 16 and doing little projects in my room LOL i like working with the easiest tools . my bad
anyway. im just very happy LOL. it's not perfect but i feel like i came full circle in a sense?!?! i've been into creepypasta since i was 9 and it comforted me when things were really hard, and when i was 18 i was going through a really hard time and got back into creepypasta as a way to distract myself. i've always had a habit of throwing myself into fiction for escapism when things suuucked.
i'm 20 now but i've met SO many amazing people, had so many fun awesome exciting projects with friends, created tons of stuff im proud of, felt more motivated to create since i was like 13, have been inspired by so many amazing artists/authors on here, etc. just so so so lucky to find community in such a tight-knit cute fandom that thrives off of creativity and playing around! i hope i can keep the momentum and make a couple more chapters this year, but im kinda busy with school and work...LOL . i'm just excited to have this posted so i can have more discussion about it T_T
anyway thank you if you read this far and thank you if you played etc etc yaahhhhhh omg ok BYE THIS IS SO EMBARRASSING im just so grateful to be in this fandom
#creepypasta#creepypasta fandom#crp fandom#creepypasta AU#crp Au#creepypasta game#creepypasta visual novel#creepypasta vn#ticci toby#toby rogers#kate the chaser#kate milens#tim wright#masky#masky marble hornets#hoody marble hornets#hoodie marble hornets#marble hornets#brian thomas#slenderman#creepypasta x reader#slenderverse#fandom#fanart#sweetart#CRPED VN
5K notes
·
View notes
Text
sliding scale
You're in need of a handyman. He has needs of his own. cw: discussion of kids/pregnancy, john price inserting himself into your life, heavily implied breeding kink, unsettling and smutless (my brand)
You win the jackpot. Okay. Not the jackpot, but you're hit by a respectable windfall. It's like a cheesy movie you'd watch around the holidays: A distant relative dies, you receive a very serious letter, and suddenly, your account isn't as sad as it once was.
So, you do the impossible. The unthinkable. You buy a house.
An old, well-loved house from an elderly couple.
The day you close, they tell you about raising their kids in the house and mention the names etched on the door frame. When you arrive home that evening, the empty house feels grand and hollow, but there they are, just where they said. Names climbing upward in uneven increments, faded with time, but legible. You trace your finger along the marks, imagining small hands and the measuring tape, the years slipping by. It makes you smile, despite yourself.
You've never wanted kids, not really, but the thought of this, people leaving bits of themselves behind—it makes you mushy. You figure, once the dust settles, you'll let rooms to friends, maybe friends of friends. Start a fun little commune of sorts, a collective of people coming and going.
The first night, you drink nonalcoholic wine straight from the bottle and lie on your mattress on the floor, staring up at the ceiling. There's no furniture yet, just your overnight bag and the smell of fresh paint from a patch you tested on the living room wall. You fall asleep smiling. The house needs a lot of work, but you're not worried. Some TLC and elbow grease can go a long way.
Over the next few weeks, you move in and start working. Anything is possible with the power of YouTube tutorials and the local tool library.
You start in the primary bedroom and bathroom, learning to tile, install flooring, and connect plumbing for the perfect vanity and sink you found at a thrift store. It feels good to learn how things fit together and see the fruits of your labor. At night, you sleep in one of the old kid's rooms. The wallpaper is covered in rockets and planets. A couple of glow-in-the-dark stars cling to the ceiling.
The bathroom comes together wonderfully, and you feel invincible.
But then you get to the kitchen.
After an outlet zaps you, you decide you may be in over your head. That there really is a limit to what one person can do on their own. You start looking up local contractors, but everything is out of your budget. You've been doing all the work yourself for a reason. Then, after digging for ages, you find a promising lead: John Price - Handyman - Sliding Scale.
On the phone, John seems normal. Charming. Funny. He tells you he's impressed you bought a house on your own. (You've heard that a lot lately, and while it feels patronizing, you let it go. You did jump up a band upon inheriting your chunk of Great Uncle Leroy's money.) He agrees to come by and see what he can do.
You have to admit he makes a good impression when he shows up. He's punctual, polite, and looks the part. Broad chest, thick arms, big hands resting on his hips as he surveys the kitchen. After only a few minutes, he says he'll take the job. No hesitation.
You explain your tight budget and that you'll work alongside him when you're not at your day job. You show him the money you've set aside, expecting him to back out, but he just shakes his head and nudges the folder back across the table.
"Said I'd do it. Don't you fret, darl."
You vet him afterward, just to be sure. His references check out. The reviews are solid. He appears to know a little about everything. You text him to confirm, formally offering the job, and he accepts.
On the first day, you let him in and immediately have to avert your eyes. You didn't realize a toolbelt could look like that on someone. His sleeves are rolled up, exposing his forearms, and the way he moves—confident, purposeful—makes you grateful you're heading out to work. You tell him when you'll be back and leave quickly, gripping the steering wheel tighter than usual thinking about the hunk of man in your house.
When you return, the kitchen looks different, unfinished, but vastly improved. John's already fixed things you didn't think could be fixed. Over lunch, he even scoped out other problems around the house: a crack in the basement wall, a loose board on the stairs, and spots where the flooring must be replaced. He gushes about the house, praising its character, the way it's held up over time.
John's face grows serious, and stares down his nose when he finally asks, "You're not gonna ask me to paint over the wood or rip out the built-in hutch, are ya?"
His relief over your answer is palpable: No. That's why you bought the house in the first place. You describe what you love about it: the glass doorknobs, the dining room archway, and transom windows above the doors. He nods. He knows exactly what you mean.
Before he leaves for the day, he stops at the doorframe and points to the tallest name etched into the wood. You explain it belonged to the previous owners, a family with seven kids.
"Seven," he repeats, eyebrows raised.
"Right? Can you believe that? Seven!" You laugh. Frankly, anything more than two sounds insane.
But John doesn't laugh. He stares at the names for a moment, his jaw tight. "Yeah. Difficult to imagine."
After he leaves, you scold yourself. You don't really know John. You've known him for all of a day. What if he came from a big family? Or what if he doesn't speak to his family anymore, if things are complicated with his parents? You feel awful, and the guilt channels itself into stress-baking.
The next morning, when he shows up, there's a platter of breakfast pasties waiting on the counter. He hesitates, looks almost bashful, until you insist. He takes a bite, then another, and looks at you with genuine astonishment. He says if you leave food like this every morning, he'll knock his rate down even further.
It makes sense, financially speaking, so you agree. You start making breakfast for two, and in return, he keeps the repairs affordable. The ritual becomes routine: John shows up every weekday morning, you eat together, he gets to work, and you leave. You look forward to seeing him. Hearing his voice rumble out good mornings and goodnights.
For two weeks, you come home to find steady progress on the kitchen. You help him out for an hour or two in the evenings, and by the time it's nearly finished, you've started discussing other parts of the house.
You mention the two smallest children's rooms aren't really usable for tenants. You show him your plans to knock down the wall between them and create a library or office space.
But this time, John doesn't agree.
"First I'm hearing of this," He leans back in his chair at your table. His arms cross over his chest, legs spreading wide. Even sitting, you see what he's doing. Trying to take a posture that carries authority, to cow you. "Tenants? What about a family?"
You try to steer the conversation back to your plans, to the picture you've sketched. "I'm not planning on having one. So, like I was saying—"
"Why buy a house this big, then? Why spend all this time fixin' it up if you're not planning to honor its legacy?"
The tone of his voice shifts completely, with no trace of the easy, flirty banter that's been your norm for weeks. His words drip with disdain. His brow knits together. Nostrils flaring. He looks genuinely upset. Mystified that you're not going to fill the house with your…your brood.
It's as if your refusal to have children is an affront to him personally.
It sends a chill down your spine. Instantly, your image of him—this dependable, good-humored man—cracks apart. You glance past him, searching for the right words, and focus on the kitchen instead. The cabinets, the fixtures, the paint. All of it bears his mark now, and it leaves a sour taste in your mouth.
The realization settles like a stone in your stomach. You can't keep working with him. Not if your plans for the house, your house, are going to be a problem.
You tell him as much, as gently as possible.
His anger bleeds out of him quickly, melting into embarrassment and shame. His shoulders drop, and he folds into himself in a way that seems almost impossible for someone his size. "Don't know what came over me, darl."
He packs up his tools while apologizing again, both for his outburst and for the unfinished work, and gives you the spare key you lent to him for emergencies. Before he leaves, he asks you not to write a review, not even a positive one, and you agree. Things had been good until now. You don't want to ruin him over this. People have bad days.
With the kitchen functional and nothing too big left on your plate, you cut your losses and decide to finish the work alone.
Progress is slow on your own, of course. One pair of hands, only so many hours after work to chip away at the list after work. Still, time moves faster than you expect. You push through exhaustion, head often swimming, and work late into the evenings. One night, you finish patching the floor and tackle the basement's cracked wall. Only when you get down there, it's already done. Smoothed over perfectly.
You tell yourself John must've fixed it before everything went south. But then you notice other things. Several odd jobs from your list are already complete.
Squeaky door hinges turn silent. The dings and nail holes in the walls, spackled over. The second toilet that kept running starts working correctly. It's partly a relief, like the house is taking care of itself, but also deeply unsettling. You don't remember doing it, you've never sleepwalked or slept-repair in your life, even in your overtired state, and you're still too sore over your falling out to text John and ask if he did it all.
Instead, you decide to take a break. A few days off work, a proper rest. Let the house settle, let yourself breathe. Nothing happens. No floating tools. No ghosts. It's like the house is waiting for you to look away.
Paranoia sets in. You order cameras—indoor and outdoor, enough to cover every angle.
The day they arrive, you barely make it through the door before tearing open the box. But something stops you. Your eyes catch on a strange wooden box sitting on the dining table. It's a shadowbox.
Inside the box is the slat from the front doorframe, the one with the heights and names of the seven kids who grew up here. It's been cut out, perfectly, and framed like an artifact.
Your stomach drops. You scramble to the doorframe and run your hands over it, frantic. The patchwork is seamless, so clean it's like the names never existed.
Then you notice the boots. Tucked in and lined up next to your own pairs. The extra jacket hanging on the hooks.
A shadow falls over you.
You freeze, heart in your throat, and slowly turn with eyes the size of dinner plates. Towering above you, sleeves rolled to his elbows, fists planted on his hips, is John. Grinning.
"Work alright today?" He bends down and pulls you to your feet by your wrist, wrapping you up in an embrace and welcoming you home. He sways slightly with you, like you're dancing, his chest rising and falling against yours. He looks at you with a clear fondness and affection, but there's something off, like a splintering foundation. Stable until you look too close.
You try to push yourself away, palms flat against his chest, but he doesn't let go. "What are—What are you doing here? What are—Why did you do that?" You glance again toward where the measurements used to be.
He chuckles, soft and unbothered, a wistfulness threaded in his words. "Well, we're gonna need the room for our little ones, yeah? Oh, we'll have seven or more, dependin' on what takes. Sliding scale and all that."
At your stunned, horrified silence, he slots a hand into the back pocket of your jeans. He gives your cheek a little squeeze and starts steering you toward the kitchen. The one he built for you.
"C'mon. Lemme tell you all about my plans for us."
2K notes
·
View notes
Video
youtube
Nodejs GraphQL API Project Tutorial for Microservice Developers | #graph... Full Video Link https://youtu.be/DXPxXJ7Qy7g Hello friends, new #video on #nodejs #graphql #api #microservices #tutorial for #api #developer #programmers with #examples is published on #codeonedigest #youtube channel. @java #java #aws #awscloud @awscloud @AWSCloudIndia #salesforce #Cloud #CloudComputing @YouTube #youtube #azure #msazure #restapi #nodejs #api #restapitutorial @codeonedigest #codeonedigest #graphqltutorial #graphql #javascript #graphqltutorialforbeginners #graphqlapireact #graphqlapicalls #graphqlapiproject #graphqlapinodejs #graphqlnodejstypescript #graphqlnodetypescript #graphqlnodejsreact #graphqlnodejsexpress #graphqlnodejsexpressexample #graphqlnodejsreact #nodejsgraphqlreact #graphqlserver #graphqltutorialapollo #graphqlapollo #graphqlapolloserver #graphqlapollotutorial #graphqlapollonodejs #apollographqlnodejs #api
#youtube#nodejs#graphql#nodejs tutorial#graphql tutorial#graphql schema#graphql query resolver#graphql resolver#graphql api#graphql server#graphql apollo server#apollo server#graphiql tool#graphiql api testing tool
1 note
·
View note
Text
Postman Tutorial for Beginners: A Step-by-Step Guide

In today's tech-driven world, mastering tools that streamline the development process is crucial. Postman, a versatile API testing tool, has become an industry favorite. This tutorial aims to guide beginners through the fundamentals of using Postman effectively. Read this article for more details!
#Postman Tutorial for Beginners#Postman Tutorial#API testing tool#postmantutorial#beginnerstutorial#api#testing#development#learnpostman#techlearning#coding#webdev#softwaretesting#postmanbasics#tutorial#rahulshettyacademy
0 notes
Text

By popular demand (I saw two people asking) I thought I would throw together a quick guide to using the road editor tool in the newest version of SimPE! You'll see that this is a very easy tool to use, and best of all, goof-proof. If you do mess up (you probably will) it's very, very easy to correct.
Very, very, very important to make a backup of your hood before you ever do any tinkering in SimPE! I also recommend practicing on a test hood you don't actively play in to get a feel for it before you do anything to your main hoods.

We're starting with a vanilla Strangetown. I would recommend going in your game and taking a nice overhead screenshot of the hood like this first to look at for reference of where everything is situated the way that you're used to looking at it.

2. Open SimPE, go to Tools> Neighbourhood> Neighbourhood Browser and open the hood you're wanting to work on. If you're not so familiar with SimPE, opening your hood can take some time. Touch nothing until it's loaded!

3. Once it's all loaded, from the Resource Tree list pick Neighbourhood Terrain Geometry (NHTG). Then you'll see one file populate the Resource List - click that. Make sure on the bottom that you have Plugin View tab selected.

4. Now you should see this map of your hood pop up! There are different things you can toggle, I like to check the Show Lots box when I'm editing the roads. Then click the Road Editor button on the right.

5. To be able to see better, I've pulled this Plugin View window up a bit - it may rearrange the Resource List and Resource Tree windows a bit to accommodate. You can also press the Zoom 2x button to see closer, and then you'll have to use the scroll bars to move around the map and the road editor tool.

6. The road editing tools here will be placed down in the same orientation as the map. So the two parallel roads running through Strangetown from this perspective are the vertical straight road pieces (top row, second from left).
When you select a road tool, above it will indicate which tool you have selected.
Also - I recommend having Handle Stop Signs ticked.

7. Once you have the correct type of road selected for the spot you're working on, simply click on the map - it lays it down one tile at a time. If you miss a spot like shown here, just fill it in.

8. If you want to create an intersection, first delete the section of road where the intersection will go.

9. Then choose the type of junction for the intersection you're making, and add that piece in. You'll see a red circle appear (unsure if this is because it's an intersection or because you have handle stop signs selected, but I recommend you do have that selected either way).

10. Once you're done making all your changes, click Close Editor.

11. This is the part where you save your changes! First click Commit in the top right of the editor. Then, File> Save!

12. Load your game to check! Looks pretty good with all those new roads!

13. However, we have indeed made some mistakes! Which were absolutely for illustrative purposes and not truly an accident.

14. Never fear! Simply reload the hood in SimPE - I've deleted the spot where the T-junction should go and added one in, and deleted where the road just ended abruptly and added a proper end piece.
I have not experimented with what happens if you try to build a road through hood deco - if you have, please let us know in the comments how that went!
I also have barely touched the terrain editing tools, so that's outside the scope of this tutorial.
I hope this helped!
#the sims 2#sims 2#ts2#ts2 maxis match#ts2 simblr#ts2 tumblr#simblr#brightmaple#ts2 tutorial#simpe tutorial#simpe road editor
783 notes
·
View notes
Text
A new script mod by fantuanss12!

I got to test this mod out and it's another fun but more interactive way of buying groceries! - desiree-uk fantuanss12! mod notes:
What does this mod do:
This mod added a grocery delivery service. Shop and wait until a delivery sim come with a bag. Accept delivery and open the bag, Get the items inside it.
How to use:
There are two way to access this service: 1. Select grocery store rabbit hole --> Request Grocery Delivery Service -Combo rabbit hole will be in Grocery Store... Pie menu
2. Select cellphone or home phone --> Services... --> Call for Grocery Delivery -If there's multiple grocery stores, a dialog will pop up and ask to select one -Can't shop if there's no grocery store in the world
Shop as usual and buy items. Wait until a delivery service sim come and ring the doorbell. Accept it like pizza delivery service. Sim will be charged 30 simoleons for the service.
The grocery bag is from The Sims 4 Cottage Living.
Others:
If the delivery didn't come:
-Use MasterController to check whether there's 4 pizza delivery service sim. Two for pizza, two for grocery (Game needs time to generate sims to fill the spot)
-Since the delivery system is almost the same as pizza delivery, try to order pizza to see whether they can reach the lot.
-There's report that in worlds with no roads, service sim may not show up but the grocery bag is somewhere around the lot. Try to search around the house.
Credit: Big thanks to twinsimming for phone coding help! Simmers on Discord and tumblr for testing Battery's script mod template CmarNYC's SimOutfitter tool ILSpy Visual Studio 2022 Multiple modder's tutorial. EA for the bag
Download from MTS!
366 notes
·
View notes
Text
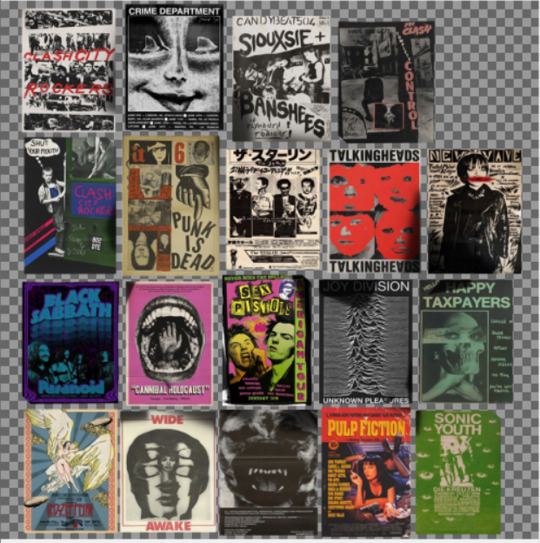
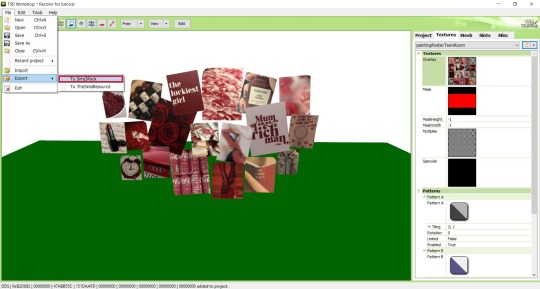
4t3 Conversion of Grouped posters by @cosmiccs4 + Recoloring PSD with tutorial
8 non-recolorable presets
1024 textures
Included PSD for retexturing (tutorial how to use under the cut)
113 poly, all LODs
Shiftable
Price - 5§
BGC
Compressed package
TOU, Ko-Fi

DOWNLOAD | ALT | SIMBLR.CC
Tutorial: How to use my PSD for retexturing
You need:
Photoshop with .dds plugin
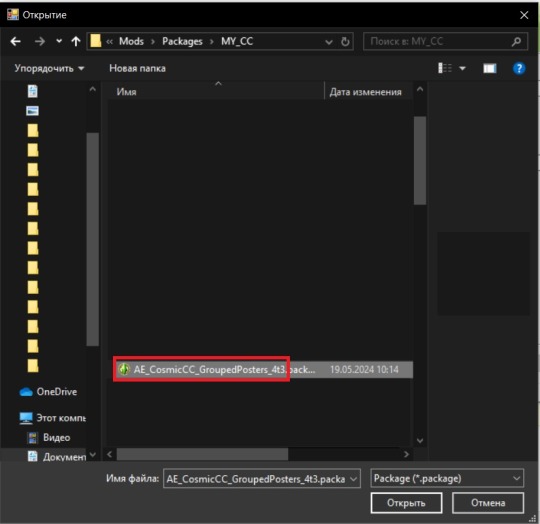
My retexture PSD and package file of posters
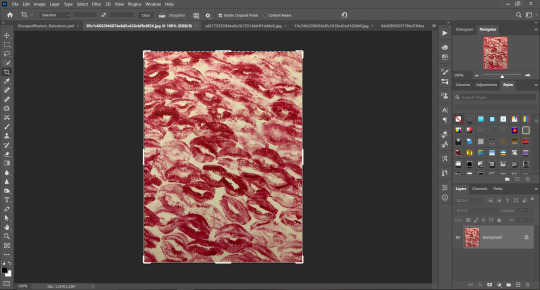
19 pictures to your liking, preferably vertical
TSRW
Sims3Pack Multi Installer and Compressionizer
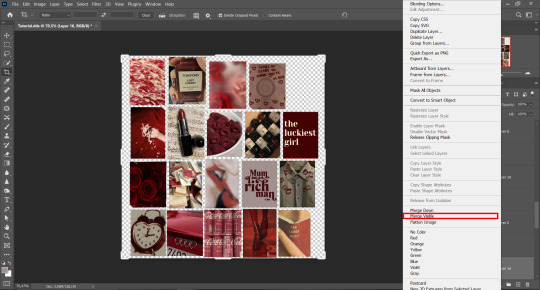
Step 1: Open my PSD file, open your images:
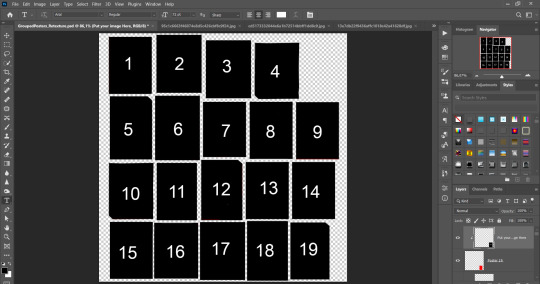
Step 2: Select (Ctrl+A) copy and paste to posters file (Ctrl+C, Ctrl+V) first of your images :
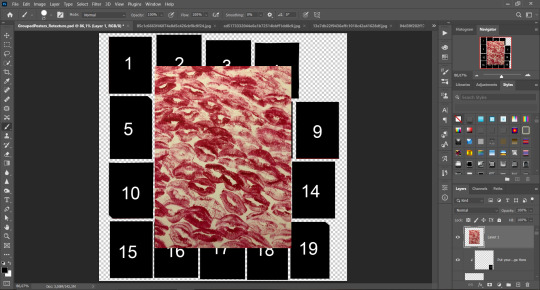
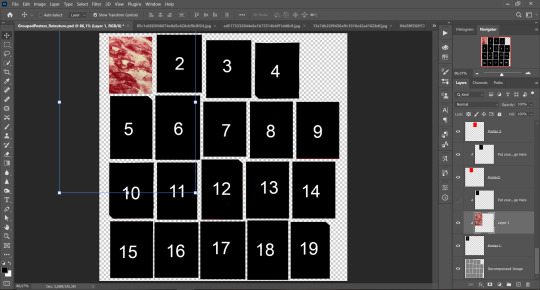
Step 3: Choose where you want to put it, for reference you can use one of the presets:
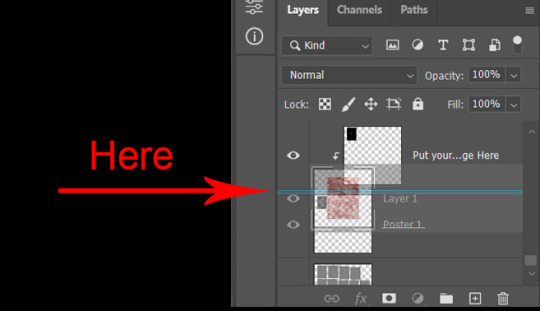
Step 4: After you decided with placement of your image. Move its layer in the Layers tab between "Poster x" and "Put your image here" layers, it will create a clipping mask, which allows the picture to be fit within the poster without cropping. Hide or delete "Put your image here" layer.
Step 5: Use Transform, Free Transform and Move tools to resize the image by your liking:

Step 6: Repeat the Step 2-5 with other 18 images:
*vibes are totally random, all images from Pinterest*
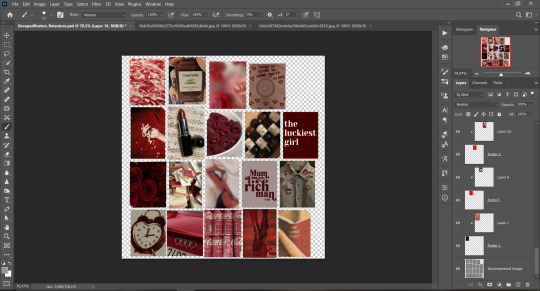
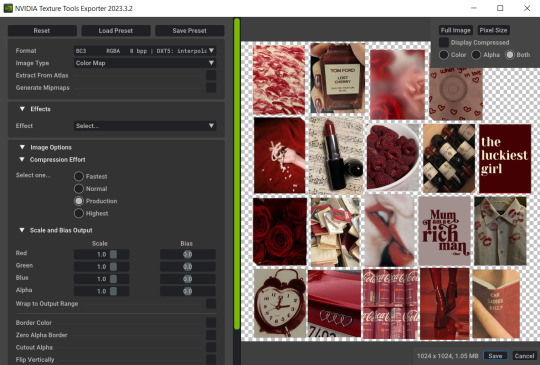
Step 7: After you've done, delete all the "Put your image here" layers, if you didn't it before. Right-click on the Layers tab and press Merge Visible (Shift + Ctrl + E). Now press Save As (Control + Shift + S) and save your image as .DDS with this parameters (2nd picture):
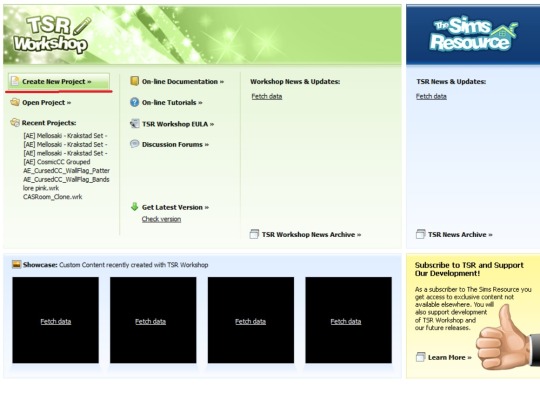
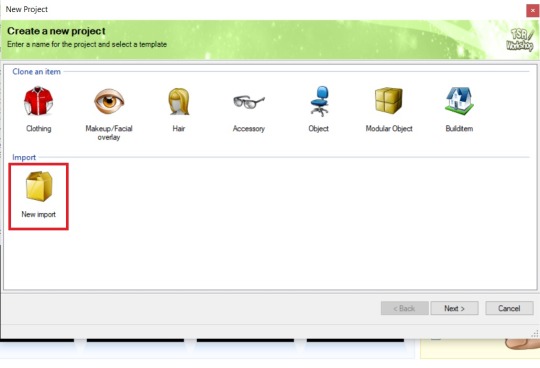
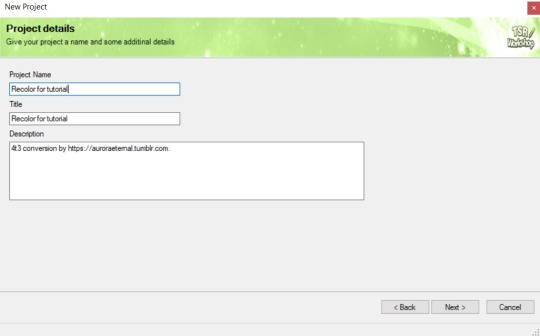
Step 8: Go to TSRW. Press Create New Project > New Import, and select package with my posters. Give for your recolor unique Title and Project name, otherwise it will override original posters:
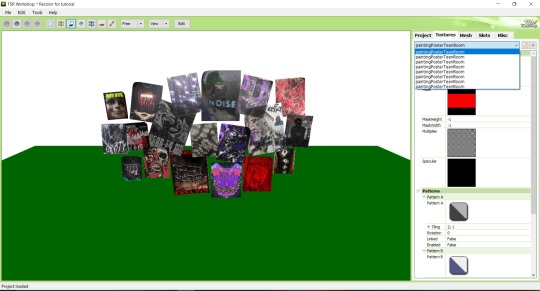
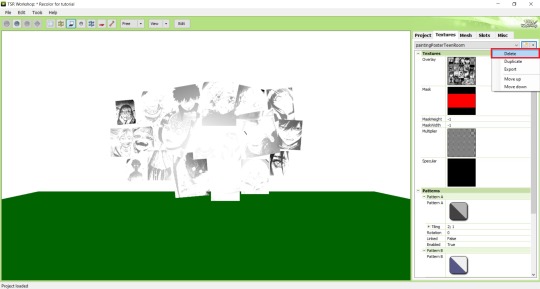
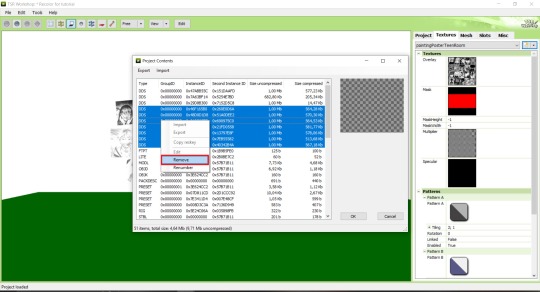
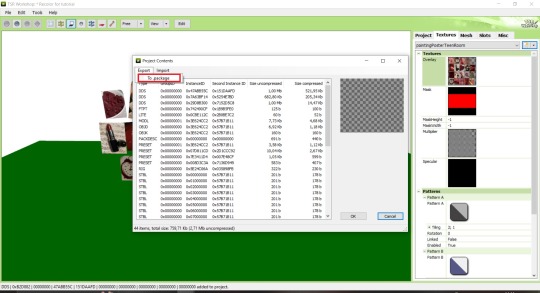
Step 9: In Textures tab go through all the presets except the first one and delete them. Then go to Edit > Project Contents and remove all the textures of removed presets. Its pretty common when someone make retexture of TS3 mesh and leave that unused textures in file, which leads to increasing its size:
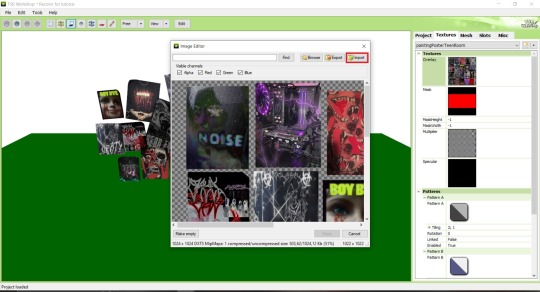
Step 10: Press Edit button next to the Overlay tab. Then press Import button and select your retexture. Press Done and when this pop-up appears, press Yes:
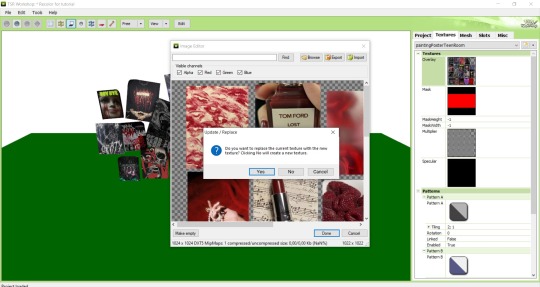
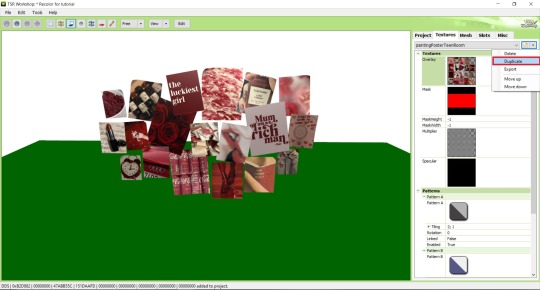
Step 11: If you want to add more presets press Duplicate and reapeat Step 10, but instead, when pop-up about replacing the texture appears, press No.
Step 12: After you've done, press File > Export > To Sims3pack or Edit > Project Contents > Export > To .package. If you choose the first method, convert your Sims3pack to Package and in both cases run it through Compressionizer. Test your recolor In-game, make thumbnails (if you want to share it) and have fun!
For those who read this tutorial to the end, click HERE to download this recolor.

@pis3update @xto3conversionsfinds @wanderingsimsfinds @kpccfinds @simfluencer-network @sssvitlanz @simblrcc-site
889 notes
·
View notes
Text


Posing Interaction for Babies (Newborns)
This mod adds an interaction to the bassinet to play poses with babies.
Based on my testing the interaction works wherever the sim is, even off lot. The baby spawns to your sim and afterwards back to the bassinet (little demo below).
As a placeholder I included a set of Gallery poses with babies. However, you can override them with your own. For that purpose, I’m including the pose files separately as well as the blend file I used that you can then use as a base (the blend file is saved in Blender 3.6). (You don't need to put the blend file into your mods folder.) Here is an alternative set of poses I made that you can use with the interaction.
XML Injector Required The XML injector is a tool/library that can be used to add interactions without the need to write your own script (another one that you might know is lot51’s core library). A script in my case would have been needed to add the posing interaction without overriding the existing game file with the baby tuning. The XML injector does that for me.
Download: SFS (*) | Mediafire
(*) Reuploaded the file to SFS on Feb 8th 2025, the old link was broken (I probably deleted the file by accident at some point).
This was just an experiment tbh but I was surprised that it works so well and so I ended up wrapping it up. But anyhow, in game interactions are pretty new to me, so let me know if there's any issue.
If you need any help making your own poses, you can also drop by in our Discord server for pose makers.
Some background information:
The baby is an object in-game that is connected to the adult sim via the stigmata bone for poses/animations – similar to poses with accessories, if you’re familiar with that. The difference is that you also need to pose the baby itself. I have some additional notes in this tutorial for Gallery poses with babies that I made a while ago.
Note that you can’t export baby poses or animations via S4S the standard way since you can’t select the baby rig in the S4S export options. I did this with a workaround by exporting the clips from the Game File Cruiser, then importing them to Blender using an add-on (it’s actually a deactivated part of the Blender add-on that S4S uses and it’s only functional in Blender 2.7).
However, you can import the blend files with baby poses to the package file like you normally would since the rig selection is not relevant for the import.
Below a little demo, sorry for the bad quality :D
@ts4-poses @luthsthings
971 notes
·
View notes
Text
Agetel AG5 Flash File Dead LCD Fix
Agetel AG5 Android Tablet Without Password Or Paid customer care latest update version tested Flash File firmware original care stock rom. No Need Unlocktool Or Cm2 Just Use Smart Phone (Sp) Flash Tool And Mediatek Vcom Usb Driver. today i am share for you Agetel AG5 firmware without password or free download or paid file. you searching but i say just download my Agetel AG5 tested flash file,…

View On WordPress
#download-firmware#firmware-downloads#stock-firmware#stock-firmware-download#symphony helio 80 flash tool driver firmware tutorial#symphony helio 80 frp reset tool file without box#symphony helio 80 hw1 v9 care firmware#symphony helio 80 tested cm2 firmware#technology
0 notes
Text

Fully Underwater Lot Tutorial
@creida-sims @kitkat99
UPDATE January 2025
There is now a much, much easier way to do this. This version of SimPE now includes a tool to change terrain geometry. To edit the terrain in SimPE, go to Tools/Neighborhood/Neighborhood Browser and load your neighborhood. In the Resource Tree, select Neighborhood Terrain Geometry (NHTG) and select the only resource in the Resource List. In Plugin View, click Terrain Editor. It's very intuitive, but basically, you can edit the terrain under a lot to make it be underwater. You can also delete the road with the Road Editor.
I'll keep the old tutorial for archival purposes, but unless you can't or don't want to install this version of SimPE, it is pretty much obsolete.


Some warnings and disclaimers
1. This is not a beginner tutorial. I have tried to explain with as much detail as I can, but still, if you just started playing The Sims 2 I recommend trying out other building tutorials first.
2. I have tested it but there's always a possibility that some new problems will come up. Follow at your own risk. Backup your neighborhoods before trying this. Test it first in a new empty neighborhood.
3. These lots are roadless, so they require specific gameplay conditions to avoid breaking immersion (pun intended).
4. They will behave like normal lots in the sense that sims can walk around and do anything as if they were on land. There's one big problem to consider: when sims go fully underwater, their hair and some parts of their clothing might disappear visually.
So this is more useful for structures that sit above the water, shallow water that doesn't reach a sim's head or, with some modifications, small islands surrounded by water. So unless you want bald mermaids, I don't recommend this for sims that live underwater.
5. If you use Voeille's hood water mod, reflections will look glitchy in lot view, because this is technically not a beach lot. The only solution I found is enabling "Lot view ocean reflections" in RPC Launcher. Otherwise you'll have to deal with glitchy reflections.
6. Before following this tutorial, make sure you know the basics of creating, editing, importing and exporting SimCity 4 terrains. Written tutorial by SimEchoes here, video tutorial by loonaplum here.
Software and mods used
The Sims 2 FreeTime expansion pack (required for the modifyNeighborhoodTerrain cheat)
SimCity 4 (required) Hood Replace by Mootilda (required)
Lot Adjuster by Mootilda (required)
Portal revealer by Inge Jones (required)
Voeille's pond and sea water overhaul and RPC Launcher (optional, see disclaimers)
The Sims 2 Apartment Life and Bon Voyage expansion packs (optional, for "walk to lot/work/school" options)
Cheat codes used
moveObjects on/off
modifyNeighborhoodTerrain on/off
1. Creating/editing a terrain in SimCity 4
1.1. You can edit an already existing terrain or create your own from scratch. In both cases, you need to keep two things in mind: If you want the usable area of the lot to be underwater, such as making houses for mermaids or a coral reef, make sure the water is shallow. No more than a few short clicks with the terraforming tools in SimCity 4. This is because The Sims 2 live mode camera won't go underwater, so making the water too deep might make it uncomfortable to build or play the lot.
If you goal is to build a structure mostly above water, like a ship or an oil rig, you can get away with making the water a bit deeper, but not too much. I've noticed that sometimes the lot terrain tools stop working correctly if there a hill that's too steep.
1.2. Once you've created the terrain, you will need to add a small island on the area where your lot will be. I know it seems contradictory, but trust me, it will make sense. Create and name your city. Use the terraforming tools in city mode to make a tiny island of about 6x2 squares.

1.3. On the island, use the road tool to place a straight road that takes up 4 squares. Then, using the street tool (the last option), place two short streets at each end of the road.
Streets will disappear in TS2, only roads translate to roads in ts2, so why do we place them? Well, placing a street at the end of a road will get rid of the rounded end bit in TS2, which can't be used to place lots. This will be important for the placement of the lot and to make sure the edges of the lot are underwater. If this doesn't make sense yet, don't worry, it might make sense later.
1.4. Save the terrain. Don't exit SimCity 4. Copy your new/edited sc4 terrain from your SimCity 4 folder to your SC4Terrains folder in your Sims 2 documents directory. It is usually
"C:\Users\YOURUSERNAME\Documents\EA Games\The Sims 2 Ultimate Collection\SC4Terrains"

1.5. Back in SimCity 4, we're going to make a second version of this terrain. Remove the roads and streets you made before, with the bulldozer tool. With the level terrain tool in Mayor mode, carefully remove the island, so it's on the same level as the bottom of the ocean/lake. Don't change anything else. Save, exit and copy this second terrain to your Sims 2 SC4Terrains folder. Make sure you rename the file to something different from the first one, like adding "no roads" to the filename. You should have two terrains by the end of this step. One with the small island and one without it.
2. Editing the terrain in The Sims 2
2.1. Open The Sims 2 and create a new neighborhood using your new terrain. Something to keep in mind: if you want the terrain to be a subhood of another neighborhood, make it a subhood from the start. You will not be able to move the lot once it's finished, since it will be roadless. I don't recommend decorating the neighborhood for now. Leave it empty until the end of this tutorial.

2.2. Place the smallest empty lot (3x1) on the island.
2.3. In neighborhood view, open the cheat console by pressing Control + Shift + C, and type
modifyNeighborhoodTerrain on
To quote The Sims Wiki:
"This allows you to alter the neighborhood terrain by raising or lowering it. To use this cheat, be in the neighborhood view, then enter the cheat "modifyNeighborhoodTerrain on" (without the quotation marks), and click over the area you would like to change. To select a larger area, click and drag the cursor to highlight the desired area. Press [ or ] to raise or lower the terrain by one click, press \ to level the terrain, and press P to flatten terrain. When you're finished, type “modifyNeighborhoodTerrain off” in the cheat box (again, without the quotations)."
If you use an English keyboard, these instructions will probably be enough for you. If you don't, I recommend first testing the cheat, because the keys for using this cheat are different in other languages. For example, in my spanish keyboard, the question marks are used to raise and lower the terrain and the º/ª key flattens it.
Another aside: When you select an area using this cheat, a green overlay is supposed to show up. Some lighting mods make this green overlay invisible, like the one I use. If that's your case, you kind of have to eyeball it. Remember that one neighborhood grid square in TS2 is equivalent to 10 lot tiles, or the width of a road. I recommend getting a mod that allows you to tilt the neighborhood camera on the Y axis, which will allow you to have a bird eye's view of the terrain.

2.4. Flatten the terrain around the lot so it's at water level. This cheat won't allow you to edit the terrain inside the lot, so you have to edit the terrain around the lot. Make sure there is plenty of flat underwater space around the island. You should end up with something like the picture above. The water will have some holes, but don't worry, those get filled with water the next time you load the neighborhood.
2.5. Enter the lot and place any object on it. Save the lot and exit the game. This is so LotAdjuster recognizes the lot in the next step.
3. Expanding the lot with Lot Adjuster
3.1. Open Lot Adjuster and select your neighborhood and lot.

3.2. Click "Advanced…". Check "Over the road (only enlarge front yard)". Use the arrows to add 20 tiles to the front yard. Click "Finish" and "Restart".

3.3. Select the same lot again. This time, check "Add and remove roads". Uncheck the road checkbox for the front yard. Add 20 Tiles to the back yard, 20 tiles to the left side and 10 tiles to the right side. Check "Place portals manually". You should end up with a 60x60 lot, which is the biggest size. You might want a smaller lot, but unless you know what you are doing, I recommend starting with this size. You can shrink it later. The goal of making the lot this big is making sure the edges of the lot are underwater. Click "Finish" and exit.
4. Moving portals and flattening the lot

4.1. Make sure you have the portal revealer by Inge installed in your Downloads folder before the next step. Open your game and load your neighborhood. The lot should look something like the picture above.

4.2. Load the lot. Delete the object you placed before. Place the portal revealer on the lot near the mailbox/phone booth and trashcan. It looks like a yellow flamingo and you can find it in Build Mode/Doors and Windows/Multi-Story Windows catalogue. You will notice that when you select the object from the catalogue, some yellow cubes appear on the lot, and when you place the object, the cubes disappear. After placing the portal revealer, pick it up and place it again. This will make the yellow boxes visible again.
So what are those yellow boxes? They are portals. They determine where sims and cars arrive and leave the lot. The ones on both ends of the sidewalk are called pedestrian portals, and in the street, one lane has portals for service vehicles (maids, gardeners, etc.) and the opposite is for owned cars and carpools. You can see the portal's names if you pick them up. Make sure not to delete any of them.
Now, since this is going to be a roadless lot, ideally there won't be vehicles in it. This means that the lot would ideally be accessed through walking only. In community lots, this would not be an issue if you have the Bon Voyage expansion pack, which allows sims to walk to lots.
In residential lots, you might run into some problems. Service NPCs always arrive on vehicles, and unless your sim owns a vehicle, the carpool and school bus will always come to pick sims up for work/school. It might break your immersion to have a vehicle show up underwater or on a ship. There are many options to avoid this: having sims work on an owned business instead of a regular job, not having kids on the lot, making the kids homeschooled, avoiding calling service NPCs… it depends on how you want to play the lot. For example, my icebreaker is a residential lot, only adults live there, some sims live in it temporarily and none of them have a regular job.

All of this is relevant because we're going to move the portals. Where you move the portals depends on you. Think about how you're going to use the lot. In my icebreaker, I placed the car portals (which won't be used) underwater, on a corner of the lot. I placed the pedestrian portals on the ship, to pretend that the walkbys are part of the crew or passengers. But for now, just move the portals, mailbox/phone booth and trashcan to a corner of the lot. To be able to pick up the mailbox/phone booth and trashcan, use the cheat moveObjects on. Delete the street and sidewalk tiles using the floor tool (Control + click and hold left mouse button + drag).


4.3. Flatten the island with the level terrain tool. Save the lot. Almost done! Don't mind the hole in the water, this will be fixed. You will notice that in neighborhood view, the island is still there. This is because the neighborhood terrain under the lot hasn't updated. I don't know why this happens, but it does. Normally, moving the lot would fix it, but we can't move this lot using the game's tools. Instead, we are going to fix the terrain with Hood Replace. Don't exit the game yet.
5. Updating the terrain with Hood Replace
5.1. Create a new neighborhood using the new roadless terrain. Make sure it has the same type of terrain (lush, desert, etc.) as the first one. Again, name it "NO ROADS" or something similar. Exit the game.

5.2. Open HoodReplace. On the left column you will select your "NO ROADS" neighborhood. In the right column, select the neighborhood that has the underwater lot. Check these settings: Replace terrain, replace road, and versioned backups. Leave everything else unchecked. Click Copy.

5.3. Open The Sims 2 and load the neighborhood to check if the changes worked. That concludes the tutorial. At this point you can shrink the lot if you don't want it to be so big. Remember to move the portals to their final placement when you're done building the lot. Also keep in mind pedestrians (walkbys) always walk by the mailbox, so keep the mailbox accessible for sims.
If you're going to have multiple underwater lots, I recommend making them first, and decorating the neighborhood after. Doing this in an already existing neighborhood might be more difficult, mainly because, if you made any changes to the terrain using the modifyNeighborhoodTerrain cheat in the past, they might get reset when using Hood Replace.
154 notes
·
View notes
Text
A small but very useful tutorial
written with the help of chatGPT
Why Use Upscayl?
Upscayl is a great tool for improving textures and reference images. Whether you are working on character skins, environmental textures, or UI elements, this program helps to:
Increase image resolution without losing quality
Reduce pixelation and enhance details
Improve the clarity of textures for a more realistic look
How I Use Upscayl (look at the photo)
Finding or Creating a Reference Image I start with an image that I want to enhance. This could be a low-resolution texture or a reference image for a new design.
Adding Noise for Testing To demonstrate how Upscayl improves images, I intentionally added noise to a mask texture. This allows me to compare the before and after results more clearly.
Processing the Image in Upscayl I import the noisy texture into Upscayl and choose an appropriate AI model. The program processes the image, enhancing its details and removing unwanted noise.
Examining the Results After running the texture through Upscayl, the difference is clear: the texture appears sharper, more detailed, and free of noise, making it more suitable for in-game use.
Enhancing Existing Game Textures
Apart from improving references, Upscayl is also useful for enhancing in-game textures, such as character skins. If a skin looks too blurry or low-resolution, running it through Upscayl can significantly improve its appearance without having to manually repaint details.


#sims3#sims#ts3#simblr#s3#sourlemonsimblr#sls#sims4#the sims#sims 2#tutorial#not sims#sims tutorial#cc tutorial
113 notes
·
View notes