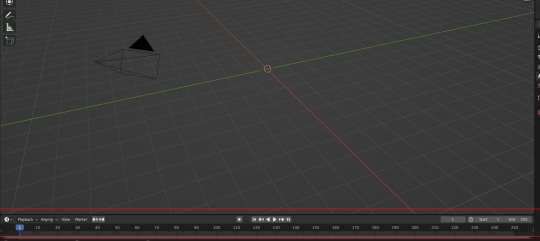
#the second image is on a blender file
Explore tagged Tumblr posts
Visit Tumblr Blog
Explore Tumblr blogs with no restrictions, modern design and the best experience.
Last Seen Tumblr Blogs


Fun Fact
BuzzFeed published a report claiming that Tumblr was utilized as a distribution channel for Russian agents to influence American voting habits during the 2016 presidential election in Feb 2018.
Text
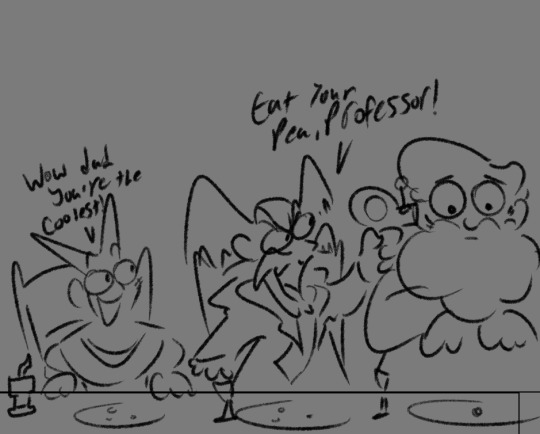
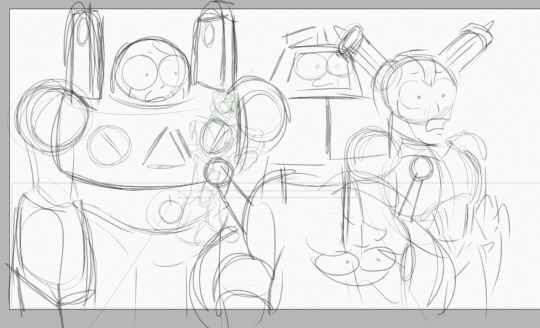
These images had separate contexts but now looking at them together they're insanely funny
#not transformers#megaman#rockman#quickman#dr wily#dr light#plugman#sparkman#sheepman#fuseman#I do have tf plans#BIG PLANS#BIG CHALLENGES#but first silly#take my robots#elecman#????#the second image is on a blender file
57 notes
·
View notes
Text


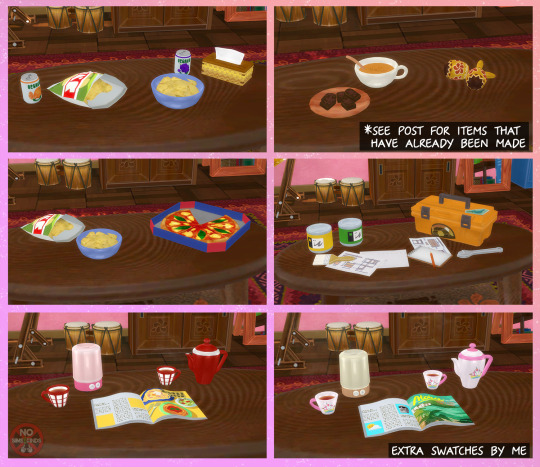


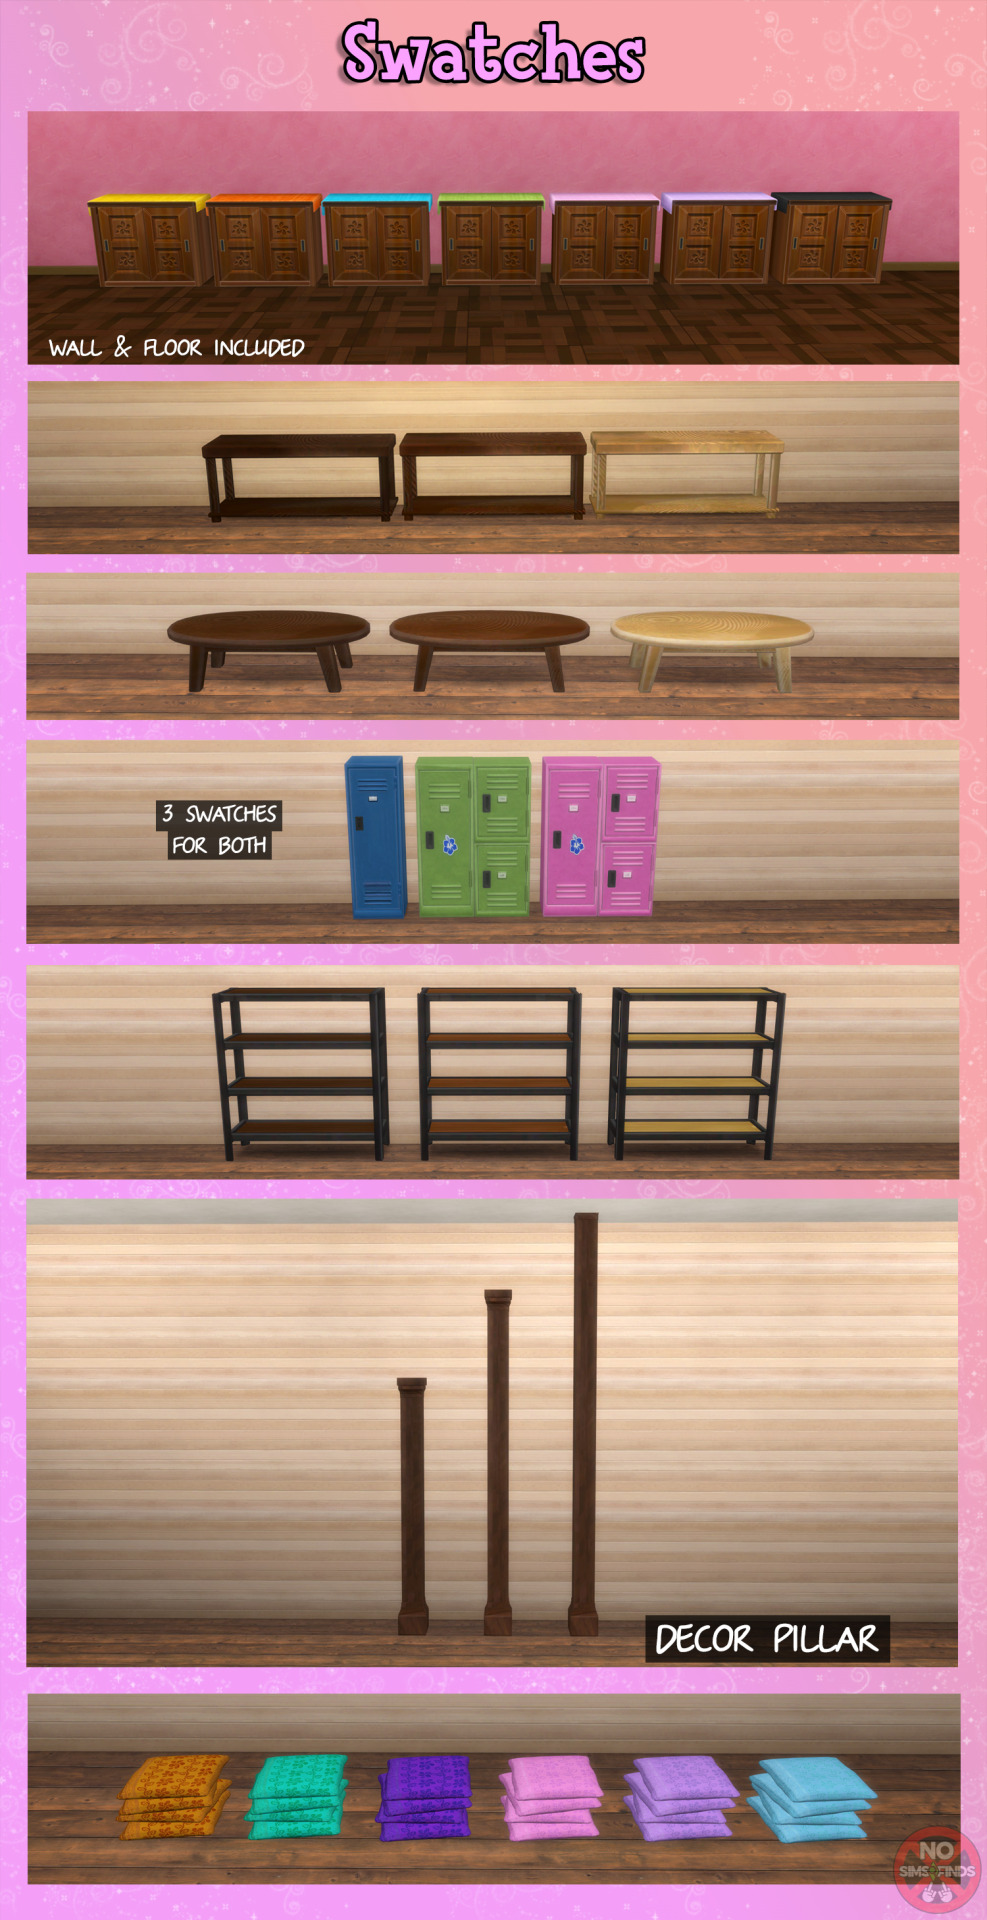
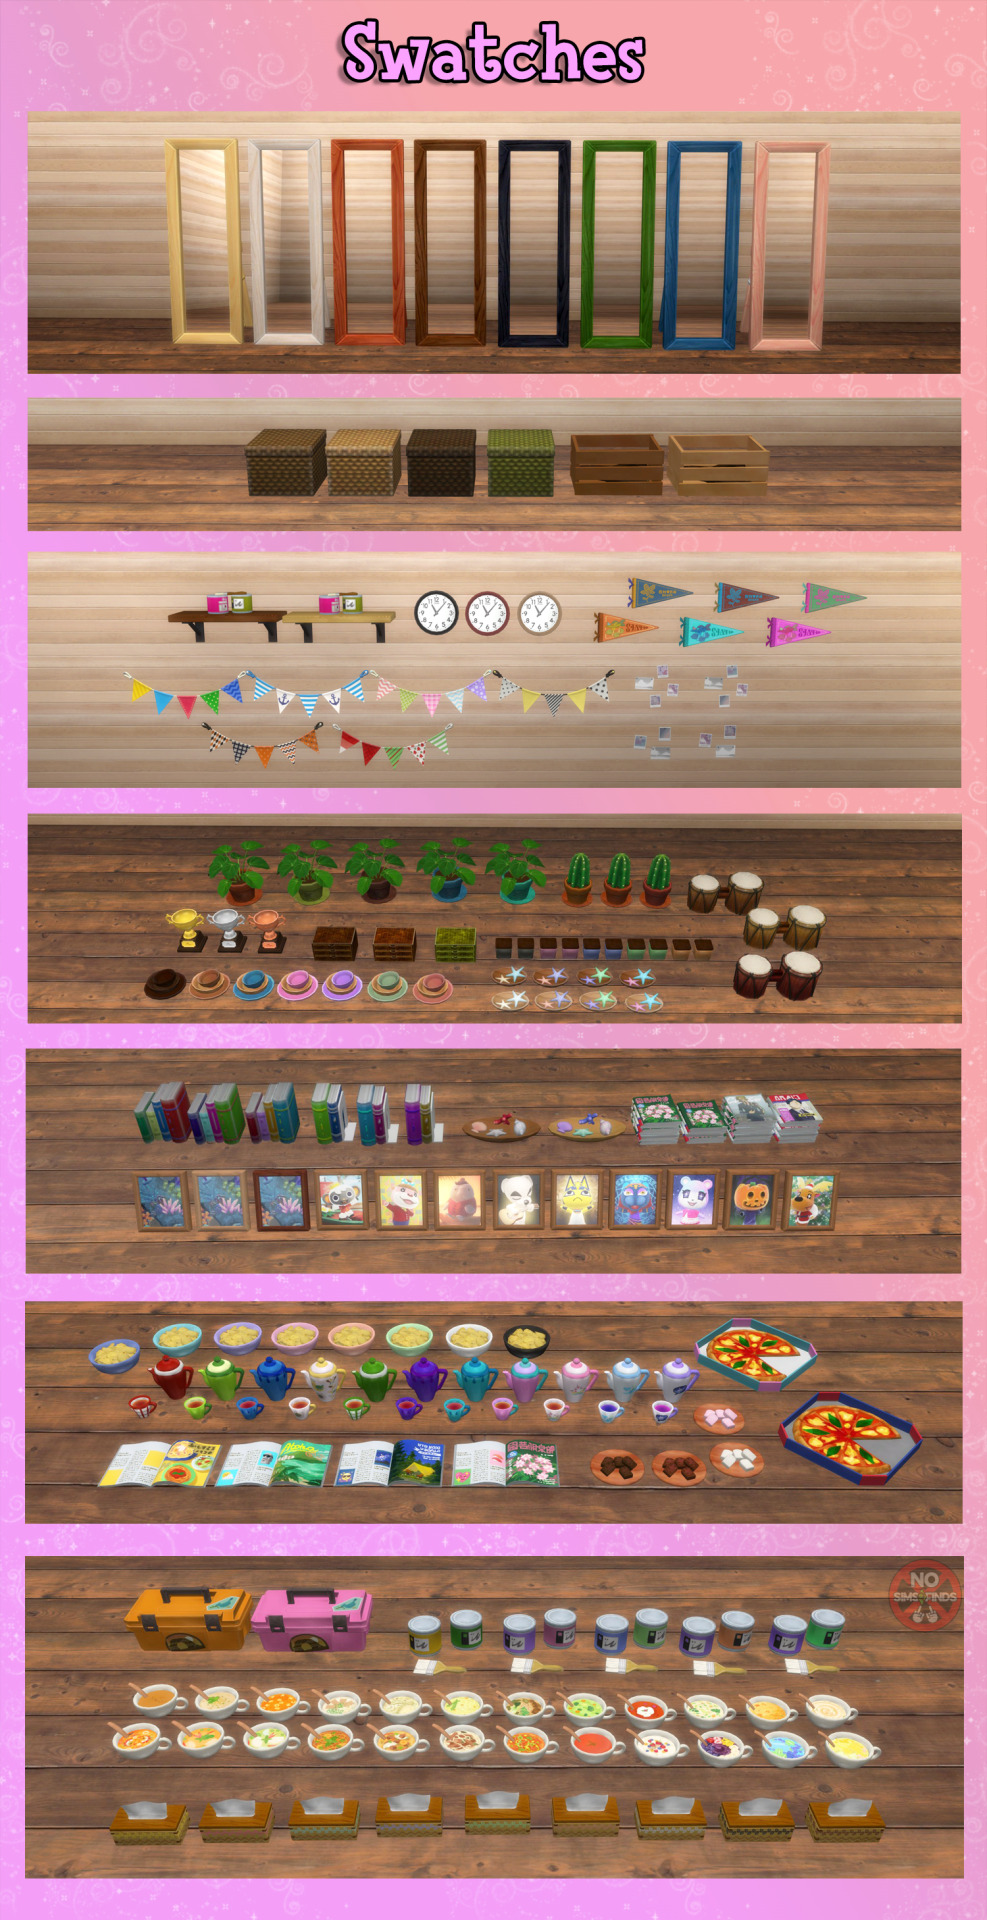

🌺🌴 ACNH Paradise Planning Set: Part 1 🌴🌺
All the items you'll need to recreate The upstairs of the Paradise Planning office in your TS4 game. Most items came with only 1 swatch each. There are lots of items that I added extra swatches for. *See bottom of item list for links to the handful of items that have already been made in other sets. Set 2 coming very soon!
Sims 4, Base game compatible | 67 items
💡As always, turning the brightness down on my functional lamps will make them look better (not overly bright) due to my vertex paint issue in Blender. I am trying to figure the issue out.
Always suggested: bb.objects ON, it makes placing items much easier. For further placement tweaking, check out the TOOL mod.
Use the scale up & down feature on your keyboard to make the items larger or smaller to your liking. If you have a non-US keyboard, it may be different keys depending on which alphabet it uses.
I hope you enjoy! ☺️ Download below, all in a zip file or pick & choose!
Set contains: Buy: -Bongos | 3 swatches | 1192 poly -Books 1 & 2 | 3 swatches each | 236, & 274 poly -Bookshelf (long) | 3 swatches | 242 poly -Bowl Stack | 7 swatches | 558 poly -Box 1 | 4 swatch | 78 poly -Box Stack | 1 swatch | 514 poly -Cactus | 3 swatches | 586 poly -Canisters | 5 swatches | 238 poly -Cart | 1 swatch | 1102 poly -Chips Bag | 1 swatch | 276 poly -Chips Bowl | 8 swatches | 866 poly -Coffee Table | 3 swatches | 434 poly -First Aid Kit | 1 swatch | 166 poly -Food Chocolates Plate | 4 swatches | 1982 poly -Large Wood Shelf | 3 swatches | 659 poly -Lei | 1 swatch | 1636 poly -Light Bulb Lamp (turn brightness down in game for best look) | 2 swatches (second swatch is whiter) | 544 poly -Locker 1 & 2 (2 items) | 3 swatches each | 954, & 1288 poly -Magazine Stack 1 & 2 | 3 swatches each | 581, & 421 poly -Mirror | 8 swatches | 986 poly -Notepad & Pen | 5 swatches | 44 poly -Open Magazine | 4 swatches | 140 poly -Paint & Brush | 5 swatches | 332 poly -Party Decoration (wall) | 6 swatches | 1252 poly -Pencil & Pad | 1 swatch | 594 poly -Pen Cup | 1 swatch | 432 poly -Picture Frame 1 | 3 frame colors, 10 images, 30 total swatches | 210 poly -Pillars (3 items, Small, Medium & Large) | 1 swatch each | 312 poly -Pillow Stack | 6 swatches | 1697 poly -Pizza | 2 swatches | 447 poly -Plant 1 | 5 swatches | 1101 poly -Polaroids & Postcard 1 & 2 (2 items) | 2 swatches each | 144, & 176 poly -Pottery | 1 swatch | 382 poly -Rug: Large & Small (2 items) | 2 swatches each (second swatch is brighter) | 480, & 10 poly -Seashell Bowl | 2 swatches | 2214 poly -Small Drawers (slotted) | 3 swatches | 81 poly -Soup Decor (2 items: Steam & No Steam versions) | 24 swatches each | 1270 poly -Spray Paint | 1 swatch | 182 poly -Starfish Bowl | 2 bowl colors, 4 starfish colors, 8 total swatches | 850 poly -Storage Cabinet (2 items: closed door & open door) | 7 swatches each | 222 poly -Storage Chest | 1 swatch | 2022 poly -Teacup (2 items: Steam & No Steam versions) | 11 swatches each | 188 poly -Teapot | 11 swatches | 746 poly -Tissue Box | 9 swatches | 606 poly -Toolbox | 1 swatch | 124 poly -Toolbox 2 | 2 swatches | 822 poly -Trophy | 3 swatches | 1040 poly -Wall Calendar | 1 swatch | 306 poly -Wall Clock | 3 swatches | 458 poly -Wall Flags | 3 swatches | 154 poly -Window Shade | 3 swatches | 124 poly -Wood Crate | 2 swatches | 730 poly -Wood Shelf | 2 swatches | 437 poly -Work Papers | 1 swatch | 83 poly -Wrench | 1 swatch | 124 poly
Build: -Floors Wood | 1 swatches | Wood -Walls Plaster | 2 swatches | Paint
Type “ACNH paradise planning 1” into the search query in build mode to find quickly. You can always find items like this, just begin typing the title and it will appear.
As always, please let me know if you have any issues!
📁 Download all or pick & choose (SFS, No Ads): HERE
📁 Alt Mega Download (still no ads): HERE
📁 Download on Patreon
Will be public on August 3rd, 2024 💗 Midnight CET
Happy Simming! ✨ Some of my CC is early access. If you like my work, please consider supporting me (all support helps me with managing my chronic pain/illness):
★ Patreon 🎉 ❤️ |★ Ko-Fi ☕️ ❤️ ★ Instagram📷
Thank you for reblogging ❤️ ❤️ ❤️
@sssvitlanz @maxismatchccworld @mmoutfitters @coffee-cc-finds @itsjessicaccfinds @gamommypeach @stargazer-sims-finds @khelga68 @suricringe @vaporwavesims @mystictrance15 @moonglitchccfinds @xlost-in-wonderlandx @jbthedisabledvet
*Veranka's Bakery Window: MediumDouble: This window is recommended if you are recreating this building in TS4.
*Maracas *Steam Diffuser *Wall Certificate *Aroma Diffuser *Soda Cans *Hammock
The rest of my CC
#s4cc#ts4cc#sims 4 tropical#sims 4 office#sims 4 paradise planning#sims 4 acnh location#sims 4 table#sims 4 wall decor#sims 4 paper clutter#sims 4 food#sims 4 soup#sims 4 candy#sims 4 tea#sims 4 box#sims 4 photo clutter#sims 4 lamp#sims 4 shelf#sims 4 plant#sims 4 plants#sims 4 cactus#sim s 4 book#sims 4 books#sim s 4 cabinet#sims 4 chest#sims 4 cart#sims 4 rug#sims 4 rugs#sims 4 storage#sims 4 mirror#sims 4 seashell
177 notes
·
View notes
Text
How to Add 3D Models to TS3
Required Applications:
Blender - https://www.blender.org/
TSRW - https://www.thesimsresource.com/workshop/
Milkshape & Plugins - https://sims3tutorialhub.tumblr.com/resources
NVIDIA Texture Tools, Photopea, or GIMP (or anything else that allows you to save an image as a .dds file)
Recommended:
S3PE - https://www.simlogical.com/ContentUploadsRemote/uploads/189/ - Used to make = object base game compatible and available in CAW
Sims3Multi Pack Extractor - https://modthesims.info/d/364038/delphy-s-sims-3-pack-multi-extracter-updated-5th-sept-2009.html - Used to convert a sims3pack into a package file
This will also require showtime, since the object we will be cloning will be from that pack. I'm not sure if there's a base game object with a light/illumination map that we can use. If you don't want the windows of the building(s) to light up or anything lighting up on whatever object you are adding then you can try and find a base game object to clone.
Step 1: Export .obj file from Blender
Step 2: Import .obj into Milkshape
Step 3: Rename object in Milkshape to group_0, then export file as .wso (in order to export it as a .wso, you need to have the TSRW plugins for Milkshape installed)
Step 4: Open TSRW - Create New Project - Choose Object
Step 5: Under The Sims 3 choose Uncategorized Objects under Object by Category. In the search bar, type in 'hill' and choose the 'Sign City Hill' object. Name your project (make sure to rename both project name and title)
Step 6: First, choose where you want your object to show in the catalog. I just choose decor (function category) and miscellaneous decor (function sub category). Go to the mesh tab and using the button of the box with the green arrow, import your .wso file. For the first pop-up click yes. For the second, click no.
Step 7: Under Group 0, click on the three dots beside 'material'. This is where you will import your textures. Before doing so, you must make sure the images are in .dds format. Simply add your image into any application that supports importing/exporting .dds files. I personally save with BC3/DXT5 compression and don't keep mipmaps. Some say to save the mipmaps, but because I use 2K textures it adds a lot more to the file to save them so I don't. Once you've got them in the correct format, import them into the object's materials. For the detail map I simply import a small blank white texture. The diffuse is the main color texture, the multiply map is the ambient occlusion map (if you do not have it, I'm pretty sure you can just add a blank white texture too), and the self illumination map is what allows part of the mesh to light up. If you do not want anything to light up you can just add a plain black texture. Click done and exit out once all textures are replaced.
Step 8: Click the drop down that reads 'high level of detail' and choose the shadow lod. Click on the blue arrows beside the import icon. A pop-up will show; check the box under medium detail and click ok. You will see that once you've done that, the object's shadow will change.
Step 9: Click file - save as and save .wrk file (just in case).
Step 10: Export to Sims3Pack
Extra - Make Object Base Game Compatible
1. Convert .sims3pack to .package using Sims3Multi Pack Extractor
2. Open S3PE and open package file you want to edit
3. Find OBJD tag and double click on it
4. Change group number to 0 and click ok.
5. Save package
Extra 2 - Make object appear in CAW
1. Open S3PE and open package file you want to edit
2. Find OBJD tag and highlight it by clicking on it once
3. At the very bottom of the window, click on 'Grid'
4. Click the arrow beside 'CommonBlock' to open the tab
5. Beside the version, change the C to E and click commit
6. Reopen the 'Grid' and go back into the 'CommonBlock' tab. If you scroll down, you will now see 'IsVisibleInWorldBuilder', change it from false to true.
7. Scroll down until you find 'BuildCategoryFlags'. Replace the number with 0x00008000.
8. Click commit and save the file.
Let me know if you have any questions! TSRW is very finicky and sometimes things can go wrong. There are some things that I may not know how to fix, but I will try my best to help.
37 notes
·
View notes
Text
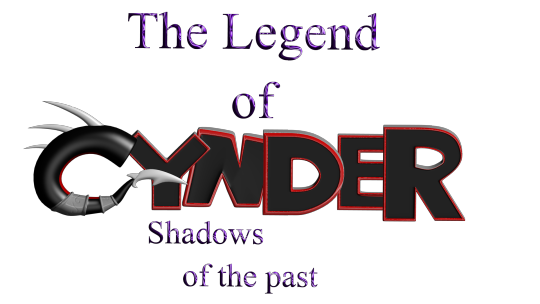
Ok so the saga with my old PC continues and is only fueling my desire to get back into fanfiction lol because I found all of the files from my attempt at making a legend of spyro fan-game! I honestly thought they were lost, I'm so excited to see all this stuff again! This was the "logo" for the game (I know its nearly unreadable lol, so it says "The Legend of Cynder, Shadows of The Past". 14/15 year old me didn't seem to care much for readability, I think I'd just discovered photoshop's layer effects lol)
Here's a bunch of random stuff I found.


I'm defiantly going to do a redraw of that last one at some point. That was like, THE thing I remember being super proud of when I first did it. I think it was going to be part of the trailer my now-partner was putting together for the game lol.
Actually, a lot of these were actually just frames from animations, but either the files are either just corrupted, or high school me didn't know how to set fps and resolution properly in the output so I got a headache trying to watch them lol. It's probably the second one honestly. Also I remember my old laptop wasn't able to play back the animation because it would lag so much, so I just had to kind of...guess at timing, and that went about as well as you'd expect. It didn't help that blender used to have this bug where your audio would move around your timeline so it really was just random guessing. I'm amazed anything got done at all, let alone how far we actually got (that is to say, not far at all but we had something playable at least).
I also found the demo files and footage of the "game" running (running at 12fps but running)! I'm curious if they still work, I'll have to download an older version of blender to test them out!
There's actually a lot more but actually finding it is proving to be quite a challenge since this laptop seems to be the digital equivalent of an ADHD "doom box" - meaning nothing is sorted into folders that make even a remote lick of sense to me, it's all just kind of thrown in together lmao.
I wanted to post these though because even though I don't really do 3D stuff anymore, It still made me really happy to see how much progress I've made over the years and how far I've come. Also a few folks who worked on this project with me back on Deviantart have started finding me lol, so in case there's anyone else out there, hello! I'm not dead, I'm still around, I'm just a lot more (openly) queer now lmao.
Image descriptions:
[ID 1: A game title that reads "The Legend of Cynder, Shadows of the Past". The two lines, "the legend of" and "shadows of the past" are written in dark purple text. The purple material is supposed to look like liquid, but instead just looks hard to read. "Cynder" is writen in black, 3D text with red outlines, with the exception of the C. The "c" is modeled as a black tube instead of in a blocky style like the rest of the letters. The inside of the C has a red underbelly, and the bottom of the C ends in a tail, resembling Cynder's from the Legend of Spyro Series. There are 3 white spikes at the top of the C. /end ID]
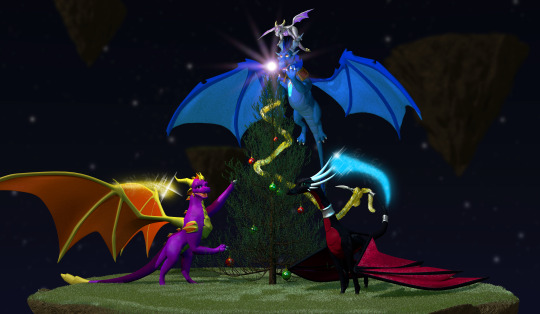
[ID 2: a 3d render of 4 dragons around a christmas tree. A black dragon at the front, Cynder, is using her tail to hang tinsel, a pruple dragon, Spyro, on the left is reaching up into the branches of the tree. A blue dragon, Ignitus, is hovering behind the tree, his paws outstretched, implying he is placing the glowing star at the top. On his head is a silver dragon, Zerali, balancing on his horns. behind them is a series of floating islands. /End ID]
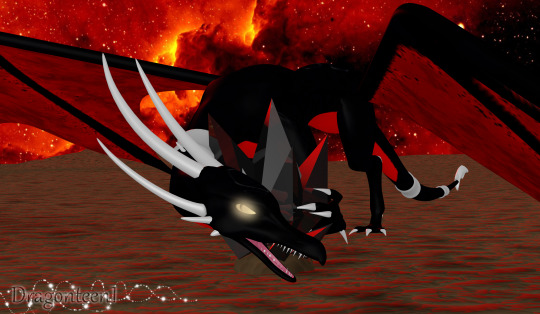
[ID 3: A render of Cynder with a darker colour pallet than the previous image and glowing yellow eyes, snarling at the camera, guarding a black gem. The sky in the background is blood red and the terrain is flat and barren. /End ID]
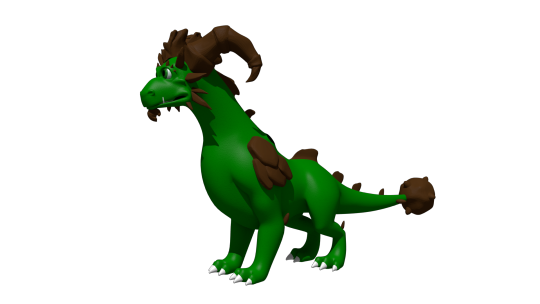
[ID 4: A render of an incomplete model of Terrador, a green dragon with brown horns and rocky shoulder decorations. He has no underbelly or wings. /end ID]
[ID 5: A render of a fan character named ekkosel, a blue, anthropomorphic dragonfly with an unsettling, uncanny face and green wings, T-posing. Her green wings are a blur /End ID]
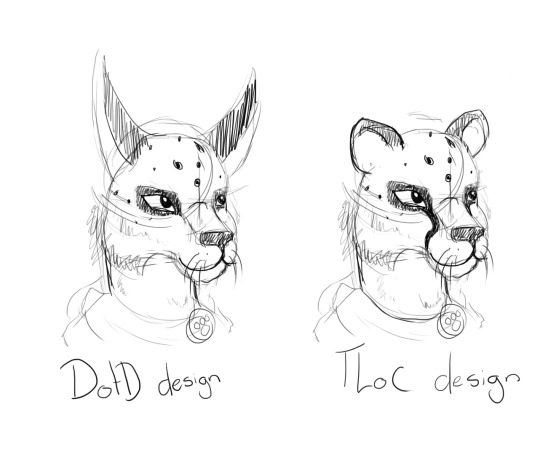
[ID 6: two sketches of a anthropomorphic cheetah heads. One has long ears like a lynx and is labeled DotD design, the other has small, rounded ears like a cheetah usually has, labled TLoC design. /end ID]
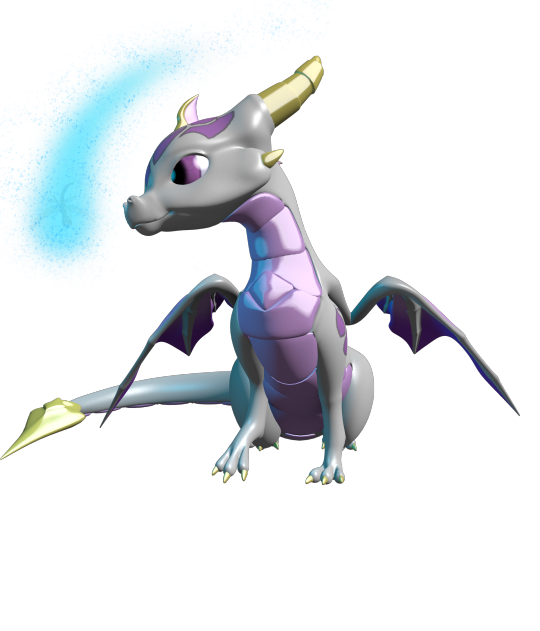
[ID 7: A render of Zerali, the silver dragon from the second image, and ekkosel, from the 5th, playing together. In this image, we can see Zerali has a pinky-purple underbelly and shiny gold horns.]
[ID 8: A rendered scene showing a close up of blue ignitus with his eyes closed. He appears to be talking to Cynder, who is in the background, but blurry. The game's logo is visible in the bottom left of the image. /end ID]
#nostalgia#old art#image descriptions#Spyro#The Legend of Spyro#tlos#cynder#spyro the dragon#spyro fanart#cynder fanart#queer artist#old projects#Blender#Blender Game Engine#I had no idea what I was doing but I had a blast!#tlos spyro#spyro oc#legend of spyro#old ocs
66 notes
·
View notes
Text
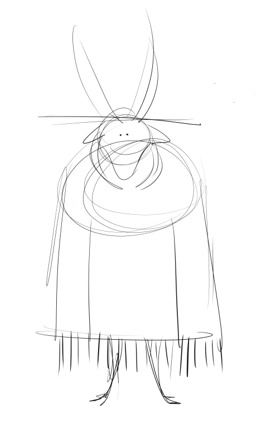
i was organizing some files and found all the wip stuff from the previous secret samol for @/seamonsterart (go check out their work!), and these are two of my favorite illustrations ever, so here's some insight into how i made these!
for starters i already had a pretty much finished design for pickman that i had first drawn back in 2021

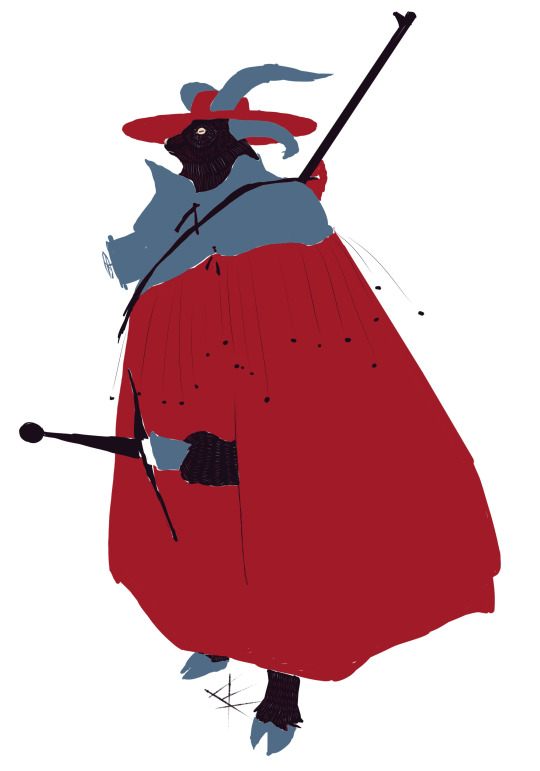
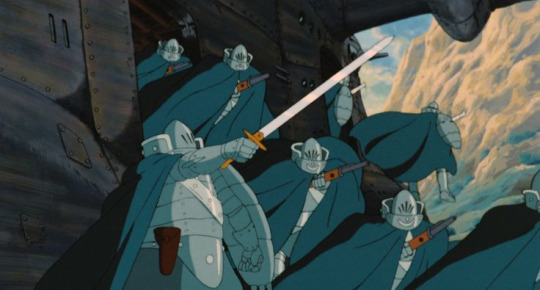
she has a completely wrong gun in this version because i did not remember how it was supposed to look like and couldn't find a description of it anywhere. she's wearing a hat because i forgot it was supposed to be a helm and so i ended up giving her the large hat just because the long horns coming through it are a fun image, though today i cannot imagine her wearing anything else. she already has the sword she takes from the lake skeletons, also. her armor is based on the armor the torumekian soldiers and kushana wear in nausicaa of the valley of the wind, with the incredible neck guard and long cape covering their entire body

i've always loved these designs and how the plates are evocative of insects, but also how mysterious they look with covered faces and bodies. matter of fact, at this point i had no fucking idea what pickman looked like below the cape.
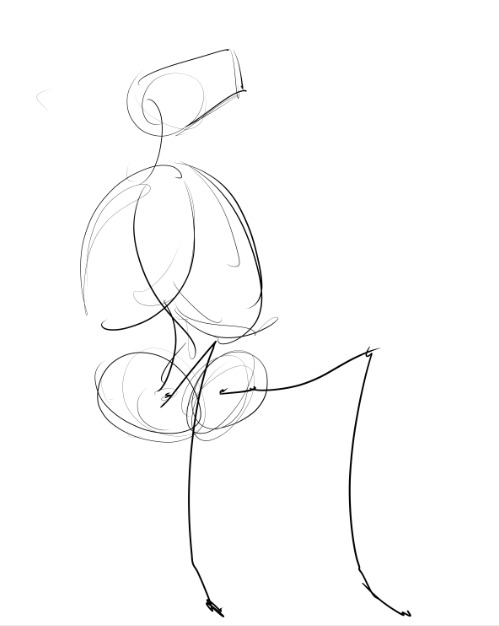
the second inspiration is the young man from angel's egg.
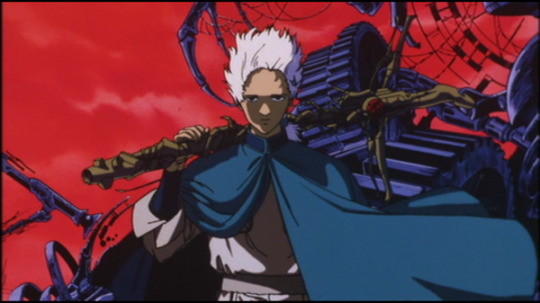
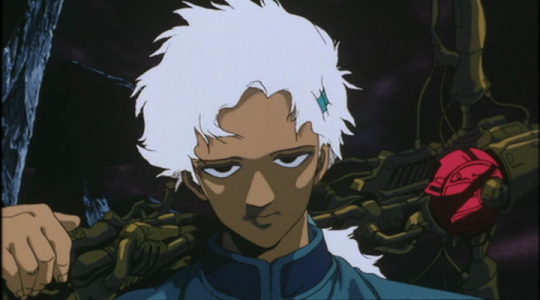
OK, STAY WITH ME. i cannot explain this other that in my head pickman and him are VERY similar characters. the image of the half pulled cape while he holds his sword-cross-thing over his shoulder and the quiet demeanor are pretty fundamental to how i try to make pickman FEEL. i actually wanted her armor to have more piping, pulling from the biomechanical appearance of his sword-cross, but it didn't feel quite right
and the third inspiration is less inspiration and more reference work, the book "arms & armor, a pictorial archive" by carol grafton

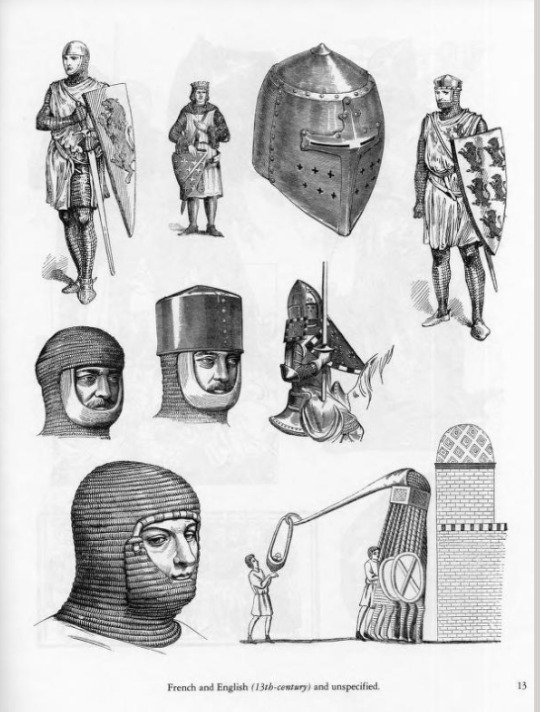
it's a compilation of illustration works sourced from several books from the 19th century. VERY cool book to take a look at historical armor. it's on the internet archive for free!
there was also a fair ammount of looking at goats and sheep, but eventually i reached this after learning i suck at drawing furry designs. big shoutout to the furry community for making so many tutorials available btw. in highlight a very important study of the character.
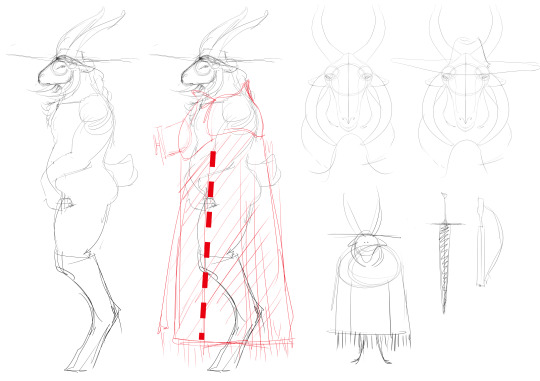
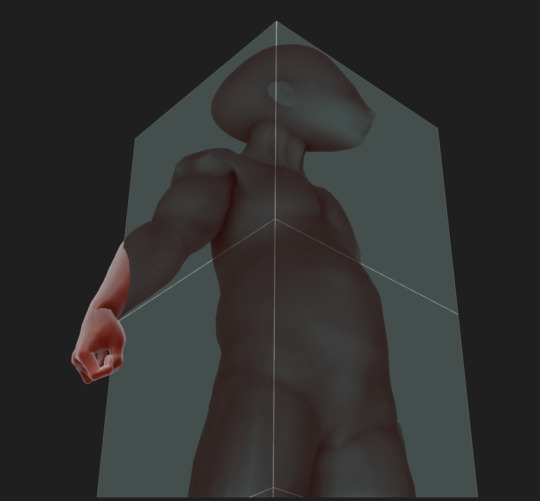
now that i kinda knew what pickman looked like i entered the wonderful phase of "i don't know what the fuck i'm doing" which resulted in a bunch of bad doodles now sitting in a folder dubbed "dev hell". at this point i kinda had an idea for a relaxed scene based on one of the prompts, which i developed for a while on blender but eventually gave up on.
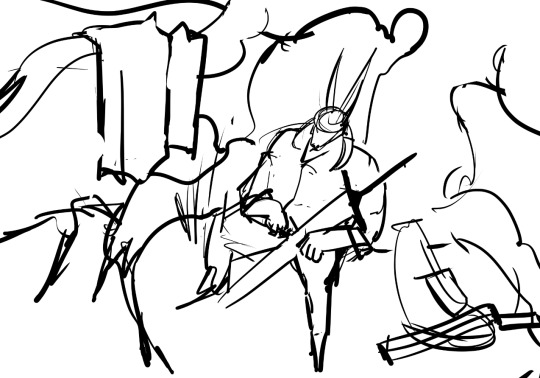

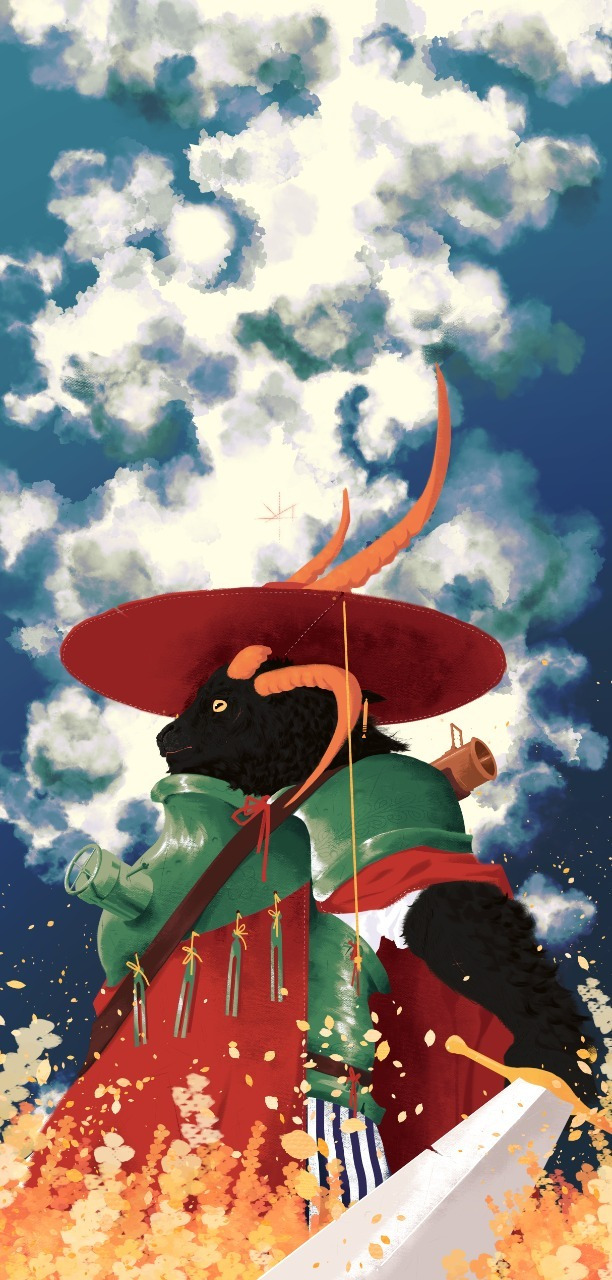
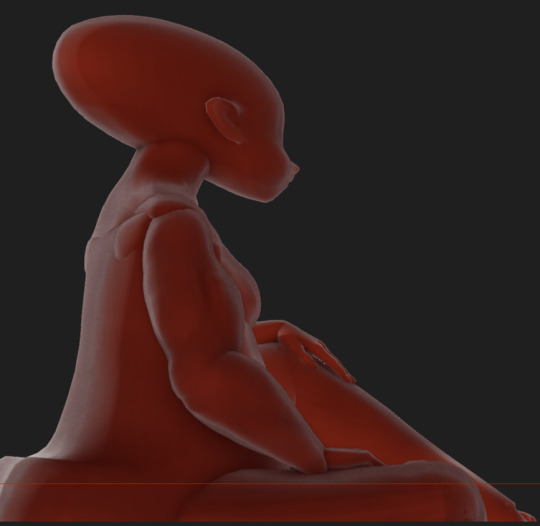
i then moved on to the second prompt, of pickman being badass. i decided on a low angle to make pickman look incredibly tall but the low angle of a goat's head legitimately kicked my ass so i eventually made a goat head on blender and used it to generate references with the help of designdoll. here i made her design a lot more muscular and fat, also, eventually coming to her final design.
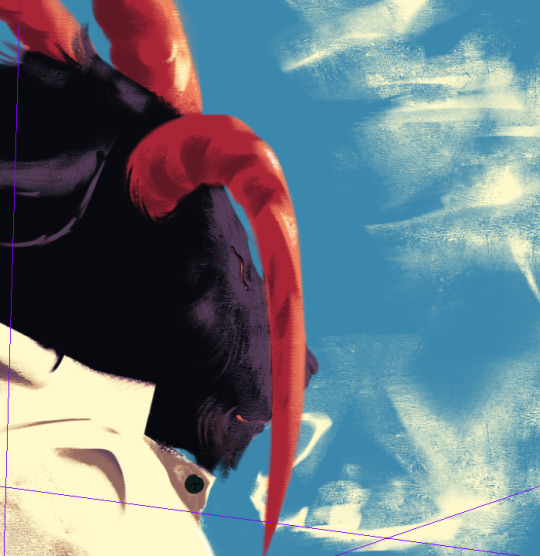
the valve on her chestplate looks WRONG to me now, but at the time i was so tired i just rolled with it. the first pass of her armor was in a completely wrong color, which i corrected later on photoshop. i added the little metal forks pulling from her 2021 design, and the idea of little musical forks for atunning to the shape was cool to me. i also corrected her gun after actually learning what the fuck it was supposed to look like. i already knew i wanted her to be standing on the field of canola flowers, and the sky in the background was the last thing i added, also the time when i decided to really make the picture tall.


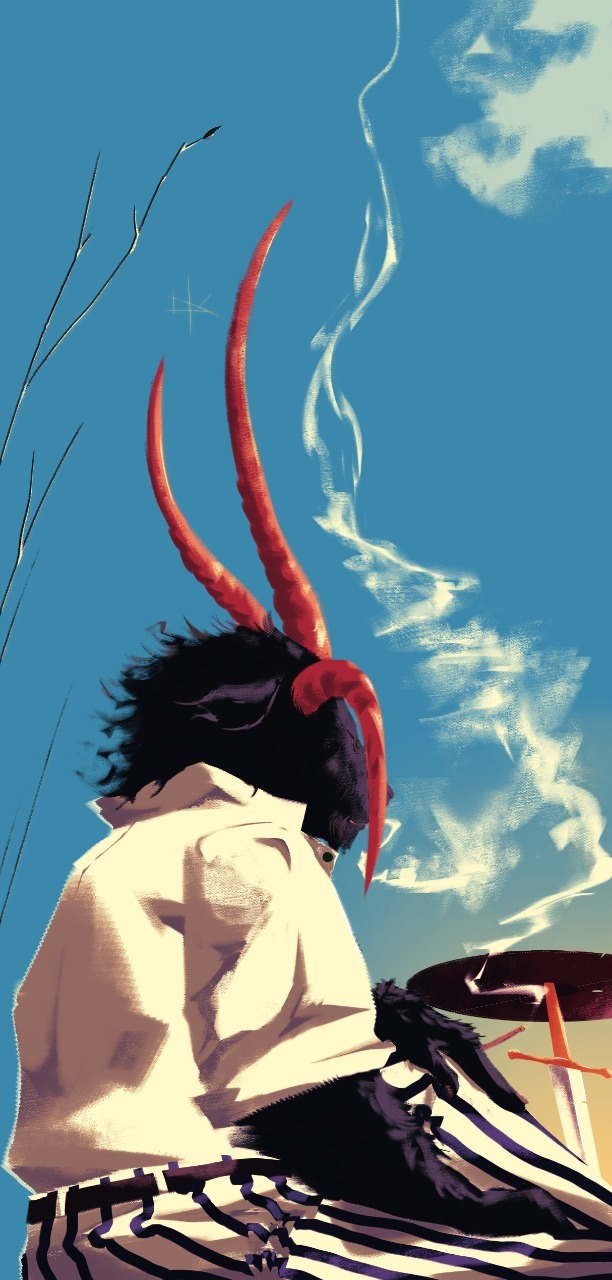
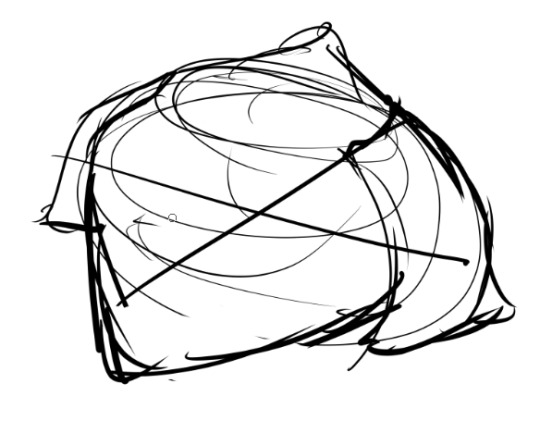
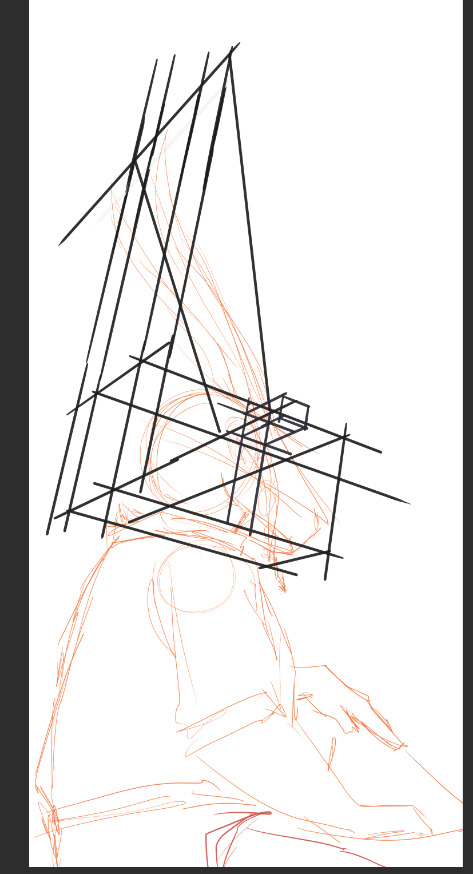
i liked the final result so much i went back and started working on the first prompt again. had a horrible time drawing the horns in the second image which led to this hell cage for building the perspective. im still not confident on the horns on the side of the head. i wanted to bring the atmosphere of a cold winter or fall morning in the second one, and to make pickman seem tired but relaxed. i overall like the second picture a lot more than the first and was very happy with how it came out.
AND THAT'S HOW THE SAUSAGE IS MADE I GUESS. if you read this whole thing then thank you for your time!
#fatt#f@tt#friendsatthetable#friends at the table#pickman#ernestina pickman#sangfielle#wip#breakdown#luketaart#brazilian artists
130 notes
·
View notes
Note
Hi! What tutorials helped you learn how to mesh clothes in Blender? Or what tutorials or tips would you recommend? Thank you
Hi,
I've watched a lot of character modelling videos on YouTube to get better acquainted with Blender. What I can recommend for you to watch is this 10-part tutorial by Darrin Lile. The creator even provides the images he's working with which makes his workflow easier to follow. The notions you'll learn here will help you create basically anything in Blender, from a bed to a crop top to a bridge.
Another good series you can watch -and specifically made for creating clothing in TS3 - is this one by Lyralei.
Once you're more comfortable with Blender, you can search all kinds of tutorials (like how to mesh flowers, coats, skirts, pillows, etc)., if you're interested and need further clarification.
What I strongly recommend is for you to export the EA game meshes and break them apart in Blender to see how the dev team has approached the category you're interested in. At the beginning, I wouldn't look too much at anyone's meshes except EAs because every creator has their own style and views over what a reasonable polycount is (you can have the same skirt at 2k or 4k- for instance, depending on how much detail you want to add to the mesh). But it is useful to look at other creator's meshes when you deal with transparency, for example.
You can also try to convert CAS stuff from TS4 if you have the possibility. This helped me a lot in getting used to meshing in general because, while being similar to TS3s, their meshes are a bit more detailed (a belt is often painted on the mesh in TS3, but in TS4 the belt will be meshed).
Another important process in Blender is UV mapping. Because it's TS3 and you can't get away with wonky and stretched textures -as long as you make your stuff recolorable, that is - you need to pay special attention to this part.
In general, for Blender I'd say:
keep your polycount in check; too detailed/high poly meshes will "explode" in the game;
close the openings on a mesh (where the sleeves, pants or skirts/dresses end); I also UV unwrap these and find them a spot on the UV layout to make the textures more cohesive.
avoid using the "subdivision surface" modifier as it increases the polycount too much;
try to delete as much of the body under the clothing mesh as possible (I'm also doing this part in Blender for a while now and it's a lot better, easier and more precise to crop it; it helps a lot with avoiding clipping too);
for baggy clothing you can use a plane or cylinder to start with; for skin-tight clothes you can use the EA body meshes ((like in the second link);
If you're really set on creating custom clothing -and sharing your stuff- I'd get used to some good practices from the beginning (because we humans tend to get used to do things one way and keep at that from there on):
create all the LODs required for your item (if it's clothing you'll need all these three: HLOD, MLOD and LLOD) and load them into TSRW. This way your carefully crafted blouse won't change into a t-shirt when zooming out in the game.
in TSRW leave only the maps/images you created for your item. Delete everything else.
for every LOD in TSRW, go to Mesh -> HLOD (MLOD, LLOD)-> Material and load your maps by using Browse. Don't import over the same map again.
textures are really important and the more time you spend working on them, the better your item will look. It's very useful to know how to create normal maps as they add depth to your mesh.
never export packages directly from TSRW as it doesn't compress your file the way it does for sims3pack files. Export as sims3pack, use S3RC to compress it further, then use the Sims 3 Pack Extractor to convert into packages.
Note: When I say TS3 and TS4 meshes, what I'm referring to is meshes from the games, not CC. Also what you're going to learn here is how to make Maxis-Match content for TS3, which I do 90% of the time. The only differences is that my textures are usually more "alpha" looking. I've got a similar ask a while ago if you want to check it out.
The most important thing is to keep at it and don't get discouraged. All this info might seem like a lot now but with practice you'll get used to it. Start with something easy like a tube top and see how it goes. If you have any more questions you can contact me again, either through ask or through DM if you feel comfortable.
Hope this helps!
27 notes
·
View notes
Text
Do you want to make your Blender renders pop? How about create delicious gradients? Then look no further than Björn Ottosson's Oklab color space! Now available in Blender via nodes.
The first image was created using Oklab with constant saturation and lightness. The second was created using HSL with constant saturation and lightness. Oklab handles perceptual saturation and lightness much better than sRGB or HSL. This is great because you can change one channel without visually altering the others.


I've implemented the sRGB to Oklab conversion code on Ottosson's website into shader nodes for Blender's compositor and shader editor. You can use them as Blender assets, and they're compatible with EEVEE and Cycles, Blender 4.3+ (although they should be compatible with prior versions). More info in the .blend file. Download here
Enjoy! Let me know if you have any questions :)
3 notes
·
View notes
Text


This is the first entry for my process journal on modeling and printing a 3D figure.
The first thing to note is I have not had any prior experience with 3D modeling or printing before starting this project. My dad, however, has a 3D printer (Ender 3 Pro) that he uses often. He is also somewhat familiar with the 3D modeling program Blender, so that is the program I decided to learn.
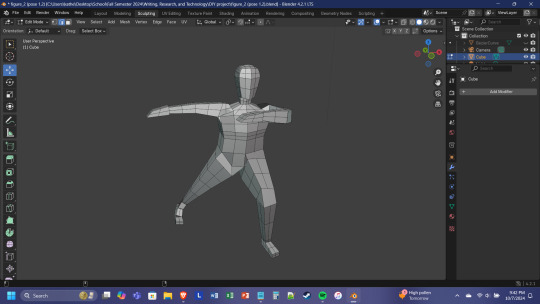
Before starting to learn Blender, I drew a simple design of the pose and elements of my figure (image 1). The figure is of a character from a story I am currently writing—he is an angel who wears a cloak and has two sickles as weapons. I had a feeling this would be quite the undertaking for a beginner, but I also didn’t know how quickly I would pick up Blender. If I was going to learn it quickly, I wanted to have enough elements to really challenge myself with.
Once I downloaded Blender, my dad showed me the basics: how to move, scale, and rotate objects; how to add new objects and create meshes; and how to apply modifiers to an object. I also messed around a bit on my own, sculpting a circle to look like a head (image 2). However, I was going to need to learn more in order to create a full figure.
I found this YouTube tutorial by PIXXO 3D which showed me how I could model an entire figure from just a single cube. This video introduced me to mirroring and extrusion, as well as how objects can be altered by selecting and editing a single face. These new techniques allowed me to create first a torso and then limbs and a head by creating new shapes that were attached to preexisting ones. Once I learned how the techniques worked, I used the video as an example but tried to shape the figure on my own (image 3). I did run into some difficulties since the tutorial used an older version of Blender. There were certain ways of morphing an object that didn’t work the way the video showed, and so I had to figure out a different way to achieve the same effect.
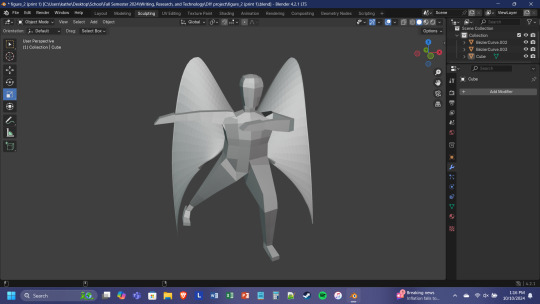
After creating a full figure, I then had to pose it. I figured the best way to do so would be to separate the model into pieces that I could rotate and arrange independently of each other (image 4). (You can also see I was messing around with how to create wings—more on that later.) I moved the pieces around, splitting some of them further to achieve the pose that I wanted (image 5). Once the pose was complete, I figured out how to fill in the gaps: by selecting the edges of the gap, I was able to create a new face that joined the pieces together (image 6).
As for the wings, I came up with a technique involving bézier curves. By creating a curve, connecting it in a loop, and then subdividing it with multiple points, I was able to manipulate it into the exact shape I wanted the wing to be. Then I could convert it to a mesh and use grid fill to fill in the shape. I did run into an issue where the fill wasn’t even—there was some weird wrapping going on at the bottom, probably because of how the curve was oriented. But I decided to use it as it was for the moment—I’ll redo the wings later.
I mirrored the wing I’d made and set both of them into the back of the figure (image 7). This was a rough prototype and I wanted to try and print it. I sent my dad the .stl file and he put it into UltiMaker Cura, a program for splicing. Splicing takes a 3D model and figures out what the layers have to be for it to be printed. There were some parts that lacked support because they were hanging in the air (the hands and the wingtips), so my dad showed me how to put supports in that could easily be removed after printing. We scaled the figure to be four inches high and could see the printing would take about three hours.
This was where things got tricky. The first print attempt ended with a big spirally ball of plastic. It seemed the wings were too thin and would need more supports, otherwise the plastic wouldn’t stick to itself and would end up creating a mess. The second print went better, although there were still problems with it—namely, the torso fell out of the body (image 8). The rest of it was in decent shape, but it seems I’ll have to do some work to strengthen the connections. I assume this will involve thickening the objects in Blender so they have more surface area melding them together.
So far, I’ve been able to get the hang of Blender fairly well. This surprised me a bit, although I have had experience with photo-manipulation programs (GIMP) before, so maybe that is helping me more than I thought it would. I am glad the modeling portion is going smoothly, however, since it looks like the printing stage is going to require more finagling than I initially thought.
3 notes
·
View notes
Text
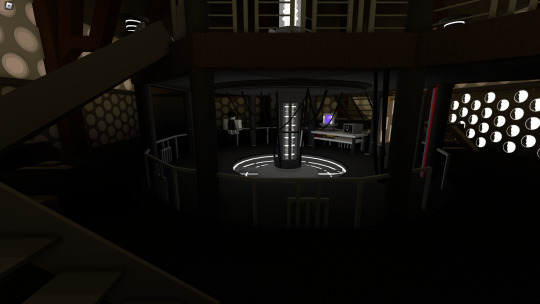
Going through my gallery and found these TARDIS interiors I made on a Roblox game when I was like 14, god I feel fucking old...
This is a long post so I'll put a read more thingamabob
I'll post them in order of being made, I don't have an image of the first one I made. Admittedly it's atrocious so we're starting from number 2
This one had three colour variants I made, purple, blue and yellow
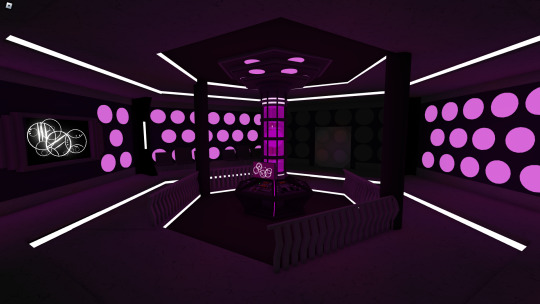
Ignore the bugged out roundels on the first floor. There's alot of elements in this one I like, this is where I was really starting to try some cool techniques for details. I like alot of the design elements in this so I might revisit this idea.
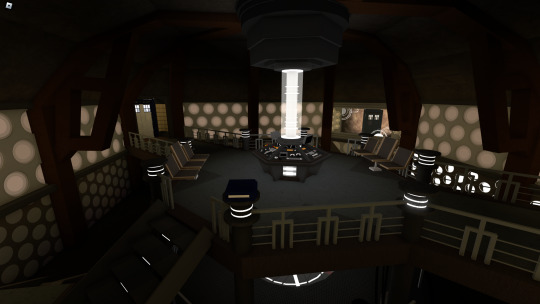
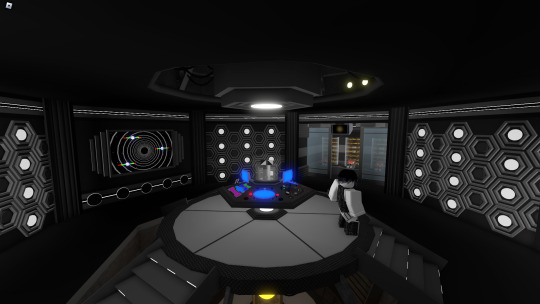
Technically not another interior as this is actually a secondary control room i made for the interior above. Ngl I like the vibe of this one more, should have made it more detailed

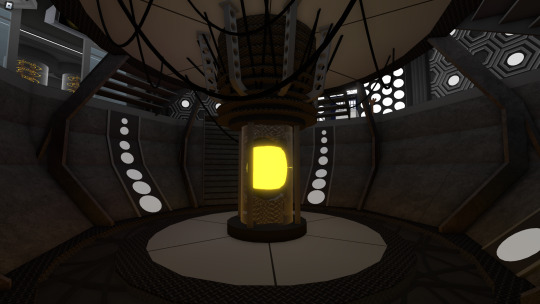
I was cooking SOOO hard with this design but I didn't know what to do with the second floor. I no longer have to worry since it doesn't exist! The save file got overwritten and I was genuinely (and still am) devastated... This is the only photo I got...

Im still really proud of this one, I would have added railings and more details if it wasn't a nightmare to build in this game.

This one was one of my favourites although around this time I lost interest in building since it was irritating to build stuff and I couldn't be arsed. This interior still sits at the back of my mind everyday and I've actually drawn up some sketches for a new version.
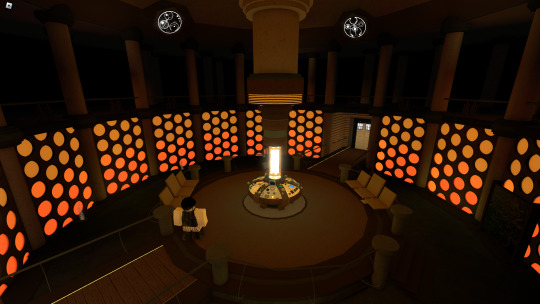
Anyway that's all the photos I got, there's some more like an interior I made that actually fits into the size of a police box and some scraps of cancelled ideas.
I've got blender so maybe one day I'll make an interior with that
3 notes
·
View notes
Note
Hi! I replied this to my previous question, but in case it's better for you to view it this way I thought I'd do this as well (don't mean to spam you). I was able to get everything working from your helpful tip last time (about the deco sim process), but when I went to do a third deco sim I ran into another issue. I attach the mesh to the rig and export it as an object, but when I open the blender file with the succulent/typewriter and import the object it turns pink. The first time this happened I just restarted the rigging process and it went through (this happened the second time I made a deco sim), but this time nothing seems to work.

I've meticulously followed each step of your document a multitude of times to no avail and don't feel like I'm doing anything differently than when I made it work. Do you think this is a blender issue?
it's a blender issue but it's not a big one. the item turns pink as it's looking for a texture to link. OBJ files don't link materials properly (it's the format unfortunately) so you have to manually do it.
to get rid of the link, follow these steps.
(long post below)
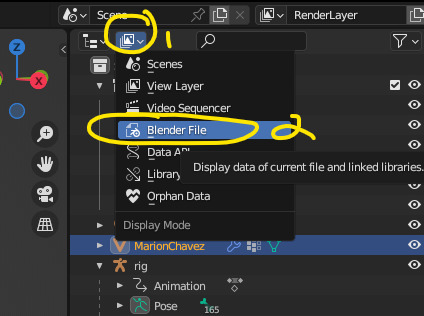
in your outliner, expand this menu and head to blender file.
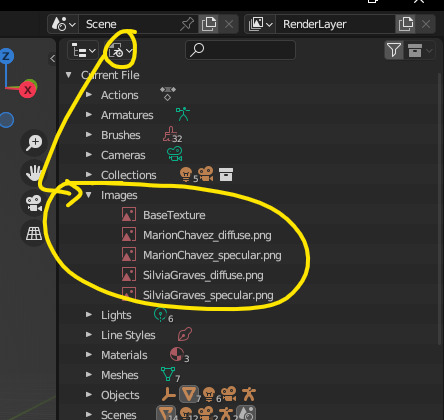
2. from here go to images and right click delete all images
3. your mesh should turn black (or white depending on your settings) at this point which is fine and you can re-link your texture as you normally would.
4. relinking your texture - once that's complete, head back up to that menu and select view layers. that should take you back to the outliner
5. scroll down to the bottom, hit the globe (1), select the material (just make sure it's highlighted as it is in my screenshot). while that's selected, we're going to go to BASE COLOUR and expand that menu.
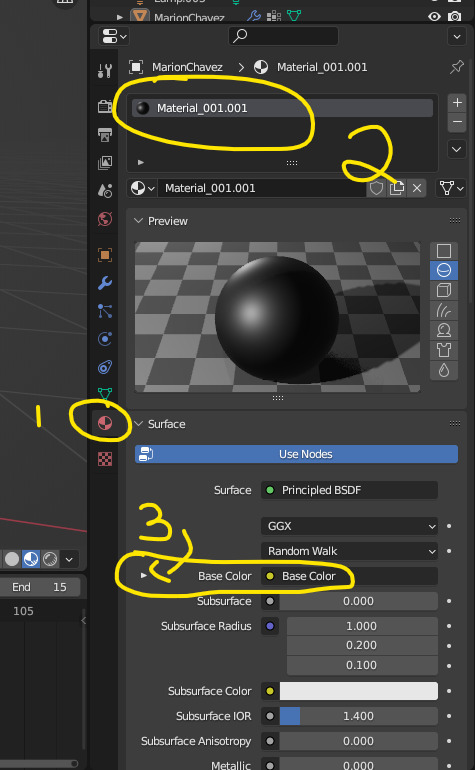
6. hit the triangle and you should be met with this selection
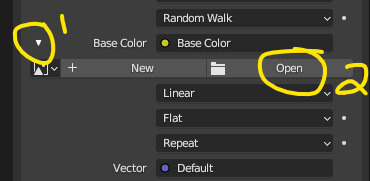
a dialog window will open up, find your texture and select it. it should re-apply the correct texture onto your deco sim.
i'll update my tutorial with a video soon but hope this helps.
5 notes
·
View notes
Text
Been having a right time of it with the 3D art.
Looking into exporting work from blender into a game engine. (Looking at godot.)
But my animations use multiple UV maps for texture animation, right? And it's just not showing up in godot. I am using dot glb files as that is what the godot documention recommends.
I spent a few days reading through the godot documentation and fiddling with the import advanced settings before I finally plugged my glbs into a generic 3D object program and realised that it's not that godot isn't importing my UVs, it's that blender isn't exporting them in the first place.
So now I'm reading through the blender manual and combing through all of the blender gltf export settings. And it looks like there isn't actually a way to do this? It might just not be possible at all?
The blender manual recommends using one UV map and using a UV offset to move that map around a single texture image containing everything you want to have in your animation.
I try looking up online forum posts where people had the same problem or video tutorials or anything like that, and again I see people recommending using UV offset and not UV maps.
The thing is, UV offset and UV maps are two different tools for texture animation. They each have different trade offs.
UV offset allows you to use only one UV map, but you have to have a larger texture image. Multiple UV maps allows you to make a smaller texture image.
Like texture animation of the face of a character. Like you would see in games like Animal Crossing. With the UV offset method, your texture image has to contain every single face you want your character to be able to make, each distinct and separate. The UV offset allows you to move the single UV Map along to each of those faces in the texture image.
But if you're using the UV maps method, then you only need to have each left eye and each right eye and each mouth in your texture image. And then you only move the specific UVs corresponding to those facial features. Depending on the art style, you can get away with only having left eyes and no right eyes, and then simply laying the UVs over that in reverse to have a mirrored left eye (a right eye) on the right side of the face.
My preference is for the UV maps method. For two reasons.
One is that I enjoy the art challenge aspect of low poly art, and I do actually want to try making more articulated detailed characters with fewer tris and smaller texture images.
Second is that the UV maps method simply allows for more control. You can, for example, change how wide or narrow your character's smile is on their face without any change at all in the mesh or texture. Say if you want to animate a character with a big smug grin, you can use the texture of a normal smile but change the UV map so that it stretches across the full face of the mesh.
Technically, you could also achieve the big smug grin look by stretching the mesh. But with a lowpoly character, what happens when the part of the mesh with the smile on is only 2 tris? You want to have 2 piddling little tris stretching around the entire character's head? That's just not going to look right! The UV map method allows for greater control, as the area of the mesh assigned to the face on the texture image could be 2 tris in one UV map and it could be every tri across the face on another UV map.
But all of this is a moot point. The blender manual says that glb exports can only store animation data for transform and rotate and scale and bones and shape keys. Every other animated property is simply removed from the export.
And coming back to godot again, apparently mesh materials only have a maximum of 2 UV maps in godot? At least that's what it shows in the mesh instance node. UV map animation might just be dead in the water.
I'm going to experiment around with exporting different file types before I commit to rethinking how I animate characters. lol
Either way, I don't see this as time wasted. I have gained familiarity and experience with how these softwares work and why they behave the ways that they do.
8 notes
·
View notes
Text
How to use shaders on his model to fix shading issues (1)
DISCLAIMER: I am in no way, shape or form obligated to do this. However, I write this so that anybody who wants to use Maruki’s model has the knowledge to do so. I know that a lot of people with custom models of their OCs primarily use MMD and instead of keeping the wall of ‘experience’ up between MMD users and those familiar enough with Blender, I decided to write this of my own volition so everybody can enjoy him.
Hello for the second time, everyone! In this guide I'll show you how to use shaders if you need to fix Maruki's model. However, this process I'm showing you can also be applied to other models if they're in a format like the native .gmd or other files i'm unsure of how they'll be opened in Blender. What are shaders, you ask? Shaders in Blender are (according to the Unity website) "small scripts that contain the mathematical calculations and algorithms for calculating the colour of each pixel rendered, based on the lighting input and the Material configuration". In the context of this project, the shaders are files that, when used, mimic the cell shading style of Persona 5. It's with these and the model's textures that we are able to accurately recreate the color and shading you see in-game.
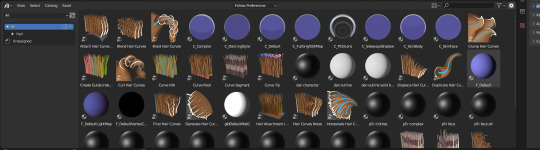
First, let's check to see if these shaders (which are categorized as an asset) are present in our asset library.
Open Blender and you'll see a window at the bottom (by hovering the cursor over the edge of the window you can lift or lower it to make it larger or smaller)
Click that little clock icon and select asset browser

you should see this since I put the shader assets into the asset folder
Don't see this?
There's an alternate method to get these to show up, just know that through this method that you'll have to do this process everytime you close Blender and open it back up.
Go to File and you're see something that looks like a paperclip that says Append next to it. Click that.
Then go to that folder I showed in the last tutorial named 'assets'.
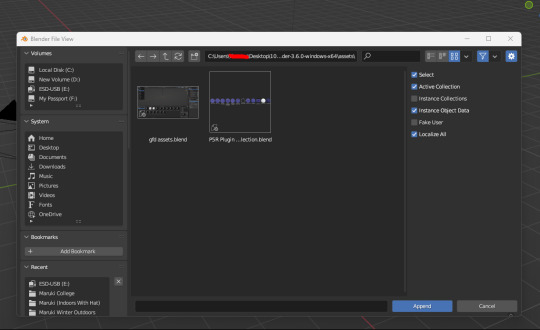
See 'P5R Plugin...lection.blend'? Click on that and press append.

You'll be greeted by a bunch of folders, but don't worry. Double click to open the folder and you should see a bunch of orbs. Select ALL of them and click append again. By doing this, it adds these shaders to your asset library.
Don't open the .blend regularly, or you'll get this
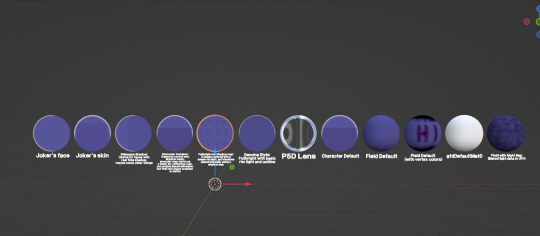
But anyway, let explain the shaders we will be using to fix Maruki's model in case he doesn't load properly.
For Maruki's models, we need 5 shaders. Maruki's Metaverse outfit where he's wearing his golden outfit is where we need all 5. Outside of those models, we only are using 4 of those. I'll be fixing a model from scratch to show you the process. To cover the basics, I'll fix Maruki's winter outfit when he's outdoors.
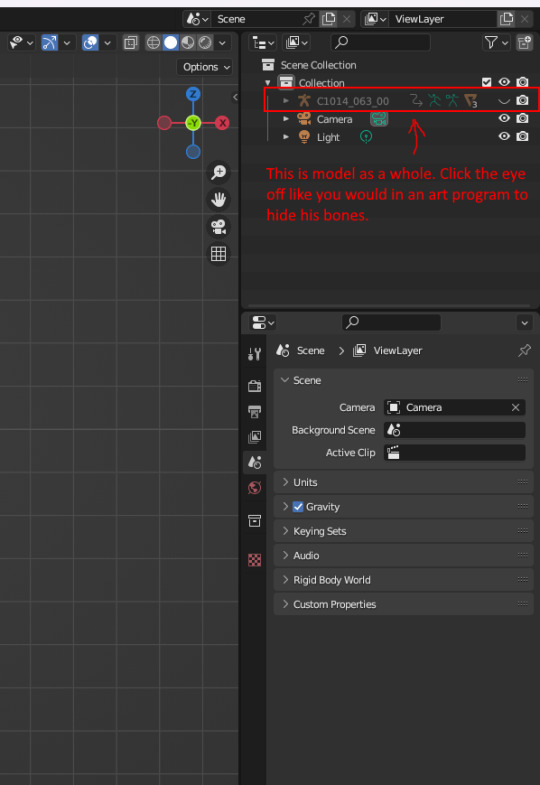
When you open his model, regardless of the format. It's gonna be gray. But don't worry!

This is easily fixable. All those spiky things jutting out of his body are just his bones. For the unaware, bones are pretty much the skeleton of the model and are like the joints in a ball joint doll – they're used to manipulate the body so he can be posed. They're obscuring our view, so for now we'll hide them.
Now poor Maruki is still solid gray but no bones showing. That's easily changed though. Just click the circle to the right of the solid white circle
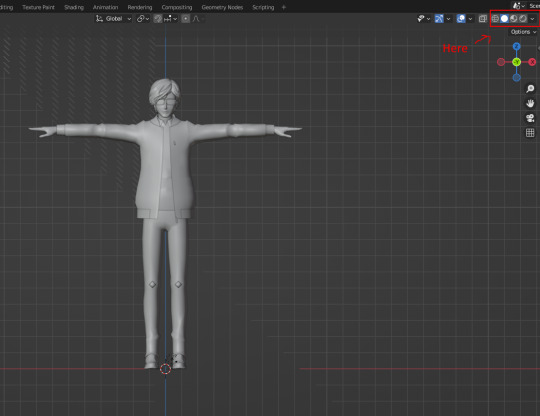
and there!

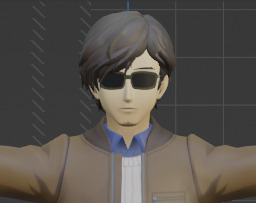
Now you may notice that his model, compared to in-game, is pretty muted in color. And that Maruki's signature glasses have transformed into shades. This is where shaders come in! I already provided the textures in the native .dds and as .png so they're at our fingertips. For those who don't know what textures are, they're the "skin" of a model. They come in images you apply to give the model all the colors. Now let's work!
With Blender you can click on a part of the model and it'll highlight. You can also do this by clicking on an item on the list of stuff that make up Maruki's model.
Let's fix his glasses first as an easy first step.
Also, for reference, you can delete all the 'hiji' and 'hiza' bones. They're useless.
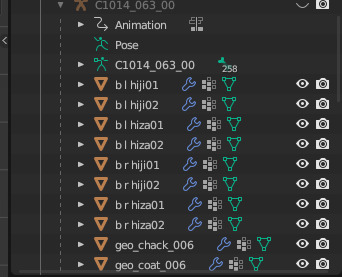
Maruki's bones are pretty straightforward in their naming, so it isn't hard finding different parts in his model. Right now we're gonna fix the lenses of his glasses. 'geo_glasses_006_0' and 'geo_glasses_006_1' are his lenses. His lenses are weird because they have two layers...? It's because of this why we're changing both of them.
Now first thing!

When we click this, we'll have an empty slot.

We're going to drag one of the shaders into this slot, but let me explain this:
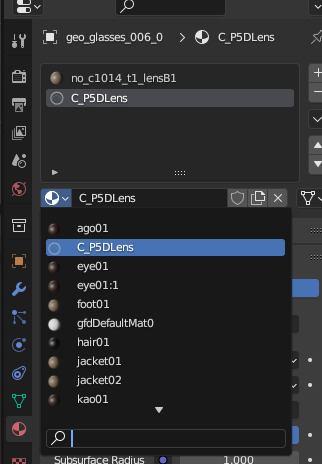
C_Default is for things like clothes, items, hair, etc
C_P5DLens is for glasses, like Maruki's and Ren's.
C_SkinFace is a shader for ONLY the head.
C_SkinBody is for ONLY the body (neck down). If a character is wearing something like gloves, you use C_Default (ex. Maruki's white gloves are separate from his bare hands, so you'd use C_Default)
C_Complex is for the more complex stuff. The only time we'll be using this one is for the metal plating in Maruki's Metaverse battle attire
Pull up the asset library and drag the orb that says C_P5DLens on top of that empty slot.

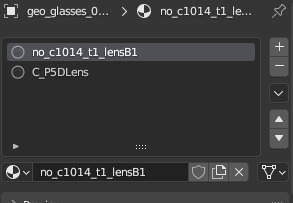
When you do this, it should look like this. Whenever you add one of the shaders to an empty slot, it adds it to this little drop down menu. So in the future you only have to use the drop down to add a shader to an empty slot.
So now that it looks like this we do this:

By copying the material, we're essentially just copying it like you would a copy+paste with words in a document or an image in a photo editing/art program.
Next we're going to click on the first material (slot) and paste what we copied

When we do, it should look like this
Next, press the little 'X' button on the C_P5DLens. We don't need it anymore. By pressing the X we remove what was in the slot, leaving it empty again. Since we don't need it we just do this:
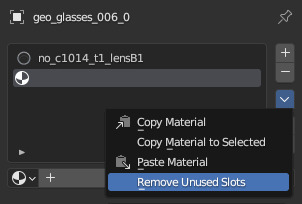
Do this to both 'geo_glasses_006_0' and 'geo_glasses_006_1' and his glasses should look like this

Yay!!
In order for his glasses to look like this, make sure that under settings the blend mode is set to 'Alpha Blend'

Before:
After:
I'll finish this with another part because Tumblr has a 30 image limit and I wouldn't be able to cover everything within one post, so stay tuned!
#takuto maruki#tutorial#hopefully this is easy to understand for everyone#mmd#tagged mmd because this is meant for people who primarily use mmd but want to work with maruki's model#and maruki's model just doesn't work in mmd#persona 5#persona 5 royal
5 notes
·
View notes
Text
Practice 2: Apache VR
Blog#19
09/03/25
I have completed the texturing of the hamburger. I performed UV mapping on the hamburger using an individual tile, as I planned to combine it with the other food items. Ana worked on the cake while Gautham focused on the jelly. Since the jelly didn't have many details, it was created using just a shader. Ana has already combined her cake with the other assets. Initially, I gave the burger FBX file to Ana so she could add it to the collection of assets.

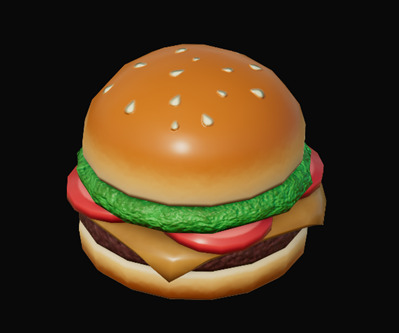
We were losing a lot of details when combining the assets due to constraints on the texture budget. I suggested adding interactive elements to the food items since they would be positioned closest to the VR camera. To enhance their visual quality, we should group all the food items together for higher resolution.
I calculated that increasing the texture resolution from 1k to 2k for the existing packed material would have a more significant impact than creating another texture at a resolution of 512x512 for the food items. Additionally, I needed a render of the pet for the photo frame, meaning we would require another image texture regardless.
Ultimately, I decided to combine the cake, hamburger, and photo frame into a single UV map. I've used this method in previous projects, where I bake textures from one UV set to another for the same object. I created a second UV set: the first UV set had the mapping used while texturing the separate objects, and the second UV set contained the packed UV mapping for these objects. I then transferred all the maps using Blender's baking option to the second UV set. Here’s a tutorial on a similar method I have used.
youtube

References:
Ryan King Art (2022). How to Bake Textures from One UV Map to Another in Blender (Tutorial). [online] YouTube. Available at: https://www.youtube.com/watch?v=wsO1eozb1Qk
0 notes
Text
Separating the second stage fuel tank into it's own file Pt1:
I opened up the full rocket model file and saved it as a new file while I remember to. Just like I did with the previous models. I named the new file "Fuel tank 3".

Here, I selected the rest of the meshes I didn't need and pressed 'Delete' to delete them.
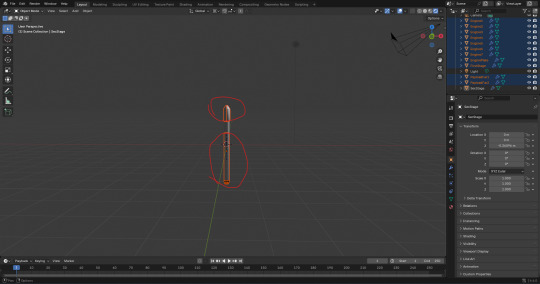
From there, I applied the 'Smooth by Angle' modifier like I did with the other models.
Next, I clicked onto the 'Shading' window and changed the 'Shader Type' from 'Object' to 'World'.

Like the I did with shading settings of the files of the previous models that I used from the full rocket file, I added a 'Light Path', 'Mix Shader', and a second 'Background' box to connect together. I did this so I could change the background colour without effecting the model visually.

I copied and pasted the same hexadecimal colour code that I keep using for the background in the files of my other models. The code is '#0086FFFF'.

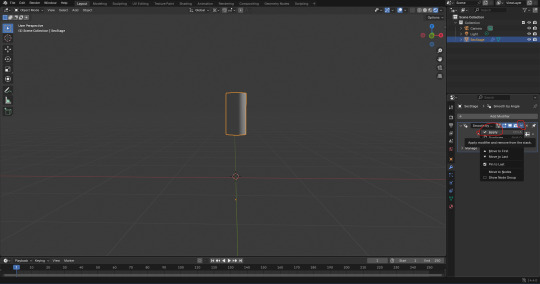
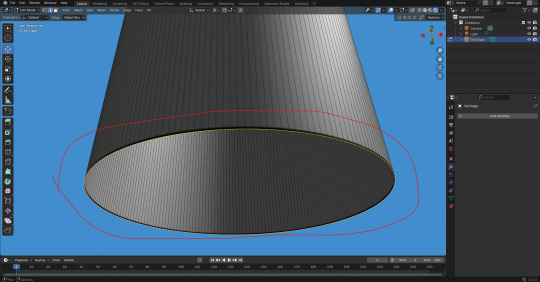
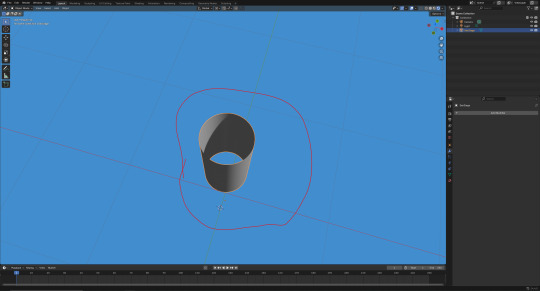
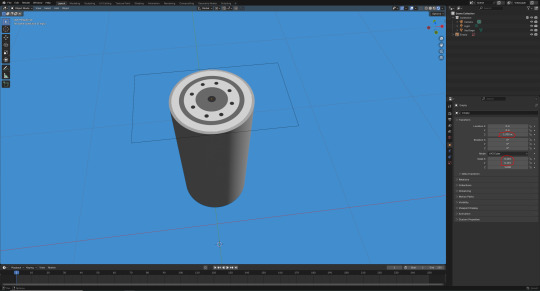
When I switched back to the 'Layout' window. I jumped straight into 'Edit Mode' to give the top and bottom of the mesh a face. I pressed 'Alt' + 'LMB' to select all the vertices on the top of the mesh. I then pressed 'F' to fill the gap with a face.
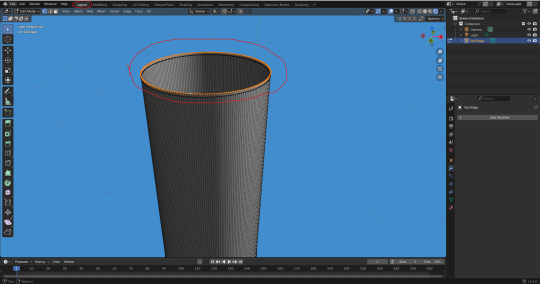
I did the same at the bottom of the mesh.

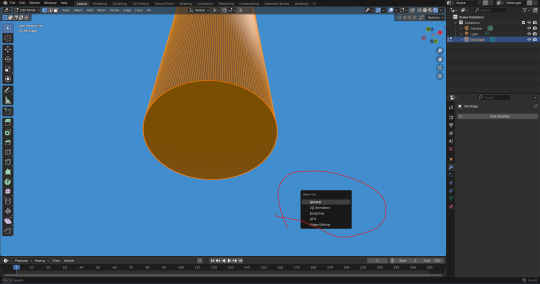
However, there was an issue. The face at the bottom was black, which suggests a lighting problem. I looked it up on Google to see what was specifically the problem.

I tried to recalculate the normals of the mesh. I entered 'Edit Mode', and pressed 'A' to select the whole mesh. I then pressed 'Ctrl' + 'N'. The problem was that when I pressed 'Ctrl' + 'N', It came up with the option to create a new file. That obviously wasn't what I wanted.
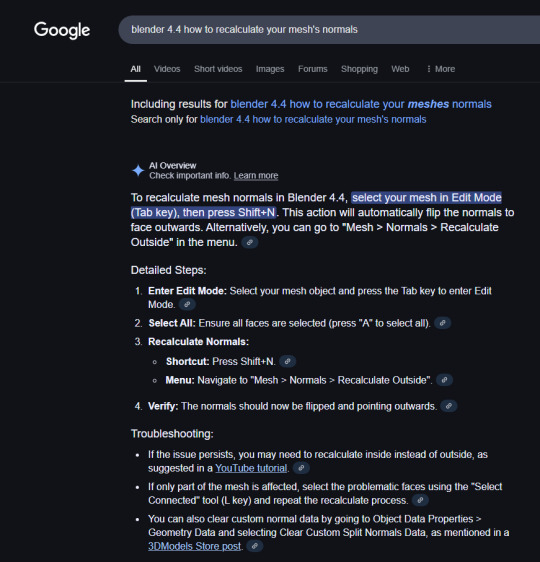
I looked up how to recalculate the normals more specifically on Google. According to this result, I need to press 'Shift' + 'N', not 'Ctrl' + 'N'.
I tried again by pressing 'Shift' + 'N'. It didn't do anything. One thing it did do, is show a box at the bottom left of the screen with a tick box. The tick box allows you to recalculate the inside.
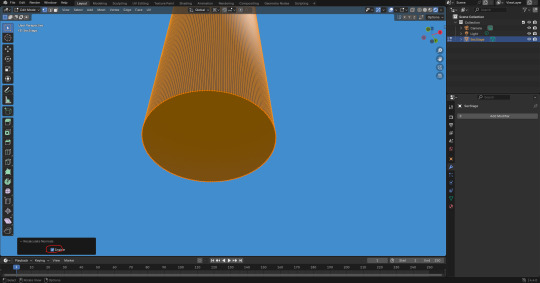
I did that and it still didn't do anything. I then tried doing it manually. I clicked on 'Mesh', 'Normals', 'Recalculate Outside'.

It still didn't work. so I tried clicking on 'Recalculate Inside'.
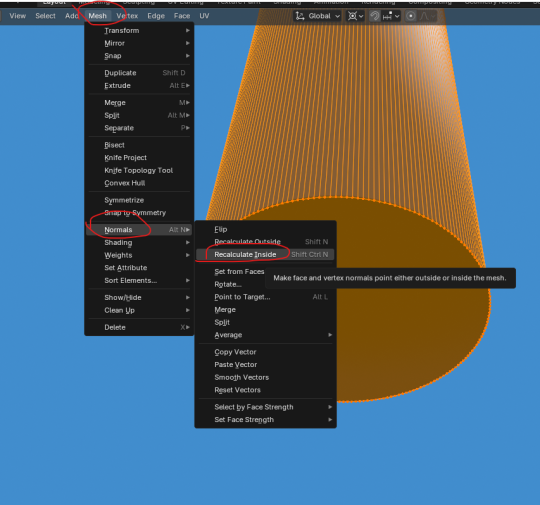
That still didn't fix a thing. However, I just realised that I have embarrassingly mistaken a faulty face with the colour of the texture. The texture is black where it separates from the first stage.
Now that that is sorted. I was ready to move onto adding an image into blender and combining it with the mesh. However, my computer black screened. Thankfully it came back on but blender's tab was pitch white. I lost progress. Now that I'm back in college, I tried to retry those steps as this is where I last saved.
Here, I added the faces back. It looks like the lighting on the mesh is a bit off.

I decided to press 'RMB' and then 'LMB' on 'Shade Auto Smooth'.
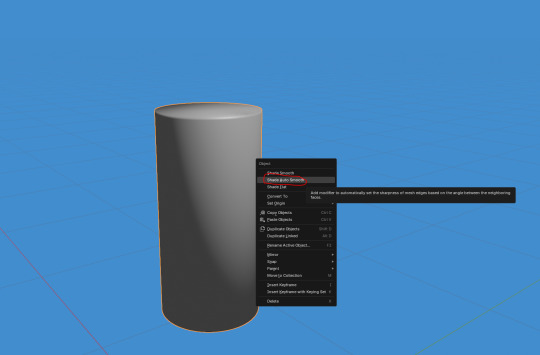
This actually worked well. I then realized that my previous models would look better if I kept making sure that I used 'Shade Auto Smooth' whenever make a big change to the model. For example, adding faces or joining meshes. I then applied the 'Smooth by Angle' modifier.

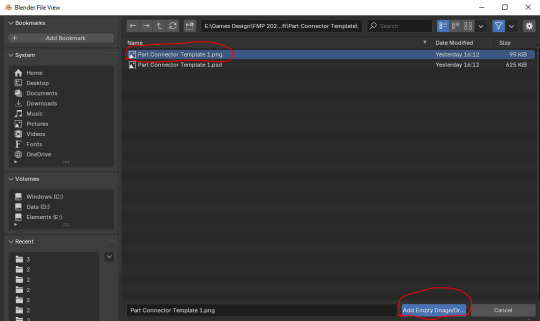
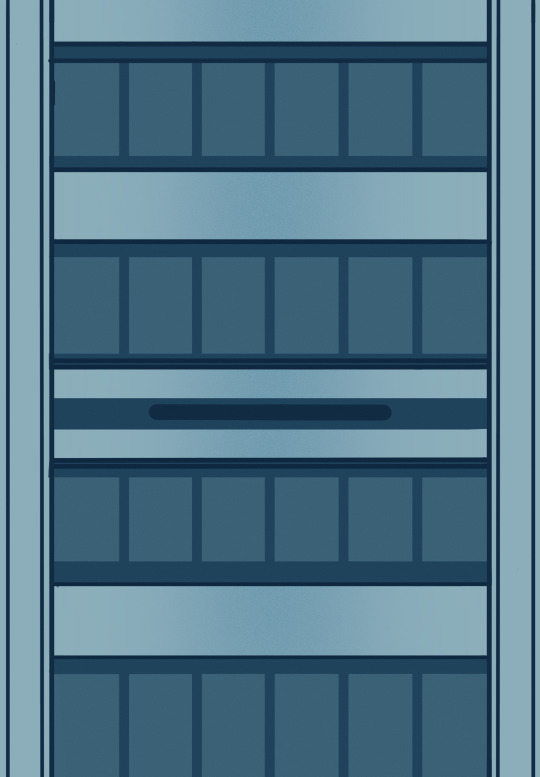
Next, I wanted to add the 'PNG' for the connector faces on the model. I made in photoshop yesterday. I did this by clicking on 'Add', 'Image', and 'Reference'.

Here, I selected the 'PNG' file that I wanted to use as a reference image object.
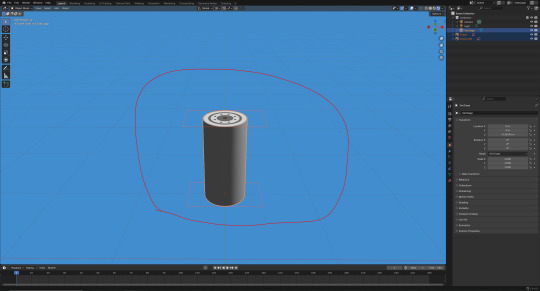
At this point, I had transformed the image to these transformations seen in the screenshot below. This is so that it looks apart of the model.
Next, I duplicated this object and placed it underneath the face model. I did that by pressing 'Ctrl' + 'C' and then 'Ctrl' + 'V'. From there, I transformed it's position on the 'Z' axis (circled below).

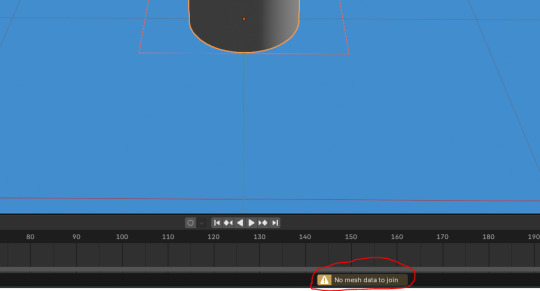
Here, I selected the two images and the mesh and tried to join them together by pressing 'Ctrl' + 'J'.
At this point, I remembered that I couldn't join them together unless the images were converted to a 'Mesh Plane'.
I then pressed 'RMB' and then 'LMB' on 'Convert to Mesh Plane'.

Last time I did this, I didn't change the settings. This still worked fine so I did the same here.
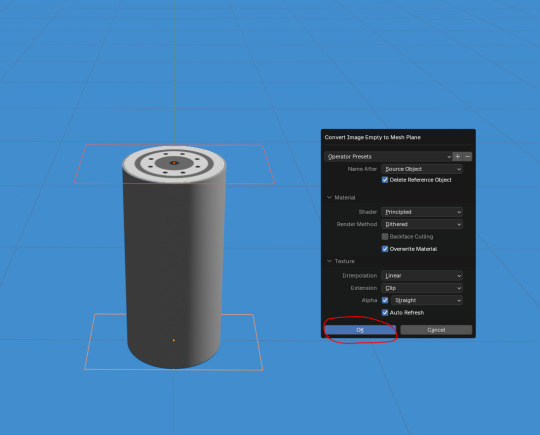
Here, I attempted to join them together again by pressing 'Ctrl' + 'J'.

Although it worked, I realized that the images were too far apart from the mesh. As a result, I undid this.

Next, I set the position of the image on the top to '1.354m' on the 'Z' axis.

0 notes
Text
Buying Guide: What to Look for When Choosing a Portable 3D Scanner

With industries in India rapidly embracing 3D scanning technology, the demand for portable 3D scanners is on the rise. These scanners have applications across manufacturing, healthcare, education, reverse engineering, and even heritage conservation. Whether you’re a product designer, architect, engineer, or artist, a portable 3D scanner can help digitize objects with precision and efficiency.
However, choosing the right portable 3D scanner can be challenging, especially with a variety of models available in the Indian market. This guide will help you understand what factors to consider before making a purchase, ensuring you select the best device for your needs.
1. Accuracy and Resolution
When selecting a 3D scanner, accuracy and resolution are the most critical factors.
Accuracy refers to how closely the digital scan matches the actual dimensions of an object. This is measured in microns (µm) or millimeters (mm).
Resolution determines the level of detail captured in the scan. Higher resolution is essential for intricate designs, industrial parts, and detailed textures.
For applications such as engineering, medical prosthetics, and manufacturing, a high level of accuracy (between 0.02 mm – 0.1 mm) is required. For 3D modeling, gaming, and creative fields, slightly lower accuracy may suffice.
2. Scanning Technology
Different 3D scanners use different technologies, each suited for specific needs.
Structured Light Scanners (SLS) use projected light patterns to capture object details and are ideal for high-precision scanning but may not work well on reflective or transparent surfaces.
Laser Scanners use laser beams to map surfaces. They are excellent for industrial applications and work well in outdoor conditions.
Photogrammetry stitches together multiple 2D images to create a 3D model. This method is great for art and cultural preservation, but it lacks the precision required for engineering or medical applications.
For engineering and manufacturing, structured light or laser scanners are the best choices. For creative applications, photogrammetry-based scanners offer a more affordable alternative.
3. Portability and Ease of Use
A portable 3D scanner should be lightweight, compact, and easy to use, especially in fieldwork applications.
Handheld scanners provide flexibility and allow scanning of objects of different sizes.
Tripod-mounted scanners offer stability for more detailed scans but are less portable.
Battery-powered scanners are ideal for outdoor use, while wired scanners are more suited for indoor settings.
If you need to carry your scanner to industrial sites, archaeological digs, or construction projects, look for a model that is lightweight and battery-operated for better mobility.
4. Scanning Speed and Object Size
If you are working with large objects or high-volume scanning, speed becomes a crucial factor.
Scanning speed is measured in frames per second (fps) or points per second (pps). The faster the scanner, the more efficiently you can capture details.
Scanning volume defines the maximum object size the scanner can process in a single scan. If you need to scan large industrial parts or buildings, ensure your scanner can handle large-scale data capture.
For engineering and industrial use, a scanner with a speed of over 1 million points per second is recommended. If your focus is design or 3D modeling, a slower scanner may still work well.
5. Software Compatibility and File Formats
The software that comes with a 3D scanner determines how easy it is to edit, process, and export scans.
User-friendly software is essential for beginners, while professionals may need advanced tools for CAD modeling and precision editing.
Compatibility with major file formats such as STL, OBJ, and PLY is necessary for integration with 3D modeling software like AutoCAD, SolidWorks, or Blender.
For engineering and manufacturing applications, ensure your scanner supports STL files, which are widely used in industrial design and prototyping.
6. Handling Reflective and Transparent Surfaces
One of the biggest challenges in 3D scanning is capturing objects with reflective, transparent, or dark surfaces. Some scanners struggle with these materials, leading to incomplete or inaccurate scans.
Advanced surface detection can help in capturing shiny or black objects with greater accuracy.
Matte sprays are often required for scanning glass or metal surfaces.
If your work involves automotive parts, jewelry design, or electronics, opt for a scanner that comes with special surface-handling features.
7. Price and Budget Considerations
Portable 3D scanners in India are available in a wide range of prices:
Entry-level scanners (₹40,000 – ₹2,00,000) – Suitable for hobbyists, students, and 3D printing enthusiasts.
Mid-range scanners (₹2,00,000 – ₹8,00,000) – Ideal for small businesses, product designers, and engineers.
High-end scanners (₹8,00,000+ ) – Used for industrial, medical, and aerospace applications.
While it may be tempting to choose the cheapest option, investing in a reliable scanner with good accuracy, durability, and software support will yield better results in the long run.
Conclusion: Choosing the Best Portable 3D Scanner in India
The right portable 3D scanner for you will depend on your specific needs, industry, and budget. If you require high precision for industrial or medical applications, structured light or laser scanners are the best choices. If you need a more affordable solution for creative projects or heritage conservation, photogrammetry-based scanners are a viable option.
For professionals working in engineering, quality control, and product design, investing in a high-resolution scanner with fast scanning speeds and advanced software compatibility will ensure better accuracy and efficiency. On the other hand, if you need a portable scanner for occasional 3D modeling and printing, an entry-level structured light scanner might be sufficient.
By considering accuracy, scanning technology, portability, software support, and price, you can make a well-informed decision and invest in a 3D scanner that enhances your workflow and meets your professional requirements.
0 notes
Text
UNIT 5: Where are We? Building the Future (Greenscreen, Lighting)
Overall, I think that this unit was a much calmer unit, and that there is still much left to be desired with my own work, but I think it went smoothly despite the burnout from the last unit.
CONCEPTS, Researching Films Since this had the option to also include animated films for the green screen, I had both animated and non-animated films, as well as television while I was brainstorming my ideas. Below is the PDF to my moodboard, including the series I looked into.
https://artslondon-my.sharepoint.com/:b:/r/personal/c_radaza0320231_arts_ac_uk/Documents/UNIT%205/concept/moodboards-research.pdf?csf=1&web=1&e=9erXmV
Initially, I was going to delve into doing concept work for 'Interview with the Vampire' (1998), looking into the second image, yet I chose to go into Henry Sugar due to Wes Anderson's simple and easy to replicate framing style. Below I had drawn out some concepts, gaging out the layout of both scenes:

This was scanned from my sketchbook and was there to set up the scale and floorplan, which is drawn in blue pencil.
LAYOUT AND MODELLING ASSETS Because beforehand I had created a floor plan for the model itself, which made it easier to block out my assets. This blockout made it easier for me to make the models as I was able to clone the cubes blocked out and build from that. This is also where I blocked out my base lighting. I had also imported an HDRI from Poly Heaven yet I had later changed to a different HDRI because the first one was too bright.

Because the image I was mainly referencing from was blurry, I had ended up sketching out some of the assets out so I could visualise the objects better (as seen on the concept illustration and my sketches below). It also helped me focus and keep with the flow of my own work.

I also used reference images from the internet to model my assets. For example, here with the window to make it more realistic. I had also done this for the chandelier light.

In addition to this, I had stripped down the vertices of objects, which was probably an unnecessary detail that prolonged my modelling process, but it did make it personally easier for me to read what vertices I'm using on a subdivided object. It also meant I had to fill in dissolved gaps. I had also used math to get more precise scales, but I could've made my life easier by making each vertex/face scale individually.

I had to also work with the cloth modifier to make my curtains, which was a learning curve. I had to play around with modifiers, create points and play around constantly to get a result I want. The result I got was not truly precise but I was at least able to create draperies that feel effective in my own work. Personally, this was the most difficult part as it involved a lot of trial and error.

I shaded each file in chunks, the fabric assets using procedural textures (magic textures, voronoi) alongside picture textures. While most of the basic shaders are from AmbientCG, I had to create the patterns from the film itself. They aren't fully accurate yet I tried to recreate the patterns similarly enough.
Below were all the shaders I made myself, as I used Procreate to create them. I could have learnt to use Illustrator to make cleaner, more vectorised designs but learning a whole new application would have been a bigger learning curve.


All of this combined led to my final model (shown below)

GREEN SCREENING The green screening required adjusting lights and multiple takes (I had around 4 takes). I think while the lights aren't too complex because my scene lighting wasn't too complicated. Personally the acting was the most fiddly part, but it ended up being workable.
The green screen was imported using blender and rendered frame-by-frame as a transparent PNG so it could be set as a plane video on the final Blender render. Much of the color was recorrected in Blender as well.
Below is a link to the BTS of the green screen.
youtube
Reflection Overall, I feel like my final result was workable and quite simple despite the complex patterns, so it helped my burnout from the previous unit. I don't find it too admirable apart from the fact that I had to create some of my own shaders. If I had more time and patience, I think that I would have likely added more detail to my assets. I also feel like I would have likely just committed to what I first looked at (Interview with the Vampire) or another film/show. I would have also probably made the scene more accurate. I would have also likely created my assets more efficiently without trying to reduce polys or clean up (despite it helping my workflow) as I wasn't trying to reduce file size. I would have also double checked my assets before rendering, as I had to redo my render once due to missing assets.
EXTRA LINK TO ONEDRIVE (GO TO OUTPUT FOR FINAL RENDER): HERE
0 notes