#this is basically the kind of thing that my tips and tricks guides will look like by the way. thank you everyone for the support!
Text
🏰 Ateez as Hogwarts Students🪄
Who wouldn’t want to go to Hogwarts with these boys? 😁 can’t wait to write some AUs for them too!

Hongjoong
☆ “Ah,” the Sorting Hat hums as it’s set atop Hongjoong’s head, “the mind of an artist. Don’t see this one too often. Creative, determined, you like to do what you want.” With a chuckle, the hat’s folds opened again, this time with a shout of “Ravenclaw!” Hongjoong is proud, hoping he could represent the house known for creatives and intellectuals who push boundaries.
☆ Proudest “blood traitor” Pure-Blood family this side of Hogwarts, that’s the Kims, especially Hongjoong 😌
☆ Like, the only student at Hogwarts who has an actual knack for Divination, like he actually sees things and they actually make sense. No one believes Hongjoong until something actually comes true. He even asks for his own crystal ball from his parents for Christmas and customizes a really pretty base for it. He’s also really skilled at Transfiguration, all the really flowing magic just cones to him even though there’s a precision to that one. Hongjoong can roll with it all!
☆ He doesn’t hate any of his classes, but History of Magic is the least interesting one for sure.
☆ Hongjoong joins the Ravenclaw Quidditch team as a Chaser, a position where he can lead and guide the team…and also try to pull as many distracting trick shots as he can! Gets really creative with how he spins the ball.
☆ He cannot wait to see what his Patronus looks like, secretly hoping to either get something adorable or really beautiful. He gets his wish and then some as wings burst out, a phoenix flying from his wand. It is quite rare for someone to have a magical creature for a Patronus, but chalk that up to Hongjoong’s spirit! He absolutely adores his Patronus, the sight of it perched on his shoulder, and his heart swells. His memories literally created magic.
Seonghwa
☆ He kind of wants Gryffindor, but has been told he'd make a good Hufflepuff, so ultimately Seonghwa leaves it up to the hat's decision. "Leaving it up to me, huh?" The Sorting Hat chuckles. "You're kind. You care for and value others...and their opinions apparently! You're a Hufflepuff!" Huh, so that was that.
☆ Having Muggle parents, he was quite surprised to develop powers, but a quick visit from his future teachers cleared things up…sort of! He can’t get over how amazing Diagon Alley is, dragging his parents into every shop he can.
☆ Absolutely ENAMORED with Care of Magical Creatures, like oh my gosh little tree guys! Funny cats! A REAL HIPPOGRIFF??? Seonghwa can’t get enough of the fantastic animals. He’s also a natural at Herbology, basically you can always trust him to keep things alive! Both of those classes simultaneously relax and excite him.
☆ Flying? Up that high? No thank you!
☆ Due to his fear of heights, Seonghwa doesn’t join Hufflepuff’s Quidditch team, but is the loudest, proudest supporter out there! You’ll always find him in the stands, especially since he has friends in every house.
☆ Seonghwa wonders what animal he'll get: maybe a cute cat or a big, strong tiger? A lovely mare? Sort of! A large pegasus is what ends up soaring from the tip of his wand, spreading its gorgeous wings and snuffling at its partner, bringing a wide-eyed look of eye and smile to him as he reaches his hands out to the white winged horse.
Yunho
☆ He’s outgoing, so maybe Gryffindor? That’s what Yunho thinks as he does some pre-hat self-reflection. The hat, however, takes a different approach. “Hm, kind, loving, loyal, yes, very loyal…” “Thanks!” Yunho exclaims, surprised the hat seems so nice. This isn’t so bad! “This one goes to Hufflepuff!” Yunho is surprised, but it makes sense given what the hat said. Happiness shouldn’t be too hard to find in Hogwarts’s kindest house!
☆ Yunho’s family is Pure-Blooded, but they raise their children with great sympathy for those without magic.
☆ Due to his interest in the world outside of wizarding, Yunho signs up for the Muggle Studies elective and loves it. They use electricity? Like lightning trapped in metal and that’s how telephones work? It’s almost more amazing how people go without magic than just waving a wand and making things move on their own! He also enjoys Charms, just quick little spells he can let go on the fly for fun.
☆ Doesn’t really hate any particular classes, but he got emotionally attached to the mandrake he raised in Herbology and got sad when it died.
☆ One of Hufflepuff’s Chasers. Loves the feeling of the wind in his hair and being able to fly victory loops when he scores and wins!
☆ Yunho is so excited when it’s his turn to try a Patronus, practically bouncing on his heels and hoping he gets a cool one as he remembers so many wonderful and exciting moments of his life so far. With quite a burst, a golden retriever leaps out and stands up on him, almost bowling him over!
Yeosang
☆ "You're an interesting one, aren't you?" "Er, thank you...sir?" Yeosang glanced upward at the mass of fabric atop his head. "You're trying not to laugh right now," the hat exposes him, "and yet a thousand ideas are coming to your head. Best express a few of those. Ravenclaw!" Yeosang wasn't sure what he was expecting, sure he thought he could make Gryffindor and some of his friends teased him about being a shoo-in for Slytherin, but something about being in a quiet, intelligent house didn't bother him either. He could be more than happy about that!
☆ A Half-Blood born to a Muggle and a wizard, Yeosang has a foot in both worlds. Magic is no great surprise to him, though, being raised around all his wizarding family and the rest sworn to secrecy! His Muggle cousins are so jealous he gets powers!
☆ Enjoys Astronomy because it’s really relaxing to look at the stars and draw beautiful charts. The idea that they might reveal secrets is amazing to Yeosang too. He jokes about taking Muggle Studies just for the bit, but ends up in Ancient Runes with Hongjoong. It’s a hard class but at least they can write secret code notes to each other!
☆ He’s not a huge fan of Potions because the mistakes tend to get messy! Wishes he could take it with Wooyoung every year.
☆ Ravenclaw’s Seeker, Yeosang has a knack for focusing in on one thing and even when his eyes wander, having them land on the golden snitch!
☆ Frankly, Yeosang isn’t sure what he’s expecting, like will the animal look like him? Represent his memories somehow? Just be whatever it happens to be? Despite having no specific expectations, he still can’t contain his awe and surprise when a glowing lioness slides out of his wand, fierce but caring and capable, and leans to peer at him with soft eyes.
San
☆ He’s not sure if he’s more of a Slytherin or a Gryffindor honestly, but the assumption in his mind is that he’s one of the two. “Slytherin or Gryffindor, huh?” The Sorting Hat asks. “Well, I just thought of those as the houses that take action, and-” “You’re a doer, huh?” The hat replies. “Big heart, too. I’ll say…Gryffindor!” The hat seemed to agree with San and listen to him, so he’s happy to join the house of lions!
☆ San is a Half-Blood, his parents being a Half-Blood and a Muggleborn, so he has plenty of wizarding experience along with his sister, but there’s something special about the memories they make with their Muggle grandparents!
☆ This boy loves to fly! He’s pretty sad it’s only an official regular class in First Year because an hour of flying is the best decompress after a bunch of lessons. He also really loves Care of Magical Creatures, trying to apply what he knows from caring for the cat he brings to Hogwarts as if it’ll help him remember what nifflers eat!
☆ History of Magic bores him, but at least it’s a good excuse to goof off and play with his friends in- all while keeping his head up as much as possible, of course.
☆ One of Gryffindor’s Chasers. Addicted to the rush of flying, just being able to soar around after the balls. Also loves having that opportunity to contribute to a team, it makes his heart warm!
☆ Everyone says it’s going to be a cat, and San just laughs, saying he wouldn’t mind at all. Well, luckily for his Patronus San is good-natured, for it slinks out of his wand as a Siamese cat that looks suspiciously familiar… perhaps Patronuses really are made from the things people love most.
Mingi
☆ Mingi wants to be in Ravenclaw, even though the house’s reputation for great minds is a bit daunting. “So, it’s Ravenclaw you want?” The Sorting Hat asks him. “Well, if I’m being honest,” Mingi replies, “yes. I- I think I can do it!” “Of course you can. You’ve a good mind on you,” the hat tells him, “Ravenclaw it is!” So proud to be in his dream house, Mingi swears to prove himself worthy of it.
☆ As a Muggleborn, he gets thrust into the wizarding world very quickly, but he makes friends the moment they set foot in Diagon Alley, so that’s where he learns about things like his school’s houses and sports. Mingi feels so lucky to get to experience it all and that the other kids he meets are so nice!
☆ Absolute Arithmancy whiz! Everyone’s whining about how hard it is and here’s Mingi with his great grades like it’s nothing, even though he’s forgotten his inkwell a few times. Everyone thinks he’s not going to be good at Potions but he surprises them with that too. Never has any big blowups and really likes making different brews once he gets the hang of it!
☆ Defense Against the Dark Arts makes him nervous because he didn’t realize how dangerous the wizarding world could be! Could those things really be out there to get him or his friends? He can only hope he remembers all he learns.
☆ Prefers watching Quidditch to playing, but he hand-makes a banner to wave in the stands that is the most precious mood booster to the team!
☆ Mingi isn’t sure what he’s going to get, jokes ranging from a powerful lion despite him being in Ravenclaw to a little leaping bunny. As his will is focused through his hand and wand, though, joy turning into light, it takes the shape of a snowy owl. Wise, fierce-looking, and yet…it tumbles over and bursts into what looks like a smile at the sight of its caster and Mingi can’t help smiling back!
Wooyoung
☆ The Sorting Hat speaks almost the second it’s placed on Wooyoung’s head. “Oh, Merlin! This one’s a Gryffindor if I’ve ever seen one!” Grinning, Wooyoung is off the stool in no time, proud to get the house he wanted so definitively.
☆ He’s a Half-Blood, both of his parents wizards just descended from mixed lines, plenty of Muggleborn and Half-Blood genes contributing. He used to joke that his family needed to be careful or else they’d end up with a bunch of squibs, but he couldn’t care less about blood- they’re his family.
☆ This boy LOVES Charms- any class he can use to screw with his friends is a great one for Wooyoung! He’s also an absolute star at Potions AKA his friends’ savior when they need help. He just legitimately loves it, though, so working on even the homework for it is often fun for him!
☆ Cannot STAND History of Magic, it’s just blah blah blah…but at least he can kick San under the bench and see what random stuff he can levitate without Binns noticing (it’s a lot).
☆ Another of Gryffindor’s Chasers, Wooyoung is known for taking (and often landing) really daring shots! May even want to try out for captain later on.
☆ Jokes about his Patronus looking like a lion because he’s that proud to be a Gryffindor, but as he remembers good times with friends and family and a fox leaps from his wand with a sly tilt of its head, Wooyoung can’t help but feel like he got the perfect partner.
Jongho
☆ "You're good at something once you put your mind to it." Jongho's mouth fell open into a little 'o' of surprise, not expecting a compliment from the Sorting Hat of all people...well, beings? "Convincing, too, very convincing. You can take charge when you need to." Jongho nodded along with the hat's words right up to the moment it called out "Slytherin!" He was a bit surprised being so brave and active, but he sort of had the feeling it'd be either Gryffindor or Slytherin.
☆ A Pure-Blood wizard, Jongho doesn’t let the pressure of that get to him- to him they’re all witches and wizards, it’s their skills and application that depend, and he intends to use and grow his!
☆ One of his favorite subjects is Flying because it helps him practice for Quidditch, one of his greatest areas of desire to achieve! He also adores Muggle Studies, the class where he learns about Muggle sports like soccer and subsequently tries to find Muggleborns to play with him.
☆ Considers dropping Divination because it’s such a ridiculous class, but keeps it just because it ends up being some of the most fun bonding time with friends. And ok, fine, once something may have been accurate and the curiosity has eaten him up since.
☆ One of Slytherin’s Beaters, and boy is he good at it! Such a strong arm makes for some spectacular Bludger shots. A big part of why the other teams are worried about playing Slytherin.
☆ Is determined to cast a corporeal Patronus, focusing with all his might on his best memory. It definitely pays off, he thinks, as a massive light fills the space in front of him, coalescing into the form of a big grizzly bear ready to firmly protect him.
#ateez#ateez imagines#ateez reactions#ateez x reader#ateez scenarios#hongjoong#seonghwa#yunho#yeosang#san#mingi#wooyoung#jongho#ateez hogwarts au#hogwarts au
207 notes
·
View notes
Text
Lettering Tips for Comics Artists!
Lettering is an easy to overlook aspect of comics creation, partially because good lettering is designed to be invisible, but bad lettering can ruin an otherwise well crafted project.
Now, I'm not a letterer by trade, I'm a colorist who thinks too much about comics craft, but I've picked up on a few common mistakes I've seen new webcomic artists making, and I thought I'd share my tricks.
#1: Get a Dialog font
Sorry, despite Comic Sans having the word comic in the name, it's not actually good for lettering comics. Comic book letterers usually use specially designed fonts when they're lettering comics, and they often have websites where you can get these typefaces for a reasonable fee (or sometimes even free!)
What makes dialog typefaces special?
The barred-I! (and other contextual options)
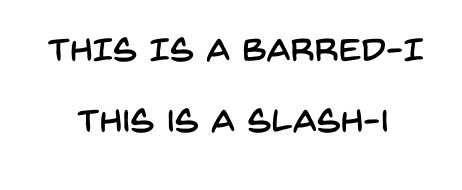
This one is subtle, but generally, you want to only use the barred-I for the personal pronoun "I" or for roman numerals. It helps clarify that what you're looking at is an I and not an L, but it takes up more space in the word, and we're trying to reserve as much space as possible for the art on the page.
Specially made comic book fonts will also be custom designed to be legible at a distance, have multiple bold/italics options, and might even include special versions of individual letters for when you type multiple of the same character in a row! It'll give your lettering a personal touch that you won't get from typefaces designed for other things.


Blambot is a great resource for all your lettering needs. Here I'm using Backissues and Nightmark
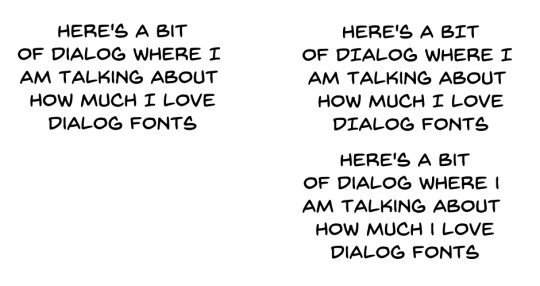
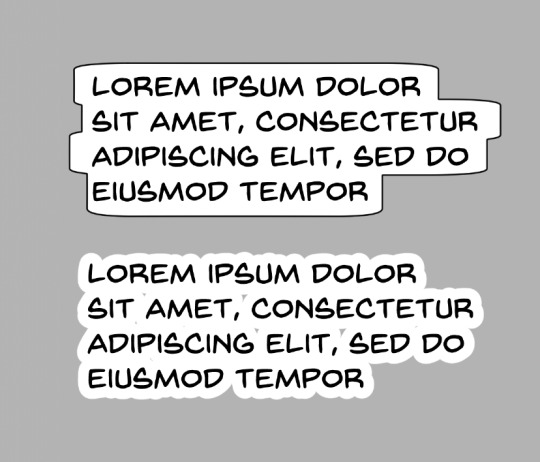
#2: Dialog Stacking
Dialog should always be stacked such that your longest line of text is in the middle. The block of text itself should have a sort of diamond shape <>. Sometimes this is difficult to do, especially if you have any long words at the beginning or end of a sentence. You can't always get it to work (and if you're unwilling to rewrite your dialog so it fits), so sometimes it might not be perfect, but if your text block is more hourglass shaped >< that's a good indication that you should try putting your line breaks somewhere else. Basically try to make your text as round as possible if it's in a balloon.
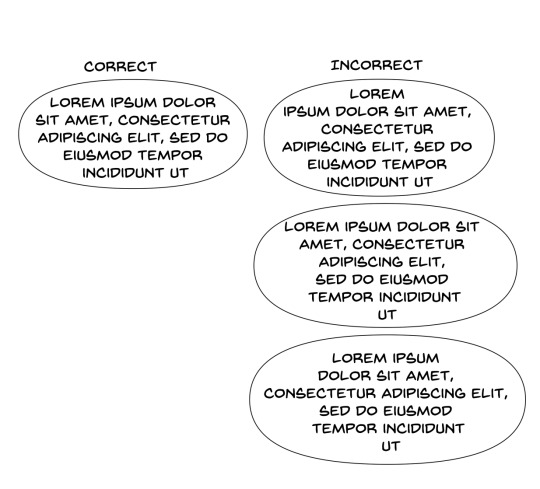
#3: Balloon Shape
One of the more common mistakes I see webcomic artists making is using perfectly elliptical balloons. It's actually kind of difficult to fit text into balloons that are perfectly elliptical; there ends up being a lot of uneven space around the text, and it looks kind of cheap. Making your balloons slightly more rectangular is going to give you more bang for you buck, they'll fit the text block a little better. I like a hand drawn balloon, I tend to think they add variety.
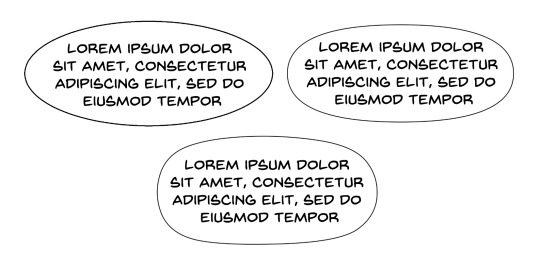
One thing you definitely shouldn't do is this:
This might be a personal preference thing more than any kind of hard and fast rule, but these lettering styles give me the impression that the text is pasted on top of the art, and that no real thought was put into arranging it thoughtfully with the art. These are probably more appropriate for captions, not so much for dialog
Lettering is a part of the medium we're working with, the dialog should be approached as a part of the artwork, and treated as such.
#4: Balloon Placement
The number one, most important rule of lettering, is that the placement of your balloons should never confuse your reader. The goal of balloon placement is to guide your reader around the page, each one should naturally lead your reader towards the next thing they should read. Here's an example of something I see a lot:
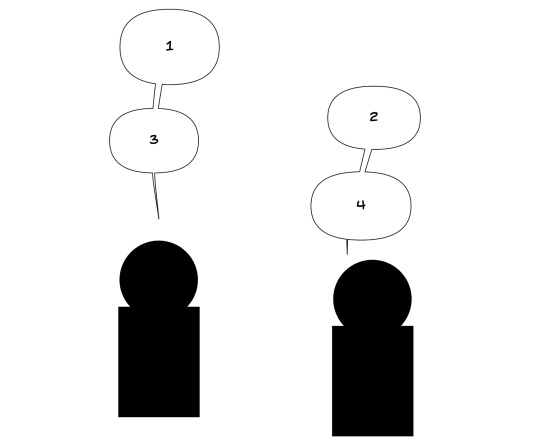
While yes, it is true that on a comics page, people read left-to-right top-to-bottom, if two balloons are connected with a line, I am going to read them one after another. Readers are not going to intuitively assume they should jump to the other side of the page just because the #2 balloon is slightly above #3. In this situation the balloons should be interwoven.

It should not be possible to look from one balloon to another and skip over intermediate dialog. If your reader misses a part of the conversation and has to double back to figure out what they missed, you've broken the flow and immersion of the page.
Like I said, lettering is all about guiding your reader around the page, it should be a part of your composition from the beginning, don't forget to incorporate lettering into your work when you're first laying out your page. Put yourself in the place of your reader and see how your eyes track across the page.


Hope these help! Like I said, I'm no expert; it took me a while to learn a lot of this. I would have found these tips super useful when I was first starting out. If you're interested in the technical side of lettering, I highly recommend The Essential Guide to Comic Book Lettering by Nate Piekos. It's one of the most useful reference books I own, and I learned most of this from that book.
#undertale and deltarune webcomics get a free pass on using comic sans#webcomics#tutorial#comics#ferrouscomicscraft#when I say I think too much about comics craft this is what I'm talking about#I could go on and on about how cool auto-ligatures are#lettering
82 notes
·
View notes
Note
You said you wanted to talk about ventriloquism?
Tell me more?
It took me so long to get to this I'm so sorry 😭 low on spoons, you know how it is
But yes, I LOVE ventriloquism, and I talk about it semi frequently here in my corner of the internet ... I'm not even sure where to start just cuz there's SO much, but this post I made a bit ago with a focus on our bonds with our puppets is a good start :)
Other than that, I've left quite a lengthy beginners guide under the cut, so I hope you enjoy!
So, here's where we start. This here:

Is a headless Jerry Mahoney. I show you this mildly uncomfortable image so you can see the most important piece of equipment in ventriloquism: the headstick! Or control stick, some people call it that too. This has a bunch of different levers on it that control different parts of the face, but more rudimentary ones will just have one lever for the mouth. Which is really all you need honestly. (Anything else costs a pretty penny. Like, an especially pretty one.) The lever being pulled on Jerry here is the only important one, and that's the one that controls his mouth.
You can see a bunch of those controls here:

This isn't the only kind of ventriloquist dummy, but it's definitely the most well known iteration. There's been a huge rise in felt puppets recently, and there's also been pull-string ones around for quite a while (which are far less intricately built than other dummies, but pretty sweet for beginners. I only own string-pulls and i love them very much. ♡)
As for actually doing ventriloquism, there's a few tips I have that I tell anyone interested.
1. Ventriloquism is easy. It is so easy. It's learning how to make it convincing that's hard!
2. And in that same vein, it doesn't matter that much how convincing you are as long as you and the audience are having fun! I always get tired of people treating what's basically playing with dolls but ✨️fancy✨️ like an Olympic sport lol.
3. Letter substitutes are whatever you can get away with. Cut corners. Change your vocabulary. Whatever works to make yourself sound more natural is what you should be doing! Remember, it's not cheating if it works.
4. If you aren't a little weird about the puppets please consider getting weirder. It is a tradition we hold very dear to us.
Now, as far as the basics go-- like I said, it's not too terribly difficult.
First and foremost, there's a certain "standing position" your mouth should rest in, which sounds very silly but it's true. Your lips should be slightly parted, enough to let air out but not enough to be super noticeable. You can't actually talk with your mouth fully closed, but it should look closed from a distance. This is one of our tricks of illusion >:3
Your tongue should always be behind your teeth, usually resting against them a bit in my experience. Your teeth are going to be acting as your new lips. That sounds insane but it'll make sense the more you do it. When you'd usually use your lips to pronounce a word, you use your teeth. ALWAYS keep your teeth resting in a mostly closed position!! This is so people don't see your tongue moving!! Learned this the hard way lol.
There are a few letters you have to watch out for: B, F, M, P, V, and W. Some of these are easier for other people and some are harder, but these are the well known ones, plus ones I have trouble with (granted I do have speech issues as is, sooo... take with a grain of salt?)
These letters are evil and cursed and don't like to be pronounced without moving your lips, which is where we introduce letter substitutes. Generally,
B = D (or G)
F = more of an S sound, like a hiss
M = N
P = T
V = a sound closer to Z
W turns into the wretched "duddayoo." I do not like this one.
I'm not that great at explaining the basics to be honest, but there's lot of great tutorial videos out there, I'd recommending doing s little dive into those if you're genuinely interested. For now here's one from Darci Lynne because I love her.
youtube
The best thing to do though, if you dont want to do the actual acting thing? Get active in the community anyways. Get your friends into it. Talk about it! Post about it! Ventriloquism has been, famously, dying as far as most people are concerned for a long while now, and we really need younger people to step up and keep this art alive. Just appreciating it and supporting from the sidelines is a huge help. As much of a loser as this makes me sound, please for the love of God make ventriloquism look cool. It sounds goofy but we really do genuinely need it.
As a final note:
Ventriloquism at its core, I believe, at least, shouldn't be competitive. There are a lot of people in the community that just take it way too seriously and frankly, it is so lame. Ventriloquism should be fun. It's odd and it's kooky and it should be accessible to everyone no matter how good they are at keeping their lips still. A lot of the best ventriloquists famously could not keep their mouths shut. And I mean that as literally as possible. They were still beloved by many and are greatly cherished figures in our community.
If you ever doubt yourself, remember: Lambchop was only a sock before Shari Lewis made her come to life. You don't need the best materials, or the best technique; all you need is passion and a good routine.
#ventriloquism#puppetry#PLEAAASR LET PPL SEE THIS ITS MY AUTISTIC MAGNUM OPUS (this is my biggest special interest)
8 notes
·
View notes
Note
Hey! I'm planning a trip to Italy, and I'd love some recommendations from a local <3 I'm visiting Milan, Florence, Rome and Napoli, so if you have any suggestions, I'd appreciate them. Also any tips will be welcome 😄
A trip to Pasta Land! How amazing?!
So, since in my humble opinion Italy is a country of art, architecture, Jesus on the cross, and food… I feel like you should see some obvious places, such as:
Milan: Duomo (and the surroundings), Castello Sforzesco, Pinacoteca di Brera (which is one of my favourite art museums), Pinacoteca Ambrosiana, the Navigli. Also I would suggest browsing for events/gigs that might be happening while you’re there. Milan always offers a lot of activities, it depends what attracts you the most! For me personally it’s always been art and music and I would be looking for galleries, gigs at Alcatraz, Fabrique or even bars and other small locals that host local artists 💛
Florence: ALL OF IT. Literally. I fell in love with that city, expecially the old town which is easy walkable: Santa Maria del Fiore is a must (and the surroundings), Basilica of Santa Croce, Uffizi Gallery (my absolute beloved! You might stand in the queue for a while but it’s worth all the wait), Ponte Vecchio, Pitti Palace, The Boboli Gardens… Everything a typical turistic guide tells you to see, go for it!
Rome: oof, Rome is a lot. I don’t know how many days you have in your schedule dedicated to Rome but I can tell you what I saw in one day: Vatican, Colosseo, Foro Romano, Pantheon, Piazza Navona, Castel Sant’Angelo, Fontana di Trevi, Piazza di Spagna, Piazza Venezia. I walked pretty much from 6AM to 8PM with a couple of short breaks but it was worth it. Expecially strolling around the old town 💛
Naples: I’ve never been to Naples, so unfortunatelly I can’t suggest much but between Rome and Naples there is one of my favourite places I’ve studied in art school: Reggia di Caserta. It’s basically the italian Versailles.
Landmarks aside, here are some random tips and tricks:
- Ask locals for the best osteria/trattoria. TripAdvisor is kinda accurate but the locals know their shit and can spot a place that only pretends to serve great food. They will send you to a place that is actually good 😂
- Speaking of food… There’s a lot of different things you should try! Artisan gelato and granita (make sure it’s artisan and not just crushed ice with fake fruit syrup), fresh pasta al ragù/caccio e pepe/amatriciana/gricia, wine, spritz, the famous tagliere served mostly as an apetizer before the first course or to go along the aperitif, maritozzi and any kind of pastry, tortellini, pizza in Naples, etc, etc. I could go on for hours but what I’m saying here is to try as many things as you can. Also coffee. Cappuccino with cocoa or cinnamon is a must.
- If you’re gonna go to museums, gigs or any paid events, book your tickets in advance when available
- Use the subway or rent a bike instead of getting a taxi or buses if you don’t want to walk for miles
- People working in touristic places and hotels will speak english but keep in mind that a lot of locals don’t. But with a mix of simple english words, dialect, “come cazzo si dice” and plenty of gestures… you will understand them (hopefully) 😂
- Be patient with Trenitalia, if you will have to catch a train at some point. Bitches are always late and there is always a lovely stink of piss. Somewhere.
- Don’t pay attention to scammers that will most likely ask you for donations for a dying dog or a sick person that never existed. Just tell you don’t have cash on you and go away.
- Italians are loud. Brace yourself.
That’s all for now! I might edit this in the following days if anything else pops in my head 💛💫
Hope you’ll have an amazing time in Italy! Slide into my DMs or anon messages to tell me how did go 🥹
12 notes
·
View notes
Text

Basics With Babish. By Andrew Rea. Simon and Schuster, 2023.
Rating: 3.5/5 stars
Genre: cookbook
Series: N/A
Summary: In his widly popular Basics with Babish series, YouTube star Andrew Rea, who has amassed millions of subscribers, attempts, often fails, but always teaches cooking techniques for all levels of cooks. He’s explained everything from how to make challah bread and English muffins to Asian dumplings and homemade bacon. Now those classic, essential recipes (and many more) are compiled into an authoritative cookbook which contains hundreds of step-by-step photographs with tips and tricks to help you troubleshoot anything from broken butter to burnt bread to bony branzino. Basics with Babish isn’t just a kitchen Bible for a new generation of home chefs, it’s a proud reclamation of mistakes which encourages you to learn from your and Andrew’s missteps alike.
***Full review below.***
To be honest up front: I do follow Rea on his Binging With Babish YouTube channel. I'm generally a fan; I like the ease with which he presents his recipes and I like his sense of humor and the accessibility of his cooking. So my rating has nothing to do with being a fan or not.
First, let's start with the good. If you're a home cook and are looking to step up your game, this cookbook is a great way to learn how to elevate your recipes and make (as the title suggests) basics. Everything from pasta to bread to eggs to meat is covered so once you get a hang of the basics, you'll be in a good spot to expand and improve your skills.
I also think the directions are fairly clear and there are plenty of step-by-step photo guides to demonstrate trickier methods. I very much appreciated the introductions to each recipe, which not only include a blurb thay sounds very much like Rea's voice, but also offers some tips to rescue your dish if you've screwed it up. In that sense, this is a very forgiving book that openly encourages trying something new and being unafraid to make mistakes.
That being said, there are mistakes in this book, which is the main reason for my rating. I've made quite a few recipes out of here, and in more than one, I've found either a confusing typo or a step that seems to be missing. For example, in the recipe for donuts (under pastry cream), the ingredients call for 340 grams of whole milk while the instruction say to take 600 grams of the milk. I assumed this was meant to say 300 grams and it turned out fine, but still: something that could have been caught on review. Also, under the recipe for pappardelle bolognese, there is an instruction to remove the meat from the pot, but no me tion if or when it goes back in. Luckily, I was able to look up the recipe video on Rea's YouTube channel, but I still think these errors are the kind that could have been caught with more diligent editing and review.
TL;DR: Basics With Babish has some excellent introductory (basic) recipes and the encouraging tone it takes to try new things is admirable. However, multiple errors made for some confusing instructions.
0 notes
Text
Lights, Camera, YouTube! Your Guide to Starting a Thriving Channel with Fancall Magic!

You’ve got a great idea for a YouTube channel — maybe you’re great in the kitchen, a gaming genius, or skilled with crafts. But where do you start? Don’t worry, future YouTube star! This guide will help you create a YouTube channel that attracts a dedicated audience. Also find out how fancall links you to experienced YouTubers for priceless advice to take your journey to the next level.
Step 1: Find Your Niche and Rock It!
Think of your niche as the personality of your channel. What issues are you passionate about and where do your areas of expertise lie? Could it be makeup tutorials? Or board game breakdowns? Or maybe DIY home improvement tricks? You name it! Here’s the trick: Concentration. You can’t serve all masters. Identifying a niche will help you establish a loyal audience that is interested in the same things as you are. This highlights how passion can drive your creativity and content production.This could be anything — cars, fashion, politics, chemistry…”
Step 2: Craft a Killer Channel Name and Brand
Make sure to name your channel something very catchy, easy to remember and relevant to the kind of content that you will be posting on it. Think of words that people would type into search engines when looking for your stuff. Do some research to see if anyone else is using the same name on other sites. Moreover, it is important for users to ascertain whether the username is available on various online platforms for consistency in personal branding. Create an attractive channel art and profile picture. These items are like the front face of your channel; they should be both appealing and informative.
Step 3: Gear Up (But Don’t Break the Bank!)
Getting started doesn’t require Hollywood-style equipment. A good microphone can work wonders with an ordinary smartphone camera. High-quality sound can be obtained with a cheap mic as well. Lighting should not be overlooked as it is essential for good videos; while you may wish to use sunlight from outside the house, consider buying some reasonably priced softboxes to ensure consistent results.
Step 4: Embrace the Power of Planning!
Make sure you take a few moments to think about what you want to say before you start recording. You should come up with several different ideas for videos which fit well within the topics or themes that interest your viewers. To help you with this process, here are some tips on planning: Developing an editorial calendar is essential if you want to maintain regularity in posting new material. If you prefer, write down words which will guide through each sentence or scene so that nothing is missed out when filming.
Step 5: Film Like a Pro (Well, Almost!)
Some brief guidelines to give your footage a professional look are shared below: Obtain a tripod to steady the unsteady footage. In selecting places for recording your video, go for spots that are orderly without any form of distraction. When starting filming, check if your sound is okay. Remember, there should not be any noise in the background. For lots of enthusiasm, don’t be afraid to be yourself; it’s infectious.
Step 6: Editing Magic — Make it Shine!
There are a lot of free and user-friendly video editing programs you can use. You need to have a basic understanding of editing so as to be able to cut out unnecessary parts, add music, and use exciting transitions.
Step 7: Titles, Descriptions, and Tags — Oh My!
On YouTube, it is important to have these things in order to be found. Make sure your video content reflects reality by creating catchy, compelling titles that also contain keywords that people are likely to use when searching for them.
Step 8: Thumbnail Power!
A thumbnail is the ad for your video. Make it attractive, clear and motivating for any viewer to click on it. Have high quality images, relevant texts, and think about throwing in a pop of color!
Step 9: Welcome to the Wonderful World of Uploading!
When you have finished editing your masterpiece, it is time to release it to the world! Choose a time for uploading that is when your target audience is most active.
Step 10: Engage, Connect, and Grow!
Building a YouTube audience is a slow burn, not a quick fix. Here are some tips to keep the fire going
Respond to comments: Show your viewers you care and build a community.
Promote your channel across social media: Let the world know about your awesome content!
Collaborate with other YouTubers: Team up with creators in your niche to expand your audience reach The app named fancall can supercharge your journey by connecting you with an app that videocall youtubers and fans through which you can ask YouTubers that how to start an Youtube channel and what after channel created ? or whatever your doubts are.
Analyze your performance: Use YouTube analytics to see what’s working and what’s not — adapt and improve!
Article Source : https://medium.com/@fancall/lights-camera-youtube-your-guide-to-starting-a-thriving-channel-with-fancall-magic-5c9d7e321ba4
0 notes
Text
Title: SEO Superpowers Unveiled: A Kid's Guide to White-Label Magic for Local Businesses
Introduction:
Imagine a world where your favorite websites magically appear whenever you want to find something. This magic is called SEO, and it helps websites become popular. But what if we told you there's a special kind of magic called "White Label Local SEO"? In this article, we'll unlock the secrets of this magical world and explain it in a way even a fifth-grader can understand.

Understanding SEO for Kids
Let's start with the basics. SEO stands for Search Engine Optimization. It's like a big library where the librarians (search engines) help you find the coolest books (websites) based on what you're looking for. To do this, they use special words called keywords.
Imagine you're searching for information on your favorite superhero. If the website about your superhero uses the right keywords, it will magically appear at the top of the library list.
Why Local SEO Matters
Now, let's talk about local SEO. It's like finding the best pizza place or the coolest toy store in your neighborhood. Local businesses want to be the first choice when someone in the neighborhood is looking for something. Local SEO helps them be the superheroes of their town!
Think about your favorite ice cream shop. If they have good local SEO, people in your neighborhood will find them easily, making the ice cream shop even more popular.

Introduction to White Label Local SEO
Okay, now it's time to introduce the special magic called "White Label." Imagine you have a friend who's a fantastic chef. You ask your friend to make a delicious cake for you, and then you put your name on it. That's a bit like what white label does for SEO.
White Label Local SEO is when experts help businesses with their SEO, and the businesses can put their name on it. It's like a superhero sidekick – it helps businesses become even more popular without them having to do all the work.
How White Label Local SEO Works
So, how does this magical partnership work? Imagine you have a friend who's good at finding hidden treasures. You ask your friend to help you find treasures for other people too, and they agree. That's a bit like how agencies and businesses work together in white-label local SEO.
Agencies are the treasure hunters, and businesses are the explorers. The agencies use their special skills to make sure the businesses' websites show up when people are searching for things. It's teamwork at its best!

for Small Businesses
Now, let's talk about why this magic is so cool for small businesses. First, it's like having a superhero friend without spending too much money. Small businesses can get expert help without breaking the bank.
Second, it's like having a team of professionals working for you. They know all the tricks to make your website awesome. And third, it saves a lot of time. Small businesses can focus on making their products or services even better while the experts take care of the SEO stuff.
Choosing the Right White Label SEO Partner
Just like choosing the best ingredients for your favorite meal, it's important to pick the right white-label SEO partner. You want someone who is like a superhero chef – skilled, trustworthy, and ready to make your website amazing.
Ask potential partners questions like, "Can you show me websites you've helped before?" or "How will you make my business stand out?" Look for partners with a track record of success, just like your favorite superheroes!
Tips for Kids to Understand White Label Local SEO
Now, let's make this even more fun for kids. Imagine SEO as a superhero with a cool cape, flying around and helping websites. Or think of it as a treasure hunt – the better the SEO, the more treasures (customers) businesses find!
Local businesses are like friendly wizards in your neighborhood, and white-label SEO is their magic spellbook. It helps them do magic without having to learn all the spells themselves. Isn't that cool?

Conclusion
We've just uncovered the secrets of White Label Local SEO together. Remember, it's like having a superhero friend who helps businesses become even more awesome. SEO is not just for grown-ups; even kids can understand its magic.
So, whether you're dreaming of becoming a superhero or just love exploring the neighborhood, remember that White Label Local SEO is here to make the online world an exciting and magical place for everyone!
Keywords: SEO, guest post, linkbuilding, offpage seo, on page seo,
onpagedigitalfarooq,content writing, regalrank, businessgoals seo,
0 notes
Text
How to Create Stunning - User Friendly Websites is the Ultimate Guide to Web Design
Web design is an important part of being successful online. In this final guide, we’ll go over the tips and tricks that will help you make websites that look great and are easy to use. We’ll cover everything you need to know, whether you’re a new creator or a pro. Learn the basics of user interface design and how to make guidance systems that are easy to use. Find out why flexible design is important and how it improves the user experience on different devices. Learn more about design, color schemes, and images to make websites that look good. And finally, look into the best ways to speed up page loading and make it work better. With this complete guide, you’ll be ready to take your web design skills to the next level.
My Best Recommended & Proven Way to Make $100 Daily — Watch THIS FREE Training to START >>

1. Understanding the Importance of Web Design
The significance of site design in the modern digital world cannot be overstated. It has an effect on things like trustworthiness, user friendliness, and search engine rankings, among other things. Having a well-designed website that leaves a great image and encourages positive user interactions is crucial to your online success. A well-designed website can:
Build Credibility: A professional-looking site instills trust in your audience.
Enhance User Experience: A user-friendly interface keeps visitors engaged.
Boost SEO: Properly structured sites rank higher in search engines.
Increase Conversions: An optimized design can turn visitors into customers.
2. Setting Clear Goals and Objectives
Effective web design begins with a well-defined purpose and vision for the site. It makes sure that whatever design decisions are made serve some kind of goal, like making more sales, getting more leads, or informing people. A more focused and effective website is the result of working backwards from these objectives.
3. The Importance of Web Design
It’s impossible to exaggerate the significance of good site design. It has an effect on trust, engagement, and visibility in SERPs (search engine results pages). Professionalism is communicated, a pleasant user experience is created, and success in web design is achieved.
Establishing a Strong Online Presence
In today’s competitive landscape, your website is often the first point of contact between your business and potential customers. A well-designed website can make a powerful first impression, helping you stand out from the crowd.
Enhancing User Experience
User experience (UX) is paramount. Explore how intuitive navigation, responsive design, and engaging content contribute to a positive user experience, keeping visitors on your site longer.
My Best Recommended & Proven Way to Make $100 Daily — Watch THIS FREE Training to START >>
4. Core Elements of Web Design
The core elements of web design encompass layout, typography, color, imagery, and functionality. These elements work in harmony to create an aesthetically pleasing, user-friendly, and informative website that captivates visitors, communicates your brand’s identity, and facilitates seamless navigation.
Responsive Design
Discover why responsive design is no longer an option but a necessity in the mobile-first era. Learn how to create websites that adapt seamlessly to various screen sizes and devices.
Color Psychology in Web Design
Uncover the psychology behind colors and how they can influence user behavior. We’ll discuss how to choose the right color scheme to evoke specific emotions and convey your brand’s message effectively.
Typography Matters
Explore the significance of typography in web design. Learn about font selection, readability, and the impact of typography on user engagement.
Visual Elements and Imagery
Dive into the world of visuals. Discover how high-quality images, graphics, and videos can enhance the visual appeal of your website and tell your brand’s story effectively.
User-Friendly Navigation
Explore the art of creating intuitive navigation menus and user-friendly interfaces. Learn how a well-structured website can improve user satisfaction.
5. Building Trust and Credibility
Getting people to trust and believe in your website is key to its growth. Visitors are reassured by testimonials, reviews, and a safe atmosphere. When data treatment and privacy rules are clear, trust grows. Trust is the key to a good user experience and a long-term relationship with a customer.
Consistency in Design
Consistency is key in web design. Find out how maintaining a consistent design throughout your website can help build trust and credibility with your audience.
Testimonials and Social Proof
Learn how to leverage testimonials, reviews, and social proof to establish trust with your visitors. Discover the impact of showcasing your happy customers’ experiences.
6. SEO and Web Design Integration
Integrating SEO into web design is essential for online visibility. It involves optimizing content, meta tags, and site structure to enhance search engine rankings. A well-optimized website not only attracts more organic traffic but also ensures that your design aligns with search engine algorithms, improving overall user experience.
SEO-Friendly Web Design
Explore the intersection of web design and search engine optimization. We’ll discuss how a well-optimized website structure, metadata, and page speed can boost your search rankings.
Mobile SEO
With the rise of mobile search, mobile SEO is crucial. Understand how mobile-friendly design and SEO practices can ensure your website ranks well on search engine results pages (SERPs).
7. Staying Ahead of Web Design Trends
To keep your website new and interesting, you need to stay on top of web design trends. Adopting trends like dark mode and simplicity makes the user experience better, while adding micro interactions and motion adds complexity and interaction. By keeping up with changing design trends, your website will stay visually appealing and competitive in the online world.
Minimalist Design
Minimalism is on the rise. Learn how simplifying your website’s design can enhance user experience and keep your site modern and relevant.
Dark Mode Design
Discover the allure of dark mode design and how it’s gaining popularity. We’ll explore the benefits and considerations of implementing dark mode on your website.
My Best Recommended & Proven Way to Make $100 Daily — Watch THIS FREE Training to START >>
8. Call-to-Action (CTA): Guiding User Actions
One of the most important parts of any website is the call to action, or CTA, which is used to strategically direct the user’s behavior. Put simply, the more people you can persuade to take some kind of action on your website — whether it to buy something, sign up for a newsletter, or interact with your content — the more successful your website will be.
Mobile-First Approach
A mobile-first approach in web design prioritizes mobile devices when creating a website. It ensures that your site is responsive and user-friendly on smartphones, considering the increasing mobile traffic.
E-commerce Integration
In web design, e-commerce integration refers to the incorporation of online buying features without disrupting the user experience. It makes it easier for clients to browse products, make purchases, and complete their orders on your website.
9. Optimizing for Speed and Performance
A crucial component of web design is performance and speed optimization. The process encompasses many methodologies, including picture compression, code minification, and utilization of browser caching, with the aim of diminishing loading durations. The optimization of performance plays a crucial role in enhancing user experience and has a positive impact on search engine results.
Minimizing Loading Times
Web design is about minimizing loading times. It involves altering images, employing efficient code, and utilizing CDNs to speed up web pages and improve user experience.
Mobile Optimization
Optimizing your website for mobile usage and making it seem good on mobile devices is what mobile optimization is all about. It entails a quick loading speed, a mobile-friendly layout, and a responsive design.
10. Measuring Success with Analytics
Analytics are a crucial part of web development for measuring performance. Google Analytics and similar tools may monitor site traffic and reveal useful patterns. You can make sure your website is meeting your goals and providing the greatest possible user experience by keeping an eye on important metrics and making choices based on the data you find.
Setting up Google Analytics
Setting up Google Analytics is a very important part of designing websites. To gather and study useful user data, you need to make an account, add tracking code, and set up goals and filters.
Key Metrics to Monitor
Monitor page views, exit rate, conversion rate, and average session duration as essential web design metrics. These measures show how engaged users are, how well the site works, and how successful it is as a whole.
Conclusion
In the end, Web design is the key to having a great existence online. If you learn how to build websites well, you can make sites that are not only beautiful to look at but also work well. Remember that a well-designed website is about more than just how it looks. It should also engage people and get results. To stay ahead in the digital world, you need to know about the latest trends, put the user experience first, and keep improving your web design skills.
My Best Recommended & Proven Way to Make $100 Daily — Watch THIS FREE Training to START >>
Affiliate Disclaimer :
This article Contain may be affiliate links, which means I receive a small commission at NO ADDITIONAL cost to you if you decide to purchase something. While we receive affiliate compensation for reviews / promotions on this article, we always offer honest opinions, users experiences and real views related to the product or service itself. Our goal is to help readers make the best purchasing decisions, however, the testimonies and opinions expressed are ours only. As always you should do your own thoughts to verify any claims, results and stats before making any kind of purchase. Clicking links or purchasing products recommended in this article may generate income for this product from affiliate commissions and you should assume we are compensated for any purchases you make. We review products and services you might find interesting. If you purchase them, we might get a share of the commission from the sale from our partners. This does not drive our decision as to whether or not a product is featured or recommended.
Source : How to Create Stunning — User Friendly Websites is the Ultimate Guide to Web Design
Thanks for reading my article on “How to Create Stunning, User-Friendly Websites is the Ultimate Guide to Web Design“, hope it will help!
#howtomakemoneyonline#makemoneyonline#makemoneyonline2023#makemoneyonlinefromhome#makemoneyfast#affiliatemarketing#cpamarketing#blogging#dropshipping#ecommerce#passiveincome#makemoneytutorials#methodsandtutorials#internetmarketing#digitalmarketing#clickbankaffiliatemarketing#affiliatemarketingtraining#cpamarketingtraining#cpa#blog#makemoney#makemoneyonlineguide#freelancingtraining#emailmarketing#makemoneyonlinewithblogging#amazonaffiliatemarketing#marketingstrategies#onlineadvertising#socialmediamarketing#contentmarketing
0 notes
Note
hii I've been watching you post about guild wars 2 a bit and it's making me want to try it out! thanks for the introduction. :)
before this I've only heard that there were a lot of builds possible and it was free, but it's nice to see that it's (somewhat?) accessible too <- keeps playing MMOs and being bad at them for reaction skills reasons
!!!!!!! :D
A lot of the classes are not super difficult, because the classes are flexible in play style and pretty well rounded, meaning you can kind of just pick based on whatever you think sounds coolest. But depending on how much you're affected by reaction time, you may also like to look for LI (low intensity) builds, which are what I use. There are a lot that you can do pressing very minimal buttons. There's a site that collects LI builds here: https://accessibilitywars.com/tags/ but these are not the only ones that exist--if you search for LI builds you'll find a ton where they have a category for LI builds like here: https://mukluklabs.com/gw2-builds or discussions on the GW2 subreddit/Discord server about it. Oh and one big thing if you have slow reaction time: So when an enemy attacks there's a little red circle on the floor before it hits and you can either literally walk away from it or if you noticed it late you can dodge. But depending on how slow your reaction time is there is another trick, which is to stand basically right on top of a high levelled player or a group of players because they usually have a bunch of stuff that lowers the damage or heals you for the damage.
Also people are in general nicer and not as reactive as in other MMOs, like to the point that it's become somewhat of a joke between me and my friend who still plays other MMOs. So even if your reaction is slow and you miss stuff, other players will just help you. :3 In maps if you see someone with an apple above their head, they're a mentor and will guide new players through events for easier levelling and they expect you to mess up/need stuff explained. Players get exp for reviving you if you die too, so it's really no trouble--though if you're doing a big boss you may want to just teleport and come back to the boss since people are busy! It's very new player friendly, the official Discord has a channel for new player questions, there are new player tips on YouTube and so forth.
And yes, base game is free and you can get all the way to max level (80)! If you end up really liking it and want more of the story that happens after level 80, you can pay for the expansion packs but it's a one time cost instead of a subscription and comparable to buying a triple A game (esp during sales). The plot spans over 10 years and is a ton of hours of playtime, like even just the dungeons which are more of a side quest situation is still I think 2 hrs of just cutscenes. Everything is also fully voice acted, including random NPCs in the cities, and has subtitles!
I hope you have fun trying it out and if you end up liking it let's play together!
#hehehe recruiting more people into GW2.....#I love the story though and the NPCs I have issues about them 🫶#SORRY THIS GOT LONG WHDNDO#ask#anonymous#ps....my guild does a world boss event every day that is open to everyone regardless of guild and is aimed at people w no/low exp...👀#gw2 posting
0 notes
Text
Course Reflection
Throughout this course I followed along with the steps and guidance and guidance Toby provided to the class to learn and practice skills in Photoshop (PS) Adobe Illustrator (AI) and InDesign (ID). I would not only learn the basics of these programmes as well as key features, tools, shortcuts and workflow methods in the moment but would also document and annotate these learnings on my online Tumblr blog. This means that I can look back into my blog anytime in the future and will be able to remind my self of any skills/ minor details to preform skills that I may have forgotten. I see this blog coming in very handy as I already found myself using it throughout the course to look back on as well as for projects in other classes.
Before I came to Polytech and started the fundamentals class all I knew from school were some of the basic tools in Photoshop. So I came into the fundamentals course with very fresh eyes.
I found programmes like AI and ID very difficult because I naturally was use the the processes that take place in photoshop. Things such as holding shift when transforming items in AI was super difficult and frustrating for me to get use to. I also found it hard to understand how curves and handles work and every drawing would encounter a lot of COMMAND + Z's before I could get curves and shapes looking somewhat how I like them. Worse of all the pathfinder just made no sense and I would kind of just randomly click icons and hope they did what I wanted. I think Im also still having a little bit of trouble which frames and images in ID as well as how to use things like fill and stroke or the swatches tab in this programme.
I don't think my ID problems are fully resolved but Im on my way there. I think the way to fix these simple misunderstandings with the programme is to just go through the motions with them and practice. I find now that I naturally use the transform tools correct in AI and can draw shapes just how I want them nearly every time, I can break points, move them around and add new ones. I even find I now know what a couple of different icons on the pathfinder tool do and can confidently cut shapes out of one another with some sense of ease. I feel I achieved this by using AI as much as possible whether it was in fundamentals, DT1 or even on some personal projects. I also think if I do the same in ID and just keep practicing I will be able to fix the problems I have now is well.
During the course I learnt how to use programmes such as ID and AI and well as much better tips and tricks for my workflow and better ways to do things in PS. I learnt heaps of shortcuts and could confidently jump into any of these programmes when needed and could contribute to a body of work.
I was influenced during the course by Toby and Alexia especially if I had any questions to ask they were able to give me one on one support and guide me through anything I needed help with right when I needed it.
I hope to improve on my core skills in ID and would also love to explore more in depth about AI as from what i've learnt while being here, it's the core design programme in the Adobe Suite. I am interested in all the things the pathfinder tool can do as well as some stuff involving gradients which I saw a person using on a youtube video.
I Touched on this earlier but I feel I will definitely be looking back on this blog semi regularly 100 percent over the next few years and possibly even more so into the future. I found some techniques really stuck with me and I can do them very instinctively while others I may not have entirely understood at the time. Yet because everything in annotated in detail on my blog I think looking back and finding the 1 or 2 steps I may be missing to achieve a certain look or complete a particular task will be super helpful and make some of those little mental blocks easy to work through.
My favourite parts of the course would definitely have to be when we did the 'AI flex' as I got to put all the skills I had learnt into 1 quick project on something completely self directed. The result was a drawing I was really happy with and is something I think is quite cool. The other thing would have to be getting to print off the booklet at the end and be able to physically see the work I made and also use it as a little gift for some of my family members.
Throughout the project I used the Moodle, teams and my own blog to help me complete projects throughout the lesson. On top of the lecturing and sometimes personal help that Toby and Alexia provided.
I think I did well to document each thing we did in the course and have a really good beginner to somewhat intermediate form of user manual on how to use the 3 programmes we talked about over the course, (AI,PS,ID). Yet in doing this sometimes I didn't test my skills to the max as I was focusing a lot on workbook meaning throughout some of the projects my work may have came out less detailed or extravagant as my classmates.
I think using this process of documenting your learning somewhat in the moment as you do it is a super good way to learn as you may not directly soak up 100 percent of everything once you walk away and think about the next thing. Yet you will have the base and the key ideas as well as a few extras that stuck with you but because you documented it you also have everything else right at your finger tips and can look back on it when needed in the future.
My goal going into the course were to learn as much about the 3 programmes as possible. I think this goal stood true throughout the process. When creating something one of the most frustrating things is having a vision but your fundamental skills are holding you back and this is something I wanted to prevent from happing to me in the future. So really just soaking up all the little details was a big focus of mine throughout this course.
A challenging moment that stands out for me was learning how to draw with the pen tool in AI. Even when drawing the most simplest of shapes on the first few days I couldn't make them line up properly or just look right in general. Then moving on to drawing more complicated shapes and moving them round and I was completely lost. I think a turning point in the right direction when I finally started sorting out how to use this tool was when I asked the question of how to 'break a point' and once toby explained this to me properly and I learnt about tools like holding down OPTION or COMMAND the whole process changed and I was finally able to start making the tool do what I wanted it too. This would then flow into editing anchor points and handles once the shape was completed and well as actually trying to stick to the idea of holding down SHIFT and trying to as much as possible pull out handles on the vertical and or horizontal axis.
Personally I think the most important thing I learnt was the same as the most challenging thing that I learnt above. Learning how to draw with the pen tool and make it do whatever I see fit opens doors to so many opportunities and I find myself using it nearly everyday. weather it be in other classes for course, Fundamentals itself or even just on a personal project it's become a commonly used part of my tool kit and I really can't believe I designed stuff for quite sometime without navigating this tool.
The only thing I can really think that got in the way when learning my skills was past habits and muscle memories I had learnt in PS which I really had to unteach my brain when moving into programmes such as ID and AI
I think again that I helped myself greatly by keeping my Tumblr blog well detailed so I had everything just a couple of scrolls away whenever I needed it.
I felt other people in the course helped by asking questions and making mistakes as commonly I had done the same thing or was wondering about a similar question when asked. This meant when Toby and Alexia would resolve these problems, commonly for the whole class to listen to I was able to fix where I had gone wrong and not have the lesson start to get to far ahead of me while I was stuck a couple of steps back.
Overall I really enjoyed the course and felt like every lesson I was learning so much all at once. I think a course like this is something I would recommend to others and also 100 percent would do something similar again.
0 notes
Text
What are the best ways to drive traffic to your website for free?
Before I begin, let me warn you that this answer is not going to reveal any magical tricks that would get you to the first page of Google search results overnight. These kinds of things require effort, patience and persistence.
At the same time, this post is not about any very high-level stuff. Instead, everything I’m about to discuss is super tactical and actionable. Anyone who knows the basic of using Internet can apply these tricks. You don’t need to be a programmer or a hard-core coder to do the basic SEO. So keep reading.
Let’s face it, SEO can be hard, and it’s even harder when you read the same advice over and over again. You know the stuff I’m talking about. You must have heard of the common SEO tactics like optimizing your title tags, sharing your content on social media, publishing great content etc etc. These suggestions are not completely useless, but they do not really rocket your site to the top of Google. Why? Because everyone with a website is following the exact same advice. So to rank above them, you need to do something completely different, which is exactly what I’m going to walk you through right now.
Visit Seotoolskit for more exciting and free SEO Content.
1. Find an Opportunity Keyword
Starting with step number 1, find an opportunity keyword. An opportunity keyword is like a regular keyword but better. I’ll explain. You probably noticed that Google’s first page is packed with more stuff than ever before. You’ve usually got a bunch of ads above the fold, a featured snippet, a questions box, and news results, which is exactly why now I focus almost 100% on opportunity keywords.
So, what are opportunity keywords? Opportunity keywords are keywords with a high organic click-through-rate. In other words, they are terms that don’t have a bunch of stuff on the first page that distracts people from the organic results.
Bottom line — look at the search results before picking a keyword. If it’s packed with stuff, consider going for an opportunity keyword that’s going to get you more clicks. With that, let’s move on to step number two.
2. Check Out the Content Competition
Okay, so you’ve found an opportunity keyword. What’s next? Well, most people whip open WordPress and start writing. But that’s actually a huge mistake. In fact, that’s what I used to do back in the day. I’d write something that I think would rank in Google. Today, I know better. Today, I analyze the first page results to see what’s already working. In other words, I check out my content competition. And once I figure out the type of content that Google wants to see for that keyword, then I start creating content.
Here’s an example. As a digital marketing specialist, one of my most important keywords is actually ‘keyword research’. Back in the day, when I looked at the content that was ranking for that term, I noticed that they didn’t list out tips or strategies for finding keywords. Instead, they were all huge guides. So I decided to create a guide that covered pretty much everything there is to know about keyword research, which helped me crack the top three for this super competitive term. With that, it’s time for our third step.
3. Create Unique Content
Create content that’s different or better.
When it comes to creating content for SEO, you have two main options. Option number one: you can create something different. Option number two is to create something better. I’ll explain. Most of the time you want to publish something that’s just way better than what’s already out there. But sometimes it makes more sense to create something completely unique.
This is an advanced SEO strategy, so if you’re new to SEO, you might want to skip this step. With that out of the way, here’s how it works. You probably already know that in general, pages with the most backlinks rank highest in Google. But how do you get people to link to you? Here’s a simple two-step process. Step number one: figure out why people link to content in your industry, a.k.a. the hook. Step number two: include that hook in your content.
For example, last year I noticed that more and more marketing blogs were publishing content about voice search, and when I read that content I noticed something super interesting. When people wrote about voice search, they almost always cited stats and data, and when they mentioned a stat, they linked to the source. Bingo! So I created a post about voice search that was packed with bite sized steps. So, how did it go? According to Ahrefs, my post has been linked to thousands of times, and if you look at those individual links, most of them reference a specific step from my post.
Now data is one type of hook that you can use. Here are three others that are working really well right now. First up we have unique techniques. Think about it, what do blogs and news sites love to cover? New stuff. And when you create something new, you’ve got yourself a hook.
4. Optimize Your Site’s On-Page SEO
There’s a lot that goes into optimizing your content for SEO. So instead of covering every single SEO technique on the planet, I’m going to focus on two strategies that are working really well right now. The first strategy is to use short URLs. When my team and I analyzed a million Google results, we found a clear correlation between short URLs and higher Google rankings. So if you’re URLs tend to be super long, cut them down so they’re nice and short.
Now to be clear, I don’t recommend going back and changing your existing URLs because that can do more harm than good. Instead, just make your new URLs short and sweet. For example, my URLs are usually just my article title or my main keyword plus a word before or after it.
5. Create Internal Links
Next up we have internal linking. Yep, internal links still work, but you have to do it right. Specifically you want to link from high authority pages on your site to pages that you want to rank. Those internal links will send authority to the pages that you want to rank, which can give them a nice rankings boost.
For example, you must have noticed that I am linking few of my other posts into this article. Since this post is brand new, it currently has absolutely zero authority. So I am linking it to other posts from my site that lots of people have already linked to, and I’ll be doing vice versa as well. That will add internal links to my new post. That’s all there is to it.
6. Apply the Skyscraper Technique
Now you might’ve already heard of the skyscraper technique. It’s a content marketing and SEO approach that went viral a few years ago. The original skyscraper technique is pretty cool, but it doesn’t cover something that’s super important for ranking in Google today, and that is, search intent. Search intent is what a Google searcher is looking for when they perform a search. And the better your content matches their intent, the higher you’ll rank.
7. Work on Your Content’s Design
In my experience, your content’s design can make or break your SEO. Imagine that you just wrote the best post ever written, but it looks very dull and boring. No one in their right mind is going to link to that page, and Google searchers that see an ugly page like that are going to bounce back to the search results. That’s why I personally spend a lot of time, money and energy on content design.
If you don’t have thousands of dollars to spend on every single post that you publish, no worries. Here are three simple ways that you can make your content look awesome. First up, we have images, screenshots and pictures. I use a ton of screenshots and images in every post. Next, you can make your content look nicer with blog post banners or featured images. Post banners are those custom-made images that go at the top of your post. Now sometimes I use a 220 by 220 pixel image in my intro and sometimes I go with a giant banner. Finally, we have charts and visuals. Not only do charts and visuals look really cool, but also they help people understand complicated stuff from your post. And they don’t need to be super fancy or expensive to work.
8. Build Backlinks
So you just published an awesome piece of content on your site. A piece of content that has a hook and it’s also optimized for search intent. So what’s next? It’s time to build links to that page. Here’s how. First, use something called the content road show. This strategy is all about getting your content in front of the right people. Who are the right people? The people who run blogs in your industry! With that, here’s exactly how the content road show works.
When you write a precious piece of article, to get the word out, try to find people who recently shared content on that topic on Twitter. Send each of these people a personalized version of an outreach script. Note that you shouldn’t sound pushy; just offer to send them a link to your post. This simple technique can land you a ton of social shares from authority bloggers.
Next, you want to use broken link building. This strategy is pretty simple. First, find a broken link on someone’s website, then pitch your content as a replacement for the dead link. If you do this by helping out the person you approach, before even asking for anything, they will be more than happy to add your link.
9. Encourage Comments and Community
A few years ago, a Google employee made waves when he said that comments can help your Google ranking. Personally, I think he meant that comments and community can indirectly help your rankings. For example, people who feel like they’re part of your site’s community are going to be more likely to share and link to your stuff.
Visit Seotoolskit for more exciting and free SEO Content.
0 notes
Note
Hello! This is the person who wrote the one shots on Quotev — the one that anon went through so much trouble to get sent your way. If you’d be willing, I would appreciate genuine critique of my work — I’m genuinely looking for how I might improve my writing, and I haven’t been getting very much feedback. Apologies if you’re too busy or if this bothers you!
Hello there! I’m willing to give you my thoughts on your work, since you’ve asked so politely and gone to such effort, but before I do that, I’d like to preface everything by saying that I’m going to approach this answer more or less the same way I would give feedback to students in a class. I think that’s most helpful. I also hope none of this feedback comes off as harsh or hurtful, because that’s not at all my intention.
You clearly know how to write well: your work is well-edited, with only a few errors here and there (be careful using semicolons, they can be very tricky). It’s clear you know the rules of writing, so I don’t think you’ve got a lot of room for improvement there.
The stories themselves, though, didn’t click for me as a reader. I didn’t get pulled into the world you’ve created and I didn’t connect with your characters. That doesn’t mean that what you’ve done is bad, though! But I am going to suggest some ideas for restructuring your work that might help make your stories more dynamic and effective in capturing and retaining your reader, or showing off your skills and ideas to better effect.
Your first story begins with the description of the character in a lot of depth, but I cannot recommend this as an opening paragraph. If you’re ever writing a manuscript, you need to remember that your first page is your first–and often only–chance to hook your reader and convince them to keep going. (Especially true if you’re sending your work to a publisher!) Because of that, a lot of good stories begin with first page or two that does everything it can to tell you who, what, where, and the tone of the book.
Very few good stories start with the “I have black hair and blue eyes and today I am wearing a big hat” type character description, unless that is actually important–i.e., The Little White Horse begins with Maria detailing to herself what she’s wearing, because she’s vain and it brings her comfort to know she looks beautiful, which matters because… [and then the plot begins]; the first Harry Potter book describes the Dursleys in very Dahl-esque fashion, which matters because… [contrast them to the peculiar happenings of the plot emerging]. What your character does is almost always more interesting than what they look like, so it’s often a sensible idea to prioritise your narration accordingly. Both of the above examples tell you who, the tone of the story, and then what is happening, while filling in other details so you know where and when by the end of the first chapter.
Something else I noticed in your work is that you’re a keen world-builder with a lot of ideas, but I found your stories to be a little overwhelmed by that, rather than enriched by it. This is something I’ve seen a lot in young creative writers, so it’s definitely not you and it’s not actually a fault, exactly–but it can detract from your work and make your work actually less inviting to read, rather than more, and that’s something that’s important for speculative fiction writers to be aware of. I’m currently working on a series of tips and tricks requested by popular demand, so I’ll probably elaborate more on this later, but basically, your world-building should be an iceberg: you know how immense it is, but your reader will only see a small delicious fragment of it.
Oversupplying world-building details often makes works impenetrable or–most commonly–overshadows the characters and plot and sinks interest in the ship story. (For me, the most egregious example that jumps to mind is Foundling by D.M. Cornish but that’s a rant for another day). Your work isn’t too overcrowded, I feel, but for me, I got the sense that you used your stories as vessels for your world-building, instead of using your world-building to decorate and deepen your stories. The reason this causes problems is because people–myself included–are most often motivated to read because they relate, connect to, or are curious about characters, rather than a world. (Worlds are very fun, don’t get me wrong! It’s just that world-building tends to be most fun for the people doing it, not the people reading it).
Finally, something I wanted to bring to your attention is style, and particularly streamlining it and leaning into your own voice. At the moment, your work is a little heavy with what I think of as “fanfiction-itis” for lack of a better concept. It’s basically an overall tendency to 1. be uncertain about what person the story is told in, or jump between views. This can be a choice! But it’s one you should be making consciously. There’s first-, second-, and third-person, but in third-person, there’s also an omniscient narration and limited narration. Each can be used to huge effect–but you need to pick the right one for the story you’re telling and stick to it. 2. over-rely on epithets and character description. Often this is a result of the above when it’s third-person omniscient. As a rule of thumb, you don’t really need to use epithets much at all. “The taller boy,” “the blonde girl,” and so on doesn’t add anything, but it does often distract and make the writing look a bit… juvenile to experienced writers. Unless the description is saying something about the character that’s worth knowing, it’s usually best not to bother with it. “The black-furred warrior walked by” says a lot less than “Blackfur stalked past, scowling.”
3. use unnecessary or tautological dialogue tags. I’ve seen a lot of “said is dead” passed around on this site, and that’s great advice to follow if you want your work to be unenjoyable and annoying to read. Said is the most useful dialogue tag, because it is invisible to us, and many other “common” tags are likewise useful–things like asked, or replied. You only need to use a different and noticeable dialogue tag when it changes the dialogue in a meaningful way. For example: i. “what did you do?” he queried. ii. “what did you do?” he asked. iii. “what did you do? he asked cautiously. iv. “what did you do?” v. “what did you do?” he said, but he was looking away, distracted. The first one’s dialogue tag is useless and clunky: we know he asked a question, there’s a question mark there, but unlike “asked,” queried really stands out and can break the flow of reading. The second one is unobtrusive, but doesn’t tell us anything about the tone of his question: he could be angry, purely curious, scared, who knows! The third one tells us his tone, but be careful not to overuse adverbs–that’s J.K. Rowling’s curse. The fourth tells us that, whatever he’s asking about, he’s worked up about it and it’s probably not great! The fifth is an example of how you can actually turn dialogue tags into full sentences sometimes. By being precise with your dialogue tags, you can make your dialogue really pop, and also not distract your reader.
4. tell, rather than show. We’ve all heard “show, don’t tell” as writing advice, but there are actually a lot of times when “telling” is perfectly fine. However, broadly speaking, characters tend to feel more alive if you make them act out their personalities, rather than recount them to your reader. If someone has a big personality, you don’t need to say it: it’ll become abundantly clear from their actions soon enough!
By being aware of these things and making conscious choices–even if your conscious choices are to keep doing these things!–your strength and skill in storytelling will improve. It looks to me that you’ve gotten to the point where now you have to hone the talent you already have, which means that being precise and self-reflective about your writing style and choices is probably going to be the best course for you to improve going forward.
I hope this is helpful to you! I want to stress that all of this advice is offered in a “take what is useful to you, leave the rest” spirit. For every piece of writing advice, there’s excellent writing that contradicts it, so honestly a lot of good writing is just knowing when to follow advice and when not to, when to follow a rule and when to break it. Good luck with all your future work!
#reply#advice#this is basically the kind of thing that my tips and tricks guides will look like by the way. thank you everyone for the support!#it's very flattering and lovely to see so many people excited to hear me talk. always takes me a little by surprise but in a nice way.#also i hope this is mostly easy to read and coherent. today was not a good health day and i'm on some wild painkillers right now.#oh also fun fact: joke rowling's favourite book growing up was the little white horse. hence why i've linked them here.#it's such a shame that joke rowling is such a terf dingbat because she's regrettably such a helpful teaching touchstone.#the other month i was teaching high schoolers and it's so useful to be like 'okay so in harry potter--' and immediately they Get It.
9 notes
·
View notes
Text
Thigh job with Genshin Boys - Xiao

Genre: Smut
Pairing: Fem reader x Xiao
When you enter your flat, a handsome but grumpy Yaksha is sitting cross-legged on your bed resting his chin in the palm of his small hand. He grimaces and shoots something that can be referred to as a death stare in your direction.
Here we go again. You think to yourself as you close the door behind you.
„You are late.” He basically growls at you fixing you with another menacing glare.
„It’s nice to see you too, Baby.” You approach the sulking adeptus and lean in to kiss his forehead but, alas, he backs away and frowns in turn.
„Oh, no kisses then?” A smile on your face but a sneer in your voice makes his blood boil.
It is like a match in a powder barrel.
„Don’t play dumb with me, Y/N!” He warns. „I know all of your cheap tricks.”
You let out an annoyed huff. Arms crossed on your chest.
„Why would you even ask when I saw you following me all the damn time, hmm?” You accuse your boyfriend, gazing right into Xiao's averting eyes.
„I wasn’t follow-,” and then he goes silent knowing fully well that lying isn’t an option with you.
„So?” You nag, hoping for any kind of response. „No need to be this jealous, Xiao.”
„Don’t get weird ideas in your head.” The boy deadpans. „I’m not jealous!” He defends himself but it doesn’t sound convincing enough even for his own ears. He blushes and turns his head away.
You let out a sigh and smile warmly at your boyfriend’s pettiness.
Does he even realise how cute he is? You briefly wonder and then you reach for his silky hair and ruffle it affectionately.
It’s been a taxing, full of ups and downs journey since you met the haunted by karmic debt Yaksha. At first, he didn’t even acknowledge your presence. You were just another bothersome individual and he could not care less about your existence. It was unnerving. He was snarky, seething with rage for no reason, hiding his feelings for so long that it seemed to you that they were going to explode inside of him one day leading to his utter despair and demise. You got to know about his past and the weight of his karmic debt from Zhongli. You took pity. Somehow you felt compelled to help the boy, regardless of his repulsive demeanour. The golden-eyed Yaksha was of a different opinion, though.
Xiao didn’t want you to get close to him. He couldn’t make any sense of your stubbornness. Why would you even want to have anything to do with him? Him?
A barbaric monster, eaten up alive by remorse and regret.
A blood-thirsty fiend whose sole purpose of breathing is to slaughter and spread fear wherever he shows his face.
These were the thoughts so deeply engraved in his unfortunate soul that he couldn’t allow anyone to come near him.
He perceived himself as a hollow, barren of any human emotions vessel. The only feelings he was familiar with were pain and the burden of his legacy that he is forced to carry up to this day.
Bizarrely, as time had passed he was taken aback by some unfamiliar sensation of tightness in his chest. It wasn’t painful. Nothing that would come close to the distress caused by the divine will. It wasn’t permanent, either. It only happened in your presence, as Yaksha would hesitantly observe. Sometimes it got even worse. It would be accompanied by this fluttery feeling in the pit of his stomach.
„Why are you this close? Huh? Do you have a death wish?”
„Move, I don’t have time to sit around and be idle like you do.”
„You have no respect for the adepti. Stop fooling around.”
The more he pushed you away the more you were determined to lure him in. You couldn’t stop laughing when one day Zhongli informed you that the troubled Yaksha came to him to seek advice regarding this weird tightness in his chest and an upset stomach when you were around.
And so, you smile fondly at your boyfriend as he yanks your hand away not liking the way you tousle the emerald green strands.
„I’m sorry XIao. I didn’t mean to be late. Just wanted to buy some jewellery.” You point to your thigh to get the adeptus’ attention back where it should be, which is you, not the wall.
Xiao glances at your thigh doing his best to remain impassive and uninterested. Unfortunately, his eyes widen a little and his mouth is somehow stuck hanging open as if he were to say something but the words never come out.
„You saw me bargaining with the shopkeeper, nothing wrong about that, right?” You explain to the adeptus currently captivated by the glimmering golden chain adorning your thigh.
Xiao has a lot to learn when it comes to dealing with his own emotions. You are acutely aware of that. He doesn’t know how to react, how to show that he cares or process what he feels. He doesn’t also entirely understand the purpose of half of the things that you insist on doing to him. Playful bites, tickling, holding his hand in public. He doesn’t question these actions even though it’s all a novelty. He does know for sure that it makes him feel flustered and all hot inside.
Does he despise it? No.
Would he like for you to continue? The answer to that question is definitely affirmative but Xiao is not going to admit it out loud.
He also has no clue how to initiate all of these things. Is he supposed to bite you back as well? What if he hurts you? Everything is so overwhelming as he’s endured years of solitude and sadness. You have to patiently teach him everything from square one. Nevertheless, it’s incredibly rewarding and you find yourself falling for him a bit more with each clumsy kiss, a shy but warm hug and an awkward attempt at complimenting you.
However, despite being not well-versed in sexual encounters, Xiao does pleasantly surprise you by catching up with everything real quick.
So, as his eyes are fixated on the trinket, you once again run your hand through his lush and long hair.
„Why would you even buy it? Pointless.” The boy retorts grumpily this time showing no signs of objection to your tender gesture. He moves his head up a little, losing himself to the tingling sensation going down his scalp.
„So that you can stare at me like that with those needy eyes?” You answer truthfully, barring the real intent behind your actions.
He snorts and his face turns into that lovely shade of pink and then deep red within seconds.
He would absolutely turn his gaze away if not for the fact that you take his chin in your hand and thrust his face upwards forcing him to look you straight in the eyes.
„If you don’t like it you can take it off.”
„No need.”
You chuckle softly.
„Let me make amends for my delay.”
You take a step forward and place your knee on the verge of the bed. Xiao drinks in the view of your thigh-highs squeezing into the meat of your legs. The chain shimmering lightly right above the lacy material.
„You can touch it, Baby.” You encourage the nervous Yaksha.
Visibly tensed, he reaches for the exposed skin and lightly traces the chain with his unsure fingers. It almost tickles but you let him do as he pleases and soon Xiao attempts to fully envelop your thigh with his greedy hand. He does cover half of it at best, but he seems satisfied and proceeds to squeeze it. It feels soft to the touch and he shivers at how warm and inviting your legs are in contrast to his icy-cold and sweaty palms. Bewitched, Xiao aches for more and he selfishly pulls you in so that you are now kneeling in front of him on the bed.
He stops breathing when you swiftly unbutton your shorts and undress for him. You let his eyes roam over your half-naked body for some time enthralled by the way Xiao’s pupils dilate in awe.
You lean into him as Xiao pulls you towards him for a messy kiss. It isn’t gentle as usual but full of passion and urgency. He whines when you bite on his lower lip but then you gently stroke him with your tongue to ease the discomfort.
Slowly, very very slowly, your hands go down his torso only to finally stop at the bulge in Xiao’s loose pants. You tug at the waistband and Xiao lifts his ass a bit to help you strip him naked. His penis, hard and heavy, resting now on his lower belly. He hisses when you palm his hard erection and that simple touch sends jolts of electricity down his spine. It leaves him intoxicated once you start gliding with the heel of your palm up and down the underside of his member. You repeat the movement and Xiao’s body jerks in response.
„Don’t tease.” The adeptus pleads through gritted teeth.
„I’m so sorry, Baby. Gonna make you feel real good.”
Xiao can feel himself growing impossibly harder when you place your feet on either side of his hips. When he looks down he can see your wet folds and the pinkish colour of your tight hole. Lying on your back, you prop yourself on your elbows so that you can look at Xiao’s face in the process. You scoot a bit closer to the confused boy, your bum is right in front of his erected shaft. You take his cock in your hand and guide him in between your thighs. In the beginning, you try to be delicate. You gently rub the tip of his cock, circle his shaft with your fingers and with a fisted hand spread his pre-cum all the way down to his pubic hair so that he is thoroughly lubricated. You wouldn’t like to hurt the boy during the whole ordeal.
His breath is shallow. Excitedly, you clasp your thighs together and start playing with his dick. You rotate your hips and massage his cock. It slides in and out and Xiao growls feeling ecstatic. You exchange between rubbing him with your thighs or gliding your hand along his cock, starting at the very top and working your way down to the bottom until Xiao can’t stifle his cries anymore. A few more strokes and he is definitely going to beg.
Xiao is on fire. It feels too good to be true and he wants this moment to last forever. He licks his dry lips and moans wantonly thrusting his hips forward. He meets you mid-way and the friction it creates every time he pushes his dick in between your legs leaves him gasping.
„You’re making me cum, Y/N.” He cries out for the last time before it is too late to warn you.
„Then cum for me, Baby.”
Obediently, Xiao shoots his thick and heavy load all over your lower body. For a moment the world around him seems out of focus and it makes him dizzy. He pants heavily and can’t catch his breath. He feels as if he was drowning. But then, your loving arms envelop him and he is safe again. You gently stroke his chest hugging him from behind. He melts in your embrace letting his head rest on your shoulder. His erratic heartbeat slowly going back to its usual rhythm.
„I think it looks pretty on you.”
„Hmm?” You want the boy to clarify what he meant.
„The chain... Looks pretty.”
„Oh.”
Shakily, he reaches out to put your hand into his and he squeezes them together.
„I’ll never let you lose yourself again, XIao. I love you and I will protect you forever.”
Xiao recognizes the familiar feeling of tightness in his chest. A single tear rolls down his cheek but he hurriedly wipes it before you can notice.
„Shut up.” The boy responds angrily and kisses you breathless.
Other boys:
Albedo
Diluc
Kaeya
Childe
Zhongli
Kazuha
#xiao#xiao smut#xiao headcanons#xiao scenarios#xiao reader#xiao x reader#xiao you#xiao x you#xiao imagines#xiao drabbles#xiao genshin impact#genshin scenarios#genshin smut#genshin headcanons#genshin drabbles#genshin imagines
852 notes
·
View notes
Text
How to write essays fast
I've been writing a lot of papers, so that's what's on my mind.
So this mostly applies to your standard 5-paragraph paper, though it's fairly straightforward to adapt it to longer (or sometimes shorter) assignments.
One of the main things to note is that essays are VERY formulaic, so knowing the formula and being able to write down your ideas in a way that fit into the formula is probably the number one way to get stuff done fast. Because of that, most of what I’m covering is breaking down the formulas so they’re more accessable.
Also this got very long. If there’s anything you want me to expand on just let me know in the comments or send me an ask/DM and I’ll make another post that goes more in-depth about it.
Structure (I hate this step, so I’ve figured out how to do it very fast becuase it’s still important)
The first thing to consider is prewriting and structure. To start, there are two major paper structures I usually consider. The first goes
Introduction
Main point #1
Main point #2
Main point #3
Conclusion
This is good if you have a lot to say on the topic, or if it's something closer to a summary essay where there's not really an opposing side. In something where there are distinct sides, (or if you have less to say to support your own side), you may want something that looks like
Introduction
Main point #1
Main point #2
Why the other side is wrong
Conclusion
The "why the other side is wrong" side is involves thinking through the MOST credible arguments the other side might make, and methodically breaking them down to show how they don't work. The stronger the argument you choose, the more effective this is.
Since I personally hate prewriting with a passion, I usually do this step very fast and end up with an outline that looks like
Intro [insert thesis statement]
P1: [three word summary]
P2: [three word summary]
P3: [three word summary]
Conclusion
(thesis statement, introduction, body paragraphs, and conclusion tips are all below the cut)
Usually, this is enough so when I look at my outline, I can see what I'm trying to focus on for each paragraph - and do so without straying from my main point.
For the prewriting, the main things to do are identify with basic structure of the two will serve your purposes better, and write a thesis statement that solidly supports your argument.
Thesis Statement
There are so many guides about creating thesis statements that are powerful, but I'm just going to quickly go over how to be fast about it.
The first thing to know is that a thesis statement is usually a complex sentence: it's your entire essay distilled down to a single line. The general formula I follow goes something like this:
"In their [media type] [name of specific piece], [creator's full name] explored/demonstrated/other verb [theme you're going to be arguing about] demonstrated/using/as evidenced/as shown by [example 1], [example 2], and [optional example 3]."
For example, a thesis statement that follows this format might go
“In his short film Job at Place, David Davidson explored the manifestations of human stupidity through the absurdity of the main character’s home, school, and office.”
Or, if you're writing a historical piece, it might look something like this:
"In [place/time period], [thing you're arguing was happening]: they had to/the conditions were such that/other thing to set up a list [example 1], [example 2], and [example 3]."
For example, a thesis statement that follows this format might go
“During the Tusken Invasion of 32nd century Tatooine, it was the lives of the children that were most affected, from their social development and connections with others to more personal struggles they didn’t yet have the tools to overcome.”
The examples you give are going to correlate to your paragraphs - example 1 is for body paragraph 1, and so on.
Introduction
I like to think of the introduction as a funnel that gets more and more specific.
First, write a broad statement that touches on whatever theme you’re referencing.
Job at Place is about human stupidity, so something like “while great minds have flourished throughout the ages, so have the not-so-great.”
Tatooine is about war, and about child development, so something like “children’s development has always been impacted by the state of the world around them.” or “war has many effects, many of which impact those not directly involved with the conflict.”
The idea is that it’s a broad statement that can almost be looked at like a universal truth.
Next, you’re going to go deeper - two sentences that narrow down the time and place you’re talking about specifically, and how that time and place fit into your universal statement.
The fourth sentence gets even more specific - introducing how the thesis sentence fits into your first three sentences.
Then the last line is your thesis statements.
Body Paragraphs
Your three main body paragraphs all follow the same formula. (I’ll get to the “why the other side is wrong” paragraph in a minute)
The first sentence you’re going to want is a topic sentence. For this, you’re going to want to look at the example you gave in your thesis statement that corresponds to this paragraph, and see how it relates to your central claim.
If we’re going with the Job at Place example from above, for the second paragraph, you might open with a line like:
“A striking characteristic of Davidson’s short film was the abnormality of the main character’s school, used to showcase exactly what happens when poor decisions get taken too far.”
Everything within the paragraph will then back up the claim you’re making in the topic sentence (which in turn is backing up your thesis).
For each paragraph, you’re probably going to want about three pieces of evidence, either in the form of direct quotes (plucking words directly from the source) or paraphrased quotes (summarizing what happened in your own words). The quote should be used to directly support your argument.
After each piece of evidence, you’re going to want about... twoish lines of analysis (this number can change as you need it to, but two lines is something solid to fall back to).
While analysis can take all kinds of forms, one pattern you can use if you’re stuck is
evidence sentence
what it means
how that meaning ties back into your main point
Following this pattern, a piece of analysis of Job at Place might look like:
“One of the first images of the private school is that it’s a tall spire with creaking stairs and loose floorboards. Despite this, the principal has eight personal cars parked outside on full display. While the first glimpse of the school might indicate that there is little money to care for the structural integrity, the notion is directly negated by the principal’s actions. By using these two images, Davidson demonstrates what can happen to the youth when those in power let greed carry them away.”
After you write your analysis, include some kind of transition phrase, and go onto the next piece of evidence.
The last line of your paragraph is going to transition into the next paragraph while also summing up the main point of what you talked about in the current one. (This line can also get moved down and tacked onto the beginning of the next paragraph, before the topic sentence, but I have found it tends to look less cohesive that way).
You might choose something like:
“While the school was a disaster in its own right, it wasn’t the only example of human folly.”
If you’re writing a “this is why the other side is wrong” you’re going to want to think about the MOST compelling arguments the other side could make. Take the top one (or two), and figure out ways to crack them apart using evidence from your source material.
In this case, your topic sentence might start off with something like
“While opponents might say [insert compelling counterargument], their reasoning breaks down when one takes into account the evidence.”
At this point, you’re going to follow the same formula as above. The main thing to keep in mind is that for the duration of this paragraph, your point is that the other side’s claim of X is wrong.
Conclusion!
If you know what you’re doing, this is actually the easiest part.
(wait, what??????)
The thing is, you NEVER want to introduce new ideas into your conclusion. Instead, you’re summarizing your main points.
The formula I follow per sentence is:
Thesis statement but reworded (you can change the sentence structure too)
Topic sentence for paragraph 2 or 3, but reworded (I’ll explain why you shouldn’t do the sentence for P1 in just a sec)
Topic sentence for paragraph 1 or 3 but reworded
Topic sentence for paragraph 1 or 2 but reworded
Wow sentence or question (i’ll get to this too)
The idea for the middle three sentences is you don’t want them to read as repetitive, so you’re going to mix up the order so it doesn’t match the order of the rest of the essay. This will help to keep it fresh.
The wow sentence is basically the last impression you get to make. I find it’s usually a good idea to go just a tad dramatic (it sounds dumb, but it has never failed me). If I can’t think of anything, a declarative statement on whatever major theme was being discussed throughout the essay usually does the trick.
Examples:
All of this shows that in the absence of friendships and platonic love, humanity will falter.
Fiction may seem far fetched now, but if the world falls into those same mistakes, it’s only a matter of time until it becomes a reality.
Art has existed for as long as humans have populated the earth; it’s not going away any time soon.
A lesson everyone must understand is the most powerful weapon isn’t anything physical or tangeable: it’s the ideas that exist in the minds of those who care.
(I told you they were going to be dramatic) A way I look at it is if you can’t imagine dropping the mic on the last line, it needs to be stronger (yes I found that plagiarized with not even a whisper of credit on Pinterest, but it works).
If you wrote a SOLID essay, consider ending with a question aimed at the reader (this will push your essay in the direction of either the positive or negative extreme: a strong essay will become stronger, a weak essay will become weaker). Questions can be a call to action or rhetorical as a means to drive home your final point. Becuase they’re more nuanced to the content of the essay, I don’t really have great examples to give you though (sorry).
Hopefully this is useful to at least some of you - good luck!
++++
Tagging:@candlemouse
If you want to be added to or removed from any of my taglists (found pinned to the top of my blog) just let me know :)
#writing#writing advice#writeblr#studyblr#writers on tumblr#essays#how to write essays#school papers#english#history#social studies#theme statements#thesis statement#conclusion#introduction#body paragraphs#homework#school#essay tips#writing tips#olive's writing vibes#long post
3K notes
·
View notes
Text
A GUIDE TO BECOME BETTER AT PLOTTING & PLOTTING ETIQUETTE.
So, one thing I hear over and over again in my time in the RP community, is the sentence “I suck at plotting.” Understandably, plotting can be difficult. Maybe you don’t know much about the other person’s muse, that muse’s fandom or universe. Maybe you’ve already used all your ideas on other plots and can’t think of any new ones. Maybe you don’t have much practice with plotting or you just automatically default to winging things because it’s easier, so you’ve gotten a bit rusty. Regardless of the reason why you think you suck at plotting though, I definitely believe there are some tips and tricks to learn how to become a better plotter or refresh your plotting skills, and I want to share some of those tips and tricks in this post.
TIPS AND TRICKS.
1) ASK QUESTIONS. This is probably the most important part of plotting if you’re stuck and can’t think of any ideas. If you don’t have any ideas, ask questions. Some examples of questions you can ask:
“What kind of theme are you interested in writing? (angst, fluff, ships, etc.)” or “What kind of dynamics would you be interested in? (romantic, friendships, enemies, frenemies, family, etc.)” or “Should we do a first interaction or something pre-established?”
The above are some questions that can narrow down on the millions of opportunities for plots that is only limited by your imagination, and instead give you a set direction when you try to come up with ideas. Think of it like a painter looking at a blank canvas. Staring a painting is always the most difficult because you have to figure out what to draw, and there are endless opportunities, which can be intimidating. But once you’ve figured out what to draw (for example a flower) it becomes a lot easier to put that painting brush down on that canvas and start painting.
If you’re still stuck after asking these questions, you can also ask questions directly about the other mun’s muse. Some examples: “How would your muse react to x, y,z?” or “.”
Some other questions you can ask. “Would you be up for doing an AU? / Would you be up for making a crossover verse for x,y,z fandom?” (If asking for the other mun to make a crossover verse for their muse, you can also offer to give information about said universe in case the other mun isn’t familiar with it.)
2) DON’T BE AFRAID TO SHARE YOUR IDEAS. If you have an idea, or even a part of an idea, don’t be afraid to share it. Even if the other mun isn’t interested in that particular idea, maybe that idea can spark an idea for them and they’ll probably tell you something akin to “I’m not sure my muse would fit in that setting, but I could see them x, y, z.” Oftentimes, even ideas that don’t work or interest your RP partner can help spark new ideas, maybe in the same direction or maybe in an entirely different, but just as much fun direction. It also shows your RP partner that you’re at least willing to make some effort with coming up with ideas, which will in turn, make them more interested in coming up with ideas of their own.
3) SOMETIMES, LESS IS MORE. A part of why some people seem to fear plotting is because they think they have to come up with intricate plots with lots of details and planning. And while that can definitely be fun, a lot of the time, LESS IS MORE. And by that, I mean, if you can just come up with the most basic of settings, sometimes, that’s more than enough to go on. Maybe that setting is something as simple as figuring out how your muses should meet. After all, if you plot out everything from how they should meet, to how their relationship should form, all the way to the end, there isn’t really a lot left to explore when you are going to actually sit down and write threads together and that can take away from the fun. It can also be that you plot out all these things, and when you start writing, you feel forced to take it in that direction when it just doesn’t flow naturally. So yeah, sometimes less is, in fact, more, and you shouldn’t ever be worried that you have to come up with big, detailed plots.
4) BACK-AND-FORTH / EXCITEMENT. Also what I like to call “Yelling about our muses to each other.” This can be a great way to plot without even thinking about plotting. It usually requires some good chemistry with the other mun, but if you are both excited about your muses and the potential for them interacting together from the beginning and show that excitement in your ooc messages, sometimes, just yelling those excitements at each other can spark a lot of ideas. Just a simple “I can see our muses becoming really good friends!!” will set in motion that back-and-forth yelling about your muses type of conversation that leads to ideas just spilling out naturally. Just the excitement in the messages themselves makes the plotting more fun and makes it come more naturally.
ETIQUETTE / DON’TS.
1) IF YOU’RE THE ONE ASKING TO PLOT / INTERACT. If you’re the one who approaches the other mun about plotting and / or interacting, DON’T leave the job of coming up with ideas to the other mun. If you’ve approached someone for plotting, chances are their muse caught your interest for some reason, and you could see an interaction between that muse and yours. Instead of putting all the job on them, express from the beginning why you could see an interaction between their muse and yours. Trust me, it makes the plotting so much more easier, not just for you, but for the mother mun, too. I can’t tell you how frustrating it is to be asked to plot, and then the person asking never actually contributes to any ideas.
2) PLOTTING IS A GROUP-PROJECT. Kind of connected with the above, but if one mun alone ends up coming up with all the ideas, it can make that mun feel like you’re not really as excited or as willing to put in the work as they are. No one likes to feel like they’re the only one in a group project doing all the work.
3) IF PLOTTING WITH A MULTIMUSE BLOG... Help the mumu-mun out by telling them which of their muses you’re the most interested in interacting with from the get-go. Even if you are interested in all of their muses, it’s usually very helpful for a mumu-mun to have some options to choose between. Or at the very least, you can ask them which of their muses they are having the most inspiration for lately.
4) NON-CONTRIBUTING RESPONSES. If someone writes you multiple sentences with ideas when you’re plotting ooc, don’t just reply with one word sentences like “Yes!”, or non-contributing sentences like “Sounds good to me!” or “I’m fine with anything!” I’ll admit, this is something I’ve been guilty of, and I think pretty much all of us has at some point, and while I do think it’s something you can get away with if you only do it on occasion, if you give these types of responses multiple times to the same person throughout the same plotting session, it can get frustrating to the other mun after a while. It kind of ties in with #1 and #2, that you’re leaving the other mun to do all the work. At the very least, if you feel like you don’t have any IDEAS to contribute with, you can still show your excitement over the idea. For example “That sounds like so much fun! I can’t wait to write that out!” Maybe even ask something akin to “Is there anything else you think we should plot out, or do you want to start with what we’ve got so far?”
There are probably a lot more tips and tricks and do’s and don’ts that could be added to this list, but this is what I can think of at the top of my mind. Feel free to reblog if you feel like this was helpful and/or could be helpful to someone else!
2K notes
·
View notes
Text
Wench's Beginner CP77 Photomode + Posing Tutorial

As a relative newcomer to the fandom, I found it kind of difficult to track down precise information on how folks were creating really intricate and beautifully staged screenshots. I realized that my experience might be useful for anyone else just starting on this journey, so here's sort of a Cyberpunk 2077 Photomode + Mods 101 guide for anyone at an absolute loss as to where to start.
This is only going to focus on the basics of using in-game mods and tools for posing and staging, not editing/post-processing or how to get those really high fidelity screenshots. The section on AMM is also intended for those who are brand new to it, so I did omit a few things that I think would be better for a more advanced user.
(Also, since my personal focus tends to be on shippy pics, that's what I use for a lot of examples. Nothing is explicit, but they might be a tad bit spicy for some workplace settings.)
Reblogs have been disabled for this post as it is very out of date. Please refer to the version 2.0 links for the most recent info.
I. Where to Find Mods
II. Essentials & Recommendations
i. Essential Mods
ii. Recommended Mods
iii. Posing & Animation Mods
iv. Cosmetic Mods
v. Niche Mods (aka Goro Takemura Mods)
vi. Notable Extras
III. Using Appearance Mod Menu (AMM)
i. Recommended AMM Settings
ii. AMM Features Breakdown
IV. Beginner Tips & Tricks
>>>>>>> 4 March 2022 - Version 2.0 is live! <<<<<<<
Reblogs have been disabled for this post as it is very out of date. Please refer to the version 2.0 links for the most recent info.
4 March 2022 - Version 2.0 is live!
I. Where to Find Mods
Unfortunately, mods are kind of spread out all over the place. The Nexus and these two Discord servers are usually the first places I go when I'm looking for something specific, but a lot of modders also house their mods on personal Google Drive folders and MEGA.
• Cyberpunk 2077 Nexus
• Cyberpunk 2077 Modding Discord
• Cyberpunk 2077 Appearance Mod Menu Discord
• My CP77 Mod Tag
• The Great Big (Vaguely Overwhelming) Pose & Animation Spreadsheet ← This is the best resource to track down poses!
(If you're like me and find Discord chaotic and ill-suited for cataloging things, I highly recommend utilizing the search feature. You can use the in: preface to narrow down the channel you want to search; e.g. a search command in the CP77 Modding Discord could look like in: discord-exclusives hair and you'll get results for "hair" listed in the discord-exclusive channel.)
II. Essentials & Recommendations
i. Essential ModsThese are the bare minimum that you'll need to spawn or swap characters, add in items (like the phone in the header screenshot), and play with lighting tools. CET should be installed first, and then AMM. (If you keep your game updated, make sure you keep these updated, too!)
• Cyber Engine Tweaks (CET)
• Appearance Mod Menu (AMM)
ii. Recommended Mods
These are more of your quality-of-life type add-ons. They aren't needed for posing or spawning, but they're very useful:
• Cybercat Save Editor (you can do a lot with this tool, but I mainly use it when I want to change my V's hair or makeup)
• Wardrobe Outfit Manager (also useful for a lot of things, but my favorite feature is being able to change clothes while I'm in photomode)
iii. Posing & Animation Mods
As I mentioned above, the best, most comprehensive, all-in-one place to find all your posing mods will be the Google spreadsheet linked above. But if that's too much (and it is a lot), these are the two posing mods I cut my teeth on:
• If It Fits - V Sits (photomode poses for V)
• (POSES) Male NPC - Average Civilian (spawnable poses for male NPCs with the generic locomotion; see note on locomotions under v. Niche Mods below)
iv. Cosmetic Mods
This is not a comprehensive list of all the mods I use, but just a handful of my favorites to get you started. (Since I play as a female V, these are femV-centric.)
→ Hair
• Hairstyle Collection• Custom Hairstyle - Femme Fatale• Hairstyle Imports
→ Makeup
• Koralina's New Eye Makeup• Eyeshadow Overhaul
→ Clothing
• Clothing Set and Recolor Catalogue• Wingdeer's Clothing
v. Niche Mods (aka Goro Takemura Mods)
Since I primarily take screenshots of V and Goro, here are a few Goro-centric mods and places to find them. 😘
• Wingdeer's Clothes for Goro
• Wingdeer's Locomotion Mods
[Note: because most NPC poses are for the "male average" NPC, locomotion mods are needed for characters with their own movement, like Goro. If you don't have the Goro_GenericLocomotion.archive file in your mod folder, he won't spawn with the intended pose.]
• Goro's Brown Eyes
• Goro Takemura New Clothes
• Takemura Simps & Friends Discord
vi. Notable Extras
Otis_Inf Injectable Camera is a paid (via Patreon) tool that is especially useful in capturing hi-resolution screenshots and unlocking cutscenes. At one point, it was also the only way to add ambient lights into the game, but AMM now offers that feature. I wouldn't recommend it to beginners, but I feel like I'd be remiss if I didn't mention it, as it is a powerful tool and pretty popular.
There is also Photo Mode Unlocker, which adds more features and functionality to the in-game photomode. I haven't used it so I can't offer much insight here, but like the Injectable Camera, I felt it was worth mentioning.
III. Using Appearance Menu Mod (AMM)
i. Recommended AMM Settings
AMM is pretty much plug-and-play, but there are two settings I recommend confirming after you install it.
Click on the Settings tab and then uncheck Spawn as Companion and check Experimental/Fun Stuff. After you check Experimental/Fun Stuff, Enable Freeze Target in Photo Mode will appear. Check that, too.

[Note: Spawn as Companion is actually a really awesome and underrated feature of AMM that lets you have followers in Night City! If you're looking to have some company while you explore and do gigs, check this option. It can be a little glitchy, especially if you fast travel, but it's fun! It really only needs to be turned off if you're working with spawnable NPC poses for photoshoots so your NPCs don't move around everywhere.]
ii. AMM Features Breakdown
Scan
This brings up a scanning reticle and will show you the various options available to you for whatever NPC or object your reticle is on. In this case, I'm scanning Goro, so I can do things like add or remove him from my favorites, despawn him, and cycle through his appearances.
Spawn
The Spawn tab is where you can find the huge list of characters you can spawn. It also lists the active spawns you have and gives you a few actions, like favoriting/unfavoriting, respawning, despawning, targeting, and changing their equipment/weapons.
The Target feature here is the most useful when you're trying to maneuver a character around on screen. Clicking this will automatically lock on that character or object so you don't have to manually target them with the reticle.
Spawning NPCs is how most people create their screenshots.
Without any posing mods installed, most NPCs have a few poses you can generate using AMM alone:
1. Their default standing position
2. A crouch position
3. Positions with various weapons
4. If you spawn them as companions, you can freeze them mid-animation cycle as they follow V or engage in combat
5. You can also "kill" them and they'll end up on the ground
However, this is pretty limited, which is why NPC spawnable poses and animation mods have become so popular.
Spawnable poses are named such because when you spawn an NPC, they will spawn with that pose or animation rather than the default standing position. (Some are also made to be toggled with the crouch position, but they're less common.)
Currently, you can only have one NPC spawnable pose/animation per locomotion type, so you'll have to choose one to work with before you launch the game. (If you have more than one in your mod folder, typically nothing severe breaks, you might get a T-pose, but usually whatever pose .archive file is listed first will just be the one that's active.)
Swap
The Swap tab will let you scan any NPC and then give you the option to swap them out with another NPC.
Two things to note with this feature:
1. In order for a swap to spawn or despawn, you will have to reload your save. I recommend saving before you swap so you won't have to track your swap down.
2. It can be a little finicky: sometimes poses will break, sometimes NPCs who aren't locked into a location will move, and you can end up with a lot of duplicates in one area.

Decor
The Decor tab is very similar to the Spawn tab, but the focus is on objects instead of NPCs.
This is also where you can find the customizable lights, which are one of my favorite tools to use in AMM. It's an easy way to really enhance the look and feel of your screenshots. Here's an example with the Ambient Light:

Tools
The Tools tab will vary a bit depending on what object you're locked on and whether or not you're in photomode.
For a beginner, I would say the key features here are:
1. The movement/position information: this is how you can move characters and objects around (you can treat the bars as sliders in which you click and drag, or you can manually enter in coordinates)
2. If you're locked on to an NPC, you can change their facial expression, where they look, and toggle weapons
3. If you're locked on to an NPC, or in some cases, on V, you can also freeze/unfreeze them to hold them in place once they have the best position/facial expression
3. If you're locked on to a customizable light, you can change the positions, intensity, and color of the light
4. You can use the teleport action to jump to different locations in the game (including a fancy mansion for V)
5. You can toggle the time of day (note: this can trigger Relic malfunctions)
Director
Unfortunately, I haven't used this feature at all, so I can't really give any insight here. I know it can be used to create live scenes with characters, but since I focus on still screenshots, I haven't really had an incentive to look deeper into it. If I find good documentation for it, I'll add links. 😘
IV. Beginner Tips & Tricks
These aren't intended to be hard-and-fast guidelines for everyone to follow, but just some general suggestions that I think make the modded photomode experience a lot more fun and less overwhelming for anyone just starting.
1. Get comfortable with AMM before adding spawnable poses
Spawn your favorite character as-is and get a feel for what they do without any additional mods. Play with the facial expressions in AMM, try freezing and unfreezing them in real-time and photomode, cycle through their appearances, get a feel for how the positioning tools work, toggle the spawn as a companion option, etc.
2. Try swapping NPCs before messing around with spawnable poses
Some of my favorite ship screenshots came from swapping Goro with existing NPCs, using the default photo mode poses, and using the AMM positioning tools to smoosh and freeze them together just right. It is a little more restrictive than having specific poses right at your disposal, but I think it's also a lot less overwhelming.
I used this technique with a guy sitting on the couch at the entrance of Lizzies to get this one:

If your goal is shippy poses, you can also find a few couple sets around town that you can swap with both your NPC of choice and V. Facial animations will work on both, so you can even change the mood of some presets. This one, for instance, is the "guy helping the drunk chick" swap, but with angry facial expressions and frozen at just the right spot in the animation loop, you can get a whole new vibe:

3. Use effective crops and angles to hide awkward clipping
Want a character to kneel in front of another character, but don't want to look for a pose or have easily swappable NPC around? Use the AMM positioning tools to clip them through the ground and capture the screenshot from a higher angle. (Goro was basically chopped in half here, but you can't tell!)
(More dramatic example here.)

4. Lighting is one of your greatest assets
Just like with real-world photography, lighting can make or break a shot. The AMM customizable lights and changing the time of day for outside shoots can really take a screenshot to the next level. The top screenshot was done in the Konpeki hotel room with some golden hour sunlight and the bottom was done with a little ambient light to make Goro visible against the dark street (neither have been edited--these are straight from photomode):

5. Take a ton of shots with just slight variations
This is also a tip I'm yoinking from real-world photography: take a ton of shots, but just switch something up slightly each time. Nudge a character in a different direction, switch your field of view, add a tilt, etc. At a certain point, it becomes a numbers game: the more shots you have, the more likely you'll end up with something you really like.
And it's corny as hell, but yes: have fun with it! Taking good screenshots is a creative skill just like photography or drawing or writing--It'll take some time to develop your skillset and style, but as long as you're enjoying the process, it's worth it. 😘
285 notes
·
View notes
Last Seen Blogs

wrinkledblackfabric
hear the snuffling?

yah999
Untitled

onionfarm4
Без названия

frostbiteuae
frostbite™

promotoyotajabodetabek
ASTRIDO TOYOTA PONDOK CABE,TANGERANG.