#tutorial nails
Text
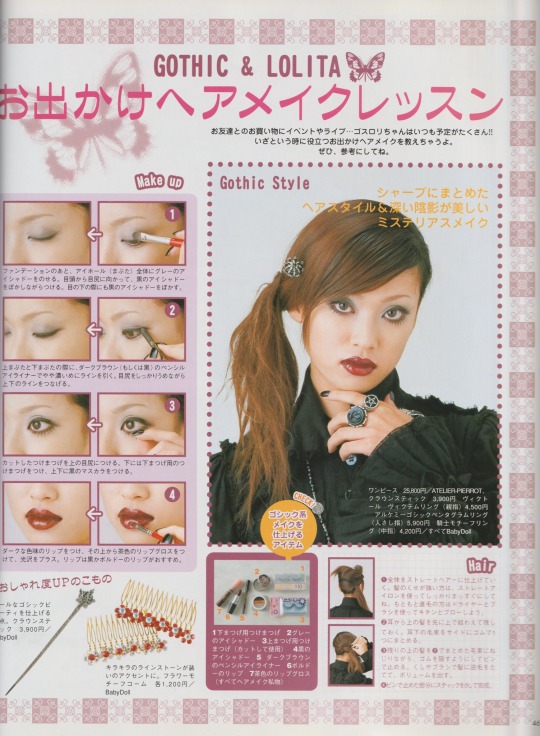
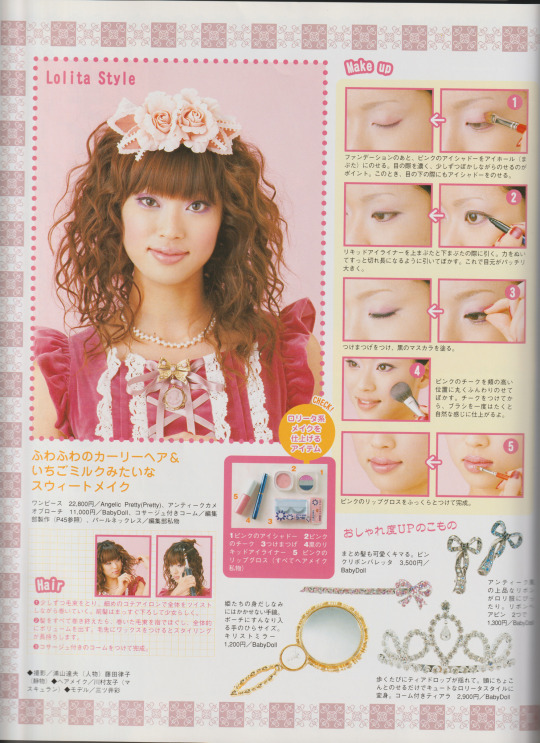
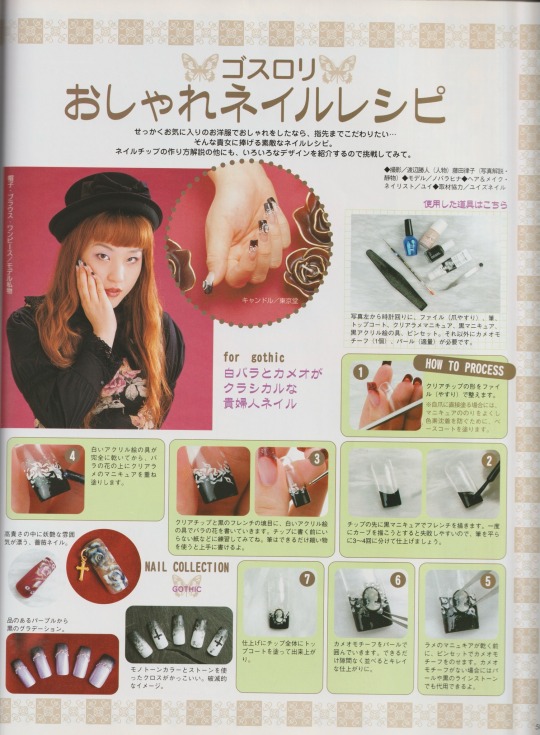
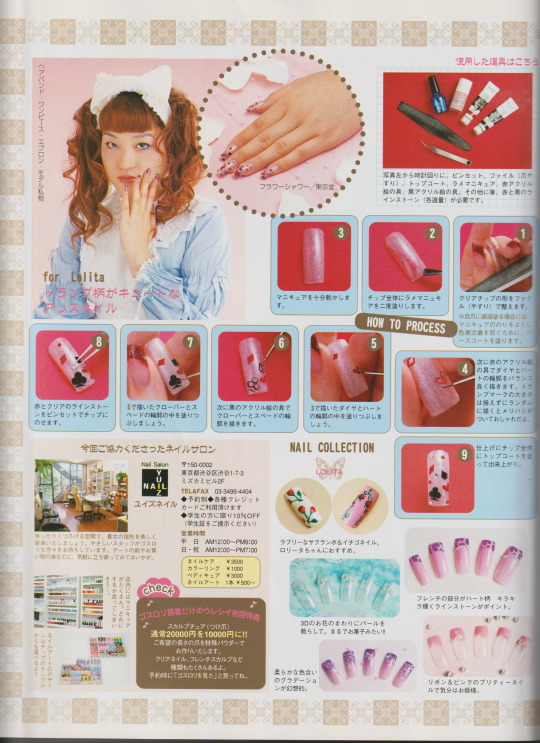
Hair, makeup, & nail tutorials from Japanese mook “Gothic Lolita Patterns Vol.1”, 2004
I wanted to do one of the makeup looks for reference, but I am neither pretty nor good at makeup, sorry T-T
#gothic lolita#j fashion#lolita fashion#egl#old school lolita#egl fashion#nail art#cute nails#makeup#hairstyle#tutorial#my scans#archive#i should up my makeup game
249 notes
·
View notes
Text
weird bad quality unhinged techno screenshots


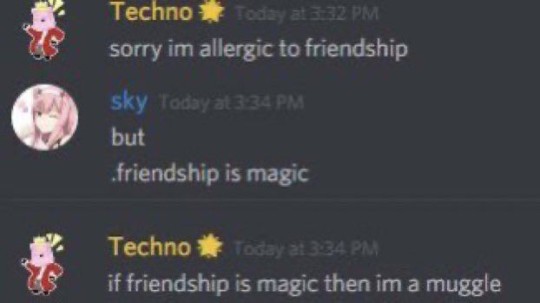


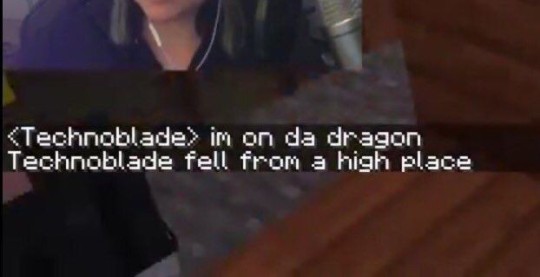

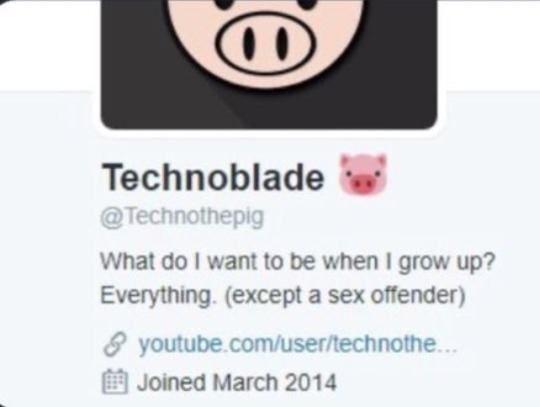
#technoblade#technoblade my beloved#wish he did do makeup tutorials#he wouldve nailed it#“drag them yaaaaas”
1K notes
·
View notes
Text

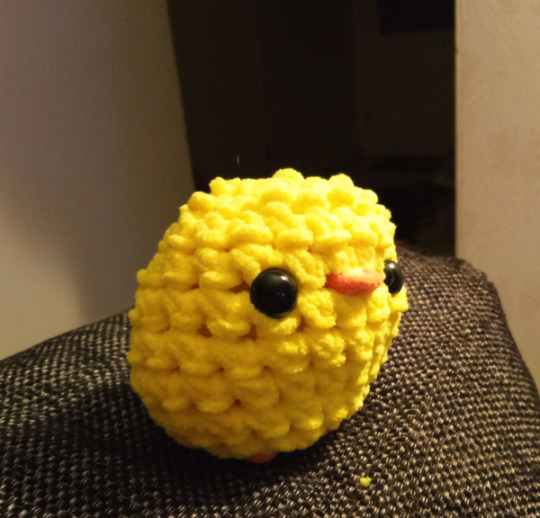

Behold! My very first crochet chic! Thank God for tutorial video! :D
But even with the video (which said this can be done in 15min), I struggled an hour or so. First 15 minutes ALONE went on me trying to get that "magic loop" right and the first and second round since there ALWAYS were too many big holes etc. issues.
Another issue is that my hook was too big. Should had been 5mm but I bought 8mm... :'D So my chick has more holes and is bigger in size than the original in tutorial video.
youtube
#Crochet#craft#chick#youtube#tutorial video#neis photo#photo#Nei crochets#My chick could take part in NAILED IT! show :'D#It's not worst tho! I really like it!#but it could had been better with right sized hook#virkkaus#Youtube
112 notes
·
View notes
Text
Process
91 notes
·
View notes
Text

me about to cast my evil little spells on u
#Decided to do a rendering exercise with that one tutorial I reblogged#This was meant to be a simple test but I felt like turning it into a full piece#Still trying to find my footing in rendering but I actually really like how this turned out#Anywho look at my evil handsome magician#Rayman#Ales mansay#rayman magician#Dreaming doodles#Artists on tumblr#Rayman origins#Rayman legends#Fanart#I gave him black nails to fuel my mental illness /joke
61 notes
·
View notes
Text

@theeditorialnail
585 notes
·
View notes
Text
Made a tutorial for my daily go-to gyaru makeup 💖
Insta: @/sei.bby
#gyaru#makeup#me#ギャル#selfie#selca#lashes#gaijin gyaru#gyaru tutorial#gyaru makeup#gyaru makeup tutorial#nails#tutorial#makeup tutorial#gyaru girl#gyaru gal#gyaru aesthetic#my face#contact lenses#eyelashes
33 notes
·
View notes
Text
#digital artist#artists on tumblr#digital drawing#digital art work#digital art tutorial#digital art on tumblr#digital art practice#digital art commissions#sketch#procreate#art#art tag#artwork#old art#drawings#digital art#artificial intelligence#nail art#my art#illustration#my poerty#beautiful photos#my photos#photoshoot#photoshop#life lessons#life quotes#life series#life update#existence
31 notes
·
View notes
Text
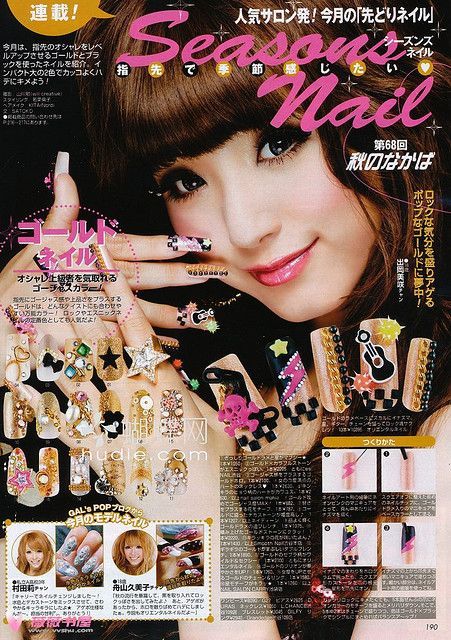
#gyaru#gyaru magazine#gyaru fashion#gyaru makeup#gyarustyle#fashion#harajuko fashion#japanese fashion#makeup#makeup tutorial#fruits magazine#makeup looks#cute nails#nails#gyaru nails#outfits#gyaru outfit#gal style#gal
251 notes
·
View notes
Text
I am still working on how to get consistent results for my zippered dice bags using fabric and batting but if you have a scrap of leather and 50cm of zipper laying about this is probably my actual favourite so far.

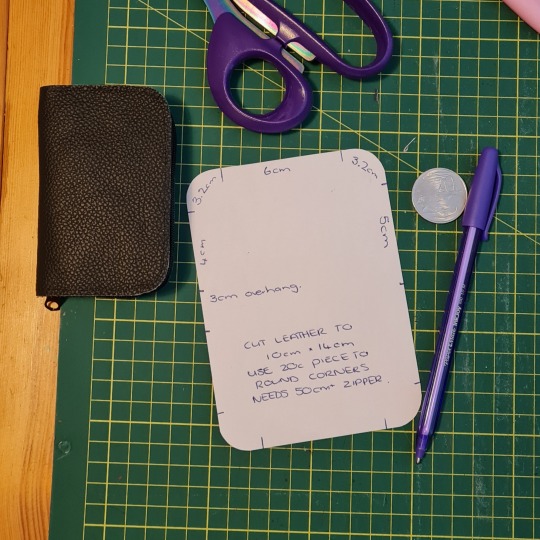
It's pocket sized but it can hold 2 sets and it opens into a little rolling tray.

Split the zip in half, double up one half, thread the zipper pull, mark the lengths along the zip from the centre side starting at the point when it is fully closed, match the marks and use those little clip things to hold the zip in place, sew about 2mm from the edge leaving a 2cm gap where the ends meet. Zip it closed to make sure it aligns right. Trim the excess zipper and use something to seal the end of it (I use LED resin).
The basic theory is the same no matter the size, so you can also use this technique to make bigger rolling bags too.
#Once I finally nail down the fabric ones I am going to do a proper write up tutorial of them#I have made like 20 already and have a half dozen good ones#but I am going to try using regular interfacing and just a boring old glue stick#just as soon as I can get some regular old interfacing#I just had to take a photo of this one anyway for when I inevitably lose that one scrap of paper#that is literally the whole pattern#this doesn't count as a sewing pattern but I need the words here to search for it later
63 notes
·
View notes
Text
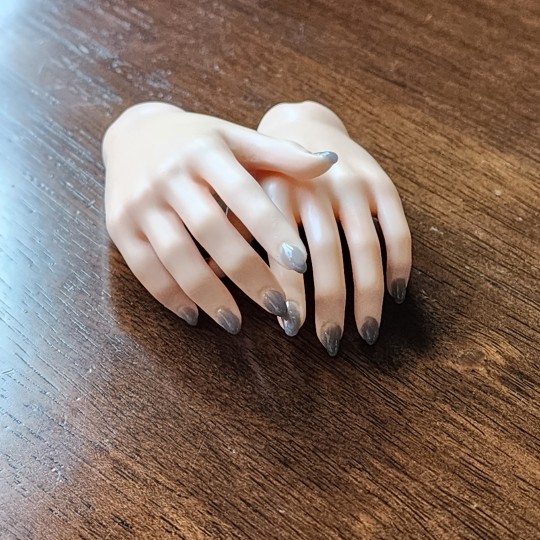
I gave Hawthorne fake nails today. With no tutorial to help me, I expected to crash and burn.
I did not. They are lovely.
Here are some notes on what I did, in case you want to attempt this yourself:
Before attempting this, I highly reccommend watching a few youtube tutorials on how to sculpt polygel over a nail form. It helps if you have knowledge of how to form gel nails.
I purchased a polygel nail kit for $20 off Amazon. It came with a curing light, a nail file, a brush, a spatula, slip solution, and tubes of polygel. I highly recommend this. I used everything in the kit, and it is much more expensive to buy everything separately. The only complaints in the reviews were that you get too small of an amount of polygel and slip solution, but if you are using this for dolls, this shouldn't be a problem.
You may want to replace the slip solution with 72% alcohol. It works the same way, is probably better for your doll than slip solution that is made for humans, but I did use the slip solution in the kit.
The first thing I tried was making nail forms out of Scotch tape, but instead of cutting a hole for the nail like a traditional nail form (the hole would be too small) I chose to cover the nail and sculpt with the polygel on top of them, then try glueing them onto the nail afterward. This would probably work with more practice, but it was much more effective just to sculpt right on top of the nail without a form. With this method, you will not be able to make them very long, but they will be sturdy, stick well, and look pretty clean and smooth.
The only issue one might have is the way it looks from some angles, but I personally don't mind. I'll try and explain what I'm saying:
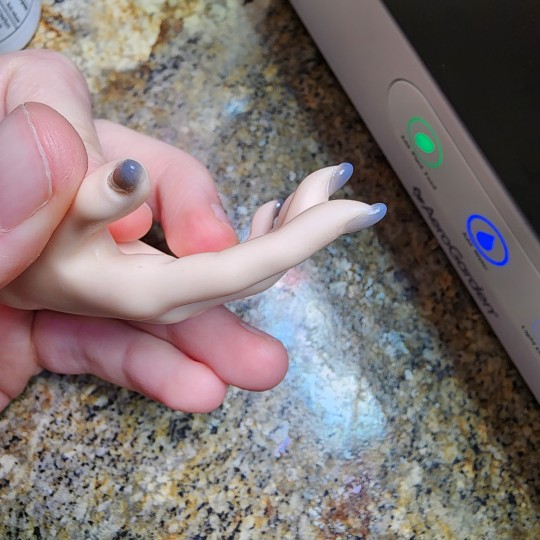
I sculpted these without a form, and as a result, from some angles, the nails can look heavy and round. I chalk this up to it being simply unrealistic to expect paper-thin sculpting on a pair of tiny hands.
Personally, I don't think this shape is a downside at all. I've seen a lot of long-nailed BJD hands that have the nails sort of... "molded" into the finger, probably for ease of casting?? But probably also because they won't snag on clothes and break. If I hadn't made the nails this shape, it'd be a lot easier to break them.
However, the reason I am embarking on this journey of doll manicuring is because I have a gyaru boy on the way, who I want to give long, ridiculous, sparkly pink nails, covered in gems. This formless method will not work for him. For this, I am going to make long tips out of plastic from straws, glue them on, and build the polygel on top. In order to reinforce it, however, I will be adding more polygel underneath, because I do *not* want these to break. This is definitely going to be "hands-off when taking off his shirt" situation.
Polygel... is sticky. I had to cure these nails multiple times. It's hard to get a small enough bead on the tip of the nail because polygel is meant to be applied in one large bead on a human nail. It takes a lot of slip solution to sculpt it, and using too much slip solution can make the curing go too sticky. It takes a little practice, but the nails look great regardless. Didn't even have to redo any.
My work process was as follows:
1. Sculpt the nails
2. Cure 30 seconds
3. Add another layer of gel to get them a bit longer and stronger
4. Cure 1 minute
5. Clean off the stickiness on top of the nails with alcohol or acetone
6. File the tops of the nails AND the bottoms (with respiratory protection PLEASE) and shape them how you like
7. Gel topcoat. Very important.
8. Cure 30 seconds.
After that, I just cleaned off whatever stickiness the polygel left behind with acetone.
This was my first attempt at this, but I always have trouble finding tutorials about this that I understand. I don't think I can fully be an authority on how to make these after one set, but I hope these notes help anyone looking to attempt this! All it took was a kit and about an hour, not even.
23 notes
·
View notes
Text
Art Tip: Common Mistake in Drawing the Hand

Credit: Miyuli
#random tip#random tips#tip#hand#hands#finger#nail#nails#fingers#palm#mass#wrist#knuckles#knuckle#human#anatomy#art tutorial#drawing tip#art tip#art tips#art tutorials#drawing#drawing tips#drawing tutorial#drawing tutorials#human anatomy#art#proportion#proportions
37 notes
·
View notes
Text
youtube
Watch the 2024 American Climate Leadership Awards for High School Students now: https://youtu.be/5C-bb9PoRLc
The recording is now available on ecoAmerica's YouTube channel for viewers to be inspired by student climate leaders! Join Aishah-Nyeta Brown & Jerome Foster II and be inspired by student climate leaders as we recognize the High School Student finalists. Watch now to find out which student received the $25,000 grand prize and top recognition!
#ACLA24#ACLA24HighSchoolStudents#youtube#youtube video#climate leaders#climate solutions#climate action#climate and environment#climate#climate change#climate and health#climate blog#climate justice#climate news#weather and climate#environmental news#environment#environmental awareness#environment and health#environmental#environmental issues#environmental education#environmental justice#environmental protection#environmental health#high school students#high school#youth#youth of america#school
16K notes
·
View notes
Text

How to get The PERFECT matte black nail🖤
~ YouTube: Nails By Danesha
56 notes
·
View notes
Text
i have not a scrap of shame left in me i’m gonna make nny’s boots
#this is gonna be a progress thread!#and i’ll make a nice tutorial once i nail everything down#but i’m not gonna gatekeep we’ve collectively wanted these boots forever#the real question is am i gonna be brave enough to wear these in public
11 notes
·
View notes
Text
You wouldn’t last an hour in the asylum where they raised me (the sims 1&2. And I’m talking to people who have only played ts4)
#sims 3 enjoyers you can perhaps also relate to this. i really genuinely don’t know#i didn’t like the look of ts3 so i never really played it#my quarrel with ts4 players is when they whinge about not being able to do some esoteric building thing#and i’m like girl. i can’t even set different heights on different parts of my roof#(they did change that in mansions and gardens but i don’t have m&g because i have a mac 🫠)#or when they’re casually building basements and i’m like you need to use an extremely specific cheat to do basements in ts2#and if you don’t absolutely nail it; your basement will be full of water. there are tutorials on this#the one that really gets me though is the pathing#i know sims can still experience pathing errors and inaccessible shit in ts4 but it’s SO much worse in ts2#i don’t even try building a kitchen without at least 2 empty counters because the motherfuckers will leave plates on there and decide it#means that they can’t cook#also gets me when i see people ✨building a tiny house in the sims 4✨ and i’m like that wouldn’t even be CLOSE to functional in ts2#i had to download a mod just to be able to use bunk beds#cluttering surfaces? forget it. you need to use a system of invisible shelves#earlier my sim couldn’t get in her shower because there was a counter next to it. NEXT TO it. not in front of it#they have zero ability to step over plates; baby bottles; teddy bears or any other inconsequential item#they have dance parties in the bathroom#genuinely the game of all time. wouldn’t play any other simulation#personal
3 notes
·
View notes
Text

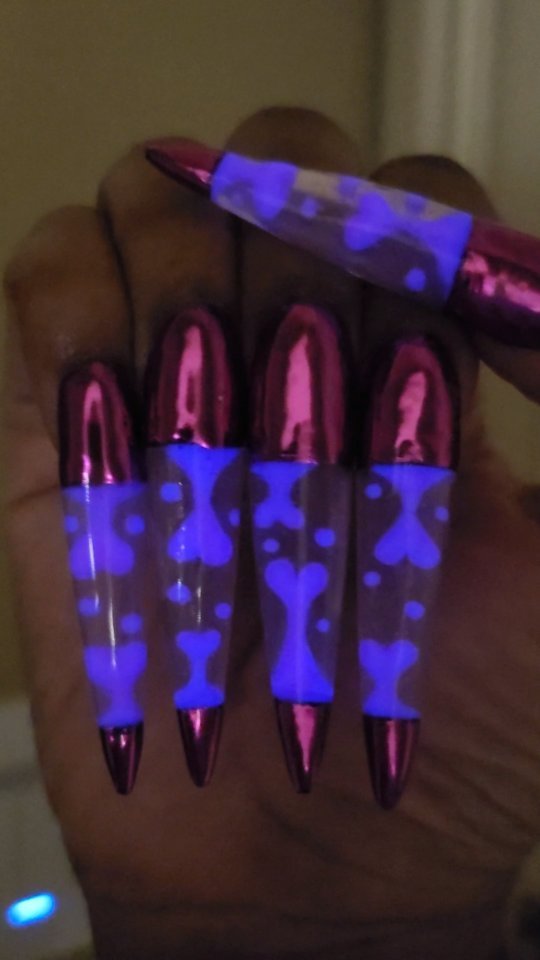
@longhairprettynails
#@longhairprettynails#uploads#lava lamp nails#glow in the dark nails#purple#chrome#glass nails#clear#hearts#pink#nail tutorials#process#nails#black#nail art
205 notes
·
View notes
Text
youtube
Watch the American Climate Leadership Awards 2024 now: https://youtu.be/bWiW4Rp8vF0?feature=shared
The American Climate Leadership Awards 2024 broadcast recording is now available on ecoAmerica's YouTube channel for viewers to be inspired by active climate leaders. Watch to find out which finalist received the $50,000 grand prize! Hosted by Vanessa Hauc and featuring Bill McKibben and Katharine Hayhoe!
#ACLA24#ACLA24Leaders#youtube#youtube video#climate leaders#climate solutions#climate action#climate and environment#climate#climate change#climate and health#climate blog#climate justice#climate news#weather and climate#environmental news#environment#environmental awareness#environment and health#environmental#environmental issues#environmental justice#environment protection#environmental health#Youtube
16K notes
·
View notes
Last Seen Blogs

thedinozone
TheDinoZone

spongebobsecretstealerpants
Abstract Condition
thedinozone
TheDinoZone

chososdoll
PIERCING BLOOD
utangachayalci
Utangaçhayalci