#tutorial post
Explore tagged Tumblr posts
Visit Tumblr Blog
Explore Tumblr blogs with no restrictions, modern design and the best experience.
Last Seen Tumblr Blogs


Fun Fact
The Tumblr office adopted Tommy, an 11-year-old Pomeranian.
Text
i’m bored so how to find then clean and whiten bones, beginner friendly:)
the best places to look for bones are where animals are/die, so this can be woods or forests, farm land, near lakes or rivers, roads and train tracks, this is just naming some places i could think of. you are probably going to have the best of luck near roads and on train tracks thanks to roadkill, but remember always be careful keep your eyes and ears open.
so you have found some bones, now how do you clean them?
well it really depends on the state of the bones, some bones if their old enough and have spent enough time in the sun don’t really need to be cleaned at all since all the fur and flesh will be rotten off and the sun whitens bones over time, you might just have to clean some dirt off.
but for bones where that is not the case, they will need to be cleaned, degreased, and whitened.
so now how to do that. before you do anything i recommend scraping/cutting off any fur/flesh that you can it will make the process easier and faster.
scrub the bones with warm water and dish soap i recommend dawn dish soap but any that says it will get rid of grease will work. once you’ve gotten any remaining dirt off soak the bones in boiling water and dish soap for at least 30 minutes then scrub the bones again and soak them in boiling water again. it’s okay if fur/flesh is still on the bones the cleaning process will take care of that.
now rinse and repeat that process. when scrubbing the bones you can use scissors and or tweezers to help pick of any remaining fur/flesh if needed, soaking them will make this easier.
now once they are clean and no longer have any fur/flesh on them they need to be degreased if the cleaning process didn’t already degrease them, it’s the same as the cleaning process make sure to use dish soap that says it gets rid of grease, except now you can also use some hydrogen peroxide, this will also help start the whitening process.
so now they are degreased and ready to be whitened this technically isn’t necessary but it makes bones look nicer, you don’t have to do this if you don’t like the look of it.
if you do want to whiten your bones, use hydrogen peroxide this is the main whitening method i know of, soak them till they have the the level of whiteness you want them to have. you may have to change out the hydrogen peroxide a couple times, you can also leave them in the sun to whiten but that will take longer.
so now you have clean bones:) you will probably have to use superglue or hot glue to glue in teeth and glue jaws together if you have skulls. super glue can also be useful to use on cracks in bones.
but if you want to avoid having to do all this you can always just buy bones. there's no shame in it and anybody who says that there is is not a real bone collector.
one more thing NEVER use bleach on your bones. NEVER. you can use other cleaning products than the ones i said but never use anything with bleach in it. it will turn your bones yellow and make them more brittle and fragile then normal bones. pictures below of some of my skulls, i used bleach on the opossum skull before i knew better.


#professional yapper#certified yapper#yapping account#yapping#bone collecting#tw bones#animal bones#vulture culture#vulture core#bones are cool#long post#tutorial#tutorial post#how to post#never use bleach on your bones#i swear to god#i WILL get you if you do#fox boy#fox core#beginner friendly#beginner bone collector
43 notes
·
View notes
Text
Hello, hello! Here, I will share some questions I ask myself when making image descriptions. Make sure to remember that these are personal questions, and that they may not work for everyone — remember to find your own way to work with image descriptions, as to be accessible for yourself too.
⠀
What is this? — A divider, banner or icon? Maybe a replycon? A flag? A drawing, an animation? A graphic element? Is it commonly referred by with a specific name/term? Is it decorative or informative?
How is this? — Is it round? Is it square? Does it have a specific geometrical feel to it? Is it sharp? Is it soft? Is it a multitude of shapes? What vibe do these shapes give me? Is it classy? Is it cyberpop? Is it minimalistic?
What colours are here? — Multiple shades of pink and yellow? Which && what names? Vanilla cream? Burnt yellow? Hot magenta-ish pink? Is it light(est/er/ish) or dark(est/er/ish)? Is it vibrant, neon or bright? Is it pastel, or a baby tone? What objects reminds me of this colour? Is it a gradient from (COLOR A) to (COLOUR B)?
How many details? — Is there additional images? Is there a symbol for the flag? Are there other shapes in the image? Does it have any outlines or stripes? Is thetr a gradient? Is there anything overlayed on it?
Who's this? — What character is this, from what series/media? What is their expression, and what may the expression possibly mean? What are they wearing? What is their stance? What are they doing?
Where's this? — Is it daytime or nighttime (if you can tell)? Is there a specific natural landscape? What does the landscape have, trees and flowers and some birds? How does the mountain in the distance look? Is it indoors? How does the room feel, scary or welcoming or home-like or official/stablishment-like? Does the room have any furniture? Which, and how do they look like? Is there any animal or critter in the image? What critter is it, and what does it look like?
⠀
Now, obviously, the amount of these questions being answer varies depending on how complex a image is — please remember to keep in mind that plain text must also be accessible to people who are reading it — a lengthy, continuous huge wall of text may give headaches and confuse people. This is also not a extensive list, and additions in the notes are more than welcome. Make sure to only answer anything that gives key information, if you'd prefer to keep it short and sweet... Toodle-o!
#image description#image descriptions#tutorial#tutorial post#accessibility#image described#image describing#image desc#blind people#screen readers#screen reader#visual aid#accessible posts#accessible post#accessibility information#buhgposting#buhggytalk#𓏵⠀unsorted trinkets⠀♡#𓏵⠀utmost importance⠀♡#tutorial tag
8 notes
·
View notes
Text
A general cane guide for writers and artists (from a cane user, writer, and artist!)
Disclaimer: Though I have been using a cane for 6 years, I am not a doctor, nor am I by any means an expert. This guide is true to my experience, but there are as many ways to use a cane as there are cane users!
This guide will not include: White canes for blindness, crutches, walkers, or wheelchairs as I have no personal experience with these.
This is meant to be a general guide to get you started and avoid some common mishaps/misconceptions in your writing, but you absolutely should continue to do your own research outside of this guide!
This is NOT a medical resource!!! And never tell a real person you think they're using a cane wrong!
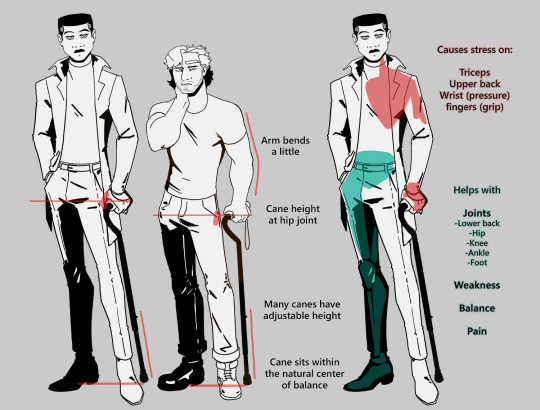
The biggest recurring problem I've seen is using the cane on the wrong side. The cane goes on the opposite side of the pain! If your character has even-sided pain or needs it for balance/weakness, then use the cane in the non-dominant hand to keep the dominant hand free. Some cane users also switch sides to give their arm a rest!
A cane takes about 20% of your weight off the opposite leg. It should fit within your natural gait and become something of an extension of your body. If you need more weight off than 20%, then crutches, a walker, or a wheelchair is needed.
Putting more pressure on the cane, using it on the wrong side, or having it at the wrong height can make it less effective, and can cause long term damage to your body from improper pressure and posture. (Hugh Laurie genuinely hurt his body from years of using a cane wrong on House!)
(some people elect to use a cane wrong for their personal situation despite this, everyone is different!)
(an animated GIF of a cane matching the natural walking gait. It turns red when pressure is placed on it.)
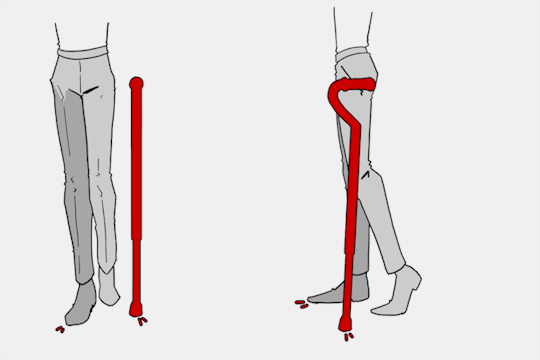
When going up and down stairs, there is an ideal standard: You want to use the handrail and the cane at the same time, or prioritize the handrail if it's only on one side. When going up stairs you lead with your good leg and follow with the cane and hurt leg together. When going down stairs you lead with the cane and the bad leg and follow with the good leg!
Realistically though, many people don't move out of the way for cane users to access the railing, many stairs don't have railings, and many are wet, rusty, or generally not ideal to grip.
In these cases, if you have a friend nearby, holding on to them is a good idea. Or, take it one step at a time carefully if you're alone.
Now we come to a very common mistake I see... Using fashion canes for medical use!
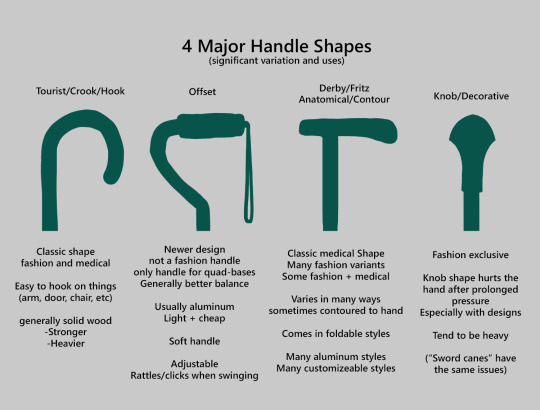
(These are 4 broad shapes, but there is INCREDIBLE variation in cane handles. Research heavily what will be best for your character's specific needs!)
The handle is the contact point for all the weight you're putting on your cane, and that pressure is being put onto your hand, wrist, and shoulder. So the shape is very important for long term use!
Knob handles (and very decorative handles) are not used for medical use for this reason. It adds extra stress to the body and can damage your hand to put constant pressure onto these painful shapes.
The weight of a cane is also incredibly important, as a heavier cane will cause wear on your body much faster. When you're using it all day, it gets heavy fast! If your character struggles with weakness, then they won't want a heavy cane if they can help it!
This is also part of why sword canes aren't usually very viable for medical use (along with them usually being knob handles) is that swords are extra weight!
However, a small knife or perhaps a retractable blade hidden within the base might be viable even for weak characters.
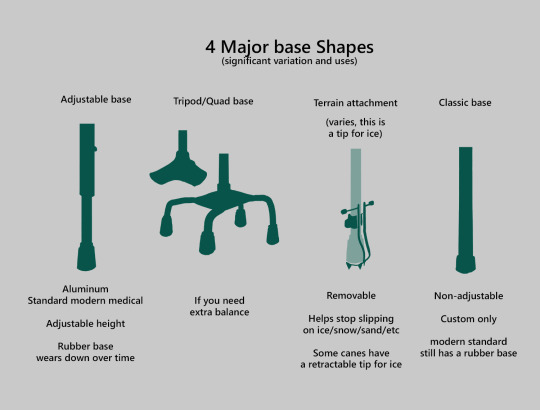
Bases have a lot of variability as well, and the modern standard is generally adjustable bases. Adjustable canes are very handy if your character regularly changes shoe height, for instance (gotta keep the height at your hip!)
Canes help on most terrain with their standard base and structure. But for some terrain, you might want a different base, or to forego the cane entirely! This article covers it pretty well.
Many cane users decorate their canes! Stickers are incredibly common, and painting canes is relatively common as well! You'll also see people replacing the standard wrist strap with a personalized one, or even adding a small charm to the ring the strap connects to. (nothing too large, or it gets annoying as the cane is swinging around everywhere)
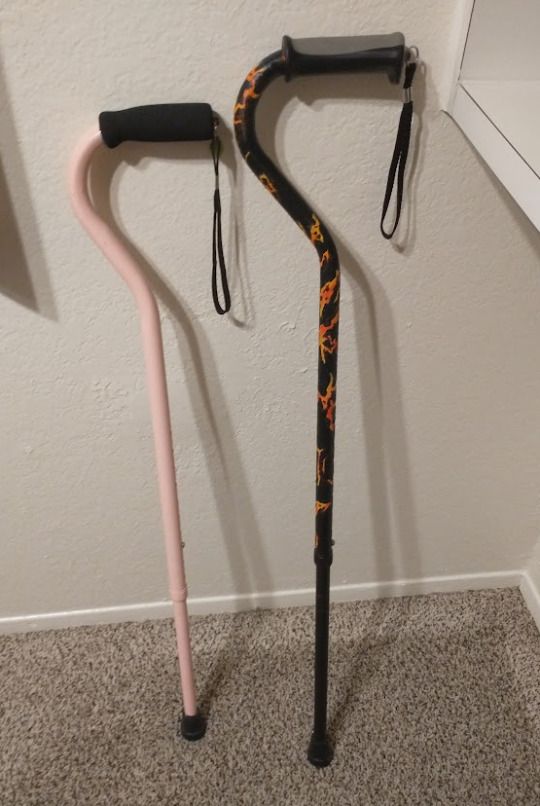
(my canes, for reference)
If your character uses a cane full time, then they might also have multiple canes that look different aesthetically to match their outfits!
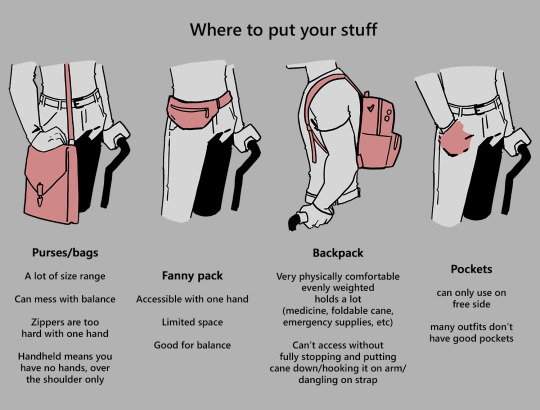
When it comes to practical things outside of the cane, you reasonably only have one hand available while it's being used. Many people will hook their cane onto their arm or let it dangle on the strap (if they have one) while using their cane arm, but it's often significantly less convenient than 2 hands. But, if you need 2 hands, then it's either setting the cane down or letting it hang!
For this reason, optimizing one handed use is ideal! Keeping bags/items on the side of your free hand helps keep your items accessible.
When sitting, the cane either leans against a wall or table, goes under the chair, or hooks onto the back of the chair. (It often falls when hanging off of a chair, in my experience)
When getting up, the user will either use their cane to help them balance/support as they stand, or get up and then grab their cane. This depends on what it's being used for (balance vs pain when walking, for instance!)
That's everything I can think of for now. Thank you for reading my long-but-absolutely-not-comprehensive list of things to keep in mind when writing or drawing a cane user!
Happy disability pride month! Go forth and make more characters use canes!!!
#mobility aid#cane user#writing tips#writing advice#drawing tips#art tutorial#art tips#art reference#art resources#art help#my art#long post
93K notes
·
View notes
Text
🎮 HEY I WANNA MAKE A GAME! 🎮
Yeah I getcha. I was once like you. Pure and naive. Great news. I AM STILL PURE AND NAIVE, GAME DEV IS FUN! But where to start?
To start, here are a couple of entry level softwares you can use! source: I just made a game called In Stars and Time and people are asking me how to start making vidy gaems. Now, without further ado:
SOFTWARES AND ENGINES FOR PEOPLE WHO DON'T KNOW HOW TO CODE!!!
Ren'py (and also a link to it if you click here do it): THE visual novel software. Comic artists, look no further ✨Pros: It's free! It's simple! It has great documentation! It has a bunch of plugins and UI stuff and assets for you to buy! It can be used even if you have LITERALLY no programming experience! (You'll just need to read the doc a bunch) You can also port your game to a BUNCH of consoles! ✨Cons: None really <3 Some games to look at: Doki Doki Literature Club, Bad End Theater, Butterfly Soup
Twine: Great for text-based games! GREAT FOR WRITERS WHO DONT WANNA DRAW!!!!!!!!! (but you can draw if you want) ✨Pros: It's free! It's simple! It's versatile! It has great documentation! It can be used even if you have LITERALLY no programming experience! (You'll just need to read the doc a bunch) ✨Cons: You can add pictures, but it's a pain. Some games to look at: The Uncle Who Works For Nintendo, Queers In love At The End of The World, Escape Velocity

Bitsy: Little topdown games! ✨Pros: It's free! It's simple! It's (somewhat) intuitive! It has great documentation! It can be used even if you have LITERALLY no programming experience! You can make everything in it, from text to sprites to code! Those games sure are small! ✨Cons: Those games sure are small. This is to make THE simplest game. Barely any animation for your sprites, can barely fit a line of text in there. But honestly, the restrictions are refreshing! Some games to look at: honestly I haven't played that many bitsy games because i am a fake gamer. The picture above is from Under A Star Called Sun though and that looks so pretty
RPGMaker: To make RPGs! LIKE ME!!!!! NOTE: I recommend getting the latest version if you can, but all have their pros and cons. You can get a better idea by looking at this post. ✨Pros: Literally everything you need to make an RPG. Has a tutorial inside the software itself that will teach you the basics. Pretty simple to understand, even if you have no coding experience! Also I made a post helping you out with RPGMaker right here! ✨Cons: Some stuff can be hard to figure out. Also, the latest version is expensive. Get it on sale! Some games to look at: Yume Nikki, Hylics, In Stars and Time (hehe. I made it)
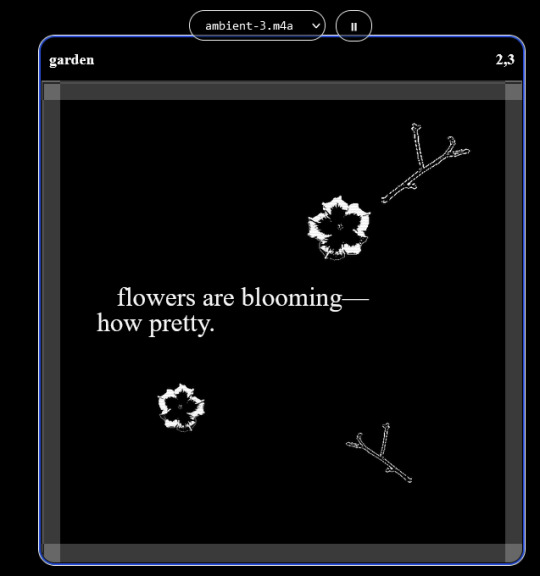
engine.lol: collage worlds! it is relatively new so I don't know much about it, but it seems fascinating. picture is from Garden! NOTE: There's a bunch of smaller engines to find out there. Just yesterday I found out there's an Idle Game Maker made by the Cookie Clicker creator. Isn't life wonderful?
✨more advice under the cut. this is Long ok✨
ENGINES I KNOW NOTHING ABOUT AND THEY SEEM HARD BUT ALSO GIVE IT A TRY I GUESS!!!! :
Unity and Unreal: I don't know anything about those! That looks hard to learn! But indie devs use them! It seems expensive! Follow your dreams though! Don't ask me how!
GameMaker: Wuh I just don't know anything about it either! I just know it's now free if your game is non-commercial (aka, you're not selling it), and Undertale was made on it! It seems good! You probably need some coding experience though!!!
Godot: Man I know even less about this one. Heard good things though!
BUNCHA RANDOM ADVICE!!!!
-Make something small first! Try making simple: a character is in a room, and exits the room. The character can look around, decide to take an item with them, can leave, and maybe the door is locked and you have to find the key. Figuring out how to code something like that, whether it is as a fully text-based game or as an RPGMaker map, should be a good start to figure out how your software of choice works!
-After that, if you have an idea, try first to make the simplest version of that idea. For my timeloop RPG, my simplest version was two rooms: first room you can walk in, second room with the King, where a cutscene automatically plays and the battle starts, you immediately die, and loop back to the first room, with the text from this point on reflecting this change. I think I also added a loop counter. This helped me figure out the most important thing: Can This Game Be Made? After that, the rest is just fun stuff. So if you want to make a dating sim, try and figure out how to add choices, and how to have affection points go up and down depending on your choices! If you want to make a platformer, figure out how to make your character move and jump and how to create a simple level! If you just want to make a kinetic visual novel with no choices, figure out how to add text, and how to add portraits! You'll be surprised at how powerful you'll feel after having figured even those simple things out.
-If you have a programming problem or just get confused, never underestimate the power of asking Google! You most likely won't be the only person asking this question, and you will learn some useful tips! If you are powerful enough, you can even… Ask people??? On forums??? Not me though.
-Yeah I know you probably want to make Your Big Idea RIGHT NOW but please. Make a smaller prototype first. You need to get that experience. Trust me.
-If you are not a womanthing of many skills like me, you might realize you need help. Maybe you need an artist, or a programmer. So! Game jams on itch.io are a great way to get to work and meet other game devs that have different strengths! Or ask around! Maybe your artist friend secretly always wanted to draw for a game. Ask! Collaborate! Have fun!!!
I hope that was useful! If it was. Maybe. You'd like to buy me a coffee. Or maybe you could check out my comics and games. Or just my new critically acclaimed game In Stars and Time. If you want. Ok bye
#reference#gamedev#indie dev#game dev#tutorial#video game#ACTUAL GAME DEVS DO NOT INTERACT!!!1!!!!!#this is for people who are afraid of coding. do not come at me and say 'actually godot is easy if you just--' I JUST WILL NOT.#long post
36K notes
·
View notes
Text
BEGINNERS GUIDE TO BLUESKY
Hiya! Curious about joining bluesky but intimidated by all the features? Already on bluesky but want to learn more? Then welcome to my quick guide on getting started and navigating bluesky!~
What is Bluesky?
it’s a social media site that’s owned by no single person or company. it's aim is to bring back the early days of twitter before bots, elon musk or algorithms took over. Personally I find the site really cozy, wholesome, and engaging. my Bluesky account for example
What’s unique about Bluesky?
→ CUSTOMIZATION: your timeline is very easy to control. There’s tons of options, so be sure to go through each tab in your settings. some options include: turning off autoplay, changing the order in which threaded replies show, changing DM settings, content preferences and lots of visual app settings.
→ MODERATION LISTS: human made, mass blocklists. These are public lists of accounts that when you subscribe to you automatically block or mute everyone in that specific blocklist. A great way to avoid unwanted content, and interactions. ✦ Moderation lists I recommend will be below the cut
→ STARTER PACKS: recommendation lists on who to follow, made by users. You can even curate your own starter pack of recommendations! ✦ Starter pack recommendations will be below the cut
→ FEEDS: public timelines, basically. There are a lot of feeds you can join, or you can even create your own. I made a feed featuring just my pixel art so it doesn’t get cluttered with text posts or other photos in my media tab. ✦ I’ll post feeds I recommend below and link you to a tutorial on how to create your own feed
→ BLOCKING/MUTING: bluesky has a great blocking system. When you block someone they can no longer see, or interact with you. They also have a feature to make your blog inaccessible unless logged in. you can also mute specific people, delete post replies, and even detach your post from a reblog. You can also mute specific words, phrases, tags etc.
→ NSFW: bluesky allows NSFW content, including artwork, porn, lewds etc. They also have a great moderation page to avoid the content completely, censor the content, or show it if you’d wish. ✦ just go to settings > moderation > toggle on NSFW settings and it’ll let you heavily moderate.
→ LABELS: this is a really cool feature on the site, you can subscribe to certain pages that enable a lot of fun/useful labels that help you in different ways! (like pronoun tags, artist tags etc) ✦ Labels to browse will be posted below
→ COMMUNITIES: the vastly diverse communities really feel like the best parts of tumblr. since you can so heavily curate your experience, it can really feel like a calming oasis. Mine is mostly artists, and other creatives.
there’s also a large community of professional artists, art directors, authors, celebrities, and even the best shitposters from twitter. the app really is what you make of it but it’s thriving right now.
RECOMMENDATIONS & LINKS BELOW ⬎
→ MODERATION LISTS:
HATE SPEECH: NAZIS | MAGA | MAGAv2 | MAGAv3 | TRANSPHOBES & HOMOPHOBES | FAR RIGHT | FAR RIGHTv2 | FAR RIGHTv3 | ELON MUSK FANBOYS | ANTI-BLACK | ANTI-VAX
NFT/AI/CRYPTO: MASTERLIST | AI/NFT | AI/NFTv2 | AI FANBOYS | CRYPTO | NFTs
SPAM/SCAMMERS: SPAMBOTS | BOTS | CONTENT SCRAPERS | CONTENT FARMING
✦ to block or mute everyone in the blocklist at once, click subscribe in the top right corner:

→ STARTER PACKS:
ART: PIXEL ART | PIXEL ARTv2 | WOMEN OF PIXEL ART | BADASS DIGITAL ARTISTS | MAGIC THE GATHERING ARTIST | PAINTERS OF BLUESKY | INDIE COMIC CREATORS | LGBTQIA+ COMIC CREATORS | WEBCOMICS ULTIMATE COLLECTION
GENERAL: WOMEN OF BSKY | AUTHORS | LGBTQ NEWS
SHITPOSTERS: JUNIPER | JUNIPERv2 | MASTERLIST | SCIENCE SHITPOSTERS
✦ for more niche starter packs, use the search function. search your specific interest and ‘starter pack’ and you’ll find some!
→ FEEDS:
DISCOVER | WHATS TRENDING | MENTIONS | ART | TRENDING ART
THE GRAM: a timeline for exclusively image posts from those you follow. no textposts etc. ONLYPOST: similar to the gram, it shows a timeline of only those you follow. no reposts, just original posts. 📌: a way to bookmark posts. just reply with the pin emoji.
✦ there’s tons of others feeds as well! just use the feed tab and you can browse feeds or search for specific ones.
✦ TUTORIAL ON HOW TO CREATE A CUSTOM FEED FOR YOUR ART/POSTS
→ LABELS:
SKYWATCH: most popular label. Lots of useful labels!
AI Labels: identifies AI users, can also enable hiding the posters.
Pronouns: self explanatory but useful. can add a badge with your pronouns!
✦ you can search for additional label bots on bluesky!
OTHER RECOMMENDATIONS:
✦ EXPIRIENCE ENHANCING TOOLS RECS ✦ CLEARSKY: TRACK BLOCKS AND BLOCKLISTS ✦ SKYFEED: CREATE CUSTOM FEEDS EASILY ✦ use the block function often. do not entertain trolls or hate speech. ✦ as well as starter packs, there’s also lists! lists can be used in the same way to create curated lists of accounts. it’s a good way to keep track of specific genres of posters you’re interested in, and finding new ones! ✦ hashtags: use them! they’re beneficial in boosting your post. you can even link hashtags in your bio making you easier to find. another method of making you more visible is if you post an ‘interest’ post! basically just type things you’re interested in and it’ll help people find you / vice versa ! ✦ update your profile first thing, like bio avi etc. make a small post so people know you're real. interact and engage! the communities there are so welcoming!
I think that covers abt everything i wanted to cover! Hope this was helpful and thanks for reading lol
#bluesky#bluesky starter pack#bluesky social#bsky.app#bsky#bsky social#bluesky tutorial#bluesky walkthrough#bluesky app#ooooooooook that took forever lol hope its useful!!!!!!!!#long post#text post
6K notes
·
View notes
Text

mike faist as jack twist and lucas hedges as ennis del mar in brokeback mountain 10/?
#one of these posts is going around again tonight. hiii people who like yankee twinks pretending to be cowboys.#there is no slime tutorial idk what anyone is talking about#however. i can send you the link to a mediocre lasagna recipe if you dm me and ask niceys#mike faist#lucas hedges#brokeback mountain#west end brokeback mountain
1K notes
·
View notes
Text
okay so like, when you lose a lot of weight, the world and everyone in it becomes suddenly way way nicer to you. people treat you better across the board, from strangers to family to friends; you get opportunities you wouldn’t have otherwise gotten; doctors take you seriously; etc etc etc. anyone who has gone through any form of major weight loss can tell you this.
& it is absolutely fucking insane how many people who have gone through this weight loss respond to this fact of the world not with horror and disgust at how bad society hates fat people, but rather with a sort of missionary-style evangelizing to everyone around them that they need to lose weight, too, because life just gets so much better!!!
i don’t even know what to say about it. just like, jesus fucking christ.
#my post#bringing this up bc a lot of my youtube recommended is fitness stuff bc. that’s what happens when you look up weightlifting tutorials#& while most of it is weightlifting stuff a bunch of it is also like. weight loss transformation videos#& ALLLLLL the comments are people being like ‘i lost 100 pounds and now my husband loves me again! everyone should do this!’#GOOD GOD SAVE USSS!!!!!
2K notes
·
View notes
Text
Needle Felt Siffrin Build Log: (oct 6 - nov 20, 2024)


Credits goes wholely to @insertdisc5 for creating ISAT and siffrin's design! I am just here to attempt to make cool fanart (and get more people to play isat.. my devious plans are going great so far :3) As always, this isn't a tutorial- it is just a log about how i go about approaching a sculpture and I hope this collection of resources can help others make their own sifs!!
PSA: this has some spoilers for endgame CGs/sprites on my references image board ( also might see it in the backgrounds of my process pics). And bc this is needle felting, you will see some sharp needles! beware!
my inspiration was the intro cutscene where Sif eats the star, so my main goal was to adhere to the style of ISAT as closely as possible while transfering it to 3D space. And I knew i also wanted to try making the cloak for stopmotion purposes, so my process was tailored towards having control over the fabric with wire inlaid within the cloak (more on that later).
I ended up not sticking eyebrows on top of siffrin's bangs lol but anyways, first order of business is Gather Reference! v important. pureref is free and an awesome program. I also do some sketches to visualize the pose and important details i wanted to include in the sculpt.
behold the isat wiki gallery page! tawnysoup wrote an awesome ISAT style guide that absolutely rings true in 3d space too!! adrienne made a sif hair guide here!! (sorry i couldnt find the original link, but it's on the wiki). It says ref komaeda hair so that's what i looked at, along with other adjacent hairstyles! I also like doing drawovers on in progress photos to previs shapes n stuff to get a better idea of the end result.
Also if you're like me and struggle with translating stuff into 3D space, take a look at how people make 3d models and figurines! sketchfab is also a great resource! I looked at the link botw model by Christoph Schoch here for hair ref. (I used Maya, but there's a blender version too ! you can pose characters too if your model has been rigged!)


Face:
Started off blocking out the main shapes of eyelids and iris, and then filling in the colour details in the iris and the star highlights before moving onto adding thin black outlines and eyelashes. I didn't take many in-progress photos cause i kept ripping stuff out to redo them many many times, sorry!! This eye took about 3 hrs bc i just wasn't happy with it!! Sometimes it do be the vibe to give up, go to bed and see how it looks in the morning (more often than naught, it looks fine and it was the "dont trust yourself after 9pm" speaking)

The Mouth:
Couldn't decide if i even wanted to add a mouth as per usual with all my humanoid sculptures.. but i did some drawover tests first to see what expression i liked and to try to visualize it from multiple angles. (I was also testing the placement of stars on the hat brim here)

And then I redid the mouth like 3 times cause the angle just wasn't right (this went on for about the course of a week yay!)
Hair: woe baldfrin be upon ye


I made the hair strands individually first, and then since Sif has some of the hair at the back dyed black, i covered some of the tips with black wool (manually) (I think it would go much faster if i just took a marker to it, but hahaha i love pain and detailing!! )
And then the rest of it was positioning strands with sewing pins layer by layer, always looking at it from different multiple angles- sometimes tailoring the angle or swoop of individual hair flippies. At one point I thought the back looked too cluttered, but the hat covers a lot of it anyways!! yay for hiding mistakes! (imo this is a similar process to how cosplayers style wigs, but on a smaller scale and the same level of time consuming)
As always, look to your reference for guides, and I always do a whole bunch of drawovers over in progress photos to ascertain what was working and what wasn't.
Hat:
A trick to get a super pointy tip, make another tip seperately while keeping the connection point unfelted, and then combine the two to make super pointy hat!! (this also helps if you made the hat too short and need it to be taller. ask me how i know)

The embroidery on the hat brim was done in a hoop and then invisible stitched to the felted top portion. Technically you don't need a hoop but it helps keep the fabric tension, so you avoid puckers in your embroidery. You can also use iron-on stabilizer if your fabric is loose weave or particularly thin. this is the tutorial i used for the stars embroidery! particularly the fly stitch one, french knots, and the criss-cross stitches. highly recommend needlenthread for embroidery stitches and techniques! i learned all my embroidery from this single site alone.

For fabric, I think I used a polycotton i had in my stash,, unsure of the actual fiber content bc i bought it a long time ago. I used DMC Satin floss which was nice and subtle shiny but frayed a lot so it was kind of a pain to stitch with... but keep a short thread length and perservere through it!! After the embroidery was done, I folded up the raw edges and invisible sewed it to the top portion of the hat.
General shape:
Ok general structure of the body is this: wire armature body covered with black wool -> cloak lining & wire cage -> edge of lining is invisibly sewn to the main cloak at the hem -> head

Don't be afraid to mess around with the pattern, it's essentially a pizza with a slice taken out of it to form a steep cone shape!! Use draft paper before cutting into felt to save material! (i think i made like 3 cloaks before i was happy with the shape lol).
You can also hide the seam of the cloak and collars by gently messing up the fibers of the felt with your fingers or a felting needle btw! you can also sandpaper the seams according to Sarah Spaceman in this vid (highly recommend them for their in depth cosplay/crafting builds holy smokes), though since sif cloak is at such a smol scale, I just blended the seam with my felting needle.
For the lining wire cage section, I sewed in wire around the cloak, so the main rotation point is at the top neck area under the collar. These paddles are used to keep whatever pose I need the cloak to be in for stopmotion purposes. Then after the wire is done, I invisibly sewed the lining to the cloak at the hem (same technique as the hat brim to the lining there).
In hindsight, I should've used a thinner fabric for the lining, but i only had sheer white in my stash so had to go with double felt, thus resulting in a really bulky lining but oh well!

Heels:
started with the general boot shape, then tacking on the diamond shape heel stack and also diamond shape sole bc we're committed to the bit here. I skewer the boot onto the armature which also conveniently hides the connection point into the base to keep the whole thing upright and also I can rotate the boot to tweak the angle if needed.

Pins:
I kinda just trial and error'd jewellery wire with pliers into the pin shapes. They're itty bitty!! had a whole bunch of fails before i got two nice ones. A hot tip is to use needle nose pliers and wrap the wire around the tip to get a smooth circle shape!

Base:
I smoothed out the edge of a circular wood base with a dremel, and then used wood stainer to get the black colour. It ended up kinda looking like I took a sharpie to it, but whatever.... now i have a whole ass can of black wood stainer........ I then made a rough mountain of black wool and stuck the feet armature in. And now he's standing!!

Normally at this point when I'm done felting everything, to get a smooth finish, I'd take a small pair of scissors and carefully snip away any flyaway fibers, but this time, I just left them fluffy cause i think that's what sif would do :3c
Photoshoot:
Normally I do shoots using daylight but it was winter so the sun was nonexistent. So I broke out the home lighting setup aka dollarstore posterboard for a nice smooth background, and then hit it with the overhead Fill, side Fill 2, and Rim light, and use white paper/posterboard for bounce light if one side feels too dark. But if things are overexposed, you can move the light sources away until the harshness dims down. I'm using a Olympus mirrorless camera (handed down to me by my sibling so i dont remember the model exactly), which can connect to my phone as a remote so I can avoid shaking the camera when i take photos. Pretty nifty for stopmotion purposes! (yes my camera stand is a stack of notebooks, a tissuebox and some eva foam under the lens, don't judge me)


Stopmotion animation:
I'm still figuring stopmo out on my part, but my process was straight ahead animation ... move the cloak a cm, take a pic.... move another cm, click.... and repeat until i get a version I was happy with. My ref was the cloak animation from Gris (beautiful game btw). The 2d star animation was also done straight ahead using procreate, exported in png with a transparent background, and finally stitched together with the stopmotion footage in photoshop.

My turnarounds are also stopmotion! also secret hack, the turntable is a fidget spinner sticky tacked to a cake platter.
And i think that's all! i mainly wanted to share how I go about thinking about taking a 2d concept and moving it to 3D. I also didn't go in depth into how to actually do the needle felting bc I don't think I''d be very helpful I'm a very good teacher by telling yall to just keep stabbing until it looks right (i'm self taught for this hobby),,, if anyone wants it though, i can share a bunch of tutorials and other felters' process that helped me learn more needle felting!
Hopefully this was helpful to someone! Feel free to send asks if ya got any questions or if anything needs clarification! Or show me your works! I love seeing other people's crafts :3
here have a cookie for making it this far 🥐
#in stars and time#siffrin#isat#isat siffrin#isat fanart#needle felt#soft sculpture#know that i am devouring all the nice words yall leave in the tags/comments of my posts :holding back tears:#I hesitate to call this a tutorial bc this is just how i fumble my way through crafting anything lmao#the only reason I know how long I worked on a project are timestamps on wip photos and however long the day's video essay or letsplay is#sorry time is immaterial when i get into crafting mode#reason why this log is so late is bc after i finish a project i'm perpetually hit with the ray of 'i dont ever want to look at this again'#hence why photos never get edited#AND THIS POST SAT IN MY DRAFTS FOR 2 MONTHS DUE TO BLOODBORNE BRAINROT SORRY#done is better than perfect!!!#sorry i dont control the braincell#sorry for using a million exclaimation points! i am not good at this.. conveying my anxiety in written form!!! my toxic trait
1K notes
·
View notes
Text
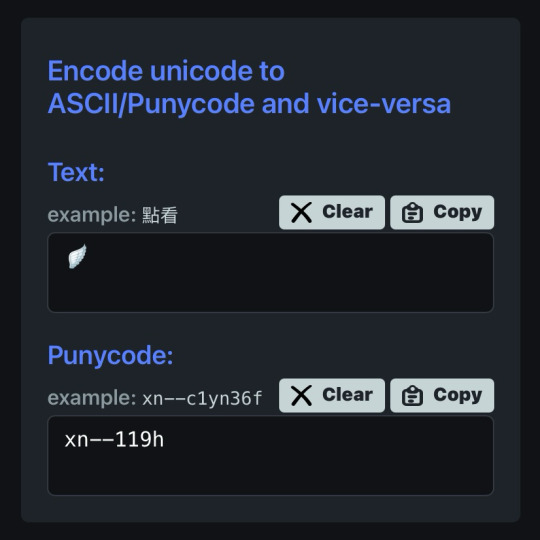
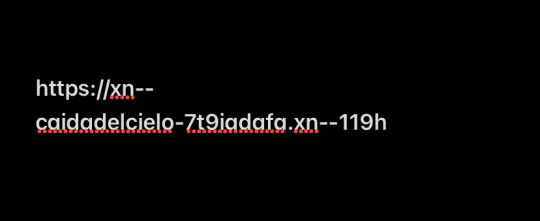
⠀⠀谷 : TUTORIAL : link personalizado para twitter


⠀⠀
en notas, escribiremos POR SEPARADO la frase o emoji que deseamos convertir. ¿por qué por separado? si se hace junto nos saldrá como un link invalido y no podremos ponerlo en nuestro perfil, procuren hacerlo por separado (para las letras usen el espacio en blanco para la separación)

⠀⠀
ya con esto realizado, nos dirigimos a la pagina puny coder (https://www.punycoder.com) en donde pondremos nuestros textos respectivos que se codificaran, es muy fácil ya que la misma pagina te entrega la opción de copiar el nuevo formato, copias ambos y vuelves a notas
⠀⠀

⠀⠀
para lograr cualquiera de los formatos que elijamos, al inicio de nuestro link hay que usar el HTTPS:// y para separar la palabra del emoji hay que usar un PUNTO ejemplo:
⠀⠀

⠀⠀
con nuestro link listo, nos dirigimos a twitter, iremos a editar perfil y procedemos a ingresarlo en la categoría de sitio web, aceptar los cambios y quedará así:
⠀⠀
⠀⠀
esto servirá bastante para hacer tu perfil más atractivo o por el entretenimiento de decorarlo más, recuerden que pueden jugar con todo el formato pero solo está disponible para twitter, en otras apps puede que no se convierta el link pero al menos en twitter puedes cambiarlo infinitas veces. espero haberlas ayudado y haganme saber sus dudas o deseos sobre otros tutoriales ( ദ്ദി ˙ᗜ˙ )
⠀⠀
#᭪𒋲 ִ੭﹕evrthng⠀: post#tutorial#link#aesthetic#messy moodboard#random moodboard#cute moodboard#aesthetic layouts#messy layouts#random layouts#messy headers#random headers#dividers#kaomoji#cute symbols#random usernames#username ideas#twitter usernames#twitter#messy bios#messy locs#messy symbols#alternative users#cutecore#cute locs#goth moodboard#goth users#grunge moodboard#emo moodboard#edgy moodboard
1K notes
·
View notes
Text
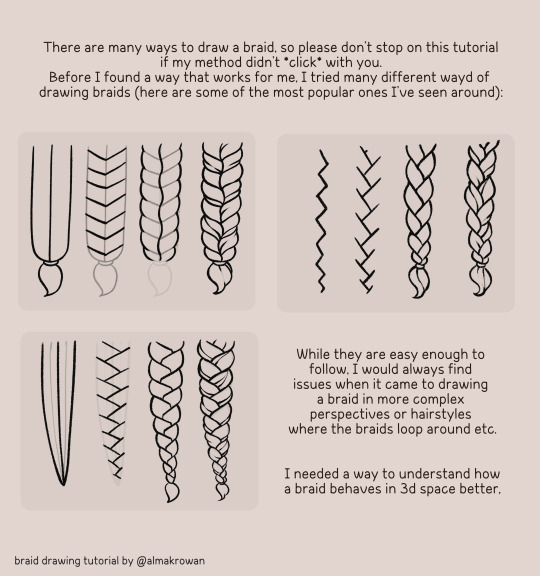
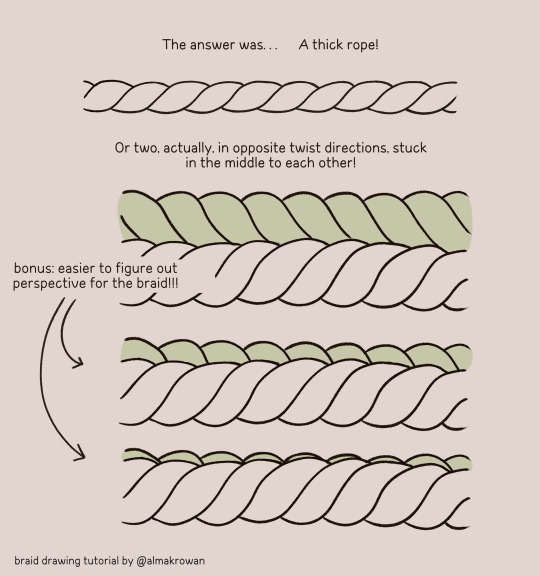
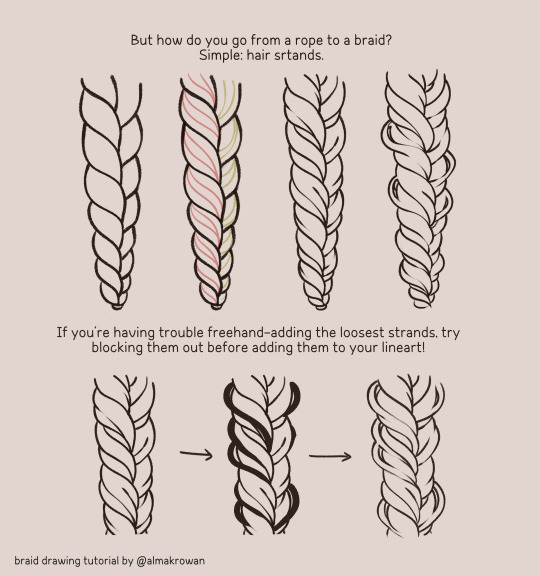
So I posted a silly doodle yesterday on twitter and now people think it was a tutorial. So I got upset and made an actual tutorial so noone says I halfassed the yesterday's one 😡😡😡
Here you go: ~How I draw braids~ 🩷🙏

#almakrowantip#how to draw#tutorial#art tutorial#digital art#art resources#artists on tumblr#I draw non-chibi stuff too!!!#now#this is a TUTORIAL#not like that random yesterday's post#ugh
6K notes
·
View notes
Text

The scrumblos (did i use that word right?)
#not a ship post#its a duo appreciation#ah whatever#geminitay#geminitay fanart#pearlescentmoon#pearlescentmoon fanart#shinyduo#life series#trafficblr#hermitcraft#hermitblr#mcytblr#mcyt#also yes#the rendering is similar to bluebiscuits'#i watched their rendering tutorial vid#hahahahah (^∀^;)#bre4yd art
542 notes
·
View notes
Text


Made more tiger sharks!!!
735 notes
·
View notes
Text
📚 A List Of Useful Websites When Making An RPG 📚
My timeloop RPG In Stars and Time is done! Which means I can clear all my ISAT gamedev related bookmarks. But I figured I would show them here, in case they can be useful to someone. These range from "useful to write a story/characters/world" to "these are SUPER rpgmaker focused and will help with the terrible math that comes with making a game".
This is what I used to make my RPG game, but it could be useful for writers, game devs of all genres, DMs, artists, what have you. YIPPEE
Writing (Names)
Behind The Name - Why don't you have this bookmarked already. Search for names and their meanings from all over the world!
Medieval Names Archive - Medieval names. Useful. For ME
City and Town Name Generator - Create "fake" names for cities, generated from datasets from any country you desire! I used those for the couple city names in ISAT. I say "fake" in quotes because some of them do end up being actual city names, especially for french generated ones. Don't forget to double check you're not 1. just taking a real city name or 2. using a word that's like, Very Bad, especially if you don't know the country you're taking inspiration from! Don't want to end up with Poopaville, USA
Writing (Words)
Onym - A website full of websites that are full of words. And by that I mean dictionaries, thesauruses, translators, glossaries, ways to mix up words, and way more. HIGHLY recommend checking this website out!!!
Moby Thesaurus - My thesaurus of choice!
Rhyme Zone - Find words that rhyme with others. Perfect for poets, lyricists, punmasters.
In Different Languages - Search for a word, have it translated in MANY different languages in one page.
ASSETS
In general, I will say: just look up what you want on itch.io. There are SO MANY assets for you to buy on itch.io. You want a font? You want a background? You want a sound effect? You want a plugin? A pixel base? An attack animation? A cool UI?!?!?! JUST GO ON ITCH.IO!!!!!!
Visual Assets (General)
Creative Market - Shop for all kinds of assets, from fonts to mockups to templates to brushes to WHATEVER YOU WANT
Velvetyne - Cool and weird fonts
Chevy Ray's Pixel Fonts - They're good fonts.
Contrast Checker - Stop making your text white when your background is lime green no one can read that shit babe!!!!!!
Visual Assets (Game Focused)
Interface In Game - Screenshots of UI (User Interfaces) from SO MANY GAMES. Shows you everything and you can just look at what every single menu in a game looks like. You can also sort them by game genre! GREAT reference!
Game UI Database - Same as above!
Sound Assets
Zapsplat, Freesound - There are many sound effect websites out there but those are the ones I saved. Royalty free!
Shapeforms - Paid packs for music and sounds and stuff.
Other
CloudConvert - Convert files into other files. MAKE THAT .AVI A .MOV
EZGifs - Make those gifs bigger. Smaller. Optimize them. Take a video and make it a gif. The Sky Is The Limit
Marketing
Press Kitty - Did not end up needing this- this will help with creating a press kit! Useful for ANY indie dev. Yes, even if you're making a tiny game, you should have a press kit. You never know!!!
presskit() - Same as above, but a different one.
Itch.io Page Image Guide and Templates - Make your project pages on itch.io look nice.
MOOMANiBE's IGF post - If you're making indie games, you might wanna try and submit your game to the Independent Game Festival at some point. Here are some tips on how, and why you should.
Game Design (General)
An insightful thread where game developers discuss hidden mechanics designed to make games feel more interesting - Title says it all. Check those comments too.
Game Design (RPGs)
Yanfly "Let's Make a Game" Comics - INCREDIBLY useful tips on how to make RPGs, going from dungeons to towns to enemy stats!!!!
Attack Patterns - A nice post on enemy attack patterns, and what attacks you should give your enemies to make them challenging (but not TOO challenging!) A very good starting point.
How To Balance An RPG - Twitter thread on how to balance player stats VS enemy stats.
Nobody Cares About It But It’s The Only Thing That Matters: Pacing And Level Design In JRPGs - a Good Post.
Game Design (Visual Novels)
Feniks Renpy Tutorials - They're good tutorials.
I played over 100 visual novels in one month and here’s my advice to devs. - General VN advice. Also highly recommend this whole blog for help on marketing your games.
I hope that was useful! If it was. Maybe. You'd like to buy me a coffee. Or maybe you could check out my comics and games. Or just my new critically acclaimed game In Stars and Time. If you want. Ok bye
#reference#tutorial#writing#rpgmaker#renpy#video games#game design#i had this in my drafts for a while so you get it now. sorry its so long#long post
8K notes
·
View notes
Text
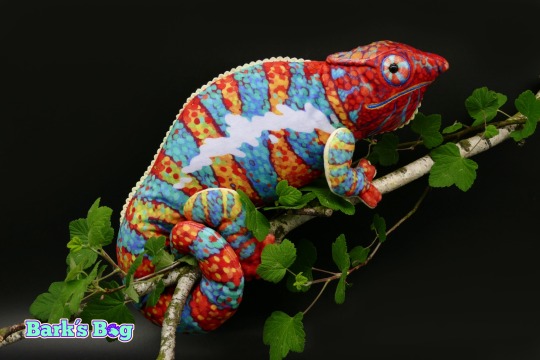
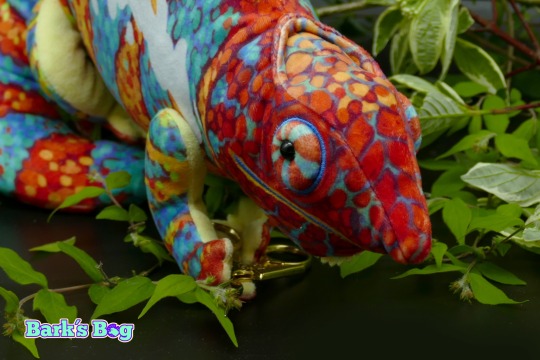

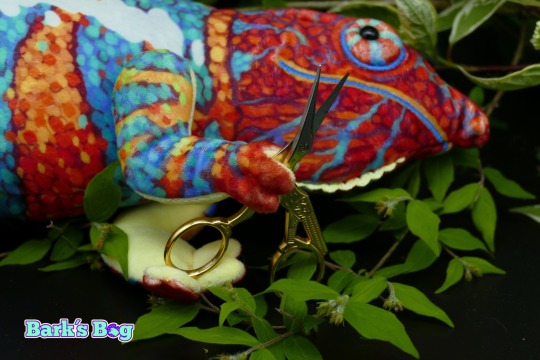
panther chameleon plushies!!!
based on the Amilobe locality of Furcifer pardalis
magnetic little hands for to grab things
soft
funny eyes
doesn´t need high humidty or complex care!
teddy joints for to move their little legs
---
adopt one from my bog
barks-bog.com
#i´m honestly really proud of these#the eyes are quite complex and i didn´t think i could pull them off but i did!!! i will post a quick tutorial later how they are done#also thanks to palaeoplushies for letting me steal her idea of using trim for little spikes#the paint job is one the more complex ones i´ve done and i hope people like it because i would love to do more like this#plush#plushies#plushblr#chameleon#panther chameleon#furcifer pardalis amilobe#handmade
4K notes
·
View notes
Text


i got it!
(og panels below!!)
HAPPY BIRTHDAY SIFFRIN!!! <- i say, scheduling this to post at midnight september 2nd. it’s his birthday somewhere!! and also loops birthday but look i had a deadline here. don’t ask why This of all things is their birthday art. i make normal choices!!!
also. somehow this entire thing only took 4 and a half hours??? insanity. i literally started this Today. thats how it Gets Me i suppose. anyways!!!! here’s the og panels!! no colored version this time, i didn’t think it’d fit the scene. also i didn’t want to render 3 colored panels.


#marshdoodles#isat#in stars and time#isat spoilers#shoutout to the 2 people on discord who immediately wished to be the tutorial sadness when i posted this#honestly . i get it.#we were out all day today and i STILL managed to get this done somehow#i dont think i can call myself a slow artist anymore#part of me wanted to make a happy birthday edit of this in the same vein as the merry christmas edit but#it is. 10pm. and i am sleepy#no cake for him
2K notes
·
View notes
Text
♡ JUBILEE | pacific northwest based pixel artist
♡ WAYS TO SUPPORT MY ART
↳ wallpapers ↳ prints & merch ↳ cross stitch patterns ↳ deskmats & tapestries ↳ sticker by number kits ↳ continue to like & reblog my art
♡ MY PIXEL ART TUTORIALS
↳ simple landscapes (old) ↳ city tutorial (old) ↳ water reflection (old) ↳ clouds tutorial ↳ how i use values ↳ color process ↳ BONUS: bluesky 101
♡ OTHER PLACES TO FIND ME
↳ bluesky ↳ kofi ↳ discord server ↳ instagram | facebook | twitter | no longer active
♡ FREQUENTLY ASKED QUESTIONS
WHAT PROGRAM DO YOU USE? ↳ photoshop (i do NOT recommend it) WHAT PROGRAMS DO YOU RECOMMEND? ↳ pixquare (you can get 30% off with code 8PXL), aseprite, graphicsgale, even krita! HOW DID I LEARN PIXEL ART? ↳ trial and error basically. I started by just trying to create, and once I hit roadblocks I would google tutorials, or find similar artwork to what I'm trying to achieve. i started heavily doing monochromatic work then eventually working into more complex pieces! GOOD RESOURCES ON LEARNING PIXEL ART? ↳ lospec is a great learning resource. has tutorials, color palettes, and a large community. there's also lots of great tutorials on youtube, like adamcyounis. there's also saint11's great tutorials.
#FAQ is under the cut!#i'll add more questions if you wanna send one youre curious about#thought id make a pinned post........ finally#pixel art#artists on tumblr#artist on tumblr#art tutorial#art tutorials
1K notes
·
View notes