#tweaks ios 10
Explore tagged Tumblr posts
Visit Tumblr Blog
Explore Tumblr blogs with no restrictions, modern design and the best experience.
Last Seen Tumblr Blogs


Fun Fact
The most popular pages on Tumblr are about Minecraft, GIFs, and David J. Peterson.
Photo

YouTube also works using a tweak called TubeRepair, which is available for devices using iOS 3-iOS 10
9 notes
·
View notes
Text
how to block tags on ao3 permanently (for both mobile and desktop):
1) if you don't already use firefox as your browser, download and switch to it. there's a ton of tutorials out there on it and it's super easy to move your bookmarks and such over, so i won't go into detail on that here. (links: desktop - ios - android).
2) download and add tampermonkey to your extensions.
3) download ao3 savior and ao3 savior config. when you click install script, it should open up a second window with tampermonkey, where you will click install again.
4) the scripts will download really fast. once you're done, check if they downloaded by clicking on the tampermonkey icon on your browser, and then the dashboard. it should show your installed scripts now!
5) restart your browser (close all tabs and/or just close firefox if you're on mobile).
6) reopen your browser and go to tampermoney's dashboard again, where you can see your installed scripts.
7) click edit on the ao3 config *savior* script. the icon should look like a square and pencil.
8) scroll down until you find the tagBlacklist part. there are already three tags added there as an example (['dobby', 'jar jar binks', '*mimes']).
9) get rid of those and add in your own tags, making sure they match the same format as the examples. asterisks work as ANYTHING, meaning that if you never wanted to see [any character]/reader again, you would put '*reader' as a tag. this would also include anything like 'strong!reader' or 'male!reader' though, so be careful with how you word it. here is an example of what my blacklisted tags look like:
tagBlacklist: ['Harry Potter *', 'Reader-Insert', '*Reader', 'Reader*', 'Dean Winchester', 'Sam Winchester'],
10) if you wanted to exclude every [any character]/reader fic again EXCEPT for a certain pairing or fandom, then you'll head over to the tagWhitelist section. here, any tags you add will always make a work shown, even if they contain tags from your your blacklist. you can also do this with authors in the authorWhitelist section!
11) decide if you want to see when a fic is blocked for you/if you want to see why a fic is blocked. if you just want the fics to be hidden without any warning, then change showReasons and showPlaceholders to true. if not, leave it as is.
12) put // in front of any of the sections that you don't want to mess with right now. for instance, if you don't have any authors you want to blacklist, put // in front of authorBlacklist to make sure it doesn't run the examples for now. you can always get rid of the // later on if you want to add something and make it run again.
12) click on file, then save. go over to ao3 and check if the tags you have blocked are hidden. if they're not, move to the next step.
13) if the tags you have muted are still showing up, try changing them a little. for instance, 'harry potter - j.k. rowling' fics kept showing up for me until i changed it to just 'harry potter *'. you should also try restarting your computer/phone to see if that works. if nothing works even after trial and error, feel free to dm me and i'll try to help you out personally!
14) enjoy never having to filter out anything you hate ever again (unless you come across a new tag that you want to add to your block list) :>
the og tutorial i made some tweaks to is here. credits to the author of that one! <3
#ao3#archive of our own#tutorial#ao3 tutorial#fandom things#fandom#writers on tumblr#writeblr#writblr#lumi's posts
6 notes
·
View notes
Text
[Update] Support iOS 17 and More
We have a long list of improvements and bug fixes in this update(version 7.8.0).
Support iOS 17.
Fix the 'Liked Posts' bug that some posts were missing during pagination.
Fix the crash when selecting 'Open the Post Reblogged' menu.
Fix the emoji text formatting bug.
Video Posting is supported(at long last).
Post Notes: separated by Comment/Reblog/Like. The comment section includes reply and reblog with text.(BTW, the notes view is not exactly the same with the official Tumblr app. Not enough Tumblr API support yet. And sometimes, the comment section may include reblog/like if no comment exists.)
The feed menu button of the current tab is re-designed.
'Tag Search in this Blog' menu supports multiple tags delimited by Comma. It will search posts containing all the tags.
The list popup supports the 'Swipe Down' gesture on the navigation bar. When swiped down, it will be pinned to the bottom left or closed. For example, following blogs or post notes support this gesture.
Restore home screen quick action features.(It was accidently removed).
The default action for Hold Gesture on Post in Grid Mode is changed to Menu (from Like). You change this option at the Settings->Gestures.
The OAuth 2.0 is supported. But there are bugs when signing with Google/Apple in OAuth2.0 Tumblr API. So, the default method is still 1.0a. You can change this option at the 'Manage Accounts'.
iOS 12 or later is supported from this version.
PS. There was a minor bug fixing update(version 7.8.1) at 2023-10-18.
PS. Another minor update with some animation refinements on iOS 17 and scroll performance tweaks (version 7.8.2 at 2023-11-05).
6 notes
·
View notes
Text
Swatch Post
Belatedly I realized that if you have a blog page, links to it won't work on mobile, so if I'm linking to a list of my hair color swatches it's more useful for it to be in an actual post. That's all this is! Scroll right past if it's showing on your dash.

Natural colors as of April 2023 - Default hairs will use the first row. My hair is binned so that elders keep their colors, with grays in the custom bin.
Family 1
Black - Dynamite Medium Brown - Depth Charge [edit to be slightly less saturated] Light Blond - Volatile Dark Red - Explosive v2 (io) Gray - Mail Bomb
Family 2
Blue Black - Vanadium Mousey Brown - Sorath (digi) Yellow Blond - Honey (io) Light Red - kotangens’ light red (digi + kotangens) Dark Gray - Pipe Bomb
Family 3
Reddish Black - Lucifer (digi) Light Brown - Safety Fuse Ash Blond - Grenade Strawberry Blond - Dawn (blackswan-sims) White - Time Bomb
CREDITS: Digi’s actions here (x), Io @.serabiet’s actions here (x), @.blackswan-sims’ Dawn here (x), and all the other natural colors are by Pooklet (x)

Unnaturals - This is my standard set of unnatural addons as of June 2023. I won't make unnaturals for every hair, but feel free to request that I add them to a hair if I didn't.
1. Mermaid (made by me) 2. Powder Cake (pooklet) 3. Bastet (io) 4. Lavender (poppet) 5. Cannonball (pooklet) 6. Emerald (Nat) 7. Toxigen (pooklet) 8. Perchlorate (pooklet) 9. Clementine (poppet) 10. Raven (digi + kotangens)
CREDITS: Poppet’s MM unnaturals (x) - I tweaked these a little to make them work with the shinier textures I like, Nat @.theboldandthebeautifulsims (x)
6 notes
·
View notes
Text
Rev Up Your Future: Master Mobile Car Diagnostics with Galaxy Uni
Imagine diagnosing your car’s issues with just your smartphone—a spark of innovation that’s changing the automotive world! Mobile car diagnostics is the future, and Galaxy Uni in Tehran, Iran, is your launchpad to mastering this skill. Our vibrant training program blends creativity, technology, and hands-on learning to ignite your career in automotive diagnostics. Ready to dive into this exciting journey?
The Art of Mobile Diagnostics
Mobile diagnostics is like giving your car a voice. Plug an OBD-II device into your vehicle’s diagnostic port (standard in cars post-1996), sync it with apps like Torque Pro or Car Scanner via Bluetooth or Wi-Fi, and watch your phone reveal everything—engine health, fuel efficiency, error codes, and more. From spotting a faulty sensor to tweaking performance, this tech empowers you to keep your ride in top shape.
Top OBD-II Devices to Explore
The market is buzzing with OBD-II devices, each with unique flair:
ELM327 Mini v2.1 ($3–$8): A budget gem, perfect for beginners and foreign cars post-2003, offering basic error code reading and engine monitoring.
Mobicar ($17–$33): User-friendly with multilingual support, it’s a hit for diverse vehicle models, including regional ones, with ABS and airbag diagnostics.
Launch X431 Mini ($50–$167): A pro-level tool for luxury brands like Porsche and BMW, packed with advanced diagnostic features.
OBD Tools Negar Khodro ($33–$83): Tailored for regional vehicles, with ECU configuration and actuator testing capabilities.
Choose a device that matches your car’s needs, and always opt for quality to protect your vehicle’s electronics.

Must-Have Smartphone Apps
Apps are the soul of mobile diagnostics, turning raw data into actionable insights:
Torque Pro (Android, ~$5): A fan favorite with customizable dashboards, live data like RPM, and error code clearing.
OBD Auto Doctor (Android/iOS, free with $1–$10 in-app purchases): Super intuitive, ideal for beginners, with detailed error explanations.
Car Scanner ELM OBD2 (Android/iOS, ~$6 Pro): Sleek, versatile, and updated regularly, with HUD mode for real-time display.
Diagzone (Android/iOS): Built for Launch devices, it shines in advanced diagnostics for systems like ABS and transmissions.
EOBD Facile (Android/iOS, $5–$20): Great for European cars, offering live data and detailed reports.
Free versions are great for starters, but premium features unlock deeper diagnostics, especially for professional use.
Why It’s a Game-Changer
Mobile diagnostics isn’t just tech—it’s freedom. Save on repair bills, catch issues early, and impress your friends with your car know-how. Whether you’re a gearhead or a budding mechanic, this skill lets you take control. The catch? Interpreting complex data takes expertise, which is where Galaxy Uni steps in.
Career Opportunities
The automotive industry is hungry for skilled diagnosticians. In Iran, you can earn $250–$500 monthly, with higher potential in global markets or specialized shops. Start your own mobile diagnostic service, join a repair shop, or take your skills international—Galaxy Uni’s certification makes it possible.
Tips for Success
Choose Quality Devices: Avoid cheap knock-offs to protect your car’s ECU.
Pick the Right App: Match your app to your device and vehicle for best results.
Practice Regularly: Galaxy Uni’s hands-on labs ensure you’re ready to tackle real-world diagnostics.
Conclusion
Mobile car diagnostics is your ticket to an exciting, tech-driven career. Join Galaxy Uni to master this skill and drive your future forward. Visit Galaxy Uni to enroll and start your adventure today!
0 notes
Text
I Upgraded to iPhone 16e - Here's What Actually Changed

"I Upgraded to iPhone 16e - Here's What Actually Changed"
Let’s be honest—phone upgrades aren’t always worth it. But after a month with the iPhone 16e, I can confidently say this one’s different. If you’re on the fence, here’s the real-world breakdown (no marketing fluff).
👉 Check Unicorn Store’s latest deals (because who doesn’t love saving money?)
The Good, The Bad, and The "Okay, That’s Cool"
✅ What Actually Feels Like an Upgrade
Camera: No more "let me take 10 shots to get one good one." Low-light photos finally look like they weren’t taken in a cave.
Battery Life: I forgot my charger at work… and survived. That never happened with my old phone.
Performance: Apps don’t freeze when I’m trying to multitask (looking at you, Google Maps + Spotify combo).
🤷♂️ What’s Nice, But Not Life-Changing
Screen: Smoother scrolling? Yes. Worth upgrading alone? Probably not.
iOS 18: Some neat tweaks, but nothing revolutionary.
❌ The One Annoyance
Price: It’s still an iPhone, so… yeah. My bank account sighed.
Why I Went with Unicorn Store
After comparing prices everywhere, they had:
✔ Actual stock (no "ships in 4-6 weeks" nonsense)
✔ No sketchy "discounts" (just transparent pricing)
✔ Fast shipping (got it in 2 days—impressive for a new release)
If you’re buying, at least do it the stress-free way.
🔥 Grab it here without the hassle
Your Turn
Upgrading? What convinced you?
Sticking with your current phone? Teach me your self-control.
Already have it? What’s your favorite (or least favorite) thing?
Drop a comment—let’s keep it real!
#iPhone16e #HonestTechReview #UpgradeWorthy #NoRegrets #UnicornStore
The iPhone 16: Why It's the Smartest Upgrade You're Not Excited About (But Should Be)
Let's face it - we've all become jaded about smartphone upgrades. Another year, another slightly better iPhone. But after living with the iPhone 16 for a month, I've had an unexpected realization: this might be the most practical phone Apple's made in years. Here's why it deserves your attention, even if it won't make your Instagram followers jealous.
The Underrated Improvements That Actually Matter
It Disappears Into Your Life (In a Good Way) The magic isn't in any one feature - it's in how you stop noticing your phone altogether. No more:
Waiting for apps to catch up to your taps
Restarting because something froze
Missing shots because the camera lagged It just works, exactly when you need it to.
A Camera That Understands Real Life Finally, a phone that:
Captures your kid's soccer goal without motion blur
Makes restaurant food look as delicious as it is
Gets skin tones right in any lighting The best camera isn't the one with the most megapixels - it's the one that gets the shot when it matters.
Battery Life You Can Actually Rely On My real-world test:
7 AM: 100% charge
Normal day of calls, emails, navigation, and social media
11 PM: Still 20% left No more battery anxiety is the most underrated feature in tech.
That Extra Button You'll Use More Than You Think I programmed mine to:
Instant flashlight (for those midnight snack runs)
Voice memos (for shower thoughts)
Camera shortcut (because life doesn't pause for perfect shots) After a week, you'll be frustrated using any other phone.
It Feels Like It Was Made for Human Hands The subtle curves. The perfect weight. The way it doesn't slide off every slightly angled surface. It's the first iPhone in years that prioritizes comfort over looking sleek in ads.
Who Should Actually Consider This?
✔ Get It If:
Your phone is older than the last season of your favorite show
You've ever missed an important shot because of camera lag
Your current phone dies before your day does
✖ Skip It If:
Your current phone works perfectly fine
You were hoping for sci-fi features
You're saving for something more exciting
The Reality Check The iPhone 16 won't win any awards for innovation. But it might be the first phone in years that actually removes frustrations from your daily life rather than adding new ones. In a world where tech often feels like it's working against us, there's something quietly revolutionary about a device that just... works.
Now if they could just make the perfect iPhone case... (we all know that's never happening)
📌 Top Unicorn Apple Partner Stores in Mumbai Unicorn Retail Stores
Mumbai & Navi Mumbai
Andheri West
Address: 001-002 Kotia Nirman, New Link Road, Near Fun Republic, Andheri West, Mumbai, Maharashtra 400053
Phone: 8879001592 | 8655674275
Hours: 10:00 AM – 9:30 PM
Get Direction | Website
2.CBD Belapur (Navi Mumbai)
Address: Shop No 2, Greenscape Shakti, Plot No 12, Sector 15, CBD Belapur, Navi Mumbai, Maharashtra 400614
Phone: 086558 56652
Hours: 11:00 AM – 9:30 PM
Get Direction | Website
3. Colaba
Address: Unit No. 03, Cecil Court, Colaba Causeway, Next to Regal Theater, Mumbai, Maharashtra 400005
Phone: 097693 72567
Hours: 10:30 AM – 10:00 PM
Get Direction | Website
4. Goregaon (Oberoi Mall)
Address: Ground Floor, Oberoi Mall, G-7 & G-8, Western Express Highway, Goregaon, Mumbai, Maharashtra 400063
Phone: 099209 51375
Hours: 10:00 AM – 9:30 PM
Get Direction | Website
5. Kandivali East
Address: Shop No. 3, Viceroy Savana, 20 Feet Rd, Dattani Park, Kandivali East, Mumbai, Maharashtra 400101
Phone: 086553 68724
Hours: 10:30 AM – 10:00 PM
Get Direction | Website
6. Malad (Inorbit Mall)
Address: Unit No. 38-40, 1st Floor, Inorbit Mall, New Link Road, Malad West, Mumbai, Maharashtra 400064
Phone: 082917 14666
Hours: 10:00 AM – 9:30 PM
Get Direction | Website
7. Malad (Infiniti Mall)
Address: GF-002A, Infiniti Mall, New Link Road, Malad West, Mumbai, Maharashtra 400064
Phone: 086575 85595
Hours: 10:00 AM – 9:30 PM
Get Direction | Website
8.Thane (Ulhas Nagar)
Address: Unit No. 2A, GNP Galaxy, Phase-1, Ulhas Nagar, Near McDonald’s, Thane, Maharashtra 421501
Phone: 086553 47152
Hours: 10:30 AM – 9:30 PM
Get Direction | Website
9. Thane (Rushabh Mall)
Address: Wadekar Compound, Rushabh Mall, Plot No. 325, Ghodbunder Road, Thane, Maharashtra 400610
Phone: 090760 44089
Hours: 10:00 AM – 10:00 PM
Get Direction | Website
10. Ulwe (Navi Mumbai)
Address: Shop No. 12, Shagun Whitewoods, Plot 204, Sector 23, GP Road, Ulwe, Navi Mumbai, Maharashtra 410206
Phone: 086558 57826
Hours: 10:30 AM – 9:30 PM
Get Direction | Website
11. Nalasopara East
Address: GF-08, The Capital Mall, Achole Road, Nalasopara East, Vasai-Virar, Maharashtra 401209
Phone: 089769 87599
Hours: 11:00 AM – 9:30 PM
Get Direction | Website
Kalyan West
Address: Shop No. 17/117, Aum Supreme, Near D-Mart, Bail Bazar, Kalyan West, Maharashtra 421301
Phone: 070458 66060
Hours: 10:00 AM – 9:30 PM
Get Direction | Website
Unicorn Service Centers
1.Colaba Service Center
📍 Address: Unit No. 03, Cecil Court, Colaba Causeway Road Next To Regal Theatre, Colaba, Mumbai-400039
📞 Phone:022 6639 6503
⏰ Hours: 11:00 AM - 7:30 PM
🚗 Get Directions | 🌐 Website
2.Kalyan Service Center
📍 Address: Shop No.17/117, Aum Supreme West, next to D Mart, Bhanunagar Kalyan(West), Bail Bazar, Bhoiwada, Mumbai, Kalyan 421301
📞 Phone:081041 09285
⏰ Hours: 10:30 AM - 7:30 PM
🚗 Get Directions | 🌐 Website
3. Andheri Service Center
📍 Address: Kotia Nirman, Near KIFS Volvo Cars, B-104/105/106, Off New Link Rd, Industrial Area, Andheri West, Mumbai 400053
📞 Phone:098200 79821
⏰��Hours: 10:30 AM - 7:30 PM
🚗 Get Directions | 🌐 Website
4.Malad Service Center (Commercial Hub)
📍 Address: Commercial Hub, EXPRESS ZONE, G-87, near Oberoi Mall, Malad East, Mumbai 400063
📞 Phone:097692 76811
⏰ Hours: 10:30 AM - 7:30 PM
🚗 Get Directions | 🌐 Website
5.Nalasopara Service Center
📍 Address: Lower Ground Floor-24, The Capital Mall, Village, Achole Rd, off New Link Road, Yashvant Viva Twp, Nalasopara East, Mumbai, Vasai-Virar 401209
📞 Phone:086556 88035
⏰ Hours: 11:00 AM - 9:00 PM
🚗 Get Directions | 🌐 Website
6.Malad Service Center ( Inorbit Mall)
📍 Address: Unit no 38, 39, 40, 1st floor, Inorbit Mall, New Link Rd, Malad, Malad West, Mumbai 400064
📞 Phone:082917 14666
⏰ Hours: 10:00 AM - 9:30 PM
🚗 Get Directions | 🌐 Website
0 notes
Photo

New Post has been published on https://www.vividracing.com/blog/the-best-way-to-get-power-on-a-gen-3-ford-raptor/
The Best Way to Get Power on a Gen 3 Ford Raptor
The Ford Raptor 3.5L EcoBoost was a game changing truck when it came out in 2017. With 450 horsepower and full off-road racing suspension setup, this truck became the flagship which all other manufactures tried to copy. From 2017-2021 the Raptor was a tuners dream platform. tons of bolt-on parts for horsepower and the ability to tune the vehicles ECU where in some cases you could get nearly 80hp. In fact on our very own 2020 Ford Raptor we did the Garrett bolt-on turbo upgrades and tuned the truck for 600 horsepower. When the updated Raptor came out in 2022, a lot started to change and one of those was with the ECU. HP Tuners is able to crack the security but not on the newer 2023 and up Raptor (as of 4/2025). So ECU flashing these trucks is not easy or possible in some cases. Even more of an issue is the vehicle warranty. These trucks have so many electronics controlling them that an ECU flash is an instant red flag to void the warranty.
This is where the VR Tuned ECU Tuning Box Kit comes into play. A tuning box is a device that plugs into vehicle sensors in the engine bay to change the signals and deliver an increase in horsepower and torque. Made in Germany, the tuning box features a high performance processor that is bluetooth controlled to work with the ECU in making power. The tuning box connects to the vehicles boost pressure and manifold pressure sensors. Once connected, the box takes over these readings and the factory ECU compliments it by adjusting fuel and timing for the boost levels it sees. Since you are not flashing or altering the factory ECU, this leaves ZERO imprint on the ECU where you do not have to worry about warranty issues. Should your vehicle have an issue or you want to take it in for service, unplug the harness and remove the box. NO TRACE!
The tuning box has preloaded 7 stages of maps. Each one of these maps is dyno tuned and tested for the vehicle. The higher the number, the stronger the map. Typically these are directly related to fuel quality and environmental conditions. If you are running 93 octane or higher in cool temps, running the tuning box on 6 or 7 is very effective. For those running 91 octane and warmer temps, we recommend setting the box at 5 or 6. You can pre set these on the IOS or Android App as Eco, Sport, or Race as well. If you turn the box off from the app, then the vehicle will perform like stock.
Even though we have dyno tested these before, we wanted to run our truck again for this video. We use a Mustang Dyno Here in Arizona and have 91 octane. These trucks are rather long so its hard to get them secured on the dyno. With the 10 speed gearbox, we like to run the truck in 5th gear. However 6 or 7th might be better for 1:1. Just going 115mph in a truck on the dyno isn’t always the most comforting thing! We were really interested to see the torque improvements as unlike a car, we are not doing to much 60-130mph runs :). So we decided on our dyno to run short tests from 2500-4000rpm. Where the turbos are spooling the truck picked up massive gains in torque of nearly 90ft/lbs and about 50rwhp. Over the years we have learned that dynos are not the most important measurement as is real world testing. Different dynos can read differently and there are settings to manipulate the outcome. As well, if you do not have the right fans on the intercooler, intake, radiator, then your numbers can be altered. So we also tested the tuning box with the Dragy GPS device.
Having learned from our 600hp Big Turbo Ford Raptor, to get the best results you need to put the vehicle in 4A and do a little bit of brake boosting. I am sure if you tweak tire pressures and not do back to back to back runs with the right temps, your 0-60 results could be better. But what matters is the delta as long as you are keeping everything else consistent. We did 3 runs of stock and tuned. Our best stock run was 6.22sec where our best VR Tuned setting 6 run was 5.77sec. At the end of the day, the tuning box gave us 0.50 seconds quicker 0-60 which is very noticeable!
Watch the entire installation and testing of the VR Tuned Ford Raptor Gen 3 Tuning Box on our Video Below.
youtube
Previous testing on a 2022 Ford Raptor Below.
0 notes
Text
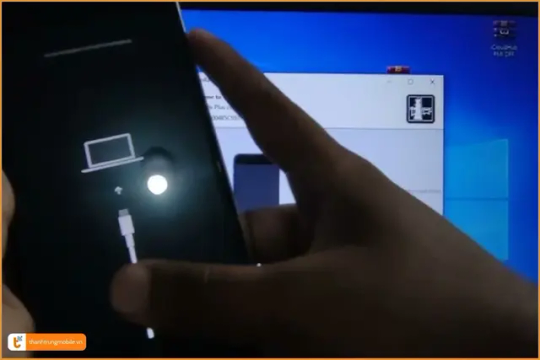
Biểu Hiện Khi iPad Bị Treo Táo, Treo Logo
iPad bị treo táo, hay còn gọi là treo logo Apple, là tình trạng khá phổ biến mà nhiều người dùng gặp phải trong quá trình sử dụng thiết bị. Khi gặp lỗi này, màn hình iPad sẽ hiển thị logo Apple và không thể khởi động vào hệ điều hành, khiến thiết bị không thể sử dụng được. Vậy, làm sao để nhận biết và khắc phục lỗi treo táo trên iPad? Hãy cùng tìm hiểu chi tiết qua bài viết dưới đây.

1. Biểu hiện iPad bị treo táo
iPad bị treo táo có thể nhận diện qua một số biểu hiện sau:
✅ Màn hình hiển thị logo Apple nhưng không vào được hệ điều hành Khi khởi động iPad, logo Apple xuất hiện nhưng thiết bị không thể tiếp tục truy cập vào giao diện chính mà chỉ đứng yên ở màn hình logo.
✅ iPad khởi động lại liên tục (boot loop) Một số trường hợp, iPad có thể tự động tắt nguồn và khởi động lại nhiều lần, nhưng vẫn dừng ở màn hình logo mà không vào được iOS.
✅ Màn hình đen nhưng có thể thấy logo Apple thoáng qua Có trường hợp iPad hiển thị logo Apple trong vài giây rồi chuyển sang màn hình đen, sau đó lặp lại quá trình này liên tục.
✅ Không thể tắt nguồn bằng cách thông thường Khi nhấn giữ nút nguồn để tắt iPad, thiết bị không phản hồi hoặc chỉ hiển thị logo rồi tiếp tục bị treo.
✅ Không thể kết nối với iTunes hoặc Finder Nếu bạn thử kết nối iPad với máy tính để khôi phục nhưng không thể nhận diện thiết bị hoặc quá trình khôi phục không thành công, rất có thể iPad đã bị treo táo nghiêm trọng.
2. Nguyên nhân khiến iPad bị treo táo
Lỗi treo logo trên iPad có thể xuất phát từ nhiều nguyên nhân khác nhau, bao gồm:
🔹 Cập nhật iOS thất bại: Khi bạn cập nhật iOS nhưng quá trình bị gián đoạn do mất kết nối mạng hoặc pin yếu, iPad có thể bị lỗi phần mềm và dẫn đến treo táo.
🔹 Cài đặt ứng dụng không tương thích: Một số ứng dụng bên thứ ba có thể xung đột với hệ điều hành, gây ra lỗi treo logo khi khởi động lại thiết bị.
🔹 Bẻ khóa (Jailbreak) iPad: Nếu bạn đã thực hiện jailbreak iPad nhưng quá trình không thành công hoặc cài đặt tweak không tương thích, iPad có thể bị lỗi và bị kẹt ở màn hình logo.
🔹 Lỗi phần cứng: Nếu iPad bị rơi, va đập mạnh hoặc bị vào nước, phần cứng có thể bị hư hỏng, ảnh hưởng đến quá trình khởi động và gây ra lỗi treo táo.
🔹 Dung lượng bộ nhớ đầy: Khi bộ nhớ iPad quá tải, hệ thống có thể không hoạt động đúng cách và gây ra lỗi khi khởi động.
3. Cách khắc phục iPad bị treo táo
Khi iPad gặp tình trạng treo logo, bạn có thể thử một số phương pháp sau để khắc phục:
🔹 Khởi động lại iPad: Nhấn và giữ đồng thời nút nguồn và nút Home (hoặc nút giảm âm lượng đối với iPad không có nút Home) trong khoảng 10-15 giây cho đến khi logo Apple xuất hiện lại.
🔹 Cập nhật hoặc khôi phục iPad qua iTunes/Finder: Kết nối iPad với máy tính, mở iTunes (hoặc Finder trên macOS Catalina trở lên), sau đó chọn "Update" để cập nhật iOS hoặc "Restore" để khôi phục cài đặt gốc.
🔹 Sử dụng chế độ DFU: Nếu iPad không thể khôi phục qua iTunes, bạn có thể đưa thiết bị vào chế độ DFU (Device Firmware Update) để cài đặt lại phần mềm hệ thống.
🔹 Kiểm tra phần cứng: Nếu các phương pháp trên không hiệu quả, iPad có thể gặp vấn đề về phần cứng và cần mang đến trung tâm sửa chữa để kiểm tra.
0 notes
Text
Participant for Zoom 4.0
Yesterday marked the release of Participant for Zoom 4.0. Here's a rundown of the changes.
Updated UI for Meeting Screen
The biggest change on the meeting screen is probably the new floating toolbar. This allows us to provide larger, clearer controls, without blocking out too much UI. What hasn't changed: your mic and camera status, along with raised hand, are always on screen for you to see and change.

There are a number of subtle tweaks here as well.
The leave meeting button has an updated style.
Other users' videos are now larger with less gap.
There is better contrast and a bolder font for participant names.
The unmuted icon will no longer show on participant videos for a cleaner look. If there is no microphone icon the user is unmuted.
The Active Apps Notifier button has been moved onto the grid for a cleaner top bar.
There is a new location for changing video sort order. Instead of sitting above the grid it can now be found in the main menu.
The connect/disconnect audio option is no longer in meeting settings and is now available right in the main menu as well.
Share Extension
Participant now has a share extension that accepts URLs. Anywhere in iOS that you can share a URL you can now share it into Participant. If the app detects a Zoom URL it will give you the option to join in Participant or add the meeting to your My Meeting list. This is an easy way to jump right into Participant if you have been given a URL in an email.

More
Redesigned meeting settings.
Tweaked the green color for the default Attendant theme.
Performance improvements.
App icon shortcuts can now provide up to 4 recent/pinned meetings, instead of just the last meeting you joined.
Localizations
Participant has been localized into 10 additional languages:
Chinese
Danish
Dutch
Japanese
Malay
Polish
Portuguese (Brazil)
Portuguese (Portugal)
Romanian
Swedish
This brings Participant to a total of 15 supported languages.
Hope you enjoy the update.
Download Participant for Zoom on the App Store.
0 notes
Text
Adobe Photoshop is the gold standard of image editing software
Photoshop Express is a streamlined, user-friendly version of Adobe Photoshop designed for those who want to enhance their photos quickly and efficiently. Whether you're a novice looking to dip your toes into photo editing or a seasoned pro seeking a lightweight tool for on-the-go adjustments, Photoshop Express offers an array of features that make photo editing a breeze. This guide will help you master Adobe Photoshop Express in just 2 hours, covering everything from the basics to advanced tips and tricks.
What is Adobe Photoshop Express?
Adobe Photoshop Express is a free photo editing app available for mobile devices and desktops. It combines a range of editing tools and filters to provide a simplified version of its more robust sibling, Adobe Photoshop. The app is designed for quick edits and adjustments, making it perfect for users who want to enhance their photos without diving into complex editing processes.
Getting Started with Photoshop Express
Step 1: Download and Install the App
The first step to mastering Photoshop Express is to download and install the app on your device. It is available on iOS, Android, and Windows devices. Simply search for "Adobe Photoshop Express" in your device's app store and follow the installation instructions.
Step 2: Set Up Your Account
Once installed, you'll need to set up an Adobe account or sign in with an existing one. An Adobe ID allows you to access additional features and sync your work across devices.
Step 3: Import Your Photos
After logging in, you can start importing your photos. Photoshop Express supports multiple file formats, including JPEG, PNG, and RAW. You can import photos directly from your device's gallery, cloud storage, or take a new photo using the app's built-in camera feature.
Core Features of Photoshop Express
1. Basic Adjustments
Photoshop Express offers several basic editing tools that can dramatically improve the quality of your photos:
Crop and Straighten: Adjust the composition of your photos by cropping them to different aspect ratios or by straightening them.
Exposure, Brightness, and Contrast: Modify the lighting and contrast to enhance the overall appearance of your images.
Saturation and Vibrance: Boost or reduce the intensity of colors to make your photos more vivid or muted.
2. Filters and Effects
One of the standout features of Photoshop Express is its extensive collection of filters and effects:
Looks: Apply pre-set filters with a single tap to quickly change the mood of your photo. These include options like "Black & White," "Vintage," "Portrait," and "Nature."
Blur: Create depth of field by blurring parts of your photo, giving it a professional look.
3. Advanced Editing Tools
For those looking to take their editing a step further, Photoshop Express offers several advanced tools:
Selective Editing: Make precise edits to specific areas of your photo without affecting the entire image. This is particularly useful for enhancing certain colors or correcting exposure in select areas.
Red Eye Removal: A quick fix for photos where subjects have red eyes due to flash photography.
Healing Brush: Remove blemishes, spots, or unwanted objects from your photos with this powerful tool.
4. Text and Borders
Add a personal touch to your photos by overlaying text or applying stylish borders. Photoshop Express provides a variety of fonts and styles, allowing you to customize your photos for social media, digital portfolios, or personal keepsakes.
Step-by-Step Guide: Mastering Photoshop Express in 2 Hours
Hour 1: Learning the Basics
Familiarize Yourself with the Interface: Spend the first 10 minutes exploring the app's layout and features. Understanding where tools are located will make the editing process smoother.
Import and Edit Your First Photo: Choose a photo to edit and start with basic adjustments like cropping, straightening, and tweaking the exposure, brightness, and contrast. This process should take about 15 minutes.
Experiment with Filters and Effects: Spend the next 15 minutes applying different filters and effects to your photo. Learn how each one alters the image and experiment with combining multiple effects.
Try Out Advanced Tools: Use the remaining 20 minutes of this hour to explore the advanced editing tools like selective editing, red-eye removal, and the healing brush. Start with easy edits and gradually try more complex adjustments.
Hour 2: Advanced Techniques and Creative Edits
Dive Deeper into Selective Editing: Spend 20 minutes learning how to use the selective editing tools to enhance specific areas of your photos. Focus on adjusting color, brightness, and detail selectively.
Add Text and Borders: Use the next 10 minutes to add text and borders to your images. Try different fonts, sizes, and colors to see what works best for your photo.
Save and Export: Spend 10 minutes learning how to save and export your photos. Photoshop Express allows you to save images in different formats and sizes, making it easy to share on social media or print.
Practice and Review: Use the final 20 minutes to practice what you’ve learned. Import new photos and apply all the techniques you’ve practiced. Experiment with different styles and looks to develop your unique editing style.
Tips for Mastering Photoshop Express
Use Shortcuts: Familiarize yourself with shortcuts and gestures that can speed up your editing process.
Experiment Regularly: The best way to learn is by doing. Regularly edit different types of photos to understand how various tools affect them.
Stay Updated: Adobe regularly updates Photoshop Express with new features and improvements. Make sure your app is always up-to-date to take advantage of the latest tools.
Conclusion
With its intuitive interface and powerful tools, Adobe Photoshop Express is an excellent choice for anyone looking to enhance their photos quickly and efficiently. By following this guide and dedicating just 2 hours, you can master Photoshop Express and start creating stunning photos that stand out. Happy editing!
0 notes
Text
iOS 18 Developer 6, Public Beta 4 Updates Rolling Out for iPhone: Everything That’s New | Daily Reports Online
iOS 18 Developer Beta 6 and Public Beta 4 for the iPhone have been rolled out by Apple. As with past beta updates, both introduce a handful of changes that Apple did not showcase at its Worldwide Developers Conference (WWDC) on June 10. Tweaks have been made in the user interface (UI) of apps such as Apple Music, and there is now a dedicated Control Centre button for toggling Bluetooth instead of…
0 notes
Text
HappyMod iOS 17.1.1: The Ultimate Guide to Downloading the Latest Version
Introduction
In the ever-evolving world of mobile applications, accessing a vast array of apps and games is crucial to enhancing your smartphone experience. HappyMod iOS 17.1.1 is a platform offering a treasure trove of modified apps and games, providing users with unique features and unlimited fun. In this comprehensive guide, we'll delve into what HappyMod iOS 17.1.1 is, how to download and install it on your device, and answer some common questions that users may have.
What is HappyMod iOS 17.1.1?
HappyMod iOS 17.1.1 is a popular third-party app store that caters to iOS users. It specializes in providing modified versions of popular applications and games, allowing users to enjoy premium features and in-app content without any charges. This unofficial app store has gained significant attention due to its extensive collection of tweaked apps and games.
Why Choose HappyMod iOS 17.1.1?
There are several reasons why users opt for HappyMod iOS 17.1.1 over the official App Store:
Access to Premium Features
HappyMod offers apps and games with unlocked premium features, giving users an enhanced experience without subscriptions or payments.
Free Downloads
All the apps and games available on HappyMod are free to download, eliminating the need to spend money on in-app purchases.
Regular Updates
HappyMod keeps its library updated with the latest versions of apps and games, ensuring users always have access to the newest content.
Easy Installation
Installing HappyMod on your iOS device is straightforward, and we'll guide you through the process step by step.

How to Download and Install HappyMod iOS 17.1.1
Now that you're intrigued by the benefits of HappyMod iOS 17.1.1 let's explore how to download and install this fantastic app store on your iOS device.
Adjust Your Device Settings
Before installing, make sure your iOS device is prepared to accept apps from third-party sources. To do this:
Open 'Settings' on your device.
Navigate to 'General.'
Tap on 'Profiles & Device Management.'
Find the HappyMod profile and trust it.
Download HappyMod iOS 17.1.1
To download HappyMod on your iOS device, follow these steps:
Open your preferred browser and visit the official HappyMod website.
Locate and tap on the 'Download' button for iOS.
A pop-up will appear, asking for your confirmation. Tap 'Install' to begin the installation process.
Installation Complete
Once the installation is complete, you can find the HappyMod app icon on your home screen.
Frequently Asked Questions (FAQs)
Q1: Is HappyMod iOS 17.1.1 safe to use?
A1: Yes, HappyMod is generally safe, but it's essential to download apps from trusted sources within the platform.
Q2: Can I download HappyMod on my iPad?
A2: HappyMod is compatible with iPhones and iPads running iOS 10 and above.
Q3: Are there any risks of viruses or malware with HappyMod?
A3: While HappyMod takes measures to ensure safety, always exercise caution and use reliable antivirus software.
Q4: How often is HappyMod updated?
A4: HappyMod is regularly updated to provide users with the latest versions of apps and games.
Q5: Can I use HappyMod without jailbreaking my iOS device?
A5: HappyMod does not require jailbreaking your device, making it a safer alternative.
Conclusion
HappyMod iOS 17.1.1 is a game-changer for iOS users who want to enjoy premium app features without spending a dime. Its vast collection of modified apps and games opens up a world of possibilities for enhancing your mobile experience. Following the simple installation steps mentioned in this guide, you can have HappyMod up and running on your iOS device quickly.
0 notes
Text
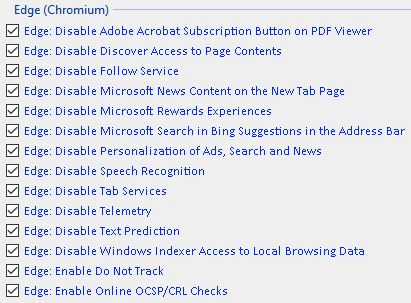
Software of the Week: DoNotSpy11
This is the first in what I hope will be a weekly series of my favorite pieces of software for Windows, Synology DSM, or iOS/iPadOS (I don't have an Android phone so I don't discover new software for that OS often, sadly).
First up is DoNotSpy11, by pXc Coding out of Germany.
Details:
Purpose: Customize the behavior of Microsoft Windows OS, specifically settings related to privacy, advertising, analytics, and default app nagging
OS Supported: Windows 10, 11
Installer Size: 2.1 MB
Country of Origin: Germany
Languages Supported: EN, DE, FR
License: Freeware (basic version) / $5-20 USD (pro version with additional features geared toward IT professionals managing multiple computers)
Download Link: https://pxc-coding.com/donotspy11/
My laptop can't upgrade to Windows 11 due to hardware requirements, and I have to say I am kind of relieved. It feels like every other week I'm reading about Microsoft putting ads in the file Explorer or Start Menu, or burying settings in odd places to make it hard to disable new "features" in Edge. Between that and how much they nag you to go back to Edge as your default browser (and how they're shoving AI into everything), I'm perfectly happy to stick with Windows 10. But even that sends a lot of tracking/analytics data back home to Microsoft.
Enter DoNotSpy11. This app consolidates all of the privacy/advertising/Edge/default app nagging settings into one simple list of checkboxes, and even adds some settings that are normally only accessible through arcane magic like registry edits or Group Policy Objects.
The list is color-coded into 3 levels of "safety": blue for settings that you should almost always be able to apply without issue, orange for things you should double check first, and red for things that are generally not recommended for most people. Clicking a setting gives you a plain-text overview of what it does so you can make the final decision for yourself.
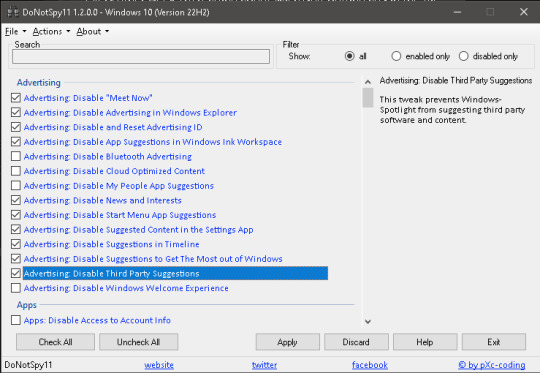
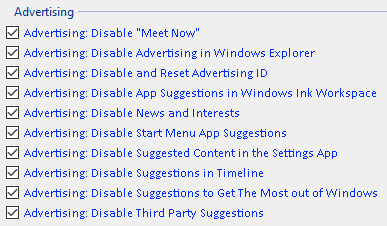
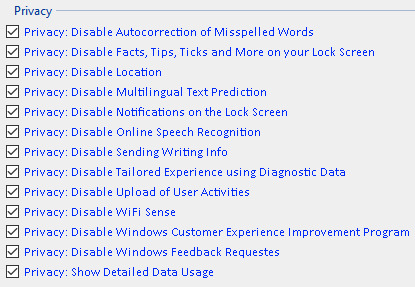
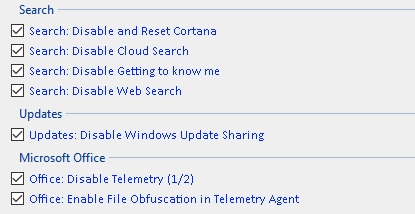
The list of options can be overwhelming at first, but I'll post screenshots of my settings below that you can use as starters if you'd like. The definitions available in the righthand sidebar go a long way toward making it easy to customize the options to fit your taste/level of comfort.
Happy tweaking!
My settings:

#donotspy11#windows software#windows 11#windows 10#internet privacy#microsoft#microsoft windows#software of the week#mine
1 note
·
View note
Text
Tìm hiểu Jailbreak iOS: Lợi ích, rủi ro & hướng dẫn chi tiết
Jailbreak iOS là quá trình "mở khóa" hệ điều hành iOS giúp người dùng vượt qua những giới hạn mà Apple áp đặt để cài đặt ứng dụng không chính thức, tùy biến thiết bị và khám phá nhiều tính năng nâng cao. Tuy nhiên, đi kèm với tự do đó là những rủi ro về bảo mật, hiệu suất và mất bảo hành.
Bài viết này của Thành Trung Mobile sẽ cung cấp cho bạn cái nhìn toàn diện nhất về jailbreak: từ định nghĩa, lợi ích, nguy cơ cho đến cách thực hiện an toàn.
Jailbreak iOS là gì?
Jailbreak iOS là quá trình can thiệp vào hệ thống để loại bỏ các ràng buộc phần mềm của Apple, cho phép:
Truy cập vào hệ thống file của thiết bị
Cài đặt ứng dụng ngoài App Store
Tùy biến giao diện, biểu tượng, hiệu ứng và nhiều yếu tố khác
Kể từ khi iPhone đầu tiên ra đời vào năm 2007, cộng đồng hacker đã liên tục phát triển các công cụ jailbreak cho từng phiên bản iOS mới. Mặc dù Apple luôn nỗ lực cập nhật bảo mật để ngăn chặn, nhu cầu jailbreak vẫn tồn tại mạnh mẽ do người dùng muốn mở rộng khả năng cá nhân hóa.

Lợi Ích Khi Jailbreak iPhone
Sau khi jailbreak, người dùng có thể tận hưởng hàng loạt tiện ích vượt trội:
Tùy biến giao diện: Thay đổi theme, font, biểu tượng theo phong cách cá nhân
Cài đặt ứng dụng ngoài App Store: Bao gồm các app, game mod, tweak tiện ích
Tối ưu hiệu suất, tiết kiệm pin: Thông qua các tweak quản lý tài nguyên
Truy cập tính năng ẩn: Như quay màn hình, ghi âm cuộc gọi, điều chỉnh cảm biến...
Các phương pháp jailbreak iOS phổ biến là gì?
Có hai cách jailbreak iOS phổ biến: không cần máy tính và sử dụng máy tính. Cách đầu tiện lợi nhưng dễ bị Apple thu hồi chứng chỉ, trong khi cách thứ hai ổn định hơn và phù hợp với người dùng muốn jailbreak lâu dài. Việc chọn đúng phương pháp giúp hạn chế lỗi, đảm bảo thiết bị hoạt động ổn định.
Jailbreak không cần máy tính
Cài đặt trực tiếp công cụ jailbreak qua trình duyệt Safari hoặc ứng dụng hỗ trợ. Tiện lợi nhưng dễ bị Apple thu hồi chứng chỉ.
Jailbreak bằng máy tính
Ổn định và an toàn hơn, yêu cầu kết nối iPhone với máy tính để thực hiện qua phần mềm chuyên dụng.
Một số công cụ phổ biến:
Checkra1n: Tương thích với iPhone 5s đến iPhone X (chip A5-A11)
Unc0ver: Hỗ trợ iOS 11.0 – 14.3
Taurine: Dành cho iOS 14 trở lên, được đánh giá cao về độ ổn định
3uTools: Tích hợp jailbreak và nhiều công cụ quản lý iPhone
📥 Tải về công cụ:
Tải Unc0ver Jailbreak
Tải Winra1n Jailbreak
Để biết cách thực hiện jailbreak chi tiết cho từng phiên bản iOS, bạn có thể tham khảo hướng dẫn jailbreak iOS 10 – 10.2 ngay trên iPhone, với các bước đơn giản và dễ thực hiện cho người dùng mới bắt đầu.
Những Lưu Ý Trước Khi Jailbreak
Trước khi tiến hành, bạn nên:
Sao lưu toàn bộ dữ liệu để tránh mất mát
Kiểm tra phiên bản iOS và lựa chọn công cụ jailbreak tương thích
Cài tweak từ nguồn uy tín, tránh xung đột phần mềm
Biết cách restore iPhone nếu quá trình jailbreak gặp sự cố
Cân nhắc việc cập nhật iOS, vì có thể làm mất jailbreak hiện tại
Kết luận
Jailbreak iOS iPhone/iPad có thể mang lại nhiều tùy biến và tiện ích, nhưng đi kèm là rủi ro về bảo mật, mất bảo hành và lỗi hệ thống. Bài viết đã giúp bạn hiểu rõ khái niệm jailbreak, các công cụ phổ biến, lợi ích, rủi ro và những lưu ý quan trọng khi thực hiện. Do đó, hãy cân nhắc kỹ lưỡng trước khi quyết định "mở khóa" thiết bị của mình. Nếu bạn còn băn khoăn về việc jailbreak iOS iPhone/iPad, đừng ngần ngại để lại bình luận hoặc chia sẻ bài viết để cùng thảo luận!
1 note
·
View note
Text
In a recent blog post by Placeholder VC, the firm drew a striking analogy between leading layer-1 (L1) blockchain ecosystems Ethereum and Solana, comparing them to Android and iOS respectively. Written by Joel Monegro on October 10, 2023, the post provides insights into the unique attributes and future trajectories of both blockchain platforms. Why Ethereum Is Like Android Drawing a parallel to Android’s open and diverse ecosystem, Ethereum is highlighted for its modularity and widespread adoption. Monegro notes that just as Android runs on a plethora of devices manufactured by various companies around the world, Ethereum is “becoming more of a platform for third-party networks than the place where most end-users and developers operate.” Quoting from the post, “The fast-growing ecosystem of layer-2 (L2) networks using Ethereum mainnet for security or leveraging the Ethereum Virtual Machine (EVM) as an operating system already processes ~5-6x more transactions than Ethereum mainnet.” This expanding ecosystem reflects the multiplicity seen in Android devices, with Ethereum’s influence potentially encompassing “hundreds of networks processing billions more transactions than Ethereum mainnet.” Monegro further elaborates that the Ethereum Virtual Machine (EVM) is set to reinforce its dominance as the premier blockchain operating system, orchestrating countless networks and rollups that cover an array of markets, sectors, and functionalities. Even though Ethereum’s mainnet might capture only a segment of this expansive value, the platform is poised to reap significant advantages from the broadening ecosystem. Despite the benefits, Monegro points out challenges reminiscent of Android’s issues, stating, “Ethereum smart contracts aren’t guaranteed to run seamlessly on all of them by default, and developers have to spend extra time tweaking, testing, and maintaining for different environments.” Why Solana Resembles iOS In contrast, Solana is likened to Apple’s iOS, recognized for its focus on integration and performance. Monegro explains, “Solana as a single, unified network is much faster and cheaper than Ethereum and many other EVM networks.” The seamless user experience, reduced transaction speeds, and cost efficiencies found on Solana mimic the consistent and integrated user and developer experiences on iOS. However, Monegro emphasizes that this analogy, while instructive, is somewhat superficial. He writes, “Which is absolutely, objectively ‘better’ doesn’t matter; that debate will never end. Some people will value a modular philosophy’s flexibility; others will value a more integrated platform’s speed and simplicity.” The post culminates in an admonition against market myopia. Drawing upon historical examples from the crypto and tech industries, Monegro states that while there were times when singular players like Bitcoin or Ethereum dominated, it’s a “mistake to assume that the status quo at any point in time will remain the same forever.” Monegro’s perspective underscores the notion that in the evolving landscape of blockchain technology, both modularity and integration have their merits. The overarching message seems to be one of appreciation for diversity, fostering a more inclusive and vibrant crypto ecosystem. At press time, Solana (SOL) traded at $22.07, down 1.4% in the last 24 hours. SOL price falls below the 38.2% Fib, 1-day chart | Source: SOLUSD on TradingView.com
0 notes
Text
Comprehensive Guide to Prepare Your iPhone for iOS 13
Apple is on the brink of unveiling its official iOS 13 in just a little over an hour, introducing a wealth of exciting new features for iPhone users. These improvements encompass a system-wide Dark Mode, a revamped Find My app, enhancements to the Photo app, updated privacy features, and more detailed street-level Maps. But the excitement doesn't stop there; numerous smaller changes and tweaks are designed to elevate your overall iPhone experience.
Preparing Your Device for iOS 13
With the impending arrival of iOS 13, Apple has made substantial advancements in how it packages apps from the App Store. They assert that app downloads can now be up to 50 percent smaller, resulting in reduced storage space requirements. However, before you can benefit from these enhancements, it's crucial to ensure that your device has ample space to accommodate the new operating system. If you're unsure, it's advisable to seek guidance from the leading iPhone service center in Kolkata.
To free up space for iOS 13, it's wise to review the apps currently residing on your device and assess whether you genuinely need all of them. Navigate through your home screen and explore your folders to identify any long-forgotten apps that are consuming valuable storage space.
You can easily remove unnecessary apps by pressing and holding your finger on their icons and then tapping the 'X' that appears in the corner. Rest assured, if you accidentally delete an app, it can be conveniently reinstalled later.
For even more efficient storage management, scrutinize the size of social media or messaging apps like Facebook and WhatsApp. These apps tend to accumulate significant data over time, including chat history and media files. Consider uninstalling and then reinstalling them to start with a clean slate.
Additionally, take heed of any recommendations provided on the iPhone Storage screen, such as storing high-resolution photos in iCloud and smaller versions on your device or granting iOS permission to automatically offload infrequently used apps.
Creating an Archived iTunes Backup
It's prudent to create an iTunes backup of your device on your computer before embarking on the iOS 13 update journey. This backup serves as a safety net in case anything goes awry during the installation or if you need to revert to a previous iOS version.
An archived iTunes backup preserves the current state of your iOS device, safeguarding it from accidental overwriting by subsequent backups. To create an archived backup on a Mac, follow these steps (please note that the process may vary slightly for Windows users, who may need to rename their iTunes backup folder or relocate it to a different location to prevent overwriting):
Launch iTunes and access 'Preferences' from the menu.
Navigate to the 'Devices' tab.
Right-click on the new backup and select 'Archive.'
Once the backup is duly archived, it will be distinctly labeled with the date and time of its creation. This archived backup serves as a safety net in case of unforeseen issues, and you can readily seek assistance from the leading iPhone service center in Kolkata if needed.
Installing iOS 13
When iOS 13 becomes available (typically around 10 AM PST/1 PM EST on the official release day), it will be seamlessly delivered to your device. You can update either through iTunes when connecting your device to your computer or via an over-the-air update. Ensure you're connected to Wi-Fi, and your device is fully charged before commencing the update process, as it may require some time to complete. If you encounter any iPhone-related issues, don't hesitate to reach out to Ctech IT Solutions for assistance.
0 notes