#unreal rename project
Explore tagged Tumblr posts
Visit Tumblr Blog
Explore Tumblr blogs with no restrictions, modern design and the best experience.
Last Seen Tumblr Blogs


Fun Fact
12.7% of mobile users access Tumblr.
Note
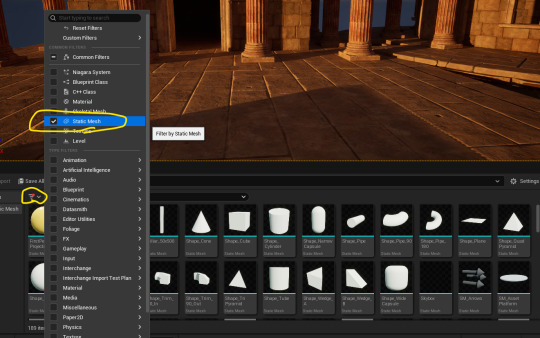
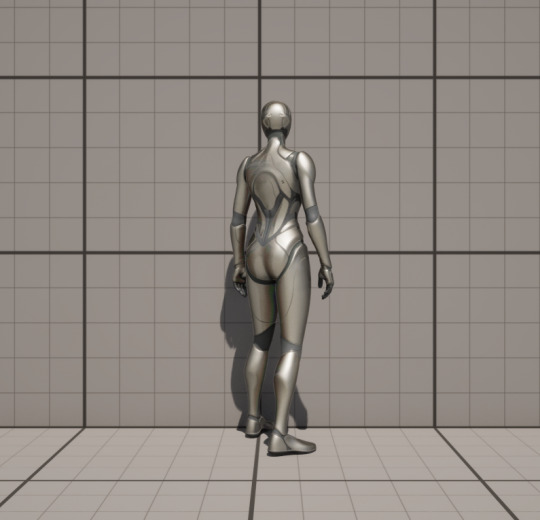
Hey hey! Apologies in advance if you already answered this before ≽^╥⩊╥^≼ do you happen to have any tips for new modders when it comes to modding color changes? With Kenshi's Order Of Darkness skin being released, I wanted to try and mod in a pink version to match Johnny's Order Of Darkness skin! Im just completely new to this stuff and have no idea where to even begin with that process- thank you so much in advance!! Your mods are lovely, and I check ur page every day to see if you released new ones, they're just amazing!! You always put so much work and creativity in, you really are the best modder I follow!! <3 Keep up the good work btw!
asdfghjk thank you!!! <3<3<3
Under the cut because ofc, I can't shut up and make it short, lol.
Everything you will need to get started can be found on the forums.
As for getting the palettes so you can match them, you have to extract the one's you're wanting to edit:
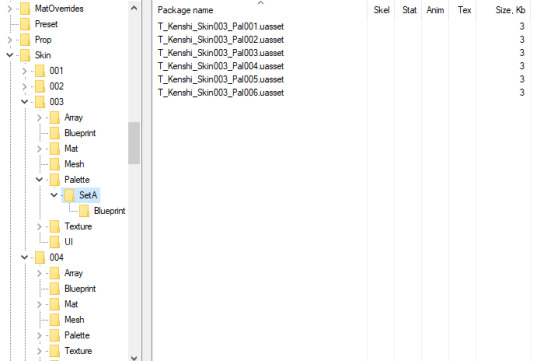
Nearly all skins released have an UI pic, those that don't just double click on the mesh file to see the model so you'll know what skin you're dealing with. If I'm going for one certain color scheme, I make sure all the palettes in the skin file are the same color(s) so that way when I release a mod, nobody can scream at me that they haven't unlocked this or that palette, lol.
Once you're done editing the palette in whatever editing program of your choice, bring it into the custom Unreal Editor (will find it in the forums) and have the layout exactly the way it is in the game:

Texture folder if you decide to edit the textures, otherwise, you don't need it.
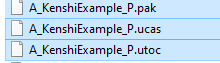
Make sure the palette(s) are selected (highlighted): right click, Asset Actions, Assign to Chunk, enter a number greater than 100 (I go with 111 bc idk why honestly I just do, lol), hit ok. Then up top: File, Package Project, Windows 64, a box will pop up asking where to save it -- keep it in the default location by clicking select folder, and it should start packaging your mod. Once done, it'll tell you. Go to the folder it saved it to and you'll find your mod but you have to rename it.
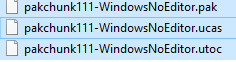
Rename those 3, just be sure to have A_ and _P for the beginning and end of your mod. Like so:
And just place it in your mods folder and see it in game :)
8 notes
·
View notes
Text
Blog 01| Pre Production| Introduction to the Darbhanga Ghat Project
Welcome to the first post in our series on building a richly detailed, game-ready environment based on Darbhanga Ghat in Varanasi. Over the coming weeks, we’ll dive deep into every stage of our pipeline—from historical research and concept scripting to lighting design and final polish. In this inaugural entry, we’ll set the stage by sharing the project’s vision, narrative context, and why Darbhanga Ghat offers such a compelling subject for environment art.
Project Vision My goal is to craft an immersive, meditative environment that transports players to the sacred banks of the Ganges at dawn. We’re aiming for:
Atmospheric Authenticity Capturing the soft golden glow of early morning light, the gentle mist rising off the river, and the weathered textures of centuries-old stone steps.
Narrative Immersion Placing a lone sadhu in ritual meditation, guiding the camera through ritual actions to evoke a sense of stillness and devotion.
Technical Excellence Employing a modular, trim-sheet–driven workflow to maximize efficiency and performance in Unreal Engine, while maintaining high-fidelity detail.
By blending architectural accuracy with cinematic storytelling, we’ll demonstrate how technical pipelines and artistic vision come together to breathe life into a digital relic of Indian heritage.
Why Darbhanga Ghat? Darbhanga Ghat stands out as both a historical landmark and a visual marvel:
Historic Roots Constructed in 1812 by Shridhara Narayana Munshi and renamed in 1915 by Maharaja Rameshwar Singh, the ghat embodies layers of political and cultural history along the Ganges
Architectural Fusion The adjacent Brijrama Palace showcases a blend of Maratha, Mughal, and European elements—an inspiring template for trim-sheet details and modular asset creation
Spiritual Atmosphere At first light, ash-smeared sadhus and wandering pilgrims imbue the site with a timeless, contemplative energy that we aim to capture in every shader, light beam, and camera track.
This rich tapestry of history, architecture, and ritual makes Darbhanga Ghat an ideal case study for environmental artists seeking to balance storytelling with technical workflows.
0 notes
Text
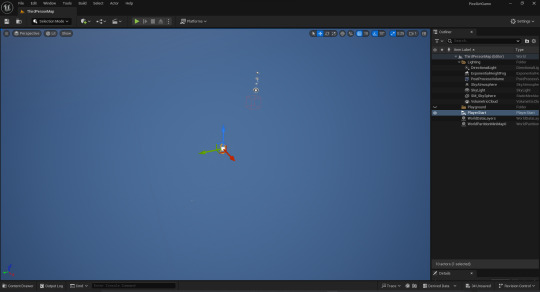
World Building Welcome

The world button is the relative position of the move/scale/rotate gizmos. You can change this so that they align to the world or the object. The blue highlighted button with the grid icon is the snapping button, it's on and it snaps to 10 unreal units (cm). This can be changed by clicking on the number. Same goes for the angle icon (snapping for rotation) and the square arrow icon (snapping for scale). The camera with 1 button is the camera speed (can be changed on the fly by scrolling while moving in viewport).
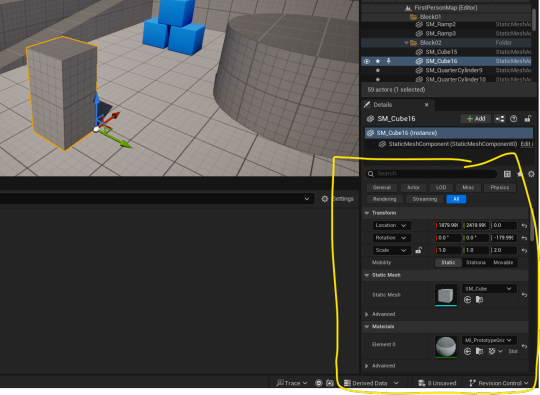
The details panel allows to edit all aspects of the mesh including location, scale, rotation, change the mesh, change mesh material, change mesh properties (collision, weight, etc.). When it comes to manual scaling, you can lock the scale modifier to make the growth uniform. Generally you want to scale every model uniformly.

Viewport modes. Lit/unlit are the most important for us.
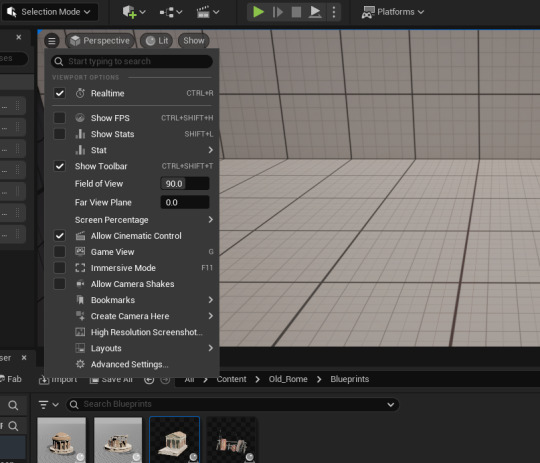
Viewport settings. FOV is for viewport.
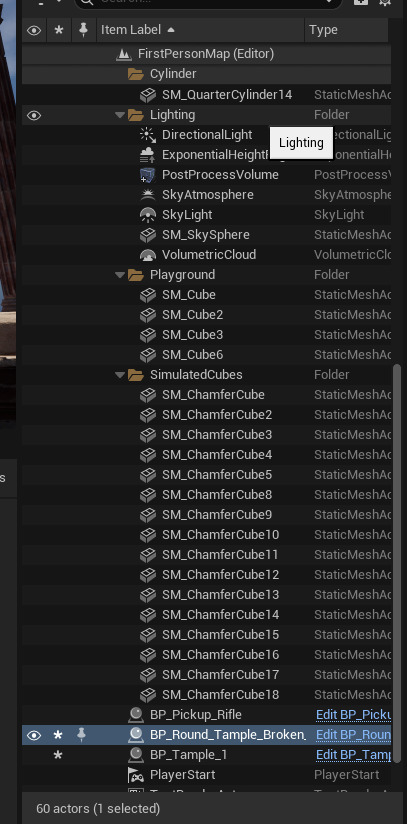
Outliner. Things can be sorted into folders. The eyeball is visibility.

Right clicking an asset in the viewport gives a bunch of options. Including browse to asset which takes you to the asset in the content drawer.
Hold Ctrl+L to have immediate control and movement over the directional light.
Filter in selected folder.

Content Drawer Settings.
Creating My content.
Creating some stuff. Keeping these systems the same over all projects I make in the future will be helpful.
creating an empty level (not basic, empty level).
Renaming.

Click on all these create buttons.
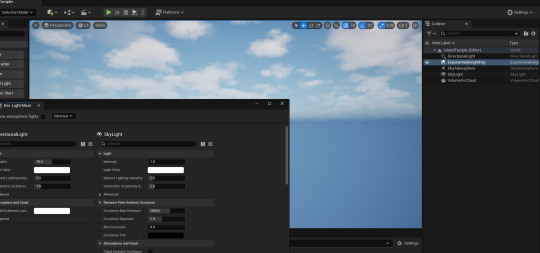
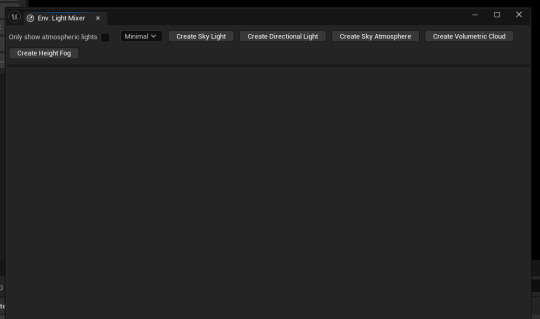
This creates all these lighting assets. If you want to delete any, you can then come back to this window and recreate them at their basic settings.
Directional light projects parallel light. Exponential light fog creates this fog that cloaks the bottom of the void. Sky atmosphere creates the blue sky. Sky light creates realistic ambient light and colour for shadows n stuff. Volumetric clouds are self explanatory.
go to https://polyhaven.com/hdris for great HDRI images.
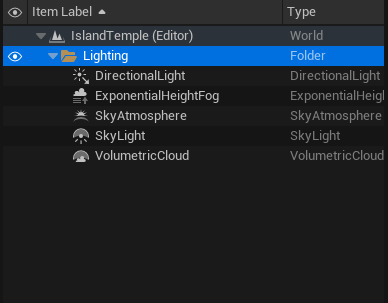
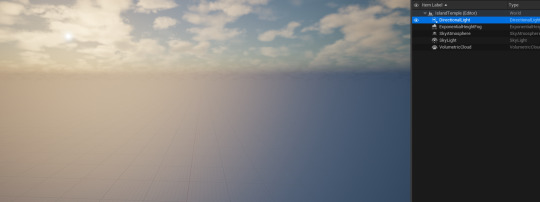
Sorting lighting into the lighting folder :).
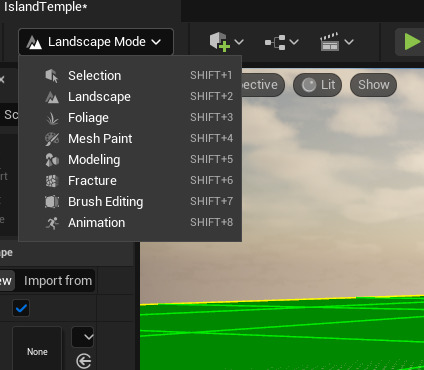
Hop into landscape mode.

This is larger than we need.
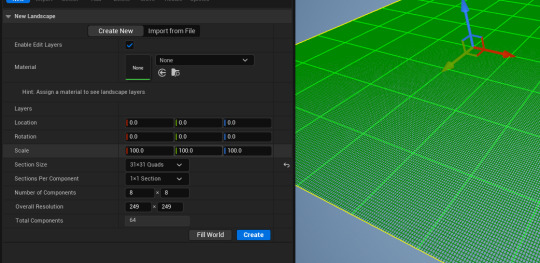
Dropping the landscape size down to 31x31 quads.
Hitting create.

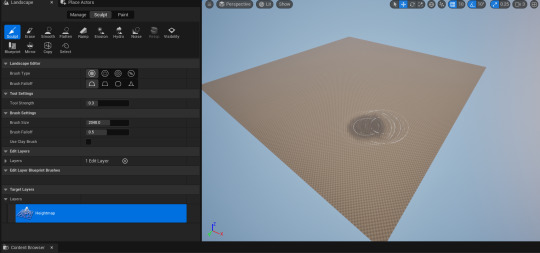
Creating some geometry with the sclupt tool.
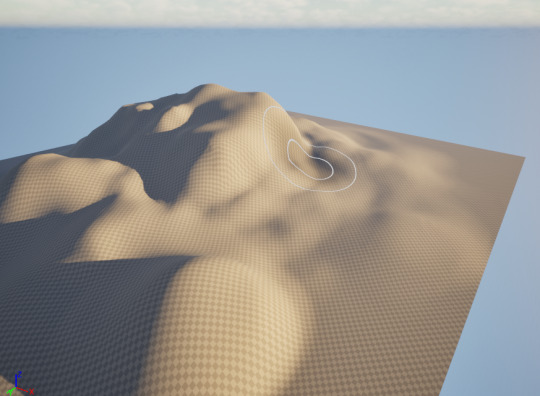
Using the smoothing tool to smoothen out the landscape and the flatten tool to flatten off some hills.

Using the erosion tool creates a more realistic degradation for cliff faces and hillsides.

The ramp tool allows you to create a ramp from the mesh by creating an angle you want, and then clicking add ramp.
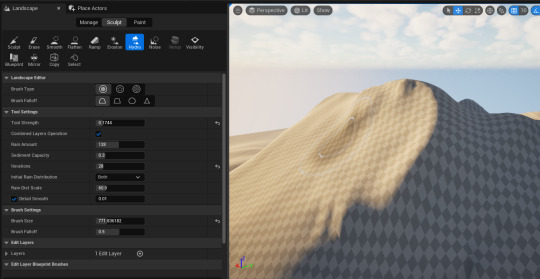
Hydro erosion simulates rainfall degredation as seen in real life, especially on the side of cliff faces and mountain peaks.

creating a large plane.
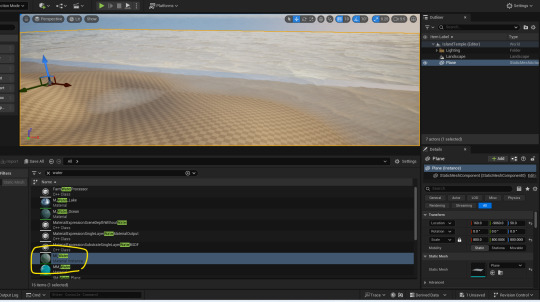
Applying the water MI (make sure it's MI) to the island.
0 notes
Text
Packaging my game & making the game icon art
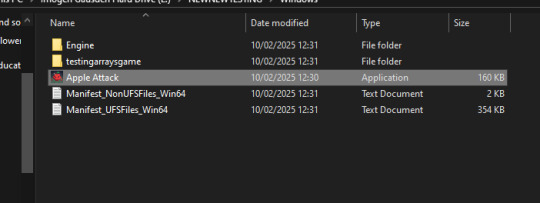
After adding the final flower details from my last blog post into my game I then began to package my game. I then also added a custom icon for my video game as otherwise it would've just been the Unreal Engine logo, so I made my own with Baldwin on the cover.

I set the game to shipping and then pressed my package project, after doing that I renamed it to Apple attack rather than it just being the Unreal project name.

0 notes
Text
Giving Each Answer a Value?
For my game there are 4 options which have some form of Political allegiance like Communism being the more extreme answers but would definitely work but might go against some moral. Environmentalism always the best of both worlds Moral and Effective but maybe not effective enough. Economics makes life easy for all but does nothing. Individualism goes against humanity as a whole. There definitely is a Correct answer but some answers are more correct then others, and one must be Incorrect.


Now in Climate Quiz HUD Event Graph disconnect the Most Correct Node from Branch's Condition

Replace it with 5 Points. disconnect the First Branch's False with the Second Branch, and also disconnect the Addition and Score Integer
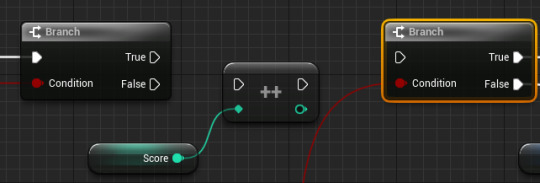
Then out of the First Branch's False I got another Branch then I did that for the Next one and again.

Then connect each Branch's Condition to the Conditions in Event Next Question

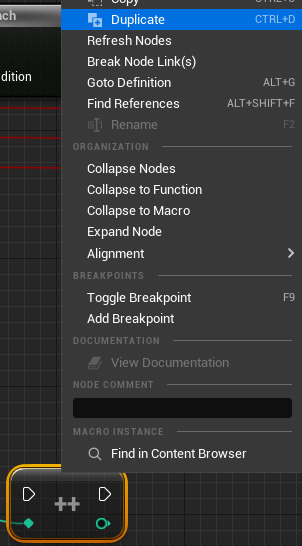
Now with the Add Right Click it and select Duplicate
In the Variables List click the Plus

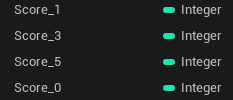
and make 3 more Integer Single Variables and call them Score_5 Score_3 and Score_0, rename Score to Score_1.
Then I dragged each one out and selected Get and connected them to an Add


Now connect each Add to each Branch's True that's condition is the same number. (That is really hard to explain so showing you is better)

(5.2.25)
Today is the Last Day* of my project and Arcade game. My vision was to have each choice be a different score but now my Game doesn't work anymore there is not Enough time to fix this so I'm going to remove this feature and delete all of the following Code that I just added and go back to the old way where there is only One Correct answer and 3 wrong answers, there will still be a Score and hopefully a High score. To fix this I went back to Making my Tutorial Part 5 about the Middle which is where it talks about the creation of the Score system. To make sure you don't have to go back I will repeat what it says and say what I had to do.
So in the Content Drawer I went into the BPI_Quiz

Then I will see Next Question which is what I Renamed it from New Function, then inside of Details under Inputs are the 4 Conditions Most Correct, Very Correct, Quite Correct and Incorrect
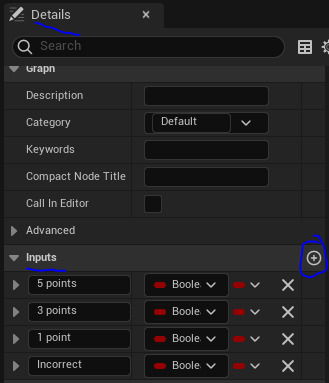
So I deleted all of them then clicked the Plus next to Inputs and called this one Correct

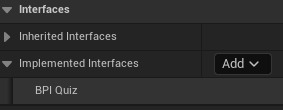
Now to make sure it works I went back to ClimateQuiz_HUD then into its Class Settings.

Then in the Details Under Interfaces in Implemented Interfaces click Add. Then I selected it wasn't working but under it was already there but I just deselected and reselected to make sure it was up to date.
Then in the Variables List there will be my 4 Integers 5 Points, 3 Points, 1 Point, 0 Points.

And you guessed it I deleted them and instead clicked the Plus and spawned a new a Single Integer just Called Score.

Drag it onto the Blueprint and select Get Score

Then connected everything normally again.

There was an Issue while Compiling that said "Two functions with the same name Next Question" so to fix this on the Custom Event I right clicked on it and Renamed it to "NextQuestion" (there is no space now)
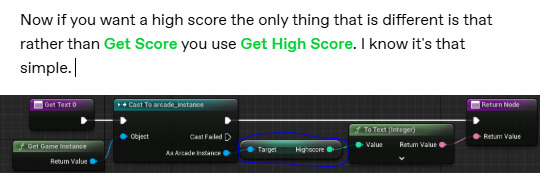
Now before I forget about the Score I decided to make a High Score. I used the Blog post titled Score System in Unreal on this Blog to find out what to do.
The way it is done in this was different as in that "Game" the Score and High score was shown the whole time during gameplay. Which means I have to make a decision, do I show the Score and High Score the whole time to make the player motivated constantly want to do better and giving them knowledge about what the Answers are for each Questions or do I make it harder and a secret until they reach the end so there is more replayability as they have no idea which questions they got Correct or Incorrect. Due to the Fact this is an Arcade Game and at one point I had an idea for a Game that was literally impossible to win I think you know which choice I will pick. But yes I will not show the Score.
So I opened the Scorecard.

Then in Palette search up Text and drag it to where you want it on the Canvas Panel (this will be my High Score)

Then while the Text was selected I Renamed it to Highscore Text and Ticked Is Variable

Then in the Event Graph I had to do the same thing that I did with the Score making a Custom Event and calling it Init HighScore then connecting that to a SetText (Text) and connecting its Target to the Variable Highscore

0 notes
Text
I am maybe thinking of making this blog about game development. I love all the different game engines so here’s some basic info I’ve read about over the years about these game engines.
0 Panzer Dragoon Saga (Saturn(
The one has an interesting story that the legend goes that the source code was completely lost for the game. Because it’s a Saturn game it was a difficult project to complete. Has some of the best graphics the Saturn has to offer.
1 Xenogears (PSX)
I’m not familiar with the square soft game engines
2 Final Fantasy Tactics (PSX)
Same
3 Sonic 2 (Genesis)
Yuji Naka programmed this one probably mostly by himself.
4 Rage (PC)
This is the most beautiful looking game I have ever seen even to this day, John Carmack’s Id engine. Lots of info out there on the megatexture technology. There is a GDC tech showcase on this and it’s amazing how they add the detail. John Carmack lived up to his promise and released the mod tools which he should be commended for it’s really fun to mess with you can get them on steam however it’s really not documented and stuff like model exports are really hard to do, I think it’s md5 format but I was never able to get any custom models in.
5 Death Stranding (PS4)
This is the Horizon Zero dawn engine renamed Decima engine. There’s a lot of info on this it’s really facinating how Kojima picked the engine but it was a collaboration with the Horzion Zero dawn team where Kojimas team added lots of contributions to the engine. Probably after rage the most beuitful engine I’ve seen. I had already beaten it before the ps5 version came out which looks even more amazing.
6 Metal Gear Solid V (PS4)
The legendary Fox engine developed by Kojima before leaving Konami. On ps3 it runs amazing, a technical marvel.
7 Dishonered 2 (PC)
This is the id tech engine and holy fuck it looks amazing. It’s an off shoot version of the engine after rage and is pretty different and completely breathtaking. There is a level where there is two levels areas on top of each and you can seamlessly transition between the two versions, another technical marvel no idea how they were able to program that. Titanfall 2 has a level that does something similar. Valve engine/most call of duty's of course based off id engine.
8 Dishonered (PC)
Unreal Engine 3
9 Cyberpunk 2077 (PS4)
Custom engine, I finished on the ps4 and even more fantastic on the ps5 version. I enjoyed it on the ps4 and I don’t understand the launch critiques even though yes it crashed quite a few times but never bothered me.
0 notes
Text
Just a little update
Lately, life has been a whirlwind of activity, and I’ve been fully immersed in working on my game. It’s been a thrilling but demanding project, and every day I find myself chipping away at it, making steady progress. At the same time, I’ve been slowly working on my book, enjoying the process when I can squeeze it in between everything else. Taking some time off has been refreshing, and I’ve really been savoring the break—even if it’s been a busy one.
That said, I’ve decided I probably won’t be continuing Snack Powered Mage beyond the conclusion. I want to make sure it gets the ending it deserves, though. I currently have five chapters written and expect at least five more to bring the story to a satisfying close. It’s a bittersweet decision, but it feels like the right one given how much I’ve got on my plate right now.
As for my game, I’ve shelved the idea of my clothing system and decided to follow this YouTube series: Unreal Engine RPG Tutorial. The series has 82 videos—yes, eighty-two—and I’m hoping that once I’ve completed them all, I’ll have a base game ready to launch any RPG I dream up, along with the knowledge to do so. I have so many stories that I’ve worked on over the years, and while I can’t adapt Snack Powered Mage due to my contract, I’m sure it will be a great story nonetheless.
I’m loosely thinking about creating a dungeon crawler featuring either a pair of women heroes or a customizable choose-your-gender story. I debated turning "The Fractured Wizard" into a game, but I couldn’t think of engaging gameplay for it, so it might work better as a movie instead. Honestly, I don’t feel like getting wrapped up in a full movie project right now. Over the years, I’ve made a few models to help visualize stories, but who knows? Maybe I’ll toss everything into a blender (pun intended) and see what comes out—perhaps even a massive multiplayer open-world game where people can explore all my ideas.
Speaking of past projects, I’ve dabbled in Second Life and still have my store there: Xade Creations. I’m pretty skilled at modeling buildings, and I have a bunch of incomplete and finished ones waiting to be added to the marketplace. Since they updated the platform, I’ve yet to tinker with it and get everything working again. It’s just another task to add to the back burner for later.
Between being under the weather, juggling DoorDashing, and diving headfirst into game development, my schedule has been packed. If you want more details or updates, you can find everything on my BlueSky account: insanexade.bsky.social. I’m excited to share what’s coming next and keep you all in the loop!
This blog will soon come to an end, and I’ll be moving my updates to my original blog, now renamed Zanden Xade. You can find it here: Zanden Xade. That will be my new blogging home moving forward.
I'm leaving everyone with an AI concept of Snacks the Dragon that I did when I first created him. Enjoy!
Anyhow, I guess I should get going. Have fun, everyone!
#GameDevelopment#UnrealEngine5#IndieDevJourney#RPGCreation#SnackPoweredMage#SecondLifeCreations#CreativeProjects#StoryTellingAdventures#DungeonCrawlerIdeas#IndieGameDesign#ModelingInBlender#LifeAsACreator#BlueSkyUpdates#XadeCreations
0 notes
Text
Brief 1: Red vs Blue (Setting up in Unreal)
After the major parts of the creation of the airplane toy asset was concluded, I moved on to importing the asset and the textures into a game engine. I chose to go with Unreal Engine because the latest client version has knocked it out of the park, with better lighting system and support for nanites to introduce a large number of poly counts with very little cost for graphical performance.
Figure 1 (Opening a new Unreal project file, 2024)
I created a new project file in Unreal Engine. I clicked on the starter assets and selected the third person template and opened a new world.
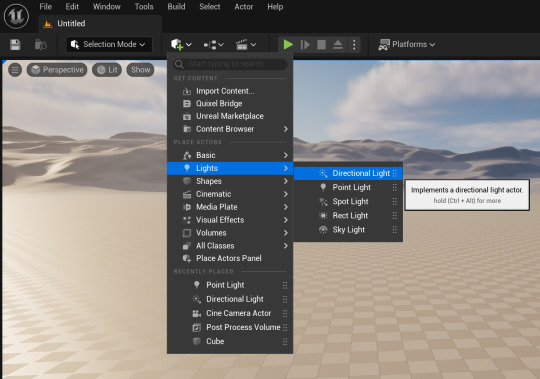
Figure 2 (Adding lights to the scene, 2024)
I added 2 different lighting systems to light up the surrounding environment. I used a directional light which will basically act as the main sunlight for the environment. I also added a sky light which will emulate the sky light with a hint of blue tint to make our scene as natural as possible.
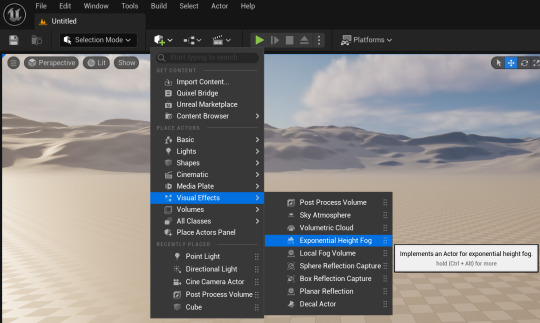
Figure 3 (Adding visual effects to the scene, 2024)
I added a sky atmosphere to the scene. This allows us to simulate a sky environment and calculate accurate light scattering in the scene. I then proceeded with an exponential height fog to get rid of the black outlines in the distant and replace them with a height fog whose attributes can be manipulated to make them seem near or distant. Finally, I added a volumetric cloud effect to the scene to simulate volumetric clouds and make our environment a bit better. This is a very easy and standard way of setting up a scene.

Figure 4 (Adding the assets to the project window, 2024)
As far as I am aware, there are 2 different methods to import textures and meshes to your Unreal project. Firstly, you can just drag and drop it onto your content browser that you can toggle open by pressing your ctrl and space bar keys at the same time. Secondly, you can migrate whatever you need from your maya or blender files that contain meshes and your substance painter files that contain textures straight into your Unreal Engine project files. Both use the same principle and since I had only 1 combined mesh and a bunch of textures to import, I just dragged and dropped it into my file and organized it in new folders.

Figure 5 (Importing the meshes onto the scene, 2024)
I imported the combined mesh of the coin airplane toy onto the scene. I also added a plane and increased its scale and placed it as a mat under the airplane.

Figure 6 (Creating a new material for the mesh, 2024)
To first assign texture maps to a mesh in Unreal Engine, you need to first create a separate material inside the engine and then assign the materials to the mesh. Then, you set up your textures inside the newly assigned material and apply it to the mesh.

Figure 7 (Assigning materials inside the material graph, 2024)
I added all of the texture maps that I exported from Substance Painter into the material graph. Material graph is basically a window where you get to assign your textures and manipulate it so that when you apply it in this graph, the textures act in the main scene.
I plugged the base color to the base color node, metallic to metallic node and roughness into the roughness node. Since I didn't have any emissive texture for my mesh, I simply deleted it.

Figure 8 (Setting up the height and normal maps, 2024)
Since I had both height and normal maps for the mesh, I was a bit confused as to how to combine them both together and plug them into the normal node. So I looked up online for a fix and while not the exact best solution, I used this method.
If you right click, you open a panel where you can search for nodes to add to the material graph. I searched for a normal from heightmap, it extract normal from the height map as its name suggest. I plugged the height map to the height node. To control the intensity of the height, I added a parameter and set its value to 1 and renamed it as height intensity. It will allow us to control the intensity of the height map.
After this, I searched for a blend node to blend both the height and the normal maps together. There is a specific node for this called the BlendAngleCorrectedNormals node, kind of a long name. I plugged the normal map to the Base Normal node and plugged the output from the NormalFromHeightmap to the AdditionalNormal node. Then, I plugged the main output into the shader normal node. Once I saved and applied the textures, I went into the scene and the voila, the textures were working as intended for the static mesh.

Figure 9 (Textured static mesh, 2024)
I added a bunch of primitive cubes and shaped them accordingly to create a small room of sorts. This will act as the main setting for the final render still. However, I also needed to fix the auto exposure issue I was facing whenever I would approach the setting.
I added a PostProcessVolume onto the scene and opened its attribute editor. I opened the Exposure tab and set the metering mode to Manual connection. This way, I eliminated auto exposure by setting it to manual exposure. I then increased the value of the exposure compensation to 10.2 to set the environment exposure to what it was before.
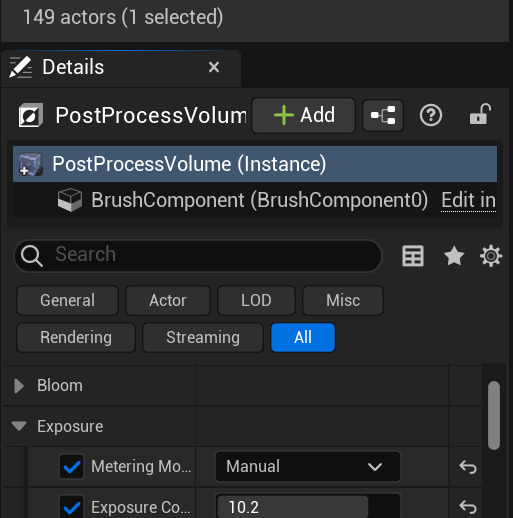
Figure 10 (Setting manual exposure, 2024)
After this, I decided my scene was ready. To get a render capture, I decided to import a camera actor onto the scene and capture the renders through its lenses. I added a Cine Camera Actor onto the scene and switched to camera perspective. I tweaked the focal length to 35 and set the aperture of the lens to 3.75 and previewed it from the lens as displayed.
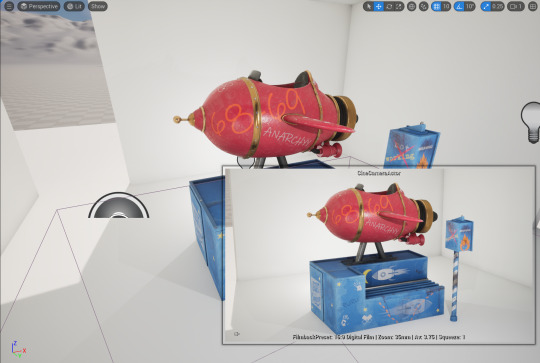
Figure 11 (Preview of the renders, 2024)
0 notes
Text
Preparation :
To start I opened Unreal editor 5.4.4
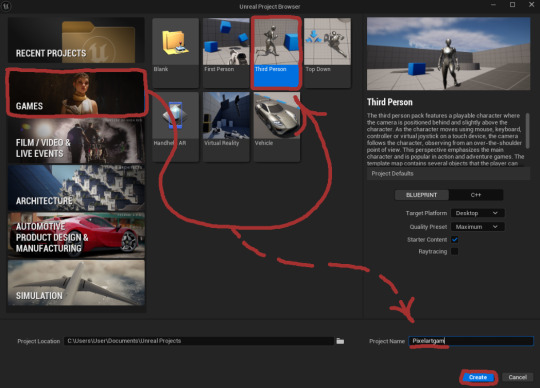
Which then I went into the Games section and clicked on the Third Person pre-set so I can get the base movement , camera and lighting after I rename the Project Name to Pixelartgame and clicked Create.
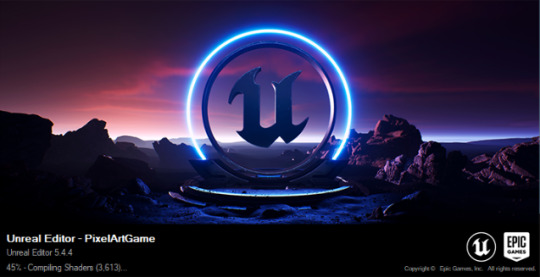
This then compiles everything for the journey of making a Pixel art game.
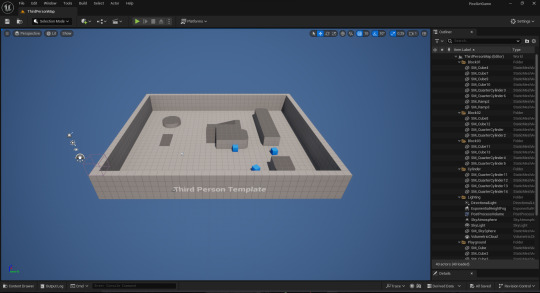
This is then gives me the base map and player character.

I then erase any unnecessary parts of the base map, keeping the lighting and player character leaving me with everything I need to start the making process.
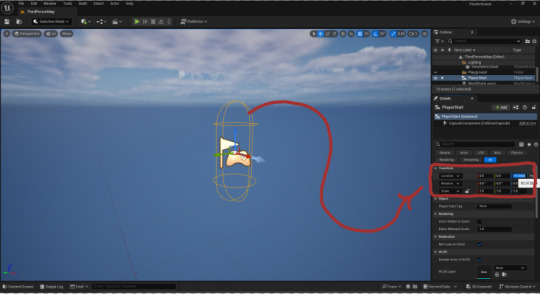
After which I move the Player character to the Location or XYZ co-ordinates to (0) (0) (0) to the centre the character and make it easier to know where the start is.
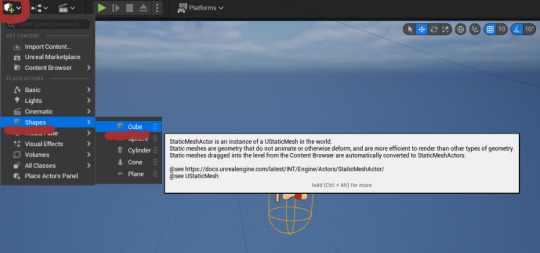
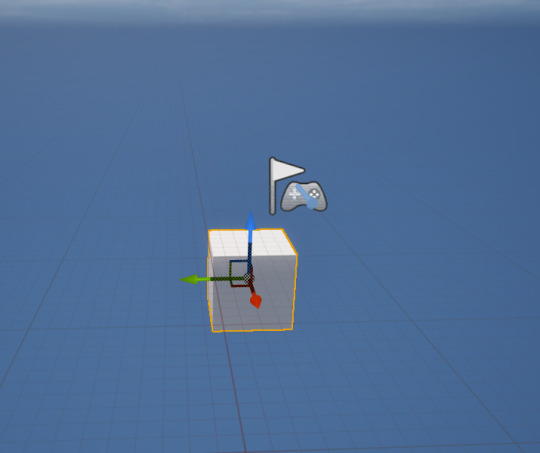
I create a cube by going to the little cube icon with a green plus symbol, going to Shapes and then clicking Cube, this gives us a base platform.

The base platform is then moved right below the Player Character and elongated along a co-ordinate to create a long platform suitable for tests.
However the player character can still move its camera and walk off the platform freely.
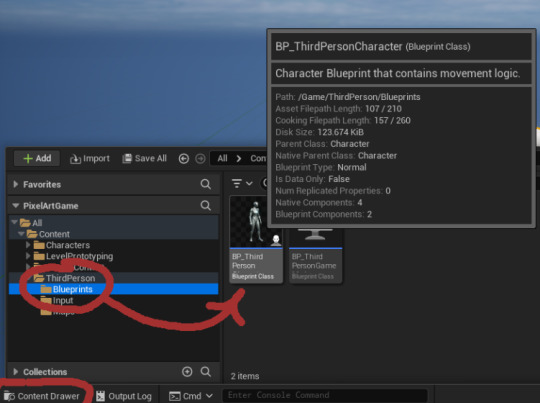
To fix this I go to my Content Drawer and go All > Content > ThirdPerson > Blueprints to find the Player character or as its named BP_ThirdPerson.

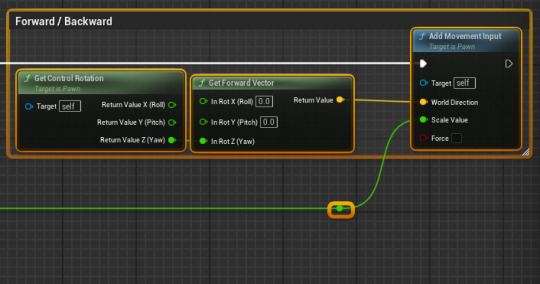
I then remove all of the Camera Input Code as well as the Forward / Backward movement code to make sure the player cant want forward or back off the base platform.
Now we have a separate problem, where slanted walls can knock us off the base platform.
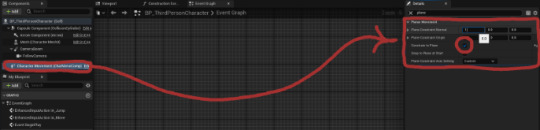
To Make it so we don't have this issue we go to the Character Movement and the find Planar Movement and turn on Constraint to Plane, after I set the Plane Constraint Normal to (1) (0) (0) to make it so the players character can on move in one plane.
0 notes
Text
Prototype one - endless runners

I went into unreal engine 5.4.4 to create my endless runner project and went into my BP_ThirdPersonCharacter and deleted the camera input code. This is because in this game I make, it will be a camera fixed view from behind the character.
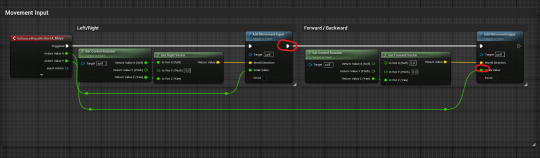
Disconnecting these codes will mean that my character will not be able to move forward/backward as this disconnects the movement input code.

I dragged the forward/backward box and its content into the space where we had deleted the camera input code, renaming the comment box as 'endless runner movement' so I know what this code is for.
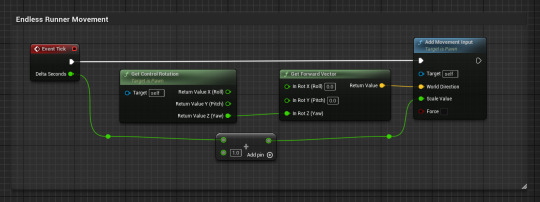
I right clicked into the event graph into finding my event tick and linked it to the add movement input and dragged out from delta seconds to search for an 'add node' (+), putting the value at 1 to connect to the scale value.
When I start the game my character is automatically moving forward, but for us to see more in the perspective, we need to go to the viewport tab, select the camera and change the location values to this:


Now when my character moves, the camera angle is higher and able to see a wider perspective.
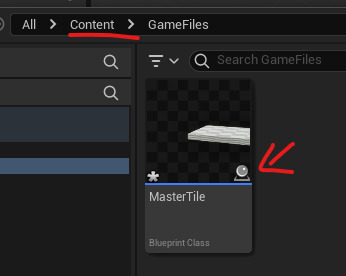
I went back to my content drawer and made a new file named 'GameFiles' and in the folder I created a blueprint actor and named it 'MasterTile', added a cube from components and changed the location and scale.
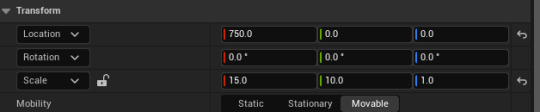

This will make sure the default scene root is at the start of the tile so when our tiles start spawning in, they will be perfectly aligned and not overlapping. I changed the material to the ceramic tile checker material to make it an easier guide for setting up the lanes.
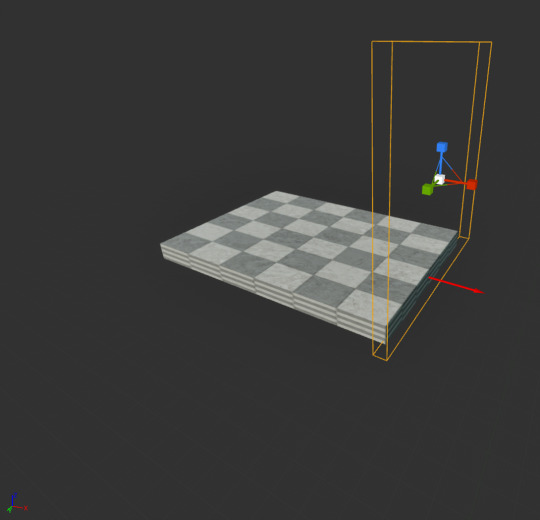
The x direction should be facing the same way as the arrow so if they aren't you'll know where you've gone wrong. Create a collision box where the box is big enough so when your character jumps, they will still go through it and that its covered by the whole tile. Then you select the box collision in the components panel and scroll to the details panel to 'events' and click on the + symbol on the 'component begin overlap'.

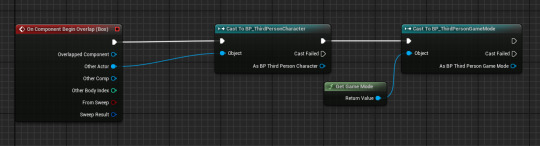
From the execution pin I dragged off to 'cast to BP_ThirdPersonCharacter' and connect the other actor to object. I then dragged the pin from BP_ThirdPersonCharacter and casted to 'BP_ThirdPersonGameMode' so I could get the node 'get game mode'. I then went into the content drawer onto my thirdperson folder, blueprints, and then went into BP_ThirdPersonGameMode. This would be for the collision box.

Forgot to take a picture of this but to access the event graph all you need to do is click on the blue words.
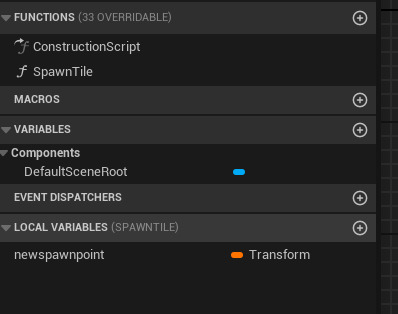
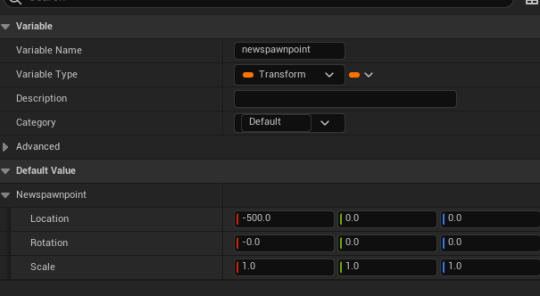
Make sure that your arrow in your master tile called 'spawn point', as this caused me struggle to find how to gain my spawn point. In the gamemode you need to create a new function from the left side bar and drag off the exec pin and search for 'spawn actor from class', you then right click on the spawn transform pin and promote it to a variable, renaming it 'nextspawnpoint', set it to the default value for this.
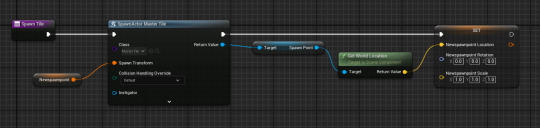
From return value, you drag off and search for spawnpoint, drag off of it and search for getworldlocation. Then drag 'NextSpawnPoint' variable from the left sidebar onto the grid and select 'Set NextSpawnPoint', right click on the left structure pin and select split structure pin. Then plug Get World Location in the Next Spawn Point Location pin This code explains how in the game, tiles will spawn infront of the character in a repeating pattern. So you'll be able to see all the tiles loading infront.
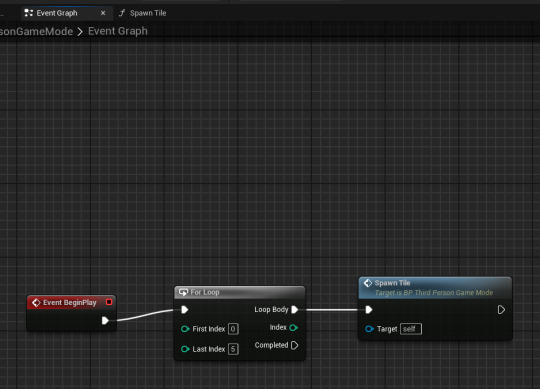
This will continue the loop of spawning the tiles.
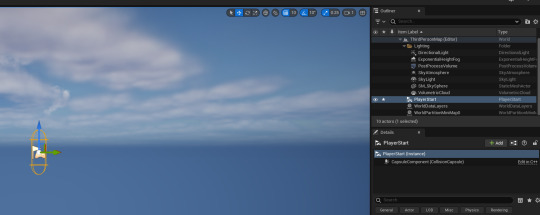
Next I had to delete everything in the map, going into 'Outlier' and deleting everything till it looks like that, and nothing is in the map anymore.
In the end my game actually didn't work at all, my tiles were collapsing all onto each other and I couldn't figure out the reasons for ages, but what fixed it all was that I put one of my variable into 'local variables' and that's how nothing was working.
0 notes
Text
Uploading and Finalisation
With the characters completed my next goal was to upload these files to Google Drive where Zoe could download them and import them into the unreal project. However, the lack of experience with unreal led to multiple problems when trying to transfer these files.
For the cutscene, they required animations which meant transferring the model to Mixamo and applying a t pose ready for other Mixamo animations. This meant turning the A pose of the models into a T pose. First to prepare the model I must join all the mesh together and remove all existing information such as the textures, and armature from previous work as well as reset any rotations or scaling effects. I originally exported it as FBX however, it struggled to read the skeleton of the mesh so once exported as an OBJ it worked. Once Mixamo has given the mesh the T pose I'll export it back into Blender however, when importing the animations the arms would cross over. This is because the mesh is still being read as A Pose, so I'll have to duplicate the armature and apply the armature to force the T pose and then reset all transformations on the original armature.
Once that issue was fixed, I first exported the T pose to unreal however there were a lot of issues, firstly there were many extra bones added as well and the rotation of the model was incorrect along with scale. This was because the measurements and information in Unreal are far different in Blender.

After some trial and error, I was able to correct the transformations for the T pose to face the correct way by changing its forward axis to Y. I was also able to remove the extra bones by turning off the leaf bones. The scale was fixed by increasing the scale by 50 within the options as well.
However, whilst exporting these FBXs there were no materials to apply to the mesh this was because it was removed for Mixamo. Therefore, I had to read them all and assign them to each part of the mesh which will allow Zoe to apply the meshes back onto the material. Whilst doing this for the warrior there was an unknown issue as to why the file would become corrupted when attempting to add the materials. Unsure what's causing this I exported mesh as OBJ which fixed most of the errors however certain parts of the texture were unable to show up on the mesh such as the weapon. With limited time we decided to put this issue aside and place some base textures on the weapon for now.
Another issue whilst uploading these T Poses was Unreal’s inability to read the empties provided by Blender. Because of this, I had to reimport all the T Poses along with the weapons and then simply weight-paint them to a bone for it to follow. It is like empties but you lose a lot of control over the weapons and are unable to move them, however, did provide a fix in the meantime. The final issue to fix was to rename the Armature to something else such as “Warrior_rig” This just allows Unreal to read the armature easier and avoid future issues.
Now with the T Poses working correctly, I was able to continue working on the animations. This was luckily far easier as it required just copying the animations onto the T-pose's Rig and exporting them. I first baked the animations before exporting them ensuring I remove NLA strips as this likely causes a few animation issues. One small issue was clipping in the rogue's animation so to fix this I went back to the T Pose and used the inflate tool in sculpt to push out the mesh more to avoid clipping. These were all exported as FBX as this provides better animation bakes.
0 notes
Text
Practice 1_Weekly Projects
80.lv assignment
Blog 1
Adding stickers to textures in Substance Painter is a powerful way to enhance the realism and detail of your 3D models. In this comprehensive guide, we'll walk through the process of seamlessly incorporating stickers onto textures using Substance Painter and subsequently exporting the textured model to Unreal Engine. Whether you're a seasoned artist or a beginner, this step-by-step tutorial will empower you to elevate your creations to new heights.
Step 1: Importing Your 3D Model into Substance Painter Open Substance Painter and create a new project. Import your 3D model into Substance Painter. Ensure that your model is UV-mapped to facilitate proper sticker placement. Step 2: Applying Base Materials Select the desired materials for your model's base layers. Apply them to the respective channels (Base Color, Roughness, Normal, etc.) in Substance Painter. Step 3: Creating a New Fill Layer for Stickers Add a new fill layer for your stickers by clicking on the "Add Fill Layer" button. In the Layers menu, rename the fill layer to "Stickers" for organization. Step 4: Importing Sticker Resources In Substance Painter, navigate to the "Layers" shelf. Click on the "Add a New Resource" button and choose "Import Resources." Select the sticker images or textures you want to use and import them into your project. Step 5: Placing Stickers on the Model In the "Stickers" fill layer, click on the "Add a Mask" button. Choose "Bitmap Mask" and select the sticker texture you imported. Adjust the mask settings to control the placement, rotation, and scale of the stickers on your model. Step 6: Customizing Sticker Appearance Fine-tune the appearance of your stickers using the various adjustment options in the "Stickers" fill layer. Utilize parameters like color adjustment, wear, and roughness to integrate the stickers realistically into the base material. Step 7: Exporting Textures for Unreal Engine Once satisfied with the sticker placement, go to "File" and select "Export Textures." Choose the desired configuration for Unreal Engine, such as Metallic/Roughness or Specular/Gloss. Click "Export" to generate the texture maps. Step 8: Importing Textures into Unreal Engine Open Unreal Engine and create a new project or use an existing one. Import your model and the exported texture maps. Apply the materials to your model, ensuring the sticker details are visible. Step 9: Fine-Tuning in Unreal Engine In the Unreal Engine Material Editor, adjust material settings like roughness, metallic, and normal maps to achieve the desired look. Utilize the UV mapping to control sticker placement and orientation on your model. Step 10: Preview and Refine Place your model in the scene and preview the stickers in different lighting conditions. Make any necessary adjustments in Substance Painter or Unreal Engine to achieve the desired visual result.

0 notes
Text
nothing that really stands out, other than some variable names here and there that were duplicated w/o being renamed so they have a _1 appended to them, which is kinda funny i guess. i may found something cooler though

^ actual unreal project file that almost loads properly
lol there's textures in here called weirdWall and Funny_Leaf01
47 notes
·
View notes
Text
Actual wrap-up of SCU, administrative duties, and onward to the VN projects!
Updating the SCU demo (soon), cleaning up the task list, and planning the future
Self-Checkout Unlimited
Last week, we tried to figure out how to optimize SCU so that it doesn’t demand more resources (the screaming and burning GPU) than AAA games with much more complex-looking environments. While these optimizations seemed to improve performance when we tested…testers reported even worse performance :(. So we were only able to push out a small update addressing minor issues like limiting the framerate (so that your GPU is not maxing out on the lowest visual quality setting). After that update though, we’re pretty much done with immediate adjustments. With the full game essentially finalized, we need to update the demo!
Unfortunately, creating the demo was not as simple as just cutting out the demo portion of the game and packaging it up. Using that method resulted in the file size being the same (actually a little bigger?) as the final game (~7GB) … We had to create a new project and migrate the assets used in the demo…and then because Unreal decided to copy over 90% of the assets, go back and delete them.
One would think that deleting files is an easy, even enjoyable process. It was the opposite. Earlier in the development cycle, we discovered that deleting files in the file browser could corrupt Unreal/the project, requiring us to redownload the entire project folder (many gigabytes) and Unreal (many many gigabytes, ~27?). This time, we wanted to be careful and delete files solely through the editor! Except, apparently that is even worse, as 95% of the time, the engine will decide that it rather freeze and crash instead of delete a single file (deleting multiple files at a time was almost a guaranteed crash while there was small success with deleting a single file at a time). In the end, we ended up deleting the files through the standard file browser, and UE did not complain about any corruption *wipes sweat*.
Aside from this file deletion quirk, we’re writing up a post of Tricks (and maybe Tips, but they are probably highly inefficient) and Quirks of UE and 3D game dev. SCU was an incredibly practical (and sometimes fairly painful) crash course, and hopefully someone (at minimum, our future selves) will benefit from having this writeup.
Admin, cleaning, dusting
A lot of items on our task list suffer from parental neglect (us) but are inundated with “friends” (enemies, new tasks get attention first). Post-SCU, we are determined to clean up at least some of them though, such as renaming some GUI files (why is the YDD GUI split into typewriter.psd, mm.psd, and pref.psd? Which bits of which files are the correct up-to-date ones?) and cleaning some git repos (we really should not be pushing giant 800MB binaries to git, but we didn’t know better…see future SCU writeup). Hopefully it won’t take too long! We aren’t looking forward to starting the project but know it will be a huge shadow banished once completed.
Back to VNs
Avoiding the issue of those admin tasks (it is too easy to put off cleaning in the digital world), we are back on track with VN work! You’ll get to see more regular updates on Dead Man’s Rest over at the GaG sites and learn about the other project mentioned some time ago.
We’re planning on trying out some dev streams too, so we hope you’ll join and hang out with us then. Going live on streams will be announced on Twitter and Discord!
Questions or Comments?
Feel free to send in any AG-related questions! Our Ask Box is always open.
Q: will you translate Re:H into other language?
A: It would be pretty amazing for RE:H to be translated! That would be quite a daunting project though, so there are no current plans.
Thanks so much for all of your amazing support, and stay safe out there!
JOIN ARGENT GAMES ON:
AG Twitter | Discord | Patreon
9 notes
·
View notes
Text
FANTa Update #1: Getting Unreal
I’ve started building FANTa on Unreal, doing some basic setup. We’ll be building on the foundation we lay here in the coming weeks and months. I’m still looking for a repository big enough to handle the FANTa file sizes. I’ll think of something. I’m also trying to strike a careful balance between doing specific things and being more general for speed and brevity’s sake. If you want to follow along in the meantime, here are the steps to get to where I currently am.
EDIT: Forgot to mention - you’ll need a C++ editor and compiler for this. I suggest Microsoft Visual Studio 2019 Community Edition. [Get it from Microsoft for free]. If you really don’t like Visual Studio, there’s some additional information on [setting up a different IDE here]. Remember, you can always compile your C++ code by hitting the Compile button in the editor.
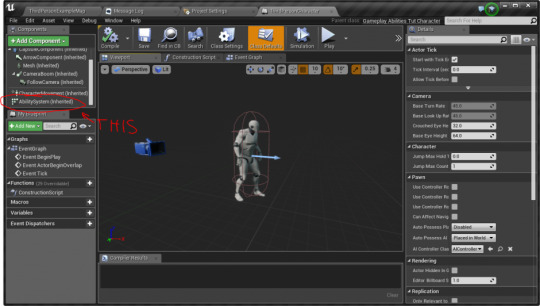
We’ll start by creating a new Unreal 4.24.2 project. Under Games, choose the Third Person template, then select C++ instead of Blueprint. We’ll still be doing most of the work in blueprints, but we need C++ in order to work in the Gameplay Ability System that we’ll be using for the traversal mechanics and such, like so:

(I’ve already created a FANTa project, which is why it says it already exists)
Optionally, you can then go to the Unreal Marketplace and add a Paragon character to your FANTa project. The AAGD Patreon Dev Team voted in Terra for our player character model, so that’s who I am using.
After you’ve gotten the project created, you need to set up the basic Gameplay Ability System in C++. [Click here for the instructions to do so]. Make sure you have the Gameplay Abilities Plugin enabled, and make the core changes to FANTaCharacter.cpp and .h. You really only need to make the changes up until the Binding to Character Input section. Find the ThirdPersonCharacter Blueprint and you should see the AbilitySystem inherited after making and compiling the C++ changes. Like this:
We’ll rename ThirdPersonCharacter to PlayerCharacter, since that’s probably a more accurate name for it.
For fun, we can also change the blueprint’s Skeletal Mesh to Terra (or whoever you decided to choose) and the Animation Blueprint to Terra_AnimBlueprint (use the dropdown menu to choose) and it should swap the mannequin for our big beefy axe lady. Compile and save everything.
Now we need a Gameplay Ability to give to the player character. Let’s start by creating a Blueprint which inherits from Gameplay Ability like so:
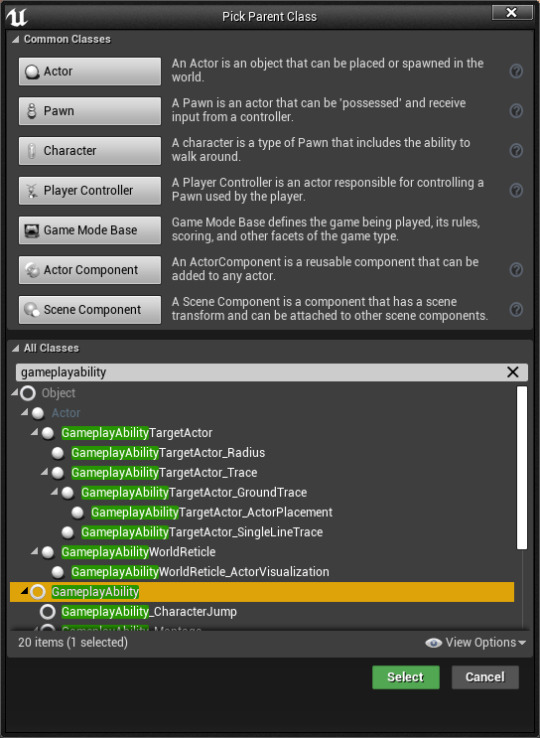
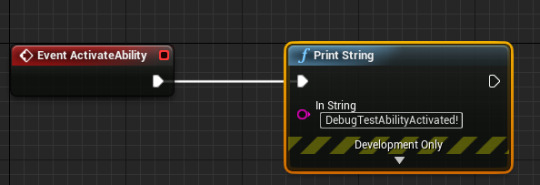
Name the GameplayAbility blueprint something like DebugTestAbility and open it up. We just want something for us to make sure it is being activated properly. Event ActivateAbility should just call PrintString with some message to indicate that the ability has been activated, like this:
Next, we need to add a little bit more code. We want to add a way to grant abilities to a FANTa Character and we want it callable via Blueprints, so I wrote this bit in FANTaCharacter.h under public:
UFUNCTION(BlueprintCallable, Category = "Abilities") void GiveAbility(TSubclassOf<class UGameplayAbility> AbilityToGive);
This declares a new class function called GiveAbility that is callable by blueprint that takes a Gameplay Ability subclass as a parameter. Then, in FANTaCharacter.cpp, we define the function as so:
void AFANTaCharacter::GiveAbility(TSubclassOf<class UGameplayAbility> AbilityToGive) { if (AbilityToGive) { AbilitySystem->GiveAbility(FGameplayAbilitySpec(AbilityToGive.GetDefaultObject(), 1, 0)); } }
This means that we can call GiveAbility from any blueprint that inherits from FANTaCharacter with a class definition for an ability and it will give that ability to that FANTaCharacter. Build it and it should be good.
Now, we need some way to make sure that this ability has a tag so we can activate it by that tag. In the Details of DebugTestAbility, edit the Ability Tag and add a new tag Debug.Test.DebugTestAbility to identify this ability in specific.

This should be enough to set up our debug test ability.
Now we have to give this ability to the player character. Go back to the PlayerCharacter blueprint and create a new variable called StartingAbility. The variable type will be Gameplay Ability Class (not object). Then, in Event BeginPlay on PlayerCharacter, give that ability to the player character like so:

You also need to set a class default for this ability - use the dropdown menu and choose DebugTestAbility for StartingAbility. This should be enough to give the debug test ability to the player character.
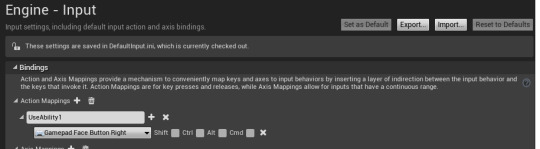
Finally, we need to put in a way to actually activate the ability. Open up your Project Settings and go to Input. Add a new action mapping and call it UseAbility1. Assign it to something. In this case, I’ve I’ve assigned it to a gamepad button.
Now... in the PlayerCharacter blueprint, we’ll put in a quick test function for this. Add a new Event InputAction UseAbility1, and for “Pressed” you can put a printstring (to make sure the input is being registered), followed by TryActivateAbilitiesByTag. The Target should be the inherited Ability System Component. Then you just need an array of gameplay tag containers. We do that by doing MakeLocalGameplayTag (choosing the tag we added above - Debug.Test.DebugTestAbility), MakeArray on it, then MakeGameplayTagContainerFromArray, and feeding that into the GameplayTagContainer input field on TryActivateAbilitiesByTag.
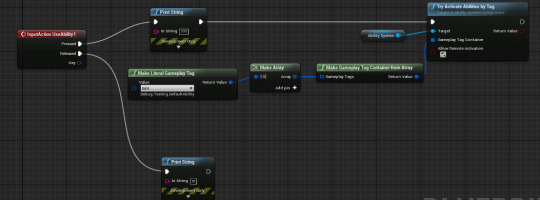
Compile your blueprints and run. You should be able to move around and pressing the UseAbility1 button should print a string to the screen that matches what we set in DebugTestAbility.
Congratulations everybody, FANTa has begun (again). We’ve set up our character and our gameplay ability system with one working ability! Future posts will be a little less in the nitty gritty as we become more familiar with the UE interface and I’ll focus more on the principles of what we’re doing rather than the exact details of the implementation. If you’re having trouble getting set up or following, please ask in #fanta-discussion on our discord server! I also want to thank all of our patrons on Patreon for helping to make this possible. We really appreciate your support.
[Join us on Discord] and/or [Support us on Patreon]
We’ve started the FANTa project in Unreal. [What is the FANTa project?]
Got a burning question you want answered?
Short questions: Ask a Game Dev on Twitter
Long questions: Ask a Game Dev on Tumblr
Frequent Questions: The FAQ
39 notes
·
View notes
Text
Why Custom Unity Character Animation?
Unity 3D is called as the open-source game engine within the VR & AR segments, it is an easy-to-use interface, it lets user import files from major designing 3D software programs such as Cinema 3D (.c4d, .c3d), Maya (.mb or .ma), Studio Max (.max), and Blender (.fbx). Animations are usually created in two ways for Unity projects, the first is through importing the characters from external applications, once the files get imported into Unity, the files need to be set up appropriately. For instance, 3D characters will have a rig – a set of bones driving the animation movements. The import settings enable users to define the Animation type i.e. Generic or Humanoid from the rig.

Setting up the Rig Steps:
• Any character you like can be imported from GameKit 3D Project into Unity, & select it in the Project window. • Then select the Rig tab in the ‘Inspector’. • Choose the Animation Type to either Generic or Humanoid.The Generic Animation type is only used for specific rigs characters & not creatures or any other type of character. The Humanoid Animation type is used for multiple humanoid characters. • Setting the ‘Avatar Definition’ as ‘Create From This Model’. • Choose Root node: as file name includes the word ‘Root’. • Checkmark on the option ‘Optimize Game Objects’ then Apply. • In the Project window, choose animation files for the character. • Select the Rig tab from Inspector. • Change Animation Type from the previous steps to match the character rig settings. • Pick ‘Avatar Definition’ as ‘Copy From Other Avatar’. • Select the Radio button for ‘Source’. • Choose the ‘Avatar Definition’ from previous steps & then Apply.
ue4 Pixel Streaming multiplayer & Unreal Streaming
Setting up the Animation Clips Steps: After the Rig set up, Animation clips set is important.
• In the Project window, choose Animation files for the character. • Select the Animation tab within the ‘Inspector’. • Rename the Animation Clip that describes your character animation. • Ensure for ‘Loop Time’ if it is looping animation. • Select ‘Root Transform’ parameters, enabling the ‘Bake into Pose’ to match the Animation clip from first to last frames. • Select ‘Based Upon’ parameter settings from the dropdown list. • Choose Apply. Then play to preview the animation in Editor.
Making Animation Clips Steps: Characters or almost any GameObjects can be animated in Unity using Animation Window.
• Choose Window > Animation option from the Menu. • Drag & drop the Animation window next to the Project window. • Choose your GameObject to animate in the Scene View. • Select the 'Create Animation Clip' button from the Animation window. • Save the Animation Clip in the destination Project directory. • Then click the Record button from the Animation window. • You can move the Time Slider to any frame location. • Move, Rotate, or Scale tool can be used to create a Keyframe on Time Slider’s location. • At the end of the animation, turn off the Record button.
Thus, customizing your characters in Unity, is you can see, adjust, and perform your animations directly in your scene with the real-time animation creation.
2 notes
·
View notes