#uvmap
Explore tagged Tumblr posts
Visit Tumblr Blog
Explore Tumblr blogs with no restrictions, modern design and the best experience.
Last Seen Tumblr Blogs


Fun Fact
25% of US internet users with an annual income of $80-100K use Tumblr.
Text
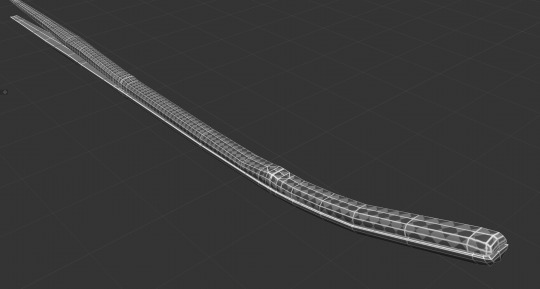
Develop & Adjust Project Phase
This week I split my time between refining the model and learning about applying texture and colour using a UV map. I was also mindful of my work set-up and looked to practice optimal positioning to avoid exacerbating my wrist and hand issues.
Refining model
I experimented with sculpting techniques to reshape the model but found this problematic in that I had less control over the shaping process so ended up abandoning this and returning to “hard surface” modelling techniques.
Applying colour & texturing
I met with my client RK this week to review the model as well as go through her process for texturing mainly using images and texture painting in photoshop. We looked at the properties I’d need for texturing for the head, antennae and eyes and getting gradation and depth to the colouring. The UV map works a bit like a pattern for clothing in that it is the 2D pattern laid out flat that then wraps around the model.
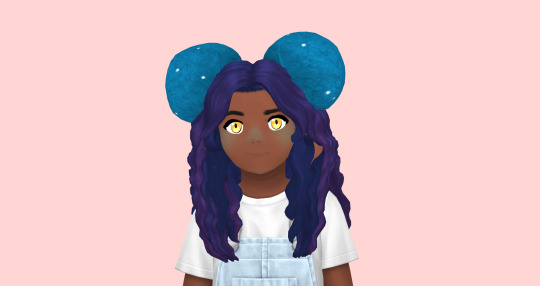
The image below shows using a reference image on the left and placing the UV map for the head over the image to colour the head. Although the image is glossy, it has a matt appearance on the model.

The second image below shows using a painted over image on the left to capture a range of colours which the UV map can be arranged on to achieve the colour results needed. The greater the amount of detail needed then the larger the map for that part needs to be. Mapping the entire ant head and all its elements onto a single image can also help keep the file size small. In this image below the head on the model appears glossy which was achieved by adjusting the material properties after the texture/colour map had been applied.

We also looked at how to layout the UV map, where to place “seams” or cuts in the design. Seams can show up so need to be either hidden or made seamless so it doesn’t interrupt the surface pattern. We also worked through some clean up of aspects of the model which included some speedy ways to select, orient and adjust the model’s mesh.
We looked at some of RK's plant models for examples of how she had put the colour mapping into practice using images, photoshop editing and adapting the UV maps. RK reiterated that playing with the model and software are key to embedding learning and understanding how to get the best out of the tools and project.
Finally, it was agreed that although the model needs further refining to reach a suitable level for scientific use, that it was important to focus on this next stage of colouring and texturing a model to round out my skill set in modelling. Further refinement of the model can be done at a later stage and will go beyond this project - RK advised that a number of iterations are usually needed to achieve a highly refined model that incorporates feedback following reviews from experts in the field. We discussed some options to try out with the colouring and the intention for this next week will be to experiment with the colouring.
0 notes
Text
ambodyslob was supposed to be a part of the base game and i know this because the uv mapping is FUCKED up
#it is AWFUL#cc making discussions#harebrained uvmapping on clothes ts2 developers y did you do it this way
22 notes
·
View notes
Text
THE BABBA
#sims 4#ts4#non cc posting#wip#pain flareup is rlly bad now so this will continue.. laters#i know kemonomimi stuff won the poll but i dont feel like uvmapping and texturing what i modeled for that ASDFGHJ
6 notes
·
View notes
Text
Albatros D II - Texturizado - 52 Materiales de la Cabina (Parte 1)
Texturizamos algunos elementos de la cabina de nuestro Albatros DII en Instamat así como directamente en 3DS Max
youtube
#albatros#WW1#instamat#hardsurfacemodeling#mazhuka#israelcantillo#3dsmax#3dsmaxtutorial#modelado3d#texturizado#uvmapping#youtube#fyp#3dmodeling#Youtube
1 note
·
View note

Video
youtube
Video Title: "How to Download 3D Coat for FREE: Steam, Official Website, and Relachado.site + ADVANTAGES!"
Video Description: "Discover how to download 3D Coat for free on Steam, the official website, and my Relachado.site! Additionally, explore the exciting advantages of this powerful 3D modeling tool. Don't miss out, subscribe, and start your creative journey now!"
Keywords (Comma Separated): 3D Coat, download, free, Steam, official website, Relachado.site, 3D modeling, digital sculpting, texturing, painting, retopology, advantages, voxel sculpting, real-time rendering, UV maps, community, continuous support, updates.
Keywords (With '#' at the Beginning): .
#youtube#3DCoat downloadfree 3Dmodeling Steam officialwebsite Relachadosite advantages voxelsculpting real-timerendering UVmaps continuousupport upda
0 notes
Text


Rocker Pants & 70s Platforms - bottom for AF
Low-rise skinnies are based on 3t2 Rockstar outfit conversion by @rented-space - I combined these with my laced 70s platforms.
Download: SFS | BOX polycount: ~2850
Morphs are not great, but acceptable.
Three recolors make use of envcube mask which is a feature of SimStandardMaterial shader edit by @crispsandkerosene (it's optional, not required)
More under the cut:
*This is for The Sims 2

Above, left: "fat" morph. Waistline shape is quite different from TS2 waist but I didn't feel like remodelling it, so there's some wonkiness going on.

Textures with studded belt are based on original, but I edited the studs and colors. Denim retexture is by me.
I haven't changed the UVmapping of the pants - patch of skin showing through the tear is actually the back of Sim's thigh.
Belt shine is quite subtle. Reflection mode is set to diffuseRadiance, so if you don't have CandK's shader edit, there will be no shine visible.

plain light denim png texture (unused)
224 notes
·
View notes
Text


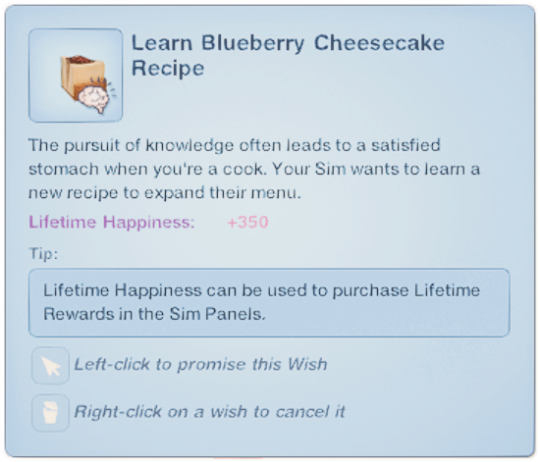
Oni28's Blueberry Cheesecake for TS3
I've been sitting on this for days because, well, 'real life'... Anyways, it's done. You can check this and this post for further info and more pictures.
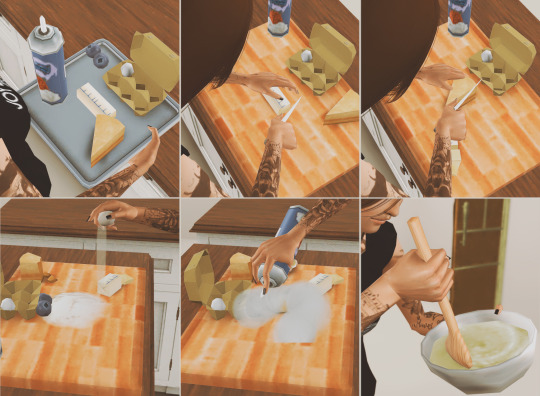
The cake can be purchased from the catalogue and a single slice can be bought from a food register. But I haven't check the Rabbit Hole Grocery Store. It also comes with a recipe book and a custom buff which are documented in the posts linked above. Two versions: A BGC one with a recipe requiring eggs, fruits (if there's no blueberry) and cheese. And a Baker's Basket version with a recipe requiring creme cheese, sugar and fruits (if there's no blueberry) which is shown in the screenshot above.
The cooking process in this post is for BGC version. Baker's Basket version has a slightly different process. During testing, upon eating the cake Gigi was so delighted she wanted to learn the recipe which amused me quite a bit so I included the screenshot of it.
Both versions require Custom Cake Connector and CCloader. Baker's Basket version additionally requires, well, Baker's Basket. You ONLY need ONE version since they're exactly the same except ingredients and cooking process which will conflict if you have both.
Technical details for the nerds: I changed the UVMap of the cake to make room for the serving tray. The berries and their sauce beds are decimated to acceptable levels. Polys are 734 for the cake and 138 for the slice. One thing to note, Baker's Basket already have a recipe for Blueberry Cheesecake. Still, the meshes and the textures are really different. Also, this one's recipe book costs §150 and requires level 5 of cooking skill. So you can easily sort them out. Have fun. And let me know if things are not right.
- Credits -
@oni28 for the mesh and textures
@martassimsbookcc for conversion to TS3
@echoweaver for the Custom Cake Connector
douglasveiga for CCLoader
@icemunmun-spicy-scalpel for Baker's Basket
@sarasccblog for that ask :)
Made with: s3oc, s3pe, Blender, GIMP
@pis3update @kpccfinds @xto3conversionsfinds
- DOWNLOAD - The Base Game Compatible version
:: MEDIAFIRE | SFS ::
- DOWNLOAD - The Baker's Basket version
:: MEDIAFIRE | SFS ::
512 notes
·
View notes
Text

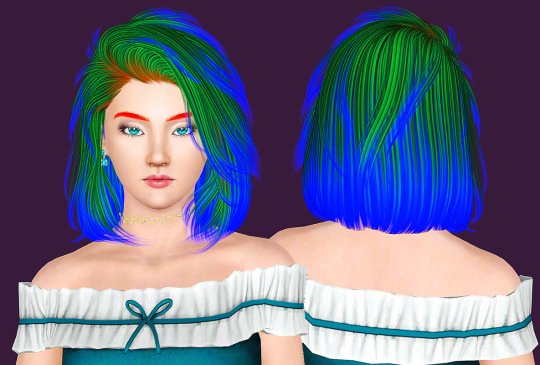
Newsea Dynamite retexture
Huge thanks to @melsts3cc for the conversion!
I ended up fixing a tiny spot on the UVmap, and since I was already on blender I redid the bone assignment.
Texture by Pooklet, EA control by Anubis, custom bumpmap
Available for females, teen - elder.
Not valid for random.
Polycount: 13k
Standalone file, won’t conflict with other versions of this hair.
Download: Sim File Share | Mediafire
208 notes
·
View notes
Note
Are there any tutorials on how to create original clothing meshes with blender alone no Marvelous Designer involved?
there's three ways to go about it: straight up modeling with planes, clothing simulation or sculpting.
method 1 - you basically start with a flat square and extrude extrude extrude. you can use retopoflow (free program) as well (it's a good program for retopology but many find it's great for clothing too). this method is great but a lot of second life girlies use it. the one con is that it's mostly limited to skin tight outfits like shapewear and body con dresses. you'd have to model in an other type of draping. that's were the bottom two methods come into play.
youtube
method 2 - cloth simulation. i truly hate this method and i think it's basically marvelous designer but in blender. i don't like this method bc it is very limited. if you have an outfit with a lot of draping, it can grind your gpu into dust. this method is for ppl who don't have MD but like how MD works.
youtube
method 3 - love this method bc you basically use the mannequin, sculpt out something amazing, retopo it to something lower, and use the high poly mesh to bake detail into the lower poly mesh. you can do this with zbrush as well. the one big con for this one is uvmapping. the sims 4 uvmap is really limited so you can only use that bottom half and make sure it doesn't crash into parts of the skin.
youtube
if you're a beginner, i genuinely do recommend frankenmeshing (ie taking assets from the game and meshing them together). it's how most of the MM girlies make their stuff and it's the easiest way to get acquainted with blender. the tutorial that got me started was deetron's and you can find it below.
good luck!
24 notes
·
View notes
Text


On the fifth day of GOATmas, my true love sent to me...
...other surfaces! Wood recolors of other surfaces!
I've recolored every surface listed as 'other' that EA has created in a pack or expansion that:
1) already had wood recolors
2) didn't have wood recolors, but I felt that wood recolors suited them

For the colors: I am using Dynamite, Depth Charge, Shrapnel, Safety Fuse and Time Bomb by @pooklet, and Nesert and Honey by Io aka @serabiet.
Please check out the Add-On's I've recommended! They are meshes made by community members that will use these textures too. Or, they are bits of CC that go along with these nicely!
~~~~~~~~~~~~~~~~~~~~~~~~~~~~~~~~~~~~~~~~~~~~~~~~~~~~~~~~~~~~~~~

Back Country Vanity - vanitycountry
notes: Seasons has some of my very favorite meshes *and* wood textures! So this one is just the texture it came with.

The seat has a few nice recolors too.
Recommended Add-On: #1

Cornerstone Veritable Vanity - vanitytablecolonial
notes: I hate most of the 'colonial' meshes that came with the game. Not the idea of them, just the sloppy meshing and UVmapping. I can tell that these were some of the very early meshes in the game. This one was HARD to retexture, but I am alright with it now.
Recommended Add-On: #1

Park Plates Table - tablediningcommunitylot
notes: shares textures with the adirondack lounger and end table if you have @hugelunatic fix
Recommended Add-On: #1, #2, #3

Youre So Vanity - vanityelite
notes: stupid vanity that I needed to fix like 5 times. Anyway, really good classic shape so who could be very mad, really.

And a few cushion recolors as well! Of course.
Recommended Add-On: #1

Tea Time Table -tabletea
notes: tabletea my beloved! Does not come in nearly enough wood colors IMO, though I've taken care of making sure that you have plenty of cushion recolors.

And then a few more, exclusive to this upload
Recommended Add-On: #1
Download - Sims 2 Other Surfaces - Wood Recolors
~~~~~~~~~~~~~~~~~~~~~~~~~~~~~~~~~~~~~~~~~~~~~~~~~~~~~~~~~~~~~~~
Recommended downloads:
#merry goatmas#merry xmas from goat#sims 2 cc#sims 2 download#ts2 download#ts2 cc#ts2cc#sims 2 object recolor
361 notes
·
View notes
Text
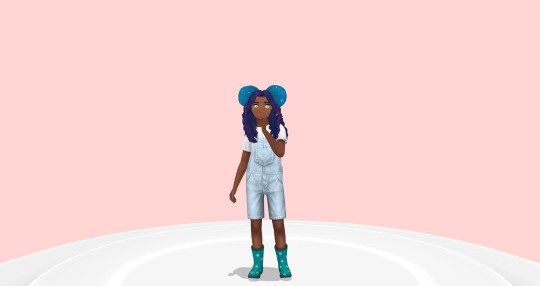
awooooooooooooooooowo what's this?
thanks for 700?!?!??!!? whadda hell thats so many people
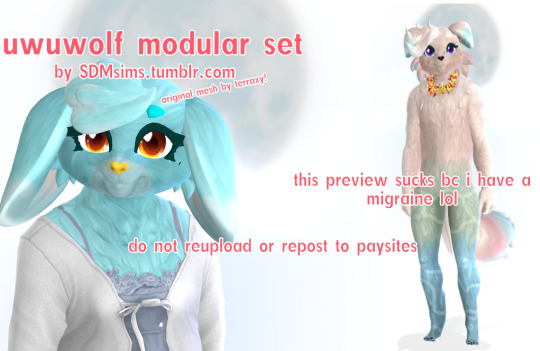
this is the successor to an experiment i did a while back, but more complete! with 28 parts to mix and match (wow)
here's the caveats, upfront:
these require the cas unlocks: werewolf addon mod to work!! because all of these are skin details and could not otherwise be added
the eyes do not fully blink, only 'flutter' because theyre so stinkin' huge
the teeth dont... look great. sorry
there's some texture seams, primarily on the tails
we good? cool
werewolf only, as they were uvmapped with werewolves in mind! sorry
mesh was primarily created based on this free base by terraxy on gumroad! please consider showing them some support if you'd like to or want the model for like, vrchat
otherwise, i meshed the hairs and cheek fluffs 1 and 2, as well as did the uv mapping and rigging
disabled for random, all should have custom thumbnails
includes bonus 'chibi' body preset (seen on right)
all parts are fully paintable, minus eyelashes! tinters for the eyebrows and lashes are included (eyeliner and facepaint)
feel free to do whatever but please dont paywall in any form!
imgoing to sleep goodnight
DL : SFS (no ads no monetization only giant huge eyes)

#sims 4#ts4cc#s4cc#ts4#sims 4 occult#cc#my cc#AUGHHHHHHHH [EXPLODES]#i feel like im forgeeting smthng but head hurtytoomuch. sorry#shoutout to that shrimp btw. i love shimp
114 notes
·
View notes
Text
Albatros D II - Texturizado - 51 Materiales de las Ametralladoras
Generamos en Instamat los materiales de todos los componentes de las ametralladoras del Albatros D II
youtube
#albatros#WW1#instamat#hardsurfacemodeling#mazhuka#israelcantillo#3dsmax#3dsmaxtutorial#modelado3d#texturizado#uvmapping#youtube#fyp#3dmodeling#curso3d#Youtube
1 note
·
View note
Text
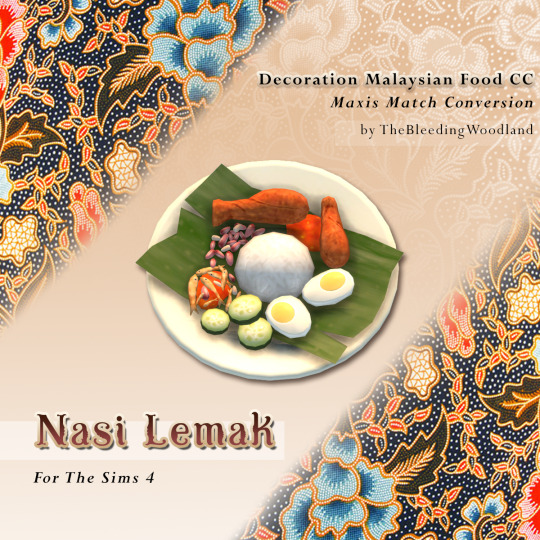
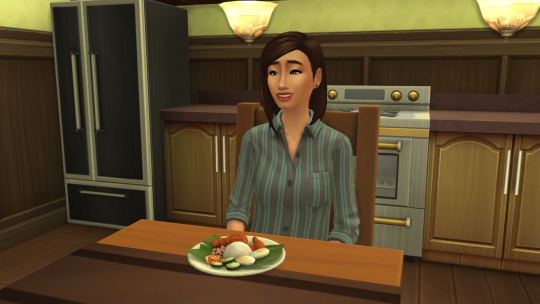
TS4 - Nasi Lemak
D E C O R A T I O N
Nasi lemak is a dish originating in Malay cuisine that consists of fragrant rice cooked in coconut milk that is traditionally served with anchovies, cucumbers, peanuts, and boiled eggs. The dish is rounded up with the addition of a spicy chili paste called sambal.
Although originally invented as a breakfast dish, soon it surpassed its original purpose and became the Malaysian national dish which can be eaten at any time.
1 Swatch
Polycount: 3,896
Price: 5
Low poly & Stylized, fit for TS4's style Maxis Match
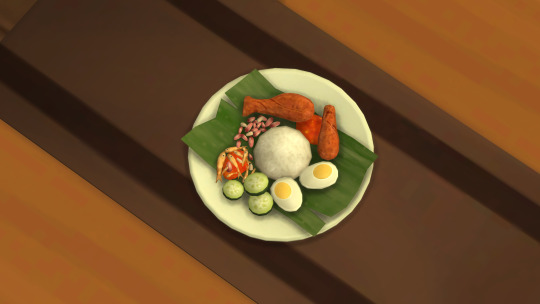
Mesh is not made by me. Nasi Lemak mesh is made by carysgooi from Sketchfab
Plate is made by adamaysils from Sketchfab and with my own modification re-UVMap and retexture.
-----------------------------------------------------
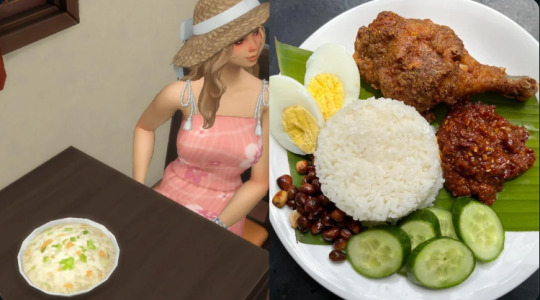
To any modders, feel free to use this Nasi Lemak mesh for your custom food or default replacement for Nasi Lemak in The Sims 4: For Rent due to horrible portrayal of Nasi Lemak in that Expansion Pack.
-----------------------------------------------------
Can be found on Decorations> Miscellaneous

[ Download ]
@maxismatch4sims @maxismatchccworld @maxismatchsims4 @maxismatchsims4 @ts4cc-finds @ts4maxismatch @culturalccfinds @ts4maxismatch Thank you in advance for reblogging
EA Maxis' wrong Nasi Lemak [Read More...]
texture that should be porridge for toddler 😂
Not just me, from Indonesia which is neighbour country to Malaysia, who are annoyed at the inaccuracy. Malaysian Sims player has already complained about this. Read more on Reddit article below.
Feel sorry for the bad representation, Malaysian brothers & sisters 🙏
#the sims 4#ts4#ts4cc#ts4cc download#ts4cc food download#ts4 nasi lemak#ts4 asian food#southeast asian#nasi lemak#malaysian food#the sims 4 for rent#ts4 maxis match#asian culture#EA Maxis San Francisco terrible representation for southeast asian culture
65 notes
·
View notes
Note
Hey quick question. It looks like you combined the maxis bottle controller with the multi default bottle recolors? The multi one uses bienchen's bottle and it is uvmapped differently than the maxis bottle. I noticed because the maxis bottle is shaped a bit differently and it only has one single panel area that accepts designs whereas the multi default one of bienchen's default replacement bottle accepts recolor designs all over and that is Jos recolors on the maxis bottle? I am pretty sure :). Just checking. I appreciate it being shown off it just looks like the two sets were combined.
Hello, yes I'm so sorry but I did make the mistake of installing both at the same time so the textures did not look as intended. So, for anyone else reading, install either Maxis Baby Bottle Controller OR Multi Default Baby Bottle not both, and the textures will look even better than shown in my video!
6 notes
·
View notes