#vertical aspect landscape
Text

Diablo Lake, Washington, 2011
#landscape#washington state#lensblr#imiging#isu#luxlit#the photographers society#diablo lake#vertical aspect landscape
485 notes
·
View notes
Text

I think that in the future, object show characters (and animated characters in general) will become taller and skinnier as the vertical format becomes increasingly common for online animation. It becomes easier to fit multiple character in the frame without doing the fake-widescreen thing
#bfdi#object shows#lol remember back in the day before tiktok#(before vine even)#when people would make fun of the vertical format for being bad#because our eyes are horizontally spaced and we thus generally prefer landscape aspect ratios#and people used to get made fun of for filming videos vertically
3 notes
·
View notes
Text
tumblr kept eating my response to this ask so I'm making a separate post to see if that solves the problem!!
I recommend by starting with the technical aspects of perspective and environments! which does not sound fun. and I might even go so far as to say it is not fun at all. But!! It is important!! Once you get the hang of drawing things in perspective with Math™, you can start doing all this free-handed! So if you feel up to some extra art homework, get yourself a sheet of paper and a ruler >:)
There's two kinds of perspective that I can tell you about, one-point perspective and two-point perspective. I'll go with one-point cause it's easier to explain haha
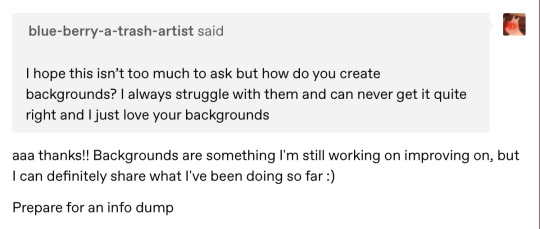
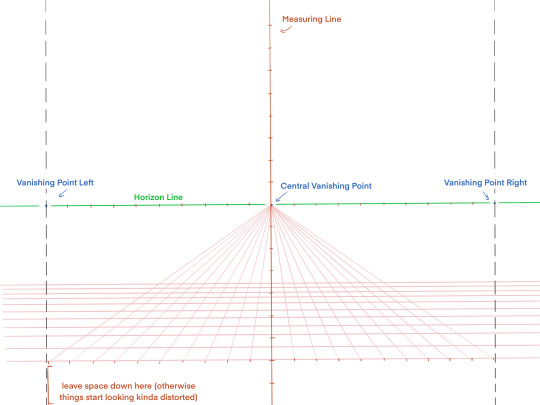
Below I've provided a picture of some of my own drawing homework from a class I took a few years back!! Annotated for clarity lol

So here we've got your Horizon Line (HL) , your Measuring Line (ML), your Central Vanishing Point (CVP), your Vanishing Point Left (VPL), and your Vanishing Point Right (VPR)!
Your HL determines where your horizon is in your drawing, which in most cases will be about halfway up your page! You can adjust this to fit your needs though, depending on where you want your point of view to be :)
The CVP is where your HL and ML intersect! The VPL and VPR are the "edges of your canvas" as it were—anything past these points start to get distorted, perspective-wise.
Your ML is the mvp of Math Perspective Drawing, and you're gonna want a ruler/measuring stick for it! The ML is in the center of your paper. Make some marks at regular intervals (in my drawing here they are all 1 inch apart, but they can be larger or smaller on yours!) up and down your ML. Then, using the same measurement, make marks along the HL. At the bottom of your page, leaving a bit of room below, make those same marks (aligned with the ones on the HL, so that if you connected them, they would make straight vertical lines).
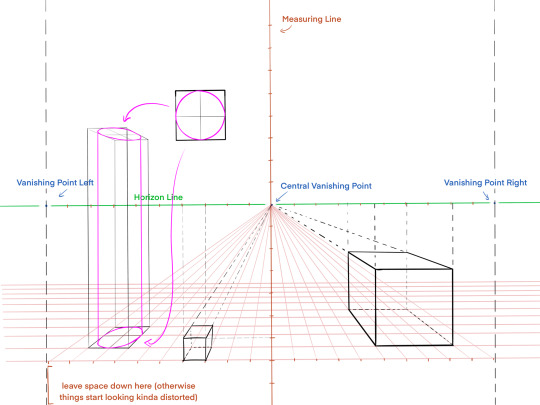
Next step is starting The Grid™
From each mark made on the bottom of your page, draw connecting lines to the CVP (shown in red below)
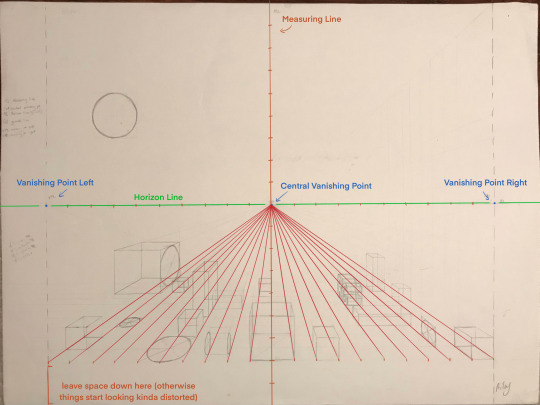
Now, make a line from the bottom right corner of your "canvas" to the VPL (shown below in purple). Where the purple line intersects with the red lines of our half-formed grid is what determines where our horizontal lines of The Grid™ are located (indicated by light blue x's)!
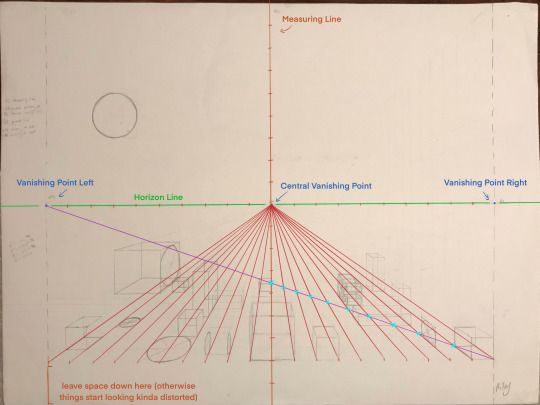
So now we have a grid!! Woo!! Things have started to get a little messy so I'm removing my homework from the background. goodbye homework o7
This grid is what enables us to start drawing in perspective! If you wanna skip all the set up feel free to just. Screenshot what I've got here and use that for drawing on lol
Now we can draw BOXES. cubes, even!! And by learning how to translate other shapes onto the faces of these boxes, you can learn how to draw other things in perspective, like cylinders (seen on the left in pink). There are specific methods for drawing other volumes in perspective, but this post is long enough as is without me going into it haha
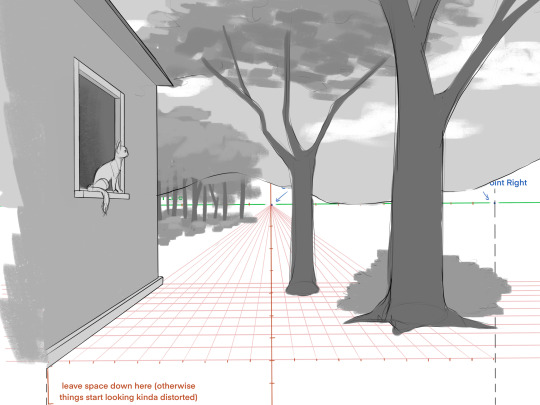
Using this knowledge, you can make all sorts of backgrounds!! Here's a super simple example (plus kitty, of course)
Once you've practiced using perspective, here's a few other miscellaneous tips!
Think about the location you're drawing. What would you find there? Is it a forest, a city, a field? Should there be trees? Boulders? Buildings?
Practice drawing different locations from life (or from photos). I cannot overstate how much this helps lol
Make some objects to distinguish Foreground, Midground, and Background. This is where perspective helps you! Once you can clearly distinguish between these three, your backgrounds start to feel deeper, if that makes sense?
Think about ways to make the ground uneven. Dips or hills in the landscape, small ridges/ledges, whatever fits for the location! Even in places with flat ground like an urban landscape, try to distinguish different levels in the ground, like from the sidewalk to the road. A lot of times, it makes the background more interesting to look at!
72 notes
·
View notes
Photo

Mount St. Helens, A Mountain Reborn
The cataclysmic eruption of Mount St. Helens on the morning of May 18, 1980, instantly transformed the glacier-capped volcano and its surrounding forests and lakes into an unrecognizable landscape. Moments before the volcano erupted, an earthquake accompanied the collapse of 3.7 billion cubic yards of land on the north flank of the mountain—one of the largest landslides in recorded history! The lateral blast that instantaneously followed the landslide flattened everything in its path—as far as 17 miles away from the volcano. Pyroclastic flows covered the land to the north of the volcano with a mixture of hot gases and debris while the vertical eruption column sent ash and gas high into the atmosphere.
In addition to altering the volcano’s physical landscape, the eruption catastrophically disrupted its productive mountain ecosystem. In the years and decades that followed, however, streams carved new paths through the volcanic deposits, the volcano grew bulky lava domes, and within the steep crater walls, a new glacier was born. Today, plants and animals have repopulated the lakes and lands around the volcano and life is once again flourishing.
Read more below for examples of how the landscape of Mount St. Helens has been continuously transformed since the eruption of 1980.
1 Lava Domes
Between 1980 and 1986, a series of smaller eruptions formed a lava dome in the crater of Mount St. Helens. These eruptions added an estimated 101 to 119 million cubic yards of lava to the crater. An eruption from 2004 to 2008 formed a series of dacite spines that added an additional lava dome with 121 million cubic yards of material—enough to fill almost 37,000 Olympic swimming pools!
2 Crater Glacier
Movement in the crater snowfield in the mid-1990s signaled the arrival of Crater Glacier (also known as Tulutson Glacier). Since then, a combination of shade from a north-facing aspect and high crater walls, avalanches of snow, ice, and rock from the crater rim, and an insulating rock cover have fueled the glacier’s continuous growth. In 2004, erupting lava began squeezing the glacier against the crater walls accelerating its downslope flow. Four years later the east and west arms of the glaciers merged, completely encircling the lava domes.
3 Spirit Lake
The debris avalanche from the 1980 eruption completely displaced Spirit Lake, pushing its waters 800 feet up the opposite slopes and completely filling the former lake basin with volcanic sediment. Amazingly, the elevation of the current lakebed is now higher than the lake’s previous surface. Although the lake is not as deep as before, the shoreline is 200 ft higher than it once was and the surface area is nearly double its previous size. In the decades since the eruption, life has returned to the lake. Phytoplankton, the base of the aquatic food chain, reemerged, followed by frogs and salamanders. Rainbow trout, likely reintroduced by humans, now thrive in the lake’s waters. A persistent mat of floating logs, remnant of the former surrounding forest, now covers 15–20 percent of the lake, providing additional habitat for insects and other life.
4 Pumice Plain
Pyroclastic flows from the initial and subsequent 1980 eruptions of Mount St. Helens blanketed the surface of the debris avalanche directly north of the mountain and left behind a barren zone known as the ‘Pumice Plain’. Incredibly, within two years, native lupine plants bloomed on this sterile landscape. In turn, lupine added essential nutrients to the soil while also providing anchor points for other plants to take hold. In the decades since the eruption, many other native plants and animals, including pocket gophers and elk, have gradually returned to the Pumice Plain. It has become an invaluable living laboratory for scientists seeking to study how landscapes recover and develop after a seemingly catastrophic geologic event.
5 North Fork Toutle River
The debris avalanche completely buried the upper North Fork Toutle River near the mountain. Hours after the eruption, a volcanic mudflow known as a lahar entered the lower reach of the river as ice and snow meltwater, groundwater, and sediment flowed from the deposit. The lahar traveled down the Toutle and Cowlitz River system to the Columbia River, choking downstream channels with sediment and debris. Today, the river winds a new course by eroding and transporting debris avalanche sediment down river. Including the lahar, over 400 million tons of sediment have entered the river system since 1980, yet only about 15 percent of the deposit has been eroded. Although many structures have been built to contain sediment and manage flooding, sediment continues to flow into the river promising the 1980 eruption and debris avalanche will continue to reshape the North Fork Toutle River into the foreseeable future.
Map by Daniel E. Coe, Washington Geological Survey, Washington State Department of Natural Resources.
184 notes
·
View notes
Text
PHOTOGRAPHERS / PRINTERS /PUBLISHERS, please read below.
I've put my usual shooting and processing routine on hold in lieu of designing my book for publishing. In less than two weeks it's already been a bit of a hassle, and learning process. After designing my book project with Saal digital titled "Solitude" I have a good grasp on the graphic design aspect, and was very pleased with how that turned out - so I'm using that as a template for this next project.
I used their software for that though, so creating this one solely in photoshop is a bit tougher. Due to size and orientation restrictions on Amazon publishing I've sidelined the Jumping Spider book for now, and instead have begun creating a selection of vertical landscapes of America and Europe.
The first thing I noticed was that in converting the color to CMYK for printing seems to take some of the pop out of these images. This worries me a little, Saal did all this for me last time. The second is dropping the resolution to fit into the proper spread layout, then converting the spreads to tif files for submission. Again, I worry that the detail, sharpness, and color may suffer.
If anyone has gone through this process, please chime in. Specifically - [jpegs > cmyk > downsized (slightly) > tif] for spread. Will resolution, color, detail or sharpness suffer?
This is the first production that I am doing from scratch and I'd rather not have to correct after initial printing. Its already a ton of work, so I'd like to minimize any issues.
The general layout will be as follows - full page fill on one side, white bordered on the other when you open the page. About every 5 pages will be a full horizontal spread. I want to include at least 100 pieces at a minimum, and I'm currently about 44 images into it. Looks great so far, but very time consuming.
Asking my photographer friends for help here, any advice please post in the notes as this may also help someone else in the future.
Thank you!
7 notes
·
View notes
Text
Behind the Scenes: Acquiring Images for the Encyclopedia
IMAGES are an obviously important aspect of a modern encyclopedia and, for this reason, our editors - both full-time and volunteer, dedicate quite a lot of their time to search for, upload, and describe images to illustrate WHE’s articles. We tend to publish two new articles every day and a text of around 3,000 words requires at least six images, both to help the reader visualise aspects of the subject and also to make the webpage visually appealing and not simply present a wall of text.
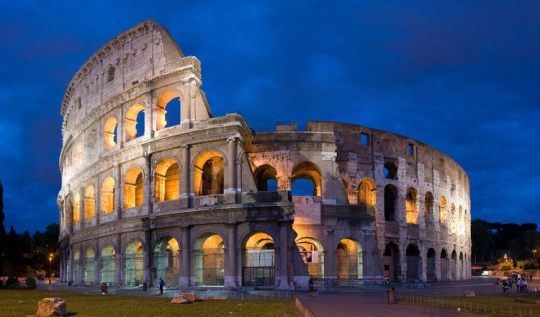
The title image of an article is particularly important in enticing people to read the text, especially so on Social Media posts but also as a thumbnail preview on the encyclopedia itself. We need images of a sufficient resolution and our editors must bear in mind that a landscape format typically works better than a vertical one, and that posts on places like Facebook and Twitter tend to crop images at the top and bottom. This latter consideration, if neglected, can lead to readers seeing the midriff of a statue instead of the face, or a stretch of brilliant blue sky but not the monument beneath it. We also like to choose images that reflect a monument or artefact in natural conditions. A night shot of the Colosseum can look wonderful but it is not necessarily helpful to someone who wants to see the different architectural orders used in each level of the amphitheatre.

The encyclopedia really has two ways of acquiring images. One is for editors to search the internet to find good-quality images that can be legally republished. Those two requirements are not quite as easy as they sound. Many of the most striking images we come across cannot be used because photographers have copyrighted them and they cannot be republished for any purpose without paying a fee, a fee which WHE cannot really afford given the number of images we require each week for new content. We would also much prefer to publish images that can be reused by readers provided they are not for commercial use. This allows teachers and students to freely use our images in class or for homework and assignments without any problems.
Fortunately, as a registered non-profit organisation and educational website, we can legally republish images that many other websites cannot. This is particularly true for museum websites. Being able to republish high-quality images from, say, the British Museum, London or the Metropolitan Museum of Art, New York is a great help to our work. These sites have the additional advantage that their image descriptions are very informative and reliable.

A second way to acquire images is to receive them from volunteer photographers and our own staff. Some of our volunteers travel extensively and they are a great source of images of unusual places. Our own staff, naturally, have a strong passion for history and in their free-time and holidays, many members of the WHE team take photographs of archaeological sites, buildings, and museum artefacts that can be useful for the encyclopedia.
The advantage of having a photographer who knows their history is that we get very useful images that can be difficult to otherwise acquire. Finding a free-to-use image of the Parthenon on the web is not very difficult but finding images of rare objects like a Roman key, Egyptian comb, or Korean roof tile is a whole different challenge. As the encyclopedia publishes many articles on daily life topics such as food, clothing, entertainments and so on, finding suitable images for these texts can be a challenge. Often, the artefacts we need to illustrate these kinds of subjects are the ones that most people pass over in a museum and so they rarely appear on the internet. Consequently, having photographers upload these kinds of images not only helps our editors but also helps differentiate WHE from other history websites. We hope you the readers enjoy looking at the images we publish!
Photos by: Diliff, Jan van der Crabben and Carole Raddato.
42 notes
·
View notes
Note
[]^[] < Question relating to [(=)413/(=)612]:
[]^[] < What do each of the lands look like visually?
non formatted version:
[]^[] < Question relating to [(=)413/(=)612]:
[]^[] < What do each of the lands look like visually?
It'll probably take me a while to edit together pictures of all the lands, so instead I'll describe them in text before I do so, as well as to give myself something to work off of.
Alopex's land is the Land of Xanthic Paint and Eels. The name was specifically chosen to be an anagram, and bears no connection to Alopex's Time aspect. (LoXPaE -> aLoPEX) "Xanthic" means yellow, so this planet, ironically for a Fire type, is covered in lakes of yellow paint. The eponymous eels have adapted to their new habitat, and are the consorts of the planet. As the Time player of the session, Alopex's planet also houses the Scratch Construct: a really fuck-huge sundial located exactly at the center of the largest lake on the planet. Alopex's denizen is Dialga.
Gelphox's land is the Land of Prisms and Frogs. All Space players get a Land of (something) and Frogs, save for Calliope, who never got a planet because of Caliborn. The planet's surface is a huge swamp, with mud that's about knee-deep (waist deep for Gelphox, because he has short legs). All across the planet are tall, triangular prisms that reflect and refract the light of Skaia, focusing it into a network of beams that surround the planet. The consorts of the planet are gelatinous cubes that have an unusual hobby of plugging themselves into the ground and pretending to be prisms themselves. The Forge on LOPAF is a geyser, with the biggest prism of them all plugging it up. Dialga's power is the only way to shatter the prism and allow the Forge to be used to launch the Genesis Frog. (Genesis Froakie?) Gelphox's denizen is Palkia.
Cirrus's land is the Land of Bridges and Downdrafts. You know how whenever a pet dies, we say it "crossed the rainbow bridge?" And how in Norse mythology, there's a rainbow bridge connecting Earth and Asgard? That's what the bridges on LOBAD are. The terrain on LOBAD is covered in mountains and rivers, with rainbow bridges crossing over the rivers, ascending to the peaks of the mountains. Due to an unusual quirk regarding the composition of the atmosphere, the sky always seems dusky, yet Skaian light reflected off of the meteors in the Veil is able to pass through, giving it a sky that looks almost perpetually covered in a band of stars. Aurorae are common on LOBAD and often cover the entire planet, rather than just the poles. Another quirk of the atmosphere is that atmospheric pressure fluctuates far more than normal, causing powerful vertical downdrafts to form often. Despite the sky being mostly dark, the ground is lit up by the faint glow of the hitodama consorts that pepper the landscape, growing more plentiful as one approaches the peak of the tallest mountain, where Cirrus's quest bed stands. Their denizen is Miraidon.
Kasi and Akesi are kind of an interesting case, due to their dual nature. They have two separate dream selves, Kasi being on Prospit and Akesi on Derse, yet both of them share a single planet: the Land of Berries and Vitriol. The planet itself seems almost like two planets that got smashed together, with its equator cleanly dividing the two halves. The northern hemisphere of LOBAV is a densely wooded area, packed to the brim with acres upon acres of fruit trees as far as the eye can see. The southern hemisphere, on the other hand, is a desolate, almost hellish wasteland, with the ground cracked and barren due to the toxic vitriol that trickles through the earth instead of groundwater. The poles of the planet host two separate quest beds: Kasi's on the north pole, and Akesi's on the south. The planet also notably has two denizens: Xerneas is Kasi's denizen, while Koraidon is Akesi's denizen.
Topaz is... surprisingly not a Rage player, although I might retcon her to be one. Her planet is the Land of Veins and Foresight. The "veins" refer to crystal veins that run through the planet's crust, poking out sporadically. The planet has been subject to mining operations by the consorts, and as such, it's also criss-crossed by a vast, elaborate network of mining tunnels, leading ever deeper into the planet's depths. On the surface, the sky is polluted and yellow, like that of Venus, but one can find their way through these tunnels by using the psychic trails that snake their way through the tunnels, all leading back to the denizen of the planet: Lugia.
Lastly, Clarion. Her planet is the Land of Brine and Ophanim. The planet itself is surrounded by five rings evocative of its namesake angel. It's a planet entirely covered in water, although land-dwelling players visiting get a bubble around their bodies to prevent them from drowning. The cities of the planet are populated by the consorts, the titular ophanim, who have designed them with alien geometries that only they can comprehend. In the palace of the largest of these cities lives the denizen, Zekrom.
2 notes
·
View notes
Text
Ey! I’m cooking something weird for DnD, and would love some input if anyone’s up for it. It’s a concept for some true deities called, “Primordials”.
"Primordials" in my DnD world are deities that manifest as the result of mortal perception. They are magically generated as a passive consequence of collective thought and represent the primal emotions which have underpinned our consciousness since the beginning of time. They are the true secret gods of the plane, as the commonly worshiped “official” pantheons are merely comprised of old adventurers who had amassed enough wealth and power to appear divine. Ultimately, the power of those “pretender gods” still stems from the Primordials, whom which hey live in constant fear of. Although some may become attuned to these true gods’ influence and believe themselves to express their will at times, these entities are not so much people as living aspects of the worldmind, taking on true forms that are more landscape than man. They are just as defined by how we see them as we are by their whims, and so long as people exist, so too will these divine beings.
To witness such a Primordial, one must succeed at a THIRD EYE check (Intelligence + Wisdom) at a DC of 20 in order to achieve an epiphany that would render its form both visible and tangible to the viewer for a period of 24 hours. During that time, a vertical slit will form down their entire face and peel it back as a lid to reveal The Eye Within, a large eyeball that had always been part of their body which had been instinctively forgotten until the moment of revelation. While the eye is open, all communication attempted with the Unenlightened will be perceived as hysteria, requiring all who gaze upon their visage to also make THIRD EYE saves. If they succeed, they will also be Enlightened. All Enlightened must make Will saves or else fall prey to their own inner natures and become receptive to the influence of the Primordial.
A Primordial’s influence is not direct mind control more than suggestion. On their turn, a player under its thrall first must state what they intend to do, the DM describe the Primordial’s impulse, and finally that player rolls a Will save to determine the actions of their character. On a 1-6, the Primordial succeeds. On a 7-13, the player character does an action that attempts to appease both minds at the same time. On a 14-20, the player succeeds.
------------------------------------------------------------------------------
Primordial Example:
Guiy: Primordial of Curiosity
A large eye in the sky seemingly one with the horizon comprised of interwoven, knotted tendrils that are connected throughout the world with the heads of all conscious beings at the base of the neck.
Throughout its complex it gathers information into its central eye called “The World Knot”.
Many of its thralls feel compelled to journey to The World Knot and peer into its depths, whereupon both the knot and the thrall learn the entire contents of the other’s mind. The soul of the thrall then assimilates into The World Knot while its expired carcass, set aflame by knowledge far beyond its comprehension, crumbles to ash.
------------------------------------------------------------------------------
[ I don't have much experience when it comes to balancing, but I know what I want to convey at least. I'm not trying to overwhelm the party with an impossible to kill foe more than establishing a force of nature that they will have to figure out how to circumvent. Thanks for reading, and feel free to comment and reblog if you like! ]
#dnd ideas#WIP#feel free to ask questions#dnd#d&d#dungeons and dragons#panda writes#weird shit#horror?#cosmic horror
2 notes
·
View notes
Text
Don't Nod's Jusant Demo Review
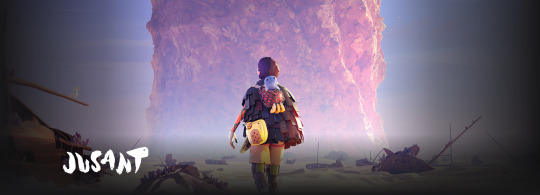
Don't Nod recently announced its newest game Jusant by revealing its trailer during XBox Games Showcase 2023. Showing off impressively tall environments and highlighting somewhat otherworldly nature, it feels like a fresh setting for the studio. It was a beautiful and intriguing look into the surprise climbing video game due out this year. Lucky for us, Steam has a demo. Here are my thoughts.
Jusant's demo starts with the definition of the title. Jusant, a noun, is French for low tide. While cliche in an essay, I don’t mind this at all. I do not know French, and the demo likely doesn’t start at the very beginning of the game. It's low tide, and in this game, it’s implied a big unusual ebb. One might miss that the desolate, incredibly tall, vertical climb is not your average desert. But beside the definition, there is the call of seagulls and areas of barnacles found on the climb. It’s a quiet game, in its isolation and sound. You can hear your breath, your hand as it grasps a ledge, the wind as it blows past your body. Jusant is almost devoid of music for the majority of the game, with subtle musical cues, and high impact when the music full of awe does come through.
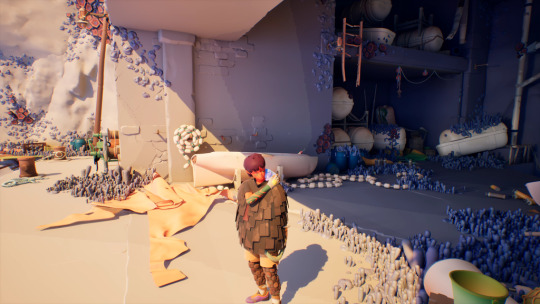
Besides the sounds, right off the bat, the visuals are great. The protagonist’s design has a brightness to it. The high saturation colors stand out from an arid landscape. The stylistic choice of no whites of the eyes makes the character design stand out. The interior environments seem to be an eclectic style of construction site, oceanic, and alien. These ad hoc scaffolding areas were built for all to climb because the low tide seemingly upheaved the locals' lives. No one outside of the player character is seen in the demo (save for glimpses of your little water-blob friend), but there are a few notes and text-based messages to be found. Those familiar with Don’t Nod’s massive hit Life is Strange or the lesser known Tell Me Why (available for free every Pride month) might wish for more interactivity of props. There is one “moment of reflection” as I like to call it, that is common in that genre, and it was peaceful. But if exploring via thoughts or item examination is lacking, that could be very intentional, Jusant’s genre is described as an action-puzzle climbing game on their website. However, Jusant is also tagged as an action-adventure game on Steam. So, it will have to be examined in the full game if the adventure elements are lighter.
I know, I know. Let’s get to the gameplay: climbing! Apologies in advance to those who boulder or rock climb that might suffer through my lack of knowledge and clunky wording. Another note: I used a controller, and it is highly recommended that you do. Climbing feels pretty good. The left hand is the left trigger, and the right hand is the right trigger. I wouldn’t say the controls are floaty, but I do feel like the experience is a little smoothed. The protagonist feels like a strong climber. It is easy to get a good flow in the beginning of the demo with an abundance of available handholds. The player can “look” with one of the joysticks to direct where they reach. Stamina is no worry at all in the start of the demo. Once embarking on some longer climbs or when jumping is needed, you’ll have to watch your gauge. The protagonist will also breathe a little heavier for a diegetic reminder to rest. While on a climb, simply clicking your left joystick down lets you rest just about anywhere. The character is shown shaking out the hands, which is fun and a thing I have seen real climbers do. I did not see what an actual fail state looked like, but when stamina was dire, there was heart racing and red blinking on the stamina meter.

There’s more depth to the aspects of the gameplay, like with the length of your rope, and adding pitons along the way so you don’t fall too far and lose too much progress if you lose grip. There’s elements of rappelling and ascending that are not realistic to physics, but fun for a game. Sometimes you need to descend or do a sort of wallrunning move to reach the next set of handholds. The demo explored mostly straightforward navigational routes except for a couple trickier spots closer to the end. From the trailer it seems more puzzle elements will be introduced. For example, growing, flowering stalks can take you higher, and seemingly magically-appearing vegetation can sprout into handholds.
Don’t Nod bills this game as a meditative climbing game in nature. I do think they will deliver that. The scenes and landscapes are really vast while on the climb. There doesn’t seem to be anything to rush you on your climb, and the visuals and music are calming. You explore a desert-like landscape in the demo, but there seems to be more biomes that will be explored throughout the game.

Any negatives or issues?
Handholds are not always the clearest, I do not have an issue with this myself but people with low vision may have trouble. A highlighted or more contrasted color scheme setting could be good for others
There was some graphical stuttering on my PC a few times (for reference I have RTX 2070, Ryzen 7 2700x). But to be honest, I don’t know much about PCs or running games.
I feel like once the panting audio to indicate lower stamina got stuck even after I rested.
Hints were repetitive, but this is a demo, and there was a setting to turn it off, so this is all good
You might wish more in the interiors were interactive
The pros:
Fun to climb, intuitive. Which is good, that’s the main mechanic!
Lovely style, saturated hues contrasted with expansive and more realistic landscapes.
Quiet game, relaxing. An hour passed without me noticing!
Potential to have unique lore, something different
Jusant is planned to release Fall 2023 on XBox Series X|S, Playstation 5, and Steam. Get the demo on Steam now.
10 notes
·
View notes
Text
Best Image Sizes for Your Website

Introduction
In the rapidly evolving digital landscape, optimizing images for both mobile and desktop users has become crucial. As of January 2024, mobile devices account for 59.01% of all website traffic, underscoring the importance of this practice. A well-optimized image not only enhances the visual appeal of your website but also significantly improves loading times, user engagement, and SEO performance. This comprehensive guide delves into the details of image optimization, including pixel dimensions, file sizes, and essential tools, to ensure your website images are perfectly tailored for an optimal online experience.
Best Practices for Website Image Sizes
Background Images
Background images are often the first visual contact a visitor has with your site. Their size and quality set the tone for your website, making it crucial to use high-quality images that are visually striking yet optimized for fast loading.
Optimal dimensions: 2500x1406 pixels
Aspect ratio: 16:9
File size: Up to 20 MB
Hero Images
Hero images are central to capturing user attention. They need to be large enough to be engaging but not so heavy as to slow down your site. Balancing these factors is key to creating an impactful first impression.
Ideal width: 1280-2500 pixels
Height: 720-900 pixels
Aspect ratio: 16:9
File size: Up to 10 MB
Website Banners
Banners, whether for advertising or site navigation, must be sized appropriately for effectiveness and speed. They should be visually appealing without compromising website performance.
Varied sizes: e.g., 300x200, 970x90 pixels
File size: Up to 5 MB
Blog Images
Consistency in blog image dimensions is essential for a cohesive look. It enhances the reader's experience by providing visually appealing and relevant imagery without distracting from the content.
Maximum width: 2240 pixels
Height: 1260 pixels
Aspect ratio: 16:9
File size: Up to 3 MB
Logos
Logos, though small, are a vital part of your brand identity. They should be clear and distinct, adaptable to different platforms while maintaining consistency in appearance.
Width and height: Up to 250 pixels
Aspect ratios: 1:1, 2:3, 4:1
File size: Up to 1 MB
Mobile Image Optimization: Catering to a Mobile-First Audience
Choosing the Right Dimensions and File Size
Mobile optimization focuses on balancing size and quality. Images should be large enough to be clear and detailed, especially for product photos, but small enough to maintain fast loading times on mobile devices.
Resizing for Mobile Screens
Adapting image dimensions for mobile screens is crucial. This includes using square or vertical images that fit well on smaller screens, ensuring a visually appealing and user-friendly mobile browsing experience.
Balancing Quality and Performance
Different image formats offer various benefits, such as JPG for a good balance of quality and file size, PNG for transparency, and WebP for superior compression. Choosing the right format is crucial for optimizing image performance on your website.
Determining Image Sizes: Tools and Techniques
Browser tools like 'Inspect Element' allow you to check image dimensions directly on your website, offering a practical way to assess and adjust image sizes as needed.
Tools for Image Optimization
Tools like Squirai Image Optimizer and LoyaltyHarbour Image Optimizer automate the optimization process, making it easier to manage image sizes and quality across your website.
Conclusion
Optimizing images is not merely a technical task but a strategic imperative in today's digital world. By following the guidelines and practices outlined in this guide, you can ensure that your website images are perfectly optimized, leading to enhanced user experience, faster page loading times, and improved SEO rankings. Remember, in the visual landscape of the web, the right image size and quality can make a substantial difference in your website's performance and appeal.
4 notes
·
View notes
Text
Why I love the Spymaster #79: The Scream! 💔
Find my full series under the HELP I WUVS HIM tag.
#79: The Scream! 💔
In The Power of the Doctor, just for entertainment, the Spymaster inserts self-portraits as Ra-Ra-Rasputin into various classic paintings of the Western canon. In #61: Playing even more with gender!, I talk about one aspect of his self-insertions: him sticking himself in the places of women and what that says about his gender expression.
This mini essay talks about another painting he puts himself into: Edvard Munch's Scream. Norwegian Munch created several versions of this image, in paint, pastels, and even lithograph, in 1893. In all versions, a pale, genderless figure stands on a bridge or pier, with swirling water and turbulent sky behind. The figure's simply drawn, skull-like face is framed by their hands, and the figure screams.

What a revealing image for the Spymaster to include in his art exhibit! Notice a few things about the painting:
The Scream is about suffering. The central figure's wavy lines and elongated features echo the seething lines of the water and the sun. By painting the figure and the landscape with the same kind of strokes, Munch connects the figure's suffering and the agitation in the world. In other words, the protagonist of The Scream suffers so much that their suffering escapes the boundaries of their body and agitates everything around them. Munch describes seeing a sunset and sensing an "infinite scream passing through nature," which prompts him to complete this work. The suffering in The Scream is universal in scope, accurately depicting how the Spymaster feels that his pain is all-encompassing.
The Scream also tells a story of isolation. In the Spymaster's Scream, two people stand behind the figure, but they seem more like abstract smears. Without expression, faces, or recognizable body parts, the two people have more in common with the vertical posts of the guard rail than they do with the screaming figure. Distant, anonymous, and indifferent, they do not notice the main figure. Even though the main figure's direct gaze invites viewers to share the main figure's horror, the main figure remains trapped in the frame of a hostile universe. The loneliness in the painting echoes the loneliness the Spymaster probably feels whenever he fails to get the Doctor's attention in the way that he wants.
For a more superficial similarity between The Scream and the Spymaster, notice that the painting is full of reverberating motion: the slashing diagonals of the pier/bridge, the tortuous turns of the water, the undulations of light in the sky. In the same way, the Spymaster is full of movement and barely contained nervous energy.
Finally, check out the main figure's pose: hands to the side of the head. Reminds you of the Spymaster's brainfingers [#12], doesn't it?

In the picture above, the Spymaster uses his brainfingers when talking to the Cyberium: “I ransacked the Matrix of the Time Lords, distilled all the knowledge, all the experiences, all the discoveries, into these brains up here. “
The Spymaster gestures toward his head/brains/self/seat of identity frequently because, as proud as he is of everything he's got up there, he also wants to control it. With his knowledge about being a derivative of the Doctor/the Timeless Child in his mind, plus the Matrix, plus the Cyberium, he has lots of slippery elements to contend with. He controls them about as well as he controls his emotions, i.e., not well. He positions himself in a painting with his hands clamped against the sides of his head because he feels like his head/brain/self/seat of identity is under assault, and he's trying to keep himself together.
@natalunasans @sclfmastery @timeladyjamie @rowanthestrange @whovianuncle
#HELP I WUVS HIM#spymaster#the spymaster#sacha dhawan#the scream#edvard munch#the power of the doctor#a masterpiece!#doctor who#💔#brainfingers#THANKS I HATE IT
24 notes
·
View notes
Video
youtube
I made a tutorial for creating a pixel perfect vertex snapping in Blender to mimic that PS1 style!
Full written version of the tutorial under the cut!
I'd like to give a huge thanks to Chris Prenn for their Blender Geometry Nodes Fields Frustrum Culling Tutorial which really helped me figure out a starting point for this method, a lot of what I do here is based on his tutorial with added and modified steps.
To start we need 5 input values
The camera we're using
The output X resolution
The output Y resolution
Don't set these too high or your computer WILL hate you!
The Focal Length
The Camera Clip End OR distance to apply the effect
We need to make a grid for your pixels, let's get it to the right size first
Add a Mesh Privative -> Grid to your Geometry Nodes setup
To get the aspect ratio of your scene let's take 2 math nodes set to divide
For the Size X we want to divide our X Resolution input from earlier by our Y Resolution input
Clamp that! This makes sure that it'll work no matter if it's a landscape or portrait style render
This actually makes the size exactly fit the edges of the camera, but we want the vertices to line up with the pixels of the camera, so we need to scale them ever so slightly
To do this we need to subtract 1 from the X Resolution and then divide that BY the X Resolution, then multiply that value with the prior divide step
For the Size Y use the inverse, just swap the X Resolution and Y Resolution inputs
For the Vertices X and Vertices Y values we're going to directly plug in the X Resolution and Y Resolution inputs, and now our grid is the right size! But we have to get it in the right PLACE as well!
Add a Transform node and plug in our grid
For the Translation value plug in the Location from the Camera input
For the Rotation value plug in the Rotation from the Camera input
Now our grid is sitting right on top of the camera, but it needs to be moved to the lens!
Add a Set Position node
Divide the Focal Length input by negative 32, this is the distance from the camera focal point to the lens
I'd like to note that I did have an issue in one project where 32 was not the correct value for the camera, I'm not sure what caused that, but if when viewing your grid it's not in the right spot try adjusting this number a bit, just make sure it sits right on the lens
Plug that into the Z of a Combine XYZ node
Add a Vector Rotate node and plug our Combine XYZ node into the Vector slot
Plug the Rotation from the Camera input into the Rotation value
Plug the Vector Rotate node into the Offset of our Set Position node, the reason we rotate it first is so that it moves the grid in the right direction instead of just along an axis, it will now always follow the selected camera, glued directly to the lens.
I tried doing this with a raycast node first, having the vertices of our model snap to the nearest spot that would hit one of the vertices of the grid, but I couldn't figure it out, so instead I used lines coming from the camera!
Add a Mesh Primitive -> Mesh Line
Set the count to 2 for optimum performance, we just need a start and an end point for our purposes
Leave the Start Location at 0
For the offset we're going to take our Camera Clip End, multiply it by -1, and plug it into the Z value of a Combine XYZ node
Add an Instance On Points node
Temporarily set your X and/or Y value to something like 16 while working on this part so your computer doesn't start crying
Plug the Grid into the Points and the Mesh Line into the Instance
For the Rotation value we're first going to subtract the Position from the Camera input's Location using a Vector math node, this gives a new vector pointing from the camera towards each line's starting point
We then plug that into an Align Euler to Vector node and set the axis to Z
Plug this final value into the Rotation and you should see your lines pointing directly out from the camera, if you go into camera view you won't see them at all because they'll be perfectly lined up
Now we're ALMOST ready to see results! Add a Realize Instances node and plug your Instance On Points node into it to make those lines REAL!
Plug your now realized instances into a Geometry Proximity node and set the type to Edges since that's what we got!
Add a Set Position node and plug your Geometry Proximity Position right into the Position input
If we plug our input geometry into the geometry field and take a look at the results, assuming you lowered the resolution earlier, you'll see a blocky looking mess, it's WORKING! However, you'll notice that if anything goes outside of the camera view it really doesn't look right, we have a fix for that using the raycast method from Chris's tutorial I mentioned earlier!
Add a Raycast node and set the Target Geometry to the Set Position node from before you instanced on points. Remember, this is the grid itself!
The Ray Direction will be the position subtracted from the camera location from earlier, that way the rays will fire towards the camera
For the Ray Length we'll actually want to plug that same node into a Vector Math Length node, that way we won't affect objects behind the camera, Chris explains why this works in the tutorial, but the basics is that's the length to the camera so it won't go Past the camera to hit the grid
Now plug the Is Hit from our Raycast node into the selection of the Set Position node, and voila! Your model will no longer freak out when it's outside the camera, it just won't be affected at all!
The very last step we should do is add a Switch node to swap between the original geometry and the wiggle-fied geometry depending on if it's in viewport or not, that's easy
Add a Switch node and set the type to Geometry
Plug the final Set Position node into the False field
Plug the Original geometry into the True field
Add an Is Viewport node and plug that into the Switch
You now have a functioning PS1 wiggle effect that is active in render! Here's a couple tips for using it:
Add a Triangulate Modifier before the wiggle Geometry Nodes for maximum accuracy
Set your Render type to Eevee and then under Film set the Filter Size to 0 to get hard edges in your render
If trying to show off that you have THE PS1 wiggle it's best to do subtle movements, slow moving models will have a more noticeable Pop
Make sure the geometry nodes for the wiggle are at the very bottom of the modifier stack below anything that may distort the model such as an armature or displacement texture
If your geometry nodes disappear from your editor make sure you have the Geometry Nodes modifier selected in the modifier stack
Back in the Render Properties tab under Color Management set your View Transform to Standard and the Look to None for accurate colors in your final render
Be sure to check if you have any compositing nodes set up in your default Blender file that they aren’t going to mess up your non-photorealistic style!
Have fun!
23 notes
·
View notes
Text


"Web Wrap" YCH Commission Requests Open!
Have you ever needed a bit of compression therapy, administered by a trusted friend or giant arachnid? Only the highest-quality organic silk will do, of course!
Humans & monster or anthro bipeds welcome! Add yourself or your OC to this scene #art #furryart
info 🔽🧵
Information:
- 3D Render,
- 16:9 landscape wallpaper aspect ratio (1920 x 1080 px)
*or*
- 9:16 vertical lockscreen aspect ratio (1080 x 1920 px)
- Delivered digitally over email (no physical product)
- Turnaround 1-2 weeks per slot
- Completion for all slots by end of October
- Up to 3 slots available
- $150 via Paypal Invoice
- +$20 if you want a landscape AND vertical wallpaper
- +$25 for complicated physical design features
- NO WINGS this time
- Invoice after form is accepted and details discussed
- Submitting the form does NOT guarantee a slot
(I will let you know!)
Please reblog if you can, commissions go towards saving us from medical debt collectors, and keeping the lights on and the roof over our heads.
Complete and submit the form here. Have reference images (or a text description) handy!
https://forms.gle/S1hQngn6tymHJSPm8
5 notes
·
View notes
Text
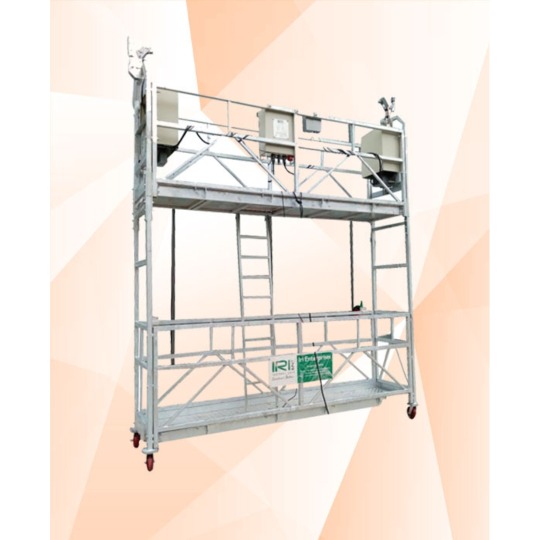
Complete Manual on Hanging Scaffold Systems or Suspended Rope Platforms for plastering
In the realm of construction and maintenance tasks, there’s a stalwart ally that stands tall, quite literally. The Suspended Rope Platform (SRP), often recognized as a gondola or working platform, has become an indispensable tool for a spectrum of vertical endeavors. Specifically, in India, these platforms have etched their place firmly in various industries, revolutionizing the way projects are undertaken.
Evolution of Rope Suspended Platforms
Initially embraced primarily by major facade contractors, the trajectory of SRPs has undergone a significant shift. Over the past three years, a seismic shift has been witnessed, with the paint industry, spanning from manufacturers to applicators, showing an avid interest. This surge in demand has propelled manufacturers of these platforms to the forefront, dominating the market for close to a decade.
The utilization of Suspended Rope Platform isn’t confined to a singular purpose. From external wall plastering, painting high-rise structures, installing glass facades to the maintenance of expansive external surfaces, the applications are diverse and extensive. Even in scenarios necessitating alterations or demolition of buildings, these platforms emerge as indispensable temporary structures.

The Rise of Rope Suspended Platforms
What sets SRPs apart is their ascendance as the preferred mode of access across construction sites. Traditionally, scaffolding held sway, but the inherent advantages of SRPs, including efficiency and versatility, have prompted their ubiquitous presence in the construction landscape.
Quality and Innovation
Platforms like the hanging rope platform hoists from Jaypee India epitomize excellence, constructed meticulously using premium materials such as stainless steel and aluminum. The emphasis on stringent quality control ensures adherence to specified durability and reliability standards, ensuring that only the finest products reach customers.
Moreover, manufacturers of SRPs have undertaken a trajectory of innovation. Varied versions of these platforms cater to diverse job site specifications. Engineers have meticulously designed these platforms, integrating multiple safety measures to mitigate the inherent risks associated with erecting and maintaining tall structures.
Safety Features and Engineering Excellence
Safety stands paramount in the realm of suspended platforms. Manufacturers have embedded an array of safety features into their products to ensure secure operations:
Rope Failure Prevention: Incorporating locks to prevent tilting due to rope failure.
Advanced Technology: Integration of sophisticated mechanical and control electronics.
Quality Wire Ropes: Utilization of high-grade steel wire ropes to guarantee robustness.
Optional Overload Sensing: Offering the option for sensing overload, further enhancing safety.
Cable Locking Angle: Ensuring a secure cable locking angle of 3–8 degrees.
Superior Suspension Systems: Technologically superior suspension systems enhancing stability.
Durability: A testament to longevity, these platforms are engineered to withstand prolonged usage without succumbing to wear and tear.
Sturdy Construction: With a solid construction, these platforms exude reliability and stability.
Energy Efficiency: Notably, the energy requirements for operating these platforms are considerably lower compared to alternative access systems.
Proficient Management and Operations
One defining aspect of the Suspended Rope Platform (SRP),landscape in India is the involvement of extensively trained professionals overseeing the operation and maintenance of these platforms. Amidst a competitive market, manufacturers differentiate themselves by providing top-tier suspended platform services. These adept specialists, well-versed in every facet of access equipment, ensure superior maintenance and repair services right on the job site. From initial setup to operationalizing the platform, these professionals handle it all with finesse and expertise.
In conclusion, the evolution of suspended rope platforms for plastering and other vertical endeavors has heralded a paradigm shift in the construction and maintenance landscape. With an emphasis on safety, innovation, and efficiency, these platforms have become the linchpin in accessing vertical spaces, promising durability, reliability, and optimal performance. As the industry continues to evolve, these platforms are poised to remain at the vanguard, catering to the ever-expanding demands of vertical construction and maintenance tasks.
#Suspended rope platform for plastering#Suspended rope platform#Rope Suspended platform for plastering#Buy Suspended Rope Platform#Rope Suspended Platform (RSP)#Construction Equipment Manufacturer and Supplier in India#Construction Equipment#Facade cleaning system manufacturers in india#Gondola Suspended Rope Platform Manufacturer
3 notes
·
View notes
Text
Horticulture definition & Branches
Horticulture is a subfield of agriculture that focuses on the cultivation, management, and study of plants used for non-food purposes like medicine or industry. It also includes non-food crops like flowers and ornamental plants. In order to produce high-quality and profitable crops for a variety of uses, including food production, landscaping, ornamental adornment, and more, it involves a wide range of plant-related operations, including planting, breeding, irrigating, growing, harvesting, and post-harvest processing. Horticulture is a broad field that includes everything from modest backyard gardens to extensive commercial operations, and it frequently entails the use of specialized knowledge and techniques to improve the growth and development of plants.
Enhancing the quality, quantity, nutritional value, and aesthetic appeal of plants—whether they are cultivated for food, medicine, ornamentation, or other purposes—is the aim of horticulture. To maximize the growing conditions and productivity of plants, horticulturists use a variety of procedures, including breeding, grafting, pruning, and pest management.
Pomology: This branch of horticulture is concerned with the cultivation of fruits. Pomologists study the production, storage, processing, and marketing of fruit crops such as apples, citrus fruits, grapes, and berries.
Olericulture: Olericulture is the branch of horticulture that deals with the production and cultivation of vegetables. It includes the study of vegetables from seed production to harvesting, storage, and marketing. Common vegetables studied in olericulture include tomatoes, lettuce, carrots, and onions.
Floriculture: Floriculture focuses on the cultivation of flowering and ornamental plants for their aesthetic and decorative qualities. This branch includes the production of flowers, cut foliage, potted plants, and landscaping materials. Floriculturists often work in the floral and landscaping industries.
Viticulture: Viticulture involves the cultivation of grapes for wine, raisins, and table grapes. This branch covers various aspects of grape production, including vineyard management, pest control, and the study of grape varieties suitable for different purposes.
Oenology: While not strictly a branch of horticulture, oenology is closely related as it involves the study of wine and winemaking. Oenologists focus on fermentation processes, wine chemistry, and sensory evaluation to produce high-quality wines.
Pest Management: This branch is concerned with the study of pests that affect horticultural crops and the development of strategies to manage and control these pests. Integrated Pest Management (IPM) is an approach that combines biological, cultural, physical, and chemical control methods to minimize the impact of pests on crops.
Post-Harvest Physiology and Technology: This branch deals with the handling, storage, transportation, and processing of horticultural crops after harvest. It aims to maintain the quality and freshness of produce from the farm to the consumer.
Urban horticulture: This field of study focuses on the special difficulties and opportunities associated with cultivating plants in urban settings. In order to improve urban green spaces, it includes endeavors like rooftop gardening, vertical gardening, and community gardening.
Seed Science and Technology: Seed science involves the study of seeds, including their development, germination, storage, and viability. Seed technologists focus on the development of high-quality seeds for improved crop production.
Turf Management: Turf management is concerned with the cultivation and maintenance of grasses for lawns, sports fields, and other recreational areas. It involves aspects such as mowing, fertilization, pest control, and irrigation.
These different types of horticulture demonstrate the diversity of plant-related activities and the important role they play in providing food, beautifying landscapes, supporting the economy, and contributing to human well-being. Horticultural practices continue to evolve with advances in science and technology, contributing to improved crop yields, sustainability, and overall quality of plant products.
Kindly visit for more - https://krishilearning.com/branch-of-horticulture/
What you"ll discover here -
Educational Resources - Our blog serves as a treasure trove of educational content, including articles and lesson plans, all designed to enhance your understanding of agricultural principles, practices and new technology in agriculture. We explore cutting-edge technologies, such as hydroponics, aquaponics, precision farming, and more, to help you stay ahead in the ever-evolving world of agriculture.
We have designed our website to be user-friendly, making it easy for you to navigate, access, and engage with our content. We value your user experience.
Join Us in Cultivating Knowledge
Whether you are a farmer, a student, a teacher, or simply someone interested in the world of agriculture, krishilearning is here to guide you on your educational journey. Together, we can foster a more sustainable, innovative, and prosperous agricultural sector. Join us in cultivating knowledge, growing communities, and embracing the future of agriculture.
2 notes
·
View notes
Text
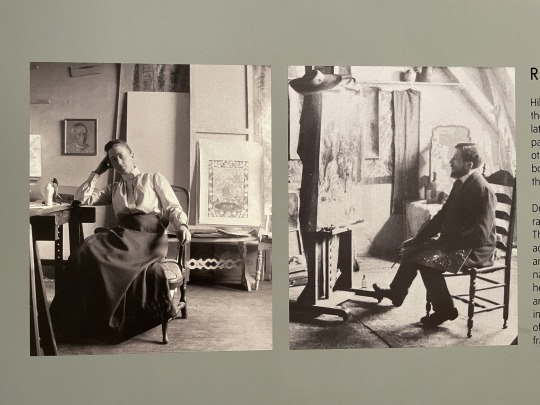
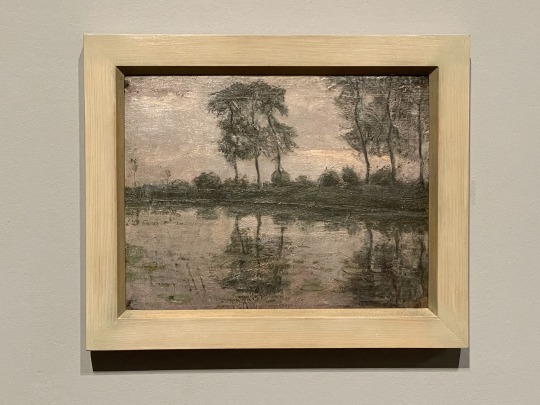
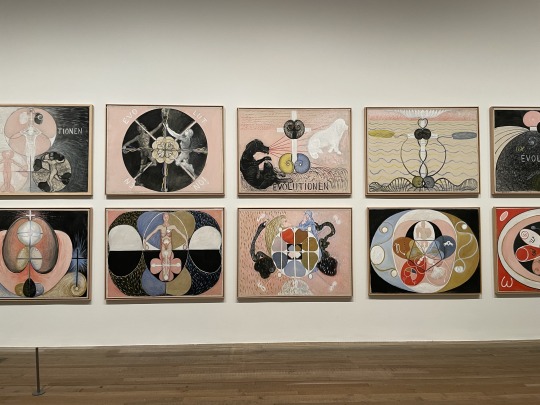
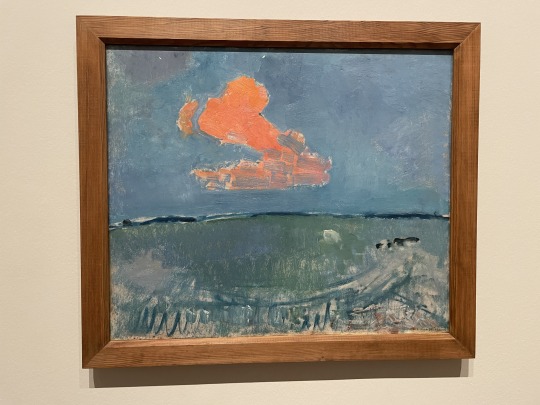


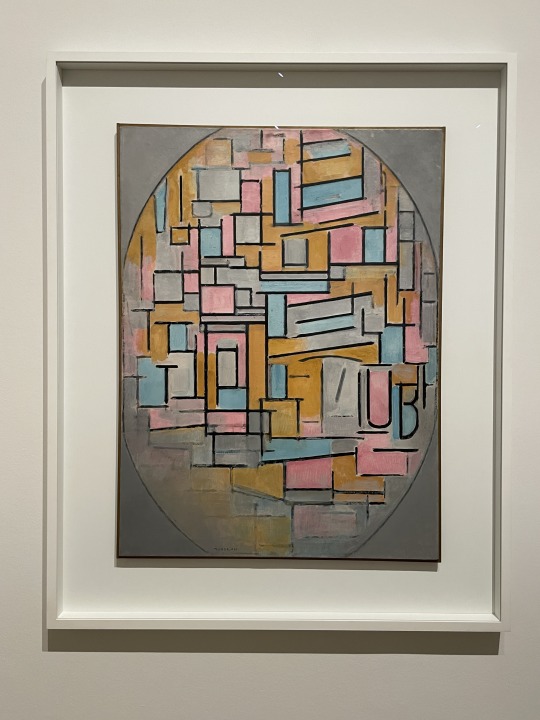
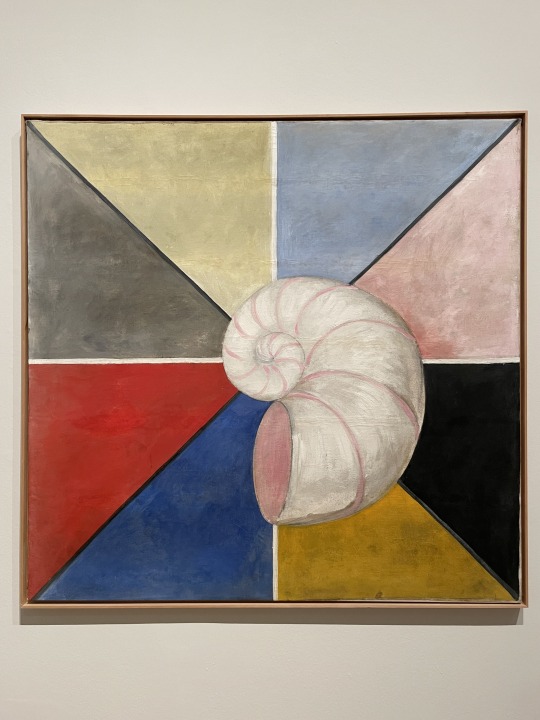
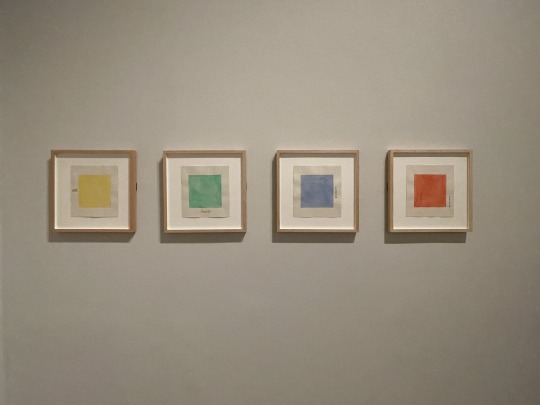


Just some of my favourites of Hilma af Klint and Piet Mondrian at the Tate Modern. Amazing how they both developed from nature and landscape to abstract at the same time from similar influences.
" Vertical and horizontal lines are the expression of 2 opposing force; they exist everywhere and dominate everything; their reciprocal action constitutes 'life'. I recognise that the equilibrium of any particular aspect of nature rests on the equivalence of its opposites"- Piet Mondrian, 1937
"... Everything is contained within the black cube: The greenery. of the earth is the bottom of the cube, the blue air is its roof, and the water-filled part is situated at that section if the cube that I rest my back against."-Hilma af Klint, 1917
4 notes
·
View notes
Last Seen Blogs

clandestinedmusings
wisteria


pairofmelaninkweens
CherAsh_MK

kuroroken1988
kuroken is the enemy

toonboy26
Love of Toons!