#we out here making unnecessary gifset edits
Text
i found like 5 quotes that are perfect for kimchay and 2 for vegaspete. now i just need the energy to make these
#im forever gonna be stuck on#kinnporsche#cuz no other dramas has made me this excited!!! even after it's done airing so#we out here making unnecessary gifset edits#lahari
3 notes
·
View notes
Text
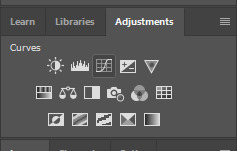
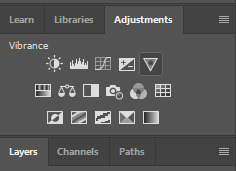
gif cut-out tutorial
ok ok so @subtledean requested a tutorial on how to do stuff like this post with the gif cutouts and the text effects. hopefully this helps aria ;w; i’m not the best at explaining things but i included some screencaps for clarity. i’ve tried to compress all the sample gifs and screenshots down to under 3mb to avoid tunglr compression on mobile so if they look a little different from the actual gifset, that’s probably why!
what you’ll need:
photoshop, i’m using PS 2021 but any version of photoshop will work out
a basic knowledge of gif-making (i’m assuming you already know how to make a gif and color it).
step 0: storyboard
this isn’t strictly necessary but i HIGHLY HIGHLY recommend it. you don’t have to do any photoshopping this first step, but it’s really important to check out your footage and the shots you have gathered to see what works, especially if you’re trying to combine three or more gifs onto the same canvas. like literally take a piece of paper and draw out where you want the character’s faces to be, where you want the cutouts to be in relation to their faces, and think about whether or not there’s enough empty space to the right or left of characters heads for a cutout to be placed. is there too much movement that would be distracting or messy in an already busy gif?
things like that really help, and it also makes you double check on your footage quality and feasibility. if you end up making a gif where you want one character’s face to be on the left side of the gif but it turns out there’s not enough empty space on the right side of their face to place a cutout and you then have to hunt for new footage or start all over, it’s kind of a trainwreck and you just waste another hour of your time as you deepen your procrastination hellhole. that’s not a real story—
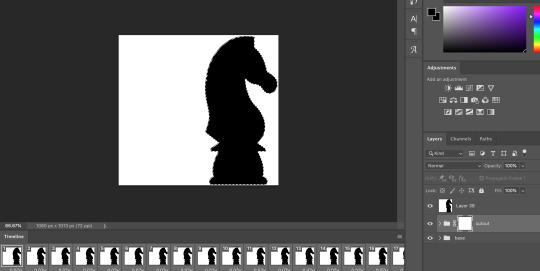
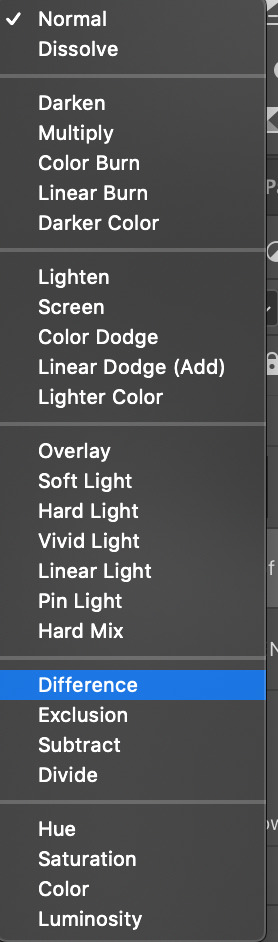
step 1: make the base gif
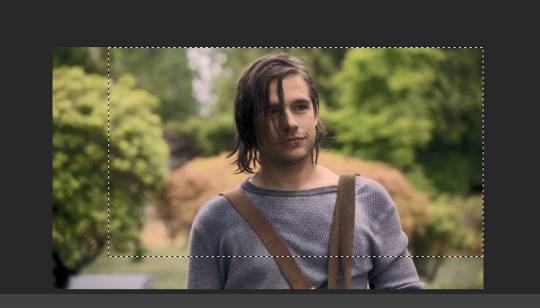
i’m assuming you know how to color it already. and aria i KNOW you know how to color already so :) size it accordingly to your desired dimensions.
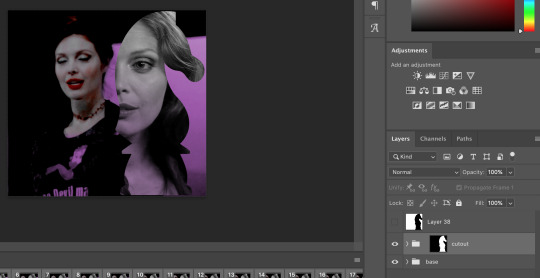
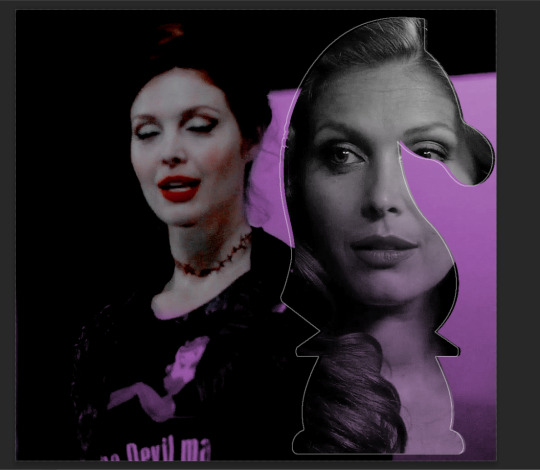
as you can see, i left enough space on the right side of abaddon for the knight cutout to be placed.
save this as a .psd file. you don’t actually have to sharpen and do everything that comes at the end of making a gif right away, but make sure your layers are clearly labeled. do NOT convert to video timeline/smart object just yet.
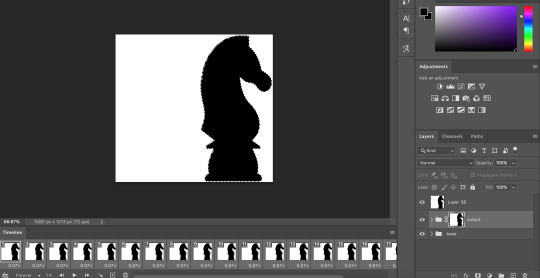
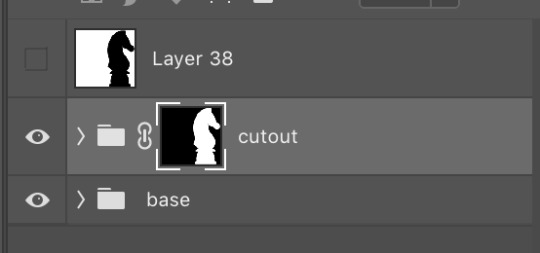
step 2: make the cutout gif
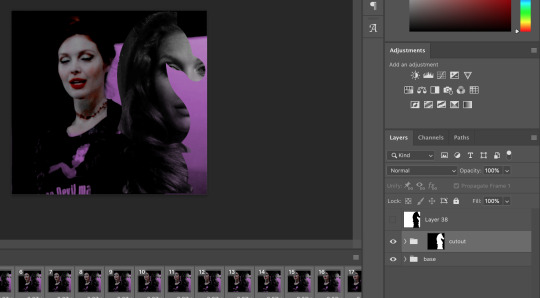
this is critical: make absolutely certain your cutout gif has the same number of frames as your base gif. otherwise it could get really messy! abaddon has 20 frames, so the cutout will also have 20 frames. again, do not convert the cutout gif to a video timeline/smart object. just keep it as a frame animation. here’s my cutout gif. it’s just a simple b&w gif but i added a touch of purple for color consistency sake whatnot.
now for this particular gif i’ve actually cropped abaddon to be roughly exactly where i would want her face to be in relation to the first gif, but that is unnecessary. helpful, but unnecessary. you do NOT need the cutout gif to be cropped exactly perfect in order to make this work.
step 3: combining the two gifs
there are many different ways to combine two gifs onto the same canvas. some people like to do it via video timeline. i prefer to do it by frames and convert everything to a video timeline only at the end (it’s just a personal preference). here’s a tutorial if you prefer working with timelines, but i’m gonna go over how to do it by frames.
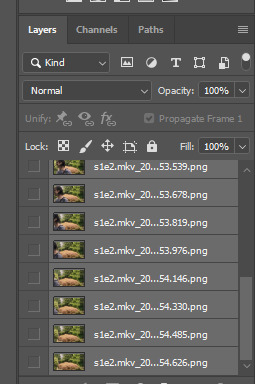
first group everything in your base gif into one folder. then group everything in your cutout gif into one folder as well. you can name them however you want to keep track of things.
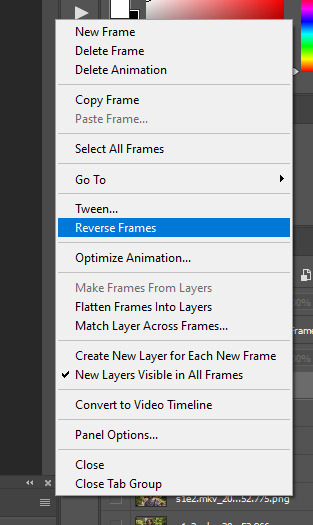
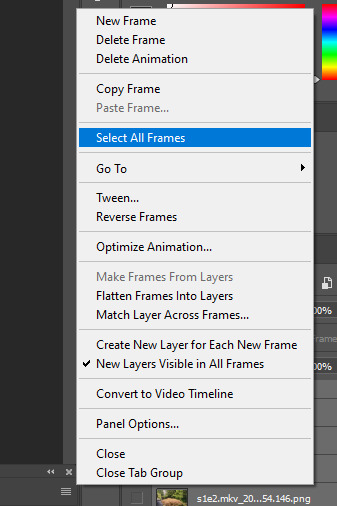
then, select all of the frames in your cutout gif. in this case, all 20 of b&w abaddon get selected. make sure its not just frames 4-20 or whatever, but all the frames you made. you can click frame one and then shift-click your last frame to double check.
click the timeline tab group options bar and then go to options > copy frames
now go to your base gif canvas. select ALL the frames of your base gif as well (it’s critical that all of them are selected).
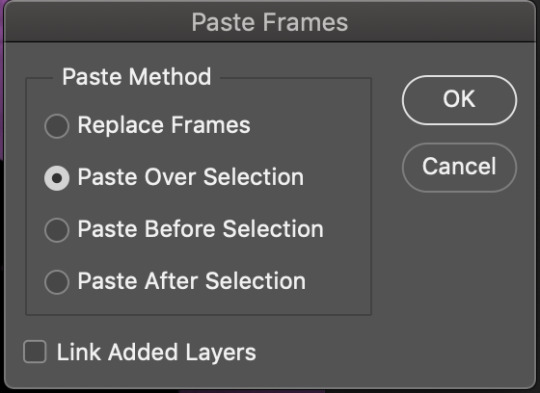
now do options > paste frames.
a popup should appear and you’re going to select the “paste over selection” option. do not link layers.
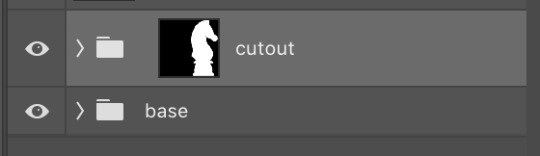
your cutout gif should now be completely or partially obscuring your base gif. however, now you should see two groups on your sidebar of layers. one for the base, one group for the cutout. if you labelled them with names you can tell which one is which.
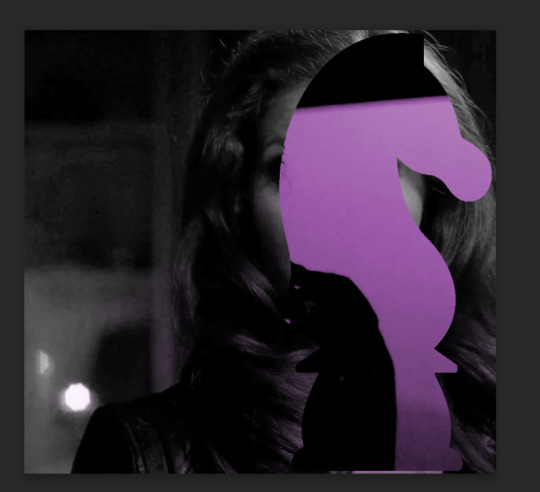
step 4: creating the cutout
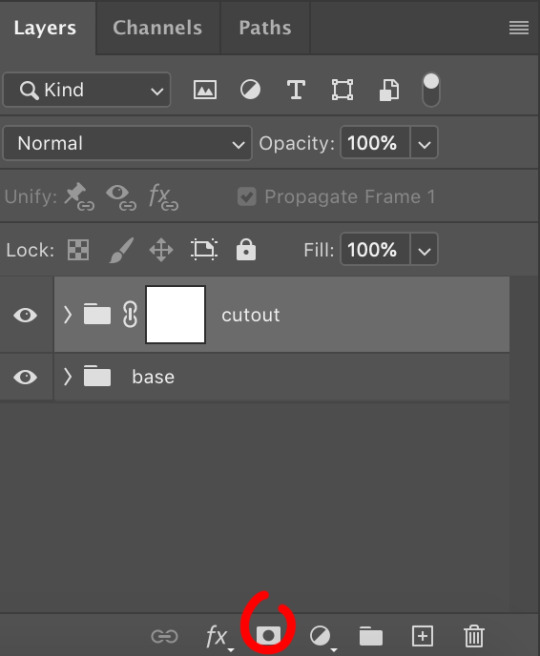
in order to create the cutout, we use my favorite thing in the whole world of photoshop. layer masks.
to make a layer mask, you simply select a layer or group you want to mask and then click this little icon on the row of icons at the bottom of your layers panel.
white on a layer mask means whatever group or layer is getting masked is completely visible. black on a layer mask means that the group or layer is invisible. if there is 50% gray on a layer mask, then its 50% visible. so on and so forth.
i love these so much i abuse them on the daily. i’ve made a few gifs where i’ve masked every frame one by one because i wanted to get some cool effects. admitting that kind of embarrasses me but oh well.
anyway this is simple though. just find a picture or an outline of a knight. i used these boyes:
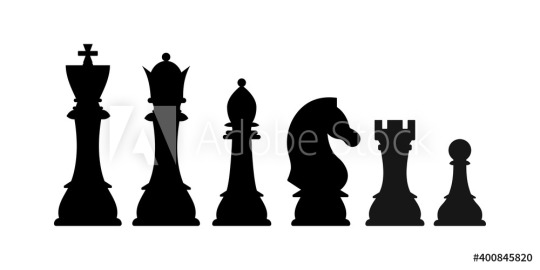
obviously i cropped out the knight of the bunch, got rid of the watermark, and then i placed it on the canvas where i wanted it to go.
select the interior of the knight with the magic wand tool. should be pretty simple since it’s all black.
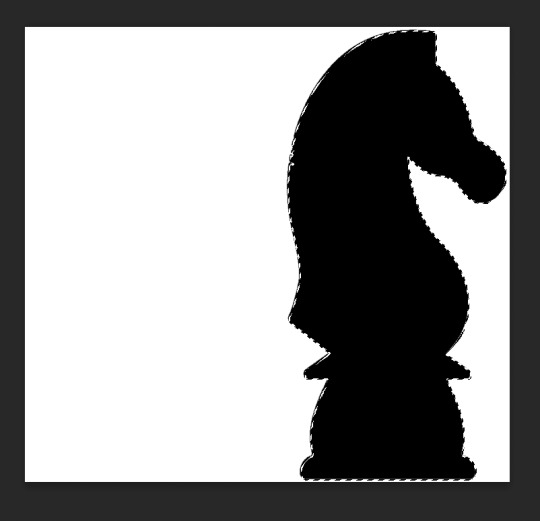
now click over to your layer mask. make sure you have selected the mask and not the group. you can tell you have selected the mask when a little white rectangle pops up on it.
when you know you have the mask selected, click command+i or control+i to invert. if for some reason you do not have this keyboard shortcut, just take a brush tool and color over the area in complete black. as long as the magic wand tool is still selecting just the interior of the knight, it should be fine.
now once again, black means a layer will NOT be showing, white means a layer will be showing. so right now after i disable the visibility of the top layer we used as a reference for the silhouette, it looks like:
do not fear the clownery. layer masks are great because they are always non-destructive. meaning that even if you somehow mess up and your canvas is showing something completely gross, you can always go back and edit your layer mask and your original gif would be unharmed as long as you did not touch any layers in the group, only the mask. simply invert the mask (again, make sure your mask is selected and then command+i or image > adjustments > invert) to get:
for a layer mask that looks like:
you could have also just made a black layer mask to begin with and then inverted the knight outline to be white. many different ways to do the same thing.
another tip: if you select your outline and then click layer mask upon a group or layer with no mask at the current moment, it will automatically make a layer mask with your selection as white and the unselected pixels as black. this is normally how i do my cutouts, because it’s a time-saver even if it like. saves a few seconds max. but i typed out the above for explanation and clarity, so hopefully i didn’t just make anyone more confused.
anyway.
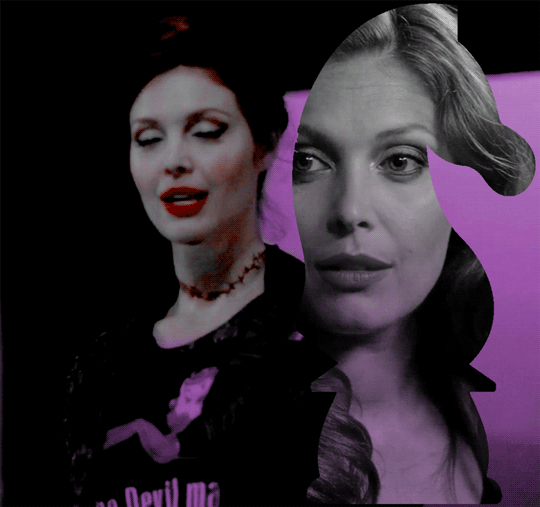
now say you don’t like where the cutout abaddon is positioned. layer masks can also be linked or unlinked, depending on the little link icon you see between the group and the layer mask in the image above. if the icon is visible, the layer mask and the group are linked. if you cannot see the link icon, they are unlinked.
linked layer masks will move in conjunction with the group if any type of transform is done upon them. if the group moves, the layer mask also moves. but if a layer mask is unlinked, you can move the mask and the group independently of one another. for instance, i can change where the cutout is located on the overall canvas of the gif by simply moving ONLY the layer mask (and thereby changing where the blacks and whites of the layer mask occlude the cutout gif contents). but i can also transform the cutout gif layers without changing where the overall outline is located relative to the canvas itself. basically, i can transform the interior contents of the cutout independently. so here (make sure all of your frames are selected):
group unlinked. i’m also making sure that now i am selecting the GROUP (ie. the frames of the layers you are actually going to move) and not the layer mask. you can tell because the little white rectangle around the layer mask can no longer be seen.
now i can transform/adjust the contents of the cutout solely “within” the cutout, and i don’t have to worry about changing where the cutout is located in relation to the overall gif. when transforming, make sure all the frames of your gif are selected. like select the whole group and not just an individual layer, basically.
i’ve seen a lot of how to combine and cut out gifs tutorials on this website, and here is a really good one that i know sully also used <3 big shoutout to all the photoshop queens being inspired by each other!! however i haven’t seen anything that mentioned the linked vs. unlinked layer masks, which i really feel like deserves a shoutout. you don’t have to crop your gifs out perfectly every time, you can always adjust them later. for demonstration, i’ve positioned abaddon in a few different positions with an unlinked layer mask.
step 5: creating the outline
so in order to emphasize the shape of the cutout (the knight), i simply delete the white space surrounding the picture of the knight in the original silhouette that i used. magic wand tool + delete. you can also make a new layer, then paint bucket tool it. many ways to do the same thing.
now with only the knight on a transparent background, i double click the layer to pull up the effects. select outer glow. i used these settings:
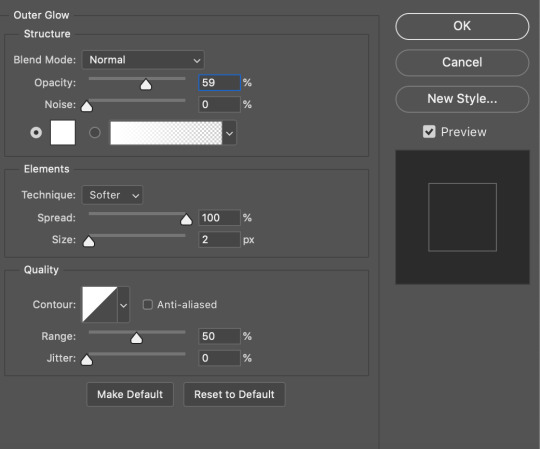
when you are doing this, make sure you are on frame one of the frame animation and the “propagate frame one setting” is selected, otherwise you might end up only applying the effect to one out of your many frames, which blows.
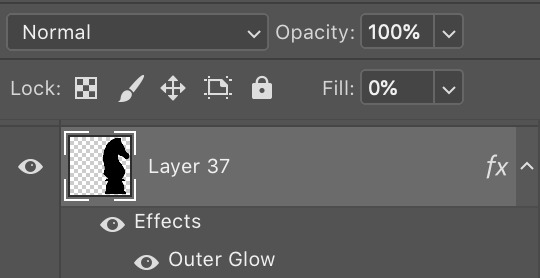
then i go change the fill setting to 0%, BUT i leave opacity at 100%. fill is basically like opacity, but it doesn’t affect layer effects (whereas opacity does). so you basically get only the outline but not the black. you can also set the blending mode of the layer to screen and get the same effect, etc, etc. feel free to adjust however you see fit, in addition to the outer glow settings.
i move this layer over a couple pixels to give it the little offset effect, but you don’t have to.
step 6: adding the text
okay the two fonts i used are avenir and perla. i think a LOT of gifmakers use them because they’re really pretty.
i make TWO different text layers, one with avenir in a smaller size and one with perla in a bigger size. this is because for the perla one, i’m going to be changing the blending mode whereas i don’t want to be changing the blending mode for the smaller text. i position the text where i want it to be and make sure the perla font is in the color i like:
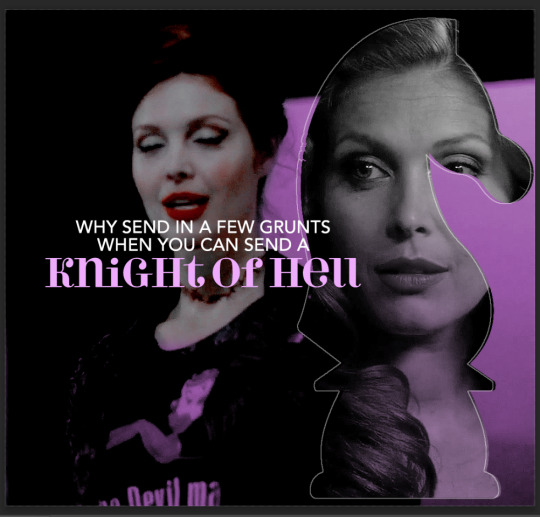
then i change the blending mode of the fancy text (perla) to difference. ONLY that layer, and again make sure to check “propagate frame 1″ and make changes on the first frame to apply the change to all of your frames.
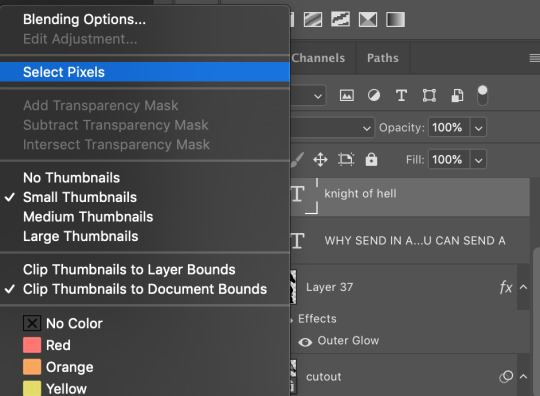
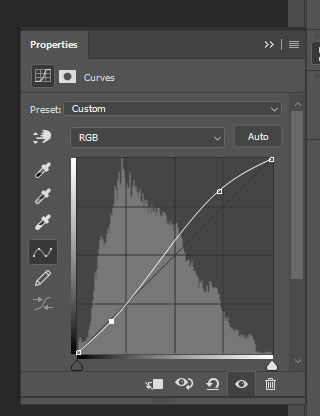
but i still don’t think it produces enough of a difference. so i right click on the text layer for knights of hell, and then go to: select pixels.
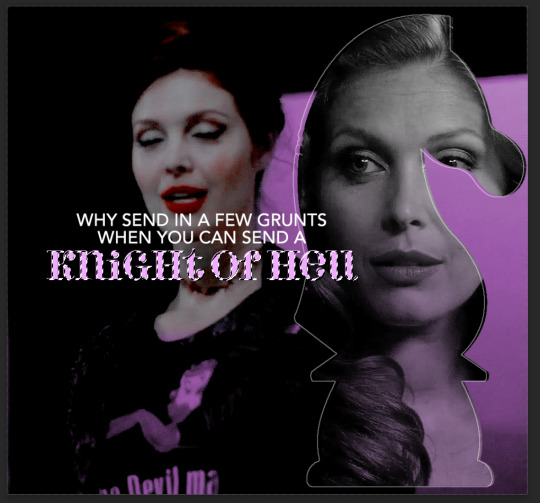
then i click the curves adjustment layer. this will automatically make a curves layer with a layer mask that occludes everything BUT the area you selected. beautiful. i drag the curves around until i get enough of a difference that i like. normally i make the lights lighter and the darks darker. yeehaw.

again there are sooooo many different ways to achieve the same effect on photoshop. this is just want comes easiest to me, and it’s totally okay if you find a different way that works better for you at producing the contrast you want or the colors you want.
step 7: export and cry
NOW you can convert everything to a video timeline, put your video frame layers to smart objects, and then apply your finishing sharpening filters. export, cry, and hope tumblr compression doesn’t screw you over.
hopefully this was helpful! pls like... idk support my edits if you found this helpful or reblog this post. feel free to dm me about how u do some of the text effects as well bc i’m always trying to learn new things and i am by no means an expert on like. any of this.
aria please go write your fucking thesis before i delete this entire tutorial challenge. :D
#subtledean#THIS IS FOR YOU#I FEEL LIKE THIS TUTORIAL HAS MORE WORDS THAN UR THESIS ATM SO!!!#tutorials#mine#idk what to tag this but PLS pls pls feel free to talk to me abt ph*toshop#or ask for help or point me towards other tutorials <3#shoutout to sully too its in there somewhere#resources#100n#ps
190 notes
·
View notes
Note
I am curious: what are your favorite scenes from your main ships (date, dair, derena...)?
scenes involving milo don't count, sorry!
for me, it's really not just scenes, but body language & just in general, how they are with each other, you know? dan and serena grin at each other and hug SO much, you can tell that being around each other in s1 made them both so happy, and even after that glow fades the way they look for comfort in each other... top level stuff. the way blair looks at dan... we never see her as radiant at any other point. she was not looking at anyone else like this. and gosh, dan and nate. they're both so comfortable around each other that there's absolutely nothing weird about like. discussing that one ex girlfriend whom they both share AND both were in love with. there is literally no other duo who trusts/enjoys each other's company so much that they're comfortable in a love triangle. (probably because they're more in love with each other than with the girl, but that is not the point. or is it?)
anyway, more specific answers. under the cut. this is one of the longest answers i've ever written on this blog possibly but you KNEW that would happen when you sent this ask, didn't you? (affectionate)
derena: i tagged one of my ds reblogs as 'the grumpy one is soft for the sunshine one' and like. look at them! this hug from 1x10 kills me in the best way. they are both the literal embodiment of :D when they see each other! i love 1x10 as a whole moment, their entire thing at cotillion is so sweet and they're both so happy. the fact that he is talking about his chemistry teacher during this kiss in 1x07. that bit at the end of 1x05 when they talk about their siblings (being there for their sibling because of fallible parents being a derena parallel makes me simultaneously really sad and really soft, tbh). 1x05 gives me SO MUCH SECONDHAND EMBARRASSMENT but the way they walk off together arms around each other does something to me - these are two people who are still getting to know each other but who really like what they see, and who trust each other and. are just having a good time together! back when derena was my OTP, the 1x11 "your story's about me?" was absolutely a fave, too, and i still adore it, albeit in a different, more nostalgic way. i like a dan who writes cute stories about serena. no empty shell sabrina van skoneker bullshit. she is so much like you, daniel! you'd be shattered if she did this to you. don't do this to her. tbh, most derena moments from s1 are just A+ romance. the bit in 2x02 in the jitney is so funny, they're SO bad at being exes. the bit in... 3x03 i think?? i don't remember... on the contrary. when they're talking about dan's fling w/ georgina and serena's relationship with carter, the ease with which they talk and how happy/supportive they are of each other's new relationships... yeah. love to see it.
i also really like any instance of them having honest/open conversations. 1x13, talking about how serena is concerned about blair. 1x08, serena talking to dan about feeling jealous of vanessa. this bit from the touch of eva or whatever that episode is. 4x04 i think. this is the conversation everyone is trying to get dan to have and he's avoiding EVERYONE else. derena interactions in 3x21 (can't find a gif right now) - the fact that dan is with serena when her dad abandons them, the fact that he goes all the way there with her. 2x07, "i'm really glad you're nate's friend. he really needs someone like you right now" (though i'm cheating, that's technically a d/n moment too klhdflkgf). there's a bit in s4 where he's advising her against having an affair w/ colin, i don't remember the ep number, but the way he takes her side so easily and naturally and puts due blame/responsibility solely on her professor... yeah. 4x10 i think this ep is?? idk. but like my tags say, im sentimental about this moment because while what dan was doing was irresponsible, sneaking her out of the ostroff, he was the only person in this episode who was actually talking to her and listening to her and taking her seriously. nobody else was doing that!!
i probably have more moments i'm not remembering, but we're only 1/3 into this answer and LOOK AT THE WORDS, good lord, i'm sorry.
dair: my favourite dair episode is hands down despicable b (5x21) which i have heard is an uncommon answer. i just love the conflict resolution of it all, okay!!! 1x04 & 2x08 are like. standard answers any dair shipper will give, and i'm no different. i love dan being able to give blair advice and blair actually taking his advice even though they're not friends yet!!! be right back, yelling at the intimacy of it all!! 5x16, with their getting together (this little kiss and dan being so startled by it), blair admitting a flaw she genuinely does have and dan saying it's not awful because it's her, which is just. romance at its finest. those vows, good lord. 5x18.... they're having fun! blair showing up at the loft in lingerie for dan... the delight on her face.... (i know this moment blows up in their face but when she's there she looks so happy and proud of herself and this was like THE moment when i was like. oh. dair is really the heart of this garbage show huh).
i think for me, the thing that really sells dan & blair together is the serena of it all. both of them love serena more fiercely than anyone else, and that is what brings them together. (fwiw i definitely think nate loved serena this much and this deeply, too; the writers just wanted to pop the serenate balloon, which even i think was extremely unnecessary and ooc.) but (& i have so much meta about this) their relationship grows beyond serena. their entire s4 arc is SO good. i love how comfortable around each other they are, in such an adult way, in the sense of like. they both bring so much stability to each other? morgan tagged this edit "the marrieds" and like. yeah. b offers to help him shave. they're having breakfast & reading the paper together.
all the love declarations we got that weren't a simple 'i love you.' be your charming wonderful self (how could she not love you/ tell me what would make you happy, dan) i told chuck he doesn't have my heart anymore (you spent your life earning the keys to set you free when you were free all along!!!!) dan's pep talk to blair in 5x21 (already linked a gifset earlier, here's another one if you want i guess). there's definitely more... but honestly, the way the dair arc was executed was so good - while i do have my complaints, i also think keeping those aside, it was SO close to perfect. i love dan & blair's banter and gradually becoming closer and closer and closer. it felt very organic and real and GOSH. the way penn & leighton looked at each other while playing dan and blair...... it's just SO MUCH.
date: this is the hardest, because it's. *screams*. maybe you saw me losing my mind over those 2 seconds of nate handing dan a waffle? i love almost every scene with these two, even the hellish s6 breakup scene. my favourite episode for d/n (& also favourite gg episode in general) is 2x06 - i love the homoerotic subtext of it all. nate pretending to be dan because dan's name is the first name that came to his head. dan flirting w/ nate while tied to that thing, in his underwear. them becoming friends. and 2x07 as a follow-up to that! dan getting nate to live in the loft with the humphreys for a while. i am so soft.
4x09 is a terrible episode in general, especially for serena my beloved, but the d/n moments in that one? off the CHARTS. this weird overly macho flirting, in some ways THE most iconic d/n line. this entire finish each other's sentences nonsense. someone (i think it was ana but im not sure?) compared the energy of those scenes i just linked to the book blairenate love triangle resolution, blairena choosing each other over nate in the books, date choosing each other over serena in the show (if only! RIP.) after the saints & sinners ball, this cute little moment of 'youre the only one who understands me. please tell me they went home together. i mean. how could they not have.
3x07, them watching vampire porn together. a tag i used on ao3 (& also on here, once) is 'nate brings out the himbo in dan'. here is a prime example. 'is she levitating?' i don't fucking know, dan, what do you think?? (i was telling my partner that that's what i love abt dair vs date. around blair dan is an intellectual, a librarian, an art historian, a museum curator. around nate it's like dan is competing to be #1 himbo on the show. can my girlfriend actually fly? i don't know, dan. i can't believe you're seriously asking such a question.)
3x12 pep talk. (sorry about the shitty quality!) essentially nate telling dan that he (dan) is hot and that he shouldn't talk himself down so much.
dan making nate gay in his book. you know. his book from which blair found out he was in love with her. nads (who i will not tag in this billion word long gushy meta, because i value her sanity) once called inside "wish fulfilment' and. i mean. yeah
nate checking dan out at the derena wedding continues to be hilarious. hilarious in the same way as dan sexually fantasising about nate. canon really went 'let's give ivy some special easter eggs' and i appreciate them a lot!
i love the way they are around each other - so quietly attuned to each other. i showed my sister my date!husbands gifset, and she was like. yeah they're so married. and it's just stuff like how dan looks for nate over his shoulder, it's not even an active action, it's as easy and natural and intuitive as breathing, checking to see if nate is still there.
oh, that wasn't as hard as it could've been! okay. cool. im SURE there's more things i could scream about, because it's DN, the fact that they're non-canon makes me THAT much fiercer about them than dair/derena, to be honest. so many dots to connect!! anyway.
#meta#derena#dair#date#anon#this is SUCH a gushy essay but like. what did you expect#how else could i have answered this#this took. an embarrassingly long amount of time#but i had SO much fun so#citations for my ships#don't mind me *whistles under my breath*
22 notes
·
View notes
Note
Hello! I just wanted to say the coloring on your gifs is always so incredible. Would you ever consider doing a coloring tutorial? Or even just share a few tips. Everything always looks so smooth and vibrant. Thanks!
hii! thank you!! 😳💕
i wanted to do some general tutorials a while ago but i need to plan them out since i like to be detailed and still hadn’t come around to it. but my colorings are also pretty simple so i don’t really consider myself good enough to teach anyone much. i did lowkey write an essay rn to explain how i do them now because i often see tutorials say what to do but don’t mention why. there is of course numerous way to do one thing in photoshop this is just a way i find it fastest and most effective.
and i was just about to delete files of some of my recent gifs to free space, but luckily i didn’t yet so i’ll include them below to download so you can see what i did on each one.

anyway here’s how i edit below the cut :D
1) 1.1 this is not directly related to coloring but it does affect it. first you wanna make sure that the file you’re working with is in good quality. ideally you should look for shows/movies that are 1080p but 720p also works. i’m using 720p here.
1.2 to make gifs look smooth it’s also important to have right frame rate that’s not too low or too big. i take screen caps with kmplayer and these are my settings.
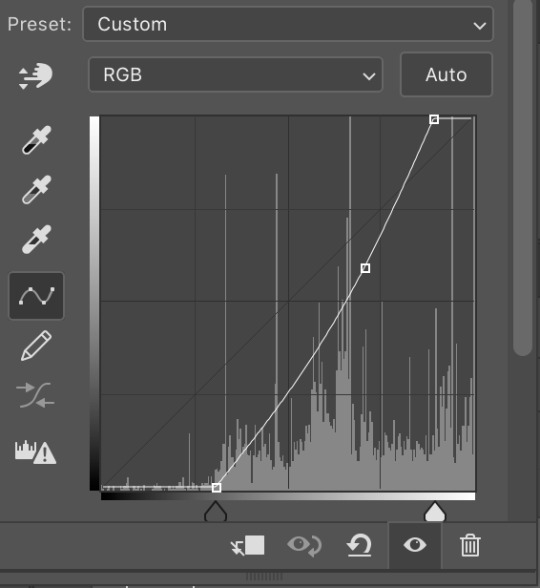
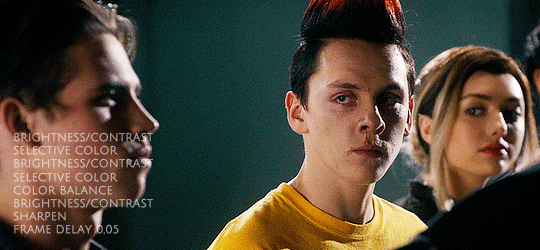
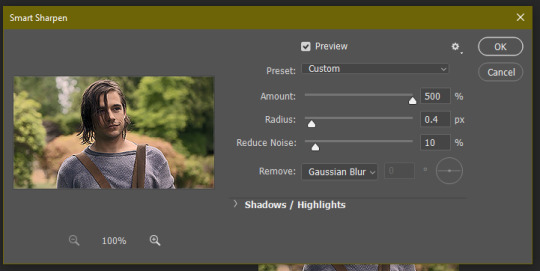
2) after exporting frame to photoshop i turn them into a gif with frame delay of 0,05 (sometimes more but max 0,07). also i sharpen them right away because sharpening affects how coloring will look. i use ‘smart sharpening’ and here is the picture of settings i used now. normally i set amount to 500 with radius either 0,03 or 0,04 but here it was either oversharpened or not enough so i experimented with settings to see how it looks nicest (the higher the file size you work with the higher you can set sharpening without ruining the gif. so when i work with 1080p i pretty much always set it to 500). anyway now that we have that set, this is what we’re starting with:

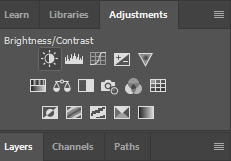
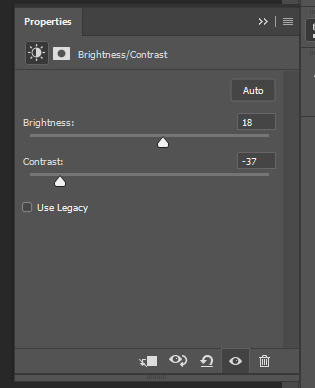
3) when it comes to coloring i make it very simple by using only 3-4 color adjustment tools (mostly brightness/contrast, selective color & color balance). trick to vibrant gifs is using ‘brightness/contrast’ options gradually as you color gifs. for example look at this set. i used brightness and contrast 3 times till i got it to where i wanted to. repeating this step depends purely on personal preference and lightning in the scene you’re working with. the darker it is the more you will probably have to do it, but i mostly use it around 3 times.
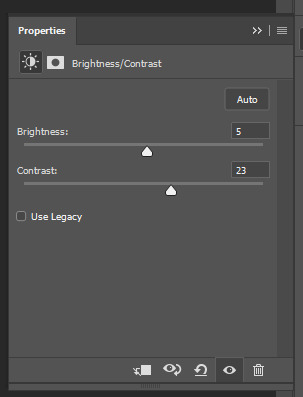
3.1 so i start by using ‘brightness/contrast’ tool and i set brightness to 51 and contrast to 9 (settings picture). you’re obviously gonna have different settings on each set you do. however what i always do is set brightness higher than the contrast. also don’t overdo it if it doesn’t look bright enough because you'll be doing it two more times.
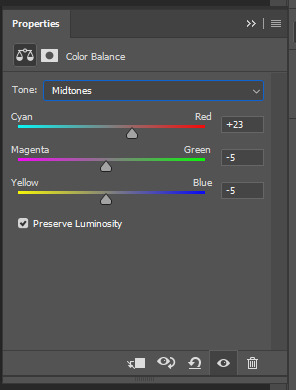
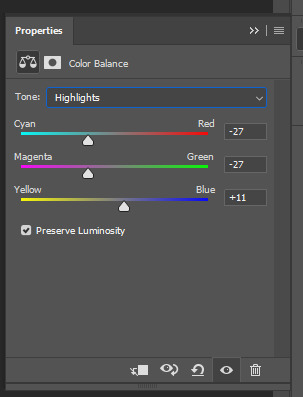
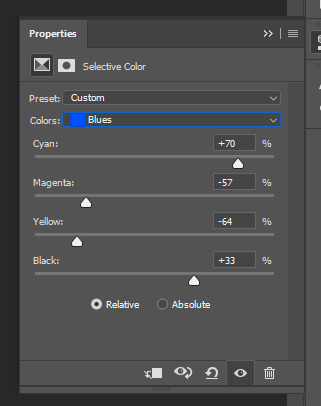
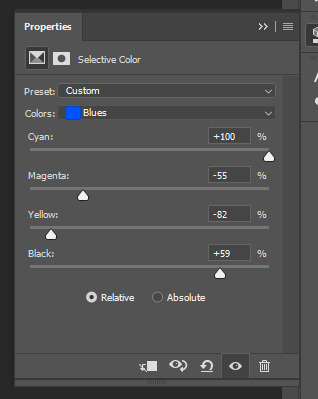
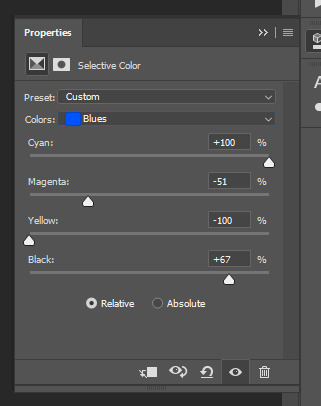
3.2 after that i start fixing the colors and i usually start with ‘color balance’ tool (settings for this gif here). i generally only move blue and magenta a bit. this is especially useful if you’re working with scenes that are overwhelmed with certain color (for example in my yneh edit you can see how drastically it changes from green to more natural colors). the more natural the scene is the less i use it.
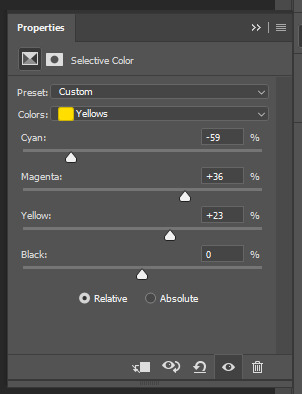
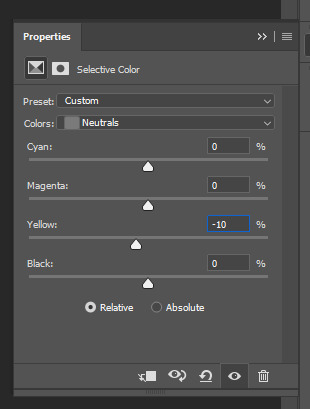
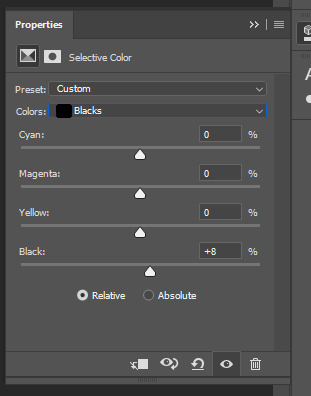
3.3 third thing i did in this step is to use selective color tool. now when i first use it i only change setting on two colors as you can see here. i like to darken red because it helps to keep skin tone and i darken black because it makes gifs appear more quality. i only do it mildly in this step.
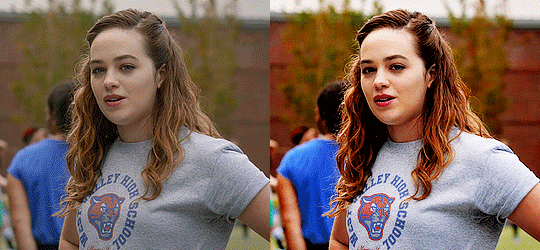
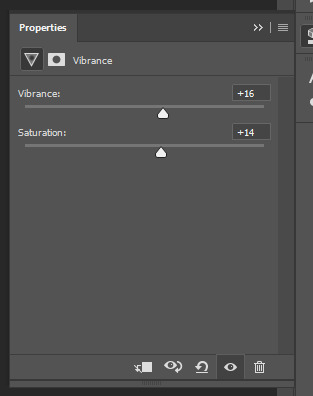
3.4 another thing which is optional but unnecessary for me to do here is to add ‘vibrance’. so far my gif has enough color, but there are certain scenes that are very pale or have lost some color after brightening them. in this example i restored some color so it became more vibrant because the scene needed it. this is also a way to avoid whiteashing!! what we have for now:

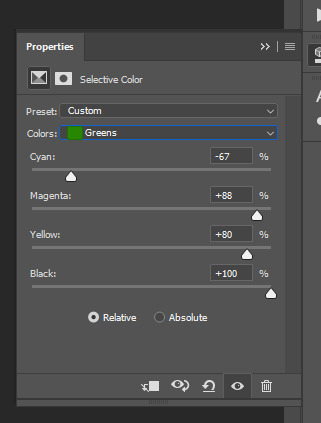
4) now i basically repeat same thing until it looks good. i added another ‘brightness/contrast’ option and then i used ‘selective color’ to fix the skin and background. i mostly only touch red, yellow and black (see here). once again i darkened black tones in each color to up the quality. you can see here how much difference that makes.
5) same as before i added another brightness/contrast option and i fixed skin further with selective color. in this case i also recolored background because blue/purple comes of more vibrant (see all here). after that i played with selective color two more times until i was happy with how everything looked. see inside pds file to see all changes i did (download here). once again darkening blacks even just a bit improves overall look.

6) other adjustments depend on the gif itself and personal style. sometimes i add some other options like ‘curves’ or more ‘color balance’. one other thing that i wanted to fix here was skin color of other people (once again useful to avoid whitewshing in many cases). i just wanted to town down yellow a bit and i did that by setting mask and adding selective color (see here).

that’s pretty much it. these are my saving settings.
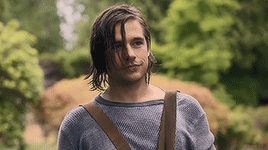
lighter gifs will probably be easier to do and won’t need so much fixing but it really depends on the scene. for example this didn’t need so much retouching (also it looks grainier because i put unedited version next to it. it looks better when you just save edited gif asdfghjk).
you can download this psd to see what i did
some tips:
- if the gif is pixelated or grainy sometimes it helps to save it as pattern instead of diffusion (pic)
- when you make very vibrant gifs they will have a lot of color. photoshop however saves only 256 which means your gifs will sometimes turn out like this. to fix this you can add ‘hue/saturation’ tool and lower saturation. you can also use ‘selective color’ and try to dawn down all background colors. this can also happen when you have multiple scenes in a single gif. there’s just too many colors then and you should probably cut them to only one scene (for example this is a gif i tried to do of multiple cuts that turned out too pixelated on the rain scene because there were too many colors so i decided not to post it).
- even if you’re working with same scene for a gifset you will still have to adjust coloring based on how lightning changes or the dynamic will be off. look at example.
- to lighten gifs you can also use ‘levels’ or ‘curves’ option instead of brightness/contrast. sometimes it works better.
- try to keep it natural and enhance already existing colors.
- sometimes something that looks good on pc will look way off on mobile so i usually check and adjust based on both.
- link to my psds on google drive
if you have any other questions feel free to ask. i tried covering most but i don’t know what’s happening in my head 90% time while editing so yeah
#Anonymous#answered#tutorials#if there typos srry i can't english#i also make gifs on 3 blogs and each one follows different style so idk even
25 notes
·
View notes
Text
@auriant-express i wasn’t going to formally address this but your persistent offensive against my friends and i has left me no choice. this is a learning experience for you. you may be in denial but your actions as of late have cost you your place in this fandom. the way you have treated myself, other content creators, and people in general over this issue has been rude, petty, and unnecessary. it’s sad that you chose this cross to die on when the reblog button was right there. i know i don’t own the show. neither i nor anyone else on this whole website has ever claimed to own the shows we gif and edit. and ok, even if technically by the letter of the law i couldn’t sue you for copyright (which i would never do to begin with) the fact that you don’t see the harm in taking people’s hard work and reposting it is very concerning to me. if you love my gifs so much, this is not the way to support me and encourage me to continue creating. creators get nothing out of giffing and creating besides the joy of seeing people like, reblog, and interact with their content. i do it for the love of it, but having the ability to receive notes and feedback on my creations taken from me without my say so really makes it hard to want to continue doing all of this. if you truly believe giffing is just “slapping filters on something” then i know for a fact you have never actually tried to do it. if you think it’s so easy, please make your own. if not, then please treat creators with respect. take copyright and the creative commons (which to be honest i’m not convinced you understand any better than i do) out of it for a second, it’s common human decency. and i’m sorry but calling me a petty little child is simply not ok. i was as polite as i possibly could have been and gave you a lot more kindness than you deserved. you went behind my back by reposting my gifs in the skam france tag as if i wouldn’t notice, and then when you were called out on it, you tried to @ me and delete the evidence. when i politely asked that you remove the post, you proceeded to call me a petty, whining child and take yet another one of my gifsets. you were passive aggressive and rude, and despite asking me to “talk to you privately next time” you blocked every one of my friends who tried to privately reach out. i draw the line at dragging my friends through the mud as well. telling caroline that her gifs aren’t interesting enough to be stolen without her permission is wrong on more levels than i care to entertain right now. this is the last i will say about this, but i hope this teaches you something, because you should know that the creators in this fandom will do everything in their power to keep you from doing this ever again. and before you thank me for the free press, please kindly check yourself. no one here wants to support someone who so unapologetically and ruthlessly takes other people’s content. oh and i do not give you permission to ever post my gifs again. if you even try to repost another time you best believe my friends will bury your blog.
37 notes
·
View notes
Text
detailed giffing + basic coloring tutorial for beginners
so a lot of gif/coloring tutorials are pretty outdated or not that detailed & i wanted to put my own out there! in this:
how to get the screencaps for your gifs
how to make a general gif
basic coloring (no psds here, it just gives you a basic idea for making colors pop and look nice. you can look up how to use psds, but i prefer making my own for every gif as it’s much more personal, gratifying, and creative. there’s nothing wrong with using psds as long as you don’t claim them as your own, it’s just not my personal thing)
how to save a gif
we’ll be going from this:
to this
what you need:
photoshop (cc 2019 is what i’m using, but this works with any version of photoshop really as long as you download a version with the timeline feature) i won’t add download links here since i don’t want this deleted, but you can look some up on tumblr or use the pirate bay (current url is pirateproxy.blue as of 4/29/2020) & follow the instructions there.
for windows: potplayer/kmplayer (both use literally the exact same instructions) this tutorial uses potplayer but kmplayer uses like literally the same instructions, it just doesnt work right on my computer
for mac: mplayer. this tutorial does NOT cover this so find a tutorial on tumblr on how to take screencaps with mplayer & then skip to the “how to make a general gif” section. though, again, i’m on a pc so i have no idea if this is entirely accurate for mac.
if you’re downloading from youtube: clipconverter
if you’re Definitely Legaly torrenting: utorrent + the pirate bay (again, current url is pirateproxy.blue as of 4/29/2020) or another torrent site + you should really consider getting a VPN when torrenting (i use privateinternetaccess but you can find one that suits you)
note: download an adblock of some kind, disable automatic downloads on your computer, & download an antivirus program if you want because some sites are sketchier than others! this is ESPECIALLY crucial on sites like piratebay. keep your computer safe babes.
1. screencapping
there’s several ways to get screencaps on photoshop, but this is the easiest imo and i’ve never done the whole convert video frames to layers thing. like i said, you’ll need potplayer or kmplayer. i’m using potplayer. important note: don’t accidentally download viruses here! read each screen carefully & make sure you’re not hitting accept to download any secondary programs.
1. download your .mp4/.mkv. you can go to youtube & find a clip/scene/whatever and use clipconverter to download it. just make sure you download it at 720 (or higher) as anything lower than that will give you a poor quality gif. you can also download using somewhere like the pirate bay, but for this you need utorrent & i would HIGHLY recommend using a vpn if you live in a country where torrenting copyrighted content is illegal, as your internet provider may flag your ip address if you don’t & you torrent too often.
2. download potplayer/kmplayer & get it set up
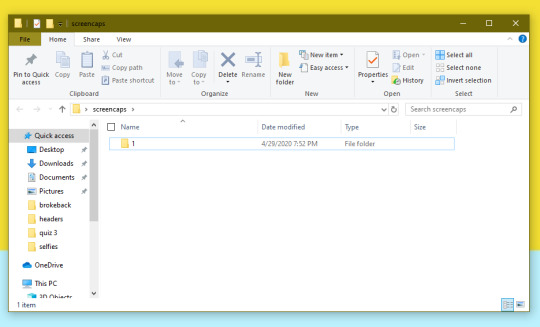
3. create a screencaps folder. i always put mine on my desktop. in your screencaps folder, make a folder for however many gifs you want in your set. i just have one for mine so:
4. open up your .mp4/.mkv

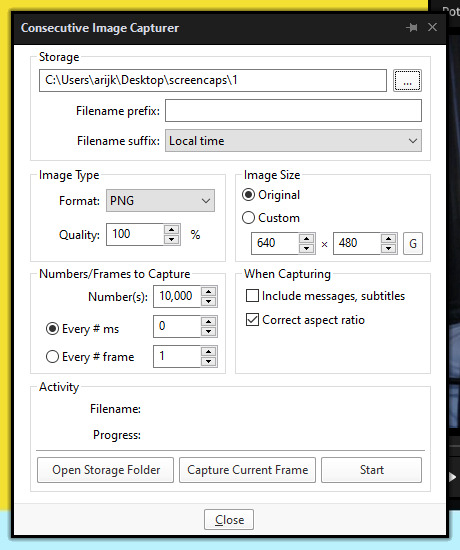
5. hit ctrl + g to bring up the screen capture pop-up & set your settings to these. click the button w/the three dots next to the storage option & select the folder you created for your first gif
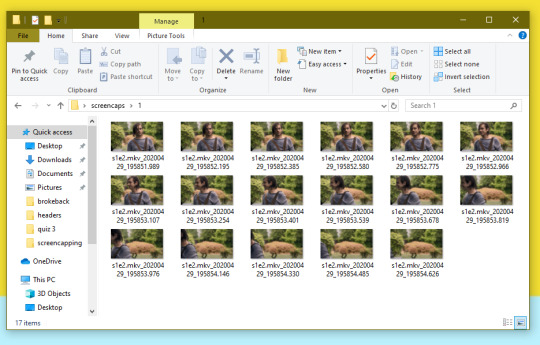
6. navigate to the scene you want to gif. when you’re there, pause it and hit the start button on the consecutive image capture screen, then play the video. how many screencaps you need depends on the size of your gif. for larger gifs (so like 540px wide gifs), you’re probably going to want to keep it below 30 frames. for smaller gifs (268px wide or less) you can maybe stretch it to 60, depending on how much coloring you add. you can always delete screencaps later though in photoshop, so don’t worry about it too much. for this gif, i only had 17 frames because the scene was really short lmao
7. go to your screencap folder you made & delete any unnecessary frames. it’ll look like this:
8. repeat the process for any other gifs, making new folders in your “screencaps” folder, numbered for however many gifs you’re making. make sure to change the folder you’re loading the images into on the image capture pop up though so they don’t all go into folder 1.
2. making a simple gif (+sharpening)
1. first, you need to load your screencaps. when you open up photoshop, go to file > scripts > load files into stack
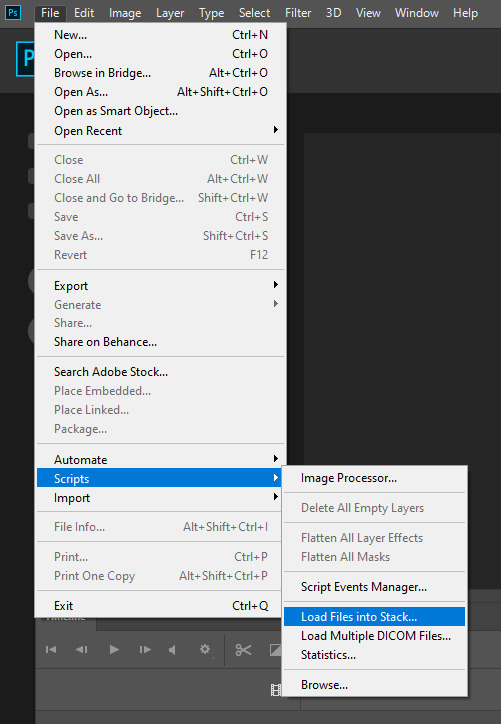
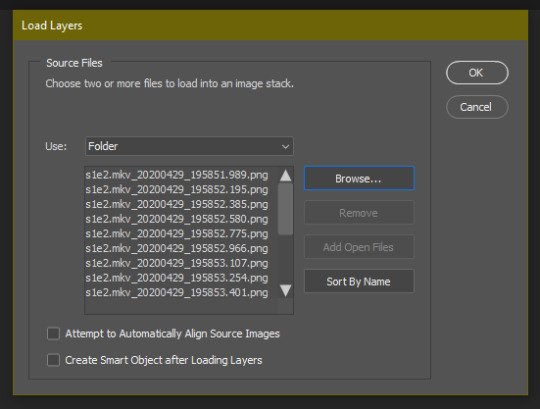
2. when the window pops up, switch the “file” option to “folder”

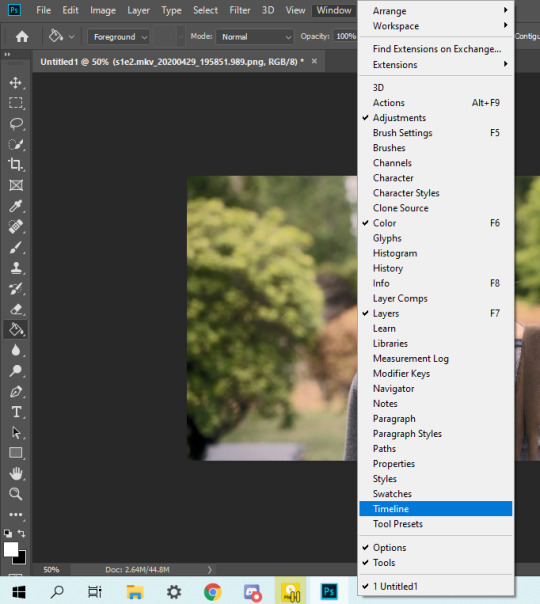
3. click browse and find your screencap folder for your first gif (in my case, desktop > screencaps > 1) once it’s all loaded, click “OK”
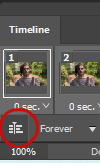
4. it’ll take a minute to load all your screencaps into photoshop. when they do, go to the upper bar on photoshop > windows > timeline
5. when the timeline bar shows up, click “create frame animation”

6. hit this button and click “make frames from layers”

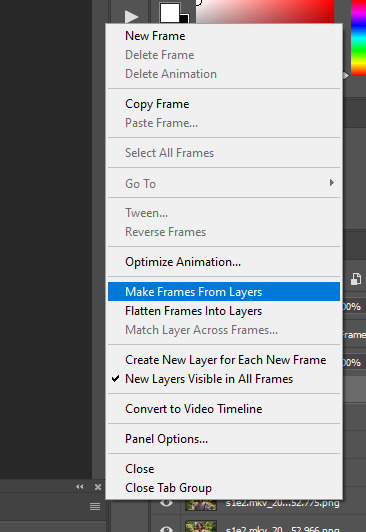
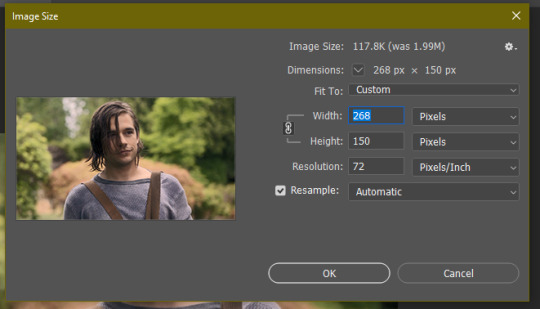
7. hit the button again and click “reverse frames”
8. click back onto your first gif. then select the rectangular marquee tool and set it to whatever gif size you want. the width for 2 small gifs next to each other is 268px, the width for full size gifs is 540px. most people use 268x150 px for gifsets of 4+


9. use the marquee tool to select what area you want for your gif, like this. it’s up to you how to crop it! get creative!
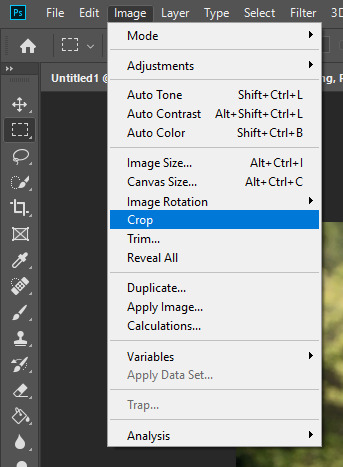
10. go to image > crop
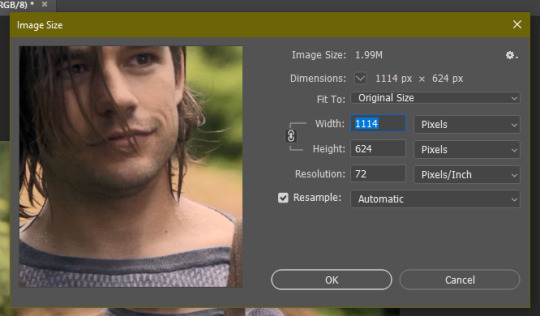
11. now that your image is cropped, go to image > image size. change the size to your desired gif size (in this case 268x150). hit “OK”. then make sure it’s zoomed in to 100%

12. now, you COULD just save this gif, but they look way better sharpened. so you need to convert this to a smart object. to do so, first select all your layers in the righthand layer window. to select all the layers, click on your top layer, hold shift, and scroll down to your bottom layer & click on it as well while still holding shift
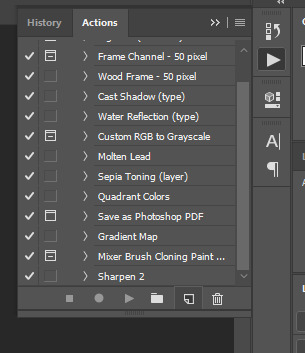
13. next, you need to select all your frames. go back to the options button from part 6 > select all frames
14. next, we’re going to create an action to make your life 100x easier when it comes to sharpening gifs in the future. to do so, go to the actions icon (may look different on different versions of photoshop, but basically just find the actions window)
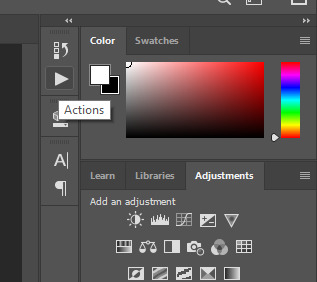
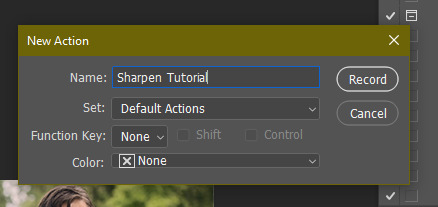
15. create a new action with this button. name it something. i named this one “sharpen tutorial” and hit “record”
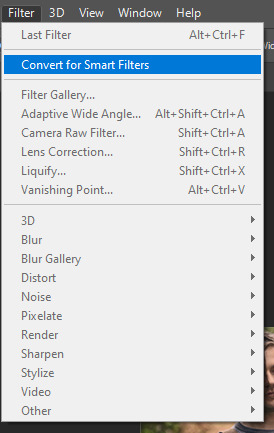
16. click this button to convert to video timeline
17. go to filter > convert for smart objects
18. go to your single created layer and right click and click duplicate layer. this helps get rid of the transparent border around the gif.
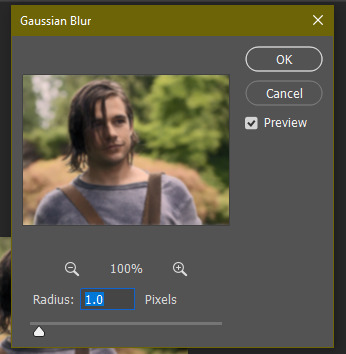
19. go to filter > sharpen > smart sharpen & use these settings
20. go to filter > blur > gaussian blur. set it to these settings.
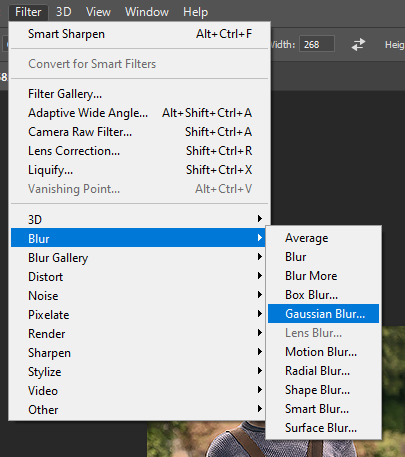
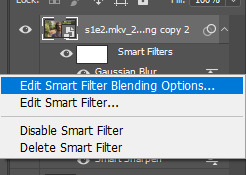
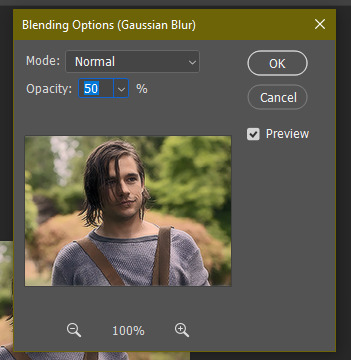
21. go to your second layer with the filters on it & right click on the gaussian blur filter to select “edit smart filter blending options” and set the opacity to 50%. you can mess around with this for different levels of sharpness. the closer to 0%, the sharper your gif will be.
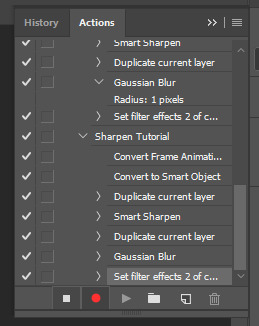
22. hit the stop recording button on your sharpen action. now you’ll have an action to use next time you make a gif! after you’ve followed all the steps 1-13 you simply go to actions, click on your saved sharpening action, and hit play instead & it’ll do steps 14-21 in a few seconds. here’s a pic of the stop button on the actions window
23. our gif is now sharpened! you can end with this & skip to the saving a gif section, or you can continue to coloring. here’s what we have so far.
3. coloring
now on to coloring. this is pretty basic coloring and it probably won’t work if you follow my numbers exactly, as every single scene is different color + lighting wise. but this is just an example of the kind of thing you could do. basically, if you’re making vibrant gifs, you want to up the brightness + contrast + vibrance and make the colors already present pop. if you want anything more complicated (pale gifs, changing the colors to make, say, quentin’s shirt in these gifs red instead of blue), you’ll have to find other tutorials or experiment on your own. learning how to color & finding your style takes time! you can download psds if you want, but imo those kinda take the fun out of making gifs? that’s just me though.
after each step, i’ll show you what the gif looks like.
1. i usually start with a curves layer. i usually don’t mess with the color curve options, just this one:

2. next, i do a brightness/contrast layer

3. next, i do a vibrance layer. make sure not to make it TOO saturated or it’ll look bad.
4. next i do a color balance layer. this is where it really starts differing depending on what color you want your gif to be.

5. next we move to the selective color layers, which are arguably the most powerful. here you can make colors pop, change colors, etc. it’ll take lots of practice & messing around with, but here’s what i did with this gif. this one is making yellow + blue pop
6. next, i did two more selective color layers editing the blue tab to make the blue pop even more


7. i still wasn’t quite happy with it, so i added another selective color layer to edit the blacks + neutrals + greens
8. for good measure, i added one more brightness/contrast layer

9. and the gif is done! however, you can play around with various adjustment layers until you’re happy. again, this is just an example of how to do basic coloring. it’s a skill like any other & takes practice. to keep consistent coloring in a gifset,
9b. you may want to make a psd of this coloring. to do so, you need to put all your adjustment layers in a folder, delete your frame layers, and click file > save as. save it as a .psd. then you can open it and drag it onto any other gifs you make, adjusting the coloring accordingly but still with the same vibes. you don’t have to do this, but it makes life easier. here’s how to use your saved psd, though obviously you’re using your own in this case and not a downloaded one.
4. saving your gif
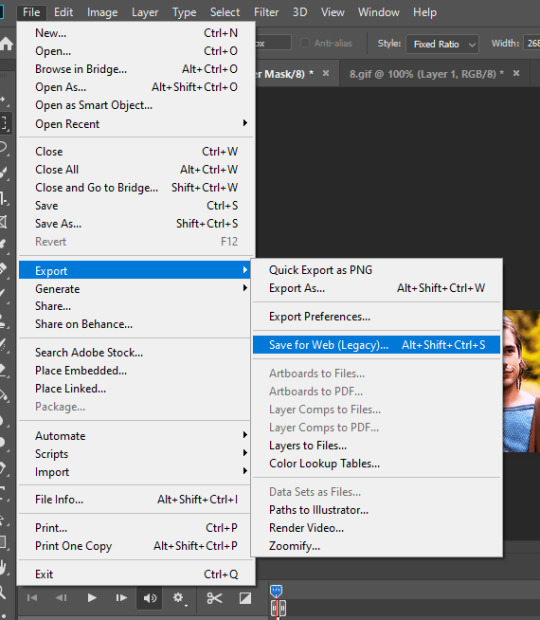
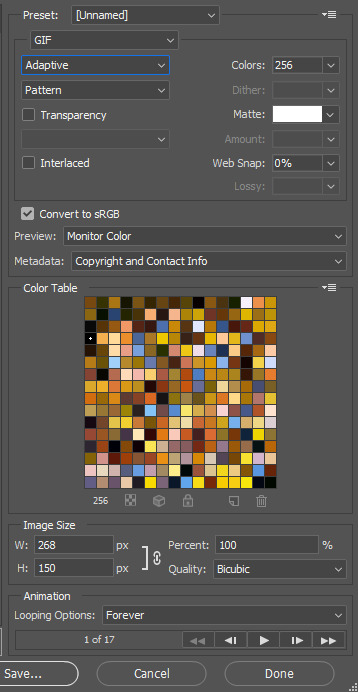
1. on photoshop cc 2019, you go to file > export > save for web (legacy). for other versions, you can just go to file > save for web. use these settings. the gif size limit is 3mb per gif, so make sure your file size is under that. if it’s not, you’ll need to delete some frames or some adjustment layers.
2. now, photoshop is a bit of a pain & this gif timing will not be right. so you need to open your newly saved gif. then you hit this button + select all frames
3. click this button & select “other”. tumblr gifs are typically .05-.08. my photoshop is glitchy and i have to set mine to .1-.15 or they’re WAY too fast. but usually, go with .05-.08 unless yours ends up glitching too.
4. save it like you did the first time and ta-da! you’ve made a gif!
#gif tutorial#photoshop tutorial#edit tutorial#coloring tutorial#yes im using the magicians its my hyperfixation and i get to choose the gifs
164 notes
·
View notes
Note
I'm glad you liked my song rec, Robot)
And since you did, here, have another one:
Basically, the song I used for this gifset (and plan to use for at least one more and, maybe, an edit once I'll get my hands on the 3A footage), Bonnie & Clyde by YUQI?
It's 100% our favorite partners in crime (and life), to the very last T.
I mean... 3A Lizzy and Red are kinda modern versions of Bonnie and Clyde, only happier ones because their lives and love don't end in death and tragedy (no, I'm not crying... because we're talking about 3A here, which is followed by a 3B AU where Liz didn't go all bitchy on Red but remained his trusting and trustworthy, loving and beloved, honest and loyal partner, in every sense of that word... so all the events of the finale and most of the events of the last 5 seasons are irrelevant, didn't happen).
Then, let's take a look at the lyrics:
You pick me up when I feel down
No matter how deep in the night
I got your back when we go out
You know I'm always on your side
Isn't that exactly what they do for each other and one of the many many reasons they're so in love with each other – because they know that they've found someone they can rely on no matter what, someone who will always be there for them in each other.
We love it on the other side
Where the dreams are real, do what we like
Let them point and laugh at who we are
It was you and me here dancing from the start
I don't even know where to start here... On the dreams and "do what we like" and "let them point and laugh at who we are" part that oddly resembles the shipping container talk... or the "it was you and me here dancing from the start" part that conjures up images of them dancing at the Embassy?
We don't need money to feel good
'Cause you're the ridе or die, the rest of my lifе
Sure, the luxuries they can afford because of the money they have are pleasant, to say the least... But there are other, much more satisfying things that make their hearts beat just right – like the thrill of a chase or a heist. As for the "ride or die" part... I've said it before and I'll say it again a million times – they are each other's ride or die for the rest of their lives and they are perfectly content to be just that.
You see the truth, you're in my heart
And you catch me every time
And if you're low and fall apart
I'll bring some peace back in your mind
Ah, and there it is, the part I used for my gifset! I think all the comments that can be made here are unnecessary because the lyrics are pretty much self-explanatory and very on brand for our soft babies who will always catch the other when they stumble or lose their metaphorical footing or fall and soothe and support each other through the darkest of hours.
And last but not the least:
Through the sky, to the stars in your eyes
They've all tried to bring us down but
We keep moving up
They wanna steal our golden crown
But all the roads will lead 'em back to us
How many times criminals, authorities and all the people in-between tried to bring Red and Lizxy down? Lots and lots. But they still find their way back to each other every. single. time.
As for the golden crown and "all the roads will lead them back to us", this part reminds me of my Red Queen & Concierge of Crime headcanon/au and the fact that no matter how much smarter etc. than Red criminals and the Task Force and the government alike sometimes think they are, they always come begging for his help in the end because he's the only one who can get the job's done and fix all the messes.
All in all, just listen to this song and the cover I linked in the aforementioned gifset and I promise you, you won't regret it!)
And sorry for rambling! I've just suddenly got hit by all the feels from this song...)
O.M.G. 💛💛💛
Wow this is such a beautiful analysis of the song lyrics and I wholeheartedly agree that in the early seasons (the only real seasons loll) they definitely do have each other's backs and that's one of the reasons I think people shipped them so hard.
Also "you catch me every time"? 🙂����🙃 I mean, he really really does, doesn't he (even at the terrible time we will not acknowledge)
Oh man. No need to apologize, I get it. It's kind of nice how some songs are kind of helping us through this time of grief ❤️
Thank you for sharing with us!
3 notes
·
View notes
Text
hello everyone! well i dont know who i mean by “everyone” considering my blog is basically an echo chamber for my own thoughts and feelings but nevertheless hello! as you may have seen already loads on your dash, everyone’s whipping out the end of year shoutout posts thanking the people who have made this dark hellhole seem a bit brighter. im going to do the same - so to all the people tagged below thank you very much for your services to my mental wellbeing!! as an avid fanfic consumer i will say the amount i interact with said fanfic writers is quite atrocious - something I hope to improve in the new year. so without further ado, here are some people id like to say thanks and well done to!
🌟 @starrychannies - thank you for being the first skz blog i decided to follow since stanning!! your fics are so beautifully written and you just have this way of writing that fills me with what i can only describe as warmth and love. the little details you put in and how you write the characters (both skz and the reader) is what keeps me coming for more. its like i feel a genuine connection with the characters that rarely occurs in fics it seems and im very grateful for your talent - along with the memey gifsets and picures of course! i genuinely hope 2021 is a gorgeous year for you!
🌷 @akinnie75 - where on earth do i even begin!!! i remember stumbling across your blog on a sunny june afternoon and suddenly it was time for dinner, id read all of your fics multiple times and i could barely remember that the BTS members werent really princes or ghosts or even sociology majors! the way your stories cascade across the page like a giant waterfall is something i havent seen in literature for a really long time. again, im a sucker for characterisation and you absolutely nail it every single time. thank you so much for the work you produce and once again i hope 2021 brings you joy and happiness.
⛩ @chenle - if we’re talking about blogs that fed my skz addiction, it would be a crime not to mention you. i literally vivdly remember sending you an ask saying I dOn’T eVeN kNoW wHo StRaY kIdS aRe YoUr FiCs ArE nIcE tHo and look where we are now. i can sense 2020 was a tough one, as was the case with so many people and whilst a part of me is sad you are no longer writing, i am mostly very grateful for the vast expanse of fics and ideas and stories and headcanons and everything else you blessed your cult with. i sincerely hope you can take this opportunity to rest and rejuvenate and whatever path you choose to take i will support you all the way.
🎨 @ofkimtaehyung - although i mentioned my avid consumption of fanfics, i do enjoy the occasional gifset and fanart too. whilst im past my brief tryst with BTS (she says 👀👀) one would have to be blind to ignore the immeasurable talent you hold. how you manage to manipulate music videos and photoshoots into concert ticket stubs, movie posters and broadway leaflets is honestly beyond me. BTS are already 7 of the most handsome ethereal men to exist and your sublime editing means they end up looking even more heavenly. i hope 2021 brings rewards for your work because it is seriously amazing!
⛓ @anqeluv - your changing aesthetics as well as the 2020 kinktober masterlist were all that i needed to be drawn in. the way you write the filthiest things in the most simple and eloquent manner is severely understated. lots of people tend to go overboard with the ~naughty~ scenes but you keep it the perfect balance of classy and downright filthy which is much appreciated. im very excited to see that you are possibly considering writing for ateez as well - who are one of my newer fav groups! i very much look forward to all that you will bring in 2021 and hope you are safe and well.
🐈 @chaoticminhos - it was priceless that pulled me in and all the rest of your gorgeous fics that have kept me here! and boy am i not complaining. you have such a gentle (ironic for someone called chaos i suppose) way of writing in my opinion, that keeps things flowing and simple without unnecessary embellishments and i just adore it. priceless, in my humble opinion, is such a classic that i keep coming back to. i sit back in awe at the quiet progress of their relationship every goddamn time (as though im reading it for the first time) and im very grateful for the experience. i hope 2021 brings you lots of light and positivity.
there are so many other blogs that have helped me get through this year - whether it be with their creative content like fics, their personalities and jokes shared on their blogs or even advice given to their anons. im sorry i couldnt mention everyone, but do know that if i follow you you hold a very special place in my heart and im very grateful to all of you content creators. people dont appreciate what you do enough, and instead of offering feedback and compliments you get attacked by rude anons demanding more of your work, regardless of what your personal situation might be. you dont deserve this at all and i do hope people have worked on their manners during quarantine now that we have had the time! anyway, to close off, even if you havent done anything this year, im still incredibly proud of you for making it this far. whether we’ve talked before or not (we probably havent im a bit of a hermit i’ll be honest), my inbox is always open. if you need a friend to joke with, a shoulder to cry on, someone to vent to - im here. have an absolutely amazing NYE and lets make 2021 our year!!!!!
15 notes
·
View notes
Text
how to support content creators
i see a lot of posts that complain about the insanely unbalanced like & reblog ratio on posts these days, or that posts just don’t get any notes anymore and while i 100% agree on this, i think it is also important to point out how exactly we can actually change this, especially for people who might not even have been on tumblr when it was almost normal to get at least 1k notes on a regular gifset.
i’m fully convinced that it is not only the popular culture of having certain blog aesthetics that stop people from reblogging things, but that also tumblr itself has made it harder and harder for content creators to spread their work around because of certain changes this site has made over the years. here are some quick things you can do to frequently see new content:
turn off “best stuff first”, luckily i’ve “only” seen this feature on the mobile app, but it is turned on by default & if you regularly use the app, please turn it off. otherwise you will mainly see content that is already circulating around, while new posts will be pushed back.

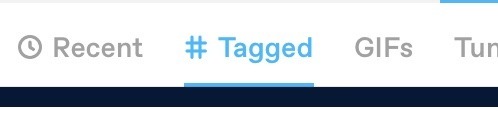
another thing you can do if you use mobile and search for specific content, switch to #tagged, so you can see the most recent posts without relying on the search function.
if you use the desktop version of tumblr and lets say you’re searching for example new star wars content, switch the default “search” to /tagged/ instead. you might ask yourself, why? simple: because the search function is trash, but more on that in a second.


if this seems too much of a hassle for you, you can install xkit extensions called “classic search” and “tag tracking +”. it will automatically redirect you to the old tracking system instead of the search one. and also! you can easily keep track on new content through your dashboard, like it used to be before tumblr introduced search. so lets say you love the lord of the rings and marvel, you will always be informed quite easily if someone made something new by tracking related tags, right on your dashboard (it’s called “follow this search” now, you’ll see it if you’re on the /tagged/ page of a specific tag).


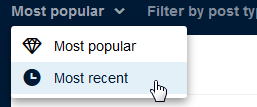
if you insist on using the search function, switch it up to let it show you the “most recent” posts. tumblr will always show you the most popular posts on default. meaning: tumblr will always show you posts that already have thousands of notes/posts that are currently circulating around and new posts will be at the back, if they even show up at all. “search” is at least in my experience, not reliable and has a tendency to eat up posts and just don’t show them at all. (especially on blogs). however it is worth mentioning that “search” is supposed to find at least the first 10 tags someone made, while “tagged” shows the first 5.
peak into tags creators use to tag their work! i’ve already shown some examples on some of the screenshots above, but basically most creators use [fandom]edit or [fandom]edits tags on their work. this can also apply to specific characters [character name]edit or even fanficiton [fandom]fic. don’t be afraid of unnecessary discourse in those tags, you’ll usually only find creative content on there.
this is very important: because tumblr has made it so hard for creators to be seen, these days no one will see content unless people reblog it and share it with their followers. you might have seen a popular theme on this post of tumblr showing us��“the best stuff first :)” and such. this is why we keep complaining about the unbalanced like/reblog ratio. blog aesthetics aside, if you clicked on “like” on a gifset, it usually means that you liked it, right? now imagine this gifset someone has made for 4 hours straight and you though it was pretty, slowy dying away unnoticed even though it was meant to appreciate our nerdy interests together, because it will die.
another thing: i know fandom can be toxic, full of bullies and incredibly close minded in their little “purity culture” bubble. if you are afraid to reblog something because you might get shit for it, don’t be. we need to slowly re-learn to like things just for the sake of having fun, because fandom is supposed to be fun. we have valid problems on this earth and i can guarantee you they have nothing to do with a fictional villain in a movie. you don’t owe anyone on this site anything, unapologetically love what you love.
that’s all i can think about right now, if i have forgotten something, feel free to add it on this post. please be aware that if we as users do not change our way of using this site, nothing will change, because tumblr as a website simply does not care about their content creators. and content creators in return, will slowly delete or stop making content for us altogether.
#sweetpca#userbrit#bisexualgorgeous#userkt#signal boost#im tagging u guys cause i know u made good posts about this problem & maybe ur interested in spreading this around? lol#tumblr#long post#i have finally snapped
3K notes
·
View notes
Text
After Effects Text Effect Tutorial
A while back, an anon had sent me a request on how to do the fancy little text effects for a previous gifset I made, so that’s what I’m here to show you all today. Here, we’re going to be going from this:
to something like this:

What you will need:
Photoshop (I have CS5)
After Effects (I have CS6, though this tutorial should work with other versions; I will provide links on where to get AE somewhere down below)
Basic knowledge on how to make gifs in Photoshop
A folder or two for your gifs (I’ll explain why as you read on)
Your scene/shot already giffed in Photoshop
The font(s) you will be using for your gifs
Some time and patience (because this is most likely your first time doing this, and it may take a minute to get the hang of it)
As this tutorial is very lengthy, detailed, and image-heavy, I want to divide it into separate little parts:
Part 1 - Opening Your PSD in After Effects
Part 2 - Adjusting Your Timeline Panel in Preparation for Your Text
Part 3 - Typing and Animating Your Text
Part 4 - Rendering Your Composition for Photoshop
Part 5 - Saving Your Final Product
PART 1 - OPENING YOUR PSD IN AFTER EFFECTS
The first thing you’re going to want to do is make your gif however you want it. Since this is solely a tutorial that teaches you all the fancy text effects, I won’t be delving into a basic gif tutorial, though if you would like me to do one of those, or if you want me to direct you to some tutorials that helped me with my giffing, then I can definitely do that for you as well.
Here is what my gif looks like with my coloring and without any text on it:
However, we’re not going to do the whole “save for web and devices” thing just yet. Before we go into the tricky part, you wanna make sure you’re fine with the coloring that you want to use, and after that, we’re going to open After Effects. When you open up the application for the first time, it may end up looking something like this:
What you’re gonna want to do next is create a new composition. Go to Composition > New Composition to create a new canvas for your gif. A little menu will come up, asking you what size you would like the composition to be. You want your composition to be the same size as the gif itself. So make sure the box where it says Lock Aspect Ratio is unchecked, and type in the dimensions for your gif (the gif I’m using for this example is 268 x 200). For the frame rate, I keep it at 29.97 frames per second for the best results. Once you’re done with that, click OK.

Once you have your composition ready, you’re going to want to open the PSD in which your gif is made into After Effects. To do that, you will go to File > Import > File..., and it will ask you to select your PSD. You should see something like this once you’ve made your selection:

You want all your layers to be there when you make your edits in After Effects, so just click OK. Your PSD will then be located on the left side of the screen. Underneath that, you will see this big, blank space labeled Comp 1.

Your next step is to drag the PSD down to this blank area, and that is when you will see your PSD cover your composition that you previously made.
PART 2 - ADJUSTING YOUR TIMELINE PANEL IN PREPARATION FOR YOUR TEXT
One important thing before we actually get to the text part itself. When you load the PSD into After Effects, you’re going to see this little timeline panel towards the bottom of your screen. It’s similar to what you would see when you would do the whole “frames to layers” thing when you make a new gif in Photoshop. Here, you’re going to notice two things: 1) the gray time ruler (that long, gray bar with the yellow end points) is used to determine what is visible when you’re working on your gif, and 2) the short, light blue bar shows you your gif itself. However, usually when you load a new PSD into After Effects, you’re going to end up with a lot of unnecessary time that you won’t be needing.

Towards the very bottom is this little slider that allows you to get a better glimpse of the duration of the PSD you chose. Drag it far enough so you can see where your gif starts and ends. Once you’ve done that, you’re going to drag the gray ruler exactly where your gif ends.
Note: You don’t have to drag the smaller ruler on top of the bigger one; it’s gonna move on its own when you drag the bigger ruler to your end point.

Now you know exactly when the text for your gif is going to stop moving. Your primary goal is to showcase the entirety of the effect you would like to choose, and I will show you why that is in a minute.
PART 3 - TYPING AND ANIMATING YOUR TEXT
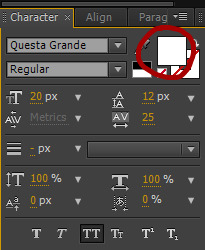
Here’s the fun part that you all have been waiting to see. Go to the panel towards the top and select your Horizonal Type Tool. You can choose any particular font you would like for your gif. For the purposes of this tutorial, I am going to use the font Questa Grande. Once you’ve selected your font, type your text over your PSD. You want your PSD to be centered over your PSD, so go to Window > Align, and you should see a little alignment box towards the right side of the screen. I placed mine in the same area with the Character and Paragraph tabs.
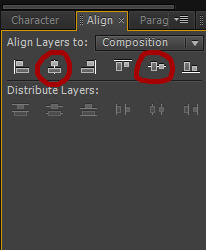
When your align tab is ready, click on these two center alignment options, and your text should be exactly in the center of your gif.
Note: You have to turn your Caps Lock off in order for this to work, as it will not only not center your text, but it will also cover your composition in one solid color.
As you will see in the timeline panel, the red bar represents your text layer. However, it is stretched out way past the point where your gif actually ends.

Align this red bar with the light blue bar as shown above. This will definitely come in handy when you are working on applying the effect itself and making it fit in your gif, which we will go into next.
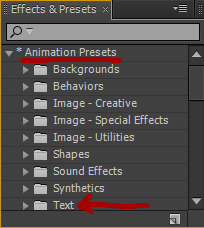
The next step — and the for-real fun part — is where you choose the text effect you would like to apply to your gif. Over to the left side of the screen, you will see a tab that says Effects & Presets, and here contains a bunch of folders and whatnot filled with effects that come with After Effects itself. You’re going to want to click on the one that says *Animation Presets, and from there, you will click on the one that says Text.
At this point, you can experiment with different text effects and see which ones you like. I’m going to show you a couple of examples of how certain effects look, because depending on the one you would like to choose and how long your text might be, you may need to make a couple of adjustments. For instance, when I go under Animate In > Fade Up Characters, this is what my gif now looks like:

Notice how the animation was able to complete itself before it reaches the end of the gif. That’s what you want for your particular gif. If you’re able to get all of your text to fit like this, then you can skip to the rendering section, if you like. Now, in some cases, you may run into animations that may not be complete when you play the whole thing through. Let’s say I decide to go to Animate In > Twirl On Each Character instead. This is what it would look like when you leave the animation as is:

What’s happening here is that some of your text gets cut off towards the end, which more than likely means that you would have to change the time stretch for the effect you’re using. What do I mean by this? Well, try right-clicking either over the text on your gif or over the text layer in your composition panel (that big space where we dragged the PSD earlier) and go to Time > Time Stretch..., and you will get this little window that comes up.
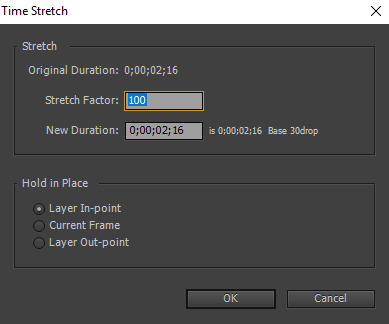
You will have to change the percentage showing in the box where it says Stretch Factor in order to squeeze all of your text in at once. You can experiment as much as you want with this until you get your desired look. I’m gonna type in a stretch factor of 70 just to test it.

However, when you change the stretch factor of your text, then that red bar in the timeline panel is no longer aligned with the light blue bar that represents your PSD. If you leave it like this, then there is a chance that your text might cut off and disappear, leaving the remainder of your gif blank. So you’re going to drag that red bar back across and line it up with the light blue one so they’re together again. Now I’m ready to test the text out once again.

This time, the whole animation is able to play itself out so you can see all of your text appear in the gif. For some people, this particular stretch factor may be cutting it a little close, so if you want to lower it to, like, 60-65 or something like that, you can definitely feel free to do that, if you want.
Here’s that same gif, but instead, I use the Raining Characters In animation and set the stretch factor to 90:

Like I said, feel free to experiment with different effects, because there are a lot of text effects already in the application that you could use. If you somehow don’t find something that you want that’s already in After Effects, feel free to look around for more text effects online, apply them to your application, and then try and follow the steps I provided for you previously.
This is another optional step, but if you’re editing your text over a very bright background, you can change the text color from white to something else. In this gifset I made not too long ago, for example, I had changed the text in one of the gifs to a particular shade of blue. To do that, you would go to the Character tab (located in the same area where I put my Align tab) and change the Fill Color (that little white square next to the available fonts).
PART 4 - RENDERING YOUR COMPOSITION FOR PHOTOSHOP
Now you have your text, the animation you would like for your gif, and all that other good stuff, so now we’re going to save it so we can open it back up in Photoshop. Go to Composition > Add to Render Queue, and you will see this appear towards the bottom of the screen.
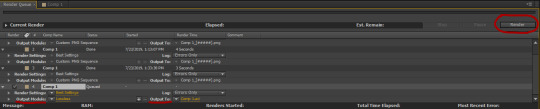
My screenshot shows multiple different compositions here for the purposes of this tutorial, though yours will only have just one since you’re starting out. There are two main areas we want to focus on changing here: the one that says Output Module, and the other one that says Output To. When you first add a composition to the render queue, the output module will be set to Lossless. Click on where it says Lossless, and this little window will come up.

The format is automatically set to AVI when you open it, but you want to change it to PNG Sequence. And for the channels section, just change that to RGB + Alpha, and then click OK.
Earlier in this tutorial, I said you would need a folder or two for your screencaps. I said this because when we changed the format to PNG Sequence, that means the gif we added the text effect to in After Effects will be saved as multiple PNG frames after it’s being rendered. In order to keep these frames organized, I personally like to make a folder for the PNG sequence to be saved in.
After making a new folder to save your frames, you’ll want to go to the Output To section and click where it says Comp 1_[#####].png. It will ask you to find the folder that you want to save the sequence in. Once you select that folder, click OK. Once everything looks okay, all you have to do is click Render, and your gif will be saved to that folder.
PART 5 - SAVING YOUR FINAL PRODUCT
You will now need to open up your PNG sequence in Photoshop in order to make it into a gif. To do this, go to File > Open, and find the folder where you placed all of your screencaps from After Effects.

Click on the first screencap within that folder, and then check the box where it says Image Sequence. That will ensure that all of the screencaps within that folder load in your Photoshop document. Once you do that, click Open.
Another dialogue box is going to come up, asking you what frame rate you would like to use. It should be set to 29.97 frames per second. If it is, click OK. If not, change it to 29.97 fps and then click OK. Now all of your frames are all together. Next, go to File > Save for Web and Devices..., make sure your file is under the file limit (3 MB) before changing the Looping Options (towards the bottom right of your dialogue box) to Forever, and click Save. I prefer to save this gif in a separate location from where you placed all of your PNG screencaps previously.
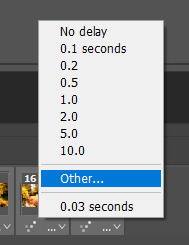
Then open the gif you just saved. You should see that all of the screencaps are set to a screen delay of 0.03 seconds in the frame animation panel. This delay makes the gif move too fast. For the best quality gifs, you want your screen delay to be set at a normal speed but also not too slow (e.g. 0.07). I set my screen delay at 0.05 seconds for all my gifs.
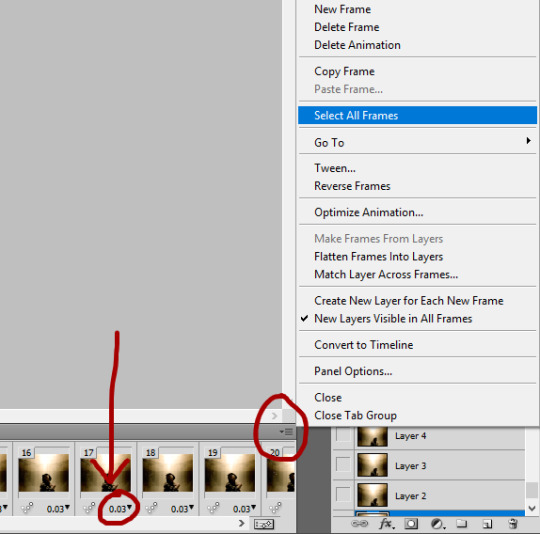
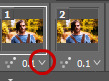
To do that, click this gray button on the top right of the frame animation panel and go to Select All, which will select all of your caps in the panel at once. Then click on the 0.03 on any of the caps you see, and then go to Other..., which will pull up another dialogue box asking you what set delay you want to choose. Then type 0.05 in the box and click OK. Lastly, go to File > Save for Web and Devices... once again, and click Save. To distinguish your final product from the faster gif you saved previously, just change the name (or, if you want, you can keep the same name, and then a dialogue box will come up asking you if you want to replace the gif or not; at this point, just click Replace, because you won’t be needing the faster gif anymore).
And that’s basically it for this tutorial. I know a lot of people aren’t too familiar with After Effects or much less even know how to use it, but since we’ve reached this point in the tutorial, I want to leave you with a couple of extra tips:
You may want to practice using text effects with smaller gifs. I say this because the file limit for gifs (3 MB) may be restricting for big gifs, especially those that are 540 px.
Going off the previous point, make sure that your gif doesn’t have too many frames in it to the point where it goes over the file limit.
The process for this tutorial is basically the same with edits or graphics, except you don’t have to really worry about the file size as much as you do with gifs, because the majority of your image will be still. However, it’s always important to check anyway in case something happens. If you end up with more frames in your edit/graphic than necessary with the text effect(s) applied to it, feel free to delete whatever you’re not going to be using once you get ready to save the final product.
I encourage you to experiment with different text effects and see what works. Not every text effect you look at will work out, depending on your personal preferences. I’m still kinda new to After Effects as well, so we’re all learning here lmfao.
When testing new effects, make sure you press the First Frame button in the Preview tab (it’s gonna be that one arrow pointing to the left towards a vertical line) so you’ll know that the animation will start at the very beginning of your gif. This is very important, because if you don’t do this, then the animation will start wherever your current time indicator (that yellow thing that goes back and forth in your composition panel) had stopped previously, and then you won’t be able to see the whole animation.
If you make a mistake at any point in testing out new effects, just go to Edit > Undo so you’ll know where you’re at.
Just practice using After Effects in general. You may end up finding something that I haven’t even come across yet. That’s totally fine. Not everyone is gonna understand it right away, so study it as much as you can.
For those wondering where specifically I got AE, I don’t remember the exact link (when I got it, I was looking for it on my old laptop, which malfunctioned before spring break this year, unfortunately), though it did take a lot of Google searching for the link to AE CS6, so if you do that and find a good link, feel free to share it so more people are aware. But for the sake of this post, here are a couple of links to posts where you can access a download link:
maxiresources downloads by @maxiresources
How to Get After Effects by @alternatetutorials
Adobe CC 2019 Suite by @yeahps
Activating CC 2018 Programs on MAC (Photoshop, Illustrator, After Effects, etc.) by @kaeveeoh (this should work for PC as well)
Make sure all of the links work when you're looking for one to download After Effects. If the ones I provided don't help, I'm sure you can ask at least one person from @yeahps or any other popular Photoshop blog for some advice.
If you have any questions on any part of this tutorial, feel free to message me anytime you want. Other than that, if this tutorial has been helpful for you, please give it a like/reblog. It would be greatly appreciated.
#completeresources#yeahps#chaoticresources#itsphotoshop#usernums#arianagrandre#gif tutorial#*#resource*#not really sure who else to tag but yeah here it is#@ anon sorry it took me so long to make this btw#between summer school and cleaning my room and dieting i've been up to a lot lately#but i didn't want to leave you hanging either so here you go!!!
279 notes
·
View notes
Text
i have posted a gifset about female characters a while ago. i saw posts with female characters from other fandoms with this quote-message and got inspired from it just like any creator could (i left the link to the source of inspiration on my original post), both by the message itself and the idea of the gifset. i was like, hey, why not make it with the lord of the rings female characters, since i am a big tolkien fan and i haven't seen it done with them before.
on october 18th i posted this gifset, featuring the lord of the rings and the hobbit female characters. at first the feedback was great—people supported and agreed with the message. the post blew up and there were a few negative comments/reblogs. at first, i didn't want to respond to them to avoid any conflict. i also kept in mind that some people might not understand the message, we, creators of this post sequence, are trying to deliver through our form of art. but the story doesn't end here.
the post blew up again after some reasonable chunk of time, however, this time the backlash was on the larger scale. i would get upset and disappointed, sometimes even annoyed by people’s unnecessary aggression towards me. so i decided i need to clarify my post, my message and intention behind it to avoid any future confusion. you can call this my response, as the op of this post, to those who say ‘what is op smoking?’ or on similar note.
let me break it all down to you. first of all, as i mentioned above, i am a creator—i love making gifs, edits, icons, etc. i am a creative person who likes to share his creations on internet. i have been in tolkien fandom for over a year, and have been a tolkien fan for over 4 years if not more. so guess what? i love making fandom content. one day i was scrolling through my tumblr feed and came across the post with this message which featured female characters from other fandom. i clicked on the link of their inspiration and got to another fandom with the same message. and so on and so on. and guess what again? i got inspired. i liked the post and i wanted to make the same one but for the lord of the rings/the hobbit fandom.
for this post you need, as you can see from the sequence and the quote, six female characters. a problem for me arose—limited number of female characters in the lord of the rings and the hobbit. i found a solution for it—i had to include really minor female characters such as sigrid and rosie cotton. the next step is to apply each quote to each character accordingly. and here is the point which sparked a lot of negativity. if you look through every post alike to this one, the quotes do not, i repeat, do not essentially apply to the character portrayed behind the quote. the idea is to show a female character for the fact that this post is about female characters in media. so when people complain about me using sigrid as ‘weak’, that doesn't mean i actually mean that she is weak or anyone else thinks about her like that. or when eowyn is said to be mean, that does not imply that she is mean or people say that this particular character is mean. to sum this point up, quotes do not essentially correlate with the characters shown along with them.
the next point is the criticism itself. you may or may not have noticed that the overall message of the post is about the criticism female characters in media receive, no matter from whom, straight white cis men, feminists, anyone. it is only the criticism itself. have you heard about criticism to harry potter female characters? i, for example, haven’t. or if i had, it was very minimal. guess what, such post was made about harry potter universe female characters, too. and my post was made, not because tolkien ladies get such criticism, no, absolutely not. in fact i would say tolkien ladies are one of the most respected and loved by everyone out of all fandoms (the only complaint is their minimal amount but that’s a topic for another day). the message is not about these particular ladies, or harry potter ladies, or star wars ladies, but female characters in general. it doesn't matter which movie, show or book. the message is to bring awareness to the negativity that, unfortunately, surrounds female characters, and this message is carried through this type of post by creators.
please, stop trying to analyse every tolkien female character to prove ‘how wrong i am’. believe me, i know these characters by my heart, i love all of them and my lore knowledge is sufficient enough for that (you may ask my fandom friends if you still don't believe me). the thing is, even if i didn't know them, i could still make this post because, let me repeat myself again, the message doesn't essentially apply to these particular characters. the idea is to spread awareness about this social issue and simply create content that i she enjoy making.
one person said that this post was about captain marvel. well, newsflash, you are late on this train. as i said above, this post was made on 18.10.2018. captain marvel, as is known, was released on february 27 in london (which i believe the earliest release date. in any case i haven't watched this movie up until the end of may.)
people are accusing feminists for this message. i don't want to get into this because this is politics and i avoid it like fire, especially feminist issue. i am a guy and i feel like i shouldn't get into this matter because it’s all up to women, and it’s not my place, although i fully support them. it could be all because of feminists, could be because of white straight cis men, anyone really. what matters is the criticism itself. look at the quote under the post itself one more ‘what can a female character do, without being criticised mercilessly?’
stop telling me ‘to shut the fuck up’, ‘step 1 : do not ask someone bathing in full on persecution hysteria’ (what does it even mean?), ‘what fucking world do people who make memes like this live in?’ and so on. it hurts me, especially as a creator who just wanted to share his art and spread a message without any intention for starting a conflict.
stop being so aggressive under a post that is not a text post with controversial ideas. if you don't like it, just skip over it. there is no need to steer negativity.
please spread this message. if people will continue with the backlash, i will start tagging them and linking them to this post. take down your accusations towards me after you have read this post and realized that you accusations were wrong.
thank you for your time and hopefully understanding.
your fellow tolkien fan, james.
29 notes
·
View notes
Note
Do you honestly think bellarke has a chance or are we just grasping for straws
This season? I don’t know, I think ep4 is always too early to tell. You know, because usually, Clarke and Bellamy end up being separated and blablabla we don’t know for how long and blablabla. I do think Jo!Clarke will propel the separation if there is any this year. Or maybe Jo!Clarke will be the separation itself, not a physical one, but a mental one this time. Idk. As for whether or not it’ll happen this season… uh, I really can’t tell, because early s5 I thought it had every chance of happening because of the calls, the “She Is”, the “Hostage taker and his girlfriend”, their reunion and all, which all hard romantic undertones to it. We still have these scenes now, but again it depends on how much they’ll share together this season. Ask me again around ep7 I’d say? LolAs for the show itself, yes I think Bellarke will happen. I think it’s in the text, and it even is in what Jroth and cie tell us, even tho they keep hiding it under the same phrases over and over again. The fact that they barely dared to adress it during a long time after s3 is an indication to me itself. I do see too much of usually romantic tropes condensed in Bellarke- forreal, I watch a couple on screen and I always think “Bellarke did that too!” like, it’s crazy, all of it is here! The fandom can see it, the casuals can see it, reviewers can see it and everyone pointed it out at the end of s5. We’re really in the second half of the show, starting walking toward the end of the show itself- like if we theorize it’ll go up to s10 we’re starting the end here! But I do think the show will be either seven or eight seasons long- if s7 is meant to be the last, my guess is that they’ll announce it at Comic Con this Summer, by the way.
The important thing to remember is that we are not grasping for straws no matter what: even if Bellarke doesn’t happen because at the end Jroth decided not to make it happen. The romantic undertones are HERE: again, it’s shown by the fact that Bellarke share TONS of romantic tropes we see among other couples on television or in cinema. You could literally parallel Bellarke with every romantic relationships on tv right now, or within the show @bellaarke does some interesting gifsets about it for example. Seeing the cinematography of the show, how they implant Clarke’s face during the BE scenes on s5 or Bellamy’s during the Clarke/random dance scene aren’t just random things! These are delibarated decisions: they made Bob pose there, they blocked the scene, and had him make faces, they filmed him from afar, called it a break, re-did the scene, re-blocked it, re-shot it, over and over again. As I said that’s HOURS of work. It could have had been edited in 500 different ways not implying some kind of romantic longing and/or “sad jealousy” from Bellamy- and yet they did it this way. In the story itself, which is about redemption and hope and acceptance, Bellarke DOES make sense. Bellarke would be everything as endgame, and maybe that’s why they’re keeping it for the very end: for when the characters are finally at peace, either with their past, with their experiences and who they’ve become. That doesn’t mean it won’t possibly end in tragedy. I’m just saying that storytelling-wise, it would be a waste not to have Bellarke be the epithome of acceptance and peace, and love in terms of romantic relationships. Really, if this ship would be to become canon, it would be one of the most epic of television: I said it. The years of slowburn are really well done, the relationship was built very carefully and apart from s5 where I had a lot of complaints, it was always there, above the storyline, above dramatic OOC decisions. I do feel like for this season, they listened to us. Bellarke and the characters themselves will talk more, and delve more into their trauma: tbh, that’s all I want right now and I’m glad the season is shaping like it’s happening, for good! This whole idea of starting a new book, a new story, start “fresh” somewhere far from their past sins, is the idea opportunity to have them have a clean slate. Hence why I think s5 is so stagnant, because it wasn’t necessary: they kinda should have had s4 ending with them leaving in space, and s5 start with the Sanctum storyline. S5 was unnecessary and yeah, I’ll say that in my death bed still. I disgressed a lot. But end of the story is, yes, I think Bellarke has every chance of becoming canon. This season? It’s too soon to tell. Bellamy is still in a relationship and Clarke isn’t herself. The way I see things, it could go very quickly, because the feelings are there, like at the tip of their tongues. Or it could go slowly because they keep circling each other and it’s the basis of a slowburn. I did feel like at some point of s5 that it was the end, but the way they’re crafting Bellarke so far, has set things back up to normal. They’re still them, and the writers are being very careful with their relationship, which is very nice.
15 notes
·
View notes
Note
hi il your gifs! can you give a tutorial??
Wow thanks so much! 💖💖Under the read more, I managed to put together a gif tutorial that I (hope) makes sense. Let me know if you have any questions. I rambled a lot in this and wrote most of it at like 1:30 in the morning, so apologies in advance if it gets weird lmao.
Keep in mind, I have been using photoshop for years, but I really have only been making gifs for like, 8 months and I still think I can improve in soooo many ways. But, that being said we all gotta start somewhere!
Let’s make a gif!
Alright, y’all. Let’s make a fucking gif. You will need:
Photoshop. Kind of a given lol. I use Photoshop CC 2018 and I pay 9.99 a month for the photoshop/lightroom package that you can get online from Adobe. I used to use a downloaded version that I found on tumblr for the longest time as well. So if you don’t want to pay monthly, there are free versions out there that work. Just download at your own risk!
A basic knowledge of photoshop. In this tutorial, I’m just gonna assume you have used photoshop before and know how to use its basic features. If not, I’d recommend finding some beginner photoshop tutorials to help you out! Also you can totally feel free to shoot me any questions if you need me to clarify anything, and I’ll do my best to answer them!
Patience and practice. Making gifs can be frustrating and tedious sometimes. If you don’t love what you’re making or aren’t having fun with it, it can be really difficult. I literally love making gifs for some weird reason, which is really the number one reason why I make them. Also, remember that every gif isn’t gonna come out perfect. I make so many gifs and then look back and think ugh that coloring was awful wtf was I thinking?? But it’s important to keep practicing and keep at it because that’s how you’re gonna get better!
Alrightyyyyy let’s get started!
STEP ONE: Download your video. You’re gonna need the video of whatever you’re trying to gif saved to your computer. If you’re giffing a video from youtube/social media or something, there are a bunch of different websites out there that will download videos for you. However, I’m a fucking weirdo and usually just screen record whatever I want to gif because I just think it’s easier. I use Quicktime to screen record which is included on Macs!
We’re gonna be making a gif of my angel rookie Brett Howden for this tutorial. I just screen recorded his postgame video that I wanted to use and saved it in 1080p.
[PRO TIP: Keep in mind, if you want your gifs to look nice and HQ, it starts with a high quality video, and that means, using videos that are 1080p. I very rarely will gif anything in 720p, unless it’s something I really really want to gif, and I def won’t use anything below 720p because it just looks really low quality no matter how much you try to edit it, imo.]
STEP TWO: Open photoshop and go to file -> import -> video frames to layer and this window will pop up

These are the settings I use. I choose selected range only so that it will only select what I want it to, and not the whole video. I also limit to every 2 frames because for the most part, using every frame is unnecessary. See those little toggle icons at the bottom of the screen that I’ve circled in red? Drag those around to select what part of the video you want to gif. Then click ok.
Here’s what you’ll get once you hit ok.

As you can see, your timeline with all your frames are on the bottom. On the right are all the layers!
STEP THREE: Select all the frames, and set your frame delay. The frame delay basically just controls how fast or slow your gif is gonna move.

Select all the frames and click on the bottom of one of the frames (where i’ve awkwardly circled in red) and you should get the dropdown menu shown above. Click other. I almost always choose 0.07 for my delay because it’s not too fast and not too slow and that’s how we want our gifs to look, right? 0.07 is a good starting point and you can always adjust slightly if need be. I wouldn’t recommend going below 0.05 because it’ll look way too fast.
STEP FOUR: Convert that shit. We’re gonna convert to a video timeline by clicking the button in the lefthand corner of your timeline window. I’ve circled it in red. Make sure all your frames are still selected!
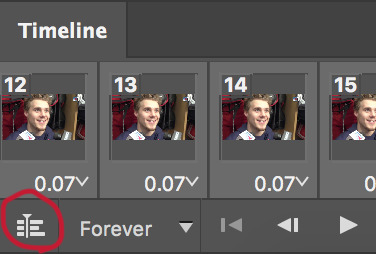
Then we’re gonna convert the layers for smart filters. This makes it easy to edit and color the gif because it’ll basically condense all the layers into one. Select all your layers and go to filter -> convert for smart filters. Bam, converted.
STEP FIVE: Crop and resize your gif!
Tumblr has specific dimension sizes that are pretty important when cropping your gifs, so you’ll have to decide what kind of gifset you’re making. If you’re making a gifset with just one gif across (example), the width needs to be 540px. If you’re making a gifset with two gifs across (example), the width needs to be 268px. The height doesn’t matter and can be whatever ya want!
For this gif of Brett I’m going to be cropping it to 540x270 (my personal standard gif size that I use for gifsets with one gif across). After that, go to image -> image size and adjust the width and height to 540x270.
After all that crap, we’ve now got a very basic, unedited gif!

This gif looks okaaay, but looks kinda flat and plain and dull. Which brings us to……
STEP FIVE: The most important step, sharpening and coloring.
To sharpen your gif, go to filter -> sharpen -> smart sharpen
I use the same settings as everyone on this website which is this:
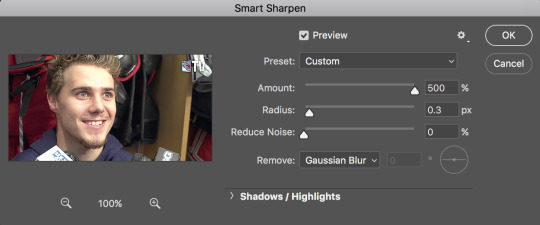
This is what the gif looks like now. Brett is looking SHARP.
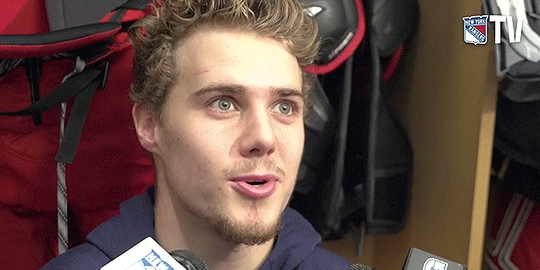
Sharpening is so important and it’s literally the best like look at how much better this gif looks already!! But we still gotta color it.
Coloring is a different ballgame than sharpening. Everyone has their own preferences on how to color and what they want their gifs to look like. There’s no right or wrong way to do it imo, as long as you like the way they look! Some people like really bright, vibrant gifs with whites so bright they’ll blind ya, and some like gifs with more muted colors. My personal preference depends on what I’m giffing and the lighting. If you look through my gifs you’ll see that my coloring changes depending on if it’s an on-ice video, a locker room interview or something else.
When I first started making gifs, I downloaded different psds from tumblr, which are basically just colorings you can download and use on your gifs. They’re a really great starting point if you have no idea what you’re doing and also just super convenient. A quick google search “tumblr psds” “tumblr photoshop resources” or even just searching “psds” on tumblr, will give you tons of stuff to choose from.
Anyway, if you’re not gonna use a premade psd, the two biggest settings that I use to color (and as a beginner they’re really the only settings you need to use) are brightness/contrast and selective coloring.
First, we’ll add some contrast. Go to layer -> new adjustment layer -> brightness/contrast. For the most part, my brightness/contrast settings stay the same and look like this:

My contrast almost always is set to 60. I’m all about high contrast in my gifs. My brightness setting is set to 0 in this gif because it’s already bright enough (just look at the light reflecting off Brett’s forehead lmao) Oftentimes I’ll set the brightness to 10 or 11 if the gif seems too dull or dark, but I usually won’t go higher than that. Just play with the setting until it seems right to you!
This is what it looks like now:

Looks good! But it still looks pretty yellow and Brett’s face is still too bright. This is where selective coloring comes in. Selective coloring basically helps you enhance or change specific colors in your gifs. It comes in handy a lot with videos that have shitty or weird lighting (looking at you, Rangers video department).
Go to layer -> new adjustment layer -> selective coloring. Like I said before, every gif is different so there’s no one specific way to set your selective coloring settings. My biggest thing with selective coloring is making sure the subject doesn’t look too yellow/red and enhancing the darker colors to create more depth/contrast. Play around with the colors until you like what you see!
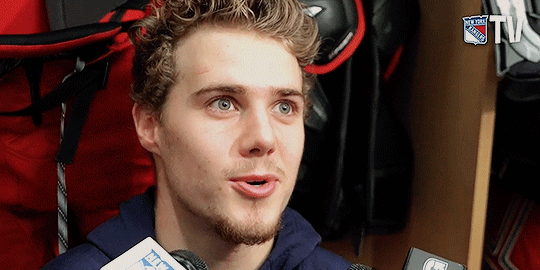
And this gif is done! Brett looks beautiful and so does this gif. But we have one final step
STEP SIX: Save your gif.
To save your gif go to file -> export -> save for web (legacy) and this window will show up.
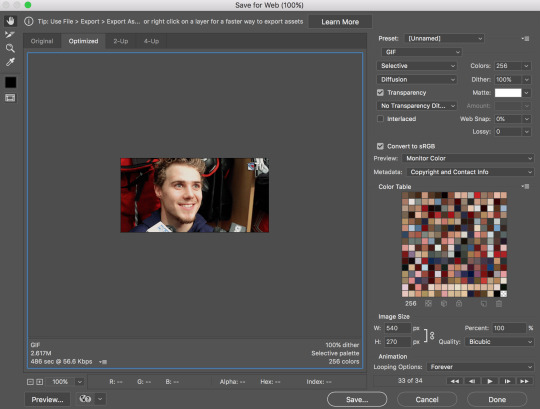
For your gif to work on tumblr the file needs to be under 3M otherwise when you post it, your gif will be frozen and won’t move and uh, that’s not ideal. The lower left hand corner will show you how large your gif is. Mine is 2.817M so we’re good.
Finally, please, please PLEASE make sure your looping options (found in the lower righthand corner) are set to forever.

If you don’t have your gif set to loop forever it literally will stop moving, so it’s real important you remember to check that it’s set to loop forever. One time I forgot to do that and now there’s a dumb gifset of Nolan Patrick that only loops once and then freezes and I didn’t notice it until it already got a bunch of notes and it’s just out there on fucking tumblr dot com and it drives me crazy and makes me so mad that I forgot to loop it. So don’t be like me and remember to loop your gifs! lol.
Anyway that’s the tutorial! I hope this helped! Again, sorry it’s so long and full of rambles. Remember you can ask me ANY questions you may have and I’ll do my best to help!
#asks#anonymous#gif tutorial#photoshop tutorial#i really hope this helped!#i probably rambled too much#long post
25 notes
·
View notes
Text
hello, we just wanted to make a quick PSA. this blog has held off on blocking people cause we realize that everyone has their favorite characters and relationships. which is fine. however, it is not okay to reblog and tag/comment offensive things on people’s edits.
none of us take the time to make gifsets so people can comment on what they HATE regarding a character. the racist and misogynists comments are out of line and completely unwarranted.
while, yes, this blog is everything flash related remember that barry allen is the flash. he is the titular character of the show. so everything relating to him we post on here. characters that are important to him. his wife and daughter being the most important. CANON relationships being the most important.
we will no longer tolerate rude bloggers that have the nerve to make unnecessary comments on our edits. thank you for taking the time to read this. have a nice day.
60 notes
·
View notes
Note
hi i was not sure if i should send this to your main or this but since this blog is more wanna one related tag could your mutuals as points in "if kpop positions were accurate" this is the post = seokjinandtonic. tumblr. com/post/164651220236/if-kpop-positions-were-accurate i have been following both of you on your main and here and i like you to know i am a fan and your graphics inspire me
YOU ARE SOOOOO CUTE OMG THANK YOU SO MUCH FOR LIKING OUR GRAPHICS!! And saying that we inspire you ;___; that’s so so sweet of you I literally screamed. You deserve the worlddddddd!!! This seems fun so let’s get to it!! ^^ Lillian and I are gonna combine our answers lol so if you’re tagged and are like “lool this girl isn’t even following me though???” it’s prob the other person~ :^)
the hyung you thought was a maknae
tbh I thought Ying was my age but it turned out she was 95 line!!! @ Ying I also tagged you for something else below c:
the unofficial visual
@woojiniel and @perkwoojin are so so so pretty?? Idk but these were the first two I thought of!! They have such soft, sweet visuals and I think usually in groups the official visuals are the ones with the “stronger” visuals? But once you get into the group more you start to notice that one member who’s like so so cute that you can’t believe they’re not officially labelled as a visual.
the “not my bias, but is my bias”
Ummm probably @hwangminyeo! She’s like the member of the group that you first notice because of her visuals, and then you’re like semi-interested in that member and half keeping an eye on that member while you settle on a bias. And then once you get into the group more you find out that not only is she a visual but she also has such a cute personality? Like she’s more shy and dorky than you originally anticipated and then you fall for her double charms. (But you still gotta stay loyal to your bias lol)
the workout-aholic who basically lives in the gym and boy does it show
I’m putting Abby @hwangminyeo under here to because idk if she goes to the gym often or not but body goals 😭😭😭😭
the walking, living, breathing meme
@seonnho This is the one image I have of Jennie tbh… just one big meme (a cute one at that)!!! She makes the best textposts on her SVT blog. I love her sense of humor it’s just so…. relatable LOL. Is it because she’s a Seungkwan stan that she’s like this? It’s proven that Boo stans are the memest. I feel like she hasn’t made that many meme-y posts on here (or maybe I missed them :(( in which case I suck) but once she does 👀 Anyway I’ve talked to you like twice but I still love you c’:
I looked at the positions list before looking at Bonnie’s answers and thought Jennie would be perfect for this one and guess what… Bonnie’s already listed her LMAOOO PERFECT - Lillian
the one everyone has called “daddy” at some point
aaah no one I can think of because Daniel isn’t mutuals with us…… LOOOOL OMFG JUST KIDDDDDING (Lillian be like 😷😣🙏) Why did I even answer this one it’s so weird kfldjglkfdjgklfd
😷😣🙏 - Lillian
the ship that’s a hundred percent real and they know it
Is this even a question… @hwangminyeo and @minhwangs are the power couple!!! You always see them professing their love to each other on your dash LOL Romeong and Daliette are feeling threatened.
the short one that everyone is highkey afraid of
@minhwangs Sarah is a cutie but everyone knows that if you mess with her friends she’ll let you have it. She won’t hesitate to lash out at you if you dare insult the things and people she holds dear. So while she isn’t scary, she’s someone you don’t want to mess with once her protective side kicks in! But honestly it’s really sweet how even though she doesn’t let harsh words directed toward her bother her, she stands up for people ;___; She’s selfless that way!
the one that takes every opportunity possible to be extra as hell aka the variety king
@emperorhwangs Rui without a doubt is one of the funniest people here on Tumblr!! I love her sense of humor and even when she says the most random things like “a stick of rat deodorant” I just die laughing. I was contemplating between putting her for “the walking, living breathing meme” but I settled with this one because I associate her with Ong a lot! And we all know he’s the variety king so~ The captions in her gifs are the funniest and most extra ever, even the way she talks is super extra and funny.
the motherly one that takes care of the rest of their members and occasionally reprimands
@2hyeons Ying is more of an older sister type than the mom but she still gives off that caring vibe. She seems like the kind of sibling who barely talks to you because she’s stuck in her room all day doing work but she’ll also be there for you when you need it the most. Lowkey the kind of older sister who will call your cheating significant other over the phone just to scream at them and rat them out for hurting her little sibling loool. She’s more of an older sibling because while she takes care of you, she makes you want to take care of her too and cook her meals and check up on her once in a while to make sure she’s still sane c’:
@luminous-point Reni gives off such motherly vibes without even trying to idk why?? Not only because she’s 95 line! But she’s like your sweet hardworking mother (working hard doing translations 👍👍👍) who you always think of fondly whenever she appears on your dash. She always expresses her true feelings and stands up for what’s right, which is really difficult to do and as a result super admirable. She always has a very mature standpoint about things and avoids unnecessary drama. I feel like the dynamic is that we’re all little ducklings and she’s the mom!! But mom has to take care of herself too!!!
@p-arkwoojin and @minsbugi I put Jem & Kenia in this category because they’d make sure all the members are equally loved!! They both have huge hearts and no matter how many members make up their group(s), they’d take care of each and every one! - Lillian
the 4D member that looks cute in a sexy comeback, and sexy in a cute one
@hahasunqwoons! I think the ‘4D’ title really suits Summer even though she may not seem like it at first. But once she opens up to you, you’ll know what I mean looooool. She’s not 4D in the really wild sense but more of a lowkey kind of 4D (like Vernon!). Also I think she would fit both concepts! But she unintentionally shows reverse charms like in her Never dance cover (if you haven’t watched it yet, go watch it please. you won’t be disappointed), the song is more serious but she gives off a somewhat cute vibe! I think she could rock IOI’s Very Very Very as welllll :^) (future cover idea?)
the member who doesn’t have to worry about gravity bc they basically just flip everywhere
can’t think of anyone? :OOO
the extremely under appreciated one
ummm @kiminguy??? @guanlliver??? @lovebugi??? @wanhyun??? (Mutuals on here and our SVT blogs squad!! LOOL) I love all of them and their graphics to death I will literally make a blog and reblog all of their creations 50 million times like they deserve. Of course they all have such cute personalities dlkgjfdkj but I’ll spare you from my rambling and focus on their beautiful works~ Naomi has such soft, pastel graphics (pastels are one of my fave things in the universe) and she was one of my first favorite graphic makers in the Seventeen fandom back in the day. I followed her first and then when she followed me back I was SOOOO HAPPY OMG BC ONE OF MY FAVES NOTICED ME. Next we have Yasmin and although we haven’t talked much I really adore her graphics because they’re really unique! She uses vibrant colors and dark colors so well (a thing I’d like to learn how to do hehehe) AND also pastel graphics with vibrant coloring… a jack of all trades tbh. Next, there’s Jaymee, who I’ve been mutuals with forever on our SVT blogs but I never really got a chance to talk to until recently! (And she’s the sweetest…my one and only fan….LOOOL). Once again she works with both dark colors and pastel colors very well! Her edits and graphics have a minimalistic approach to them which I admire so so much because I always cram stuff onto a canvas and get bothered when there’s empty space in my graphics. Last but not least there’s IMA!!! My self-proclaimed little sister c’: I’ve known her for most of her time in the Seventeen tumblr community and I love seeing how her works changed over this period of time. But her works always have that special charm and uniqueness that you know right away that it’s her work! No one could imitate her style and pull it off! Inimitable seventeen carat hehe Ima always has a special place in my heart. I love her coloring style, I love her graphics style, I love her. But yea as you can tell I have much love for graphic makers and more especially underrated graphic makers! Graphic makers are a blessing to each and every fandom. Thank you.
also @tokkimingi like we’ve never talked before but Ale’s gifs and edits are soooo high quality and have the prettiest coloring and they deserve so so so so many more notes??? Like the Ren gifset I just reblogged….this is the kind of content that should receive 1k notes okay AAAAAH @ Ale, Lillian and I love your creations so much and you’re basically the go-to blog for NU’EST related gifs and stuff AAAAH 💕💕
I AGREE WITH ALL OF THE ABOVE HOLY MOLY - Lillian
the one that finds pleasure in other members’ demise
I’m sure this goes on a lot when people tag each other in their bias wrecker posts cough when I send Bonnie black-haired Suga pics but I see @minhwangs and @hwangminyeo tagging each other in Daniel stuff sometimes and it’s so funny loool. I know you guys are Minhyun-biased but Daniel!!!!! - Lillian
#asks#anonymous#ahhh it was hard for me (lillian) to classify some mutuals from this blog#since i haven't spoken to/interacted with most of them#but please know i love you ;___;#b:answered#l:answered
16 notes
·
View notes
Last Seen Blogs

lonym82fanfics
lonym82fanfics

biscuityt
SaltedBiscuit

jsoul318
Soul.. JSoul

sicilylapse
Sicily Lapse

birrufarmsorong
Birru Farm Sorong