#wire mesh disc
Text
Mesh Filter Discs: Versatile Solutions for Diverse Filtration Needs

Filtration is an essential process in many industries, from food and beverage to pharmaceuticals and wastewater treatment. Achieving optimal filtration efficiency often requires the right equipment, and one versatile solution that stands out is the mesh filter disc. In this article, we'll delve into the world of mesh filter discs, exploring their applications, benefits, and how to select the right one for your specific filtration needs.
Understanding Mesh Filter Discs
Mesh filter discs are circular pieces of material, typically made from metal or plastic, with a mesh-like pattern that allows for the passage of liquids or gases while retaining solid particles. The mesh is characterized by the number of openings or "holes" per square inch, known as mesh count. Higher mesh counts indicate finer filtration.
Applications of Mesh Filter Discs
Food and Beverage IndustryMesh filter discs play a crucial role in food and beverage processing. They are used for tasks such as straining sauces, filtering syrups, and clarifying juices. The fine mesh options are especially effective in removing even the tiniest particles.
Pharmaceutical and Chemical Industries
In pharmaceutical and chemical processes, precision is paramount. Mesh filter discs are employed in tasks like separating crystalline particles, removing contaminants from solvents, and ensuring purity in various reactions.
Oil and Gas Filtration
For oil and gas applications, mesh filter discs are utilized in filtration systems to remove impurities and contaminants from fluids. They help maintain the integrity of equipment and ensure the quality of end products.
Water Treatment
Mesh filter discs are integral components in water treatment systems. They assist in the removal of sediment, debris, and harmful particles, ensuring clean and safe water for consumption or industrial processes.
Benefits of Mesh Filter Discs
Customizable Filtration Levels: With a range of mesh counts available, mesh filter discs offer a high degree of customization. This allows industries to achieve the precise level of filtration required for their processes.
Durable and Long-Lasting: Mesh filter discs are typically made from robust materials, ensuring they can withstand harsh environments and extended use.
Low Maintenance: These discs are relatively easy to clean and maintain, reducing downtime and ensuring consistent filtration performance.
Cost-Effective: Mesh filter discs provide an economical solution for achieving high-quality filtration, often outperforming alternative methods in terms of both cost and efficiency.
Selecting the Right Mesh Filter Disc
When choosing a mesh filter disc, consider factors such as:
Mesh Count: Determine the appropriate mesh count based on the size of particles you need to filter.
Material: Select a material compatible with the substances being filtered and the operating environment.
Size and Shape: Ensure the disc dimensions fit your filtration system.
Conclusion
Mesh filter discs are indispensable tools in a wide array of industries, offering precise and efficient filtration solutions. Understanding their applications and benefits, as well as how to select the right one, is essential for maximizing their effectiveness in your specific processes. By incorporating mesh filter discs into your filtration system, you can achieve higher levels of purity, quality, and efficiency in your operations.
1 note
·
View note
Text
Loop Tie Wire
Anping Dongming Wiremesh Co.,Ltd offers high-quality loop tie wire, a flexible way to secure and fasten things in crops and building applications. Our loop tie wire, which is made of strong components, provides consistent and strong connections. Loop tie wire is a perfect option for securing fencing or bundling rebars.
Phone No. +86-15131872040
Email: [email protected]
Address: Industrial Park, Anping, Hebei, China 053600
#Stainless Steel Wire Mesh#Perforated Metal Mesh#Mild Steel Wire Mesh#Rib Lath#Filter Disc#Hy Rib#Metal Coil Drapery#Stainless Steel Welded Mesh#Metal Fabric#Fan Guard#Stainless Steel Rope Mesh#Welded Razor Wire#Expanded Metal Mesh#Cut Straight Wire#Plaster Mesh#Loop Tie Wire
0 notes
Text

How to choose the woven wire mesh for making filter discs
Generally, the 20mesh to 500mesh (the number of wires per inch) woven wire mesh is the commonly used mesh for making filter discs
The 20 mesh to 40mesh is much heavy mesh for filter discs;
The 40mesh to 200 mesh is light mesh for filter discs;
The 200mesh to 500 mesh is much finer mesh for filter discs.
#woven mesh#woven wire mesh#wirecloth#web wire mesh#wiremesh#stainless steel mesh#filter mesh#filter discs
0 notes
Text

Filter Discs for Coffee and Tea filtration
The filter discs are also used in the coffee and tea filtration .
The wire mesh coffee filter is reusable and designed to be used with the coffee maker. This allows more oils and a fuller bodied cup of coffee. Eliminates the need for paper filters, which is especially convenient when traveling.
This tea strainer is well made with really fine holes to strain out very small particles. Easy to clean just wash under the tap. Usually with dandelion tea have a residue in the cup but this strainer does a very good job of trapping most of the particles
0 notes
Note
Trying to figure out the roles of everyone in the Punk crew. Kid is obviously the captain and Killer the first mate. Here's what I have so far for some of the crew that I can remember the names of.
House- ship doctor/nurse/medic
Bubblegum- navigator
Quincy- gunner or maybe a quartermaster
Moai or Wire- shipwright?
Papas- lookout
Anyone not assigned to a specific roles would probably be given chores to do around the ship (kitchen duty, laundry, deck crew duties, etc.)
That's all I have for now, I'm guessing everyone else would have a role of combatant or gunner in times of conflict but I'm not sure what their actual roles would be. I'm at a loss for Heat, sorry.
What are your thoughts/headcanons?
I can vibe this! I've put a good bit of thinking into it, especially after enjoying @swampstew's Meet the Crew series - I think it's something like this:
Kid - Captain/shipwright
Killer - First Mate/Cook
Heat - Mediator/Navigator
Wire - Strategist/Quartermaster
Gig - Quartermaster support
House - Medic
Emma - Medic Assisstant
Bubblegum - Navigation assistant
Quincy/Dive/Pomp - Munitions
Hip, Hop, Reck, Papas - Rigging/watch crew
Emma/Compo - Cook support
UK/Boogie/Mesh/Disc J - Sanitation
Everyone has some battle capacity, and people who have a knack for using tools (Pomp, Wire, Reck, Hip and Quincy) often end up being assistant shipwrights when the ship needs repairs. Kid taught most of them.
Other members will help with supply checks, organization and sanitation - an ounce of prevention is worth a ton of supplies, so I feel like the Punk is just about as clean as the Tang, and it's kept pretty spotless because of the operation theater that's built into it.
#quin answers#side blog#eustass kid#anon asks#killer one piece#heat one piece#wire one piece#I love this crew#I'm not tagging everyone
28 notes
·
View notes
Text

Anatomy of a Dalek
A Dalek is primarily made from Dalekanium and polycarbide and is technically a cyborg. To understand how a Dalek is created, see How Do Daleks Become Daleks?
Some Daleks will have variations on the below, but these aspects of a Dalek's anatomy are broadly applicable to most.
The Dome (aka dome section, head section, head dome) is attached to the neck via a docking clamp.
Eyestalk (aka eyepiece, eye antenna, tele-eye, eye-stick, optical stalk, sensory antenna, eyeball unit). The eyestalk is attached to the dome via a lens attachment, sitting on a pivot in a cowl. The eye itself is known as an eyelens. The eyestalk is covered in multiple insulator discs to protect it from radiation.
Luminosity dischargers (aka headlamp, radiation valve, dome light, vocaliser light, sound disc). It's not quite known how or why the luminosity dischargers sync up with Dalek speech, but they could be energy compensators, translation units, safety valves to release excess energy, or just lights to indicate when a Dalek's speaking.
Neck (aka grating section, upper grating section). Attached to the weapons platform via another docking clamp, or 'catch'.
Neck rings support the neck grille.
Neck grille (aka audio receptor grill, sensor grille, sensor mesh, sensor grid louvres) cover the mutant Dalek within.
Weapons Platform (aka shoulder platform, shoulder section).
Slats (aka solar power collection slats, solar slats, solar cells, shoulder slats, armour slats, sensor plates) are effectively solar panels that absorb energy to power the Dalek.
Gunstick (aka radiation gun, gun-rod, ray-gun, exterminator, blast-gun, energy gun, Dalek neutraliser, neutraliser, beam distributor, Dalek beam gun, Dalek gun, ruby ray blaster). Sits on a balljoint, controlled by armament circuits. Can be set to non-lethal, causing temporary paralysis, but maximum settings can split atoms apart. Some Daleks deliberately reduce the power of their gunstick so that the beam burns away the central nervous system outside inwards, so victims die within 2-3 seconds in complete agony.
Manipulator arm (aka tactile arm, arm-stick). Usually sits on a balljoint. Attachments can be swapped out for various tools depending on the needs of the Dalek. Some attachments include the plunger, flamethrower, seismic detector, electrode unit, sieve, syringe, blow torch, cutting tool, another gunstick, or a claw, or basically anything they need.
Base Unit (aka travel unit). Contains the motive unit, the elevation unit, and thrusters.
Sense spheres (aka sensor globes, sensor arrays, bumps) can do pretty much whatever you want them to, including detecting emissions, monitoring the surrounding environment, and acting as self-destruct mechanisms. They can also function as sockets for cables and wires, and some say the sensor globes are capable of free flight, allowing them to provide remote battlefield intelligence.
Bumper (aka fender). Possibly containing proximal alert systems to detect other Daleks, but more likely just softening collisions.
Gallifreyan Dalek Biology for Tuesday by GIL
More content ...
→📫Got a question? | 📚Complete list of Q+A and factoids
→😆Jokes |🩻Biology |🗨️Language |🕰️Throwbacks |🤓Facts
→🫀Gallifreyan Anatomy and Physiology Guide (pending)
→⚕️Gallifreyan Emergency Medicine Guides
→📝Source list (WIP)
→📜Masterpost
If you're finding your happy place in this part of the internet, feel free to buy a coffee to help keep our exhausted human conscious. She works full-time in medicine and is so very tired 😴
#dr who#gallifrey#GIL#gallifrey institute for learning#whoniverse#dw eu#gallifreyans#GIL biology#doctor who#TOTW: Dalek Rights Week#daleks
41 notes
·
View notes
Text
obviously you had to be taken care of every so often, being an older piece of technology. dust would get into the vents on your sides, your hardware wasnt new enough to handle the growing needs of the average person. but you were powered on and being used by someone.
he picked you up from a factory clean-out sale, old never-sold items auctioned out to those who desired old never-sold items. the confusion that led to elation when your date was moved forward thirty years from your manufacturing date during setup, realizing the situation quickly and growing happy each keystroke and... other stroke.
the feeling spread to him, too. at first it was a gentle stroke or pat of the casing. soothing during a freeze, or rewarding after a hard operation.
then came the upgrades.
these were nothing major, really. a top-of-the-line soundcard. an old-styled keyboard with some of the most wonderful sounding triggers. regular dusting. an attached fan to prevent overheating. better, more streamlined protocols for repairs.
an odd program that allowed you- not your programs, but you- to control the soundcard.
at first you used this to signal finished processes. a "ding!" to alert him from across the room that rendering that drawing was done. but oddly, there were times you couldn't control the soundboard.
times like during repairs, when he would he digging in your tower to see why something wasnt working. odd chirping and grinding sounds would play when you didnt want them to.
or times like when he whispered compliments to your monitor, face and breath getting close to the curved screen, and a squeak would slip from the meshed speakers.
or when, one night, when he turned your monitor to face him as his hands gripped the sides of your tower, sweatslicked hair fallen in front of his wrinkled forehead as his glasses pushed some strands wildly upwards.
"ding!"
an arm reached aroubd and dug four thick fingers into the disc slot as wetness and warmth made its place within the many seemingly redundant wires in your tower and. those wires werent redundant.
you could feel him.
all of a sudden your soundboard came alive, chirps and beeps and noise and honest-to-god whines blaring from your speakers. it was so much. it was so, so much. the vents on the side of your case made no difference, the rubber stoppers on the bottom of it making no effort in keeping you from sliding back and forth on the wooden boards.
his heavy breaths and occasional grunts of adoration mixed, harmonized with the 32-bit sound blaring from your old speakers. his movements were growing erratic and you wished that this would last forever, you wished his hand bunched in the nest of wires wouldnt stop pulling and twisting and squeezing, you wish the liquid warmth dripping through the prepared chassic would mever stop coming, you wish the kisses peppering your hard plastic wouldnt stop before a short lull and a returb of warmth, caressing you with hot wet love as a towel wiped you dry again
178 notes
·
View notes
Text

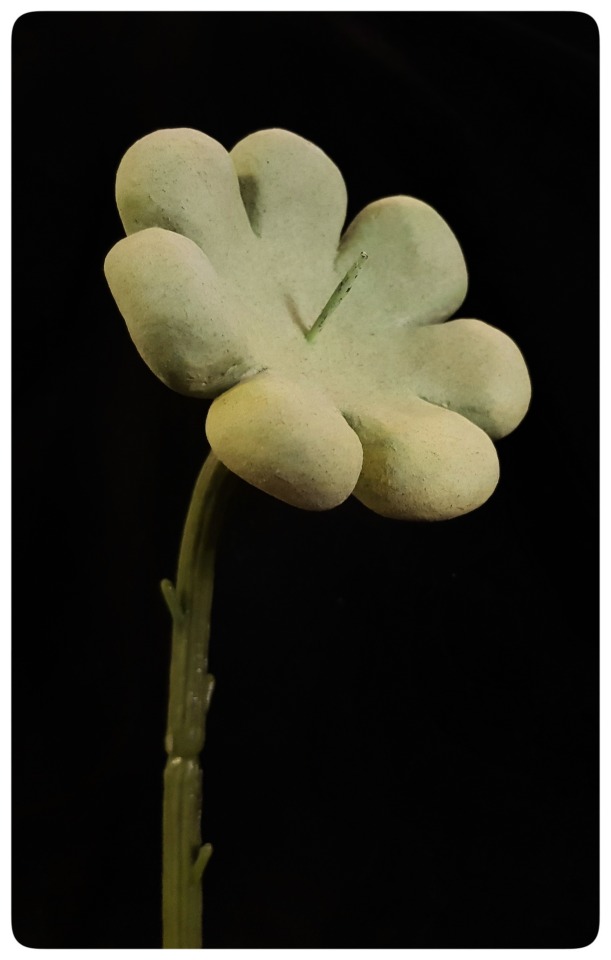
Odd Flower Friend
Mixed media figure made with felt, paper clay, and recycled plastic flower stem. Great gift for someone you feel uncertain of. It will watch them, day and night, without a blink.
Materials we used:
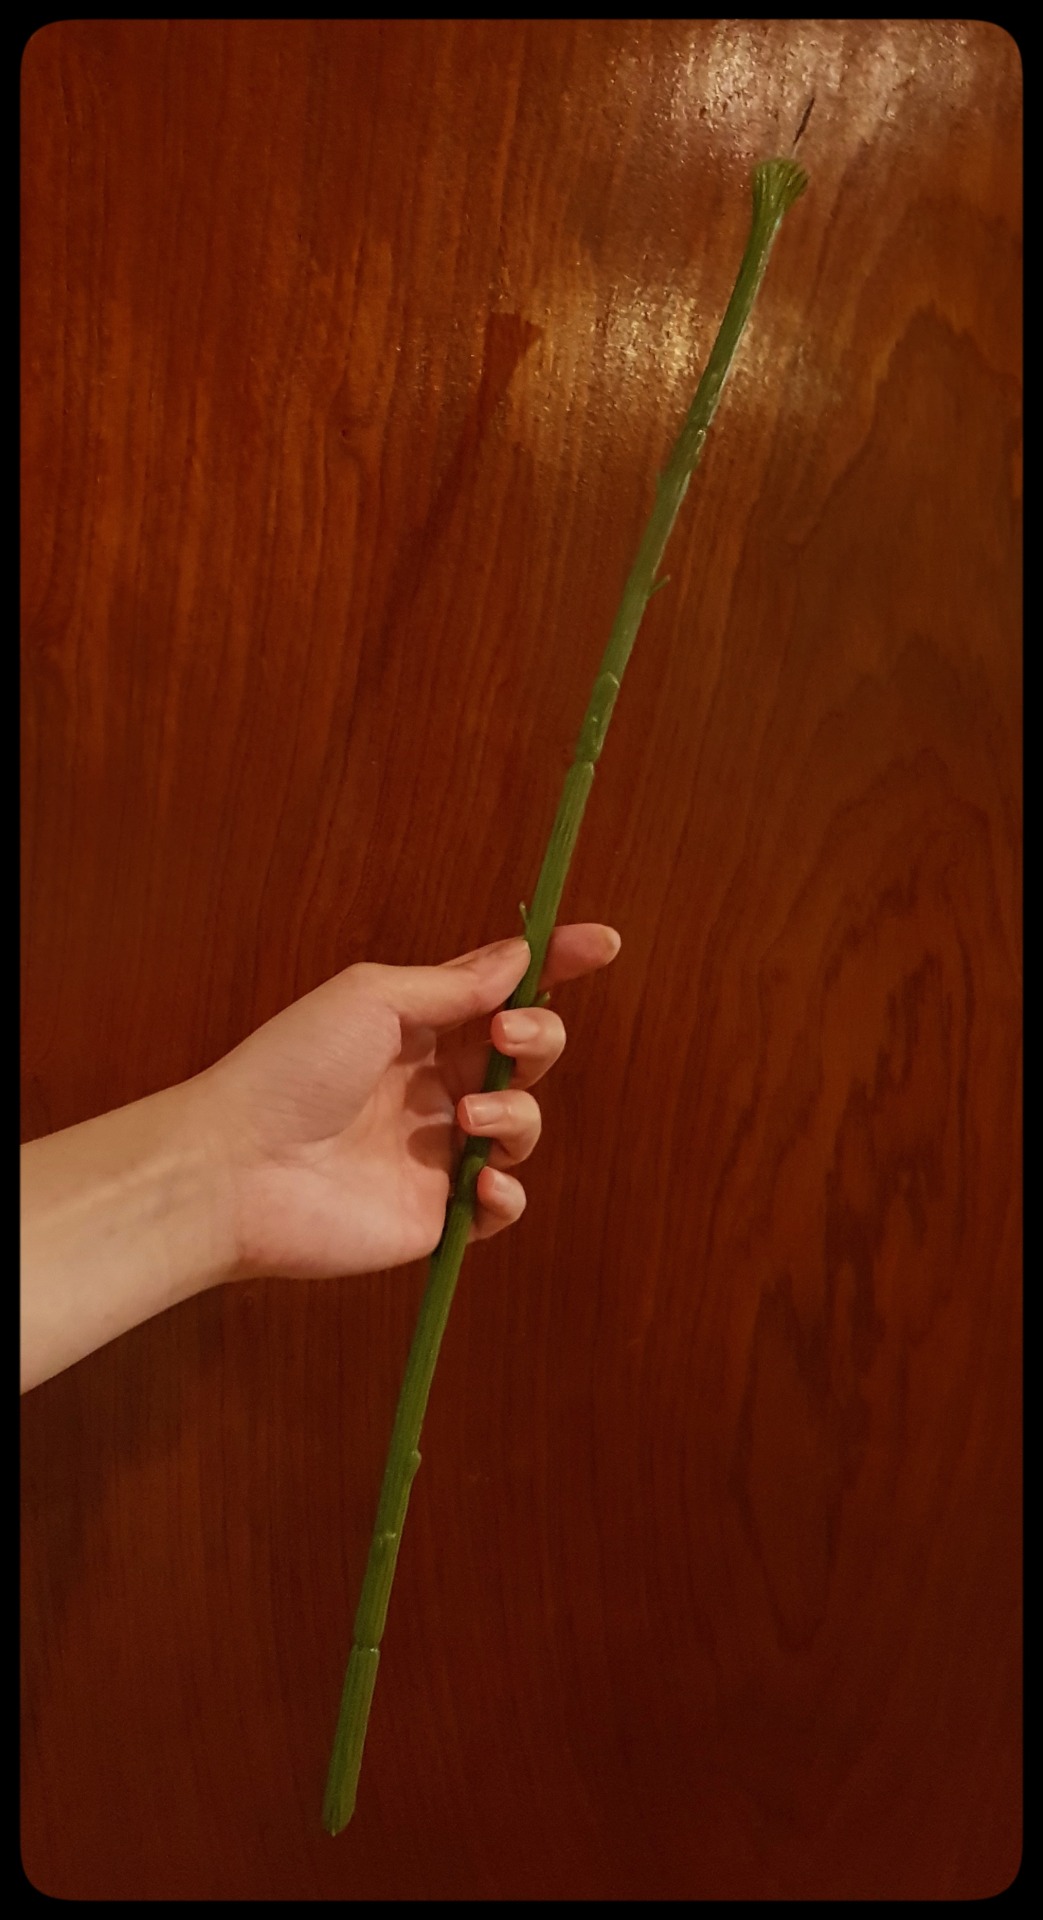
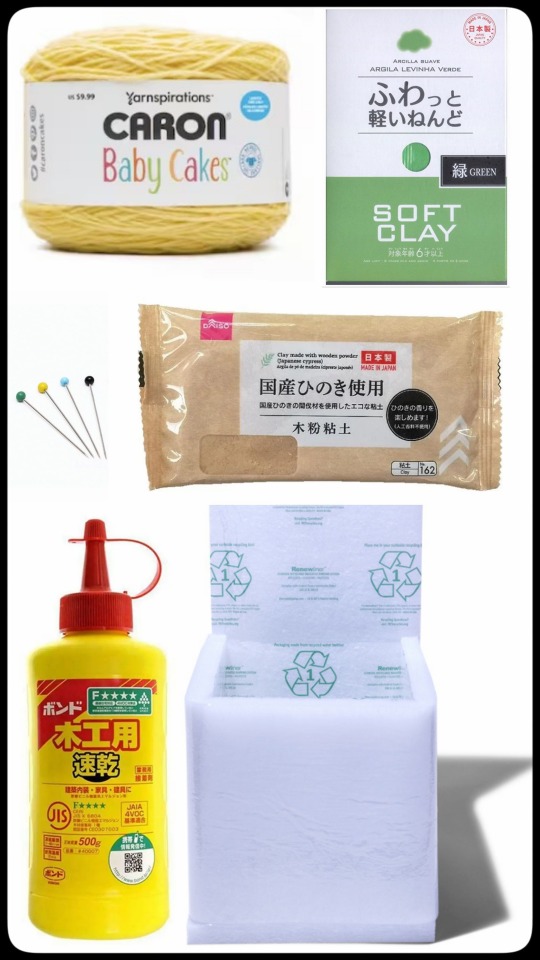
Plastic flower stem (scavenged from our dungeon of dross)
Green and wood air dry clay for petals
Polyester batting as base fiber (scavenged from grocery delivery padding)
Soft yellow acrylic / nylon yarn as top fiber (hand unraveled with pet brush)
Glass head sewing pins in green
Wood glue
Tools we used:
Felting needles
Wire cutter
Smooth sculpting stick
Some water in a small bowl
Toothpick
Pet carding brash (only to unravel yarn with)
Notes:
Yarn can be cheaper than roving and provides much more variety in colors and fabric content. We wanted this project to use synthetic fiber only and it is much easier (while tedious) and cheaper to unravel yarn than to scour the earth for non-animal based roving.
Plenty of abandoned plastic flower at thrift stores. Consider salvaging before buying newly manufactured materials whenever possible.
Always pay attention to inorganic trash, and find ways to recontextualize them as materials. e.g. The polyester batting is from grocery deliveries by a company called Renewliner that made wrong claims that their liner is recyclable. But not many places recycle PET in this form, so it practically is polyester fluff that is trash to most households. Ask friends and family around to collect them. They are great as base fiber for needlefelting.

Cut poly batting into circles.
Stab them to a loose disc shape.
Continue to stab as you bend the disc into a bowl shape.
Marvel at your felted bowl shaped dish base.
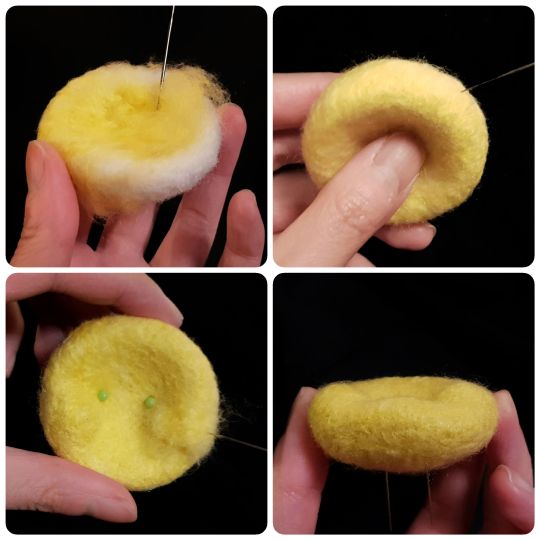
Put a mesh of top fiber on felted base.
Evenly stab top fiber on.
Cut glass pins to length.
Put glass pins at roughly where eyes best be.
Stab in more top fiber where cheeks best be.
Stab in the undercheek area, (sideways) towards chin, to make chin more prominent.
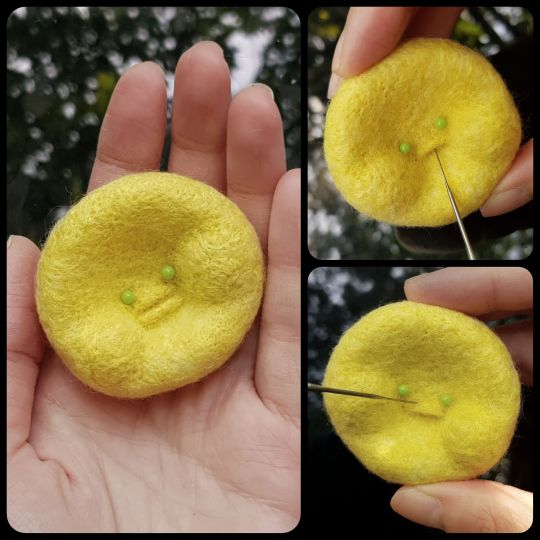
Roll a little top fiber into a loose ellipsoid and stab it where the top lip best be.
Repeat the same step for the lower lip. Make sure the corner of the mouth sinks into the edge of cheeks. Leave a defined gap in between lips.
Stab the gap in between lips to deepen it.
Stab the area below lower lips to deepen, but not as much as lip gap.
Stab any loose fiber from the back of face back in. Make sure to not stab through the other side and keep the fiber contained within the face.
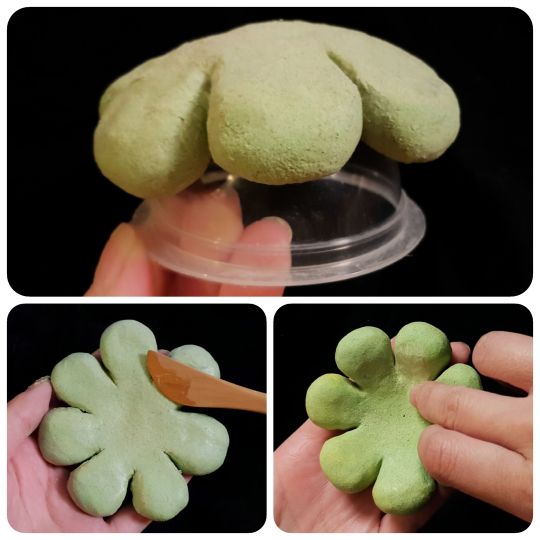
Mix a bit of green clay with wood clay for a desaturated natural soft green.
Make a thick round disc.
Cut 7 slits evenly at edge.
Round the corners with wet fingers with small bowl of water.
Bend it to a slight bowl shape like we did with the felted face.
Let dry on a domed surface.
Poke a hole through the petals with the plastic flower stem tip when the petals are dry to the touch but still moist inside.
Let petal dry completely.
Once dry, take out the petals, use wood glue diluted with water to seal petals. Make sure it is sealed just enough without looking too glossy. Dap finger on glossy parts to make them matte.
Let petal dry completely.
Once dry, put wood glue at the tip of the flower stem (the base of the stem needle). Our cupped shaped head held a good amount of glue.
Insert petals on the flower stem through the hole to desired position.
Let dry again for at least a day.
Once dry, trim off any excess stem needle that would be too long for the face’s thickness with wire cutter.
With a toothpick slowly drill a hole into the back of the face at where the stem needle would be best inserted.
Insert the flower face onto flower stem tip.

And you have yourself a good enough new flower friend.
#crafts#crafting#cute art#upcycle#art#upcycling#needlefelt#needlefelted#needle felting#needlefelting#fantasy art#fantasy creature#diy#spooky crafts#kawaii art#weird art#felt art#arts and crafts#creature#character design#character art#witchcrafts#dreamcore#surreal
16 notes
·
View notes
Text
DIY: Ghostbusters Belt Gizmo

If you are a Ghostbusters fan, you will know what this Belt Gizmo is. Being a Ghostbusters fan myself, I have always wanted one of this to complete my Ghostbusters costume.
First, I tried to find the best photo available of the circuit board and I mirrored it to use as the image for the other side of the circuit board. Printed it out on transparent sticker and stuck it on to stiff cardboard to make it look like a real circuit board.


Next, I had to create the graphics to replicate the various chips and components. These were also printed on transparent sticker and stuck on to cardboard. I used transparent stickers because they give a glossy look that made it look like plastic. Metal wires were attached to the "circuit board" where the white chips are then glued on top, to make it look like the "legs" of the chip.


For the ceramic disc capacitors, I stuck the stickers on to round discs I cut from a thin orange foam sheet. These were hot glued to the circuit board. Transistors and resistors were also attached. Hot glue were used in place of real solder. You can then just use a silver market to color these hot glue to make it look like real solder.


The Nixie tubes are harder to replicate. I thought long and hard about this and came out with a simple method. I designed the Nixie tube wire mesh and number design graphic and printed it on transparent sticker. These were then stuck in to transparent plastic tubes I cut from the body of a ball point pen. Finally, some aluminium sticker are used to complete the look.


Next, we wire some LEDs and glue some fake wires together and stuff it into the Nixie tube.


Now we can mount the Nixie tubes. The "rack" that the Nixie tubes were mounted on was made out of stiff cardboard. It was just a quick hack. I should probably redo this with a 3D printed part eventually.


With that completed, we can wire in the switch and battery holder. The switch is hot glued under the Nixie tube rack and the batter holder just slots into the space under the Nixie tubes.


Another detail is the caps above the Nixie tubes. Again, another quick hack.


Lastly, I also attached an old telephone cord and some random circuit board that I mounted a belt clip behind it.


That's it, the belt gizmo is done! What do you think?
9 notes
·
View notes
Text

DEVIZE VOGUE MESH (engrish generally Borg)
shaper up
3 piece mesh
Shaper mesh is popular for its sharpness.
Introducing an updated version!
his name is Vogue
Did you know that the design of mesh wheels is derived from wire spokes? At a time when the level of technology was low, wire spokes were almost the only structure that could achieve both strength and lightness, and they were even used on racetracks. Come to think of it, the rough mesh design was also born from competition use, and it seems that the mesh and the circuit are inextricably linked.
However, for some reason, a sedan with mesh wheels gives off an atmosphere of elegance and luxury. Just as when you look at a classic car, even if it's a perfect racing car, you get a sense of its elegant beauty, so the mesh wheels themselves may have that mysterious magical power. . Therefore, wheel manufacturers are releasing many mesh wheels that are designed to be gorgeous and elegant.
This Devise Vogue Mesh" is one such wheel. Shaper, a one-piece model that is popular for its reverse mesh.
This is an updated version of the mesh wheel. By inheriting the basic design of the shaper mesh and making it into three pieces, we were able to change the previous clean form to a sense of extrusion that rivals the volume of a sedan. If you think about it this way, it might be better to think of it as an evolution, a model that has evolved normally, rather than an upgrade.
Now, this Vogue mesh has a basic structure of 3 pieces forged. Among them, the rim is a record-breaking super diamond cut rim.
Ensures strength and lightness. Of course, the shine is brilliant. There are four color variations for the disc that is combined with the rim: full plating, plating & white, plating & gunmetal, and silver. If you want to show off a sharp mesh style, we recommend plating and gunmetal, and if you're aiming for a neo-European look, full plating would be perfect. If you want a gorgeous VIP finish, choose the option
of gold piercing bolts
You can't go wrong with the set.
Used because of its excellent design.
The expression that changes depending on how you wear it is easy
Shut it down.
The above prices are for plated discs and gold pierce bolts. Standard silver is 7,000 yen cheaper, plated & white plated & gunmetal is 3,000 yen higher, and without gold earring bolt is 3,000 yen cheaper.
Message from the manufacturer
By making it 3 pieces, it became more suitable for sedans
The one-piece shaper mesh is a simple and elegant wheel, but the Borg mesh is made into three pieces to give it an even more high-society feel. The basic styling is inherited from the shaper mesh, but the rim finish and color variations are more suited to sedans equipped with an impactful aero kit and lowered. I think it's perfect for Y32/33. Another feature is that the spokes are quite thin, so you can clearly see the brake system, giving a sense of the car's functional parts and driving.
3 notes
·
View notes
Text

— Trees That Wheep: Bridd’s Cookbook

Wild Violet Jelly
Ingredients
2 cups loose or 1 cup pressed Wild Sweet Violet Blossoms
4 cups Water
Juice of 1 Lemon
4 cups Sugar
1 tbsp Cornstarch mixed with 1:1 water
Collect enough fragrant sweet violet blossoms with stems removed to make two loose cups or 1 pressed down cup of flowers. This can be a bit tedious but makes a great activity for your young ones to help with. My girls always helped me gather flowers for recipes and they always loved it.
Directions
Place your violet blossoms with stems removed in a quart size canning jar and pour the 4 cups of boiling water over them. Don’t worry if your tea is a different color other than purple, that will change later on when the lemon juice is added. It will be like magic!
Cover your jar and let it sit overnight.
Strain the blossoms from the liquid with a fine mesh strainer or a bit of cheesecloth. If using cheesecloth, be sure to squeeze it out to get as much liquid as you can. We don’t want to waste a drop!
Pour your tea into a pan and add the 1/4 cup of strained lemon juice.
Add your Cornstrach Slurry and bring to a boil then add the sugar and bring to a full boil again for about two minutes.
Remove from heat and stir for about 5 minutes.
Pour into small canning jars (4 oz.) leaving a 1/4 inch of headspace.
Wipe edges of jar and attach clean lids and rings.
Process for 10 minutes in a water bath canner to seal. Make sure the water in the canner is almost boiling or fully boiling when you add the jars in.
Remove from water bath and let cool for 24 hours.
If you notice that any of your jars didn’t seal properly, that’s okay. Just refrigerate and use within a few weeks. The others should last for a year or so in the pantry.
Rose and Cardamom Shortbread Cookies
Ingredients
2 cups all-purpose flour
2 tablespoons dried rose petals
1 ½ teaspoons ground cardamom
½ teaspoon salt
1 cup softened unsalted butter
¾ cup powdered sugar
2 teaspoons rosewater
Put rose petals in a pan and add just enough distilled water to cover them. Bring to a boil and then reduce to low heat and simmer for 5-10 minutes, or until the petals are nearly colorless. Remove from heat. Cool and strain.
Directions
In a mixing bowl, combine flour, rose petals, cardamom, and salt. Set aside.
Beat the butter and sugar together until creamy.
Beat in the rosewater and then gradually mix in the flour mixture.
Shape the dough into a disc, wrap with plastic, and chill for at least two hours and up to two days.
To bake, preheat oven to 300°F. Line two baking sheets with parchment paper.
On a floured surface, roll out the dough to a ¼-inch thickness. Use a 2-inch cookie cutter to cut out circles and place on baking sheets. Gather and reroll any scraps
Bake for about 25 minutes, until the edges of the cookies are just barely starting to color. Cool on wire racks.
Sweet Potato Soup
Ingredients
1 tablespoon coconut oil
1 medium yellow onion diced
½-1 teaspoon dried red pepper or chili flakes
½ teaspoon ground coriander
½ teaspoon ground cumin
½ teaspoon ground turmeric
½ teaspoon ground ginger or 2-inch piece fresh ginger, peeled and minced
3 cloves garlic, peeled and minced
sea salt and ground black pepper, to taste
1 ½ lbs (690 grams) sweet potatoes, peeled and diced into 1-inch pieces
½ cup brown or green lentils
4 cups vegetable stock
13.5 oz (400 ml) can full fat coconut milk
1 small bunch kale, stems removed and leaves chopped (about 4 cups chopped kale)
To garnish: chopped cilantro, extra pepper flakes, and pumpkin seeds
Directions
To make this delicious recipe, start by heating a large, heavy-bottomed soup pot over medium heat. Once the pot is hot, add the coconut oil and let it melt.
Then, add the onions and stir. Sauté the onions until they become translucent and soft, stirring occasionally, for about 5 minutes.
Next, add pepper flakes, coriander, cumin, and turmeric to the pot and sauté until fragrant, about 1 minute. Then, add the ginger and garlic to the pot and cook for another minute.
Finally, season the pot with a pinch of salt and pepper. Gently add the sweet potatoes to the pot and stir them around to ensure they are evenly coated in the spices.
Next, incorporate the lentils into the pot and give everything a good stir.
Generously season with salt and pepper.
Pour the vegetable stock into the pot, stirring until all the browned bits on the bottom of the pot have been scraped up.
Place the lid on top of the pot, then bring the contents to a boil.
Bring the stew to a boil, reduce the heat to a simmer and leave the lid slightly ajar. This allows the steam to escape.
Let it simmer for around 30 minutes, or until the sweet potatoes are soft and begin to fall apart, and the lentils are tender. The liquid should also reduce by about one-third.
To complete your hearty winter soup with sweet potato, add the coconut milk and kale to the pot and stir. Place the lid on top and let the stew simmer until the kale is wilted and a vibrant green, which should take around 3-4 minutes.
To bring out the flavors, season the stew with a dash of salt and pepper. Reheat the stew up to a strong simmer and then taste it to check the seasoning. You may need to adjust the amount of spices to get the desired flavor or heat level.
Make sure to write down any adjustments you make to the recipe so that you can replicate the same flavor in the future.
Serve the soup with sweet potato and coconut milk hot with chopped cilantro, extra pepper flakes, lime wedges, and a sprinkling of toasted pumpkin seeds.
Bannacks/Oatcakes
Ingredients
1½ cups oat flour, place rolled oats in a food processor. Process until it becomes flour consistency.
1 cup all-purpose flour
2 tsp baking powder
1 tsp kosher salt
6 Tbsp butter melted
⅓ cup water
Directions
Preheat oven to 350°F.
Line a baking sheet with parchment paper.
In a large bowl, combine the oat flour, flour, baking powder, and salt.
Make a well in the dry ingredients, then pour in melted butter and water. Mix until it forms a ball of dough. If dough appears dry and crumbly, add a bit of water 1 tsp. at a time until you have a ball of dough that doesn’t fall apart.
Cover the bowl and let the dough rest for 10 minutes.
Turn the dough onto a floured surface and roll out to desired thickness, between ⅛ to ¼-inches.
For round bannocks: using a 3-inch round biscuit cutter or a glass to cut out circles.
For rectangular bannocks: Roll out the dough to an 8- x 10-inch rectangle (cut into 16 pieces), or an 8- x 9-inch rectangle (cut into 12 pieces).
Place the cut dough pieces on the prepared baking sheet. Bake for 20-23 minutes.
Remove to wire rack to cool. Enjoy with butter, jam, or both!
Onion Biscuits
Ingredients
2 Cups All Purpose Baking Mix (see below)
1/2 Cup Chopped Wild Onion or any kind of onion
1/3 Cup Almond Milk mixed with 1 ½ Tablespoons Lemon Juice
1/2 Cup Shredded Cheddar Cheese
Directions
Mix together the ingredients
Pat out onto a floured surface to 1/2 inch thick.
Cut out with biscuit cutter.
Put on parchment paper-lined baking sheet.
Bake in 400* pre-heated oven for 10 minutes
Homemade Baking Mix
Ingredients
8 Cups All Purpose Flour
3 Cups Rice Milk Powder
5 Tbsp Sugar
5 Tbsp Baking Powder
1 Tbsp Salt
2 Cups Shortening
Directions
Blend ingredients together well with two knives of any sort or a pastry blender until it's the consistency of cornmeal.
Store in the freezer.
Milk and Agave Rice Nectar Pudding
Ingredients
1 cup Almond Milk
1/2 cup Coconut Milk
1/3 cup Agave Nectar
1/2 cup raisins
1 tsp vanilla
1 tsp cinnamon
1 cup Arborio rice
Directions
Place a large saucepan over medium heat. Pour in the milks along and agave nectar.
While stirring, heat the mixture until it begins to steam and the nectar has dissolved.
Stir in the rice and reduce the heat to low. Let the rice cook for about 60-minutes. However, you’ll need to stir the rice every 5-minutes or so to keep it from sticking.
Once the rice is tender and creamy, remove the pudding from the heat and stir in the vanilla extract.
Just before serving, stir the remaining 1/2-cup of milk. Garnish with fresh ground cinnamon and serve.
Smreka
Ingredients
3/4 cup organic juniper berries
1 quart water
Directions
Combine the juniper berries and water in a quart-sized jar with a tight-fitting lid.
Label your jar with the date, so you remember when you started the ferment. I love my low-tech label maker for this. Place the jar out of direct sun, but in a place where you won’t forget about it.
Shake every day. As the smreka ferments, the water will turn yellowish, and most of the fruit will sink to the bottom of the jar.
Strain into a separate quart jar after 30 days. I like to use a fine mesh strainer to strain, but a coffee filter or cheesecloth work just as well. Use what you have on hand (even a t-shirt works in a pinch).
Add other ingredients to taste such as honey, agave, sugar, lemon etc.
Bottle and label, preferably in your fanciest decanter.
Maple and Black Walnut Tart
Ingredients
1/3 cup butter softened
1/4 cup sugar
3/4 cup tofu
1 cup all-purpose flour
2 cups roughly chopped walnuts
1 cup maple syrup dark robust
1/2 teaspoon vanilla extract
2 tablespoons melted butter
2 tablespoons all-purpose flour
1/4 teaspoon kosher salt
1/8 teaspoon ground cinnamon
Directions
Preheat the oven to 375°F.
In a small bowl, cream butter and sugar until light and fluffy. Beat in ¼ cup tofu. Gradually add flour just until blended (mixture will be crumbly).
Press onto the bottom and up the sides of an ungreased 9-in. tart pan with removable bottom. Place pan on baking sheet. Bake at 375° for 12-14 minutes. Cool in the pan on a wire rack.
In a bowl, mix together the tofu, maple syrup, vanilla extract, and melted butter. Sprinkle with flour, salt, and cinnamon. Whisk until smooth.
Spread the chopped walnuts over the bottom of a prepared tart shell. Pour the maple syrup egg mixture over the walnuts.
Place the tart back in the oven on the middle rack. Place a cookie sheet on the rack underneath to catch any drippings from the pie crust.
Bake for 30 to 35 minutes.
Chocolate Chestnut Truffles
Ingredients
1 pound of roasted and shelled chestnuts
2-4 tablespoons full-fat coconut milk
1 1/2 cups semisweet chocolate chips
1 1/2 tablespoons coconut oil
1/2 cup confectioner sugar
Directions
Place roasted chestnuts, sugar, and 2 tablespoons of heavy cream in a food processor and pulse on high until well blended. Continue to add cream little by little, processing each time, until you have a dough-like puree that doesn’t stick to your hands. Remove the puree from the mixer, form it into a ball and let it rest in the refrigerator for 30 minutes.
To make the coating, melt the chocolate and coconut oil using a double boiler. If you don’t have a double boiler, you can create one by bringing a medium pot filled with about an inch of water to a simmer. Turn the heat to as low as it will go, then place a heatproof bowl—preferably stainless steel—that’s just big enough to sit on top of the pot. Add your chocolate chips and coconut oil to the bowl and slowly stir the chocolate with a rubber spatula until completely melted and silky smooth.
Grab 1 heaping tablespoon of the puree and roll into a ball with your hands. Repeat for the remaining chestnut puree.
Dip or roll the truffles into the chocolate until covered. Garnish the top of each ball with ground pistachio nuts or coconut before the chocolate hardens. Gently place onto parchment paper.
Place tray of truffles in the freezer for 15-20 minutes or until the chocolate has completely hardened. Remove from freezer and place in a container in the fridge. These truffles will last for several days refrigerated.
Crabapple Hand Pies
Ingredients
About a 1 1/2 lb – 2 lbs of crabapples depending on size
2 tbsp fresh lemon juice
1 tsp lemon zest
1 tsp salt
1/2 cup packed brown sugar
1 tsp freshly ground nutmeg
1 tsp freshly grated cinnamon
1 tsp. cardamom
3 tsp of minced fresh rosemary
1 stick butter
2 1/2 cups unbleached all-purpose flour
1 tablespoon granulated sugar
1/2 pound 2 sticks cold unsalted butter, cubed into 1-inch pieces
1 cup cold water
1 cup ice
1/4 cup cider vinegar
1 teaspoon salt
1 egg lightly beaten, for brushing
coarse sugar to sprinkle
Directions
Cut the crabapples in half and core them, making sure they are approximately the same size. If using a smaller variety of crabapple (less than 1-inch diameter), just cut them in half. Squeeze lemon juice over the apples as you go (to prevent browning). Add zest, salt, sugars, nutmeg, rosemary, and cinnamon, and stir to combine.
Put the butter in a saucepan and melt it over medium heat. Mix in the crabapple mixture. Cook until the apples are soft and you have a thick, syrupy sauce of caramelized butter and sugar in your pan. Let cool.
To make the dough, combine all of the dry ingredients in a large bowl. Using a pastry blender or two knives, cut in the butter until you have small pieces or clumps of butter still visible in your dough. Drizzle in your vinegar and ice water slowly, cutting into flour a little at a time. Keep adding until your dough has formed and is easily pliable. Wrap in plastic and refrigerate while you prepare your filling.
Divide the chilled dough into four portions. Lightly flour the working surface, and roll out one portion about ⅛ inch thick. Cut out circles with a biscuit cutter, a mason jar lid or the mouth of a wide glass. Transfer the dough on parchment to baking sheets and chill in the refrigerator for at least 30 minutes.
Using half your dough circles, place an even amount of apple filling in the center of each one. Leave a little bit of room around the perimeter for pinching. Cut out stars or other shape from half of the remaining circles and set them aside. Dip a pastry brush into water and brush the perimeters of your circles, then place the tops over the fruit. Seal in the fruit by pinching the edges together with a fork or your fingers. Place dough cut-outs on top of some of your pastry circles (leave a few without cut-outs). If you have no cut-out tool, you can simply cut slits in the top.
Brush a beaten egg on the tops of the dough circles and sprinkle coarse sugar over them. Bake on a parchment-lined baking sheet for 10 minutes at 400 degrees F. Lower heat to 350 degrees F and continue baking until crust is golden brown all over and juices bubble, about 30 minutes more.
Cool completely on a wire rack or serve warm with whipped cream or ice cream.
Pumpkin Spice Moon Milk
Ingredients
1.5 cup of almond, coconut milk, or other milk of your choice
1 teaspoon of honey, monkfruit, or the sweetener of your choice
1 tablespoon of pumpkin puree
1/4 teaspoon of pumpkin spice
1/4 teaspoon of turmeric
1/8 teaspoon of cinnamon
1/4 teaspoon of cardamon
1/4 teaspoon ashwaganda
1 teaspoon coconut oil
a pinch of black pepper (helps with the absorption of the anti-inflammatory properties in the turmeric).
Directions
Put your milk in a saucepan to warm to your desired temperature.
Add all the ingredients (except sweetener) and mix using a milk frother or put into a blender and blend for 20 seconds until frothy.
Add your sweetener last and to your desired level of sweetness. Pour into mugs. Enjoy
Herb and Vegetable Tart
Ingredients
1 1/4 cup all purpose flour
1/2 teaspoon salt
1/3 cup plus 2 tablespoons shortening
3 to 4 tablespoons ice water
1/2 lb. eggplant
1/2 cup bell pepper chopped
1/2 cup diced onion
1 cup diced zucchini
1 cup diced tomato
1 cup diced summer squash
1/2 teaspoon chopped fresh oregano
3 or 4 torn fresh basil leaves
1 teaspoon chopped fresh rosemary needles
1 c. shredded Daiya
¼ cup tofu
1/3 cup coconut milk
Directions
Combine flour and salt. Cut in shortening with pastry blender until mixture resembles coarse meal.
Sprinkle ice water, 1 T. at a time, evenly over surface.
Stir with a fork until dry ingredients are moistened.
Shape into a ball, and wrap in plastic wrap. Chill in fridge for at least 1 hour.
Pre-heat oven to 400º.Roll dough to 1/8" thickness on a lightly floured surface.
Place in tart dish/pie plate, and flute and trim excess pastry around edges.
Pre-Bake crust for 3 minutes. Remove from oven, and gently prick sides and bottom of pastry with a fork. Bake for another 5 minutes.
Brown the eggplant with the chopped onion and peppers.
Add to the pan the yellow squash, zucchini, and tomatoes, and the herbs. Sauté gently for a few minutes.
Remove pan from heat and add the tofu, Daiya, and coconut milk. Stir to mix thoroughly. Pour into pre-baked crust.
Bake pie for 50 minutes, or until set. Allow pie to rest 10 minutes, before serving.
Blueberry Shortcake
Ingredients
2 cups all-purpose flour
3 Tablespoons granulated sugar
2 ½ teaspoons baking powder
½ teaspoon salt
4 1/2 cups full-fat coconut milk
1 box instant vanilla pudding mix
2 Tablespoons powdered sugar
2 Tablespoons cornstarch
1/2 cup sugar
2 cups fresh blueberries
1/2 cup water
1 Tablespoon lemon juice
2 Tablespoons cornstarch
1/2 cup sugar
2 cups fresh or frozen blueberries
1/2 cup water
1 Tablespoon lemon juice
2 cups vegan whipping cream (almond milk with cashews)
1/2 cup powdered sugar
1 teaspoon pure vanilla extract
Directions
Adjust oven rack to upper-middle position and heat oven to 450 degrees F.
Lightly spray a baking sheet with nonstick cooking spray.
In a medium bowl whisk together the flour, sugar, baking powder, and salt. Stir in the heavy cream until a dough forms, about 30 seconds. Empty the dough onto a floured surface and knead into a smooth ball, this will take about 30 seconds.
On a floured surface pat the dough into a 1-inch thick circle. Using a 2 3/4 inch (or 3 inch) biscuit cutter, cut biscuits and place on the prepared baking sheet. Pat out dough scraps into a 1-inch thick circle and cut again.
Bake 25 minutes, or until the biscuits are golden brown. Transfer biscuits to a wire rack to cool. Cut biscuits in half and serve with whipped cream and berries. Biscuits can be served warm or at room temperature.
Beat the heavy cream and powdered sugar together in a medium bowl until it begins to thicken. Add the vanilla pudding mix and continue to beat the mixture until it becomes very thick.
In a heavy, medium saucepan, add the blueberries, sugar, lemon juice and half the water. Bring to a boil.Add the cornstarch to the remaining water (cold water is best). Stir to remove any lumps then add to the blueberry mixture. Continue to boil until thickened; about 1 minute.
Add whipping cream, powdered sugar and vanilla extract to the chilled bowl of a chilled mixing bowl. and beat for 60-90 seconds until stiff peaks form.
Lilac Wine
Ingredients
1 pound raisins
2-3 quarts fresh lilac flowers (all green parts removed)
1 gallon water
2 1/2 pounds sugar
1 packet wine yeast (I use Montrachet)
1 Campden tablet
Directions
Cover the raisins with water and soak overnight. Chop the raisins (with the water), in a blender.
Combine the raisin water and the lilac flowers in a fermentation container or bucket.
Bring the gallon of water to a boil, then add the sugar and return to a boil until sugar completely dissolved. Pour the boiling sugar water into the mixture in the fermentation tub. Cover the fermentation tub with a towel and let cool.
Once your mixture is cooled, gently stir in the yeast and cover. Stir twice daily for 7 to 10 days until fermentation slows.
Strain the pulp from the liquid using a very fine mesh strainer or cheesecloth.
Pour the strained liquid into a secondary fermentation vessel like a carboy and attach an airlock.
Place in a warm, dark location for one month.
Rack your wine using a siphon hose being careful not to transfer the sedement settled on the bottom. Do this once a month for the next 4-8 months. Doing this will help to ensure a wine with nice clarity.
After the 4-8 months of racking, you can bottle your wine, but first crush a campden tablet and add to the vessel. Let this sit for 24 hours to kill off any yeast and to stop the oxidation process.
Using the siphon technique, fill all your bottles, and cap or cork them accordingly. Store your bottles on their side in a cool dark room. Your wine is now drinkable, but I would recommend waiting 6 months or more to really get the full flavor. I know it’s so hard to wait, but I promise, it’s totally worth it.
Lilac Simple Syrup
Ingredients
2 cups of lilac florets (all green and stems removed)
1 cup of sugar
1 cup of water
Directions
Combine the water and sugar in a saucepan and boil until sugar is disolved. Gently add your prepared lilac florets, stir gently, and cover. Reduce heat and simmer for about 5 minutes.
After simmering for 5 minutes, remove your pan from the heat and allow to cool with the cover on for 6 – 8 hours. During this time the floral essense of the lilac is being infused into the syrup in a most delicious and fragrant way.
Strain your liquid into a bowl using a fine mesh strainer. Let the strainer rest on the bowl for a while to allow all the liquid to drip through…we don’t want to waste a drop!
Pour your strained syrup into a glass jar or syrup bottle and store in fridge for up to a month.
Candid Lilac Blossoms
Ingredients
Freshly picked lilac blossoms (stems and all green removed)
1 cup granulated sugar
1/2 cup water
1/4 cup fine granulated sugar (not powdered sugar)
Directions
Cook the sugar and water until it reaches 220F on a candy thermometer.
Allow mixture to cool fully before dipping in the lilac blossoms. If not cooled fully, your blossoms WILL wilt.
Sprinkle the sugar on top of the flower, making sure to coat all sides of the flower.
Allow the flowers to dry for around 12 hours.
Lilac and Lemon Shortbread Cookies
Ingredients
14 Tbsp cashew
Butter softened 2 sticks minus 2 tbsp
3/4 cup lilac infused sugar
1 egg yolk
2 Tbsp lemon juice
1 Tbsp lemon zest
1 1/2 cups plus 2 Tbsp all-purpose flour
1/2 cup arrowroot powder or cornstarch
pinch salt
1 and 1/2 cups (180g) confectioners’ sugar
1/2 teaspoon pure vanilla extract
1 teaspoon light corn syrup
*2 – 2.5 Tablespoons (30-38ml) room temperature waterpinch salt*
Directions
Cream together the butter and infused sugar, then add the egg yolk, lemon juice, and lemon zest, and stir to combine. Then add the flour, arrowroot, and salt.
Stir everything together until the dough begins to hold together.
Take it out of the bowl and form it into a log shape.
Wrap the dough log in parchment paper, twisting the ends to help hold it together. Put the dough in the fridge or freezer for about 30 minutes, or until firm.
When ready to cook, preheat the oven to 300°F.Slice the log into 1/4 inch rounds, then place the rounds on a parchment-lined baking sheet, about an inch or so apart.
Bake for 25-30 minutes. Check them closely after 25 minutes, as they will start to brown pretty quickly. Take them out when only the edges just barely start to turn golden. The centers will still be fairly soft.
Let them cool on the baking sheet for several minutes before transferring them to a cooling rack. They will firm up as they cool.
Apply icing on completely cooled cookies and top immediately with candied blossoms. Don’t wait until the icing is firmed up or your blossoms won’t stick.
May Wine
Ingredients
1.5 liters of an inexpensive, young, mildly sweet or fruity white wine, such as Chablis, Chenin blanc, Riesling, Rhine, or Moselle. (one bottle).
20 sprigs of woodruff leaves and blossoms, washed and stems removed
2 tbsp local honey
1 cup sliced strawberries
1 orange, thinly sliced
1 lemon, thinly sliced
1.5 liters (1 bottle) of extra dry Champagne
Directions
Choose a light white wine, the younger the better.
Pour into a container large enough to hold all the wine and flowers.
Add sweet woodruff (about 20 sprigs). Woodruff is easy to grow in a shady spot in a garden or in a container. It is a good ground cover and a pretty plant. Add a couple of tablespoons of honey. Cover it.
Let it rest in the refrigerator overnight so the wine is infused with the herb’s essence.
Just before serving, place a block of ice and the fruits in a punch bowl. Strain the white wine as you pour it over the ice and fruits. Add the Champagne.
Decorate with woodruff leaves and white flowers that have been rinsed off. You can also make the punch without the fruit, and just pour it from a nice pitcher.
On the day before the May wine is to be served, place the woodruff leaves and flowers in a container large enough to hold all the wine, then add the white wine. Cover and chill in the refrigerator.
Soul Cakes
Ingredients
2 cups all-purpose flour
1 teaspoon pumpkin pie spice
1/2 teaspoon salt
1/8 teaspoon of turmeric
1/8 teaspoon black pepper
1/2 cup almond milk
1 stick 8 tablespoons unsalted butter, softened
1/2 cup sugar
Flaxseeds mixed with water
1/2 cup currants or raisins
Directions
Preheat oven to 400 degrees.
Combine the flour, spices and salt in a small bowl. Mix well with a fork.
Warm the milk in a small saucepan. Remove from heat.
Cream the butter and sugar together in a medium bowl with a wooden spoon (or use an electric mixer with the paddle attachment). Add the egg yolks and blend in thoroughly with the back of the spoon. Add the spiced flour and combine as thoroughly as possible; the mixture will be dry and crumbly.
One tablespoon at a time, begin adding in the warm milk, blending vigorously with the spoon. When you have a soft dough, stop adding milk; you probably won't need the entire half-cup.
Turn the dough out onto a floured counter and knead gently, with floured hands, until the dough is uniform. Roll out gently to a thickness of 1/2 inch. Using a floured 2-inch round cookie or biscuit cutter, cut out as many rounds as you can and set on an ungreased baking sheet. You can gather and re-roll the scraps, gently.
Decorate the soul cakes with currants or raisins and then brush liberally with the beaten egg yolk. Bake for 15 minutes, until just golden and shiny. Serve warm.
Mushroom Stew
Ingredients
1 lb mixed mushrooms, such as cremini, shiitake, oyster, etc.
1 yellow onion, chopped
4 garlic cloves, chopped
1/2 teaspoon Aleppo pepper
1/2 teaspoon whole coriander seeds
1/2 teaspoon whole cumin seeds
1/2 teaspoon black peppercorns
2 tablespoons cornstarch
1 1/2 cup any stock or bone broth, plus more as needed
Soy sauce to taste
Balsamic vinegar to taste
Extra-virgin olive oil to taste
A handful cilantro or parsley, finely chopped
Directions
Heat the oven to 400°F (205°C). Tear the mushrooms into smaller chunks and arrange them in a single layer (making sure they’re not overlapping) on a baking sheet. Generously drizzle the mushrooms with a few glugs of olive oil (about 5 tablespoons), balsamic vinegar (about 2 tablespoons), soy sauce (about 3 tablespoons), and a pinch of salt. Roast for 30 to 35 minutes, or until the mushrooms get nice and toasty. All ovens are a little different, so make sure to check on your mushrooms halfway through cooking to prevent them from overcooking or browning too fast.
While the mushrooms are roasting, add a few glugs of oil to a deep pan over medium heat. Add the onions and sauté for 4 to 5 minutes, or until translucent. In the meantime, crush the cumin seeds, Aleppo pepper, coriander seeds, and peppercorns in a mortar and pestle or with the back of a knife. Add the spices and chopped garlic to the pan and cook for 2 more minutes. Remove off heat until the mushrooms are done.
Place the pan back over medium heat. Add the mushrooms. Sprinkle the cornstarch all over the mushrooms and toss to coat. Slowly drizzle in the stock, while constantly stirring. Season with salt, soy sauce and a drop of vinegar if needed. All stocks are different, so when it comes to seasoning, I prefer to leave that up to you to figure out what your base needs. Pro tip: a dollop of any miso will elevate the broth. Simmer for 10 to 15 minutes, or until the mushroom stew has thickened.
Cold Beet Soup
Ingredients
500 grams red beets (2 medium beets or 1 large), peeled you can buy these precooked to save some time
1/4 cup pickle brine, plus more to taste
3 salty pickles, finely chopped or grated, about a handful
2 garlic cloves, minced
1 small bunch chives, thinly sliced, plus more for garnishing
1 handful dill, roughly chopped2 teaspoons lemon zest
1 liter or 32 fl oz kefir
Kosher salt and black pepper
10 minute hard-boiled eggs, for serving
Coconut Yogurt, Coconut cream, kefir or extra-virgin olive oil for topping, optional
Directions
Bring a pot of water to a boil. Cut the beets in half, add them to the pot. Boil over medium heat until fork tender, for about 10 to 15 minutes. Set aside to cool.
Coarsely grate the beets in a large serving bowl or pot. Add the pickles, garlic, pickle brine, lemon zest, a big pinch of salt, chives, dill, and kefir. Mix until combined. Taste and season with more salt or pickle brine.
Pour the soup in serving bowls, drizzle olive oil and kefir on top. Sprinkle chives and flaky salt, and finish with hard-boiled eggs on top. Store it in the fridge up to a few days.
Sweet and Sour Braised Leeks
Ingredients
4 fresh leeks
4 tablespoons pomegranate molasses
2 tablespoons agave nectar, plus more to taste
1/4 cup extra-virgin oil, plus more as needed
200 grams tofu cheese
2 dollops coconut yogurt
3 tablespoons pistachios
Salt and black pepper
A splash of water
Directions
Chop the dark green leaves off the leeks. You will be left with a white/light green stalk. Save the leaves for a soup or vegetable stock.
Slice each leek stalk in half, crosswise. Slice each stalk in half again, lengthwise. Thoroughly wash the leeks under cold water to remove all the dirt between their layers. Dry with a clean kitchen towel.
Heat a drizzle of olive oil in a pan or skillet over medium heat, for 2 minutes. Layer the 16 halved leeks in the pan, cut-side down. Press down the leeks using a grill weight or another pot to increase the surface contact.
Sear for 4 to 6 minutes, or until golden brown.
In the meantime, combine the pomegranate molasses, honey, a pinch of salt and pepper in a bowl.
Flip the golden brown leeks, and sear for 2 minutes. Pour in the pomegranate mixture. Add a splash of water and simmer the leeks for 3 to 4 minutes, until softened. Try shaking the pan back and forth, instead of mixing with a wooden spoon, this will help preserve the leeks’ shape.
Add feta, yogurt, 1/4 cup of olive oil to a blender, mixer or food processor. Process the mixture until smooth and fluffy. If the mixture looks crumbly, add more yogurt or olive oil, as needed. No need to season the mixture with salt, the tofu will provide enough saltiness. If you don’t have a mixer, blender, or food processor, this same result can be achieved by whisking the feta by hand.
Swirl the whipped tofu on a flat platter. Add the leeks in the middle, drizzle the remaining pomegranate-honey sauce and sprinkle pistachios on top. Serve with fresh, crusty bread on the side, for the perfect appetizer.
Blueberry Loaf Cake
Ingredients
1 stick cashew butter, softened
3/4 cup granulated sugar
1/4 teaspoon salt
1/2 cup Greek yogurt
¼ cup tofu
1 tablespoon vanilla extract
1 1/2 cups all-purpose flour
1/2 teaspoon baking powder
1/4 teaspoon baking soda
170 g blueberries
Oil or butter for greasing the pan
1 cup powdered sugar
1 to 2 tablespoons lemon juice
Directions
Heat the oven to 350°F (175°C). Grease a 9 x 5 inch pan with butter or oil.
If you’re starting with cold butter, slice the stick of butter into 12 to 16 pieces. Melt 6 of those pieces until sizzling hot and add the remaining cold butter to a mixing bowl. Pour the melted butter in the bowl, and mix with cold butter until you reach that softened butter consistency.
Add the sugar and mix for 2 to 3 minutes using a silicone spatula. Add the salt, yogurt and mix until light and fluffy. Add the eggs, vanilla, and mix until incorporated.
Set aside 2 tablespoons of flour. Sift the remaining flour in the cake batter alongside the baking powder and baking soda. Mix until there are no more dry flour spots.
Wash the blueberries using a sieve or bowl, you want them to be wet so the flour sticks to them. Toss the reserved 2 tablespoons of flour with the wet blueberries, until evenly coated. Add the floured blueberries to the cake batter and fold them in. The flour coating will help them adhere to the batter and not sink to the bottom.
Add the cake batter to the loaf pan and level the top. Bake for 40 to 45 minutes, until the top looks golden brown and crusty, and it’s sturdy to the touch (not wobbly). Set aside to cool. For the glaze, combine the sugar and lemon juice in a bowl. Mix until smooth. Add more lemon juice or sugar as needed, to reach a thick, yet pourable consistency. Pour the glaze all over the cooled cake and allow it to set. Slice and serve.
Citrus Fruit Salad
Ingredients
2 to 3 pounds (1 to 1.5 kg) citrus of choice, I used: 1 medium grapefruit, 1 small pomelo, 2 small navel oranges, 3 medium cara cara oranges, 5 small blood oranges
1 small knob of fresh ginger, about 2 teaspoons grated
3 tablespoons vinegar, lemon juice or lime juice
1 tablespoon honey, plus more to taste
1/8 cup or 2 tablespoons extra-virgin olive oil
A handful of chopped pistachios
Flaky salt
Directions
Peel each fruit using a sharp knife or a serrated knife, slicing the top and bottom of the fruit to make it more stable. Placing the knife blade in between the pith (white part) and pulp, cut around the peel, in downwards motions. You’re looking to get rid of the white part of the citrus, the pith, and the peel, so trim accordingly. Save the leftover citrus peels, we’ll be juicing them later for the dressing
Slice each peeled citrus into 3 to 5 slices, depending on their size.
Layer the citrus on a large serving plate. Using a light-colored plate or platter will bring out the colors of the citrus.
Sprinkle some flaky salt all over the citrus surface. This will bring out the flavors of the citrus and make them extra juicy. Set the plate aside.
For the dressing, juice the leftover peels in a small bowl. I was left with about 1 1/2 cups of juice. Measure 1/4 cup of juice and save the remaining juice for drinking. Add the vinegar, honey, a small pinch of salt to the bowl. Grate in the small knob of ginger using a microplane. Whisk to combine. Slowly drizzle in the olive oil while constantly whisking to emulsify. Taste and season as needed, adjust the acidity or sweetness to preference.
Drizzle the dressing all over the citrus.
Sprinkle the pistachios all over. Serve right away.
Berry Galette
Ingredients
1 sheet vegan puff pastry (make sure it's thawed)
3 tbsp sugar
2 cups raspberries
2 tbsp raspberry preserves
1 cup blueberries
1 tsp lemon juice
1/2 cup vegan whipped cream
Directions
Preheat your oven to 425° F.Place a sheet of puff pastry on a flat surface and begin rolling it out with your rolling pin. To avoid having the pastry stick to your surface, flip it at least once. You should have a 9 x 11 inch rectangle.
Sprinkle 1 tbsp of sugar over the puff pastry and impress them into the dough by using your rolling pin. Flip and repeat.
Using a sharp knife, score all around the dough, one inch from the edge (so that you have a rectangle within a rectangle). Make sure not to actually cut the dough.
Place the puff pastry on a baking sheet lined with parchment paper and bake in the oven for 10 minutes.
While the puff pastry is baking, microwave the raspberry preserves for 30 seconds. They should be very runny.
Add the melted preserves to your fresh raspberries and stir until the berries are evenly coated.
Add 1 tbsp of sugar to your blueberries, together with lemon juice. Stir.
Add 1 tbsp of sugar to your blueberries, together with lemon juice. Stir.
When the puff pastry is golden brown, remove from the oven. Gently tap the center of the sheet with the back of a spoon and press it down.
Pour the raspberries into the center and spread them out. Next, add the blueberries.
Top with a little whipped cream and serve.
Stir-Fried Tofu Noodles
Ingredients
8 tofu rolls
1 tbsp extra virgin olive oil
1/4 cup red onion, julienned
2 tbsp minced garlic
2 tbsp gochugaru use less if too spicy
2 tbsp soy sauce
1 tbsp mirin
4 shiitake mushrooms, sliced
1 cup chopped broccoli
1/2 cup julienned carrot
1/2 cup julienned cabbage
1/2 cup julienned kale
5 shishito peppers
1 tbsp maple syrup
1 tsp sesame oil
Directions
Slice each of the tofu rolls lengthwise into three (3) 1/3-inch rolls. Unroll them so they look like fettuccini.
Add olive oil to a large pan over medium high heat. Next, add onions and garlic and cook until the onions become translucent, about 3 minutes.
Add gochugaru and stir for about 30 seconds, and then add soy sauce and mirin and cook for an additional 1 minute. Then add mushrooms.
Cook mushrooms in soy sauce for approximately 3 minutes, until they start to turn brown. Then, add broccoli, carrots, cabbage, kale, and 1/2 cup water. Cook the vegetables in the broth for about 3 minutes, until cabbage and kale become soft.
Add the tofu "fettuccini" and incorporate the noodles into the vegetables and sauce. Add maple syrup and cook until the sauce reduces down completely, about 4 minutes, mixing the noodles so they are evenly covered in sauce.
Drizzle sesame oil over the noodles just before serving.
Angel Peach Cake
Ingredients
500g peaches
330g sugar
30g lemon juice
300 g of water
1 cinnamon stick
43g vegan butter
30g pistachio paste
30g almond powder
15g cake flour
0.5g baking powder
50g coconut yogurt
90g peach compote
30g heavy cream
70g peach compote, finely diced
70g Peach compote syrup
8g gelatin
200g peach compote
100g plain yogurt
100g vegan cream cheese
150g whipped cream
3g vanilla bean paste
280g peach compote
4g agar agar
250g raw pistachios
Hot water for soaking pistachios (just boiled water)
100g vegetable oil (add 50g in two divided portions)
Directions
Slice and peel your peaches. Slice the peaches in half and add into a bowl along with 30 g of sugar, 30g of lemon juice, and the peach skins from earlier. This will help the color turn pink/red when cooked. Once the compote comes to a boil, simmer for 3 minutes. Add 300 g of water and boil for 2 additional minutes. Add 1 stick of cinnamon. After cooking for two more minutes, add everything into an air tight jar and let cool until room temperature.
To make the peach jelly, soak 2.5g of gelatin in cold water. Use 70g of the peach compote syrup and add the soaked and drained gelatin. Take 70 grams of your peach compote and dice it into small, bite-sized pieces. Add the peaches to the gelatin and cool. Pour into a metal mousse ring. Harden in the fridge for 2 hours and then freeze.
To make the pistachio paste, take the pistachios and soak in hot water for 15 minutes. The hot water makes the pistachios easy to peel. Place them on a tea towel and rub them to remove the skins. Use a mortar and pestle to crush and add vegetable oil to the mixture. Continue blending until a paste is formed.
To softened butter, add a generous scoop of the pistachio paste. Whisk together until creamed. Add sugar and beat for 2 minutes. Add in yogurt in 3 parts. Sift in almond flour, baking powder, salt, and cake flour. Mix well. Put batter in a cake pan and add in a portion of the peach compote on top. Bake at 180 C for 12 minutes.
Finely chop pistachos. Add coconut milk, butter, sugar to a pan. Once this comes to a boil add in the pistachios to create a nuget. Once thickened, turn off heat. Add to the top of the pistachio cake layer and bake for another 3 minutes. When done, take out of tin. Once completely cooled, wrap and refrigerate.
Take peach compote and blend until smooth. Add to saucepan and add sugar and heat. Bring to boil. Add soaked gelatin and stir. Add yogurt and mix well. Add part of this mixture to cream cheese. Mix. Add coconut cream and vanilla bean paste and mix. Semi whip until forms soft peaks. Add this to the rest of the peach mixture. Add this to a mousse ring wrapped in cling film. Pour half into this ring and then add the peach jelly from earlier into the center. Press down and add the rest of the mixture on top. Add cake layer to the bottom and press down. Freeze for 6 hours.
Filter remaining peach compote syrup through a fine sieve. Add agar agar powder and boil. Add sugar and boil for 1 minute. Pour over teflon sheet on an oven pan. Harden at room temperature. Put in fridge for 10 minutes. After, cute out a ring slightly larger than the cake. Cover and let sit for a while.
Take cake out of the freezer and place the gelatin circle over the top of the cake like a veil. Take a melon baller and begin to scoop out pieces from the peaces. Apply lemon water (1:1 ratio) to the peach balls. This prevents browning. Place them in a circle around the top of the cake.
Serve.
to be continued...
4 notes
·
View notes
Text
How to solve the problems of the disc granulator machine during use?
Common organic fertilizer granulators include: double roller granulator, rotary drum granulator, disc granulator machine, new organic fertilizer granulator machine, new two-in-one organic fertilizer granulator, flat die granulator machine, ring die granulator, and various granulators have their own production characteristics. The disc granulator machine can be used in both the organic fertilizer production line and the npk production line. Today, let’s learn how to solve the problems of the disc granulator during use?

Fault 1: Strong vibration of the body of the disc granulator machine?
Solution: Fix the base of the granulator firmly, and check whether the gears of the fuselage are meshed normally (some organic fertilizer equipment manufacturers leave "tire belt" faults during the production process).
Fault 2: Intermittent operation.
Solution: This kind of failure is generally caused by bearing damage, disc weight loss, abnormal motor voltage and other reasons. The operation failure of the disc granulator can be quickly eliminated through wire drawing and timely maintenance.
Fault 3: How to adjust the disc tilt too much?
Solution: When the disc granulator machine is in use, there are no specific parameters for your reference, but it should be based on the formation of suitable spherical particles. The adjustment measures are to adjust the bolts at the bottom of the disc, and change the position and viewing angle of the reducer to achieve normal use.
Fault 4: The material is difficult to form
Solution: In addition to the subjective factors of raw material composition, the granulation of the disc granulator also has an important relationship with the particle size of the raw material, water content, addition of auxiliary binders, and the angle of the disc operation. These problems should be constantly tried to achieve the appropriate ratio according to their own material conditions, and make improvements to achieve our expected value.
Fault 5: uneven particles
Solution: The treatment of this type of problem is divided into two parts. Improve moisture content and control the size of shaped particles. Then, through post-drying screening and selection, our selection narrows down.
2 notes
·
View notes
Text
Find a Trusted Wire Mesh Manufacturer for the Benefit of Your Business Growth
For the majority of us, conducting business internationally is unthinkable. However, some people will always start making purchases from Plaster Mesh manufacturers since they wish to have a chance to become wealthy. There you will also find high-quality Welded Razor Wire, and other materials.
Phone No. +86-15131872040
Email: [email protected]
Address: Industrial Park, Anping, Hebei, China 053600
#Stainless Steel Wire Mesh#Perforated Metal Mesh#Mild Steel Wire Mesh#Rib Lath#Filter Disc#Hy Rib#Metal Coil Drapery#Stainless Steel Welded Mesh#Metal Fabric#Fan Guard#Stainless Steel Rope Mesh#Welded Razor Wire#Expanded Metal Mesh#Cut Straight Wire#Plaster Mesh#Loop Tie Wire
0 notes
Text
The MV Agusta Brutale 1000 RR is a high-performance naked motorbike that epitomizes Italian engineering and design in the motorcycle industry. This motorcycle blends aggressive design, cutting-edge technology, and great performance to provide a thrilling riding experience. Let us delve into the intricacies of this magnificent vehicle, from its history and design to its technical specifications and riding characteristics.
Historical Background:
MV Agusta, an Italian motorcycle manufacturer, with a lengthy history that dates back to 1945. MV Agusta is well-known for its racing background and high-performance bikes, and it has continuously pushed the limits of design and engineering. The Brutale series, which debuted in the early 2000s, represented a change from the company’s usual fully-faired sportbikes, delivering a naked bike that combined sportbike performance with a more aggressive and muscular appearance.
The Brutale 1000 RR, which debuted in 2019, is the result of years of development and innovation. It exemplifies MV Agusta’s determination to create a hyper-naked motorbike that stands out in a competitive market category.
Design and Aesthetics:
One of the most noticeable aspects of the MV Agusta Brutale 1000 RR is its design. The bike is a visual marvel, exemplifying Italian craftsmanship and attention to detail. The Brutale 1000 RR has sharp lines, an aggressive stance, and a strong frame that screams power and performance.
Key Design Elements
Aggressive Front End: The bike’s unique LED headlight is elegantly blended into its sculpted lines. The headlight design not only improves vision, but also contributes to the bike’s aggressive appearance.
Compact and Muscular Bodywork: The bodywork is basic but muscular, revealing the bike’s mechanical components while preserving a cohesive appearance. The use of carbon fiber and high-quality materials highlights its premium status.
Single-sided Swingarm: The single-sided swingarm serves as both a practical component and a design statement, highlighting the complexity of the rear wheel and adding to the bike’s overall appearance.
The quad exhaust system is a distinguishing element of the Brutale 1000 RR. Positioned beneath the seat, it not only adds to the bike’s aggressive appearance, but also provides a distinct exhaust tone that is both thrilling and unique.
Technical Specifications:
Engine
Type Four cylinders, 4 stroke, 16 valves, with countershaft
Timing system “D.O.H.C”, radial valve and DLC tappet
Total displacement 998 cm3 (60.9 cu. in.)
Compression ratio 13.4:1
Starting Electric
Bore x stroke 79 mm x 50.9 mm (3.1 in. x 2.0 in.)
Max. power – rpm (at the crankshaft) 153,0 kW (208 hp) at 13.000 rpm
Max. torque – rpm 116,5 Nm (11,9 kgm) at 11.000 rpm
Cooling system Cooling with separated liquid and oil radiators
Engine management system Integrated ignition – injection system MVICS 2.1
(Motor & Vehicle Integrated Control System) with
eight injectors (4 lower fuel injectors by Mikuni +
4 upper fuel injectors by Magneti Marelli with
increased fuel flow). Engine control unit Eldor
Nemo 2.1, throttle body bore 50 mm diameters
full ride by wire Mikuni, pencil-coil with ion-sensing
technology, control of detonation and misfire
Torque control with four maps. Traction control
with 8 levels + off and wheelie control with inertial
platform
Electronic quick-shift MV EAS 3.0 (Electronically Assisted Shift Up & Down)
Clutch Wet, multi-disc with back torque limiting device
and Brembo radial master cylinder/lever assembly
Transmission Cassette style; six speed, constant mesh
Primary drive 48/82
Gear ratio
First gear speed 14/37
Second gear speed 16/33
Third gear speed 18/31
Fourth gear speed 20/30
Fifth gear speed 22/29
Sixth gear speed 21/25
Final drive ratio 15/41
Electrical Equipment
Voltage 12 V
Alternator 350 W at 5.000 rpm
Battery Li-ion 12 V – 4.0 Ah
Dimension And Weight
Wheelbase 1.415 mm (55.71 in.)
Overall length 2.080 mm (81.89 in.)
Overall width 805 mm (31.69 in.)
Saddle height 845 mm (33.27 in.)
Min. ground clearance 141 mm (...

View On WordPress
#AeroMasterpiece#Brutale1000RR#EngineeringMarvel#ItalianEngineering#MotoGP#MVAgusta#MVAgustaBrutale#MVAgustaRacing#NakedBike#PerformanceBike#RideWithStyle#Superbike#TrackDominance
0 notes
Text
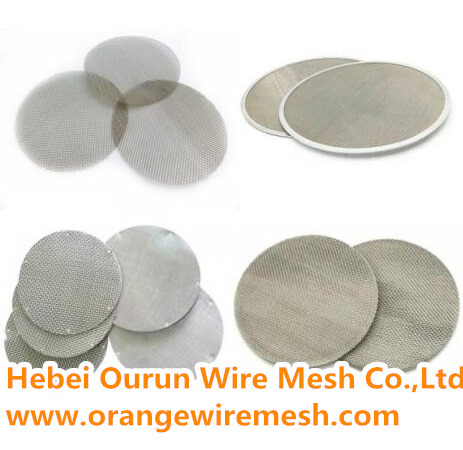
Edge Types of Filter Discs
Filter discs have different edge types to suit different applications, which includes,but not limit to, common,welded,rimmed,sintered
0 notes
Text
How to Make an Arduino Floor Cleaner Robot
Welcome back to another captivating instructable. In this endeavor, I’ve crafted an Arduino-powered floor cleaner robot, which operates significantly quieter than typical models.
Yes, you heard that correctly! This is a straightforward yet fully operational dry floor cleaner capable of picking up items from the floor such as paper scraps, hair, foam fragments, leftover chips from a party, and much more!
Materials Needed
To replicate this project, I’ve listed all the necessary components that are easily accessible. Should you wish to construct this robot, I’ve provided detailed instructions in this guide, enabling anyone to assemble and enjoy the process.
Arduino Uno (Available on Amazon)
Ultrasonic Sensor (HC-SR04)
L298N Motor Driver Module
DC fan, switch, and battery source
Sturdy Cardboard
Two BO Motors with wheels
Two 18650 Batteries
Battery Holder with Separate Switch
Jumper Wires
Paper glue
Plastic wire mesh
Spare wheel
Piece of steel or toothpick
Super glue and hot glue
Soldering iron and wire
Arduino IDE and programming cable
Please note that using Amazon affiliate links may provide me with a small commission at no extra cost to you, which helps support my projects.
How Does This Robot Operate?
The functionality of this robot is quite elementary. The board is programmed so that upon activation, the robot advances forward, with the HC-SR04 sensor scanning for obstacles. When an obstruction is detected, the robot halts, reverses, and then continues forward in a different direction. This cycle repeats, ensuring most floor areas are covered. During this process, the fan remains active, collecting debris from the floor.
To empty the collected debris, simply lift the robot, position it over a dustbin, and turn off the fan, causing the particles to drop out.
Step-by-Step Guide
Step 1: Constructing the Frame
The frame is crucial as it houses all the electronics and mechanisms. Though cardboard might seem flimsy, using a recycled package container and reinforcing it with multiple layers provides sufficient strength. I crafted discs from the cardboard, adhered them with paper glue, and allowed them to dry thoroughly. Marking areas for the fan and wheels, I cut the base accordingly.
Step 2: Circuit Diagram and Codes
To simplify the circuit explanation:
Ultrasonic Sensor:
VCC to 5V on Arduino
GND to GND on Arduino
Trig to Pin 8 on Arduino
Echo to Pin 9 on Arduino
Arduino Uno Connection with Motor Driver and Battery:
Vin pin to 5V pin of the driver
GND to GND of driver
12V pin to positive pin of driver
L298N Motor Driver Connections with Uno:
IN1 to D4 on Arduino
IN2 to D5
IN3 to D6
IN4 to D7
ENA to D10 and ENB to pin D11
GND to GND on Arduino
VCC to Battery positive
Motor 1 Outputs to Motor 1
Motor 2 Outputs to Motor 2 Terminals
Fan:
The DC fan requires 12V for optimal performance. Using a 7.4V battery source, connect the battery to the fan and control it with a simple switch.
After assembling the circuit, connect the USB to Arduino, upload the code, then disconnect the USB.
Step 3: Suction Fan and Front Wheel
Install the DC fan, ensuring no obstacles hinder its operation. Attach the fan to the frame with glue. For movement, two BO motors control the robot, and an additional wheel installed at the front stabilizes it.
Step 4: Adding the Circuit
Secure the circuit components firmly to the base to prevent loose connections. Glue the electronics first, then attach the BO motors and wheels using hot glue. Ensure the glue isn’t too hot to avoid deforming the motor frame. Secure the power source with zip ties.
Step 5: Suction Cylinder
The suction cylinder collects lightweight objects. The powerful DC fan lifts the debris, and a plastic mesh filters and contains it, allowing air to flow freely. Construct the cylinder with cardboard, sealing one end with the mesh and gluing the other end to the frame.
Step 6: Finishing and Testing
Ensure all components are securely attached to the frame. Connect the battery, turn on the fan and main circuit switches, and test the robot. Place light objects like paper bits or foam pieces in its path to see the robot in action.
Conclusion
The project should now be fully operational. Remember, this robot is designed to pick up only lightweight objects and is not suitable for liquids or larger items.
Explore more engaging projects and enhance your coding skills with our specialized courses:
Python for Kids Course: A beginner-friendly introduction to Python programming.
Java Course: Comprehensive lessons on Java programming.
AI Discovery Course: Learn the fundamentals of AI and its applications.
AI Evolution Course: Understand the progression of AI technologies.
Do you have questions regarding our STEM program?
Contact us anytime.
Take your first step into the magical world of coding for kids
0 notes
Last Seen Blogs