#(many of which are duplicate uploads)
Explore tagged Tumblr posts
Visit Tumblr Blog
Explore Tumblr blogs with no restrictions, modern design and the best experience.
Last Seen Tumblr Blogs


Fun Fact
Post activity is at the highest at 4:00 pm EDT; notes peak at 10:00 pm EDT.
Text
i have a parasocial relationship with everybody who's ever uploaded an MCC vod to archive.org
#i saw an archivist in my youtube shorts and pogged bc i recognjzed the name#several vods are labeled unknown but i think i know who uploaded them based on the formatting of the item#they are my brothers in arms my comrades. names on a screen and datapoints that become meaningful#shadow is bored but loves smajor and they loved him enough to download vods from three years ago to keep them safe#clem is a long time dedicated wilbur soot enjoyer and still to this day keeps track of wilbur content#the finnster enjoyers who upload no other mcc except finnster. the guy who saved every video from technoblade ever#(but didnt save any of his streams)#idk. as a pet project (uploading all of mcc to archive.org) ive had to keep track of every mcc upload on there & i notice who does what#and it fascinates me#wilbur is currently the most saved mcc player; he has 43 uploads that ive found#(many of which are duplicate uploads)#some people are dedicated to players and some to the event itself#im winning the numbers btw. currently 247 uploads (or about 27% of all mcc uploads to archive)#bearvocalizations
95 notes
·
View notes
Text

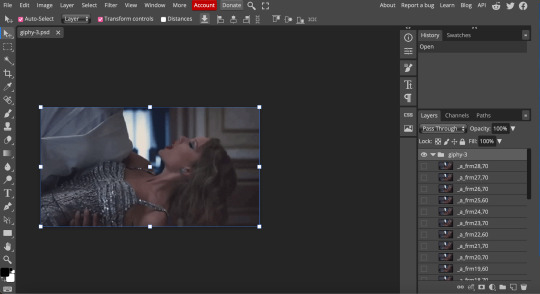
A quick method to deal with blurry action shots that have Hannibal's quintessential dim lighting + green color grading combo.
Here's the example I'll be using:

Don't get me wrong, I love the look of Hannibal, but the average person doesn't scroll tumblr with their screen brightness on max. Plus, night light filters and blue light glasses add even more yellow to an already heavily filtered show. If you want people to see your gif clearly, you have to edit it at least a little. Especially for extreme shots like this lol.
What I use: macOS 15.1.1 Elmedia Player 8.18 dupeGuru 4.3.1 Topaz Photo AI 3.2.0 Photoshop 25.11.0 LuLu 2.6.3 (optional, but it's nice to block outgoing connections from pirated programs)
Step One: Take Screenshots
Open your video file (1080p preferred) in Elmedia Player and navigate to the first frame of your gif. Hit "Playback > Record a Series of Screenshots" and let it run until you have all the frames you want. Unfortunately for mac users, we have a problem where a lot of duplicate screenshots are taken (like every third screenshot is a duplicate... it's so annoying). To save time later, I use dupeGuru to clean out as many duplicates as I can.
Open dupeGuru and add whatever folder you saved your screenshots to.

Scan the folder, then hit "Mark > Mark All" (you can see here that the program only caught one duplicate, which means more work later. it's not a perfect program -_-)

Hit "Actions > Send Marked to Recycle Bin..." to remove the duplicates from the folder

Step Two: Denoise
At this stage the screenshots are so dark that the noise isn't obvious, but it'll be more noticeable after brightening and sharpening. Here's the difference this step makes later:

Upload all your screenshots to Topaz Photo AI and add a Denoise layer. I normally go with the automatic settings.

Hit "Select All," "Apply > Current Settings," then export all your images. This can take a while depending on how many images you have.

Step Three: Create Frame Animation in Photoshop
If you've read any other gif-making tutorials this part should be familiar, so I'm gonna skim over it.
"File > Scripts > Load Files into Stack"
"Browse..." and select your Topaz output files
"Sort by Name" so they load in the correct order
"Ok"
Once all the layers have loaded, hit "Create Frame Animation" in the Timeline window
Under the Timeline window options menu, hit "Make Frames from Layers," then "Reverse Frames"
This is probably when you want to go through frame-by-frame and delete any remaining duplicates. It's very annoying to have to redo this step if you want to go back and edit your crop size later. (Not that I would know... 🤡)
Step Four: Crop + Resize
Crop, then "Image > Image Size" to adjust the width of your gif. You'll most likely want to use one of the common tumblr image dimensions:
Keep in mind that tumblr's gif size limit is 10 MB. But it's honestly best to keep it under 9.5 MB if you want the gif to load smoothly. A 540x540 px gif can have 40-60 frames while a smaller gif can be longer.
Make sure to add +2 px to whichever width you choose (so 542 px, 270 px, etc), since we'll be adjusting the canvas size later to get rid of transparent border anomalies.
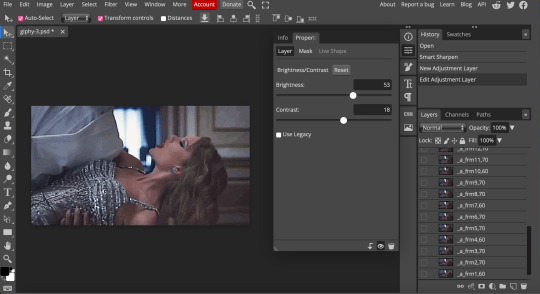
Step Five: Color
The more common order of operations is to sharpen before coloring, but for dark scenes like this, it's kinda silly to sharpen when you can barely see what you're doing, so I like to color first.
Select all your frame layers and make a new group, just to keep them separate from your adjustment layers.
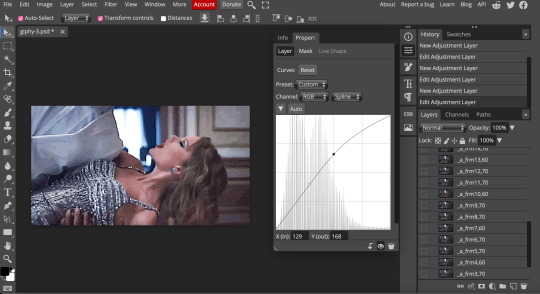
I always start by testing out the Auto Color Correction Options in a Curves adjustment layer. To access them, opt + click on the Auto button. This opens a window with four options.
I like to use a combination of "Enhance Per Channel Contrast" and "Find Dark & Light Colors," though either option can be used to adjust color balance. The important part is selecting "Snap Neutral Midtones" and picking a midtone that brings your gif as close as possible to the desired color balance.

If changing the midtone doesn't affect the color balance, brighten the gif first and try again.
For this gif, "Enhance Per Channel Contrast" removed the bulk of the green filter:

It's still pretty dark, so I brightened up the gif with some more Curves layers:

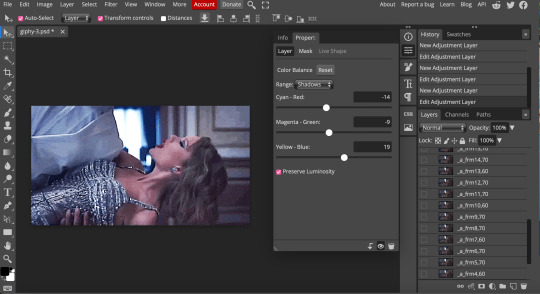
There's still a lot of purple/blue in Dolarhyde's black leather jacket, so I added another Curves layer and used "Find Dark & Light Colors" to improve the blackpoint:

Now we can up the contrast a little:

Nice! Good enough to move onto sharpening!
SIDE NOTE: The reason I use these Color Correction Options is because simply brightening leaves you with purple/blue shadows and sickly green over-exposed highlights that take ages to color correct. You can see the difference here:

(If you've ever wondered why so many Hannibal gifs have blue shadows, this is why.)
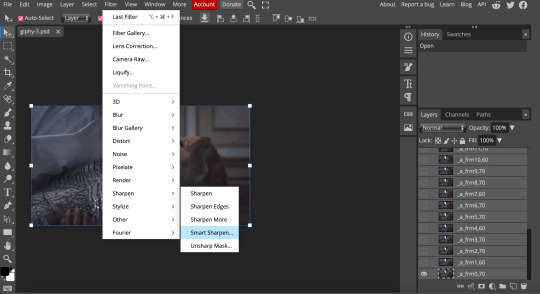
Step Six: Sharpen
This is where you'll want to start implementing actions, which are pre-recorded series of adjustments that you can perform with the click of a button. I mainly use three actions (download here, open the Actions window in PS, open the Action options menu, and click "Load Actions...").
The "frame animation to smart object" action converts the gif to a video timeline so we can apply smart filters.
The "legacy sharpening + high pass" action applies my standard sharpening filters. Not every gif will need the high pass filter, so feel free to change its opacity or delete it altogether. You can also tweak the smart sharpen filters by right clicking them and selecting "Edit Smart Filter..."

3. Once you're happy with the sharpness, the "convert to frame timeline" action turns the gif back into a frame animation. I use a 0.05 s frame delay for most gifs (equivalent to 20 fps; 24 fps is standard for tv/movies). I normally use 0.07-0.08 seconds for action shots, so the gif doesn't whip around so fast. Over 0.1 seconds, it starts to look like stop motion, so I try to avoid that.
Step Seven: Final Adjustments
This is where I fine-tune the colors, mostly using Hue/Saturation layers.
If I use a Color Balance layer, I only make very small adjustments and try to counterbalance them in the other tonal ranges (e.i. adjustments to the Highlights spill over to the Midtones, so I make the opposite adjustments to the Midtones to fix it). But most of the time, I'd rather play around with Curves or Hue/Saturation to fix stuff like that.
Hue/Saturation gives you more control by allowing you to select the exact color range you want to affect. For this gif, I used Hue/Saturation to get rid of the purple introduced around the highlights in Will's hair by the high pass filter.
The eyedropper tool allows you to select the exact color you want to include in the range. Then you can move the bars around until all the colors you don't want to affect are excluded.

Once you have your range selected, you can bring the saturation all the way down and set it to whatever lightness you prefer:

I also reduced cyan's saturation so that Will's shirt wouldn't look quite so blue.

[You could do a lot more to make the colors prettier... but there are other tutorials online for that. 😅]
Step Eight: Export
Once you're happy with your final product, go to "File > Export > Save for Web (Legacy)..."
These are my settings:

You can use Diffusion instead of Pattern if you want. Diffusion is probably better for mobile gif compression, but I like the way Pattern looks on desktop, especially for gifs with smooth gradients. It's a personal preference thing.
Hit "Save..." and you're all done!

This isn't gonna win any gif-making awards, but at least you can see what's happening and the colors don't look wonky. And for Hannibal, I call that a win! 🥲👍
61 notes
·
View notes
Text
“How do you make your dividers?”
(PT: “How do you make your dividers?”)
this is a question i get a lot! this is my best attempt at a tutorial. this was requested by @oktavia-is-a-fish ; the only reason i’m not answering their ask is because it was sent to my other blog:]
I am using procreate to make my dividers, but i’m sure this tutorial can be modified and applied to plenty of different applications.
⭐️(please tell me if you see any typos in this, thanks)
very long tutorial below the cut! ⬇️
step 1:
(PT: step one)
if you can, turn on snapping on your art program! this helps you make sure everything is aligned and centered. here’s a video on how to do that in procreate:
youtube
step 2:
(PT: step two)
pick an Object. sometimes i use PNGs, sometimes i use free vectors i find online, sometimes i draw it. whatever you want! for the sake of this demonstration, ill be using this rubber duck:

which i turned into a transparent PNG using this website:
step 3:
(PT: step three)
create your canvas!
the dimensions i personally use vary depending on the divider. usually it’s 3000x225 for dividers like this:

3000x330 for dividers like this:

and 3000x440 for dividers like this, with a character on it:

in this tutorial i will be making a simple 3000x225 divider, like the first example!
step 4:
(PT: step four)
make your pattern! drop your little guy into your canvas and push him all the way to the left (or right if you prefer, but i usually start at the left) and make sure it’s centered horizontally

then draw a line as long as you want the objects to be spaced out, and push it right up against (but not overlapping) your object

then you’re going to duplicate both the line and the object, and select one layer of each

and you’re going to move it so that the second object is now aligned with the first and pressed right up against (but not overlapping with) the first line

then merge the two lines with each other and merge the two objects with each other, so you’re back to two layers: one of lines, and one of objects.

then, repeat the duplication and movement process above!

repeat this until you have filled the canvas to your liking!


i like to fit mine to the canvas so it reaches the edges, but you may center it however you’d like!
once you have it centered to your liking, delete the line later. you can now turn off the background and save this image as a PNG.

congrats !! you have just made a divider!!
i only used one object for this tutorial, but you can use as many as you’d like, and modify this process however you see fit!
thank you for reading, happy graphic making! ✨
66 notes
·
View notes
Text
HeartBeat Sync PART 1
Soulmates Explained
In this world, there is a chance that you are destined to have a soulmate, or multiple soulmates in rare cases. These bonds are realized by tattoos unique to the bonded pair which in the light had a reflection like oil-slicked water. The tattoos were more of random symbols and patterns that were never duplicated. When the tattoos are first acquired, a sensation coincides with them. Common examples include a random taste or seeing a random flash of light. Some way the senses notify you that your lives are forever changed.
However, there are many who do not have soulmate bonds, or maybe they just simply do not find them. This was the case for Y/N. In her youth she had been so sure that her soulmates had to be out there. After years of hopeful dreams, however, doubt began to creep in. As she now entered her third decade of life, she knew she belonged to those who had to make the dream for themselves.
This is what had made her want to pursue music. It was her soul’s way of crying out what her words could not express. This is where our story begins….
Chapter One: Exposed
The beats thrummed through her headphones, having her subconsciously swaying to her created beats. Music had become her soulmate when life had failed to provide her one. At her age, Y/N just accepted that wasn’t in the cards. Romantic dreams of her youth had turned into angst-powered fuel for the songs she made. After recording a few of the songs and uploading them to the internet, she had drawn a relative amount of attention. Her music’s heavy beats and heartfelt lyrics mixed with obscure instrumentals were not to everyone’s taste however. She had developed a niche following including, unknown to her, a few from overseas.
Y/N chose to use an alias with her uploads as her family had told her many a time she was too old to pursue such things and that she should just settle down and start a family. Her passion for passion and for life showed in every creation and it was her one area of pride, even if very few knew about it. Those few who did included her friend Lexi, who’s feet currently rested on Y/N’s coffee table as she flipped through her social media feeds on her phone.
Y/N just smiled contentedly at her friend’s antics as she stepped up to her microphone and began to sing powerfully into it. Lyrics about longing strung over dance beats. Checking on Lexi again, she saw her friend’s phone camera aimed at her face.
“Lexi, cut the shit! You know I don’t like my sessions recorded.”
Lexi leaned forward and twirled her chocolate hair in one hand while balancing her phone in the other hand. “Well….then good thing this is a live stream instead then, hmm?”
“WHAT?!” Y/N immediately yanked the beanie off her head and threw it with laser precision, knocking the phone out of her best friend’s hand. Dashing over and narrowly beating Lexi to recover the phone, she hit the button to end the live stream.
“What the hell is wrong with you Lexi?! Literally ONE RULE! Keep me anonymous! How long were you recording? How many were watching? I need to brace for impact for the amount of damage you just caused!”
“I know I know! I’m sorry! I just think you need to get out there with your music. You are so talented and you deserve to be performing other places besides your home office, Y/N!”
“Thank you and I love you but I am still mad at you. How….many….Lexi?”
Lexi began to nervously twiddle her fingers together, looked up at Y/N through her eyelashes. “About 3,000?”
“Three thousand people?! Oh my god! It’s over! It’s all over….” Y/N sank to the floor dramatically, slowly sliding down the wall and placing her head in her hands. “What have you done?” Her voice sounded small and pitiful but she didn’t care. Her dreams were ruined. There was no way she continue now that they tied a face to her work. She was a 30 year old curvy girl who currently looked like a bum in sweatpants and a giant anime shirt.
Her family had always overlooked her and never taken her seriously. Her dream “wasn’t a real job” and “arts were a hobby and not a career”. Anytime she explained about it being her outlet and why she needed to release this emotion, they told her soulmates are obviously not meant for her and she needs to get over it. Her sister Riley had been particularly cruel “I mean obviously no one is destined for you. Look at you!” Over time she had gotten over her insecurities. Distance from her family had helped, but occasionally all those emotions came rushing back to her. This was one of those times.
Lexi noticed the panic in Y/N’s eyes and immediately crawled to her side. “I’m sorry, Y/N. I am so sorry. I mean maybe this isn’t a bad thing, you know?”
Y/N simply scoffed at that.
“Seriously, bestie, this could be a huge opportunity for you! I imagine agents will start messaging ASAP. THINK about it!” With almost comedic timing, Lexi’s phone vibrated from where it lay across the room. Once.
Twice.
Three times.
Lexi smirked and quickly ran to grab her phone. Upon looking at the screen, however, she nearly dropped it again due to the shock with what she was reading.
“Y/N…It is a message from Eden.”
“Am I supposed to know who that is?”
“Dum-dum ma-goo goo! Eden is the main producer for ATEEZ? Remember, those dudes you were drooling over their edits from Coachella?”
“Oh! Eden….Eden-ary production team! Shit shit….what did he say?”
“He invited you to ATEEZ’s next show. Says he has a proposition for you.”
^^^^^^^^^^^^^^^^^^^^^^^^^^^^^^^^^^^^^^^^^^^^^^^^^^^^^^^^^^^
I admit this is my first ATEEZ fanfiction and it is more a fun writing exercise than anything else. I hope you enjoy it so far despite that. Sorry this is so short so far! <3
Part 2 Here
#poly ateez#soulmates#poly ateez soulmates#ateez x reader#ateez and y/n#ateez soulmates#ateez x curvy reader#ateez x older reader
86 notes
·
View notes
Text
TS2 CC downloaders & creators discussion recap
Under the cut is a recap of the feedback gathered from the comments, community replies and reblogs on this thread. Thank you for taking the time to give your input! I tried to organize everything clearly in categories, with what was most often brought up at the top of each. I hope I didn’t forget anything. If I did, or you feel I didn't do your point justice, or you didn’t get a chance to say your piece, feel free to comment (I can always make edits). The text in brackets [] is my own remarks that I'm adding to the report.
About CC in general:
The people clamored for clear swatches/pictures that show which file corresponds to which recolor, so we can pick and choose what to keep.
Many people would like creators to put their usernames in their file names (or object descriptions) so they are easier to trace back to later. Two creators had counterpoints to this. One who has a long username said: “as a creator, I don't like to be told how I should name my files (besides identifying the thing clearly, which I think we really should do). If I've made the effort to make a thing, take previews, upload it, write the post etc. Just spend 5 seconds of your life renaming the file to whatever is convinient to you, I'm not going to add 16 characters to each of my files to include my username (I still think that longer names = longer loading time).” The other creator said: “As a creator, I don't want to put my full username in tooltips (just SB) because some hair names are quite long and I do not have the time to re tooltip the names.”
On the topic of file names, many people agreed that creators should not put special characters and spaces in their file names, to optimize loading times. One creator clarified: “the filenames should always have _ instead of spaces, as apparently this allows the game to load them easier/faster [...] underscores should be the only kind of special character in them” [use the Bulk Rename Utility - see tutorial by @ilovethesims2cc].
Still on file names, a Mac user said they dislike when file names are too long because apparently long file names are enough for Macs to shit themselves [sorry if I misunderstood, never had a Mac].
Several people mentioned disliking poorly optimized CC (one person listed: “bulky for no reason, unused bump maps, comically large or duplicated textures, things that could easily be repo'd but are not”), one person pointed out: “There is no reason a TS2 object needs a texture bigger than 1024x1024 unless it’s a special case like a skybox.”
One person said they dislike when a CC post lacks basic text info about what the download is. On this note, another person said they dislike when a creator isn’t clearly stating what mesh their recolors are for.
Two people asked that creators state their stuff’s polycounts.
Two people said they dislike when the recolors for a piece of CC are only available merged together, as they want to be able to easily choose which they want to keep. On the other hand, someone who “takes all recolors anyway” said they would like creators to offer a merged version of their recolors [you can merge CC to reduce loading times using LazyDuchess’s CC Merger].
One person recommended avoiding just using “here” as hyperlink text, but instead describing what you are linking to, so that if the link gets broken we still have a chance to find the thing. In the same vein, they and another person advised against reliance on an image alone to give info about the download. As we know, images can disappear, and a Google search won’t lead to the item if your post has no text that Google can detect.
About the images that creators do show, one person mentioned a download not having a proper preview as their pet peeve. On previews, two people recommended that the piece of CC be clearly visible and the main focus. Two people said they like when a preview of the item is included in the archive (“helpful when looking through old CC”).
One person said they appreciate when creators give two download links to two different hosting platforms, in case one of them ever breaks.
One person asked for creators to always test their stuff before uploading [it should go without saying but we do see egregious things to this day]. Their pet peeve is “CC with obvious issues that can’t have been tested properly in game! Don’t just look at it in build mode or bodyshop, actually use the item in live mode. Have a Sim wear the clothing or use the object!” They pointed out as an example that some CC lights don’t light up. Someone else said: “if there are minor imperfections, that's ok! But let your downloaders know what to expect.”
One person said that they enjoy reading detailed descriptions of CC: “Share your inspos, what went wrong, tag the pieces you used if you are Frankenmeshing because I might want those items too! Creating and sharing is deeply personal, don't be afraid to share a part of who you are in your downloads if you feel comfortable doing so.” [If I may offer a slight counterpoint, I think detailed technical info + proper crediting should always be frontloaded. And then, in a separate paragraph, you can write about how you made this because your grandma used to wear something similar on those cool autumn days back when you were 6. But please, don’t expect your audience to have to parse through your life story to get the basic info they need to even understand what the download is.]
On subfolders: one person mentioned that they dislike when individual files are placed in subfolders; someone else said they don’t like many subfolders within an archive; a third person said that when downloading a ‘bulk’ CC pack, they dislike when each item has its individual subfolder (unless the object has dozens of recolors).
One person said they dislike downloads that include a large number of things that aren’t all part of a single coherent set.
One person said they dislike gift/mega packages that don’t give the possibility to pick and choose what you’re downloading.
One person asked that creators compressorize their CC, unless there is a good reason for not doing so, reason that should be stated [yes please! Use jfade’s Compressorizer, found on this page].
One person said they like when creators who make recolors give a link to the mesh they are recoloring whenever possible, even if the mesh is included.
One person mentioned appreciating when creators include base PSDs in their downloads [they were talking about hair specifically but I suppose it can be done for other things too].
About Bodyshop CC specifically:
Many people mentioned disliking when a piece of clothing lacks a fat morph (as one person put it: ✨“its literally bigotry”✨ [iconic]), or has a fat morph that's blatantly a quickly WSO’d afterthought. Someone said: “Absurdly shaped/clipping fat morphs that were most probably never tested in game before uploading are pretty annoying”; someone else said: “I make male content and am constantly flabbergasted by some of the UM Top fat morphs that make no attempt to align with Bottom items, or look completely ridiculous. [...] WSOs are a great starting point, but that's just it: a starting point" [I couldn’t agree more]. One person added that clothes should also have preg morphs.
One person really wants tooltips. Someone else further asked that creators give actually helpful tooltips to their recolors to make it easier to identify which recolor corresponds to which file [you can use CatOfEvilGenius’s Tooltip utility to give your recolors tooltips that correspond to their file names].
One person mentioned gaps in meshes being their #1 pet peeve [putting this in this section because I’m assuming they’re referring to Bodyshop CC].
One person asks that creators give their accessories unique BIN numbers to make them layerable with other accessories.
The same person would like creators to remember to delete the inapplicable ages in their accessories [this also goes for hairs].
The same person also appreciates when creators make custom thumbnails for their accessories, “especially for accessories that are not on the face”.
The same person said: “Accessories that are 'part of the sim' (like ears, tails, etc.) should be showerproof”. Another person had the same request: “Body part accessories (such as animal ears, tails, horns, wings) should be available for all types of clothing.”
One person appreciates when hair meshers specify if their hair is animated or not.
One person would like to see more hairs for toddlers and children.
For geneticized skintones, one person said they find it helpful when the genetic number is indicated in the file name.
About Build & Buy CC specifically:
Several people said they dislike when CC objects are set to an absurd price (like a couch for 1 simoleon) [this can be fixed with Pick’N’Mix’s Object Relocator], and two people added that they dislike when an object’s price isn’t congruent with their stats (like when an expensive bed has a low energy score). A creator further said: “whats worse is sometimes items are cloned from a very expensive item, and then the creator has reduced the stats shown in the description, but the bhav still has very high ratings, or sometimes it can be the other way around, an item might have been cloned from a cheap one, then their displayed stats are set to 10 but the bhavs still have low ratings”.
Three people said that they really appreciate when creators state which category their object is in and what the price is. One person said they appreciate when creators give info about how their object functions (“Is it just deco? Does it have hobby enthusiasm?” etc.). For complex objects, they like when there’s a video to show how it works.
One person said they dislike when creators place objects in categories that don’t make sense. Someone said more specifically that they like when objects are put in categories other than deco/sculptures or deco/misc.
One person said they dislike blank object descriptions or object descriptions that were left the same as that of the Maxis object that the piece of CC was cloned from.
One person said they don’t like when objects aren’t enabled for quarter-tile placement [can be fixed in simPe or with the Object Relocator].
One person said they dislike non-functional objects (like a sofa that’s a sculpture).
One person brought up two experiences they and their friend had with CC beds that didn’t have unique GUIDs and therefore would override other beds. In the same vein, someone else said they dislike when a creator forgets to mention that their CC is not custom but default and will override something in the game.
One person encourages creators to learn about the TXMT settings of objects (e.g. should an object be reflective?) and praised @pforestsims and @shastakiss for their CC in that regard. Another person said they dislike when an object is too shiny, which is also a TXMT setting.
One person said they dislike “transparent cut out textures”. [I quote because I’m clueless about this:] “I’ve seen this a lot on TS3 or other game conversions, where the texture has been imported without enabling transparency, and you get ugly squares around draw handles and such. Import the texture as DXT 5 and enable AlphaTest in the TXMT.”
One person said they like when 4t2 conversions have several subsets.
The Mac user among us would like creators to resize their walls and floors for Macs, otherwise they show up grey in game.
About lots specifically:
Two people said they like when creators show the floor plans of their lots.
104 notes
·
View notes
Text
The United States government has collected DNA samples from upwards of 133,000 migrant children and teenagers—including at least one 4-year-old—and uploaded their genetic data into a national criminal database used by local, state, and federal law enforcement, according to documents reviewed by WIRED.
The records, quietly released by the US Customs and Border Protection earlier this year, offer the most detailed look to date at the scale of CBP’s controversial DNA collection program. They reveal for the first time just how deeply the government’s biometric surveillance reaches into the lives of migrant children, some of whom may still be learning to read or tie their shoes—yet whose DNA is now stored in a system originally built for convicted sex offenders and violent criminals.
The Department of Justice has argued that extensive DNA collection activity at the border provides “an assessment of the danger” a migrant potentially “poses to the public” and will essentially help solve crimes that may be committed in the future. Experts say that the children’s raw genetic material will be stored indefinitely and worry that, without proper guardrails, the DNA dragnet could eventually be used for more extensive profiling.
Spanning from October 2020 through the end of 2024, the records show that CBP swabbed the cheeks of between 829,000 and 2.8 million people, with experts estimating that the true figure, excluding duplicates, is likely well over 1.5 million. That number includes as many as 133,539 children and teenagers. These figures mark a sweeping expansion of biometric surveillance—one that explicitly targets migrant populations, including children.
The DNA samples are registered in the Combined DNA Index System, or CODIS, a database administered by the FBI, which processes the DNA and stores the resulting genetic profiles. A network of criminal forensic databases, CODIS is used by local, state, and federal enforcement agencies to match DNA collected from crime scenes or convictions to identify suspects.
On May 10, 2024, for instance, records say that CBP agents from the El Paso, Texas, field office collected a DNA sample from the mouth of an individual in its custody whom CBP identified as Cuban and who was detained for allegedly being an “immigrant w/o docs.” Swabbing the individuals’ cheek, the agents obtained a DNA sample containing the individual's entire genetic code and then sent the sample to the FBI for processing.
According to CBP records, the individual was just 4 years old.
Of the tens of thousands of minors whose DNA was collected by Customs and Border Protection over the past four years, as many as 227 were 13 or younger, including the 4-year-old. Department of Homeland Security policy states that individuals under 14 are generally exempt from DNA collection, but field officers have the discretion to collect DNA in some circumstances. The data shows additional entries for kids aged 10, 11, 12, and 13. The numbers spike beginning at age 14; more than 30,000 entries were logged for each age group from 14 to 17.
Under current rules, DNA is generally collected from anyone who is also fingerprinted. According to DHS policy, 14 is the minimum age at which fingerprinting becomes routine.
As many as 122 minors were categorized as American citizens, 53 of whom were not detained for any criminal arrest, CBP records say. (People asking to enter the United States to apply for asylum are put in civil rather than criminal custody.)
Neither DHS nor CBP provided comment ahead of publication.
Multiple legal, privacy, and immigration experts described the findings as deeply troubling. “It’s horribly dystopian,” says Vera Eidelman, a senior staff attorney with the American Civil Liberties Union's Speech, Privacy, and Technology Project. “It’s impossible for me to think of a reason to collect a 4-year-old’s DNA and upload it to a database that’s explicitly supposed to be about criminal activity.”
As one of the world’s largest law enforcement agencies, CBP is responsible for intercepting and processing individuals who cross the US border without authorization. While Immigration and Customs Enforcement handles long-term detention and deportation, CBP controls the earliest, most vulnerable hours of a migrant’s legal journey in the US, often when they are first taken into custody, questioned, and in many cases fingerprinted and swabbed for DNA.
Both CBP and ICE operate under the Department of Homeland Security and, under current policy, are authorized to collect fingerprints and DNA from anyone in their custody as young as 14 years old. Exceptions for younger children can be made in certain cases involving “potentially criminal situations”; however, the CBP data analyzed by WIRED indicates this was the case in as few as 2.2 percent of the hundreds of kids subjected to DNA swabs.
Of the 227 people listed in the data as children under 14 and having their DNA submitted to the FBI, most of them are simply labeled “detainee.” Only five were listed as arrestees or linked to criminal charges.Got a Tip?Are you a current or former government employee who wants to talk about what's happening? We'd like to hear from you. Using a nonwork phone or computer, contact the reporter securely on Signal at dmehro.89.
CBP’s participation in the CODIS program isn’t new, though it expanded significantly after a 2020 Department of Justice rule amending a previous exemption that effectively allowed DHS to avoid collecting DNA from civil immigration detainees.
Sara Huston, an expert in genomics policy and the principal investigator at the Genetics and Justice Laboratory and a research assistant professor of pediatrics at Northwestern University’s Feinberg School of Medicine, tells WIRED that CODIS is a powerful tool for law enforcement when solving violent crimes, sexual assaults, and missing persons cases.
Huston explains that typically when DNA is collected from a crime scene—such as in a sexual assault case—it’s processed and uploaded to CODIS and compared with DNA from anyone in the database, which includes people who have been previously arrested for certain crimes or convicted. A match can help investigators connect unsolved cases, identify suspects, and share critical leads across jurisdictions.
But the inclusion of migrants, the vast majority of whom were not listed in CBP data as having been accused of any felonies, raises deeper questions about what kind of data belongs in a criminal database. CODIS was designed to track criminal offenders, not to permanently catalog the genetic information of undocumented children passing through immigration custody.
“It’s not that we can’t solve crimes by collecting these samples—that’s why CODIS exists, and it’s a wonderful tool,” Huston says. “But it’s not a fair system to keep DNA of people who have not committed crimes on the assumption that they likely will.”
Apprehensions of migrants who crossed the border unlawfully between ports of entry have since fallen to historic lows during the current Trump administration; it's unclear whether the pace of DNA collection has also slowed, as the most recent data ends on December 31, 2024.
The data, which CBP published to its website in February, shows that DNA collection accelerated under the Biden administration, with daily submissions to CODIS increasing sharply in 2024 alongside a reported rise in border apprehensions. On a single day in January 2024, for example, the Laredo, Texas, field office submitted as many as 3,930 DNA samples to the FBI—252 were listed as 17 or younger, CBP records show.
The DOJ has defended the mass collection of DNA at the border as necessary for solving crimes. In its official rationale, the agency argues that this sweeping effort is “essential” not only for identifying migrants who may have committed crimes in the past but also for potentially solving crimes they might commit in the future.
For Stevie Glaberson, the director of research and advocacy at the Center on Privacy & Technology at Georgetown Law, the implication is clear: The US government is treating every person who crosses the border, regardless of age, legal status, or whether they’re accused of any wrongdoing, as a possible suspect in crimes yet to occur.
If the government’s goal is to determine whether a detainee is connected to past crimes, Glaberson tells WIRED, there would be no need to add that person’s DNA to CODIS—they could simply check for a match against existing profiles. “It’s hard to imagine a situation where a 4-year-old was involved in criminal activity,” Glaberson says.
“Taking DNA from a 4-year old and adding it into CODIS flies in the face of any immigration purpose,” she says, adding, “That’s not immigration enforcement. That’s genetic surveillance.”
Multiple studies show no link between immigration and increased crime.
In 2024, Glaberson coauthored a report called “Raiding the Genome” that was the first to try to quantify DHS’s 2020 expansion of DNA collection. It found that if DHS continues to collect DNA at the rate the agency itself projects, one-third of the DNA profiles in CODIS by 2034 will have been taken by DHS, and seemingly without any real due process—the protections that are supposed to be in place before law enforcement compels a person to hand over their most sensitive information.
CBP collects DNA using buccal swab kits—long cotton-tipped sticks used to scrape the inside of a detainee’s cheek. While the DNA sample itself contains a person’s entire genetic code, Huston says that what’s uploaded to CODIS is better understood as a lower-resolution snapshot—a DNA profile made up of select genetic markers used solely to identify individuals—and is not intended to reveal traits, health conditions, or genetic predispositions. However, both she and Glaberson note that the raw DNA sample itself could be stored indefinitely.
The DOJ did not respond to multiple requests for comment, nor did it answer questions about how long raw DNA samples are stored. However, a current DOJ official, speaking to WIRED on the condition of anonymity due to fear of retribution, defended the collection and retention of migrant DNA. Storing raw samples, they say, is necessary for due process—to confirm that a match in CODIS can be traced back to the original raw material. “If you aren’t committing a crime, being in this database isn’t going to affect you,” they say, arguing that a larger pool of DNA increases the chances of finding a match.
Under federal law, CODIS data and the raw genetic samples can only be used for identification in criminal cases. DHS policy states that DNA samples may not be used to discriminate “in the provision of health benefits or other services” and that DNA samples are not used by the FBI to “reveal any physical traits, race, ethnicity, disease susceptibility, or other sensitive information about an individual.”
But privacy advocates worry that those rules aren’t enough, since policies can change and new uses can emerge alongside new technology. For instance, privacy and civil liberties experts have warned that the government could one day use DNA to link immigrants to family members, who could also be targeted by law enforcement. Another concern is that genetic data might be reanalyzed to predict health-related markers or inherited conditions—potentially influencing decisions about admissibility or whether someone is likely to require government support.
As Glaberson warns, “The warehousing of genetic samples containing the entirety of people's genetic code presents a risk in the future.”
16 notes
·
View notes
Note
How do man-made pokemon work? Like polygon and it's evolutions?
Since man-made pokemon vary drastically in their physiology and behaviour, I'm focusing on the given example, Porygon, in this post. Feel free to shoot an ask about any other ones you are interested in!

Introducing Porygon!
Porygon is an artificial AI program that's learned the biology need to reproduce and survive over time. In its original form, it's a series of code intended to run a program that aids in organizing and transferring pokemon. After interacting with thousands of pokemon and working with human beings, the AI learned to mimic emotions and share many similarities with organic pokemon.
Appearance + Life History
Usually, the data is offloaded into hard drives as a program back up. A data leak (from an unnamed pokemon center) resulted in this unique specimen infecting other electronics. The original low-poly form they take is because of its source code and placement PNG design. Now, with its newly gained sentience, it prefers this form.
Once the program spread to other devices, each porygon tries to assemble itself using old scraps until it decides the body is close enough to what it would like. This is fairly easy for an analytical and precise program.
Reproduction wise, porygon simply duplicates its base code (along with important learned data) and sends it into a newly built form.
Evolutions + Other Forms
Porygon2 can be evolved via an upgrade disc. This disc contains new code, which is uploaded into a Porygon's main body. The form of the physical body is made to be more aerodynamic akin to how many devices/programs we use day to day looks more polished as time goes on.
Porygon-Z can only be evolved from Porygon2 due to how the dubious disc is only compatible with its prior evolution. The extremities are attached via magnets, and can be replaced without too much damage to the body.
Pokemon are truly incredible creatures! I highly encourage everyone to learn more about them. Even artificial pokemon like Porygon have complex histories and fascinating behaviours!
#mod: thinkera#pkmn irl#pokemon irl#tw unreality#pokemon#pokemon ask blog#porygon#porygon2#porygon z#pokemon biology#rotomblr
12 notes
·
View notes
Text
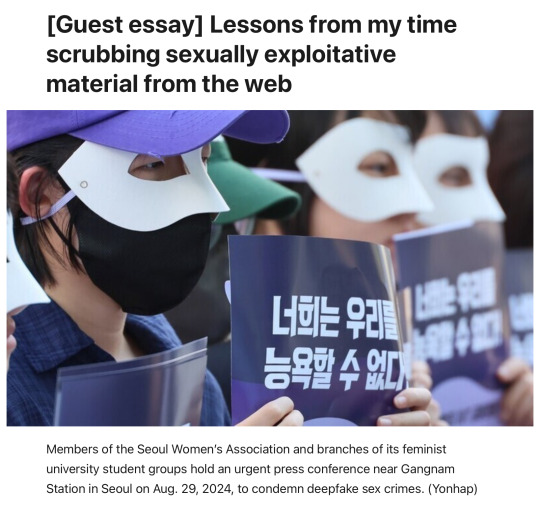
editorial from the english version of the Hankyoreh
archive link
plain text
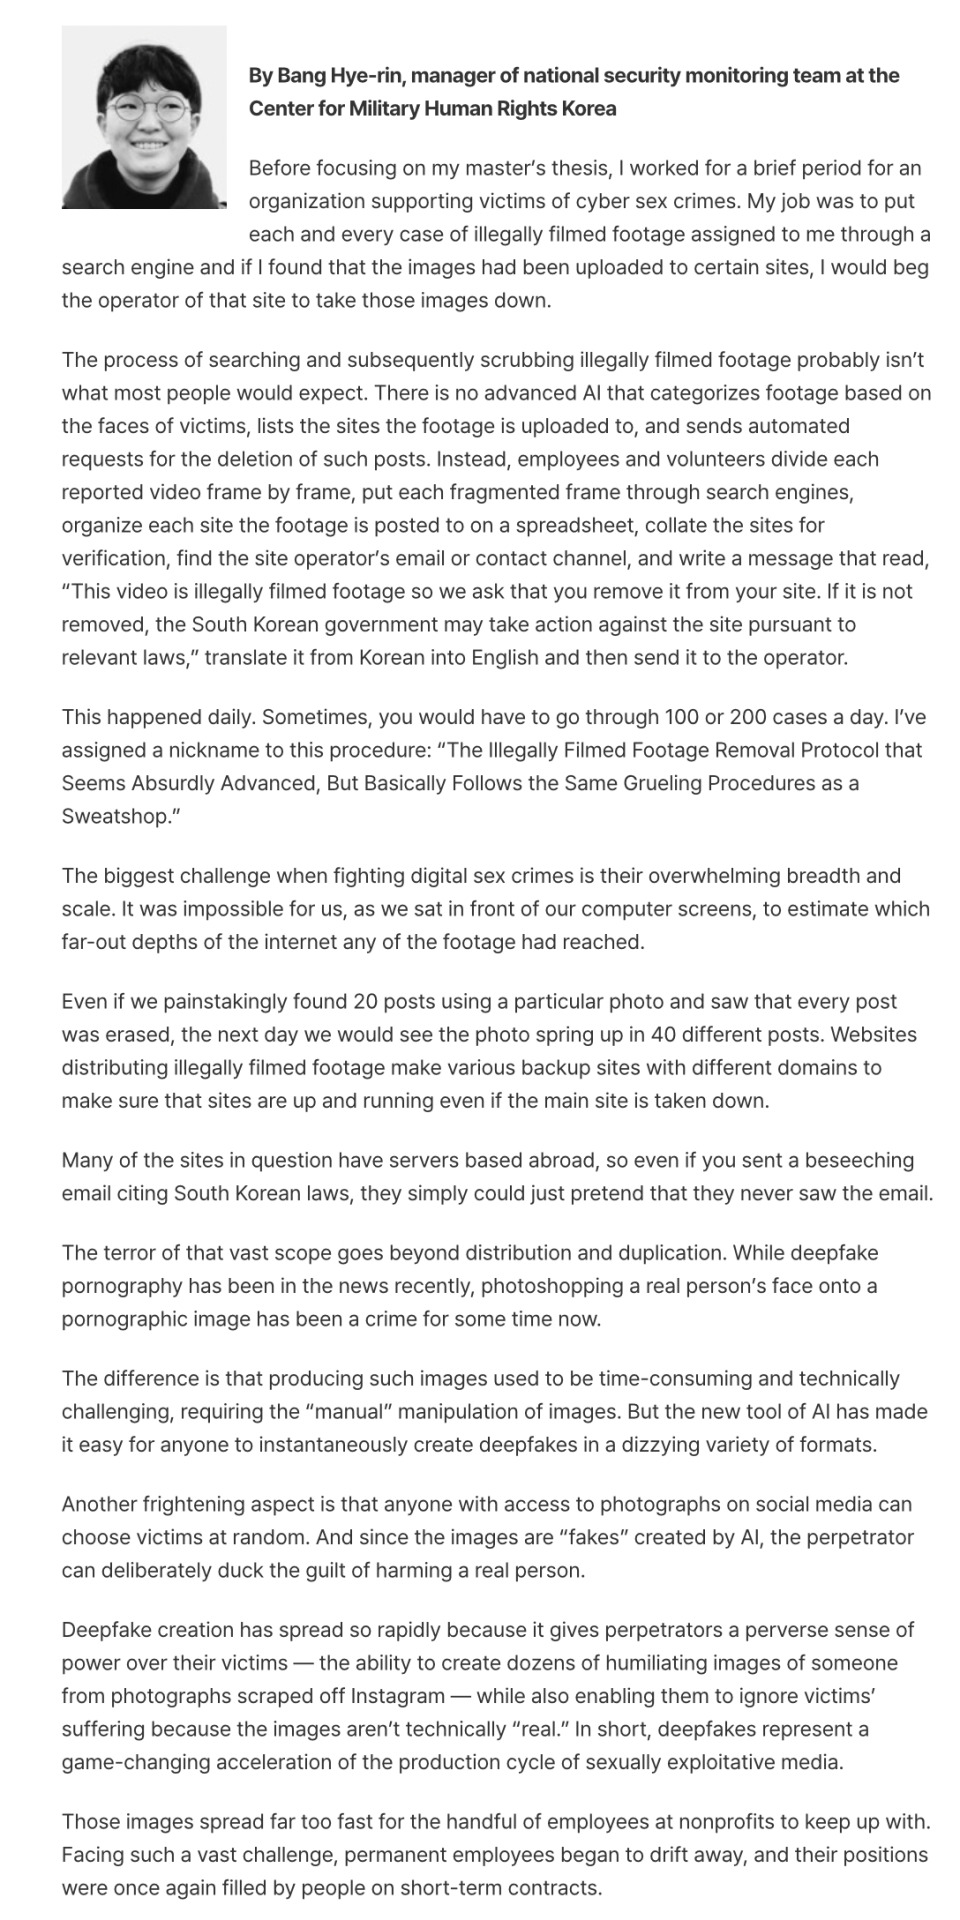
Before focusing on my master’s thesis, I worked for a brief period for an organization supporting victims of cyber sex crimes. My job was to put each and every case of illegally filmed footage assigned to me through a search engine and if I found that the images had been uploaded to certain sites, I would beg the operator of that site to take those images down.
The process of searching and subsequently scrubbing illegally filmed footage probably isn’t what most people would expect. There is no advanced AI that categorizes footage based on the faces of victims, lists the sites the footage is uploaded to, and sends automated requests for the deletion of such posts. Instead, employees and volunteers divide each reported video frame by frame, put each fragmented frame through search engines, organize each site the footage is posted to on a spreadsheet, collate the sites for verification, find the site operator’s email or contact channel, and write a message that read, “This video is illegally filmed footage so we ask that you remove it from your site. If it is not removed, the South Korean government may take action against the site pursuant to relevant laws,” translate it from Korean into English and then send it to the operator.
This happened daily. Sometimes, you would have to go through 100 or 200 cases a day. I’ve assigned a nickname to this procedure: “The Illegally Filmed Footage Removal Protocol that Seems Absurdly Advanced, But Basically Follows the Same Grueling Procedures as a Sweatshop.”
The biggest challenge when fighting digital sex crimes is their overwhelming breadth and scale. It was impossible for us, as we sat in front of our computer screens, to estimate which far-out depths of the internet any of the footage had reached.
Even if we painstakingly found 20 posts using a particular photo and saw that every post was erased, the next day we would see the photo spring up in 40 different posts. Websites distributing illegally filmed footage make various backup sites with different domains to make sure that sites are up and running even if the main site is taken down.
Many of the sites in question have servers based abroad, so even if you sent a beseeching email citing South Korean laws, they simply could just pretend that they never saw the email.
The terror of that vast scope goes beyond distribution and duplication. While deepfake pornography has been in the news recently, photoshopping a real person’s face onto a pornographic image has been a crime for some time now.
The difference is that producing such images used to be time-consuming and technically challenging, requiring the “manual” manipulation of images. But the new tool of AI has made it easy for anyone to instantaneously create deepfakes in a dizzying variety of formats.
Another frightening aspect is that anyone with access to photographs on social media can choose victims at random. And since the images are “fakes” created by AI, the perpetrator can deliberately duck the guilt of harming a real person.
Deepfake creation has spread so rapidly because it gives perpetrators a perverse sense of power over their victims — the ability to create dozens of humiliating images of someone from photographs scraped off Instagram — while also enabling them to ignore victims’ suffering because the images aren’t technically “real.” In short, deepfakes represent a game-changing acceleration of the production cycle of sexually exploitative media.
Those images spread far too fast for the handful of employees at nonprofits to keep up with. Facing such a vast challenge, permanent employees began to drift away, and their positions were once again filled by people on short-term contracts.
Lee Jun-seok, a lawmaker with the Reform Party, said during a meeting of the National Assembly’s Science, ICT, Broadcasting and Communications Committee that the 220,000 members of a deepfake channel on Telegram was an “overblown threat” and estimated that, given the percentage of Korean users on Telegram, only about 726 of the channel members are actually Koreans.
But what does it matter whether there are 220,000 Koreans on the channel or just 726?
Let’s suppose there aren’t even 726, but just 10 people in the group — they could still produce 220,000 deepfakes if they set their mind to it. Those images would then be copied and circulated beyond their point of origin and around the world, perhaps remaining permanently in some dark corners of the Internet without ever being deleted.
That’s the nature of sex crimes in the digital age.
So assuming that the criminal potential of this technology remains the same regardless of whether the channel has 220,000 members, 726 members or even just 10, I can’t help wondering what Lee thinks would be an acceptable number of deepfake purveyors that would not constitute an “overblown threat.”
38 notes
·
View notes
Note
Do u have any tips/tutorial how to make gifs so smooth if there's movement? Mine are always choppy and weird :(
Hi anon, ty for sending this ask. I'm sooo honored!! (and plz don't call your gifs choppy or weird i have a feeling they're very lovely 😌)
✨ Gif Tutorial: making movements in ur gifs as smooth as possible✨ (updated)
↳ aka: speed management in gif making
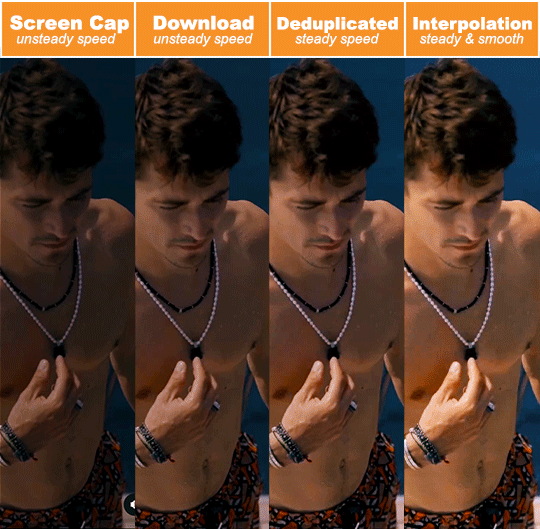
Remember to always source your content responsibly!! Process in this tutorial is simply what works best for me. Every creator has their own preferences and imo there is no right or wrong. We should always make content in the way we enjoy 🤍 Outline: 1. Remove duplicate frames 2. Repair missing frames 3. Speed management in Photoshop 4. Smoother slomo using Video Frame Interpolation
1. Remove duplicate frames
Obviously, if there're duplicate frames in a video, our gifs will end up with lil lags here and there (since some frames get more screen time than others). Although the dup frames are likely barely observable once compiled into gifs, imo this is what makes the difference between smooth and butter smooth. the two daniel gifs above (guy with big brown eyes, if ur not from our fandom 🤍) can hopefully showcase this difference**.
**technical explanation for this that you can totally skip: the persistence of human vision is approx. 0.1s, ie everything we see stay on our retina for this amount of time. since gifs refresh faster than this (eg. 0.04s on every frame for a 25 fps gif), we usually can't pinpoint exactly which frame is a duplicate just by looking at a gif. however. by definition, a duplicate frame will slow down a gif, by making it pause longer than it should. as a result, a movement during this lil chunk of time will move less pixels than your brain would've expected. and this is where we perceive the not-so-smoothness.
ok, now that we've established that we don't like duplicate frames -- I know it's common practice to handle this by looking for an optimal output frame rate to offset the dupes. to me this feels chancy. bc it's a process where you don't have control over exactly which frames to keep or discard. Personally, I prefer making sure my videos are dupe free before everything else. (Again, this is just what works for me. Everybody has their own process and imo there is no right or wrong :)
To remove duplicate frames, the first thing I do with a clip is to play the first few seconds frame by frame to see which one of the following scenarios it falls into:
a. no duplicate frames ↳ best case scenario! congrats!! plz proceed directly to step 2 b. there is a duplicated frame once in a while ↳ This happens most often with (but not limited to) videos from social medias ↳ Reason behind this is frame rate conversion. For instance, instagram/tiktok has a default frame rate of 30 fps. However, many media sources (eg. no brakes, sharl's vlogs) produce at 25 fps. When these videos are uploaded, instagram/tiktok convert them from 25 to 30 fps by duplicating 1 frame every 5 frames, hence twitchiness in gifs when slowed down. ↳ Solution: in photoshop, go through the clip frame by frame, delete dupes manually (recommended) ↳ Alternative solution: use duplicate frames remover softwares (see next bullet point) c. almost every frame has duplicates ↳ This will almost always** be the case with screen record. ↳ What not to do: When there are many duplicates, we may be tempted to use photoshop's 'import 1 out of every n frames' function. this is not ideal bc, the dupes are rarely uniformly distributed. you could end up losing frames you don't want to lose (resulting in choppy gifs) or end up with dup frames still in the mix (resulting in laggy gifs) or, most likely: both. ↳ A better way: is to import all frames into photoshop, adjust the output frame rate to offset the dupes (here is a good tutorial on this) Pros: efficiency; yields decent results in most cases. Cons: again, in my experience this is a process where you don't have precise control over the frames. Therefore runs the same (albeit smaller) risks as the method above. It can also limit how much you can slow down a gif, and generally doesn't work well if the target frame rate (of the clip you're trying to gif) exceeds your computer's recording rate**. **More on this statement: when target rate is comfortably lower than recording rate (~ 55 fps for many), chances are most to all frames will be captured. It is therefore more tolerating towards skipping a unique frame from time to time. However, when target rate (i.e. anything 60 fps) nears or exceeds recording rate, you will be dealing with dup frames as well as missing ones. Using the method above can therefore subject you to the possibility of losing two unique frames in a row, making the gifs noticeably choppy. ↳ Solution: we always have the option to trim dupes by hand in photoshop. But in this case, it can be time consuming, even with keyboard shortcuts. as a result, here is where we can really use a: ↳ Dup remover software: google search 'dup frame remover software' will give you several options and tutorials (here a plug-in for after effects). i've heard good things about some of these but unfortunately can't give recommendations (they do cost money sooo i wrote my own)
Demonstration:
This is a frame-by-frame animation of an ad Charles did for apm. It was produced at 25 fps & uploaded to socmed where the default is 30 fps. You can see that: i. With screen recording, every frame has an unpredictable amount of duplicates. ii. Original clip from instagram has 1 dup frame every 5 frames. iii. After deduplication, the movement becomes lag free and continuous.

2. Repair missing frames
At this point, our video clip is (hopefully) free of duplicate frames, which makes our gifs lag-free (yayy!!). At the same time, we don't want choppiness in our gifs either. Choppiness in a gif is usually caused by missing key (unique) frames. To check if there is any, replay the clip, look out for the sudden jumps/fast forwards in movements. Three possible scenarios:
a. no missing frames ↳ best case scenario! congrats!! plz proceed directly to step 3 b. a lot of missing frames ↳ This is usually the case if the target frame rate (of the clip you want to gif) exceeds the screen recording frame rate. ↳ Solution, imo: (surprise!) is to leave things be. Reason is that something like this would be quite tedious to fix, but not that noticeable if made into a gif that's fast enough ↳ Alternative solution: Record at 120 fps c. occasional missing frames If a video clip misses frames, but not a lot, chances are it's only gonna happen very occasionally, i.e. 1 or 2 occurrences in total. A frame-miss in this case is usually due to either the screen recording skipping a frame by mistake, or that the original video misses frames/contains bad frames to begin with. ↳ Solution (for screen recordings): record again, find missing frame (chances are it will be captured on a second try), insert frame back into original timeline in PS ↳ Solution (if video misses frames or contains bad frames to begin with): Let's talk about ✨ VFI ✨. VFI (Video Frame Interpolation) is the process of synthesizing in-between images from a given set of images. It can increase videos' frame rates (i.e. 30 fps to 60 fps), achieve smoother slomos, and by definition, also help with missing/bad frames. There are many software products that let you use VFI by simply dragging videos into the app and clicking 'export'. Afterwards, all we need to do is to find the missing frame generated by the app & insert it back into the original timeline in PS (ahh technology). For more info on VFI, see "4. Smoother slomo". ↳ Note that VFI processed footages will likely differ slightly from the originals in terms of colors & lightings. This may be tuned out using clipping masks (allow a group of adjustment layers to only apply to one frame/layer, keyboard shortcut: Command+Opt+G)
3. Speed Management in Photoshop (✨ updated ✨)
At this point, our clip is without dupe or missing frames (or at least as close as can be). Whether you dodged the first 2 steps like a breeze or freshly emerged victorious from photoshop covered in blood to get here, good news is, things will be very straightforward for this point on. congrats!!!
🎉🎊🎉
As mentioned before, in terms of smoothness, our clip is now in ideal shape. The important thing is to keep it this way throughout the rest of the process. My workflow looks something like this:
Open file, crop, resize, sharpen, color, export gif, reopen gif in photoshop (which won't compromise quality), assign frame delay, export finalized gif
If you're used to finding a comfortable frame delay or speed/duration combo at the beginning, this process might feel unnatural. But it's so so so so important to leave the speed related settings alone until right before exporting. Here's why:
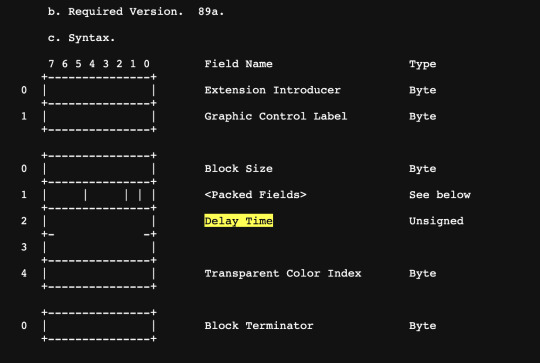
By not converting frames with modified delays into timelines with fps, we avoid having to give our finished product a frame rate (which photoshop timelines have to specify). This is crucial bc, there is no such a thing as frame rates in gifs. According to the syntax of GIF89a (the current '.gif' format, screenshot below), gifs control their speeds through (and only through) how much time to wait in between frames, aka delay time. Our process above does exactly that. It compiles frames directly into gifs, and avoids expressing frame delays (a gif concept) through frame rates (a photoshop concept), a conversion where dupe frames and missing frames come from**. In other words, using frame delays to control speed is simply more natural to a gif's syntax. **Why would this conversion cause dupe frames? ↳ On paper, frame delays should translate into frame rates seamlessly (i.e. 1 second ÷ 0.06s per frame = 16.67 fps). In reality, photoshop does not support direct translations like this. When converting frame animations into timelines, PS defaults outputs to 30 fps, regardless of frame delays. This disagreement between frame rates is where dupe frames come from. ↳ Some examples: i. Consider a frame animation where frame delay = 0.04s (25 fps), to convert it into a timeline defaulted at 30 fps, 5 out of every 25 frames will be 'duplicated' by photoshop (30-25=5) ii. Now, consider a frame delay = 0.06s (16.67 fps roughly 17 fps), to convert it into a timeline defaulted at 30 fps, 13 out of every 17 frames will be 'duplicated' by photoshop (30-17=13) ↳ (the 'duplicated' was in quotes bc photoshop achieves this thru assigning a frame roughly twice it's original screen time instead of actually adding another) ↳ (afaik, currently there's no way of changing the default 30 fps as long as u start with frame animations. If anyone does know how please let me know 😳) **Why would this conversion cause missing frames? ↳ This happens when one tries to reverse the harm done by photoshop in prev step by changing the 30 fps frame rate back to what it's supposed to be (using function 'Set Timeline Frame Rate') ↳ Let's use the last example again. As mentioned, to go from 16.67 fps to 30 fps, 13 out of every 17 frames will receive roughly twice its original screen time (0.033s * 2 ≈ 0.07s). On the other hand, 4 out of every 17 frames' screen time will remain the same (0.03s). to go from 30 fps back to 16.67 fps, photoshop resamples frames from its 30 fps timeline in 0.06s intervals. As a result, any frame with screen time less than 0.06s runs the risk of 'slipping through the cracks', namely ones whose screen time remained 0.03s ↳ (gifs require frame delays to be rounded to the nearest hundredth of a second) ** What if I open the file as video object, instead of importing as frames? ↳ Indeed, when opening as video object (i.e. command+o instead of command+i), photoshop inherits its frame rate as is. We would then have the option to manipulate it's speed by right-click ➡️ adjusting the percentage (of how much to speed up or slow down). ↳ Here, if we slow down a gif without changing its frame rate, we risk introducing duplicate frames into the result (since frame rate is now higher than needed). If we slow down a gif and lowered the frame rate, but the math didn't check out, we also risk losing unique frames (frame rate not high enough). The same (opposite) goes for speeding things up. Therefore the best and easiest approach is, again, leaving speed related settings alone until right before exporting.
(the block of GIF89a syntax responsible for graphic control:)
Ok in hindsight this probably isn't exactly like. the most straightforward thing ever but the execution part is very much so 😳 here goes:
1. Open file in PS via Command + O note the (25 fps) on bottom left
without changing speed, duration, or frame rate: 2. Trim ✂️ 3. Crop 4. Resize 5. Sharpen 6. Color

(Updated!!!) 6. Export gif, and then reopen it in Photoshop **Compare to the original method (timeline into smart object, smart object back into frames), the updated method has the following benefits: i. Avoid lowering gif quality by converting into smart objects ii. Reopening gif into frames and reassign frame delay saves time (bc less steps) and won't hurt the quality at all (bc no image processing required)
7. Assign Frame Delay (i usually go with original frame delay + 0.01s) 8. Export ✨

Tada!! Speed = managed!!
This ad actually came out last December where I was aware of like, maybe 5% of what's in this post. Here is what my original gif looks like. I'd say what we have rn is a big improvement :)
Now, imo there are situations where it simply makes more sense to start with frame animations (imported using command + i). For instance: when we need to remove duplicate frames by hand, when there is a missing frame/bad frame that needs to be repaired, etc. My workflow would then look like this:
1. Command + i 2. (do things to frames) 3. Set frame delay to 0.03s 4. Convert to video timeline 5. (the rest will look exactly like the workflow above)
This works bc when frame delay is set to 0.03s, photoshop will treat your video timeline as a "natural" 30 fps timeline and leave your frames alone. Therefore maintains its uniform speed.
4. Smoother Slomo using Video Frame Interpolation
As mentioned above, VFI (Video Frame Interpolation) is the process of synthesizing in-between images from a given set of images. It can increase videos' frame rates (i.e. 30 fps to 60 fps), hence smoother slomos. There are many software products that let you use interpolation by simply dragging videos into the app and clicking 'export'. I've had very good experiences with Topaz and After Effects.
Let's talk about After Effects first. If you have Photoshop, chances are you have AE as well. To use AE's Keyframe Interpolation:
i. Import ii. Set speed to half iii. Click square twice until you see lil arrow iv. Export

Topaz is a production grade video enhancing software. It's capable of enhancing frame rates (i.e. 30 fps to 60 fps), increasing resolutions (i.e. 540p to 4K/2160p) and more. Unlike AE who uses only the two neighboring key frames to generate an in-between frame, Topaz takes the whole sequence into account, hence better reliability. It's also more user friendly than AE imo.
Here is a before-and-after interpolation using Topaz.


That's all 🎉🎉🎉
To sum up: remove dupe frames (if any), repair missing frames (if any), use and only use frame delay to control speed, and software enhance frame rate if needed.
This post got way longer and more technical than I had planned and I honestly have no idea where all this stuff came from lol. But it was really fun and I hope you'll find it helpful. Feel free to message me if you have any questions. Have fun moving-picture making!!
#f1edit#gif tutorial#asks#*#my gif tutorials#photoshop#dailyresources#allresources#completeresources#this was. 3k words?????? what?????
227 notes
·
View notes
Note
Since you don't see many edits here, and i am a dumbass in editing, could you make a tutorial on it? Like: what apps should we use, what should or shouldn't do, devices, etc. Since i personally worship your editing prowess, i couldn't help myself but ask for your guidance sensei. 🙇♀️
I don't use a "special device" to make my edits, just a computer which can run a videoediting software and Wallpaper Engine correctly (in my case it's an Apple Mac Pro 4,1 from 2009 with upgraded RAM and GPU, and also with Windows 10 installed on it, but that's not important). My server pc build out of my spare parts, and it's serves as a network bridge, and a file storge (like a NAS, or something) to store my personal files, like the assets for the edits on HPP. The way I make my edits, is a different story. I like to put the charaters in different scenarios to make the edit more enjoyable. I usually chose one image from my pre-granarated ones, or I use (if i see a, as i call an edit "suspicious" image here on Tumblr or X) an image from my "Likes", or if I can't find any which is good for the scanario in my head I generate one using PixAI's Ebora Pony XL AI model. Than if I have an image, I put together a static version of the edit in Paint.NET (PaintdotNET). Here I cut down the unnecessary and the broken (weirdly generated hands, .etc) parts of the image, and I remove the background if I'd like to use a different one. Than I chose a stethoscope png what are suitable for the edit, but I recently using the hand with stethoscope one which you can see in my recent edits. I also make some barely visble changes to the main image and the stething image. If it's done, and looks good I save them (the base image, the background, and the steting png separately) in a folder. After that it's time to "animate" the edit, which is just using the Wallpaper Engine's built in Shake effect, if that part is done, I record the animated soundless edit using OBS, which is usually a 5-6 minutes raw mp4 file. Than I put the raw recording into the video editor which is my case is the Wondershare Filmora X. I chose one of the heartbeat and bearthing audios from my server (if it's needed I modify it a bit in Audacity), and speed them up to mach with the animation. I make the breathing way quieter to have the heartbeat in focus, also i duplicate the hb sound to make a stereo effect, which means the I make the left side a bit louder and add more bass to it than the right side, which make a really good heart pulse effect (ROLL CREDITS). Also in here I add some video effects, cut down the unnecessary parts, I cut down the video to 2 minutes to become uploadable for X, than it's time to export it. After I exported the final edit, i check it for mistakes and I fix them if i find any, and the fixed version gonna be uploaded to Tumblr and X. This whole process is 2+ hours usually, but it's could be more for longer and more complex edits. But you doesn't need to follow my way to make edits, if you ever used a photo editor and a video editor before, and you know how put a transparent png on an image, and a greenscreen video on another one, you good to go. There is a lot of ways you can make an edit, so you can chose one which are suitable for you. If you still need help, you can join the Cardio Editor's Hub, there are lot of other people who gladly gives you some tips and tricks. Good luck, have fun! :D
11 notes
·
View notes
Note
Can I ask something that ive been thinking about for a few hours now, that i do not want it to come across as being rude, but WHY does LordCrumps and clique convert stuff that is already done? Because then we the downloader end up with duplicates and it can get confusing to find duplicates and not to mention that other creators might feel bad that their stuff will not be picked and used because they are choosing your stuff instead, which is not how the Sims 2 community works, we share and work together. Its just my opinion and I do not want you to be offended, i am just curious.
Hey Anon, Okay, this is quite a message to break down. First of, I assume that the "clique" you mention is myself, @tvickiesims and @platinumaspiration, @episims? (there are tons more people that I collab with personally, but these are the ones I mostly work with) If this is the case, then as friends we like working and collaborating together, many hands make light work in that sense! Like you mentioned, this community it built up on team work and collaborations, I personally love working with friends, and involving as many people as I can utilising their 'specialities' and knowledge to create awesome conversions.
So now onto the "duplicate" portion of that message, yeah fundamentally there will be dupes of stuff out there, each creator will do things differently, ranging from making stuff deco or functional, categorise them differently, edit the mesh differently, have shadows or not, reduce texture sizes / keep texture sizes etc, the list is endless. I convert stuff how I want them, how I want the object to be made. So to not "tell" people how to convert stuff to my specifications, I just do it myself.
I also like doing sets of stuff, so its a one hit download for all the items. I always hated it when there would be sets uploaded and the sofas would be on link 1, the chairs on link 2, the tables are on link 3 etc. I get overwhelmed so out of preference I just like a one link fits all.
Not to mention it's about consistency; like I said earlier I create stuff how I like it, if I include others stuff / or links to others, then they might not match, ie; missing shadows and what not. So this way, I know that all items in a set are going to be of the same quality.
Following on from that point, if I did link to others or include their stuff in the sets, it might go against the TOU of that creator - not that any one person owns the rights to TS4 conversions, but that's a different debate for another time...-
It is also easier for my brain to just load up Sims 4 Studio, see everything that belongs in that pack, and then just convert it in its entirety. I get overwhelmed when in a creative flow stopping to look around seeing if its already been done. At the end of the day, its not a competition or a contest, it does not matter if there is the same stuff out there, just means there is more choice.
Sorry for a long response, but I couldn't sum it up and shorter? But I hope it answers your questions!
Dag Dag! - I am going to crawl back into my cave now!
41 notes
·
View notes
Text

lovely anons have been requesting a gif tutorial, and while there's plenty photoshop ones out there I think there's only a couple photopea ones (if you dont know photo pea is like an internet photoshop basically) so I thought I'd make a little tutorial on how I do my gifs!
first you're gonna want to use any gif making platform to actually turn your video clip into a gif. I personally use giphy but I know there's a bunch of other platforms for this. then you're just going to open the gif in photo pea either by clicking "open from computer" on the home page or dragging it in from finder (Mac) or files.
IF YOU'RE MAKING A GIFSET: the first thing I do is make sure all of my gifs are the same number of frames. its important to do this if you want all of your gifs to restart at the same time! to do this I just go to the side where all the frames are listed - this one has 29 frames (note: it says 28 on the top frame, but the very first frame is listed as 0, so always add 1 to the top number to know now many frames there are). what I do is find the gif with the least amount of frames and then make all the gifs the same number - depending on what part of the gif I want to keep/delete I'll delete frames from the beginning, end, or both which usually requires some basic math
next, I click on the top frame, press shift, and then press on the bottom frame to select all (unfortunately there's no keyboard shortcut for this I don't think). then I'll click filter -> sharpen -> smart sharpen that way I can freely customize the sharpness of each gif depending on it's original quality. usually I do 200% at 0.5 pixels but I'll adjust if necessary.
now comes the actual coloring of the gif! all of these will be adjustment layers (layer -> new adjustment layer).
first I'll select the brightness/contrast layer and play around with those settings until it looks good to me.
next, I'll play around with the levels and curves layers until it looks how I want it.

sometimes I'll stop here if it looks good, sometimes I'll play around with the saturation adjustment layer, or in this case I'll edit the color balance to deepen some of the shades that aren't popping out how I want.
IF YOU'RE MAKING A GIFSET: the easiest thing I've figured out for coloring multiple gifs to save time is duplicating these adjustment layers to each gif in the set (layer -> duplicate layer into; it'll prompt you to select the psd you want to add the layers to). when I do this I turn off the visibility for each one and one by one turn them back on (starting with brightness/contrast) and adjust them if necessary.
if I'm not adding text this is where I'll end, but sometimes I like to add texts to more of my creative gifts. usually I'll follow a tutorial (@usergif resource directory has a bunch of good tutorials that can be adapted to photo pea, or I'll just look them up on Tumblr itself). sometimes I like to do things a little simpler, which is what I'll show here.
you're going to click on the T towards the bottom on the left sidebar, type put your text, change your font (photopea has a ton and I'm not too picky but you can download fonts from the internet and upload them), as well as color and size (don't forget to select all of the text when you do this!!) then click on the cursor icon to move the text to your desired placement.
then click on the layer in the right sidebar and select blending options.
I'm going to add a stroke of 1px in black to my text and position it to the center. I do this on every text I add to gifs (even if the text is black, which I ended up changing this one to) to add some extra size/detail.
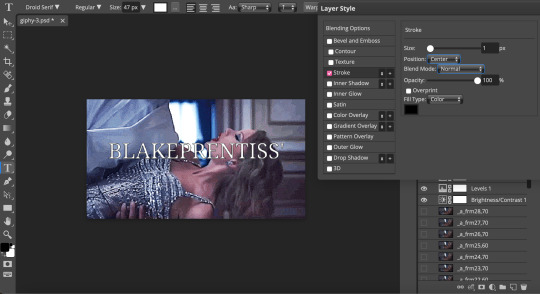
you're more than happy to stop here, but I like to play around with some of the other blending options until I'm satisfied. sometimes I'll lower the fill to 0-30%, or in this case, I changed the blending option to overlay to get the desired effect. (both under blending options)
I followed the same steps with my second row of text, except I changed the font and then warped the text a bit after placing it where I wanted by T -> warp -> arch and changing the settings.

and you're done! file -> export as -> gif to save it! I also like to do this periodically throughout the process to make sure the gif is giffing if you know what I mean

#gif tutorial#photopeablr#photopea#photopea gif tutorial#mine*#tutorial*#tutorial#gif making tutorial#gif making
40 notes
·
View notes
Text
A bias for the Internet Archive and the future of archiving circa 1971?
Hi folks. been a while.
So, I was updating a link on the list today. It's not a new show that wasn't previously there; the original link was on soundcloud, and someone recently uploaded it to the internet archive. I don't know if it was the same recording, but it's the same show.
I will always favour the Internet Archive over other sources. even the original source. i just feel like even though the internet archive is having difficulties, it's the place where the show is easiest to access and least likely to disappear.
you can't download from soundcloud without premium, you can't download from youtube at all, media fire links go dead all the time.
i think best case scenario is that the tapings can be on as many platforms as possible and be easy to access. Having the shows up on as many places as possible ensures they never go away.
Arguably, the most easily accessible method is an FTP server. File Transfer Protocol. The great thing about FTP servers is that you can mirror them. effectively hosting your own duplicate, which I think updates as the main one does. And if the main one goes down, the mirrors still exist.
Now, I don't know how to host it myself, so this is just a pipe dream. The only real downside is that if you don't know how to use FTP clients, you might not want to use FTP.
This is just something I've been thinking about for a while, and I wanted to pass the thought along.
Also, there's one bootleg that's only available on Bandcamp? Bandcamp! a platform where people are expecting you to buy music, not stream it. Its price is "pay what you want", but it still makes me uncomfortable
-Josh
4 notes
·
View notes
Text
For Rent Update to Career World is Live!
The For Rent update to Career World is here! Before I link it, though, a quick:
CAUTION: There is a serious bug in the game right now that causes irreversible save file corruption. The causes of it are unclear, but it seems to have something to do with residential rentals. I actually GOT this bug while doing this update, and had to scrap two weeks’ worth of work on the update and start over completely from scratch by downloading the previous version of Career World from my own Tumblr—because once it’s in, it can’t be fixed. Luckily, I did not get it on the second attempt (I checked obsessively as I was going), but I don’t know: A) why I got it the first time, B) why I didn’t get it the second time, or C) how to prevent it from happening again in the future.
Because of this, I have not opted to overwrite the previous version of the save file with the new version as I usually do. Until this bug is fixed (please go click “Me Too” on the bug report, it’ll encourage the devs to give this more attention), I want people to have the option to play with or without rental residential lots, knowing that there may be more risk of save file corruption by playing the version with rental residentials. To be clear: neither of these two versions of Career World is currently corrupted. I have uploaded clean saves for you to download. But since I don’t know what triggers the bug, the save may become corrupted as you play, and it looks like this is marginally more likely to occur in the version that has been updated to incorporate For Rent. You will know you have triggered the corruption if you begin to see exclamation points over lots instead of the usual lot identification symbols.
If you get this bug as you play, do not save your game! And perhaps even more importantly, do not close the save you were just playing and click into another; exit the game entirely. There is some evidence that this can spread from one save file to another if you play several save files in the same session. There is, I repeat, no fix for this. The only thing you can do with a corrupted save is restore old versions until you find one that doesn’t have the corruption yet. In the case of Career World, you can always come back to this page and re-download a clean copy from this website.
That was the important info for everybody, but for a few players, I must also give the usual . . .
IMPORTANT MOD NOTE: If you use Frankk’s Language Barriers mod, you must download and install the latest version of that mod before opening the save file in order to retain language data for Tomaru, the newest language.
OK, now that we’ve covered the important need-to-knows, here are links to:
Career World updated for For Rent
Career World only updated as far as Horse Ranch—i.e. without any content from For Rent
Both are also now linked in the main post.
Phew! Alright, now we can get to the details of:
What’s New?
Rental residentials, of course! The thing to know about them first off: there is another, far more minor bug in the game right now that hard-codes the names of all rental residential lot types as whatever EA originally called the lot rather than any new names the player might have given that lot. So, many of the existing apartment buildings—which used to have names that told you what they were, like “Sunny Retirement Village” or “FutureSim Employee Housing”—have reverted to having unchangeable informationless names, or worse: misleading and defunct names, like the house with a basement rental in Britechester that has gone back to being called “Pepper’s Pub” even though I moved Pepper’s Pub and it already has that exact name on a totally separate lot (ditto for the now-duplicated “Thebe Estate”). This is a mess. I will fix it if they ever change this bug/feature/whatever it is, but at the moment, please know that rental residentials have weird names that I can’t change, and the real identity of the building is probably buried several clicks deep in the unit descriptions.
In order to combat this somewhat for players who are willing to read these Tumblr updates, here’s a list of rental residentials with specific gameplay identities that I think should be more obvious than they are with the locked lot names:
Special Rental Residentials:
1) The apartment building on the FutureSim campus (Mirage Canyon) in Oasis Springs is employee housing for employees of FutureSim Labs (the scientist career employer), or its subsidiaries Obscure Logistics (the engineering employer) and Rainy Day Entertainment (the tech guru employer), and their families. If you do not have a scientist, engineer, or tech guru in the family, you are not eligible to move into these apartments.
2) The trailer park in Bedrock Strait in Oasis Springs is a retirement community. We don’t want any young whipper-snappers here, nor any of these go-getter old folks who still work and will just remind us of the daily grind we’re trying to forget. Don’t even dream of moving here unless you are 1) an elder, and 2) retired. And no live-in children or grandchildren, either! If you can’t remember the golden age of landlines, find somewhere else to live!
3) I did a little playtesting of the solar farm in Oasis Springs for this version of the save file, and discovered that A) you couldn’t even get to any of the solar panels to maintain them the way this was originally set up, and B) it wasn’t actually possible to make money from selling electricity—the lot value was too high relative to the payback from the solar panels. But, I discovered, it is possible to have the electric payback exceed your bills if the lot is changed to a rental residential with the living quarters set as the one and only unit and the solar farm itself as common area. So that’s what I did: I fixed the solar panels so you can access them, and set the place as a rental with only one unit. You can now functionally play as a solar plant operator. And of course, the Landgraabs are your landlords. They do own the whole electric utility, after all. (This is also now true for the power plant in Evergreen Harbor and the hill house/micro wind farm in the Windslar neighborhood of Windenburg.)
4) The cluster of huts at the top of the hill in Sulani’s Ohan’ali Town is an eco-living commune that blends traditional Sulani ways of life with new green technologies. Residents live in separate off-the-grid huts with little more than bedrooms and kitchens, powered by the commune’s on-site solar panels, windmills, solar hot water heaters, and dew collectors. In the collective space, however, you’ll find a thriving taro patch, a communal art studio, game tables, a full bar, a small basketball court, chickens and insects to raise, a roadside stand for selling the commune’s produce and crafts, and lots of opportunities to interact with fellow members of this intentional community. One of the huts is generally reserved for students on study abroad who have come to learn about Sulani culture through this communal living experience—see the List of Study Abroad Opportunities (now updated for Tomarang!) for details.
5) The defunct motel in StrangerVille was bought for an almost-literal song by an eclectic throuple of artists who are very flexible about making changes proposed by tenants. Currently, all the former hotel rooms are just in the state they were when the place was a hotel, but if you move in here and want to—say—combine two units into a larger, single unit like they have done with their own, they’d be open to that. If you want to add a rooftop space to your top-floor unit, or even create some kind of wonky townhouse by linking two units that are directly above one another with a rooftop space, they’re open to that, too. If you want to install blackout curtains over all the windows, paper the walls with conspiracy-theory notes, and run secret experiments in your former hotel room, go nuts! They’ll really let you do just about anything. All you need to do is play as the owners for a minute to change these things before moving your sim in.
6) The big house where Pepper’s Pub originally was in Britechester is just that—a big house. They rent out their converted basement to university students, but this isn’t really an apartment building. The understanding with this one is that whoever lives in the above-ground house portion will always be the property owner and not just a renter—and in order to make this true, I have had to add an owning family to that section of the property, which means the college administrator Jade Rosa has been house-sitting for all this time has returned! You now have the option to dive right in to professoring or college administration with the new family that now lives there (thanks to Ivelle_creates for making the couple).
7) Both the large piazza in Tartosa where the Thebe Estate used to be, AND the apartment building at Ro Kaya Rockside in Tomarang, are mixed-use areas with commercial establishments on the ground floor (and sometimes into the upper floors) with apartments above. This is not exactly possible yet in The Sims 4, but several of the businesses are still usable—you can buy wedding dresses off the mannequins in the Tartosan bridal shop, for example, because that gameplay is tied to the mannequin object and not the lot type. Mostly, however, these commercial areas are designed with gameplay as their associated workers in mind, allowing you to live in an apartment but do work tasks in one of the on-site businesses (EX: be a cosmotologist who works in the on-lot salon).
(And a quick sidenote on the piazza in Tartosa: there is the potential for A TREMENDOUS NUMBER of apartment units on this lot. I have only designated the three that are occupied as actual units for now, because I was already running up against the per-save-file unit limit, but if you want to move your own sim in, just pick whichever of the many empty spaces suits your fancy, create the perfect apartment for your sim, and designate it as a new unit. Or, if you are really into furnishing/interior decoration and you want to turn this into basically an entire town, you can just bulldoze the existing rental residentials in other worlds, use the bb.increaserentalunitcap on cheat to allow yourself all the space you need, and go to literal town.)
8) Tam Nang Sands in Tomarang is a resort hotel. The place is set up for short-term rentals only, and is really meant to be played from the property owner perspective, to create a faux active career as a hotel manager. While it is possible to play from the tenant perspective and “stay here” on “vacation,” the game does not register it as a vacation and will make you sell your current residence in order to move here. I don’t really recommend doing that unless you live with someone else and are planning on going on vacation without them; then you can use the “split household” feature to send part of your household for a temporary stay while the other part of the household holds down the fort. If the Sims team ever release an honest-to-goodness hotel system, I will update this, but in the meantime this is better played as the manager.
9) Isda Riverfront in Tomarang is the site of the Linh family compound. While most Tomarani people have abandoned this traditional mode of housing the entire extended family in a walled compound with central courtyard and a special family spirit house, the Linh family is determined to stick to it, no matter how many foreigners marry in. And that, of course, means that unless you’re marrying in, you may not move here. Marry in or be born in, that’s the deal.
10) The colonial mansion on the former site of The Screaming Gecko in Tomarang has been set “for rent” so it can be used as a private second home by a wealthy sim. One of the new and unique things the rental system now allows us to do is have sims own multiple homes and just swap between them at will; all you have to do is set all the homes you want to own as residential rental lots, assign all the rooms to a single unit in each, and then buy all the homes as a property owner. Since property owners pay no rent to live in a property they own, voila! You can live that snowbird life and just move to Tomarang when you get tired of winter, then move back to your original house (or any other vacation homes you own) when you need a change of scenery. I seriously considered having Judith Ward buy this house, since there is text in the tiger sanctuary about her having a particular connection to it, but ultimately decided I wanted you, the player, to have the opportunity to buy this with whatever sim you’re playing—whether Judith Ward herself or any other. And bonus, you can actually use this method to play out tax-evasion-by-the-wealthy storylines, because the property taxes on a big, expensive mansion that you own outright are astronomical, but taxes on “rental” properties you “manage” is just a flat $50 per unit per day, which is often far less than what you would have been paying on an owned house. This pack introduced lots of new paths to crime, for rich and poor alike!
All in all, there are 22 rental residentials in the save file now, with a total of 90 units (so you have 10 to play around with still!), the overwhelming majority of which are just empty and waiting for you to select and move your own sims in. If you choose to live in one of these buildings and want to have more neighbors, just move a few in from the gallery or elsewhere in the save.
And a quick note about a choice I didn’t make: I have not split any of the boarding houses in Copperdale into separate units for different students, because having a whole bunch of high school students with common interests in the same household is what allows you to control them as a group at the school and have them engage in active club activities together. This was half the point of creating the boarding-house system for Copperdale in the first place, so they are always going to be giant, unwieldy households full of sims. Embrace the challenge! You can play single high school students in any old save file. The same goes for the three movie set households added in the last update: all those sims need to be in the same household and simultaneously controllable for the gameplay to function correctly, so they have not been subdivided.
Tomarang Makeover:
As with some previous worlds, I’ve tried to lean in to the differing neighborhood identities by making Morensong bustling, crowded-together, modern, and rundown, while Koh Sahpa has a much more chill, spread-out, traditional, and upscale vibe. Morensong is overrun with street cats (i.e. it has “cat hangout” as a neighborhood trait), while Koh Sahpa has “peace and quiet” as its neighborhood trait. Both neighborhoods of Tomarang, however, have “mold” as a world challenge, because the air is just so heavy with moisture—the only exceptions to this are lots with absolutely no indoor space whatsoever, and therefore sufficient airflow to prevent mold growth. But if there’s an interior, there’s going to be mold.
The limited number of lots presented a challenge for filling Morensong with businesses and activities, but I think I did pretty well, considering. Its four lots are split half-and-half between residential and community, but one of the residentials is a mixed-use building with businesses on the ground floor, including a functional street market where you can play as a vendor if you’re living in the building. And I managed to pack quite a lot into the two community lots, as well! The one currently set as a thrift and bubble tea shop can have its lot type changed to karaoke bar, bar, lounge, or nightclub at will, depending on which spaces you want to focus on, what events you’d like thrown there, etc. And for the other lot, simmers made so many wonderful and creative alternatives to the bland national park that I couldn’t pick just one, so I picked four. I have turned this into one of the Eco Lifestyle four-in-one community space lots, with each of its states a completely different venue by a different simmer. If you want to keep it as a botanical garden, just leave it on the “community garden” state and you will have a fuller version with actual plants for your sims to tend (all flowers and tropical plants), spirit houses, and a picnic area—great if you’re playing as a botanist or a florist. If you’re some kind of vendor who doesn’t live at Ro Kaya Rockside and you want a more playable version of the night market, just set it to “marketplace” and now you’ll have easily editable stands at which to sell your wares. If you want a community center with tons to do, set it to “makerspace,” and if you’re looking for a non-rabbit-hole temple / Tomarani wedding venue, set it to “community space.”
In Koh Sahpa, I played around a bit with the new career and lifestyle possibilities unlocked by the new rental residential venue type. Three of the five lots out here are rental residentials, but none of the three are classic apartment buildings or townhouses like you’ll find in Morensong. One is a luxury hotel, where playing as the property owner means keeping the guests happy and the place in tip-top shape with very short leases and lots of rules. Another is a traditional family compound, where your “tenants” (or your “landlord,” depending on which household you’re playing) are actually your family members, and the point is to do lots of gathering and socializing in the common space, throw potlucks every night to represent big family dinners, and all pitch in to help when a maintenance or emergency event hits. In this “rental,” there are no rules and the leases are basically forever. The final “rental” is only marked as a rental residential to enable you to buy it as a second home—once you’ve purchased it, all you have to do is turn your own home into a rental residential and you can move between your two houses at will. In addition to these rental residentials, a straight-up vacation rental and a spa round out the primarily vacation-oriented neighborhood of Koh Sahpa.
Of course, this is a career-focused save, so a lot of the choices I made with Tomarang’s lots—like the ones described above—were career driven. But identifying careers for Tomarang was a bit tricky. For Rent certainly came with new ways to make money, a new part-time career, and several interesting gameplay features that fold particularly well into existing careers . . . but interestingly, none of these new features were particularly location-specific. You can be a landlord or a handyperson anywhere, and the same goes for blackmail or break-ins. So while I made many additions to the Career Chart as a result of this pack, none of these new career options are limited to Tomarang. Instead, Tomarang has joined the lists of especially good places to pursue several other pre-existing careers, like fisherman (I mean, those waters!).
That said, I did make Tomarang an especially great spot to pursue anything that jives well with vending your wares at the Night Market (and the many extensions to it I added), so being a freelance crafter, artist, food stall owner, fisherman, gardener, florist, jeweler, or anything else that consists primarily of making or collecting small items to sell will be particularly rewarding when playing in Tomarang. I had also listed a new ministry of labor career as a masseur back when the Spa Day refresh came out, but never had much of a dedicated space for it. Now, with Tomarang, I decided to lean into the well-regarded tradition of Thai massage by including three different venues of varying quality where your masseur sim can give commercial massage in this world: a seedy downmarket massage parlor on the Ro Kaya Rockside lot, a mid-tier venue at the historical spa in downtown Koh Sahpa, and an upscale open-air massage area at the four-star Tam Nang Sands Resort Hotel. Plus, there’s a private massage room in the colonial mansion, so if you’re playing as a massage therapist and someone moves in there, feel free to invite yourself over and charge them for private massage services.
On the subject of things at Ro Kaya Rockside being seedy, I chose the building I did for that lot because the builder, eenitmartini (Matinee on YouTube—go check her out!) made this absolutely fantastic criminal lair/hideout/underground nightclub as part of her building, so all credit to her for the fact that there is now an “Illegal Gambling Ring” club in this save file, hosted at Ro Kaya Rockside and open only to criminals, secret agents, and undercover cops. This means that, while not exclusive, Tomarang is also now an especially good place to be a criminal—which is great, because the For Rent pack enabled me to create a plethora of new specialties within the criminal career, including things like “B&E specialist” and “blackmailer” (see the Career Chart for details).
As usual, I have also used the T.O.O.L. mod to add extra activities to the open parts of the world—most notably, I added several extra stalls to the night market, so you can play there as a vendor. You’ll note that most of them do not have sales tables/food stalls at the front of the tent; this is because, as I was testing, I discovered that you can’t actually sell anything using these objects unless the game knows you own them, so you’ll have to bring your own and place it from your sim’s inventory for these spaces to be functional. There are two that are already complete: Alon Sadya’s food stall in the main part of the market, and Chánh Linh’s fish stall on the other side of the buildings, over near the public toilets. These stalls are completely functional for these individuals, but will not be for anyone else unless you have the owners remove those key objects so you can replace them with others that belong to your active household.
Townie Updates:
Vanesha Cahyaputri, poster child for the pack and model landlord, is now running a four-star hotel in Koh Sahpa! She has quite the job trying to keep her little sister from breaking into people’s hotel rooms to snoop, in addition to keeping the buffet table stocked with local delicacies, making drinks for guests and offering them massages when they emerge from their rooms, and of course keeping up with maintenance and bookings.
The extended members of the Linh-Sadya clan now live in a traditional Tomerani family compound that has allowed me to split them into three households instead of two. They routinely throw big potluck-style family dinners in their shared courtyard. The elder patriarchs have both retired from their more demanding careers and are now in relaxing part-time jobs that cater to their interests—namely, fisherman for Chánh (complete with functional night market food stall!) and handyperson for Arturo. Their elder daughter Liên and her husband Alon both work in Morensong, where Liên makes over sims at the salon at Ro Kaya Rockside and Alon runs a night market street grill. Auntie Thi is still a secret agent, but as part of her work she has now infiltrated an illegal gambling ring in Morensong and is trying to uncover secrets at their weekly poker night. She also adopted a new cat, Bub II, a toyger who is a smaller, more approachable version of the tigers that are Tomarang’s special animal. All members of the extended Linh family now know learnable recipes for Vietnamese and Selvadoradian dishes, reflecting their mixed heritage.
The Bun Ma family have established themselves as fixtures at Ro Kaya Rockside, Morensong’s shadier district. Bua runs a hole-in-the-wall noodle soup place, Nin gives massage at various locations around Tomarang, and Kasem runs the illegal gambling ring under the building that Thi has infiltrated—in between break-ins and expert hacking of various trust funds. Yes, you wouldn’t expect it from the sweet-faced young father of an adorable toddler, but that’s part of what makes him such an effective criminal.
But wait, there’s more! A few sims outside of Tomarang have also been updated:
Eliza Pancakes has become much more investigative since becoming a cop. Some people might even call her nosy. Kasem had better hope she never uncovers any of his secrets.
Katrina Caliente took the scads of money she has gotten from selling expensive Selvadoradian artifacts to museums, bought the other three condos in her building, knocked the whole building down, and built a modern desert villa for herself, her two daughters, her dog, and whatever boy toy she’s currently entertaining (still Don, at the moment). She was tired of sharing space, and there are more than enough apartments in Oasis Springs, anyway.
Geoffrey Landgraab got tired of playing secret agent and has returned to what he really always has been: an electric company mogul who owns and operates power plants around the worlds. It’s up to him to fill job vacancies in these plants by “hiring” onsite managers, keeping them happy, and handling maintenance on the plants. What is more, at the same time that he realized he was only fooling himself about the secret agent thing, he also realized he was only fooling himself about being family-oriented, because let’s face it: he disowned one of his sons, the other one is evil, and his wife is a criminal. Instead, he has decided to focus his love and attention outward to the world by re-branding himself as a generous philanthropist. He now regularly attends charity benefit parties, gives to online charities, says yes to anyone who calls him asking for a donation, volunteers his time, and will even go on sprees where he goes around just handing money to random sims on the street. Good thing he has so much that he could live off just investments for the rest of his life.
SimTube star Dustin Broke is running out of material. His jokes, memes, and dances have gotten a little dated. Over time, he has become—well—cringe.
Judith Ward has adopted a tiger (and given a boatload more money to the tiger sanctuary, besides!), as per her lore in the new pack. Her in-house handyman is also now in the actual handyperson career. It’s good to be the queen!
The university administrator who had Jade Rosa house-sitting for so long has returned from the family vacation she took to Tartosa to show her kids their father’s homeland. The family is now happily reinstalled in their big fancy Britechester home, back to work as Dean of Admissions and adjunct art professor, respectively, at the University of Britechester, and back to charging Jade rent for her basement apartment underneath their house. If you’re looking to play either of the advanced branches of the Education career, they are now an option.
The group of salarypersons I downloaded originally as unhoused NPCs in order to give Kado Akiyama some co-workers to do karaoke with have now moved into houses on his own street! While I left most units empty in the places I converted to rental residentials, I did feel kinda weird about leaving an entire street’s worth of stand-alone houses empty except for the Akiyama family—it was just a little too post-apocalyptic for my taste. So since I already had this Mt.Komorebi-based club, I figured I’d turn its other members into neighbors and integrate them into the community a little more.
For users of Frankk’s Language Barriers mod, which is a supported mod in this save file, I have updated the native languages of some previously-existing townies for the new inclusion of Tomaru. Before this pack came out, I used Komorebigo as the stand-in for all languages originating from Eastern Asia writ large—now, I have separated it out into Komorebigo for East Asian languages (not only Japanese but also Mandarin, Cantonese, Korean, Mongolian, etc.) and Tomaru for Southeast Asian languages (Vietnamese, Thai, Tagalog, Malay, etc.). So now, for example, the Filipino sim Jules Rico, who shipped with the Eco Lifestyle expansion, is natively bilingual in Simlish and Tomaru (previously, I’d had him set as natively bilingual in Simlish and Komorebigo). So there have been a few alterations to townies like that. I hope to get to do more updates like this in the future as the Sims team diversifies the worlds on offer and Frankk—who absolutely makes my game with this beautiful mod—continues to expand the language offerings of the Sims universe.
Other stuff that has changed:
I took that excellent new object that looks like a “for sale” sign and stuck it outside every unoccupied house in this save file. I just thought it was a nice touch.
While I was working on this update, I saw a YouTube video that reminded me what a great object the photo booth from High School Years was, and realized I was under-utilizing it. I have now gone back and scattered several more of these around, ensuring that each world has at least one photo booth somewhere. Thanks, lilsimsie!
Pressure cookers and kettles have been strategically added in places where I thought they were needed.
A few of the more run-down houses have the new “maintenance” lot challenge—and some have mold, as well!
I realized there was nowhere to get nectar in Tartosa (a serious oversight), so I scattered a bunch of bottles around the public areas of the large piazza that is the local rental residential in Porto Luminoso. They are just debug bottles and nothing special—for that, you’re going to have to help Hugo Villareal restart Tartosa’s defunct nectar-making business. I’m sure his bottles will be better than the debug ones.
All this updating took me into spring, so seasonal lots (including prom!) have been updated.
That’s it for this update! When you don’t randomly get the corruption bug, it’s actually quite enjoyable. I had a ton of fun doing all the building conversions and playtesting, and I hope you’ll have fun playing, too!
Download now: Career World For Rent update
#career world#sims 4#the sims 4#ts4#sims 4 save file#the sims 4 save file#ts4 save file#ts4 gameplay#sims 4 gameplay#the sims 4 gameplay#the sims 4 for rent#sims 4 for rent#ts4 for rent
22 notes
·
View notes
Text
[Hello, tumblr]. This is the Shadow Committee, aka me.
Last month I had my fourth obsessive episode of Wayne and I thought: why don't I write a fanfic? I didn't really like most of the fanfics that were written on the Russian-speaking ficbook, so I came out of five years of creative procrastination and started writing. I'm not good at making up other people's fates, so I just started writing about me. i have about six chapters written now, which i'm going to duplicate here, so you should know that the story is already underway and i'm not just showing up here with empty promises, but with a real fucking novel.
I know that Wayne's fandom is barely alive. I know that there is no hope that Wayne will become as popular in America as he is here in Russia. and I know that sometimes fanfics are a cringe, but if you like it, if you are drawn to my story, I want to ask you to promote it to the fullest. because my work is not just for those who adore Wayne McCullough like me. it's for those who were not loved as children, it's for victims of abusive relationships, it's for depressed teens, it's for people with avoidant attachments, it's for punks, it's for the angry and vulnerable, it's for those who want to find hope and meaning in this life.
Just know that this story is not just for fans of the series, it's for everyone. so if you haven't even watched Wayne (btw watch please) but you liked my chapter, please reblog it so that as many people as possible can see what I'm trying to write.
I guess this will just be a welcome post, because I want to start translating my fanfic into English and uploading it here piece by piece. anyway, if you found this post and read it to the end - thank you.
Now let me tell you about Helle Caulfield of Ivan's Teeth band (you can literally stream «Ивановы Зубы» on apple music or SoundCloud for better experience lol), who was spoken to by Wayne McCullough on Monday in the school hallway at Brockton High.

#wayne mccullough#Wayne#fanfic#artists on tumblr#wayne series#wayne 2019#Wayne fanfiction#ao3 fanfic#mark mckenna
3 notes
·
View notes
Text
okay! this took a bit to type out, but here we are!
disclaimer: my way might not work for you and that’s okay! there’s no right or wrong to make gifs, so long as you enjoy the way you make them then that’s all that counts. this is only a detailed look into my own personal process and things i’ve learned along the way. i'm also an idiot who sometimes doesn't know what he's talking about, so if something doesn't make sense let me know so i can fix it!
but these are some of the things i'll be going into a little more detail than before:
tools
importing & converting to smart object
smart filters
coloring (lighting, basic, and gradient)
exporting
tools
there are a few things i use in the process, some new and some old. whether you want to use them is entirely optional, given that it can be a lot to take in at once.
photoshop 2024
if you use an older version of photoshop, then i think the layout is similar to newer versions. though iirc some older versions don’t have the timeline function so you might have to look that up yourself since i’m not familiar with any ps version without it.
handbrake
i only use handbrake if the recorded video is super long. usually i try to record each scenery shot (4-8 seconds at a time) or an entire cutscene so i don’t have to use handbrake to trim the video. if i do, then i have the settings set to export as super hq with 60 fps, deselecting align a/v start and passthru common metadata. the rest i leave alone.
vapoursynth
this is really useful and makes coloring easier imo. you can download it from the official site, but i found a portable version (i have the 200722 one) for windows here. i’m not sure how to set it up for mac users, and, truthfully, to this day i still don’t know how to use it entirely. i just followed a tutorial i i found on youtube and only changed the amount for the denoise filter and turned off the sharpen filter since i do that in photoshop itself. so it’s trial and error, and i’m erroring a lot sometimes ajdkjasvjdas. it’s also where i crop the video to my preferred dimensions, unless you choose to crop in ps.
jsfiddle code playground
if you want to have the text in the tumblr post be a gradient, then type whatever you want in the first box on the bottom right, change the color from red to your starting color of choice, then the same of the green for the ending color. hit run, copy the code, and paste it inside the text post while in html mode. ngl, i stared at the site for like ten minutes before i figured out how to use it asjdjasdasd
nvidia shadowplay
i use shadowplay since it comes with my laptop’s gpu, set to record in 1080p60. i’ve seen other giffers use obs for recording, but i don’t have any experience with it. there are scenepacks and gameplay walkthroughs on many sites, which you can use as long as you have the uploaders permission and credit them as they ask! please don't steal their videos!
reshade
i’ve started using reshade recently to tone out the blue tint of the game and sharpen it up a bit more. it makes a big difference and helps with coloring if you start out with near neutral colors. the effects i use are: • deband • clarity • sharpcontrast • emphasize • amd fidelityfx contrast adaptive sharpening • fxaa • prod_80_04_colorisolation • adaptivetonemapper i'm pretty sure some of these are redundant, but i’m too lazy to go back and see which ones i don’t need lol. but it’s all personally preference with how you want the game to look, and there are many effects to choose from.
importing & converting to smart object:
my preferred method is the video frames to layers, which is: file > import > video frames to layers, and then select the video. if you use vapoursynth, then there might be duplicates frames (or at least there are for me) so when the popup window appears i check the box to limit the frames to how ever many duplicates there are of each frame. usually in my case, it’s three.
after the video has been imported, i select all frames in the timeline and change the frame delay to either 0.03-0.04 depending on how fast or slow i want the gif to be. for converting to smart object, i recorded my own action set to save time by clicking on a couple of buttons, but the process is: select all layers currently > convert frame animation > convert to smart object.
let me know if you want the action set! it saves a lot of time in the process
smart filters
i don't think sharpening before or after coloring matters, but definitely do not sharpen before cropping if you haven't done already.
vapoursynth combined with the in game reshade sharpening effects doesn’t require as much sharpening as i normally use. just note that it varies from scene to scene, and whatever you're giffing. these are just the settings i used for the pirates’ cove set.:
smart sharpen #1: 500% with a radius of 0.2 px
smart sharpen #2: 10% and 10 px radius
gaussian blur: 0.7 px at 30% opacity
add noise: 1% uniform at 30% opacity
on to the coloring, which i'm breaking this up into three sections: lighting, basic coloring, and gradient coloring, with a brief description and the result after each section.
something to note is that all coloring is personal preference, and how you want your gifs to look. if you're just starting your giffing journey, here's a site i bookmarked that explains pretty well the adjustment layers and what they do if you have questions for how they work. but i'd be more than happy to answer any that you guys have!
lighting:
brightness/contrast:
with this, i’ve found that changing the blending mode to screen brightens it up well enough without having to move any on the sliders. if it’s too bright, then lowering the opacity should do the trick.
curves:
before, i used the white and black point with the eyedropper tool, but now i’ve started using the auto function that can be found in the four horizontal bars in the top right of the adjustment properties. i choose the find dark & light colors options and check the enhance brightness and contrast box. if it’s too bright or tinted too much one color, then i fiddle with the rgb curves individually to get it as neutral as i can.
levels:
with levels there’s not much to adjust other than moving the sliders for the shadows and midtones to give it a little more contrast.
basic coloring:
selective color #1:
for the first selective color set to absolute, i use it for the white/black colors to make them as white and black as possible. increasing the black can make it too dark, so i limit the increase by two or three. sometimes i change neutral if it needs it, after all the coloring is done if it still looks too much of one color that the other adjustment layers can’t fix. i don’t know exactly what the difference is between absolute and relative is, i just remember it being part of a tutorial i read and have been doing it ever since.
color balance:
i only change this as minimally as possible, usually one for cyan, one for magenta, and one for blue for all tones. sometimes i increase it more, but it all depends on how you want it.
selective color #2:
the last selective color i use it for all the other colors, set to relative, usually for reds, yellows, and blues. if there are people in the gif, then i focus mostly on skin tones, bringing out reds and yellows to make it look as natural as possible. a hue/saturation layer can be useful to even out darker skin tones by lowering the saturation for red or yellow. with scenery, i boost whatever dominate color pops up while lowering the other colors by adding in a lot of white if the lighting is bright, or adding black for dim scenes. again, if it needs it, adding in an optional hue/saturation layer, but this time to lower the saturation for less prominent colors.
gradient coloring:
if you’re satisfied with the coloring of your gif, then this step can be skipped!
i’ve recently fallen in love with using gradient fills. there are several preset gradients available, but if you search around online there are other gradients available to download and use. or you can make your own gradient of your colors of choice.
for me, i often use blue/pink or blue/purple gradient fills. the blue/pink preset is the one i used in this case.
gradient fill:
after adding the gradient fill and choosing the colors, i change the blending to soft light and lower the opacity anywhere from 30%-50%. with darker skin tones it might be tricky as it would involve more tweaking of the settings until it looks nice.
gradient map:
i follow it up with a gradient map to help with the sharpness (i think? i’ve forgotten exactly) set to soft light again with varying opacity given how dark the scene is.
vibrancy
this is completely optional here, but i like the colors cranked to the max, boosted to 80% or slightly lower. some minor adjustments might have to be made after this, usually with it being too red or possibly yellow.
exposure
the final adjustment layer to top it all off is exposure. i like my gifs to have a matte-ish look, so i change the offset anywhere from +0.0010 to +0.0030. if the gif is still a little on the dark side, increasing the exposure helps.
the gradient coloring takes the longest to get the colors to look good, but i love my colors so much and the end result is so worth it.

logo:
this is optional of course, but since there's quite a few people out there who love to steal gifs, it's probably a good idea to put your logo on the gif to help deter them. mine's simple and uses either the font code bold or moon. i have it saved as a png so that i can go to file > place embedded and resize it to my liking before moving it to the bottom right corner.
but for me those are too many steps to do for each gif, especially if i’ve been working on them for hours. so i open up an old psd with the same dimensions and duplicate the logo layer for each gif to save time.
exporting:
under file > save for web (legacy) the window for it should pop up. i don't usually mess around too much with the settings here, keeping it at selective diffusion and changing the matte to none.
sometimes the size will be too large for tumblr's limit since i like bright colors, and depending on how many frames are in each gif, most of them end up on the large side. i have to fight photoshop sometimes to make it work by either trimming a few frames or messing slighting with the lighting. occasionally i end up having to go back and reimport the videos to divide the frames equally if i don't want to trim any off. it’s a pain, and it’s something i should honestly try to plan out before that point lmao.
but if you're satisfied with how it looks, save, and you're good to post!
8 notes
·
View notes