#CC tutorial
Explore tagged Tumblr posts
Visit Tumblr Blog
Explore Tumblr blogs with no restrictions, modern design and the best experience.
Last Seen Tumblr Blogs


Fun Fact
Mobile Tumblr US users spend an average of 4.04 minutes per session on the app.
Text
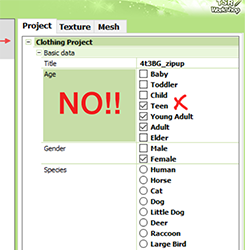
Please please PLEASE stop releasing clothes and claiming they're for teens or elders but not actually changing the mesh. It isn't. If I still have to deal with gaps then that's work *on me*. I can already enable all with nraas so I expect cc I download *for* those age groups to actually BE for those age groups. I do not tag my reblogs for those age groups unless it really is the mesh but sometimes it's hard to tell without going in game.
tips for 4t3 converters/CAS clothing creators
3 main things:
non-recolorable presets
DDS. settings
Adult to Teen conversions
disclaimer: i'm not a CC expert, but these are things i've noticed and learned these last couple months converting cc. special thanks to thornowl and the other converters in the TS3 Creators Cave discord.
Non-recolorable presets:
we obviously know that ts4 lacks a CASt tool, so ts4 creators rely on recolors. In my conversions, I do include a couple of the item's recolors. these usually are patterns that CASt does not have.
one thing I've noticed more and more converters doing is putting such item recolors in the 'Overlay' tab in TSRW.
let me show you what that looks like for a non-recolorable preset:
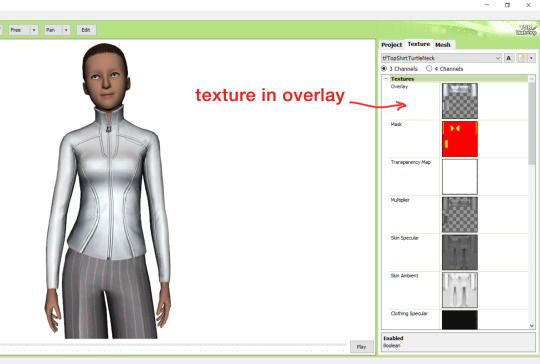
it looks over-saturated, and almost crunchy. but there's another place you can import the recolor into: stencils.
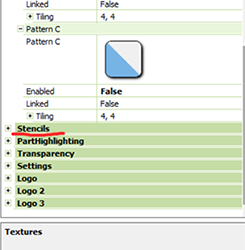
stencils will be found at the bottom, under patterns. hit the plus sign next to stencils to open it.
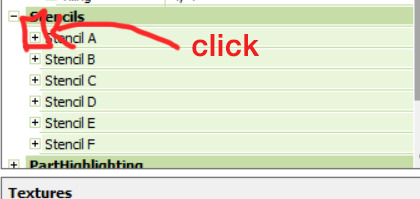
opening it will show you this:
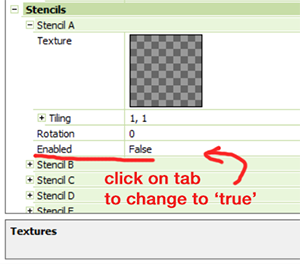
by default, it will be enabled as false. import your recolor into the texture tab as you would do for any other texture tab. make sure you tick the 'false' to 'true.' stencils override overlays, so if you want to use an overlay, enable stencils back to 'false.'
here's what the recolor imported into stencils looks like:

here's the two side by side:
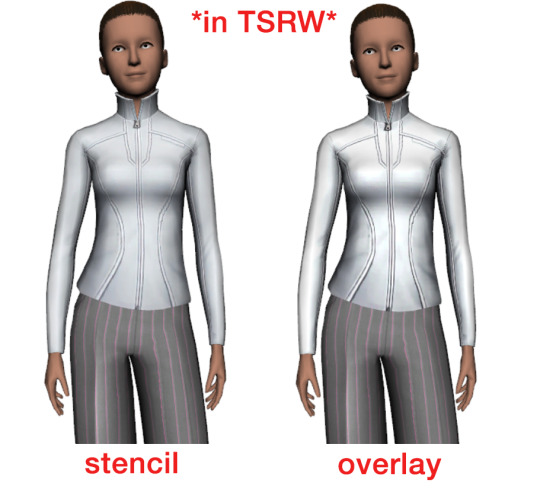
see how different they are? let's see how they are in game:
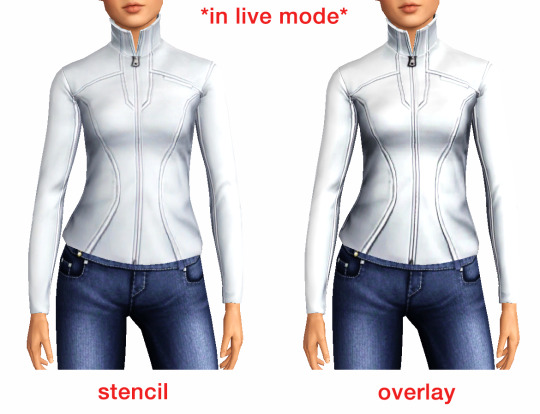
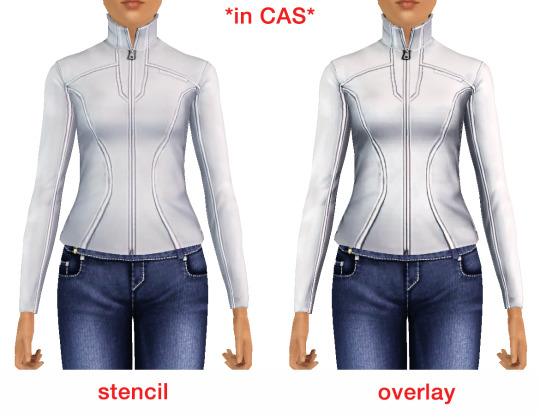
click on the pictures to really see the difference in quality. since TS3 uses DDS. format, it compresses the texture, which results in the crunchy texture. importing the recolor into the overlay tab makes the DDS. compression more noticeable. it ultimately is up to you and whichever one you prefer, but do keep it in mind.
the overlay tab is good for small details that you want to maintain on all recolorable presets, like zippers, buttons, tags, etc. just look at EA clothes for reference, especially their shoes and male clothes.
another thing you can see from the images are the bumps on the mesh. doing normal maps can help you keep those same details on the recolorable presets without importing the recolors.
-----------------
DDS. settings:
something I also see and used to do myself is bloat package files with large file sizes, specifically normal and specular maps, as well as masks. the Sims 3 Tutorial Hub provides a link to plain maps, but the file sizes are unnecessarily big.
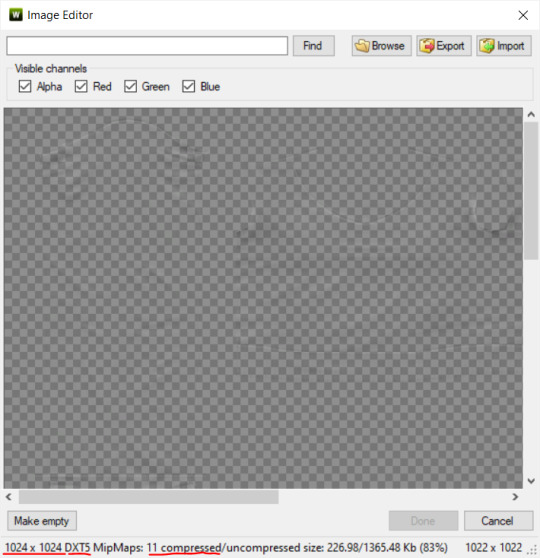
let's look at some of EA's maps in TSRW:
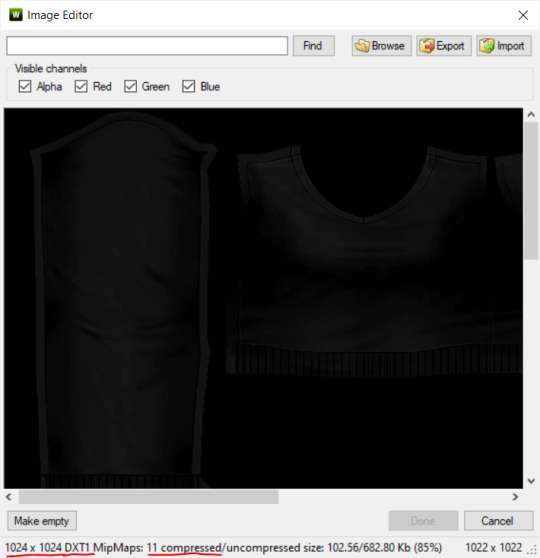
here's the specular from one of the basegame sweaters. notice the image size, DXT format, and compression size.
a lot of converters don't want the shine on regular clothes, so we use a plain, black specular map. but ask yourself, why do you need a 1024 x 1024 purely black specular map with no details?
let's try sizing it down:
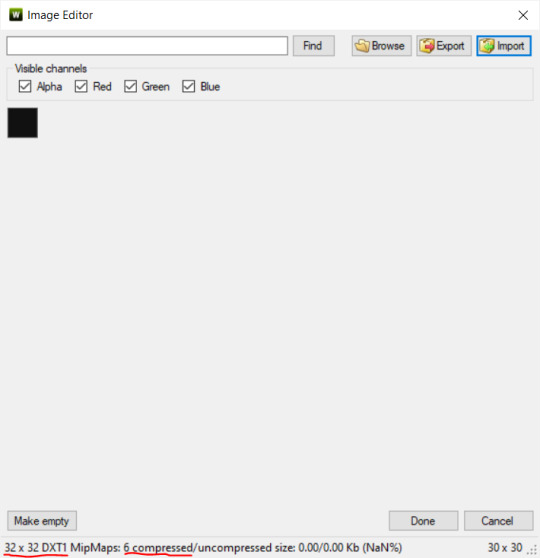
notice the difference between the image and compression size. instead of bloating the package file, we can keep it down by using a 32x32 plain black specular map instead, since there aren't details we want from the specular map.
same goes for normal maps:
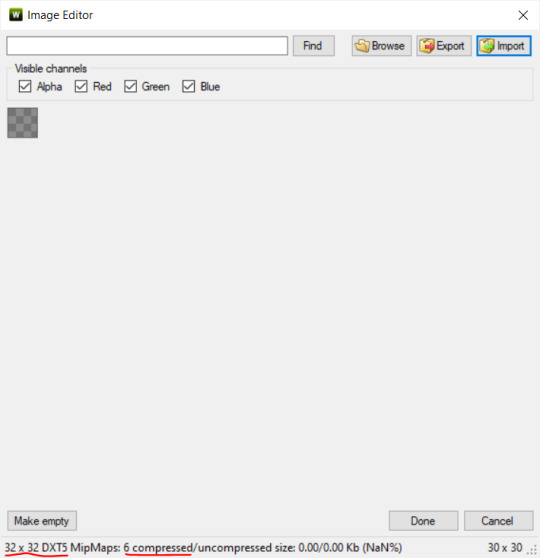
and masks (meant for 1 channel only):

now, notice how I underlined the info about DXT MipMaps. see how the normal map has a different number there compared to the specular map and mask.
the reason these textures use different DXT is because of the colors and alpha channel.
here's how my DDS. settings appear when saving:
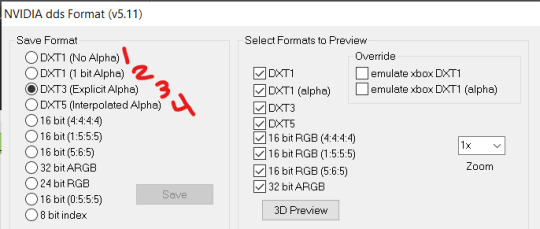
DXT1 (no alpha): this keeps only the 3 color channels and has the strongest compression. it results in half the file size as DXT3/5. 3 channel masks should be saved with this, as they don't need an alpha channel.
DXT1 (1 bit alpha): this includes an alpha, but only black or white. it also results in half the file size as DXT3/5.
DXT3: this one is rarely used for TS3 textures. it really is only used for overlays. it compresses the same as DXT5, but may not be the best for images with smooth-blended alpha regions (Neely).
DXT5: multipliers and normal (bump) maps should only EVER be saved with this. it's best for colors but has a larger file size. this is why it's important to reduce the multiplier and normal map image size, especially if you don't make a normal map.
if you DO decide to do a specular and normal map, they should be regular image size, 1024x1024, and saved in the right format.
here is more information on which textures should use which compression.
-----------------
Adult to Teen Conversions:
the default for converters is obviously AF and AM. a lot of people want the items for teens too. I've seen several converters just enable it in TSRW:
please don't do this. it's honestly the lazy route. you can hardly ever get away this, specifically because of the body differences between adult and teen.
some major issues with this include gaps, seams, and unnatural body characteristics:
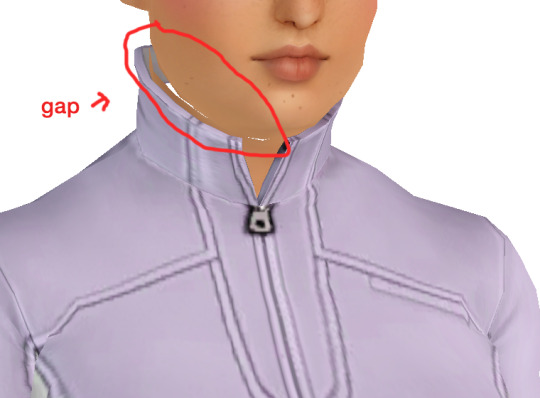
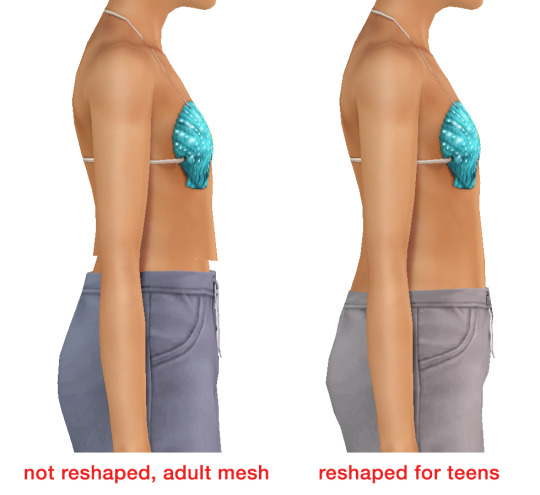
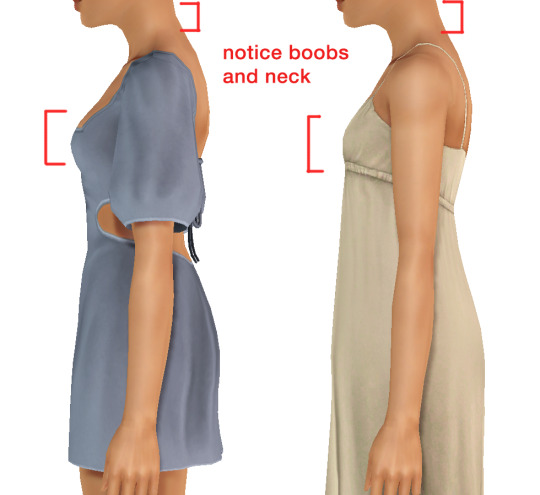
so please, either skip the teen mesh entirely or spend the time reshaping the mesh. @/sweetdevil-sims has a great tutorial on converting meshes from AF to TF here. the inevitable seams on TF meshes are also now fixed, thanks to @/thornowl with their new version of mesh toolkit.
@pis3update
---------------
here are reduced file sizes and corrected settings of the plain mask, specular, and normal:
download
Sources:
Neely, G. ‘Buckaroo’. Working with DDS/DXT Files. Available at: https://www.buckarooshangar.com/flightgear/tut_dds.html (Accessed: 28 May 2024).
199 notes
·
View notes
Text
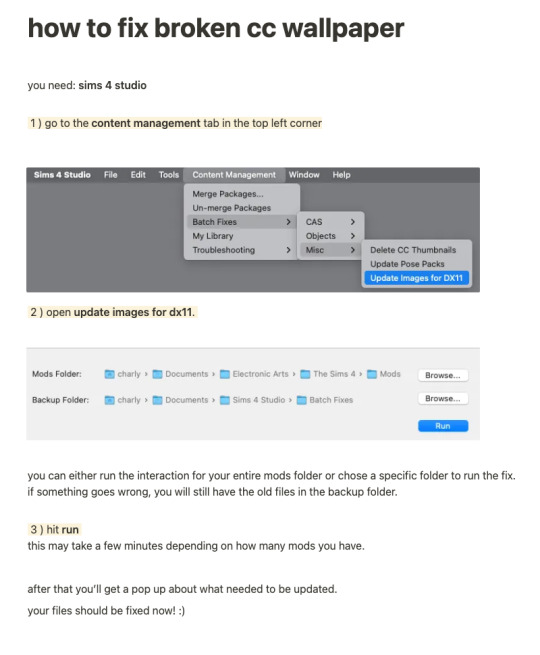
while finally (!!!) fixing my own cc for the dx11 update, i put together a little tutorial on how to fix broken cc by yourself because there might be a lot of cc you can't connect to the og creator anymore, the creator doesn't exist anymore or whatever. there's also a lot of other batch fixes in this menu tab so maybe you can even find some fixes for other cc that's been broken in your game as well :)
there's quite a few things i have to update since i didn't take proper care of some older sets as well as the recent update that stopped custom content tv's from working with the consoles in game since they got a few new interactions. so, i am onto that, too!
i will put out my own updated files asap 💛
306 notes
·
View notes
Text
A small but very useful tutorial
written with the help of chatGPT
Why Use Upscayl?
Upscayl is a great tool for improving textures and reference images. Whether you are working on character skins, environmental textures, or UI elements, this program helps to:
Increase image resolution without losing quality
Reduce pixelation and enhance details
Improve the clarity of textures for a more realistic look
How I Use Upscayl (look at the photo)
Finding or Creating a Reference Image I start with an image that I want to enhance. This could be a low-resolution texture or a reference image for a new design.
Adding Noise for Testing To demonstrate how Upscayl improves images, I intentionally added noise to a mask texture. This allows me to compare the before and after results more clearly.
Processing the Image in Upscayl I import the noisy texture into Upscayl and choose an appropriate AI model. The program processes the image, enhancing its details and removing unwanted noise.
Examining the Results After running the texture through Upscayl, the difference is clear: the texture appears sharper, more detailed, and free of noise, making it more suitable for in-game use.
Enhancing Existing Game Textures
Apart from improving references, Upscayl is also useful for enhancing in-game textures, such as character skins. If a skin looks too blurry or low-resolution, running it through Upscayl can significantly improve its appearance without having to manually repaint details.


#sims3#sims#ts3#simblr#s3#sourlemonsimblr#sls#sims4#the sims#sims 2#tutorial#not sims#sims tutorial#cc tutorial
113 notes
·
View notes
Text
Nucrest Cocoa Hoodie V2 for teenagers
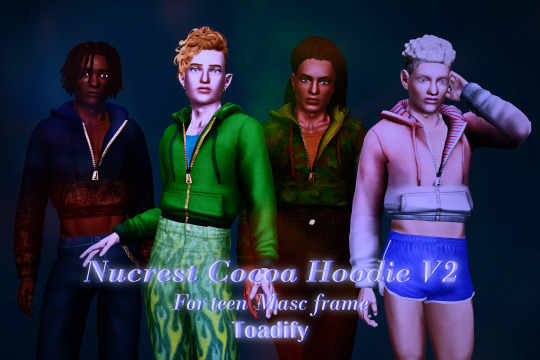
The @nucrests cocoa hoodie version 2 for teenagers, previously made for adults which was recently updated.
It doesn't have any of the original swatches because I made the original as a sort-of collab with @geminipixels , who did the TS4 presets while I did a castable version, and to give it presets I would need to reconvert it from scratch. Though I do have ideas - I would make them hue-recolorable for example.
Download simblr.cc / SFS (acted up, will be added) / Mediafire

About the hoodie
For teen male sims
Sensible specular map (near-black with shiny zipper), blank normal map.
4 presets with 4 combo's of multiplier-mask, 4 channels each.
Enabled for everyday, sleepwear, athletic, outerwear (with accessory tops) and career
Fat, fit, thin morphs
All LODS: 4537 F - 3374 V / 2098 - 1428 / 891 - 698
Custom Thumbnails


Made with
Blender 3.6
Affinity photo
Adobe photoshop
TSRW
S3PE
Meshing tool kit.
I wrote down my whole work progress, right here! Hopefully it can function a bit as a tutorial ♥
@katsujiiccfinds @eternalccfinds @wanderingsimsfinds @pis3update
#florian pistache#andres bardem#sims 3#ts3cc#downloads: me#downloads: cas#downloads: clothing#ts3#sims 3 cc#s3cc#clothing TM#ts3 cc tutorial#cc tutorial
69 notes
·
View notes
Text
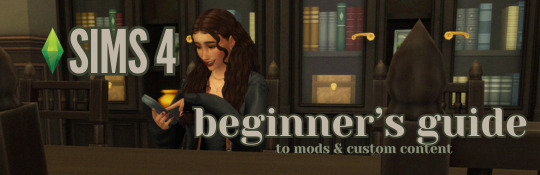
this guide is specifically for my friend mel <3 but of course anyone is free to reference it x
𖡡 you've downloaded the game, played around a little bit, and now you're looking to add mods and custom content (cc) into your game
────୨ৎ────
this game is basically nothing without mod and cc creators, so all credit and love to them ♡
step 01: setting up your mods folder
open file explorer, go to documents, and find the folder labeled electronic arts. then click on the sims 4.
you'll see a folder labeled mods - pin it to quick access [this will make accessing it easier]
step 02: downloading mods and cc
you can find cc and mods so many ways!! tumblr, youtube, pinterest, instagram, etc. there are a lot of blogs on tumblr specifically for cc finds too
make sure you're downloading things from a reliable source. for example - a creator's patreon/tumblr or website, simfileshare.net [often linked as sfs], google docs, curseforge, itch.io, and *unanimously hated* thesimsresource.com → the sims resource is hated because of all of the fucking ads lmaooo
you'll be downloading package files and zip files. you'll find them in your downloads in file explorer
step 03: installing mods and cc
navigate to downloads in file explorer
package files can be simply dragged into the mods folder
zip files need to be extracted, then you can drag and drop the unzipped folder into your mods folder → whatever you put into your mods folder can only be one extra folder deep or it won't show up in your game
when it comes to mods [not cc], creators will often have instructions for you. follow those exactly
step 04: mods + game updates
sometimes mods break when there's a game update. it's just a very annoying part of the game at this point lol
some mods will have a pop-up in the game letting you know it needs to be updated. but if it doesn't and you notice something is fucked up, you can google 'broken mods' and usually someone else will be having the same problem and can let you know to update it
if a mod is broken, remove it from your mods folder and go download the new version from the creator → a lot of mod creators update very quickly [like the same day or within a couple days] but sometimes they don't. just be patient and check for updates periodically
recommended: the sims 4 mod manager // dl here → the mod manager will allow you to see and deactivate or remove mods and cc from your game [it's automatically connected to your mods folder and can be helpful when you can't find broken mods or cc]
gameplay mods i recommend
mccc by @deaderpoolmc // dl here ✧ gives a you a lot of control of your game
tool by @twistedmexi // dl here ✧ place and size things however you want
better build/buy by @twistedmexi // dl here ✧ gives you easier access to things in build/buy that you'd normally have to use cheats for
relationship and pregnancy overhaul by lumpinou // dl here ✧ more realistic gameplay [this one is essential!!]
lgbtqia+ by lumpinou // dl here ✧ gender identity, gender affirmation and transition, self-discovery, coming out, dating apps and lot traits [i love this mod so much!!]
healthcare redux by adeepindigo // dl here ✧ adds illness, injury, chronic conditions, allergies, medical emergencies, etc
childbirth mod by @pandasamacc // dl here ✧ good for family gameplay
snbills by @simrealist // dl here ✧ bank accounts
also want to mention milk thistle & sunblind by @softerhaze ✧ the lighting with these mods is *essential* pls check them out!!
create-a-sim [cas] mods i recommend
cas backgrounds // you can download mine here but i also love vyxated ✧ these are just extra fun!! you can find a lot on tumblr or youtube to download. it's a super easy drag and drop into your mods folder. but when you want to change it, make sure you remove the current one or it won't work!!
gentle cas lighting by northerin siberia winds // dl here ✧ replaces the ea lighting in cas with a softer glow and shadows
any cas lighting by helgatisha // dl here ✧ i like the colors they have!!
custom content [let's make your sims hot!!]
cc creators i love: @kumikya @dogsill @aladdin-the-simmer @arethabee @imvikai @jius-sims @northernsiberiawinds @oakiyo @its-adrienpastel @daylifesims @twisted-cat @madlensims @miikocc @obscurus-sims @evoxyr @powluna @pralinesims @simandy @sentate @simstrouble @christopher067 @aharris00finds @bluecravingcc @crypticsim @gorillax3-cc @gegesimmer @frzrbunny @greenllamas @lisatrait @joshseoh @liyahsim @thatonegreenleaf @trillyke @waterlily0210 @clumsyalienn @johnnysimmer @lamatisse
────୨ৎ────
anyways mel, i really enjoyed making this for you and i hope you enjoy the game!! <3
#sims4guide#sims 4#the sims 4#ts4#gameplay mods#cas mods#create a sim mods#sims 4 mods#sims 4 cc#sims 4 guide#cas#simblr#cc finds#sims 4 game mods#sims 4 beginners guide#ts4 beginner guide#mod tutorial#cc tutorial#sims 4 cc creators#sims 4 mod creators#where can i find sims 4 cc#the sims community#sims community#create a sim#cas lighting#cas backgrounds#lumpinou mods#pandasama mods#adeepindigo mods#mccc
26 notes
·
View notes
Text

📗 The Sims 4 Flawless Posters Tutorial | Beginner Friendly
READ ON PATREON (FREE)
This is basically a comprehensive tutorial on making flawless posters. I know a lot of simmers start their modding journey with custom paintings and it can feel a bit overwhelming at first.
But don't worry, I'm here to make everything crystal clear and show you just how easy it really is. With just a little guidance, anyone can create amazing CC right from the start! So, if you’ve always wanted to make posters for The Sims 4 but didn't know how, this is your chance! 😊
I would love to hear your feedback on this tutorial! And feel free to share it with other simmers to help them create perfect posters as well!
#sims 4#sims 4 mods#sims 4 cc#ts4 cc#sims 4 sexy#sims 4 wall art#sims 4 wall decor#sims 4 aesthetic#sims 4 interior decor#sims 4 custom content#sims 4 creator#sims 4 decor#the sims 4#ts4#ts4cc#sims 4 download#sims 4 cute#ts4 deco cc#ts4 decor#simblr#sims 4 tutorial#ts4 tutorial#sims 4 how to make posters#sims 4 poster tutorial#sims 4 painting tutorial#cc tutorial#making posters is easy lol (it really is!)
79 notes
·
View notes
Text

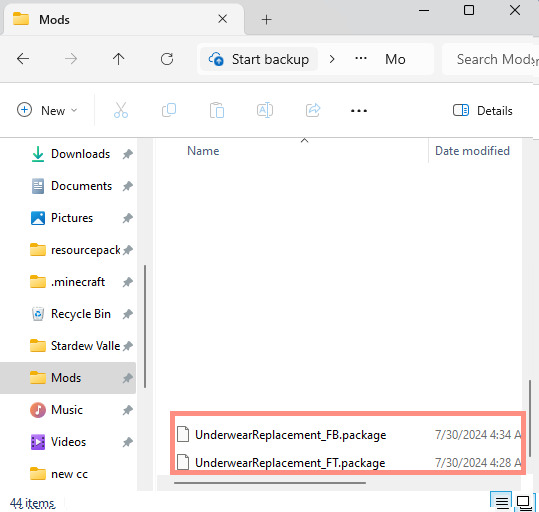
CAS UNDERWEAR OVERRIDE TUTORIAL!

faq/before you begin: This is a tutorial for personal use ONLY. If you use this tutorial DO NOT reupload your overrides unless it the original creator gives you permission to do so. reuploading a creator's custom content IS theft. I do not condone stealing cc from hard working creators, so please only use this as a tutorial for yourself! to get started, you will need: ꣑ৎ sims 4 studio ꣑ৎ the underwear you want to make your default ꣑ৎ and patience ( ,,◕ ̫ ◕,, ) this tutorial is aimed towards people who have never used ts4 studio before! so if it seems too hand holdy im sorry, i just want to make sure everyone can understand! If you don't understand something, please don't feel shy about reaching out! either through a dm or an ask! i'll be happy to help!
start by downloading TS4 studio. The process is fairly simple, but if you get stuck here's a great tutorial you can follow!
once you have it all installed, you'll want to make a folder on your desktop. This is just for organization purposes, to make digging for the files easier later on:
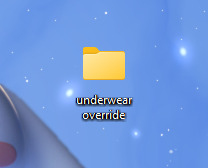
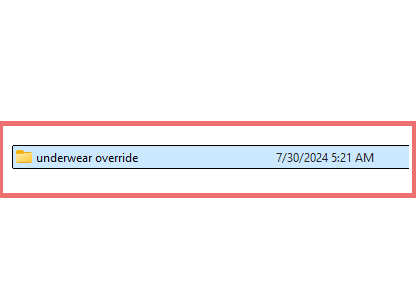
here's an example of what i named my folder! for simplicity's sake though, i'll be referring to the desktop folder as the "underwear override" folder, but you can name yours whatever you want! Just make sure its on your desktop~ ( ˶ˆᗜˆ˵ )
────୨ৎ────────୨ৎ────────୨ৎ────────୨ৎ────
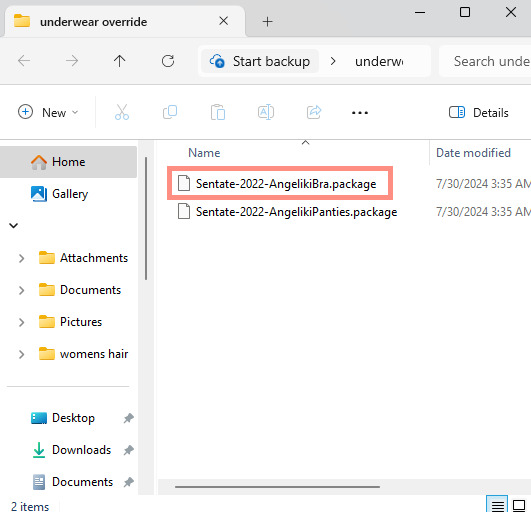
next you'll want to find the underwear you'd like to make a default replacement. I'm using the Sentate's Angeliki set (bra and panties) from their midnight collection found HERE. (Also a gentle reminder, this is for PERSONAL USE only. Sorry i keep repeating this, i'd just hate for people to use this tutorial for bad 。°(°.◜ᯅ◝°)°。 )
any underwear SHOULD work, unless the underwear you pick has 3D pieces. I wish i could explain why, but i honestly have no clue. Im a noob at this haha. Just make sure your mesh isn't 3D!
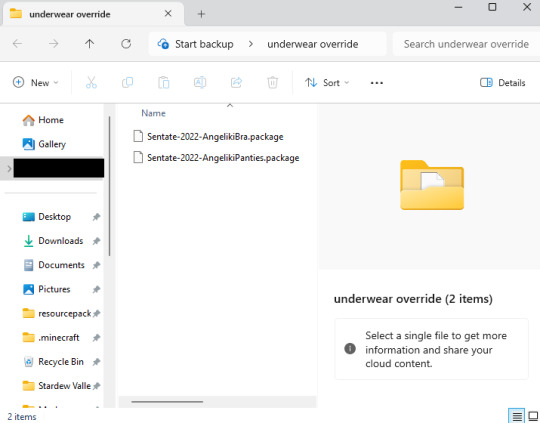
once you have the undies of your choice secured, go ahead and place both into the "underwear override" folder on your desktop! (photo below)
────୨ৎ────────୨ৎ────────୨ৎ────────୨ৎ────
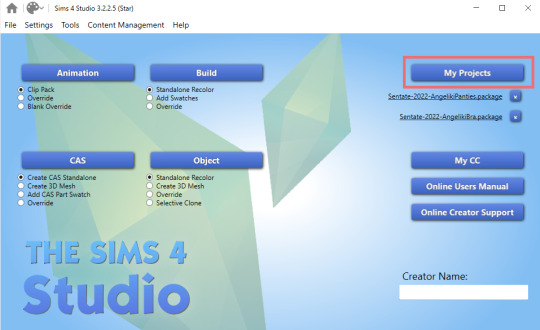
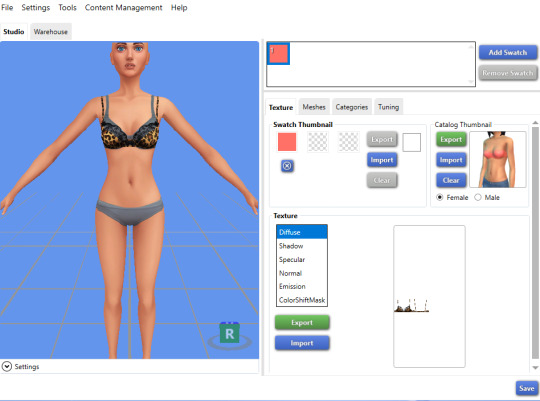
now it's time for the fun part! You'll go ahead and open sims 4 studio, once in there, you'll want to click where it says "my projects" (photo below)
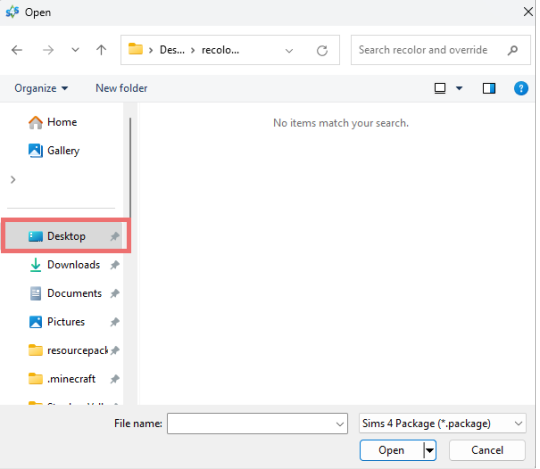
Once you do that, your files should all pop up. It doesn't matter where it takes you, you'll just want to find the "desktop" section of your file menu! Then, you'll find the "underwear override" folder and open that~ Now you'll just go ahead and open the package that you want. I'm going to start with the bra, but the process for the underwear is exactly the same! so it doesn't matter which one you choose to do first ദ്ദി ˉ͈̀꒳ˉ͈́ )✧ (photo below)
────୨ৎ────────୨ৎ────────୨ৎ────────୨ৎ────
if you did it right, your screen should look similar to mine! ¡¡¡( •̀ ᴗ •́ )و!!! (photo below)
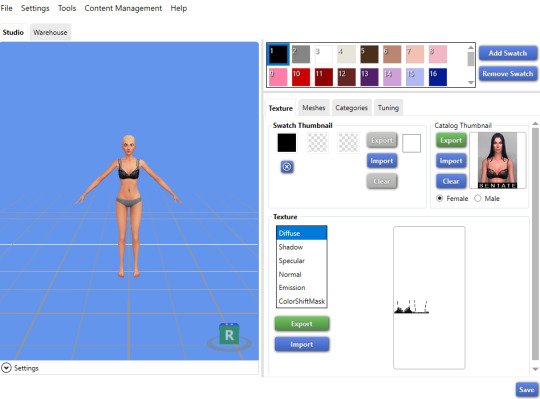
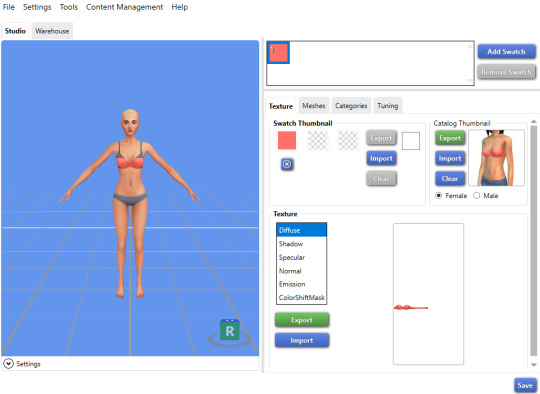
now, you'll just want to select the swatch you'd like at the top! (if you've never used the sims 4 studio before, you can use your mouse wheel and the right mouse button to control the camera in the blue area with the weird bald sim lol- that way you can see the swatch you're picking a bit better! (photo below)
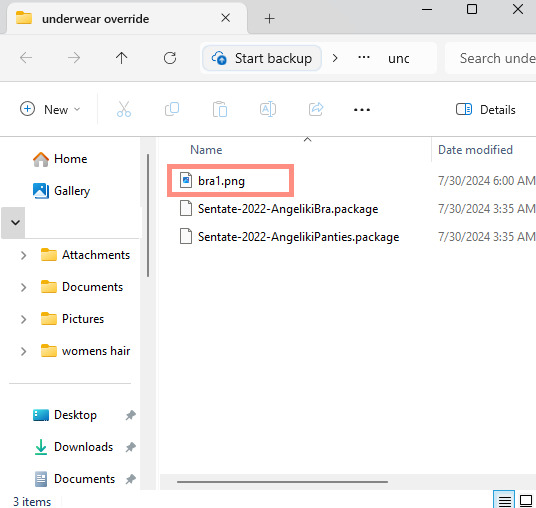
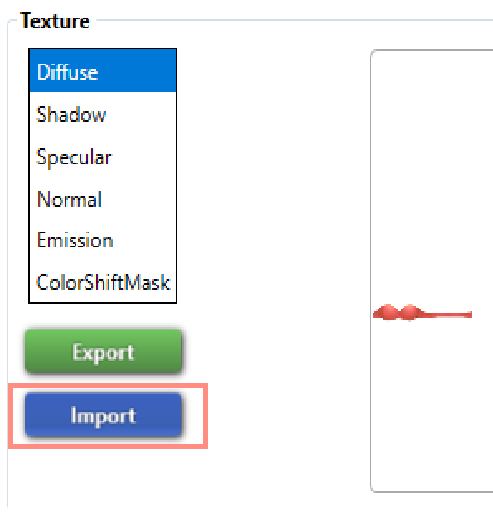
now that you have the swatch you like, in the texture setting, diffuse should already be selected. You'll want to go ahead and click "Export", then name the file "bra1". If you did it correctly, it should save as a PNG! (photo below)

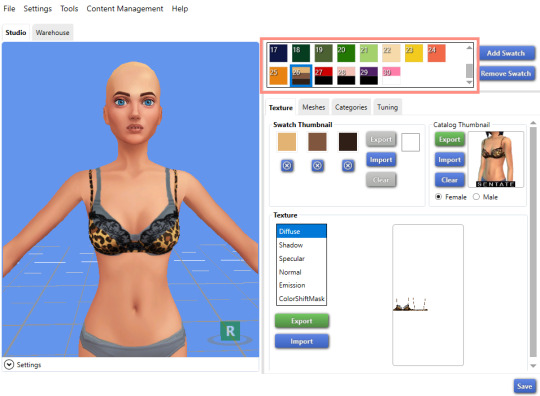
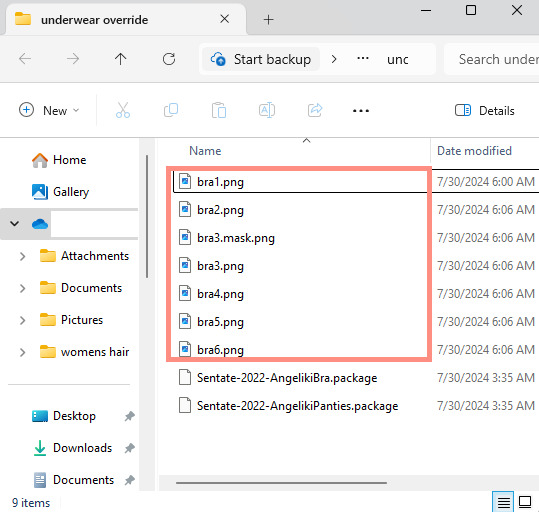
then, you'll want to go down the line of textures (shadow, specural, normal, emission, colorshiftmask) and continue to number them (EX: shadow is bra2, specural is bra3, ect ect) til your folder is full with each texture! It should look like this if you've done it right! (photo below)
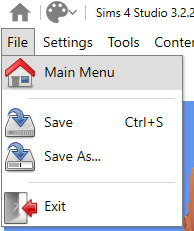
after you're done with that. You'll go ahead and click "File" and "main menu" in your sims 4 studio! (no need to save!) from here, you'll go ahead and select "Override" under the CAS section on the main menu then click the CAS button at the very top. (photo below)

the menu here might look confusing if you've never used sims 4 studio before, but just copy the way mine looks to make the process a bit easier! At the top drop down menus, you'll want to select "Gender: female, Age: Adult, Part Type: Clothing Top, Game Pack: base game" This should narrow down the menu a bit! (photo below)

then, you'll scroll til you find THIS exact bra. This is the bra the sims 4 uses as their default, and we're overriding this, so please be sure to select the exact one! (photo below)

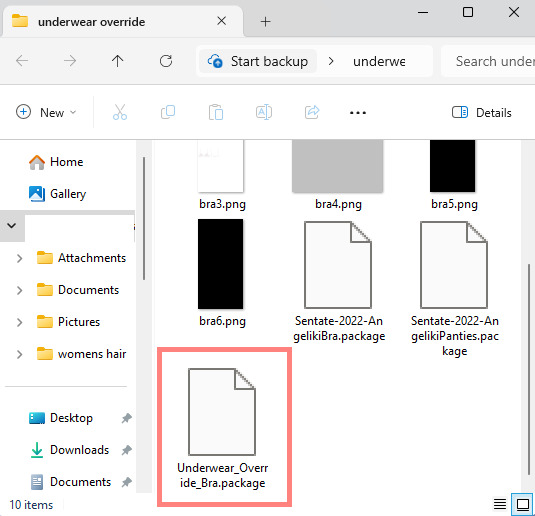
once you select it, click "next", and it should take you to your files once more. You'll want to name THIS file something unique, that way there's no conflicts! I suggest something like: "Underwear_Override_Bra" just so you know which one you're working on, and you also know that this is an override (๑˃́ꇴ˂̀๑)
once you've named your package at the bottom, go ahead and click enter, and the studio should open back up~ (photo below)

now, you'll want to repeat the same export process from before, but use import instead! Then, you'll import the pngs the same way you saved them. (EX: diffuse is bra1, shadow is bra2, ect). Once you've done that, you should immediately see the textures change (photo below)
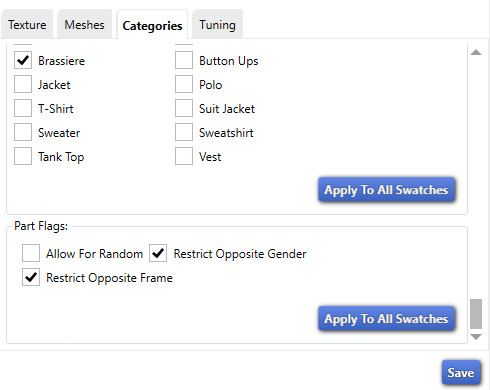
now that your textures are changed, you'll want to make sure to catagorize it properly, just to prevent your male sims from getting a bra when you take their shirt off as well. If you for some reason want your male sims to have an unremoveable bra, feel free to skip this step! if not, then you'll want to click the "catagories" tab right beside "meshes"
once there, you'll scroll all the way to the bottom til you hit "Part Flags", then you'll check "restrict opposite gender" and "restrict opposite frame" (i'm not sure if these mean the same thing, but i just checked both to be extra sure!) (photo below)

once you've finished replacing all the textures and catagorizing the override, you'll go ahead and click the save button at the bottom right hand corner, then open your "Underwear Override" folder. You should have your "Underwear_Override_bra" package now saved! yay! All that's left to do is repeat these steps with the panties of your choice, then drag both package files into your mods folder just like you would any other cc! (photo below)
(mine are named differently because i already made my own recolors + default replacements ( 〃..).. i'll try and upload a recolor tutorial later today for anyone curious!)
but now, you're done! all that's left to do is open your game and see your overrides in cas! If you did everything correctly, the undies should just appear when you take your sim's clothes off (⁄ ⁄•⁄-⁄•⁄ ⁄)
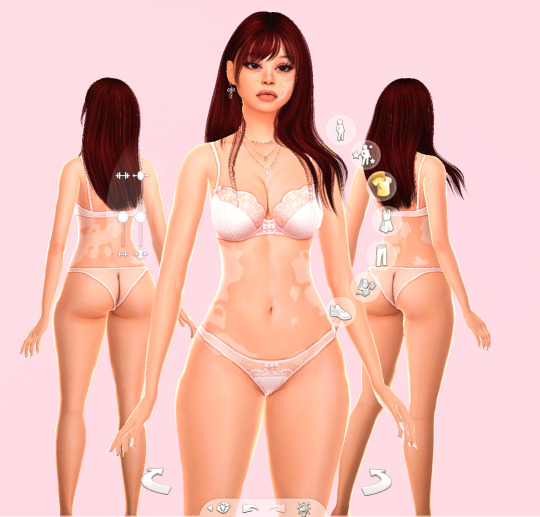
heres how mine turned out! (˵ •̀ ᴗ •́ ˵ ) ✧ im super proud of them!
it took me a few hours to get this tutorial together, so im a bit loopy signing off. If this is completely incomprehensible and confusing im so sorry, again if anyone has questions please do send an ask or message me! i'll do my best to answer any questions :) and also please remember; DO NOT REUPLOAD ANYONE ELSES CUSTOM CONTENT! this is for PERSONAL USE!
thank you for reading! (。•̀ᴗ-)✧
#the sims 4#ts4#sims4#maxis match#maxis mix#s4cc#sims 4 cc#ts4 cc#sims 4 custom content#cc tutorial#cc rec#cc cas#sims 4 cas#sims tutorial
91 notes
·
View notes
Text
if you're using CC that goes transparent when you have MXAO turned on with reshade/gshade, it's missing a shadow LOD - it's very easy to fix this yourself using sims4studio and blender with only basic knowledge of both.
open the .package file of the CC that's going transparent in sims4studio > go to meshes tab > export LOD 0 mesh > it will save the mesh as a .blend file. open the exported mesh in blender. press A to select all parts of the mesh and then right click > join. it might look weird. that doesn't matter. next you want to go to the 'scene' tab and look for S4studio mesh tools and set the cut number to 0. save your blend file.
go back to your package file in S4S. under meshes, scroll to SHADOW LOD 0 and then import the blend file you just saved (do this for all shadow LODs from high to low). save package file. put the new version of the file back in your mods folder. TADA the CC will no longer go ghost mode on you.
38 notes
·
View notes
Note
Hi! I love your cc!! I've been trying to find a tutorial for how to make something take on the texture of a sims body, like your tails do, and vice versa how to make a piece of cc that does that have different swatches instead. Haven't been able to find anything and I was wondering if you might know of one? No worries if not, thank you!
Hi! Thank you so much! So sorry for the delay with this, my internet died last week and I’ve been busy since then. I honestly can’t remember when I learnt how to make it take the texture from the skin but iirc it was me just asking someone else how to rather than an actual tutorial. The process is super simple so I’ll do a lil tutorial here for it

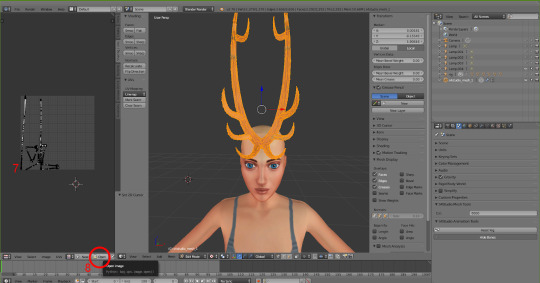
Depending on how you have your blender set up you might not have the extra window like I do, so go up to where the red circle is, click and drag those 3 diagonal lines and it’ll open a new viewpoint.
Click on the icon at the bottom of the viewpoint.
Select UV/Image Editor, the window will then look like the one on the left with the pixel grid.

4. Click this box and change the mode from Object Mode to Edit Mode. 5. Press A on the keyboard to select the entire mesh. 6. Press U on the keyboard and select Unwrap. (There are different ways to unwrap an object, but considering how tiny the UV will end up and it not needing a "proper" texture, there’s not really any point in doing any fancy unwrapping here)
7. After unwrapping you will see the UV map of your mesh in the UV editor 8. Click Open and find the UV image (Linked Here)

9. Click in the UV Editor window so it is active, press A to select the object's UV and then press S and scale it down (Move the mouse to scale it). Then press G and move it to where you want the object to take the skin colour from. For horns I tend to go for mid forehead, for my tails I go near the ear because the back skin is slightly darker/shaded so it blends better.

10. Now, the texture won’t immediately take note of the skin colour, so to fix that click the Material icon and then click New.

11. Click the icon next to Material and choose BaseTexture. This will apply the texture to the horns.

12. (Edited two screenshots together to show the uv placement, it won’t show it when you’re in object mode) Now back in object mode on the mesh viewpoint you can see that the mesh is now taking the colour or skin from the sim's forehead! You can move it around if you want to see if there's any other area you prefer, but be mindful of where other objects and textures will interact. With my tails and horns any hairs that have shadows or cover the ears will have issues with darkening the horns' colour. It's kinda inevitable honestly.
13. Now it’s just a case of importing it into Sims 4 Studio like other cc, for my horns I used earrings, but for the children and younger I used the blank body mesh (Because there's literally no base game accessories for any of them which don't have additional issues? I tried a bracelet but with long sleeve the horns would disappear, and I didn't have the patience to figure out exactly how to stop that lol). I replace the existing texture in Sims 4 Studio with a completely blank image (That’s the same size as the UV map)
The process for regular texturing is very similar, but I used a regular blender tutorial for that. There is also This Tutorial which goes over how to properly divide up your mesh for a cleaner UV map.

To get a image you can use to apply an actual texture, whilst in edit mode, click A to select the UV map, then click UV at the bottom and then Export UV Layout. This will save an image that just shows where your UV is, you can then use this as a guide when painting/applying a texture.
This is how my UV map looks after exporting and after painting it the texture I want. You can then reimport your textured image back into blender to see how it looks. Also if you've already imported your file into S4S you can simply just import the texture and it should apply.

I hope this all makes sense! Any questions I'll try to answer!
#sims 4#simblr#ts4#sims tutorial#cc tutorial#sims 4 tutorial#most of this is muscle memory at this point I almost forgot you had to apply the material for it to actually show lol#my regular methods of doing things is fucking around and finding out honestly lol
13 notes
·
View notes
Text
TheStarTome A Sims 4 Lightmaptex tutorial. ✨💖✨

Credits for tutorials that made this tutorial possible:
•orangemittens •@sp-creates •@alistu •sim_man123
This would not be possible without the help of
•@brainstrip •@aj-nebula •@itsonlythee-sims
I thank you all, I am ever grateful for your help!
#TheStarTome#thestartome#thestartome-tutorials#sims 4#sims 4 simblr#sims 4 custom content tutorial#the sims 4 tutorial#sims 4 cc tutorial#ts4 tutorial#sims 4 tutorial#tutorial#cc tutorial#the sims 4 custom content#content creator
14 notes
·
View notes
Text
Simtanico Cropped Tee V1 For teenagers

I've been overusing the first version of this cropped Tee set by @simtanico , but as I started working on some flashback chapters with teenaged Florian, I realized they could use it as well- so I converted it for teens! I also added two extra masks for Toadifian recolorability.
I have full permission to convert it. Simtanico originally adapted it from a University Life t-shirt.
Download Simblr.cc/ SFS / Mediafire

About the t-shirt
3 Presets with 3 different masks
1k Textures
Found under Everyday, formal, sleepwear, athletic, and career.
All lods: 2902 F 1798 V / 1199 F 793 V / 489 F 382 V
All morphs.
Custom Thumbnails


Made with
Blender 3.6
Affinity photo
Adobe photoshop
TSRW
S3PE
Meshing tool kit.
I wrote down my whole work progress, right here! Hopefully it can function a bit as a tutorial ♥
@eternalccfinds @wanderingsimsfinds @katsujiiccfinds @pis3update
#florian pistache#andres bardem#sims 3#ts3cc#downloads: me#downloads: cas#downloads: clothing#ts3#sims 3 cc#s3cc#clothing TM#ts3 cc tutorial#cc tutorial
60 notes
·
View notes
Text
hey so i've been working on a lot of things (and also second guessing myself a lot because perfectionism) but here's some very random sneak peeks if y'all are interested!!

#and happy black history month!!#how are we already entering into the final week :((#also#i've been inspired to write some 'creating deco cc' tutorials#i saw someone ask where they could find some easy-to-follow ones on x and i thought why not???#i'm far from the best but i can do lil sumn sumn i suppose
1K notes
·
View notes
Text
Since the new eyelash update is here, I'm gonna teach you how to convert old eyelash cc into the new eyelash option!
First of all, we will need the Sims 4 Studio. The download link can be found here: https://sims4studio.com/board/6/download-sims-studio-open-version
Now, head into the app and click the "My Projects" button on the main menu.

Open the eyelash file (.package file) you want to convert. I'll just pick a random one for reference. Once you picked the one you want, hit open.
You will be directed into the studio, which will look like this:

Now on the right side of the screen, find the CATEGORIES button and click on it.

Once there, change the OUTFIT TYPE to MASK DETAIL EYELASHES and APPLY TO ALL SWATCHES. Save the file, and the .package file will be updated in your game. Also, make sure to double check in-game before continuing with your other custom content.

As you can see in my game, It worked! Hopefully it works for all of you, too.

And that's about it. Thanks for reading all the way.
And by the way, If you're going to distribute these publicly without the original creators consent, just don't do it. This is meant for private use only or for content creators who want to convert their eyelashes into the new eyelash section.
EDIT: As trillyke has said, This does not work with eyelashes in the glasses section as they will collide with rings and most of the accessories
#sims-4-custom-content#ts4#thesims4#customcontent#ts4cc#the sims 4 cc#the sims 4 custom content#tutorial#the sims 4#the sims community#the sims cc#sims#sims 4#simblr
4K notes
·
View notes
Text
This is my go-to method to decimate all kinds of CC. It's very clean and you can exactly decide where you want to keep denser geometry and where to reduce! To make this process faster, there is a nifty way to select every other edge loop to quickly decimate the loops by 50%, which is especially useful for clothing meshes that have a tubular shape (use it on sleeves, pants, tops, shoelaces, jewelry chains...) Remember to first convert the mesh into quads using alt+j as bellakenobi mentioned or it won't work. Depending on the structure of the mesh, the loops might not get selected all the way through automatically and some manual selecting is necessary to finetune the result, but it's worth it. I don't find this method takes an unreasonable amount of time, and it gives such great and clean results that it makes working with the meshes much easier too since you do not get faces randomly deleted like with the decimate modifier. This is a helpful video tutorial that explains the technique: how to select every other edge loop!!
Once the loops are selected according to the video tutorial, you just dissolve the edges (x -> dissolve edges). Remember to also dissolve some of the edges going into the other direction (if you dissolved the vertical loops, also dissolve horizontal ones) to reduce overall density! As bellakenobi mentioned, with one or more parallel loops selected, you can double tap g to enter edge slide mode to re-adjust the remaining edge loops. This is not only very convenient and less prone to cause issues, because it just slides along the surface of the mesh, not elsewhere, but edge slide will automatically adjust the UV map for you too to reflect those changes, which means less work for you.
Tips for fixing topology: Selecting edge loops works best on quads, but there are several ways that you can edit and alter a face. for example, by selecting two vertices and pressing j, you can quickly cut a new edge between the two vertices. It's like a quicker version of the knife tool (which is very good to use too!). With the dissolve options (press x), you can delete unwanted vertices, faces, or edges, depending on what you want. I sometimes dissolve several faces next to each other and then cut out new edge loops in a messy area. Just experiment a bit! It helps to periodically triangulate (ctrl+t) some areas with n-gons (faces with more than 4 edges) when you dissolve a larger area of faces to "settle" them so you do not lose the overall shape of the mesh. You can then convert the area back to quads afterward (ctrl+j). After these edits, you may want to reset the normals in areas with dissolved topology since they may get wonky in the process. But with Mesh->Normals->Average->Face Average you can reset them and make them smooth and gorgeous again. A really helpful tip is to look at the Blender manual which explains a lot of techniques and provides shortcuts, or videos that explain small features that can have a big impact, speed up your workflow, and improve your meshes. I recommend BlenderSecrets, a YouTube channel that offers lots of quick tips for Blender that make life easier.
Tiptorial: manually reducing the poly from hair (if you're crazy enough and have a lot of free time)
First of all, get rid of the undersides and remap the whole mesh to the proper ts3 hair texture size;
Select one strand, revert the selection with ctrl+i and hide it all with H, to isolate the strand we want to work (do not separate it into another object, if you do that you'll mess with the strands order and will have transparency issues!);
We need to convert the tris into quads, for this, press alt+J. This strand had almost no issues converting it, but some might present it, then you'll have to select each square manually and dissolve the faces to turn it into a quad. It's easier to do that in the UV map with sync selection by selecting it like a checkerboard, then dissolve everything, then select one tri and press shift+g and select polygon sides, this will select everything that was not converted and then you can dissolve it.
After everything is in quads, alt+click on a edge to select the whole edge loop, then dissolve the edge. You can also press G twice to slide the edge along the mesh to better adjust it.
When the strand is like you want it, you can select it and assign to a vertex group so you can easily select all the dissolved strands to better work with the whole mesh (remember, do not separate any strand!)
And now you'll repeat the process with all the other strands 🫠
138 notes
·
View notes
Text

IF YOU CAN'T ENABLE CC 🌸
Sul sul ^^
After today updates, I wasn't able to enable CC again. It doesn't matter how many times I closed and launched the game.
So I remembered that this had already happened to me before.
If you're going through the same problem, this is how you can fix it:
🌸🌸🌸🌸🌸🌸🌸🌸
HOW TO ENABLE CC AGAIN:
1- On the game home page, in the bottom right corner of the screen, you can see what the current game version is. After today's update, mine was: 1.108.318.1020. Launch the game and check the number that appears for you.
2- In your game folder (Documents>Electronic Arts> The Sims 4) you'll find a file called "GameVersion". There will be a number.
The number in that file has to match the current game version number.
When I opened mine, it was "1.107.151.1020". So I just updated it to "1.108.318.1020" and saved. Then when I launched the game I could enable CC again.
Note 1: There's a "space" before the number in "GameVersion" (as if it were a paragraph). Keep that space. Change the numbers exactly where they are.
Note 2: If you prefer, before changing the number, make a backup copy of "GameVersion" just in case. It won't harm your game, but it's better, just to prevent and make it safer.
💎 If you want a tutorial video, I made one about it some time ago. You can watch it here :)
🌸🌸🌸🌸🌸🌸🌸🌸
ALSO IMPORTANT AFTER UPDATES:
Remember to delete "localthumbcache". You can find the tutorial here.
🌸🌸🌸🌸🌸🌸🌸🌸
I'm currently checking my CC to see if they're still working.
If anything, I'll let you know :)
I hope it helps you if you're having any problems :)
Happy Simming ^^
3K notes
·
View notes
Text

hey guy's i made a quick and easy tutorial on youtube about how you can frame your sims screenshots with any cc frame you want, you don't need photoshop or any other of these overwhelmimg programs and you also don't need any kind of photo editing skills! you can find the video here. i hope it's helping some of you. love, jodie ♡
#tuts*#sims 4 mods#sims 4 cc#sims 4 simblr#sims 4 custom content#the sims 4#the sims#the sims community#sims 4 tutorial#the sims 4 custom content#sims 4 maxis match#sims custom content#sims 4#ts4 simblr#sims community#ts4
444 notes
·
View notes