#mod tutorial
Explore tagged Tumblr posts
Visit Tumblr Blog
Explore Tumblr blogs with no restrictions, modern design and the best experience.
Last Seen Tumblr Blogs


Fun Fact
Post activity is at the highest at 4:00 pm EDT; notes peak at 10:00 pm EDT.
Text
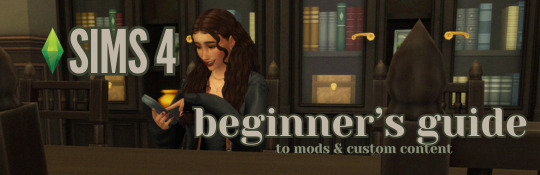
this guide is specifically for my friend mel <3 but of course anyone is free to reference it x
𖡡 you've downloaded the game, played around a little bit, and now you're looking to add mods and custom content (cc) into your game
────୨ৎ────
this game is basically nothing without mod and cc creators, so all credit and love to them ♡
step 01: setting up your mods folder
open file explorer, go to documents, and find the folder labeled electronic arts. then click on the sims 4.
you'll see a folder labeled mods - pin it to quick access [this will make accessing it easier]
step 02: downloading mods and cc
you can find cc and mods so many ways!! tumblr, youtube, pinterest, instagram, etc. there are a lot of blogs on tumblr specifically for cc finds too
make sure you're downloading things from a reliable source. for example - a creator's patreon/tumblr or website, simfileshare.net [often linked as sfs], google docs, curseforge, itch.io, and *unanimously hated* thesimsresource.com → the sims resource is hated because of all of the fucking ads lmaooo
you'll be downloading package files and zip files. you'll find them in your downloads in file explorer
step 03: installing mods and cc
navigate to downloads in file explorer
package files can be simply dragged into the mods folder
zip files need to be extracted, then you can drag and drop the unzipped folder into your mods folder → whatever you put into your mods folder can only be one extra folder deep or it won't show up in your game
when it comes to mods [not cc], creators will often have instructions for you. follow those exactly
step 04: mods + game updates
sometimes mods break when there's a game update. it's just a very annoying part of the game at this point lol
some mods will have a pop-up in the game letting you know it needs to be updated. but if it doesn't and you notice something is fucked up, you can google 'broken mods' and usually someone else will be having the same problem and can let you know to update it
if a mod is broken, remove it from your mods folder and go download the new version from the creator → a lot of mod creators update very quickly [like the same day or within a couple days] but sometimes they don't. just be patient and check for updates periodically
recommended: the sims 4 mod manager // dl here → the mod manager will allow you to see and deactivate or remove mods and cc from your game [it's automatically connected to your mods folder and can be helpful when you can't find broken mods or cc]
gameplay mods i recommend
mccc by @deaderpoolmc // dl here ✧ gives a you a lot of control of your game
tool by @twistedmexi // dl here ✧ place and size things however you want
better build/buy by @twistedmexi // dl here ✧ gives you easier access to things in build/buy that you'd normally have to use cheats for
relationship and pregnancy overhaul by lumpinou // dl here ✧ more realistic gameplay [this one is essential!!]
lgbtqia+ by lumpinou // dl here ✧ gender identity, gender affirmation and transition, self-discovery, coming out, dating apps and lot traits [i love this mod so much!!]
healthcare redux by adeepindigo // dl here ✧ adds illness, injury, chronic conditions, allergies, medical emergencies, etc
childbirth mod by @pandasamacc // dl here ✧ good for family gameplay
snbills by @simrealist // dl here ✧ bank accounts
also want to mention milk thistle & sunblind by @softerhaze ✧ the lighting with these mods is *essential* pls check them out!!
create-a-sim [cas] mods i recommend
cas backgrounds // you can download mine here but i also love vyxated ✧ these are just extra fun!! you can find a lot on tumblr or youtube to download. it's a super easy drag and drop into your mods folder. but when you want to change it, make sure you remove the current one or it won't work!!
gentle cas lighting by northerin siberia winds // dl here ✧ replaces the ea lighting in cas with a softer glow and shadows
any cas lighting by helgatisha // dl here ✧ i like the colors they have!!
custom content [let's make your sims hot!!]
cc creators i love: @kumikya @dogsill @aladdin-the-simmer @arethabee @imvikai @jius-sims @northernsiberiawinds @oakiyo @its-adrienpastel @daylifesims @twisted-cat @madlensims @miikocc @obscurus-sims @evoxyr @powluna @pralinesims @simandy @sentate @simstrouble @christopher067 @aharris00finds @bluecravingcc @crypticsim @gorillax3-cc @gegesimmer @frzrbunny @greenllamas @lisatrait @joshseoh @liyahsim @thatonegreenleaf @trillyke @waterlily0210 @clumsyalienn @johnnysimmer @lamatisse
────୨ৎ────
anyways mel, i really enjoyed making this for you and i hope you enjoy the game!! <3
#sims4guide#sims 4#the sims 4#ts4#gameplay mods#cas mods#create a sim mods#sims 4 mods#sims 4 cc#sims 4 guide#cas#simblr#cc finds#sims 4 game mods#sims 4 beginners guide#ts4 beginner guide#mod tutorial#cc tutorial#sims 4 cc creators#sims 4 mod creators#where can i find sims 4 cc#the sims community#sims community#create a sim#cas lighting#cas backgrounds#lumpinou mods#pandasama mods#adeepindigo mods#mccc
26 notes
·
View notes
Text
Farmer 2.0 ESWF
I've had a couple of different people asking me through different venues about how to set up the portraits in the mod Farmer 2.0 ESWF.
I'm assuming that the reader knows how to download mods and their dependencies, so I'm going to talk specifically about setting up the file structure within your mod folders. The screenshots are all from Windows 11, and my Stardew is through Steam, so keep that in mind.
If this is something you're curious about/looking for info on, just look under the cut. There are lots of screenshots.
I'm giving Stardrop a spin these days, so the folder path is somewhat different.
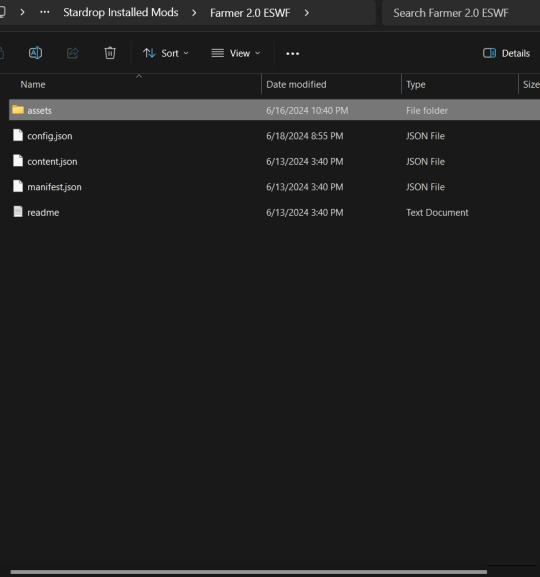
My Mods Folder looks like this:
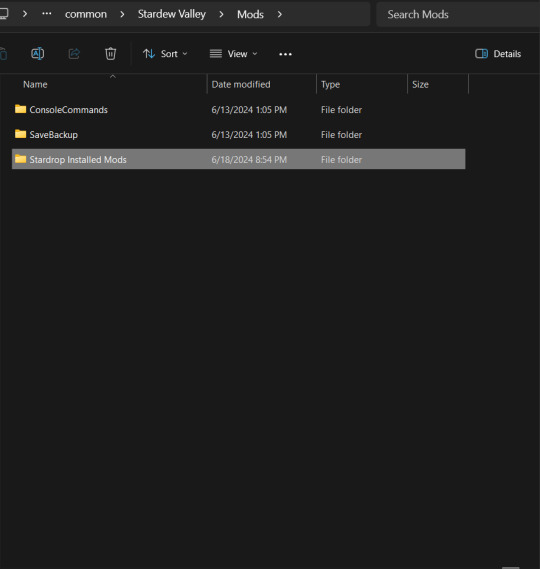
Within the Stardrop Installed Mods folder, it looks like a typical Mods folder setup if you're doing manual installs:
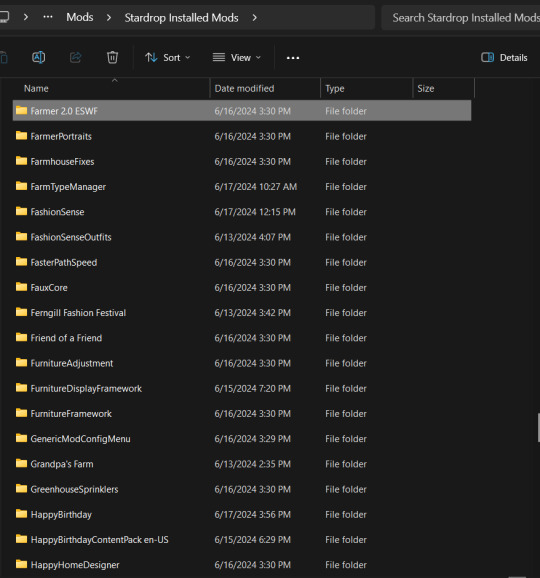
You'll need to go into the folder I have highlighted, "Farmer 2.0 ESWF."
It should look like this:
We're going to need to go into the assets folder that is highlighted there. Inside, you should have a file structure similar to this:
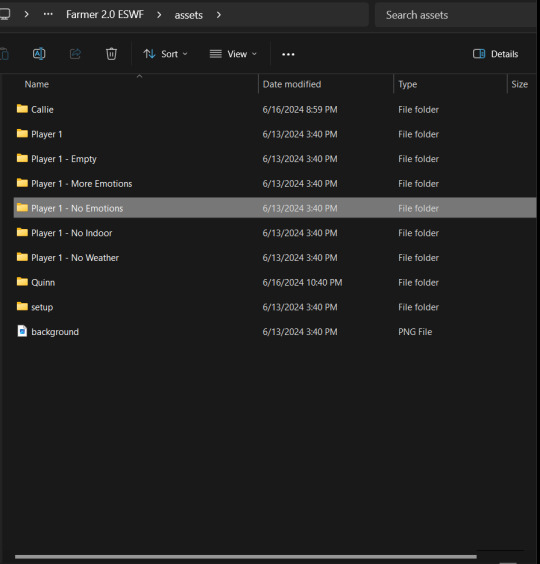
(Note, if you've just installed, you won't have anything like the "Callie" or "Quinn" folders. We're getting ready to set that up.)
Now, for this setup, I'm doing the "Player 1 - No Emotions" because pixel art is not in my wheelhouse and this is a pretty straight-forward set up. This one allows you to set up different portraits for different weather types, as well as different portraits for indoors versus outdoors if you want your character to not have a coat on while inside or whatever.
The first thing you need to do is Copy and Paste the "Player 1 - No Emotions" folder within that same assets folder.

In older versions of Windows, instead of it tacking on a "- Copy" at the end, it oftentimes will add a "(1)" or "(2)" instead. You're going to rename that to the name of your Farmer--not your farm, but your character. Hence why I have a "Callie" and a "Quinn."
For this demonstration, I'm going to use Quinn since I used the No Emotions setup for them.
Inside of your Farmer Folder, you'll see this:
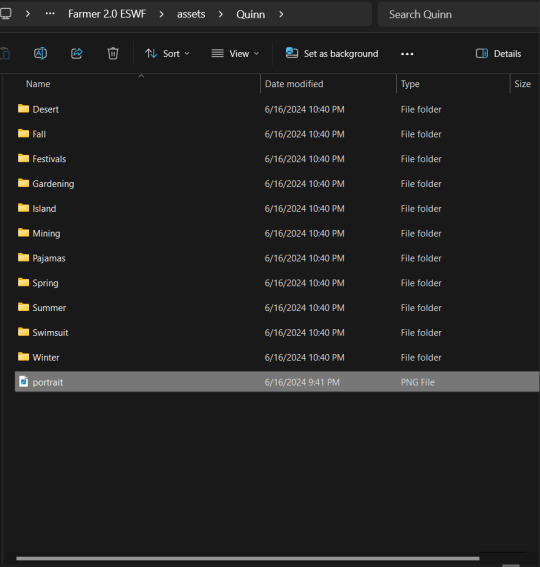
That portrait file? You can replace it with a base portrait. The most important thing is that you A) don't delete it and B) if you do replace it, make sure you keep the same file name of "portrait." Otherwise, the mod will bork hardcore.
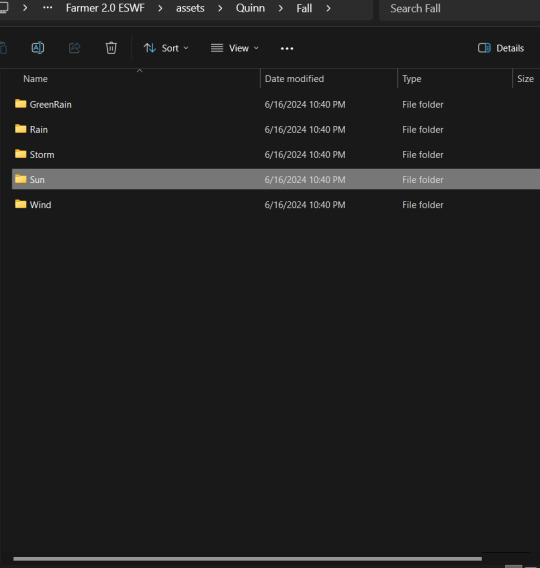
You'll notice that it has eleven folders for different seasons/events/locations. For this example, we'll go into "Fall."
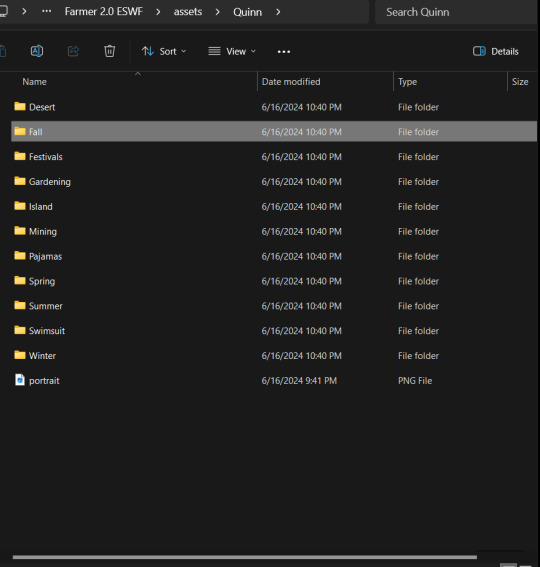
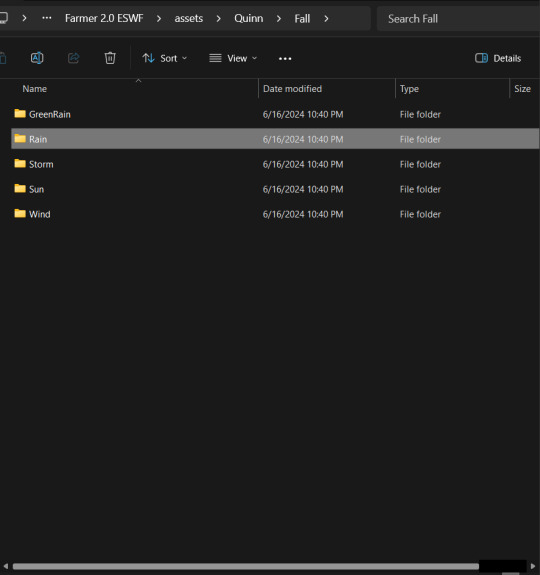
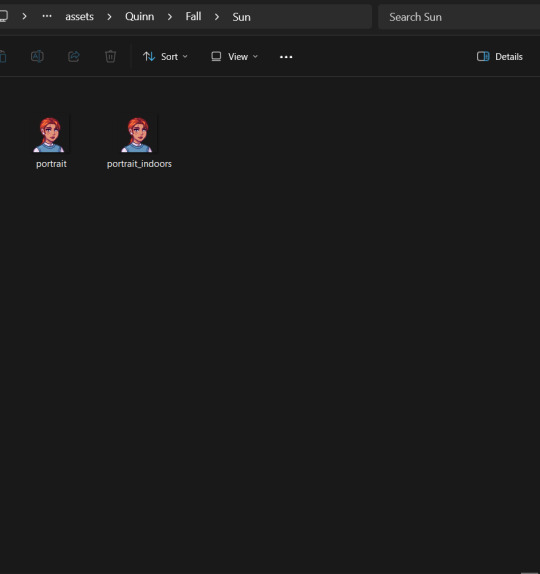
Inside are subfolders for different weather conditions. "Sun" is the default portrait that it uses on most days. For this example, however, we're going to go into "Rain," as I actually use different outfits/portraits for indoors and outdoors in those conditions.
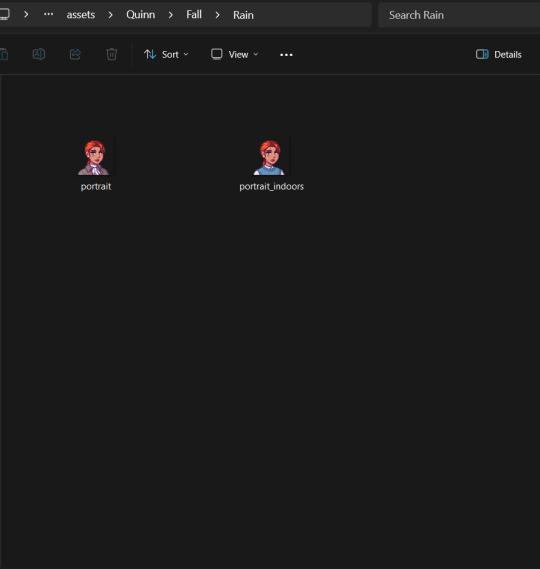
The files are pretty straight forward: "portrait" is for when Farmer is outside, and "portrait_indoors" is for when Farmer is inside. (Side note: to make my portraits, I used this portrait creator. When I saved my files, I saved them as either "portrait" or "portrait_indoors" and replaced the original files in that folder. Make sure you download the 64x64 version and not the 256x256.)
But what if you don't want to use a different portrait while indoors?
Just reuse the same image!
Once you have all of your portraits for the various seasons/weather/events set, you're going to want to copy your Farmer's folder to elsewhere on your hard drive. That way, if it gets deleted during an ESWF update, you have a back up and can just copy it back into the assets folder.
This is a quick and dirty tutorial, and I'm sure I've missed something. If you have questions/need clarifications, please ask and I'll do my best to help!
9 notes
·
View notes
Text
new video is out!
youtube
1 note
·
View note
Text
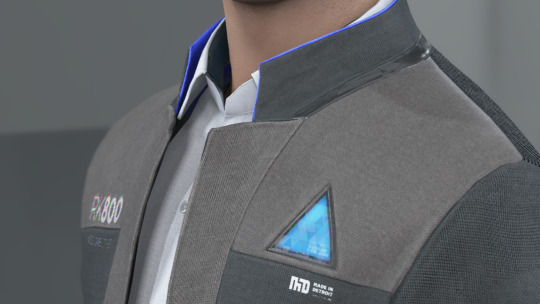
i caved and got dbh for my pc (despite already having it for my console) and honestly it's nice to be able to have have my monitor so close to me and be able to really just stare at all the details in the gallery (i may have spent an obscene amount of time staring at each character model)
here's some details i noticed about connor's model
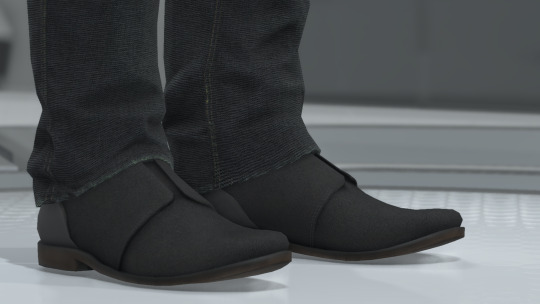
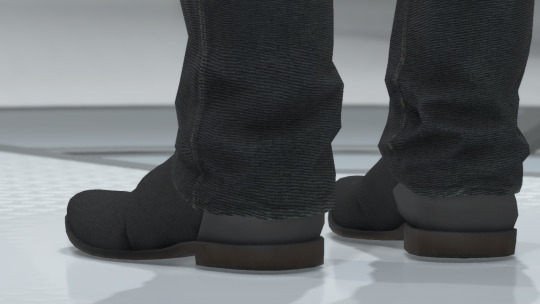
firstly, wtf is going on with his shoes. like does it have laces???? is it just a slip-on??? I WANT TO KNOW WHAT THE TOPS OF THE SHOES LOOK LIKE. also why are his jeans unhemmed?????
at the bottom of his jacket there's the two little dark grey rectangles that honestly i never really noticed and i don't think i've ever included it in my art bc my brain just erases them from my brain. it's such a random design choice and i can't decide if i hate them or not.
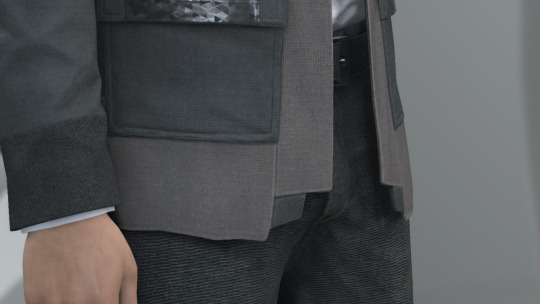
also why tf does he have two random button holes on the front of his jacket??? his jacket doesn't have buttons???? i cannot fathom why these exist or what their purpose is

never really took the time to analyze connor's jacket so closely and i love the detail of the different materials on his jacket. like the tessellated triangle motif throughout his jacket clearly being some sort of synthetic material compared to the cotton/wool fibers
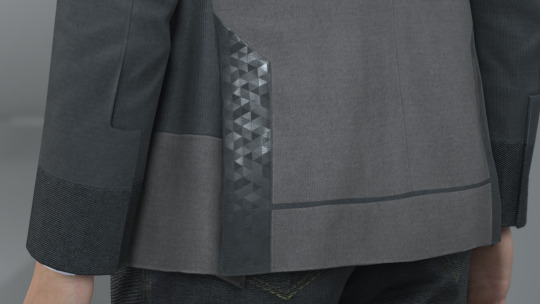
also i love the seam detail on his sleeve? like i love how it's not just one straight line but adds more shape and design to his cuff.

i love the texture on the top back half of connor's jacket. it reminds me of carpet or those really textured couches. it's like some type of corduroy likely or something. i wanna touch it. also the cyberlife branding right under the ANDROID text how did i never notice that??

if you look at the inner lining of his white collar, it has a darker liner on the inside. i don't think you typically see that on white button-ups???
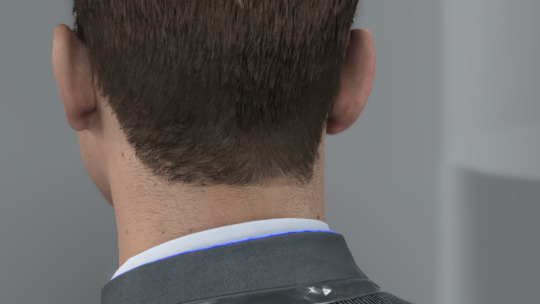
lastly LOOK AT HIS NECK MOLES. HE'S GOT SO MANY LITTLE NECK MOLES. and after extensive zooming in and out and looking at it from all angles, i have determined that he has a little tiny mole on the back of his right ear on the rim. idk if you can see it in these screenies BUT IT'S THERE I SWEAR TO YOU. he's also got the little divot some ppl have on their ears near the top of his ear.

anyway, uhm, yeah i totally haven't spent more time staring at the character models than i have spent playing the actual game
i was also staring at kara's and markus' models and might post my thoughts observations on those at another time. but for now we got connor.
#duda if you're reading this just know i am 1000% going to consult you on how to take screenies bc the in-game camera is ass#also nine if you are reading this imma ask you too and ask you for a tutorial on how to add your mods to the game bc ANDROID HANDS#mine#reference#connor#dbh screenshots#dbh reference#dbh connor#connor rk800#detroit become human#detroit: become human#d:bh#dbh
518 notes
·
View notes
Text

hey guy's i made a quick and easy tutorial on youtube about how you can frame your sims screenshots with any cc frame you want, you don't need photoshop or any other of these overwhelmimg programs and you also don't need any kind of photo editing skills! you can find the video here. i hope it's helping some of you. love, jodie ♡
#tuts*#sims 4 mods#sims 4 cc#sims 4 simblr#sims 4 custom content#the sims 4#the sims#the sims community#sims 4 tutorial#the sims 4 custom content#sims 4 maxis match#sims custom content#sims 4#ts4 simblr#sims community#ts4
444 notes
·
View notes
Text
how to clean & organize your mods folder + update broken/outdated mods by ashley plays
this video goes over the following:
how to organize your mods folder
how to update your mods folder after a patch update
how to find broken/outdated mods
how to clean out custom content & find duplicate files
↓ mods, programs & helpful websites mentioned below
mods:
better exceptions
mc command center
programs:
sims 4 tray importer
sims 4 mod manager
helpful websites:
sims 4 news & updates
scarlet's realm: the mod list
bienchen's mods
littlemssam's mods
kiarasims4mods's spreadsheet
mizoreyukii's spreadsheet
2K notes
·
View notes
Text

Quick Guide: Stay Safe While Downloading Sims 4 CC & Mods
I just published a quick guide to help you download Sims 4 CC & mods safely. ⚠️ From trusted sources to spotting red flags. Keep your game clean and secure! 😊
Read it now
#avoid malware in sims 4 mods#how to avoid malware sims 4 mods#how to download mods safely sims 4#patreon sims 4 cc download#safe sims 4 cc creators#safe sims 4 download sites#sims 4 cc best practices#sims 4 cc community guide#sims 4 cc download checklist#sims 4 cc education#sims 4 cc folder structure#sims 4 cc mod manager#sims 4 cc mod security tips#sims 4 cc mods support guide#sims 4 cc protection#sims 4 cc safe download#sims 4 cc safe hosting platforms#sims 4 cc safety guide#sims 4 cc safety tutorial#sims 4 cc virus warning#sims 4 cc zip file tips#sims 4 custom content security#sims 4 custom content tips#sims 4 mod folder organization#sims 4 mod malware prevention#sims 4 mod safety#sims 4 mod safety checklist#sims 4 modding guide#sims 4 mods antivirus#sims 4 script mod warning
281 notes
·
View notes
Text
While setting up my Stardew Valley save, I wanted to find out if it was possible to create community lots that have live-in residents, given that many of the town buisnesses also function as NPC homes in Stardew
Turns out it is possible to do - it uses an NRAAS feature I never knew existed, so I thought I'd give a tutorial! (ty to the NRAAS forums & MTS help threads for this information! - I've just compiled it to help others :D)
Essentially, this means you can create functional pubs / bars / shops / restaurants etc. which your sims can actually live in while running the business, and other non-playable town residents will view the lot as a community lot and come to visit / interact with it as such!
Also, as I've got a few of these NRAAS tutorials going now, I made a page where you can find all of them linked here - I'm open to requests as well :)
Tutorial under the cut ⬇️

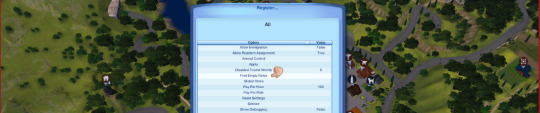
Mods you will need:
NRAAS MasterController & MasterController Cheats
NRAAS Register (only for Part 2)
EDIT TO ADD: I recommend using a business mod such as Ani's Merchant Mod to allow your sim to earn money from their business in addition to this tutorial - you may find this much better for current-household gameplay, because your sim will not earn funds from their business when you're only using the NRAAS method detailed here (apart from mixology tips etc.)
Part 1: Adding sims as residents
Start by building / placing your business of choice using Edit Town, and pick what kind of community lot you want it to be through the 'change lot type' menu
Plop down the sims you want to live there on a different residential lot in town (this is temporary housing, it doesn't matter where / what it is)
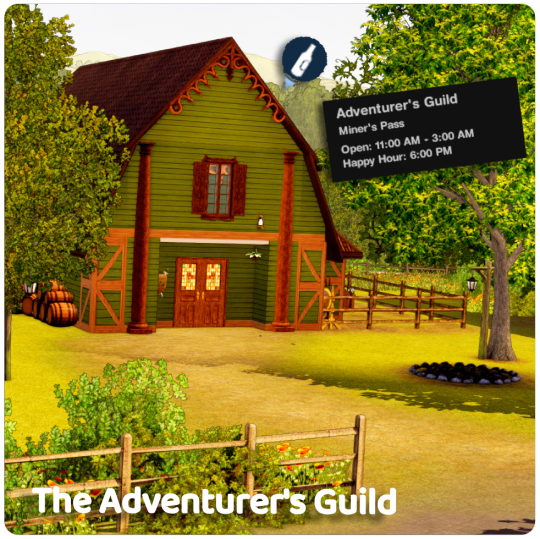
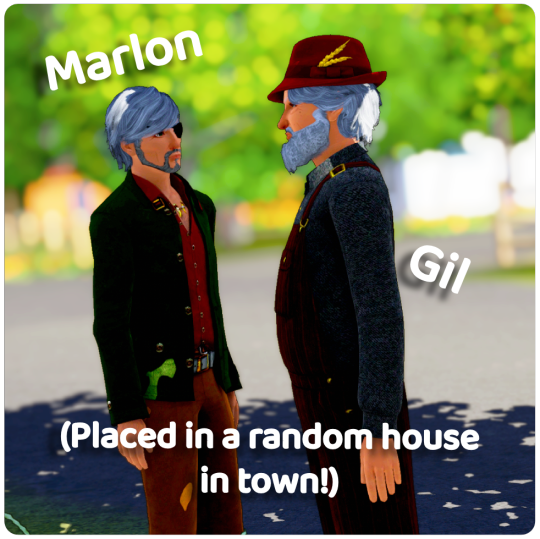
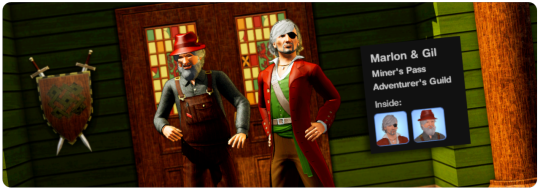
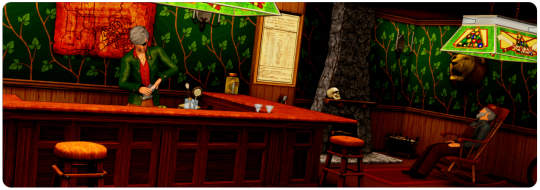
For this tutorial, I'm going to be using The Adventurer's Guild dive bar as an example, & I want my two sims to live there: Marlon & Gil - Marlon will be tending the bar and Gil will just be living on the lot without any specific role
Your business doesn't have to be a bar, I'm just using that for the purposes of this tutorial - You can add residents to any community lot type, someone on the NRAAS forums even suggested adding 'homeless' sims as residents of community parks which would be fun for a rags-to-riches challenge! - other examples include: a bakery, personal training gym, savvy sellers shop, a nectary etc. etc.
Now everything is placed, you need to alter some settings over in the NRAAS MasterController main menu to set things up
Click on a computer or city hall to bring up the NRAAS MC Menu:
NRAAS -> MasterController -> Settings
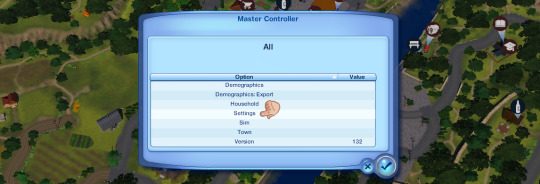

'Allow Add Sim on Community Lots' is set to false by default, click on it -> change it to true
Click the checkmark & exit out of the NRAAS MC Menu
Go back to your community lot, click on the building and bring up:
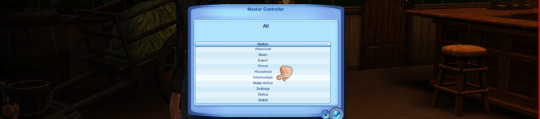
NRAAS -> MasterController

At the top of this menu, there should now be an option to 'Add Sim' (as there usually only is on residential lots)
Click 'Add Sim' and then you can either filter by sim type OR just click 'Test Full Family' to find your sims on a list of all the townies - once you've found them, select their portraits and press the checkmark to exit the menu
I recommend resetting the sims & the lot once you've done this, your sims should now be residents of the community lot of your choice! You can keep them as the active household (although I haven't playtested this) or just have them as non-active families who are meant to own businesses around town
Part 2: Giving sims Functional Roles
I'd like to go one step further and have Marlon be the functional bartender for this lot, for this part you will need NRAAS Register (linked above)
There are two ways to do this:
1. If it is within working hours (for my dive that's 11AM - 3AM, you can check your lot's hours in map view), click on the bar object (or whatever role object you want, such as the industrial oven / cash register etc.) and choose
NRAAS -> Register -> Select


This will bring up the same sim selection menu as before, just choose your sim out of the list
They'll now be the functional bartender / role sim for that object!
However, this menu may not show up for various reasons, the main one being if it's not within working hours for the lot - there's another way to assign your sim if that is the case:
2. Go through the main NRAAS Register menu - click on City Hall or a computer to bring it up
NRAAS -> Register -> Find Empty Roles

As long as you haven't pressed play on the game since you placed your community lot, it will not have anyone assigned to the object yet, and it will show up under this menu as an empty role you can fill with your sim (through the sim selection menu again)
If the object does already have a sim assigned to it, you need to find whoever the sim is and remove them from that role:
I suggest just waiting until it is working hours & the sim shows up for work, then click on them & choose
NRAAS -> MasterController -> Intermediate -> Remove Role

You need MasterController cheats for this 'Intermediate' menu to show up!
This should then free up the object for you to add your sim to it through either of the previous methods - KEEP YOUR GAME PAUSED while you do this so no one else gets assigned to it before you're able to assign your own sim!
And that's everything!
Have fun with your functional residential businesses - as always if you have any further questions leave a comment or send me an ask and I will try and help 🥰🥰
Big thanks again to the NRAAS Forums & MTS Threads for this info, I'm just compiling what I found online as I had no idea this was a feature and figured it might be useful for others to know too!
381 notes
·
View notes
Text
Giving your Rook a custom name for the subtitles in 5 minutes - A modding tutorial
The tutorial is also available on Nexusmods as a PDF-file, and as a Google Doc.

Hidden under the read more for length, but it's actually super easy! Anyone can do it following instructions, I promise!
The guide assumes you’ve already installed Frosty Mod Editor, so I won’t be covering its basic set-up. If it’s your first time using the Editor, please refer to this guide by Gabbet. Gabbet's guide may look somewhat intimidating, but to prepare for my tutorial, you’ll only need its “Frosty Editor Download & Installation” section.
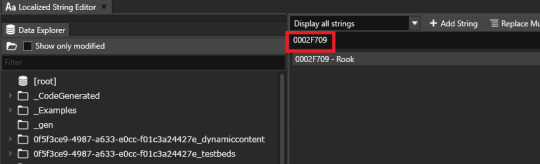
Open the Mod Editor and navigate to View >> Localized String Editor

2. Once you open the Localized String Editor, click on the leftmost column inside it, input the following string ID: "0002F709" (without the "") and press Enter. It should display one search result that says “Rook”.
3. Click on the line in the search results to make it appear in the column to the right. There, erase “Rook” and type in your custom name using your keyboard. In this tutorial, I’m using “Ghilasara” as an example.

4. Once you finish typing your custom name, click “Update” to save the result.

That will refresh the line’s contents in the search results.
You’ve made all the necessary edits, and your mod is now ready to be exported :)
5. In the Editor’s main window, click on File > Export to Mod
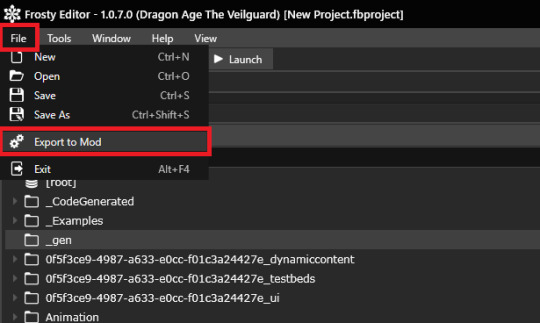
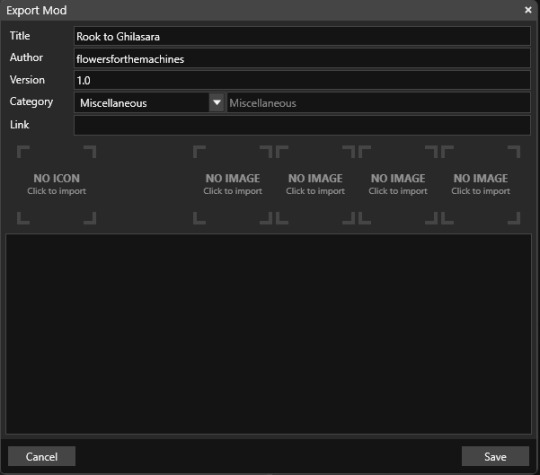
Feel free to fill in the contents of the pop-up window as you see fit. Note that the first line, “Title” will be the name under which your mod displays in the Mod Manager. I named mine “Rook to Ghilsara” to make it easy to find in case I need to remove it or turn it off.
And, that’s that! All you have left to do is to import your mod into the Mod Manager.
#how the hell do I tag this#Dragon Age#Dragon Age Veilguard#Dragon Age The Veilguard#DAV Modding#DAV Tutorial#flowers mods#dragon age#dragon age the veilguard#datv modding#veilguard modding#rook datv#rook#dragon age rook#flowers.txt
211 notes
·
View notes
Text
How to play TS2 with Longer Days (50% Slower Time) without going crazy
I don't think I've ever mentioned it here, but I like to play TS2 in a slow mode, to enjoy more time with my sims. This means time runs 50% slower (heavily inspired by @anibats).
But anyone who has tried playing with time at 50% slower knows there are 3 main problems: (1) time control clock in every lot, (2) need decay and (3) relatioship decay. So how do you get around this?
1. Time 50% slower
For me, the first issue is making the day slower. I'm too lazy to place a time control clock in every single household. That's why I use CJH_TimeController, the global version of the mod, that you can download here.
2. Need decay
Now that your day is 50% slower, your Sims' needs decay at the normal rate—meaning, effectively 50% faster. To prevent that, I use Lazy Duchess Motive Decay mod. You set a divider for the hood (mine is 17), and that's it! You can delete the flamingo (mod setup) and never worry about it again. Obs: this link contains the relativity mod. It would solve all our problems, but personally it never worked for me, with it the pregnancies didn't progress.
3. Relantionship decay
In an unmodded game, a Sim's relationship with another Sim drops by 2 points every afternoon. However, with longer days, the relationship drops much more—up to 12 points. Here are two alternatives:
a. For me, the solution is a mod where relationship decay only happens once a week, dropping 12 points all at once. This mod is LessRelDecay, which makes relationships decay only on Fridays.
b. Other alternative is Monique's Relationship (STR) Decay Hack. With this mod, decay is based on STR points and skips some days depending on the relationship strength. However, the total decay will still be 12 points instead of the intended 2.
Other useful mods:
Slower fitness decay
Slower fitness gain
Slower Skill and Badge Gain
Slower LTA Gain
Mods that would be very useful, but that I don't know if exists:
Slower/harder hobby enthusiasm gain (I'm aware of the mod by Tunaisafish, but I don’t notice a difference in-game)
If anyone has any more tips, please, let me know <3
285 notes
·
View notes
Text
youtube

Tutorial : Face Preset Editor
After releasing my default replacements presets, I don't want to be the only creator to do so. Having many people share their content is amazing and that alone creates growth of custom content for the Sims 3.
Therefor, I think it is important for me to share my knowledge with you so you can be able to better understand how to use the Face Preset Editor by LazyDuchess and create your own custom presets or default replacement presets
What I'm assuming in this tutorial :
You have S3PE installed
You're familiar with the basics of S3PE.
You know what game files are
You know what a default replacement is
Download - Default Presets Folder :
SimFileShare - GoogleDrive
Questions and Answers
What's in the default presets folder ?
They're the default presets from the basegame and world adventures that I extracted from the game files and organized according to their names and categories
Can I use your already existing face presets default replacements as a base to make my own presets ?
Yes, feel free to use them all, just credit me if you do so ! - Heads Eyes Noses Lips -
Credits :
S3PE
FacePresetEditor
#ts3#sims 3#the sims 3#tutorial#siims 3 face preset editor#sims 3 face presets#sims 3 presets#ts3 face presets#ts3 face preset editor#sims 3 custom presets#sims 3 default replacement presets#sims 3 mod tutorial#sims 3 tutorial#ts3 tutorial#ts3 cas#sims 3 cas#sims 3 create a sim#ts3 create a sim#ts3 mods#Youtube#CAS : Presets#tutorials
208 notes
·
View notes
Text
Using NRaas Master Controller's Filters, Skill Stamps and Hot Keys - Part 2
Skill Stamps and Hot Keys
This is part 2 of my NRaas Master Controller tutorial on how I use filters, skill stamps and hot keys! (Tumblr wouldn't let me have my fun and use more than 30 images on one post, so 2 parts it is 🤨)
See also:
Using NRaas Master Controller's Filters, Skill Stamps and Hot Keys - Part 1: Filters
Tutorial under the header!

Mods needed for Filters, Skill Stamps and Hot Keys to show up:
Master Controller v.135
Master Controller Cheats v.134+
(9th Feb 2025 - desiree-uk correction: Additional mods needed for filters and door-locking system (my apologies! 😌) GoHere v.45 Tagger v.5
Skill Stamps:
I use skill stamps to add a whole bunch of skills to a single sim or sims in bulk!
When adding a newly created sim to your town, they may not have any skills yet until you play them, but a skill stamp can quickly add some skills to them as if they were already played for a while.
MC Cheats Interaction: Skill Stamp> Add New Stamp
Allows the user to define a skill set to apply during "Advanced \ Skill Stamp". Once added, selecting one from the listing will allow you to specify the levels for each skill.
I want some sims to be able to have some basic skills such as cooking.
Click on Town Hall/Computer>NRaas>Settings> Skill Stamp
Add New Stamp: name the skill stamp (e.g Basic Skills).


The skill stamp is listed. Click on it and set the cooking level to whatever you want it to be. I have both the regular cooking skill and the hidden child-skill level, just because. I don't know. 😄
I maxed out the child skill to 3 and set the regular skill to 1.

I've set other skill stamps such as ones for artistic sims (painting, photography, writing) and outdoor sims (athletic, waterskiing, gardening, scuba diving, snowboarding, diving, windsurfing)
I also set one for sims who I want to be able to drive! We now have the 'Sims Need Driving Lessons' mod by the awesome Phoebejaysims! All sims (except NPCS) can't drive until they've reached the maximum level of the driving skill.
Of course you'd want some sims to be able to drive in an already established town, right?
I want my adults and elders to at least have the driving skill, even if some don't have a car yet.
Set a skill stamp for driving:
Click on Town Hall/Computer>NRaas>Settings>Skill Stamp
Name the skill to something driving related, e.g Sims With Driving Licence.
Click on the 'Driving' skill.
Max it out to 3.


Adding skill stamps to a sim with no skills:

Click on a single sim: NRaas>MC>Advanced>Skill Stamp


You see the list of my skill stamps. When I click on each one, all the skills under the stamps will be added to the sim all at once (you'll see the notices that appear in the top right hand corner pop up notifying you the sims have the skills.)
Check their skill panel to see all their added skills. The driving skill is hidden, so it won't show on the panel, but you can check the sim has it by checking their skill levels in Sim>MC>Advanced>Skill Level. It should show 'Driving: 3'
To add the skill stamp to multiple adults and elders, I'll use the filter I made earlier in Part 1.
Click on Town Hall/Computer>Sim>Advanced>Skill Stamp
The filter 'AGE: Adults/Elders' is listed.


Click on it to see a list of all the adult and elder sims.
From the list you can select some of the sims who you want to be able to drive or scroll to the top and click 'All'.

The Skill Stamp list will pop up - choose the 'Sims with driving licence' skill stamp. The skill stamp will be applied. As stated before, you won't see the hidden skill in the sims panel, but they'll be able to drive. You can of course check their skill level via MC>Sims>Advanced>Skill Level.
While you're at it, you can edit some of the selected sims driving skill levels according to whether you want them to do a driving test, theory test or have their skill maxed out so they can drive straightaway when you give them a car...
PJsims mod interactions notes:
If they are level -1 or 0, sims can first do their theory test which will increase driving skill to level 1.
Once they are level 2 in driving, they can do their driving test which, if passed, will automatically max out their driving skill.
Now you can make and add as many skill stamps to any single sim or multiple sims in a filter.
~~~~~~~~~~~~~~~~~~~~~~~~~~~~~~~~~~~~~~~~~~~~~~~~~~~~~
Hot Keys:
MC Interaction: Hot Keys
Allows the user to specify which interactions are to be shown directly under the "NRaas" menu
You can add any MC interaction to the uppermost level of the NRaas menu when you click on a sim, household or terrain as short-cuts, especially your most often-used interactions.
I added the 'skill stamp' and other interactions as hot keys so I can easily edit a sim when I click on one.
Click on Town Hall/Computer>Settings>Hot Keys

I added:
* Change Autonomy
* Reset Sim
* Skill Level
* Skill Stamp
Make sure 'True' is next to the interactions you want to see in the NRaas menu:

Click on a sim or the terrain and you'll hopefully see all your created hot keys.
See my screenshot - all 4 are there!

With the skill interactions you can quickly and easily set a sims skill level or add a skill stamp to them when you click on the sim in less clicks than clicking on multiple dialog boxes.
The other two are self explanatory, turn on/off a sim's autonomy and reset a sim.
Note: The more hot keys you add, the slower the pie menu will take to pop up, so keep that in mind.
If you still don't want to click so many times in the menu to find your interactions, you can use Arro's UI Tweaks mod (currently in testing, soon to be released - it's an excellent mod, I highly recommend it! 👍🏾) You can search the menu by clicking on the magnifying glass icon on the menu or press the 'F' key and type the interaction you want, using a full or partial word!


That's it! That's how I use filters, skill stamps and hotkeys. It will become second nature the more you use them and they can be as easy or as complex as you want them.
If you use them already, how do you set them up and in what scenarios? Share in the comments or let me know if I can add or explain anything! :)
Click for part 1:
Using NRaas Master Controller's Filters, Skill Stamps and Hot Keys - Part 1: Filters
#ts3 mod info#ts3 test gameplay#ts3 gameplay#nraas#phoebejaysims#arro#ts3 tutorial#sims3#ts3#ts3 mod
154 notes
·
View notes
Text

Sims 4 Mod Folder Organizer + Icon DLL (Downloadable Folder Template Included!)
Hey Simmers! 💛
I’m excited to share something a little different today — not new custom content (CC), but a downloadable folder setup and icon system to help you organize all the Sims 4 CC and mods you already have.
✨ What’s Included
✅ A clean, pre-built folder template to keep your Mods folder tidy and script-friendly ✅ A custom-made icon DLL file with over 900 Sims 4 folder icons, so you can apply cute, matching icons to each folder on your computer (Windows) ✅ A detailed guide on organizing, troubleshooting, and clear instructions
💡 Important: This is NOT CC or Gameplay Mods!
You’re not downloading any Sims 4 content itself — this is just an external tool to help you organize your existing CC and mods on your computer more easily.
📁 Folder Template Categories
The folder template includes suggested categories like:
CAS Mods
Build/Buy Mods
Script Mods
Utilities
Gameplay Mods
Visual & UI Tweaks
…and more! You can adjust or expand them however you like to fit your own collection.
🛠 How to Use
1️⃣ Download and unzip the folder template. 2️⃣ Move your existing CC and mods into the matching folders. 3️⃣ Use the included .dll to apply cute folder icons (Windows only). 4️⃣ Keep your Mods folder cleaner, easier to manage, and easier to update!

⚠ Reminder The .dll file doesn’t go inside your Sims 4 Mods folder or into the game — it’s used outside the game on your computer folders, like your Sims 4 Mods folder or any other folders you want to decorate.
You can store the .dll anywhere on your computer — but if you move or delete it later, the folder icons you’ve applied will stop displaying. So be sure to keep it in a permanent, safe location.
✅ The download also includes a detailed guide with:
Step-by-step instructions for applying the folder icons using the .dll
A troubleshooting section if anything isn’t working as expected
Tips and recommendations for organizing your custom content (CC) and mods for easier management
📥 Note on Downloading
When you download the folder template and .dll, make sure to extract the zip to a new, separate folder — I recommend creating a fresh folder just for this setup. That way, you can organize your mods and CC cleanly without accidentally mixing the template folders into your existing Mods folder. Once you’ve organized everything, you can move your files into your actual Sims 4 Mods folder as needed.
Thank you so much for supporting me — I hope this helps you keep your Sims 4 setup tidy and stress-free. 💛
PATREON (✅ (free for all members)
115 notes
·
View notes
Text
I feel like my brain gained a wrinkle?
Okay, some people might know this already, but I'm sharing for those who don't! Sims 3 players, if you have @omedapixel's Sims 3 decorator Tool, you can select a OSMP (even the resizer and tipsy ones), and move your sims around with it.
Currently, the mod doesn't support moving a sim on it's own, but this is an excellent workaround. Works really good when you're trying to pose a sim and need to move them up or down or tilt and spin them a little.
So just a little psa for you because my brain felt SO unsmooth when I tried it out lol 🫶🏾

#sims 3#simblr#ts3#the sims 3#the sims#If you don't have this mod already#you should#Its a gamechanger#tutorial#tutorials
146 notes
·
View notes
Text
YOUR VISITOR CONTROLLER MIGHT NEED SURGERY
Hello out there!!! If you use Visitor Controller mod for the Sims 2, it might be broken. I am not sure exactly which version I have ... Midge's that allows togas or the older CrispandKerosene's version with personality options.
The personality settings may be broken because I looked at my file today and sure enough, the BHAVs are not referencing personality properly.
Go into the BHAV "Check Personality Flags" inside Visitor Controller in SimPe.
It should look like this:

The highlighted node should not reference any other value but a number higher than 100.
If you see this:

Then it is broken. Personality has to be referenced in hundreds!
You must change it with the Instruction Wizard which is on the right hand side of Plugin view to make Personality features work, as in banning Lazy Sims from a gym.

The first image shows that Sims with a Neat personality lower than 400, which is 0x0190 in hexadecimal, will be banned from the lot.
Repeat for the other personalities lower in the code.
HAPPY SIMMING!!!!
Also, if anyone is interested in a tutorial for adding custom careers to Visitor Controller, let me know!
#sims 2#sims 2 gameplay#sims 2 simblr#sims 2 mods#sims community#ts2#ts2 mods#ts2 glitch#ts2 visitor controller#visitor controller#sims#Sims mods#Sims 2#sims 2 cc#the sims 2#sims 2 screenshots#Simpe#sims 2 tutorials#sims 2 tutorial
109 notes
·
View notes
Text

Create Your Own Main Menu for The Sims 4 - Tutorial
Hey folks!
This tutorial will walk you through creating your own main menu override for The Sims 4 based on my custom repository.
_________
What is required:
JPEXS Free Flash Decompiler
Sims 4 Studio
Raster graphics editor (e.g. Photoshop, Gimp, Photopea)
Your Own Main Menu repository
_________
Step 1: Download and unzip the Your Own Main Menu repository
It's available on my Patreon page for free.
_________
Step 2: Prepare your custom images
There are two images that you need to customize:
SimMattically_YourOwnMainMenu_MainBG.pngThis is the main background image, where you want to put the desired graphic.Size: 1440px x 1200px
SimMattically_YourOwnMainMenu_BarBG.pngThis is the second background for the navigation bar on the right.Size: 480px x 1200px
Prepare your own images based on these templates. Do not change the size of the images.
Tips: If you're using a more complex background, such as a screenshot from your game, I recommend blurring the Bar_BG with a Gaussian Blur (~60px). Additionally, I suggest adding a white overlay with ~50% opacity and a 5-pixel wide white bar on the left edge with ~10% opacity. This helps improve the readability of the navigation bar buttons and adds an extra layer of detail to your menu design.

The repository also contains the optional file "SimMattically_RefreshedMainMenu_ScenarioButton.package" from my other mod, which replaces the Scenario button icon with a semi-transparent white version. It's up to you whether you want to use it.
_________
Step 3: Import the images to the .GFX file
Firstly, open JPEXS Free Flash Decompiler and then open my SimMattically_YourOwnMainMenu_Template.gfx with it.


Select "No to all" when prompted.

On the left, choose "images" and scroll to the bottom where you will see the images you just edited in their original form. Right-click on each and select "Replace." Select the custom images you prepared in step 2.


Save the file.
_________
Step 4: Import the .GFX file into the .package file.
Open Sims 4 Studio, then click on "My Projects" and open SimMattically_YourOwnMainMenu.package. Select "Scale Form GFX" (the one with the "gameentrylauncher" description) and click on "Import." Select the modified .GFX file and import it. On Windows OS, you need to switch from .binary to all file types to see the file.


Save the .package file via File -> Save As... Give it a custom name and place it in The Sims 4/Mods folder.
That's it! Enjoy!
_________
IMPORTANT INFORMATION/TERMS OF USE:
Main menu overrides can become outdated with some game updates, causing them to break the game. You will have to remake your custom main menu with a new, updated template in this case. Always make sure you are using the latest available template and that it's not outdated.
Since these mods can break the game, I do not advise sharing your custom main menus with other players. You are free to do so, but be aware that since you're relying on this repository to create your own version, you most likely won't be able to update the mod and resolve issues for other players on your own, so you take responsibility for breaking their game.
If you decide to share your version with other players, please credit my repository and link to my Patreon post.
Do not put your custom main menu based on this repository behind any paywall or early access. I made this repository and tutorial free for everyone, so keep it fair.
I do not take responsibility for people misusing this repository or breaking your game with incorrectly modified files. I do not provide support for custom main menu overrides created by other creators using this repository.
_________
#sims#thesims#thesims4#sims4#sims 4 mods#sims 4 custom content#simblr#s4cc#ts4#main menu override#sims tutorial
314 notes
·
View notes