#Free Pattern Link
Explore tagged Tumblr posts
Visit Tumblr Blog
Explore Tumblr blogs with no restrictions, modern design and the best experience.
Last Seen Tumblr Blogs


Fun Fact
Tumblr has 16.74 million mobile monthly users in the US.
Text
Snowflake Monday 9
Hi, Sweet Friends! I am so glad you are here today! Snowflake Monday #9 Adorable Snowflake. I have been pumpkin making for a few months now and am switching over to Snowflakes again. I love the Winter time and snowflakes. I have made about a dozen snowflakes already and thought I would share them on Monday’s for the rest of the year of 2024. Those of you who crochet, may like to join along…
#Afternoons With Gramma#CJD.Sign#crochet#Crocheting#Easy Crochet#Free Pattern Link#Free Patterns#snowflake
3 notes
·
View notes
Text


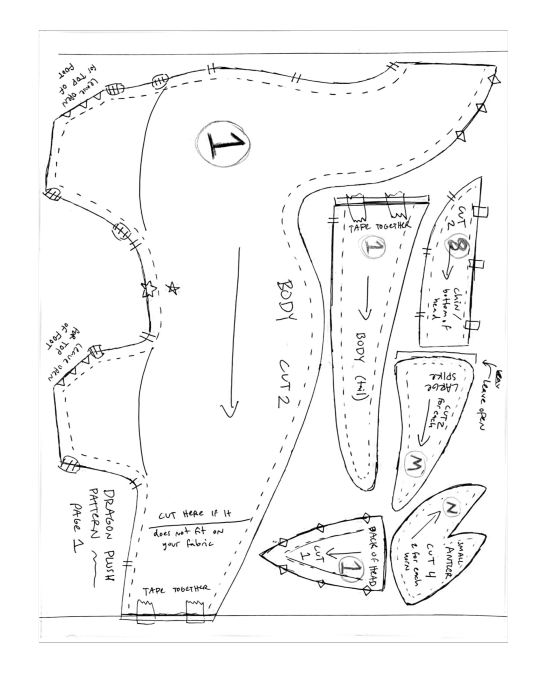
Do you want one of your own little dragons like these? Well I finally made a pattern for them! It's not the prettiest or most well-written pattern in the world but it will get the job done. Find it here!
This pattern is totally free but if you would like to send a few dollars my way, it would mean a lot if you supported my local zine project!! Ko-fi here.
If you are not able to make your own dragon and still want one, I will also accept commissions for these in a wide range of colors and add-ons. Just send me a message! :3
#let me know if these links don't work because i can never tell with google drive#sewing#free pattern#dragon#art#stuffed animals#plush#plush dragon#sewing pattern#my art#staticstray
2K notes
·
View notes
Text
I'm currently knitting in my favorite coffee shop and so far 2 middle aged dudes in trucker hats have stopped to ask me about my project and how knitting works. Normally only little old ladies or other knitters talk to me about it, so this has been a fun change of pace
Like, this project is pretty complex so I get that it invites questions, this just isn't who I would expect them from

The project in question with my blueberry cornmeal muffin and floral lemonade
#knitting#fiber art#food#food tw#this is a blanket from a free ravelry pattern#if this post gets any notes ill reblog with a link to the pattern i just don't feel like digging for it now
458 notes
·
View notes
Text


More sprites from the iam8bit Undertale vinyl.
#no real pattern just ones I felt inclined to do#all free to use without credit obv since they're not actually my sprites#although I guess link back to this post if it's convenient?#undertale#wd gaster#undyne#everyman#froggit#ice wolf#burgerpants#grillby#dress lion#mettaton ex#undertale redacted
631 notes
·
View notes
Text
Anyone want to make a Twilight Princess wolf plush? Or a Korok?
Here you go! Credit to Sew Desu Ne.
It's written in the comments, the Korok fabric is available on SpoonFlower.
#linked universe#linkeduniverse#legend of zelda#korok#botw korok#totk korok#loz korok#lu legend cosplay#legend of zelda twilight princess#loz tp#wolf link#twilight princess#sewing plushies#sewing stuffed animals#free sewing pattern#everyone should be able to have cute plushes
90 notes
·
View notes
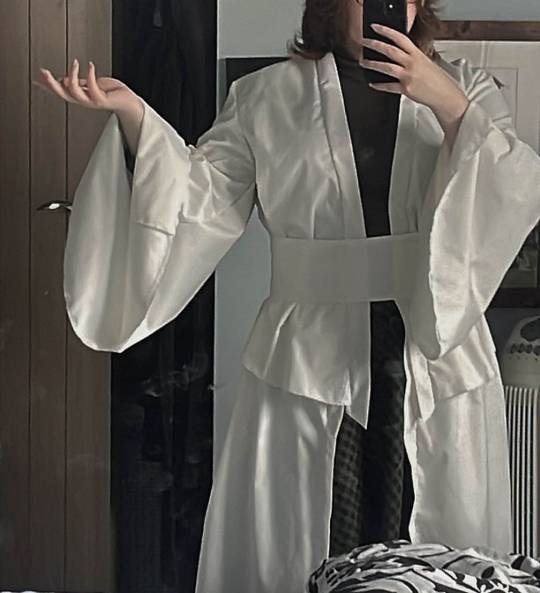
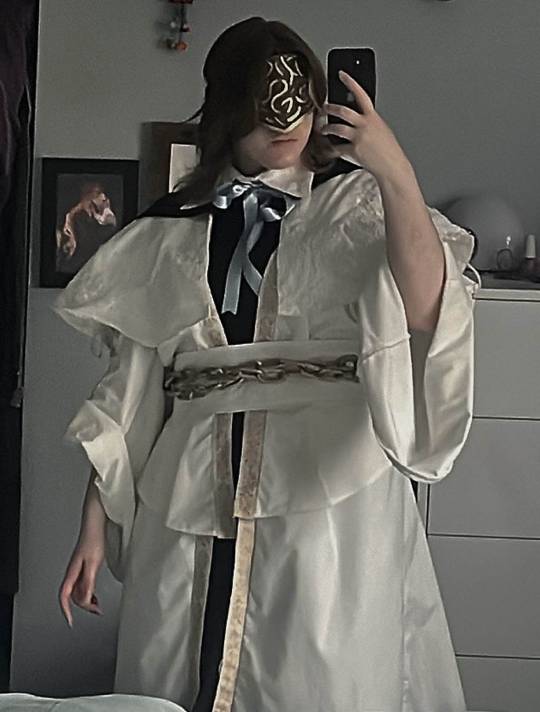
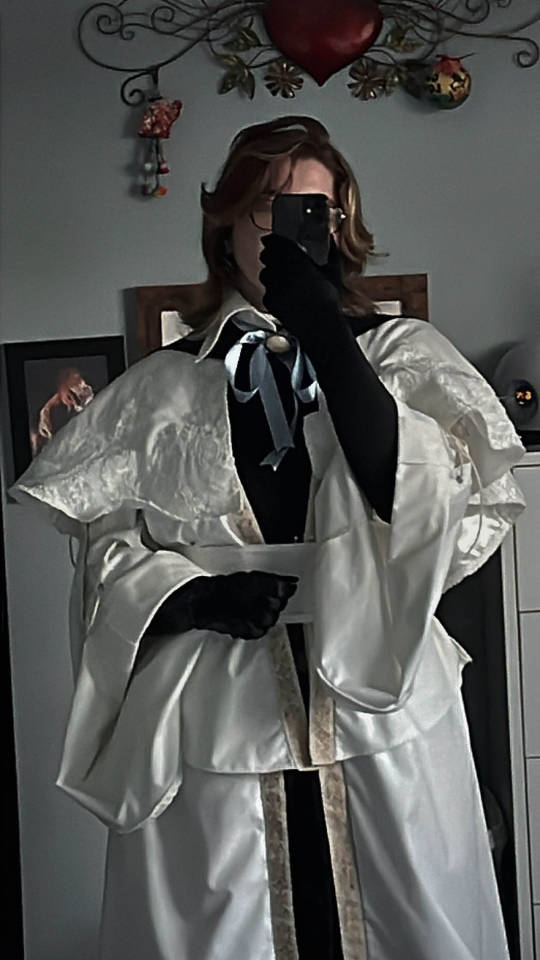
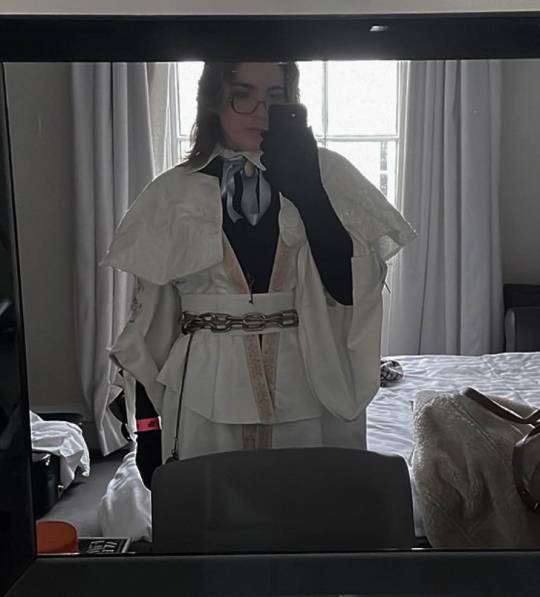
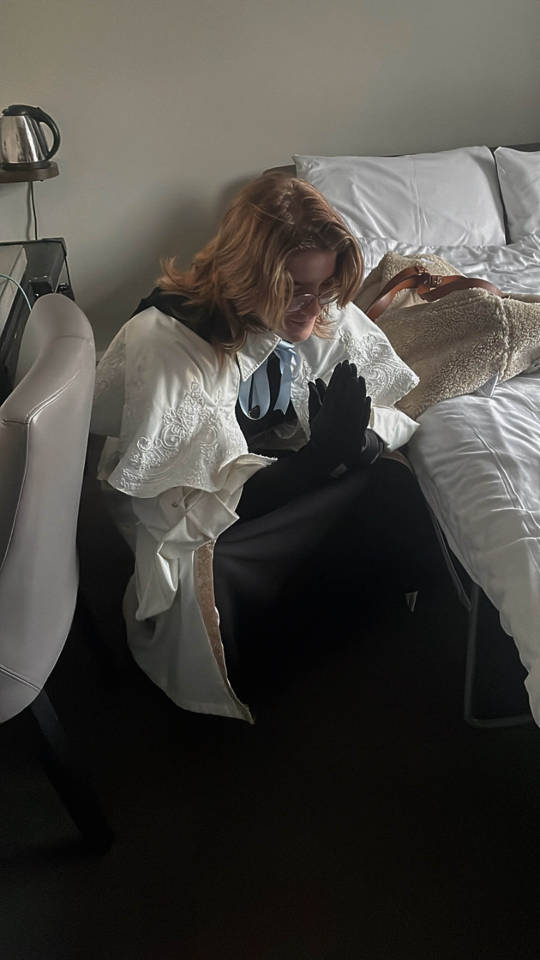
Text
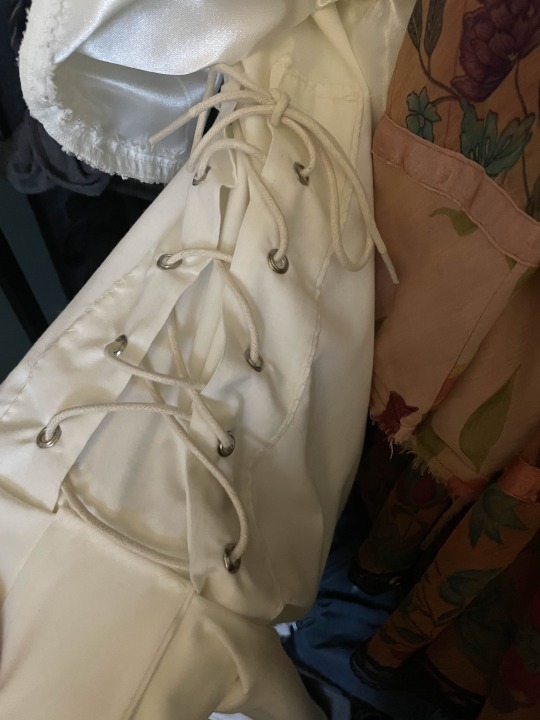
Hello!! breakdown of Choir Cosplay!! This is not really gonna be a step by step but a general vibe of what I did to make this cosplay :) To note: I haven’t sewn anything since I was in highschool which was 8 years ago, so a lot of this is like a ‘ya that works’ - make improvements where I could not :p Overall I wanted the cosplay to not be an exact copy of what is in game, personally I prefer more fitted clothing so I went close to my size with the pattern. Fabric: I used an ivory polycotton, ivory satin and black cotton. 1. I started hunting for a pattern that at least captured the vibe of the choir garb. I had split up the garment in my head into 3 separate parts: The base, the capelet, all the extra fancy bits. The big concern when picking fabric is I didn’t want the garment to be translucent, which is a problem for lighter coloured fabric. BUT!! I found that I didn’t have to make a lining and could instead flatline the fabric - where you cut double the piece and stitch them flat against each other - making it both thicker and opaque!
Flatlining tutorial:
https://www.youtube.com/watch?v=5N-qdP9tcc4&pp=ygUSZmxhdCBsaW5pbmcgc2V3aW5n
I found this pattern by Gunnar Deatherage on Etsy (as a beginner I loved this pattern, it’s very in depth and easy to follow)
https://www.etsy.com/uk/listing/1270370974/maxi-duster-wrap-pattern-instant?ga_order=most_relevant&ga_search_type=all&ga_view_type=gallery&ga_search_query=gunnar+deatherage&ref=sr_gallery-1-14&pro=1&sts=1&dd=1&content_source=95a164c411331c5aaff8fee029dee1e6377d3f92%253A1270370974&search_preloaded_img=1&organic_search_click=1
I did not use the sleeve pattern from it, instead I made my own to have the right fall and size.

Use the sleeve cap from the pattern so it can attach correctly to the bodice/back pieces - then where the sleeve starts to become longer draw out diagonally on both sides. For length I used the original pattern and went slightly longer! :) I used the same pattern for the peplum sorta top section and again for the skirt on the bottom. It creates a stitch line along the front but it’ll be covered by the belt!
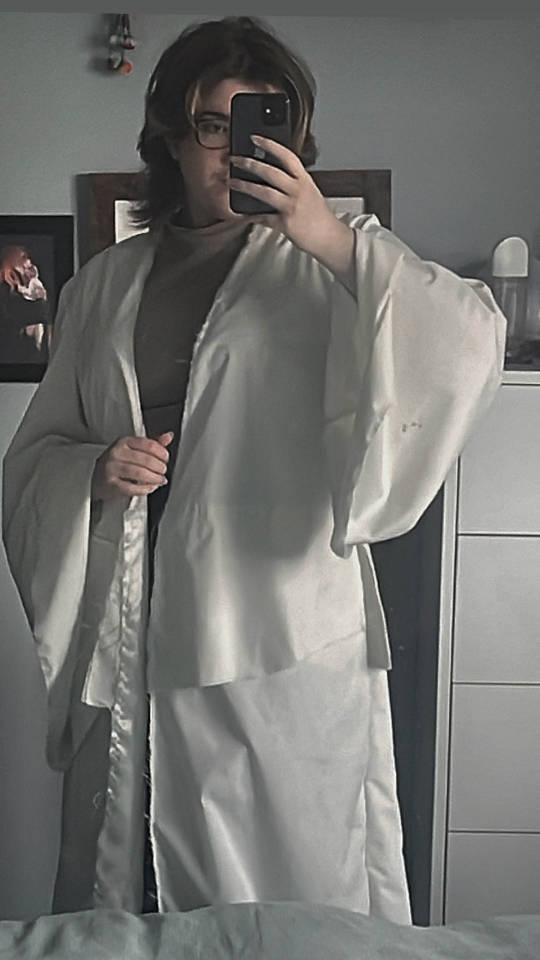
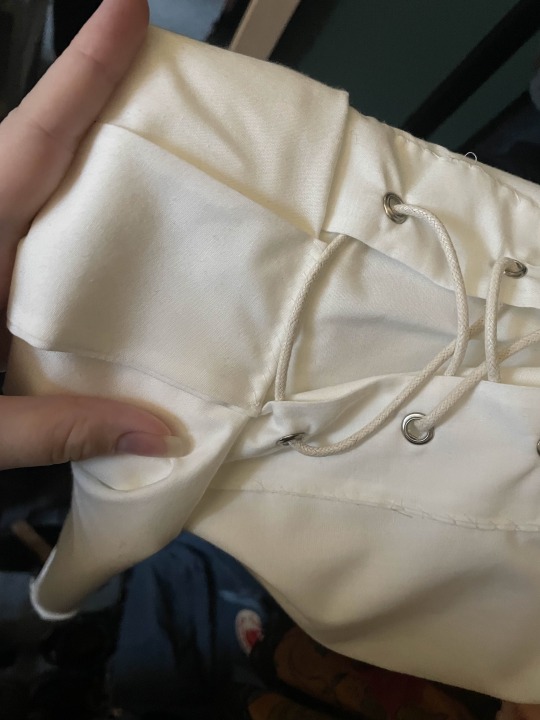
I bought this embroidered ribbon and attached it around the edges of the garment! https://www.etsy.com/uk/listing/840215852/35-mm-golden-victorian-jade-jacquard?click_key=2c042e9416627d9bf9d2f1e85385ba93e48ca464%3A840215852&click_sum=1fe453a7&ref=shop_home_active_1&sts=1 Corset/rolled sleeves: I did this last Corset pieces: Cut out 4 pieces (twice) - and attach them together leaving the end open to turn them inside out. Use a grommet tool and punch some holes through your fabric - make sure they line up. Roll the sleeves to roughly where your inner elbow is and attach another piece of fabric around the width of the roll - pin it in place. Hand sew the corset pieces on and the other piece of fabric so it is all secure :) Thread some similar coloured lacing to the fabric through the holes.
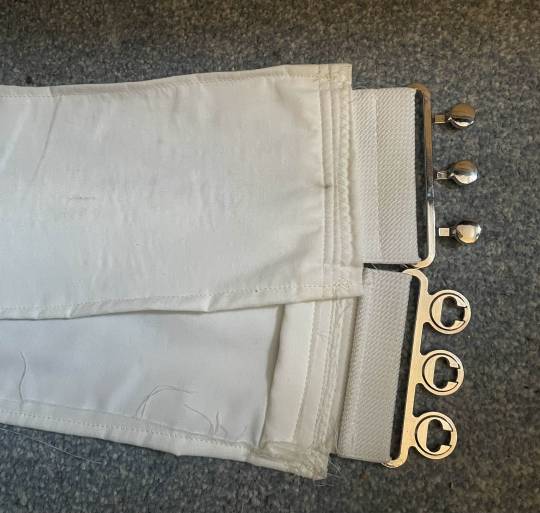
2. The belt! (My mum helped me a lot on this and was my voice of reason) Originally I had bought an elasticated belt with a clasp, but it didn't work at all and ruined the fall of the garment.
I chopped off the end of the belt, leaving me with some elasticated ‘fabric’ and the clasp. Measured my waist and cut out a thick piece of fabric twice and one piece of iron on interfacing. The measurement I did with the base on and added slightly more for both seam allowance and so there was breathing room for myself. Put the clasp piece on either end of the fabric and sew it all together! :) (marks are from the paint of the chain rubbing off onto the fabric :P)
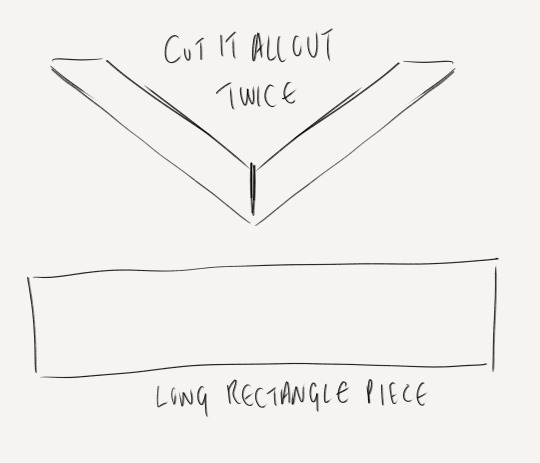
3. The caplet! For the capelet I used this tutorial Easy DIY Capelets | For Halloween, Thanksgiving & Christmas🎃🍂🎄 (The only issue with this is I couldn’t get my head around how to attach a non circle collar) Ivory polycotton + Ivory satin used. Doing the base of this is pretty straightforward with the tutorial - it’s just a circle skirt but for your neck. If you want to be evil to yourself, you can do what I did and hand sew bridal applique all around the garment. If you can machine sew it please do :p I went for a big swooping shaped applique in ivory - any gaps I had were filled with more applique https://www.etsy.com/uk/listing/628065500/beaded-sequinned-lace-flower-wedding?click_key=d8b4937d8079ab34b301cf2d4dc7fbd0d6ede960%3A628065500&click_sum=81fb49a9&ref=shop_home_recs_1 I used poppers on the base and the cape to attach them together - it kept choking me if i didn’t 4. The collar - made me want to cry ngl I could not figure out for the life of me how to attach a non circle collar to the capelet (which is how I wanted it). Instead we have a removable collar!! I copied the size of collar from one of my own shirts and followed these tutorials TWO PIECE COLLAR TUTORIAL | KIM DAVE How to Sew a Collar and Collar Stand Easily by Sew Sew Live 5. Graduation hood???? For some reason you can’t just buy these in the UK without paying £30, so I made my own Cut out double for the pieces around your neck and one for the ‘hood’ part Gather the ends of the rectangular piece and attach them to the other pieces!
6. The Fancy back panel piece Measure from mid shoulder blade to the bottom of the garment for the main rectangular piece. Cut out two other rectangles of the same width coming into an arrow shape. Sew them all together and start sketching on the design. The great thing here is you can make it up, because it’s too complicated and nobody is gonna look at it and be like ‘u did it wrong’ I used a fabric medium and gold metallic acrylic
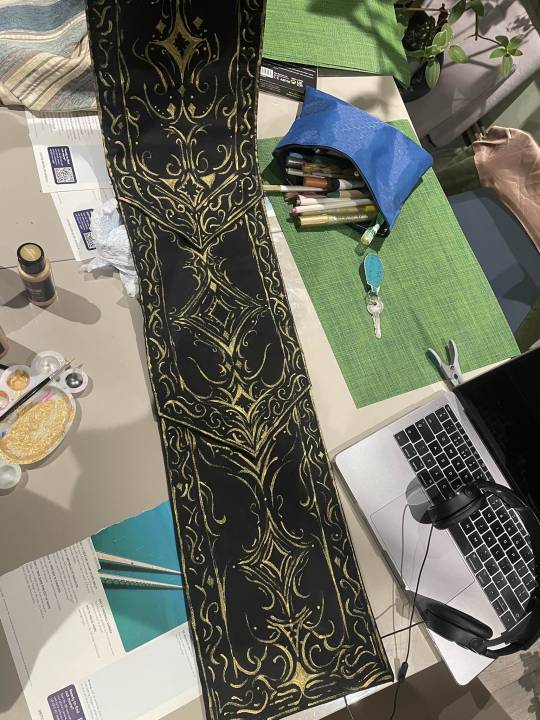
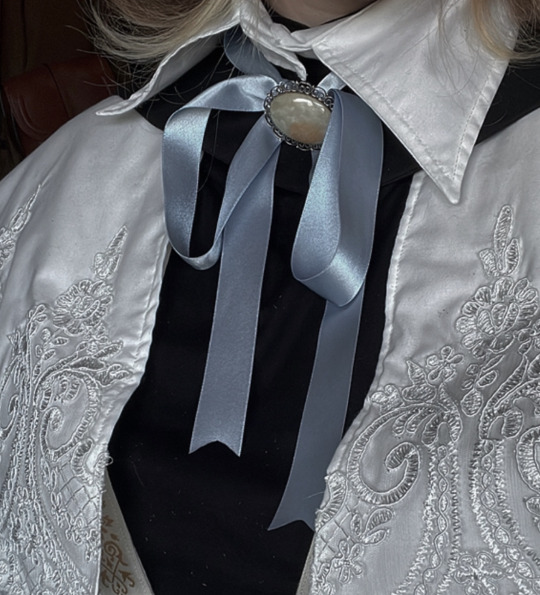
Once it’s all done, I machine sewed it to the back of the base garment because it’s hidden by the cape. 7. THE REST Chain: Me and the chain belt had a fight - Originally I used metal chain,, but I’m allergic to some metal and can’t deal with the smell,, I switched to a plastic chain with 2 D Ring clasps - had to sand it down but the gold spray paint loves to flake off. If I knew about it before, I’d use EVA foam chain :) Black pieces underneath: I bought a turtle neck and a long black skirt :P but you could make it as a dress or smth! Purchased long black velvet gloves, a pocket watch and a key necklace (I didn’t want to use a censer - and they are v expensive/idk how to make one) Ribbon + brooch: I bought chunky soft blue ribbon and found a vintage brooch on vinted
The mask: If you have contacts you’d probably be fine, but I don’t and this mask messed with my depth perception and balance so I had to take it off so I could wear my glasses :(
Use buckram plastic mesh - the thicker kind, used for fursuit eyes and in black! You can see out but nobody can see in. I made a mock up with paper but sorta looks like this shape :)

Eva foam pieces cut out into swirls and filigree like shapes, glue it onto the buckram I did a base coat in grey over the entire thing and painted it with black, gold and bronze acrylic! I hole punched and put the ribbon through it so the mask could be tied around my head.
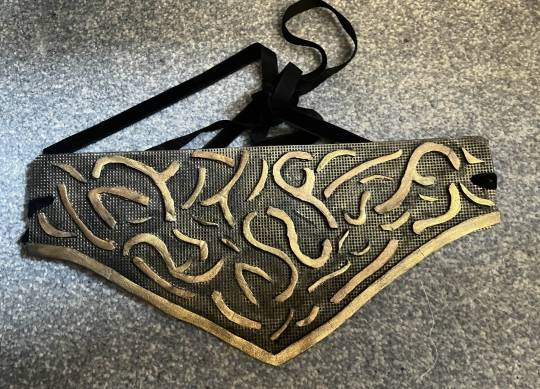
If you’re making the mask and hat - I’d attach the mask to the hat so it’s one piece :) Where I went wrong/what I’d improve I wish I had been able to attach the collar to the rest of the garment. There is a gap that appears between the collar and the caplet/base at the back (mainly due to gravity and it moving) that can be annoying, since my hair is on the longer side it was covered but still I wish it wasn’t there. I’d also want a bigger collar! I’d not use satin as a lining for the skirt and capelet - it’s so annoying to use and it’s so slippery Maybe would not hand sew all that applique because it took me over a week :P BUT OVERALL for a first cosplay, it’s pretty good! I’m mostly happy with the outcome and it was one of my dream ones to do! :) I hope this helps, I didn’t take photos of all the steps unfortunately but hopefully it makes sense :)
#Choir cosplay breakdown as best as I could#with links and things to where I got my patterns and tutorials from#I hope it helps - if you wanna know more or see more photos feel free to dm and ask idm showing!!#bloodborne#bloodborne cosplay#choir cosplay#bloodborne art#bloodborne choir#cosplay#fanart#art#artist#fromsoft
54 notes
·
View notes
Text
If Morgoth is a Thought of Eru Ilúvatar, and Morgoth is the original corruption of Arda, then I don’t think Eru is as omnibenevolent as Tolkien would want us to think.
#tolkien#silmarillion#morgoth#the fallacy of divinity#something interesting is that the ainur are fragments of divinity#different aspects of the greater divine#they reflect certain tendencies of their creator#choosing evil does not mean that your source was evil#but it certainly means the source had the capability#this stands directly in opposition to the christian god#who is innately and diametrically opposed to evil and can no more choose evil than he can change himself#to many people this may feel like slicing hairs#but questions of free will and evil and the Fall are central to the legendarium#and if Morgoth was the first fall but his capacity for it came from Eru?#well#maybe the fall started one more link up the chain#btw#this all came from an idle thought experiment#about how a lot of the Silm would make sense if eru was actually a sadistic overlord who made morgoth#and set him loose to fuck up everything in the world through an echoing pattern of corruption and greed and destruction
45 notes
·
View notes
Text
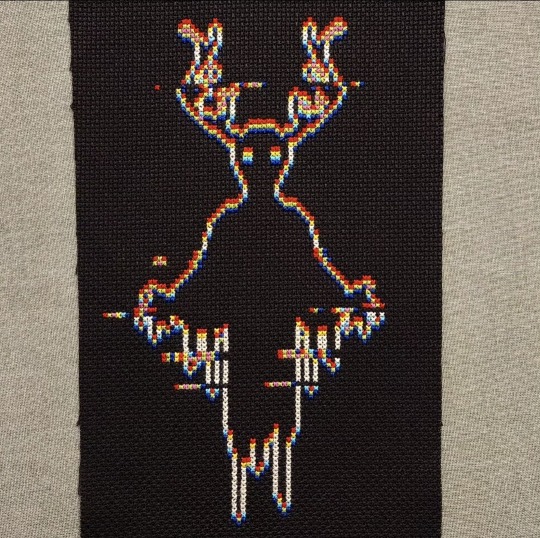
Just finished my first spooky cross stitch of the season. It honestly wasn't so hard on the eyes until the last two colors, and then... ouch.
The (free!) pattern is Lost, based on a design by BlindCherub.
#cross stitch#art#embroidery#lost#glitch#blindcherub#pattern#free pattern#xstitch#spooky#ghost#glitchy#spirit#haunted#halloween#stitch#it won't let me link to both the pattern and BlindCherub's art#sorry about that#if you look up glitchy lost blindcherub#you'll be able to find the reddit post
290 notes
·
View notes
Text


I made this tapestry about a month ago? I used this pattern that I purchased off of Etsy Here!!
This was all done in single crochet and I plan on hanging it up sometime soon! I am also planning on creating some of my own patterns soon so if you are interested in seeing that please follow and support me on my Ko-fi! Thank you!!
#crochet#tapestry crochet#tapestry crochet pattern link#crochet pattern#I'm still super proud of this. I'm currently working on another tapestry using a free pattern#and also working on my own tapestry patterns that I will post here soon#ko-fi link#I hope to be able to put up commissions soon as well <3
12 notes
·
View notes
Text
Plush Pumpkin
Hi, Sweet Friends, I’m loving this rich texture of my plush pumpkin!🎃 Yarn: Bernat Super Value, Redwood Heather, 💯 Acrylic yarn. Premier yarn, Cocoa, 💯 Polyester yarn. Hook: 5 mm/(H) Scissors Upholstery Needle Fiberfill or yarn scraps (a piece of stick, a piece of cinnamon stick, or a crocheted stem) White glue or hot glue stick Directions: Using both of the yarns together, Chain…

View On WordPress
#Afternoons With Gramma#CJD.Sign#crochet#Crocheting#decor#Free Pattern Link#Free Patterns#Home Crochet#pumpkins#pumpkins tutorial
3 notes
·
View notes
Text

I started a cat blanket yesterday.... Already done 15 rows .... The hyperfocus is strong within me....

Just don't look at the back for the moment 😅
#crochet#crochet blanket#cat crochet blanket#i love it#just dont really have anything to watch while doing it#any suggestions??#i really do not have enough wool though#btw#if anyone wants#the pattern is free ill drop the link
11 notes
·
View notes
Text

It took 6 months but I finally finished what has been by far the biggest blanket I've made - my mom requested a nice big soft blanket so this is for her
Made using mosaic crochet and my first envelope border, it was definitely worth it to hide the fringe and neaten the edges
11 notes
·
View notes
Text
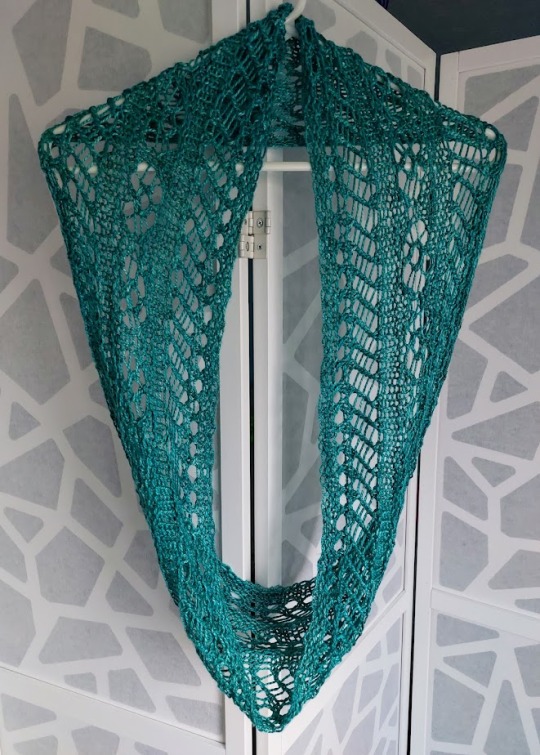
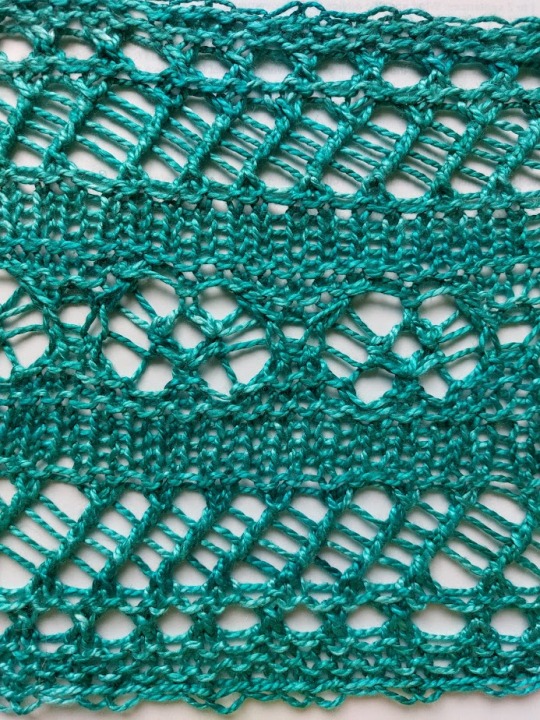
Garland Cowl by Galzanne Knits.
Made this delightful cowl for a friend's birthday using hand-painted pure mulberry silk by Araucanía Yarns (which appears to be a thing they no longer make?? We won't talk about how long I've had this stashed). The big worsted-weight lace was a lot of fun and worked up quickly once I got my gauge issues sorted out. I'd never worked with silk before! I'm a fan. Learned a new cast on for this, and I turned my bamboo knitting needles and fingers VERY blue, but I sort of like when my crafts stain my hands--it's bright evidence that I'm Out Here Making Things, y'know?
#knitting#my knitting#garland cowl#my photography#it was fun!!#it was scary to block!!#i had great interstate support for it!!!#(shout out to asexualbookbird's mom for care instructions and silk hacks)#(ez whatever would i do without you two???)#pattern is linked in the title!!#free pattern on ravelry#i did add a couple garter repeats because i figured i'd have some extra yarn to use up#(i did)#i tried this on 11s and that was a Mistake#10.5 was perfect#(and i do knit VERY tightly so like. be forewarned lmao)#great news: silk is easy to frog!!#(we won't talk about how many times i had to do that either lmao)#seriously i do love when yarn dye bleeds onto my fingers or when i get pen ink all over my hands#like yeah i'm over here and i'm creating something out of either string or NOTHING#witness meeeee
26 notes
·
View notes
Text
does anyone wanna see my tit themed wiskers kandi cuff pattern? originally made it 4 the shits n giggles but I actually really like how it looks lmao
#its private on my kandi pattern profile cause actually making stuff that ppl can see is spooky scary#but. if anyone wants it I can post the link n image on here#only going 2 my show in JAN. AAAAA#phan#<- 4 fandometrics#the beads im gonna use r gonna cost SO MUCH (in my broke world. around 20 quid) but its worth it#do NOT mention spoilers in the notes. I am trying 2 be a spoiler free man#kandi#the kat speaks#terrible influence tour#dan and phil
8 notes
·
View notes
Text
I just wanted to show off something I made! (It’s a blanket)

I made this for my little nephew. When your mom’s side is cajun, you have to have an LSU blanket. 💜💛🤍
#rhi makes#rhi rambles#its crocheted!#and I will gladly link the pattern (it was free online) and tell you the changes I made
4 notes
·
View notes
Text


!!!!!! observe and admire splendid serendipity by the loopy stitch!!!!
god they both turned out GORGEOUS!!! even tho that wasn’t my original plan, i think i want to make a blanket with these. i might take a few other afghan square patterns into the mix so it can be a really cool differently textured and colored blanket!
the orange (left) square was done with Lana Grossa Cotonella 100% pima cotton in color 004. i ended up having to cut the yarn eventually after the last bobble stitch round (everything before that was one continuous thread!!), because it a) changed color mid round into b) a reeeeeally long stretch of brown-orange that didn’t fit with the rest of the square. so i ended up doing some cuts to get the yellow and orange out of the rest of the yarn!
blue (right) square was done with Lang Yarns Merino+ Color Extrafine Superwash / No Mulesign, in color 926.0210 — similarly as with the orange square, the yarn ended up changing color mid round for the last three rounds and I ran out! so the border is done in Lang Yarns Merino 120 Extrafine - Superwash Color 34.0372 (light blue) and Merino 120 Fine Superwash color 34.0272 (dark blue).
due to the different fibers, the orange cotton square is much much much more stretchy and thus a bit larger than the blue merino wool square, but that’s honestly okay, especially if i end up making this into a cool patchworky blanket!
#fiber crafts#fiber art#crochet#crochetblr#afghan block#sunny crochets#handmade#sunny crafts#sunny’s afghan blanket#these are unblocked btw so they’re wonky in some places#if anyone reading knows large square patterns that have fun stitches like splendid serendipity!#please feel free to link em in the notes!!!
8 notes
·
View notes