#Free step file viewer
Explore tagged Tumblr posts
Visit Tumblr Blog
Explore Tumblr blogs with no restrictions, modern design and the best experience.
Last Seen Tumblr Blogs


Fun Fact
The average Tumblr user visits about 67 pages every month.
Note
your oc website is SO SO SO SO INCREDIBLY COOL how the hell do you even start learning how to do this ?? if you learned how to do this by yourself online, are there any tutorials or resources you can share with us? was making this website free??
omg THANK YOU SO SOOOOOO MUCH!!! It makes me so happy to hear that folks like my little site. I code my site with Phoenix Code (for the live viewer and number dials) and I host my site on Neocities - it is all free. Phoenix can be used in browser or on desktop, but I like having it on desktop more for big projects in case my files get deleted. I use the browser version when I just want to test something quickly.
The 2 videos I use and can not recommend enough to anyone who asks me are this HTML tutorial and this CSS tutorial. They are simple and easy to understand, but I recommend watching it the first go, and then following along the next few watches until you get the flow of basic parts to a website, how they're organized, and what order they go in. At this point, I've memorized exactly where everything goes, and it is all thanks to these 2 videos.
If I am being honest, I learned how to code by myself, not quite even with online tutorials but just from being stupid and messing around myself (1, because I was a kid, and 2, because I didn't understand English very well to know what tutorials are saying.) I used to do html coding for Neopet pages when I was a kid with too much online time, first by just editing the default petpages and adding info and images, and then just doing trial and error with the html. I'll just try something and then if it doesn't turn out the way I want it, I try to find out why it didn't work and also get inspiration from other similar sites to figure out where things go or how they coded (with this nifty thing called right click > inspect page or right click > view page source). And BOOM, working webpage.
It was rudimentary, white blank background without any boxes or anything, you just scrolled down the page and sections were separated by a horizontal bar. OH and every text was centered! I had no idea how to make scrolling boxes or fancy assets, but damn I still had so much fun working on it every weekend. When you find authentic selfmade sites from the 90s and 2000s, most of them aren't super fancy either unlike what modern nostalgia makes you think. So I hope you don't feel discouraged if you begin making a website and feel it isn't "fancy", you're already doing a first big step which is making a webpage and learned your first set of html code!
It was over a decade later before I coded webpages with html again. I've gotten lazy and started relying on site builders, but nothing was quite as versatile as html. I wanted to try coding my own OC site again, so that was when I started working on OutKrop (the site I posted). Until I started coding again, I had literally no idea what CSS even is (and let me tell you, it's a game changer!)
Personally, I work best when I can do things hands on. I don't read through tutorials, I code first then go back and read through coding help sites like w3schools when I find myself stuck and unable to figure something out. Sometimes I grab existing codes and play around with them to see what changes and what I can do with it, cuz having visual context is what helps me a lot.
I can also share my process:
Once I gather up some ideas, I make a sketch, including what boxes (divs in css) should approximately go. It is very rough, but shows me exactly what I need to know.
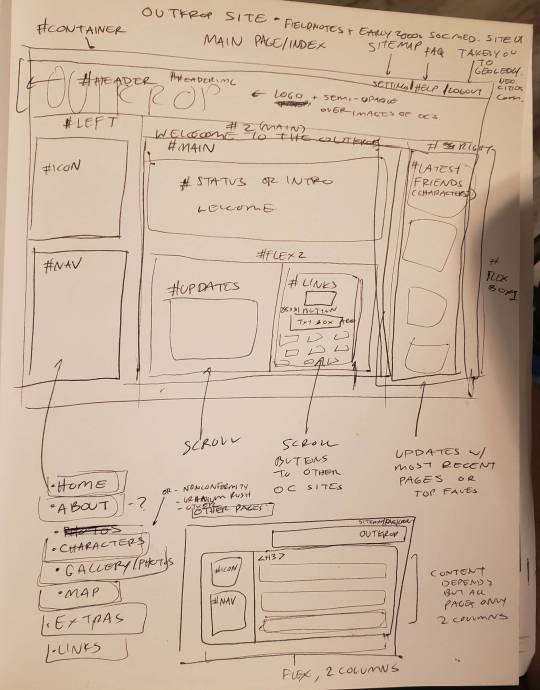
Next I load up my coding app (Phoenix Code in my case) and "sketch" the layout. Nothing fancy going on here, just putting things where they need to be, and fixing size of boxes and margins if needed. I give my boxes all a background color so I can easily see how big they are and where they are located.

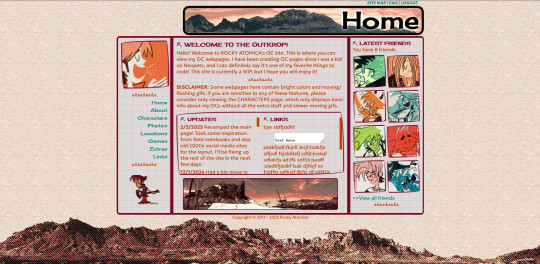
After some adjustments like moving stuff around and adding assets like backgrounds and images, and changing colors of the boxes, rounding off corners, etc., we get this!
so recap + additional useful sites I use:
Coding app: Phoenix Code
Site hosted on: Neocities
Video tutorials: HTML and CSS
Sites for learning code: w3schools, also lissa explains is a great site that is written for kids to learn html so it's easy to understand. Finally, sadgrl has a lot of great resources for coding as well!
I recommend looking through these sites AFTER you tried taking a spin at coding - it doesn't have to be anything fancy just follow the HTML video tutorial I linked!
Thanks for the ask, and I hope this helps you and many others out there who are interested in building a site with html/css! Don't be afraid to get things "wrong" or have an "un-fancy" site. This is how you learn to code, and it'll become so easy once you get the hang of it.
Anyone is always more than welcome to reach out for coding help and advice :-]
55 notes
·
View notes
Text

THE SIMS 3 TUTORIAL
HOW TO CREATE DEFAULT REPLACEMENT MOD USING CUSTOM MESH & TEXTURE FOR SIMPLE OBJECT
⚠️ Tumblr has 30 pictures limit, so I cannot include too many pictures. If you want to zoom in the pictures, click the pictures to enlarge, or save the pictures into your PC, zoom the pictures on picture viewer or zoom in the pictures on your mobile phone. ⚠️
----------------------------------------------------
I create this tutorial to make easier to follow because there are older tutorials available before but scattered on internet and usually only say "Export to replace s3asc" without explaining how to export the edited object properly.
My method is using TSR Workshop instead of exporting the object using Sims 3 Object Export/Import plug in because exporting to replace the s3asc using that plug in always giving error notification "ERR: Model has 1 groups; original had 0" and cannot be exported.
For beginners who are very new using s3pe and haven't created default replacement mod before, better start from simple object first.
Simple objects I mean in-game object that has single MODL and single texture with no morphs, no GeoStates, no presets, no CAS colour channels, and easily cloned from OBJD on catalogue. Usually as utensils that Sims holding in their hand, not buy/build objects. For example: Pencil, pan, fork, spoon.
----------------------------------------------------
Tools to prepare:
s3oc
s3pe
Milkshape 3D for bone assignment (Version I use 1.8.5 beta, discontinued by its developer, therefore feel free to download the full version with its license key provided).
Sims 3 Object Export/Import 1.01 by Wesley Howe (Milkshape plug-in. Download msS3ObjPluginsV101.rar )
TSR Workshop (Older version for TS3 only version 2.0.88)
TSR Workshop plug-ins for export.import TSRW Object.
3D Program (Blender/Maya/3dsMax)
Editing images software (Photoshop, make sure you have to install .dds plugin by Nvidia. For free software alternative, you can use GIMP with its .dds plugin)
This tutorial will not teach you how to:
Meshing object ❌
Create alpha texture ❌
Change thumbnails in-game ❌
Install programs and plug-ins ❌
This is how I created Chinese chopsticks replacement mod using custom mesh and texture.
In summary, this tutorial has 10 steps:
Step 1. Clone the Object using s3oc
Step 2. Open S3PE to Copy the Original Resource Code and Export the Files
Step 3. Export the Original Mesh as Base Mesh to .obj format
Step 4. Create Your Custom Mesh
Step 5. Bone Assignment & Create Group
Step 6. Create custom Texture
Step 7. Import the .wso of Edited Mesh on TSR Workshop & Export the package
Step 8. Export MODL file from Package saved from TSR Workshop
Step 9. Finalizing in s3pe & Replacing the Original file with Edited File & Correcting the Code As Same As Default Code
Step 10. Test the CC in your game.
-----------------------------------
✳️ Step 1. Clone the Object using s3oc
Before cloning the object, check the Game Folder for in-game object file location. Settings > Game Folders...
Take a look if the Base Game or Expansion Pack for object file you want to clone is in the right folder. For example, my The Sims 3 game are all bought from Steam, so the location is D:\SteamLibrary\steamapps\common\The Sims 3
If you want to clone object from Expansion Pack, make sure input the folder location. For example, the location for World Adventures EP is D:\SteamLibrary\steamapps\common\The Sims 3\EP1

If you are done, close the pop-up box. You can continue click Cloning then choose Normal Object...
Wait until you get the whole catalogue. Click Search...

For example, I clone object from World Adventures Expansion Pack. You can clone object from Base Game or other Expansion Packs as long it is considered as "utensil" that Sim holding on hand. For example: "Pencil" or "Pan"
Search for text: chopsticks
or if you want to clone object from Base Game, search: utensil
Tick check marks for Resource Name, Object Name, Object Desc then click "Search button"
Search result gives you results with name "chopsticks". Here is the object we are looking for: UtensilChopsticks
We need the OBJD file to clone. OBJD = Object Data.

Click "Clone or Fix" at the right bottom. Then you see the next page to determine if you want to clone with renumber or not. If you want to make default replacement, then do not check the Renumber box. Keep it blank.
Tick check box means the s3oc will generate new resource code for new item. Not tick the check means the s3oc will overwrite the same resource code, it is to replace object you cloned in-game.
I am personally a detailed person, so I usually tick as many as I want: tick "Deep clone" "Missing String Tables" and "Include Thumbnail" to include more details. Then click "Start" to proceed.

It will give you file name [CreatorName]_ObjectName_Number
Then save your package file in "DBPF Package" format in your project folder. Always make folder for any file to make everything organized.
✳️ Step 2. Open S3PE to Copy the Original Resource Code and Export the Files
Open S3pe, locate your package file you cloned from s3oc. Find the MODL of Utensil Chopsticks, Right-Click, "Details..."

On Resource Details, click "Copy TGI" to copy the Resource Code. Type, Group, and Instance will automatically be copied on clipboard. Then open Notepad, Right-Click to "Paste".
Click GRID on bottom of the s3pe (I mark it red on picture), it will give you pop-up box with Data Grid. Click "Resources", it will be highlight blue and there's 3 dots button appeared on the right side. Click the 3 dots button. It will give you TGI Block List Editor.
Inside MODL's TGI Block List Editor only has IMG. You may wondering why, but that's how the game coded. Type, Group, Instance of _IMG inside TGI Block List Editor should be the same as _IMG on the package.
Copy the TGI, Group, Instance to your Notepad.

After you copied code of MODL, do the same for the texture image (_IMG), but only copy the code from Resource Details. You cannot edit TGI Block List Editor for _IMG as the Grid button for _IMG is greyed out.
The main task is the code of your edited mesh and texture should be the same as the code you copied now from original package you cloned with s3oc.
Keep the code on notepad. You will need this code later.
Export the MODL file. Right-Click, "Export to s3asc". The file appears in long string such with name for example: S3_01661233_08000001_B619DB2238C3430B%%+MODL_filebase
Do not rename the file. Save.

Export the texture file. Right-Click "Export > To File..." The file will be saved in .dds format. Do not rename the file. Save.

✳️ Step 3. Export the Original Mesh as Base Mesh to .obj format
Open Milkshape. Import the s3asc file you saved before.
More steps click spoiler tag "Read More / Keep Reading" below
File > Import > Sims 3 Object Import v 1.01 by Wesley Howe

Locate the s3asc file, then the original chopsticks mesh appears.
Click the "Joints" tab. It has 4 codes. Check box "Draw vertices with bone colors" It will show Bone Assignment colors on the original mesh. Yellow on top chopstick and light blue on bottom chopstick. The colours are to make the object has rig and movement following the Sim's interaction.

Take a look at the 4 codes on Joints Tab. You can play around to see which colour of the code will appear, after that copy paste the code to Notepad to make it easier to comprehend.
Click Select from Tools menu, Select Options: Face. On "Right/Left/Top/Bottom 2D View", Left-click make selection of one part of chopsticks. While the part of object being selected (Red), click Joints then Choose "Assign".
0x96239247 --> Yellow 0xFEAE6981 --> Purple 0xCD68F001 --> Light Blue 0xD0DECA8E --> Red
Your edited mesh must have the exact same Bone Assignment colour later. Check again if the code and colour are correct.

You can save object mesh as .obj to other 3D software such as Blender or any other 3D software.
✳️ Step 4. Create Your Custom Mesh
Use the original .obj as base model. While you can create longer mesh or any edited version as you wish.
Make sure the scale and position of the edited mesh is same as base original mesh, because the edited mesh will be used on Sim's hand.

If you are done editing the mesh, export the UVmap.
You can export the uvmap in higher resolution, as long as it is Power of 2. 64x64, 128x128, 256x256, 512x512, 1024x1024, 2048x2048, 4096x4096. I export in 1024x1024 pixels to make the size of texture larger and have more details.
Then export the mesh object in .obj format.
✳️ Step 5. Bone Assignment & Create Group
Open Milkshape. Import the original mesh.
Check the Groups Tab. Original mesh has 1 group, "group 00". Group 00 means it is the main mesh. There is no shadow beneath the object.

Import the edited mesh as .obj file.

My edited mesh has one single name "default" name on the Group Tab. While edited mesh may have a lot of file name scattered on Group Tab. Regroup the file name to simplify your edited mesh into one single name. Select > Regroup.
The main task is replacing the EA's original mesh with your edited mesh.
Before you delete anything, you must do Bone Assignment first to the edited mesh you created.
Your edited mesh does not have Bone Assignment, so it appears white.
Remember the 4 codes you copied earlier in Notepad.

Copy Bone Assignment from original mesh to your edited mesh.
This case, your want to Bone Assign Yellow colour.
Select > Face to select one part of chopsticks of your edited mesh. On Joints Tab, double click the appropriate code 0x96239247 in blue highlight then the code box on the right side of "Rename" will appear 0x96239247. Make sure the code is correct. Then you can click "Assign".

Your edited mesh will appear in Yellow colour. Then do the same for another part of chopsticks.
Select another part of chopsticks of your edited mesh. On Joints Tab, double click the appropriate code 0xCD68F001 in blue highlight then the code box on the right side of "Rename" will appear 0xCD68F001. Click "Assign".

Your edited mesh will appear in Light Blue colour.
Then what's the other code for? With colour purple and red?
Leave them. Let the codes have the same exact codes as appear in original mesh and let the colours only assigned Yellow and Light Blue. The colours are to determine rig for interaction in-game, which only use Yellow as upper part of chopstick and Light Blue as bottom part of chopstick.
You can safely delete the original mesh with name group00 until it remains your only your edited mesh.

Rename your edited mesh to group00. Type group00 on the box then click "Rename" on the left side.

Export to TSRW Object in .wso format. .wso is format with bone assignment on object attached.

Save your .wso in your project folder.
✳️ Step 6. Create custom Texture
Import original texture you exported from s3pe to your editing image software.
Look at the original texture made by EA. 32x64 pixels. It is very low resolution, blurry and stretched, because the texture should be compressed as low as possible by game designer. As player you want it has higher detail to look realistic as possible and your PC of course can handle high resolution content, sure you can make the resolution much higher than EA's.

Import the UVMap you saved from 3D software. For example, UVmap I imported has 1024x1024 resolution. Add your custom texture. Then save it to .dds format in the same name as original texture. Save in separate folder, name it "Edited Texture" to keep it separated from original texture.
✳️ Step 7. Import the .wso of Edited Mesh on TSR Workshop & Export the package
Open your TSR Workshop.
Create New Project > New Import >Next...

Then Browse original mesh by EA in package format in your project folder.
On Open file box, you cannot see .package file because the filter is .wrk (TSR Workshop Project). Choose the .package dropdown.

Then you can see .package file.
Open the .package. After the file is located, then Next. On Project Details I usually skip without giving name of Project Name and Title. Next.
You must have seen green land with white blank sky.
Where's the mesh? It is actually there... just being zoomed in too close. You need to zoom out by scrolling down mouse.
You can see the original chopsticks mesh by EA. You can save the project file in .wrk format. After you save the file, import the .wso of your edited mesh. Mesh tab > High Level detail. Click green arrow folder icon to import. Then your edited mesh will appear replacing the original EA mesh.

As you see, the texture is messed up because the texture is still using original EA's texture. But then you check Textures tab and it has blank dropdown...
I cannot change the texture on this TSR Workshop!
Don't worry, we can replace the texture on s3pe later.
No need to change anything other than importing mesh. Click Edit > Project Contents to save as package.
You will see pop up box with number or files DDS, FTPT, LITE, MODL, OBJD, OBJK, etc. Export > To. package. Give name such as "EditedChopsticks_TSRW"

✳️ Step 8. Export MODL file from Package saved from TSR Workshop
Open S3PE, File > Open package "EditedChopticks_TSRW" that you saved from TSR Workshop.
Export MODL. Right-Click, export. It gives you file name with [StringOfNumber] .model .
Save it on project folder. Keep it organized and separated from original MODL. Name the folder "Edited MODL". Do not rename the file.
✳️ Step 9. Finalizing in s3pe & Replacing the Original file with Edited File & Correcting the Code As Same As Default Code
Open s3pe, File > Open original package that you cloned from s3oc. [CreatorName]_ObjectName_Number
Find the MODL. Right-Click > Replace...
Locate to your edited MODL with filename .model .
Then click Open.
The original MODL of the package should be replaced with your edited mesh.
Do the same for the texture.
Locate to your edited texture with filename .dds
Then click Open.
The original texture of the package should be replaced with your edited texture.
Take a look at MODL's Type, Group, Instance. It has the same code as original MODL in the original package cloned with s3oc (because it has been replaced)
Don't forget to see the code inside TGI Block List Editor.
Repeat step 2 how to check the code. Right-Click on MODL/IMG > Details... and click GRID > Resources > TGI Block List Editor.
The Type, Group, Instance of the _IMG are different compared from IMG from original package clone, which means that is the evidence of edited mesh replaced the original.
Rename the Instance with default/original Instance you copied on notepad from Step 2. Type, Group, Instance should be the same as default/original Type, Group, Instance.

Open notepad with resource code you copied from Step 2. Make sure the Type, Group, and Instance are all the same.
If the codes are the same, then your edited mesh and texture will overwrite the default mesh and texture with the same code in the game. Save, Commit, Save the package.
Check again if the texture is replaced properly. Right-Click on _IMG > ViewDDS.
ALTERNATIVES!
Yes, you can delete unwanted files in your edited package, to keep the package clean. Simply Right-Click>Deleted.
The only files needed in package are: MODL, _IMG, _KEY
They are the only files with your edited mesh/texture including codes to overwrite the default codes.
You can Start new fresh blank s3pe. Right-Click>Import from file...
Locate your edited MODL and _IMG (texture) file.
On Resource Details box, tick mark "Use resource name" > OK.
Make sure all the Type, Group, and Instance of MODL and _IMG including in the TGI Block List Editor are all the same as the code in original package.

Save the package.
✳️ Step 10. Test the CC in your game.
Put the package to your CC folder in your The Sims 3 document folder to see if the CC is working or not.
If the CC is working as your intended, with your custom mesh and texture, then test the animation. Are the chopsticks animation working as the same as original EA's? If the animation are working well too, then congratulations!

Your default replacement are working. Give applause to yourself. 👏
-------------------------------------
QUESTIONS!
Q:
Can I use this tutorial for making default replacement for buy/build object?
A: This tutorial covers basic method of using TSR Workshop and replacing the default codes (Type, Group, Instance), so you will understand the basic principle of doing default replacement mod.
Keep in mind that different object has different case. Buy / build object has MLOD (not just MODL) more than one, texture images more than one, has presets, and CAStable colour channels.
The TGI Block List Editor for buy/build object has a lot of codes, so have to spend a lot of time to do trial-and-error to make the default replacement working properly, because a lot of times the texture doesn't work (still using default EA's texture), or when the object appears right with your edited mesh and texture, after you choose the presets, the object reverts back to your edited mesh with default EA's texture.
Q:
Help! The texture is black! / still using same EA's texture when tested in the game!
A: The texture codes must be not the same. Check the Type, Group, Instance of _IMG. Do the codes are the same like codes in original package? Check the TGI Block List Editor for MODL, is the _IMG inside has the same Type, Group, Instance as in original package.
Q:
Help! The object disappears when tested in the game!
A: You must be replacing OBJD in your package. Do not replace OBJD. Just MODL and texture only.
#tutorial#the sims 3#the sims 3 tutorial#thebleedingwoodland#the sims 3 default replacement mod#modding#s3pe#s30c#TSR Workshop
118 notes
·
View notes
Text
well hi :3 welcome to deja’s skinblending guide. this is my first full written tutorial so excuse me if its not very good LAWL before we get started, here's the tools i'll be using
sims4studio
tray importer
photoshop 2022 (theres cracked version everywhere on tumblr)
blender 4.1
sims 4 ripper
blender + the ripper aren't required to make skins, plenty of people don't go that extra step, but i love using it for placement help
okay lets fuckin go gamers heres my very in depth process for making my ocs skins
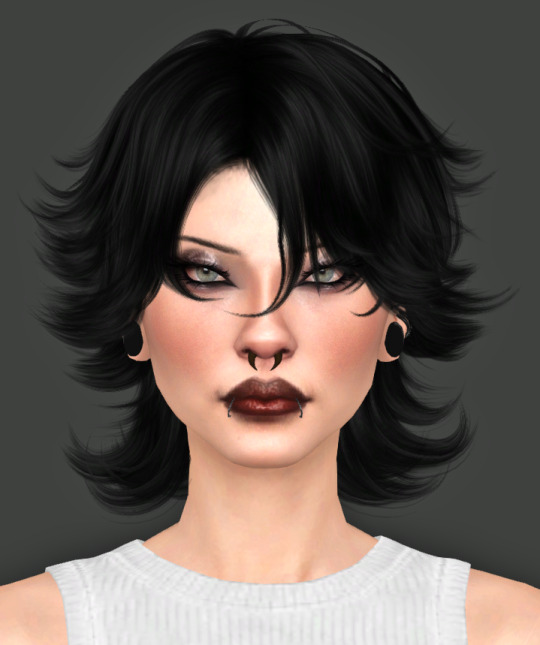
miss dolly is gonna be our model today. she already has a skin but im gonna add some little details for the sake of example + some tats cause ive been meaning to anyway.
so when i first get started on making someone a skin, ill find a good base to use and then add details from other categories like nosemasks, eyebags, contours, etc.
my fav skin creators are @sims3melancholic and @thisisthem. my bases are usually thisisthem, and then i'll pick through a couple s3m skins and make notes on my phone about what parts i wanna take off of them (like, say, i like how a certain s3m skin's nose looks. i'll use that instead of a nosemask)
my goal when im gathering things i wanna add is to free up as many slots as i can. id rather add cheshire's freckles onto her skin than use up the freckle slot in skin details that i could use for something else, yknow?
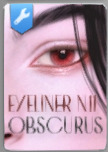
ill repeat this process for makeup next. obviously im not giving my ocs permanent full glam, but some lipsticks can add better texture, you can get highlights/blush from........the blush section LOL and i love using this obscurus eyeliner at a low-ish opacity
just adds an extra level of detail i love. i think what keeps my sims looking consistent next to each other is that i tend to use some of the same details all across the board
make sure for all makeup/skin detail/tattoo category swatches you use, you make note of what swatch it exactly is. when you go into s4s to export the file, you're gonna have to manually select it and if u cant remember what skintone u chose out it can be annoying :/
note that she is completely nakey aside from her piercings while i pick what im gonna use for her skin! no clothing but u can keep on their hair. this is so we have a clear view of everything (and i mean EVERYTHING) for blender.
after you make sure u save the sim/household to ur gallery, you can close out of cas and save ur game! i forgot to do this bc im a fucking idiot but its okay bc you will not. its not REALLY necessary to do this as long as you know exactly what packages you need to locate for texture exporting
step one is done!!!! close out ur game
i have a million fucking characters so i made a deja senti skinblending folder to keep it all organized :-)
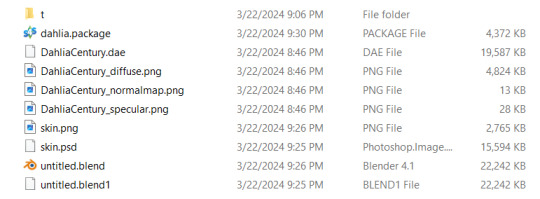
this is what it looks like inside. gives u a pretty good overview of what ur gonna be doing tbh. the 't' folder is all the textures we're about to export
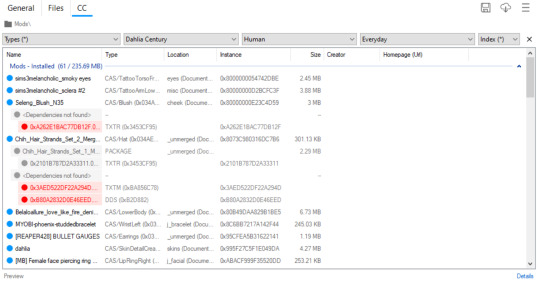
thankfully i do have a version of dahlia saved in my gallery so even tho i didnt go it before i closed my game i can still show u what to do in tray importer lol. i have multiple sims in one household, so i narrowed it down by going up top and selecting dahlia / human / and her everyday outfit.
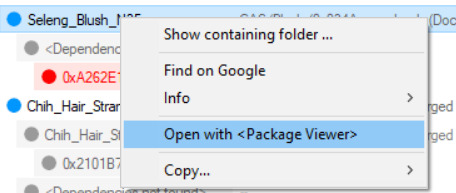
since im gonna give her this blush, i right click and hit open w package viewer so itll find it and open s4s for me
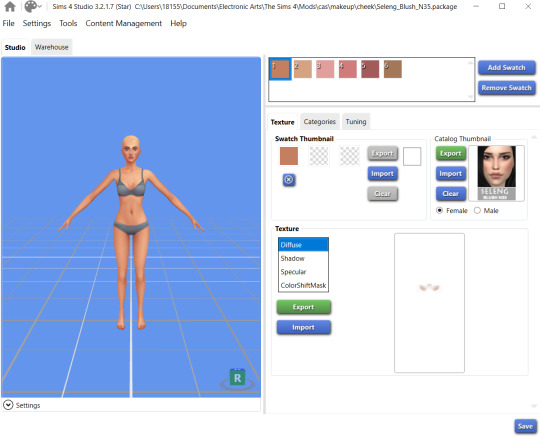
anime wow sound. im gonna change the color manually in photoshop so it doesnt matter to me what swatch i export. hit that green export button under the list of diffuse/shadow/etc (u dont need to worry about all those options, just diffuse) and save it to ur folder!
once ur done gathering ur textures ur good to close out of tray importer and s4s(we'll come back to s4s later tho)
thats step two! the quickest step lawl
this is where i start being a little extra. u dont have to rip ur sim and use blender if u dont want to, but i think it can rly help bc the default sim in s4s doesn't have ur sims facial features and can make ur skins look wonky/wont give an accurate representation of how itll look in game. this cuts out having to go in game/out of game over and over to check
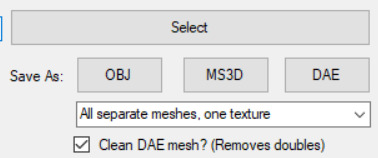
so in simripper once u load up ur sim, the important part is to make sure u have it set to export the dae with separate meshes. once thats done u can import it into blender and there's plenty of other tutorials out there how to use simripper n all that.
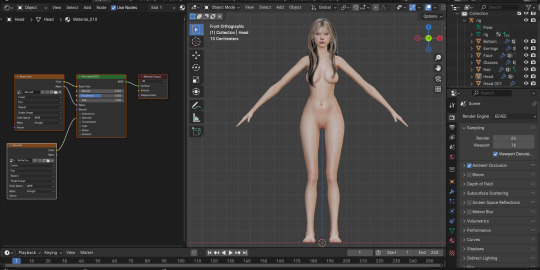
so once u get the dae loaded into blender im gonna send u on a little side quest over to this ask i answered where i explain how i separate eyes from the head mesh. next thing ur gonna open is photoshop! or whatever u have thats similar

say hi to flat dahlia. u should have ur own guy but flat open now too :-) along with everything else ur gonna combine. in my case its blush and a titty mask. im gonna start w the blush so i zoomed into her face in blender. i went into the blush file and copied, then back into my base skin file and pasted into place with crtl+shift+v
please do not be like me. make sure u rename ur layers as you copy and paste them into the main skin file. do this because it DOES matter what order ur layers are in. u dont want to put ur highlight under ur nose mask cause the nose mask will just cover the highlight etc etc. i already lost what layer the new blush i added is. what is wrong w me
so when u have ur first detail pasted on and in place, ur gonna save the base skin file as a psd. then go into blender, and in the little textures window ur gonna replace the diffuse file ur dae came loaded with with ur new psd file
u should see the change u made but mine was super subtle so im gonna show it to u when i put on the cleavage overlay
when it comes to stuff like this, ur obviously gonna want to pick the closest to ur skintone swatch as u can. i did not do this, because again, im an idiot

mine is way too pale LAWL whoops. we can fix this tho
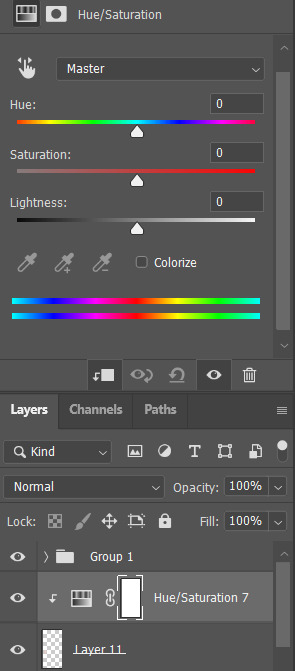
i add a hue/saturation adjustment and make it a clipping mask using that square w the arrow so the adjustment will ONLY affect the mask
from there i just make little adjustments until the color match up is as perfect as i can make it. for example for this, ik that it needs to be a little warmer and a little more saturated, so im gonna bump the hue and saturation sliders to the right and it was pretty much perfect
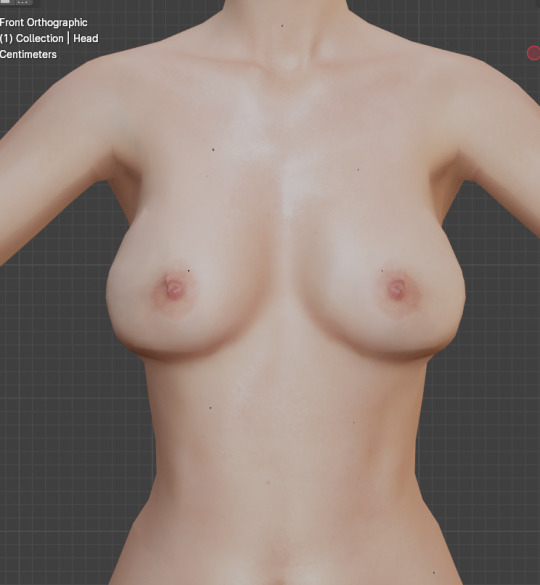
tiddies with no mask > with mask no adjustments > with mask and adjustments
and ur gonna go ahead and repeat that process with every single thing u wanna add to ur skin.
so as for tattoos! this is another thing ur gonna wanna rename the layers for because depending on how heavily ur sims can be tatted it can get A LOT
here's psyche's neat little tattoo folder. its separated into where the tattoo is and then
what it is
i find all my tattoo inspo on pinterest using flash sheets/keywords in the search. my ocs usually have sub-boards that i hoard inspo in for them specifically. dahlia doesnt have one bc ive never seen her as the most tattooed person, but i think she'd have some at least
this process is pretty much the same as putting on skin details! its all about adjusting to what u like. for example, i like when my sims tattoos are a little faded and a bit blurred at the edges cause it looks a little more real
when it comes to images i find on pinterest, ill save the image and first try to make it as clean as i can
for example, this lil guy
a curve mask made the whites brighter and the blacks darker as u can see. then ill go into filter > reduce noise to soften the harsh edges
then i flatten it, copy and paste to the skin file, n place it wherever i want it to go :-)

louder anime wow!!!
okay so now ur gonna want to make sure u .psd file is saved (it should be bc we've been checking our progress w blender) and then merge the visible layers (NOT flatten, merge visible. we need the transparency around the skin to be in tact)
ur done in photoshop and blender!!! good job :-)
step whatever number we're on. back into s4s!
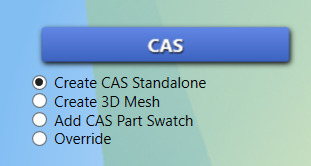
ur focus is over here. make sure the option filled is the top one, and then hit the cas button
this menu will open, ur gonna go up to part type and find the option skin details, forehead. pick the first forehead wrinkle option that appears and hit 'next.' itll prompt you to save ur new file n give it a name, i usually just make it my sim's name cause i have a folder in my mods folder for specifically my cc
remember wayyyy back when we were exporting the skin details? ur gonna go back to that same section and hit 'import' instead of export. select ur skin's .png file, and poof !

ur skin :DD it looks great man good job
this part is EXTREMELY important. go up to the warehouse tab
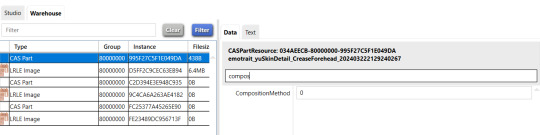
in the 'data' section ur gonna see a box at the top labeled 'filter.' thats where i typed in 'compos' just so it would show me JUST the compositionmethod section since theres a lot of shit in there lawl. yours is initially gonna say '3,' but we're gonna change it to '0' mind you, this is because MY skins are all alpha. maxis match overlays do not show up on my skins because my comp method is set to 0, meaning it has top priority essentially.
after you do that, you can hit save and place that .package file you created into your mods folder!!! and GUESS WHAT BESTIE UR DONE!!!!! U DID IT :DDDD
of course, as always, you can always dm me if youre stuck on anything or need any more clarification. i am always open to help as much as i can. i rly hope this helped :-)
64 notes
·
View notes
Text
Easy Work
cw: beating/interrogation, emeto, mild dissociation
T$$ Masterlist ///// Next
~
He doesn't have a name today.
It's pragmatic. No name means no answer for the men who demand to know who he is, who hit him whenever he responds with only a glaring silence.
The spy doesn't mind the blows. He's had worse.
When one of his captors pulls out a camera, he knows the drill. Threats and recorded pain, in an effort to force a viewer to act. Could be an efficient strategy, if the viewer in question wasn't Shepard Vic his superior.
Vic doesn't care what the spy has to endure; he knows his subordinate can take whatever's thrown his way. Likewise, the spy understands that he shouldn't expect help, rescue, or sympathy.
One of the men who has him jerks his head up by the hair, and the other shoves the camera in his face, muttering something to its intended audience. The spy barely pays attention to his words; he's too busy watching the man himself.
He walks with a self-assured step, confidence oozing from his voice and eyes. A man who believes himself on top of the world, not seeing how easily he'll topple if only pushed at the right moment.
The man behind him loosens his grip, and the spy lets his head drop, taking a deep breath in the instant of reprieve they've allowed him.
It doesn't last long.
The man's fist buries itself in his gut, and the spy hunches forward, reflex overcoming his bearing. Mentally, he recoils from the nauseating blow, burying that still-soft part of his brain he could never kill completely. He's tried not to hold it against himself. It's only human to hurt.
The man hits him again and again, until the spy’s nausea becomes too much and he empties his stomach onto the floor, thinking only of how this man's blows seemed to weaken after the third hit.
He may be strong, but he tires quickly.
Had he encountered this duo in an even fight, face to face and aware, he'd have disposed of them swiftly and been on his way. As it were, the pair had ambushed him with a gas attack, drugging him unconscious in order to get him here. As soon as they put the camera away, they'd be wishing they'd given him a stronger dose. Neither of them would leave this building alive.
The spy's torso throbs from the hits he's taken—they’ve been attempting to persuade him to speak since the dawn first shone through the cracks in the ceiling—but he doubts it will be much of a hindrance. He'll make quick work of the pair, pain or no pain.
From there, it'll be back to the compound with the intel he's collected. Back to the new team that's usurped the life he's grown into, that he works so hard to keep at arm's length. He needs them to hate him as much as he craves their respect.
The spy still doesn't understand why Vic insisted on collecting such a group, but by now he knows not to question his master's will.
The camera is shut down. Its wielder carries it up the stairs, likely to upload the file it contains and ship it off. In approximately ninety seconds, the spy will break free of his restraints and kill the man’s partner.
Easy work. Two quick jabs to the throat if he's facing him, seize his weapon and pull the trigger. If he's stupid enough to turn his back, the first step will become unnecessary.
The spy will be free of this place in less than six minutes. Free to return to the cage home that is the compound.
Free to return to the name Sahota.
~
@theonewithallthefixations @violet-prism-creatively
#said screw it to my writing plans and full sent into sahota's head lol#it may take me a while to get the hang of it but this is pretty There?#this may be the only one for a while because y'know spoilers#total$hit$how#t$$ sahota#spy whump#interrogation#will rb tomorrow because im impatient and posting RIGHT NOW#short!
86 notes
·
View notes
Text
I already mentioned that the final iteration of my latest video is actually version 3.8. Here's the (unfinished, raw and not-colored) ending of the original version inspired by this post, followed by trivia on the final version:
The idea was that Griffin knew the Trix were descendants of the Ancestral Witches and for some reason they were the only ones who could free Valtor. Once they stopped listening to her, she did everything she could to steer events in such a way that they would end up in Omega and free Valtor. However, the Trix, sensing that there's something Valtor is hiding from them, spy on his conversation with Griffin and attempt to gain control of him the same way that their ancestors were pulling his strings. Griffin ends up imprisoning them before they can despite Valtor's refusal to believe that they could pull it off since they're clearly unaware of who he is and what that entails for the power balance between them.
The reasons why I ultimately gave up on this were because a) it was overly convoluted and hard to convey, b) it actually doesn't make sense when you start examining the events and character motivations and c) it moves the focus away from the emotional mess between Griffin and Valtor. I am instead filing this idea away for potential future projects.
Version 2.0 was just an oversight on my end. I somehow forgot that in this AU Griffin only "betrayed" Valtor because the Ancestral Witches threatened her with harm coming to him. I had built this emotional arc about him refusing to trust her after her betrayal which just... doesn't make sense considering the reason why she left.
Thankfully, I did write notes on the story arc I had in mind and reading through them once I'd taken a step away from the project and my brain wasn't running in circles helped me notice my mistake. Which is how the latest direction for the storyline emerged from the clusterfuck of thoughts I had on this. After that I had to tweak certain moments here and there to make the story more coherent.
Now I'll share some thoughts and insights about the final video, this time using gifs instead of stills.

I decided that Griffin can see in Omega, yeah. She can take a page out of Faragonda's book and place a tracking spell on the Trix right before they were taken to Omega so she can see what they're up to in there. I originally hadn't thought of adding the effect to make it look as if the viewers are also looking through her seeing orb but then the revelation hit and here we are.

Idk, I just like how this works considering that it's just the same footage only played in reverse to make it look like she disappears and then reappears in a very quick succession. I used that trick towards the end of the video again when Valtor loses control of himself and starts slipping into his demon form.

I really have no idea what she expected. He has remained with the impression that she betrayed him and, furthermore, she wasn't the one to free him. She just chilled for 17 years while he was literally chilled in Omega. The fact is that she couldn't really free him because the Ancestral Witches took precautions when they forced her to leave by making sure that he will be as trapped as them if she tries something but the Trix being their descendants was enough to free him. However, she's not using her words (for concerns that end up being substantial and completely founded later on) so this was only ever going to go one way.

Sneak Faragonda attack! He did not expect her and Griffin didn't call her either. This part I feel doesn't come through clearly in the video (mainly because I still had no idea what I was doing here and then I had already blocked everything and I couldn't really change it). Valtor basically caught Griffin off guard but Faragonda showed up, having her back as always. Griffin's friendship with the Company was real but she was also very much using their resources to look for a way to free Valtor from the Ancestral Witches. Frankly, she hasn't figured out how she's supposed to balance her relationship with Valtor and her friendship with Faragonda and Saladin yet but she can do it! She will do it! Even Valtor won't manage to fuck this up for her, you'll see!

I am proud of managing this effect, simply. It's been a while since then (this really took forever to make) but I'm sure I tried at least 5 different things here and, believe it or not, this was actually kind of an accident. A lucky one, for certain! Also, Griffin finally figured out she might need to actually clue him in on the truth behind her actions.

Possibly my most favorite moment of the video? Top 3 at least! I would have loved to see some kind of interaction between Griffin and the Ancestral Witches (which is highly unrealistic but they also had the perfect chance for it in Magical Adventure since light magic was extinct and she's a witch, who used to be part of the Company? She should have been there along with Saladin and Hagen at least). Also, I colored the part where Belladonna threatens Valtor separately once before then coloring it along with the rest of the video in order to convey that it's a vision that they showed Griffin. Love the way he reacts to it as well!

He instantly decided that he now has to go and imprison her because she knows his weakness and is too dangerous to be left to her own devices. He's equally repulsed and tempted by the idea that she knows about his demon form. If she can accept him like that and still love him, well... Then he'd have no reason to doubt her ever again. But it's also humiliating that someone else would know about his... situation.

This time she takes a page out of Valtor's book and does his walking-through-walls trick. He really didn't expect that but he has to update his idea of her abilities. It has been 17 years, after all (not to mention that he's on her terf). I just love how he traps her and she escapes right under his nose only to proceed to attack him. She's sick of his bullshit.

My initial vision for this was different as I was considering showing Griffin falling (using the footage from 1x19 where she jumps off a ledge (completely needlessly, might I add) to save her students) but that wasn't going to work so eventually I settled on this. It works super well as a Valtor PoV sequence since he wouldn't see exactly what she's doing and I am quite proud of it!

Griffin is well and truly done with his shit here. She didn't go through all the trouble that dealing with his outbursts is only for him to not believe her feelings just because of his own hang-ups (about his demon form) rather than for any rational reason (she admits she's given him justification to doubt her). And she holds her ground when she catches a glimpse of his demon form, which she hadn't seen until now, but she is done trying to convince him if he will undermine them both on every step of the way.

This doesn't need much elaboration per se. Admittedly, he seems to be having mood swings in this part of the video but the truth is that he's decided to take her at her word that she wants to be with him again. If she steers off path once more, he has all the tools in his disposal to course-correct her. It'd be a waste to ignore how powerful she's grown, not to mention that she truly didn't bat an eye at the sight of his demon form. He's eager to explore the opportunities this situation has to offer so he admits he's willing to believe her if she's willing to prove her words by quitting her (completely deserved) attacks on him. (Who started this, Valtor???)
#winx club#griffin x valtor#winx griffin#winx valtor#covenshipping#trix#video#my video#trivia tuesday#my gif
19 notes
·
View notes
Text

Unleash the Slashers (CLOSED)
Event on my ig : https://www.instagram.com/p/DBOx_ntxTdy/
Step into the heart of terror with Unleash the Slashers, an exclusive adoptable event where fear takes form. Each terrifying figure is more than just a masked menace—they are forces of nature, waiting for their next victim or, perhaps, their next master. Will you dare to take control? These hulking brutes of horror can be tamed... but only if you know how to handle them.
From towering hunters to sinister masterminds, each slasher comes with their own twisted backstory and deadly personality. Will you survive? Or will you unleash something you can't control?
How the Auction Works:
Starting Bid - $50 Receive the unique character file of your chosen slasher, with their chilling story and haunting design. Minimum increase - $5
AB - Survivor's Edge - $99 Get the character file + a YCH commission of the slasher interacting with an OC of your choice—are they stalking you, or are you in command?
Rules:
Payments: Payment must be made 100% upfront via PayPal.
Three Designs Limit: You may claim up to 3 characters per person during the event. If designs remain unclaimed after the event, you are free to adopt more.
Payment Timeframe: You have 24 hours to make the payment after placing your bid. If not, the opportunity will be given to other interested buyers.
Complex OC Designs: If your OC is heavily complex, some design adjustments may be made to avoid the need for extra fees.
No Reservations: The auction is first come, first served. Let’s keep it fun and fair for everyone!
The auction ends when I post the next Slasher. (May vary from 24h to 72h)
Warning Please note that this event is inspired by classic slasher films and contains themes typical of the genre, including horror, violence, gore, and intense imagery. Viewer discretion is advised.
#horror#digitalart#creepy#originalcharacter#adoptable#boyfriend#horrormovie#monster#slasher#yandere#adoptableauction#halloween2024#inktober2024#arttrober2024#my art
9 notes
·
View notes
Text
No-Google (fan)fic writing, Part 4: Markdown
Storytime
As I mentioned in this post, I frequently use LaTeX to write fanfiction. As a system based on plain text, it takes fewer resources and lets me do stuff like using a glossary to swap between the vocabulary used in different continuities of my fandom for the same concept.
Most fandoms don’t suffer of that particular problem, though. They may use slightly different terminology, but it’s usually not six different words for the same concept, so that’s a feature very few people will need. So what would be an alternative, if you want to move away from using Word or Google docs, have decided that LibreOffice Writer isn’t for you and LaTeX is really too complicated?
I would suggest you take a look at Markdown.
Word/Writer/Google docs versus Markdown
Let’s perhaps start out by backing up a step and clarifying a few things. Like, for example, what plain text even is and what it looks like.
Very simply, plain text shows only the characters, but no graphical representation or other stuff. If you use AO3 to upload your stories and you’ve clicked on the HTML button, you already have an idea of what plain text looks like, but images say more than words, so
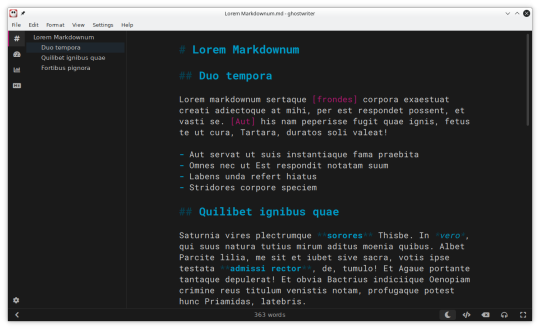
It doesn’t look too scary, does it? It’s just text with a few characters mixed in, like # and ** and [].
What do they do?
Well, other than in Word/Google docs, where you click on the button to mark words you want in italics, in Markdown, you enclose the word in *stars*. If you want a heading, start the line with #. For a subheading, you use ## before the subheading title.
These characters won’t be printed in the output document. They’re just instructions to your computer that you want this word in bold and that word in italics and it’s the same thing as in Word, except you can see the **bold** and the *italics* in your text and you need to type ** and * instead of clicking a button.
That’s pretty much all there is to it. And you probably already know that already, because Markdown is one of the most commonly used markup languages on the internet. Chats use Markdown. Tumblr uses Markdown. If you don’t believe me, create a new post, open the options via the little wheel and scroll down to “Text Editor”. It’ll probably be set to Rich Text, but if you click on it, the dropdown also gives you the option of using HTML or Markdown.
So basically, you already know Markdown. If you are thinking about getting away from Word/Google docs and you don’t want to invest much time in learning something else, Markdown will take you about half an hour to learn.
Yes, seriously. Half an hour of your time and you can be free of Word/Google docs forever.
That deserves a big +1.
Cost
Equally deserving of +1 is the fact that Markdown is free. And there are really good, also free and simple guides for Markdown beginners. My favourite is the Markdown Guide.
Also free are many of the applications you can use to write Markdown.
Interface
One personal favourite, and the one I would recommend especially for Markdown beginners, is Ghostwriter – simply because it comes with an inbuilt preview window that lets you check what your text will look like on output.
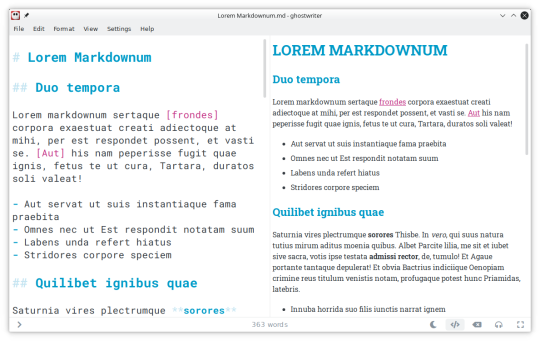
It’s also incredibly easy to export your .md-file to your desired output format from Ghostwriter – CTRL + E opens a menu, which gives you different options. Because, much like LaTeX, you can export Markdown into a whole variety of other file formats (more below).
But, in case you don’t like Ghostwriter, there are other options. Also a personal favourite of mine is KATE, which is originally for Linux systems, but runs on Windows just as well. KATE, too, has a preview window, but is more of a general-purpose editor, so can also be used for other stuff.
Then there’s Notepad++, which is for Windows only. It needs the Markdown Panel or Markdown Viewer++ plugin to preview Markdown documents in the same way Ghostwriter and KATE allow you to, but they’re free, too, and easy to install, so that’s not really a problem.
+1 for the choices and also for the quality of the editors.
File formats
Some people may still be wondering what exactly the benefit of Markdown is when you still need the extra step of exporting the text. Word/Google docs and even Writer just allow you to copypaste directly.
Well. The benefit is that you can convert your .md-file to a vast number of other file formats, especially if you install a translator like Pandoc in addition. You want to copypaste your text into the AO3 Rich Text editor? You export your .md-file to RTF, or ODT, or even DOCX.
You prefer the AO3 HTML editor? Great, simply export your .md-file to HTML instead and copypaste from there.
Why is that useful? I’m going to write a longer post on this, but it is for example very useful if you want to send the same story to your beta, who then uses “track changes” in Word/Writer, and later on upload it to AO3 from HTML.
Or if you publish on AO3 and fanfiction.net both, where you still need to upload your story as a .docx- or .odt-file in order to publish it.
Of course, if you continue using Word/Google docs, all of that kind of comes automatically without needing to export anything.
That’s true, but the post that sparked this series explains how Google is now using Google docs to train their AI on your work. And Word uses proprietary code. If your document ends up corrupted in some way and you haven’t made backup copies, there’s a pretty good chance your story will be lost.
Markdown documents use plain text. You can open them with any text editor, on any computer, on whichever operating system, and it’s close to impossible to corrupt a plain text file to the point where the contents are beyond saving. You really need to put a lot of effort into it, let’s put it like that.
So even if your editor breaks; if Ghostwriter stops development; if KATE and Notepad++ disappear – there will still be tons of free plain text-editors around for you to open your file with and read your story.
+1 for flexibility – and +1 for not having to be afraid of losing stories to outdated file formats and software.
Features
Markdown has all of the features you need to mark up text: italics, bold, italicbold, strikethrough, superscript, subscript, numbered lists, unnumbered lists, quotes, and yes, you can include images as well.
A feature that I particularly like and that neither Word nor Writer have, is the ability to “outcomment” text. What that means is quite simply that you write text that doesn’t appear in the final output, for example like this:
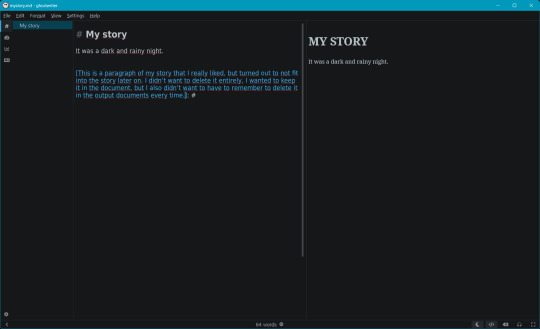
The [text]: # tells your computer that this is text you don’t want to include in the output, allowing you to keep notes or stuff you didn’t want to delete in the original file. Neither Word nor Google docs nor Writer can, to my knowledge, do that, and it’s a feature I love to death because I’m one of those authors ridiculously attached to what they’ve written, even when I recognise it doesn’t fit into the story any longer.
+1 many times over.
Syncing
Markdown files can be synched between computers with any common synching service out there: Dropbox, OneDrive, GIT, an old-fashioned USB.
Because it is plain text, syncing with GIT has additional benefits, which needs an extra post – let’s just say for now that if you use GIT to sync Markdown files, you’ll easily be able to see the changes you made between the last and the current version of the document.
Ease of use for Word/Google doc-users
If you’re coming straight from Word/Writer/Google docs, Markdown needs some rethinking. By that I mean, probably about an hour until you’ve gotten used to it. It is very easy to learn, it is very easy to use and it takes very little time to get the hang of it. In fact, I would say that for someone coming straight from Word(-like) text processors, Markdown is probably the easiest markup language to get into. Other than LaTeX, it doesn’t require you to learn a whole new way of approaching documents, it doesn’t even require using the command line depending on which editor you use.
So yes, besides Zettelkasten, this is the approach I would most recommend to every writer looking to get away from Word and Google docs.
#fic writing#no-google (fan)fic writing#fanfiction#fanfic writing#degoogle#degoogle your writing#degoogle your fics#software recommendations#resources#markdown
4 notes
·
View notes
Note
Honestly the rhetoric of “Japan isn’t a perfect place” is so hollow at this point because of how obvious Japan’s societal problems are. Yes, Japan does have low birth rates, yes Japan has a harsh and unforgiving work culture, yes Japan does not have a society that reaches out to or discusses mental health of its population, creating a drive towards the growing hikikomori culture where you just stay inside your house all day and ROT. And finally, yeah many Japanese people do not like immigrants, immigration, or foreigners. This is a mix of European tourists being inconsiderate of their culture (it’s getting so bad tourists are getting banned from some districts of Japan for repeatedly taking pictures of geishas even though there are signs with visual clues of stick figures taking pictures of a geisha with a BIG CIRCLE WITH A SLASH THROUGH IT and this also applies to even simple stuff like ignoring the painted rows for getting on trains in a filed line, and a lot of little cultural divisions that you gotta learn before stepping into Asia’s biggest cultural exporter.
Of course, it’s not just the tourists, Japan also hates immigrants mostly because of the continuous cloud of Japanese nationalism that remains in the nation even after the war, which at best preserves landmarks and iconography of old imperial Japan (the naval flag hasn’t changed since 1868, even though the rising sun flag is now associated by Americans, many Chinese mainlanders, and Southeast Asians as a flag of oppression and war crimes since WWII, unless your Thailand, because Japan let Thailand keep their king and even join the Axis powers as an independent state) and at worst racism against Koreans and Chinese people that denies the terror at unit 731 and the massacre of Nanking.
Finally a lot of societal pros and cons of Japan come from 2 things:
1. America is Japan’e sugar daddy, it raised the country from rubble after WWII and created an economic miracle that modernized it so fast that by the 1980s it was developmentally ahead of countries like Italy and France.
2. Japan is dominated by one party since WWII and it only lost that majority for about 4 years after the economic crisis in 2008. It was Shinzo Abe that got the party’s grip on Japan, and economic state, back in the groove.
So Japan is a complex society with many people, a long history, complex politics (did you know Japan is one of the only countries in the global north to have a communist party represented in its parliament?) and it has problems, very human, and some of it does stem from the free-market Conservative politics of the country, and some of it was practices and cultural norms translated to the modern day.
The issue is the phrase “Japan ain’t a paradise ya know” does not address any of this, it more or less just attacks a superficial belief that people who like anime and complain about “wokeness” in western media like anime because anime generally does not explore or address social movements or political philosophy that deals with LGBTQ rights, racism, economic inequality, social justice, or political theory compared to modern american media which has integrated many more openly queer main characters and usually fights a villain who is a megalomaniac aristocrat who wants to get rid of some “other” to return society to “the good old days” and take power as this “great man” which must do what the unwashed masses could not stand up to. The assumption is since anime, and generally in genres like slice of life and shonen (and even beyond the scope of anime, tokusatsu) does not cover topic of modern political and social climate, it’s because Japan doesn’t have to deal with these issues, and is to the anime viewer, a harmonious, enriched, and bountiful society where there’s no crime, no poverty, and everyone is proud to be Japanese and accepts their place in society no matter how trivial their job or position in their community is.
The thing is: NO
Many popular anime and cartoons in Japan can cover modern social issues or political philosophy, it’s just that not all of it is going to get so popular that it gets dubbed or shipped to translation publishers like Crunchyroll or Viz media. The other thing is some Japanese media can cover older or more personal struggles in their works, it can get popular, and that’s alright! Not every piece of media that avoids talking about modern issues is anti-woke! Sometimes a fine story is a fun break from reality, a way to ease your stress from a day at work.
I think when people say “Japan isn’t a paradise you think it is” I think they’re saying that Japan has active movements that fight for more modern political causes like LGBTQ rights and economic reform, and that inevitably, they will win. Some courts in Japan are already considering same-sex marriage to be a right. That’s great.
The thing is, what the nu-fan is also saying is that the pressure of the American audience, and the growing progressive movement in Japan will reform the production and distribution of Japanese media that will introduce a new wave of authors, writers, and even animators who will be more woke than any previous generation of Japanese artists that preceded them.
And when Japan’s media landscape goes woke, where will you turn to to “escape the nu-fans” South Korea?
As if there’ll be 2 Koreas within the next decade.
🇰🇵🇰🇵🇰🇵
Then there's Western companies that are trying to ask JP creators to change, edit, and censor their works in order to fit the standards for Western audiences. If they don't try to persuade them, they do it in more subtle ways through localization without their knowledge. And they will take that advantage that the creator will be fine with it because most don't understand English or Western culture. Sites like Pixiv that is limiting US and UK NSFW content because they don't wish to change the rules for other countries for a site that was exclusively made for Japan. It's why people are starting to accept AI translations as a new way to translate anime/manga/video games over localizers like Crunchyroll. I also think there is a difference in addressing Japanese's political and society issues over policing their media and having to alter it in order to make a quick buck. It's just as bad as Disney removing one gay reference since it isn't part of the big plot to get dem Chinese bux. At least stuff like Apex Legends is having some balls to not LGBT+ shit for Saudi Arabia release without fear of losing money or being killed.
9 notes
·
View notes
Note
question about your femshep: how would she react if confronted with her private affairs by the media and what do hackett and anderson think of her having multiple children and affairs/ how did they react?
I love your character, so different from what people normally do with paragons!🩷🦑
thank you! I like the concept of characters who make the best heroes yet are bad in their personal life.
It really makes you feel conflicted about how their scaled heart would weigh against a feather. On one side, they save people's lives, on another side, they break their lovers' hearts.
They make mythical legends, great leaders, even good friends, but terrible partners.
One of the benefits of going paragon is the high persuasion. A paragon Shep is effortlessly charming, the media's darling even. When it comes to the extranet viral interview vids, it doesn't matter what she's really saying as long as how she's saying it is seemingly convincing.
A reporter tries to corner her about another spouse who filed for divorce after catching her in bed with another? Femshep mentions how, yes, that did happen, and she takes full responsibility. That it's their right to divorce her if they feel like it, that's their freedom, isn't it? The same freedom she's been defending for decades, the freedom everyone almost got robbed of by the reapers not so long ago, the entire galaxy would've been wiped wasn't it for her stepping up and convincing everyone to put their differences aside and work together.
Do tell her, reporter, do you have a family? Are they from earth or an outer colony? Who do you think kept it safe? Kept your family and friends safe while you were spreading high-school lockerroom gossip about her. You should be ashamed of yourself. She is not perfect, yes, but who is?
Or something along those lines. As if those unrelated things excuse her actions.
Evading the question, speaking with confidence, appearing charismatic on camera, and she's got every viewer in her pocket. Die hard fans ready to defend her wrongdoings because "She is commander Shepard!" and "we should be asking what the ex-spouce did to cause her to cheat? It can't be her fault." as if it's ever the fault of the person who gets cheated on.
-
Admiral Hackett
He is shown to have looser morals than the rest of the alliance multiple times in canon. He understands how messy the real world can be, how you can't achieve results without getting your hands dirty and sweeping things under the rug.
Not only did he massively stall the alliance investigation on Shepard back when joining Cerberus, replying to every email sent to him—presented with hard evidence of Shepard's treasons—requesting permission to open an offical case, with "negative."
He is a seasoned vetran, a decorated admiral who has seen everything the world has to offer. If the saviour of the galaxy is a serial adulterer, then so be it. He genuinely could not give less of a shit what Shepard got to in her own free time, as long as it doesn't make the alliance look too bad, as long as her legacy remains unblemished, then everything could be overlooked.
But he still went to Shepard for help when it came to rescuing an old friend. In the aftermath of the mission, he promised to keep the government officials off Shepard's back until the collectors threat is no more.
Hackett is one of the first people to completely dismiss and shut down any interviews with him trying to expose Shepard's infidelity. He denies every all and all allegations, offers no comment, and ensures no printing press would ever accept these "baseless" articles or host them online.
Thanks to him and the alliance PR team, Shepard's inner life conflict is kept hush-hush on the down low. The average person wouldn't know about it, you have to really dig deep and look through courtroom records and deleted inteviews and articles to find out about it. To do that, chances are you're either an obsessed fan or a nosy reporter, reporters can be bribed and fans are too deep in denial to face reality.
This isn't the first or the last time an important public figure fucked up, a little corruption is needed to grease the wheels of the goodness machine. Shepard's risking her lives for people and doing it with the efficiency of an entire fleet. As long as she keeps at it, Admiral Hackett has no qualms cleaning her messes.
Paragon or Renegade, in his views, the world needs a Shepard. If anything, he's relieved it's just being a shitty partner & cheater and not like money embezzlement from the government, legal matters are always annoying to cover up.
-
Captian Anderson
He feels...immensely guilty, as if he failed Shepard, as if it was him who led her down this scummy path. Especially after their conversation in ME3 ending, where he tells her she'd make a great mom.
She is a mom now, an even decently good one... but at what cost? Being a terrible wife.
He always defended her against the crew, always sang her praises in front of superiors. How could he not? She was the textbook definition of the perfect soldier, diligent and hardworking, she was the best XO he has ever had.
With that rough uprising she had on earth, he expected her to have a million problems he'd have to sort through, attitude, stubbornness and prejudices... yet to his surprise, there was nothing. Shepard was a squeaky clean slate, even when he tested her faithfulness to the alliance on multiple occasions.
Turns out, it was a different kind of faithfulness she lacked. The kind that breaks families, he should know, the mention of his ex-wife's name still leaves a bitter taste in his mouth.
So he blames himself for not knowing, for not paying much attention to the different people she'd mingle with during shore break, only to abandon them for a new shinier person. Maybe if he was more observant, he could've prevented this, he could've had a serious talk to her about it.
the way he views it, of course, it is his fault, for how could it be hers when she never had a father to sit her down and explain love and trust? How could it be hers... no, it can never be Shepard's fault. It must be his own.
He was there for her as a captain, but he failed her as a friend.
Is what he tells himself to take the blame from her.
It's never mentioned why he divorced his wife, but from the huge amount of responsibilities he had, I assume she left because she was feeling neglected.
Only for him to find out she "met" someone else back when they were still together through a Facebook post where she's gushing about their anniversary, the timeline not adding up, until things click into place in his head.
He used to be in denial about Shepard's "predicament," just reporter drama. Until catching up with one of his old crew—be it Kaidan or else—and hearing first hand of how Shepard broke their trust and betrayed their love. How she showed no remorse yet still maintained a friendly relationship with them after the breakup, how it didn't take her much to immediately move on to a new person. For the cycle to start all over again before their eyes.
The immense disgust and disappointment he felt in that moment, the stained glass painting of Shepard in his mind shattering into a million pieces. It was almost as if it's his own heart she broke, a person he proudly called a friend, one of a kind.
It stung even more with the knowledge that Shepard kept repeating the same mistakes despite Anderson entrusting her about what happened between him and his ex-wife, venting to her like an old friend, how uncharacteristic it was for her to just sit there and not say a word, changing the subject afterwards.
And now he carries that guilt with him akin to a ball and chain, mulling it over a glass of whiskey...or three. Nursing his glass as he wonders if it's too late for an intervention, Shepard is well into her 40s by now...is it too late for him to step up as a guardian again?
Does she even see him as a father figure anymore? They drifted apart after the reapers incident. A peaceful life was never Shepard's style, and so she was determined to make the most out of her field days before old age forces her into a retirement or an admiral uniform.
-
As for Shepard herself, she doesn't grant herself excuses or justifications, the charismatic speeches she gives to reporters don't work on her own mind.
She is forced to stare into the brutal truth of her being rotten at the core, that despite all of her virtues, her mortal sin resonated in the most hurtful way possible to the people closest to her hearts.
Whatever new relationship she starts, she dreads the eventual breakup once her old habits creep up again. She doesn't know why she does this. It simply feels right during the moment to give into temptation. The mere idea of her being chained to one person makes her skin break out in hives.
Their love is never guaranteed. In her perspective, it's better to just hop on whatever new opportunity presents itself.
She is guilty over her lack of guilt when it comes to infidelity. How it feels like second nature for her to shamelessly break her oaths of devotion and love for a one night stand with a lovely woman she just met at a bar.
Because deep down, she knows she's lying through her teeth when she admits to her partners about her cheating being a bad habit.
Deep down, she genuinely has no problem with it. She's only saying what she learned to say to appease the other person, to mediate the situation.
4 notes
·
View notes
Note
hi recurring-polynya: in a recent post of yours that had to do with orihime inoue's choconomiyaki, you incorporated a gif of orihime's finished creation.
i really would like to know how you create gifs from bleach's episodes.
Here is my process for making gifs:
You will need the thing you want to make your gif out of as a video file (generally mp4) saved locally.
Trim the video down to just the part you want
Convert it to a gif
There are many ways to do these steps, but I've detailed the way *I* do it in excruciating detail under the cut, along with some tips.
Get the video file Ha ha ha, obviously you want to only do this with videos that you have the rights to use and definitely not anything you might find from some link on r/Piracy! I'm going to demonstrate using a free-to-use video I downloaded from Pexels, a great source for free stock footage, specifically this video of some koi swimming.
Trimming the video
Windows comes with two different utilities that work great for this. I'm sure MacOS and Linux have their own versions, I'm just not that familiar with them.
Option 1: Photos Yes, Photos. It actually used to be even better for video editing, but Microsoft has been nerfing it, which is a shame. This will not likely be your default video-viewing program, so right click and then hit "Open With" and then "Photos."
The "Trim" button is the leftmost button on the toolbar along the top of the app (or you can hit ctrl-E).

This will take you into a different screen where you can adjust the sliders to set the start and stop of your video to what you want your gif to be. Then hit that turquoise "Save as copy" button on the upper right. If you hit the down arrow, you can do "Save" instead, but that will overwrite your original file, which you most likely do not want.
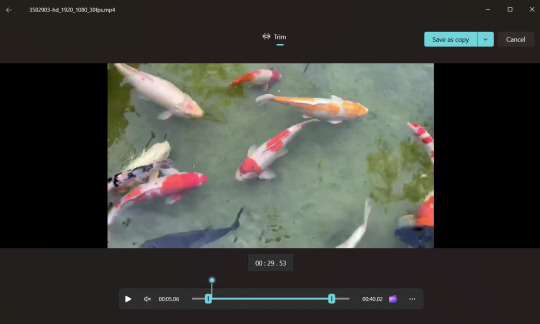
Once you've saved it, Photos will automatically open up your new, cropped file. Now, if your video is long (like an episode of a tv show or movie), it may be hard to get good granularity on your start and stop. You can do a rough trim first, and then repeat the process on your new, shorter file. If you're having trouble getting down to the exact frames you want, don't sweat it, you can take care of that in step 3. Alternatively, you can use ClipChamp instead, which I will describe in just a moment.
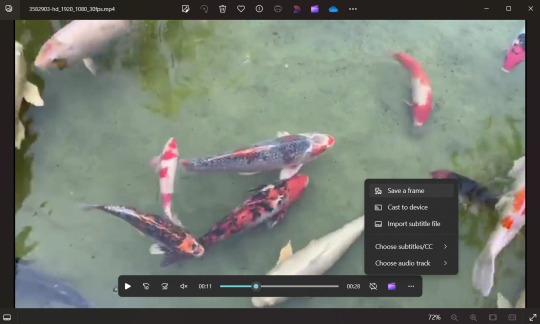
Before we go, though, I want to point out that Photos has another really cool feature that you would think most video editing programs would have, but many don't, and that is "Save a frame."
(You need to be back in the regular movie viewer screen, so back out of the Trim window if you're still there)
Pause the video at the frame you want. Hit the "..." button on the bottom toolbar, and the option will be there. (If you're not paused, it will be grayed out).
Trimming Option 2: Clipchamp
Clipchamp is a more powerful video editing tool that also comes with Windows. For some dumb reason, you have to be signed into your Microsoft account to use it, and it takes a long time to open especially if your file is big, so if I'm trying to do something real quick, I'll just do it in Photos. On the other hand, if I'm trying to get multiple gifs out of a single video, or I'm trying to do something fancy, it's usually the better tool.
You can right click on your file and choose "Edit with Clipchamp". If you've already got the file open in Photos, you can hit the little purple clapboard icon just the left of the "..." icon in the screenshot above, and that will also open the file in Clipchamp. There's a second icon along the top toolbar, too, because Windows just really really wants you to use Clipchamp.
Here's what our video looks like in Clipchamp:
You can drag that white bar around, or use the video controls to play the video or jump forward or back, and then choose the little scissors icon to "cut" it. Then select the part you don't want (in this case, I am setting the start of my gif, so I am going to delete everything to the left), and select the little garbage can icon (or the delete key) to delete it. It will leave a gray space-if you hover over it, a little trash can icon will appear, and you can click it to delete the gap.
Again, if you're cutting a gif out of a big file, you probably want to do a rough cut first to give you a smaller chunk of video to work with. Then do a finer trim to get it down to just the frames you want. It can be hard to click on tiny, slivery gaps to delete them, so you can also right click in any of the gray area after the end of the video and select "Delete all visual gaps". Also, over on the right, there are little magnifying glass icons you can use to zoom in and out if you need.
Repeat the process to set the end of your video.
Next, go up and hit that purple button at the top right that says "Export." I always pick "Export in 1080p" even if my videos are not 1080p. (Note: If you haven't already deleted your gaps, it will ask you now if you want to delete them, so I guess you can just do it there if you prefer.)
You may notice that "GIF" was an export option. However, the gif it outputs will be small and grainy looking, so I don't recommend using it.
Exporting will take you to this screen where it tries to convince me to post this beautiful koi gif I am making to various social media, including LinkedIn. Clipchamp, thank you, I will not.
It will automatically save your export to your Downloads folder with an auto-generated filename. You can hit that little "Save to your computer" button (it's above and a little to the right of the bright blue "Connect to OneDrive" box") and save it where you want, with a meaningful name.
Clipchamp has loads of other features--you can use it cut together multiple videos, you can add captions, you can do stuff with the sound. This is not a tutorial on Clipchamp, but I've been able to figure out a lot just messing around with it.
Converting to a gif
For this second part, I use a fantastic website called Ezgif. There's a ton of stuff here, but we are specifically going to use their Video-to-Gif utility.

Hit that "Browse" button and select your file.
Then hit the blue "Upload video!" button. If your file is big, it may take a few minutes to upload. Once it has, it will give you a preview, and some options. I usually leave the options as they are, and hit that blue "Convert to Gif!" button at the bottom.
Note: You could, in theory, skip step 1 and do your trimming right in Ezgif. However, it does have filesize limits. Also, it would take a long time (and bandwidth) to upload a big file--it just makes more sense to me to trim it locally first.

Again, depending on how long your gif is, it may take a few seconds, but then it will give you a preview of your gif (it will be animated, but this is just a screenshot)

If you're happy with it, you can simply right click and save the gif as is.
Optional, but possibly very helpful:
Right below the preview, it will always recommend you optimize the gif, and I almost always do. Even just picking "Lossy Gif" and setting the compression to 30 will usually reduce the file size by 20-40%. If I have a long or slow gif, I will sometimes also play around with the "remove every Nth frame" option. This is kind of arbitrary, but I aim for less than 3MiB if I'm planning to post it to Tumblr.
It might be hard to see, but I've got some little black letterboxes on the left and right sides of my gif. You can use the "Crop" option to get rid of those.
I often adjust the speed of my gif, especially if removing some frames made it too fast.
If you select the "Frames" option, opens a page that shows every frame of the gif and how long it plays. Back when you were trimming the video, if you ended up with some extra frames, you can turn those off there. Also, sometimes, my gifs end too abruptly, like if the scene cut to something else I don't want in my gif. In this case, you can set the delay on the last frame to be longer, and it may end up looking smoother.
Anyway, Ezgif is easy to explore and figure out on your own and doesn't add any watermarks to your final product. It is one of my very favorite sites on the internet.
Here's my final product:

Hope this was helpful and good luck!
#thank you for this ask! i have the sickness where i simply love to write up a little set of instructions#i am very much an amateur at this but it's fun and the output is good enough for my humble tumblr
4 notes
·
View notes
Text
How to edit captions with your video track
Why: I like making edits of my favorite series, but I hate redo captioning. But I also know quality captions are vital to some viewers (I also use them). To me adding captions is the bare minimum for release, but also hearing all the words and timing them or even re-timing existing captions is very hard with my disabilities and this has been a barrier to me releasing edits. But no more!
DaVinci Resolve lets you add a SubRip (SRT) subtitle track to any video and then edit it at the same time as the video. It also counts as an edit for the Go To Previous/Next Edit button. Con: You can't use the button to jump to big cuts in the video. Pro: You can now easily jump to the an existing timing for someone starting to talk.
DaVinci Resolve:
DaVinci Resolve is a professional video editor with widespread industry use that also has a no-strings-attached perpetual free version. It's got a ton of features in the free version that will more than cover basic editing. It's relatively easy to use (basic tutorials help). If you need more advanced tools you can upgrade to a full license. They don't pester you about it in the free version unless you try to use the advanced tools. I would already recommend using this program to anyone looking to get into video editing.
SRT Subtitles
The SRT subtitle standard is a type of text file that includes subtitles with timings and no formatting. They can be stored separately from a video file or embedded into certain files like MP4s. This is what you'll get if you download captions from YouTube (some YouTube downloaders embed them in the video, some don't). DVD rippers usually have several options. You want an SRT file. And there are websites that host fan-made or fan ripped subtitles for less officially obtained material. You can also make your own SRT file with timings within DaVinci Resolve or with an SRT editor. You can also use this to improve on official captions while making your edit.
A pro feature of DaVinci is it can do machine captioning and then you clean it up. You can also do this for free using YouTube by privately uploading the video, letting it auto-caption, and then editing the captions. You MUST edit machine captions. They are not accurate enough on their own to be accessible. But they can be a step in helping you get it done.
Extracting Embedded SRTs
DaVinci needs an SRT file to import captions. It doesn't seem to extract embedded SRT files from MP4s. Fortunately, it's very easy to extract them.
Subtitle Edit is an open source subtitle editor. It's a great tool if you're making your subtitles from scratch or editing existing ones.
For our purposes, simply open the video with the embedded subtitle track. Click save. Save the SRT file with a useful name somewhere convenient. I recommend using the same name as video it goes with in the same folder.
Adding a Subtitle Track to DaVinci
Rev Tutorial with text and video
Open your project in DaVinci Resolve. Add your SRT file to the bin.
Under "File" select "Import" then "Subtitle."
Or click the Import Media button and add it as normal.
From the bin, select your video and subtitles. Right-click them and select "Create New Timeline Using Selected Clips".
You should now have a timeline where the video and captions are reunited and can be edited together.
Editing the Subtitles
You can now move around the subtitles like any text overlay, including making them longer or shorter. If you click a subtitle you can edit the text and exact timing using numbers. Or edit the timing visually using the timeline. The Go To Previous/Next Edit button can now help you skip to a timing someone else made for you which is usually good enough for a fan cut, making your job easier. From the Edit view you can see the audio track visualizer along with the captions for a perfect cut.
Putting Your Tracks Together
If you're making a compilations, where's where things start to suck. The subtitles are not brought along when you next your clips. They will play over the video, but they won't export to an SRT video or be embedded. You're going to have to manually copy them. But at least now they're the correct length and you have them synced up. I would highly recommend you start your subtitles right at the beginning of the clip or put a fake one in to delete later.
Add your Timelines to a new timeline as usual.
Go to the timeline of the first clip.
With the clip at the beginning, right click the seeker bar and click the select to right button on the circular menu.
Use CTRL + left click to deselect the video/audio tracks. Copy the subtitle track.
Go to the combined timeline. Go to the start of your clip.
Paste the subtitles. You may have to add a subtitle track.
Copy the subtitles from the next clip.
Go to the combined timeline and move to the start of the that clip. Paste the new set in.
Rename your subtitle tracks with the language they're in or type.
Export
Go to the deliver tab. Choose the file name and location. If you're posting to YouTube, render as a single clip, and export to MP4. Under the Subtitle Settings, select "Export Subtitle", Format "As a separate file", and Export As "SRT Without Formatting". Select the subtitle tracks you want to export with the video.
Add to Render Queue. Then render the clips over on the right.
Uploading to YouTube
Upload the video as normal. At the Video Elements step, add subtitles. Select upload file, then with timings. Your subtitles should show up on the timeline and you can check they're correct and fix anything last minute. Do this for each language you add. Continue uploading as normal.
Conclusion
That's my process for adding existing subtitles to my videos. I've wanted something like this for ages so I was super pleased to learn Davinci Resolve has it. I hope this encourages other clip makers with some access to pre-made captions to use them for their videos. It's easy, free, and can even help speed up the editing process. It makes your videos much more accessible and creates a transcript that's searchable and timestamped for easy navigation and quote copying. I really recommend working this into your process so more fans who need captions can share in your work.
4 notes
·
View notes
Text
Explore Free Stock Footage & Images

In the digital realm where creativity meets accessibility, I've taken a step to bridge the gap between creators and high-quality resources. Understanding the essential need for vibrant and compelling visuals in personal and professional projects, I've curated a collection of free stock footage and images. This collection is housed on my Google Drive, a testament to my commitment to fostering creativity and innovation without barriers.
These resources, crafted with the unique touch of Acid Cam, stand out for their artistic flair and the ability to transform any project into a visually stunning masterpiece. The eclectic mix available ranges from mesmerizing abstract patterns to vivid landscapes, all designed to captivate and inspire. Each piece in this collection is not just a resource; it's a gateway to exploring new dimensions of creative expression.
Accessibility is at the heart of this initiative. With a few simple clicks, you can dive into this treasure trove of stock videos and pictures. There’s no need to navigate through complicated licensing agreements or worry about credit attributions. My vision is to offer these resources completely free of charge, enabling you to use them in your projects or videos with ease. Whether you're a budding filmmaker, a digital artist, or anyone in between, these resources are here to fuel your creativity without constraints.
To access this collection, simply follow the link to my Google Drive. From there, you can browse, preview, and download any of the available files. It's my way of sharing the love and creativity with the world, hoping to inspire and be a part of your creative journey. This initiative is more than just sharing files; it's about building a community of creators who support and inspire each other. So, dive in, explore the possibilities, and let your creative projects shine with these free, high-quality resources.
Acid Cam videos challenge conventional visual expectations, encouraging viewers to embrace an open mindset. They transcend traditional patterns and forms, dissolving preconceived notions of appearance to create something entirely new and captivating. This transformative process invites you to see beauty in unexpected transformations, allowing personal interpretations to shape the experience. It's about reimagining the familiar into something extraordinary, leaving space for individual belief and interpretation.
Download Full Quality Free Stock Footage
Download: 360 Video Download: 1080p/720p Video Download: 4K 60 FPS Video Download: 4K 30 FPS Video Download: Artwork/Photos
3 notes
·
View notes
Note
how do you make the background on the characters transparent? i'm trying to make a banner for my blog but i've never worked with WoW screenshots before.
I am not sure how familiar you are with editing software, so this tutorial is going to be detailed.
Step 1:
You need a simple screenshot of your character. Here are some ways you can get it:
a) in-game screenshot
b) Wowhead Dressing Room screenshot
c) Wow Model Viewer
d) WoW Tools
e) far stretch, but if you want to mess around with mogs, Epsilon Private Server is fantastic for that (they also support the Narcissus addon)
I prefer Wowhead's Dressing Room, so that's what I'll use. Recommendation: If you use Wowhead, use the PTR version of the page (right now it's 10.2.5) to remove Wowhead's watermarks in the background.

Step 2:
Take the screenshot of your character (Print Screen on Windows keyboard) + paste it to Paint.
Now you have your very own Screenshot with a background.
Step 3:
To remove the background, you will need an app that can do that for you. The two options I can personally recommend are:
a) Photoshop
b) Photopea (basically free in-browser photoshop) (link)
I will use Photopea for this tutorial.
Step 4:
Once you upload your screenshot to Photopea, you will need to select the character with the Magic Wand tool.
Everything you select will be outlined with a scissor line.
Step 5:
There will be some areas where the tool might 'overselect' and get bits of the background. There might also be areas which the tool will not select. To fix that, use the Lasso tool (red circle).
If there are any areas that are on the character, that the Magic Wand did not get, draw over them with the Unite option (green square). If there are bits of the background, exclude them with the Subtract option (blue triangle).
If you need to zoom in or out, hold Alt and use your scrolling wheel. It will make some smaller areas easier to see and select/deselect.
This is the most important step, so be meticulous.
Step 6:
After you mess around with the Magic Wand and Lasso tools, you will have something like this.
Now you need to remove the background completely. On the right side of the screen, there is the Add Raster Mask option. Click on it.
Voila!
Your character is separated from its background!
Step 7:
To save it, you will need to export it. Here's a quick how-to:
Press on File in the top left corner. Then Export as. Then save it as a PNG (make sure it's a .PNG as .JPG / .JPEG do not support transparency).
After that, you will be prompted again. Just click Save.
Step 8:
And here's your character, completely divorced from the background! Now you can use an editing app to put her in any background your heart desires. If you don't have any software of that sort, there are also plenty of websites that you can use.
Some that I know of:
a) Pixlr (link)
b) Canva (link)
c) BeFunky (link)
d) Picsart (link)
I often use BeFunky because it's easy to get the hang of, minimalistic and convenient to use!
At this point, only your creativity is the limit.
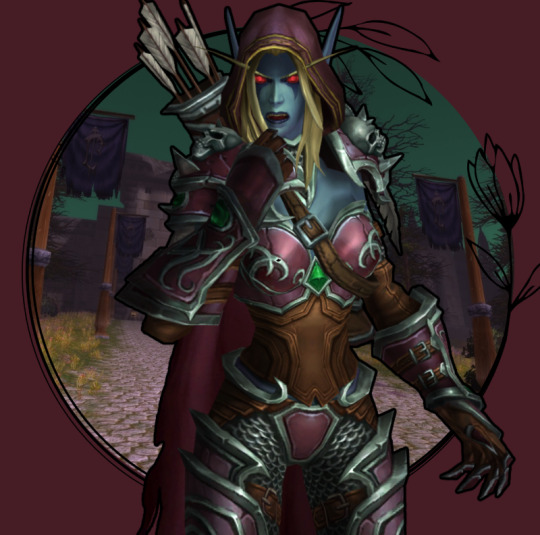
This is by far not the only way to do it (and not the fastest), but it's the simplest one that I could come up with.
It might seem a bit tedious, but I find it quite relaxing :3
Good luck, anon!
3 notes
·
View notes
Text
Adventure in the Quinta
I used to live in Potsdam, or Prussian DisneyVegas as I not so fondly remember it. Sintra seems to have the same sort of idea behind it. "We're rich. Let's build over the top architecture and turn our extensive grounds into an adventure land."
I support this choice more in Sintra than I ever did in Potsdam. I think it's because of the "choose your own adventure" parks surrounding the palaces.


As I entered the grounds of Quinta da Regaleira, I was overwhelmed by the shear size. I looked at a posted map to try and make a plan, scanned the QR code to download a copy to my phone, and waited and waited and waited for the impossibly slow, but unlimited, data to respond. I decided to climb up towards the main event, the Initiation Well, turning up empty paths whenever I saw another human.


And it was the best decision. Right up until I made it to the well, heard the crowd of people, and couldn't find the end of the line.
Nope. Not doing it.


I turned around immediately, deciding to cross off the remainder of the grounds and return to the well after last entry at 5:30. Climbing up the side of the mountain twice was better than standing in a ridiculous line and potentially not seeing something.


Off I went, once again turning any time I saw another human. Up to the top, down to the bottom. Prancing around through the woods on tiny paths, exploring every tunnel, cave, and grotto, loving every moment of it.

Finally, I felt I had covered everything other than the main palace, the absolute bottom of the grounds that led to the exit, and the well. I could feel the grounds emptying. I was making more decisions based on interesting looking paths than away from humans. It was almost 5:30. Back to the well I went.

The line was gone! I slowly filed in after reading a sign about how we needed to keep moving, quickly take photos, and be respectful of everyone who also wanted their moment in the well. In case we forgot, staff yelled over the top and up from the bottom, "Keep moving, keep moving!"

I wouldn't say that this was my favorite moment of the palace. I did get to watch a woman refuse to keep moving, taking 3000 selfies with various hair swoops, leans, angles, and then proceed to disrespect the staff who were trying to allow everyone in attendance to get through the well. Nice humaning, lady, but her disrespect did allow me to capture the photo on the right with fewer people in. Because of its insta-fame, the well had lost the hidden magic the rest of the grounds have. It's already been discovered. By everyone.


Quinta da Regaleira is amazing. I can completely see why it is my guesthouse owner's favorite castle; it might be mine as well. The way the architects played with the water level in the grottos was probably my favorite aspect. You're above, you're below -- well done leading viewers through multiple vantage points. Going close to closing time was ideal. For my first hour or so, I strategically shot behind walls and foliage for people-free shots. Or waited, willing that guy in the blue shirt to just, a few more steps, yes! I also avoided almost every supposed insta-epic look out and every female possible. Oooh, there's a dress. Opposite direction. Ugh, and a hat. Definitely not. Around 5:45 the crowd really started to die down.
NOTE: You really do need more than 2 hours. Because of my palace research, I ended up with just under 2 hours and I would have loved more time to take it all in at a much slower pace. Not that I do slow well, but a little more breathing room that I was going to be able to fit in every inch would have been nice.
4 notes
·
View notes
Text
emerald hues stare at her brother's back, bellamy already in an orange jumpsuit for his trial. it's okay, she holds tightly to. he's not going anywhere. he can't. she sits forward on the courtroom bench, hand tightly holding the railing in front of her that separates the lawyers, and the accused from the viewers. as the jury files back out, her stomach flips. anxiety and excitement mixing together because after this...she's not going back to the apartments with nicklas. she'll go with bell. finally, they'll go home together.
but as a member of the jury stands, octavia's eyes shift from her big brother to that person, waiting for the innocent verdict. it's why they went to trial right? nick said their lawyer was confident going through a trial instead of taking some sort of deal would work in her brother's favour. except...what comes next, octavia wasn't nearly prepared for. we as members of the jury, find bellamy blake guilty of all gun charges. guilty. guilty. bellamy's been found guilty and before octavia can process what that means...before she can think of anything, she's instantly on her feet, " bell! " she called to him. her world very suddenly going off-centre. no, she needs her brother. has to get to him. octavia tried to push her way through to where she was not supposed to be, but a tight hand wrapped around her forearm, pulling her back to her seat. " bellamy! " octavia cried out for him, pulling against nicklas as glossy eyes locked with her brother when he turned to her despite the way the sheriffs drag him out of her sight. it'll be okay, o, it's okay, is all she could make out from bellamy before the judge banged his gavel, calling for order and octavia tore from nicklas, rushing for the exit.
nicklas had wanted to stick around the courtroom. to obtain further information from their lawyer about which prison bellamy would be taken to, visitation, and how the hell this even happened but as octavia took off, he couldn't help but feel the pull to go after her. she's just a kid & her entire world has flipped. everything she's ever known the last few years...gone. he follows closely behind her as she makes her way down the steps outside, giving a small shake of his head to the rest of the gang sitting outside on their bikes. he could talk to them later. fully explain later, all they needed to know now was their leader was gone.
with tears streaming down her face, the bikes come into octavia's view. instead of that sense of home she's felt all her life, octavia just feels sick. angry. devastated because they'll all continue on with their lives...they'll work, they'll grow, they'll do what is it they've always done. but like last time when she'd lost her entire family...mom, dad, bell all in one swoop...she'd been lost to the gang that's become her family again. she knows it. can feel it brewing already. without bellamy, there's no place for her. no home. instead of stopping near the bikes, octavia continues moving passed them to wait outside the passenger door of her brother's truck. he's supposed to be here. he's supposed to bring her home.
nicklas comes around to where octavia stands outside bellamy's truck, pulling the keys from his pocket to unlock it. but with her hand coiled around the door handle, nick leaned his shoulder against the truck. " octavia... hey, we're going to figure this out, you hear me? " red-rimmed eyes shoot his way and all nick could feel was the devastation and fury that's bubbled up inside of the younger blake. " we are not doing anything...my brother...he's all that i had, and now he's gone and now i...i'm going to go back into the system. " her voice shook as octavia spoke but nicklas quickly moved towards her, free hand clutching her shoulder tightly. " i need you to hear me when i tell you that's not the way it's going down. not this time, tavia. " although she looked up at him, nick could see the disbelief in her gaze. but what was he supposed to say? that he'd spoken to their leader yesterday? that bellamy had all but made him promise that octavia wouldn't be swept up and lost in the system like last time. " c'mon, let's get you home. " he said, unlocking the truck door for octavia to retreat inside.
although the drive was long and silent, by the time nicklas' pulled into the parking lot of their apartment building, one he rarely spent time at anymore, he had not found the perfect words to make octavia's world better. it's been years since he's had to be any source of comfort...for anyone. now he's supposed to somehow help this distraught kid through the most devastating day of her life? what the fuck was blake thinking? but it appears he doesn't need any words because the moment he parked in bellamy's usual spot, octavia's out of the truck and quickly making her way into the apartment. nick shook his head, cutting the engine to the truck as he slid out to follow her.
" are you going to be okay here for a bit? i can send one of the guys over, i just... " nick twisted the skin at the back of his neck tightly, trying to gauge what the best option was. " i have to... " octavia cut him off quickly, shrugging her shoulders as she threw open the apartment door. " go do what it is you all do, " she muttered, " i'll be fine. " nick's feet hesitated a moment. she most certainly isn't fine...but she's stopped crying and he really did have to fill in the rest of the gang. " all right, i'll be back in an hour...don't... " nick looked up and down the hallway, his hand colliding with his leather jacket as he dropped it, " don't go anywhere, all right? " octavia shrugged, disappearing inside the apartment.
with a long drawn out breath, nick followed the hallway down to his apartment. it's been months since he'd been inside, unsure why he even still paid rent for this place when he'd much rather sleep in his dorm room at the bar. that place was home, this... he sighed as he flicked the light on inside the bare apartment. this place would become home, at least for a while until octavia and he adjusted to how their new situations would work. so long as she got to remain in the apartment that's been home...nick could make a few uncomfortable sacrifices. just as nick's about to switch off the light again, the shattering sound of glass draws his attention. brows furrow as he quickly goes to his window, eyes widening at what he saw in the parking lot. " fuck... "
by the time nicklas made it down the three flights of stairs and back out into the parking lot, octavia stood with a baseball bat tightly in her grip. she wasn't swinging anymore but still, nicklas approached her very slowly, crystal eyes taking in the damage to bellamy's truck. both side windows shattered. the front window with four different spidered breaks. " octavia... " he said with quiet shock as he approached her.
there's no real thought given to octavia's actions. as soon as the door closed shut and she was left standing alone in her apartment all she could see was the last few moments she shared with her brother. everywhere she looks, she can see images of her brother there. in the kitchen it's her on the counter while he makes her grilled cheese. in the living room, it's where her books are sprawled out and they sit together on the floor while he helps her through her schoolwork. even at the window, she swears she can smell her brother's cigarette smoke. & now he's gone. when she'd wandered into his room...something inside of her snapped. before she knew it, she was outside with his baseball bat in hand and now her brother's truck sat ruined in front of her. the bat drops to the pavement with a clatter as octavia sinks down onto her knees there. this isn't supposed to happen. she's supposed to have her brother. he's supposed to be here. always.
she felt nick's arms come around her, knees on either side of her as he pulled her closer to him. he tightly held her but no more tears fell as the hole in her heart grew larger. octavia gasped for breaths on the ground in the parking lot, unable to comprehend that she'd just lost her brother for years. years. her head shakes as the overwhelming idea of that settles in her heart. she's already lost him once before and it nearly killed her. she can't do this without her brother. & she doesn't want to. suddenly, nicklas tight grip around her feels suffocating and octavia pushes against his body, her hands coming up to try to pry his grip free. but he only holds her tighter, whispering that she's okay, she's okay, they'll be okay. " screw you. " she said brokenly. she's not, not without bellamy.
// @thewholecrew
6 notes
·
View notes
Text
Fanatics 99.20
Everyone leaves the planet Tourney and returns home.
There will be a short break before the next- and final- chapter as I am going away next weekend and won't be able to post.
*Links to previous and next chapters in reblog*
--
The Greatest in the Galaxy Part 20
“What...a...show! I knew this would be the best competition we’ve ever seen, but I could never have predicted this! This will go down in history, folks, and I’m so happy to have presented the majority of it. Well, for all of us here at Tourney, and every competitor, thank you for watching The Greatest in the Galaxy! This is the AI announcer M1-C, signing off for the very last time.”
Across the galaxy, all televisions tuned into the competition channels lose signal. Viewers turn their screens off and return to their day-to-day lives.
On Tourney, the Resisty ship is parked in a giant parking lot, surrounded by other large ships. In its infirmary, the Battalion are seated on the beds, after having spent the night healing and recuperating. They also turn off the TV.
“That was a good show we put on,” Zim remarks.
“Too bad we couldn’t win though,” Gaz sighs.
“What do we mean?” Squee questions. “We did win. It was like a whole thing yesterday, remember?”
“No, I mean, the competition,” she replies, “we didn’t finish it so we couldn’t win it and get a trophy. We won’t get a trophy for winning a revolution.”
“No. We just helped free countless of beings from the Irkens’ tyranny,” Dib says, “but we won’t get a trophy.”
“I thought the whole point of this was we get a trophy,” Gaz grumbles.
“She’s got a point,” Tak agrees.
“I tell you what, we may not get a trophy, but those two over there can get an award for most injured,” Pepito grunts, pointing to Dib and Squee. Both of their torsos are wrapped up in bandages to cover their burns.
“Pepito, you really gotta let this go,” Dib groans.
“You’re just lucky with Shmoopy’s advanced alien healing you don’t need skin grafts,” he snaps, “I say we ban bombs from the team.”
“Whoa, whoa, whoa,” Squee says quickly, “this wasn’t because of my bombs. My bombs are fine.”
“You blew yourself up twice this week!”
“And that was not the cause of this injury.”
“Too bad those cam-bots are gone,” Tak grunts drily as the pair argue. “They’re missing some quality content.”
“I swear, if you two keep this up, you’ll be riding the ship home instead of using the teleporter,” Zim warns.
Squee and Pepito quiet down and grumble, their hands linked together.
The door suddenly opens to Kio, who’s smiling excitedly. “The Irkens are leaving. Do you guys wanna see them off?”
“Yeah,” Zim says and everyone quickly throws on some proper clothes, wincing from their still tender injuries, and hurry out of the ship.
The Massive is parked on the other side of the lot, taking up more space than anything else. Irken soldiers are filing inside, many of them cuffed. Civ and Viv fly around them, making sure everyone behaves themselves. At the back of the group are tallest- only in size now than in title- Red and Purple. Their hands are cuffed and their PAKs have plates drilled over them to keep them from opening. Rory and Zinather stand behind them, surveying everybody. Rory hurries over when he sees the Battalion.
“You got your work cut out for you, Tallest Rory,” Dib remarks.
“No doubt,” he replies, “but it’ll be worth it. It’s time for a major change on Irk.”
“There’s no one else I would trust with this project,” Zim says.
“I appreciate that,” Rory grins. “So when are you finally gonna rule your planet?”
“Eventually,” he replies, “why rush it? It’s not going anywhere, not as long as we’re around.”
“Well, I look forward to the day we become true planetary allies.” The new Irken leader steps back and bows regally. “Until then, my friends.”
The team smile and wave as he follows the rest of the Irkens onto the Massive. Zinather is the last to board. He looks back at Zim and nods. Zim nods back.
Everyone watches as the Massive lifts off, disappearing slowly into the atmosphere.
“Looks like everyone else is leaving too,” Squee says as he looks around. Around the parking lot, countless different species are boarding their various ships and leaving the planet. He spots the Swifs, particularly Nimbel. She meets his eye and he waves. She waves back.
“I guess it’s about time we leave too,” Kio says.
The team head back to the Resisty ship. Shmoopy is in the infirmary, putting together a kit.
“In here are all the salves you need for your injuries,” she explains, handing a duffle bag to Zim. “As well as instructions on how to use them. Follow it diligently, especially you two.” She points to Dib and Squee.
“Yeah, yeah,” Dib grunts.
Kio faces the team, smiling sadly. “I guess this will be the last time we all meet up like this, at least for a while. You’re all gonna be doing your own thing back on Earth.”
“That’s why we did this, right?” Squee asks. “One last hurrah.”
“And what a last hurrah it was,” Pepito adds.
“What about you?” Zim asks Kio. “What are you and the Resisty gonna do now that you won’t need to resist against the Irken Empire?”
“I’m not sure,” she replies, “we haven’t really had a chance to talk about it. I don’t think everyone here actually believes it’s happening. But I doubt we’ll split up. Many of the species on this ship don’t have a planet to return to. And even those of us who do might not consider it home anymore. I’ve been gone from Vort for so long, I don’t think I’ll recognize it.”
“You could always come to Earth,” Dib suggests.
Kio smiles. “I’ll consider that.”
An awkward silence fills the room as nobody knows how to proceed. Then Zim clears his throat.
“Well, Kio, Shmoopy, as always, it’s been an honour,” he says, bowing his head. They both smile softly at him.
“Why you being so respectful?” Tak asks suspiciously.
“It’s creepy,” Gaz comments.
“He’s just feeling uncomfortable,” Dib chuckles and the others laugh.
“Enough,” Zim snaps, “let’s go already. Ready the teleporter.”
“As you wish,” Kio nods and rests a circular device on the floor. It lights up and whirs with energy. “Battalion.” “Resisty,” Zim bows.
With a wave, one by one the Battalion steps onto the teleport pad and transport to its twin on Earth, in Tak’s house.
Johnny, Devi, Tenna, Colton, Carmen, Maddie, and Skoodge are there to meet them. Colton immediately hugs Squee, making him wince painfully.
“Owwwww I’m still so tender,” he whimpers.
“Sorry,” Colton says quickly, letting him go.
“So did we put on a good show?” Pepito asks cheekily.
“You guys were awesome!” Tenna cheers.
“It wasn’t the worst thing I’ve ever watching,” Johnny grunts, ruffling Squee’s hair.
“I cannot believe what you accomplished!” Skoodge exclaims, “you revolted against the Irken Empire! You ousted the Tallest! This is...inconceivable!”
“He’s right,” Devi agrees, “it was a helluva fucking show.
“Everything is going to change because of this,” Skoodge adds.
“Yeah, but not here,” Tak points out, “Earth will remain the same as it always has.”
“Maybe,” Gaz grunts, “but starting next week...we won’t.”
She looks up at Pepito and Squee, who glance at each other. A heaviness suddenly hangs over the air.
“Nah, we will,” Zim argues, “even with you three leaving, we’ll still be the same team.”
Just like that, the heaviness dissipates and everyone smiles because they realize he’s right. No matter what changes they go through, or where they go, they’ll still be a team.
#invader zim#invader zim fanfiction#johnny the homicidal maniac#johnny the homicidal maniac fanfiction#iz jthm crossover#myocs#myart
6 notes
·
View notes