#Gifmakers
Text
Question for gifmakers
470 notes
·
View notes
Text
#content creator#gifs#gifmaking#gifmakers#giffing#artists on tumblr#artists#content creation#art#authors of tumblr#fanfiction#fanfiction authors#edits#editors#musicedit#gif resources#tumblr polls#polls#gif#gifset
439 notes
·
View notes
Text

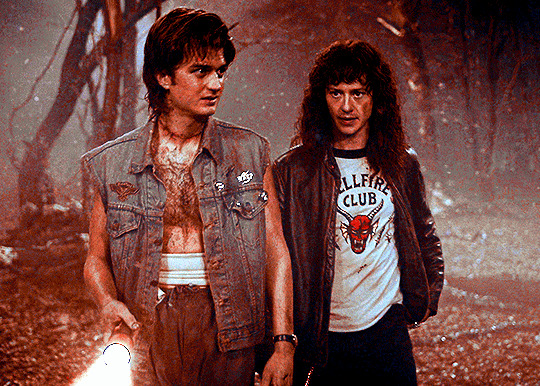
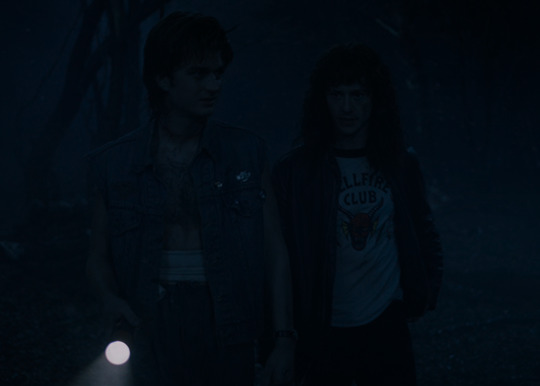
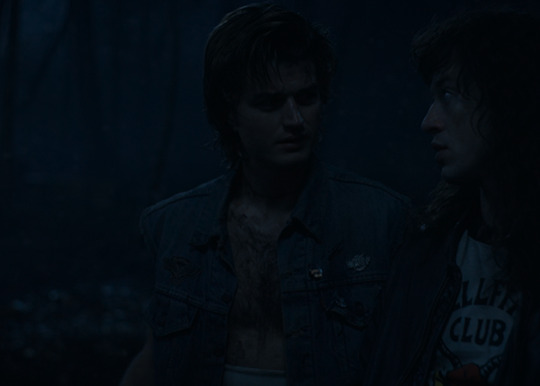
Gifmaker's challenge : Reblog this post with one before/after gif just to show people the work it takes to make even the most basic gifs. I'm not even talking about beautiful colouring that a lot of gifmakers put time into, this is the bare minimum editing I'd do for a scene like this 🫶 Gif making takes so much time and effort (and sometimes, funds for external hard drives and screencap software programs and legally getting PS) so I would just like people to see how hurtful it is when gifs get reposted on Twitter and here 🥲
Tagging @bizarrelittlemew @cobbbvanth @seance @djarin @yenvengerberg @michaelsheens @saltpepperbeard @ofmd-ann and any other gif makers out there who want to participate
#meow speaks#ofmd#our flag means death#giffing#gifmakers#ofmd edit#ofmd gifs#ofmdsource#Edward teach#🙃#every time you repost a gif#my PS crashes right after I've masked so remember that#PLS credit your giffers#pls call people out when they steal gifs on twitter etc#be kind obv a lot of people don't know what they're doing#but there's literally 0 motivation to make gifs anymore because theft is so rampant#left one is just HD and I've cropped and timed that's about it
263 notes
·
View notes
Text

Me: Feeling like I haven't quite achieved what I wanted in terms of contrast, quality, how light it is etc when I make gifs
Also me: Remembers how the original footage looked
We're fine, we're good lol
262 notes
·
View notes
Text
People complaining about the lack of reblogs and interaction with gifs/other art posts; then you look at their blog and they don't reblog other fellow gifmakers and artists.
Something to think about. Don't complain if you're in the middle of the problem. Do what you want, but don't hold up other people to different standards. And don't be surprised if you don't get reblogged, after people notice what you're doing.
141 notes
·
View notes
Note
Heyo. I'm new to the whump community and stumbled across your beautifully pleasing blog and I wanted to ask you, if you knew a couple of whump blogs who mostly post gifsets. Dumb question, you probably know a LOT but could you name some of them? Thank yoouuuuuuu
Hi! Omg thank you! Welcome to the community! And you bet I can recommend you blogs! Here ya go:
@fyeahvulnerablemen @justwhumpythings @random-fandom-whump @the-wandering-whumper @whumpypepsigal @lostwhump @letthewhumpbegin @cuteguywhump @where-is-my-whump @whumpookies @captivity-whump @99point9percentwhump @whumpygifs @animewhump @emotionalwhump @set-phasers-to-whump @whumpgalore @agonyalley @whumpythingy @how-much-for-a-whump @wonderwhump @dwhumpster @whump-collector @letthewhumpbegin @where-is-my-whump
And I know that I am missing people and it's driving me crazy. I'm so sorry if I've left you off but consider this an excuse to give yourself a shoutout if you make or reblog a lot of gifs!!!!
56 notes
·
View notes
Text
Making Gifs Part 2: Photopea
This is part 2 of my own personal gifmaking guide. Please read Part 1 to learn about how I capture the sequential screencaps to make my gifs.
Once you have your screencaps, open Photopea. They have a very simple guide on how to make animations in their help guide. I will be going into much more detail.
Note: ***Tumblr has a limit of 10mb for the filesize of each gif, and recommends no wider than 540 pixels. If your gif is wider than 540 pixels Tumblr will resize it, and it will cause the quality to be reduced, and also take much longer for the gif to load in your post.***
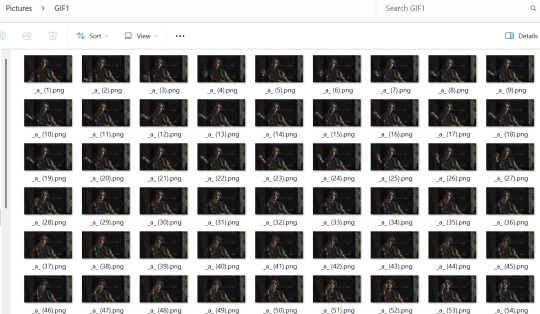
1. RENAME CAPS:
First things first. Rename all of your caps that you will be using for a gif to have the prefix _a_ on your computer. Select all and right-click on the FIRST file and select Rename (windows) and type _a_. Windows will add the numbers.
For most gifs, try not to have more than 60 frames as it will make the gif too large to upload to Tumblr. I usually aim for 45-50 frames max for most of my gifs.
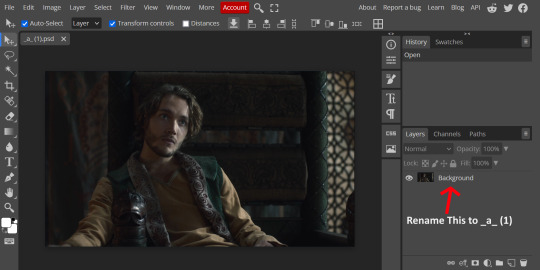
2. IMPORT FRAME #1:
Drag and Drop _a_ (1).png into Photopea. Rename the layer from Background to _a_ (1)
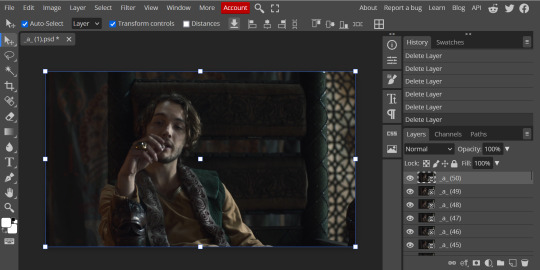
3. IMPORT IMAGES:
Select all the rest of your images from the folder on your computer, and drag and drop ON TOP OF the image (not the layers section). Make sure the file you grab to drag/drop is the next one in the sequence (so _a_ (2).png in this case. Otherwise they will be out of order. If you do it right, you will see the layers section on the right get populated with your caps in reverse order, with 1 at the bottom and the last one at the top.
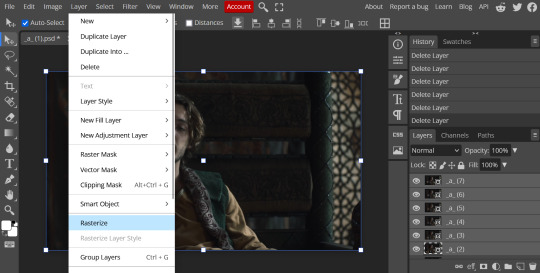
4. RASTERIZE:
Next, select all of the layers (on the right, by holding CTRL and clicking on each layer), go to Layer > Rasterize. They are currently Smart Layers, and if you keep them this way the sharpening will not apply (for some reason, I have no idea why that is)
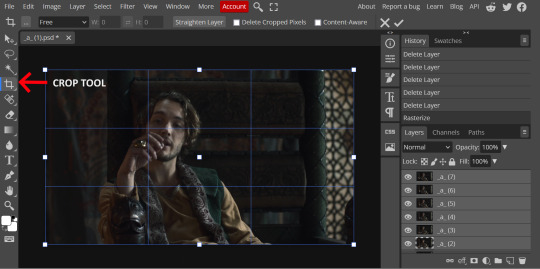
5. CROP:
Next, crop your gif. This tool is on the left menu. You do not have to have all the layers selected for this, it will crop all layers together. Move the blue lines at the edges until the frame is cropped how you like. Be mindful of the character moving in other frames; you may want to check your other layers to make sure nothing important gets cropped off in another frame. Once the blue lines are where you want them, click the checkmark at the top right to finish the crop.
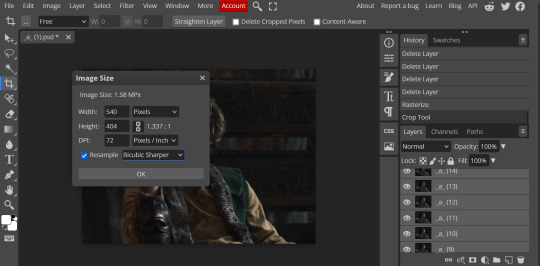
6. RESIZE:
Resize your gif so that it is 540 pixels wide. Go to Image > Image Size in the top menu. Make sure you choose "Bicubic Sharper" as the resample mode. Once this is done, you will see your image is tiny, so go to the Zoom tool (on the left menu, the magnifying glass near the bottom) and select Fit the Area at the top of the screen so you can see what you are doing.
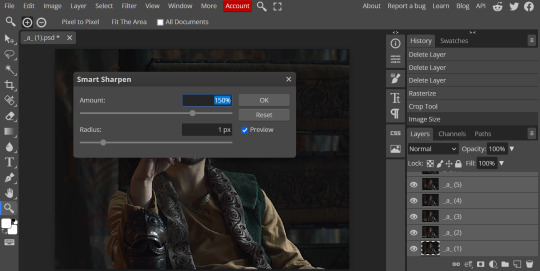
7. SHARPEN:
Next is sharpen. Select all your layers again (on the right), then go to the top menu: Filter > Sharpen > Smart Sharpen. The default settings here are for 150%, and that is good for most things.
8. ADJUSTMENTS
This is the tricky part. You now need to adjust the brightness, contrast, exposure, color balance, and saturation. This will vary from gif to gif how much to adjust these values. I will show how I adjusted this one and you can apply that to whatever gif you are making.
For starters, since this show is SO DARK, you will need to brighten it. There are many ways to do this, but I found the method that works best for me is adjusting the Levels.
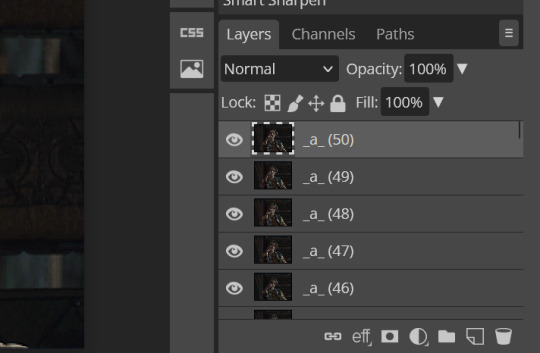
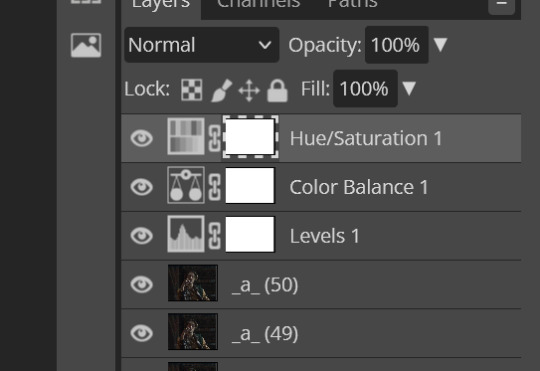
First off, in order to make adjustments, make sure you scroll all the way to the top of your Layers panel and make sure only the TOP LAYER is selected. Otherwise the adjustments will only be applied to whatever is BELOW the selected layer. You want all of them.
8a. ADJUST LEVELS
Next, go to Layer > New Adjustment Layer to pull up all your adjustments. For this first example we will use Levels, which is the second from the top.

You will see a histogram like this one:
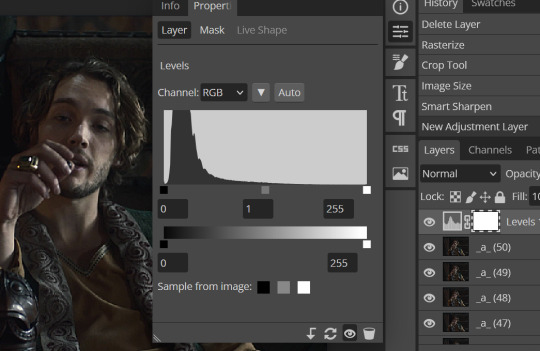
This is a lot of information about the image, but pay attention to where the curve starts and stops. On the left, you see a "0". That is your dark point. This image is slightly washed out so I need to move that adjustment to the right so that the little square is just below where the curve starts. The third number is "255" and this is your bright point. The images are very dark so most of the graph is shifted to the left (dark) so in order to brighten, move the third square (the white one) so that the second square (grey one) is just at the edge of where the curve drops off on the right.
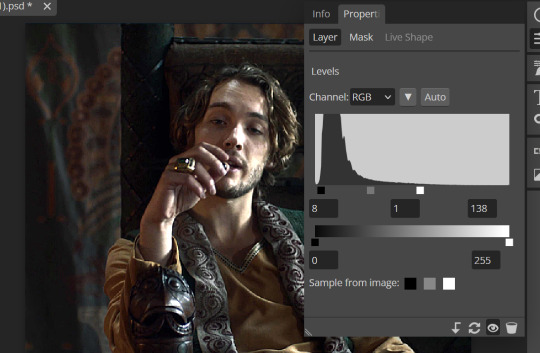
You can now see the numbers changed. Moving the first dark square will enhance your contrast, and moving the THIRD square will enhance your brightness. It is usually not necessary to move the second square, but you can experiment with this by moving things around and seeing how it affects your image. After this, it may be necessary to also increase the Exposure and Brightness if it is still not bright enough, but most of that can be done here.
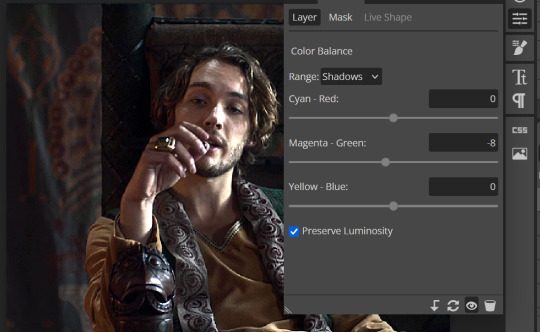
8b. ADJUST COLOR BALANCE
Again go to your Layer > New Adjustment Layer > Color Balance to get this tool. This is a neat one with A LOT of variables, so play around with it to get the colors to look how you want. A lot of the raw video tends to have a bluish or greenish cast to it, so you just move the sliders to get rid of the cast and make the colors look how they are SUPPOSED to.
In this case there is a very slight greenish cast to the pictures so I will adjust that slider to compensate. The Range (at the top) you can select Shadows, Midtones, or Highlights, depending on where the color cast is located. Usually I stick to Shadows but sometimes will use Midtones if the color cast is really bad. Make sure Preserve Luminosity is checked.
8c: ADJUST SATURATION
Layer > New Adjustment Layer > Hue/Saturation. This will brighten up your colors. This tool is VERY COOL in that you can select color families to selectively increase or decrease the saturation of. Under Range you can choose Master, which is all colors, or choose only Red, Yellow, Green, Cyan, Blue or Magenta. The slider at the very bottom (when a single color is selected) allows you to set the range of colors to. I chose Master and increased the saturation of all colors, but be careful as this can make skintones look VERY orange. So select other colors in the Range to adjust single colors only.
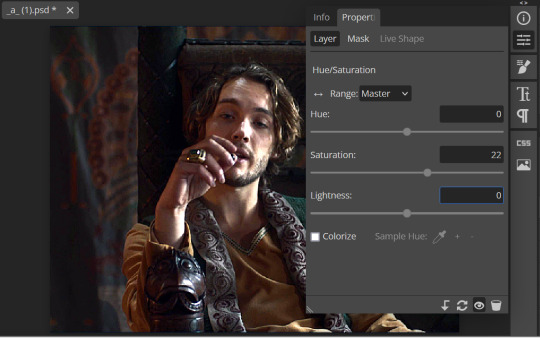
With this tool you can also change the HUE (which is changing the overall colors to a different color, like shifting all the reds to orange) and Lightness (which may or may not be necessary if you did the Levels correctly)
If you need to go back and change something in your adjustment layers, you can do so by clicking on the white box in the Layers section next to whatever you need to adjust.
There are many other Adjustment Layers you can play with, so have fun and experiment!
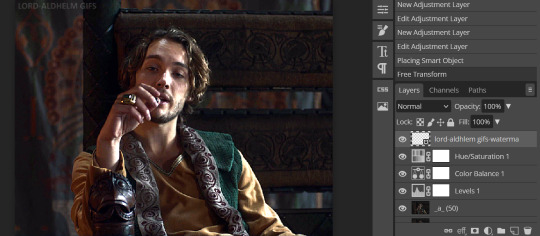
9. ADD YOUR WATERMARK AND TEXT
Next, you can add a watermark if you have a premade file, by dragging and dropping it on the image. Then move it around to where you want it, resize it if needed, and change the opacity if it is too bright. Make sure this layer is the TOP layer.
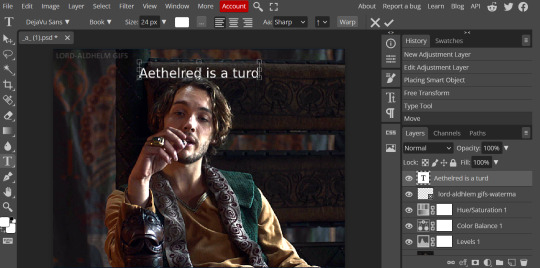
To add text (for subtitles or effects) simply click on the Text icon in the left menu (the T) and click anywhere on the image and start typing. You can change the font, color, size, and style in the menu on the top. Move the text around by using the Select tool (arrow on the left) Again make sure this is the TOP LAYER so that it will be present over the entire gif.
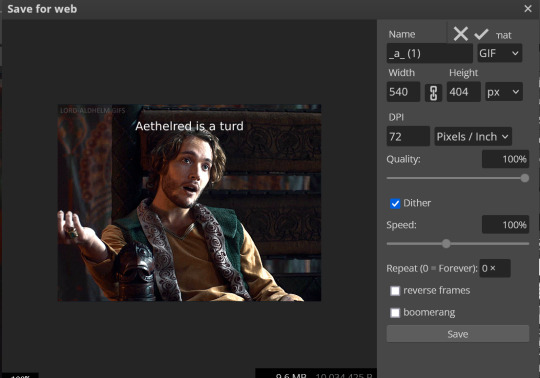
10: EXPORT YOUR GIF
File > Export as > GIF
A pop up dialog will appear and you can change some settings here if you want. I usually don't. Pay close attention to the filesize (at the bottom) and make sure it is under 10mb. Keep the quality at 100%. And most importantly MAKE SURE DITHER is checked! This will prevent compression artifacts from ruining your gif.
Save the file to your computer and VIOLA! Gif!
Have fun!
#gifmaking#gifs#gif makers#gif making resource#gifmakers#gif making#gif#gifmaking resources#gif making resources#my guides#giffing tutorial#gif making tutorial#photopea#photopea tutorial#photopea resources#photopeablr#photopea gifs#long post
30 notes
·
View notes
Text
hey fellow gifmakers, do any of you have any interest in doing like a collective tumblr for fundraiser commissions for gifsets? lmk if there's any interest because I think it would be good to have a central place for people who want to do these things to go.
#gifmakers#gifsforgaza#creators for palestine#spread the word id like to see how much interest there is
17 notes
·
View notes
Note
I love the gifmakers of the fandom so much. You have no idea how many hours I've spent gazing on pretty pretty gifs
Yes yes yes, I love you, gifmakers! Where would we be without you?! Here is a kiss for all of your foreheads, or noses, you choose.

96 notes
·
View notes
Text
Guys, I am so serious: I see you reposting my gifs, artwork, or creations OR someone else’s gifs, artwork, or creations, and I will block you immediately! I operate on a zero-tolerance theft policy.
#for anyone who is new around here or is rusty on Tumblr etiquette#stop doing this#reposting is theft#if you didn’t make it don’t post it#always reblog the original#ask for permission#cite your sources#gifmakers#gif makers#artists on tumblr#tumblr etiquette#i will never stop speaking up about it
78 notes
·
View notes
Text
Before/After Gif Coloring Challenge.
Thank you for tagging me @safedistancefrombeingsmart and @a-victorian-girl (SB)! 🤗
I´m doing a post apart bc i was extending myself too much and kinda felt like i was hijacking the other thread 😳, so...
These are some colorings i did to the Doctor Strange movie for the ongoing Giftober event. ☺️


1. having fun with the colors, to highlight the greens.
2. turning the lights on in Wong's library 😬
3. taking out the criminal yellow filter 🤦♀️.
And a couple from my side blog (@marv-el-spot) 😃

Now, since I think this is also a way to show appreciation to gifmakers and the work we do, I'll tag some creators who are currently participating in @giftober 2023. (no pressure to do it tho)
Fortunately there are lots of ppl participating so i can't tag everyone but here are just a few ☺️
@scottxlogan @lastencoregraphics @ijustthinkevilunoisneat @hidengifs @t-u-i-t-c @sylkithecat @trapezequeen @walnutmistjamie @walterkov @spookylum @swanthief @gifsfrommydvds @marvels-universe
Everyone not tagged can do it too, of course!
:))
#gif coloring challenge#gif challenge#gifmakers#gifmakers on Tumblr#i usually do a different coloring for each set#i don't save PSDs because of space#but luckily i still had these ones in my folders#tag games
31 notes
·
View notes
Text
Maybe it's just me, but I don't understand the sudden influx of words being censored on gifsets? Like...??? This isn't tiktok, you don't have to do that stuff. It's okay to type out the word fuck.
#maybe I'm missing something#or maybe not#but I just find it odd#especially when they're subtitles and the character/person says it#gifmaking#gifmakers#gifs
19 notes
·
View notes
Text
We're halfway! 🥳
Hello everyone, it's your admin here! 👋
I just want to take a moment to give my appreciation to all of you who had been joining during these 2 weeks!
Congrats! You're doing great! i want you all to know that i read all the tags, and I'm so happy that this event is encouraging you to create again, or to try new stuff, or that it's inspiring you in any way. i love to see you're having fun with the prompts!
And if there's any struggle you have with a prompt, please let me know and I'll try to help you. I don't want anyone having headaches over this 🤭
THANK YOU SO MUCH! 💐💐
Ele :))

ps: If you just see the event post now, know you can still join, it's not too late!
ps 2: Remember if you participate for Marvel, check out this info from @mcuchallenge 😉
20 notes
·
View notes
Text
I haven't updated my collection of reaction gifs in so long. there are still superwholock and "you tried" gifs in there
please reply with your fave reactions!
66 notes
·
View notes
Text
Attention all whump gifmakers and visual artists!!!

I am seeking your opinions and advice.
So I am seriously considering creating a whump gif makers challenge for some time in 2024. I'm thinking maybe in August because it seems pretty empty in terms of whump challenges.
I don't know what it would look like or what I'd call it but I want something just for gif makers/visual artists instead of a writer's challenge that gif makers are allowed to take part in as well but are actually just geared towards writing and the prompts are really hard. There's so many writing challenges and I love them. I do. But lately I feel they're getting harder and harder for gif makers to participate in (that might just be my problem though who knows) in terms of prompts.
So I want something made specifically for whump gifmakers. An event to bring everyone together, meet other gif makers, learn and share skills, share our favorite whump scenes and find new ones to loves. I could also share gif making tutorials and resources for people who are new to it or would like to up their skills. From basic skills like screencapping and software and how to use programs like photoshop to more complex things like how to do layouts and blending techniques.
Would this be of interest to you all?
If yes, what kinds of things do you as a gif maker like best about prompt challenges? What do you like least? What would you like to see in a monthly gif making challenge?
Let me know what you guys think! Share your thoughts! I'll even add a poll option but I'd love to hear your thoughts on the comments!
Please reblog for larger sample size thank you
63 notes
·
View notes
Text
Making Gifs Part 1 - Capturing Video
I am making this for @errruvande but I thought maybe others could use this guide to. This is my own personal workflow on how I make my gifs. Everyone has their own way of doing it, and there is no right or wrong way, but I have found this works best for me, with my limited tools and since I do not have photoshop.
Please note I am not an expert lol! There are people out there making far better gifs than me, and many other gifmaking resouces on Tumblr that are probably better than mine.
Keep reading below >>>
So there are two ways that I have found that work for capturing video. If you have the discs like I do, using a program like Videobyte BD-DVD Ripper works really well to grab video clips from Blu-Rays and DVD's. I recommend only using Blu-Rays if you have them. since DVD's are much lower quality.
However I have noticed the videos I captured with this program tend to be dark and have some compression artifacts, even when rip to an MKV with high quality settings. So I use a different method which I feel produces higher quality video captures.
I use Windows Screen Recorder (I have Win11 but this will work for all versions of Windows) with the quality settings set to High. In order to do this, go to Settings > Gaming > Captures and set the following:
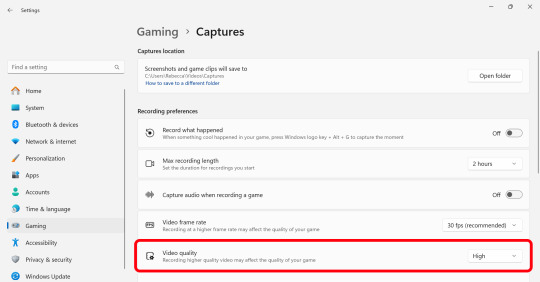
Make sure the Video Quality is set to High, set your Screenshots folder, turn off Audio (you don't need it), and keep the frame rate to 30 fps.
For Windows 11 press WIN + ALT + R to activate the screen recorder. There is usually a bit of a delay so make sure you start a few seconds before the scene you want to capture. And try to keep the length of the capture below about 90 seconds; the shorter the better.
______________________________________________________________
Capturing Sequential Caps
So, for those of you with Photoshop, you can import your video directly into the program and make your gif from there. But I found that Photopea really does not like videos, and will stall and crash if I load a video directly. So I have to capture sequential screencaps to make my gifs.
I use VLC Media Player. There are a few others out there that take sequential caps, but I have not been able to get them to work myself.
Download and install the latest version. Then go to your settings to set up the Sequential Caps function. They have a great guide on their website here but I will reiterate it in this post.
Go To Tools > Preferences and then at the bottom of the screen select the All radio button to show all settings.
Select Video from the left menu. Scroll down about halfway until you see the Snapshot section. Choose the folder where you want the caps to go.
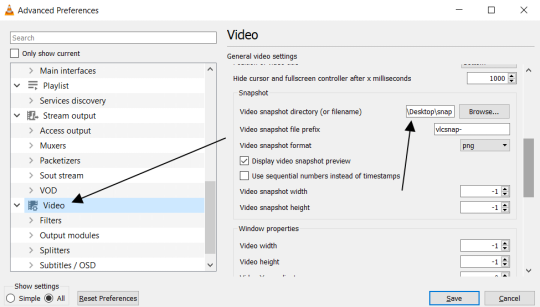
3. Then, under Video on the left, expand the Filters list.
4. Check the "Scene Video Filter" from the list.
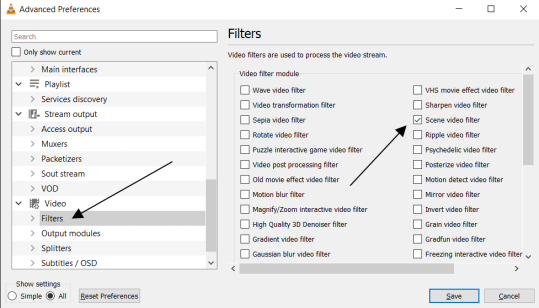
5. Then scroll down on the left menu under Filters and click on Scene Filter. This will open up the settings for that particular filter.
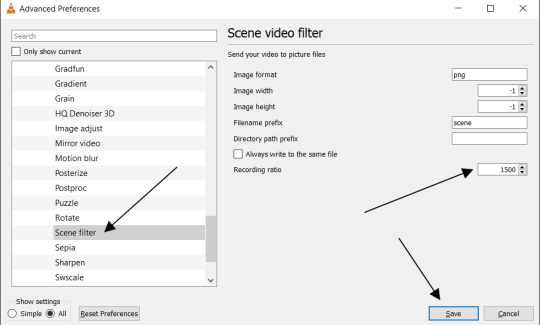
6. Set the Image Format to PNG.
7. Then for the Recording Ratio, change to "1". The Recording Ratio is the frame interval. So for example, if it was set to "300" (with a 30fps video), then it would take one cap every 10 seconds. Setting it to "1" will make it take a cap once per frame.
8. None of the other settings need to be changed.
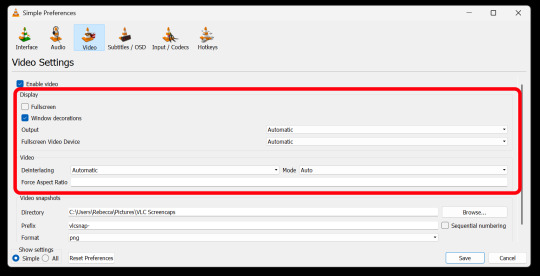
9. One more important setting, otherwise this will not work! Close the menu, and go back to Tools > Settings and leave it on Simple. Go to the Video section and MAKE SURE the output is set to "Automatic". This is important because if it is not on Automatic the Scene Filter won't work!
Then just open your video with VLC. VLC will automatically take the screencaps while the video is playing. If you pause the video, it will stop taking caps.
NOTE: For smoother gifs, change your playback speed to be slower. Go to the top menu > Playback > Speed > Slower (fine). The more you click this the slower the video will playback, and that means more caps will be taken over that time frame. I usually set it to 0.75x, but if you want even smoother gifs for really short clips, you can set it even slower than that.
Your screenshot folder will look like this:

Then we are done with this part and onto Photopea! Which I will go into detail in another post: PART 2
#gifmakers#gifmaking#gif making#gifmaking resources#gif making resources#my guides#giffing tutorial#screencapping#sequential caps#gif making tutorial
15 notes
·
View notes
Last Seen Blogs

senior-7
Senior - 7
somberlittledeer
Tea And Stories
cinemabyconnor
Cinema and Other Thoughts by Connor

end23
Untitled
tathagatorganics
Untitled