#Green Screen Software for PC
Explore tagged Tumblr posts
Visit Tumblr Blog
Explore Tumblr blogs with no restrictions, modern design and the best experience.
Last Seen Tumblr Blogs


Fun Fact
Tumblr’s reach among the 26-to-35-year-olds in the US is 11%.
Text
How to Pick the Best Chroma Keying Software in 2023

In today's fast-paced, digital world, it is all too common to detach "Chroma" from a picture, image, video, etc. Unfortunately, we found that some expensive and poor-quality solutions deter users from looking for creative, effective, and knowledgeable wizard-like software. Let's look at the specifics of the best Chroma Key Software for 2023 and talk about how to get the most of it.
The removal of the green screen from a photo or video is a challenging process without an easy-to-use solution. The following factors are particularly important to us as we search for the best Chroma Key Software in 2023:
Usability: The majority of commercially viable software depends on the end-users' ability to operate its simple, intuitive user interfaces. In this case, PC, Mac, iPhone or green screen software for desktop ought to be usable by both professional and novice photographers.
Features and versions: To create software that is uniquely tailored for each stakeholder, the software industry has subdivided and profiled its user base. In order to achieve good results, you could look for green screen software with features that specifically define the requirements at various professional and super-professional levels.
Platforms: In order to accommodate overlays and special effects, photographers should find it simple to access over Desktop, PC, or iPhone and make outstanding artworks on time. The most adaptable green screen apps give customers access to additional features.
Demonstration: Get acquainted with the numerous features, special effects, overlays, enhanced effects, etc. that a green screen software has to offer the user by using the Free Demo versions.
Cost: One configures settings to take into account all the variables when buying green screen software for a PC, desktop, or Mac, and it's important for the right reasons. Compare the costs before making the transfer.
The most popular green screen backdrop removal tool, Green Screen Wizard, fits the aforementioned requirements and has wizard-level capabilities. We believe 2023 will likely show to be a great year for improving photo and video editing.
0 notes
Text
I have this tinfoil hat theory that the death of customization made people technologically illiterate.
Back when customization was big, it wasn't exactly user friendly. Sure, there were default themes for a lot of places, but if you wanted to truly customize something, you had to learn HTML and image editing.
Not to mention that when PCs were new-ish, the fact that it wasn't just a black screen with green text, but a blank slate that you could put any program with any function on was also novel. Even that degree of customizability was unheard of beforehand. We knew it came with a promise of infinite possibilities, and so if you wanted your PC to do something, you knew that you had to learn how to get it to do it. That was just how it is.
If we wanted a program from the internet, we either got it as an exe file or a zip/rar file. We learnt that there's a free program that can unzip compressed files. Today, ads are the norm, but back then, we learnt that if we see ads, they're most likely a virus and we need to block them with an anti-virus software or a browser extension. Everyone and their mother knew how to torrent and crack programs. They knew it could be done somehow and so they learnt how to do it.
Now, all you can customize are your posts and pfps and banners, and if you're lucky, you can choose between dark or light mode, but that's it. We've been needing to put up with shittier and shittier website updates that slowly but surely took out every morsel of customizability and I think by 2016-ish we just gave in. Of course, OS' followed suit along with everything else, seeing the success of the first things that were sleek and minimalist (I suspect that it was Windows 8 and the Windows Phone as much of a trainwreck as they were at the time or maybe Apple).
And now everything is homogenized. Nowadays I keep meeting so many people who have no idea about 95% of their PCs' functions. They don't know that they can install an adblocker or how to unzip zip files or even that they don't have to put up with Microsoft's bullshit and they can just get rid of the tiles and Xbox-related functions if they don't need it. They've been conditioned to think that customization is at best minimal on any given platform and so they won't even try it.
I often hear that all they do on their PCs is check social media (the same things they can do on their phones as well).
It's genuinely making me sad.
15 notes
·
View notes
Text

Image: Damien McFerran / Time Extension
The world of emulation handhelds has given us numerous clones of the Nintendo Game Boy, but Sega systems have been curiously underrepresented. Sure, Anbernic gave us the Saturn-style ARC, but we haven't had all that many devices that take inspiration from Nintendo's bitter '90s rival—until now, at least.
The $99 Game Kiddy Bubble ($99 from MechDIY) is clearly inspired by the Game Gear, Sega's answer to the wildly successful monochrome Game Boy. Released in the early '90s and based largely on the 8-bit Master System hardware, the Game Gear offered a full-colour illuminated screen but suffered from the same shortcomings as the Atari Lynx and NEC PC Engine GT: battery life.
Even so, it was clearly the "best of the rest" and would sell almost 11 million units—small fry compared to the Game Boy's gargantuan lifetime sales, but better than the competition could manage.


Image: Damien McFerran / Time Extension
If you grew up with this battery-hungry but likeable handheld, then the Game Kiddy Bubble might catch your eye. The design is a close match to Sega's portable, albeit a lot smaller in overall dimensions. It has four face buttons instead of two, and there are four shoulder buttons and two analogue sticks, but little tributes to the Game Gear remain; for example, the green power and red charging LEDs are located in the same place that the three-colour Game Gear logo would be, and the screen bezel mimics the one seen on Sega's device.
The system is powered by the Rockchip RK3566, which is a pretty mid-level proposition in the world of emulation these days but is nonetheless capable of running 8 and 16-bit systems with ease, as well as PSP, N64, Dreamcast and (some) Saturn titles. The lack of grunt means that you're going to find things a little hit-and-miss with anything more powerful than N64, but for NES, SNES, Game Boy, GBA, Genesis, SMS and (of course) Game Gear, this is more than adequate.
The system's 3.5-inch 680x480 pixel screen is lacking a little when it comes to overall brightness, but it's colourful and offers good contrast—it's also a good resolution for handling most retro titles. There's a 4000mAh battery inside, which is going to give you between four and six hours of play, depending on what kind of emulation you're doing.


Image: Damien McFerran / Time Extension

Image: Damien McFerran / Time Extension
Special mention must go to the Game Kiddy Bubble's circular D-pad, which is a close match to the 'Sega-style' pads the company was famous for during the majority of the '90s. This 'rolling' pad is fantastic for games which require smooth changes of direction, such as side-scrolling brawlers or one-on-one fighters, but there's slightly less precision when it comes to games that rely more on the cardinal directions, such as 2D platformers. Personally, as someone who grew up with Sega consoles, I think the D-pad is fantastic, but if you were a Nintendo kid during the 1990s, you might be less impressed.
In terms of software, the Game Kiddy Bubbles comes with two options—the amusingly named 'Lovely Child' OS and the more recognisable Emulation Station. You can choose to boot into the latter every time the system is powered up, and it's by far the best choice, in my opinion.
The user interface looks fantastic, and the pre-configured MicroSD card I was sent with the review sample has box art and screenshots. The selection of ROMs is a little odd, however, and like always, I recommend you load up your own library rather than relying on what's provided by the seller.
Game Kiddy Bubble Review: Conclusion
Sega fans will love the Game Kiddy Bubble mainly because it pays tribute to one of the most iconic Sega consoles of all time, the Game Gear. It's a nice size, has a great D-pad and is powerful enough to play most of the best games from the '90s.
As is so often the case with these sub-$100 devices, emulation for more powerful machines—like the PSP, Saturn, N64 and Dreamcast—is inconsistent, but if you're happy to stick with 8 and 16-bit machines, you won't be disappointed.
Sure, the competition at this price point is beyond fierce these days, but the Game Kiddy Bubble sets itself apart by offering a different form factor to its Nintendo-obsessed rivals.
0 notes
Text
Breaking more so cause I'm driving myself nuts with the mock-model (I'd put this on my main blog, but I didn't want anyone knowing about this project) Every time I look up how to do something, I drive myself insane Cause 1. I don't know if I'd like streaming 2. I don't know if my internet can handle streaming And 3. I don't want to use my phone cam cause my phone isn't great So, these fancy models that take forever to make and don't track right with pc software and cam aren't gonna be what's best for me. Yet I'm still cutting and rigging as if I could rig it that way I don't want to have a generic anime model, I want to stand out, and doing the same type of movement rigs will only make me blend I love unique ones, like the 3/4 ones that don't move side-to-side, yet I'm going nuts trying to cut hair pieces and rig my nose to move side-to-side I knew I should have went with a 'paper-doll' gimmick I wanted to do. I though that'd be so cute, just have a flat model with little movement, and maybe have like a weird raffle thing where if you like, I don't know, gave so many subs I'd wear an outfit of the donators choice I want involved, for the viewers to feel connected, it's why I want to focus a lot on the eyes. I don't even know if it's possible, but I want my eyes to be a green-screen that donators could make play whatever they want. And y'know how twitch streamers sometimes have something that reads out chat messages? What if my model got 'hacked' and would start doing mouth movements for the message and stop reading my own as the eyes go glitchy? I want gimmick, I want to stand out, I want to have fun
0 notes
Text
How to Find the Color Code of an Image Using PhotoCut

Whether you're a designer trying to reproduce an existing color scheme or someone simply interested in knowing the actual color of an object in an image, PhotoCut helps make this task straightforward. Use the PhotoCut photo color picker to grab and examine the HEX, RGB, and other color values from your images. You can choose color and create art with it using PhotoCut’s AI Art Generator. We'll walk you through finding color codes from your images using PhotoCut, creating color palettes, and explaining why you'd love this tool both for a casual user and in the professional sphere.
What is a Color Code?
A color code is a digital representation of a particular color. It helps computers and software display a color precisely on screens. Color codes are a technique of web design, graphic design, and digital arts that ensures that colors come across just right on a screen on any device and across various platforms. To do this, color representation comes in many different ways such as:
HEX Code: This is a six-digit code representing colors used in web design and digital graphics, starting with the "# " symbol.
RGB: Abbreviation for Red, Green, and Blue. The color values are depicted by three numbers ranging from 0 to 255.
CMYK: It is a model that shows colors by the percentage of Cyan, Magenta, Yellow, and Black inks used in printing.
This will enable you to get the color codes of any color that appears on an image, such as a logo, photo, or artwork.
Why Use PhotoCut's Color Picker Tool?
With a tool in this aspect such as the color picker, color identification becomes simple, fast, and accurate. It manages to extract the precise color code from any image, so it is very useful to graphic designers, web developers, and content creators, among others, who are connected with digital design or the creation of content. You can create portraits with your chosen colors using PhotoCut’s AI Portrait Generator.
Here is what makes PhotoCut's color picker stand out:
Accurate Color Codes: Whether you want to find the HEX, RGB, or any other color models, PhotoCut's color picker gives you the correct color codes.
Easy Process: It is easy and swift to find a color code: upload your image, choose a color, and that's it.
Zoom in: You can zoom into a specific portion of an image to confirm the exact color you require.
Saturation and Tint Adjustable: Once you choose the color in PhotoCut, you can directly adjust saturation and tint to fine-tune your designs.
Let's now see how you can use this tool step by step to find the color code of an image.
How to Find the Color Code of an Image Using PhotoCut
Step 1: Upload Your Image
A picture of the color you want to capture should be uploaded first. Use your computer's file explorer or drag the file from your PC to do this. After the picture is uploaded, PhotoCut will process it immediately and display it.
Step 2: Select the Color Using the Eyedropper Tool
The interface of the website will display an "Eyedropper" button when you upload the picture. With this tool, you may quickly select any color from the image.
Click the Eyedropper Icon: Select the icon for the eyedropper. After the image loads, activate the color selection tool by clicking the "Eyedropper" button.
Hover Over the Image: Place your mouse cursor over the image. Once you move the cursor, the software will automatically indicate other areas of the image. This is how it will give you a real-time color display.
Click to Select a Color: If you locate the color, you are interested in using, simply click on the color. PhotoCut will show you the color as well as give you its color code.
Step 3: View the Color Code
After choosing the color, PhotoCut will present its precise HEX code in a color box. Presented as a six-digit HEX value (for example, #FF5733) or in RGB, CMYK, and other formats, the color code will be shown right on the screen. You can get the color code for Ivory and use it in your designs.
Step 4: Copy or Save the Color Code
Now that you have the color code, you can copy it for later use. You just click the color block that displays the HEX code and the code will automatically be copied into your clipboard. This allows you to paste it directly into your design software, website code, or any other platform that uses color codes.
Copy the HEX Code: To use the color in your designs, click on the HEX code box to copy it. The color code will be saved to your clipboard.
Save for Future Use: If you would use this color code across several designs or if you'd like to save this for future use, you can save the color code inside the PhotoCut, so you can find them easier next time.
Step 5: Experiment with Saturation and Tint (Optional)
If you want to tweak the chosen color, PhotoCut also lets you change saturation and tint. You can adjust the color's brilliance or desaturate it. When making a palette, it's helpful to observe many tones of the same hue.
Generating a Color Palette From an Image
Once you have chosen a color from your image, using PhotoCut can easily create a full-color palette. This can be used when creating color schemes or finding matching colors based on the image you are working with. You can use your chosen color palette to create AI girls using PhotoCut’s Girl Generator.
Here's how to make a color palette:
Create a Palette: Once you have picked the colors from your image, you can save them as a color palette. This will help you access and use them across various design projects.
Save Your Color Palette: Once you have saved your color palette, you can apply the colors to a variety of design templates in PhotoCut. With the aid of PhotoCut's editable templates, you can produce logos, posters, and social media posts that appear professional and match your preferred color palette.
By using an image's color scheme, you may make your designs seem consistent.
PhotoCut as a Comprehensive Design Tool
PhotoCut color picker is great for choosing colors, but it offers way more. It serves as a ready assortment of thousands of templates designed and available for different design tasks. Its platform can be used for generating invitation cards, social networking graphics, business cards, and any kind of required design material for your project.
Some of the extra features available on PhotoCut include:
Customizable Templates: Several templates of ready-to-use design for business promotion, invitation, and posting on social media.
Diverse Range of Fonts and Stickers: Use a range of fonts, stickers, and more graphic elements to personalize your designs.
Layering and Editing: PhotoCut provides you with the capability of layering images, texts, and other elements that you might need in a design.
Conclusion
PhotoCut's image color picker is essential software for any digital designer from graphic designers and web developers to hobbyists. It facilitates the identification of color codes from images, the creation of color palettes, and designing with exact colors. Using PhotoCut means you can take any picture, extract its colors, and use them in your artistic projects in just a few easy steps. Try PhotoCut today to streamline your design process and enhance your creative workflow! PhotoCut also helps you convert images to JPEG format.
FAQs
Q1. What is a color code? Ans. A color code is the digital form of a color, allowing it to be identified and reproduced digitally. Color codes may take the form of HEX, RGB, or CMYK; they help designers achieve color consistency.
Q2. What is a HEX code? Ans. HEX is a six-digit code to denote colors in digital design. It consists of numbers and letters, each pair of which denotes red, green, and blue values. For instance, the HEX code for gold is #FFD700, which shows high percentages of red and green but no blue.
Q3. How do I find the HEX code for a color? Ans. Using PhotoCut's color picker tool is the simplest method for finding the color's HEX code. The HEX code will show on the screen once you upload your image and use your eyedropper tool to choose the color. You can then cut this and use it in all future designs you do.
Q4. May I change the color once I have selected it?
Ans. Yes! The color you choose can be made lighter or darker by desaturating or tinting it. You may tinker with your design and make several shades of the same hue, which is convenient.
Q5. Can I generate a color palette from my image? Ans. Absolutely! Once you’ve selected a color, you can generate a color palette from your image by saving and using the colors in your designs. This feature helps ensure a consistent color scheme for your projects.
0 notes
Photo

Lenovo IP1i Gen 7 Intel Celeron N4020 Celeron® Notebook Roam wherever life takes you while connecting and exploring with the remarkably thin and lightweight IdeaPad 1i Gen 7 (15″ Intel) laptop. It boots up in seconds with Flip to Start, which only requires you to open the lid to power up and is driven by up to Intel® Celeron® processors that let you multitask with ease. Maximized experiences & unlimited uses The IdeaPad 1i Gen 7 (15" Intel) is exactly what you need in an everyday use laptop. Watch shows on an expansive up to 15.6" FHD display with a razor-thin frame. Listen to rich and clear audio from two Dolby Audio™ speakers. And with a battery that lasts all day and charges super-fast, you can work from anywhere while enjoying clear video calls with Smart Noise Cancelling. Key Specifications Processor: Intel Celeron N4020 (2C / 2T, 1.1 / 2.8GHz, 4MB) Memory: 8GB SO-DIMM DDR4-2400 Storage: 256GB SSD M.2 2242 PCIe 3.0x4 NVMe Screen size: 15.6" FHD (1920x1080) TN 220nits Anti-glare Operating system: Windows 11 Home Single Language PERFORMANCE Processor: Intel Celeron N4020 (2C / 2T, 1.1 / 2.8GHz, 4MB) Graphics: Integrated Intel UHD Graphics 600 Chipset: Intel SoC Platform Memory: 8GB SO-DIMM DDR4-2400 Memory Slots: One DDR4 SO-DIMM slot Max Memory: Up to 8GB (8GB SO-DIMM) DDR4-2400 offering (8GB module need to be purchased separately in order to upgrade) Storage: 256GB SSD M.2 2242 PCIe 3.0x4 NVMe Storage Support: One drive, up to 256GB M.2 2242 SSD or 512GB M.2 2280 SSD (512GB SSD need to be purchased separately in order to upgrade) Storage Slot: Non-eMMC models: one M.2 slot One M.2 2280 PCIe 2.0 slot Card Reader: SD Card Reader Optical: None Audio Chip: High Definition (HD) Audio AUDIO Stereo speakers, 1.5W x2, Dolby Audio Camera: HD 720p with Privacy Shutter Microphone: 2x, Array Battery: Integrated 42Wh Max Battery Life: Local video (1080p) playback@150nits: 11 hr Power Adapter: 45W Round Tip (3-pin) DESIGN Display: 15.6" FHD (1920x1080) TN 220nits Anti-glare Touchscreen: None Keyboard: Non-backlit, English Case Color: Cloud Grey Surface Treatment: IMR (In-Mold Decoration by Roller) Case Material: PC-ABS (Top), PC-ABS (Bottom) Dimensions (WxDxH): 360.2 x 236 x 17.9 mm (14.18 x 9.29 x 0.70 inches) Weight: Starting at 1.54 kg (3.4 lbs) SOFTWARE Operating System: Windows 11 Home Single Language, English CONNECTIVITY Ethernet: No Onboard Ethernet WLAN + Bluetooth Wi-Fi 6, 11ax 2x2 + BT5.1 Standard Ports 1x USB 2.0 1x USB 3.2 Gen 1 1x USB-C 3.2 Gen 1 (support data transfer only) 1x HDMI 1.4b 1x Card reader 1x Headphone / microphone combo jack (3.5mm) 1x Power connector SECURITY & PRIVACY Security Chip: Firmware TPM 2.0 Fingerprint Reader: None Other Security Camera privacy shutter CERTIFICATIONS Green Certifications ENERGY STAR 8.0 ErP Lot 3 RoHS compliant INSIDE OF THE BOX 1 x Notebook 1 x AC Adapter
0 notes
Text
How to Connect Cricut Wirelessly: A Guide for Beginners
Are you a Cricut enthusiast planning to start your crafting journey? Well, you have come to the right place! I am going to walk you through all the essential info you need to learn in order to connect Cricut wirelessly.
Cricut crafting machines come with Bluetooth and USB connectivity to provide the utmost comfort in setting up the device. Crafters familiar with the machine can easily get started with the machine. On the other hand, some new users can find it difficult to complete the setup. In this case, it is best to have a thorough understanding of the process beforehand. So, get through the whole blog and grasp all the vital details and steps to wirelessly set up heat presses and cutting machines.
How to Setup Cricut Cutting Machines Wirelessly?
You can wirelessly connect your cutting machine to both computer and smartphone devices. So, here you will find a quick guide to completing the setup on both devices.
Method 1: Connect Cricut Wirelessly to Your Computer
Begin by unboxing the cutting machine and placing it near your computer device. (Make sure both devices are within the 10-15 feet range.)
(If you are using the Explore One machine, then you should insert the Bluetooth toggle to establish the connection.)
Next, attach the machine plug to a power socket and turn it on by pressing the power button.
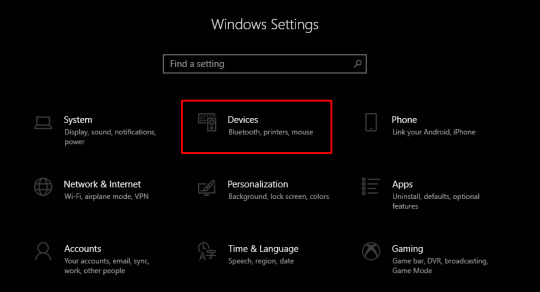
From the Settings window on your PC, choose the Devices option.
After that, go to “Bluetooth and other devices,” turn on the Bluetooth toggle, and select “+Add Bluetooth or other device.”
On the next open page, select the Bluetooth option and move forward.
Henceforth, the printer will start looking for the available printers within its range.
Once you see your cutting machine model number on the screen, click on it.
If a prompt comes on the screen to type a PIN, you need to enter 0000 to move forward.
Afterward, the wireless connection process will be complete.
In order to use the cutting machine, you need to complete the setup process through the Design Space app. In the next step, you will learn about the setup process.
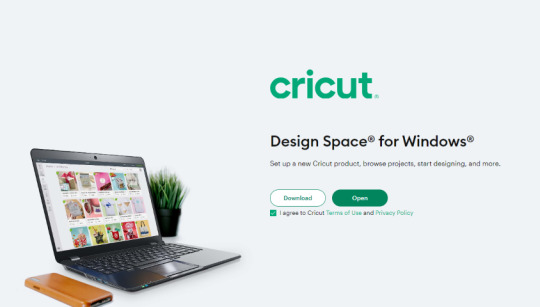
Begin by visiting the Cricut official website on your PC.
From the screen, click on the Apps option, which will take you to the Design Space download page.
In the open window, you will see that the Download button is greyed out.
To enable the download button, move to the terms and conditions checkbox and click on it.
After that, you will see that the Download button is now green; click on the button to initiate the download process.
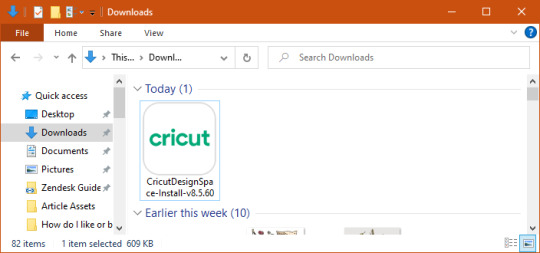
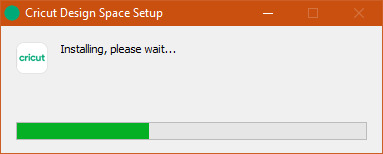
Wait for the design app download process to complete, and then open it after that. (Or you can access the file from the Downloads folder on your device to install it.)
Before the app installation process begins, it will ask if you trust this app and want to open it; click on the correct option to start the installation.
Afterward, a box will show up on the screen to indicate installation progress.
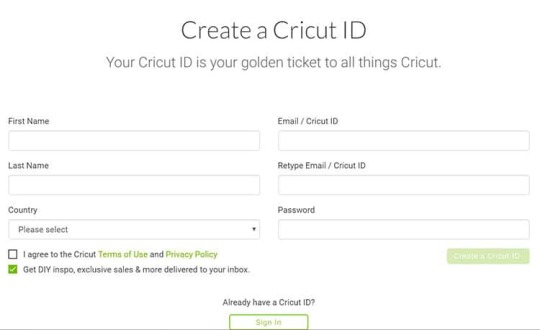
Once the installation process is complete, launch the software/app and complete the login process. (Or create a new account if necessary)
Then, choose the Machine Setup option to search for the cutting machine you are using.
From the result, click on your machine’s name, and the setup process will be complete.
Method 2: Connect Cricut to a Smartphone Wirelessly
The following method will allow you to get complete knowledge of how to connect Cricut wirelessly to a smartphone device.
For the first step, power on your cutting machine and bring the mobile device within its 10-15 feet range.
On the smartphone, tap on the Settings icon and then go to Bluetooth.
Now, turn on the Bluetooth toggle and tap on your machine name based on the result.
Follow the instructions to complete the machine’s Bluetooth connection process.
After completing the Bluetooth connection, the same as the computer device, you need to download the app on your mobile phone. Follow the below guide to do that.
First and foremost, launch the Apple App Store or Google Play Store app on your mobile phone device.
Next, type cricut design space in the search section by tapping on the search bar.
After that, tap on the Search option.
From the list of open results, tap on the correct app icon and then tap on Get to start the downloading. (You might need to type your iTunes password if you are downloading the app on your iOS device.)
Once the downloading is finished, the app icon will appear on your system home screen.
You can open the app from the home screen or from the application downloader you are in.
After opening the app, you are required to complete the account sign-in process. (If you are using the machine for the first time, you need to create a new account.)
On the app, you can tap on the Machine Setup option to search for your cutting machine.
Afterward, follow the on-display instructions, and your machine setup process will be complete.
Here you go! Your machine is ready to create beautiful and stunning DIY projects.
How to Set up Cricut Heat Press Wirelessly?
If you are planning to connect Cricut wirelessly to a heat press machine, then you can do it easily without using any app except EasyPress 3. The following guide will help you complete the process without any issues.
First of all, connect your heat press machine’s plug to a power outlet.
Afterward, go to the Bluetooth page on your phone and establish a wireless connection between both devices.
On your smartphone device, download the Cricut Heat app from the App or Play Store.
Once that process is complete, launch the heat app on your device.
Also, you need to tap on the Sign Up option to initiate the machine setup process.
From the heat press names open on the screen, select your machine’s name, and select Connect.
Now, the app will verify the heat press with your registered email address.
Moreover, select the Activate option after reading the terms and conditions.
Once the machine setup process is complete, a notification will show up on the screen.
Finally, you can use your machine to apply icon-on designs on various products.
Final Words
This piece of content shares all the need-to-know info about the machine setup. You can effortlessly complete the setup process of your device without any issues. However, before downloading the Design Space app, make sure to check the device compatibility and system criteria to avoid any complications. If everything is as required, you are good to go to start using the crafting devices. I wish you a happy crafting journey!
Frequently Asked Questions
Does Cricut Require Bluetooth?
All the newer models of the Cricut machines come with both USB and Bluetooth connectivity technology. However, if you are using the first model of the Explore series, then you need to use the Bluetooth adaptor to establish the wireless connection. All other devices come with built-in Bluetooth to set up the device to a smartphone and computer.
Why Can’t I Connect Cricut Machine Wirelessly?
There could be various reasons if you are unable to make a wireless connection to your machine. Some common ones are given below.
The machine is not compatible with your PC or mobile phone.
The OS of your device has not been updated.
Using the outdated or incompatible Design Space app.
Either of your devices is facing a technical problem.
You are not following the correct connection process.
If you are having these types of problems, then ensure that everything is required or seek help if the problem seems too complex.
Does My Cricut Need to Be Connected to Wi-Fi?
There is no need to connect your machine to Wi-Fi in order to use it. These devices have Bluetooth and USB connectivity options. However, you might need to connect your computer or smartphone to Wi-Fi while downloading the Design Space app to complete the setup.
Source :- https://cricuthelpcenter.wordpress.com/2024/08/29/how-to-connect-cricut-wirelessly-a-guide-for-beginners/
0 notes
Text
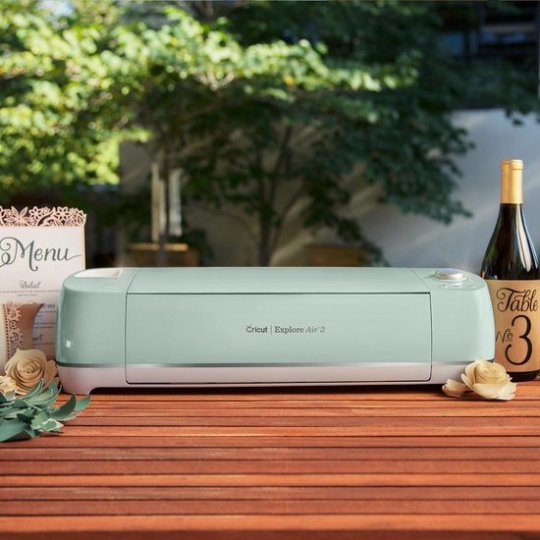
Uneekor EYE MINI LITE SIG8 Golf Simulator Package


The Uneekor MINI LITE SIG8 Package pairs Uneekor’s EYE MINI LITE launch monitor with our SIG8 Golf Simulator Enclosure, and is perfect for golfers looking for a premium experience but short on space.
Featuring real time visual feedback capturing both clubhead and ball performance data, your Uneekor SIG8 package is everything you need to work on your golf game.
EYE MINI LITE by Uneekor brings you all the outstanding qualities you’ve come to expect, blending state-of-the-art technology with unmatched simplicity. With EYE MINI LITE, setup is as easy as connecting to a PC, and you’re ready to enjoy a comprehensive practice and full golf simulation experience right out of the box
What’s Included In The Uneekor MINI LITE SIG8 Package
Uneekor EYE MINI Launch Monitor
EYE MINI Clubhead Stickers
Choice of Simulation Software
SIG8 Golf Simulator Enclosure
Landing Pad Turf
Choice of Golf Hitting Mat
Golf Simulator Projector
Ceiling Mount
50’L HDMI Cable
Here’s What You’re Getting
Uneekor EYE MINI LITE Launch Monitor
The EYE MINI Lite has the ability to track both ball & club data. Tracking the same metrics as the EYE MINI but instead of the on unit display, the MINI Lite utilizes the gaming pc to show the data.
Ball Data:
Ball Speed
Side & Back Spin
Side Angle
Side Distance
Launch Angle
Carry Distance
Club Data ( EYE MINI club Stickers Required):
Club Speed
Attack Angle
Smash Factor
Club Path
Software Included
Included with your EYE MINI Lite is the VIEW software app for PCs. Connect to your selected device through the included CAT6 cable.
The View software from Uneekor gives golfers access to ‘Peak Driving Range’, unlimited sessions for practice, tracking of all Ball & Club data, various shot and flight path visualizations.
The EYE MINI Lite also offers the option to upgrade software to Uneekor Refine & Refine+ software.
SIG8 Golf Simulator Enclosure
The SIG8 screen and enclosure pairs beautifully with the EYE MINI LITE. Built tough, the SIG8 screen can withstand the hardest of golf shots time after time. Unlike other screen systems, we designed the SIG8 so that it can fit within compact spaces with as little as 9’W. Due to the squareness of the screen, the image will fill in 80% of the screen – there will be some white space above and below the image.
Features:
Image Fills In 80% Of The Screen in HD
Premium, Handcrafted, Made in the USA
Powder Coated Aluminum Frame
Tight Knit Polyester Impact Screen
Protective Foam Padding Around The Screen
Dimensions: 8’4″H x 8’4″W x 5′ D
Golf Simulator Projector
With WXGA (1280×800) resolution and 3,600 Lumens, your golf simulator projector will have the best image and color quality for your indoor golfing experience.
Landing Pad Turf
The landing pad is made specifically for the SIG10 golf simulator. It fills in the area between the screen and the hitting mat making it aesthetically pleasing and protects your floor from golf ball strikes.
Ceiling Mount
The Ceiling Mount is a permanent option that ensures your projector is out of the way and safe from any stray golf shots.
Cables
A 50′ HDMI cable is included!
Choice of Golf Mat
Fairway Series 5′ x 5′ Golf Mat
Our Fairway Series mat is 5′ x 5′, roughly one inch thick and can hold a real tee. Ideal for those seeking realistic feel.
SIGPRO Softy 4′ x 7′ Golf Mat
The SIGPRO 4′ x 7′ is easy on the joints thanks to the SIGPRO Softy Hitting Insert that comes standard with the 4’x 7′ and 4′ x 10′ Golf Mats.
SIG8 Golf Simulator Flooring
The Indoor Golf Shop’s simulator flooring is a great option for those seeking the clean, professional look of a custom install – with the convenience of a done for you, easy to assemble kit.
It combines the best of two worlds: an integrated hitting strip embedded into the floor for full swing shots, surrounded by a putting green with four cups for dialing in your short game.
Not only does this look great, but it also conserves space by reducing the footprint of the hitting surface and maximizing the putting and chipping surface.
That’s the beauty of SIGPRO’s golf simulator flooring.
Click Here to Read More
#golf#golfing#gamechanger#golfer#golfmat#improveyourswing#swingturf#golf accessories#sports#golf equipment
0 notes
Text
Color space basics for HDMI video
There are two general measures of video perception: resolution and color. Those notions are intentionally vague for the purpose of explaining their relation to HDMI transmission.
I've covered the resolution part in previous posts, as this metric is simpler to quantify. Every screen has a limited number of pixel dots; the more, the better. The same logic works for refresh rate; the faster we change the image on the screen, the smoother the motion picture. Screens are rectangular matrixes of pixels with a small number of aspect ratios (roughly, from long 21:9 to square-ish 3:2) and resolutions of 1, 2, 4, 5, or 8K. Higher HDMI standards support more Ks. Thanks to Steve Jobs' legacy, we have the upper limit for the density and, consequently, the number of usable pixels, known as 'Retina'.
The second part, color, is more a matter of taste and perception. Much like audio, there's always a place for debate on compressed vs. lossless and the number and range of color or audio frequency levels. So, let's review color-related terms one by one.
Color space
Color space is basically a color wheel from any color picker window in the software of one's choice. Just arranged in a more scientific, yet two-axis planar pattern. This half-parabolic rainbow-colored thing, called the 'cromaticity diagram', was introduced in 1931 and is still referenced today as a space for all the colors, not counting their luminocity.
Then there's 'color models', a system with a multi-letter name for representing a set of colors (color gamut). The ultimate goal for color models is to cover the color space, but in reality, all the RGBs and CMYKs try to cover the most of the color gamut (or technically possible with the technology they are made for).
RGB

One of the most known color models is RGB. I intentionally don't make any distinction between all the variations of RGB (sRGB, AdobeRGB, and xRGB), as this makes no difference for today's topic. RGB, as the name suggests, is copying the human eye's cone cells that make any color a mixture of red, green, and blue.
RGB is the go-to format for PCs, monitors, and most image processing activities. Specifically, sRGB is the standard for web images.
The channels, R, G, and B, are represented as three 8-bit numbers, 0 to 255. Some models can use more raw data to get more chrominance levels—16 bits per channel or 48 bits per pixel. So should we aim to use as many bits per pixel as we can? Well, no, it's not practical. A 24-bit Full HD RGB image takes 1920 × 1080 × 24 = 5.93 MiB of space (or 11.87 MiB for a 48-bit one). It seems manageable, but if we consider a minute of FullHD 30 fps 24-bit video, it will occupy 10.43 GiB of storage, which is obviously too much even for modern networks (that's 938 GiB for a 90-minute movie).
There are two ways to mitigate this: either to use compression algorithms like Youtube's H.264/H.265 or to use a better color space to use less data for better results. In terms of RGB, one could use a limited set known as R'G'B' with values of 16 to 235.
CMYK
Worth a quick mention. It has no use in HDMI video transmission as it is made for printed physical products.
YUV, YPbPr, and YCbCr
Those are used interchangeably, although they differ slightly. But all we care about here is the general idea. YUV works best for photo and video content. Human eyes perceive images as a combination of luminance and color. The luminance is the most important part; black-and-white images are enough for us to have a pretty good idea of what's shown in the image. In the dark, we see just black and white, as there's no light to reflect from colored objects, and it's fine.
So the idea is to devote one color channel to luminance alone and the other two to color: red (or red-difference) and blue (or blue-difference). YCbCr can be converted to and from RGB with a matrix. But the levels of the components Y, Cb, and Cr are gamma-corrected, meaning they are non-linear. When RGB has the same steps for color channels, luminance and, subsequently, red and blue-difference channels don't work like that. Levels of luminance are perceived in a more complex pattern; the white part of the spectrum should have fewer steps, and the dark part needs more.

This attention to luminance levels brings us to HDR.
HDR

HDR stands for high dynamic range, as opposed to SDR, which stands for standard dynamic range. Wider range means more bits for the channels (usually 10 or 12), higher maximum luminance levels, and more metadata for the display.
That means that the number of luminance steps (the same goes for both chromatic channels) increases; the maximum luminance level is an order of magnitude greater than in SDR. In addition to raw data, there's metadata for monitor settings. All the screens are built differently in terms of color calibration and maximum peak brightness. The source communicates luminosity and contrast values to the display for it to adjust. HDR was introduced in HDMI 2.0 as 'static HDR', meaning it sends one set of metadata for the whole video stream. HDMI 2.1 can use 'dynamic HDR', sending different metadata for every scene. HDR is a well-known, widely marketed feature that really elevates the user experience. Dynamic HDR is usually titled 'HDR10+' on the box (compared to static 'HDR10').
Here lies the answer to the question some people ask, "Is 10-bit color ('deep color') HDR?" No, it is not. 10-bit color in RGB means more steps for chromatic channels, not an extra-wide range of luminance. Should YCbCr HDR always take upwards of 10 bits per channel? Yes, 10-bit color could be HDR or SDR, but an HDR signal is 10-bit or more.
Chroma subsampling

The last part is subsampling. It is a third middle option between using compression or implementing a limited color model. Chroma subsampling is used for YCbCr to keep luminance data, as it is the most precious for us, and compress individually colored pixels into bigger blocks.
A standard sample is a two-row block of pixels, usually 4×2. Subsampling is represented as numbers J:a:r.
The first digit 'J' of 4:4:4 or 4:2:0 represents the number of pixels in a row. Basically, it's always 4.
'a' represents the number of different colors (chromatic samples) in the first row. Can be treated as a horizontal resolution; do we reduce the 4 pixel colors of the first row to '1', '2', or do we keep all '4'?
'r' is the number of color changes between the first and second rows. This is a vertical resolution and can be either '0' (no difference; the second row has the same chrominance as the first one) or 'a' (there is a difference in color between two rows).
So, 4:4:4 means no subsampling; 4:2:2 or 4:4:0 reduces 8 different colors to just 4; 4:1:1 or 4:2:0 reduces the number of colors to 2 (vertically or horizontally). Practically useful numbers are 4:4:4 and 4:2:0, as they are the most common.
In conclusion, different color spaces are made for different applications. A PC monitor with SDR works best with RGB for displaying pixel-perfect text on flat surfaces. YCbCr is meant for non-productivity applications like photos, movies, or videogames. YCbCr with no subsampling is great for everything; 4:2:0 is visually indistinguishable from perfect when watching movies and sports.
HDR should always be 10-bit; there's no 8-bit HDR and never was.
All this makes sense for units with HDMI version 2.0 and higher, and there's no point in talking about color spaces in previous versions.
====== Eugenio S
0 notes
Text
How to Pick the Best Chroma Keying Software
In today's fast-paced, digital world, it is all too common to detach "Chroma" from a picture, image, video, etc.
Unfortunately, we found that some expensive and poor-quality solutions deter users from looking for creative, effective, and knowledgeable wizard-like software. Let's look at the specifics of the best Chroma Key Software for 2023 and talk about how to get the most of it.
The removal of the green screen from a photo or video is a challenging process without an easy-to-use solution. The following factors are particularly important to us as we search for the best Chroma Key Software in 2023:
Usability: The majority of commercially viable software depends on the end-users' ability to operate its simple, intuitive user interfaces. In this case, PC, Mac, iPhone or green screen software for desktop ought to be usable by both professional and novice photographers.
Features and versions: To create software that is uniquely tailored for each stakeholder, the software industry has subdivided and profiled its user base. In order to achieve good results, you could look for green screen software with features that specifically define the requirements at various professional and super-professional levels.
Platforms: In order to accommodate overlays and special effects, photographers should find it simple to access over Desktop, PC, or iPhone and make outstanding artworks on time. The most adaptable green screen apps give customers access to additional features.
Demonstration: Get acquainted with the numerous features, special effects, overlays, enhanced effects, etc. that a green screen software has to offer the user by using the Free Demo versions.
Cost: One configures settings to take into account all the variables when buying green screen software for a PC, desktop, or Mac, and it's important for the right reasons. Compare the costs before making the transfer.
The most popular green screen backdrop removal tool, Green Screen Wizard, fits the aforementioned requirements and has wizard-level capabilities. We believe 2023 will likely show to be a great year for improving photo and video editing.
0 notes
Text
Cricut Installation Software: Easy Steps to Get Started
Are you in need of Cricut installation software? If you’re a beginner looking to download and install Cricut Design Space on your desktop or smartphone, you’re in the right place. As a professional Cricut crafter, I’m here to guide you through the step-by-step process.
I rely heavily on my Cricut machine for all sorts of crafts. To do this, we need to set up our machine. Whether it’s a heat press or cutting machine, all require a setup before we can use them. But do you know which software we need to use for this setup? It is a Cricut Design Space that is compatible with Mac, Windows, Android, and iPhone/iPad devices.
So, whichever device you are using, installing the Cricut app is a piece of cake for me. Be a part of my journey, and let’s delve into this blog to install the software.
Cricut Installation Software on Desktops
Installing the Cricut Design app on my desktop computer is really a piece of cake. But before you download this app, you must know whether your device is compatible enough to run it. Thus, it’s important to ensure that your desktop, whether it’s a Windows or Mac computer, is running the most up-to-date operating system.
For Mac
Initially, you will need to open an internet browser.
After that, visit the site design.cricut.com.
On the next screen, you will see a checkbox saying I agree to Cricut’s Terms of Use and Privacy Policy. Click on the checkbox and select the Download button.
Next, you will need to wait and let it download the app in your default file folder.
Once downloaded, you have to open the downloaded .dmg file by double-clicking on it
Then, double-clicking the .dmg file will start the installation.
For the Cricut installation software, you will have to drag the Cricut icon to the Applications folder.
In the last step, your Cricut software will be added to the Applications folder.
That’s all you need to do if you want to download and install the Cricut app on your MacBook.
For Windows
The downloading steps are the same as those explained for the Mac above.
Once you have downloaded the Cricut software on your desktop, go to the Downloads folder or any file folder where you have saved your downloaded file.
Next, you have to double-click on the downloaded file to install it.
As you double-click on it, it will start showing the installation progress, meaning your Cricut app is being downloaded.
After that, you are ready to create your Cricut account and then set up your machine.
By now, you might have understood how to download Cricut Design Space on Mac and Windows. I am sure you found the steps easy and helpful.
Cricut Installation Software on Your Mobile
The best thing about Cricut is that we can use it on our mobile devices, including iOS and Android smartphones. All you need is the latest operating system on your device. Then, learn the basic steps below to install the Cricut Design app on your suitable device.
For iOS
To start, open the App Store and navigate to the search bar.
On the search bar, you have to type Cricut Design Space and hit Enter.
After tapping the Enter button, you will notice multiple results. Choose the one with a green Cricut icon in the center of the white box.
Then, hit the Get button and start the Cricut installation software.
After installation, you are ready for the Cricut machine setup.
For Android
In the beginning, launch the Play Store and search for Cricut Design Space.
Then, choose the app from the result and hit the Install button.
After that, the installation will start.
Finally, it will be added to your home screen.
FAQs
Question 1: What are Cricut system requirements for PC & Mac?
Answer: You should know the system requirements for your PC and Mac before downloading the Cricut app:
For Windows
● Operating System — Windows 10 or later (64-bit)
● RAM — Minimum 4 GB
● Disk — 2 GB free
● CPU — Intel Dual Core or equivalent to AMD processor
● Display — Minimum 1024px x 768px screen resolution
● A USB port or Bluetooth is required
For Mac
● Operating System — macOS 11 or later
● CPU — 1.83 GHz
● RAM — Minimum 4 GB
● Display — Minimum 1024px x 768px screen resolution
● A USB port or Bluetooth \is required
● Disk — 2 GB
Question 2: Can I use Cricut software on a Chromebook?
Answer: No, Cricut doesn’t support Chromebook laptops. However, it is only compatible with four platforms, including Windows, MacBook, Android, and iPhones. Plus, the Cricut software is incompatible with Unix/Linux. So, make sure you check the system compatibility of the Cricut Design app before downloading it to any device.
Question 3: How to download Cricut Design Space on Linux?
Answer: You can’t use the Cricut Design Space app on your Linux operating system as it is incompatible with the software. Cricut has officially launched its app for four devices, including MacBook, Windows 10/11, Android, and iPhone/iPad. Therefore, you should know the system requirements of the software before downloading and installing it.
Read more: cricut.com/setup
cricut.com/setup mac
Cricut Design Space
Cricut New Machine Setup
Source: Cricut Installation Software
#Cricut Installation Software#Cricut New Machine Setup#Cricut Design Space#cricut.com/setup mac#cricut.com/setup
0 notes
Text
NVIDIA Broadcast App Boosts Livestreaming and Remote Work

Silence the Chatter: NVIDIA Broadcast App Boosts Livestreaming and Remote Work. On RTX PCs and workstations, a free programme offers AI-powered features for high-quality audio and video.
In the AI Decoded series, new RTX PC hardware, software, tools, and accelerations are shown to demystify AI and make it more accessible.
Artificial Intelligence has revolutionized computing. Although generative AI has received a lot of attention lately, NVIDIA RTX-powered technologies that accelerate AI have also played a significant role in enhancing productivity, gaming, and content production throughout the years.
NVIDIA Broadcast
One example is the NVIDIA Broadcast App, which effortlessly enhances audio and visual quality utilising Tensor Cores on a local RTX GPU. When used in conjunction with the NVIDIA encoder (NVENC) included with GeForce RTX and NVIDIA RTX GPUs, the software simplifies the process of beginning a livestream or projecting a polished image during video conferences.
Expensive hardware was typically needed for high-quality livestreaming. The x264 software library was used by several livestreamers for software CPU encoding, which frequently affected gameplay quality. As a result, a lot of people used two computers, one for streaming encoding and gaming, and the other for content creation. It was difficult to assemble, challenging to troubleshoot, and frequently too expensive for beginning livestreamers.
NVENC can assist you. The encoding is handled by a specialized hardware video encoder on NVIDIA GPUs, which frees up system resources to concentrate on content and game performance. New broadcasters on well-known platforms like Twitch and YouTube are made possible with the addition of support for NVENC by industry leading streaming software like Open Broadcaster Software (OBS).
In the interim, NVIDIA Maxine assists in resolving the problem of pricey equipment. It has free AI powered capabilities that do away with the need for specialized gear like motion capture suits or physical green screens, such as webcam-based augmented reality tracking and virtual green screens. The technique was originally demonstrated to broadcasters at TwitchCon 2019, when they used a GeForce RTX 2080 GPU and an AI accelerated green screen to test OBS live on the show floor.
Originally available in the RTX Voice beta for RTX users, Maxine’s AI-powered effects were later integrated into the NVIDIA Broadcast App.
Currently Featured: NVIDIA Broadcast App
NVIDIA Broadcast improves audio and video quality using AI for many use scenarios. It is easy to install, use, and compatible with all programmes. It consists of:
Noise and Acoustic Echo Removal: With a single button press, AI removes undesired background noise from the microphone and incoming audio.
Virtual backdrops: You can alter backdrops without the need for pricey equipment or intricate lighting arrangements with features like Background Removal, Replacement, and Blur.
Eye Contact: Even when a streamer is taking notes or glancing off camera, AI can make it appear as though they are looking directly at the camera.
Auto Frame: This technology continuously monitors motion in real time, automatically cropping and zooming in on moving objects no matter where they are.
Vignette: AI uses a darkening effect on camera images’ corners to create a visual contrast that highlights the video’s centre while also incorporating artistic flare.
Video Noise Removal: Enhances the quality of your image by eliminating visual noise in low light conditions.
How To Update Nvidia Broadcast App
In order to enable users to set up their devices once and use them in any broadcasting, video conferencing, or voice chat app such as Discord, Google Meet, Microsoft Teams, OBS Studio, Slack, Webex, and Zoom NVIDIA Broadcast App functions by generating a virtual camera, microphone, or speaker in Windows.
The dedicated Tensor Cores on an NVIDIA GeForce RTX, TITAN RTX, NVIDIA RTX, or Quadro RTX GPU can be used to support the real-time operation of the app’s AI networks.
App developers can also access the AI-powered NVIDIA Broadcast App technology through a software development kit. An RTX-accelerated model tracker plug-in is available for free download from VTube Studio, a well-known tool for attaching a 3D model to a webcam for streaming as an animated character. Elgato, a firm that specializes in audiovisual technology, incorporates Maxine’s AI audio noise removal technology into its Wave Link software. NVIDIA Maxine is used by independent developer Xaymar in his VoiceFX plug-in.
When post-processing recordings in digital audio workstations like Ableton Live and Adobe Audition, or video editing suites like Adobe Premiere Pro, content creators can use this plug-in or Elgato’s virtual studio technology (VST) filter to eliminate echo and noise.
Perceiving Is Trusting
Broadcast App Nvidia
Millions of people have utilized NVIDIA Broadcast App since it was released.
“The features that he was used the most are the background replacement and video noise removal,” Twitch celebrity and broadcaster Mr. Vudoo stated.
In an extreme situation, Unmesh Dinda, the host of the PiXimperfect YouTube channel, showcased the noise-canceling and echo-removal AI features of NVIDIA Broadcast App. He placed an electric fan right next to his microphone and put on a heavily beaten helmet. With the noise-removal function enabled on Broadcast, Dinda was quite clear even with these loud noises in the background. Over 12 million people have viewed the video.
Another helpful tool for the expanding remote workforce is NVIDIA Broadcast App. Editor-in-chief of Tom’s Hardware Avram Piltch wrote about testing the app’s noise reduction features against neighbours who mow their lawns at high volume, robot-wielding children, and noisy air conditioners in an article. Every time, Broadcast’s AI audio filters won out:
Piltch said, “he got my eight-year-old to pretend to throw a fit just behind me, and after he turned on noise reduction, all of his cries of, “He not going to bed,” stopped (at least on the tape). We made him throw a fit while toting a robot car with rotating treads in order to amp up the difficulty. Once more, NVIDIA Broadcast App eliminated every undesirable sound.
The AI-powered backdrop reduction offered by NVIDIA Broadcast App is beneficial even in commonplace situations, such as video calls with medical professionals.
Read more on govindhtech.com
#NVIDIA#BroadcastApp#BoostsLivestreaming#Remotework#rtxpc#generativeai#GeForcertx#gpu#3Dmode#AIfeatures#ai#technology#technews#news#govindhtech
0 notes
Text
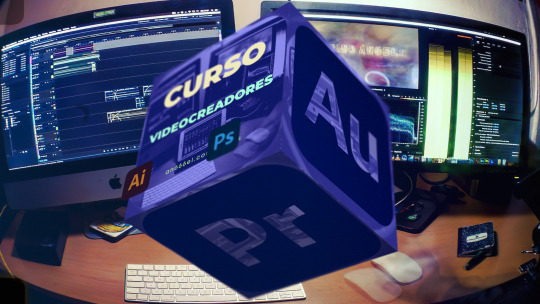
CURSO VIDEOCREADORES
Software: Premiere Photoshop Illustrator Auditions Media Encoder
Descripción
Creadores audiovisuales
Este curso está enfocado al proceso digital de postproducción, a conocer y dominar distintos procesos del lenguaje audiovisual mediante diversas técnicas, aplicadas con herramientas de Adobe (Pr - Ps - Ai - Au).
Con los ejercicios diseñados para la clases practicaremos las herramientas, al mismo tiempo que se fomenta el desarrollo estilístico y conceptual de cada integrante.
Está dirigido a personas que buscan especializarse desarrollar narrativas en diferentes géneros, pero también para el creador independiente que busca ofrecer un discurso con mayores cualidades técnicas y discursivas, así como conocer los procedimientos organizativos y el flujo de trabajo. Además de poder resolver una gama extensa de problemas técnicos o narrativos.
El curso se imparte via Zoom.
Los participantes deben tener instalada la paquetería de Adobe
IMPARTE ANGEL LUVIANO
Enfoques del curso
ORGANIZACÓN Y NARRATIVA: Revisamos elementos narrativos como: forma, unidad, contraste, desarrollo progresivo, ciclo y tiempo, aplicados al discurso fílmico, buscando claridad lineal y no lineal, claridad creativa, formas de crear ficción o documentar la realidad.
ESTILO GRÁFICO Y SONORO: Por otro lado se estudiarán conceptos estéticos (convenciones), como la proporción, el plano, los movimientos de cámara, el eje de acción, continuidad, etc., que servirán para proponer formas narrativas que definan el trabajo de cada participante.
POST DE AUDIO: Es la fase final de la elaboración de la banda sonora que consiste en seleccionar, organizar y manipular los diversos elementos sonoros que se utilizan en una producción audiovisual.
Temario
1.- Organización y espacio de trabajo (Pr)
Métodos de organización, calificación y selecciónde material y contenido
Configuración de espacio de trabajo. Formatosde audio e imagen.
Respaldos automatizados en segundo plano (Macy PC)
Propiedades de imágenes en movimiento: escala,posición, rotación...
Fotogramas clave y control de efectos
2.-Bese Narrativas (industria) (Pr)
Proporciones video vertical horizontal ycuadrado (4k, HD, Ig, Fb, etc.)
Auto reframe
Desplazamiento, ajuste de tiempo y transiciones
Composición y principios estéticos digitales
3.-Secuencias y capas (Pr)
Formatos principales de video y características
Fotogramas por segundo y video progresivo
Principales formatos
Anidar
4.- Efectos y Transiciones (Pr)
Panel de efectos
Importación y manipulación de templares
Esencial Graphics
5.- Green screen y mates (Pr)
Herramientas de calado
Luminancias y porblemas ténicos
Mate de seguimiento
Calado de textos
6.- Corrección de color (Pr)
Lumetri
Modos de fusión
Iluminación de escenas
7.-Photoshop para video (Ps)
Herramientas
Espacio de trabajo y de color
Formatos de imágenes
Camera raw y Neuronal Filters
Canales alpha
8.-Illustrator para video (Ai)
Herramientas
Espacio de trabajo
Textos y trazos
Imágenes y Vectores
9.-Audition - Diseño Sonoro (Au)
Herramientas
Espacio de trabajo
Mejorar audio
Multipista con video
10.- Integración de Adobe (Pr) (Ps) (Ai) (Au)
Integración y actualización
Importación de capas
Exportar de Premie a Auditions
11.- Masterización (Me)
Renders
Formatos para master
Render secuencia de imágenes Compresiones (Media Encoder)
HORARIOS
Lunes a Viernes (6pm a 9pm) - 10 sesiones de 3 de horas
Lunes Miércoles y Viernes (7am a 9am) - 15 sesiones de 2 horas
Sábado de (8am a 10am) - 10 sesiones de 3 horas
Sábado de (3pm a 6pm) 10 sesiones de 3 horas
COSTO POR PARTICIPANTE
Existe la posibilidad de brindar hasta 2 descuentos por grupo. ¿Realmente lo necesitas? Llena el formulario 👇🏼
El curso de requiere al menos 2 participantes para iniciar. El cupo máximo es de 4 por cada grupo.
La duración sugerida es de 10 sesiones, cada una de 3 horas, ya que es un curso teórico práctico.
Las clase a distancia, via Zoom.
Las clases serán grabadas y estarán disponibles en linea durante 15 días, únicamente para fines de repaso de cada alumno inscrito al curso.
Queda prohibida la copia, publicación o distribución, total o parcial de las clases grabadas.
El curso debe ser cubierto al menos un día antes de iniciar.
Los precios son en Pesos Mexicanos.
¿Dudas o comentarios? CONTÁCTAME 👇🏼
#Clases#Edición digital de video#Premiere Pro#Photoshop#Illustrator#Curso#Auditions#Media Encoder#Adobe
0 notes
Text
Panasonic Connect Kairos Production Ecosystem Keeps Growing - Videoguys
New Post has been published on https://thedigitalinsider.com/panasonic-connect-kairos-production-ecosystem-keeps-growing-videoguys/
Panasonic Connect Kairos Production Ecosystem Keeps Growing - Videoguys

At the 2024 NAB Show, Panasonic Connect North America introduced groundbreaking advancements to its AV technology solutions, enhancing content creation and delivery across diverse production environments. From broadcast studios and event venues to corporate meeting spaces, these innovations cater to the evolving needs of content creators.
Revolutionizing Live Production with Kairos Platform Enhancements Panasonic Connect’s Kairos platform now features the AT-KC200L1 Main Frame (Kairos Core 200). This powerful core supports SDI workflows, making it ideal for dynamic environments that require complex live production capabilities. With its scalable and software-defined architecture, the AT-KC200L1 future-proofs productions for seamless transition to IP in the future. This launch solidifies Kairos as the go-to solution for live video production in entertainment venues, rental and staging setups, corporate environments, and broadcast studios.
The Kairos Alliance Partners program has expanded, now including over 50 partners such as Drastic Technologies, LAWO, NETGEAR, and Singular.live. These partnerships ensure the Kairos platform integrates effortlessly into diverse production systems, offering flexibility and reliability.
Enhancing Corporate and Educational Productions with the AW-UE30 PTZ Camera The new AW-UE30 PTZ Camera addresses the needs of corporate and educational settings by providing superior video streaming capabilities. With 4K/30p resolution, 20x optical zoom, and easy integration with USB-based systems, the AW-UE30 enhances the experience for both in-person and remote participants. Its compact design and quiet operation ensure it blends seamlessly into any environment, while its user-friendly features make it accessible to users without extensive production experience.
Streamlined Camera Management with Media Production Suite Panasonic Connect’s Media Production Suite is a unified software platform designed to centralize camera management for small team operations. This innovative solution streamlines camera setup and offers a wide range of features to support high-quality video production. Notably, its auto-tracking capabilities and AI-powered video mixer plug-in enable efficient and cost-effective production, mimicking the work of a real camera operator without the need for a green screen.
Simplified Switcher Operations with AV-SF10 Software Control Panel The new AV-SF10 Software Control Panel for the AV-HSW10 Main Switcher allows networked PCs or tablets to control switcher functions, making it possible for a single operator to manage diverse operations and configurations. This software panel includes exclusive features for efficient pre-shoot preparation and on-shoot review, ensuring intuitive operation even for users with minimal experience.
Conclusion Panasonic Connect’s latest solutions showcased at the 2024 NAB Show demonstrate the company’s commitment to providing innovative AV technology that enhances content creation and delivery. With the expansion of the Kairos platform, introduction of the AW-UE30 PTZ Camera, launch of the Media Production Suite, and the new AV-SF10 Software Control Panel, Panasonic Connect empowers content creators to meet the evolving demands of their audiences effectively.
Read the full article by Panasonic HERE
Learn more about Panasonic below:
#2024#4K#ai#AI-powered#America#architecture#Article#content#content creation#control panel#creators#Design#easy#entertainment#Environment#Features#Full#Future#green#innovations#integration#it#kairos#Learn#management#media#Netgear#north america#partners#partnerships
0 notes
Text
Cricut Setup Explore Air 2: A Complete Tutorial in 4 Steps
Looking for a way to Cricut setup Explore Air 2? You are in the right place. Ever since I bought a Cricut machine, the setup has been a crucial part. I have not only setup Cricut Explore Air 2 but also setup other models such as Cricut Maker, Joy, and Venture. Although every machine setup is the same, you will need to know the proper steps to connect your Cricut to your device.
Without any further ado, let’s delve into this Cricut Explore Air 2 setup tutorial and learn things like checking the PC’s requirements, downloading Cricut Design Space, creating a Cricut account, and finally finishing the setup process, which includes further sub steps. Remember, the following steps for Cricut machine setup are only on a Windows computer. Let’s get started now.
Step 1: Check System Requirements for Your Desktop
In the first step, you must ensure that the PC you will use is compatible with your Cricut Explore Air 2 machine. This is a must for the Cricut setup Explore Air 2 because if your PC doesn’t meet the basic requirements, you won’t be able to download the Cricut Design Space, which I will discuss in the next step.
Here, I have mentioned the system requirements for Windows 10 PC to run the Cricut software:
Operating System - Windows 10 or later (64-bit)
CPU - Intel Dual Core or equivalent to AMD processor
A PC/laptop with a USB port or built-in Bluetooth
Display - Minimum 1024px x 768px screen resolution
RAM - Minimum 4 GB
Disk - 2 GB free
Step 2: Download Cricut Design Space
Above, I covered the basic system requirements to download the Cricut Design Space app on Windows 10. Now, I will show you how to download the software stepwise. Since the Cricut setup Explore Air 2 is not possible, you have to download this software on your PC.
Here’s how to download Cricut Design Space on a Windows PC:
First of all, you have to navigate to your compatible PC device.
You will see a small Windows icon on your PC desktop’s screen on a taskbar. You have to click on it.

Just start typing Chrome and hit the Enter key on your keyboard; it will open your Google Chrome browser.
Once you have opened your browser, you have to go to its search bar.
After that, you have to visit design.cricut.com, paste it into the browser’s search bar, and hit the Enter key.
Now, you will move to Cricut’s official website, from where you can download the Cricut software.
Here, you will notice a small squared checkbox. Click on it to check.
After ticking the checkbox, your Download button will be enabled. Click on it to start downloading Cricut Design Space.
Before downloading, it will open your File Explorer and will confirm where you want to save this file. By default, it will be saved to your Downloads folder.
When the download is finished, you have to go to your File Explorer > Downloads folder or wherever you have saved your downloaded file.
Double-click on this downloaded file to begin installation.
For installation, you can simply follow the instructions on your screen.
Step 3: Creating a Cricut Account ID
The second last step is to create a Cricut account. It is a must; without an account, you won’t be able to do Cricut setup Explore Air 2. In this method, you will learn to create an account from scratch and then log in to your Cricut ID. Let’s get started.
In the beginning, visit cricut.com/setup.
After that, hit the green Get Started button.
Enter your first and last name, including your email address.
Then, you have to choose your country. (For example, the United States, Canada, or the United Kingdom.
Now, you will need to read the Cricut terms of use.
On the following screen, tick the checkbox.
Next, click on Create User ID.
You will now receive an Updated Policies pop-up window. To proceed, click the Accept button.
Step 4: Cricut Setup Explore Air 2 on Your Computer
Once you have created your Cricut ID, you will move to a Prepare Workspace screen, where Cricut displays it’s on-screen instructions. You can set up your device by following these instructions. While displaying on-screen instructions, it will ask you to connect your Cricut to your PC. To connect, follow the steps below:
Step 1: Connect Your Cricut Machine to Windows
Users can connect to a Cricut cutting machine using two methods: Bluetooth and a USB cord.
Method 1: Via Bluetooth
Switch on your Cricut Explore Air 2 cutting machine.
After that, position your Cricut machine 10 to 15 feet from your PC.
Then, open Settings on yourWindows computer.
When your Settings window is open, you have to select the Devices option.
Now, confirm whether your Bluetooth is turned on. If not, then you have to turn it on.
Afterward, you will need to click on Add Bluetooth or other device.
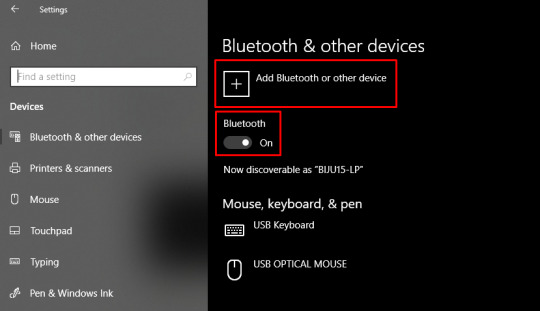
Next, you will see a pop-up to add a device; select Bluetooth.
Subsequently, you have to wait for your nearby Cricut model.

Once the PC finds your Cricut machine, select it and finish the pairing.
Method 2: Using a USB Cord
If you do not want to connect your Cricut wirelessly, you can easily do so with a USB cord. Connecting via a USB cable is a breeze. Follow the steps to connect with a USB cable:
Turn on your PC and Cricut Explore Air 2 machine.
After that, you will need to take your USB’s one end and connect it to your PC’s USB port.
Then, you have to take the other side of the USB cable and insert it into the Cricut’s USB port.
Once done, you’ve successfully connected your Cricut.
Once you have established the connection, you need to click Continue on your PC.
Step 2: Cricut Machine Updates
As you click the Continue button, it will start updating your Cricut cutting machine. Click on the Update button to start updating your machine. Once the machine has been updated, click next to proceed.
Step 3: Register Your Cricut Model
After updating the machine, the next step is to register it. To register your Cricut, click the checkbox and then click the Register button. After registration, click next.
You will see a screen for the Cricut Access Trial. If you’ve selected to try out Cricut Access, go ahead and fill out the required information. Once done, you’ll be prompted to do a test cut. Move further and follow the on-screen instructions to perform a test cut.
FAQs
Question 1: Are the setup steps similar for Mac, iOS, and Android?
Answer: Not really! Overall, the steps will be the same, but as you delve deeper into the details, they may vary. For example, connecting Cricut to a PC differs greatly from connecting it to your Mac or any other mobile device. The same goes for downloading Cricut Design Space.
Question 2: Is a Cricut account a must for machine setup?
Answer: Yes, absolutely! Without a Cricut account, you can’t use your Cricut Design Space and half of the setup uses Cricut software. So, it is a must to download the Cricut app on your compatible device. Cricut is compatible with Windows, Mac, Android, and iOS. So, make sure you download this app before setting up your Cricut.
Question 3: What is a test cut in Cricut setup?
Answer: A test cut is generally performed in the last stage of your Cricut setup. When you have almost completed your machine setup, Cricut will ask you to perform a test cut. It ensures whether everything has been done correctly or not. If any problem will be there, it will be detected right away while performing the test cut.
0 notes
Text
The Angelina (or Stoned.Angelina) computer virus
The Angelina (or Stoned.Angelina) computer virus is a boot sector virus that has been known since around 1994. This virus affects the boot sector of floppy disks and hard drives, which can cause a system to fail to boot properly or function correctly. As you've mentioned, floppy disks are not commonly used anymore, so the potential impact of this virus today is minimal compared to what it might have been in the past.
While this virus was well-known in the 1990s, modern computers are much less susceptible to these older types of boot sector viruses due to changes in technology and security practices. Most antivirus software can easily detect and remove such old viruses. Additionally, many modern computers no longer have floppy disk drives, further limiting the potential impact of this virus.
The reason this virus may come up in discussions could be related to historical interest, discussions about the evolution of computer security, or as a cautionary tale about older technology. It's also possible that it could be used as an example in cybersecurity education to show how threats evolve over time and how antivirus software must keep pace.
Regarding the mention of the virus being found as a "default application" on some German PCs, that would be concerning if it were happening today. This would likely be an unusual and accidental occurrence, as it is rare for manufacturers to ship computers with known viruses installed. If you believe that this is happening, it would be advisable to contact the manufacturer or reseller for clarification and ensure that any affected computers are properly cleaned and protected from the virus.

A visual representation of the Angelina virus could take the form of a digital or graphical illustration. Since the virus is an older boot sector virus that primarily affected floppy disks and early hard drives, you might imagine:
Floppy Disk: A floppy disk being scanned or infected, perhaps with a green or red glow to signify infection.
Boot Sector Illustration: A computer hard drive's boot sector with graphical representation of the virus affecting the sector, such as lines or digital effects representing the virus's disruption.
Virus Structure: An artistic depiction of the virus structure, showing a schematic of how the virus interacts with the computer's system.
Error Messages: A computer screen displaying error messages or warnings about the Angelina virus infection, along with representations of antivirus software scanning and eliminating the virus.
These visual representations could help illustrate the effects of the virus, how it interacts with hardware, and how antivirus software can remove it. Let me know if you need further assistance or other types of information.
0 notes