#Honestly I might start doing more Linux tutorials!
Explore tagged Tumblr posts
Visit Tumblr Blog
Explore Tumblr blogs with no restrictions, modern design and the best experience.
Last Seen Tumblr Blogs


Fun Fact
Tumblr has a low social media market share in South America.
Text
How to enable Hardware acceleration in Firefox ESR
For reference, my computer has intel integrated graphics, and my operating system is Debian 12 Bookworm with VA-API for graphics. While I had hardware video acceleration enabled for many application, I had to spend some time last year trying to figure out out how to enable it for Firefox. While I found this article and followed it, I couldn't figure out at first how to use the environment variable. So here's a guide now for anyone new to Linux!
First, determine whether you are using the Wayland or X11 protocol Windowing system if you haven't already. In a terminal, enter:
echo "$XDG_SESSION_TYPE"
This will tell you which Windowing system you are using. Once you've followed the instructions in the article linked, edit (as root or with root privileges) /usr/share/applications/firefox-esr.desktop with your favorite text-editing software. I like to use nano! So for example, you would enter in a terminal:
sudo nano /usr/share/applications/firefox-esr.desktop
Then, navigate to the line that says "Exec=...". Replace that line with the following line, depending on whether you use Wayland or X11. If you use Wayland:
Exec=env MOZ_ENABLE_WAYLAND=1 firefox
If you use X11:
Exec=env MOZ_X11_EGL=1 firefox
Then save the file! If you are using the nano editor, press Ctrl+x, then press Y and then press enter! Restart Firefox ESR if you were already on it, and it should now work! Enjoy!
#linux#debian#gnu/linux#hardware acceleration#transfemme#Honestly I might start doing more Linux tutorials!#Linux is fun!
6 notes
·
View notes
Note
Do you have any tips or guides on how to make gifs?
I do! Firstly, this guide here is probably the best guide I've seen for gif making. It's concise and easy to follow, and it's what I used to learn myself. They have a lot of resources as far as programs go, but I'll list what I use below. As always, never download and install anything from unknown sources without doing your own due diligence. Run everything through your antivirus and/or virustotal before installing always always always!
This is kinda long, so imma put it under the cut lol. Also note that I use windows (Win10), so things may not work the same way for mac or linux
Before you can actually make the gifs, you need a way to download high quality videos! I like jdownloader 2 because I find the interface to be user friendly, it gives you the option to download multiple elements (like srt files), and it works with more websites than lots of other video downloaders (and their user support is leagues better as well). My second choice is yt-dlp, which isn't necessarily more complex but might look a little more intimidating. Both are great programs, but a quick note about jd2: DO NOT download it from anywhere else but the link above. The developers package adware in all their installers EXCEPT for that one (I hate it too, and I think it's fundamentally unethical, but at least they're up front about it and they have an adware free version). Both methods automatically download the highest quality video available in your source link, so you don't have to worry about fiddling with that.
Now on to extracting frames! My method of choice is ffmpeg. It looks more intimidating than it is, and it's honestly the best way to extract frames imo. Like yt-dlp, it uses your computer's command console, which means you'll need the relevant command lines to run it. This tutorial is great to get you started, and it includes a command line for if you only want to extract frames from a specific part of your video. If you want to extract every frame from the entire video, you can either input the start and end times of the video into that command line, or you can use this version (I use both depending on what I'm doing):
ffmpeg -i "file path" "out-%05d.png"
Always make sure you're working with png files. To make quality gifs you have to start with quality images, and png files, unlike jpg, are lightweight and lossless, meaning you won't end up with compression artifacts and fuzziness
To get the file path for your video, select the file, then in the upper left hand corner of your window select home > copy path. It will copy the path in quotes, so replace the entire section "file path" with the path you just copied. Then copy and paste the entire line into your command console. The tutorial above says this as well, but be sure to create a folder for your frames, go into that folder and click the file path bar at the top of the window, then type "cmd" to open the console. This will ensure your files are dumped in that folder
So now you need a way to actually MAKE the gif. This is... a little more tricky. You can use gimp, I think, though it's certainly not my program of choice. You could buy PS but like... ew. OR you could do what I did and arr it. I use a portable version of CS6 that I downloaded literally a decade ago, and unfortunately the website I got it from isn't up anymore. I did a quick search and found this on reddit, but again, do your due diligence before downloading and installing anything!
Now I'll talk a little bit about my actual process. The actual process of making frames into layers into a gif I got from that first tutorial I linked. I took that process and made an action on PS so that I never have to do it manually again because I'm lazy and my memory is dogshit and I didn't want to have to consult a guide every time I wanted to do something lol. Everything else I learned through experimenting and my own experience as a photographer, so I encourage you to play around with everything to see what you like and what works for you
For coloring, I fiddle with levels, brightness/contrast, and color balance adjustment layers until I'm happy with how it looks. You can use curves instead of levels if you want finer control (or if you want to produce effects like matte), but levels works just as well and has a histogram right there in the panel, which makes it easier to adjust the exposure based on the image's actual data
For sharpening, I have a couple of custom actions I use. Here's what they look like:

The first one (bound to the F2 key) gives a smoother appearance, and I like to use it for kpop gifs where the subjects are already airbrushed and smooth without much texture, or wide shots where detail isn't super important
The second one (bound to the F3 key) is the one I use when I want to preserve texture in the image. Closeups of people where you can see their skin texture, or busy images with lots of detail benefit most from this one
The basic gist of it is, the "sharpen" filter does exactly what it says on the tin and it's usually all the sharpening an image needs, and the "surface blur" filter erases or dampens artifacting created by the sharpening filter. Sometimes I'll run the action twice, or use them both in combination to get the effect I want. Here's what the difference looks like in practice, featuring two very cute dudes:
F2 sharpening action


F3 sharpening action


You'll notice in the first two gifs, there's not much in the way of texture to preserve. Yoongi's skin is smooth and airbrushed, and the scenery is all metal and concrete shot with a wide aperture, which makes the background nice and blurry and smooth. In the second set, Jesse has facial hair and stubbly texture on his throat that I wanted to preserve, so I used the action with the lighter surface blur
My advice on all of this though, again, is to play around with it and see what you like! And if you have any more questions, feel free to ask! I'm by no means an expert, but I'll do what I can to help!
edit: oh, a quick note about speed! The tutorial I linked above mentions changing the delay to 0.05, and that's great for full speed gifs! But if you want them slow like my gifs above, I set the delay to 0.08. Sometimes I'll slow them down even more by setting the delay to 0.09 or 0.1, but any higher and you start to lose some of that smoothness
15 notes
·
View notes
Text
Light at the end of the tunnel
Hello! Its been a while, like a while since my last post... well I've been going through some things and I feel as though I'm at my lowest low... my mind is just all over the place and I can't seem to think straight and all. Like Damn, yeah?
I started doing bad habits again, like I'm also getting sick and might have to see a doctor too... its so bad these days, I don't seem to cope. I'm also having trouble envisioning the future. I can't put in any work for the project that most of my blogs were about.
I've seem to have lost some fire, however there are some glimpses and still want to improve and do better... I just lack the discipline to accomplish all of this. Even my brother told me that I need to be more proactive but I'm just so so down.
Things aren't all bad like I finally managed to get a facial recognition service, the first attempt was making use of AWS rekognition however our app was primarily GCP and AWS was not charging the same rate so it became too much of an expensive ordeal to keep around. Felix Yu is really good at this, he took me step by step into setting up a AWS facial recognition service and I appreciate it so much!
youtube
An alternative was to make use a of pretrained python facial recognition module, it works so perfectly with the only downside being we have to self host however we can do all that using GCP so its really cool!
Another thing is that I've been getting excited learning about history of programming languages and database systems, like I'm now super familiar with PostgreSQL thanks to Derek Banas . It was really helpful and I'm grateful for his tutorials, he's taught me so much!
youtube
Another good thing is that I've been watching my favorite youtuber's videos again, the Kubz Scouts! I'm so glad despite so many years I still love the guy! He's just so funny, watching his old videos and new videos. They make me laugh, I always watch them at night to help me sleep (not to say his videos make me sleep! He's just my nightly bed time story you know)
I've been keeping consistent grades so far, I'm still waiting for one of my semester test results. But I'm happy with learning so much, but what of the bads I've been facing is the future. Yeah I know cybersecurity is there but I don't feel like I got the skills that pay the bills. Like I'm having trouble envisioning the future 2 months from now

But yeah.... I honestly don't know, I want to be more disciplined and probably eat better yeah? How do I even start with that, the goal just seems so far and distant. My self image (in terms of being a software engineer or computer science proficient person?) seems to have improved, I feel like I have the skills to do anything in software engineering but cybersecurity feels like its going to be a challenge.
Well there's a hackathon in a couple of weeks, I'll see if I join it or not. It requires me to know a lot of stuff like Kali Linux and offensive and defensive hacking, its also a capture the flag type thing and my only exposure of that was watching Mr Robot. But I'll see if I really want to improve on that or not.
Alright, thank you for reading! I have to finish a practical before demoing it in a couple of hours! Yes I shouold have finished it earlier but hey! I was busy kinda bye bye!!

1 note
·
View note
Text

Great for commutes/while doing chores/etc. Also great for proofreading your own stuff! I made version 1.0 in 2015, but the program I recommended has since switched over to a monthly subscription-base model (boooo). So, here’s my new, still free, 2020 method:
1. Choose and Download Your Fanfic:
AO3 comes with download options, and of them HTML tends to play the nicest. Viewing then downloading the fic using AO3’s ��Entire Work’ option will save you some time. Copy and pasting the entire body of the text will works too. For FFN, you’re going to either have to a.) use a third party site to download fics (sketchy) or b.) install a userscript that reenables copy-paste (more labor intensive).
2. Choose Your Text-to-Speech Software:
First, you’ll need text-to-speech software. There are many options on the market, some free, some not. For this tutorial, we’ll be using Balabolka. A free program made Ilya Morozov in 2010 that he’s continued to update and work on since. It’s Windows-only for now. (Mac and Linux users might want to look into Natural Reader since that’s web-based, though the free version offers less functionality.)
Balabolka Pros:
Can export audio files
Can create multiple custom pronunciation dictionaries!!!
Change pitch and speed of read-aloud voice
Sleep timer!
Very customizable interface
It’s free
Balabolka Cons:
Doesn’t come with additional voices. Only uses default Windows voices + any extra additional ones you’ve installed.
It’s freeware maintained by one man for free, so patches and bug fixes will come slower.
3. Download and Install Balabolka
As of Nov. 17th, 2020, Balabolka’s official website is cross-plus-a (dot) com. Google it. If the site layout changes in the future just check that the bottom still says ‘Copyright © 2006-2020 Ilya Morozov’ so you know you’re in the right place.

Upon downloading, if you’re using Windows 10 you might get this pop-up:
Here Windows is checking the program for an EV Code Signing Certificate. Basically, checking its credentials. Getting and keeping an EV Certificate costs the developer(s) ~$100+ yearly, so bc a program doesn’t have one doesn’t inherently mean its not safe. That’s the trade-off for freeware. No money goes in, so no money can go out to get certified. As always, do your due diligence before downloading any program to your computer, and read up on the benefits and risks of freeware if you’re not familiar with them already. *gets off soap box*
Pressing More Info will allow you to continue installation.
4. Get to Know the Program
Keep your hands and feet inside the vehicle! Upon opening the program you’ll be greeted with this interface. Feel free to open your HTML file or paste some sample text to start playing around with.
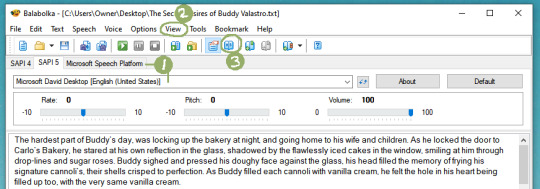
Areas of Note:
These are essentially your voice engine options and will vary computer to computer. Click through the tabs to see where your default voices are stored. If you buy additional voices from a 3rd party they’ll show up here too.
Up under View you can change the font settings and the program’s skins. Nifty.
Meet your new favorite button: The Panel of Dictionaries.
5. Fix the Pronouciations (Optional)
Chances are your fic has internet slang like t/n, or non-english words, or fantasy terms, or maybe just an unusual surname that your voice bank refuses to pronouce correctly. Balabolka makes it quite easy to fix that. I have a more in-depth tutorial for this on my blog.
Balabolka can also switch voices within a single document. This could be useful for differentiating dialogue or forcing correct pronunciation of foreign names if you have voice banks in multiple languages and the original characters at your disposal. Tutorial for that here.
6. Convert Your Fic, And You’re Done!
The hardest part is long since past. Now that you’ve got your settings worked out and the pronunciation as good as it’s gonna get, time to press either ‘Save Audio File’ or ‘Split and Convert to Audio Files’:
Notes about File Types
Mp3 – compressed for smaller file size, pretty universally playable
Mp4 – refined compression, (potentially) even smaller file size, widely accepted, but not universal
WAV – no compression, high quality, large file sizes
For multi-chapter fics:
I highly recommend using ‘Split and Convert to Audio Files’, as trying to export a 100k fic as a sound file takes forever (esp WAVs), and is very unruly to navigate as a listener.
10k words roughly equates to an hour of audio
Pick through the options offered for what suits your needs best. For AO3 HTML files I have good luck picking ‘two empty lines in succession’ if you’re trying to divide by chapter.
Next Balabolka lets you preview the cuts you’re about to make. Truly a kind and forgiving piece of software. I recognize my own chapter titles, so it’s easy for me to uncheck anything that doesn’t belong.
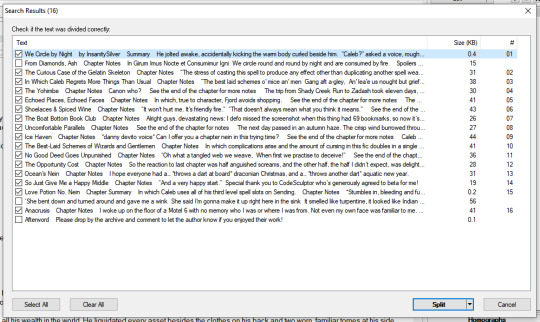
Fix the settings to your liking on that and BING! Finished! Oh, and whenever you finish a fic remember to go back and leave a review! Sweet reviews make authors write faster!
End Notes:
So the first time takes a bit, but after that you can convert fics in under ten minutes.
A text-to-speech program isn’t going to beat out a real living, breathing narrator. Not this decade anyway. If you find yourself using Balabolka a lot and crave a smoother voice than Microsoft David’s, it might be time to look into buying a 3rd party voice bank. CereProc makes my favorites, and the personal use licenses cost ~$35. Balabolka + a CereProc voice is still much cheaper than most of the other software on the market and honestly outperforms a lot of it. Also throw a donation Ilya Morozov’s way through his website since he’s maintained this program freely for a decade and helped a lot with accessibility through doing so.
Example text is from ‘The Secret Desires of Buddy Valastro’ by perfectcannolis, and thank you to @bearfoottruck who informed me about balabolka to begin with.
822 notes
·
View notes
Text
A Web Development Master Post
I’ve spent the last two years working as a professional developer. I didn’t go to college for this, and just about everything I know I’ve either taught myself or learned from looking through other people’s source code as we research if we want to pull a project into our code base. I love it, and I have done some things I never would have expected from myself at the start. But before we get into any of those, I wanted to put together a list of resources I wish I had or worked with more fully when I was sitting in my job interview two years ago. Think of this as part resources on how to learn some of these skills, some recommendations on applications to incorporate into your workflow, and a few opinions on some of the other common applications that you’re welcome to heartily disagree with.
First things first lets get a few resources together, and for those of you who are already familiar with HTML, CSS, JavaScript, and PHP, none of these will be a surprise. It might be worth your while to jump ahead.
Online Resources
https://www.w3schools.com/
Starting out, W3 schools will probably be pretty omnipresent for help. They have tutorials for HTML, CSS, JavaScript, PHP, ASP, and many other web technologies. They pride themselves in being the largest web developer site, and unfortunately that has a downside. They don’t always update all of their articles to the most current specifications. This is a wonderful resource, as they do a good job of explaining a lot of these concepts in a beginner friendly way, but when you’re ready for nitty-gritty details, it’s almost always best to go with a more specialized developer resource.
https://css-tricks.com/
CSS is a powerful and flexible tool. Every day I see projects where developers have pushed it to new heights, but sometimes it’s a little arcane too. Well the wizards over at CSS-Tricks have collected a large number of articles and tutorials that explain everything from how z-index works to how to use newer layout-centric rules like Flexbox or Grid. If a CSS rule is misbehaving, 9 times out of 10, I can find a clear and concise reason on this site, and more importantly, I find many recommendations on how I can achieve the same effect differently.
https://flexboxfroggy.com/
Speaking of Flexbox, Flexbox Froggy is a one-note kind of resource, but it teaches all of the core concepts behind flexbox, and it can also teach CSS savvy managers why moving to a new layout methodology would benefit your work flow.
https://cssgridgarden.com/
Created by the same developer as Flexbox Froggy, and it does the same thing with Grid concepts.
https://developer.mozilla.org/en-US/
Mozilla’s developers have been at this game a long time, and their resources are next to none. In my opinion, this collection does not do much help a beginner understand, but the trade-off is that once you’re over that initial hurdle, the information you’re looking for is almost always only a few clicks away. This is the first, and often the last, place I go whenever I’m looking to solve a weird JavaScript bug that the rest of the internet is too clever to have encountered, (or to explain why only IE9 is seeing it).
http://php.net/manual/en/index.php
I know PHP isn’t a popular language right now, but it’s powerful, it’s flexible, and it’s still the primary language of the largest and most popular CMS on the planet, for better or worse, WordPress. Especially if you’re going to work freelance, you owe it to yourself to at least be familiar with PHP, and this will be your best friend. It’s no nonsense, and not beginner friendly, but it’s clear, and the comments on the articles are often as helpful as the articles themselves.
https://codex.wordpress.org/Developer_Documentation
Speaking of working in freelance (or even for a firm like I do), I have my own opinions about the way WordPress works, but you’re going to be doing projects in WordPress, and you aren’t going to be able to accomplish them without this. I have a small problem with the way functions and parameters are explained (it isn’t always easy to differentiate how one calls a function manually, or if it is called by filters, or how it is different from they three other functions named roughly the same thing), but I do know that the WordPress core developers work very hard, so there is always a method to the madness, even if you don’t have the key to see it.
https://stackoverflow.com/
When you get to the debugging stage, you’re going to become familiar with Stack Overflow pretty fast, as it almost always dominates the first few google results for a problem. Now, I’ve had developers try to scare me away from using Stack Overflow because it is open for beginners and experts, and sometimes it’s hard to tell quality of answers, but I strongly disagree with that. While it’s true you should always look cautiously at using someone else’s code right out of the box, there are a lot of members of the community that go out of their way to explain what the code is doing, and those are the answers you should be looking for. You don’t have to use their code, but if you can understand why you had the problem in the first place, you grow as a developer, and now have the tools to solve the problem. Stack Overflow is a big part of the Open Source community, so it’s always nice to give back at least as much as you take, so if you see a question you have the answer to, feel free to share.
https://github.com/
Eventually, you’re going to run into a project where you need a plugin developed by someone else, either because you don’t yet have the knowledge or you don’t have the time, but the client needs the functionality. 9 times out of 10 you’ll find what you need on GitHub, and honestly, you should be getting together your own GitHub with plugins and projects of your own. No matter how single purpose they may be, you’d be surprised how useful things can be in very specific situations. GitHub, like Stack Overflow, is a big part of the Open Source community, so it’s always nice to give back when you can. Make suggestions or report problems you have with any projects you pull, and in doing so you’ll make the community a better place.
Applications for Windows Based Developers
Now, for the next section let’s get into some tools. I love gaming, so I have a Windows computer at home. I don’t really know why we’re wasting money on a Windows license at work, but we are so I can mirror the full stack in both locations. Here’s what I use.
https://notepad-plus-plus.org/
When I first started, my boss insisted I use Dreamweaver for everything. I have nothing against Adobe, and their products are quality, but Dreamweaver was way more trouble than it was worth. Everything I cared about from Dreamweaver I can do in this free and Open Source program, with some extra functionality I find it extremely hard to mimic in Dreamweaver. Notepad++ is fast, stable, and hugely extendable. If you’re doing this as a full time job, I strongly recommend switching to a dark theme for the sake of your eyes. Blackboard is among my favorites (unless you’re trying to write Python). I also really love its macro functionality, I have a couple of re-used DOM structures programmed in there right now as well as my multi-line comment format.
https://winscp.net/eng/download.php
Arguably, the best part of Dreamweaver is the built in FTP client that lets you push changes directly to the server, but set Notepad++ as your primary editor in this, and suddenly you even have that feature, as this will sync temp folders back to the server. This is probably the best FTP client I’ve seen on Windows, with full support for SFTP and SSH (built on PuTTY) with all sorts of encryption and authentication options. It’s also hugely configurable and fairly dependable. If you’re working on a remote server using a Windows machine, this is probably how you should be accessing the file system.
https://www.putty.org/
I hope that as a web developer you don’t have to learn to be a server administrator, but as a web developer I am telling you you’ll probably have to learn at least a little bit about Unix/Linux server administration, as they are by far the most popular web server stacks out there, and you’ll be controlling them with an SSH client at some points, even if a web interface is available. This is a great one, with all sorts of authentication options, so if (like us) you know you need root access to a server remotely, but you don’t like the idea of protecting that with just a simple password, you can set up Public/Private key pairs with encryption passphrases.
http://www.wampserver.com/en/
Let me be clear on this: WAMP, which stands for Windows Apache, PHP, MySQL, is great to have. It’s good for training, it’s good for prototyping tools without having to wait for a virtualized server to start up, but the differences in environments between running Apache, PHP, and MySQL on Windows versus Linux will bite you eventually. Don’t expect to be able to push anything you worked on in WAMP directly to your Linux based server without having to fix a few problems here and there. That said, I have a number of things I run in my WAMP server all the time (linting, IP geolocation, domain DIGs, and a few others). It’s a great tool, but it isn’t a replacement for a staging server.
https://www.virtualbox.org/
You should be using a virtual machine for your staging server. That way you can simulate things like network communications and how your code will actually be run on Linux. Virtual Box is free and powerful. You’ll need to get ISOs for whatever operating system you intend to run, and you should be aware that at least some versions of Windows have it written into their License agreement that you can’t run them virtualized.
https://www.gimp.org/
Gimp is powerful. I don’t really know how to use it well. It’s always been one of those things where I know I need to sit down and teach myself, but since I’ve fallen far into the trenches of server backend work, I haven’t ever had the motivation. Mostly, I use this to resize images when I notice that a website is loading a 14MB PNG on the homepage for some unknown reason. Please designers, think of the mobile phones, keep total page loads (Including all resources, pictures, scripts, and DOM structure) as close to or below 1MB as you can, especially if your site is supported by ad revenue, as there’s no telling how much the ads will need to load on top of that.
https://tools.stefankueng.com/grepWin.html
GrepWin is an implementation of Grep functionality on Windows. For those of you who aren’t aware, Grep is a terminal tool on Linux/Unix that uses a very efficient algorithm to search through large amounts of text for whatever you define, be it flat text, or something represented by a regular expression. It’s super useful for renaming an included document or global variable, and can really save your bacon if your error reporting is being vague. I like this particular implementation because it has context menu integration, so it’s as easy to use as right clicking in the directory you want to search in and telling it to search. It also supports text replacement with backups, so this simple tool is extremely useful more often than I’d like to admit.
https://gitforwindows.org/
The last tool is an implementation of Git for windows that also includes a Bash terminal. This is important because a lot of developers work in Linux, and so installation directions might only be available as Bash code, this makes it easy to move past that step without being bogged down translating that into Windows CMD code. This is a full implementation of Git, so it comes with all of the version control features and easy project building that Git provides. If you end up working with Electron or Node.JS in general, you’ll end up leaning on this pretty hard.
And that’s it. I’m hoping that later this week I can get into more interesting stuff, but I wanted to have a foundational post of the resources I might reference and the tools I’m using for people to fall back on. It’s the kind of thing I wish I had to reference when I was starting out, especially since all of the tools I’m using now are free and Open Source, and making that change has sped up my workflow significantly, as the only application I’ve listed here with any noticeable boot time is Gimp, something I hated about Dreamweaver every time I had to shut the computer down for whatever reason.
I plan on coming back to this post periodically and updating it as my opinions change, or I become aware of other resources that should be on here. Eventually I’ll also be lining out a software for Linux section, but I’m still shopping around for an affordable and stable Linux development machine.
Next time I think we’re going to dive right into some anecdotes about code commenting and design patterns, and why it pays to think about those from the beginning. Nothing glamorous, but I’d argue hugely important, and you get to laugh with me about some dumb things I’ve done.
4 notes
·
View notes
Text
...I know like five posts you're looking for, and I apparently did not save any of them, so I'm going to give you a bunch of links and then you're going to ask me questions and then I will answer them. Because honestly, I'd love to write up a guide but I'm unsure where to start. You know the "of course the average person only knows the formulae for quartz and some feldspars" comic? Yeah, tragically that's me, so I'm gonna hand you some links and write some real quick guides and go from there.
Here is a Computer Hardware Care 101 post, with additions by yours truly.
Here's some webmastery links, which isn't quite what you're looking for but is also the first link I had on hand. The second link I grabbed while I was searching was the how-to-unfuck-Windows-11, which I figure you guys might be running. As a slightly easier version, here is how to disable web search where it shouldn't be.
A very big masterpost of internet resources; and a beginner's guide to the indie web. Another masterpost of things to do on the internet. And a digital piracy guide, for funsies.
Quite a few of these guides will say "but seriously, switch to Linux" and while that's an option, if you're struggling to understand directories and folder trees (no judgment if you've never seen them before, unfortunately everything to me should be a folder tree) then it might not be a good option until you know what you're doing. However, if you're bold and want to try it anyway, here's a guide.
Now, under the cut, I'm gonna give you some really quick and dirty tutorials that are really more pointing you in a direction and giving you a thumbs-up about it. If you can't figure it out, that's fine, I can answer any and all questions you have. (I graduate in two months with a bachelor's in IT, it's unlikely you'll throw me.)
Excel / Gsheets / Very Basic Databases
As far as excel goes, use google sheets, it's just faster, and then making the jump to excel is easier. Your task: make a spreadsheet that tracks something and then tallies them up and hands them back to you in a nice counted format. For this example, let's track genre of books we've read.
Make a new gsheet. Leave the top ten rows mostly blank for now, but put in a real quick list of book genres in one column. Then colour row 11 in another colour as a visual divider. Under it, place a bunch of book titles in column A, the corresponding author in column B. Now right click row 12 column C, which should be next to the author's name of the first book. Select data validation, add a rule, and then select dropdown from a range.
Then click the little square button. Go back up to your list of genres, left click the top one, then hold down shift and left click the last genre. It should have selected the whole list. (Holding down shift selects everything between the first and second click. Holding down control will instead just select the second one without unselecting the first, so you can pick and choose. Do experiment with this until you get the hang of it.)
Hit ok until you're out of there, and that cell should now be a dropdown of genres. Sick. Now on the bottom-right of your selected cell should be a little square a big bigger than the rest of your cursor. Left click, hold down left click, and drag straight down to the last book. Release left click, and they should all now have that dropdown.
Go through manually and give each book a genre from the dropdown. Then go back up to your first genre, and in the column immediately beside it, place in a COUNTIF function. Your range should be column C, from row 11 to row whatever the last book is. So C11:C[number here]. Your criterion should be either "Genre" with quotations (this identifies it as a string, aka it's text), or just place in the cell number of the genre. So if the genre is Fantasy in cell D4 (and you're in cell E4), place just D4.
This should return a counted value of how many books are fantasy books. Rinse and repeat for the other genres. You should get a total of all of them. Your next task is to use the UNIQUE function to get a list of all your authors, and then to use COUNTIF to get author totals.
Once you've gotten that far, you can do whatever you want, you probably can read the documentation well enough to do whatever. I recommend learning VLOOKUP, CONCATENATE, and SUMIF. Spreadsheets are great for crunching numbers and keeping track of stuff, I recommend them.
File Trees / Directories
I'll be honest, I really don't know where to start because I don't know what you know and don't know. So if I am missing information, please tell me and I will explain. This is very natural to me, if I skip over stuff I can go back.
But it works like this. Every file on your computer has a location and it is almost always going to look pretty similar to this: "C:\Users\RaymondShields\Pictures\rickroll.png"
Note the backward slash, \, as opposed to the forward slash, /. We do not use forward slashes locally (on your computer, not on the web), but we do use them on the web, where they fulfil the same purpose.
I must heavily stress one thing: file explorer is not the internet. It should only show you things on your computer, not on the web. I hear windows 11 fucks with that, but I won't touch it with a ten foot pole so idk. This focuses on file explorer.
So let's break that url down real quick. C:\ is "C drive". It is very likely where your OS (operating system) is stored. (A and B drives are reserved for floppies and generally no longer used. Fun fact.) If your computer has multiple hard drives, they are likely to be D:\ (generally CD/DVD) and E:\ and continuing on from there.
(If you want to look at your drives, just go into file explorer and click This Computer / My PC. It will display them. If you right click and go into properties, you can see more info.)
After C:\ is a bunch of folders we generally don't care about unless we need to. Program Files and Program Files (x86) are generally interchangeable, but that is where most of your programs (the desktop version of mobile apps) are stored, alongside many many configuration files. (They are sometimes stored as .dat or .bat files. When in doubt, just google '.dat file format' or whatever format to learn what they are.)
Right now, we care about the Users folder. It should have default, public, and all local user accounts. One of those folders is your local account, for this example it's RaymondShields. (To check your local account, hit that start menu and bottom left should be a few icons, including power and settings, and the top should be an avatar. That is you.)
Go into there and there's a bunch more folders, whee. Some of them have fancy icons, those are Official Microsoft Directories. Some of them start with a dot and are program-installed. One of them is hidden and called AppData (and you can get there fast by typing %appdata% into the file explorer address bar), and you only care about that one when you're installing minecraft mods.
Now. Official Microsoft Directories are two things at once and that makes them fun. They are first and foremost Regular Folders like every other folder so far. (If you create folders in your pictures or documents directories, exact same thing.) They are also shortcuts.
Which is to say, when your computer says "get me Pictures\rickroll.png", it knows to translate that 'Pictures' into "C:\Users\RaymondShields\Pictures\". However, because 'Pictures' is just a shortcut, you can also just change where the shortcut 'Pictures' points to. If you decide you want your pictures on your D:\ drive instead, create a folder on D:\ named Pictures, then go to the Pictures directory, right click properties, and change its location. It'll ask you if it can copy files over, and from then on, when you select 'Pictures' in the file explorer sidebar, it will lead you to 'D:\Pictures\' instead.
This is a very important point: there is a difference between a relative file path and an absolute file path. Think of it like this: a relative path is saying "uh, the gas station on First Ave and 6th St?" and an absolute path is "the Shell at 12345 First St Vancouver BC Canada V4G 1N4". (Actual Canadian postal code, fun fact.)
Which means when you're in the command prompt, which you'll end up doing quite a bit for any finicky stuff, the difference between "pictures\folder\folder2\rickroll.png" and "\pictures\folder\folder2\rickroll.png" is massive.
The first one, without that first slash, is the relative path. It will look for a folder named "pictures" in the folder you are currently viewing. So if you're viewing the RaymondShields folder, it will start there and look for Pictures there. The second one, with the slash, is the absolute path. It will go all the way up to the root folder, which is generally going to be C:\ or D:\ or whatever. Where you can't go up a folder anymore. And then it will look there for Pictures.
This is good because no one wants to hardcode file paths every time. (Hardcode: using the absolute file path. Sometimes you have to, but if you say, renamed folder2, every absolute file path that needs something in a subfolder (folder within) of folder2 is going to break.) It is also bad if you're new and still getting the hang of when to use the absolute path and keep mixing it up.
You may also notice at some point that I mentioned AppData, a hidden folder inside RaymondShields. If you did not see it, go up top to the file / home / share / view bar, select view, and then view hidden folders. Now it should be visible.
Hidden folders generally mean "don't touch me" but all a hidden folder really means is that it isn't visible without that option turned on. I keep the setting on because I want to see stuff, but it doesn't prevent access or anything. However, if a file is hidden and it's a .bat or some other system config file, don't touch it unless you know exactly why you're doing it. It might break a program, it might crash your OS. Be careful, is what I'm saying.
But that's how a file tree works. You can keep going down folders for as long as you have folders to go down, and then you just go right back up the tree and down a different branch. (Think of it like a family tree, to visualize, but like, upside down. You start at one root and go down, and in a family tree, you are the root directory, and your parents are subfolders of you, and so on and so forth.)
Every single file on your computer, every single bit of data, is somewhere in the file tree. It has an absolute path, it has a file type, it is stored somewhere on your drives. Half the battle is finding it.
When you're in the command line, you go up and down and sometimes jump across the file tree using the "cd" command, and it's "cd .." to go up one level to the parent folder. You will do this a lot, and it'll be shorthand really fast.
Your phone also has a file tree. As does every other computer, in whatever form they take, on the planet. If you have an Android, plug it in, select the device under the 'This PC' directory in the sidebar, open that sucker up, and go wandering through the file tree. If you have an iphone, your file tree is hidden from you without specialized software, because Apple sucks.
Get really familiar with just googling shit. ".bat file format" and "appdata folder" and "gsheets get all unique values from range" and "motherboard specs command prompt". Right click your task bar at the bottom of your screen and open task manager, click around and figure out what stuff is by googling.
In desktop machines, you do a lot of click around and "huh what's that" and opening menus just to open menus. If you know you're in the right area of a program's menus, do as you would looking for your mother's chocolate stash and just start opening folders and drawers and menus and under the bed until you find what you're looking for. Don't be afraid to click stuff and do actions! Control+Z (hold control, press Z) is the shortcut for undoing things, and Control+Y redoes them if you just undid them.
Windows will prompt you if whatever you're about to do is permanent and cannot be ctrl+Z'd. Don't worry about it. You can just do whatever you want.
(Last tip, to learn to touch type, don't bother with any of those tutorials. F and J on keyboards generally have little ridges that you can feel, put your index fingers there, and then copy a note from a paper to Microsoft Word. Put the paper next to your monitor and just transcribe as fast as you can. You will eventually just memorize where the keys are, and if you start fucking up, feel for F and J and put your hands back in the right place and then keep going. It's fine.)
So hope that helps a bit?? I spent like an hour writing this and if you have any questions PLEASE TELL ME I WILL WALK YOU THROUGH IT. But I think it's an okay start!!
also re lrb does anyone have that one post that was going around a while back abt a site of like. computer skillz by gen z for gen z. i wanna look at it
9 notes
·
View notes
Text
AY2020/2021 Y2S1 Module Reviews
This semester proved to be a pain as expected. Said pain coming mostly from BT2101 and CS2030. Everything was conducted online with the exception of the weekly lab sessions for CS2030 so I only had to go to school for 1 day. F2F CS2030 recitations were optional so I gave up and just watched the recorded zoom session instead of going to school just for a class half way through the semester. I usually miss the live zoom sessions because mine was at 1pm and I am almost always still having lunch at that time and not ready at all. Also i missed about half of my BT2102 tutorials because I simply forgot I had tutorials at that time (2-4pm). They still awarded me nicely for participation much to my surprise (7/10).
BT2101 Decision Making Methods and Tools
BT2102 Data Management and Visualisation
CS2030 Programming Methodology II
GEQ1000 Asking Questions
IS1103 Ethics in Computing
CS2030: Programming Methodology II in Java
Prof: Dr Henry Chia, A.P. Terrence Sim
Weightage:
Weekly labs (5%)
Individual project (15%)
Practical assessment #1 in week 7 (15%)
Practical assessment #2 in week 12 (20%)
Class participation (5%) : includes lab participation, piazza discussions and peer learning activities
Final exam (40%)
CS2030 proved to be intensive not only in the aspect of planning code design but also the actual implementation itself.. (thinking about how to solve the problem and/or get the expected outputs).. Really struggled my way through the start although that really was only the tip of the iceberg because I had no prior experience in Java and the introductory Winter Workshops were reserved exclusively for freshmen or I missed the deadlines can’t remember.. The first few lectures got us familiar with Java Programming before diving deep into Functional Programming which is a lot harder to grasp vs Object-Oriented Programming which was introduced to us in CS1010S already. The hardest part comes with Streams but honestly after learning streams so many processes can be coded so much more efficiently as compared to OOP, really simplifies some of the tasks when using FP rather than OOP. Interesting to note that this streams part ties in well with BT2102′s coding part where we learnt aggregation pipelines in MongoDB and MySQL i believe the concepts felt similar??
Weekly Labs
Pretty manageable imo , compared to the project ofc (rolls eyes)
This semester they changed things up a bit and shifted all the weekly labs deadlines to finals so we had more control in terms of time management and our progress in the labs. Naturally we are expected to do them every week but say we are busy in a certain week for other modules we can always come back on another. I was always behind by like a month compared to my friends who were more on task.
Individual Project
Project part 1 was still okay for the Discrete Event Simulator (DES) basically designing a system for customers to queue and be served and recording the relevant work done at the appropriate times using OOP.
The hardest part was project part 2 where you had to rewrite the whole chunk in part 1 FP style and also they added a lot of more complex simulations and cases which I really just gave up entirely after completing level 2.
It was so hard it was traumatic. Level 3 had something to do with importing a random number generator and the test cases only get more confusing and long i just really had no brain cells left for the work worth only 7% before deducting late submissions penalty (bc brain slow LOL) and the code design criteria and checkstyles. I was so mad that it takes up so much time and effort just to be worth a petty 7% that I gave up entirely didnt even finish reading the questions (which was also pretty darn long). Sorry i am dumb. Please be proud of me I am trying my best.
I have zero idea who in the department decided to rig the difficulty of this project by so much up compared to previous semesters. They really expected too much out of us i am so sorry to disappoint.
Practical Assessments
Basically similar to weekly lab exercises but you have to do it within the time frame during a lab session. You get to take home and re-edit the code to get the full marks and are moderated according to the changes you made compared to the one submitted during the PA itself. That also means if you do not submit the correct full marks version of the code in a week, you do not get moderated and will be awarded with the marks scored in lab which is obviously 0 for me I had over 70 compilation errors and you might be thinking how. But trust me i am too, confused how. Most people will score around 0-2m in lab but taking it home and refining the whole code with minimal changes and will be graded according to the amount of changes made to get the final code. Tests you how close you can get to the correct outputs within the time frame whether you already had it in your head.
Final Exam
Comes in MCQs, a few case questions consisting of subparts if i remembered correctly some of which required you to write out a possible code (2-3 lines) converting oop to streams, synchronous to asynchronous etc. There are plenty resources (pyps) floating around in the gc so you can use them well for revision.
Theoretical content was tested i dont really know how to put in words but you may be able to code well even though you may have some of the concepts wrong
We only did pure coding work in labs, projects and practical assessments so this really reinforces your understanding of the material
Considering I didnt finish project part 2 this is quite a decent grade already really thankful i dont have to go through this ordeal again. See you never.
BT2101: Decision Making Methods and Tools
Professor: Rudy Sentiono, A.P. Huang Zhiyong
Weightage:
Group project (20%)
Written assignments - 3x 5% (15%)
Tutorial participation (5%)
Midterm - open book (20%)
Finals - open book (40%)
This is the second module that I have been struggling with since the start of the semester. Tutor changed after the first session, the former tutor was much better and clearer in her explanations. This is quite a math-intensive course and requires some knowledge of linear algrebra and thus the pre-requisities. Maths has never been my strong suit (well except in primary school) so I struggled hard with this module. Nearing the end we learnt about deep learning neural networks which was pretty interesting and really broadened my perspectives on the future of machine learning. The pace was okay, but the lecturer seems to just repeat the words on the lecture slides in his lectures. The lectures were seemingly simplified from the reference texts he used but is nevertheless still daunting to look at to revise. Project was a 4-5 people groupwork where we had to conduct all the stages of data analytics from data exploration, cleaning of data to data mining, conclusions etc. There were an additional 3 assignments that we had to do together with our groupmates by the stipulated deadlines. This module requires a lot of work and preparation. Am glad to be able to pass.
BT2102: Data Management and Visualisation
Weightage:
Assignment 1 (Group): 25 marks
Assignment 2 (Individual): 35 marks
Assignment 3 (Group): 30 marks
Class Participation: 10 marks (Participation in Tutorials and Group Assignment Discussions)
IS1103: Ethics in Computing
Weightage:
FPAQ (50%)
Missions (50%)
Expected Grade: B+
Final Grade: A-
For this module, all 13 missions are to be done by the last date of submission for finals which was a 300 question quiz held on LumiNUS. Missions are assigned weekly where we go to the WordPress website the professor has built, a server that he regularly does maintenance on and in it he uses a tracker to track our progress through clicking links and submitting short answer questions sometimes. Most of them were done by clicking of links and we were told to disable our Adblockers if any to prevent interruptions or his system not capturing our data. We were encouraged to do it weekly although the deadline was the end of the semester. One of the missions included us doing some Linux practice penetration questions on Kali, it was a bit tough but other than that the other missions were pretty simple and straightforward. After every mission done we were to do a practice PAQ which is not graded and upon submission would give us the model answers to study in preparation for FPAQ the final week submission. PAQ consists of 5 themes * 7 questions = 35 questions, whereas FPAQ has 300 over questions to be done over the span of a week, the reading week. Carpal tunnel.
GEQ1000: Asking Questions
Weightage:
Tutorial attendance/participation (36%)
Forum participation - forum 1 and 2 (14%)
MCQ quiz (36%)
Final paper (14%)
This is a general education module everyone in NUS is required to take. I dont think I learned much so I am really only there to go through the motion. There are a few pillars that the department touches on mainly Physics, Engineering, Design, etc to show how the different disciplinary courses are interconnected and how/why is questioning important. Really low maintenance course, we do a 6 or 10 MCQ quiz every week prior to the lecture for that pillar. Tutorial was online via zoom and really low workload in general. Final week was on design and we had to make a wallet for our partner and explain why or how we chose the designs, and also submitting a word essay on our reflections of things we learned.
Update. I only pray to hover above or maintain at this current CAP lemao PLEASE YOU NEED TO
0 notes
Link
The Ultimate Hands-On Hadoop - Tame your Big Data!
The Ultimate Hands-On Hadoop - Tame your Big Data!
Hadoop tutorial with MapReduce, HDFS, Spark, Flink, Hive, HBase, MongoDB, Cassandra, Kafka + more! Over 25 technologies.
What you'll learn
The Ultimate Hands-On Hadoop - Tame your Big Data!
Design distributed systems that manage "big data" using Hadoop and related technologies.
Use HDFS and MapReduce for storing and analyzing data at scale.
Use Pig and Spark to create scripts to process data on a Hadoop cluster in more complex ways.
Analyze relational data using Hive and MySQL
Analyze non-relational data using HBase, Cassandra, and MongoDB
Query data interactively with Drill, Phoenix, and Presto
Choose appropriate data storage technology for your application
Understand how Hadoop clusters are managed by YARN, Tez, Mesos, Zookeeper, Zeppelin, Hue, and Oozie.
Publish data to your Hadoop cluster using Kafka, Sqoop, and Flume
Consume streaming data using Spark Streaming, Flink, and Storm
Requirements
You will need access to a PC running 64-bit Windows, macOS, or Linux with an Internet connection and at least 8GB of *free* (not total) RAM, if you want to participate in the hands-on activities and exercises. If your PC does not meet these requirements, you can still follow along in the course without doing hands-on activities.
Some activities will require some prior programming experience, preferably in Python or Scala.
A basic familiarity with the Linux command line will be very helpful.
Description
The world of Hadoop and "Big Data" can be intimidating - hundreds of different technologies with cryptic names form the Hadoop ecosystem. With this Hadoop tutorial, you'll not only understand what those systems are and how they fit together - but you'll go hands-on and learn how to use them to solve real business problems!
Learn and master the most popular big data technologies in this comprehensive course, taught by a former engineer and senior manager from Amazon and IMDb. We'll go way beyond Hadoop itself, and dive into all sorts of distributed systems you may need to integrate with.
Install and work with a real Hadoop installation right on your desktop with Hortonworks (now part of Cloudera) and the Ambari UI
Manage big data on a cluster with HDFS and MapReduce
Write programs to analyze data on Hadoop with Pig and Spark
Store and query your data with Sqoop, Hive, MySQL, HBase, Cassandra, MongoDB, Drill, Phoenix, and Presto
Design real-world systems using the Hadoop ecosystem
Learn how your cluster is managed with YARN, Mesos, Zookeeper, Oozie, Zeppelin, and Hue
Handle streaming data in real-time with Kafka, Flume, Spark Streaming, Flink, and Storm
Understanding Hadoop is a highly valuable skill for anyone working at companies with large amounts of data.
Almost every large company you might want to work at uses Hadoop in some way, including Amazon, eBay, Facebook, Google, LinkedIn, IBM, Spotify, Twitter, and Yahoo! And it's not just technology companies that need Hadoop; even the New York Times uses Hadoop for processing images.
This course is comprehensive, covering over 25 different technologies in over 14 hours of video lectures. It's filled with hands-on activities and exercises, so you get some real experience in using Hadoop - it's not just theory.
You'll find a range of activities in this course for people at every level. If you're a project manager who just wants to learn the buzzwords, there are web UIs for many of the activities in the course that require no programming knowledge. If you're comfortable with command lines, we'll show you how to work with them too. And if you're a programmer, I'll challenge you with writing real scripts on a Hadoop system using Scala, Pig Latin, and Python.
You'll walk away from this course with a real, deep understanding of Hadoop and its associated distributed systems, and you can apply Hadoop to real-world problems. Plus a valuable completion certificate is waiting for you at the end!
Please note the focus on this course is on application development, not Hadoop administration. Although you will pick up some administration skills along the way.
Knowing how to wrangle "big data" is an incredibly valuable skill for today's top tech employers. Don't be left behind - enroll now!
"The Ultimate Hands-On Hadoop... was a crucial discovery for me. I supplemented your course with a bunch of literature and conferences until I managed to land an interview. I can proudly say that I landed a job as a Big Data Engineer around a year after I started your course. Thanks so much for all the great content you have generated and the crystal clear explanations. " - Aldo Serrano
"I honestly wouldn’t be where I am now without this course. Frank makes the complex simple by helping you through the process every step of the way. Highly recommended and worth your time especially the Spark environment. This course helped me achieve a far greater understanding of the environment and its capabilities. Frank makes the complex simple by helping you through the process every step of the way. Highly recommended and worth your time especially the Spark environment." - Tyler Buck
Who this course is for:
Software engineers and programmers who want to understand the larger Hadoop ecosystem, and use it to store, analyze, and vend "big data" at scale.
Project, program, or product managers who want to understand the lingo and high-level architecture of Hadoop.
Data analysts and database administrators who are curious about Hadoop and how it relates to their work.
System architects who need to understand the components available in the Hadoop ecosystem, and how they fit together.
The Ultimate Hands-On Hadoop - Tame your Big Data!
Created by Sundog Education by Frank Kane, Frank Kane
Last updated 3/2020
English
English, Portuguese [Auto-generated]
Size: 2.62 GB
DOWNLOAD COURSE
Content From: https://ift.tt/2X8xwtf
0 notes
Link
Hadoop tutorial with MapReduce, HDFS, Spark, Flink, Hive, HBase, MongoDB, Cassandra, Kafka + more! Over 25 technologies.
What you’ll learn
Design distributed systems that manage “big data” using Hadoop and related technologies.
Use HDFS and MapReduce for storing and analyzing data at scale.
Use Pig and Spark to create scripts to process data on a Hadoop cluster in more complex ways.
Analyze relational data using Hive and MySQL
Analyze non-relational data using HBase, Cassandra, and MongoDB
Query data interactively with Drill, Phoenix, and Presto
Choose an appropriate data storage technology for your application
Understand how Hadoop clusters are managed by YARN, Tez, Mesos, Zookeeper, Zeppelin, Hue, and Oozie.
Publish data to your Hadoop cluster using Kafka, Sqoop, and Flume
Consume streaming data using Spark Streaming, Flink, and Storm
Requirements
You will need access to a PC running 64-bit Windows, MacOS, or Linux with an Internet connection, if you want to participate in the hands-on activities and exercises. You must have at least 8GB of free RAM on your system; 10GB or more is recommended. If your PC does not meet these requirements, you can still follow along in the course without doing hands-on activities.
Some activities will require some prior programming experience, preferably in Python or Scala.
A basic familiarity with the Linux command line will be very helpful.
Description
The world of Hadoop and “Big Data” can be intimidating – hundreds of different technologies with cryptic names form the Hadoop ecosystem. With this Hadoop tutorial, you’ll not only understand what those systems are and how they fit together – but you’ll go hands-on and learn how to use them to solve real business problems!
Learn and master the most popular big data technologies in this comprehensive course, taught by a former engineer and senior manager from Amazon and IMDb. We’ll go way beyond Hadoop itself, and dive into all sorts of distributed systems you may need to integrate with.
Install and work with a real Hadoop installation right on your desktop with Hortonworks (now part of Cloudera) and the Ambari UI
Manage big data on a cluster with HDFS and MapReduce
Write programs to analyze data on Hadoop with Pig and Spark
Store and query your data with Sqoop, Hive, MySQL, HBase, Cassandra, MongoDB, Drill, Phoenix, and Presto
Design real-world systems using the Hadoop ecosystem
Learn how your cluster is managed with YARN, Mesos, Zookeeper, Oozie, Zeppelin, and Hue
Handle streaming data in real time with Kafka, Flume, Spark Streaming, Flink, and Storm
Understanding Hadoop is a highly valuable skill for anyone working at companies with large amounts of data.
Almost every large company you might want to work at uses Hadoop in some way, including Amazon, Ebay, Facebook, Google, LinkedIn, IBM, Spotify, Twitter, and Yahoo! And it’s not just technology companies that need Hadoop; even the New York Times uses Hadoop for processing images.
This course is comprehensive, covering over 25 different technologies in over 14 hours of video lectures. It’s filled with hands-on activities and exercises, so you get some real experience in using Hadoop – it’s not just theory.
You’ll find a range of activities in this course for people at every level. If you’re a project manager who just wants to learn the buzzwords, there are web UI’s for many of the activities in the course that require no programming knowledge. If you’re comfortable with command lines, we’ll show you how to work with them too. And if you’re a programmer, I’ll challenge you with writing real scripts on a Hadoop system using Scala, Pig Latin, and Python.
You’ll walk away from this course with a real, deep understanding of Hadoop and its associated distributed systems, and you can apply Hadoop to real-world problems. Plus a valuable completion certificate is waiting for you at the end!
Please note the focus on this course is on application development, not Hadoop administration. Although you will pick up some administration skills along the way.
Knowing how to wrangle “big data” is an incredibly valuable skill for today’s top tech employers. Don’t be left behind – enroll now!
“The Ultimate Hands-On Hadoop… was a crucial discovery for me. I supplemented your course with a bunch of literature and conferences until I managed to land an interview. I can proudly say that I landed a job as a Big Data Engineer around a year after I started your course. Thanks so much for all the great content you have generated and the crystal clear explanations. ” – Aldo Serrano
“I honestly wouldn’t be where I am now without this course. Frank makes the complex simple by helping you through the process every step of the way. Highly recommended and worth your time especially the Spark environment. This course helped me achieve a far greater understanding of the environment and its capabilities. Frank makes the complex simple by helping you through the process every step of the way. Highly recommended and worth your time especially the Spark environment.” – Tyler Buck
Who this course is for:
Software engineers and programmers who want to understand the larger Hadoop ecosystem, and use it to store, analyze, and vend “big data” at scale.
Project, program, or product managers who want to understand the lingo and high-level architecture of Hadoop.
Data analysts and database administrators who are curious about Hadoop and how it relates to their work.
System architects who need to understand the components available in the Hadoop ecosystem, and how they fit together.
Created by Sundog Education by Frank Kane, Frank Kane Last updated 5/2019 English English
Size: 2.57 GB
Download Now
https://ift.tt/2o0w8sn.
The post The Ultimate Hands-On Hadoop – Tame your Big Data! appeared first on Free Course Lab.
0 notes
Text
[Free 100 % Download Udemy] The Ultimate Hands-On Hadoop - Tame your Big Data
[Free 100 % Download Udemy]
The Ultimate Hands-On Hadoop - Tame your Big Data
Hadoop tutorial with MapReduce, HDFS, Spark, Flink, Hive, HBase, MongoDB, Cassandra, Kafka + more! Over 25 technologies
What you'll learn
Design distributed systems that manage "big data" using Hadoop and related technologies.
Use HDFS and MapReduce for storing and analyzing data at scale.
//<![CDATA[ (adsbygoogle = window.adsbygoogle || []).push({}); //]]> Use Pig and Spark to create scripts to process data on a Hadoop cluster in more complex ways.
Analyze relational data using Hive and MySQL
Analyze non-relational data using HBase, Cassandra, and MongoDB
Query data interactively with Drill, Phoenix, and Presto
Choose an appropriate data storage technology for your application
Understand how Hadoop clusters are managed by YARN, Tez, Mesos, Zookeeper, Zeppelin, Hue, and Oozie.
Publish data to your Hadoop cluster using Kafka, Sqoop, and Flume
Consume streaming data using Spark Streaming, Flink, and Storm
See more
Requirements
You will need access to a PC running 64-bit Windows, MacOS, or Linux with an Internet connection, if you want to participate in the hands-on activities and exercises. You must have at least 8GB of free RAM on your system; 10GB or more is recommended. If your PC does not meet these requirements, you can still follow along in the course without doing hands-on activities.
Some activities will require some prior programming experience, preferably in Python or Scala.
A basic familiarity with the Linux command line will be very helpful.
Description
The world of Hadoop and "Big Data" can be intimidating - hundreds of different technologies with cryptic names form the Hadoop ecosystem. With this Hadoop tutorial, you'll not only understand what those systems are and how they fit together - but you'll go hands-on and learn how to use them to solve real business problems!
Learn and master the most popular big data technologies in this comprehensive course, taught by a former engineer and senior manager from Amazon and IMDb. We'll go way beyond Hadoop itself, and dive into all sorts of distributed systems you may need to integrate with.
Install and work with a real Hadoop installation right on your desktop with Hortonworks (now part of Cloudera) and the Ambari UI
//<![CDATA[ (adsbygoogle = window.adsbygoogle || []).push({}); //]]> Manage big data on a cluster with HDFS and MapReduce
Write programs to analyze data on Hadoop with Pig and Spark
Store and query your data with Sqoop, Hive, MySQL, HBase, Cassandra, MongoDB, Drill, Phoenix, and Presto
Design real-world systems using the Hadoop ecosystem
Learn how your cluster is managed with YARN, Mesos, Zookeeper, Oozie, Zeppelin, and Hue
Handle streaming data in real time with Kafka, Flume, Spark Streaming, Flink, and Storm
Understanding Hadoop is a highly valuable skill for anyone working at companies with large amounts of data.
Almost every large company you might want to work at uses Hadoop in some way, including Amazon, Ebay, Facebook, Google, LinkedIn, IBM, Spotify, Twitter, and Yahoo! And it's not just technology companies that need Hadoop; even the New York Times uses Hadoop for processing images.
This course is comprehensive, covering over 25 different technologies in over 14 hours of video lectures. It's filled with hands-on activities and exercises, so you get some real experience in using Hadoop - it's not just theory.
You'll find a range of activities in this course for people at every level. If you're a project manager who just wants to learn the buzzwords, there are web UI's for many of the activities in the course that require no programming knowledge. If you're comfortable with command lines, we'll show you how to work with them too. And if you're a programmer, I'll challenge you with writing real scripts on a Hadoop system using Scala, Pig Latin, and Python.
You'll walk away from this course with a real, deep understanding of Hadoop and its associated distributed systems, and you can apply Hadoop to real-world problems. Plus a valuable completion certificate is waiting for you at the end!
Please note the focus on this course is on application development, not Hadoop administration. Although you will pick up some administration skills along the way.
Knowing how to wrangle "big data" is an incredibly valuable skill for today's top tech employers. Don't be left behind - enroll now!
"The Ultimate Hands-On Hadoop... was a crucial discovery for me. I supplemented your course with a bunch of literature and conferences until I managed to land an interview. I can proudly say that I landed a job as a Big Data Engineer around a year after I started your course. Thanks so much for all the great content you have generated and the crystal clear explanations. " - Aldo Serrano
"I honestly wouldn’t be where I am now without this course. Frank makes the complex simple by helping you through the process every step of the way. Highly recommended and worth your time especially the Spark environment. This course helped me achieve a far greater understanding of the environment and its capabilities. Frank makes the complex simple by helping you through the process every step of the way. Highly recommended and worth your time especially the Spark environment." - Tyler Buck
//<![CDATA[ (adsbygoogle = window.adsbygoogle || []).push({}); //]]>
DOWNLOAD Free
تقنيات from Blogger http://bit.ly/2MwHIYF via IFTTT
0 notes
Text
“Linux is too Confusing”
That’s an argument I will hear a lot from people who are not very familiar with Linux, including those who have even spent a little time with simple distributions like Ubuntu. Often times, I just wrote it off as people just not wanting to try something new, but… looking at the Linux community as of late has made me realize that the people who say this may not be too far off-base with their opinion. I know I’ll probably get a lot of flak for saying that, but I’ll explain; just hear—er, read—me out.
I’ll list several reasons down here and go over them. Hopefully, this will shed some light on the situation.
Most of the Linux community vehemently refuses to allow most distributions to resemble Windows or macOS…
Even at the cost of advancing technology and pleasant GUIs.
Honestly, Linux people are some of the most stubborn people I’ve met. I can say that without worry because I’m one of said stubborn Linux people. XD Unfortunately, that stubbornness and obstinance can find a way to interfere with what really could be a good thing for Linux as a whole.
As much as people hate it, take Unity for example. This was one of the only projects besides GNOME that was trying to be different, but unlike GNOME, it was easily learnable and usable by people of all levels of technological aptitude… pun intended. XP Now, though, Unity is dying, soon to be replaced by GNOME, a desktop that many now hate, and I can’t even bring myself to like it when I'm using a mouse and keyboard setup.
Unity hit that sweet spot between mouse/keyboard and touch that most OSes, even Windows 10, fail to hit. Even if Untiy 8 never came to be, Unity 7 was still a solid desktop environment, but people weren’t too supportive of it, mostly because it wasn’t “Linux” enough.
Yet KDE, elementaryOS, and Cinnamon, which look more like Windows/macOS are embraced with open arms. It’s confusing, to say the least.
There is no universal app-packaging system.
And even on distros where there is a package system, some apps don’t have premade packages, forcing the user to build them or just not bother.
Remember the days when programs didn’t really live in our Program Files folders? Remember when you’d just put in your floppy disk and run the program? I can’t say I’ve been around long enough to remember that, but to this day, there are still programs that do not need to be installed, which is totally okay in my book.
It’s a simple form of packaging that works well for simple apps and programs, but what happens when you use a program for everyday work and want it to have easier access to folders on your computer, and what happens when a program becomes extremely complicated? Well, the simple solutition would be to, in the former case, grab an installer, or in the latter case, if you’re a developer, create an installer. This has become standard on Windows and, to an extremely odd extent, macOS, but Linux distros still have a problem with this.
Sure, most users will just stick to Ubuntu or Linux Mint, in which case there are plenty of .deb installers for common programs, but you might come across a user that needs a bit more than what can be found packaged in an Aptitude-friendly .deb file, and these programs may not be single binary programs that can be packaged in a simple zipped folder.
What happens then? The user, if they’re a beginner, may just give up on Linux and go back to their familiar NT or Unix-ish workspace, or if they know a bit more, they might try to find out how to build a tarball, which is all well and good, but it’s overall an inconvenience to the user.
Plus, there are situations where the user may not be able to use a Debian-based distro or even use one that can install .rpm files. To the non-technical user, this is all just too much.
The Linux community, by and large, expects people to be tech savvy.
Even complete beginners should know what they’re doing. Otherwise, begone!
The Linux world doesn’t ever seem too welcoming to beginners compared to the Windows and macOS worlds, where you can find tutorial after tutorial about how to do anything and everything, and you’re often guided by very nice people along the way.
Many tutorials on even how to get the most out of Ubuntu are directed at more technical users, leaving the masses feeling like they couldn’t learn about Linux even if they wanted to.
This has been happening much less, and I’m happy about that, but it probably still discourages a fair amount of people.
There is still too much done by command line.
This is going to be a short point because, well, we all know it’s true, and it should be obvious why that’s a turn-off for most people. :/
There are not many devices out there preinstalled with Linux.
And those that are out there aren’t advertised very much.
Despite the fact that there has been a growing trend of putting out laptops and desktops that come with a Linux distro, there still aren’t enough to convince people to possily stop using the very-familiar interfaces of Windows and macOS. Excluding Android and Chrome OS users, there aren’t too many people who have Linux on their devices, and there are even fewer who buy one with it preinstalled.
Honestly, I could go on for hours about why Linux is actually quite confusing and not user-friendly, but I’m sure you get the gist of it with all this.
Now… is this our faults? Well, not all of it, but sure, some of it is, and we need to try to improve so that it’s not like that in the future. Linux is a wonderful collection of operating systems with potential that far exceeds that of Windows or macOS, but we need to stop acting like we can’t let it evolve and start allowing it to. We need to develop better solutions for all the users who might consider Linux in the future.
Is Linux complicated? Yes. Can we fix it? Definitely. We just need to work at it.
— CJ Roth / TechieFoxee / FennecFoxee
0 notes
Text
50% off #Begin Unity Programming ✅ – $10
The perfect guide to start using Unity with C# programming
All Levels, – 2 hours, 33 lectures
Average rating 4.4/5 (4.4 (45 ratings) Instead of using a simple lifetime average, Udemy calculates a course’s star rating by considering a number of different factors such as the number of ratings, the age of ratings, and the likelihood of fraudulent ratings.)
Course requirements:
have a will to learn have a desire to make games a mac, a pc, or linux
Course description:
Hi, and welcome to the Begin Unity Programming course, my name is Yohann and I’m famous for having helped tens of thousands of students to make games and publish them in the app stores. My courses have hundreds of 5 star reviews on Udemy alone. If you want to build a game portfolio, then you found the right instructor.
This course is the go to course to get started making games with Unity. If you’re either new to Unity or have little experience with it then this course is for you. You will start by familiarizing yourself with Unity’s user interface . Then we’re learn about key concepts to understand the mechanics used to make professional games, and finally we’ll get into the fundamentals of programming using the great programming language called c sharp. Now, if you’ve never programmed before or if you’re not very comfortable with programming, then you’re going to like this course. Contrary to most instructors on this platform, I have been teaching programming in University for more than 7 years, and I am confident that this time you will get it. This course is all about hands on training, if you’re like me and you’d rather learn by doing rather than listening to a boring instructor then this course is for you. Programming is everywhere, it’s inside of games, websites, cars, and even coffee machines. The skills you’ll learn here are applicable to so many projects, i can’t tell you enough how this course will be key to a better future for you. About the course: The course is broken down in short, easy to digest chunks. Now right at the beginning we go straight into downloading Unity and work on a project that’s based on a game that is published in the app stores. You get to work on a real game, not just some random useless project. You can follow along whether you’re using a Windows computer, Linux or Mac.
As my current students already know, I’m always around in the forums and I’ll be there to help you out whenever you get stuck. But you get a lot more than just the best Unity Programming Beginner’s course available online. As a bonus You get a copy of the Unity source code of the Crossy road game clone called Dangerous Lanes that’s a famous 3D isometric pixel game. You also get a copy of the Captain Rocket source code that is a fun endless 2D platform runner that you can use any way you’d like. And as a bonus, you get lots of characters and environment object that you can use freely to make your upcoming game look professional. This bonuses are worth well over $500.
Are you ready to be successful at getting into the game development world? Then join me on this exciting journey. Become part of this whole new world of learning skills and fun. The future’s bright with Unity, you’re gonna love it.
Why Programming? You may already have used software, perhaps for word processing or spreadsheets like Excel, to solve problems. Perhaps now you are curious to learn how
programmers write software and want to make awesome games.
What is a Program?
A program is a set of step-by-step instructions that directs the computer to do the
tasks you want it to do and produce the results you want. Unity 3D helps you create that “program” that we call a “game”
Full details Finally get started with Unity the right way understand what is programming use Unity User Interface understand unity gameobjects and how to use them create your first scripts get to use the most common Unity 3D functionality Get ready to take on any classes
Full details Anyone wanting to make games Artists interested in playing with Unity and programming students anyone that’s been programming and would like a solid foundation
Reviews:
“The course does what Yohann designed it to do. That goal was to give a beginner an introduction into Unity’s interface and coding concepts. I think it’s a great course to get you started with Unity and I learned quite a bit. Thanks, Yohann!” (Benjamin McKissick Jr.)
“I took this course mainly to familiarize myself with the basics of Unity. I am not a newcomer to coding or game development in general, just to the Unity engine. That being said, I still found the course as a whole to be worth my time. The overview of the Unity UI section was great overall. I definitely learned some new things that messing with Unity myself, plus several hours of looking at random (mostly terrible) tutorials on YouTube didn’t get me. The coding part of the course is mostly for the absolute beginner coder. However, if you’ve been away from coding for a while for whatever reason or just starting to learn C#, you may still benefit from it. The beginner tutorials can be a great refresher for things like code structure and punctuation. Since I would assume nearly everyone who starts learning Unity has game development in mind, there are two suggestions I have for the slightly more advanced coding part of the course. First, would be to go a little more in depth on rotation of objects continuously (ie. ball rolling or planet rotating) instead of just at the start of a scene or by key press. Second, I’d either liked to have seen spawning in a more advanced course, or since it was included, a little more in depth explanation of the Instantiate code. Honestly it was no big chore for me to find answers to my questions with a quick Google search, but not everyone might search efficiently enough to easily figure it out. As for the pace of the course, I really liked it. Not too slow to bore a more experienced coder to death, but not so fast that most newbies would get completely lost. You can always go back and watch a section over again if you missed something! Overall, a nearly perfect introduction to Unity for me!” (Zach Hobden)
“Great course for beginners! Easy to follow along with and everything was explained very well.” (Dylan Tavares)
About Instructor:
Yohann Taieb
Yohann holds a Bachelor of Science Degree in Computer Science from FIU University. He has been a College instructor for over 7 years, teaching iPhone Development, iOS 10, Apple Watch development, Swift 3, Unity 3D, Pixel Art, Photoshop for programmers, and Android. Yohann also has plenty of ideas which naturally turned him into an entrepreneur, where he owns over 100 mobile apps and games in both the Apple app store and the Android store. Yohann is one of the leading experts in mobile game programming, app flipping and reskinning. His teaching style is unique, hands on and very detailed. Yohann has enabled more than 20000 students to publish their own apps and reach the top spots in iTunes App Stores, which has been picked up by blogs and medias like WIRED magazine, Yahoo News, and Forbes Online. Thanks to him, thousands of students now make a living using iOS 9, Swift 2, Objective C ( ObjC ), Android, Apple Watch ( watchOS ), Apple TV ( TVOS ), Unity 3D, and Pixel art animation
Instructor Other Courses:
Introduction to Game Development with Unity Yohann Taieb, Apps Games Unity iOS Android Apple Watch TV Development (22) Free Build Weapons Automatically Unity . Fantasy Edition Unity Asset Store …………………………………………………………… Yohann Taieb coupons Development course coupon Udemy Development course coupon Game Development course coupon Udemy Game Development course coupon Begin Unity Programming ✅ Begin Unity Programming ✅ course coupon Begin Unity Programming ✅ coupon coupons
The post 50% off #Begin Unity Programming ✅ – $10 appeared first on Course Tag.
from Course Tag http://coursetag.com/udemy/coupon/50-off-begin-unity-programming-%e2%9c%85-10/ from Course Tag https://coursetagcom.tumblr.com/post/157412182423
0 notes
Text
How to Prototype Web Apps Quickly with AppGini
This article was sponsored by AppGini. Thank you for supporting the partners who make SitePoint possible.
I honestly can't think of how many possible reasons there are that you might need a database, especially today. So let's hypothesize for a moment that you're a web developer in training.
It's already a pretty confronting world. You're going to to learn HTML, CSS, and JavaScript at an absolute minimum. Then you'll probably need to pick up a JavaScript library such as jQuery, React, Angular, or whatever you're drawn to, and more than likely some kind of server-side tech, be it PHP, Ruby, Node.js... you get the idea.
And I would say that without fail, even if your ultimate aspiration is to be the best front-end developer out there, you are absolutely going to need to pick up some database skills. Even if you're working with an amazing ORM, it's to your benefit to know what's happening under the hood.
Imagine that you want to try your hand at building some kind of web app. You need data, right? If you're just getting started with APIs you might want to start with a simple weather app, but if you want to try something more complex you may just need to create a database yourself.
Trying to learn too many skills at once has been the downfall of many great people.
Adding databases into the mix is enough to overload someone. Even if SQL syntax isn't overly complex, trying to understand how a relational database fits together can be overwhelming, especially when it comes to designing, seeding, and optimizing one.
Why AppGini?
For every argument for using a generator to build things, there are many more against it. But using a tool such as AppGini certainly has its merits, and I believe there are several strong use-cases.
AppGini makes creating a database very easy, such that you can realistically have a database up and running in a few minutes — though, of course, a more complex database will take longer. It's great for people with limited SQL or Relational Database Management System knowledge, or those who want to prototype an idea with limited time wastage, but you can also use it to efficiently built a production-ready database.
How to Get Started with AppGini
To get started you'll need to download AppGini and install it, though a caveat here is that it only runs natively on Windows. Linux users can follow these instructions to virtualize AppGini.
Once installed, you'll also need to make sure you have PHP and MySQL running on your machine, with recommended minimum versions being 5.2 and 4 respectively.
If you don't have PHP and MySQL set up on your machine right now, there are an abundance of ways to do it — however, for this tutorial I've opted to use XAMPP with PHP 5.5 and MySQL 5, which you can download here. Once you've got it installed, start the Apache and MySQL servers and verify they are working by opening http://localhost in your browser. You XAMPP control panel should look something like this:
What We're Going to Build with AppGini
We're going to build a database that you might expect to use for a very simple content management system. For this, we're going to need to make three tables with various fields.
Users (ID, userName, userEmail, userDob, userImage)
Categories (ID, categoryID, categoryName)
Posts (ID, AuthorID[FK], postTitle, postContent, postPublishDate, categoryID[FK])
As we go through creating this I'll be explaining some of the data types we are working with, and how AppGini handles fields with special names.
Creating a Database in AppGini
When you open AppGini it will ask you how you want to begin. We're just going to choose start a new project and click OK.
AppGini will start the project for you with just a database name, new_db, chosen. Here you want to click on new_db and change the name as you please — I'm changing this to be named content.
In the main pane you can modify the appearance as you please, but what I want focus on here are the localization settings. I want to change the date format to Year, Month, Day, and set the character encoding to UTF-8, though that should already be set by default. It's worth noting that AppGini does support Right-to-Left languages, so you can safely use Arabic, Hebrew, and so on with it.
Before we move on, here's what I'm looking at.
Creating Tables in Our DB
The first table we're going to create is users, and we can do that simply by clicking on 'Add a new table` — you can see this in the previous screenshot, both in the top menu and in the main pane under the database name.
As soon as you add a new table, AppGini will set the cursor so you can change the name, so naturally we're going to call this one users. I'm going to add in a description stating what the table holds, which will be visible on the AppGini-generated dashboard later.
Depending on the data you're looking to use, you may wish to change the table view template from horizontal to one of the other options, such as Vertical, pictured below, however I find the default works just fine.
Now we need to add some fields to our table. You can do this by clicking on "Add Field" which is to the right of "Add Table" in the menu.
When you do this, again, AppGini will automatically put the cursor in the field name in the left pane. We're going to call this first field ID, which in AppGini is treated specially. When you name a field ID, it will automatically set it to the Primary Key of the table, make it auto-increment, and hide it in the table view. In an RDBMS such as SQL, the Primary Key is a unique identifier for each row that is set automatically by the database engine when you add a record. Its value auto-incrementing means that each new row's Primary Key has a value of the prior + 1. We're going to leave it hidden in the table view because we do not need to see it.
Our next step is to add another field called simply userName. It requires no special configuration and will be created as a character field of up to 40 characters in length.
Next we'll add another field, this time userEmail — but when adding it, we're going to call it just email. Email is another special word in AppGini, where it will set certain properties for the to-be-generated front end, basically setting the value to have a mailto link, as you can see below.
Once you've named it email for the autogenerated properties, click on the name and update to userEmail.
Now we're going to add another field. We want to call it userDob but we're first going to call it date as this is another special word in AppGini, where it will automatically set some properties. In this case, the field's data type will automatically be set to type Date. Once created, click on the field's name and change it to userDob, and then change the "Caption" field to "Date of Birth".
Our final field in this table will be userImage, though yet again we're going to call it something different — this time it will start as image which sets certain properties for the front end including a prefilled description, so create that and then rename it to userImage. Below you can see the media options summary.
With the users table complete, we're going to make a new one, this time called categories. After creating the users table this one should be super simple. We want to create two fields.
categoryId — name it id to start then rename to categoryId, and
categoryName — which we don't have to do anything special with, though I recommend changing the "Caption" field to "Category Name"
Finally, we create our third and final table, called posts. Start off by creating a field in this table called id, but then rename it to postId, so we can take advantage of AppGini's behavior for the best result from the least effort.
The second field to create for this table is going to be called authorID. Rather than have to fill this in manually for every post that is added, we want it to use data from another table, so we're going to click on the "Lookup field" tab, select a Parent table of users, then set the caption fields to ID and userName as pictured below.
We're going to basically do the same thing again, but this time for a field called categoryId, where we'll go into "Lookup field" and set the caption fields to categoryId and categoryName respectively, pictured below.
Why are we using Lookups? Data integrity. In using Lookups in our tables, what we're actually doing is setting the field's value to be a Foreign Key, which is simply the Primary Key from another table, and there are three main benefits:
The data needed for an item in this table can be pulled from another, preventing data duplication
It becomes almost impossible to insert invalid data into that particular field
The data is, ideally speaking, protected from being accidentally deleted, where you couldn't delete a user who had 10 posts without first deleting their posts.
Now create another table, this time called postTitle. The defaults will most likely suffice, though the character limit will be 40, which you may wish to change to be larger. I'd also recommend changing the "Caption" field to "Post Title".
Next we're going to create the postContent table. Because this is going to store the text that would constitute a post we need to give it some more room to move. As such we want to change the Data type to Text, which is a field that can hold slightly over two billion characters. I'll also recommend changing the "Caption" to "Post Content". We also want to change the field's front end display type to Rich (HTML) area so formatting can be added as required, pictured below for clarity:
And with that it's time to create our final table, this time called postPublishDate, and we're going to set the Data type to DateTime because we want the post to have not just a publish date but the time as well. With this field we want to click on the Auto menu and select Creation date and time so that this is automatically populated, however, this will also set the field as Read Only. And of course, I recommend changing the "Caption" to something a bit more user friendly, in this case "Publish Date".
If you wanted to be able to track when it was changed, you could create another field and set its Data type to DateTime and under Auto choose Editing date and time. Otherwise, if you've been following along this is how your AppGini will look.
Deploying Our DB
Alright! We've created the structure for our database, so now it's just about time to deploy. By default, AppGini will deploy with a standard Bootstrap frontend, however you're able to change this easily by clicking on your database in the left-hand pane, and then selecting Edit theme.
In here you'll get a preview of how it's going to look by default. Using the dropdown you can change the theme to another Bootstrap-based template, some of which I am sure readers will recognize from Bootswatch. Below you can see that I have selected Flatly and the preview has updated accordingly.
Remember to hit RTL if you need it!
And with that it's time to hit Generate PHP Code, after which you'll need to tell AppGini where to deploy the actual code. If you're using XAMPP and followed the default install then you'll want to put it in C:\xampp\htdocs\foldername where we will substitute foldername with content. Assuming everything went well you should see an output window just like this.
What I want to stress here is that if you want, you can make practically any number of changes to your Database and run the PHP generator again, without fear of losing your data.
Otherwise it's time to open our project in the browser, which for most people will be http://localhost/content. You'll see a message saying there's no configuration file, but not to worry: simply click on continue and you'll see another message identifying that you'll need to know the database server, name, username, and password. If you're using XAMPP in its absolute default configuration, your details will be as follows:
Server: localhost
Database name: content (you don't need to create the database first)
Username: root
Password: blank
This is all pictured below, however you'll also need to set an Admin username, email, and password. Please note, these are not related to the content database we have created — these are to log in to the AppGini generated dashboard.
If all goes to plan, you'll see a success message from which you can navigate to start adding data, import from CSV, or go to the admin homepage to modify application settings. We'll get straight down to business and start adding data.
Inputting Information into Our DB
First up, we're going to be adding user data to our users table. If you haven't already, click on "Start adding data" and then "Users" which will show you everything in that table right now (which is, obviously, nothing).
Of course, we're going to click on "Add New" and get started. I'm going to keep it simple and just add a dummy user to the Database as pictured below.
Fill it out as required and when you're done just click on "Save New". You'll see something like this, where we can see all the user data we just put in, and change if required:
If you are to click the red cog pictured (which shows only when the user is signed in as administrator) you'll receive a small dialog where you can see the record owner, change said owner, email the user, and so on.
From the top menu let's select Jump to... and navigate into our Categories table and once again, we're going to add a new record. Because of the limited scope of this table, the only value we can input is the category name, so I'm just going to call my category by "news".
When you've done that, use the Jump to... menu again, but this time head into Posts and click on "Add New".
Here you can see that we've got a more interesting view to work with. Naturally we can't change the ID or Publish Date of the post, as they're managed by the database, and as for the Author ID and Category ID, they're restricted to what's in dropdowns. However, the latter two have + buttons next to them, and if you click on those you can add new user and category records while you're creating the post.
I'm not going to do either of those, instead electing to set a post title and paste in some classic lorem ipsum into the WYSIWYG editor, though I'll change it to Comic Sans because I'm a classy guy. When you're done hit save, then navigate back to the posts table and you should see something like this.
And, well, that's basically it. That's how you create a database in AppGini and can feed in data via the generated front end.
Exporting to CSV
When you've got some data in your tables, if at any time you want to back that data up, you just need to navigate to the table in question, and click on "Save CSV" which will automatically download a CSV to your computer named after the table.
Continue reading %How to Prototype Web Apps Quickly with AppGini%
via SitePoint http://ift.tt/2kGgGfg
0 notes