#How To Install Prometheus And Grafana On Docker
Explore tagged Tumblr posts
Visit Tumblr Blog
Explore Tumblr blogs with no restrictions, modern design and the best experience.
Last Seen Tumblr Blogs


Fun Fact
Tumblr is available in 18 languages.
Text
Docker Setup: Monitoring Synology with Prometheus and Grafana
In this article, we will discuss “Docker Setup: Monitoring Synology with Prometheus and Grafana”. We will be utilizing Portainer which is a lightweight/open-source management solution designed to simplify working with Docker containers instead of working with the Container Manager on Synology. Please see How to use Prometheus for Monitoring, how to Install Grafana on Windows and Windows Server,…
#Accessing Grafana and Prometheus#Add Portainer Registries#Configure and Run Prometheus Container#docker#Docker Containers on Synology#Enter5yourownpasswordhere123456#Enter5yourownpasswordhere2345#Grafana monitoring#Grafana/Prometheus Monitoring#How To Install Prometheus And Grafana On Docker#install portainer#Modify Synology Firewall Rules#monitoring solutions for Docker#portainer#portainer server#Prometheus Grafana integration#Prometheus metrics#Pull Docker Images for Grafana and Prometheus#Set Up Grafana Data Source#Synology monitoring setup#Your Portainer instance timed out for Security Purposes
0 notes
Text
Master the Digital Future with Artifact Geeks: DevOps Training in Jaipur & WordPress Online Course
In today’s rapidly evolving digital world, technology continues to redefine how we work, connect, and grow. Businesses, startups, and even individuals need up-to-date tech skills not just to survive—but to thrive. At Artifact Geeks, we are committed to equipping you with the practical knowledge and tools you need to succeed in tech, whether you're an aspiring developer, digital marketer, or IT professional.
Our two most sought-after programs—DevOps training in Jaipur and our industry-recognized WordPress online course—are designed to empower learners with the latest skills in web development and IT operations. Whether you're in Jaipur or learning remotely from anywhere in the world, Artifact Geeks has a path tailored for you.
Why Choose Artifact Geeks?
Artifact Geeks is not just another training institute. We focus on practical learning, real-world projects, and industry-relevant curriculum. Our mentors are experienced professionals who bridge the gap between theory and application. We offer both classroom and remote learning options so you can train at your own pace and convenience.
We’re proud to offer:
Hands-on projects
Certification upon completion
Small batch sizes for personalized attention
Career support and interview preparation
Affordable pricing with EMI options
DevOps Training in Jaipur – Get Future-Ready with Cloud and Automation Skills

DevOps is one of the most in-demand tech skills today. As businesses continue to adopt cloud computing, automation, and continuous deployment models, DevOps engineers have become central to agile operations and modern software development.
Our DevOps training in Jaipur is designed for IT professionals, developers, system administrators, and fresh graduates looking to build a future-proof career.
🔧 What You’ll Learn in Our DevOps Course:
Introduction to DevOps and the software development lifecycle (SDLC)
Linux fundamentals and shell scripting
Version control with Git and GitHub
Continuous integration/continuous delivery (CI/CD) pipelines
Tools like Jenkins, Docker, Kubernetes, Ansible, Terraform
Cloud platforms: AWS basics and deployment
Monitoring and logging tools: Nagios, Prometheus, Grafana
Real-world DevOps projects and case studies
🏆 Why Join DevOps Training in Jaipur at Artifact Geeks?
Industry Experts as Trainers: Learn from working professionals who have built and managed DevOps pipelines for real companies.
Live Projects: Work on real-time deployments and CI/CD workflows.
Certification: Get certified with an Artifact Geeks DevOps badge, which adds credibility to your resume.
Placement Assistance: We offer resume reviews, mock interviews, and connections with hiring partners across Jaipur and India.
Whether you're looking to upskill, switch careers, or land your first tech job, our DevOps training in Jaipur gives you the tools and confidence you need.
WordPress Online Course – Build Beautiful, Functional Websites Without Coding
Looking to start a blog, launch a portfolio, or build an eCommerce website? WordPress is your go-to solution. Powering over 40% of websites globally, WordPress is the most accessible and powerful content management system (CMS) out there.
At Artifact Geeks, our WordPress online course is perfect for beginners and intermediate learners who want to design, build, and manage websites with ease—even if they don’t have a technical background.
🌐 What You’ll Learn in Our WordPress Online Course:
Introduction to WordPress, domain registration, and hosting setup
Installing WordPress manually and using one-click tools
Understanding the WordPress dashboard and settings
Choosing and customizing themes
Installing and configuring plugins
Creating and organizing content: pages, posts, menus
Setting up contact forms, galleries, and SEO plugins
Building a blog, business site, or WooCommerce store
Website security and performance optimization
💡 Why Artifact Geeks is the Best for WordPress Learning?
Beginner-Friendly Modules: Designed for people with little or no coding experience.
Self-Paced Learning: Study at your own pace with full access to recorded sessions and downloadable resources.
Live Mentor Support: Weekly Q&A sessions with WordPress experts.
Real Projects: Build your own website from scratch during the course.
Affordable Pricing: Get high-value training without breaking the bank.
Whether you're a freelancer, entrepreneur, or content creator, our WordPress online course gives you the skills to take control of your web presence—without relying on expensive developers.
Who Can Benefit from These Courses?
Both of our flagship programs—DevOps training in Jaipur and the WordPress online course—are designed to serve a wide variety of learners: Learner Type DevOps Course WordPress Course IT Professionals ✅ Advance your career with automation ❌ Not the primary audience College Students ✅ Gain industry-relevant skills ✅ Build a personal website or blog Entrepreneurs ❌ Not relevant unless tech-specific ✅ Create your own business website Freelancers ✅ Add DevOps as a skill ✅ Offer WordPress services to clients Career Changers ✅ Enter the tech domain with demand ✅ Transition to freelance or design work
What Our Students Say
Ankur Mehta – DevOps Learner, Jaipur "The DevOps training at Artifact Geeks was detailed, structured, and hands-on. I landed a job at a startup in just 3 months after completing the course."
Ritika Singh – WordPress Student, Remote "As a graphic designer, I wanted to offer website design too. The WordPress course helped me build websites for clients without needing to code. Highly recommend it!"
Rahul Bansal – Freelancer "Thanks to both courses, I now offer DevOps consulting and WordPress website packages to small businesses. Artifact Geeks gave me the foundation I needed."
Why Learning with Artifact Geeks Makes a Difference
What sets us apart from the rest is our commitment to skill-based education and career transformation. Here's why learners love us:
Hands-On Learning: Not just theory—our focus is on real-world implementation.
Flexible Access: Whether you're learning from Jaipur or New York, our LMS (Learning Management System) keeps everything organized and accessible.
Mentor Support: One-on-one sessions, career advice, and direct feedback from professionals.
Community Access: Join a growing community of tech learners and freelancers.
Enroll Now and Shape Your Digital Future
Whether you’re passionate about cloud computing, automation, and infrastructure, or you dream of building stunning websites that reflect your personal or business identity—Artifact Geeks has the right course for you.
🎯 Choose DevOps training in Jaipur for a future-proof tech career. 🎯 Take the WordPress online course to build, manage, and launch your own websites.
Get in Touch Today
📞 Call: [9024000740] 🌐 Website: [https://artifactgeeks.com/] 📧 Email: [[email protected]] 📍 Location: Jaipur, Rajasthan, 302034
0 notes
Text
Unlock Infrastructure Mastery: Join the Prometheus MasterClass for Monitoring & Alerting

If you've ever tried to troubleshoot a slow-loading website, debug a crashing server, or simply wanted more insight into what your system is doing behind the scenes — then monitoring and alerting are already on your radar. But here’s the deal: traditional monitoring tools often leave you juggling incomplete data, clunky dashboards, and alerts that scream, “Something’s wrong!” without telling you what, where, or why.
That’s where Prometheus comes in — and more importantly, where the Prometheus MasterClass: Infra Monitoring & Alerting! becomes your ultimate ally.
Whether you're a DevOps engineer, a system administrator, or just an aspiring tech pro, this course can be your game-changer for mastering infrastructure visibility, real-time alerting, and proactive problem-solving.
Let’s dive into why Prometheus is so powerful, what you’ll learn in this masterclass, and how it sets you on a path to dominate infrastructure monitoring like a pro.
Why Infrastructure Monitoring Matters — A Lot
Let’s break it down.
Infrastructure monitoring is like the health tracker for your digital ecosystem. It tells you how your servers, containers, databases, and applications are doing — whether they’re healthy or if they’re about to explode in a flurry of errors.
Think of it like this:
No monitoring? You're driving blindfolded.
Poor monitoring? You’re guessing where the potholes are.
Great monitoring with Prometheus? You're getting real-time traffic alerts, weather updates, and predictive insights to avoid crashes before they happen.
The problem? Setting all this up isn’t always plug-and-play — unless you're learning from a guided course like the Prometheus MasterClass: Infra Monitoring & Alerting!
Meet Prometheus – Your New Monitoring Power Tool
Prometheus is an open-source monitoring and alerting toolkit designed for reliability, performance, and flexibility. Originally developed by SoundCloud, it has since become a CNCF project (Cloud Native Computing Foundation) and a favorite in the DevOps and cloud-native world.
What makes it a rockstar?
✅ Time-series database – stores metrics efficiently ✅ Flexible query language (PromQL) – get exactly what you want ✅ Pull-based architecture – better control and reliability ✅ Built-in alert manager – integrated and customizable alerts ✅ Integration with Grafana – gorgeous dashboards in minutes ✅ Massive community support – plenty of exporters and documentation
If you're working with Kubernetes, Docker, AWS, GCP, or even legacy servers — Prometheus can slide into your stack seamlessly.
But understanding how to actually use Prometheus effectively? That’s a skill.
What You'll Learn in the Prometheus MasterClass
Now let’s talk about the Prometheus MasterClass: Infra Monitoring & Alerting!, because this isn’t just a “read the docs” kind of learning experience.
This course was crafted with both beginners and intermediate learners in mind. It’s hands-on, example-driven, and refreshingly easy to follow — no overwhelming theory, just clear, actionable learning.
Here’s what you’ll walk away with:
🔍 Understanding Metrics and Monitoring Essentials
Difference between monitoring, observability, and alerting
Types of metrics: gauge, counter, histogram, summary
Designing your monitoring strategy
⚙️ Installing and Setting Up Prometheus
How to install Prometheus on Linux and Windows systems
Navigating the configuration file (prometheus.yml)
Setting up node exporters, cAdvisor, and blackbox exporters
📈 Visualizing Metrics with Grafana
Connecting Prometheus with Grafana
Creating custom dashboards and panels
Using variables, annotations, and templating
📡 Collecting and Querying Metrics
Writing PromQL queries like a pro
Building advanced queries for insights
Getting data from third-party services
🚨 Setting Up Alerts That Actually Work
Configuring alert rules and conditions
Using Alertmanager to manage notifications
Integrating Slack, email, and other services
🛠️ Real-World Scenarios and Use Cases
Monitoring CPU, memory, and disk I/O
Detecting and responding to application crashes
Setting thresholds and predictive alerts
Analyzing service availability and response times
☁️ Bonus: Cloud + Kubernetes Monitoring
Kubernetes cluster monitoring with Prometheus
Service discovery and scraping from pods
Best practices for cloud-native environments
The best part? Every lesson is designed to be practical. You’ll be spinning up Prometheus instances, writing queries, and building dashboards right alongside the instructor.
Who Should Take This Course?
This MasterClass is perfect for:
🧠 System administrators tired of jumping between logs and guesswork
💼 DevOps professionals looking to sharpen their monitoring toolset
🌱 Cloud engineers who want visibility across dynamic infrastructures
💻 Developers interested in app performance and availability
🎯 Career switchers or students learning modern DevOps skills
Even if you’ve never touched Prometheus before, the course takes you step-by-step. And if you have used it casually? It’ll take your knowledge to the next level.
Why This Course Beats Random Tutorials
You might be thinking — can’t I just watch YouTube videos or read blog posts?
Sure. You can — but here’s why this MasterClass is a better investment of your time:
🔁 Structured Learning – Each lesson builds on the last 🎯 Focused Content – No fluff, just what works in real environments 🙋 Hands-On Practice – Real scenarios, live configurations 📚 Lifetime Access – Revisit any lesson, anytime 🧑🏫 Expert Guidance – Learn from an instructor with real-world experience 📈 Career-Boosting Value – Add it to your resume, your GitHub, your confidence
And yes — once you enroll in the Prometheus MasterClass: Infra Monitoring & Alerting!, you’ll gain full access to everything, including updates, resources, and community support.
Real Results: What Others Are Saying
💬 "I went from not knowing what a time-series metric was to building real dashboards for my team." 💬 "The best Prometheus learning resource I’ve ever used. Well-structured and practical." 💬 "I finally understand PromQL. The instructor makes it so clear!" 💬 "After this course, I set up alerting that saved us from a major outage last week."
There’s a reason this course is gaining momentum — because it works.
The Future is Observable — Don’t Stay in the Dark
Modern infrastructure is fast, dynamic, and complex. The days of hoping your app works fine in production are long gone. You need visibility, insights, and the power to act fast.
That’s exactly what Prometheus offers — and what this course teaches you to harness.
The Prometheus MasterClass: Infra Monitoring & Alerting! is your opportunity to master one of the most in-demand tools in modern DevOps. Whether you’re upgrading your skills or future-proofing your career — this is the place to start.
Ready to Take Control of Your Infrastructure?
Enroll now in the Prometheus MasterClass: Infra Monitoring & Alerting! and take the first step toward becoming the go-to monitoring expert in your team.
👉 No guesswork. 👉 No overwhelm. 👉 Just clean, clear, confident infrastructure management.
0 notes
Text
How to Become a DevOps Engineer : A Complete Guide
In the ever-changing technology world, DevOps engineering has become a key job, which combines operations and development to create smooth and efficient software solutions. This guide outlines the most important steps, abilities and strategies that will assist you in becoming an effective DevOps engineer.
Who is a DevOps Engineer?
The DevOps engineer is a bridge between the development and IT operations teams, encouraging cooperation to boost the efficiency of software deployment. The job of DevOps engineers is to implement automation as well as managing infrastructure, monitoring the performance of infrastructure, and making sure there is an uninterrupted, smooth delivery pipeline. Through focusing on efficiency and automation, DevOps engineers play a crucial role in speeding up the development of software.
Why Choose a Career in DevOps?
Aws devops course online is a highly sought-after career choice because of its ability to improve workflow efficiency and productivity. The benefits of being an DevOps engineer are:
•Very High Pay Professionals in DevOps are among the highest paid working in the IT sector.
•On-Demand Skill Expertise in DevOps is sought-after by startups and large companies alike.
•The Dynamic Role Utilize the latest tools and technologies.
•Effective Work is a crucial part in shaping the Software delivery process.
Steps to Become a DevOps Engineer
1. Gain a Strong Foundation in Computer Science
Get a bachelor's education in computing science or IT and related fields. Knowing the basics of network, programming and system architecture are vital. Self-taught professionals may also achieve success by learning the required skills via online courses and assignments.
•Key Areas to Learn:
•Operating system (Linux is vitally crucial)
•Networking fundamentals
•Programming languages such as Python, Java, or Go
2. Learn Essential DevOps Tools
DevOps engineers depend on a wide range of tools that improve and streamline infrastructure. Being proficient with these tools is an essential step.
•Categories of Tools:
•Version Control: Git, GitHub, GitLab
•Continuous Integration/Continuous Deployment (CI/CD): Jenkins, CircleCI, GitLab CI/CD
•Configuration Management: Ansible, Puppet, Chef
•Containerization: Docker, Kubernetes
•Cloud Platforms: AWS, Azure, Google Cloud Platform (GCP)
•Monitoring: Prometheus, Nagios, Grafana
3. Master Coding and Scripting
DevOps engineers often write scripts to automate the tasks. Master scripting languages like:
•Bash: For Linux automation
•Python is used for more advanced automation, scripting and programming
•Go to build an application that is scalable
The ability to code is vital to be able to integrate automation tools with software pipelines efficiently.
4. Develop System Administration Skills
A DevOps engineer needs to understand the management of servers, networking, and security to maintain a robust infrastructure. Essential skills include:
•Configuring, installing as well as maintaining server.
•Manage cloud-based environments, such as AWS ECS2 and Azure Virtual Machines.
•Tasks of managing databases.
5. Understand Cloud Computing
Cloud platforms are at the heart of modern DevOps methods. Learn to deploy, monitor and scale up applications on popular cloud services such as:
•AWS Master services include EC2, S3, and Lambda.
•Azure: Explore Azure DevOps and Virtual Machines.
•GCP: Understand Compute Engine and Kubernetes Engine.
Also, getting proficient to Infrastructure as Code (IaC) tools such as Terraform will give you an advantage.
6. Build Expertise in CI/CD Pipelines
DevOps is synonymous to CI/CD, which streamlines the process of integration of code testing, deployment, and integration. Learn how to create and manage pipelines so that you can ensure continuous supply of top-quality software updates.
•Steps to Master CI/CD:
•Automate testing of code using tools such as Jenkins and GitLab CI.
•Release updates to code seamlessly with Docker as well as Kubernetes.
•Monitor the performance of pipelines and find bottlenecks.
7. Enhance Collaboration and Communication Skills
DevOps is a way to foster collaboration among teams. A good communication system ensures a smooth flow between the development, QA, and operations teams. Utilize tools such as Slack and Microsoft Teams to facilitate communication and issues tracking.
8. Stay Updated with Industry Trends
DevOps is a rapidly evolving field that is rapidly evolving. Be informed of new techniques, tools and emerging trends through:
•Follow blogs such as DevOps.com along with The New Stack.
•Participating in conferences and webinars.
•Joining communities on platforms such as Reddit, Dev.to, and Stack Overflow.
•Building a DevOps Portfolio
As you gain abilities, you can work on real-world projects that show off your knowledge. Develop a portfolio with:
•Pipelines for automated deployment.
•Cloud-based Infrastructure Configurations.
•Examples of dashboards used for monitoring.
•Hosting your work on platforms such as GitHub can show your expertise to prospective employers.
•Certifications to Boost Your Career
9. Certifications can verify your abilities and improve your chances of getting a job. Think about earning credentials like:
•AWS Certified DevOps Engineer - Professional
•Microsoft Certified: DevOps Engineer Expert
•Certified Kubernetes Administrator (CKA)
•Docker Certified Associate
•Where to Find DevOps Jobs
10. DevOps jobs are in high demand across all industries. Find job openings on:
•Job portals such as LinkedIn, Glassdoor, and Indeed.
•Specialized platforms such as AngelList (for entrepreneurs).
•Events for networking and DevOps Meetups.
•Challenges in DevOps
11. While it can be rewarding, DevOps is not without obstacles:
•The balance of multiple responsibilities in both operations and the development department.
•Controlling security in complicated environment.
•Staying current with the rapidly changing techniques and tools.
•Be prepared for these challenges by continual learning and proactive problem solving.
Conclusion
Being a DevOps engineer is a blend of technical know-how as well as practical experience and an ability to collaborate. Through mastering the tools, gaining an understanding of the cloud's infrastructure and keeping up-to-date on industry trends and developments, you can create a rewarding career in this thrilling field. If you're just starting out or moving from an IT position, the road to become an DevOps engineer is definitely worthy of the time and effort.
0 notes
Text
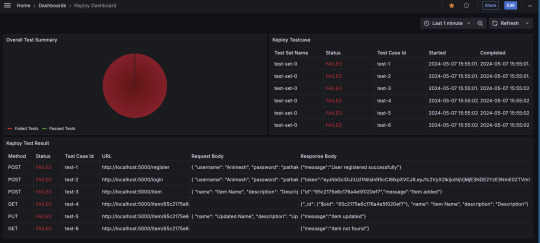
Visualize Keploy Test Data in Grafana for Real-Time Monitoring

In today's fast-paced development environment, efficient monitoring and visualization of test results are essential for ensuring the quality of your application. Keploy, a zero-code testing tool, simplifies test generation and integration, but how do you effectively monitor and analyze the test data Keploy generates?
This is where Grafana, a powerful open-source analytics and monitoring platform, comes into play. In this blog, we'll explore how you can set up a Grafana dashboard to visualize Keploy test data, enabling you to quickly assess the health of your tests and debug issues efficiently.
What is Grafana?

With Grafana, you can create real-time dashboards to track everything from server performance to test results, all in one place. By combining Grafana with Keploy, you can visually monitor your test suites and gain insights into test performance, failures, and trends over time.
What is Keploy?
Keploy is an open-source, zero-code testing platform that generates and executes test cases by observing real-world network traffic. It captures API requests, responses, and user interactions to automatically create test cases without requiring developers to write test scripts.
Brownie points out that it can integrate with existing CI/CD pipelines to enable end-to-end, integration, and unit testing.
Why Integrate Keploy with Grafana?
While Keploy automates test creation and execution, visualizing the test results can sometimes be challenging, especially with large test suites. Integrating Keploy with Grafana allows you to:
Monitor test results in real-time: Get immediate insights into your test runs.
Visualize test trends: Track how your tests perform over time, including pass/fail rates and test coverage.
Analyze test failures: Quickly identify patterns and potential areas of improvement.
Share insights: Easily share dashboards with team members, providing transparency and accountability across your testing process.
Step-by-Step Guide to Using Grafana with Keploy
Step 1: Install Grafana
If you don't have Grafana yet, follow these steps:
Use the docker to start Grafana service:docker run -d -p 3000:3000 --name=grafana grafana/grafana-enterprise
Access Grafana via http://localhost:3000/ and log in with the default credentials (admin/admin).
Step 2: Set Up Keploy to Generate Test Data
Before integrating Grafana, you need to ensure that Keploy is generating and storing test reports. Keploy captures API traffic to create tests and stores the test results, which can then be visualized in Grafana. I am using a sample app based on Mux router with Postgres database : - https://github.com/Sonichigo/mux-sql#Start Postgres docker-compose up -d postgres #Build App binary go build -cover
You can generate test cases with Keploy by running:keploy record -c "./test-app-product-catelog"
This command captures the real-world traffic from your application and creates test cases based on it. We can make API Calls using Hoppscotch, Postman or cURL command and keploy would be able to capture those calls to generate the test-suites containing testcases and data mocks.
To run the test cases we created earlier and generate our report, let’s run :keploy test -c "./test-app-product-catelog"
This will execute the test cases and generate test reports.
Step 3: Export Keploy Test Data
Next, you need to export the test data generated by Keploy into a format that Grafana can read. Most common being JSON format, so let’s export the test reports to JSON using JSON Converter.
Step 4: Configure Grafana Data Source
Grafana supports a wide range of data sources, and you can use one based on how you've exported your Keploy data. If you're using JSON or CSV, you can set up Grafana Loki or another time-series database that supports the format. If you store test reports in MySQL or Prometheus, configure Grafana to fetch data from that source.
Go to Settings > Data Sources in Grafana.
Select the appropriate data source type (e.g., MySQL, Prometheus).
Configure the connection by providing the necessary credentials and database details.
Test the connection to ensure that Grafana can pull data from your source.
Step 5: Create a Grafana Dashboard
Once the data source is set up, you can create a dashboard to visualize the Keploy test results.
Go to Create > Dashboard in Grafana.
Select Add a new panel.
Query the test data from your chosen data source.
Configure visualizations based on your needs. Some examples include:
Bar charts to display test pass/fail ratios.
Time-series graphs to track test execution times.
Tables to list failed tests and their details.
Customize the panels to reflect the key metrics you want to monitor, such as:
Total tests run
Passed/failed tests
Test duration
Coverage percentage
Alternatively, you can import the existing Keploy Dashboard on Grafana with everything already in place and just upload the JSON to view the metrics.
Step 6: Automating Keploy Test Data Updates
To keep your dashboard updated with the latest test data, you can automate the process of exporting Keploy reports and updating the Grafana data source. Set up a cron job or CI/CD pipeline step to regularly export Keploy reports.
Key Metrics to Track in Your Dashboard
Here are some useful metrics to include in your Grafana dashboard for Keploy:
Total Test Runs: The number of test executions over time.
Pass/Fail Ratio: A visual breakdown of successful vs. failed test cases.
Test Execution Time: The average time it takes for tests to run, helping identify slow-running tests.
Test Coverage: Percentage of code covered by the tests, which can help you identify areas lacking coverage.
Failed Test Cases: A detailed breakdown of the specific tests that failed, including error messages and stack traces.
Conclusion
Integrating Keploy with Grafana offers a powerful combination of zero-code test automation and real-time test visualization. By creating a Grafana dashboard for your Keploy test data, you can monitor the health of your application’s test suite, track key trends, and quickly respond to any issues that arise.
This setup not only saves time but also improves transparency and accountability across your testing process, enabling your team to make data-driven decisions with confidence. So, whether you're a developer, tester, or DevOps engineer, start using Grafana with Keploy to streamline your testing and monitoring efforts.
FAQs
What benefits does integrating Keploy with Grafana offer?
Integrating Keploy with Grafana provides real-time monitoring of test results, enabling you to visualize test trends, quickly spot failures, track test execution times, and assess test coverage. It also promotes transparency, helping teams make data-driven decisions and improve testing accountability.
How does Keploy generate test cases without writing code?
Keploy automatically captures network traffic and API interactions within your application to create test cases. This zero-code approach lets you generate comprehensive test suites by simply observing real-world user interactions, saving time and eliminating the need for manually written test scripts.
What kind of data sources can I connect to Grafana to view Keploy test data?
Grafana supports various data sources such as Prometheus, MySQL, CSV, and JSON. Depending on the format of the Keploy test data, you can configure Grafana to pull data from these sources, allowing flexible and customized visualization of test metrics.
Can I automate the process of exporting Keploy test data to Grafana?
Yes, you can automate the export of Keploy test data by setting up a cron job or adding a CI/CD pipeline step. This automation ensures that Grafana receives the latest test reports regularly, keeping the dashboard metrics up to date.
What are some key metrics I should monitor in my Grafana dashboard?
Useful metrics include Total Test Runs, Pass/Fail Ratio, Test Execution Time, Test Coverage Percentage, and specific details of Failed Test Cases. These metrics help assess the overall health of your tests, identify slow-running tests, and focus on areas requiring improvement.
Is there a pre-built Grafana dashboard for Keploy, or do I need to create one from scratch?
You can import an existing Grafana dashboard for Keploy by uploading the provided JSON file. This allows you to quickly set up a dashboard with default panels and visualizations, which you can further customize based on your specific testing needs.
0 notes
Text
How to migrate your app to Kubernetes containers in GCP?
Migrating your application to Kubernetes containers in Google Cloud Platform (GCP) involves several steps. Here is a comprehensive guide to help you through the process:
Step 1: Prepare Your Application
Containerize Your Application:
Ensure your application is suitable for containerization. Break down monolithic applications into microservices if necessary.
Create a Dockerfile for each part of your application. This file will define how your application is built and run inside a container.
# Example Dockerfile
FROM python:3.9-slim
WORKDIR /app
COPY . /app
RUN pip install -r requirements.txt
CMD ["python", "app.py"]
2. Build and Test Containers:
Build your Docker images locally and test them to ensure they run as expected.
docker build -t my-app .
docker run -p 5000:5000 my-app
Step 2: Set Up Google Cloud Platform
Create a GCP Project:
If you don’t have a GCP project, create one via the GCP Console.
Install and Configure gcloud CLI:
Install the Google Cloud SDK and initialize it.
curl https://sdk.cloud.google.com | bash
exec -l $SHELL
gcloud init
3. Enable Required APIs:
Enable Kubernetes Engine API and other necessary services.
gcloud services enable container.googleapis.com
Step 3: Create a Kubernetes Cluster
Create a Kubernetes Cluster:
Use the gcloud CLI to create a Kubernetes cluster.
gcloud container clusters create my-cluster --zone us-central1-a
2. Get Cluster Credentials:
Retrieve the credentials to interact with your cluster.
gcloud container clusters get-credentials my-cluster --zone us-central1-a
Step 4: Deploy to Kubernetes
Push Docker Images to Google Container Registry (GCR):
Tag and push your Docker images to GCR.
docker tag my-app gcr.io/your-project-id/my-app
docker push gcr.io/your-project-id/my-app
2. Create Kubernetes Deployment Manifests:
Create YAML files for your Kubernetes deployments and services.
# deployment.yaml
apiVersion: apps/v1
kind: Deployment
metadata:
name: my-app
spec:
replicas: 3
selector:
matchLabels:
app: my-app
template:
metadata:
labels:
app: my-app
spec:
containers:
- name: my-app
image: gcr.io/your-project-id/my-app
ports:
- containerPort: 5000
3. Deploy to Kubernetes:
Apply the deployment and service configurations to your cluster.
kubectl apply -f deployment.yaml
kubectl apply -f service.yaml
Step 5: Manage and Monitor
Monitor Your Deployment:
Use Kubernetes Dashboard or other monitoring tools like Prometheus and Grafana to monitor your application.
Scale and Update:
Scale your application as needed and update your deployments using Kubernetes rolling updates.
kubectl scale deployment my-app --replicas=5
kubectl set image deployment/my-app my-app=gcr.io/your-project-id/my-app:v2
Additional Tips
Use Helm: Consider using Helm for managing complex deployments.
CI/CD Integration: Integrate with CI/CD tools like Jenkins, GitHub Actions, or Google Cloud Build for automated deployments.
Security: Ensure your images are secure and scanned for vulnerabilities. Use Google Cloud’s security features to manage access and permissions.
By following these steps, you can successfully migrate your application to Kubernetes containers in Google Cloud Platform, ensuring scalability, resilience, and efficient management of your workloads.
For more details click www.hawkstack.com
#redhatcourses#information technology#linux#containerorchestration#docker#kubernetes#container#containersecurity#dockerswarm#aws
0 notes
Text
How do I start learning DevOps?

A Beginner’s Guide to Entering the World of DevOps
In today’s fast-paced tech world, the lines between development and operations are becoming increasingly blurred. Companies are constantly seeking professionals who can bridge the gap between writing code and deploying it smoothly into production. This is where DevOps comes into play. But if you’re new to it, you might wonder: “How do I start learning DevOps?”
This guide is designed for absolute beginners who want to enter the DevOps space with clarity, structure, and confidence. No fluff—just a clear roadmap to get you started.
What is DevOps, Really?
Before jumping into tools and techniques, it’s important to understand what DevOps actually is.
DevOps is not a tool or a programming language. It’s a culture, a mindset, and a set of practices that aim to bridge the gap between software development (Dev) and IT operations (Ops). The goal is to enable faster delivery of software with fewer bugs, more reliability, and continuous improvement.
In short, DevOps is about collaboration, automation, and continuous feedback.
Step 1: Understand the Basics of Software Development and Operations
Before learning DevOps itself, you need a foundational understanding of the environments DevOps operates in.
Learn the Basics of:
Operating Systems: Start with Linux. It’s the backbone of most DevOps tools.
Networking Concepts: Understand IPs, DNS, ports, firewalls, and how servers communicate.
Programming/Scripting: Python, Bash, or even simple shell scripting will go a long way.
If you're a complete beginner, you can spend a month brushing up on these essentials. You don’t have to be an expert—but you should feel comfortable navigating a terminal and writing simple scripts.
Step 2: Learn Version Control Systems (Git)
Git is the first hands-on DevOps tool you should learn. It's used by developers and operations teams alike to manage code changes, collaborate on projects, and track revisions.
Key Concepts to Learn:
Git repositories
Branching and merging
GitHub/GitLab/Bitbucket basics
Pull requests and code reviews
There are plenty of interactive Git tutorials available online where you can experiment in a sandbox environment.
Step 3: Dive Into Continuous Integration/Continuous Deployment (CI/CD)
Once you’ve learned Git, it’s time to explore CI/CD, the heart of DevOps automation.
Start with tools like:
Jenkins (most popular for beginners)
GitHub Actions
GitLab CI/CD
Understand how code can automatically be tested, built, and deployed after each commit. Even a simple pipeline (e.g., compiling code → running tests → deploying to a test server) will give you real-world context.
Step 4: Learn Infrastructure as Code (IaC)
DevOps isn’t just about pushing code—it’s also about managing infrastructure through code.
Popular IaC Tools:
Terraform: Used to provision servers and networks on cloud providers.
Ansible: Used for configuration management and automation.
These tools allow you to automate server provisioning, install software, and manage configuration using code, rather than manual setup.
Step 5: Get Comfortable With Containers and Orchestration
Containers are a huge part of modern DevOps workflows.
Start With:
Docker: Learn how to containerize applications and run them consistently on any environment.
Docker Compose: Manage multi-container setups.
Kubernetes: When you’re comfortable with Docker, move on to Kubernetes, which is used to manage and scale containerized applications.
Step 6: Learn About Monitoring and Logging
DevOps is not just about automation; it’s also about ensuring that systems are reliable and observable.
Get Familiar With:
Prometheus + Grafana: For monitoring system metrics and visualizing data.
ELK Stack (Elasticsearch, Logstash, Kibana): For centralized logging and log analysis.
Step 7: Practice With Real Projects
Theory and tutorials are great—but DevOps is best learned by doing.
Practical Ideas:
Build a CI/CD pipeline for a sample application
Containerize a web app with Docker
Deploy your app to AWS or any cloud provider using Terraform
Monitor your app’s health using Grafana
Don’t aim for perfection; aim for experience. The more problems you face, the better you'll get.
Step 8: Learn About Cloud Platforms
Almost all DevOps jobs require familiarity with cloud services.
Popular Cloud Providers:
AWS (most recommended for beginners)
Google Cloud Platform
Microsoft Azure
You don’t need to learn every service—just focus on compute (like EC2), storage (S3), networking (VPC), and managed Kubernetes (EKS, GKE).
Final Thoughts: DevOps Is a Journey, Not a Sprint
DevOps isn’t a destination—it’s an evolving practice that gets better the more you experiment and adapt. Whether you're from a development background, system administration, or starting from scratch, you can learn DevOps by taking consistent steps.
Don’t worry about mastering every tool at once. Instead, focus on building a strong foundation, gaining hands-on experience, and gradually expanding your skills. With time, you’ll not only learn DevOps—you’ll live it.
And remember: Start small, stay curious, and keep building.
0 notes
Text
Welcome to our guide on How to Install Prometheus on CentOS 8 / RHEL 8. Prometheus is an open-source time series monitoring and alerting toolkit originally developed at SoundCloud. It has very active development and community and has seen wide adoption by many organizations and companies. Prometheus is the defacto monitoring tool for Cloud native applications and microservices. You can’t talk Docker and Kubernetes infrastructure monitoring without mentioning Prometheus. To achieve complete monitoring, alerting and visualization, Grafana usually comes into the mix. Below are the steps to install Prometheus monitoring tool on RHEL 8. Step 1: Add system user and group for Prometheus Let’s kick off the installation of Prometheus on RHEL 8 by creating a dedicated user that will run and manage Prometheus service. This is a system user that doesn’t have access to console/shell login. sudo groupadd --system prometheus sudo useradd -s /sbin/nologin --system -g prometheus prometheus Note that this user doesn’t have /bin/bash shell, that’s why we used -s /sbin/nologin. Step 2: Set NTP Server To avoid any time drift, configure NTP server on Prometheus server to provide accurate time. How to Configure NTP Server Using Chrony on RHEL / CentOS 8 Step 3: Create data directory for Prometheus Once the system user and group has been created, proceed to create a directory that will be used to store Prometheus data. This includes the metrics collected from the agents being monitored. sudo mkdir /var/lib/prometheus You can choose to use a different path, e.g separate partition. Step 4: Create configuration directories for Prometheus Prometheus primary configuration files directory is /etc/prometheus/. It will have some sub-directories. for i in rules rules.d files_sd; do sudo mkdir -p /etc/prometheus/$i; done Step 5: Download Prometheus on CentOS 8 / RHEL 8 We need to download the latest release of Prometheus archive and extract it to get binary files. You can check releases from Prometheus releases Github page. You can use curl or wget to download from the command line. curl -s https://api.github.com/repos/prometheus/prometheus/releases/latest \ | grep browser_download_url \ | grep linux-amd64 \ | cut -d '"' -f 4 \ | wget -qi - Extract the file and move it to directory in your $PATH tar xvf prometheus-*.tar.gz cd prometheus-*/ sudo cp prometheus promtool /usr/local/bin/ Also copy consoles and console_libraries to /etc/prometheus directory: sudo cp -r prometheus.yml consoles/ console_libraries/ /etc/prometheus/ Step 6: Create a Prometheus configuration file. Prometheus configuration file will be located under /etc/prometheus/prometheus.yml. Create simple configurations using content: # Global config global: scrape_interval: 15s # Set the scrape interval to every 15 seconds. Default is every 1 minute. evaluation_interval: 15s # Evaluate rules every 15 seconds. The default is every 1 minute. scrape_timeout: 15s # scrape_timeout is set to the global default (10s). # A scrape configuration containing exactly one endpoint to scrape:# Here it's Prometheus itself. scrape_configs: # The job name is added as a label `job=` to any timeseries scraped from this config. - job_name: 'prometheus' # metrics_path defaults to '/metrics' # scheme defaults to 'http'. static_configs: - targets: ['localhost:9090'] Make changes to the file to fit your initial setting and save the file. Step 7: Create systemd Service unit To be able to manage Prometheus service with systemd, you need to explicitly define this unit file. Create a file sudo vi /etc/systemd/system/prometheus.service Add the following contents to it. [Unit] Description=Prometheus Documentation=https://prometheus.io/docs/introduction/overview/ Wants=network-online.target After=network-online.target [Service] Type=simple User=prometheus Group=prometheus ExecReload=/bin/kill -HUP $MAINPID
ExecStart=/usr/local/bin/prometheus \ --config.file=/etc/prometheus/prometheus.yml \ --storage.tsdb.path=/var/lib/prometheus \ --web.console.templates=/etc/prometheus/consoles \ --web.console.libraries=/etc/prometheus/console_libraries \ --web.listen-address=0.0.0.0:9090 \ --web.external-url= SyslogIdentifier=prometheus Restart=always [Install] WantedBy=multi-user.target Set correct directory permissions. sudo chown -R prometheus:prometheus /etc/prometheus sudo chmod -R 775 /etc/prometheus/ sudo chown -R prometheus:prometheus /var/lib/prometheus/ Start Prometheus service. sudo systemctl daemon-reload sudo systemctl start prometheus Enable the service to start at system boot: sudo systemctl enable prometheus Check status using systemctl status prometheus command: $ systemctl status prometheus.service ● prometheus.service - Prometheus Loaded: loaded (/etc/systemd/system/prometheus.service; disabled; vendor preset: disabled) Active: active (running) since Fri 2019-01-11 00:36:17 EAT; 4min 44s ago Docs: https://prometheus.io/docs/introduction/overview/ Main PID: 7576 (prometheus) Tasks: 9 (limit: 11510) Memory: 19.8M CGroup: /system.slice/prometheus.service └─7576 /usr/local/bin/prometheus --config.file=/etc/prometheus/prometheus.yml --storage.tsdb.path=/var/lib/prometheus --web.console.templat> Jan 11 00:36:17 rhel8.local prometheus[7576]: level=info ts=2019-01-10T21:36:17.709504055Z caller=main.go:244 build_context="(go=go1.11.3, user=root@b> Jan 11 00:36:17 rhel8.local prometheus[7576]: level=info ts=2019-01-10T21:36:17.709529058Z caller=main.go:245 host_details="(Linux 4.18.0-32.el8.x86_6> Jan 11 00:36:17 rhel8.local prometheus[7576]: level=info ts=2019-01-10T21:36:17.709557341Z caller=main.go:246 fd_limits="(soft=1024, hard=4096)" Jan 11 00:36:17 rhel8.local prometheus[7576]: level=info ts=2019-01-10T21:36:17.709576706Z caller=main.go:247 vm_limits="(soft=unlimited, hard=unlimit> Jan 11 00:36:17 rhel8.local prometheus[7576]: level=info ts=2019-01-10T21:36:17.712203022Z caller=main.go:561 msg="Starting TSDB …" Jan 11 00:36:17 rhel8.local prometheus[7576]: level=info ts=2019-01-10T21:36:17.712231744Z caller=web.go:429 component=web msg="Start listening for co> Jan 11 00:36:17 rhel8.local prometheus[7576]: level=info ts=2019-01-10T21:36:17.717664176Z caller=main.go:571 msg="TSDB started" Jan 11 00:36:17 rhel8.local prometheus[7576]: level=info ts=2019-01-10T21:36:17.71771626Z caller=main.go:631 msg="Loading configuration file" filename> Jan 11 00:36:17 rhel8.local prometheus[7576]: level=info ts=2019-01-10T21:36:17.718015628Z caller=main.go:657 msg="Completed loading of configuration > Jan 11 00:36:17 rhel8.local prometheus[7576]: level=info ts=2019-01-10T21:36:17.71803238Z caller=main.go:530 msg="Server is ready to receive web reque> Step 8: Configure firewalld I’ll allow access to Prometheus management interface port 9090 from my trusted network using Firewalld rich rules. sudo firewall-cmd --permanent --add-rich-rule 'rule family="ipv4" \ source address="192.168.122.0/24" \ port protocol="tcp" port="9090" accept' sudo firewall-cmd --reload If you want to allow from any IP, use: sudo firewall-cmd --add-port=9090/tcp --permanent sudo firewall-cmd --reload Open Prometheus Server IP/Hostname and port 9090 Step 9: Secure Web console with Password We have a guide dedicated to using basic http authentication to access Prometheus Metrics. Use below link to access it. Secure Prometheus Server With Basic Password Authentication You now have Prometheus Server installed on CentOS 8 / RHEL 8 Linux system. Also check our Prometheus monitoring guides below. Monitoring Ceph Cluster with Prometheus and Grafana How to Monitor Linux Server Performance with Prometheus and Grafana in 5 minutes How to Monitor BIND DNS server with Prometheus and Grafana How to Monitor Redis Server with Prometheus and Grafana in 5 minutes
Monitoring MySQL / MariaDB with Prometheus in five minutes How to Monitor Apache Web Server with Prometheus and Grafana in 5 minutes
0 notes
Text
Web monitor linux

WEB MONITOR LINUX INSTALL
WEB MONITOR LINUX SOFTWARE
The results are published for collection by external services in our case Prometheus will be collecting the cpu:mem data to the Monitor node. Telegraf processes input data to transform, filter, and decorate it, and then performs selected aggregation functions on it such as tallies, averages, etc.
WEB MONITOR LINUX INSTALL
On the Workload, install Telegraf: workload:~# apt update With LXD installed in our host we can use its lxc command line tool to create our containers: $ lxc launch ubuntu:20.10 workload We’ll be using LXD as our container technology, but there’s very little that depends on this particularly any VM, container, or bare metal host should work for purposes of this example, so long as it’s running Ubuntu 20.10. If you select other hostnames, simply substitute the correct ones as we go.Īs reference, here are the ports we’ll be binding for each service:įirst, let’s set up the Workload. Our Monitor node will double as both data store and web UI, receiving data from the Workload, storing it to disk, and displaying it for analysis.įor clarity, we’ll refer to these two hosts as named ‘workload’ and ‘monitor’.
WEB MONITOR LINUX SOFTWARE
In a real environment, we’d have multiple hosts each with their own Telegraf instance collecting hardware, network, and software status particular to that node. For demo purposes we’ll just read the cpu/mem data from the node. The Workload node will be running Telegraf to collect metrics from whatever load we’re monitoring. This will help familiarize ourselves with the various components and how they interoperate. Let’s set up a basic demonstration with two nodes, the first acting as a placeholder load with Telegraf installed - the “Workload”, and the second acting as our data visualization system - the “Monitor”. For this LMA stack, visualization is handled via Grafana and email/pager alerts are generated via the Prometheus Alertmanager plugin. Prometheus works as a hub, polling data from different Telegraf nodes and sending it to various outputs, including persistent storage. Its plugin system permits export of data in any arbitrary format for this system we collect the data in a central data manager called Prometheus. Telegraf collects metrics from the operating system, running software, and other inputs. Architectural OverviewĬanonical’s LMA stack involves several discrete software services acting in concert, including: Your LMA stack will help point out issues in load, networking, and other resources before it becomes a failure point. Logging, Monitoring, and Alerting (LMA) is a collection of tools used to guarantee the availability of your running infrastructure. Logging, Monitoring, and Alerting - Introduction
Multi-node Configuration with Docker-Compose.
0 notes
Text
Web monitor linux

#Web monitor linux how to#
#Web monitor linux free#
#Web monitor linux how to#
Tutorial: How To Install and Configure Prometheus 2. Grafana is one of the best open-source monitoring dashboards. Also, it has very good integration with tools like Grafana for visualizing metrics. Prometheus can collect system metrics, application metrics, and metrics from modern containerized applications. It handles alerting for all alerting rules configured in Prometheus. The alert manager is another component of Prometheus. The PromQL system analyzes data and permits the program to produce plots, tables, and other graphics on the systems it monitors. It is able to assemble several metrics on servers, kubernetes, and various devices using SNMP pings and inspect network bandwidth usage from the device point of view, along with the other functions. It is an ideal monitoring setup for containerized environments like kubernetes and the best open-source server monitoring tool. It enables users to set up monitoring capabilities by utilizing the in-built toolset. Prometheus is an open-source monitoring solution primarily fixated on data gathering and analysis based on time-series data. Let’s take a look at the top-rated open-source monitoring tools and see what works for you! 1.
#Web monitor linux free#
Numerous absolutely free and open-source network monitoring tools can be considered while looking for monitoring solutions. Support all modern cloud and containerized applications.Able to provide long-term insights for better capacity planning.Collect system/application metrics in real-time.Able to handle and process huge amounts of monitoring data.Detect service outages and unauthorized activities.Provide indicators on outages and service degradation.Professional or Business-grade tech solutions are generally regarded as costly, but that’s not necessarily always the case.įollowing is the key list of key indicators for the best monitoring software. What are the Best Opensource Monitoring Tools? Cloud Infrastructure monitoring (Public & Private).Container Monitoring ( Docker/ Kubernetes/Mesos etc.).All modern cloud and on-premise infrastructure come with the best monitoring solutions.Īlso, when it comes to DevOps, monitoring, and observability plays a key role in the team’s performance.įollowing are the key areas when it comes to monitoring. Regardless of the company’s size, one cannot ignore the need for Server, network, and infrastructure monitoring using the best monitoring tool. Monitoring various aspects of the IT infrastructure can be quite pesky and cause many difficulties if not done properly. Monitoring is necessary for businesses to make sure that the required system is up and working.
0 notes
Link
Server monitoring is really essential if we want to make sure that our applications are running smoothly. It is a basic need for every DevOps engineer, System Administrator and Developers as well.
0 notes
Text
IaC - Speeding up Digital Readiness

Historically, manual intervention was the only way of managing computer infrastructure. Servers had to be mounted on racks, operating systems had to installed, and networks had to be connected and configured. At that time, this wasn't a problem since development cycles were long and infrastructure changes were not frequent.
But in today's world the businesses expect agility on all fronts to meet the dynamic customer needs.
With the rise of DevOps, Virtualization, Cloud and Agile practices, the software development cycles were shortened. As a result, there was a demand for better infrastructure management techniques. Organizations could no longer afford to wait for hours or days for servers to be deployed.
Infrastructure as Code is one way of raising the standard of infrastructure management and time to deployment. By using a combination of tools, languages, protocols, and processes, IaC can safely create and configure infrastructure elements in seconds.
What is Infrastructure as Code?
Infrastructure as Code, or IaC, is a method of writing and deploying machine-readable definition files that generate service components, thereby supporting the delivery of business systems and IT-enabled processes. IaC helps IT operations teams manage and provision IT infrastructure automatically through code without relying on manual processes. IaC is often described as “programmable infrastructure”.
IaC can be applied to the entire IT landscape but it is especially critical for cloud computing, Infrastructure as a Services (IaaS), and DevOps. IaC is the foundation on which the entire DevOps is built. DevOps requires agile work processes and automated workflows which can only be achieved through the assurance of readily available IT Infrastructure – which is needed to run and test the developed code. This can only happen within an automated workflow.
How Infrastructure as Code Works
At a high level IaC can be explained in 3 main steps as shown below.
Developers write the infrastructure specification in a domain-specific language.
The resulting files are sent to a master server, a management API, or a code repository.
The platform takes all the necessary steps to create and configure the computer resources.
Types of Infrastructure as Code
Scripting: Writing scripts is the most direct approach to IaC. Scripts are best for executing simple, short, or one-off tasks.
Configuration Management Tools: These are specialized tools designed to manage software. They are usually used for installing and configuring servers. Ex: Chef, Puppet, and Ansible.
Provisioning Tools: Provisioning tools focus on creating infrastructure. Using these types of tools, developers can define exact infrastructure components. Ex: Terraform, AWS CloudFormation, and OpenStack Heat.
Containers and Templating Tools: These tools generate templates pre-loaded with all the libraries and components required to run an application. Containerized workloads are easy to distribute and have much lower overhead than running a full-size server. Examples are Docker, rkt, Vagrant, and Packer.
Some of the frequently used IaC Tools
AWS CloudFormation
Azure Resource Manager
Google Cloud Deployment Manager
HashiCorp Terraform
RedHat Ansible
Docker
Puppet/Chef
Use Cases of IaC:
Software Development:
If the development environment is uniform across the SDLC, the chances of bugs arising are much lower. Also, the deployment and configuration can be done faster as building, testing, staging and production deployments are mostly repeatable, predictable and error-free.
Cloud Infrastructure Management:
In the case of cloud infrastructure management using IaC, multiple scenarios emerge, where provisioning and configuring the system components with tools like Terraform and Kubernetes helps save time, money and effort. All kinds of tasks, from database backups to new feature releases can be done faster and better.
Cloud Monitoring:
The usefulness of IaC can also be utilized in cloud monitoring, logging and alerting tools which run in different environments. Solutions like ELK stack, FluentD, SumoLogic, Datadog, Prometheus + Grafana, etc. can be quickly provisioned and configured for the project using IaC.
Benefits of Infrastructure as Code
Faster time to production/market
Improved consistency
Agility, more efficient development
Protection against churn
Lower costs and improved ROI
Better Documentation
Increased transparency and accountability
Conclusion:
IaC is an essential part of DevOps transformation, helping the software development and infrastructure management teams work in closely and provide predictable, repeatable and reliable software delivery services. IaC can simplify and accelerate your infrastructure provisioning process, help you avoid mistakes, keep your environments consistent, and save your company a lot of time and money.
If IaC isn’t something you’re already doing, maybe it’s time to start!
#iac#code#devops#digital#transformation#cloud#aws#azure#automation#kubernetes#agile#scripting#sdlc#network#virtualmachines#loadbalancers
0 notes
Text
Kubernetes Engineer

Descripción
Our family is growing very rapidly, and with it also our development capacity. We want to build new applications as fast and reliably as we can, and have recently started our journey towards microservices and CI/CD. To be able to support all these applications, we are developing and maintaining our own Kubernetes clusters.
At its core it runs Kubernetes, but on top of that, we use a wide range of other Open Source Software to abstract away as much of the infrastructure and processes from the development teams as we can, so they can spend all of their energy on the things that really matter; building our innovative and kick-ass platforms and products. Our tech stack currently contains Kubernetes, Helm, Flux, Keycloak, Harbor, Traefik, Prometheus, Grafana, Elasticsearch, Kibana, Ansible, git, and we are continuously seeing how we can improve the functionality of the clusters to help further our goals. We are passionate about standard procedures and use things like Infrastructure as Code, GitFlow for infrastructure and GitOps for release management.
You will work in a team to build and maintain a stable, scalable platform. To do this, you will be working closely with the development teams of different companies in our group, spread over Europe. Those teams use these clusters to build, test and deploy numerous applications of different flavours (web, voice, video). You will teach them how to best use the different components that our platform provides, look for way to add more useful functionality to the clusters, or remove functionality that is no longer in use. And you use techniques like Continuous Integration and Continuous Delivery (and possibly Deployment) to ensure the clusters has production-grade stability, while delivering new features as fast as we can.
Your challenges will be:
Building, testing and implementing reproducible Kubernetes clusters and related infrastructures; Operating, supporting and maintaining the clusters so they can meet the applicable Operational Level Agreements; Automating as much as we can, so we can spend our time on other cool things; Be part of an on-call rotation to fix those corner-cases which we didn’t foresee; Supporting and training different teams in getting the most out of the infrastructure we provide; Translating wishes, requirements or annoyances from the users of the clusters into improvements to make the clusters even better; Learning and sharing knowledge about new developments around application delivery, containers, CI/CD which could be of use to the team or our companies.
Those shouldn’t be a problem if you:
Have experience installing and operating Kubernetes clusters running production workloads; Have a really good understanding of Docker and its internals; Have a development background, or a very big interest in development workflows, technologies, tools, etc, mainly around CI/CD; Are experienced with Ansible and Vagrant, or similar tools to build reproducible infrastructures; Have experience with some of the other tools in our technology stack, or tools that can be used for similar tasks; Are somewhat of a Linux guru; Are able to work together with people from numerous different backgrounds, located in different countries, who have different ways of working; Feel comfortable working in a self-steering environment where you are expected to make your own decisions driving the company’s purpose; Like to work hard, and play hard.
In return, we offer:
Great challenges making our products more suitable for international presence. We believe in working hard and rewarding effort. We also take a creative approach to relaxation, organizing a wide range of surprising and fun activities for our employees to enjoy. We enjoy an informal, no-nonsense culture with plenty of room for creativity and personal growth. This is a fulltime position within a truly international company, offering a good remuneration depending on your knowledge and experience.
Tecnologías
Funciones Profesionales
Detalles de la oferta
Idioma: Inglés
Experiencia: 2 años
Formación Mínima: FP2/Grado Superior
Nivel Profesional: Especialista
Tipo contrato: Indefinido
Jornada: Jornada completa
Salario: No especificado
www.tecnoempleo.com/kubernetes-engineer-malaga/kubernetes-docker-ansible-linux/rf-0d8492a50v9846c182u3
La entrada Kubernetes Engineer se publicó primero en Ofertas de Empleo.
from WordPress https://ift.tt/2uJYfg3 via IFTTT
0 notes
Text
Notes from Root Conf Day 1 - 2017
Root Conf is a conference on DevOps and Cloud Infrastructure. 2017 edition’s theme is service reliability. Following is my notes from Day 1.
State of the open source monitoring landscape
The speaker of the session is the co-founder of Icinga monitoring system. I missed first ten minutes of the talk. -The talk is a comparison of all available OSS options for monitoring, visualization.
Auto-discovery is hard.
As per 2015 monitoring tool usage survey, Nagios is widely used.
Nagios is reliable and stable.
Icinga 2 is a fork of Nagios, rewrite in c++. It’s modern, web 2.0 with APIs, extensions and multiple backends.
Sensu has limited features on OSS side and a lot of features on enterprise version. OSS version isn't useful much.
Zabbix is full featured, out of box monitoring system written in C. It provides logging and graphing features. Scaling is hard since all writes are written to single Postgres DB.
Riemann is stream processor and written in Clojure. The DSL stream processing language needs knowledge of Clojure. The system is stateless.
OpenNMS is a network monitoring tool written in Java and good for auto discovery. Using plugins for a non-Java environment is slow.
Graphite is flexible, a popular monitoring tool for time series database.
Prometheus is flexible rule-based alerting and time series database metrics.
Elastic comes with Elastic search, log stash, and kibana. It’s picking up a lot of traction. Elastic Stack is extensible using X-PACK feature.
Grafana is best for visualizing time series database. Easy to get started and combine multiple backends. - - Grafana annotations easy to use and tag the events.
There is no one tool which fits everyone's case. You have to start somewhere. So pick up a monitoring tool, see if it works for you else try the next one til you settle down.
Deployment strategies with Kubernetes
This was talk with a live demo.
Canary deployment: Route a small amount of traffic to a new host to test functioning.
If new hosts don't act normal roll back the deployment.
Blue Green Deployment is a procedure to minimize the downtime of the deployment. The idea is to have two set of machines with identical configuration but one with the latest code, rev 2 and other with rev 1. Once the machines with latest code act correctly, spin down the machines with rev 1 code.
Then a demo of kubectl with adding a new host to the cluster and roll back.
A little bot for big cause
The talk is on a story on developing, push to GitHub, merge and release. And shit hits the fan. Now, what to do?
The problem is developer didn’t get the code reviewed.
How can automation help here?
Enforcing standard like I unreviewed merge is reverted using GitHub API, Slack Bot, Hubot.
As soon as developer opens a PR, alice, the bot adds a comment to the PR with the checklist. When the code is merged, bot verifies the checklist, if items are unchecked, the bot reverts the merge.
The bot can do more work. DM the bot in the slack to issue commands and bot can interact with Jenkins to roll back the deployed code.
The bot can receive commands via slack personal message.
Necessary tooling and monitoring for performance critical applications
The talk is about collecting metrics for German E-commerce company Otto.
The company receives two orders/sec, million visitors per day. On an average, it takes eight clicks/pages to complete an order.
Monitor database, response time, throughput, requests/second, and measure state of the system
Metrics everywhere! We talk about metrics to decide and diagnose the problem.
Metrics is a Clojure library to measure and record the data to the external system.
The library offers various features like Counter, gauges, meters, timers, histogram percentile.
Rather than extracting data from the log file, measure details from the code and write to the data store.
Third party libraries are available for visualization.
The demo used d3.js application for annotation and visualization. In-house solution.
While measuring the metrics, measure from all possible places and store separately. If the web application makes a call to the recommendation engine, collect the metrics from the web application and recommendation for a single task and push to the data store.
What should be PID 1 in a container?
In older version of Docker, Docker doesn’t reap child process correctly. As a result, for every request, docker spawns a new application and never terminated. This is called PID 1 zombie problem.
This will eat all available PIDs in the container.
Use Sysctl-a | grep pid_max to find maximum available PIDs in the container.
In the bare metal machine, PID 1 is systemd or any init program.
If the first process in the container is bash, then is PID 1 zombie process doesn’t occur.
Using bash is to handle all signal handlers is messy.
Yelp came up with Yelp/dumb-init. Now, dumb-init is PID 1 and no more zombie processes.
Docker-1.13, introduced the flag, --init.
Another solution uses system as PID 1
Docker allows running system without privilege mode.
Running system as PID 1 has other useful features like managing logs.
‘Razor’ sharp provision for bare metal servers
I attended only first half of the talk, fifteen minutes.
When you buy physical rack space in a data server how will you install the OS? You’re in Bangalore and server is in Amsterdam.
First OS installation on bare metal is hard.
There comes Network boot!
PXELinux is a syslinux derivative to boot OS from NIC card.
Once the machine comes up, DHCP request is broadcasted, and DHCP server responds.
Cobbler helps in managing all services running the network.
DHCP server, TFTP server, and config are required to complete the installation.
Microkernel in placed in TFTP server.
Razor is a tool to automate provisioning bare metal installation.
Razor philosophy, consume the hardware resource like the virtual resource.
Razor components - Nodes, Tags, Repository, policy, Brokers, Hooks
FreeBSD is not a Linux distribution
FreeBSD is a complete OS, not a distribution
Who uses? NetFlix, WhatsApp, Yahoo!, NetApp and more
Great tools, mature release model, excellent documentation, friendly license.
Now a lot of forks NetBSD, FreeBSD, OpenBSD and few more
Good file system. UFS, and ZFS. UFS high performance and reliable. - If you don’t want to lose data use ZFS!
Jails - GNU/Linux copied this and called containers!
No GCC only llvm/clang.
FreeBSD is forefront in developing next generation tools.
Pluggable TCP stacks - BBR, RACK, CUBIC, NewReno
Firewalls - Ipfw , PF
Dummynet - live network emulation tool
FreeBSD can run Linux binaries in userspace. It maps GNU/Linux system call with FreeBSD.
It can run on 256 cores machine.
Hard Ware - NUMA, ARM64, Secure boot/UEFI
Politics - Democratically elected core team
Join the Mailing list and send patches, you will get a commit bit.
Excellent mentor program - GSoC copied our idea.
FreeBSD uses SVN and Git revision control.
Took a dig at GPLV2 and not a business friendly license.
Read out BSD license on the stage.
0 notes
Text
This article is part of Smart Infrastructure monitoring series, we’ve already covered how to Install Prometheus Server on CentOS 7 and how to Install Grafana and InfluxDB on CentOS 7. We have a Ceph cluster on production that we have been trying to find good tools for monitoring it, lucky enough, we came across Prometheus and Grafana. Ceph Cluster monitoring with Prometheus requires Prometheus exporter that scrapes meta information about a ceph cluster. In this guide, we’ll use DigitalOcean Ceph exporter. Pre-requisites: Installed Prometheus Server. Installed Grafana Server. Docker installed on a Server to run Prometheus Ceph exporter. It should be able to talk to ceph cluster. Working Ceph Cluster Access to Ceph cluster to copy ceph.conf configuration file and the ceph..keyring in order to authenticate to your cluster. Follow below steps for a complete guide on how to set this up. Step 1: Install Prometheus Server and Grafana: Use these links for how to install Prometheus and Grafana. Install Prometheus Server on CentOS 7 and Install Grafana and InfluxDB on CentOS 7. Install Prometheus Server and Grafana on Ubuntu Install Prometheus Server and Grafana on Debian Step 2: Install Docker on Prometheus Ceph exporter client Please note that Prometheus Ceph exporter client should have access to Ceph cluster network for it to pull Cluster metrics. Install Docker on this server using our official Docker installation guide: Install Docker CE on Ubuntu / Debian / Fedora / Arch / CentOS Also, install docker-compose. Install Docker Compose on Linux Systems Step 3: Build Ceph Exporter Docker image Once you have Docker Engine installed and service running. You should be ready to build docker image from DigitalOcean Ceph exporter project. Consider installing Git if you don’t have it already. sudo yum -y install git If you’re using Ubuntu, run: sudo apt update && sudo apt -y install git Then clone the project from Github: git clone https://github.com/digitalocean/ceph_exporter.git Switch to the ceph_exporter directory and build docker image: cd ceph_exporter docker build -t ceph_exporter . This will build an image named ceph_exporter. It may take a while depending on your internet and disk write speeds. $ docker images REPOSITORY TAG IMAGE ID CREATED SIZE ceph_exporter latest 1e3b0082e6d4 3 minutes ago 379MB Step 4: Start Prometheus ceph exporter client container Copy ceph.conf configuration file and the ceph..keyring to /etc/ceph directory and start docker container host’s network stack. You can use vanilla docker commands, docker-compose or systemd to manage the container. For docker command line tool, run below commands. docker run -it \ -v /etc/ceph:/etc/ceph \ --net=host \ -p=9128:9128 \ digitalocean/ceph_exporter For docker-compose, create the following file: $ vim docker-compose.yml # Example usage of exporter in use version: '2' services: ceph-exporter: image: ceph_exporter restart: always network_mode: "host" volumes: - /etc/ceph:/etc/ceph ports: - '9128:9128' Then start docker container using: $ docker-compose up -d For systemd, create service unit file like below: $ sudo vim /etc/systemd/system/ceph_exporter.service [Unit] Description=Manage Ceph exporter service [Install] WantedBy=multi-user.target [Service] Restart=always TimeoutStartSec=0 ExecStartPre=-/usr/bin/docker kill ceph_exporter ExecStartPre=-/usr/bin/docker rm ceph_exporter ExecStart=/usr/bin/docker run \ --name ceph_exporter \ -v /etc/ceph:/etc/ceph \ --net=host \ -p=9128:9128 \ ceph_exporter ExecStop=-/usr/bin/docker kill ceph_exporter ExecStop=-/usr/bin/docker rm ceph_exporter Reload systemd daemon: sudo systemctl daemon-reload Start and enable the service: sudo systemctl enable ceph_exporter sudo systemctl start ceph_exporter Check container status:
sudo systemctl status ceph_exporter You should get output like below if all went fine. Step 5: Open 9128 on the firewall. I use firewalld since this is a CentOS 7 server, allow access to port 9128 from your trusted network. sudo firewall-cmd --permanent \ --add-rich-rule 'rule family="ipv4" \ source address="192.168.10.0/24" \ port protocol="tcp" port="9128" accept' sudo firewall-cmd --reload Test access with nc or telnet command. $ telnet 127.0.0.1 9128 Trying 127.0.0.1... Connected to 127.0.0.1. Escape character is '^]'. $ nc -v 127.0.0.1 9128 Ncat: Version 6.40 ( http://nmap.org/ncat ) Ncat: Connected to 127.0.0.1:9128. Step 6: Configure Prometheus scrape target with Ceph exporter We need to define the Prometheus static_configs line for created ceph exporter container. Edit the file /etc/prometheus/prometheus.yml on your Prometheus server to look like below. scrape_configs: - job_name: prometheus static_configs: - targets: ['localhost:9090'] - job_name: 'ceph-exporter' static_configs: - targets: ['ceph-exporter-node-ip:9128'] labels: alias: ceph-exporter Replace localhost with your ceph exporter host IP address. Remember to restart Prometheus service after making the changes: sudo systemctl restart prometheus Step 7: Add Prometheus Data Source to Grafana Login to your Grafana Dashboard and add Prometheus data source. You’ll need to provide the following information: Name: Name given to this data source Type: The type of data source, in our case this is Prometheus URL: IP address and port number of Prometheus server you’re adding. Access: Specify if access through proxy or direct. Proxy means access through Grafana server, direct means access from the web. Save the settings by clicking save & Test button. Step 8: Import Ceph Cluster Grafana Dashboards The last step is to import the Ceph Cluster Grafana Dashboards. From my research, I found the following Dashboards by Cristian Calin. Ceph Cluster Overview: https://grafana.com/dashboards/917 Ceph Pools Overview: https://grafana.com/dashboards/926 Ceph OSD Overview: https://grafana.com/dashboards/923 We will use dashboard IDs 917, 926 and 923 when importing dashboards on Grafana. Click the plus sign (+)> Import to import dashboard. Enter the number that matches the dashboard you wish to import above. To View imported dashboards, go to Dashboards and select the name of the dashboard you want to view. For OSD and Pools dashboard, you need to select the pool name / OSD number to view its usage and status. SUSE guys have similar dashboards available on https://github.com/SUSE/grafana-dashboards-ceph Other Prometheus Monitoring guides: How to Monitor Redis Server with Prometheus and Grafana in 5 minutes How to Monitor Linux Server Performance with Prometheus and Grafana in 5 minutes How to Monitor BIND DNS server with Prometheus and Grafana Monitoring MySQL / MariaDB with Prometheus in five minutes How to Monitor Apache Web Server with Prometheus and Grafana in 5 minutes
0 notes