#How to install Nvidia CUDA on linux
Explore tagged Tumblr posts
Visit Tumblr Blog
Explore Tumblr blogs with no restrictions, modern design and the best experience.
Last Seen Tumblr Blogs


Fun Fact
The most popular pages on Tumblr are about Minecraft, GIFs, and David J. Peterson.
Text
How to install Nvidia CUDA? (for GPU rendering in Blender)
How to install Nvidia CUDA? (for GPU rendering in Blender)
How to install Nvidia CUDA on linux
Solution :-
On Nvidia’s website they have a .deb package that you have to download and then installed on your system to enable the repository. To install CUDA from Nvidia’s website directly. Here’s the step to install Nvidia CUDA working:
Open Nvidia’s website https://developer.nvidia.com/cuda-downloads
Select the .deb file that corresponds to your Ubuntu…
View On WordPress
1 note
·
View note
Text
Pop!_OS 19.04 is here!
It’s spring again! Leaves are budding and updates are blooming for Pop!_OS. Here’s what’s new in Pop!_OS 19.04:
-The Slim Mode option maximizes your screen real estate by reducing the height of the header on application windows
-Dark Mode gives your applications a relaxing ambience for nighttime viewing. Both Dark Mode and Slim Mode can be activated in the Appearance settings menu.

-Refresh Install allows you to reinstall Pop!_OS without losing Users and any data in your Home directories. This feature is available from the recovery partition on new installations (not upgrades). For more information on how to do this, click here.
-Pop!_OS has been updated to use version 5.0 of the Linux kernel
-GNOME has been updated to version 3.32

Icon changes:
In addition to these features, you’ll also notice design changes to your icons. The icons for Pop!_OS applications, files, and folders have been redesigned to complement GNOME’s icons under their new design guidelines. We’ve also removed custom icons for third party applications, keeping the authors’ design choices for those applications intact and maintaining the intended identity for the project. Many applications have been updated to new GNOME icons already, and we hope to work with the GNOME project to help design app icons that have yet to be updated.
Updates and fixes to 18.04, 18.10, and 19.04:
-Packaging for both CUDA 10.1 and Tensorflow 1.13.1 toolkits
-Gamehub and Lutris are now available through the Pop!_Shop
-Popsicle, the installation media creator for Pop!_OS, has been improved to remove the possibility of UI freezes.
-The NVIDIA driver has been updated from 410 to 418, which provides new hardware support, security and stability fixes, and improves GNOME Shell animations.
How to Upgrade:
To update Pop!_OS 18.10 to 19.04, simply type these commands into the terminal:
sudo apt update
sudo apt install pop-desktop
sudo apt full-upgrade
do-release-upgrade
To upgrade Ubuntu 18.10 to 19.04, use these commands:
sudo apt update
sudo apt full-upgrade
do-release-upgrade
Pop!_OS 17.10 is no longer supported. You can download 19.04 on the Pop!_OS page on our website.
To upgrade from 18.04, run these commands:
sudo apt update
sudo apt full-upgrade
sudo sed -i s/Prompt=lts/Prompt=normal/ /etc/update-manager/release-upgrades
do-release-upgrade
After the update, you can continue upgrading to 19.04 by running do-release-upgrade in 18.10.
Keep an eye out for our monthly newsletter for updates on even more features and improvements coming your way following the release of 19.04!
Have an improvement in mind? We'd love to hear your ideas at https://chat.pop-os.org/
Head over to our friends at Pop!_Planet for all things Pop!_OS, and check out our developer Michael’s (mmstick) “This Week in Pop!” series to keep up with new developments and upcoming changes to the project.
In the Poplight: Pop!_OS was featured on Linus Tech Tips this month! Watch hosts Anthony Young and James Strieb reenact the Matrix as they discuss gaming on Linux with Pop!_OS.
12 notes
·
View notes
Text
How To Convert An MP4 To An MP3
For those who've ever tried to seek for software program that can convert audio and video files on Windows, you would possibly understand how hard it may be to seek out devoted solutions that are really free and performance as marketed. Click on Convert to transform your MP3 file(s). Persons are simply confused with some common audio formats, especially have confusion about M4A and MP3 audio. MP3s are usually audio-only files, the format shouldn't be capable of deal with video or imaging. VLC's progress indicator will transfer and that signifies that the audio format is being transformed. So, I paid the primary month's charge, and it took me the better part of two weeks to transform most of my music from backups of former saved music. After a couple of conversions, you get a discover that it can't find the information. So you return to the start of your backups, and try to remember the place you left off after you restart this app. And there we find the recordsdata they couldn't discover. This occurred so many occasions I misplaced count. Step 2. Select Output Format as MP3. Whereas putting in Any Video Converter Free, you'll be prompted to put in ByteFence (an anti-malware device) and a Yahoo browser extension. It is not instantly apparent, but you can opt out of these utilizing the small text hyperlinks labelled ‘Click here to customize the set up' and unchecking the boxes that seem. Otherwise you may choose to leave them chosen to assist the developers. I wrote a easy bash script to convert mp4 to mp3 on Linux. The script will convert mp4, mkv and webm video codecs to mp3 audio format. Most MP4 file formats are used when uploading movies to the Internet and for viewing and storing personal media units. Sometimes you might have to convert the MP4 information to the MP3 audio format so that you can improve your music library. If you have a Windows computer, you may flip the MP4 to MP3 with out the need to download any software program. When you've got the Home windows Media Participant positioned on your PC, you should utilize it to convert between the two file codecs. The steps on find out how to convert MP4 to MP3 with Home windows Media Participant are discussed beneath. Paid-for converters such as MediaEspresso (which prices £35) do not watermark or add splashes to your video. MediaEspresso additionally consists of assist for Intel Quick Sync, nVidia Cuda and AMD APP to vastly velocity up the conversion process. and may convert pictures and music into the cut price. Buying Video Pack (or DivX Professional ) lets you convert unencrypted MPEG-2 and VC-1 recordsdata, so you can backup your Blu-ray or DVD discs. In case you have stacks of discs to convert to digital information, or need to solid Blu-ray or Windows Media to your TV or gaming console, Video Pack is your resolution. Simply drag and drop your information and convert with a single click. Learn more in regards to the MPEG-2 video normal.
To convert to MP4, it's important to choose in Select Video Codec as No Video. Above all, just download the AnyMP4 Video Converter Final from AnyMP4 website, after which you need to install it on your laptop. Once you convert MP3 to MP4, you'll be able to play the audio format on more devices. What is more, you can also choose the presets with the optimal format. As for the case, you may at all times enjoy MP3 music on most of the devices with ease. Works as an expert MP4 to MOV converter, FonePaw Video Converter Ultimate can helps you exchange MP4 videos and movies to QuickTime supported MOV, MP4 codecs for playback. Also, this program can convert AVI to MP4, WMV to MOV, M4V to MP4 in order that any video can successfully play on QuickTime, iPhone, iPad and iPod. A free online app that converts audio recordsdata for you. The app helps all codecs, processes your files quickly, and does not require set up. Get Prepared: Free obtain and install Sidify Music Converter for Spotify on Mac or Home windows laptop. Any Video Converter will be installed on Windows 10, eight, 7, Vista, XP, and 2000. Simply enter the URL of the web video converter, which is among the hottest free conversion instruments, including convert MP3 format into MP4 format. Click on Obtain to avoid wasting your transformed MP4 file(s). After changing you will note download possibility. Alright, hope you discover ways to convert MP3 to MP4 in two ways. Go ahead and check out it on your music with filmora. If you haven't had it but, visit and download your free trial! Thanks for watching and bear in mind to subscribe for more interesting ideas. You can convert a song to a unique file format (and hold a copy of the unique). For instance, it can save you a duplicate of a compressed track file reminiscent of MP3 or AAC in an uncompressed music format ( AIFF or WAV ). The digital media boom has led to quite a few file codecs for audio and video content material of varying quality and ubiquity , whether you devour your media on desktop, smartphone, tablet or dedicated media player. Some, resembling MP3 and MP4, are ubiquitous, while extra esoteric formats comparable to OGG and FLAC offers technical advantages, however may be unsupported on some devices. Happily, conversion software program involves the rescue, allowing you to input your media files, and then convert them into one other format. Here are a few of our favourite free apps. MP3 Video Converter is a great tool that may be very simple to use. You may make an audio file out of any video file that you've on your computer, together with, for instance, the videos you downloaded from YouTube (something that could be very straightforward to do using TubeMate). Click on Save Hyperlink As on the correct-click on menu. This will prompt you to pick a saving location in your transformed file. Edit all metadata prior conversion. Preserve all metadata, embedded photographs, and supply folder construction on audio file conversion. As much as sixty four parallel converters for maximum performance on multi-core processors. Word: Solely the assembly host can download the file in WebEx. As well as, the choices for downloading recording recordsdata are available only if a WebEx administrator has turned on the administration possibility for downloading recording files. The conversion of a Webex recording to Windows Media Format or convert MP3 to MP4 Flash-format (ARF solely) requires a Windows-based mostly utility. Webex recordings may be played again on a Mac, but they cannot be converted on a Mac. There are dozens of various video codecs, and generally you will want to modify between them. That is once you need a video converter, Convert MP3 to MP4 and while free video conversion software is a good alternative in case you have a big batch of information to transform, an online software is extra handy for occasional use.
1 note
·
View note
Text
Random stuff
Good afternoon Alex, and today I’m feeling lazy and I have no topic soooo here goes :P
Potato gaming
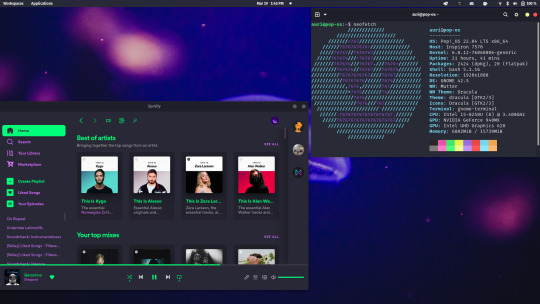
As you know, I have a 6 year old potato of a computer with performance worse than integrated graphics nowadays (i5-8250U, 16GB RAM, 128GB SSD, 500GB HDD, NVIDIA 940MX). Also, for fun, I checked how it compares to the best GPU right now. The RTX 4090 has 16384 CUDA cores and the 940MX 384, so that’s like 42.667 times the cores. Enough numbers, into gaming. So, I use Linux, specifically Pop!_OS, you don’t want me to get into it, but it’s a better in every way to Windows (I will provide a few fields tho :P)
As Linus Torvalds, creator of the Linux kernel once said,
“A computer is like air conditioning – it becomes useless when you open Windows.”
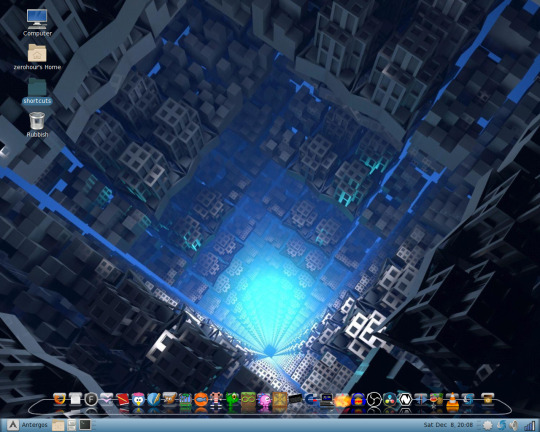
Allow me to flex my desktop
I haven’t even customized it fully yet. Windows is much more restricted when it comes to customization, and I'm a customisation freak.
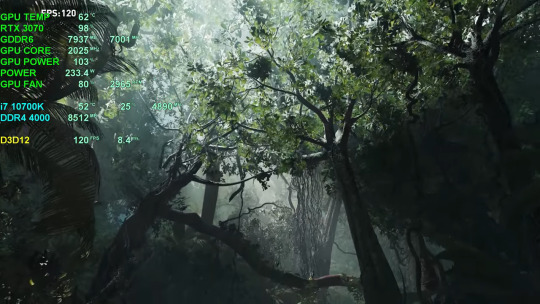
Okay, right, gaming. As a Linux user I obviously prefer open-source software, so for most games I use the awesome Heroic Games Launcher for games I own on Epic Store (sidenote: I would never buy from Epic Games, they are a crappy company and do not support Linux, even for games like Shadow Of The Tomb Raider, which has a linux native port for god’s sake, but they do offer free games every week and I am broke so :P). I discovered however, that SOTTR would not run on Linux because of DRM (Digital Rights Management, a software thing that stops you from doing anything the service provider does not approve of, a la linux gaming without the use of the epic store :P). So, I decided to switch to Windows and try it there. So, first thing I did, download NVIDIA drivers for the GPU. Big mistake, you can’t install drivers without an NVIDIA account which is like so dumb, I JUST NEED MY GPU TO RUN YOU DRICKIGN AJFD. sorry, I hate nvidia. Okay, next, install Epic Games Store, and the game itself. I ran the game. I got an average 15 FPS, with a lot of stuttering with crappy graphics. This is coming from me, who plays games at 960x540 with FSR Sharpening at 1, I am very generous to graphics, but look at this
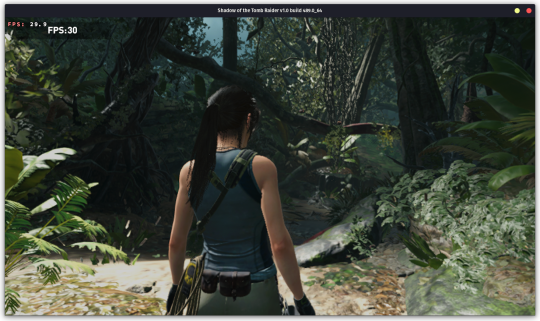
Bleugh. Then, I installed Epic Games on Linux using Wine, instead of using Heroic, and the results were shocking. The game ran at 33 AVERAGE FPS. Rich gamers will look at this and go “33 fps? Makes me puke, why is this girl so excited about that” and they’re right, 33 is low, but I am running on a potato. And also, I started playing the game with V-sync set to half refresh rate so it was locked to 30 fps, it barely ever dropped below that, and the visuals looked like this.
Sure, it didn’t look the best, but it is waaaaaay better than how it looked on Windows, and at a better framerate!
For reference this is how it looks with ray traced lighting.
And here's how it looks on my laptop:
I could even play at Medium settings at a higher resolution. I don’t know how a Windows version of a game ran better on Linux, but that is how it performed on my laptop.
I also played Control, another 2019 game at 60 fps at low settings, 540p render, upscaled to 4k, yes, 4k. Although, the game is set is a much smaller are and has much less to render, so it’s apples to oranges.
Control
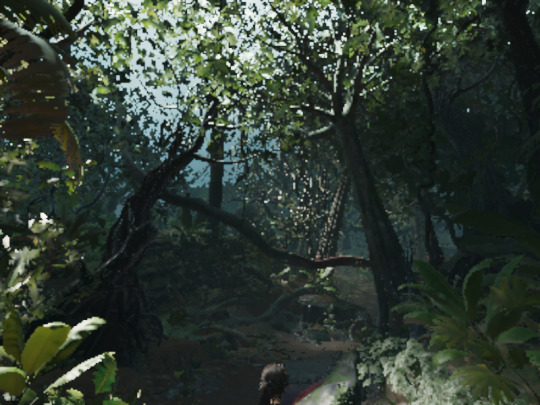
I know the post is getting extremely long but I just need to talk about Control. Control is a game made by Remedy Entertainment in 2019 as part of their Remedy Connected Universe. They're known for the critically acclaimed Max Payne series, Alan Wake, the first game in the Universe and Quantum Break. From this we see that Remedy is pretty much known for exceptional games with interesting topics. So, Control. Control follows the story of Jesse, a girl from a town called Ordinary searching for her brother. The game is set in the Oldest House, the headquarters for the Federal Bureau of Control. The atmosphere is awesome, really fun gameplay, the game hands you supernatural powers which are really fun to play around with, and the game has the best destruction physics ever seen in video games. The story and the characters are really captivating and even the characters you don't really directly interact with turn out to be a fan favorite. The game is inspired by the SCP Foundation, a fictional secret organization dealing with the paranatural. If you like SCP stuff, you'll love this. The soundtrack, while almost non-existent, has it's moments, especially in one of the best levels in video game history, the Ashtray Maze (i'm not the best person to comment on that, since I've not played many PC games, but I did play the Arkham series soooooo). And the graphics, god it looks phenomenal even on lowest setting and upscaled from 960x540

My music listening habits
As you may know, I have this habit of switching favorite artists every so often, so I tried to find my favourite artists for each week since I got a spotify account. Here's a pastebin if you're interested:
You can see the exact point where I became obsessed with Avicii. Also I was not aware that I was into DC Comics in 2019???
American Pie
In 1971, Don McLean released a song called “American Pie”. 52 years later it inspired me to write this small segment of this post. This song lyrics are so complex, there’s a whole website dedicated to the meaning of the song. https://web.archive.org/web/20200118091340/http://understandingamericanpie.com/vs1.htm
McLean has also famously said "It means I don't ever have to work again if I don't want to." and "You will find many interpretations of my lyrics but none of them by me… Sorry to leave you all on your own like this but long ago I realized that songwriters should make their statements and move on, maintaining a dignified silence." which is like, you know that meme,
> Drops banger
> refuses to elaborate further
> leaves
Although he did auction of his notes so ¯\_(ツ)_/¯ (also sidenote to brag about Linux, there’s this feature called the Compose Key, so I can press Alt and two corresponding characters and get any symbol or letters from other languages, like ß, å, č ø or ©, ™, ¯ or even type unicode so I can get ツ in 5 keystrokes okay sorry I go off on tangents sometimes, forgive me.)
There’s also an awesome Weird Al parody of it that you can’t watch because you haven’t watched Star Wars >:(
McLean himself praised the parody, even admitting to almost singing Yankovic's lyrics during his own live performances because his children played the song so often.
I love stuff like this, with a lot of hidden and complex stuff. The first ten minutes of the Pixar movie Up is so important it has its own Wikipedia page. Like, how wild is that. The iconic music in that scene, “Married Life”, is scored by Michael Giacchino, whom you may know I adore for The Batman, Spider-man’s MCU Trilogy, Jurassic World, Coco, okay I’ll stop right there, but he’s scored a lot of awesome movies. He is even in the Top 10 most listened artist for the past 6 months, so that’s an achievement, considering how many artists I listen to.
Okay that’s it, I thought I’d need more but hey. Okay, cya!
#linux gaming#unixporn#linux#popos#tomb raider#shadow of the tomb raider#sottr#lara croft#american pie#don mclean#control 2019#control game#remedy entertainment#control remedy
0 notes
Text
Check nvidia cuda toolkit version

#CHECK NVIDIA CUDA TOOLKIT VERSION HOW TO#
#CHECK NVIDIA CUDA TOOLKIT VERSION INSTALL#
#CHECK NVIDIA CUDA TOOLKIT VERSION UPDATE#
#CHECK NVIDIA CUDA TOOLKIT VERSION DRIVER#
#CHECK NVIDIA CUDA TOOLKIT VERSION SOFTWARE#
But now it is clear that conda carries its own cuda version which is independent from the NVIDIA one. If both versions were 11.0 and the installation size was smaller, you might not even notice the possible difference.
#CHECK NVIDIA CUDA TOOLKIT VERSION INSTALL#
The question arose since pytorch installs a different version (10.2 instead of the most recent NVIDIA 11.0), and the conda install takes additional 325 MB. Taking "None" builds the following command, but then you also cannot use cuda in pytorch: conda install pytorch torchvision cpuonly -c pytorchĬould I then use NVIDIA "cuda toolkit" version 10.2 as the conda cudatoolkit in order to make this command the same as if it was executed with cudatoolkit=10.2 parameter? Taking 10.2 can result in: conda install pytorch torchvision cudatoolkit=10.2 -c pytorch CUDA 8 GA release NVIDIA Tesla NVLink V100 16GB HBM2 SXM2 Passive CUDA GPU. If you go through the "command helper" at, you can choose between cuda versions 9.2, 10.1, 10.2 and None. Table 2 Path in which the CUDA toolkit is downloaded for P2s ECSs ECS Type.
#CHECK NVIDIA CUDA TOOLKIT VERSION SOFTWARE#
CUDA Toolkit: the basic software foundation of CUDA CUDA GPU Device. The toolkit includes GPU-accelerated libraries, debugging and optimization tools, a C/C++ compiler, and a runtime library to deploy your. torch.cuda package in PyTorch provides several methods to get details on CUDA devices. With the CUDA Toolkit, you can develop, optimize, and deploy your applications on GPU-accelerated embedded systems, desktop workstations, enterprise data centers, cloud-based platforms and HPC supercomputers.
#CHECK NVIDIA CUDA TOOLKIT VERSION HOW TO#
In other words: Can I use the NVIDIA "cuda toolkit" for a pytorch installation? Although you might not end up witht he latest CUDA toolkit version, the easiest way to install CUDA on Ubuntu 20. Perform a system compatibility check and present a license agreement that you. This article explains how to check CUDA version, CUDA availability, number of available GPUs and other CUDA device related details in PyTorch. you can also check the CUDA version simply by viewing. One of these questions:ĭoes conda pytorch need a different version than the official non-conda / non-pip cuda toolkit at The first method is to check the version of the Nvidia CUDA. Swap CUDA Toolkit Versions on Windows Step 0: Check CUDA Version Step 1: Locate System Environment Variables Step 2: Change System Variables Step 3: Change.
#CHECK NVIDIA CUDA TOOLKIT VERSION UPDATE#
Ensure you have the latest kernel by selecting Check for updates in the Windows Update section of the Settings app.Some questions came up from. Operating System Architecture Distribution. Operating System Architecture Distribution Version Installer Type Do you want to cross-compile Yes No Select Host Platform Click on the green buttons that describe your host platform. Once you've installed the above driver, ensure you enable WSL and install a glibc-based distribution (such as Ubuntu or Debian). Select Target Platform Click on the green buttons that describe your target platform.
CUDA on Windows Subsystem for Linux (WSL).
#CHECK NVIDIA CUDA TOOLKIT VERSION DRIVER#
For more info about which driver to install, see: I believe I installed my pytorch with cuda 10.2 based on what I get from running. Install the GPU driverĭownload and install the NVIDIA CUDA enabled driver for WSL to use with your existing CUDA ML workflows. I have multiple CUDA versions installed on the server, e.g., /opt/NVIDIA/cuda-9.1 and /opt/NVIDIA/cuda-10, and /usr/local/cuda is linked to the latter one. 11.7.1 / Aug20 days ago () Operating system Windows, Linux Platform, Supported GPUs. nvidia-docker version NVIDIA Docker: 1.0.0 Client: Version: 1.13.0 API version: 1.25 Go version: go1.7.3 Git commit: 49bf474 Built: Tue Jan 17 09:58:26 2017 OS/Arch: linux/amd64 Server. This command works for nvidia-docker too, we add a single line on top of the output. To use these features, you can download and install Windows 11 or Windows 10, version 21H2. It's better to use docker version, it gives you more details. See the architecture overview for more details on the package hierarchy. CUDA Toolkit 11.5.1 (November 2021), Versioned Online Documentation CUDA Toolkit 11.5.0 (October 2021), Versioned Online Documentation CUDA Toolkit 11.4.4 (February 2022), Versioned Online Documentation CUDA Toolkit 11.4.3 (November 2021), Versioned Online Documentation CUDA Toolkit 11.4. For podman, we need to use the nvidia-container-toolkit package. After installing podman, we can proceed to install the NVIDIA Container Toolkit.
Install Windows 11 or Windows 10, version 21H2 cuda version colab CUDA-MEMCHECK is a functional correctness checking suite included in the CUDA toolkit map() to -Create space on the GPU and. Step 2: Install NVIDIA Container Toolkit.
This includes PyTorch and TensorFlow as well as all the Docker and NVIDIA Container Toolkit support available in a native Linux environment. Windows 11 and Windows 10, version 21H2 support running existing ML tools, libraries, and popular frameworks that use NVIDIA CUDA for GPU hardware acceleration inside a Windows Subsystem for Linux (WSL) instance.
0 notes
Text
Ubuntu truecrypt

#Ubuntu truecrypt how to
#Ubuntu truecrypt cracker
#Ubuntu truecrypt plus
In Ubuntu 16.04, development packages of wxWidgets 2.8 are no longer available. create-keyfile FILEPATH Create a new keyfile containing pseudo-random data. If at any step the hidden volume protection is triggered, start again from 1). 5) Mount the new filesystem and fill it with data. Besides those improvements, there are no attempts to change the crypto or continue development in any significant way. 4) Create a filesystem on the virtual device of the outer volume.
#Ubuntu truecrypt plus
You can also choose another character encoding and try again. deb of TrueCrypt 7.1a, plus a few patches that fixes minor issues. If you continue editing this file you could corrupt this document. The file you opened has some invalid characters. It works on Linux and it is optimized for Nvidia Cuda technology.
#Ubuntu truecrypt cracker
GitHub - lvaccaro/truecrack: TrueCrack is a brute-force password cracker for TrueCrypt (Copyrigth) volumes. "There was a problem opening the file /home/(removed username)/.cach…/truecrypt-7.1a-setup-x86. TrueCrack is a brute-force password cracker for TrueCrypt (Copyrigth) volumes. Once the bar indicating the progress finishes, I get this: It runs it in "Text Editor" for some reason. This implementation supports mapping (opening) both system and normal TrueCrypt volumes, as well as opening hidden volumes and opening an outer volume while. I selected the standard option, downloaded & clicked the "Truecrypt setup" and it ran its thing in "Archive Manager" (That's what it was set to open the file with by default). There’s a PPA which contains the TrueCrypt package with the tray icon replaced by a application indicator, so that you can get back the TrueCrypt indicator applet in Ubuntu 13.04 panel since the tray icons is no longer supported. I have Ubuntu 10.10 and Windows 7 with TrueCrypt as a.
#Ubuntu truecrypt how to
I double checked the type (32 or 64) to make sure I downloaded the correct one. This simple tutorial shows you how to install TrueCrypt as well as its indicator applet in Ubuntu 13.04 Raring Ringtail. I have now been searching days for a solution but have found nothing. So, I should be able to just run the download as I did before, right?Įdit: Ok, scratch that. I let the updates run themselves, so we're up to speed. Veracrypt is available for Linux, Windows, and MacOS. Ubuntu is successfully installed.although its kind of strange that it doesn't have the "multiple user interface" thing that it had in 12.04.1. VeraCrypt is a fork of TrueCrypt which is a free and open source on-the-fly disk encryption (OTFE) tool.
0 notes
Text
Nvidia gpu download

Nvidia gpu download how to#
Nvidia gpu download software download#
Nvidia gpu download install#
Its a low overhead tool suite that performs a variety of functions on each host system including active health monitoring, diagnostics, system validation, policies, power and clock management, group configuration and accounting. All in all, NVIDIA GPU Temp comes in handy whenever you want to quickly check your GPU temperature. NVIDIA Data Center GPU Manager (DCGM) is a set of tools for managing and monitoring NVIDIA GPUs in cluster environments.
Nvidia gpu download how to#
For more information about how to access your purchased licenses visit the vGPU Software Downloads page.
Nvidia gpu download software download#
It has a good response time, displays accurate information, and works well, without causing the OS to hang, crash or pop up error dialogs. Enterprise customers with a current vGPU software license (GRID vPC, GRID vApps or Quadro vDWS), can log into the enterprise software download portal by clicking below. The lightweight gadget has minimal impact on system performance, running on very low CPU and RAM. NVIDIA NCCL The NVIDIA Collective Communication Library (NCCL) implements multi-GPU and multi-node communication primitives optimized for NVIDIA GPUs and Networking. Prior to Release 75, drivers for these OpenGL 2.0-capable GPUs advertised OpenGL 1.5 support but also exposed the feature set of OpenGL 2.0 through the corresponding extensions listed in section 1. However, thanks to the Windows built-in features, you can set the frame to stay on top of other windows, as well as adjust its opacity level to a preset value, ranging between 20% and 100%. Quadro FX GPUs, and all future NVIDIA GPUs support OpenGL 2.0. NVIDIA GPU Temp does not integrate additional options of its own. It automatically displays the GPU temperature at initialization.Īs far as options are concerned, you can create a dump file on the desktop, change the background theme, display the PCIe link width, as well as select another temperature unit (Fahrenheit). Please check your NVIDIA Entitlement Certificate for information on how to register for access to the NVIDIA. Customers who have purchased NVIDIA vGPU software can download the drivers from the NVIDIA Licensing Portal. The interface is based on a very small frame that you can move to any position on the screen, with the help of the mouse cursor. GPU Tech Conference CUDA Industries Game Development HEALTHCARE Higher Education & Research Industrial Media & Entertainment.
Nvidia gpu download install#
It is very easy to install and set up, as it comes packed with limited configuration parameters. DOWNLOADS NVIDIA Optimized Containers, Models, and More Deploy the latest GPU optimized AI and HPC containers, pre-trained models, resources and industry specific application frameworks from NGC and speed up your AI and HPC application development and deployment. GitHub: Download NBMiner v37.0 (Windows/Linux) NBMINER NVIDIA & AMD GPU ETH, RVN, GRIN, BEAN, CFX, AE, BTM, SERO, HNS, BFC. Explore NGC Download Centers CUDA Toolkit Toolkit for GPU-accelerated apps: libraries, debugging/optimization tools, a C/C++. NVIDIA GPU Temp is a desktop gadget that shows the temperature of your GPU temperature of your Nvidia graphics card. DOWNLOADS NVIDIA Optimized Containers, Models, and More Deploy the latest GPU optimized AI and HPC containers, pre-trained models, resources and industry specific application frameworks from NGC and speed up your AI and HPC application development and deployment.
0 notes
Text
Epsxe obs studio recording

#EPSXE OBS STUDIO RECORDING HOW TO#
#EPSXE OBS STUDIO RECORDING INSTALL#
#EPSXE OBS STUDIO RECORDING UPDATE#
#EPSXE OBS STUDIO RECORDING DRIVER#
#EPSXE OBS STUDIO RECORDING FULL#
Please make sure you have the mono setting ticked in the advanced audio properties.
#EPSXE OBS STUDIO RECORDING DRIVER#
Once you have set your audio device in the properties you can then exit that window and navigate to the Advanced Audio Properties tab from the Settings menu.Īs OBS does not support multi-channel ASIO driver types, it will only be able to receive audio from the first two inputs of an audio device, so you will need to ensure that you connect your microphone/instrument to Input 1 or 2. This example uses a Scarlett USB Interface so 'Focusrite USB' is selected as the device. Once downloaded and installed, open the OBS application. With your audio interface connected please navigate to the Audio Mixer > Mic/Aux > Click the S ettings button (small gear cog symbol) > Properties.Ĭlick the dropdown menu next to Device, and select your audio interface. Setting the audio interface as the audio device To start, navigate to the OBS website and download the compatible version of OBS software for your system. OBS is a free program that allows you to stream audio and video to online platforms such as Facebook, Twitch, and Youtube.
#EPSXE OBS STUDIO RECORDING HOW TO#
This is a guide to setting up your audio interface in Open Broadcaster Software (OBS) on Windows. For instructions for Mac, please see the following article: How to set up your audio interface in OBS (Open Broadcaster Software) on a Mac
#EPSXE OBS STUDIO RECORDING INSTALL#
Install the obs-studio package.Applies to: All Focusrite audio interfaces.To ensure any existing FFmpeg packages are switched to Packman versions execute the following before installing obs-studio.
#EPSXE OBS STUDIO RECORDING FULL#
The Packman version of FFmpeg should be used for full codec support.
It is recommended to set the priority for Packman lower so it takes precedence over base repositories (skip on Tumbleweed as included in initial command). If you do not already have the Packman repository add it as shown below.įor openSUSE Tumbleweed: sudo zypper ar -refresh -priority 90 packmanįor openSUSE Leap 42.3: sudo zypper ar -refresh packmanįor openSUSE Leap 42.2: sudo zypper ar -refresh packmanįor openSUSE Leap 42.1: sudo zypper ar -refresh packmanįor openSUSE 13.2: sudo zypper ar -refresh packman
The Packman repository contains the obs-studio package since it requires the fuller version of FFmpeg which is in Packman for legal reasons.
For NVIDIA Hardware accelerated encoding make sure you have CUDA installed (in case of an older card, install xorg-x11-drv-nvidia-340xx-cuda instead): sudo dnf install xorg-x11-drv-nvidia-cuda.
Then you can install OBS with the following command (this pulls all dependencies, including NVENC-enabled ffmpeg): sudo dnf install obs-studio.
If you do not have it configured (if you’re not sure, then you probably don’t have it), you can do so with the following command: sudo dnf install $(rpm -E %fedora).noarch.rpm $(rpm -E %fedora).noarch.rpm
Command-line: install it via pacman with the following command:.
Graphical: search “obs-studio” on Pamac Manager or Octopi.
“Release” version is available on community repository: sudo pacman -S obs-studio
#EPSXE OBS STUDIO RECORDING UPDATE#
Sudo apt-get update & sudo apt-get install obs-studio Arch Linux (Unofficial) You can install OBS Studio on Ubuntu Linux with the following commands: sudo add-apt-repository ppa:obsproject/obs-studio
xserver-xorg version 1.18.4 or newer is recommended to avoid potential performance issues with certain features in OBS, such as the fullscreen projector.
Sudo apt-get update & sudo apt-get install ffmpegįor Ubuntu 15.04 and following versions, FFmpeg is officially included, so you don’t need add PPA and you can install it with this command: sudo apt-get install ffmpeg Sudo add-apt-repository ppa:kirillshkrogalev/ffmpeg-next If you do not have the FFmpeg installed (if you’re not sure, then you probably don’t have it), you can get it with the following commands:įor Ubuntu 14.04 LTS, FFmpeg is not officially included so you will need a specific PPA: You can check what version of OpenGL is supported by your system by typing the following into the terminal: glxinfo | grep "OpenGL" Ubuntu Linux Requirements NOTE: OpenGL 3.2 or later is required to use OBS Studio on Linux. Any installation directions marked Unofficial are not maintained by the OBS Studio author and may not be up to date or stable.
0 notes
Text
Linux Life Episode 42
Hello folks and welcome back to Linux Life. Well since last episode I was still having issues with ArcoLinux B Cinnamon due to issues with mirror lists. I changed them I reset them and I was still having issues regarding updates. Also Cinnamon kept crashing at random intervals for no apparent reason and had to be restarted. So it was being a tad problematic.
So I have now gone back to Antergos using MATE on the i7 desktop. First I had to write my USB stick to install it. I used Etcher under ArcoLinux which has normally not been a problem but for some reason it did not set up the stick correctly and it failed when I tried to boot it into the UEFI version.
Given my BIOS does not like Legacy boot systems it can do them but is very reluctant to do so. I tried to install the old way but it refused to start Grub 2 correctly. Ironically I had to now go and use a Windows system to rewrite the USB stick using Rufus and the UEFI setup worked.
Once installed I setup all of my regular programs without a hitch and was actually surprised the MATE could use the theme I had downloaded for Cinnamon called Cinnamox Heather without any conversion or problems.
Due to me having my home directory on a separate drive I also did not have to setup Steam, Thunderbird or Firefox plug-ins as they were already in the home directory config files, Handy.
So within a matter of under an hour I was back up and running without a hitch. Updates seem to be working fine in Antergos and Cnchi did not crash on me even once which is an absolute achievement as it used to be unstable as hell.
It did give me a few more Window Manager options to play with such as i3, Budgie and Openbox which I don’t believe were in the list last time I tried to run Cnchi. Ultimately I went with MATE because I know it works quite well and is quite low on resources usage compared to Gnome 3 or KDE.
So Antergos is back for now. We will see how long it lasts. Something didn’t work I think it was Davinci Resolve 15 but that I have discovered is due to you need the Nvidia 390.xx drivers as it does not work using the 340.xx ones. The 340.xx drivers don’t work well with OpenCL and CUDA which is what Davinci Resolve uses. The 390.xx ones are fine with it.
I planned a video experiment using OBS and certain emulators to do a comparison of a game between systems. Now I managed to install Fuse (ZX Spectrum) and VICE (C64) emulators no problem. However when it came to Amstrad emulation it was a bit of a pain. First I tried to install Caprice32 from the AUR but it refused to build due to issues with an alleged missing freetype-config. Also it was looking for pkg-config so I installed pkg-config then as soon as I ran the AUR build it uninstalled it and reinstalled pkgconf.
After lots of trying to get it to build playing with Makefiles and PKGBUILD files which the AUR uses I eventually gave up. Eventually I installed Arnold which seems to work. As a man who has not really emulated Amstrad machines I have no idea which one is a good emulator. They did say CPC4x is not bad but I could not get it compile as it uses TCL/Tk and I had no idea how to get it to build. I kept claiming it was missing old GCC v5 libs which I could not be bothered to install.
Especially as Antergos is using GCC version 8 if I remember correctly so it would have been a major step backwards and would probably break something.
Now that I have the three emulators working I can do my comparison but I must remember if I am using OBS not to capture in MP4 as the free version of Davinci Resolve does not include the H264 codecs, for them you need to buy the Studio version which is $200 I believe.
Unless Kdenlive can use MP4 considering I have not used any video editing packages beyond Adobe Premiere for about 5 minutes. I can try them and see if I can find one I like. Natron I believe is more like After Effects and is used to add filters and transitions but I have no idea as I have not tried it.
So now I have all of the necessary tools I can start playing with my video project. I can’t guarantee I will be happy with it or that I will even release anything but it will be a learning experience. I am sure I will keep you informed of the joys and pitfalls if I do so.
Anyway that’s enough waffle for this episode. So until next time ... Take Care
#linux life#linux antergos#linux arcolinux#kdenlive#natron#davinci resolve 15#mirrorlists#uefi#waffle
1 note
·
View note
Text
How to Increase R7 450 Mining: Overclock/ Hashrate/ xubuntu/ Windows 10 (2022)

How to 'Increase/ Max/ Optimize/ Tuning/ Boost' Hashrate AMD Radeon R7 450 4GB Mining: Overclock/ Hashrate/ xubuntu/ Windows 10 (2021/2022)/ Is it good for mining? At the beginning of 2021, the video card market is seeing a crazy increase in prices for more or less powerful video cards. Everything that has at least some computing power rushes into battle - to mine cryptocurrencies. Thanks to the fantastic growth in the price of some cryptocurrencies, even relatively old and low-powered video cards can bring profit. Some of them (Nvidia GT710/730, AMD Radeon RX550/560 with 2 GB of GDDR5-type memory) were partially discussed in the article "Mining on budget graphics cards in 2021". This article discusses the features of a little-spread video card manufactured by Dell with an AMD R7 450 chip, which has 4Gb of GDDR5-type memory on board. Dell AMD R7 450 video cards with a Cape Verde chip were produced in 2016-2017, installed in Optiplex 7050 computers. They have a rather weak computing potential, but can still perform computer calculations on a number of algorithms. Similar video cards for mobile devices were sold under the label: - AMD R9 M360 (Tropo PRO-L) - with 4 GB GDDR5 memory; - Radeon 8830M (Venus LE) — 2 GB DDR3; - R7 M465X (Tropo) - 2 GB GDDR5. How to Increase Hashrate R7 450 4GB Mining: Specification Technical features of the video card Dell R7 450 4Gb GDDR5 The Dell R7 450 4Gb GDDR5 graphics card (AMD Radeon R9 M360) has the following specifications (compared to Nvidia GT710/730 and AMD RX550/560 graphics cards): ParameterVideo card nameNvidiaAMDGT 710/7302 GB GDDR5GTX10302 GB GDDR5Radeon RX5502и 4 GB /RX 550 640SP 4 GBRadeon R7 4504Gb GDDR5Production start date2014-2020May 17, 2017April 2017/October 2017June 30, 2016GPUGK208GP108-300-A1Lexa PRO /Baffin LECape Verde PRXArchitectureKepler 2.0PascalGCN 4.0GCN 1.0Technical process, nm28141428Number of transistors, billion1.021.82.2/31.5Crystal area, mm²8774103/123123Number of Cores(Cores)192/384384512/640512Number of texture units/rasterization(TMU/ROP)16/8 and 32/824/1632/16 and 40/1632/16GPU operating frequency, MHz954/90212281100/1019925/1125FP64 floating point performance,GFLOPS15.26/28.8635.2375.71/85.6859.2Video memory size, GB222/44Video memory typeGDDR5GDDR5GDDR5GDDR5Memory clock frequency, MHz125315021750/15001125Memory capacity, bit6464128128Effective memory frequency, Gbps567/64.5Memory bandwidth, GB/s40.148.06112/9672Supported version of CUDA or OPENCLMiracles 3.5Miracles 6.1OpenCL 2.1OpenCL 1.2Theoretical hashrate on Ethash, mh/s5.01614/129Consumption(TDP), watt19/383050/6065 How to Increase Hashrate R7 450 Mining: Specification As can be seen from the table, the AMD Radeon R7 450 has several times more processing power than the low-end Nvidia GT 710/730 and even the GTX1030 (by 68%) at twice the consumption (comparable to the AMD Radeon RX550). The memory bandwidth of the red video card outperforms the green ones by 62-79% due to the 128-bit total capacity of four memory modules. The Cape Verde core of the R7 450 lags behind the AMD RX550 in floating-point performance by about a third, and the memory subsystem of this video card is 33-55% worse in performance. Since the AMD Radeon R7 450 uses a fairly old core, its full potential can be unleashed on Linux. What the monitoring utilities say about the Dell R7 450 graphics card в Linux? The clinfo program in xubuntu 18.04 detects the video card as AMD Radeon (TM) R9 M360: On command lspci | grep -E "VGA|3D" displays information about the GPU and the number of the Pci-E slot in which it is included: 03:00.0 VGA compatible controller: Advanced Micro Devices, Inc. Cape Verde PRO / Venus LE / Tropo PRO-L (rev 87) On command sudo lspci -v -s 03:00.0 where 03.00.0 is the PCI-E device number, you can get more detailed information about the video card, including its core, manufacturer, driver, etc.: To display information about installed memory modules, you can use the amdmeminfo utility. Unfortunately, this utility does not work on the Dell R7 450 4Gb GDDR5 video card, giving a segmentation error. The ohgodatool program, the ROC-smi utility and others with this video card (in xubuntu 18.04+) either refuse to work on modern drivers or give incomplete information about the video card due to the absence of the /sys/class/drm/card1/device/pp_table file. In xubuntu 16.04 with amdgpu-pro version 17.40 the situation is much better, some programs detect the video card, but the control and management options remain limited. The amdcovc program detects the core of the video card as Venus LE / Tropo PRO-L (Radeon 8830M / R7 M465X), but does not see anything other than temperature and cooling fan speed: The element base used on the Dell R7 450 4Gb GDDR5 graphics card The front of the PCB with details of the R7 250 graphics card: The back of the Dell R7 250 board: The heart of the R7 250 video card is the Cape Verde PRX BGA chip marked 215-0825445: Power MOSFET transistors MDU1514 (Vds = 30V, Id = 66.3A) and MDU1517 (Vds = 30V, Id = 100A): The memory power controller circuit includes a GS7256 forward synchronous buck-DC converter, : PCI-E controller power supply - GS9238 forward voltage buck converter (similar to APW8713): On the back side of the board in the center is a SOP-8 flash memory chip 25D10BT: Active cooling of the video card is provided by a small 9-blade Power Logic PLA0501S12M-2 fan for 12 volts, 0.2 amperes: Modest video card heatsink (rear): The video memory is based on four modules 7QA47 D9SXD (MT51J256M32HF-60) manufactured by Micron: This is 256MX32 (words x bits) FBGA chips high (8G) density manufactured by Micron Technology Inc. with a low clock frequency of 1.125 -1.5 MHz (effective - 5-6 Gb / s). They are powered by 1.31V ~ 1.39V, 1.46V ~ 1.55V (VDD = VDDQ) and operate at temperatures up to 95°C. Such modules are no longer produced due to unsatisfactory characteristics for the present. To improve the working conditions of memory chips during mining, it is desirable to provide better cooling. To do this, heat-conducting pads can be placed on two microcircuits located under a windproof radiator, and radiators can be glued to the other two microcircuits with thermally conductive tape: In addition, it is desirable to add heatsinks to the transistors of the power system. Dell R7 450 4Gb GDDR5 video card hashrate on different mining algorithms To fully reveal the AMD R7 250 video card, you need to use Linux with old kernels, for example, xubuntu 16.04 (similar to AMD R9 290/390 video cards, which can still perform calculations at the level of modern cards, more details in the article "How to achieve from Radeon video cards R9 290/390 hashrate 29-30 Mh/s on Ethash”). In xubuntu-18.04+, the R7 450 graphics card on the amdgpu-pro-20.20-1089974 drivers gives a memory segmentation error. Old drivers in this system cannot be installed without perversions. In xubuntu-16.04 with the amdgpu-pro-17.40-514569 drivers, the AMD R7 450 graphics card works fine and at the same time it shows a hashrate of 6-7 mh/s on Ethash, and 7 mh/s on etchash+zil. The memory bandwidth of the R7 450 without overclocking, but using amdmemorytweak (ref 30), is 51.2 MB/s: This provides a hashrate of 5.9-7.1 mh/s on the ethash algorithm in xubuntu 16.04 (in Phoenix Miner, which identifies the R7 450 graphics card as AMD R9 M360): On Windows 10, the same ethash card delivers 4.3 mh/s (62% less). The AMD R7 450 (R9 M360) graphics card clearly lacks the core power to reveal the full potential of the ethash memory subsystem. When overclocking the core, the hashrate increases, but due to a weak cooling system, overheating and freezes are possible. To ensure the stability of the work, it is desirable to reduce the intensity of the Phoenix Miner by adding the -mi 10 parameter to the script (by default, the intensity is 12). At the same time, the video card works stably with a hashrate of 7.1 mh / s on the etchash algorithm (Ethreum Classic) with automatic switching to ZIL mining on the ezil pool: The idle power consumption of this R7 450 video adapter is 8 watts, while under load it rises to 40-60 watts, which is not too bad for a core developed 6 years ago. xmrig with R7 450 works on both Linux and Windows, issuing 175 h/s (Windows 10) and 240 h/s (xubuntu 16.04) on the cn-heavy/xhv algorithm (BLOC.money coin). When an error occurs (in any miner) ...opencl error CL_OUT_OF_HOST_MEMORY when calling clCreateCommandQueueWithProperties ... opencl thread #0 failed with error CL_OUT_OF_HOST_MEMORY ... opencl thread #0 self-test failed at the beginning of the script you need to add the lines export GPU_FORCE_64BIT_PTR=1 export GPU_USE_SYNC_OBJECTS=1 export GPU_MAX_ALLOC_PERCENT=100 export GPU_SINGLE_ALLOC_PERCENT=100 export GPU_MAX_HEAP_SIZE=100 The latest versions of most miners with an AMD R7 450 (R9 M360) video card refuse to work, giving errors, for example, lolminer 1.20 in linux gives a message: All devices deselected or failed compatiblity check. Closing lolMiner The same situation is with gminer, which gives an error: Failed to initialize miner on GPU1: AMD Radeon (TM) R9 M360 3GB: Unable to load kernels No devices for mining Old versions of lolminer with AMD R7 450 should work, giving out several sol/s on different equihash variants (144 (zhash), 192 and others), but is it worth the candle? On Windows 10 in lolminer 1.19 AMD R7 450 runs 4 sol/s on equihash192. Nanominer is not friendly with the AMD R7 450 video card, swearing with the OpenCL program build failed error. Wildrig-multi gives Syntax error: "done" unexpected. Conclusion Examining the capabilities of the AMD R7 450 leads to the conclusion that it "still has gunpowder in the powder flasks" in terms of computing, although its disclosure in most cases requires the use of older versions of the miners. Given the low computing potential of the video card, we can say that it is limitedly suitable for mining only during the “special pump period”. Read the full article
0 notes
Text
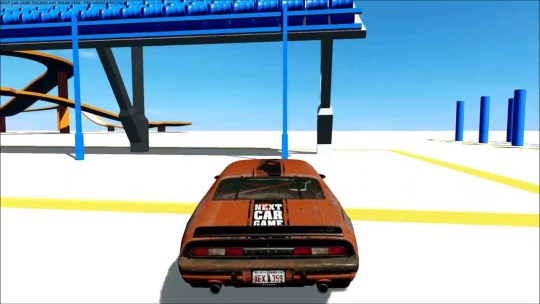
Next Car Game Tech Demo Download
Communications
Editing
File Management
For Developers
Gaming
Internet Tools
Operating Systems
Optimization
Players
Productivity
Security
Miscellaneous
Android
Device Drivers
Welcome to Azeroth, a world of magic and limitless adventure. Experience the ever-expanding fantasy of World of Warcraft for free today.
November 14, 2020
Freeware
Windows
Comprehensive, powerful flight simulator, and has the most realistic flight model available for personal computers.
September 29, 2020
Demo
macOS
Relive the classic Quake II, now with real-time ray tracing.
January 6, 2020
Freeware
Windows/Linux
Fast download for the InSomnia Tech demo. This RPG is set in a Brutal Dieselpunk Universe. Atmospheric single-player/co-op RPG set in a 'living' dieselpunk sandbox with real-time tactical gameplay.
July 10, 2014
Demo
Windows
Redline is a racing game for MacOS X that demonstrates just how much fun tossing polygons around at 200+ mph can be.
December 6, 2013
Demo
macOS
iConquer is an addictive game of world conquest, played by 1 to 6 players.
July 4, 2013
Free to Try
macOS
Transport a vast variety of cargo across more than 60 European cities.
December 6, 2012
Freeware
Windows
Try the new Pro Evolution Soccer 2013, also known as World Soccer: Winning Eleven 2013 in Asia.
December 6, 2012
Demo
Windows
Snood is a fun puzzle game for Macintosh that will test your intellect rather than your reflexes.
April 30, 2012
Free to Try
macOS
Featuring two maps, two modes and four weapons. The Crysis 2 multiplayer demo is guaranteed to provide hours of first-person shooting fun ahead of the full game’s release on March 22nd.
March 1, 2011
Demo
Windows
Experience the epic sequel to the 2009 Game of the Year from the critically acclaimed makers of Dragon Age: Origins and Mass Effect 2.
February 23, 2011
Demo
Windows
A game that presents to you a 3D virtual world where you become a bug
January 20, 2011
Demo
macOS
Third-person action video game prequel to James Cameron's film of the same name.
November 22, 2010
Freeware
Windows
Batman: Arkham Asylum utilizes Nvidia PhysX, 3D Vision y SLI Scaling that brings Arkham Asylum to life.
November 22, 2010
Freeware
Windows
With CUDA and 3D Vision support, download this demo to get a taste of what Just Cause 2 has to offer.
November 22, 2010
Demo
Windows
Turn-based strategy computer game developed by Firaxis,
November 22, 2010
Demo
Windows
Grab your MREs and prepare to spend four days playing two new maps and modes for the multiplayer version of Medal of Honor.
October 4, 2010
Freeware
Windows
FIFA 11 reinvents player authenticity – on and off the ball – for every player and at every position with Personality+.
September 16, 2010
Demo
Windows
JongPuzzle it is the tile solitaire game similar on mah jongg.
October 28, 2009
Free to Try
Windows
Unique WWII real-time strategy game.
October 19, 2009
Demo
Windows
Make jigsaw puzzles from any picture and solve them in the screen.
October 7, 2009
Free to Try
Windows
Bejeweled 2 Deluxe will allow you to play the sequel to the classic gem-swapping puzzler!
October 7, 2009
Demo
Older Mac OS
You must line up 5 balls of the same color.
February 17, 2009
Free to Try
Windows
Create your own creatures for use in the upcoming strategy/sim game Spore.
December 18, 2008
Demo
Older Mac OS
Tank-o-box is a new action-packed remake of a classic arcade battle tank game.
December 17, 2008
Free to Try
Older Mac OS
Enjoy new storylines and explore massive environments not seen in the film with this playable demo for Wall-E.
August 12, 2008
Demo
Windows
Create your own creatures for use in the upcoming strategy/sim game Spore.
August 12, 2008
Demo
Windows XP/Vista
Duke Nukem 3D is a fantastic 3d shooter game
May 23, 2008
Free to Try
Older Mac OS
LucasArts has released a playable demo of LEGO Indiana Jones: The Original Adventures.
May 15, 2008
Demo
Windows XP/Vista
Atomic Cannon is a fun strategic tank artillery arcade game that is easy to learn but difficult to master.
April 24, 2008
Free to Try
Older Mac OS
Destroy the neon light beams before they reach the ground!
December 25, 2007
Demo
Windows
Remake of a popular classic game Bubble Bobble.
December 19, 2007
Free to Try
Windows
Control the stone frog idol of the ancient Zuma in this thrilling action puzzler.
December 3, 2007
Demo
Older Mac OS
Six classic games designed to stimulate the cerebellum and cajole the cortex!
November 29, 2007
Demo
Windows XP
Need for Speed: ProStreet (NFS:PS) is the latest installment of Electronic Arts' popular racing game series Need for Speed.
November 2, 2007
Demo
Windows XP/Vista
This Crysis demo includes one single player level, and the Sandbox2 Editor.
October 26, 2007
Demo
Windows XP/Vista
Midway and Epic Games announce that the beta demo for Unreal Tournament 3, the highly anticipated first-person-shooter.
October 23, 2007
Freeware
Windows XP/Vista
This demo puts you in the shoes of a second F.E.A.R. team investigating Armacham.
October 23, 2007
Freeware
Windows XP/Vista
An innovating,nervous, funny and colorful FPS: the real First Penguin Shooter
September 26, 2007
Demo
Windows
Billionaire II is a new thrilling and exciting business game
September 19, 2007
Free to Try
Windows
Enemy Territory: Quake Wars pits the armies of Earth against the invading alien Strogg in an online strategic shooter.
September 10, 2007
Demo
Windows
Lead the U.S. army in an attempt to reclaim its cities from a Soviet attack in 1989.
August 28, 2007
Demo
Windows XP/Vista
The BioShock PC demo allows you to play the game's first thirty minutes or so.
August 28, 2007
Demo
Windows Vista
In a war for Earth's survival against an unrelenting Alien enemy, the only way to defeat them is to become one of them.
August 3, 2007
Demo
Older Mac OS
Roll your marble through a rich cartoon landscape of moving platforms and dangerous hazards.
July 20, 2007
Demo
Older Mac OS
Try Munch a Bunch that is new twist of popular PacQuest 3D!
July 9, 2007
Free to Try
Windows
Play the Lost Valley level in the retelling of Lara Croft's classic adventure.
July 2, 2007
Demo
Windows XP/Vista
Attack an Akrik hive or an ice-pirate fortress in this sci-fi shooter demo.
May 29, 2007
Freeware
Windows XP
Attack an Akrik hive or an ice-pirate fortress in this sci-fi shooter demo.
May 29, 2007
Freeware
Windows XP
Find as a fallen angel against Etherlight, heaven's secret agency.
May 29, 2007
Demo
Windows XP
Next Car Game is a demolition derby themed racing game with sophisticated driving dynamics and in-depth vehicle upgrading, soft-body damage modeling, featuring both demolition derbies and more traditional track races. The game brings you epic crashes and tight, neck-to-neck fights over the finish line on run-down racing tracks.
Next Car Game: Wreck Fest is most likely the best racing game in terms of its realistic car destruction physics this generation we’ll see. While still being in alpha and gone through many iterations, it holds such high standards in its car destruction with tremendous details spewing from it, along side its great driving physics.
Speak of driving, if you’ve ever enjoy playing Flatout games before, then you’ll enjoy this one as it’s being developed by the creators of Flatout and it holds just as much care and love in its handling as much as its fun and amazing realistic destruction physics.
By pre-ordering the game now, not only you get to play right away but also have a chance to get a lot of cool exclusive extras like technology sneak peek 2.0, special supporter car and your name.
Drive Tech Demo is a high quality game that works in all major modern web browsers. This online game is part of the Simulation, Physics, Driving, and Download gaming categories. Drive Tech Demo has 183 likes from 223 user ratings. If you enjoy this game then also play games Hot Wheels: Stunt Track Driver and Russian Car Driver.
Download the tech demo by sign-up for the game’s newsletter here.
Get access to the alpha access here.
Next Car Game Tech Demo Free Download
Played it? We’d love to know what you thought about it.
0 notes
Text
John The Ripper Gpu Windows

John the Ripper is a free and open source software. It is a dictionary-based free password cracking tool that attempts to crack plaintext ciphers in the case of knowing the ciphertext, it fully supports the most current encryption algorithms such as DES, MD4, MD5, etc. Simply speaking, it is a brute force password cracking. Based on OpenBenchmarking.org data, the selected test / test configuration (John The Ripper 1.9.0-jumbo-1 - Test: Blowfish) has an average run-time of 2 minutes.By default this test profile is set to run at least 3 times but may increase if the standard deviation exceeds pre-defined defaults or other calculations deem additional runs necessary for greater statistical accuracy of the result. John the Ripper is a fast password cracker, currently available for many flavors of Unix, macOS, Windows, DOS, BeOS, and OpenVMS (the latter requires a contributed patch). Its primary purpose is to detect weak Unix passwords. John the Ripper 1.7.9-jumbo-6 supported GPUs for the following hashes and non-hashes: Latest release include more formats and latest git trees include even more. CUDA significantly benefits from compile-time tuning of parameters for a given GPU, see doc/README-CUDA. WPA-PSK CUDA uses a little bit of CPU code as well, and benefits from OpenMP (so you'll get slightly faster speed if you enable OpenMP in the JtR build, although you'll load multiple CPU cores then).
John the Ripper (JtR) is one of the hacking tools the Varonis IR Team used in the first Live Cyber Attack demo, and one of the most popular password cracking programs out there. In this blog post, we are going to dive into John the Ripper, show you how it works, and explain why it’s important.
Prison school ova dubbed. Notes about hacking: Hacking is a pursuit of knowledge about systems, design, and humans. In this case, we are talking about software and operating systems.
Get the Free Pen Testing Active Directory Environments EBook
“This really opened my eyes to AD security in a way defensive work never did.”
Hacking is not necessarily criminal, although it can be a tool used for bad intentions. We advocate for ethical hacking. Stay in the light side of the Force.
How Does John the Ripper Work?
JtR supports several common encryption technologies out-of-the-box for UNIX and Windows-based systems. (ed. Mac is UNIX based). JtR autodetects the encryption on the hashed data and compares it against a large plain-text file that contains popular passwords, hashing each password, and then stopping it when it finds a match. Simple.

In our amazing Live Cyber Attack demo, the Varonis IR team demonstrates how to steal a hashed password, use JtR to find the true password, and use it to log into an administrative account. That is a very common use case for JtR!
JtR also includes its own wordlists of common passwords for 20+ languages. These wordlists provide JtR with thousands of possible passwords from which it can generate the corresponding hash values to make a high-value guess of the target password. Since most people choose easy-to-remember passwords, JtR is often very effective even with its out-of-the-box wordlists of passwords.
JtR is included in the pentesting versions of Kali Linux.
What is John the Ripper Used for?
JtR is primarily a password cracker used during pentesting exercises that can help IT staff spot weak passwords and poor password policies.
Here is the list of encryption technologies found in JtR:
UNIX crypt(3)
Traditional DES-based
“bigcrypt”
BSDI extended DES-based
FreeBSD MD5-based (linux and Cisco IOS)
OpenBSD Blowfish-based
Kerberos/AFS
Windows LM (DES-based)
DES-based tripcodes
SHA-crypt hashes (newer versions of Fedora and Ubuntu)
SHA-crypt and SUNMD5 hashes (Solaris)
That’s the “official” list. JtR is open-source, so if your encryption of choice isn’t on the list do some digging. Someone might have already written an extension for it.
How to Download John the Ripper
JtR is an open-source project, so you can either download and compile the source on your own, download the executable binaries, or find it as part of a penetration testing package.
The official website for John the Ripper is on Openwall. You can grab the source code and binaries there, and you can join the GitHub to contribute to the project.
JtR is available on Kali Linux as part of their password cracking metapackages.
Tutorials for Using John the Ripper
We are going to go over several of the basic commands that you need to know to start using John the Ripper. To get started all you need is a file that contains a hash value to decrypt.
If you ever need to see a list of commands in JtR, run this command:
Cracking Passwords
John the Ripper’s primary modes to crack passwords are single crack mode, wordlist mode, and incremental. The single crack mode is the fastest and best mode if you have a full password file to crack. Wordlist mode compares the hash to a known list of potential password matches. Incremental mode is the most powerful and possibly won’t complete. This is your classic brute force mode that tries every possible character combination until you have a possible result. Iobit folder lock crack.
The easiest way to try cracking a password is to let JtR go through a series of common cracking modes. This command below tells JtR to try “simple” mode, then the default wordlists containing likely passwords, and then “incremental” mode.
You can also download different wordlists from the Internet, and you can create your own new wordlists for JtR to use with the –wordlist parameter.
If you want to specify a cracking mode use the exact parameter for the mode.
Word Mangling Rules
Mangling is a preprocessor in JtR that optimizes the wordlist to make the cracking process faster. Use the –rules parameter to set the mangling rules.
Viewing Your Output
When you want to see the list of passwords that you have cracked, use the –show parameter.
If your cracked password list is long, you can filter the list with additional parameters. You can also redirect the output using basic redirection in your shell. For example, if you want to see if you cracked any root users (UID=0) use the –users parameter.
John The Ripper Gpu Support Windows
Or if you want to show users from privileged groups use –groups.
Below is the JtR command from our Live Cyber Attack Webinar. In this scenario, our hacker used kerberoast to steal a Kerberos ticket granting ticket(TGT) containing the hash to be cracked, which was saved in a file called ticket.txt. In our case, the wordlist used is the classic rockyou password file from Kali Linux, and the command was set to report progress every 3 seconds.
If you want to see some cool pentesting and defense tactics using Varonis, check out the Live Cyber Attack Webinars! Pick any time that works for you!
Password cracking a Word document or an Excel file hasbecome much easier. Previously you hadto rely on a flaw in the document, some sketchy software or an even sketchierwebsite. Since October 2014 OclHashcat now supports cracking the documentspassword. The process is simple but notas straight forward as a novice might want. You need a couple of things agraphics card capable of cracking using GPU’s, such as an NVidia card with cudasupport, OclHashcat version 1.31 or greater, python, and a password protecteddocument.
I’m writing this for Windows because, let’s face it if youlost a password for Word, Excel or Powerpoint you probably have Windows. First go to hashcat.netgrab the correct OclHashcat version for your GPU either AMD or NVidia. Download it and unzip it, you may need 7zipif you can’t unzip the file. Next, you need python, get that here python.org.(I’m not going to say use Python 2.7 or Python3 just grab whatever, I just use2.7.) Grab the installer, and install it. You also need a python script calledoffice2john and you can get that here office2john.Long story short john the ripper another password cracking suite is alsocapable of doing this, but I prefer OclHashcat.
Now, we have everything we need to recover that passwordright? Nope, we need one more thing some dictionaries to use with OclHashcat.Get those from SkullSecurity. You can move on torule attacks or brute force if the dictionaries fail. One of my first go tolists is the rockyou list start there.
Let’s get cracking, open up a command prompt and navigate tothe directory with the office2john.py file and the password protectedfile. Enter: python office2john.py FILENAME, filenamebeing the protected document. After a second you will see the output likebelow:
Book1.xlsx:$office$*2010*100000*128*16*657ca4864bf8f86a617d21cb71b0c572*0d689a95b0e6ddca4c6f0b3b2c30cc46*1b4c305643f3a7da83f0671df10e80e6ed4d6c576129406f79dd6526ca34f153
This is the hash of the password that protects the document,the important part here is highlighted as we need to tell OclHashcat what typeof hash this is. This one is an Office 2010 document. From the command prompt navigate to where youhave OclHashcat actually CudaHashcat for me. Entering --help after thecudahashcat32.exe or cudahashcat64.exe will show you the hash type numbers andyou pick the one that matches your office version you see in the extracted hashabove.
Since the document is Office 2010 I need hash type 9500.Here is my command
John The Ripper For Windows
“cudaHashcat32.exe -a 0 -m 9500 --username Book1.xlsx:$office$*2010*100000*128*16*657ca4864bf8f86a617d21cb71b0c572*0d689a95b0e6ddca4c6f0b3b2c30cc46*1b4c305643f3a7da83f0671df10e80e6ed4d6c576129406f79dd6526ca34f153'D:password_listsskullsecurity-listsskullsecurity-listsrockyou.txt'
-a 0, specifies dictionary attack mode
-m, is the hash type
--username, tells hashcat to ignore the usernamein this case the username is “Book1.xlsx”
The next part is the hash followed by the dictionary.Running this will result in the output similar to below.
In the image the hash was cracked in 4 seconds with thepassword being “Password”. If thatdoesn’t work try another dictionary use rules or try to brute force. Keep inmind that a brute force can take a LONG TIME.
Install John The Ripper For Gpu Windows
Even brute forcing a 6 character password with uppercase,lowercase and numbers can take more than a year. Obviously, the better or moreGPU’s you have the faster it will be. Long story short:
John The Ripper Password Cracker
Run office2john.py to get the hash of the protected document
Run OclHashcat on the hash
Open document
Gpu Download For Windows 10
See, I told you. easy.
0 notes
Text
Devices , and Intel said its second-quarter performance was driven by high-performance computing and automotive demand. Revenue in both areas increased sequentially. Sales to all of the company’s end markets grew by double-digit percentages.
Smartphones amounted to about 42% of total revenue, and high-performance computing contributed about 39% of revenue.
Though Taiwan Semi continues to add capacity at a breakneck pace across its chip-manufacturing portfolio—ranging from the most advanced processors, to less sophisticated chips destined for uses such as automotive parts—executives said that the global shortage will persist into 2022. There was some good news for auto makers, as the company said it had increased capacity for such chips by 60%, which will help ease shortages in the third quarter.
But for the first time since 2019’s second quarter, Taiwan Semi’s operating income fell short of expectations, coming in at NT$145.7 billion, when analysts expected NT$150 billion. Operating income—also known as operating profit—is sometimes viewed by investors as a more accurate measure of a business’s performance because it gauges the profitability of core operations, excluding items such as interest and taxes, among other things.This is a list of the top AWS competitors. 2021 р. 7. It has over 175 fully-featured services from data centers globally. AWS Trainium will be available in 2021. By Kurt Marko December 11, 2018. c. Congratulations! You created an AWS IoT Greengrass group that is ready for use on your edge based IoT project. GPU4. AWS is offering access to its EC2 Inf1 instances, which are based on 16 Inferentia chips, available immediately. . sql. I hope this guide helped you to install the Nvidia display driver in Ubuntu Linux. . We will periodically update the list to reflect the ongoing changes across all three platforms. AMD GPUs: How do they measure up? A straight comparison between Nvidia and AMD's GPU performance figures gives AMD an apparent edge over Nvidia, with up to 11. 2020 р. An Open Source Alternative to AWS SageMaker. Megaport enables access to Hosted, Hosted VIF, and Dedicated Connections to AWS cloud through the AWS Direct Connect Service Delivery Program. “Supporting Trainium, Gaudi and Nvidia GPUs is a smart move,” Freund wrote for Forbes , “and it is consistent with AWS’s strategy of offering customers . AWS Trainium shares the same AWS Neuron SDK as AWS Inferentia, so it’s integrated with TensorFlow, PyTorch, and MXNet. 24xlarge have 32 GB GPU memory. Q: Why am I not getting NVIDIA GRID features on G3 instances using the driver downloaded from NVIDIA website in Amazon EC2? May 26, 2020 in Amazon Elastic Compute Cloud EC2 #ec2 AWS ditches Nvidia for in-house 'Inferentia' silicon. Another major announcement from AWS at re:Invent 2018 was the news that Amazon will introduce their own machine learning chip to compete with Google & IBM in TPU development. Amazon's so-called “Inferentia” chip announced on Wednesday wil. The 1650 has 896 NVIDIA CUDA Cores, a base/boost clock of 1485/1665 MHz and 4GB of GDDR5 memory running at up to 8Gbps. 14 груд. Compute wise, Amazon EC2 Inf1 instances featuring AWS Inferentia chips are now available in additional AWS regions and EC2Launch is now at v2 with a range of new features, including renaming of the administrator account. It’s the fastest way to get rolling with machine learning. Whether you're on a budget, learning about deep learning, or just want to run a prediction service, you have many affordable options in the CPU category. 2021 р. AWS has compared performance of AWS Inferentia vs. The AWS Cloud is an ideal platform to provide an agile compute environment for Artificial Intelligence and technical compute workloads that require high-performance computing (HPC) methods to accelerate discovery. Each AWS Inferentia chip contains four NeuronCores . Azure Stack vs. 0. Performance and The Edge. The cloud giant. To use the noise removal effects in Streamlabs OBS, add an “Audio Input Capture” source. . Oracle Dedicated Region is a fully managed cloud region that brings all of our cloud services into customers’ data centers in a self-contained model.


0 notes
Text
How To Install Nvidia Drivers in Ubuntu?
You can install Nvidia drivers in Ubuntu in two ways; using the Command Line Interface (CLI) method or Graphical User Interface (GUI) method. Before installing the Nvidia drivers, check the system requirements. Your system needs to have a CUDA-capable GPU, should run a supported version of Linux, requires the build tools such as make, gcc to be installed, and should have appropriate Linux kernel headers.

Carry out these steps to install Nvidia driver in Ubuntu using the CLI method:
Open the Terminal app and type the “apt” or “apt-get” command to search for the Nvidia drivers.
Type the “apt search nvidia-driver” command and press the Enter key.
Alternatively, type the “apt-cache search nvidia-driver” command to search for the Nvidia driver.
Type the “sudo apt install nvidia-driver-390” command and press the Enter key to start installing the Nvidia driver.
After completing the installation, restart your computer using the “sudo reboot” command.
Next, you need to verify the installed Nvidia driver.
After restarting the computer, open the Terminal app and type the “nvidia-smi” command to view the GPU information.
It will process the drivers that use the Nvidia GPU.
After verifying the installation, configure the Nvidia graphics driver in the Terminal app.
Type the “nvidia-settings” command to open the server settings window.
Finally, type the “sudo nvidia-settings” command to save the settings.
To install the Nvidia drivers using the GUI method, please visit https://how-to-setup.com/how-to-install-nvidia-drivers-ubuntu
0 notes
Text
NVIDIA Docker って今どうなってるの? (19.11版)
from https://qiita.com/ksasaki/items/b20a785e1a0f610efa08?utm_campaign=popular_items&utm_medium=feed&utm_source=popular_items

エヌビディアの佐々木です。
突然ですが皆さん、Docker コンテナで GPU を使うとき、(典型的には NGC のコンテナイメージを使うときとか) どういうコマンドを実行していますか?
と打ち込んでいる方は是非この記事を最後まで読んでください。懐かしの nvidia-docker コマンド (NVIDIA Docker 2 ではシェルスクリプト) は、最新の NVIDIA Docker にはもはや含まれていません。
NVIDIA Docker の歴史
さて、ここまで普通に「NVIDIA Docker」と書いてしまっていますが、GitHub リポジトリを見ればわかるとおり、このプロジェクトの名前は既に NVIDIA Docker ではありません。実はこのプロジェクトはこれまでに、
名前が3回変わっており
大きなアーキテクチャ変更 (所謂「NVIDIA Docker 2」になったとき) や
後方互換性のない変更 (nvidia-docker(1) が消えたとか) もあり
インストールするパッケージ名も変わっています
ちょっと表にしてみましょう。なお、ここで言う「バージョン」は、GitHub の nvidia-docker リポジトリのリリース番号です。
Name Version Package Name Description
NVIDIA Docker 1.0.1 まで .deb や .rpm ファイルを配っていた nvidia-docker-plugin という Docker ボリューム プラグインのデーモンが動いており、nvidia-docker コマンドはこのデーモンと通信してコンテナで GPU を使うための環境を整えていた 。
Docker Engine Utility for NVIDIA GPUs 2.0.2 nvidia-docker2 ボリュームプラグインは使われなくなった。 docker run --runtime=nvidia としてエヌビディアによるカスタマイズ版の runc を指定するようになった。 nvidia-docker は --runtime=nvidia オプションなどを補って docker コマンドを実行するラッパースクリプトになった。 このカスタムランタイム (/usr/bin/nvidia-container-runtime) の役割は、コンテナ作成直後に処理を挿入できる pre-start-hook にプログラム (/usr/bin/nvidia-container-runtime-hook) を登録して、以前のバージョンのボリューム プラグイン相当の処理を行うこと。
NVIDIA Container Runtime for Docker 2.1.0 nvidia-docker2
2.0.x 系と仕組みは同じ
NVIDIA Container Toolkit 2.2.1 nvidia-container-toolkit Docker 19.03 が GPU にネイティブ対応したことに伴い、pre-start-hook の登録にカスタムランタイムが不要になった。 --runtime=nvidia ではなく --gpus オプションを指定する必要がある。 nvidia-docker コマンド(スクリプト) が含まれなくなった。
なんか、ころころ変わっててすみません…
NVIDIA Docker 使い方 (最新版)
というわけで、本記事執筆時点 (2019年11月) の最新 NVIDIA Docker しぐさは次のようなものです。まずは過去のしがらみなく、まっさらな Linux 環境で初めて NVIDIA Docker を使い始める状況を想定します。
この場合話は簡単で、こちらに記載の通り
最新の NVIDIA ドライバーをインストール (注)
Docker の最新バージョン (19.03) をインストール
nvidia-container-toolkit パッケージをインストール
これだけです。そして、GPU コンテナを実行するには Docker 19.03 でサポートされた --gpus オプションを使います。
docker run --gpus all nvidia/cuda:9.0-base nvidia-smi
--runtime=nvidia オプションは無意味です。
nvidia-docker コマンドもありません (nvidia-container-toolkit パッケージに含まれていません)。
今後はこれが標準かつ唯一の方法になって世の中が少しシンプルになるはずです。
後方互換性
いくら最新の Docker が公式に GPU に対応したからとはいえ、--runtime=nvidia オプションや nvidia-docker コマンドが突然使えなくなってしまうのでは困るケースも多いと思います。ご安心ください、実は --runtime=nvidia オプションや nvidia-docker コマンドを提供していた nvidia-docker2 パッケージは、
With the release of Docker 19.03, usage of nvidia-docker2 packages are deprecated since NVIDIA GPUs are now natively supported as devices in the Docker runtime.
出典: https://github.com/NVIDIA/nvidia-docker/tree/master#quickstart
と明記はされているものの、最新の Docker 19.03 の環境でもまだ利用可能です。この、「Docker 19.03 + nvidia-docker2 パッケージ」の状態では、次のように新旧全ての書き方が通用します。
$ docker run --gpus all nvidia/cuda:9.0-base nvidia-smi $ docker run --runtime nvidia nvidia/cuda:9.0-base nvidia-smi $ nvidia-docker run nvidia/cuda:9.0-base nvidia-smi
出典: https://github.com/NVIDIA/nvidia-docker/tree/master#upgrading-with-nvidia-docker2-deprecated
しかし、いつまで nvidia-docker2 パッケージが使えるかはわかりませんから、できるだけ前述の標準かつ唯一の方法への移行をオススメします。
おまけ: NVIDIA ドライバーのインストール
NVIDIA Docker と直接は関係しませんが、いや、そんなことないか、ほぼ直接関係する大事なことなので書きますが、 NVIDIA ドライバーをインストールする、オススメの方法(だけど案外知られていない気がする方法) は次の通りです。NVIDIA Docker の FAQ にあるのです。
The recommended way is to use your package manager and install the cuda-drivers package (or equivalent). When no packages are available, you should use an official "runfile".
出典: https://github.com/NVIDIA/nvidia-docker/wiki/Frequently-Asked-Questions#how-do-i-install-the-nvidia-driver
適当訳: 「オススメの方法はご利用の環境に応じたパッケージマネージャで cuda-drivers メタパッケージ (あるいはその相当品) をインストールすることです。パッケージが利用できない場合に、公式の "runfile" を使ってください。」
cuda-drivers パッケージをインストールというのをもう少し具体的に示しますと、例えば Ubuntu 18.04 であれば CUDA 10.1 のインストール Web サイトで下記のようなコマンドが提示されると思います。
wget https://developer.download.nvidia.com/compute/cuda/repos/ubuntu1804/x86_64/cuda-ubuntu1804.pin sudo mv cuda-ubuntu1804.pin /etc/apt/preferences.d/cuda-repository-pin-600 sudo apt-key adv --fetch-keys https://developer.download.nvidia.com/compute/cuda/repos/ubuntu1804/x86_64/7fa2af80.pub sudo add-apt-repository "deb http://developer.download.nvidia.com/compute/cuda/repos/ubuntu1804/x86_64/ /" sudo apt-get update sudo apt-get -y install cuda
https://developer.nvidia.com/cuda-downloads?target_os=Linux&target_arch=x86_64&target_distro=Ubuntu&target_version=1804&target_type=debnetwork
この最後の sudo apt-get -y install cuda を sudo apt-get -y install cuda-driversとすれば、最新のドライバだけが綺麗にインストールされます。これがオススメの方法です。
まとめ
Docker 19.03 の GPU ネイティブ対応により、NVIDIA Docker の使い方も少し変わりました。今後は Docker 標準の --gpus オプションを使いましょう。
nvidia-docker2 パッケージは Docker 19.03 の登場で非推奨になりましたが今のところ有効です。新旧双方のオプションが使えるので今のうちにじわじわと移行を進めてください。
ついでに言うと、 NVIDIA ドライバは cuda-drivers パッケージでインストールするのがオススメ。
関連情報
https://cdn.qiita.com/assets/qiita-fb-2887e7b4aad86fd8c25cea84846f2236.png
0 notes