#cuda install ubuntu
Explore tagged Tumblr posts
Visit Tumblr Blog
Explore Tumblr blogs with no restrictions, modern design and the best experience.
Last Seen Tumblr Blogs


Fun Fact
28.6 is the average number of monthly visits per US mobile user.
Text
can't update telegram desktop bc can't update ubuntu overall bc of an issue with an out-of-date signature related to ROS and Cuda packages that are still there despite me trying to blast them off the face of the earth bc I only want to spend a limited amount of time (read: like 10 min) trying to troubleshoot software updates and each time I approach the issue (read: like 3 times) I find another set of steps I have to try and I am considering wiping the whole installation, increasing the partition size, and reinstalling from a clean slate despite this Definitely Not Taking Less Time Than Fixing It
8 notes
·
View notes
Text
banging my head against a wall trying to install an older version of cuda on ubuntu
0 notes
Text
Setting Up a Training, Fine-Tuning, and Inferencing of LLMs with NVIDIA GPUs and CUDA
New Post has been published on https://thedigitalinsider.com/setting-up-a-training-fine-tuning-and-inferencing-of-llms-with-nvidia-gpus-and-cuda/
Setting Up a Training, Fine-Tuning, and Inferencing of LLMs with NVIDIA GPUs and CUDA
The field of artificial intelligence (AI) has witnessed remarkable advancements in recent years, and at the heart of it lies the powerful combination of graphics processing units (GPUs) and parallel computing platform.
Models such as GPT, BERT, and more recently Llama, Mistral are capable of understanding and generating human-like text with unprecedented fluency and coherence. However, training these models requires vast amounts of data and computational resources, making GPUs and CUDA indispensable tools in this endeavor.
This comprehensive guide will walk you through the process of setting up an NVIDIA GPU on Ubuntu, covering the installation of essential software components such as the NVIDIA driver, CUDA Toolkit, cuDNN, PyTorch, and more.
The Rise of CUDA-Accelerated AI Frameworks
GPU-accelerated deep learning has been fueled by the development of popular AI frameworks that leverage CUDA for efficient computation. Frameworks such as TensorFlow, PyTorch, and MXNet have built-in support for CUDA, enabling seamless integration of GPU acceleration into deep learning pipelines.
According to the NVIDIA Data Center Deep Learning Product Performance Study, CUDA-accelerated deep learning models can achieve up to 100s times faster performance compared to CPU-based implementations.
NVIDIA’s Multi-Instance GPU (MIG) technology, introduced with the Ampere architecture, allows a single GPU to be partitioned into multiple secure instances, each with its own dedicated resources. This feature enables efficient sharing of GPU resources among multiple users or workloads, maximizing utilization and reducing overall costs.
Accelerating LLM Inference with NVIDIA TensorRT
While GPUs have been instrumental in training LLMs, efficient inference is equally crucial for deploying these models in production environments. NVIDIA TensorRT, a high-performance deep learning inference optimizer and runtime, plays a vital role in accelerating LLM inference on CUDA-enabled GPUs.
According to NVIDIA’s benchmarks, TensorRT can provide up to 8x faster inference performance and 5x lower total cost of ownership compared to CPU-based inference for large language models like GPT-3.
NVIDIA’s commitment to open-source initiatives has been a driving force behind the widespread adoption of CUDA in the AI research community. Projects like cuDNN, cuBLAS, and NCCL are available as open-source libraries, enabling researchers and developers to leverage the full potential of CUDA for their deep learning.
Installation
When setting AI development, using the latest drivers and libraries may not always be the best choice. For instance, while the latest NVIDIA driver (545.xx) supports CUDA 12.3, PyTorch and other libraries might not yet support this version. Therefore, we will use driver version 535.146.02 with CUDA 12.2 to ensure compatibility.
Installation Steps
1. Install NVIDIA Driver
First, identify your GPU model. For this guide, we use the NVIDIA GPU. Visit the NVIDIA Driver Download page, select the appropriate driver for your GPU, and note the driver version.
To check for prebuilt GPU packages on Ubuntu, run:
sudo ubuntu-drivers list --gpgpu
Reboot your computer and verify the installation:
nvidia-smi
2. Install CUDA Toolkit
The CUDA Toolkit provides the development environment for creating high-performance GPU-accelerated applications.
For a non-LLM/deep learning setup, you can use:
sudo apt install nvidia-cuda-toolkit However, to ensure compatibility with BitsAndBytes, we will follow these steps: [code language="BASH"] git clone https://github.com/TimDettmers/bitsandbytes.git cd bitsandbytes/ bash install_cuda.sh 122 ~/local 1
Verify the installation:
~/local/cuda-12.2/bin/nvcc --version
Set the environment variables:
export CUDA_HOME=/home/roguser/local/cuda-12.2/ export LD_LIBRARY_PATH=/home/roguser/local/cuda-12.2/lib64 export BNB_CUDA_VERSION=122 export CUDA_VERSION=122
3. Install cuDNN
Download the cuDNN package from the NVIDIA Developer website. Install it with:
sudo apt install ./cudnn-local-repo-ubuntu2204-8.9.7.29_1.0-1_amd64.deb
Follow the instructions to add the keyring:
sudo cp /var/cudnn-local-repo-ubuntu2204-8.9.7.29/cudnn-local-08A7D361-keyring.gpg /usr/share/keyrings/
Install the cuDNN libraries:
sudo apt update sudo apt install libcudnn8 libcudnn8-dev libcudnn8-samples
4. Setup Python Virtual Environment
Ubuntu 22.04 comes with Python 3.10. Install venv:
sudo apt-get install python3-pip sudo apt install python3.10-venv
Create and activate the virtual environment:
cd mkdir test-gpu cd test-gpu python3 -m venv venv source venv/bin/activate
5. Install BitsAndBytes from Source
Navigate to the BitsAndBytes directory and build from source:
cd ~/bitsandbytes CUDA_HOME=/home/roguser/local/cuda-12.2/ LD_LIBRARY_PATH=/home/roguser/local/cuda-12.2/lib64 BNB_CUDA_VERSION=122 CUDA_VERSION=122 make cuda12x CUDA_HOME=/home/roguser/local/cuda-12.2/ LD_LIBRARY_PATH=/home/roguser/local/cuda-12.2/lib64 BNB_CUDA_VERSION=122 CUDA_VERSION=122 python setup.py install
6. Install PyTorch
Install PyTorch with the following command:
pip install torch torchvision torchaudio --index-url https://download.pytorch.org/whl/cu121
7. Install Hugging Face and Transformers
Install the transformers and accelerate libraries:
pip install transformers pip install accelerate
The Power of Parallel Processing
At their core, GPUs are highly parallel processors designed to handle thousands of concurrent threads efficiently. This architecture makes them well-suited for the computationally intensive tasks involved in training deep learning models, including LLMs. The CUDA platform, developed by NVIDIA, provides a software environment that allows developers to harness the full potential of these GPUs, enabling them to write code that can leverage the parallel processing capabilities of the hardware. Accelerating LLM Training with GPUs and CUDA.
Training large language models is a computationally demanding task that requires processing vast amounts of text data and performing numerous matrix operations. GPUs, with their thousands of cores and high memory bandwidth, are ideally suited for these tasks. By leveraging CUDA, developers can optimize their code to take advantage of the parallel processing capabilities of GPUs, significantly reducing the time required to train LLMs.
For example, the training of GPT-3, one of the largest language models to date, was made possible through the use of thousands of NVIDIA GPUs running CUDA-optimized code. This allowed the model to be trained on an unprecedented amount of data, leading to its impressive performance in natural language tasks.
import torch import torch.nn as nn import torch.optim as optim from transformers import GPT2LMHeadModel, GPT2Tokenizer # Load pre-trained GPT-2 model and tokenizer model = GPT2LMHeadModel.from_pretrained('gpt2') tokenizer = GPT2Tokenizer.from_pretrained('gpt2') # Move model to GPU if available device = torch.device("cuda" if torch.cuda.is_available() else "cpu") model = model.to(device) # Define training data and hyperparameters train_data = [...] # Your training data batch_size = 32 num_epochs = 10 learning_rate = 5e-5 # Define loss function and optimizer criterion = nn.CrossEntropyLoss() optimizer = optim.Adam(model.parameters(), lr=learning_rate) # Training loop for epoch in range(num_epochs): for i in range(0, len(train_data), batch_size): # Prepare input and target sequences inputs, targets = train_data[i:i+batch_size] inputs = tokenizer(inputs, return_tensors="pt", padding=True) inputs = inputs.to(device) targets = targets.to(device) # Forward pass outputs = model(**inputs, labels=targets) loss = outputs.loss # Backward pass and optimization optimizer.zero_grad() loss.backward() optimizer.step() print(f'Epoch epoch+1/num_epochs, Loss: loss.item()')
In this example code snippet, we demonstrate the training of a GPT-2 language model using PyTorch and the CUDA-enabled GPUs. The model is loaded onto the GPU (if available), and the training loop leverages the parallelism of GPUs to perform efficient forward and backward passes, accelerating the training process.
CUDA-Accelerated Libraries for Deep Learning
In addition to the CUDA platform itself, NVIDIA and the open-source community have developed a range of CUDA-accelerated libraries that enable efficient implementation of deep learning models, including LLMs. These libraries provide optimized implementations of common operations, such as matrix multiplications, convolutions, and activation functions, allowing developers to focus on the model architecture and training process rather than low-level optimization.
One such library is cuDNN (CUDA Deep Neural Network library), which provides highly tuned implementations of standard routines used in deep neural networks. By leveraging cuDNN, developers can significantly accelerate the training and inference of their models, achieving performance gains of up to several orders of magnitude compared to CPU-based implementations.
import torch import torch.nn as nn import torch.nn.functional as F from torch.cuda.amp import autocast class ResidualBlock(nn.Module): def __init__(self, in_channels, out_channels, stride=1): super().__init__() self.conv1 = nn.Conv2d(in_channels, out_channels, kernel_size=3, stride=stride, padding=1, bias=False) self.bn1 = nn.BatchNorm2d(out_channels) self.conv2 = nn.Conv2d(out_channels, out_channels, kernel_size=3, stride=1, padding=1, bias=False) self.bn2 = nn.BatchNorm2d(out_channels) self.shortcut = nn.Sequential() if stride != 1 or in_channels != out_channels: self.shortcut = nn.Sequential( nn.Conv2d(in_channels, out_channels, kernel_size=1, stride=stride, bias=False), nn.BatchNorm2d(out_channels)) def forward(self, x): with autocast(): out = F.relu(self.bn1(self.conv1(x))) out = self.bn2(self.conv2(out)) out += self.shortcut(x) out = F.relu(out) return out
In this code snippet, we define a residual block for a convolutional neural network (CNN) using PyTorch. The autocast context manager from PyTorch’s Automatic Mixed Precision (AMP) is used to enable mixed-precision training, which can provide significant performance gains on CUDA-enabled GPUs while maintaining high accuracy. The F.relu function is optimized by cuDNN, ensuring efficient execution on GPUs.
Multi-GPU and Distributed Training for Scalability
As LLMs and deep learning models continue to grow in size and complexity, the computational requirements for training these models also increase. To address this challenge, researchers and developers have turned to multi-GPU and distributed training techniques, which allow them to leverage the combined processing power of multiple GPUs across multiple machines.
CUDA and associated libraries, such as NCCL (NVIDIA Collective Communications Library), provide efficient communication primitives that enable seamless data transfer and synchronization across multiple GPUs, enabling distributed training at an unprecedented scale.
</pre> import torch.distributed as dist from torch.nn.parallel import DistributedDataParallel as DDP # Initialize distributed training dist.init_process_group(backend='nccl', init_method='...') local_rank = dist.get_rank() torch.cuda.set_device(local_rank) # Create model and move to GPU model = MyModel().cuda() # Wrap model with DDP model = DDP(model, device_ids=[local_rank]) # Training loop (distributed) for epoch in range(num_epochs): for data in train_loader: inputs, targets = data inputs = inputs.cuda(non_blocking=True) targets = targets.cuda(non_blocking=True) outputs = model(inputs) loss = criterion(outputs, targets) optimizer.zero_grad() loss.backward() optimizer.step()
In this example, we demonstrate distributed training using PyTorch’s DistributedDataParallel (DDP) module. The model is wrapped in DDP, which automatically handles data parallelism, gradient synchronization, and communication across multiple GPUs using NCCL. This approach enables efficient scaling of the training process across multiple machines, allowing researchers and developers to train larger and more complex models in a reasonable amount of time.
Deploying Deep Learning Models with CUDA
While GPUs and CUDA have primarily been used for training deep learning models, they are also crucial for efficient deployment and inference. As deep learning models become increasingly complex and resource-intensive, GPU acceleration is essential for achieving real-time performance in production environments.
NVIDIA’s TensorRT is a high-performance deep learning inference optimizer and runtime that provides low-latency and high-throughput inference on CUDA-enabled GPUs. TensorRT can optimize and accelerate models trained in frameworks like TensorFlow, PyTorch, and MXNet, enabling efficient deployment on various platforms, from embedded systems to data centers.
import tensorrt as trt # Load pre-trained model model = load_model(...) # Create TensorRT engine logger = trt.Logger(trt.Logger.INFO) builder = trt.Builder(logger) network = builder.create_network() parser = trt.OnnxParser(network, logger) # Parse and optimize model success = parser.parse_from_file(model_path) engine = builder.build_cuda_engine(network) # Run inference on GPU context = engine.create_execution_context() inputs, outputs, bindings, stream = allocate_buffers(engine) # Set input data and run inference set_input_data(inputs, input_data) context.execute_async_v2(bindings=bindings, stream_handle=stream.ptr) # Process output # ...
In this example, we demonstrate the use of TensorRT for deploying a pre-trained deep learning model on a CUDA-enabled GPU. The model is first parsed and optimized by TensorRT, which generates a highly optimized inference engine tailored for the specific model and hardware. This engine can then be used to perform efficient inference on the GPU, leveraging CUDA for accelerated computation.
Conclusion
The combination of GPUs and CUDA has been instrumental in driving the advancements in large language models, computer vision, speech recognition, and various other domains of deep learning. By harnessing the parallel processing capabilities of GPUs and the optimized libraries provided by CUDA, researchers and developers can train and deploy increasingly complex models with high efficiency.
As the field of AI continues to evolve, the importance of GPUs and CUDA will only grow. With even more powerful hardware and software optimizations, we can expect to see further breakthroughs in the development and deployment of AI systems, pushing the boundaries of what is possible.
#ai#AI development#AI research#AI systems#AI Tools 101#amp#applications#approach#apt#architecture#artificial#Artificial Intelligence#benchmarks#BERT#Bias#challenge#clone#CNN#code#Code Snippet#Collective#command#communication#communications#Community#complexity#comprehensive#computation#computer#Computer vision
0 notes
Text
Exeton Launches Vector One, A New Single-GPU Desktop PC

The Exeton Vector One is now available for order. The new single-GPU desktop PC is built to tackle demanding AI/ML tasks, from fine-tuning Stable Diffusion to handling the complexities of Llama 2 7B. Exeton customers can now benefit from a more compact, quieter desktop PC at a price point of less than $5,500.
Vector One Specs
GPU: 1x NVIDIA GeForce RTX 4090, 24 GB, liquid-cooled
PROCESSOR: AMD Ryzen™ 9 7950X 16-core, 32-thread
SYSTEM RAM: 64 GB or 128 GB DDR5
STORAGE: OS — Up to 3.84 TB M.2 (NVMe) | Data — Up to 3 x 3.84 TB M.2 (NVMe)
NETWORK INTERFACE: 10Gb Ethernet
Key benefits of the Vector One
The Vector One offers Exeton customers a powerful deep learning solution to train neural networks right from their desktops.
Sleek Power that doesn’t Disturb
The Vector One has been meticulously designed with liquid cooling for both the CPU and GPU, ensuring optimal performance without the noise. Even under typical high workloads, it only emits a mere 39 dB SPL of sound, making it perfect for maintaining a quiet workspace.
Next-gen Graphics for Advanced AI/ML Tasks
Equipped with the cutting-edge NVIDIA GeForce RTX 4090 graphics card boasting 24 GB of VRAM, the Vector One stands ready to tackle demanding tasks. From fine-tuning Stable Diffusion to handling the complexities of Llama 2 7B, this machine ensures that high-intensity computations are a breeze.
Experience the Power of future-ready Architecture
At the heart of Vector One lies the state-of-the-art AMD Ryzen 9 7950X CPU, hosted on the advanced X670E chipset. This powerhouse supports both PCIe Gen 5 and DDR5 and offers up to twice the memory bandwidth of its predecessors. Dive into the future of computing with unrivaled speed and efficiency.
Delivering the Optimal Experience for AI/ML
Through rigorous research and experience, our engineers have crafted the ultimate system configuration tailored for AI/ML tasks. No more guesswork or configurations needed: the Vector One is fine-tuned to deliver unparalleled performance right out of the box. Additionally, every Vector One comes with a one-year warranty on hardware, with an option to extend to three years. For added peace of mind, choose to include dedicated technical support for Ubuntu and all ML frameworks and drivers that come pre-installed with your machine.
Pre-installed with the Software you Need

How to get started with Vector One
The Vector One is now available to purchase. Equipped with a single NVIDIA GeForce RTX 4090 graphics card boasting 24 GB of VRAM and pre-installed with Ubuntu, TensorFlow, PyTorch®, NVIDIA CUDA, and NVIDIA cuDNN, the Vector One is the optimal single-GPU desktop PC for deep learning. At less than $5,500, the desktop solution meets tighter budget requirements without sacrificing performance.
Muhammad Hussnain Facebook | Instagram | Twitter | Linkedin | Youtube
0 notes
Text
How to install Nvidia CUDA? (for GPU rendering in Blender)
How to install Nvidia CUDA? (for GPU rendering in Blender)
How to install Nvidia CUDA on linux
Solution :-
On Nvidia’s website they have a .deb package that you have to download and then installed on your system to enable the repository. To install CUDA from Nvidia’s website directly. Here’s the step to install Nvidia CUDA working:
Open Nvidia’s website https://developer.nvidia.com/cuda-downloads
Select the .deb file that corresponds to your Ubuntu…
View On WordPress
1 note
·
View note
Text
LOL. Linux user uses Nouveau drivers instead of the binary Nvidia https://www.cyberciti.biz/faq/ubuntu-linux-install-nvidia-driver-latest-proprietary-driver/ drivers. 🤣 You need the official driver for gaming, ML, CUDA, etc. There is no alternative. #Linux #Ubuntu #Debian #ArchLinux
-> Ubuntu Linux Install Nvidia Driver (Latest Proprietary Driver)
20 notes
·
View notes
Link
In this tutorial, you will learn about Install TensorFlow GPU on Ubuntu - Configuring GPU Tensorflow on Ubuntu and Guideline for installation cuda 9.0 Toolkit for Ubuntu.
Ubuntu comes with opensource ubuntu NVIDIA driver called nouveau. So first step would be disabling it. This tutorial is divided into following parts
Disabling nouveau
Install cuda 9.0 Toolkit for ubuntu 18.04 LTS
Install Cudnn 7.0
Install libcupti
Adding path of cuda toolkit
Installing Tensorflow-GPU on virtual environment.
#ai#Install TensorFlow GPU on Ubuntu#cuda installation guideline#Configuring GPU Tensorflow on Ubuntu
0 notes
Text
Compiling GDAL with OpenCL on Ubuntu
I needed to apply GDAL operations to very large rasters, so I needed GPU acceleration for these. Our cloud infrastructure has GPUs available, but unfortunately Ubuntu's prebuilt GDAL binaries come without.
I found instructions on the internet how to include it, but they were outdated. The below instructions worked for me on Ubuntu 16.04 compiling GDAL 2.4.2. I strongly suspect the approach works the same on later Ubuntu versions, and only different in flags for later GDAL versions.
I based my method on this and this source.
# Add the nVidia cuda repo curl -O https://developer.download.nvidia.com/compute/cuda/repos/ubuntu1604/x86_64/cuda-ubuntu1604.pin sudo mv cuda-ubuntu1604.pin /etc/apt/preferences.d/cuda-repository-pin-600 sudo apt-key adv --fetch-keys http://developer.download.nvidia.com/compute/cuda/repos/ubuntu1604/x86_64/7fa2af80.pub sudo add-apt-repository "deb http://developer.download.nvidia.com/compute/cuda/repos/ubuntu1604/x86_64/ /" # Install the necessary Ubuntu packages; I needed cuda-9-0 # Note: opencl is in a separate package, make sure it's the same version as your nvidia driver is (modprobe nvidia; modinfo nvidia) apt update && apt install cuda-9-0 nvidia-libopencl1-455 # Download and unpack GDAL wget http://download.osgeo.org/gdal/2.2.4/gdal-2.4.2.tar.gz tar -xvzf gdal-2.4.2.tar.gz cd gdal-2.4.2 # Set ENV vars to point GDAL to Cuda/OpenCL export LD_LIBRARY_PATH=/usr/local/cuda/lib64 export PATH=/usr/local/cuda/bin:$PATH # Compile with Cuda and OpenCL support # Note that --with-opencl-lib=cuda is necessary ./configure --prefix=/opt/gdal \ --with-threads \ --with-opencl \ --with-opencl-include=/usr/local/cuda/include/ \ --with-opencl-lib="-L/usr/local/cuda/lib64 -lOpenCL" make sudo make install
1 note
·
View note
Text
Theme Updates, Offline Upgrades Headline New Additions to Pop!_OS 19.10

Halloween came early this year with our latest release of Pop!_OS. Fill your treat bag with theme updates, Tensorman, easy upgrading, and more as we unwrap the details of Pop!_OS 19.10:
Theme Updates
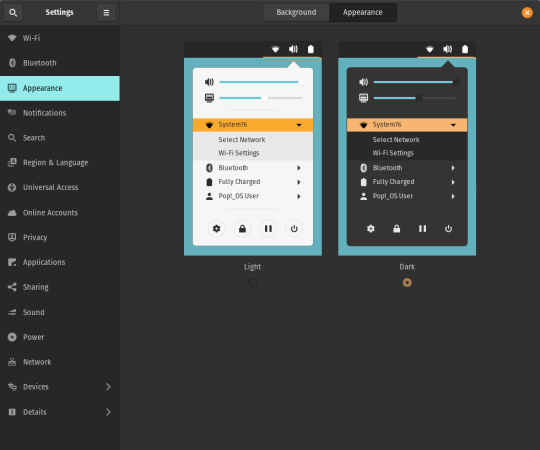
A new Dark Mode for Pop!_OS is available in the operating system’s Appearance Settings. Both the Light and Dark modes feature higher contrast colors using a neutral color palette that’s easy on the eyes.
The functionality of Dark Mode has been expanded to include the shell, providing a more consistently dark aesthetic across your desktop. If you’re using the User Themes extension to set the shell theme, disable it to use the new integrated Light and Dark mode switcher.
The default theme on Pop!_OS has been rebuilt based on Adwaita. Though users may only notice a slight difference in their widgets, the new OS theme provides significant measures to prevent application themes from experiencing UI breakage. This breakage manifests in the application as missing or misaligned text, broken widgets, and scaling errors, and should not occur with the new theme in place.
The updated theme includes a new set of modernized sound effects. Users will now hear a sound effect when plugging and unplugging a USB or charging cable. The sound effect for adjusting the volume has been removed.
Tensorman
Tensorman is a new tool that we’ve developed to serve as a toolchain manager for Tensorflow, using the official Docker builds of Tensorflow. For example, executing a python script inside of a Tensorflow Docker container with CUDA GPU and Python 3 support will now be as simple as running:
tensorman run --gpu python -- ./script.py
Tensorman allows users to define a default version of Tensorflow user-wide, project-wide, and per run. This will enable all releases of Pop!_OS to gain equal support for all versions of Tensorflow, including pre-releases, without needing to install Tensorflow or the CUDA SDK in the system. Likewise, new releases of Tensorflow upstream will be made immediately available to install with Tensorman.
Examples of how to use Tensorman are in the tool’s support page. Tensorman is now available on Pop!_OS 19.10, and will be coming to Pop!_OS 18.04 LTS soon.
To install Tensorman, enter this command into the Terminal:
sudo apt install tensorman
GNOME 3.34
In addition to theming improvements, the GNOME 3.34 release brings some new updates to the fold. From GNOME’s 3.34 Release Notes:
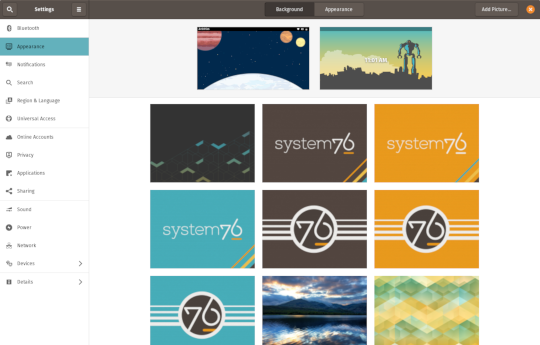
A redesigned Background panel landed in the Appearance settings. Now when you select a background, you will see a preview of it under the desktop panel and lock screen. Custom backgrounds can now be added via the Add Picture… button.
Performance improvements bring smoother animations and a more responsive desktop experience.
Icons in the application overview can be grouped together into folders. To do this, drag an icon on top of another to create a group. Removing all icons from a group will automatically remove the group, too. This makes organizing applications much easier and keeps the application overview clutter-free.
The visual style for the Activities overview was refined as well, including the search entry field, the login password field, and the border that highlights windows. All these changes give the GNOME desktop an improved overall experience.
Some animations in the Activities overview have been refactored, resulting in faster icon loading and caching.
The Terminal application now supports right-to-left and bi-directional languages.
The Files application now warns users when attempting to paste a file into a read-only folder.
Search settings for the Activities overview can now be reordered in the Settings application by dragging them in the settings list. The Night Light section has been moved to the Display panel.
New Upgrade Process

Offline upgrades are now live on Pop!_OS 19.04, bringing faster, more reliable upgrades. When an upgrade becomes available, it is downloaded to your computer. Then, when you decide to upgrade to the newest version of your OS, the upgrade will overwrite the current version of your software. However, this is not to be confused with an automatic update; your OS will remain on the current version until you yourself decide to upgrade.
To upgrade to 19.10 from a fully updated version of Pop!_OS 19.04, open the Settings application and scroll down on the sidebar menu to the Details tab. In the About panel of the Details tab, you will see a button to download the upgrade. Once the download is complete, hit the button again to upgrade your OS. This will be the standard method of upgrading between Pop!_OS releases going forward.
Alternatively, a notification will appear when your system is ready to upgrade. This notification appears on your next login on your fully updated version of Pop!_OS 19.10. Clicking it will take you to the About panel in the Settings application.
In early November, Pop!_OS 18.04 LTS users will be notified to update to Pop!_OS 19.10 or remain on 18.04 until the next LTS version is available.
New to Pop!_OS:
Visit the official Pop!_OS page to download Pop!_OS 19.10.
Upgrade Ubuntu to 19.10
See our support article on upgrading Ubuntu for information on how to upgrade Ubuntu 19.04 to 19.10.
17 notes
·
View notes
Text
Running TensorFlow 2 with GPU support on Ubuntu 18.04
This is for most of you out there who have spent many hours trying to setup things and screwing up every possible setting out there.
Let’s do this quick and dirty!
But before that a few assumptions:
Make sure you have a NVIDIA compatible graphics board. If you don't just stop reading this and go order one on Amazon or the shop of you preference. Be back after you have it in your PC.
Make sure you have python 3 installed
Installing CUDA
I'm also going to assume you already have the NVIDIA repositories installed in your machine. If you don't, check it out here.
Now add the repositories for CUDA, following the instruction here.
Important:
From the TensorFlow developers:
Official tensorflow-gpu binaries (the one downloaded by pip or conda) are built with cuda 9.0, cudnn 7 since TF 1.5, and cuda 10.0, cudnn 7 since TF 1.13. These > are written in the release notes. You have to use the matching version of cuda if > using the official binaries.
In my case I'm using the latest TensorFlow 2.0 as of now (2.0.0-beta1) and it is linked to CUDA 10.0 As I can't tell which version of TensorFlow you will be installing, check the release notes for more information and add the proper version of the repository.
Now install the necessary CUDA libraries by running:
sudo apt install cuda-toolkit-10-0
Next you'll have to install cuDNN. To add the repository run:
sudo echo "deb https://developer.download.nvidia.com/compute/machine-learning/repos/ubuntu1804/x86_64 /" | sudo tee /etc/apt/sources.list.d/nvidia-ml.list sudo apt update sudo apt install libcudnn7=7.6.1.34-1+cuda10.0 sudo apt install libcudnn7-dev=7.6.1.34-1+cuda10.0
Install TensorFlow
To install TensorFlow with GPU support just run:
pip3 install tensorflow-gpu==2.0.0beta1
You're done!
Let me know if you have any problems in the comments
2 notes
·
View notes
Text
How to Install the Latest Version of NVIDIA CUDA on Ubuntu 22.04 LTS
The full form of CUDA is Compute Unified Device Architecture. CUDA is a parallel computing platform and programming model that is developed by NVIDIA. It is used to run the programs on NVIDIA Graphics Processing Units (GPUs) to speed up the computing applications dramatically. In this article, we will show you how to install the latest version of CUDA on Ubuntu 22.04 LTS. We will also show you…
View On WordPress
0 notes
Text
In this blog post, we will install Tenso... https://www.computingpost.com/install-tensorflow-cpu-only-on-ubuntu-20-0418-04-debian-109/?feed_id=20354&_unique_id=637b0e0158d47
0 notes
Text
Check nvidia cuda toolkit version

#CHECK NVIDIA CUDA TOOLKIT VERSION HOW TO#
#CHECK NVIDIA CUDA TOOLKIT VERSION INSTALL#
#CHECK NVIDIA CUDA TOOLKIT VERSION UPDATE#
#CHECK NVIDIA CUDA TOOLKIT VERSION DRIVER#
#CHECK NVIDIA CUDA TOOLKIT VERSION SOFTWARE#
But now it is clear that conda carries its own cuda version which is independent from the NVIDIA one. If both versions were 11.0 and the installation size was smaller, you might not even notice the possible difference.
#CHECK NVIDIA CUDA TOOLKIT VERSION INSTALL#
The question arose since pytorch installs a different version (10.2 instead of the most recent NVIDIA 11.0), and the conda install takes additional 325 MB. Taking "None" builds the following command, but then you also cannot use cuda in pytorch: conda install pytorch torchvision cpuonly -c pytorchĬould I then use NVIDIA "cuda toolkit" version 10.2 as the conda cudatoolkit in order to make this command the same as if it was executed with cudatoolkit=10.2 parameter? Taking 10.2 can result in: conda install pytorch torchvision cudatoolkit=10.2 -c pytorch CUDA 8 GA release NVIDIA Tesla NVLink V100 16GB HBM2 SXM2 Passive CUDA GPU. If you go through the "command helper" at, you can choose between cuda versions 9.2, 10.1, 10.2 and None. Table 2 Path in which the CUDA toolkit is downloaded for P2s ECSs ECS Type.
#CHECK NVIDIA CUDA TOOLKIT VERSION SOFTWARE#
CUDA Toolkit: the basic software foundation of CUDA CUDA GPU Device. The toolkit includes GPU-accelerated libraries, debugging and optimization tools, a C/C++ compiler, and a runtime library to deploy your. torch.cuda package in PyTorch provides several methods to get details on CUDA devices. With the CUDA Toolkit, you can develop, optimize, and deploy your applications on GPU-accelerated embedded systems, desktop workstations, enterprise data centers, cloud-based platforms and HPC supercomputers.
#CHECK NVIDIA CUDA TOOLKIT VERSION HOW TO#
In other words: Can I use the NVIDIA "cuda toolkit" for a pytorch installation? Although you might not end up witht he latest CUDA toolkit version, the easiest way to install CUDA on Ubuntu 20. Perform a system compatibility check and present a license agreement that you. This article explains how to check CUDA version, CUDA availability, number of available GPUs and other CUDA device related details in PyTorch. you can also check the CUDA version simply by viewing. One of these questions:ĭoes conda pytorch need a different version than the official non-conda / non-pip cuda toolkit at The first method is to check the version of the Nvidia CUDA. Swap CUDA Toolkit Versions on Windows Step 0: Check CUDA Version Step 1: Locate System Environment Variables Step 2: Change System Variables Step 3: Change.
#CHECK NVIDIA CUDA TOOLKIT VERSION UPDATE#
Ensure you have the latest kernel by selecting Check for updates in the Windows Update section of the Settings app.Some questions came up from. Operating System Architecture Distribution. Operating System Architecture Distribution Version Installer Type Do you want to cross-compile Yes No Select Host Platform Click on the green buttons that describe your host platform. Once you've installed the above driver, ensure you enable WSL and install a glibc-based distribution (such as Ubuntu or Debian). Select Target Platform Click on the green buttons that describe your target platform.
CUDA on Windows Subsystem for Linux (WSL).
#CHECK NVIDIA CUDA TOOLKIT VERSION DRIVER#
For more info about which driver to install, see: I believe I installed my pytorch with cuda 10.2 based on what I get from running. Install the GPU driverĭownload and install the NVIDIA CUDA enabled driver for WSL to use with your existing CUDA ML workflows. I have multiple CUDA versions installed on the server, e.g., /opt/NVIDIA/cuda-9.1 and /opt/NVIDIA/cuda-10, and /usr/local/cuda is linked to the latter one. 11.7.1 / Aug20 days ago () Operating system Windows, Linux Platform, Supported GPUs. nvidia-docker version NVIDIA Docker: 1.0.0 Client: Version: 1.13.0 API version: 1.25 Go version: go1.7.3 Git commit: 49bf474 Built: Tue Jan 17 09:58:26 2017 OS/Arch: linux/amd64 Server. This command works for nvidia-docker too, we add a single line on top of the output. To use these features, you can download and install Windows 11 or Windows 10, version 21H2. It's better to use docker version, it gives you more details. See the architecture overview for more details on the package hierarchy. CUDA Toolkit 11.5.1 (November 2021), Versioned Online Documentation CUDA Toolkit 11.5.0 (October 2021), Versioned Online Documentation CUDA Toolkit 11.4.4 (February 2022), Versioned Online Documentation CUDA Toolkit 11.4.3 (November 2021), Versioned Online Documentation CUDA Toolkit 11.4. For podman, we need to use the nvidia-container-toolkit package. After installing podman, we can proceed to install the NVIDIA Container Toolkit.
Install Windows 11 or Windows 10, version 21H2 cuda version colab CUDA-MEMCHECK is a functional correctness checking suite included in the CUDA toolkit map() to -Create space on the GPU and. Step 2: Install NVIDIA Container Toolkit.
This includes PyTorch and TensorFlow as well as all the Docker and NVIDIA Container Toolkit support available in a native Linux environment. Windows 11 and Windows 10, version 21H2 support running existing ML tools, libraries, and popular frameworks that use NVIDIA CUDA for GPU hardware acceleration inside a Windows Subsystem for Linux (WSL) instance.
0 notes
Text
Ubuntu truecrypt

#Ubuntu truecrypt how to
#Ubuntu truecrypt cracker
#Ubuntu truecrypt plus
In Ubuntu 16.04, development packages of wxWidgets 2.8 are no longer available. create-keyfile FILEPATH Create a new keyfile containing pseudo-random data. If at any step the hidden volume protection is triggered, start again from 1). 5) Mount the new filesystem and fill it with data. Besides those improvements, there are no attempts to change the crypto or continue development in any significant way. 4) Create a filesystem on the virtual device of the outer volume.
#Ubuntu truecrypt plus
You can also choose another character encoding and try again. deb of TrueCrypt 7.1a, plus a few patches that fixes minor issues. If you continue editing this file you could corrupt this document. The file you opened has some invalid characters. It works on Linux and it is optimized for Nvidia Cuda technology.
#Ubuntu truecrypt cracker
GitHub - lvaccaro/truecrack: TrueCrack is a brute-force password cracker for TrueCrypt (Copyrigth) volumes. "There was a problem opening the file /home/(removed username)/.cach…/truecrypt-7.1a-setup-x86. TrueCrack is a brute-force password cracker for TrueCrypt (Copyrigth) volumes. Once the bar indicating the progress finishes, I get this: It runs it in "Text Editor" for some reason. This implementation supports mapping (opening) both system and normal TrueCrypt volumes, as well as opening hidden volumes and opening an outer volume while. I selected the standard option, downloaded & clicked the "Truecrypt setup" and it ran its thing in "Archive Manager" (That's what it was set to open the file with by default). There’s a PPA which contains the TrueCrypt package with the tray icon replaced by a application indicator, so that you can get back the TrueCrypt indicator applet in Ubuntu 13.04 panel since the tray icons is no longer supported. I have Ubuntu 10.10 and Windows 7 with TrueCrypt as a.
#Ubuntu truecrypt how to
I double checked the type (32 or 64) to make sure I downloaded the correct one. This simple tutorial shows you how to install TrueCrypt as well as its indicator applet in Ubuntu 13.04 Raring Ringtail. I have now been searching days for a solution but have found nothing. So, I should be able to just run the download as I did before, right?Įdit: Ok, scratch that. I let the updates run themselves, so we're up to speed. Veracrypt is available for Linux, Windows, and MacOS. Ubuntu is successfully installed.although its kind of strange that it doesn't have the "multiple user interface" thing that it had in 12.04.1. VeraCrypt is a fork of TrueCrypt which is a free and open source on-the-fly disk encryption (OTFE) tool.
0 notes
Text
Cuda toolkit

#Cuda toolkit install
Sudo apt-key add /var/cuda-repo-ubuntu-local/7fa2af80.
#Cuda toolkit install
You can install it by typing: sudo apt install nvidia-cuda-toolkit however. libaccinj64-11.5: NVIDIA ACCINJ Library (64-bit) libcublas11: NVIDIA cuBLAS Library libcublaslt11: NVIDIA cuBLASLt. Sudo dpkg -i cuda-repo-ubuntu-local_11.4.3-470.82.01-1_b JaredHoberock nvcc -version produce The program nvcc is currently not installed. Sudo mv cuda-ubuntu2004.pin /etc/apt/preferences.d/cuda-repository-pin-600 Then simply I followed the process from official documentation for local deb (Ubuntu 21.10 isn't available there but 20.04 works), and it worked. The toolkit includes GPU-accelerated libraries, debugging and optimization tools, a C/C++ compiler, and a runtime library to deploy your. Then from NVIDIA CUDA Toolkit Release Notes I got that CUDA 11.4 Update 3 ships with nvidia-driver-470 (470.82.01) and it's done. Although you might not end up witht he latest CUDA toolkit version, the easiest way to install CUDA on Ubuntu 20.04 is to perform the installation from Ubuntu’s standard repositories.To install CUDA execute the following commands: sudo apt update sudo apt install nvidia-cuda-toolkit. With the CUDA Toolkit, you can develop, optimize, and deploy your applications on GPU-accelerated embedded systems, desktop workstations, enterprise data centers, cloud-based platforms and HPC supercomputers. I found that my supported nvidia driver is nvidia-driver-418 from nvidia driver downloads, later I found that ubuntu nvidia-driver-418 has been moved to nvidia-driver-470 (470.82.01), I don't know the theory behind this. Before updating to the latest version of CUDA 9.2 (9.2.148) on the AC922 POWER 9 system, ensure that the IBM AC922 system firmware has been upgraded to at least the version of OP910.24 or OP920.02. conda install linux-ppc64le v11.7.1 linux-64 v11.7.1 linux-aarch64 v11.7.1 win-64 v11.7. Removing all the stuff regarding nvidia is mandatory, otherwise you might face some installation issues.
0 notes
Link
In this tutorial, you will learn about GPU Computing - Configuring GPU Tensorflow on Ubuntu and cuda installation guideline 9.0 Toolkit for Ubuntu. Nouveau is the community/organization that makes the open source drivers for nvidia graphic card. It provides open source drivers. Developers performs reverse enginerring of nvidia proprietary drivers. As we need to build the proprietary drivers for the nvidia, open source ubuntu drivers needs to be disabled. So please type the below code to disable it.
0 notes