#I don't even have a sketch! this is not how you do illustration!!
Text
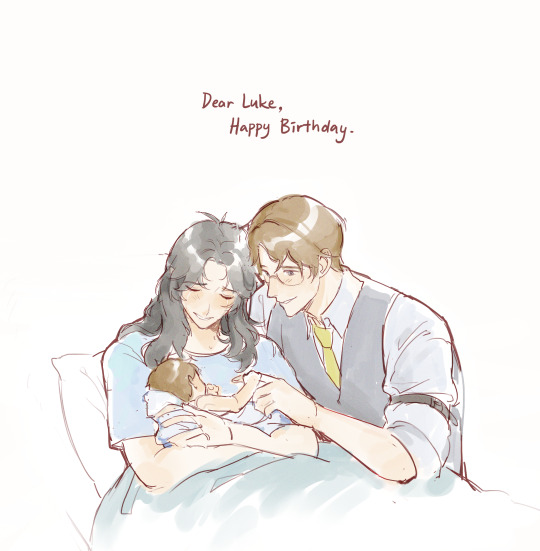
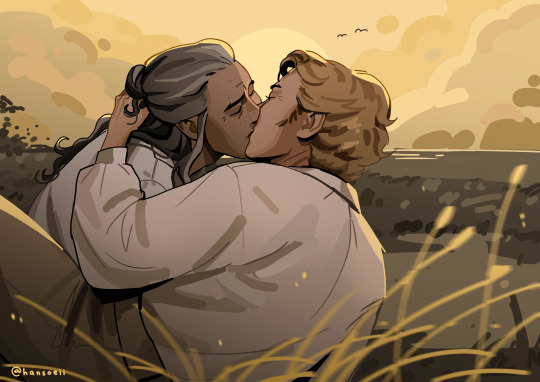
"no matter what the future holds, we love you very much."
#art#artist#fanart#illustration#illust#luke pearce#tears of themis#sketch#tears of themis fanart#digital art#luke pearce you don't know what you do to me#i never knew how much i could care for a character but here we are#i have so many things to say to you#i'm not even sure how to convey them#but please know you're so deeply deeply loved#thank you for existing
298 notes
·
View notes
Text
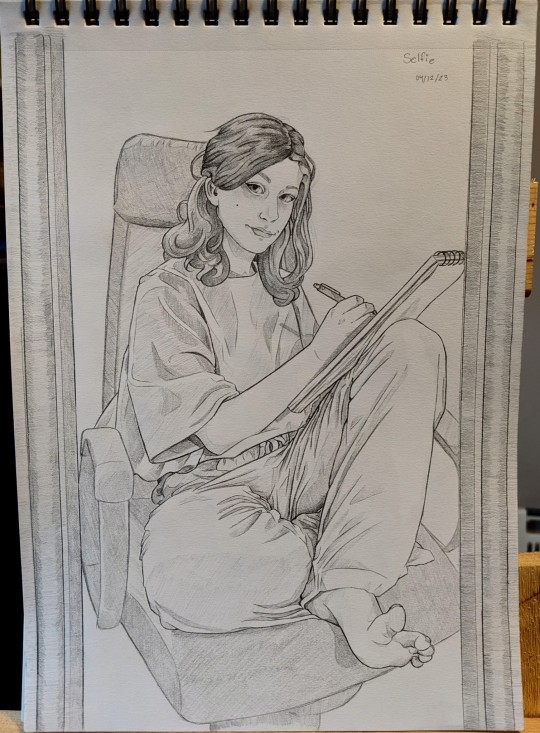
Self Portrait I drew in front of my mirror ฅ^•ﻌ•^ฅ
#art#drawing#doodle#artwork#illustration#sketch#self portrait#my art#sketchbook#sketchbook drawing#mirror drawing#pencil sketch#pencil illustration#self portrait drawing#portrait drawing#mechanical pencil#this would not be possible without my trusty 0.03mm mechanical pencil#ty graphgear#not sponsored I just enjoy the razor thin lines I get from my absurdly thin mech pencils#ew I probably sounded so gross and cheesy in this post#I swear I'm actually an emo bad bitch#Now that I posted this drawing I'm noticing all the little mistakes like the warping on my desk chair and how rushed the hair is lolololol#would you believe me if I told you that the most difficult part of this drawing aside from the arm was the sketchbook#I can easily falsify clothing folds and they don't have to be extremely accurate to still look believable#but godamn it was really hard for me to get the angle of the sketchbook and the loose paper in the back etc etc#This probably doesn't even look all that impressive to most and it may be cringe to be this happy with the result but what can you do#I doubt anyone will read these tags anyhow lolol this is just free vent space#oh and if you are reading these#thank you#also you just lost the game HAHA
21 notes
·
View notes
Text
AN ARTIST'S GUIDE TO HANDS
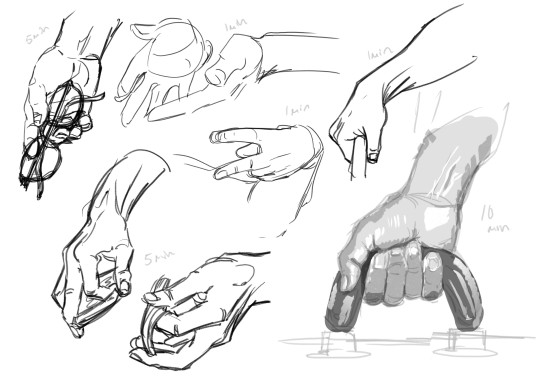
No, sorry it's actually not an artist's guide to drawing hands. Those are just warmup studies (which I'll talk about in this post.)
This is a guide to Your Hands and how to take care of them when making art.
No one ever sits down and teaches artists how to take care of their hands. They didn’t even teach me this while I was in art college. This is just what I've learned myself through years of pain and scouring the internet for advice.
This is going to be a long one and geared towards illustrative traditional/digital/pen/pencil artists specifically, but artists of other mediums and crafts should take care of their hands too! Well, we all should take care of our bodies in general, but this is about hands.
(advice is below the read more)
First off I'm not a professional or anyone with actual medical advice. I'm just some guy with chronic hand pain who makes art. This advice is free for you to use or discard.
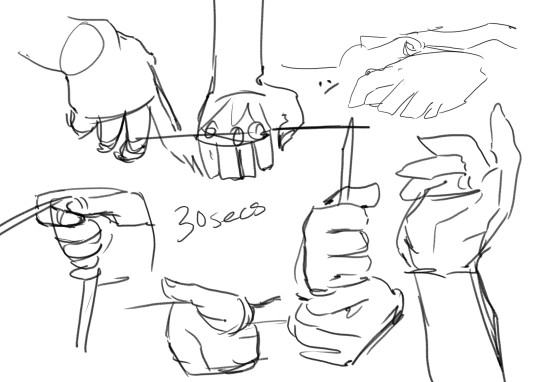
WARMUPS!
Ever sit down in the morning to draw and wonder why your art is so stiff and looks so much worse than what you were drawing last night? It's because you didn't warm up!
You know how for physical sports they all warmup and do stretches before getting into the actual sport. To prevent injuries and all that? Yeah, it's good to do that for art too.
One way to warmup is to just draw lines. Try to keep them as straight as you can. Going up and down and diagonal. Draw squares. Big squares. Small squares. Circles! You are warming up, keep it loose and relaxed! Basically just scribble away.

(examples. I usually keep going until there is no paper white left. This can double as practice for drawing straight lines without a ruler, which is a great skill to have when freehand city drawing.)
Before hopping right into drawing people you can try doing some quick gesture drawings. Line of Action has timed sessions with a large variety of clothed or nude models. I usually do the 30 min class as it has a nice balance of short and long timed poses. The point isn't to draw nice art, but to warm up. Try to get the basic form down, not the details. I find that doing a full class session can really help my drawings feel more loose and grounded in reality for the rest of the day.
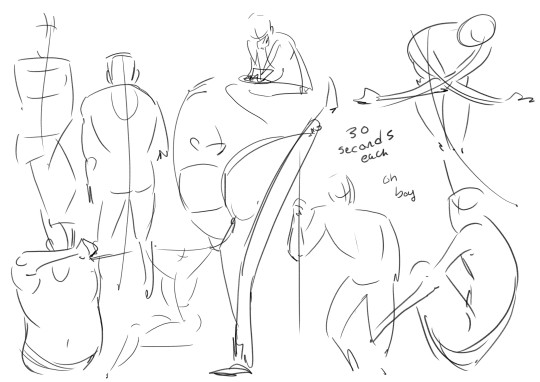
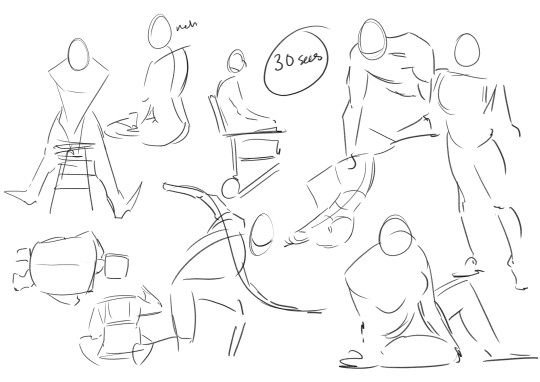
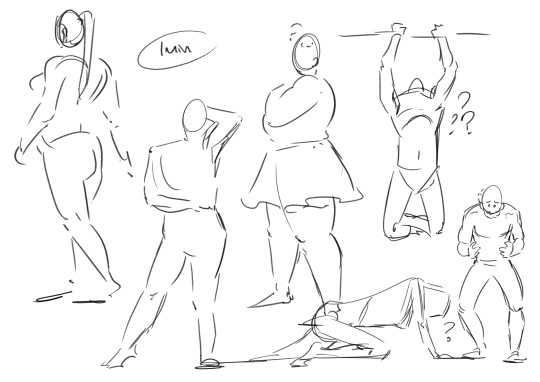
Some examples I found in my folders. I suggest looking into what a line of action (not the site) is and giving it a try with some of the studies!
COOLDOWNS!
For sports it's to return your body back to your everyday baseline after a workout.
Example; you are working on a big project! A masterpiece! It's detailed and cool! You have been focusing on this for hours and drawing so intensely. But you need to stop working for the day.
A cooldown is for winding down out of the go go go mindset. Put away the big project and do a couple small doodles and sketches. You are relaxing your hand and letting it stretch out. Keep the sketches loose. Let the art happen slowly. Don't polish anything, that can happen another day. Just ease yourself out of drawing.
...
Cool! Now we get into the meat of this thing.
HAND PAIN
How to avoid it and how to manage it if you already have it.
I love you artists and creatives, I am begging you to please take care of your most important creative tools. I really don't want this to sound like scare tactics like "oooh you better do this or blah blah!" Nope. I just had to learn all this the hard way and I'm extremely passionate about it.
Take this advice or don’t ╮(゚~゚;)╭ I can't tell you what to do, I'm not your dad
Adjustments and Small Solutions
If you are feeling physical discomfort while drawing there are many different solutions to try! Here are some suggestions that may or may not work for you.
Hold your pencil more loosely. Stop gripping that thang so tightly!!! Relax that hand! They make these… squishy pen grip things... I think they are called Adaptive Pencil Grips or Adaptive Writing/Drawing Aids? They stop your hand from being all cramped up by making your drawing tool wider. It's going to take a bit of time to adjust to drawing with it, but it's worth it for those who hold pencils too tightly.
Don't press as heavily. For traditional art, if you find yourself pressing really hard to get darker lines try moving to a softer pencil. Most standard pencils are HB, the B pencils have softer graphite. Experiment until you find the right one for you. For Digital, adjust your pressure settings so you don't have to press as hard to get thicker lines. You should not be pressing so hard all the time, it wears out both your hand and your tablet! It takes a bit of time to adapt to pencil or pressure changes. Try doing some unimportant sketches, they don't have to be good. You are just training your hand and mind to adjust using less pressure.
Draw with your arm and not your wrist! It's small repetitive motions that cause the most strain. You probably hear this one a lot, what does it even mean? It means moving your arm with the motions of your line, and trying not to make too many tiny movements with your just your fingers or wrist. This one is hard! It takes time and conscious thought to change the habit. Tips? Work bigger. Zoom in more. Use bigger sheets of paper.


(Motions exaggerated for a clearer example)
Change the angle of your drawing surface. They make angled tablet holders, angled desks, angled desktop raisers. Experiment, find and angle that is comfortable and the one that causes the least pain. (It's also good to make sure you don't have to hold your head at an uncomfortable angle when drawing. Staring straight down or hunching over a paper flat on the table can cause pain!)
Compression Glove? Wrist brace/tensioners? Some folks use them and I've been thinking of getting one for years now. I can't give advice on this one, because I don't have experience with it. Look into it if you want!
Managing Pain
First things first.
IF YOUR HANDS START TO HURT WHILE YOU ARE DRAWING. STOP! Put the pencil/pen/paintbrush/whatever down. The art will still be there for you to continue tomorrow.
I know from experience that it's extremely hard to pull away when you are hyper focused on an art piece. It's hard to remember all sorts of basic needs like food or bathroom when hyper focused. But you Need to stop when you feel that pain. (Preferably even before the pain…)
Take Breaks! Let your hands rest when you can. Just like a machine, if you don't schedule maintenance, the machine will schedule maintenance for you. Often that means having to wait a few days for it to return to functional. Best to take a day off from heavy usage or take an occasional 30 min break throughout the day to let your hands rest.
Stretching is important! Full body stretches are good; your arms, shoulders, neck, and spine are all connected, but I'm specifically talking about HAND and wrist stretching. There are a lot of stretches and massages for carpal tunnel and arthritis out there. I find they work for hand pain in general. Move into and out of each stretch slowly. Do not push a stretch if it hurts!! Be gentle!!
I am not a qualified professional and I will not be giving out specific stretches (that is beyond my personal comfort level). There are other artists out there who have made helpful stretching info-graphics which are cool, but I will not be because i don't want to be responsible for someone accidentally hurting themself. Ask your doctor for stretches & advice or look some up on your own.
Don't feel bad about forgetting to stretch frequently! Of course it is good to do it regularly and frequently, but I would be a hypocrite if I said that I remember to stretch daily. Setting timers for stop and stretch sessions can work for some people, but also doing stretches whenever you remember is fine! If you are sitting on the toilet you can idly do some hand stretches. On the bus? Laying in bed? At the beach? Do a couple stretches! Even just once a week is better than… nonce a week.
Using Cold or Heat to treat pain. If you really overdid it, put your hands in some cold water or wrap a cloth around an ice pack and apply it to your hand. Cold works best for me, but warmth works for others. This is just pain reduction and reducing inflammation from overuse! This is not a permanent solution.
If your hand hurts a lot! Frequently! Talk to your doctor? Idk mine has never given real advice. Just gently poked my hand and told me there isn't much to be done about it :/ but there are really good doctors out there who will care and give helpful advice!
Again. IF IT HURTS TO CONTINUE DRAWING. STOP DRAWING! This is not a "no pain no gain" type situation. Drawing so much that you hurt yourself isn't noble, it's just… limiting yourself. You only get one set of hands. These things are very handy to have.
Other Advice
Things I couldn't figure out how to fit into the earlier sections.
Your other hand can't handle the strain! Lets say you hurt your drawing hand... the other hand is right there free to use for art. Right? Wrong. Your other hand can't keep up with the demand, it hasn't been trained to the same extent as your dominant hand, it does not have the built up muscle. If you want to use that hand for drawing you are going to have to use it s l o w l y and train it bit by bit over a long period of time. When I tore a tendon in my right hand I decided to just keep drawing with my left and I got Really Good at it. It only took like two months before my left hand hurt too much to move. Then I had 0 functioning hands to pull up my pants. Not fun!!
People who draw on phones. That is extremely impressive! I'm amazed by the things people can create on such a small space. But phone artists are the ones I see most frequently mentioning hand pain. please please please make sure you are taking breaks. Would a stylus work instead of using a finger?
Outside of Drawing. Sometimes it's things outside of drawing that are causing the pain. For me there are multiple sources, but I also have tiny baby hands. Holding a phone too long causes pain. The handheld mode for my Switch causes A Lot of pain. The way my hand rests while typing on my laptop hurts! Playing tense videogames for too long hurts! Find the source of your pain and make some changes. The same things will apply to most; take regular breaks, do some stretches, and find soft things to prop up or rest your arms on.
Change your Artstyle. This one is more of a last resort. You might have to change your art style if you are getting sharp pains every time you draw. I loved drawing tight clean lines and many small fancy details, but drawing like that left me in so much pain at the end of the day. In 2023 I had to take the better part of year off from illustrations just to learn how to sketch and draw more loosely. I had to learn how to be gentle. To stop gripping my pencil so tightly. Learn! Adapt! You might discover a new style that you love even more!
A lot of this stuff gets more complicated in a work setting where you have to draw fast and long in order to get paid. Things like reducing your workload can help, but that can be... financially rough. But outside of that, it’s ok to be a slow artist. Going full steam and hurting yourself is not worth it.
Aaaaaanyway, thats all folks. Today's rant brought to you by me! The guy with chronic hand pain who always forgets to stretch! The guy who got frustrated with a sketch yesterday and decided to push to keep drawing for just one more hour! The guy who woke up this morning and had to spend 2 hours massaging and stretching their hands. The guy who probably shouldn't have typed all of this out because ooww ow ouch

If your hands do hurt, it's going to be ok! You don't need to be a speed demon who draws all the time. It's ok to take your time and take frequent breaks. You are going to do great things! Just be gentle with yourself...
#art advice#carpal tunnel#hand pain#last tips!#don't punch people... use your elbows or smthn. your hands are too precious to wreck punching a jerk#if you are an artist and enjoy longboarding wear wrist guards. lifesaver fr#i hope this thing is readable. it's long and my eyes are tired#also i am an artist not a writer... forgive my grammar
979 notes
·
View notes
Text
August Walker x Reader (Drabble)
Warnings: Daddy/little vibes, noncon/dubcon, violence...its August.
There's no plot I'm sick and possessed.

It was your fathers business, then it was your brothers business. You didn’t care for the details of it, you just looked after the gardens and made sure the house was in good condition. Talked to the servants and all that. Sure, you knew it was a dodgy business. Far too often you saw people going home in body bags in the dead of night. But you chose to ignore it.
The current guest….was a man named August Walker. You caught a glimpse of him as he was dragged in through the back door, unconscious. He was gorgeous in a demented, do not touch kind of way and that intrigued you all the more. So when your brother said he’d be away on business for 2 days and you weren’t to go into the basement…well. It was obvious what you would do. One peak wouldn’t hurt, right?
At first the man is terrifying, and even speaking to him is like dipping your finger into a lake of piranha and waiting for one to snap.
But eventually you realize his binds are painfully tight around the centre column he's sat against, which means you can tease and annoy the living daylights out of this poor guy. And hey, if he's tied up in your basement it's for a good reason. Maybe a bit of fun torture would do him well. Besides, you were dreadfully bored and the staff had all gone home for the weekend.
He can’t do a thing.
The more he calls you a slut, bitch, whore or worse, the more you giggle. It infuriated August to the point he almost welcomed death.
On the first day, you sit 10 inches from him with your drawing pad and sketched him. You made small talk, showed him your drawings. He'd even admit you're a decent artist, that is until you added the kitten ears and heart stickers to his illustrated face. After a few hours your curiosity grows. You've one pink heart sticker left and you want to see how close you can get to the lion before the lion rips your hand off.
"Don't..." He warns. You giggle. "I mean it, girlie. Don't you put that thing on me." He wiggles again and you pout, frustrated. “Get the fuck off me, dumb bitch!”
“Hey! That’s not very nice! I’m giving you my heart!” You giggle. Once he calms down you try again, ignoring his persistent complaints. The more he speaks, the more his warnings turn to a plea. "Hey! No!" He shouts, snatching his head away from your index finger.
"Hold still, Mister! It won't hurt." You gently press the sticker to his left cheek with your finger and smooth it over with a gentle kiss and a loud “Mwah!”
August huffs as he stretches his face muscles to try to get it to wrinkle but the damn thing won't come off!
"All pretty! Good night, mister." You blew him a kiss as you closed the basement door and left him alone for the night.
“Stupid girl…..” He mutters. Wait… Why was he so uncomfortably hard? “Fuck.”
On the second night, you feed him some bread and cheese by hand and reluctantly he actually lets you. You were finally taming him!
August sits with you in his lap, a firm and unwavering snarl painted on his lips. You begin to play with his curls with one hand, and his chest hair with your other. All the while August is growing more and more hard under you. You're so distracted by a specific lock of his hair that you fail to notice all but a sound when the rope finally snaps behind him.
With a stupid amount of bravery you climb into his lap and start to tell him all about your day as if he was a willing listener. You feel something solid beneath your skirt but choose to ignore it. Your nonsensical ramblings about the latest episode of your favourite TV show send him into a begging frenzy yet again, but what you don't realise is that those bindings are getting more and more loose as you yammer on.
"Did you hear that?" You ask, curiosity lacing your words
"Must be the pipes. We are in the basement, girlie." He lies.
You snort at him. “I like you. You even have a cute nickname for me! I’ve never had a nickname before.”
You start to comb your hand through his hair and you're suddenly taken aback by the look he's giving you. Like the cat who got the cream. Was he...enjoying you stroking his hair? You tried not to think about it and continued but his unwavering stare and….lustful eyes? Well, you were drowning in them.
You're gently pulled closer by his left hand and in your naivety you give him a sweet smile before the penny drops.
And boy does it fucking drop.
You gasp. His fangs show in a sinister grin and you launch yourself from his lap, snatching his hand from your hip. He only has one hand loose so you take it as your opportunity to escape, slamming the door behind you to slow him down.
You sit in the cloakroom, cowering with the cobwebs and long forgotten coats of the guests who never had the chance to leave this house. Hoping and praying your brother would be home soon to save you. But the truth of it was, superheroes don't exist.
The heavy sound of the prisoners bare feet on your father's old wooden floors beat in tandem with your heart as he chases you through your home. Eventually you lose him and as quietly as humanely possible, you climb into the cloakroom and hide.
Nothing was coming to save you.
You stayed silent for what felt like hours before you were alerted to a dull creak and a loud slam as the cloakroom door was almost ripped off its hinges.
"Found ya!". You screeched as you were physically dragged from the cloakroom by your ankles.
"No need to squeal, little pig. It'll only hurt a bit." You clamber to your feet, the harsh carpet making your ascend slow enough for August to catch you first. He sticks his foot out, tripping you to the floor again, toying with you. Like you were food.
"Oh stop crying, girlie. I thought you liked to tease?" You try to stand and run again but you're thrown over his shoulder in a split second and no amount of hitting him is helping. There’s nothing else to do but to watch his feet as he carried you up the stairs, straight to your bedroom.
With one swift movement and a harsh grip of your hips he has you pinned, chest down to the bed.
"That's a good girl, stay still for Daddy." He purrs, pulling your bright pink stockings from your legs. He tosses them to the floor as he climbs onto the bed, the mattress deepening under his heavy body.
"Please! I'm sorry, I was just bored! I didn't mean to upset you-" You try your best to help yourself, but it’s like a switch just been flicked and he turns from excited, to pissed the fuck off.
"You were 'bored'?!" The man flips you to your back and yanks your body towards him, as he leans on his calves. "No, no, no. You're a slut. A dirty brat and you thought you could get away with it, didn't you? Thought I wouldn't break free and catch you. Well I know just what you need, just what you asked for."
If you could, you would laugh at the situation. Here was this gorgeous, dangerous and absolutely insane man. Kneeling at the end of your bed, hard as a rock and all the while with a heart sticker attached to his cheek. And he was so pissed!
It was the reappearance of the rope binding in his hand that brought you back to the severity of the moment. Fear turned to manic terror as you shuffled backwards.
"No...no! Please don't!" August climbs on top of your body, thick thighs trapping you to the bed as he deliberately presses his hard crotch into you.
"Ah, ah, ah, shhh." He presses his index finger to your lips. You can't stop him, he's twice the size of you at least. So you watch as he ties your hands to the headboard of the bed.
Once he's done, he leans down....covering your entire body with his own...
"I fuckin' hate a tease." He snarls into your ear, before your pretty pink skirt is ripped clean off.
You’re pulled back to the office with a sudden wave of guilt and shame. Your face felt like it could light a match and your coffee cup almost slipped from your sweaty hands.
“Are you alright, Miss? You look like you just remembered an embarrassing dream.” Mr. Walker teases, before he walks on past your desk and towards his own. Fuck. How could you have forgotten that dream until now? How could you have even dreamed something like that up, and with your boss. And that look on his face, it was as if he knew.
You shake your head and face your computer, determined to continue your work and get on with your day. Maybe you could look into therapy later or talk to your best friend about it. Surely there was a completely normal reason for dreaming about your boss being tied up in your basement and then chasing you for some depraved, frustrated sex. Right?
“Ms. Y/S/N, Mr Walker would like to see you in his office, it's urgent.” Fuck.
199 notes
·
View notes
Note
Any tips on how to draw Poppy's hair without it looking like a legit tree? I'm struggling so hard and it's making it impossible to draw any Broppy art because of it 😔
I finally got some time to put together somewhat of an answer for this?? Again, I'm not so great at explaining things so I'll do my absolute best!
I used to struggle so much with drawing her ponytail, a lot of my older art bothers me tbh because I don't like how I approached drawing her ponytail. I tried looking up images from the movies and even the video game, and I experimented with a few different methods. I actually found that the Poppy ornaments I have on my desk served as the most solid reference material I could have. So I studied the figure and have been incorporating that into my newer works, and it absolutely changed how I approached drawing it.
Here are some photos I took from different angles to really show off the shapes, second image is how I visualize it when drawing. Thinking of the hair as "pieces" or "tufts" really help, and breaking them down between foreground and the background.


Try practicing off these images and see if it shifts the way you draw hair! Tracing helps too because it helps your brain just figure out shape language. After doing some traceovers, I then just tried sketching some very quick Poppy pony's and it already felt a lot better

And then, here are two illustrations where I'm proud of Poppy's hair because I incorporated these refs into them:


I personally feel like thinking of the hair this way really sells the volume of it, as well as showing that it's soft and fluffy as opposed to strands of hair.
But yeah! That's how I do it. The more you draw it over and over the more it starts to become natural!
168 notes
·
View notes
Note
Hi there! I apologize for taking up your time, I am just so curious: When you tackle a comic, what does the process behind it look like?
Asking because I found myself scrolling through your blog once again and couldn't help but marvel at all the beautiful effects you use, at how flawlessly the structure guides the viewer's eye across each page, how the graphic weight seems to always be in just the right places…, and wonder how you learned doing this. Everything you put out looks incredibly professional and I aspire to reach your level of skill 😌❤️
Thank you Finz!! You're no bother at all, I'm an open book.
This is such high praise for a guy that really doesn't have a set process, I feel like a hack. Ha. Rest assured my style is still developing. Besides the referencing of the linework and composition of official comic books, (practicing by redrawing panels for fun), explaining the process makes me feel like a serial killer but I will do my best.


(WIP Riddler panel, scrapped Scarecrow composition)
My comics usually stem from a single panel or concept — I like to focus on/emphasise particular panels of my pages, the heavy hitters, the main piece that catches your eye. I know I'm not a profoundly technically proficient artist so I prefer visually interesting elements and formatting, i.e. drawing characters outside their frames, negative space, notation, perspectives etc.

(Kung Fu Panda 4 sketch god I hate Kung Fu Panda 4)
I like to establish 'main focus' panels, the bits of the comic that really, well. make people want to chew on it. This is where the technical effort is concentrated, really, and the rest of the comic is generally build around these concepts.


('Restaurant Balthazar' focus panels)
Textures and effects are done on individual panels first, then the entire page as a whole to even out the unity. Generally, blocking in shadows, hatching for visual interest + middle tones, then textures/half-tones, then highlights.

(Script excerpt WIP)
I'm not a writer per se, but having a vague 'script' in your pages helps with pacing and direction. Comics are a versatile story-telling medium. I only really do scripts for comics longer than 2 pages. An optional but recommended strat is to send your script to a friend for a second opinion.

(Script excerpt — 'Restaurant Balthazar', annotated by @vincepti0n I don't know why he drew a face in the middle)
With the script crudely slapped together, I rough out the thumbnails and composition with the text, prioritising coherence and clean integration of previously mentioned 'main focus' panels.
Settling on a composition sucks the hardest. Drawing is fun, thinking makes brain hurty. Variety is good! Close-ups, wide shots, visual metaphors. Every panel is its own artwork.
The text bubbles are usually added in post, yes, but I'm just one guy and I don't have a writer to call me a good boy for doing things correctly. Bite me.


(Early 'Restaurant Balthazar' drafts)
In addition, keeping the text graphics in mind help create a sounder composition wherein even if the panels don't read cleanly left to right + top to bottom, the text can stagger and create the same reading order effect.


Panels and concepts are constantly tweaked, and my comic process is still highly experimental. A lot of industry standard comics aren't illustrated to their full potential due to deadlines and such — I strive for visual epiphany by treating each panel as its own artwork, and every page as a a bit of a mural.


(Old art hurts the soul)
Constantly experimenting allows you the insight of looking at your current art in comparison to your older works. In more recent works, I've been blocking in more shadows wiht lineart with thinner lines and more line weight, and learned to integrate the subject characters with less plain, abstract backgrounds.
TLDR: I have no idea
#creaman-answer-sheet.pdf#art process#vinegarclown#creaman#fanart#digital illustration#jonathan crane#riddler#wip#comic process#creaman talks to drywall
173 notes
·
View notes
Note
I love your art so much!!! I've also been starting to paint with gouache, and I'd love to know a little more about your process! What kind of paints do you use, do you sketch first or start with paint, do you paint in layers over several day or all at once?
Hi and thank you! I hope you don't mind me answering this publicly and apologies for length, but:
MY ART PROCESS!
Supplies: I use winsor and newton gouache and arches cold press paper blocks, usually 140 lbs (the lime green ones) and sometimes 300 lbs (the teal green ones). Even though this paper comes pre-stretched in blocks, I actually take the sheets off and stretch them myself because I've found arches' glue isn't as strong as it used to be. This is how you get watercolor paper to lay flat! I recommend youtubing some videos on how to do it -- there's a lot of great tutorials out there. Also, I use princeton brushes, and kraft paper tape and these boards to stretch my paper. (these aren't affiliate links, I just shop at blick)
A word about art supplies: these are the exact tools I use but everyone uses supplies differently and two people with the exact same supplies might get different results! A lot of it is about what works for you and what you like, so I always suggest that gouache/watercolor beginners just buy a few tubes from a couple of different paint companies and some small pieces of paper from different manufacturers to see what you like. Just changing one ingredient in the above has created massively different results for me, but maybe that'll end up being something you'd like! The first step in learning a new medium imo is to play. Just have fun!
ALSO: gouache isn't super light permanent, check your tubes for which ones hold up to sunlight. Here is winsor and newton's color chart explaining which ones will fade when exposed to sunlight -- all manufacturers will give you this. I only use the colors rated A and AA, and I still frame my pieces with UV glass just to be safe. Not all gouache is re-wettable, but winsor and newton is. I just put it in my palettes and refill my palettes if it runs low. AND SOME PAINT IS TOXIC. A lot of paints have cadmium and cobalt in them. I don't use any of the toxic colors, but if you do, make sure you don't eat while working and wash your hands thoroughly afterwards. This information is also usually available on manufacturer's websites. As more people are rejecting cadmium paint, you'll see more tubes labeled things like cadmium-free yellow. This is why. More artists should be aware that their tools can be dangerous. You don't need that many tubes of paint to begin, just a warm and cool red, warm and cool yellow, warm and cool blue, white and black. I have around 50 colors and use 20 regularly. I always mix all my colors myself, and never use straight tube paint. Most of my colors have about 5-6 different tube colors mixed together. If you use re-wettable paint a tube of paint will last you years; even as a professional I only buy new paints every 5 years or so.
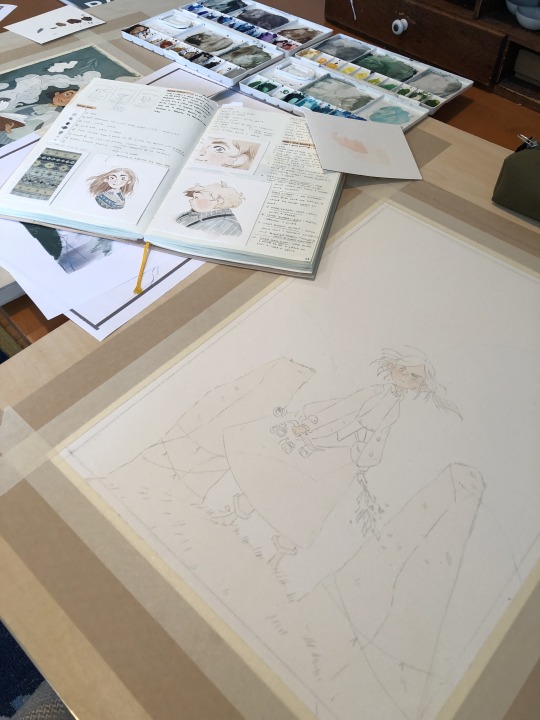
Process: I ALWAYS start with a sketch first. Not everyone has to, but because I do illustration work -- where sometimes a client gets input on a drawing -- I always do a lot of preliminary work before I even begin to paint. At this point, even my personal work usually involves the exact same process:
I start with a 3" or so thumbnail that I scan (left; I traced it quickly digtally for clarity to myself here) and then either clean up digitally or print out and clean up traditionally with tracing paper (right):

Then I scan the cleaned sketch in and color rough it digitally (left, this was for a gallery show, so no one had to approve my color roughs, so it's messy!) then I transfer my sketch to my paper (with either carbon transfer paper or a light table), stretch my paper, and paint (right):
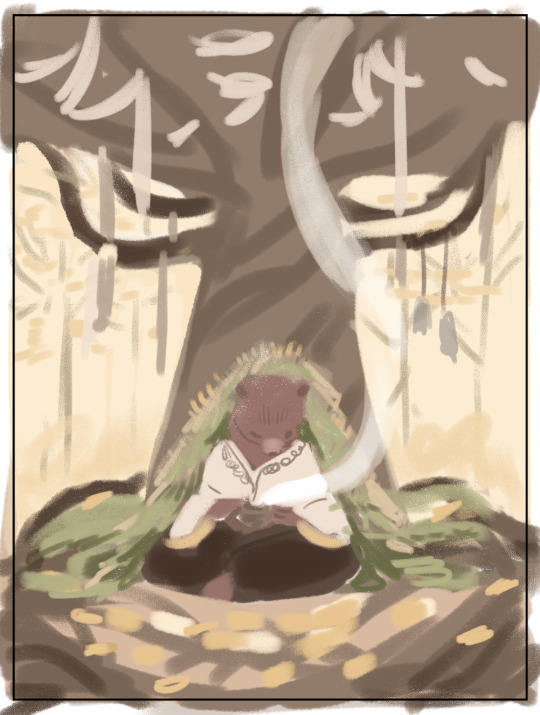
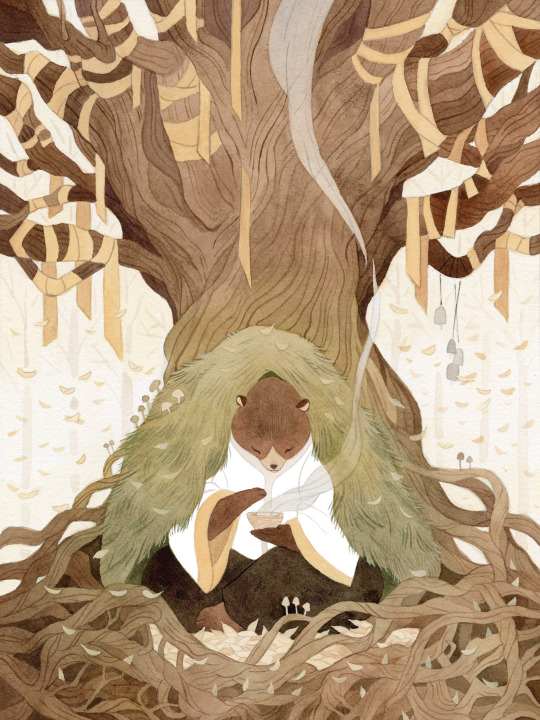
I obviously changed my mind about the color of the ribbon in the trees, ha, and made everything a lot more vibrant. The benefit again of gallery work is no pre-approval!
You are correct, I paint in a series of washes, going from lightest to darkest, where I apply the same color beneath all shapes that are the same warmth (cools under all upcoming cools, warms under all upcoming warms). I paint a piece usually in one or two days, depending on complexity. I didn't take pictures of the above painting, but here's a different painting to show you a little bit what I mean:
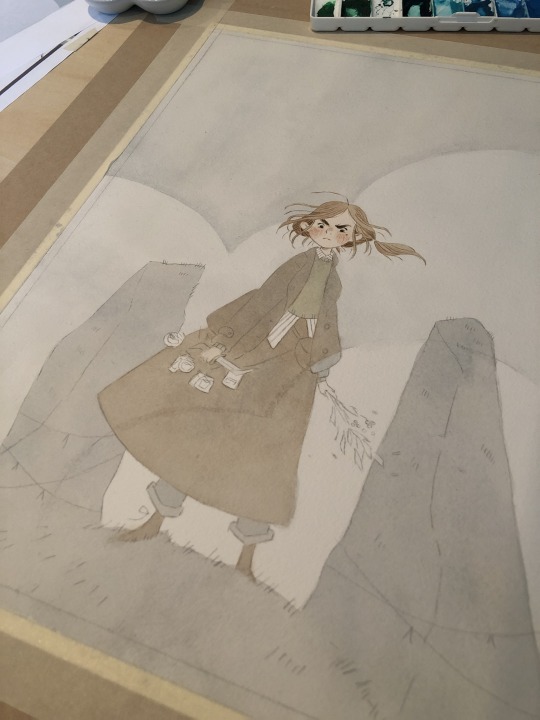
I painted the peach color under everything (and twice for skin tones), and the gray color of the sky under everything that would be grayish (the rocks, trees, her pants, her skirt, and coat). I do this to stop me from getting darker lines where two different colors butt up against each other, and also for color harmony. I have step by step photos of this in my process stories highlight on my instagram; also check my FAQ and tip highlights for more info on all this stuff. Most pieces take around 25-30 washes before I start adding in the details (sometimes I add in face details early though because if I mess those up it's not worth finishing the rest of the painting! 😅)
All this might seem like a lot of work (...it is) but I do it so that I can show clients previews of the final piece and so I don't have to repaint the finals. I also used to pre-test all of my washes on scrap paper like this:

I still recommend doing this if you're just beginning! But at this point I only do it when testing techniques because I know my paints really well. (the above was my test for the pine boughs in this piece)
Painting by far is the longest part of the process, so I do more work up front to not have to do it twice. Every piece takes about 6-24 hrs of actual work time to produce. Stretching watercolor paper takes about 24 hrs to dry, and because I sell most of my originals in galleries, they need to be flawless, so planning ahead is useful and in the end saves me time.
And to conclude this novel of an explanation, don't be overwhelmed by all the information I've given you! I put it here so that people at various stages of their artistic journey can maybe find something useful in it. But seriously, the first step to learning how to paint whether it's traditionally or digitally is just to have fun. Try it out, see what's working and what isn't, and then try to solve specific issues that you're struggling with. I've been doing this for a loooooong time at this point, but here's my first watercolor piece from when I was re-teaching myself how to paint traditionally nine years ago:
Obviously, I was destined for greatness. Ha, yeah, no. If you scroll back through my tumblr archive, you can see me learning how to use these paints in real time. And keep in mind that I'd been working digitally for years before then, and years before that where I didn't post my work online at all.
So for anyone who needs to hear it: there's no such thing as talent, just hard work, patience, and trying again and again and again...and sometimes again. What I do is a skill and anyone can learn it. Sometimes, progress is slow. I'm 38. I only really feel like my art was half-way decent starting a few years ago, but I've been making art my entire life, and I went to art school at 18. 20 years later I'm kind of figuring it out.
The best advice I can give, whether it's about art or not, is find the thing you love so much that you'll keep at it even when you suck at it, because most skills you'll suck at to begin with -- and perhaps for a long time. I sucked at art for yeeeaaaaarrrrs. On top of the usual learning curve, I struggled with fine motor control and dexterity. But I loved it so much I kept trying every time I failed. If I can do it, so can all of you, no matter what stage of art you're at now, and no matter how old you are.
Anyway, thank you to those still reading this deep in. I wish you all the best on your artistic journey. Art can kick your butt sometimes, but it's also pretty dang rewarding 💛
535 notes
·
View notes
Text
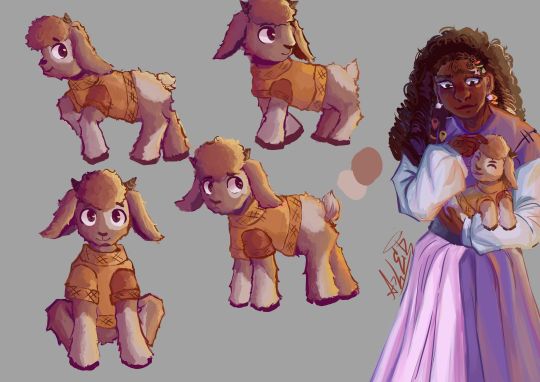
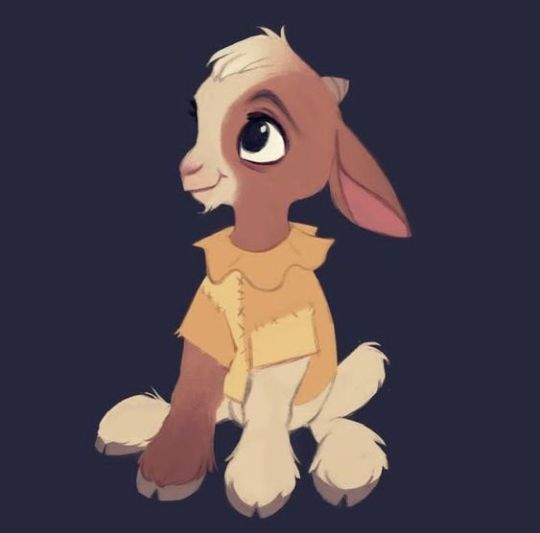
¡ Valentino redesing!
We finally have the baby!
(This redesign belongs to the Wish Au "Kingdom of wishes", written by @annymation and illustrated by @emillyverse and me)
This will surely be the redesign where I have the least things to say lol, but I still have some things to comment on so let's go!
At first I hadn't thought much about how I would redesign Valentino, what I was sure of was making him more adorable and cuter so that everyone would want to have a goat as a pet, because if I'm completely honest, Valentino's official design in the Disney movie I didn't find it adorable at all (sorry Disney artists, I know they put effort into drawing and animating but I just didn't like Valentino's design)
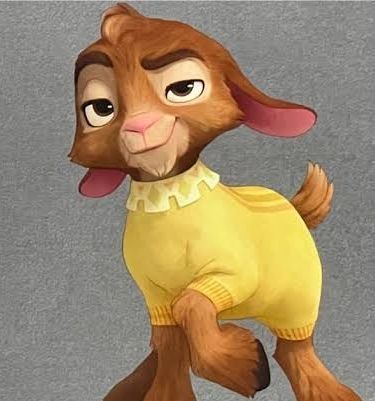
(Do you get my point? He's just not cute or adorable, and the voice they gave him didn't help either, or the face idk ,but I thought the joke about his voice at the beginning of the movie was funny ¯_(ツ)_/¯)
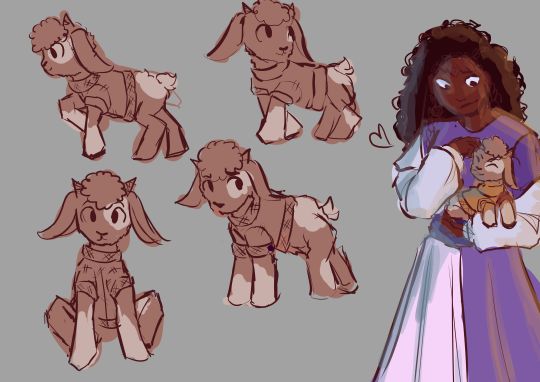
So I made a mental list of things I wanted to do (which aren't many if I'm honest):
-Make it fluffier and fluffier
-Give him other clothes
-Add even one symbol in your redesign
Anny sent me several references of goats and concept art, among them I found this one, which I based myself on mainly because 1-I have always liked that animals had moles or spots on their fur or skin 2-When I saw that on their clothes You could see the seams that joined the different fabrics, I realized that it coincided with Asha's redesign (on the sleeves) so I was like: "AWWWWW it matches his mom's clothes!"
In the end I only added a part of it with a different fabric because I didn't want to complicate the design too much, but I liked how it turned out, I added some symbols of the tattoos that exist in the Amazigh culture, which is also to protect the person (or animal in this case) of the bad influences that are around them
I also liked adding that little ball of curly hair on our goat's little head, it just looks so cute!
FINAL COMMENTS!
As I said, this is not very long, but I'm satisfied with how the drawing turned out, I wanted to try something new that looks like the lighting was a sunset, I don't know if it's noticeable but at least it turned out nice lmao, as a curious fact, with this drawing I realized how MUCH my sketches change when I paint them in detail
…..BRO HOW THE HELL DID THIS CHANGE SO MUCH WITHOUT REALIZING ME? (ESPECIALLY ASHA)
Well that's all for now, until next time! ✨✨
#disney wish#wish 2023#art#artists on tumblr#artwork#wish#sketch#disney#drawing#wish movie#the kingdom of wishes desings#the kingdom of wishes au comic#the kingdom of wishes au#the kingdom of wishes fandom#the kingdom of wishes#wish reimagined#wish rewrite#wish redesign#wish review#disney wish star#wish asha#wish disney#queen amaya#king magnifico#disney movies#disney animation#disney fanart#wish star#kow au#artist
157 notes
·
View notes
Text
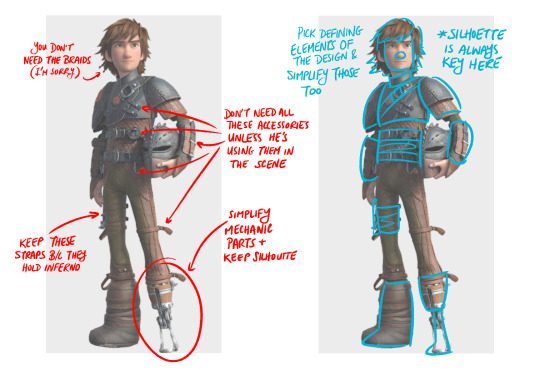
Get Started Drawing...
...even as a complete beginner!
In my efforts to help some friends who are only just starting to learn to draw (as adults! glorious!! <3), I kept digging around for resources that cover things I remember learning in the various art classes I've taken...but that does a better job than I can of laying it all out in a comprehensive, but not overwhelming, manner. (I am far too prone to rambling as you can see from this post, and bounce around topics as I remember them, rather than in a sensible order.) I've found a few guides here and there that cover one thing or another decently well...but I've finally found a free site I'm really keen on as an overall source if you're just starting out with learning to draw!
It's incredibly clear and concise, whereas many of the other sites and books I found could sometimes be overwhelmingly detailed. It's arranged in a way that reminds me of the flow of art classes, starting at the very first steps--how to approach art if you've never done it before, and the fact that you only need basic tools to begin with. If you go in approximate order, it then establishes that you should start sorting out a solid foundation by practicing simple lines and shapes--the same way you learned to write letters so you could ultimately make words, sentences, stories... This includes some neat little practice exercises with questions to consider while you do them, so you also learn to see and observe things like angles and proportions, which are critical for being able to accurately draw more complex things.
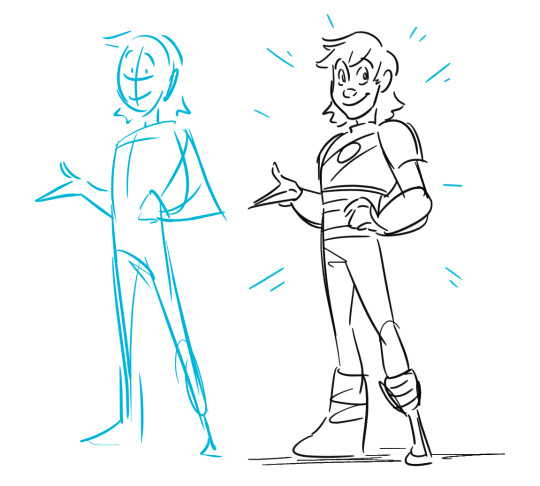
It evolves from there into how to take those basic shapes and turn them into simplified human bodies--and from there, how to consider more complex 3D versions of the shapes to give those bodies a sense of dimension and physicality. It even touches on things like composition, silhouette, negative space, and line of action--all in a quick, straightforward manner. It plants the seed of understanding for these more complex illustration concepts, which you can then research further, armed with relevant terminology to dig up more in-depth resources as they catch your interest!
The style itself is usually simple, but even if your aim is to draw with a more detailed style, this one can serve as a base sketch to add that detail to. (Combine learning this base with photo studies, plus more detailed style guides for wherever you want to take your art, and you could use this as a base for comics, cartoons, anime, realism...the core concepts and skills remain the same!) There's also examples of how to adjust for varied body shapes, so it provides more flexibility than some drawing guides do, which often only focus on one "ideal" body type. (This style can also be used for that, if it's what you want--you just adjust the proportions of the basic shapes as you need! But this provides examples of how to handle variety, which will give you a better foundation for drawing people and characters so they don't all look the same, instead of having to figure out how to adjust for it later on.) The Shape Dolls for reference are also incredibly delightful, and a great cheap way to have a little pose reference mannequin of sorts!
There's also links to sources if you want to dig into concepts more deeply--available both as a general source page, as well as some specific topics including relevant sources at the bottom of their respective pages. There's also a patreon with some extra thoughts that is fully accessible for free, but has a paid option if you want to support Tan for providing such a lovely resource! (Also they have a legit vegetable farm?? How cool is that.)
So yes! If you have any interest in learning to draw--whether you've ever tried before or not, and no matter your age--try looking through this site, and let it guide you through the process!
#art reference#reference#art resource#art tutorial#learn to draw#how to draw#beginner drawing#tan henderson#not my art#this also has a concise (but thorough!) guide for facial proportions!!#it covers all the specifics I've wanted from a guide!#but everything else I found either skipped some points or were INTIMIDATINGLY COMPLEX#(it also reminded me that typical mouth width is approximately equal to pupil distance)#(learned that one in school but haven't seen it since)#(that changes with facial expressions squashing and stretching but it's an accurate starting point)#I do not know Tan I just found this today and got SO EXCITED I wanted to share it with EVERYONE#also gosh I am so joyous about adult friends learning to draw#my heart is FULL I am so happy for and proud of them#also also I haven't made a paper doll with brads in AGES#they're so neat
143 notes
·
View notes
Note
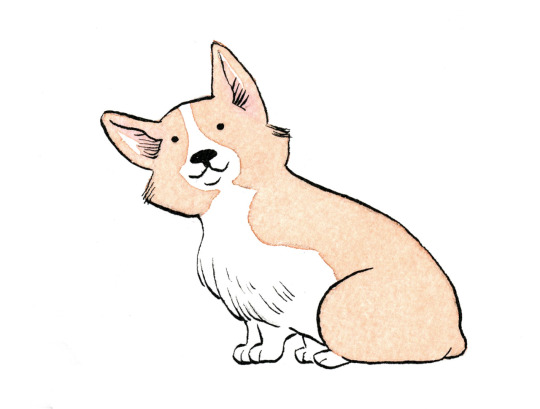
Well I really love your art, may I ask how do u color? I struggle with coloring turtles and I wasn't to know how do u do that?
Hi anon! That's a very broad question, so you've given me a great excuse to ramble anything I want about my coloring, eehehehee~!
This will be in two parts and I'll start with talking about my simpler coloring style.
As in, when I color characters on a white background, with a limited or light palette.
The driving force behind this style is me being lazy. My time, energy, and attention span are pretty limited, so if I want to finish anything, I gotta do it fast. And with fanart, I'm usually just doing it for fun and relaxation, so there's no need to push myself to polish it too much.
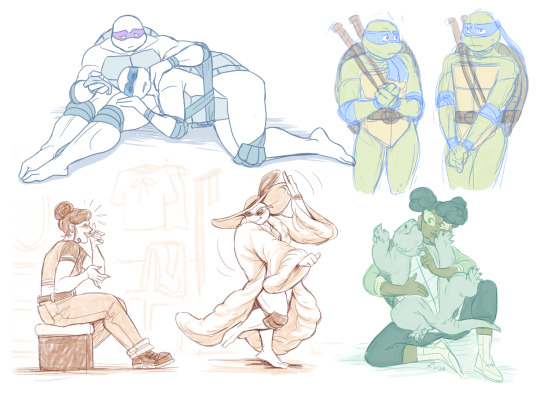
Despite that, I rarely post just black and white sketches or line arts. I always try to add at least a little bit of toning or shading, because that makes the image easier to read. The characters and their shapes pop out and catch the eye of the viewer better.
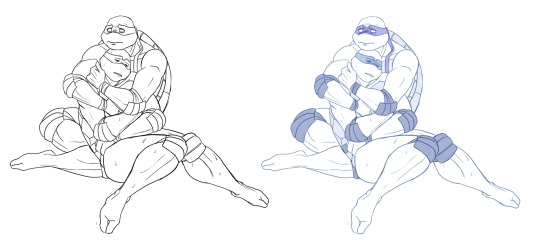
However, in this particular example, just the couple toning colors don't quite do the job. The way Don and Leo are entangled makes the center area of this illustration very busy and hard to read.
As a comparison; this pic has only one tone + mask colors, and it works. This is because all the characters are standing separately and their poses are very stationary and simple.
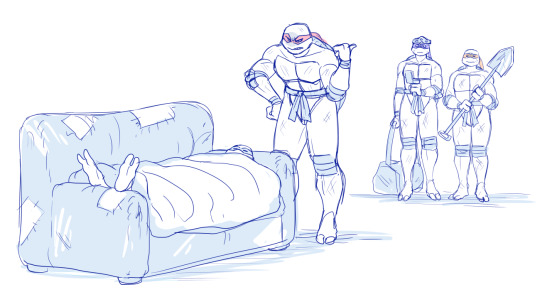
So for the Don + Leo pic, adding some shadows helps in bringing out shapes and depths. Also in general, if you don't feel like drawing BGs, it's good to at least add a shadow below the characters. It grounds them and makes them feel like they exist within a space.
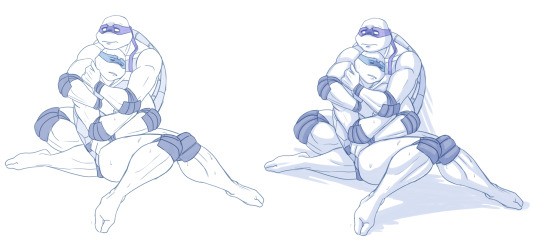
Sometimes if the posing looks too complex and busy, it might just be best to color in the characters fully.
However, even if I do full flat colors, I tend to use a lighter palette. Putting characters in their neutral/default color on a white BG can look a bit jarring as if they're floating in a void. It feels less immersive and like the picture is unfinished.
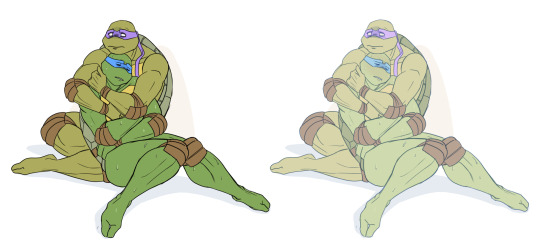
Using lighter colors makes the image more cohesive, and fits the characters into the white environment a bit more naturally.
If I'm too lazy to draw a BG, I prefer using stylized and limited colors. It feels deliberate and that the whiteness is just part of the palette, whereas the character-accurate colors on white don't match as well, even if they're more pastel.
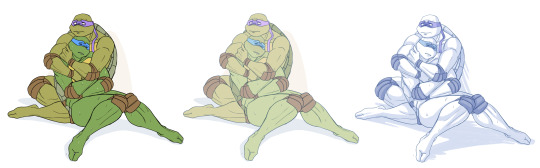
That being said, there's nothing wrong with just slapping the flat-colored characters on a white background. As you know, I do it too. I'm just exposing my 'fancy coloring style' for what it is; me being lazy, hah!
Limited and monochromatic palettes are a nice shortcut even when you do actual backgrounds. It's faster and you don't have to worry about clashing colors. And you can still convey atmosphere and mood.

Also, on the topic of conserving your time and efforts; I think it's very common among younger/less experienced artists to think that the amount of time you spend on your art piece = how good and well received that piece will be.
Which has some merit to it of course, but it can lead to putting too much effort into areas where it's not necessary. E.g. filling the piece with tons of details and clutter that don't serve an actual purpose, but rather make the image hard to read. Or doing really complicated shading for a meme/comic, where simplicity would deliver the joke better.
So whenever I'm drawing something I intend to publish, whether it's a quick doodle or a more polished piece, I try to follow these two principles:
Make it easily readable and do the bare minimum that needs to be done to convey what I want to convey.
Putting time into practice is important, but if you draw for work, it's also crucial that you know how to prioritize and use your time efficiently!
Anyway, thanks for reading! In the next part I'll go into how I do my fully colored pieces, so stay tuned for that!
172 notes
·
View notes
Note
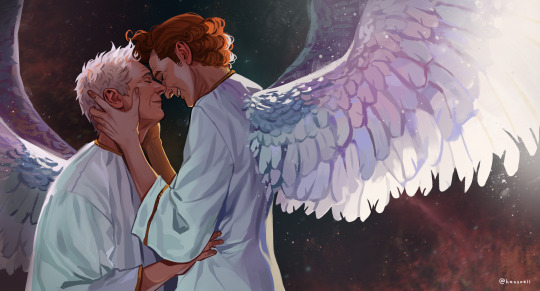
Several things: -LOVE your art, it’s amazing! Especially the one with Crowley and Aziraphale under the umbrella - which software do you use? Your art always look SO gorgeous (cheeky quote from GO right there lol) - how did you get so good at drawing?And thank you for encouraging other people to keep drawing and being so kind as I sometimes can’t help but compare my sketches to others and feel silly, but I guess it’s just a learning curve… Thank you so much for bringing your art to the world!😊
Thank you so much!!
I use Clip Studio Paint for drawing and Photoshop for small adjustments!
2. Haha thanks! Honestly...it's the hyperfixations. I managed to improve a lot in just a year because I've been drawing SO much cos there's so many shows and movies I became obsessed with that I wanted to create art for. So by drawing a lot I just naturally improved. For example these two Illustrations are just a year apart:
I actually didn't actively try to improve, it's been a while since I did proper studies (I just don't really have the time for it between freelancing and art school), it just happened.
But I can absoluetly recommend going on YouTube and look for some art tutorials if you actively want to start improving! There's some channels that helped me so much back then:
moderndayjames
Incredible shape language and super insightful tutorials on all kinds of topics! I learned so much from him.
Ahmed Aldoori
So many awesome tutorials on so many different areas of art. Love it.
Marco Bucci
Incredible tutorials on color theory and understanding how color works in general! Learned SO much from him!
Sinix Design
The OG tutorials I began learning from. I watched his videos religiously as a teen. I adore his painterly style and adopted it in some way, haha.
Ethan Becker
This dude sometimes drops these tiny art tips that just completely blow my mind and that I adopt immedietly. He's super entertaining but also such a great teacher.
And I can also recommend checking out this book by James Gurney if you want to get better at colors!
And for anatomy I highly recommend the Morpho books!
But improvement doesn't only come from drawing a lot. A lot of the time I don't draw for a while and just study the world and artists around me and suddenly I improved when I get back to drawing. Don't ever overwork yourself to the point that you don't enjoy what you do anymore. Take breaks and listen to your body!
I learned to try and not compare myself to other artists, which helped a lot. Through conventions and social media I made so many lovely artist friends and realized how we're all struggling in a very similar way. A lot of us don't even really know what we're doing most of the time, haha. But we help each other out, it's such a wonderful community. I think when you're not actively part of the community it tends to feel like other, more successful artists are some kind of art gods that have perfected the craft and never struggle. But believe me, all the artists you admire go through rough times all. the. time. Sometimes what they do feels easy and natural, other times (more often than not) it feels like you have to try and learn how to walk all over again and you start to doubt your abilities. I personally go through that so many times.
So what I'm trying to say is that instead of comparing yourself to the artists you admire, learn from them instead. Ask questions, befriend fellow artists, study the artists you enjoy and just have fun with it!
And finally I thought it would be fun to share some of my horrendous Johnlock fanart from a decade ago for some motivation:
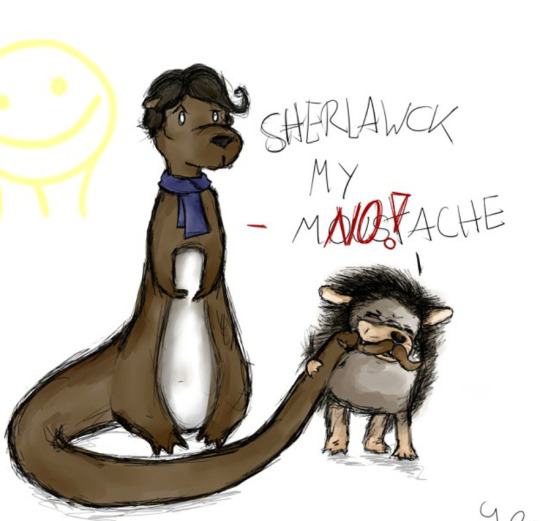
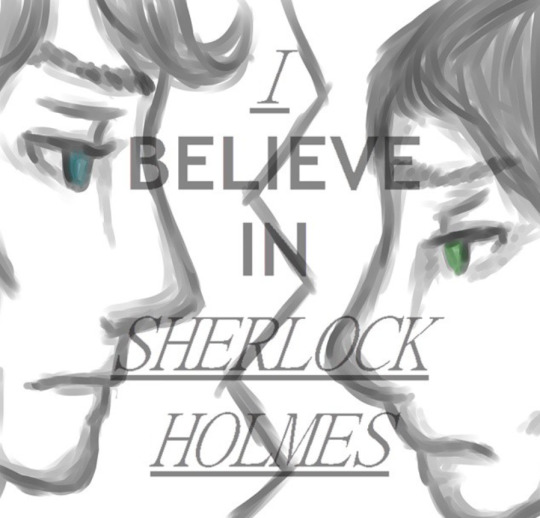

I hope my answer didn't overwhelm you, but I thoight it would be nice to give a more detailed answer!
Have a wonderful day and keep drawing! :)
466 notes
·
View notes
Note
Hey Alka, I had a quick question for you (whenever you have the time to answer or even if you have the time), I've been taking some storyboard classes and with my illustration background, it's been hard to really find a good shorthand for characters to really get that anatomy/gesture looking right without it being too sketchy and unreadable.
How long did it take you to find your storyboard shorthand, and what exercises would you recommend to try to find it? I'm sure it just takes time and practice, I've been doing a lot more studies and gesture drawings (currently following along all the free Glenn Vilppu videos I can find on youtube) but I wanted to ask you as well because I am in love with how fluid your anatomy is, and how clear your storyboards read. And those hands my god you're a wizard!!!
Thanks a bunch, have a wonderful day!
Heya Secret, great to hear from ya! Well, what you don’t see online is how gross the rough stage of my boards can get LMFAO. Most of the boards I post are actually overly cleaned up because I'm just doing them for fun and can afford the time! I'm not really sure how long it took to develop my shorthand, I've never really enjoyed drawing detail to begin with, so when I decided to go into boarding I kinda just leaned into it!
I’ve covered a bunch of gesture drawing exercises already if you scroll through my advice tag, but ***once you have a good foundation*** here's some stuff you can try!
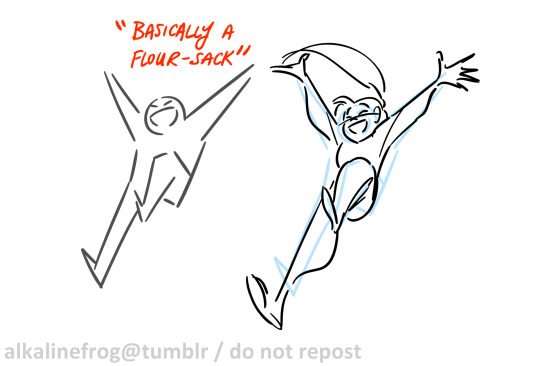
First you'll want to build up an arsenal of anatomy hacks you can always fallback on, particularly for complex parts of the body. The less time you spend on details, the more time you have to focus on the overall pose and storytelling. Aim to find ways to draw with as FEW lines as possible. If I had to make a list to streamline what to practice:
Head shapes - find the most efficient way to draw the front + 3/4 + side view in as few lines as possible (the challenge is still making them look structured with dimension)
Eyes - are SO important for expressions! Unless your project has characters with dot eyes, you're going to need to find a quick way to do the circle and iris in as few lines as possible. Make sure you can convey where they're looking
Hands - fists (you'll be drawing a lot of people holding poles), open palms at various angles, foreshortened fingers pointing at viewer, fingers making grabby motions----protips: 1) half the time all you need is a vague triangle/rectangle plus thumb sticking up and that's a hand 2) if the hand is relaxed, you probably don't need to draw the knuckles. Save some time!
Feet - just learn how to make sure they look like they're standing on the ground, and do some studies of what they look like when you're running. Otherwise you can usually get away with a vague shoe or boot shape (just add toe lines if they're not wearing any)
----everything else you'll practice as you go!
Jump from SUPER rough straight into clean boards to really force yourself to be economic. I've done each of these methods for work before:
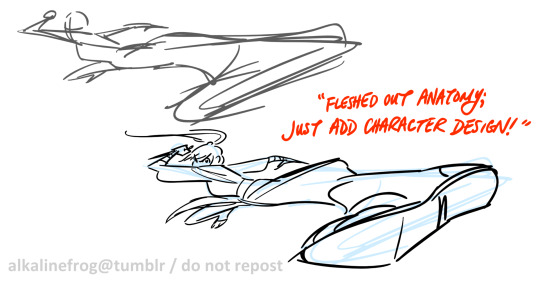

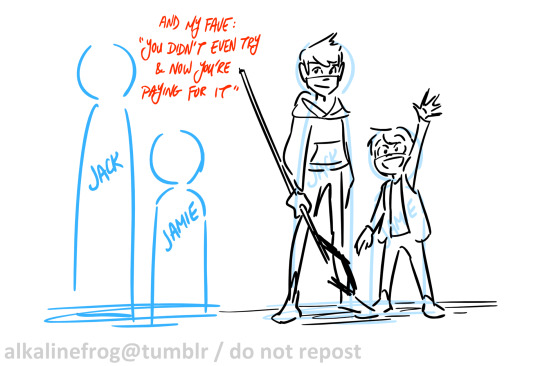
Before you start boarding with a character, sketch them a few times with the intention of simplifying their design while keeping them recognizable:
You'd be surprised how little you need to recognize a character:
Depending on the scene, you can adjust how much detail you want to include:
Stay loose/more generalized with action, especially for the "inbetweens" between key poses. Clean up enough to communicate movement and make the character recognizable.
If the character's small on screen in a wide shot, edit out most details and focus on the silhouette
Save the detail work for character acting, when you really want to be specific with their expressions and gestures.
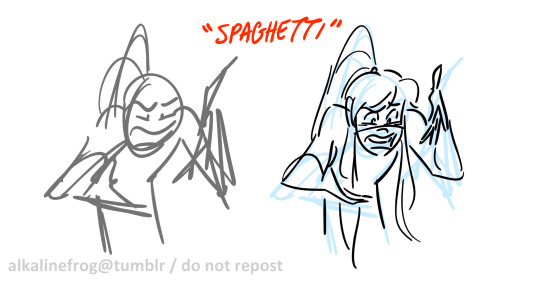
But outside of all that, be bold and fearless!! Everyone has that stage where their boards look like spaghetti! Boarding is like handwriting; you could have really shitty chicken scratch, but if you're writing beautiful poetry, who cares!
god I love drawing hands you don’t even know thank you so much!! Good luck dude!! You’ve more than got this!!
#my art#advice#ask#secretsivekept#you got this!#sorry this took a while! my mental health was in the pits for a solid couple weeks#getting better now though!#storyboards
492 notes
·
View notes
Text
a little update
heyyy, how's everyone doing?
it's been a while since I've posted anything and I have quite a lot of followers here now so I felt like you guys deserve an update on what's been going on lately and why the lack of the new art.
the truth is that I became burnt out of doing the same type of art. Discovering the world of collages and photo manipulation was an incredible way for me to dip my toes into art 4 years ago, but I'm at a point now where I don't feel like I can create anything else in that medium that will keep me motivated. A lot of times I have a great idea for a piece but photos can only take me so far in bringing that vision to life, so I just stopped doing it.
What I have been doing in the meantime though, has been learning how to draw. I've always been one of those people who said "I wish I knew how to draw but I can't even draw a stick figure". So when this burnt out happened I figured "Why not actually learn how to draw?" and that has kept my artistic flow going even if I'm not posting anything on here.
Here's some of the stuff I've drawn since I started learning during these last couple of months:
day 4:

day 7:

day 14:

day 20:

day 27:

day 33:

and today I made a simple sketch of one of my own artworks:

I would like to get to a point where I can draw and illustrate my own space landscapes. I still have a lot of ideas and my love of scifi and retro futurism is still the same :)
In the meantime, I might still do a few collages when I feel like it.
I could also start showing my drawing progress here if you guys would be interested in that? Let me know! :)
Thank you for reading!
101 notes
·
View notes
Text
Weird SH3 dream I had + a sketch page to illustrate some bit of it

pls read this u wont regret xd
OK SO I don't even know how to start it because it's always hard to tell when dream stories start 😭😭 but I can only remember of a BIG and WIDE library scenery. I felt very surprised because something told me it was a whole new "story expansion" that went in the SH3 HD collection (how specific of my brain, never played that version if u wanna know) almost like a discovered secret (so discovered that I remember coming to Twitter shouting like "WDYM THERE WAS A GODDAMN STORY EXPANSION IN AN HD COLLECTION HOW DIDN'T I KNOW THAT WTF". All of this in the dream, with the whole emotion LOL).
The funniest and weirdest point of the story in the game is the characters, more specifically Heather, Claudia n Vincent, the three fuckers were all in the same room aka the big library, but something about their interactions was very… different.
More specifically towards Vincent, dude was ABSOLUTELY STRESSED, he wasn't being the same slightly passive-aggressive he was with Claudia in the real game, or doing his common gaslight with his stable and concentrated voice tone, nah dude, he was COMPLETELY MAD, idk why, idk who hurt him but bro kgkgkfjgkgj he had no patience while taking to both Heather and Claudia, y'know that scene where Heather is about to get out of the same room as Vincent in their first meet and he shouts "WAIT, I'M NOT FINISHED TALKING"? It sounded pretty arrogant and aggressive, right? Now imagine it multiplied by 10 and we have Vincent having the worst day of his life, don't talk to him or else you die.
As a result, both Heather n Claudia was becoming as stressed as he was, mainly Heather in this case, dude was getting so arrogant that she had enough of that shit, she literally THREW HIM ON THE FLOOR, LITERALLY PICKING HIM ON THE ARMS AND SHIRT COLLAR N THROWING HIM ON THE FLOOR LIKE A… IDK LIKE A JUDO WRESTLER??? ISTG IT LOOKED SO FUNNY YET SO UNCANNY, IMAGINE HEATHER BEATING THE SHIT OUT OF HIM, THAT'S WHAT HAPPENED (y'know that eerie feeling when you see irl ppl fighting and you're like "omg why are they doing this pls STOP", that's how I felt on the dream seeing such scenery, but as we speak now I can't help but LAUGH LOUD like kdjfksjsek I LOVE REMEMBERING THIS, I LOVE 2 SEE MY MAN GETTING BULLIED IDK WHY).
There was also that confusing information that was inserted into my brain that the story was actually a SEQUEL of the events like??? Vincent received the backstab but didn't rlly die??? Neither Claudia??? But they were in there… As if nothing happened (maybe that was the reason Vincent was so distressed, he couldn't believe such a thing happened LOL).
After Vinny got completely ROASTED by Heather, he was there on the floor trying to get up, he was as mad as before but he couldn't do a thing, only look at Heather with his eyebrows working the RAGE that was inside of him.
Jeez, I loved that dream, hope I can have more of this in my future nights 🤣
#text#silent hill#silent hill 3#vincent smith#heather mason#claudia wolf#shitpost#sh3#silent hill fanart#fanart#video games#silent hill series#artwork#dreaming#dreams#dream#silent hill art#digital art#art#artists on tumblr#my art#illustration#drawing#digital painting#sketches#sketch page#sketch#digital sketch#long post#long text
81 notes
·
View notes
Note
i hope this hasn't been asked before. what size do you make your canvas? and do you crop it to fit other socials (like Instagram for example)? i hear that 300 dpi is standard. i never know if it's good to make my canvas big or not.
hi i think this ask is like at least 4 months old but i was scanning my sketchbooks from last year and i abruptly remembered i had gotten this ask because i had made a little chart in my sketchbook trying to figure out how to answer it
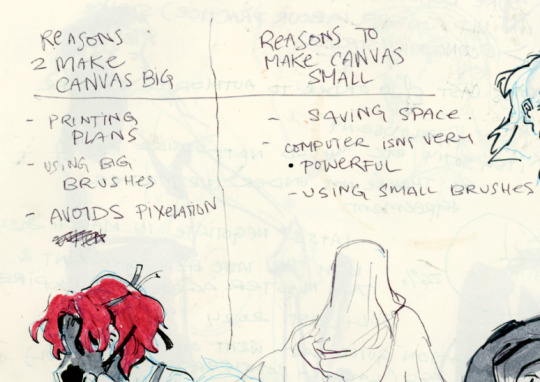
anyways theres pros and cons. and the size of your canvas is really going to depend on personal needs + preference. how good ur computer is, how complicated ur art style, how comfortable drawing feels, how much disk space you have to spare, what youre gonna end up using the art for in the end...300dpi is standard for PRINTING specifically, if you only plan to ever post things online then 72dpi works great and will save you space (fun fact a lot of professional animation files i deal with are 72dpi. and those eventually go on your tv screen). but personally i make everything i draw 300dpi because i am always printing stuff for cons, zines, etc and its nice to have the option even if i dont end up printing.
when I was a teen I used to draw on a rly shitty laptop and i made everything 800x800px 300dpi because big canvases would cause a lot of lag and also the resolution on this laptop was pretty small so 800px was a lot of the screen already. now i have a slightly better laptop with a bigger resolution and i sketch on giant 10000px-40000px canvases with the hard round brush and no shape dynamics or transfer whatsoever to minimize lag. when it comes to making a final illustration when i know ill be using a bunch of layer effects/blending modes/colors/mixing brushes etc etc ill generally crop the canvas down to the 6000px range. most illustrations i try to make sure are comfortably printable on tabloid size paper so thats pretty much anything hovering around or above 3000x5000px w 300dpi (so 11x17in). HOPE THIS HELPS?
EDIT: OH ALSO re: socials. i always ALWAYS size down my art to post on the internet. i think its crazy when other artists dont. because why would i ever let the internet have my hi-res file for free. also in general i think it looks better if you do the resizing yourself because if you don't then many social media sites will compress your file for you! a lot of people will post a hi-res file to twitter and then go "Wow twitter killed the quality of this img!!!" UH YEAH because they have an automatic image compressor. because they need to save space too lol and they dont want your image to take 248263895 years to load. same with instagram and to a lesser extent tumblr. when i post anything on social media i resize it down to 1200px-1600px on the longest side... its a little arbitrary but im kind of basing it on the smallest resolution of widely available screens. mostly because i think it looks stupid when u open up an image file fullsize and u have to scroll to see the whole thing... also iirc instagram only takes images up to 1080px before it resizes them? granted if you upload something smaller than that itll also resize it up which will look worse so I think bumping the numbers just over 1080px is pretty safe.
I should really be bringing the dpi down to 72 too when i post online but often im too lazy to do that. but it will technically help ur image load faster and stuff. and make it less likely for people to yoink it off the web and print it themselves.
147 notes
·
View notes
Note
Hey, Nipuni! First off, I want to say that i love your work sooosoooo much and i can’t even truly describe the impact it’s had on me. You’re an inspiration to me!! No matter what your interest is in i will always be a fan. I was really curious and wanted to ask, i think you’ve talked about it a looong time ago but, how long do you reckon it takes your to do your fully painted illustrations these days?? and how long do you wait before posting it, assuming you aren’t sure if you’re satisfied with it. I’ve just been struggling with overworking my art and feeling like it’s not ever ready to post so i was curious. 😟
Hello!! I'm so late to reply I'm so sorry!! Thank you so much for the kind words!! to hear that my work can have such a positive impact on someone is the greatest compliment truly 😭❤️ and thank you for sticking through all my interest hopping too haha
These days it takes me anywhere from 2 to 9 hours most of the time, non consecutive if I can help it, and I usually sleep on them at least one night before I share them. But I've held on for over a month to some just because I didn't think they looked quite right, so I keep coming back to them every now and then and do some small tweaking until I reluctantly post them either out of frustration or exhaustion haha I don't have the patience or the attention span to work on the same thing for very long to be honest, so I've adapted 😆
The truth I like to remind myself of is that once I share something all my focus shifts to my next idea every time so whether I could have done better or not doesn't matter once it is out of my hands. I can always do better on the next one, there is just the comfort of letting go and a fresh start.
I've struggled with overworking pieces to death a lot too. It stems from anxiety really so it's a matter of building confidence, the point at which art is ready to be shared is arbitrary after all. You can convey a message or idea just as effectively through the roughest of sketches to the most detailed oil painting, the rest of the work is mostly towards aesthetic value.
On the technical side of things, when you grow frustrated with a piece to the point where you start to resent it is a good indicator that you need a different course of action. Sometimes bringing in new references can help you find the issue, sometimes the problem is structural and buried under piles of unnecessary detail and you have to go back and redo or remove something you were reluctant to, and sometimes the best thing you can do is to let go and come back to it with fresh eyes when you have learned more. As for studies, working from big to small, training for speed and on a time limit has helped me. Anyway I think I've started rambling, I hope any of this helps!! Remember that art at any stage is better than no art at all!!
#nips replies#will I ever learn to be concise when asked a question#it has taken me years to hone the craft of caring more about my time than my perceived performance!! a most valuable and elusive skill#I'm dead serious
73 notes
·
View notes
Last Seen Blogs
rabesbabe
Elle

extra-safe
起死回生

solelifauna
Just for funsies

talentedmrsalas
⭐️TALENTED MR SALAS⭐️

patdfobvines
Interesting !