#MMO Guides
Text
Easy Late-Game Palia Gardening
I've been seeing some posts about what to do with late-game gardening in Palia so I thought I'd post my current genius plan that makes gardening manageable while super profitable.

$107k Garden Planner Link Here
2 Apple Trees (the big $$)
4 Blueberry Bushes (the 2nd big $$)
23 Potatoes (cash cow and water!)
20 Tomatoes (cash cow and water!)
4 Rice/Wheat (can be interchangeable depending on need)
No Cotton (Why? After level 25, your star seeds will always produce starred produce)
Carrots/Onions are optional (weed prevention isn't a necessity, and it gives some additional $ lol)
Fertilizer: Since apples and blueberries provide the growth trait, the majority of your fertilizer will be HarvestBoost which is much easier and cost effective (using a Glow Worm Farm). For the items that are not touching the apples or berries, they get the SpeedyGrow. (Fertilizer does not add a bonus to an existing bonus! It only adds a bonus if isn't there already)
Note: The amount generated is assuming that you throw all your produce (except rice/wheat) into preserves jars
Hope this helps! I find this much more manageable for my neurodivergent brain than randomly scattering things around and hoping for the best.
278 notes
·
View notes
Text

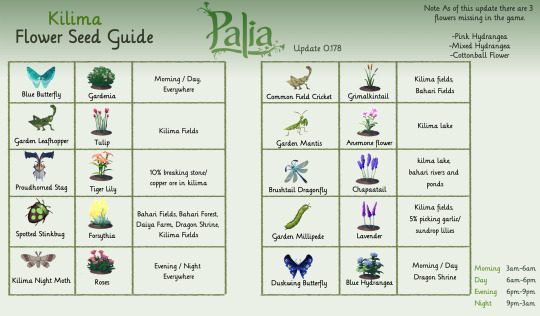
Flower Seed Guide for Palia
57 notes
·
View notes
Text

This is for the anime that aren’t officially shoujo/josei, but they likely could pass as one.
#anime#anime fandom#anime community#anime discussion#anime polls#anime poll#shoujosei#shoujo anime#shoujo#shojo anime#shojo#wotakoi#love is hard for otaku#recovery of an MMO junkie#given anime#my senpai is annoying#life lessons with uramichi oniisan#the yakuza's guide to babysitting#sasaki to miyano#the saint’s magic power is omnipotent#7th time loop#play it cool guys#my roommate is a cat#why raeliana ended up at the duke's mansion
26 notes
·
View notes
Text
Elder Scrolls Online | ☆ Weapons with Emotes Trick ☆
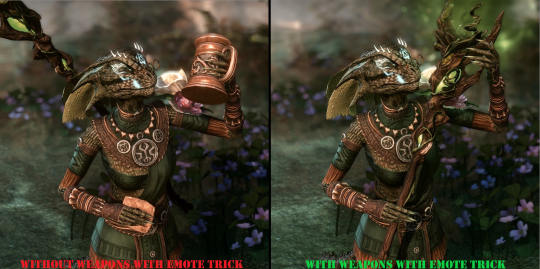
STEP 1: Select an emote you want to use!
STEP 2: Draw out your Weapon! (It can be any weapon.)
STEP 3: Activate the emote so your character does it, then click 'Block' quickly straight after! (Block should be your mouse's right button.)
It might take a few attempts before you get it right, but once successful, you will notice your character is holding their weapon equipped in hand while still emoting. This trick is handy to have some custom weapon emotes for screenshots, and I recommend testing them out with all the emotes to see what custom weapon emote you can make.
For some reason, the above trick does not work with all emotes! I do not know why some emotes require this trick while others work fine with the block trick, but if the first trick doesn't work for you, try this one:
STEP 1: Quickslot 'Hide your Helm'! (Quickslots are found in your Inventory menu.)
STEP 2: Hold 'Q', then hover over the 'Hide your Helm' in the Quickslots circle and make sure it's the one that's active when you click 'Q'.
STEP 3: Draw out your Weapon! (It can be any weapon.)
STEP 4: Select an emote you want to use!
STEP 5: Activate the emote so your character does it, then click 'Q' (Hide your Helm) quickly straight after!
STEP 6: If the character does the emote, but the prop is invisible, click 'Block', which should be your mouse's right button.
As mentioned, it might take a few attempts before you get it right, but once successful, you will notice your character is holding their weapon equipped in hand while still emoting.
~ Keep in Mind ~
The Trick will work with personality emotes as well.
Unfortunately, It does not seem to work with ALL emotes.
Seemingly does not work with mementos.
Moving your character will break the emote!
Some of the emotes already make use of prop items. If this prop item appears with your weapon during the trick, you either did it wrong, or the prop item cannot be turned invisible.
You need to BE PATIENT! This trick can sometimes bug out and require a retry! So keep going even if it doesn't work the first few times. It requires perfect timing and occasionally multiple attempts.

#Lotus Creations#type: screenshot#type: tutorial#elder scrolls#the elder scrolls#tes#tesblr#elder scrolls online#eso#the elder scrolls online#teso#tamriel#gaming#mmo#screenshots guide
59 notes
·
View notes
Text
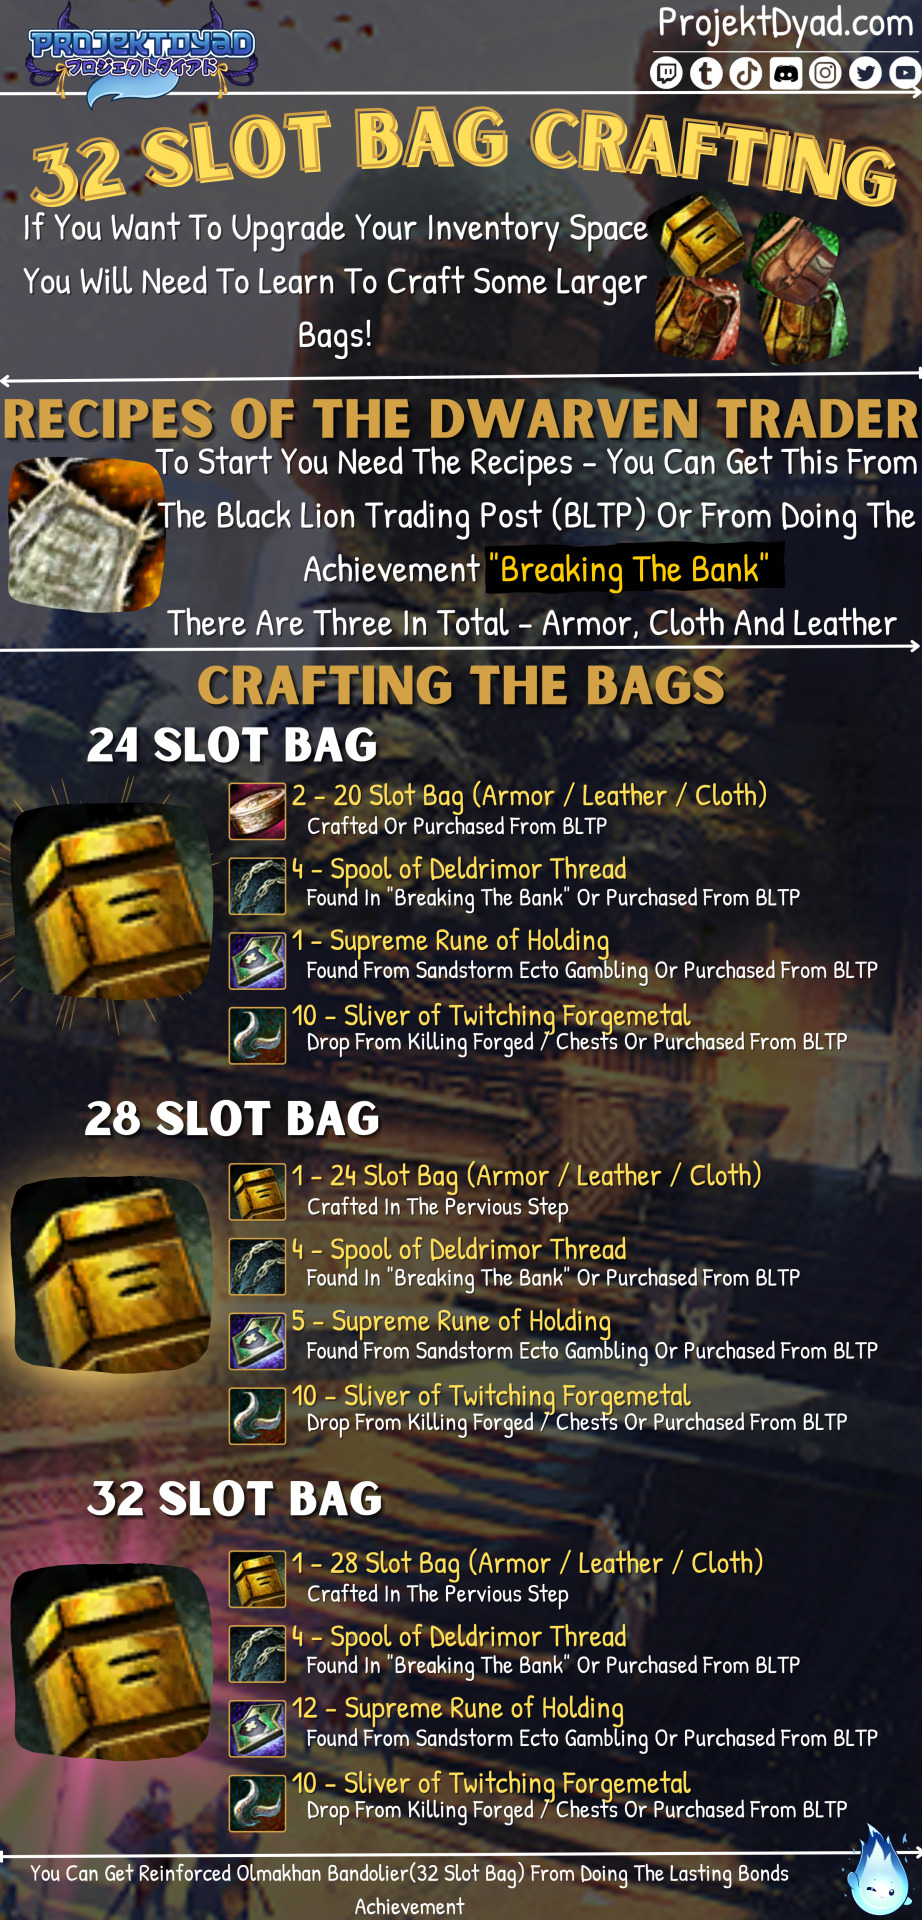
32 Slot Bag Crafting!!
If you want to maximize your bag space you will need to learn to craft some 32 slot bags!
There are a few you can get from achievements and a few different recipes to unlock as well, but here is the standard one!
#guild wars 2#guildwars2#gw2#gw2 ocs#gw2 human#gw2 commander#guild wars oc#guild wars guide#guild wars 2 guide#guild wars 2 guides#Guild Wars 2#Guild Wars2#Guild Wars 2 Info#MMORPG#MMO#multiplayer#twitch#streamer
206 notes
·
View notes
Text
it's most likey a combination of adhd hell related memory issues and vast preference of story over meta is 99% of games i play but eso makes me feel like a toddler trying so so fucking desperately to understand calculus
#yes i hate mmos yes i re-downloaded an mmo. sjhut up.#eso from everything i've seen over the years is so BLAND looking tbh but like.#like everyone else i don't think i need to remind you what came out TWELVE YEARS AGO. i need new tes related stimuli.#i watch beginner sorcerer build guide videos and the jargon thrown @ me turns me into one of those scared cats with the Half life sfx video#edit on the bland comment this does not aply to eso mephala. love u crazy scheming bitch <3
2 notes
·
View notes
Text
Getting Started with Path of Exile
Getting Started with Path of Exile - Path of Exile is a great ARPG, but has a steep learning curve so this morning I attempt to flatten it a bit.
The launch of Diablo IV was a huge event, and it brought a lot of players who latently enjoy the ARPG genre out of the woodwork. Unfortunately, this mishandling of the game leading up to the launch of the first season has created a bit of a vacuum. If you survey the ARPG landscape you find many options with various benefits. Last Epoch, for example, shows a lot of promise but is still very much…

View On WordPress
#arpg#Beginner#d3#D4#diablo#diablo 3#Diablo 4#Diablo IV#games#Gaming#getting started#guide#Howto#MMO#MMORPG#path of exile#poe#Video Games
4 notes
·
View notes
Text

Palia | 20 Tips For Beginners!
Palia is a new Cozy MMO full of fun and relaxing things to do. Beginners may come across many things they are unsure of, or may haven’t explored quite far enough to answer their itching questions. Some of this list of 20 beginner tips you may already know, some may come as a surprise. Depending on how much you’ve been able to play the game, hopefully some of these come in handy for you!
Check them out!
2 notes
·
View notes
Text
Guild Wars 2 UI basics


#guild wars 2#gw2#mmo#mmorpg#guide#ui guide#I made this for my homies but I thought other people might find it useful
4 notes
·
View notes
Text
Sorcerer Base Game Build for Beginners
Healer
Skills
Bar 1
Class: Dark Magic: Dark Exchange morph: Dark Conversion (heals oneself and restores Magicka, then restores Magicka over time) (Or Weapon: Restoration Staff: Grand Healing: Illustrious Healing, Area of Effect on Target, one can put down an area of healing for allies)
Class: Daedric Summoning: Bound Armor: Bound Aegis (damage blocking shiled that gives Minor Protection lowering one's damage taken by 5% for 20 seconds, and Minor Resolve adding Physical and Spell resistence, and adds 8% Magicka at all times while on your bar)(Or Weapon: Restoration Staff: Steadfast Ward: Ward Ally - gives one and an ally a damage absorb shield)
Class: Daedric Summoning: Summon Winged Twilight morph: Summon Twilight Matriarch (heals pet and 2 allies, also shock damage) (Or Weapon: Restoration Staff: Grand Healing: Illustrious Healing, Area of Effect on Target, one can put down an area of healing for allies. Press 3 for bonus damage given and healing)
Weapon: Restoration Staff: Blessing of Protection: Combat Prayer (heals and buffs up all the allies standing in front of you)
Weapon: Restoration Staff: Regeneration morph: Radiating Regeneration (heals you and 3 up to 3 others)
Ultimate: Weapon: Restoration Staff: Panacea: Life Giver (heals one or an ally, and Regeneration - heals one, Blessing of Protection - heals allies and increases allies Physical and Spell Resistance, and Steadfast Ward - damage absorb shield)
Bar 2
Class: Daedric Summoning: Ward: Empowered Ward (damage absorb shield that also gives one and one's allies Minor Intellect for added magicka recovery and Minor Endurance for added stamina)
Class: Storm Calling: Surge morph: Critical Surge (healing and damage buff)(or Class: Daedric Summoning: Ward: Empowered Ward - damage absorb shield that also gives one and one's allies Minor Intellect for added magicka recovery and Minor Endurance for added stamina. Good for one, one's Twilight Matriarch, and one's tank.)
Class: Daedric Summoning: Summon Winged Twilight morph: Summon Twilight Matriarch (heals pet and 2 allies, also shock damage) (Or Weapon: Destruction staff: Force Shock: Force Pulse, Lightning staff does shock damage, With the Status Effect from Destructive Touch, 2 nearby opponents take magicka damage. Press 3 for bonus damage given and healing)
Weapon: Destruction Staff: Wall of Elements morph: Elemental Blockade (Lightning staff - opponents under the Concussed Status Effect are knocked off balance.)
Weapon: Destruction Staff: Destruction Touch: Destructive Reach (damages opponents and applies status effect knocking opponents off balance with the next Shock damage skill)
Ultimate: Class: Dark Magic: Absorption Field (Area of Effect, centered on oneself, sets down an area around onself healing allies and stopping all opponents' Area of Effect attacks. Opponents in this area are also stopped still.)
(Alternative: World: Soul Magic: Soul Strike morph: Soul Shatter (deals damage to 1 opponent, and then, once they are finished off, damages any opponents next to them. one becomes immune to being disabled, so oneself can't be stunned or knocked off balance while oneself is dealing this damage. Any opponent that was invisible or stealth is revealed and can't hide again for 3 seconds.Or Desctruction Staff: Elemental Storm morph: Elemental Rage - target an area with a storm damaging any opponents caught in it)
Tank
Skills
Bar 1
Class: Dark Magic: Dark Exchange morph: Dark Deal (heals oneself and restores Stamina, then restores Stamina over time)
Class: Dark Magic: Encase: Restraining Prison (stops opponents still, unless no opponents are stopped, then one restores magicka instead. Also gives one Minor Vitality adding healing taken)
Class: Daedric Summoning: Summon Unstable Familiar: Summon Unstable Clannfear (damage and heals oneself and one's pet, press 3 for bonus damage given and healing taken)
Weapon: One Hand and Shield: Puncture: Pierce Armor (Taunts)
Class: Daedric Summoning: Bound Armor: Bound Aegis (damage blocking shield that gives Minor Protection lowering one's damage taken by 5% for 20 seconds, and Minor Resolve adding Physical and Spell resistance, and adds 8% Magicka at all times while on your bar) (Or Weapon: One Hand and Shield: Low Slash: Deep Slash (Slows opponents and reduces their damage output)(Or Power Bash morph: Reverberating Bash, damages and stuns, Bash damage)
Ultimate: Class: Dark Magic: Absorption Field (Area of Effect, centered on oneself, sets down an area around oneself healing allies and stopping all opponents' Area of Effect attacks. Opponents in this area are also stopped still.)
Bar 2
Class: Storm Calling: Lightning Form: Boundless Storm (damage, and Major Resolve adding Physical and Spell resistance, and Major Expedition adding 30% bonus speed for 4 second)
Class: Daedric Summoning: Ward: Hardened Ward (damage absorb shield)
Class: Daedric Summoning: Summon Unstable Familiar: Summon Unstable Clannfear (damage and heals oneself and one's pet, press 3 for bonus damage given and healing taken)
Weapon: Destruction Staff (Ice): Wall of Elements morph: Elemental Blockade (Ice staff - allies get shields, opponents are stopped still if the are already under the Chilled Status Effect)
Weapon: Destruction Staff: Destruction Touch: Destructive Reach (damages opponents and applies Chilled status effect slowing opponents with the next Ice damage skill)
Ultimate: Class: Storm Calling: Summon Storm Atronach: Greater Storm Atronach (Shock damage and stops nearby opponents still, and adds Major Berserk adding 10% damage for one and one's allies for 8 seconds)
B. (Or Weapon: Desctruction Staff (Ice): Elemental Storm morph: Elemental Rage - target an area with a storm damaging any opponents caught in it, Ice staff stops them still.)
Damage Dealer
Skills
Pet Build (No Lightning)
Bar 1
Dark Magic: Crystal Shard morph: Crystal Fragments (Magicka damage)
Class: Daedric Summoning: Summon Winged Twilight morph: Summon Twilight Matriarch (heals pet and 2 allies, also shock damage) (Or Class: Daedric Summoning: Ward: Hardened Ward (damage absorb shield)
Class: Daedric Summoning: Summon Unstable Familiar: Summon Volatile familiar (shock damage and stuns opponents, press 3 for bonus damage)
Weapon: Destruction Staff (Ice): Impulse morph: Pulsar (Area of Effect, centered on oneself, damage, and adds damage based on how many opponents are hit, and adds Minor Mangle lowering opponents' maximum health by 10% for 10 seconds)
Weapon: Destruction Staff (Ice): Force Shock morph: Force Pulse (Shock Damage, and if opponents are already under a Status Effect, opponents take bonus damage)
Ultimate: Class: Dark Magic: Absorption Field (Area of Effect, centered on oneself, sets down an area around oneself healing allies and stopping all opponents' Area of Effect attacks. Opponents in this area are also stopped still.)
(Or World: Soul Magic: Soul Strike morph: Soul Shatter - deals damage to 1 opponent, and then, once they are finished off, damages nearby opponents one becomes immune to being disabled, so one can't be stunned or knocked off balance while one is dealing this damage. Any opponent that was invisible or stealth is revealed and can't hide again for 3 seconds.)
Bar 2
Class: Dark Magic: Dark Exchange morph: Dark Deal (heals oneself and restores Stamina, then restores Stamina over time)
Class: Daedric Summoning: Summon Winged Twilight morph: Summon Twilight Matriarch (heals pet and 2 allies, also shock damage) (Or Class: Daedric Summoning: Bound Armor: Bound Aegis - damage blocking shield that gives Minor Protection lowering one's damage taken by 5% for 20 seconds, and Minor Resolve adding Physical and Spell resistence, and adds 8% Magicka at all times while on your bar)
Class: Daedric Summoning: Summon Unstable Familiar: Summon Volatile familiar (shock damage and stuns opponents, press 3 for bonus damage)
Weapon: Destruction Staff (fire): Wall of Elements morph: Elemental Blockade (fire staff - opponents are burned are already under the Afterburn Status Effect)
Weapon: Destruction Staff (fire): Destruction Touch: Destructive Reach (damages opponents and applies Afterburn staus effect burning opponents with the next fire damage skill)
Ultimate: Weapon: Destruction Staff (fire): Elemental Storm morph: Elemental Rage - target an area with a storm damaging any opponents caught in it, fire adds lingering damage)
Lightning Build (No Pet)
Bar 1
Class: Storm Calling: Mages' Fury morph: Mages' Wrath (Shock damage)
Class: Storm Calling: Bound Armor morph: Boundless Storm (damage, and Major Resolve adding Physical and Spell resistance, and Major Expedition adding 30% bonus speed for 4 second)
Class: Storm Calling: Lightning Splash morph: Lightning Flood (Area of Effect on Target, Shock Damage)
Weapon: Destruction Staff (lightning): Wall of Elements morph: Elemental Blockade (Lightning staff - opponents under the Concussed Status Effect are knocked off balance.)
Weapon: Destruction Staff (lightning): Destruction Touch: Destructive Reach (damages opponents and applies status effect knocking opponents off balance with the next Shock damage skill)
Ultimate: Class: Storm Calling: Overload morph: Energy Overload (Shock damage, and restores Magicka and Stamina)
Bar 2
Class: Dark Magic: Dark Exchange morph: Dark Deal (heals oneself and restores Stamina, then restores Stamina over time) (Or Dark Magic: Crystal Shard morph: Crystal Fragments (Magicka damage)
Class: Storm Calling: Surge morph: Critical Surge (healing and damage buff)(or Class: Daedric Summoning: Ward: Empowered Ward - damage absorb shield that also gives one and one's allies Minor Intellect for added magicka recovery and Minor Endurance for added stamina. Good for one, one's Twilight Matriarch, and one's tank.)
Class: Dark Magic: Rune Prison: Shattering Prison (Magicka damage, and stops opponents still) (Or Dark Magic: Daedric Mines morph: Daedric Minefield (Area of Effect, centered on oneself, magicka damage)
Weapon: Destruction Staff (fire): Impulse morph: Pulsar (Area of Effect, centered on oneself, damage, and adds damage based on how many opponents are hit, and adds Minor Mangle lowering opponents' maximum health by 10% for 10 seconds)
Weapon: Destruction Staff (fire): Force Shock morph: Force Pulse (Shock Damage, and if opponents are already under a Status Effect, opponents take bonus damage)
Ultimate: Class: Storm Calling: Summon Storm Atronach: Greater Storm Atronach (Shock damage and stops nearby opponents still, and adds Major Berserk adding 10% damage for one and one's allies for 8 seconds)
(Or Weapon: Destruction Staff (fire): Elemental Storm morph: Elemental Rage - target an area with a storm damaging any opponents caught in it, Ice staff stops them still.)
Armor
Healer - light armor
Stendarr's Embrace from Eastmarch (cleanse when healing, magicka recovery, and stacks maximum magicka 2x)
Prayer Shawl from Deeshan (when oneself deals bonus healing, one gives 1 ally a shield that absorbs damage)
Tank - heavy armor
Storm Knight's Plate from Stormhaven (stacks armor bonuses, adds maximum health, and adds Shock damage to all nearby opponents)
Thunderbug Carapace from Malabal Tor (stacks armor bonuses, adds weapon and spell damage, and adds Shock damage to all nearby opponents)
Damage Dealer - light armor
Necropotence from Rivenspire (adds pet damage and stacks maximum magicka) (Or Bloodthorn's Touch from Glenumbra, adds weapon and spell damage, adds maximum magicka, adds magicka recovery, and when one deals damage one restores magicka and stamina)
Dreamer's Mantle from Strormhaven (stacks maximum health, adds maximum magicka, restores magicks, and knocks down opponents when one is under 35% health and taking damage)
Passives
Race
Armor
Healer: Light Armor
Tank: Heavy Armor
Damage Dealer: Light Armor
Class:
Dark Magic
Deadric Summoning
Storm Calling (except for Pet-No Lightning Damage Dealer)
Weapon 1:
Healer: Restoration Staff
Tank: One Hand and Shield (Sword, Axe, Mace, or Dagger)
Damage Dealer: Destruction Staff - Lightning or Ice
Weapon 2:
Healer: Destruction Staff - Ice or Lightning
Tank: Destruction Staff - Ice
Damage Dealer: Destruction Staff - Fire
World: Soul Magic
Attributes
(there is a base for every attribute, then bonus points):
⦁ Healer: Magicka: 42, Health: 22, Stamina 0
⦁ Tank: Magicka: 32, Health: 16, Stamina: 16
⦁ Damage Dealer: Magicka: 42, Health: 22, Stamina: 0
Mundus:
Non-attribute buffs
Healer: Shadow - adds critical healing done (found in Shadowfen, Rivenspire, or Greenshade)
Tank: Steed - increases speed and health recovery (found in The Rift, Bankorai, or Reaper's March)
Damage Dealer - Thief - increases crital damage dealt (found in Eastmarch, Alik'r, or Malabal Tor)
Maximum attribute buffs (found in Deeshan, Stormhaven, or Grahtwood)
Healer: Mage - maximum magicka
Tank: Tower - maxumum stamina
Damage Dealer - Lord - maximum health
Provisions: Just go ahead and get a tri-potion, a health potion that also boosts magicka and stamina. There are a variety of potions, but the tri-potion is a staple and great for levelling new characters. Potions are levelled. so, oneself will probably out-level more expensive potions like Spell Critical or Weapon Power before one can use them.
Same for food. Before Level 25, any food is fine. It's a small buff that lasts for 2 hours, so one can buff up one's strongest attribute or onself can choose to level out one's weakest attribute. One can learn every craft (or profession) in the game at the same time on the same character, though each craft has a skill line that will need skill points.
One can learn to craft Provisions (food and drink), or ask one's guild mates, or buy from a guild store, or buy food from a Chef or drink from a Brewer. Fighter's and Mages Guild reward boxes also contain levelled food and drink.
The tri-provision recipes drop in one's reward box from Provioning crafting writs. You can also buy them from Guild Stores.
Tri-provisions:
Sweet Skeever Gumbo (level 25 and up),
Summerset Rainbow Pie / Nibenese Fricasseed Fawn / Dawnstar Dusk Chowder (level 35 and up),
Capon Tomato Beet Casserole / Jugged Rabbit in Preserves / Longfin Pasty with Melon Sauce / Withered Tree Inn Venison Pot Roast (Max, Level 50 Champion Points 150)
As for poisons, damage health is fine. It's a small debuff on one's opponent. All poisons help in their own way.
Notes:
You can gain any weapon or armor skill line by equipping the weapon or 2 or more pieces of that weight of armor (Light, Medium, or Heavy). That's it. No training required. The skill line will appear in you Skills (Hotkey: K)
Belts and Boots can be found in Delves (small, solo dungeons)
Helmets, Jackets, Pants, and Weapons can be found on World Bosses. (Like Dungeon Boss that wandered out of the dungeon and made a home for themself)
Gloves, Shoulders, and Weapons can be found in Public Dungeons. (big, solo dungeons, can bring friends). Mages Guild has daily quests where they send players to specific dungeons on specific days, so if you pick up that quest you might find people to join.
Jewelry (necklaces and rings) can be found in Dark Anchors (Dolmens in Base Game, Dragons in Elsewyr, Harrowstorms in Skyrim, Geyers in Summerset, Volcanic Vents in High Isle. Blackwood has a wandering Public Dungeon.) The Fighter's Guild has daily quests that will send people out to specific Dolmens on specific days, so you can often find groups already fighting at Dolmens. And you can join in at any time it's active.
Any Armor and Weapons from Zone Quests, daily quests, or side quests (Mages and Fighter's guilds quests only provide jewelry and 1 weapon each, their daily quests only give ornate armor and weapons)
Roles in Dungeons: Healer heals allies and damages opponents. Tank taunts the Boss and deals damage. Damage Dealer deals as much damage as possible, either through critical strikes or over time with poisons and status effects, or a mix of both.
#elder scrolls online#game guides#guide#beginner#sorcerer#caster#pet build#non pet build#esofam#mmo#mmorpg#rpg
2 notes
·
View notes
Text
youtube
#ff14 gil#ff14 lalafell#ffxiv gil#ff14#ffxiv#vtuber#virtual youtuber#final fantasy#ffxiv guide#ff14 guide#gil guide#gil#market board#mmo#Youtube
4 notes
·
View notes
Video
youtube
Talisman Online-Guard Token EVENT review(Light in Darkness)
#youtube#mmo mmorpg talisman talismanonline 2024 june event lightindarkness lid light darkness game youtube video viral npc reward limited token guid
0 notes
Video
youtube
The Ultimate Guide to World of Warships Vladivostok
Are you ready to dominate the high seas in World of Warships Vladivostok? Look no further, as we've got the ultimate guide to help you master this powerful ship.
The Vladivostok is a Tier VIII Soviet battleship known for its strong armor and impressive firepower. It boasts nine 406mm guns that can deal massive damage to enemy ships.
When playing the Vladivostok, make sure to position yourself strategically to maximize the effectiveness of your guns. Utilize your armor to absorb damage while dishing out punishment to your foes.
Keep an eye on your team's positioning and support them as needed. The Vladivostok excels at leading the charge and engaging enemies head-on. Don't be afraid to push forward and show your enemies who's boss.
Remember to manage your cooldowns effectively and use your consumables wisely to gain the upper hand in battle. Communication with your team is key to securing victory in World of Warships Vladivostok.
Thanks for watching this guide on the Vladivostok. If you found this video helpful, don't forget to subscribe to our channel for more World of Warships content. See you on the high seas!
#youtube#WorldOfWarships#Vladivostok#Gaming#Warships#Navy#VideoGames#Strategy#Guide#Gamer#shipping#Battleship#OnlineGaming#Multiplayer#Naval#blackpool combat club#GamingCommunity#Combat#MMO#war#WarshipGames#UltimateGuide#TipsAndTricks
1 note
·
View note
Text

City of heroes is a free mmo. And by free I mean actually free. You don't pay for anything. It's an old MMO revived by fans on fan run servers where they've continued to update the game with all manner of new content. The population is very much thriving. They accept donations on their website to help keep servers running but that's it.
CoH has a rather novel class system. You pick two power sets from a large selection. Which class you choose determines which power sets you can use and how powerful those sets are. For example, Tankers and Scrapper have a lot of the same power sets but defensive sets are stronger for Tankers than for Scrappers and assault sets are stronger for Scrappers than for Tankers.

Here are some of the defensive sets available to Tankers. Each one has its strengths and weaknesses. For example, Fiery Armor gives you a lot of damage but poor defenses. While Invulnerability has fantastic defenses but offers no damage.
After you've chosen your Primary power set you then choose your Secondary. You can mix and match sets however you want and can change the colors, and sometimes even the graphics, of all your powers to help make them work visually together.

Later I'll create posts about each individual class going into depth about their role, strengths, weaknesses, and mechanics.
If you are interested in playing you have only to download the launcher found below and install the game.
1 note
·
View note
Text

⋆.ೃ࿔*:・Volatile Magic Infographic⋆.ೃ࿔*:・
Volatile Magic is a Living World Season 4 currency that will make getting into Fractals a breeze! Wanting to make some stock up your Material Storage, or make some Gold? Check out all of the shipments you can buy!
Also if you are looking to unlock the Skyscale in Dragonfall, or even make the Legendary Trinket Coalescence you will make use of this currency!
Want to see a larger version? Click Here!
#guildwars2#guild wars 2#gw2#guild wars#guild wars oc#mmorpg#gw2 fan submission#guild wars 2 guide#gw2 guides#guild wars 2 guides#Legendary#Twitch#Crafting#Gaming#mmo#girl gamer#gamer#small streamer
14 notes
·
View notes
Text
have super torn through the materials from the $bp, nice to make good progress on some characters though (like march/himeko/yukong and their light cones as I mentioned earlier). also did a ton more work again on evaluating relics. making sure to max out any gold ones that have 2+ needed substats. been trying to be conservative with the resources but that's holding my characters back, they're weak bc of low relics. so i think i've been too picky waiting. so yeah, so long as it's got the right main stat and at least 2 substats, i'm upgrading.
also then had to take a ton of time to do more with salvaging to then generate more of the material, and i really struggle with salvaging what really isn't a great item vs but what if a future character needs it or what if a 2/4 pc bonus combines with unexpected stats and gets recommended in the guides, like i wouldn't have suspected healing stats being needed on what looks to be non healing relic types. so hard to know what's trash and what the guides are going to suddenly say is useful. (and jfc is everyone going to end up in hackerspace?)
but doing my best. trying to use mats and not just hoard them for 'just in case' when characters need them now and i can tell it's why i'm so much weaker than other players. and trying to learn, like i know it takes me so much longer to pick up this information (just finally getting to where i understand pity and 50-50). wish there were a bit more info on this stuff for those of us who're new to hoyo games (like my dabbling in genshin never got me to gearing and evaluating stats so sr is basically my first).
not that many levels left on the battle passes, i'm in the 40s, so yeah, it'll be a bummer when that dries up. bc there's quite a while left before the new one.
#it'd still be nice if i could find people doing text guides about salvaging basics i'll have to keep looking#just not youtube i need writing >_>;#it's sad that i'm this game dumb but i've always been like that#took me all of vanilla wow to really learn the basics of mmos and raiding and to start to understand my class (rogue)#ofc then i promptly switched to warlock with burning crusade lol#but i think this style of game is different enough that i've really been clueless even though it's been since june#though it's *only* been since june like a few months? compared to the years i spent in other games (or near a decade and a half in wow)#it's just kind of like i think so many are so familiar with these systems from so much time in genshin or even that other honkai game#that it's all second nature like everyone's in hoyo college and i'm still in grade school#trying to find guides that handhold and speak to my 'for dummies' level >_>;;#and lord i still don't know if i'm rushing it and wasting materials maxing out upgrades on relics that match 2+ substats#maybe others wait for 3 or 4 substats? bc i tried and was upgrading so few it was so rare?#or do people max out just if the main stat matches or with that or one substat?#this is where i miss the social aspects of mmos i could ask others easier and compare what i was doing vs them#i like game8.co but i still have made so many so many mistakes bc even being a guide that assumes more knowledge of the system than i had#like i needed guides that said no don't trust their automatic relic assignment button it's bad you have to evaluate each item and here's ho#and here's where you use your resources to upgrade#finally have the achievement for synthesizing 5 relics though i'm going to be super cautious on doing more#what with the extreme rarity of the resin#anyway... babbling to the void here i know#please ignore my sr bs#and figures i salvage all that disciple stuff bc i don't have blade and the guides say other stuff for arlan (who i won't lvl for ages)#only to find out that it's exactly what fx will need and while i don't have her what if i do get her?#it's exactly why i've been in 'save everything' mode bc the moment i got rid of something i didn't need whoops turns out it might be needed#i swear this game makes me so often feel like i'm always not doing the right thing while constantly doing the wrong thing#i'd like to feel like i truly understand the basics and am mostly competent with them but i'm not to that point yet :/
1 note
·
View note
Last Seen Blogs


kotabalige
Kota Balige

koreroplatformsofficial
Korero

myrock-n-roll
Мой рок-н-ролл

general-channel
Sans titre