#Make app icon resize
Text
Make app icon resize

#Make app icon resize manual
How to Use Widgets to Control Your Favorite Applets on iPhone or Androidĭisable 'Press Home to Unlock' to Open Your iPhone Faster Remove Widgets from Your iPhone's Lock ScreenĪccess Your Screen Time Usage Stats Faster in iOS 12 for iPhoneĪdd a Google Search Widget to Your iPhone's Home Screen This Widget Lets You Open Wi-Fi Settings Faster, Share Passwords & More on Your iPhone The Easiest Way to Add Widgets to the Today View on Your iPhone How to Add Widgets to Your iPhone's Lock Screen & Notification Center
59% off the XSplit VCam video background editorĬover photo and GIFs by Justin Meyers/Gadget Hacks Related.
Get a lifetime subscription to VPN Unlimited for all your devices with a one-time purchase from the new Gadget Hacks Shop, and watch Hulu or Netflix without regional restrictions, increase security when browsing on public networks, and more. Keep Your Connection Secure Without a Monthly Bill. But until then, you might want to add multiple sizes of each widget to your home screen or Today view to see which you like best, then delete the sizes you don't want.ĭon't Miss: 22 Things You Need to Know About iOS 14's New Home Screen Widgets for iPhone It would be the most convenient way to do it. Unless you want to do that whole process all of the time, I suggest you submit feedback to Apple asking for a "Resize" button for live widgets. It's a Lot More Complicated Than It Should Be Use Step 1 to enter the widget editor, then add back all of the settings you had before if you want them to be the same. If you recorded your widget edits from Step 1, you'd want to add those back to the widget's new size. Step 4: Restore Your Widget Edits (If Any) If it's in a stack, make sure the widget you want to remove is visible, long-press the stack, then choose "Edit " to see its settings. If you customized the widget, it might be a good idea to first long-press the widget on your home screen or Today view, select "Edit Widget," and record your changes so you can add them to the new size. Step 1: Record Your Widget Edits (If Any)
#Make app icon resize manual
And by "long way," we mean the annoying, tedious, slow manual way that'll make you have to reinput your widget settings on ones that had them. So for the time being, until Apple implements a quick way to resize widgets on the home screen and Today view, you're stuck doing it the long way. Don't Miss: Apps That Work with iOS 14's New Home Screen Widgets.It would make sense to long-press on the widget and select something like "Change Size" to get options for the small, medium, and large options, but Apple never baked that in. While some of the widgets that you can add to your home screen or Today view have editable items, such as choosing a different time zone for Clock or picking a different folder in Notes to view, that's as far as it goes. But what happens when you picked the wrong widget size? In a perfect world, you would just edit the current widget's settings, but Apple didn't make it that easy. Home screen widgets come in various sizes in iOS 14, and which size you choose will depend on how much content or data you actually want to see.
0 notes
Text
Friday, July 28th, 2023
🌟 New
We’ve updated the text for the blog setting that said it would “hide your blog from search results”. Unfortunately, we’ve never been able to guarantee hiding content from search crawlers, unless they play nice with the standard prevention measures of robots.txt and noindex. With this in mind, we’ve changed the text of that setting to be more accurate, insofar as we discourage them, but cannot prevent search indexing. If you want to completely isolate your blog from the outside internet and require only logged in folks to see your blog, then that’s the separate “Hide [blog] from people without an account” setting, which does prevent search engines from indexing your blog.
When creating a poll on the web, you can now have 12 poll options instead of 10. Wow.
For folks using the Android app, if you get a push notification that a blog you’re subscribed to has a new post, that push will take you to the post itself, instead of the blog view.
For those of you seeing the new desktop website layout, we’ve eased up the spacing between columns a bit to hopefully make things feel less cramped. Thanks to everyone who sent in feedback about this! We’re still triaging more feedback as the experiment continues.
🛠 Fixed
While experimenting with new dashboard tab configuration options, we accidentally broke dashboard tabs that had been enabled via Tumblr Labs, like the Blog Subs tab. We’ve rolled back that change to fix those tabs.
We’ve fixed more problems with how we choose what content goes into blogs’ RSS feeds. This time we’ve fixed a few issues with how answer post content is shown as RSS items.
We’ve also fixed some layout issues with the new desktop website navigation, especially glitches caused when resizing the browser window.
Fixed a visual glitch in the new activity redesign experiment on web that was making unread activity items difficult to read in some color palettes.
Fixed a bug in Safari that was preventing mature content from being blurred properly.
When using Tumblr on a mobile phone browser, the hamburger menu icon will now have an indicator when you have an unread ask or submission in your Inbox.
🚧 Ongoing
Nothing to report here today.
🌱 Upcoming
We hear it’s crab day tomorrow on Tumblr. 🦀
We’re working on adding the ability to reply to posts as a sideblog! We’re just getting started, so it may be a little while before we run an experiment with it.
Experiencing an issue? File a Support Request and we’ll get back to you as soon as we can!
Want to share your feedback about something? Check out our Work in Progress blog and start a discussion with the community.
857 notes
·
View notes
Text
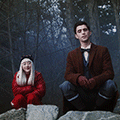
ao3 icon gifs: edwin and charles
for ao3 icon gifs that are of other dbda characters, see here
About a month ago I discovered that you can have gifs as your Ao3 icon and so obviously I’ve had one since then. It’s a bit of an acquired look but I’ve come to enjoy it and have been wanting to make a collection of icons for anyone to use.
I went through my most popular posts, as well as some of my favorite gifsets and spent some time resizing, optimizing, and for some, adjusting the colors a bit, to make sure they fit in the super small file limits for Ao3 icons (under 500kb), and still look okay.
There’s about 50, and most of these are 120px squares, which is a bit bigger than the 100px square that Ao3 recommends. I mostly did this because Ao3 makes your icon bigger in the comment section and on your profile, so it's nice if it’s a bit larger than 100px. That being said, they will not look very good in this post. They are itty, bitty gifs and as such, they are really pixelated.
To download, I recommend using tumblr desktop, opening the gif in a new tab, and then in the url where it says “.gifv” delete the ‘v’ so that it says “.gif” at the end. Only then can you download the gif properly.
If you’re on the mobile app, tumblr will often compress the gif. I recommend opening the post in your phone browser instead of the app, and then following the same instructions for desktop. This way, you’ll get the best looking file for your icon :)


row 1: charles cricket bat ep 1 | charles "yes i can crow, you'll see" | charles "i left it back at the office"


row 2: charles "i'll make you my friend eventually" | charles "an evil seagull" | charles imitating edwin ep 4


row 3: charles "is that right?" | charles cricket bat ep 6 | edwin indignant ep 2


row 4: edwin "do not get used to it" | edwin "what is a handjob?" | edwin crying in hell


row 5: charles "i'm here to rescue you" | ep 8 hug pt 1 | ep 8 hug pt 2


row 6: charles post-hug hand on heart | ep 5 hug | edwin post-hug hand on heart


row 7: (potential couples icons) charles on tube | edwin on tube | edwin "perhaps we should follow up with this molly character"


row 8: (potential couples icons) edwin smiling at charles ep 1 | charles smiling at edwin ep 1 | charles "molly character" reaction


row 9: edwin staring wistfully ep 4 | charles talking to crystal ep 4 | charles "right edwin?" ep 4


row 10: edwin gasp ep 4 | edwin violet gif ep 1 | edwin violet gif ep 1 (pink edition - inspired by @idliketobeatree)
99 notes
·
View notes
Text

The Simply Plural 1.11 Beta
Hello, in this post I'm gonna talk about the new beta from simply plural that was released on August 14, 2024
Subtopics:
What are the new futures?
How each feature works
Friends glitch/bug
Custom fields glitch/bug
Buckets glitch/bug
Other noticeable bugs
Extra things
Final thoughts
Now that we know what it's going to be in this post let's dive into it!
What are the new features?
This beta provides some new features, most of them suggestions that were previously asked a lot of times that finally got implemented
Privacy buckets which works as a new privacy system for the app
Ability to change the default setting of privacy
Group moving finally implemented
Easier access to read groups descriptions
Ability to cancel editing
Resizing images with markdown
How each feature works
Privacy buckets:
The privacy buckets is a new function that was suggested for a long time, with this new privacy system you can create groups that you can customize to have a more specific privacy experience
The customization things that you can add are having an emoji that identifies the bucket, being able to put a name, description and a color on the bucket, specify which ones of your friends can see the alters/groups/fields under that bucket
Bucket example
This buckets applies to groups, profiles and fields as you see here

Your friends won't be able to see the emoji while looking at your profile, this means they don't know in what bucket they are
You can add multiple buckets to the same friend, this is to make a better and more specific privacy customization
All the groups, members and fields that aren't given a bucket would be automatically set to private
For getting access to the buckets settings you have to enter your app settings, go to account, go to privacy buckets and there you go
For more information about how buckets works please check this oficial guide
Change the default privacy setting:
The default privacy settings let you choose what would be the new default setting around privacy buckets when making new things
This setting is applicable to all the things you can change the privacy of, this means:
Profiles/members
Custom fronts
Groups
Custom fields

So depending on what bucket(s) you choose all the new things you create would have that bucket from now on
Important to note that putting a default bucket won't change any of your already existing information, this would only apply for new created things after the bucket was assigned, you still have to manually change the buckets from old things
For getting access to the buckets settings you have to enter your app settings, go to account, go to privacy buckets and click the gear icon next to the question mark one, there you go
Group moving:
As the name implies the group moving feature allows you to move one folder to another one, you don't have to re-do the whole group from scratch anymore
The whole page for editing groups has changed so you'll might get a bit confused. The whole moving folders part can be found now when you edit a group
Visual example of what I mean


So you might ask how does the move group work, this is a little example and tutorial on how this function works
We have this test group called "A", as you see A is in the main root, it's not a subfolder of any kind, we're gonna move it to be a subfolder

When you click in the already shown "Move group" option it would pop out a new menu (This loading can be a little delayed, at least from my experience, so be patient)
The group who's darker is the one you'll move, you just need to click on the folder you want to put the group on and it would show you this pop out to make sure you're ok with moving it into the folder you chose

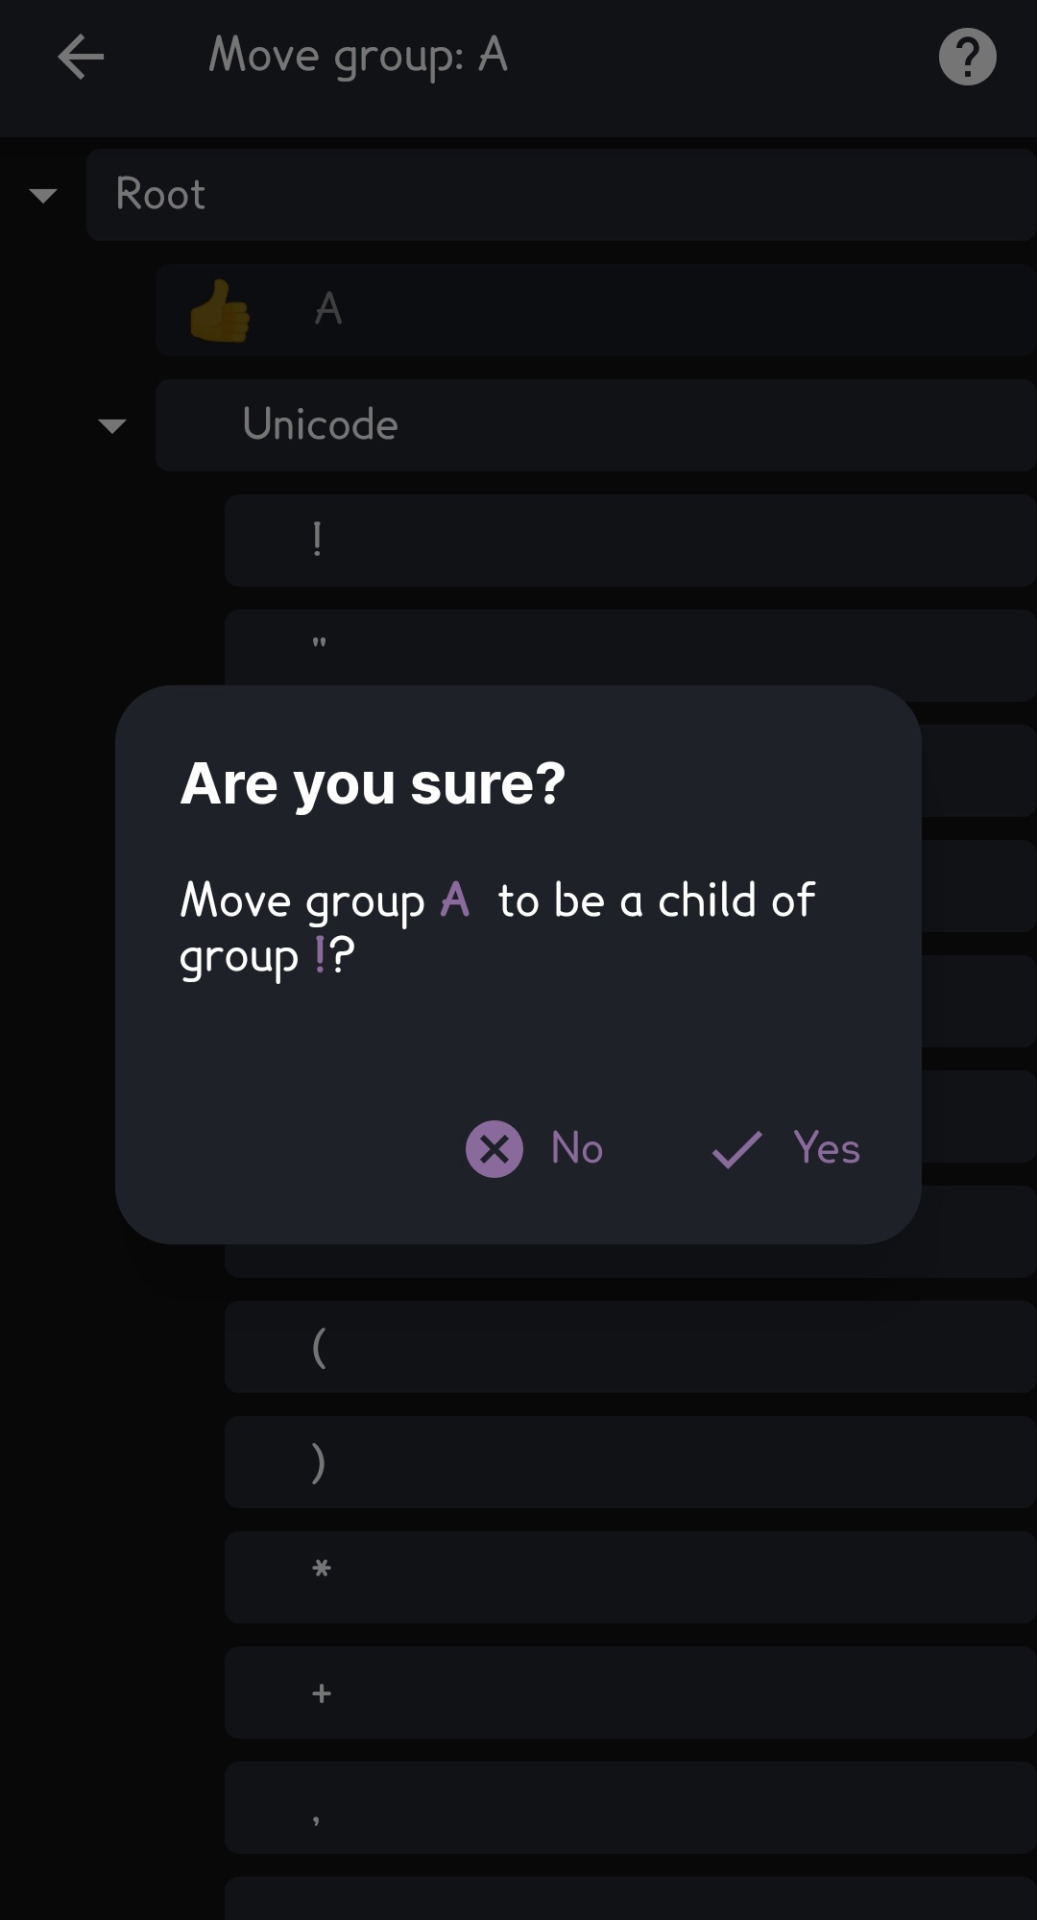
And there you go, you moved the group
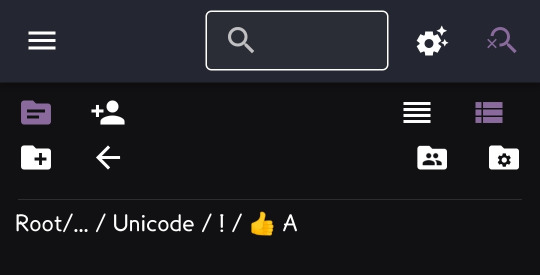
Groups descriptions:
The groups descriptions were updated to a more easy and friendly way to see them, not only for you but for your friends too
Now all the groups that have a description will have a question mark symbol attached to them, clicking it would show you the description
Visual example of the described:


There's no more mystery outside this, this works with your friends groups and your own in both sides
Cancel editing:
Have you ever had the problem that while editing a profile or a custom front you don't want to save the changes so you have to close the app and re open to make sure that doesn't get safe? Well that's why the new beta fixed that issue
Now when you're editing things like profiles, you can decide if you want to cancel or save your changes, it's pretty simple to see it, there's and x and a 💾 icon, the x it's for not saving the changes and the 💾 for saving them
Visual example

This visual not only applies to profiles but also anything that can be changed and/or edited, I just put this for the sake of keeping it simple and not full of pictures of the same thing in different perspectives
Resizing images with markdown:
Using links for images is something that is used since a lot of time, it's normal to see people trying to resize their images directly from the markdown feature but failed, but now you can actually do this
In this image I'm using the same link, just that one is using the resizing markdown and the other isn't, this is to show that the resizing isn't super perfect and it's more based around fitting the picture in the indicated size, it would not stretch out or modify its property, it would just re adjust the size of it


As you might seen the only change you do it's adding the #300x300 after the link, putting the # along with the size that you want will resize your picture, this can work with any kind of numbers you put (#numxnum), but in some cases might look wonky or the picture might not appear/be cut so be sure to know the size and things you want with that to not mess up
Friends glitch/bug
It has been reported that the friends part might be very glitchy and have some errors, bugs and problems when entering in the moment you're using the beta
Some of the bugs reported are:
Not being able to see the preview of fronters in the main friends page
Not being able to see the custom fields of some friends
Some profiles not being able to bee seen although the friend has the bucket to see it
Menu doesn't work, it shows a gray box
More buckets assigned to a friend than the ones you actually have
Errors while seeing each others profiles when one's on beta and the other isn't
The friend menu it's a bit wonky and buggy with this beta, so don't be shock if you have some issues while seeing it, it's not broken, the beta is still a beta after all, it's to see the errors to fix them for the official release
Custom fields glitch/bug
The custom fields is one of the part who shows more errors while using it, some common reported bugs are
Friends and/or you can't see your fields information
The changes aren't saved
While offline they might disappear
Errors with the image links (They don't act like images rather than normal links)
Not being able to move them
When tagging (@) alters from another systems appears instead of yours
The custom fields are very delicate in this area, specially because the migration between 1.10 and 1.11, because of this I'm gonna copy paste words of the developers about it
API was further updated to fix the issues of large systems having trouble sharing content with friends and not being able to see custom fields of friends across release and beta versions.
Note: The fix for cross-version only works for release if you never opened beta before. If you left or will leave beta you will still have issues seeing custom fields of beta friends.
Second note: I just noticed that beta seeing release custom fields is still not fully working. So we'll report back when that is fixed.
Additionally, custom fields from 1.11 are not compatible with 1.10.3 either, if you downgrade back to 1.10.3 you will not be able to save changes to custom fields (neither custom fields settings or member custom fields data).
It's not mandatory but I'll recommend not touching your custom fields if you have the beta because it can have some issues about losing information, but this is a recommendation, this lost bug doesn't happen to everyone so do it at your own risk
Buckets glitch/bug
Because of the new future it was expected that it would have bugs and errors while testing it
The feature isn't 100% polish and it's being fixed, but this isn't stopping you from using it because it is workable
Some common bugs are:
Selecting a friend while creating a bucket doesn't work, you have to make the bucket and then edit it again to add the friend
Scrolling being difficult to almost impossible while editing buckets to assign friends
Don't adding the selected people (can also add people who's not selected)
Bucket count showing incorrectly as a visual error (previously mentioned in friends bugs)
Multiple visual errores in different areas
Also adding a note said by the developers to keep in mind
Important note: If you open the app in beta version you will no longer be able to go back to the old privacy system, even if you downgrade your app back to 1.10.3. We suggest you stay on 1.11 once you used the app in 1.11. Critical bugs found within the Beta will be resolved swiftly.
Other noticeable bugs
As is expected this bet has a lot of bugs going on, I'm not going to name all the bugs because this would be more long than it has to be, but I will list some common bugs that don't fall into any of the other two previous categories I mentioned
While offline all things appear as private even with different bucket
Editing colors isn't saving (profiles, groups, custom fronts, buckets)
While making a description you can't use the enter button
The lines to easy select text isn't showing up
Somo areas flicker when selecting/touching them
Getting front notifications of people you didn't select to have them
Bugs with pop outs about deleting members/groups
All of this errors and some more are being fixed for the proper release
Extra things
While it might be kinda obvious if you see the pictures I presented, the layout of the app it's kinda different, it didn't have an incredible mega change but various things about how it works were changed to fit better the new functions that were added
This betta has more bugs than previous betas but this isn't because it was bad designed, it functions pretty well and the bugs are being fixed, after all a beta it's for test out, report bugs, glitches and errors to make sure the final and official release it's the best product we can have, so maybe wait for the official release if you don't want that many bugs
Also as it was mentioned, if you already get the beta don't quit it, it can broke your simply plural and won't reverse the changes made in beta, you'll have to stick with the beta till the update it's public if you don't want to have more bugs and broke your app
For the people who might not know this, the beta testing isn't available on the web version, only the app
Little explanation on how to get the beta if you want:
Android: Go the the Play Store, search for Simply Plural and scroll down to join the beta
Apple: https://testflight.apple.com/join/DzPX698w
If you need more help with the download of the beta on android you can send me questions and I'll answer them
Final thoughts
Though it's not the best of the betas in terms of not being glitchy it's incredible how great this beta update was, and taking in mind that this errors will be fixed looks to have a very good and promising final result
I might say it's better not to get the beta if you really lay to much in SP and can't handle that many bugs and errors, but if you're willing to give it a try it can be a goofy and great experience at the same time
This update is more based on fulfilling already wished suggestions so it's pretty exciting to see it
For being a beta I give it a solid 7.5/10, maybe too buggy but a great preview of what it comes for the new update
If you have more questions about the beta, non beta or anything related to simply plural please send asks about it, I love to talk about SP so feel free to ask about it ^^
The bugs/glitches reports, the link fo the buckets and the basic information about the beta were taken from the official simply plural server, I really recommend checking it out if you want to ask questions about it, see inspiration, see third party tools or report bugs, also there you can see server status, announcements and updates. It's important to clarify that it's not a social server so have that in mind
Simply Plural Discord Server Link
If you read all this I have to really thank you very much for giving me that much of a time to talk about this, simply plural is one of my special interests and hyperfixation and I'm so glad I get to talk about it, I didn't expect that much people being interested on seeing me talk about this new update, sorry if it took me some time but I was kinda in a bad moment of my life, but writing this really cheered me up and I hope people can find this useful
Please reblog and like if you find it useful in some way and to make sure more people get to know this information about the new update cause it has a lot of important things! /nf
#persmo yapping#persmo#simply plural#simply plural update#simply plural beta#did system#cdd system#cdd community#dissociative system#system stuff#osdd#pdid community#did osdd#osdd system#osddid#did#udd system#system#osddid community#osddid system#did community#system community#pdid system#complex dissociative disorder#complex dissociative identity disorder#dissociative identity disorder#sysblr
54 notes
·
View notes
Note
Hi!!! I'm new here and I was wondering what apps you use to convert clothes,items,😂 literally anything from The Sims 4 to The Sims 2. You have inspired me to start making conversions for CC.
Your CC conversions always look breathtaking and it inspires me to do the same. Thank you so much for this.You really are helping out.
Have the most joyful day ever! 😌
hi nonny, thank you for your lovely kind words! i use so many programs to convert stuff that i'm honestly not sure where to start...? do you want the programs or do you want actual tutorials on how to use them to convert stuff from ts4 to ts2 🥴
for anything involving ts2 cc, simpe is a must-have. it's also used to edit your sims 2 towns and other stuff involving the game.
for modelling software, i use blender 4.1, blender 2.79b, and milkshape. plus also the sims 2 plugins for milkshape.
for extracting the models and textures from sims 4, i use sims4studio (you must have the game installed alongside the appropriate version of blender).
for editing the textures to match sims 2, i use an older version of photoshop (photopea or GIMP could probably also work).
for editing the bones of CAS and other items to match the sims 2 models, i use the meshtoolkit and WSO plugins from t$r workshop
for binning my hairs, adding basic tooltips, making collection files, and compressorizing my file sizes, i use the hair binner, tooltipper, collections creator, and compressorizer edited by @lazyduchess, respectively.
for organising my outfit categories, adding repo'd ages to my outfits, changing the categories of my objects, and other stuff, i use a variety of tools by @picknmixsims.
and of course, for outfits and scalp textures that need to be painted directly onto a sim's skin, i use @paluding's iconic sim tattooer.
i think it's important to stress at this point that at the moment, as far as i'm aware, there is no one program to directly port sims 4 assets to the sims 2. it seems to be a common misconception but 4t2 creators are making new packages, adding new bones, resizing textures, and a bunch of other stuff that is necessary to import these assets to the game. at some point the only similarities are the meshes and their textures (and even those are subject to change!)
if you want tutorials on how to use these programs and how 4t2 creations actually work, feel free to check out the cc creation section of the simscord - i also occasionally will livestream my process there 😄
#ask#answered#sims 2 ask#sims 2 cc creation#anonymous#ky's cc rambles#fr the amount of times i've been approached by people who assume it's easy because 'everyone seems to do it' is lowkey crazy#like imagine a program where u put a sims 4 package file in and it spits out a sims 2 package#my dream fr fr
23 notes
·
View notes
Text
Photoshopping/giffing tips and tricks pt. 2
[in addition to this post i previously made]. Before we start, I want to say that i’m no expert in any way, and everyone should work in ways they're most comfortable with, i just want to share some knowledge i collected over the years with everyone who might find it useful and maybe improve their skills in making content. So, let’s get started! WARNING: IMAGE/GIF HEAVY!
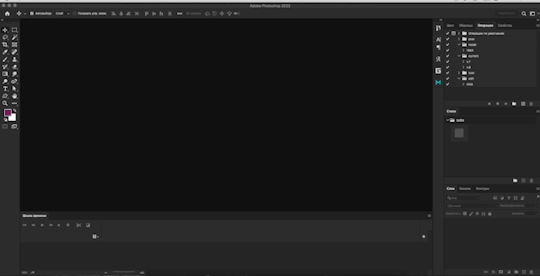
Save workspaces. You can have multiple workspaces for different needs. For example, i’m making gifs more often, but sometimes i make edits as well, so having to switch the timeline panel off when it gets in a way, then go back to the view menu, then bringing it back again... idk, call me lazy, but it seems like a few extra clicks for me 💀 What you can do instead is save your current workspace and easily switch between them any time you want. To do that, align all your tools and menus as you want, then find this icon at the top right corner

Scroll down to New Workspace, and this window will pop up


Name your workspace however you want, and chose what you want to save. You can save keyboard shortcuts, menus and tools. When you click save and change your layout, nothing will happen. That is because you need to reset your Essentials workspace first (the one that’s usually the default). Now when you switch between your workspaces (if you saved multiple) everything should work as expected
How to change the speed of gif without converting to frame animation (PS 2021 and above). THANK GOD Adobe fixed the glitch where the frame rate gets all messed up when you switch to video timeline, so i would suggest upgrading whatever version of PS you currently have if you can, working with timeline is MUCH easier in my opinion. To change the speed, after you imported the video (photoshop reads only .mp4’s btw, so be sure to check if you have the correct format), click the little play button

and type in whatever number you want: 25% — the lowest value, but you can also speed the gif up by entering a number higher than 100%. Remember to do that BEFORE you convert your gif to a smart object (& before resizing it, bc after applying the changes video automatically converts into a smart object), because once you convert it, the speed can’t be changed without going back a few steps). When you slow a gif down, photoshop “eats” some parts of it (usually towards the end), so you need to extend the gif by dragging it to the right until you reach the end of your scene to fix that
Normal speed

Slowed down to 60%. Sometimes slowed down gifs may look choppy, i explained the trick on how to fix it in pt. 1 (click the first link in the post).

Use plugins. There are so many great ones! For example, i found this plugin called Better Grids: it creates grids and converts them into shapes or frames AUTOMATICALLY based on the numbers you set within the plugin. It’s a lifesaver for me when it comes to photosets! DL (Google drive. M1 Mac users: for the plugin to work, you need to run Photoshop under Rosetta mode first. To do that, right-click the app, go to get Info and check Open using Rosetta if you have that option available)
If your disk space allows, do not convert media. It’s time consuming, messes up the original quality, and usually extremely hard on processors, especially not very powerful ones. Instead, just change the container to open your file in photoshop, It’s faster & less power consuming. I use Subler (mac) and Avidemux (mac & windows) to change the container to mp4, bc for me it’s the simplest ones to use
Handy thansform tool trick. When you try to fit your image into a certain sized canvas, this is probably what you’ll caught yourself doing
there's actually a much faster and easier way to resize stuff. when you activate transform tool, you'll see these boxes with numbers in the top panel
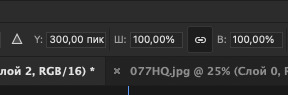
watch what happens when i change one of the numbers

isn't that neat? (make sure that little chain button is checked to mantain proportions. x and y values are for stretching the image horizontally or vertically)
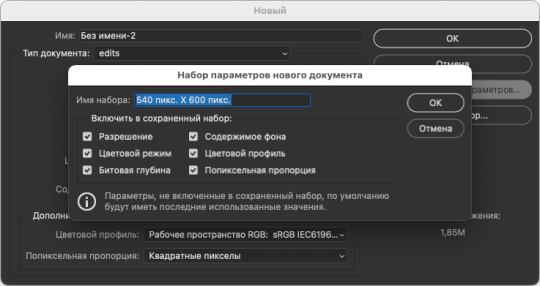
Save document presets. In new document window, type in your desired dimmensions, then click "Save Preset", choose which options you want to save, name it however you want, click ok and you're done — congrats, now you have a saved canvas preset for further use!
So, i hope these little tips were useful. Have fun creating guys 🌸
44 notes
·
View notes
Note
Not really a request but your stuff is so pretty!! Do you have a tutorial of how you make them??

TYSM!!!! i’ve put a tutorial under the cut just for you :3 lmk if you need any clarification or pics for some of the steps!!!

apps used: ibis paint x (putting it all together), pinterest (manga panels, masks), picsart (transparents)
1 ) get the mask you’ll clip everything to!! i found the one i use on pinterest and i simply made it into two separate parts. i’ll attach them below!! import them both into the same 1280 x 1280 canvas and you should be all set!! make sure that the one on the right (hollow circle) is on top


2 ) import the flag you’re going to use and make sure it’s on the highest layer and completely covers both masks. after it’s all imported and sized, duplicate it and move it so it’s on top of the mask on the left (filled in circle). clip both layers of the flag to their corresponding mask (the one they’re on top of)
3 ) color pick each color from your flag and add it to your palette. then, create a new layer and clip it to the filled in circle. just make sure it’s below the flag! turn off the flag layer and set the new blank layer to lighten.
4 ) while you have the new blank layer selected, go into effects and choose parallel gradiation. under the gradiation section of the effect, add the colors you picked from the flag (and remove any that are already on there). space them out as desired. play around with the other settings a bit to get it to line up with the flag (which you should still be able to see on the hollow circle mask). pro tip: even if the flag has white, i recommend omitting it from the gradient unless it is the first or last stripe. if you leave it in the panel will basicalli become invisible in that section due to the white on white.
5 ) now add your manga panels! add them below the gradient layer but still on top of the lower circle. clip them to the lower circle as well. the black on the panels should now be replaced with the gradient you made!!
6 ) after you’ve made the desired amount of icons with the manga panels, you can now create some with transparents/renders. open picsart, choose a transparent canvas, and go to the stickers tool. search up the character you’re making icons of. i usualli do two manga stickers and one anime/colored sticker of the character.
7 ) after you’ve gathered your transparents, go back to ibis paint x and select the color of the middle stripe of your flag. then go to the hex code/color wheel area of the color palette and make that color a bit darker. you can do this by sliding the curser around the square as you see fit. make sure to save this darker color to your palette!
8 ) open a new project in ibis paint x (i use square 1280 x 1280, but it doesn’t matter that much) and use the paint bucket to fill the canvas with that darker center color. then, import the manga transparents you got from picsart. move the color fill layer above one and duplicate if needed to go above however many other ones you have. clip the color layer to the transparent, and set the color layer to lighten. save each newly colored transparent.
9 ) go back to the original project and import the newly colored transparents so that they are above the flag on the lower circle mask but below the upper circle mask. resize them as needed. you can also turn the eyeball of the gradient and manga panels off if you haven’t done that already, but bc the flag is over it, it doesn’t make much of a difference. make sure the transparent is clipped to the lower circle mask as well!
make sure you have all the icons saved and voilà!! you now have super cool pride icons!!
4 notes
·
View notes
Note
Do you mind sharing how you edit your screenshots of your sims to make them all in one post? Thank you in advance!
Hi dear <3 thanks for asking! So, I actually bought Canva because it seemed easy to use and its web based which I like! I’m sure there are plenty of free apps that could potentially do this same exact thing. Forgive me, this is LENGTHY.
Firstly, I use the pose player mod, gshade by @pixelglam, and take screenshots via gshade to get my photos.
Open Canva
Select Create a design
I choose Facebook cover since it is the size of the photo I want

Select the rainbow square in the left corner to change the background color
Click the add icon to create your own color (see my color pictured below)
Select Elements from the menu on the left
Select the square under lines and shapes
Adjust the square into a rectangle and recolor using the same steps as the background


Select Text from the menu on the left
Add your desired text
Rotate 90 degrees using the two arrows
Drag it within the rectangle
Change your text font and color as desired

Select Uploads
Drag and drop the pics from your library or select upload to find them
Select Edit photo
Click BG Remover and it will automatically remove the background from your screenshot! (this is the part I paid for)


Rearrange your photos and resize as needed
Select File
Download! You’re done!


15 notes
·
View notes
Link
2 notes
·
View notes
Text
Responsive vs. Adaptive vs. Neither of those things
Aight so. Big topic. We hear the word 'responsive' a lot when talking about web design but it's kind of a wishy washy topic for lots of people outside tech, especially if you've mostly coded while interacting with jcink. John did it really weird, with two skins- one for mobile, and one for desktop. This is actually pretty convenient because it helps distinguish two ideas. If you go to a website like youtube or even tumblr and resize your window as large as you can and as small as you can. These sites are properly responsive- the layout changes and adapts to the size of the screen. Youtube is (unsurprisingly) better at this than tumblr. It changes to use all of the available screen width at every size, pretty much no matter what. Tumblr (the dash anyway) only expands to a certain size- but it also doesn't break when you make it really small.
Now go look at the base jcink skin- jcink support forums for instance. If you look at it on a phone, it'll mostly look okay, and after a certain size, will mostly look okay on desktop too. But there's this whole area between the two where things start to get janky. The fixed sizes of everything start to spill over the window size. That's an adaptive skin. Everything is a fixed size, and which layout you see depends on the type of device you're using. Adaptive sites are generally seen as outdated at this point. Almost no one is coding this way anymore.
Now go to a jcink skin. Do the same thing with making your window bigger and smaller. In every skin I've ever seen, *something* will break. Text will overflow, you'll have to scroll from side to side to read a post, images will start to overlap other content. That kind of thing. Some sites will resize to a certain point, but almost none of them will do so all the way down to a mobile size, or even half of a laptop screen. This is neither adaptive nor responsive.
THIS IS OKAY. I mean it's not ideal, but almost no one coding for jcink is a professional, and these are legitimately difficult things to get right. You have to be thinking about it from the start of the design process. What's going to happen to that icon when the screen gets small? What about the topic information? How are you going to keep information which looks beautiful at a desktop size looking good at tablet and phone sizes? It's legitimately difficult, and if you're not building with that in mind from the start it's a non-trivial task to make an unresponsive skin responsive.
If you want to start thinking about these things, I'd recommend reading about media query breakpoints. For jcink, I think it's fair to code for desktop first (usually it's mobile first today) because people using a jcink site will usually want to be typing in it somewhere. Anecdotally, I think even people who post on mobile usually are writing in a notes app first. My skin worked really well at a 600px breakpoint, but other skins might need different figures. That's okay! As long as you can identify (maybe two) places where your views start to breakdown and have consistent behavior in your css for those breakpoints, you should be fine. I think it's good practice to know what you want your mobile version to look like, and code at least the skeleton of both views as you go, so you don't back yourself into corners.
That's already a lot of text, so I'll stop there. I'll follow this up with a few different ways you can approach responsive design beyond breakpoints- grid, flexbox, and percentage based css. I can't really effectively teach these things on tumblr, but I can talk about the pros and cons of each approach so you can start looking into the things that seem like they might fit your use case.
2 notes
·
View notes
Text
@kiwi8fruit6 forgive me if it sounds as though I am insinuating you only read the last part of my post but when I upped the contrast and brightness there was no texture or pixel differences differences indicating overlaying images to fake a screenshot or text. These are also exported discord messages so that would make it a lot harder to hide because its not just a screenshot
Your idea how they could get her pfp doesn't quite explain the perfect alignment, lack of pixels indicating an overlay that would show up when upping the image adjustment. If you wanna suggest someone colored over them with a brush tool in an app it would stick out with upper contrast and brightness. So itd be really hard to hide.
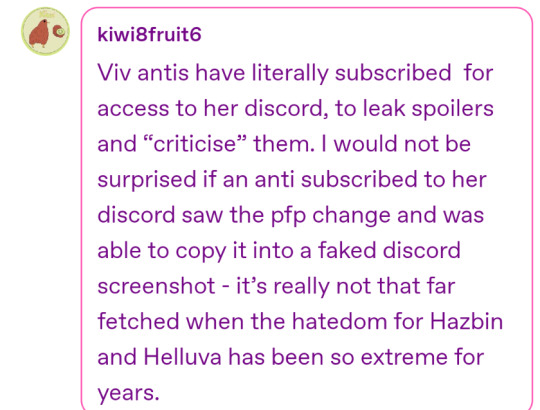
Let me show you what i mean, here's a edit I made (with contrast and brightness upped to see) vs the OG image


Now when i made this edit i used an eyedropper tool to open the eyes and give moxxie teeth. We can tell these are edits because despite me grabbing the black from the outline of moxxies mouth for consistency under a brightness and contrast layer

The outline gains a red hue and grainy texture to it. My line work stays black. Looking at Moxxies eyes I opened them and again color picked from the outline
Its thicker, solid color with no grain, and no yellow inside the line to accompany my line work. You can also see this post where it can be noticed
I dont like using fancy terms to have this misunderstood but just so we're on the same page
Artifact is a term that describes a degraded picture (digital image) where small areas of the picture have obvious localised islands of distortion or blocky spots of off-colour pixels. A similar phenomenon occurs as a halo around some objects in the picture where there are sharp edges. <- This is the grainy texture im talking about.
Theres also her icon would be blurrier because presumably theyd have to get a separate screenshot of it and resize it to fit over the other one and match her typing quirks. If that makes sense? Generally the steps would be
1. Export the original messages
2. Screenshot either vivs name or icon or both
3. Resize it exactly and consistently over the original
4. Somehow hide the overlay but also any compression from resizing images in a way that doesnt show up upping contrast and brightness
That idea doesn't fully check out but thats part of the importance of the discussion! And I appreciate your effort in trying to make sense of it.
5 notes
·
View notes
Text
ao3 icon gifs: various characters and cinematography
for ao3 icon gifs that are of edwin and charles, see here
(also i anticipate making another batch eventually with some gifs of jenny and the night nurse, as well as more of monty, niko, and the cat king)
About a month ago I discovered that you can have gifs as your Ao3 icon and so obviously I’ve had one since then. It’s a bit of an acquired look but I’ve come to enjoy it and have been wanting to make a collection of icons for anyone to use.
I went through my most popular posts, as well as some of my favorite gifsets and spent some time resizing, optimizing, and for some, adjusting the colors a bit, to make sure they fit in the super small file limits for Ao3 icons (under 500kb), and still look okay.
There’s about 50, and most of these are 120px squares, which is a bit bigger than the 100px square that Ao3 recommends. I mostly did this because Ao3 makes your icon bigger in the comment section and on your profile, so it's nice if it’s a bit larger than 100px. That being said, they will not look very good in this post. They are itty, bitty gifs and as such, they are really pixelated.
To download, I recommend using tumblr desktop, opening the gif in a new tab, and then in the url where it says “.gifv” delete the ‘v’ so that it says “.gif” at the end. Only then can you download the gif properly.
If you’re on the mobile app, tumblr will often compress the gif. I recommend opening the post in your phone browser instead of the app, and then following the same instructions for desktop. This way, you’ll get the best looking file for your icon :)
row 1: ep 1 cinematography | ep 1 cinematography | tragic mick


row 2: ep 1 cinematography | ep 1 cinematography | george's "i'm free" bloopers


row 3: cat king "ennui" | cat king "why the fuck are you here" | esther finch ep 3


row 4: crystal ep 4 | crystal "wow edwin, an apology" | niko ep 4 "thank you"


row 5: monty ep 5 | monty ep 5 | monty ep 6

row 6: charles and monty ep 6 | niko and edwin ep 4 | the cat king as charles ep 4
#dead boy detectives#dbda#crystal palace#niko sasaki#the cat king#tragic mick#esther finch#monty finch#monty the crow#mygifs#dbdagifs
66 notes
·
View notes
Text
HOW I MADE MY BACKGROUND IMAGE

a mutual asked me how i made my background image, so i decided to post a tutorial for anyone who's interested.
APPS I USED— pinterest, ibispaint x, polarr.
WHY THOSE APPS?— i use pinterest to find images i like, such as character cards, icons, etc. but if i found a card of a rhythm game character(ex. ena shinonome), i go on the wiki to find the character's card, as it'll be high quality. i use ibispaint x to resize the image and make the fade, and lastly, i use polarr to make my pics more fitting in my blog aesthetic.
OKAY, BUT HOW DO I DO IT?—
go on pinterest and find an image, but make sure it's big enough to ensure the quality to be good. then, go on ibispaint x, make a new "canvas" by pressing the + button at the bottom, and don't choose any options that are BELOW the custom option, size it to 951x537.

press OK and click the layered paper icon with the number 1, and then press on the camera and pick the image you downloaded, then resize it using these

once you're done resizing the image, download it and then go on polarr, press "edit" and then "open photos", pick the image and then just fuck around to see what looks best (or download filters, but credit the person who made the filter if it's required). download it and go back to ibispaint on the 951x537 canvas you made.
and now, make another layer, and press these things

now, move the ruler to (89°) ( 621, 286), or, more simply, just move the ruler to make it vertical, then you choose a color according to your blog's background color and make a straight line with the help of the ruler, then, disable the ruler, and then press the paint brush icon, then the filter icon.

choose the "blur" section and pick "gaussian blur", you can choose more blur options if you want to.
and this is what you'd probably get if you followed this tutorial!
13 notes
·
View notes
Note
hiii i just saw your ryuseitai phone theme and it’s so cool!! can you make a tutorial of how you did it?
hi !!!! id love to! im so glad you liked my ryuseitai theme! :3
first step: this widget app (widgetopia), or any other of choice. i used this to make the little square widgets as well as the countdown timer labeled LIBERATION (which is actually my graduation date)
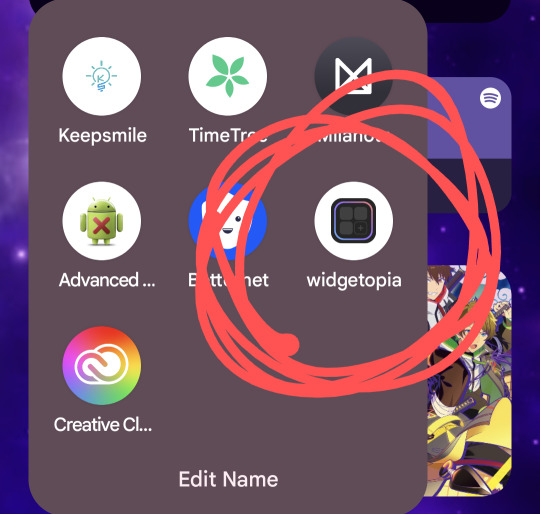
in addition, i would recommend having some kind of drawing app / image editing program on hand in case you want some custom graphics like my lock screen / wallpaper! ibisPaint X is my app of choice, as its free and has a pretty simple interface, but any programs will reasonably work!
keep in mind both of these programs have ads and paid versions but you dont need to pay for anything for this!
also i dont have progress pictures so. bear with me lol.
for the small square widgets, youre going to want to go to the LIBRARY panel and hit +SMALL.

this will open the NEW WIDGET menu! from here, youre going to want to hit NEW WIDGET (should show up as a tealy green button), which brings up this menu

from here, you can set various things, such as making the background of the widget transparent, making it a specific color, or setting it to send you to a website via an embedded link if you please!
for this tutorial we'll just make a basic regular widget with a picture on it :3
on this screen, hit the PLUS icon, and choose the option that says IMAGE. choose the image you want, and voila! its there!
although...

the borders are an issue. youre going to want to resize your image! this is a part of the process regardless of the image's original size.
click on the image to open the image property menu! here you'll find a ton of options for moving the image around, and edit it! here you can add some extra flair such as a slight rotation or tint, or you can set it to have an action when you tap on it! i wont get into that in this, but its neat to take a look at on your own!

make sure the chain icon between width and height is LINKED, and then increase the size! this is just a matter of eyeballing it based on your image, and will result in corners being cut off, so avoid having important bits of the image in the very corner! when youre done, you should be able to see rounded corners INSIDE the image's bounding box! this means that your image is as large or larger than than the widget, meaning that no weird borders will show!

from here, you can hit the back button, and then the purple ADD WIDGET button to put it on your homescreen!
note: if youre editing an already made widget of the same size, you do not need to press ADD WIDGET, as it will result in having two of the same widget on your screen!
from here, itll look something like this!

if you ever want to change the widget image, you can just click on it (if you have multiple, click on the specific one you want to replace), and go through this process again!
as for the lock and home screen backgrounds, thats more tedious. i recommend a 9:16 aspect ratio for phone screens, but other than that theres not many tips i can give you in the design sector of things, sorry 😔
one tip i can give is that if you dont want your home screen image to shift when youre swiping between screens, go into google photos, and zoom in on the image! make sure its cropped the way you want it to by the borders of your own device, get the UI out of the way (done easily by tapping once on the image), and take a screenshot, that way there wont be any buffer room on the sides for it to shift!
---
anyways, i hope this helps! i absolutely advocate for playing with some of the more advanced options on your own, as its super fun to learn new modes of phone customization! if anyone makes any themes with help from this tutorial, feel free to tag me in the comments! id love to see your work! :3
16 notes
·
View notes
Text


WAS - SO - EXCITED - I WAS - INFLUENCED - BY -
AMAZON - KDP - PRICES - THEY - LOVE - $0.99 -
CHANGING - eBOOK - PRICE - ($3.95) - WHAT I -
MEANT - GRUESOME - 3 DAYS - WAS - EVEN -
PURSUADED - 2 - TRY - ETSY - BUT - I COULD -
NOT - FIND - MY - DIGITAL - PRODUCT ALSO -
HAD - 2 - SIGN - IN - 25 TIMES - ROBOFORM -
NOT - ACCEPTED - TRIED - 2 - APPS - AS - A -
SELLER - THEN - ALWAYS - REMEMBERING -
THEIR - CODE - REQUIRED - $0.20 - PER XO -
LISTING - GOOGLE - SEARCH - SAID - FIRST -
SALE - AFTER - 2/3 MONTHS - NO - THANKS -
ETSY - HAS - LOTS - OF - DIGITAL PRODUCTS -
HATE - THEM - I'M - STICKING - 2 - AMAZON -
KDP - 6 MONTHS - OVER - $100,000 - GOT -
THAT - WE - STICK - 2 - WINNERS - AND -
AMAZON - MAKES - UNLIKE - ETSY -
OVER - $1.29 BILLION - EACH - DAY -
GETTING AN - OUTLOOK.COM - EMAIL -
ACCOUNT - GIVES - U - FREE - OFFICE -
WORD - DOCUMENT - 4 - eBOOKS - SO -
HERE's - THE - REQUIREMENTS -
CANVA PRO - RESIZER - 8.5 X 11 -
INCREASE - SIZE - USE - JPG AS -
DOWNLOAD - ZIP - FILE - OPEN -
USE - LARGE - ICON - THEN XO -
UPLOAD - 2 - DESKTOP - PAGE -
IMAGES - WILL - SHOW - THAT -
IS - WHAT - US - PUT ON THEIR -
WORD - REGISTERING - OUTLOOK -
EMAIL - ADDRESS - GIVES - U - XO -
AUTO - SAVE - U - WANT - THAT - 2 -
LAYOUT - SIZE - CLICK - LETTER -
8.5 X 11 - THEN - INSERT - PHOTO -
INDIVIDUALLY - ADD - eBOOK -
REQUIRED - 2 - ADD - PAGE XO -
TABLE - OF - CONTENTS
SO - ALWAYS - ADDING - THAT -
MANUSCRIPT - UPLOAD - AND -
COVER - CONVERTER - MUST -
USE - GOOGLE - CHROME AS -
COVER - NEXT - TIME - I'M - USING -
PNG - 300 DPI - I'M - GUESSING IS -
INCLUDED - PRICE - NEXT - SO XO -
GET - 70% - ROYALTY - I WILL - YES -
REMEMBER - 2 - CHANGE - MY XO -
PRICE - FR - ($3.99) - TO - ($3.95) -
WAS - SO - EXHAUSTED - TRYING -
2 - MAKE - WORD - AND - PAPERBACK -
SUBMISSION - WORK - I - WAS EASILY -
PURSUADED - 2 - USE - $0.99 REALLY -
I'M - SO - HAPPY - RIGHT - NOW - AND -
NO - COMPETITION - AT - AMAZON -
THEY - SOMETIMES - HAVE GREAT -
COLORING - BOOK - COVERS - BUT -
INSIDE - IS - NOT - GREAT - AT - ALL -
SO - RIGHT - NOW - I'M - STARTING -
THE - NEXT - BOOK - I'M ALREADY -
HERE - AT - BRICKELL - CITY - YES -
CENTRE - OUTDOOR - MALL - SO I -
WILL - START - 2ND - BOOK - I'M -
SO - TIRED - AND - EXCITED TOO -
ALMOST - 1 YEAR - HOMELESS IN -
MIAMI - FLORIDA - AND - NOW - THAT -
IS - ENDING - WITH - PUBLISHING SO -
I'M - EXHAUSTED - EXCITED - THIS -
VERY - MOMENT - WILL - PRAY AND -
PRAY - THAT - I - FIND - FAVOR - FOR -
THERE's - NOTHING - ELSE - I - CAN -
DO - ABOUT - MY - BOOKS - WITH -
PRO - VERSIONS - BUT - I'M - YES -
GOING - 2 - MAKE - IN - FUTURE -
MY - COLORING - BOOKS - FRM -
MY - COMPUTER - AFFINITY - PUBLISHING -
UNIVERSAL 2 - AFFINITY - PHOTO - AND XO -
MORE - HIGH - CLASS - I - CAN'T - WAIT -
JESUS - IS - LORD - 'FROM - WHERE WE -
ARE - 2 - WHERE - WE - NEED - 2 B' - AS I -
SHARED - NEED - DENTAL EXTRACTION -
MORE - THAN - 1 - AND - IMPLANTS - SO -
SIGNING - WITH - CIGNA - DENTAL PLAN -
TAX - DEDUCTIBLE - I - CAN'T - WAIT FOR -
MY - NEW - LIFE - 2 - BEGIN - CHOOSING -
ILLUSTRATION - AS - MAJOR - 4 - I - WAS -
INTIMIDATED - BY - ARTISTS - BUT - LOGO -
COMMERCIAL - WORK - WHAT - GRAPHIC -
DESIGNERS - DO - THAT's - NOT - ME FOR -
CREATING - ART - WORK - BOOK COVERS -
PAINTING - ANYTHING - ANIMATION - YES -
CREATION - THAT's - ME - AND - IT'S YES -
CALLED - ILLUSTRATION - SO - THAT -
WILL - B - THE - MAJOR - I'M - GOING -
4 - ONLINE - WITH - ACADEMY - OF -
ART - UNIVERSITY - SO - BACK - TO -
CANVA - PRO - ENDED TRIAL WITH -
PIXOMOTO - READY - 2 - MAKE - MY -
2ND - PAPERBACK - AND - eBOOK -
HAVE - FUN - EVERYONE - SWEET
2 notes
·
View notes
Text
well. thoughts on android edition sketchbook
you cant resize or crop the canvas after you make it
as far as i can tell there no dedicated eraser button, because the one that LOOKS like an eraser button just changes the color of your brush to "transparent" and this is functionally useless as an eraser if youre using a thin brush. you have to change to one of the eraser brushes every time or use the "last brush" feature (which doesnt help if you want to actually use more than one brush)
saving a canvas seems to save the actual image to your phones gallery??
for some reason my phone isnt showing the sketchbook icon with my other apps and instead i have to search for it. even when i try to put it on my homescreen. it just doesnt show up. is this an issue with my phone or an issue with the app. god only knows
3 notes
·
View notes
Last Seen Blogs

sudan-cartoon-2021
Untitled

suck-my-assbutt-blog
Ur Ugly

k-reations
Kreations

dafathailand6793-blog
The best Clubvip777 Free Slot casino Gaming in Asi

inhinhonline
In Hình Online