#Optimized File Size
Explore tagged Tumblr posts
Visit Tumblr Blog
Explore Tumblr blogs with no restrictions, modern design and the best experience.
Last Seen Tumblr Blogs


Fun Fact
130K people were victims of a chain letter scam that affected Tumblr in May 2011.
Text

=^-^=
#fnc rekkles#I GUEESSS??????#gifs#is the tag supposed to be gif or gifs?... idk#NEVER OPTIMIZING A GIF BTW!!!!!!!!!!!!!!!!!!!!!!!!! BIG FILE SIZE FAN!!!!!!!!!!!!!!!
23 notes
·
View notes
Text

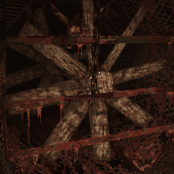
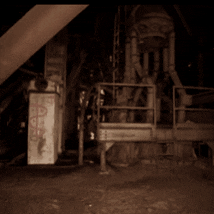
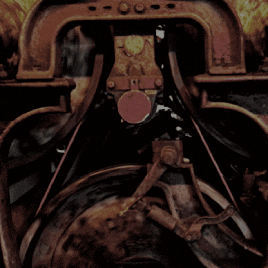

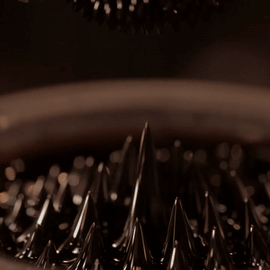
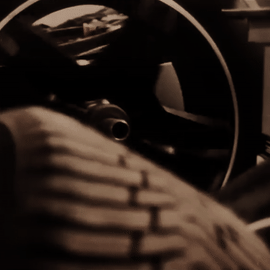


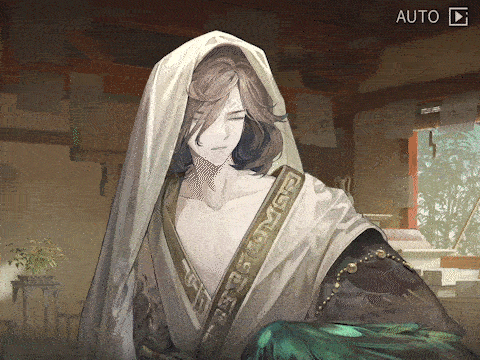
karl heisenberg (resident evil 8) stimboard for Me :•]
[ID: A 3x3 stimboard of 9 GIFs that are all dark and desatured red-orange.
GIF 1: A closeup of a shovel digging a hole.
GIF 2: A video game rendering of an industrial fan spinning behind a bloodied grate.
GIF 3: First person POV of walking into an abandoned factory and looking up at abandoned machinery.
GIF 4: A system of wheels and belts connecting them turning in tandem.
GIF 5 (center): Karl Heisenberg leaning down and talking into the player's face, gritting his teeth.
GIF 6: A closeup of a magnet being slowly lowered to a tray of ferrofluid that spikes up to reach it.
GIF 7: A panning shot taken behind a pile of tires of a car wheel spinning.
GIF 8: A gloved hand tightening a wing nut on a piece of metal.
GIF 9: A rusted metal tank being crushed in an industrial shredder.
End ID]
#scopostims original boards#stim#stimblr#stimboard#stimmy#rust#metal#industrial#mechanical#ferrofluid#factory#shovel#digging#karl heisenberg#resident evil 8#sorry who am i to turn down a rust colour palette. it's so awesome#also i think the third ever stimboard i made was also him so. returning to my roots aldkfjalskdfja#also center gif was made by me and i immediately ignored all my optimization rules for it so if you use it. sorry it's unnecessarily#large. i treated it like my not stim gifs and left it with a huge file size akldfjalskfdj
131 notes
·
View notes
Text
Noah's Ark on Broadway


LISTEN NOW (8 minutes):
Listen Now as Francis Douglas tells of when Noah's Ark was featured on New York City's Broadway stage.
PODCAST TRANSCRIPT:
Today on Celebrate the Bible:
NOAH’S ARK on BROADWAY in 1896
You are not likely to find anything about Noah's Ark on New York City's famous Broadway today … but, at one time, it was the "toast of the town".
Noah's Ark, and the great world-wide flood as recorded in Genesis, is perhaps one of the most easily identifiable events in all of the Bible. The most interesting aspect of this episode is not the illusion itself, but the fact that it attracted so many people from New York City's secular population: from every-day working families, to the City's upper crust … all were thrilled with the experience.

A few points of note:
Technical details of the illusion were featured in Scientific American magazine
The Olympia was the premiere entertainment showplace of the world
Biblical themes were very popular, with all NYC audiences at the Olympia
It was founded and built by famous Oscar Hammerstein
It was reported that audiences were left spellbound after each Noah’s Ark performance
It was so popular and well-received, that the highly respected science publication, Scientific American, devoted an entire page to this Biblically-themed entertainment attraction -- complete with stunning illustrations.
Let’s take a step-by-step look at the Noah’s Ark illusion. I will inter-space the steps throughout today’s presentation.
STEP ONE

Hammerstein's Olympia Theater and Music Hall was once celebrated as the foremost entertainment venue in the entire world.
Located at 44th and Broadway in New York City, it was only two blocks from what is known today as Times Square. The main theater held 2,800-seats. And the building took up an entire city block.
STEP TWO

The rooftop was just as famous as the theater and music hall. It had a 65-foot tall glass roof, and was illuminated with over 3,000 light bulbs. To provide electricity, there were four dynamos that generated 3,200 amps of power. These dynamos also powered a complete air circulation system, and pump, that brought refrigerated water from the basement to the rooftop area -- providing what was a very early version of air conditioning ... in 1896!

Not to be outdone by any other venue, the rooftop also had trees, rocks, and even a stream that eventually led to a 40-foot lake. There were swans, ducks, and even South American monkeys.
And, while you were enjoying all of this, you could walk around the perimeter of the roof, and take in views of Central Park and neighboring New Jersey.
At the time, the cost of admission for everything, including entertainment, was only 50-cents! However, keep in mind, with the rate of inflation from 1896 to 2025, that same fifty cent admission price would be equivalent to roughly $15 to $20 today.
STEP FOUR

The Scientific American publication was founded by inventor and publisher Rufus Porter in 1845. Contributors of note include Thomas Edison, Robert Goddard, Jonas Salk, Albert Einstein, and Linus Pauling -- just to name a few.
STEP FIVE: The SOLUTION

The answer to the filling of the Ark with water is a simple one … the water funnel on the top of the Ark is attached to a hose that runs down through the support beams, then empties under the stage. The water never fills the Ark in the first place.
Other than taking creative license with a few details (for instance, the real ark was never filled with water), it was a wonderful opportunity for audience members to experience one of the great Biblical events on the grand Broadway stage.
Perhaps one day we'll see a revival of the Noah's Ark Illusion, or a variation on the theme. In the meantime, I'm glad to have been able to bring it to you with this Celebrate the Bible 250 podcast.
So, until we meet again, and for celebratethebible250, this is Francis Douglas.
If you would like me to give a presentation and small exhibit to your church group, school, or organization, on the History of the Christian Holy Bible in America, I’ll place contact information below as the 2026 Semiquincentennial America 250 year approaches.
I will be available for Southern New Jersey, Southeastern Pennsylvania, and Northern Delaware.
Source: Noah's Ark on Broadway
0 notes
Text


getian in notes on shuori 🪶
#yeye ily#i love your pouting face#pinch cheeks#and your neck is very thin#are you eating properly#getian#reverse 1999#リバース:1999#just timekeeper stuffs#r99 screenshots#gif making#i hope it loads hahah#their file sizes are pretty big#even after being optimized
10 notes
·
View notes
Note
I'm soooooo fucking pissed off
I spent like a week making a huge ref sheet. It was such a pain in the ass. The file was so fucking big that I had to make a separate file, finish things in that file, and then paste them into the main file.
But I finally finished it. I went to upload it on DeviantArt.
Immediately got an error. File was too big.
Their file size limit is 80mb but my file is 116mb.
I don't know how to fucking resize it or make it smaller without destroying the image quality and I don't know how to phrase my question to google it because I'm not getting the answers I need so I guess I'm fucked lol!
.
#try searching ''image optimization''!#you can also downscale in photoshop -- export as png and click ''smaller file size''#it will compress ur png to a lower bit size (fewer colors/antialiasing) but what can ya do
13 notes
·
View notes
Text
one of things i am the most elitist about is gifs and specifically like gif fps. i see gifs that are like 10FPS come across my dash and im like what went wrong here. let me help you bc clearly something went wrong.
#i mean i dont actually do that i scroll past bc im not rude. but i do think it.#like what HAPPENED. can your computer not run the game at a higher fps? how the fuck are you playing it then?#did you not set your recorsing software to record at greater than that? FIX that#are you doing this to optimize the file size? the like lowest i would ever consider going is 20fps MAYBE.#optimize transparency instead. theres a balance of aesthetics and being baseline watchable that you gotta figure out.#anyway. theres my hater moment.#carly.txt
3 notes
·
View notes
Text
JS Minifier is a web-based code optimize tool that reduces the size of JavaScript (JS) files by removing unnecessary characters like whitespace, comments, and line breaks, improves website performance by decreasing load times and bandwidth usage.
#JS Minifier#JavaScript Minifier#JavaScript Compressor#Minify JavaScript Online#JavaScript Code Minifier#Reduce JavaScript File Size#Free JavaScript Minifier Tool#JS Optimizer#Terser JS Minifier#free online tools#online tools#web tools#online web tools#free web tools#online tool#a.tools
0 notes
Text
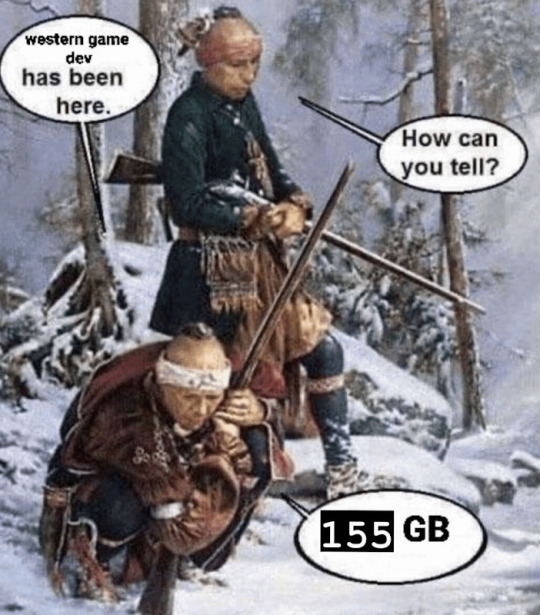
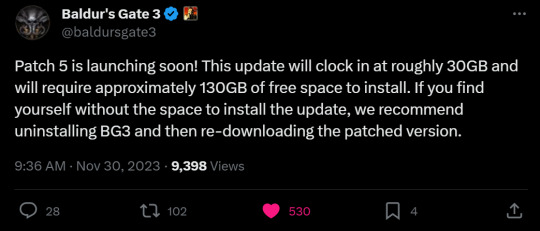
time to make some space for patch 5 y'all
#sent to my gc when this was announced...... this game is made of uranium-dense textures or something#on one hand yay i want to see my wife. on the other. optimize your games i beg..#sry im critiquing bg3 here now—these are some big patches and seemingly important updates (ie making sure 1/3 of the game is even Playable)#being added into the game...months after release.. idk... i feel like perhaps it could have cooked a little longer.#smooth out the wrinkles yknow (insane file size) before releasing...hmmh#baldur's gate 3
1K notes
·
View notes
Text
Supercharge Your Data: Advanced Optimization and Maintenance for Delta Tables in Fabric
Dive into the final part of our series on optimizing data ingestion with Spark in Microsoft Fabric! Discover advanced optimization techniques and essential maintenance strategies for Delta tables to ensure high performance and efficiency in your data Ops
Welcome to the third and final installment of our blog series on optimizing data ingestion with Spark in Microsoft Fabric. In our previous posts, we explored the foundational elements of Microsoft Fabric and Delta Lake, delving into the differences between managed and external tables, as well as their practical applications. Now, it’s time to take your data management skills to the next…
#Advanced Techniques#Apache Spark#Big Data#Cloud Data Management#Data Compaction#Data Efficiency#Data Maintenance#Data management#Data Optimization#Data Performance#Data Retention#Data Scalability#Delta Lake#File Size Optimization#Handling Deletes#Merge Optimization#Microsoft Fabric#Optimize Write#Partition Pruning#Real-Time Data#Schema Evolution#Vacuum Command#Z-Ordering
0 notes
Note
There are a ton of free video compression apps on the app store! just look for something less fancy so you're less likey to drown in ads 🙏
Ooh.. will look into those....
tbh I do have a kinda video editing app (that I have no idea how to use properly) called VN?? I usually use that and just mess with the settings lol
But I'll check em out!!,
#bloated file sizes my BEHATED#IF I EVER MAKE A VIDDY GAME I WILL DO MY DAMNEST TO MAKE SURE IT'S THE MOST OPTIMIZED THING EVER!!! GRAAAHHH I HATE AAA GAME SIZES#weird tangent I know but BLEGGHHH#fowl rambling#straight from the box- the ask box!#thank you for your wisdom luthfi :]#giving you a platonic kiss on the hand. you be a lifesaver
1 note
·
View note
Text

Working on an update to TPack Diagnostic, check out what it'll be able to do!
#dev#rust#terraria#tpack diagnostic#not only will it scan for music and sounds#but i also plan on better optimizing the size of localization files during `build`
1 note
·
View note
Text
#PNG vs JPEG#Image File Formats Comparison#Image Compression#Lossless Compression#Lossy Compression#Graphic Design#Image Quality#Digital Images#Image Format Selection#Visual Content#Image Optimization#Web Graphics#File Size Reduction#Digital Photography#Multimedia Formats#Transparency in Images#Visual Effects#Image Loading Speed#Image Compatibility#Format Choice
0 notes
Text

Painted Lady is Available For Everyone + Update
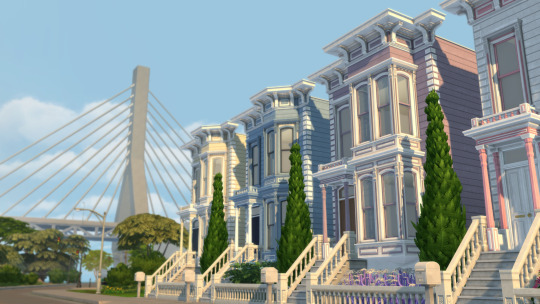
Hey everyone! I'm finally ready to share my new set of objects for BuildBuy. It comes with 25 objects:
2 Front Doors
4 Bay Bottom Windows
4 Bay Top Windows
2 Framed Windows
2 Frameless Windows
2 Bay Wall Decoration
5 Types of Trim
1 Porch
1 Balcony
2 Wallpapers


To find all the objects and items just type in «PAINTED LADY» into the search bar.
Some objects share the same texture for optimization and saving memory. Don't delete them as some objects may get affected. They're tagged as "TEXTURE" at the end of the package name.
My TOU
Base game compatible
Maxis match textures
All LODs
Just put all package files into your mods folder
Total size: 48 MB
Download
#sims 4 mods#the sims 4#the sims 4 cc#the sims 4 custom content#ts4#ts4 cc#the sims 4 build#maxis match#ts4 mods#sims 4 cc#sims 4 build
476 notes
·
View notes
Text
========================================================
[tutorial: build your own neocities/nekoweb page]
========================================================
a beginner's guide for making your very own home on the indie web—retro, personal, weird, and 100% yours.
this ain’t an average wix, squarespace, or tiktok aesthetic.
we’re talking full html/css with soul and attitude.
[ prerequisites ]
------------------
> an idea
> basic text editor (vscode, notepad++, or even notepad)
> account on https://neocities.org or https://nekoweb.org
> some gifs or tiles you love (dig deep or make your own)
> optional: image host or gif repo (or self-host everything)
[ feeling overwhelmed? read this. ]
-----------------------------------
you do *not* need to know everything.
html is not a mountain. it's a garden.
you plant one tag. then another. then a style. then a button.
you can build your site piece by piece.
and every piece is a portal to somewhere personal.
you are allowed to make broken pages.
you are allowed to use templates.
you are allowed to start over as many times as you want.
this is *your* world. you control the weird.
[ step 1: create an account ]
-----------------------------
> neocities: https://neocities.org
> nekoweb: https://nekoweb.org
register a name, log in, and enter your file manager.
this is where you upload your files and see your site live.
[ step 2: your first file - index.html ]
----------------------------------------
make a new file: `index.html`
basic starter:
<html>
<head>
<title>my weird little corner</title>
<link rel="stylesheet" href="style.css">
</head>
<body>
<h1>welcome to the void</h1>
<p>this is my page. it’s strange. like me.</p>
<img src="mygif.gif">
</body>
</html>
> upload to the dashboard
> boom. you’re live at
https://yoursite.neocities.org
or https://nekoweb.org/u/yoursite
[ step 3: add a style sheet - style.css ]
-----------------------------------------
create a file called `style.css` and upload it.
here’s some nostalgic magic:
body {
background: url('tile.gif');
color: lime;
font-family: "Courier New", monospace;
text-shadow: 1px 1px 0 black;
}
img {
image-rendering: pixelated;
}
marquee {
font-size: 20px;
color: magenta;
}
link it in your html and the vibes activate.
[ step 4: decorate it like a haunted usb ]
------------------------------------------
> use <marquee> for chaos scrolls
> embed gifs from https://gifcities.org/
> steal buttons from https://cyber.dabamos.de/88x31/
> set up a guestbook at https://www.smartgb.com/
> loop audio with <audio autoplay loop>
> add fake errors, 90s web lore, random link lists
[ step 5: resources, themes, and comfort ]
------------------------------------------
> templates & layouts: https://numbpilled-themes.tumblr.com
> glitchy gifs & buttons: https://glitchcat.neocities.org/resources
> layout builder: https://sadgrl.online/projects/layout-builder/
> free tiled backgrounds: https://backgrounds.neocities.org/
> beginner html intro: https://www.w3schools.com/html/
> pixel fonts & cyber assets: https://fontstruct.com/
remember:
you don't need to know js. you don't need to be a coder.
you just need a mood, a direction, a dream.
the html will follow.
[ bonus concept: shrine pages ]
-------------------------------
> a page just for one character you love
> a room to house digital fragments of your identity
> embed quotes, music, images like altars
> call it shrine.html and link it from your homepage
[ closing mantra ]
------------------
you are not here to be optimized.
you are not a brand.
you are a ghost inside the machine,
carving your initials into the silicon void.
welcome to Your website.
========================================================
#webcore#old web graphics#neocities#web graphics#carrd graphics#carrd resources#rentry decor#rentry graphics#carrd moodboard#carrd inspo#neopets#indie#indie web#early web#webdevelopment#web development#web resources#web design#old internet#old web#oldweb#nekoweb#transparent gif#tiny pixels#pixel gif#moodboard#tutorial#html page#html theme#htmlcoding
435 notes
·
View notes
Text
I have a collection of some that I've done. ; w ; ... If one doesn't mind old gifs, at any rate.


More people should make gifs of their OCs. This is a threat.
#i genuinely don't know how to optimize my gif making so that i have high quality gifs in smaller file sizes o)--(#so a lot of the ones i have end up being crunchified by giphy
84 notes
·
View notes
Text
JUNE DEVLOG

June DEVLOG time for OMORI THE DREAMER and...some big things have happened.
IMPORTANT INFORMATION:
In even more contrast to prior optimism, it seems the entire DREAMER release timeline will be overhauled. Due to the size of the story, the assets that relies on other's to complete, and the large amount of new assets far outweighing the amount in the PRELUDE...
From now on, we will be following a "CHAPTER BY CHAPTER", or in accordance to DREAMER's naming conventions, a "BOOK BY BOOK" release schedule. So, instead of waiting for the entire game to come out and getting overloaded with way too much content, books will be released in this sequence; BOOK 1 - KEL BOOK 2 - AUBREY BOOK 3 - HERO BOOK 4 & 5 - BASIL + ???
The final release of Book 4 & 5 will be the entire game. Each new release will include the chapters before, and save files will carry over. I believe this will be better overall for development, and for you guys to experience the story without being overwhelmed. The current plan is for BOOK 1 to release in the fall, and for BOOK 2 to release before the end of the year. I want this project completed in 2026, and with the additional time, hopefully everything will be at a higher quality. The narrative was already built in this book by book format, so nothing is actually changing besides release dates!
I'm sorry if this is frustrating to hear, but I'm confident this is better overall for both players and definitely for the team. We are not in development hell–people just have actual lives and are not being paid to work on this, so it can't be a priority. Still, the goal is a timely release schedule, with each book getting its own release trailer. I hope you can still look forward to the releases ^^
PROGRESS (BOOK ONE):
Due to the time of the year and a certain game releasing, a lot of the team was busy. Progress significantly slowed, but will hopefully pick back up again. Unfortunately, I cannot help with tile-set creation as it's outside of my wheelhouse (though I'll do my best to learn in the future!) so that team has a lot of pressure on them to handle SECTION TWO tile-sets on their own. Hopefully in the future I can help carry the burden. For now, it'll take as long as it needs to to avoid stress, but hopefully the internal deadlines can still be met!
Music is coming along amazing, and once again, there is going to be a large soundtrack coming with the chapter. Lots to see and lots to hear!
As of now, I'm making as much art and surrounding assets as I can while waiting for SECTION TWO to be ready for programming and writing. Progress is steady but certainly not at the breakneck pace it used to be. I got severely burnt out after continuing to work on THE DREAMER right after PRELUDE release and churning out SECTION ONE...but I am recovering! I'll bounce back passionately soon enough! I'm learning more and more how to rely on others and be patient with myself.
Battling is in the process of being overhauled and fixed up, and that will be available for the Book 1 release still!
For SECTION THREE, progress is also steady, though similarly significantly slowed. Still, nearly all maps are actively being mad, so it's looking very promising. Bug fixing still needs to happen for SECTION ONE, though...
CONCLUSION:
Wish us luck. A lot of luck. And for more pixel artists to sign up. This mod is on the right track and will certainly be completed! Just...at a more steady pace than originally assumed. On the bright side, that means you guys don't have to wait as long for more of THE DREAMER! Yay!
190 notes
·
View notes
Text
Quick GIF tutorial (Photoshop)


#holy shit this is perfection!!#i am so jealous of this set!#the coloring op THE COLORING!!! (original post)
alright @dontyouknowemma-itsyou and anyone interested, this was really easy to colour so I'm gonna give you a quick breakdown. (i didn't save the psd file?? so i'm redoing this i guess, but i did it on autopilot in the first place. i've been making gifs for over 15 years.)
GONNA INCLUDE A VIDEO AT THE END SHOWING OFF THE SETTINGS!!
General GIF stuff
This is in Photoshop CC. I extract a clip from a video as an MP4 file, which photoshop can open. (I use AviDemux for this, which is free, because it lets you save clips using 'copy' encoding for video output and still change from MKV to MP4 format - without losing any video quality, cause you're not re-encoding.)
Open that shit directly in photoshop as a video layer (just drag and drop), that lets you scan through it to check the colouring works overall. Convert the video layer to Smart Object, that lets you resize and edit it. (Do NOT open a full movie in Photoshop, it'll probably die and it has a max length anyway.)
Also all the colour adjustments are gonna be adjustment layers you can tweak and turn on/off whenever. There's a lil button at the bottom of the Layers window to add them quickly.
When we're done we're choosing a section of the video in the Timeline window and we're doing File->Export->Save For Web. 'Adaptive' (or selective) palette selection, 'pattern' style dithering.
Colouring
Curves layer to lighten. Just pull the curve up. Curves seem to give a much smoother lightening, since it mostly affects the middle, leaving the brights and the darks where they are.
Levels to make the darkest darks pure black, and the lightest lights pure white. Good for limiting GIF size. Don't overdo it though.
Colour balance!! My beloved, most important. So for the Shadows and Highlights, you're gonna move the sliders towards Cyan and Blue, but for the Midtones you're gonna do the opposite - towards Red and Yellow. This means you don't shift the overall colour of the picture, but trust me it does SO MUCH for the contrast and colour. I swear I do this for almost any edit, and also my art tbh. Also if the original clip is like very green or whatever, you can correct that here.
Selective colour. For this I did one thing. For 'Black' dropdown, I upped 'black' and 'yellow' sliders (the latter to counteract the blue in the darks). This in combination with:
Levels again. Bring in those darks, turn them pure black. Basically this does a couple things. It preserves GIF file size, by making sure the dark areas are static (file sizes mostly depends on pixels that are CHANGING). It ALSO makes the palette much more optimized, meaning you don't waste palette on the darks no one sees anyway, and instead uses them in the mid range colour variation, giving much smoother gradients. That's it!! That's all the colouring!!
EDIT: Uh I probably also had a Vibrance layer?? Idk. This just ups the saturation, but it's softer than upping Saturation. Makes the colours pop without overdoing it.
Other tips and tricks
Often I'll put a Smart Sharpen (50% amount, 0,5px radius) filter on the video layer, just to make it a bit crisper. Subtle but effective.
You can manually edit the palette when you save as a GIF, either to reduce file size, or because some colour areas look pixelly. See the video for how.
If your file size is huge but you don't want to shorten or resize, you can reduce the frame rate manually. To do this, FIRST save the GIF, then open the GIF you just saved. Go through in the Timeline window (which is now a Frame Animation rather than a Video Timeline), select every other frame, and delete them. When you do this, remember to select the rest of the frames and double their Frame Delay so you don't end up with a super speedy GIF. (You can also make a GIF slow-mo like this.)
Since the video is a smart object, I literally just resized it in between saving the different GIFs, to change composition between the different shots.
Selective Colour layer can be used for a lot of image tweaking. For example, if something is overly yellow or green, I may go to the Yellow and Green in dropdown and just reduce the yellow slider. (I usually then go to Red in dropdown and ADD some yellow to that, to balance out the reds to be less pink.) Or maybe the overall colours are nice but the blues are dull, so I'll just go to Blue/Cyan and tweak those specifically.
If you have a colouring you like that you want to use on lots of things, remember you can drag-and-drop layers between different images. You can also save a photoshop file with nothing but those layers, to use on later gifs and just tweak as needed. (You can also make Actions to automate stuff, but I won't go into that.)
How easy or hard something is to colour HUGELY depends on the original video, both lighting/colouring and video quality.
Finally the video showing settings!
This is like 5 minutes long and has no commentary or anything. This is mostly to show off where you find each individual thing, and what difference it makes in the colouring.
ANYWAY hope someone found this useful!!! ♥
#next to normal#gif making#photoshop#gif tutorial#photoshop tutorial#my posts#my gifs#art things#tutorials#PS if you can't afford Photoshop then just you know.... yo ho ho and all that
119 notes
·
View notes