#Sloper Pattern
Explore tagged Tumblr posts
Visit Tumblr Blog
Explore Tumblr blogs with no restrictions, modern design and the best experience.
Last Seen Tumblr Blogs


Fun Fact
Tumblr has a low social media market share in South America.
Text
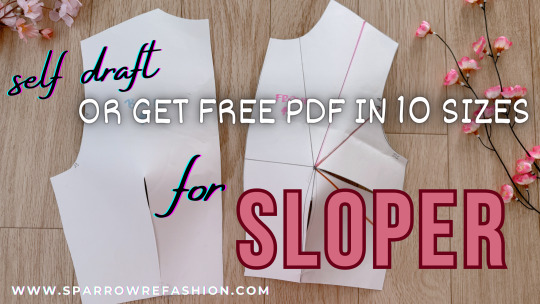
Sloper - Self Draft and Hack or Get Free PDF in 10 ! Sizes
In this post, you will learn how to draft sloper and you will get free PDF pattern in 10 sizes for basic block. Join me on a journey to perfect fit and precision with my comprehensive guide on drafting the quintessential sloper. This post is your ultimate resource, complete with a video tutorial that demystifies the process of creating a custom sloper tailored to your unique measurements. What…
View On WordPress
#Basic Block#Block Pattern#Bodice Sloper#Custom Fit#diy sewing#pattern drafting#Sewing Sloper#sewing tutorial#Sloper#Sloper Pattern
10 notes
·
View notes
Text
often thinking about how I'm in the upper ranges of what sewing patterns you can buy commercially will accommodate. Like, I'm one size below the largest size in the pattern I've been working off of for my bo peep costume. I'm on the heavier side of average, I think:
so if you're fat and think sewing your own clothes might be easier than purchasing them, congrats, it isn't! fat people literally can't have anything :( I don't think vintage patterns even go up as high as me, so you have to know how to make your own patterns on top of knowing how to sew if you aren't straight sized.
I've been slowly gaining weight as I age (a natural thing that happens to most people) so I should probably start learning how to make my own patterns if I wanna keep doing this lol. The good news is that the dress above was something I figured out on my own, without a pattern. It is possible!
#sewing#working off a sloper is probably your best bet#ClosetHistorian on youtube has some great tutorials on that#she doesn't use any commercial patterns
54 notes
·
View notes
Text
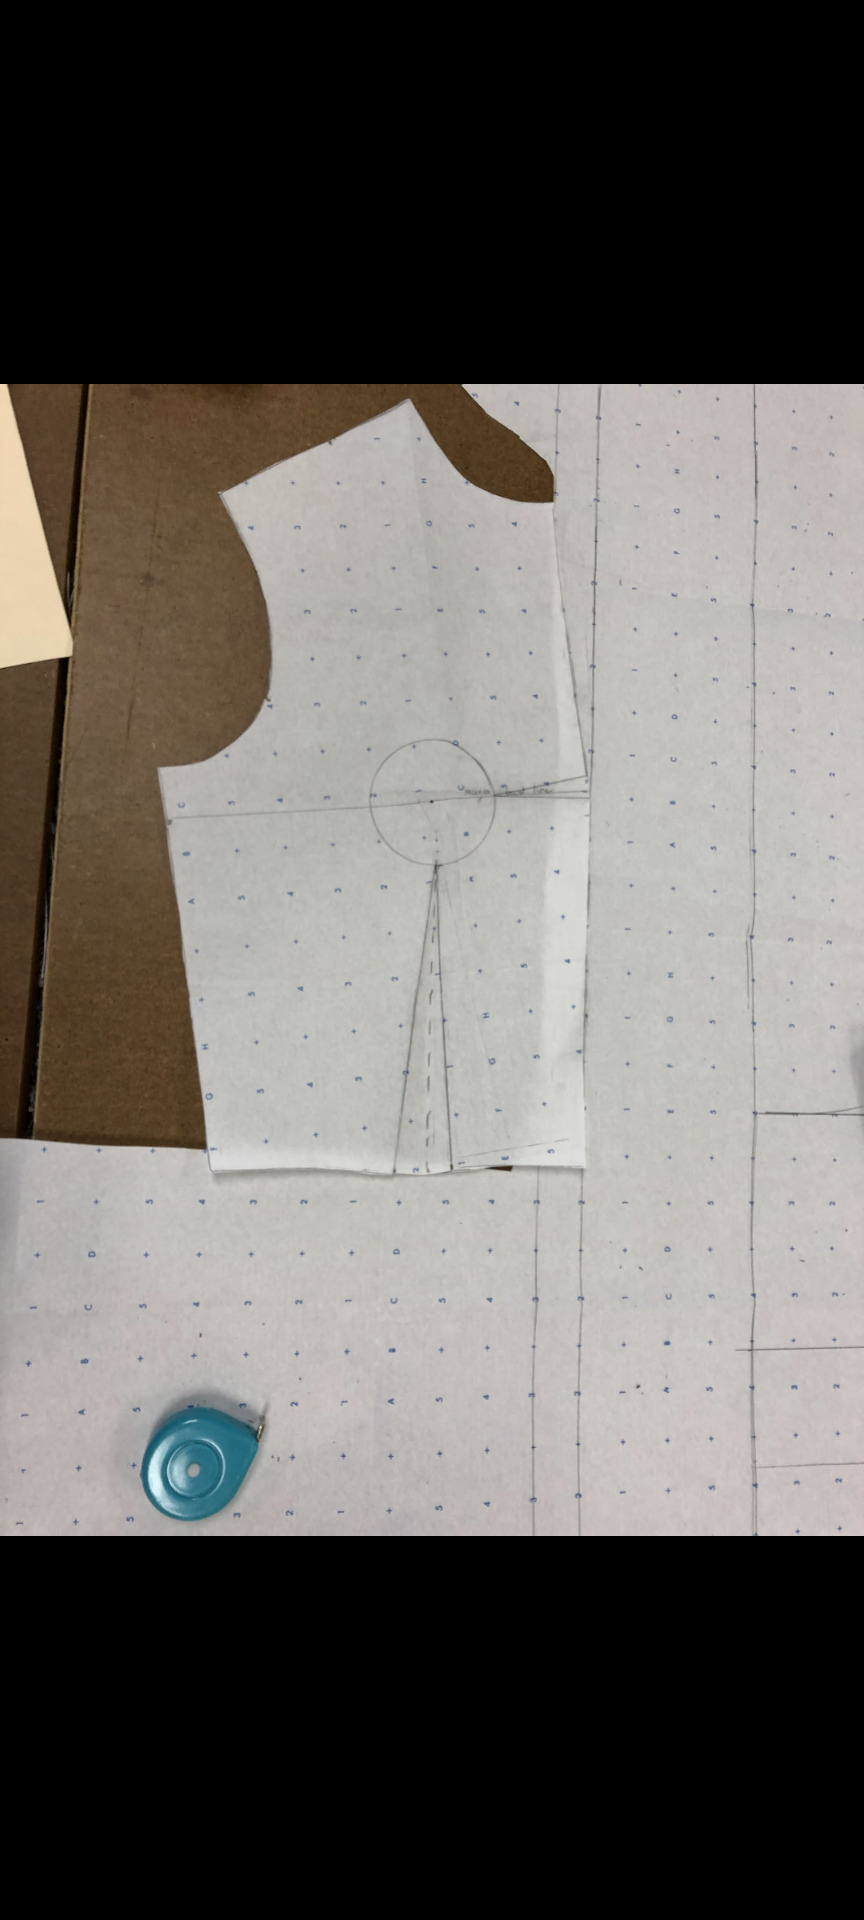
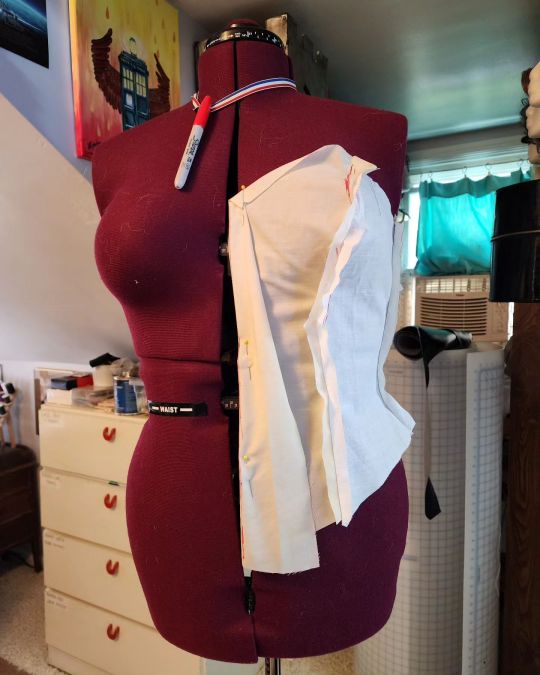
UUUUUGGGGHHHH I am trying to make my own slopers, but struggling so much.. I am on my 11th bodice draft, 5th skirt draft (3rd sleeve, but not attached yet), and I CANNOT figure out how to fit this thing.
I feel like I just lack the right...intuition? Plus I made things doubly hard on myself by refusing to make paper patterns. My partner very kindly gifted me a short throw projector for Xmas, so I decided "hey, I'll teach myself how to pattern draft, and create digital patterns at the same time! Less paper waste!" Well, one set of bedsheets later from all my mock-ups, I hardly think I've succeeded in being less wasteful.
This is my latest draft, after trying to adjust for what I now know is called "swayback" (i.e. my spine curves at the end, causing my butt to stick out, and my waistline to be at a sort of angle). You can kind of see it in my second picture. See how my back waistline is higher than the front waistline?


This meant the center back length of my bodice had to be shorter than on the front and sides, and the back skirt had to be taller at the waist. I hope to go more in depth later, but I wanted to have it figured out before I start offering any advice.
Speaking of advice, I would love some help from someone more experienced at fitting clothing! At this point, I know it doesn't look quite right, but I've reached the limits of my skills, and don't even trust my eyes anymore. What counts as a fit-issue wrinkle, and what is just a...fabric-being-fabric wrinkle? I don't trust myself enough to tell the difference considering it took me 11 iterations to reach this point.
TLDR: What is wrong with my sloper and how do I fix it??? 😭
22 notes
·
View notes
Text
tbh i've always found sewing patterns uncomfy. there's literally no way they can fit most bodies regardless of how you size them. they rely on people not knowing or not being willing to pattern draft themselves, which is a relatively simple thing to get started with even if it takes a while to perfect (i've been pattern drafting since 2023 and i've made a lot of things that fit me really well - it takes time but it's worth it!). buying patterns requires you to have a printer or be able to print them out, money to buy the pattern, and at least one mockup to adjust the fit, whereas pattern drafting just requires paper, a pencil, a ruler and a measuring tape. you can easily make a bodice block/sloper that you can easily adjust for every new project, but buying new patterns means going through the whole process again and again.
if you want to get started pattern drafting, i suggest watching TheClosetHistorian (all of her projects involve pattern drafting), Minji Lee's bunnysuit series, Mariah Pattie's Secret Formula for Drafting Stays, this tutorial on how to draft a bodice or this one or this one like there is a wealth of information on how to pattern draft please please you can do this you can draft patterns yourself i believe in you
187 notes
·
View notes
Text
Another year, another recap: a list of things I sewed in 2024
So...I kicked off the year by not doing any sewing in January or February.
In my defense, I was starting a new job and doing paperwork and moving across the state at the time, and most of my sewing things were still in cardboard boxes in my parents' guest room. Figured I'd start small when I finally moved and unpacked all my worldly possessions, so I revisited the cape I made for Capetember 2022 and added slits so that I can still use my arms without letting cold air in. I also added pockets for my phone and keys. Photo not included because, well, it looks the same as it did in 2022, just with arm slits.
Then I made this hand-embroidered Regency reticule. It's based on the one in the Rijksmuseum. It's cute, it's functional, and I made it as true to the original as I could, thanks to video footage from Sewstine on Youtube, who actually got to study the extant reticule and see the hidden side panels.

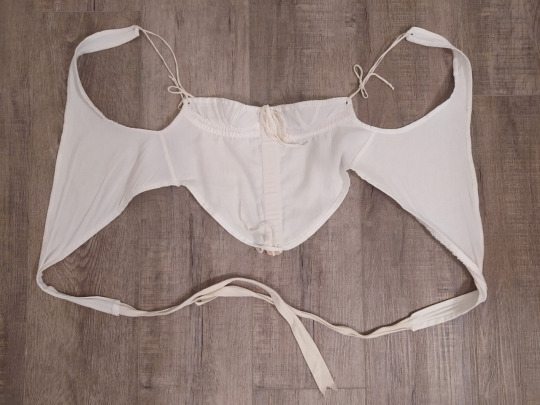
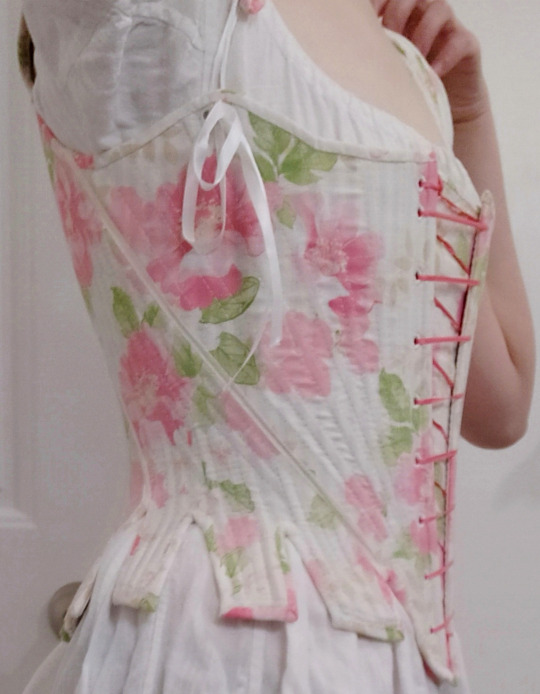
Then I got sick of back-lacing myself into Regency stays that never seem to fit my scoliotic torso correctly, so I made the c0rset a la parasseuse. They take like 30 seconds to put on and actually give the correct shape, and now I finally have regency stays that work for me. I'm not including pictures of myself wearing them, but here they are laid flat:
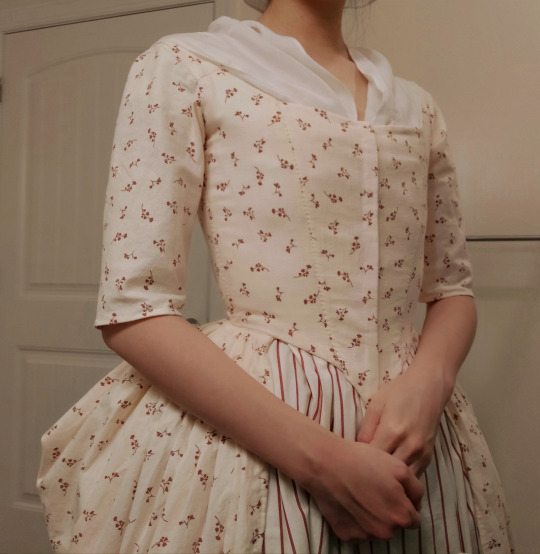
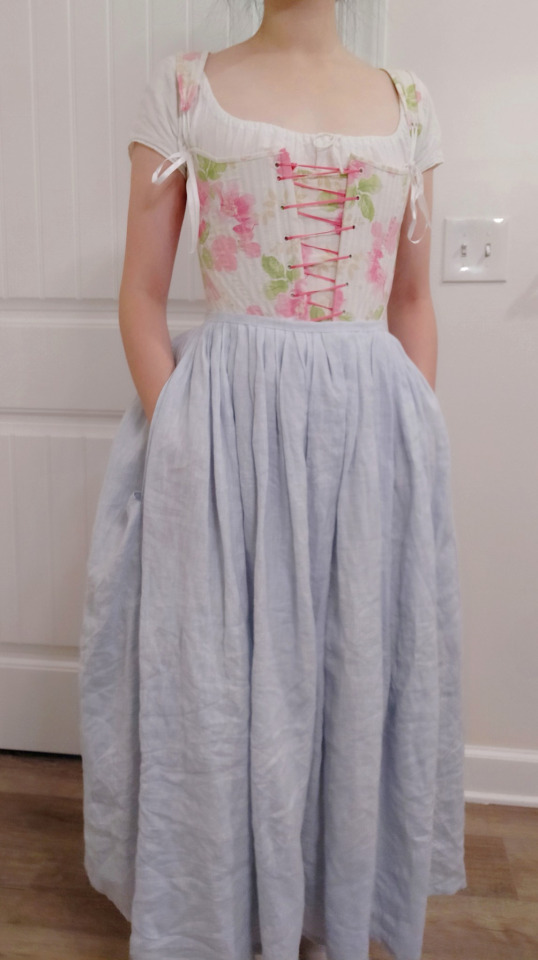
Then in April, I finished my red and white floral 1780s Italian gown ensemble. Technically, I'd made the overdress in 2023, but at the time I hadn't added the hooks and eyes that would allow the skirt to be bustled up in the back, and I still needed to make the contrasting striped petticoat. It's not a true HA recreation because I put all the structure directly into the bodice lining, instead of making a separate pair of stays to wear underneath, but all the other under layers are period correct, including the split rump I made to go with it. I also made an attempt at the American Duchess 18th century cap, but I made it out of limp, flimsy cotton batiste instead of linen, and it doesn't look right, so I'm going to have to revisit that once I make a proper 18th century linen shift and see how much leftover fabric I have after that. Oh, and I hand-embroidered some garters for my 18th century stockings but never bothered to take pictures because I don't like how they turned out.

In May, I also made this generic 18th century petticoat to go under my Italian gown ensemble, because the visible striped petticoat kept grabbing to my stockings and the fabric of my shift.
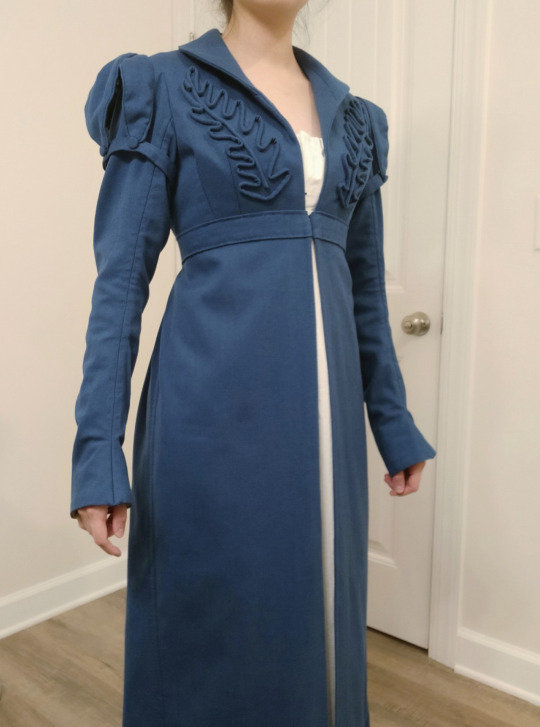
Also in May, I made the blue Regency pelisse. Base pattern for the bodice part is Black Snail’s #0323 regency spencer c. 1810-1815. I just altered the sleeves and added the long skirt. The oak leaf rouleaux pattern on the front of the bodice is from this pelisse from the Cincinnati Art Museum, though I wasn't going for a direct reproduction.
Then came the Edwardian nightgown, based on an actual pattern from the era. I wish I had had more fabric to work with because the final hem is less full than I would prefer, and the sleeves could use maybe 2-3 inches of ruffle to length them.
I forget why I didn't sew anything in June or July. Maybe I had gone back to fix a fit issue with the regency pelisse? I don't know. But in August, I hammered out three more projects.
I've been working on creating a series of body blocks/slopers for myself so that I can then use them to draft whatever patterns I want. I currently have a basic modern princess seam bodice block, a sloper for a generic blouse (which I've used to adapt multiple Edwardian shirtwaists, because I really just need it to fit the neck and shoulder region), a basic regency bodice block, an 18th century conical bodice block, and a bunch of circle skirt templates. I've been meaning to make a new set of Edwardian combinations (because I totally used the wrong weight of fabric on my first attempt), but I wanted to test out my drawers pattern first, so I made a pair of basic drawstring shorts to wear under my skirts for work, just for a bit of extra coverage. They function okay, but they're going to need more fullness in the legs to work for Edwardian costuming, so I didn't take any pictures, and there will probably be several more rounds of wearable mockups in my future.
My second sewing project in August was to revisit my old gathered-front regency partially-bodiced petticoat. Now that I had a functional regency bodice block pattern, I basically installed an entirely new bodice, reduced the amount of fullness in the front gathering, and also added about an extra yard and a quarter of fabric to the back of the skirt, since the original skirt hem was a little too narrow for walking comfortably. Regency skirts may look slim, but they should have at least 2 yd (preferably more) in the hem circumference in order to look and function correctly. The new and improved petticoat could basically be a dress on its own, minus sleeves.

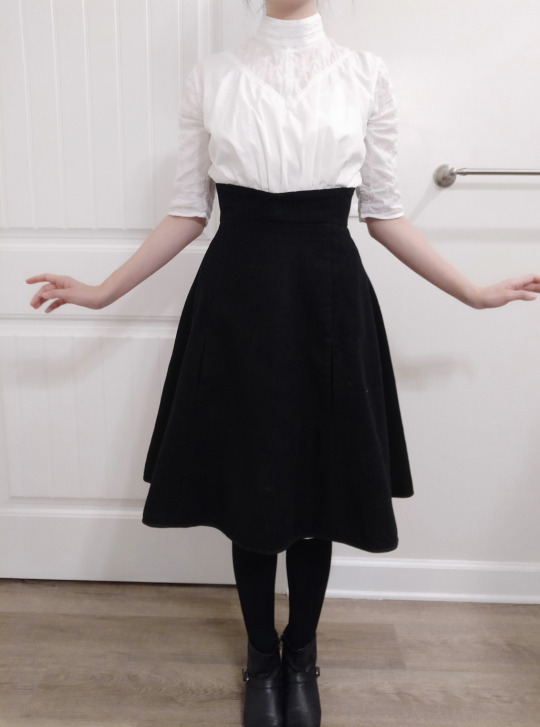
And finally in August, I made the historybounding princess skirt. I've already detailed my grievances with this skirt in my original post, but it was basically an attempt to have a warm skirt to wear to work in the winter, but it requires a c0rset (and undershirt and c0rset cover and petticoat) to look correct, so I basically only use it for casual cosplay/Halloween costumes now.
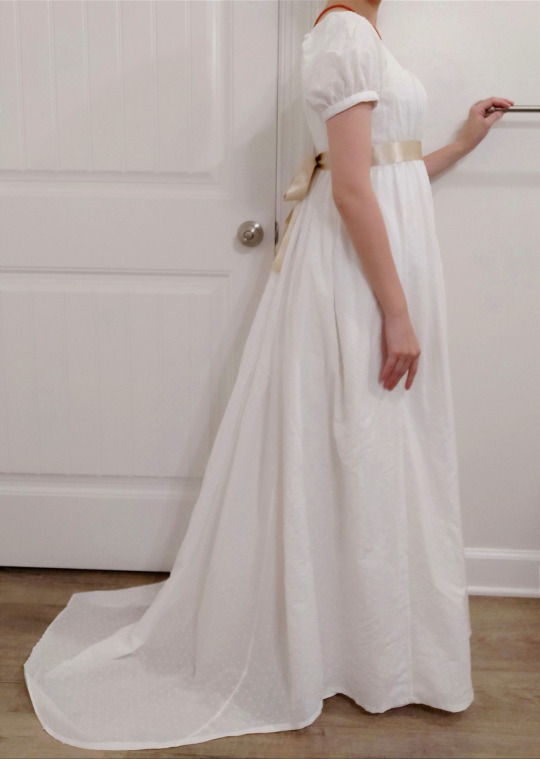
Moving on from that dud, in September, I went back to regency and altered my new and improve bodiced petticoat pattern into an actual evening gown pattern. This dress came out exactly how I wanted. It would probably be my favorite thing I've made this year, except that it has a 2-foot train that is very unwieldy.
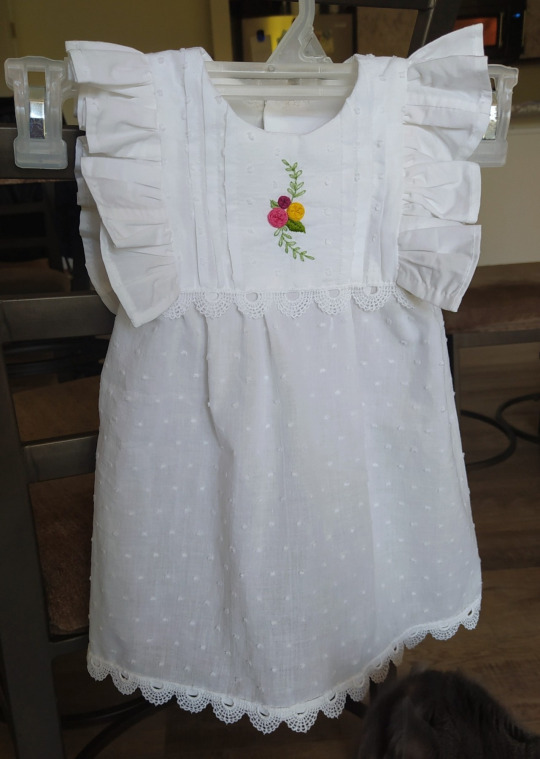
I had quite a bit of large scraps leftover from the gown project. My friend from residency was expecting a baby around September, so I used some fabric scraps and made her a ruffly baby dress. Since baby was due in September and I wasn't sure whether the weather would still be warm enough for white frilly summer dresses, I decided to make the dress in a 6-9 month old size so that baby would be able to grow into it come spring/summer. (Spoiler: baby came in mid-September while it was still reasonably warm. Oh well. At least she'll get to wear it in the spring. And now I have a birthday twin.)
In October, I embarked on my most ambitious project of the year and made my first pair of 18th century stays. This fabric is 100% not HA, and I did a combination of hand-stitched and machine-stitched channels, but everything else about the stays is historically...adequate. It's boned with zip ties because I didn't want to waste a whole roll of $$$ynthetic baleen on my first pair of (fully boned) stays when there was a 95% chance I'd screw something up. Pattern is self-drafted, and my only gripe is that I made my mockup half-boned and it fit perfectly, but I switched to fully boned for the final stays, and that affected the fabric's bias stretch, and I had to add a stomacher to give myself more room.
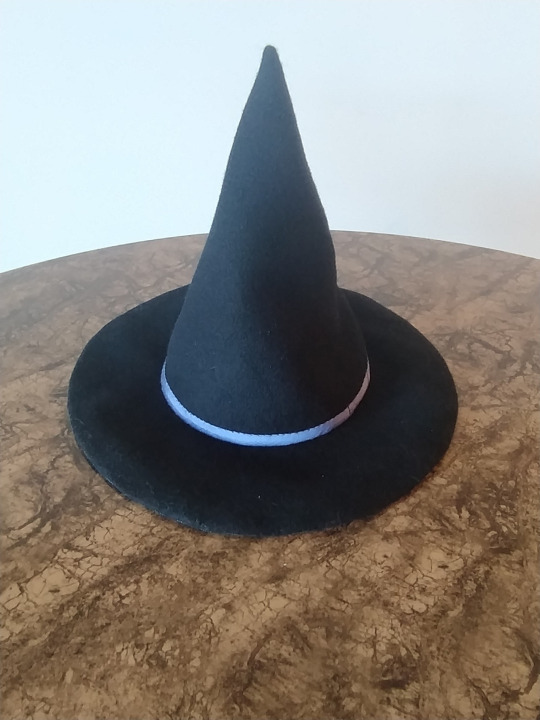
Then Halloween was approaching, so I made a witch hat from scrap wool coating fabric from my cape and wool skirt projects. Wish I had made the brim wider and the crown taller (it's just a little too small proportionally all around), but I didn't have a stiff enough interlining material, and the whole thing was floppy enough as it was. I'm just going to have to get more fabric and proper millinery buckram for next year's Halloween project.
Speaking of Halloween, I ended up not using the witch hat at all. Instead, I made what I'm calling the Anne Shirley blouse. It's another Edwardian shirtwaist I self-drafted from my basic blouse pattern. It's not an exact match to the blouse she wears at the end of Anne of Green Gables (1985), but I couldn't find a narrow-striped black and gray cotton shirting-weight fabric. Trust me, I looked for months. The final blouse is pretty, but the ruffle needs to be redone because it makes my shoulders look too wide for the wool historybounding princess skirt I wore it with, and the collar needs to be taken in a couple inches because it's too loose right now. And I need to make a proper ankle-length Vicwardian walking skirt some time in the future before I can put this project to rest.
November was another slow month for me, between the results of the you-know-what and our impending doom and I just couldn't find the time or motivation to do stuff for fun. I did have a 2-yard length of deadstock burgundy polyester chiffon in my stash that I had been holding onto for about a year without a clear project in mind for it, so I used it to make a Greek chiton. No pictures included because I'm probably only going to wear it as an accessory with my regency gown (because those white regency gowns are basically OG historybounding).
December was another weird month. I had just seen the Wicked movie and was drooling over all the costumes (designed by THE Paul Tazewell), so instead of sewing clothing to wear for myself, I went back to my roots and made a modular origami doll of Glinda, then sewed her bubble dress from actual fabric. It was a lot like draping a dress, except with a miniature dress form.
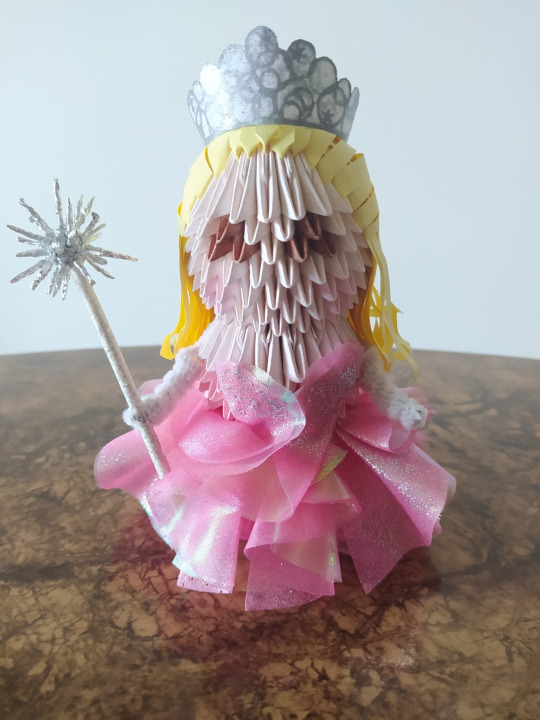
Then, because the doll is like 6 inches tall and I had a bunch of fabric leftover (I only got a quarter yard of each and even that was too much for a 6" tall doll), I used as much of the scraps as I could to make another Glinda bubble skirt but big enough to fit my brother's cat. (Neither of our cats likes to dress up, but my cat is too big for the skirt to fit, and his cat is pure black so a black Elphaba dress wouldn't show up on her). I don't think I took a picture of the skirt when I finished it, and now I don't have it because I gave it to him for Christmas. We'll just have to see if his cat lets him put the skirt on her long enough to get photos.
It looks like I accomplished even less sewing this year than I did last year, and 2023 was a down year too, but I don't feel that unproductive. This list was something like 21 projects, so I'm still averaging about one project every 2-3 weeks, which is reasonable since I'm working a Big Girl Job now. I do have more days off per week since starting this job, but my free time is now clustered into 2-3 day periods (during which I also need to remember to cook, eat, clean my living space, do laundry, shower, sleep, prep for the work week, etc.), instead of being spread out more evenly throughout the week like when I was in residency, so that probably has something to do with my productivity level.
Or maybe it's because my projects in 2024 are more intricate and involved than, say, making a batch of small things like baby bibs and tailoring hams, or so I'm spending more time on each project. There were also several other projects I started in 2024 that are currently still in my Unfinished pile, and I'm slowly working my way through them in the hopes that they'll make it onto next year's list of things I sewed in 2025.
Oh, and in other news, my sewing machine broke on 01/01/2025, and it broke even more when I tried to fix it FML, so I'm either going to have to take the thing in for repairs (if anyone even still fixes this old crappy cheap model) or buy a new slightly less crappy one secondhand. So expect to see even more hand sewing from me. I might even take up Stephanie Canada's Butterick walkaway dress challenge 2025 but do it by hand just to see how long it takes.
26 notes
·
View notes
Text
I started my first attempt at this 1830s trousers pattern, knowing full well I’m going to need to do alterations for both height (short) and having a pair of stout muscular thighs like mighty redwood trees. To get a sense of the construction involved and of the areas I’d need to tweak in a final version, I patterned out and sewed a version that’s a little more detailed than a sloper but less polished than the pair I have planned for later, cut out in a nice medium weight white cotton-linen blend that used to be an estate sale tablecloth. By doing this I have now made myself a pair of fucking… wet tee shirt trousers. They are so close to being sheer, but not quite, just opaque enough that I’d be tempted to wear them anyway and then blammo, someone takes a flash photograph and I’m hosed.
I actually am really liking this pattern, now that I’ve puzzled out some of its quirks and the somewhat finicky translated instructions… but I will like it more when I can wear it without showing all of Wisborg my haunted bush.
#more information than you perhaps require#this isn’t actually FOR a Nosferatu 2024 cosplay… yet… but who knows
9 notes
·
View notes
Text
next project excitement
I am home for a week and a half and am determined to spend most of it sewing. OK it's not even quite a week and a half, i've just realized. whatever!! getting started now.
I have a huge number of projects pent-up and am suffering as I try to decide which to work on, BUT, the thing is! i have one i really want to start on, so I'm going to at least start on it, and that is the Loftus Bralette pattern, which it's sort of unfair to call a bralette-- it's not, it's fully a bra, it has a powerbar and everything, and nonstretch cups, it's seriously a bra but there's no wire. Which is why I think it might fit me. Cut for more wittering on this topic...
I printed it out and taped it up ages (a couple of weeks) ago when it first came out because I was so excited, but I've been traveling since then. So. Now I have laid out the pattern pieces, and assembled the notions I ordered and got and haven't looked at yet, and now am figuring out just what I need. I might write up more about this, let me know if it's something you're also interested in sewing or learning about or whatever!! I'm really comfortable with Cashmerette patterns by now and am confident I can make it through sewing this, though I am *not* confident I can fit myself well-- by sheer dumb luck I fit Cashmerette really well without many adjustments so I'm not great at fit adjustments, but I'm sure I'll need them for this, since bras are so specific. But we'll see!
Anyway to start with I just went through the whole pattern instruction booklet and figured out how many inches I need of how many kinds of elastic, and which fabrics I should cut which pattern pieces out of. I'm going to then label each of them with masking tape the whole time I'm working, because I watched the video sewalong and realized I'm absolutely going to lose track of what I'm doing. So here is my starting point:
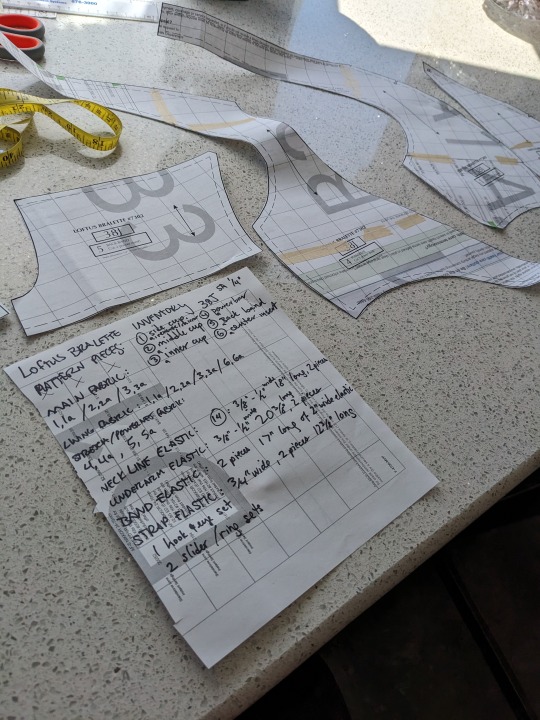
[image description: a number of pattern pieces spread out across a countertop, and in the foreground is a list on a scrap paper in felt-tipped marker that inventories the pattern pieces, specifies which should be cut out of which fabric, and says how many inches of how wide an elastic are needed in my size for each of the neckline, underarm, band, and strap elastics.]
I measure into a 38J, and I plan to make my muslin out of some heavy-duty powermesh I got from Mood, and then some light pink stabilized nylon tricot I got from Porcelynne, and the notions and elastic I also got from Porcelynne. (Porcelynne's owner is the one who did the engineering on the pattern I think, and is certainly the person who appears in the sewalong video. I bought myself a super-nice kit from their selection, but I'm making the muslin first before I cut into the cute red and black lace from the kit.)
Ha I might actually just mark the muslin in felt-tip marker and not worry about the marks washing out or not, honestly. i need all the help i can get. i can do it right for the nice one. hopefully i will get this to work and i will make like a dozen. it would help me so much to have a TT bra pattern i can standardize off of-- I started the sloper course but looked at it and was like, there's no point getting a really good fit around the bust of any dress because I only have one each of any given bra and none of them are perfect and all of them make me a drastically different shape. I need something I have several of and can reliably get more of (alas, for when i get a good bra i love and go to buy more and it's discontinued, this keeps happening to me). so. This is like, the necessary next step to not only my life but also my sewing game.
29 notes
·
View notes
Note
I'm a guy who wants to get into making his own clothes, mainly for historical stuff and partially for a want to get into cosplay. Any advice for a newcomer who does not know his stitches and his fabrics, or anything at all?
I might be able to assist, here are some things I know I felt like were helpful as I got into the hobby:
Get your measurements. If you can't have someone help you, measure your body 3 times and use the average for the best results and accuracy.
You only really need to straight stitch on a sewing machine, imo, you do not need a serger, do not let people tell you that you need a serger. I promise you I only use straight stitches and hand stitching for my garments. A serger is indeed a nice tool to have though.
If you do any hand sewing, seriously invest in good needles. And get yourself a thimble, it's life changing.
Make mock ups, always. Unless of course you made it before (in that case make a reusable paper copy, have have thick poster paper copies of patterns I made.)
In reference to patterns; go for broad, general use patterns. Like once you have one good pants pattern, you really do not need any other pants pattern (unless it's just that different of a style, like baggy versus some slacks). I have like 3 paper patterns I have bought and I used them as a basis to create new patterns on my own. Not all people who make clothes should feel obligated to create a pattern, but I think it's a very helpful skill. it seems overwhelming at first but it's so worth it.
And to reiterate on part 5, consider making yourself a sloper. A sloper is basically a bodice/shirt and basic skirt/pants that you made to your measurements and shape, you're meant to save this and you can trace it for infinity to make whatever you want without worrying about refitting every new pattern you make (very helpful). You can make this out of cheap muslin. Once you make this I swear it saves you time for all future projects.
For fabrics, If you have store near you always opt for buying in person and feeling the fabrics. otherwise if you shop online it's worth getting samples. I have a book on fabrics I sometimes use to reference when I'm confused called "Textilepedia." It's not remotely mandatory but nice to have. Personally I use the same 3-4 types of cottons over and over again so once you have a favorite I'd just stick to it.
Long list but I hope this helps you and anyone else. The most important thing is to also be kind to yourself. You will mess up, even experts mess up, but the beauty of stitching is that you can seam rip and start again. The only time it's too late is when you cut too much off.
24 notes
·
View notes
Text
Plenty of people have reflected that sewing patterns are designed for an average that doesn't really fit anyone. It especially doesn't fit me. Ramblings below the cut on how I've been approaching sewing/adjusting clothes to my own proportions.
I have a narrow back paired with a large and forward-projecting bust. There are two, two and a half brands (freya, fantasie, sometimes panache) that make bras of the right shape and size to fit me & be comfortable without fucking up my back. I can buy ready to wear knit tops that fit me pretty decently, or oversized shirts, but tailored garments are generally designed with a B or at most a C cup in mind, not a G cup.
So by trial and error over the past 4+ years I have been approaching a top basic block that fits, which I can then adjust as needed for garments which actually fit. (following guidance from people like the closet historian). My current attempt is pretty close - I think I need a little more room in the back shoulder and a bit of a dart to keep the back armscye from gaping. Feeling pretty positive there.
Then on the bottom, the unusual body shape strikes again. My high hips are the same width or wider than my low hip, and my butt is low and small. In making (or adjusting) trousers I generally need to take up to an inch of length out of the back rise and up to 3/4'' out of the side height. But I've got a fairly long torso and waist to crotch measurement (and a bit of a belly) so need to keep (or sometimes add) height to the front rise.
This works fine for wide leg trousers, flared skirts, etc. But for fitted garments I'm increasingly turning to the age old approach of just adding padding. After all most of fashion design is about silhouette & it's a time-honoured tradition to add padding in order to get the silhouette you're aiming for.
Here I've found there are a lot of tutorials on Nigerian fashion youtube where it's just a normal thing to do. I hadn't been getting much joy out of trying to make a sloper that both a) fitted my lower body and b) achieved the shape I wanted. I'm thinking I may just make a petticoat with the padding attached that I can swap out under garments as needed. It's pretty freeing actually.
#setnet makes#mostly notes to self#chronic pain issues aside i'm positive to neutral about my body#but you do you on whether you want to read?#idk i know talk about body shape is uncomfortable for some people
3 notes
·
View notes
Note
Out of curiosity, how do you make your patterns? Do you drape, pattern flat, both??
I drape all of my initial slopers for the different doll bodies I have. I find draping is the only way to get a good fit on dolls, especially those with atypical proportions, such as Dollfie Dream Dynamite or super-muscular guys.
I drape garments in stretch fabric for stretchy items; socks, t-shirts, tights, leggings, etc.
I trace my completed fabric slopers/patterns onto paper to preserve them, and scan them into my computer as backup, in case I misplace my binder of doll slopers.
From there, I can use the slopers I made to flat-draft all kinds of garment patterns!
I occasionally use traditional pattern drafting software to quickly generate basic flat-drafted patterns or slopers for myself (human clothes/cosplay) and dolls, but I find these always need a lot of fitting adjustments before I'm happy with how it looks, so I do prefer to work with my own draped slopers.
21 notes
·
View notes
Text
i was so disheartened as to why the bodice patterns i was making successfully, weren’t fitting me.
Turns out I was in fact making the pattern(s) and resulting slopers correctly, but the pattern making book I was reading from doesn’t work for fuller, curvier, bustier bodies 😵💫🫠
3 notes
·
View notes
Text
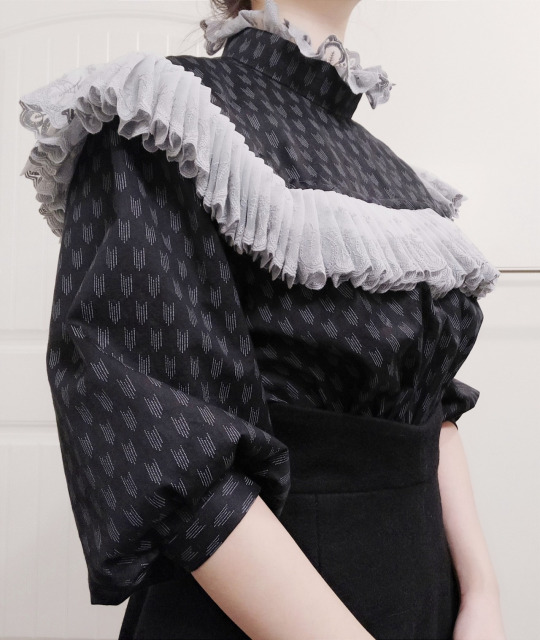
drafting radri's mage dress
i started with a shoulder princess sloper—it actually takes cup size into account, which was a big selling point for me, and the bust fit perfectly with no adjustments! i still had to edit it though ofc, the waist was too low and i took it in a bit
i made a first draft with most of the actual features of the dress, in red flannel because that's what i had lying around lol. i french seamed everything (i wanted to learn how to do sleeves & slits with french seams), but my final fabric is on the heavier side of lightweight so i'll have to stick with regular seam finishes for the real thing
the hemline does lift a little in the front when i belt it bc extra fabric has to go under the bust, and i'll be adjusting the princess seam just a liiittle bit, but i don't wanna take the princess seams fully in towards the underbust or anything because then it wouldn't look right if i didn't have a belt on. and anyway the lift isn't that bad either because this'll be ankle length, so 1) who's really looking down there and 2) if anything it'll help me not step on the front hem
oh and the left and right cuffs are different bc i didn't know if i wanted to stick with the pointed cuff i drew. i knew i'd have to add a little loop to the pointed cuff in real life if i didn't want it to shift around, and didn't really wanna do that so i was prepared to just go with the regular non-pointed cuff, but then the regular cuff kept rotating willy-nilly too and i got annoyed at that, so. pointed cuff with a little loop it is
in the drawing i closed the cuffs with ribbon ties, but in real life i uh. can't imagine being able to tie those cuffs closed alone. so i just put buttons there 🤷 which will be a little annoying if i have my wrists down against a surface, like if i'm typing or something, but i kind of feel like i won't be typing in this garment (if i even wear it at all after i finish it lmao). i did think about migrating the button closure to the outside of the wrist, like suit jacket placement, but i feel like it'd look a little weird on the pointed style cuff 😖 and anyway suit jacket sleeve buttons bother me when i leave my wrist against a surface too lol so it wouldn't be a huge improvement
i used this method to attach the collar and sleeve cuffs, which i like the result of but never like executing. it wasn't as tedious on this muslin since i was lazy and didn't baste or press anything, but on the final i'll have to do everything i skipped 😣
anyway the next step is to tweak the pattern a bit and make it ankle length, then make another muslin in my semi-final fabric (semi-final bc it's the same as my final fabric but just in a different color). i'm actually pleasantly surprised that this hasn't felt like a ton of work yet—probably because it doesn't need a lining lol
15 notes
·
View notes
Text
What is patternmaking?
As this is my first post, I would like to explain what patternmaking is.
I am creating this post to those that are unfamiliar with the basics of patternmaking. As part of my journey, I want to become a teacher; and I think this is a good platform to improve those skills. All critical feedback is appreciated.
Patternmaking is the process of designing garments from homemakers to mass productions. This process uses a preexisting basic garment template. I refer to it as a sloper, which is drafted and fitted before it's used by a patternmaker.
The sloper is then traced onto pattern paper. After this, the trace outline is then manipulated in the following areas:
• dart manipulation
• seams
• fullness
• pleats
I will explain each category in the upcoming posts. I will also explain the tools in more details as well.
10 notes
·
View notes
Photo
Ahahaha who's the genius who decided to make a new steel-boned corset a week and a half before Gen Con with no pattern or instructions? 😅😅😅 I've made boned corsets before, but trying to make this one on the fly to match a video game reference without any base design to work from is... an adventure. (I really need to make a new sloper...) #sewing #cosplay #patterndesign — view on Instagram https://ift.tt/6oB1ngh
7 notes
·
View notes
Text

Designing a garment
Garment design includes components of "color, texture, space, lines, pattern, silhouette, shape, proportion, balance, emphasis, rhythm, and harmony". All of these elements come together to design a garment by creating visual interest for consumers.
Fashion designers work in various ways, some start with a vision in their head and later move into drawing it on paper or on a computer, while others go directly into draping fabric onto a dress form, also known as a mannequin. The design process is unique to the designer and it is rather intriguing to see the various steps that go into the process. Designing a garment starts with patternmaking. The process begins with creating a sloper or base pattern. The sloper will fit the size of the model a designer is working with or a base can be made by utilizing standard size charting.
Three major manipulations within patternmaking include dart manipulation, contouring, and added fullness. Dart manipulation allows for a dart to be moved on a garment in various places but does not change the overall fit of the garment. Contouring allows for areas of a garment to fit closer to areas of the torso such as the bust or shoulders. Added fullness increases the length or width of a pattern to change the frame as well as fit of the garment. The fullness can be added on one side, unequal, or equally to the pattern.
A designer may choose to work with certain apps that can help connect all their ideas together and expand their thoughts to create a cohesive design. When a designer is completely satisfied with the fit of the toile (or muslin), they will consult a professional pattern maker who will then create the finished, working version of the pattern out of paper or using a computer program. Finally, a sample garment is made up and tested on a model to make sure it is an operational outfit. Fashion design is expressive, the designers create art that may be functional or non-functional.
Technology within fashion
Over the years, there has been an increase in the use of technology within fashion design. Iris van Herpen, a Dutch designer, incorporated 3D printing in her Crystallization collection.
Software can aid designers in the product development stage. Designers can use artificial intelligence and virtual reality to prototype clothing. 3D modeling within software allows for initial sampling and development stages for partnerships with suppliers before the garments are produced.
Modern Western fashion design is often considered to have started in the 19th century with Charles Frederick Worth who was the first designer to have his label sewn into the garments that he created. Before the former draper set up his maison couture (fashion house) in Paris, clothing design and creation of the garments were handled largely by anonymous seamstresses. At the time high fashion descended from what was popularly worn at royal courts. Worth's success was such that he was able to dictate to his customers what they should wear, instead of following their lead as earlier dressmakers had done. The term couturier was in fact first created in order to describe him. While all articles of clothing from any time period are studied by academics as costume design, only clothing created after 1858 is considered fashion design.
It was during this period that many design houses began to hire artists to sketch or paint designs for garments. Rather than going straight into manufacturing, the images were shown to clients to gain approval, which saved time and money for the designer. If the client liked their design, the patrons commissioned the garment from the designer, and it was produced for the client in the fashion house. This designer-patron construct launched designers sketching their work rather than putting the completed designs on models.
Types of fashion
Garments produced by clothing manufacturers fall into three main categories, although these may be split up into additional, different types.
Haute couture
Main article: Haute couture
Until the 1950s, fashion clothing was predominately designed and manufactured on a made-to-measure or haute couture basis (French for high-sewing), with each garment being created for a specific client. A couture garment is made to order for an individual customer, and is usually made from high-quality, expensive fabric, sewn with extreme attention to detail and finish, often using time-consuming, hand-executed techniques. Look and fit take priority over the cost of materials and the time it takes to make.[8][9] Due to the high cost of each garment, haute couture makes little direct profit for the fashion houses, but is important for prestige and publicity.[10]
Ready-to-wear (prêt-à-porter)
[edit]
Main article: Ready-to-wear
Ready-to-wear, or prêt-à-porter, clothes are a cross between haute couture and mass market. They are not made for individual customers, but great care is taken in the choice and cut of the fabric. Clothes are made in small quantities to guarantee exclusivity, so they are rather expensive. Ready-to-wear collections are usually presented by fashion houses each season during a period known as fashion week or fashion month. This takes place on a citywide basis and occurs twice a year. The main seasons of Fashion Week include spring/summer, fall/winter, resort, swim, and bridal.
Half-way garments are an alternative to ready-to-wear, "off-the-peg", or prêt-à-porter fashion. Half-way garments are intentionally unfinished pieces of clothing that encourage co-design between the "primary designer" of the garment, and what would usually be considered, the passive "consumer". This differs from ready-to-wear fashion, as the consumer is able to participate in the process of making and co-designing their clothing. During the Make{able} workshop, Hirscher and Niinimaki found that personal involvement in the garment-making process created a meaningful "narrative" for the user, which established a person-product attachment and increased the sentimental value of the final product.
Otto von Busch also explores half-way garments and fashion co-design in his thesis, "Fashion-able, Hacktivism and engaged Fashion Design".
Mass market
Main article: Mass market
Currently, the fashion industry relies more on mass-market sales. The mass market caters for a wide range of customers, producing ready-to-wear garments using trends set by the famous names in fashion. They often wait around a season to make sure a style is going to catch on before producing their versions of the original look. To save money and time, they use cheaper fabrics and simpler production techniques which can easily be done by machines. The end product can, therefore, be sold much more cheaply.
There is a type of design called "kutch" originated from the German word kitschig, meaning "trashy" or "not aesthetically pleasing". Kitsch can also refer to "wearing or displaying something that is therefore no longer in fashion".
Income
The median annual wages for salaried fashion designers was $79,290 in May 2023, approximately $38.12 per hour. The middle 50 percent earned an average of 76,700. The lowest 10 percent earned $37,090 and the highest 10 percent earned $160,850. The highest number of employment lies within Apparel, Piece Goods, and Notions Merchant Wholesalers with a percentage of 5.4. The average is 7,820 based on employment. The lowest employment is within Apparel Knitting Mills at .46% of the industry employed, which averages to 30 workers within the specific specialty. In 2016, 23,800 people were counted as fashion designers in the United States.
Geographically, the largest employment state of Fashion designers is New York with an employment of 7,930.New York is considered a hub for fashion designers due to a large percentage of luxury designers and brands.
Fashion today is a global industry, and most major countries have a fashion industry. Seven countries have established an international reputation in fashion: the United States, France, Italy, United Kingdom, Japan, Germany and Belgium. The "big four" fashion capitals of the fashion industry are New York City, Paris, Milan, and London.
0 notes
Text
Heavy sigh... I know I'm going to need a shitload of yardage to make the next version of this dress and I'm really cranky about it.
This weekend it's incredibly fucking cold here, so I haven't had access to the ironing and pattern-cutting space I normally do, I've just been putting together the first draft/sloper version of this 1830s trouser pattern and it came together pretty nicely but juuuuust too narrow in the thighs for me to actually wear for anything but standing around picturesquely. I want to be working on round two! I puzzled out these absolutely arcane pattern descriptions for this!
2 notes
·
View notes