#Tutorial tumblr
Explore tagged Tumblr posts
Visit Tumblr Blog
Explore Tumblr blogs with no restrictions, modern design and the best experience.
Last Seen Tumblr Blogs


Fun Fact
Tumblr has 4 main sources of revenue.
Text
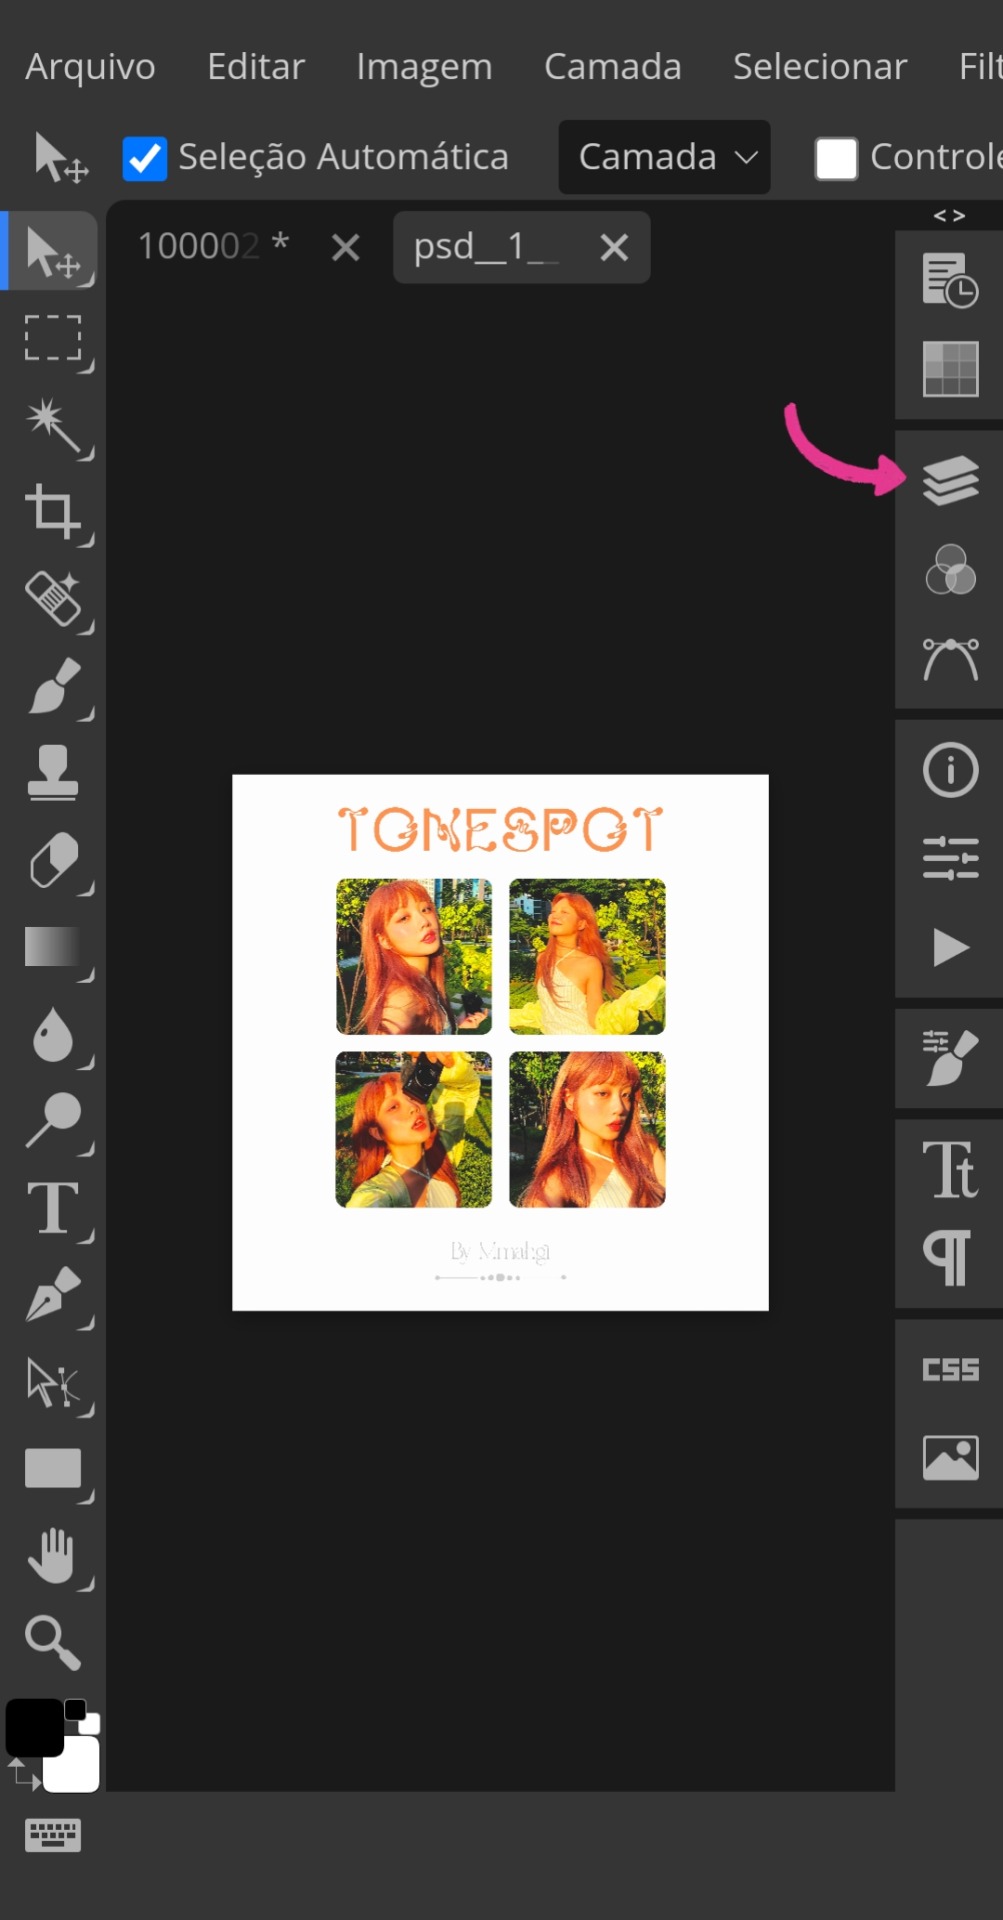
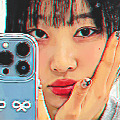
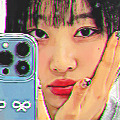
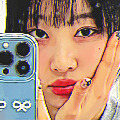
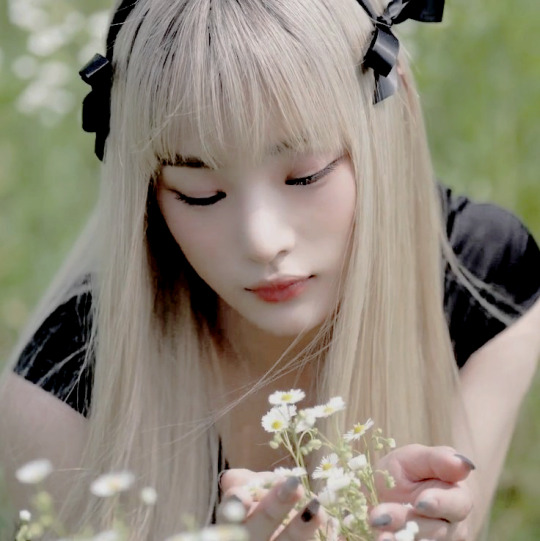
— TUTORIAL DE COMO FAÇO MEUS ICONS PELO CELULAR
Olá! Como vocês estão? Eu espero que bem. Há um tempo atrás, recebi uma ask me perguntando como eu faço meus icons e decidi trazer um tutorialzinho aqui pra quem também tem esse interesse.
⠀
Vale ressaltar que, se você procurar direitinho, conseguirá encontrar diversos outros tutoriais de iconmakers ensinando seus métodos. Digo isso porque a forma como eu produzo meus icons pode ser considerada um pouco mais estendida do que os demais costumam fazer. Não quero dizer mais elaborada! Na verdade, é como se eu fizesse as mesmas coisas que os demais, mas pegando um caminho mais longo. De qualquer forma, foi o jeito como eu aprendi a fazer quando me interessei em criar icons e continuo ainda assim pela comodidade.
⠀
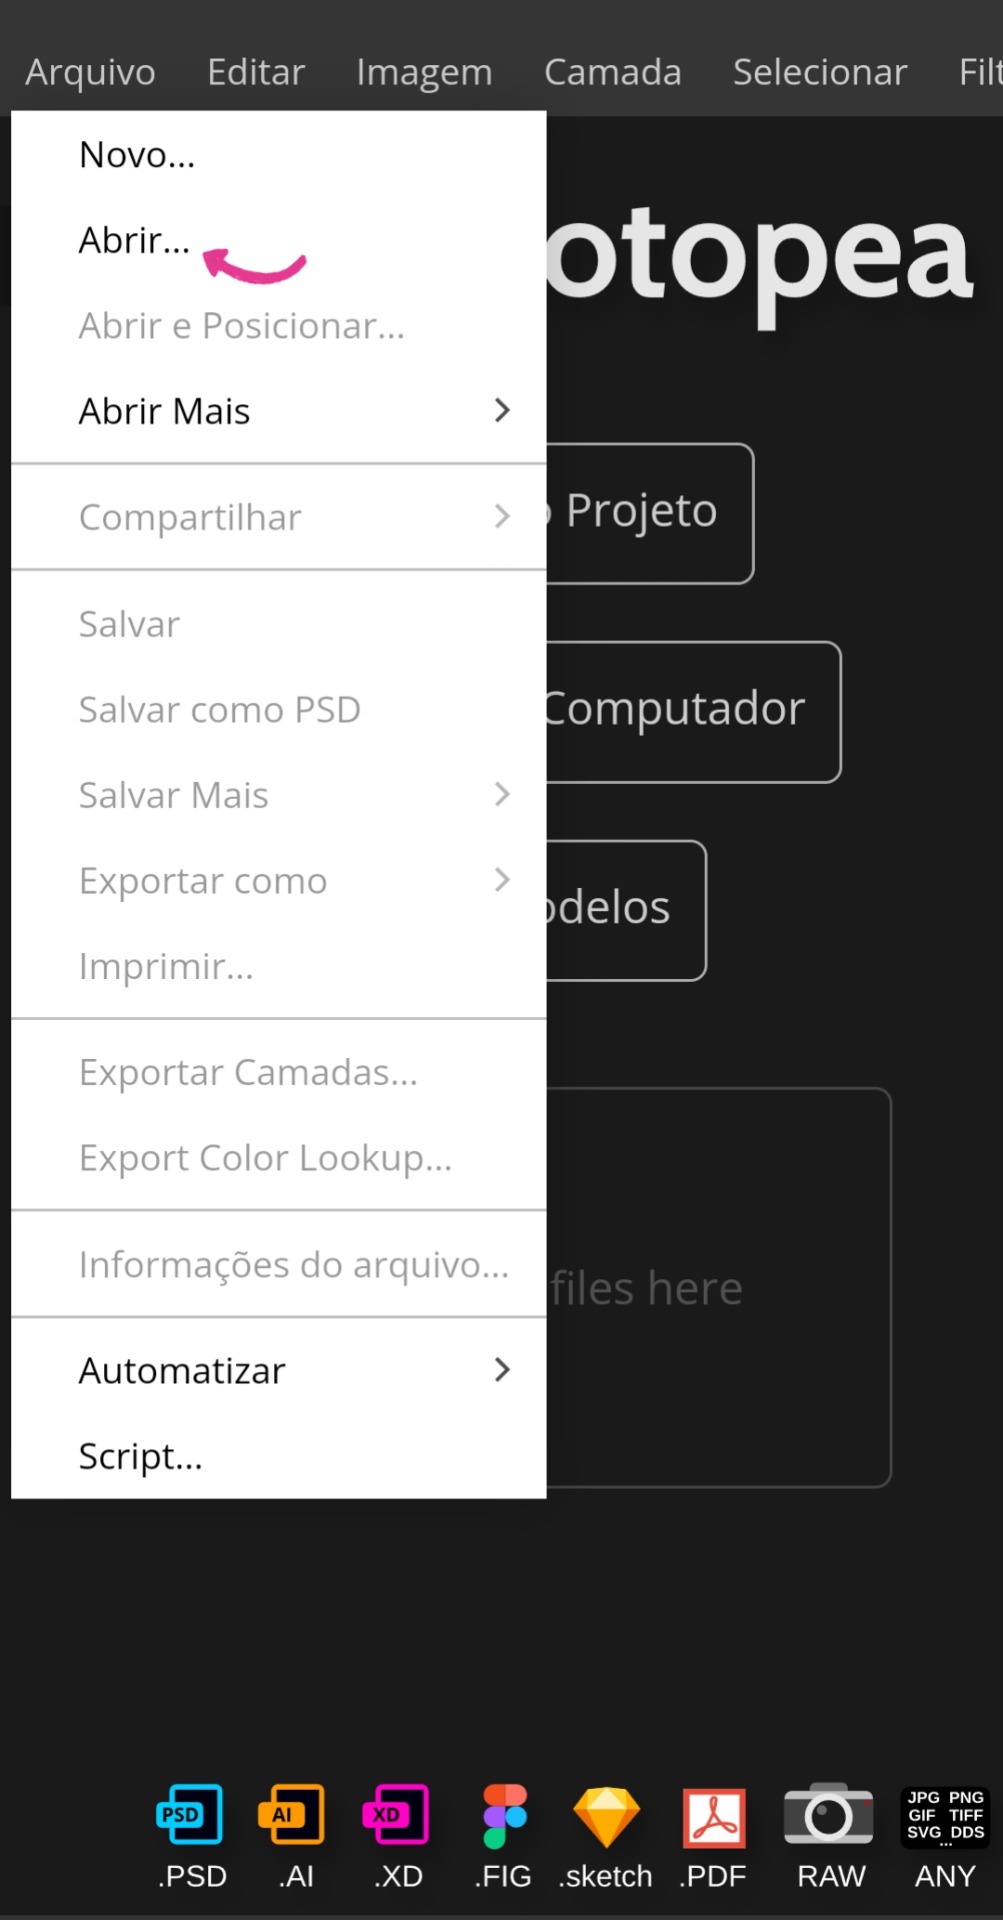
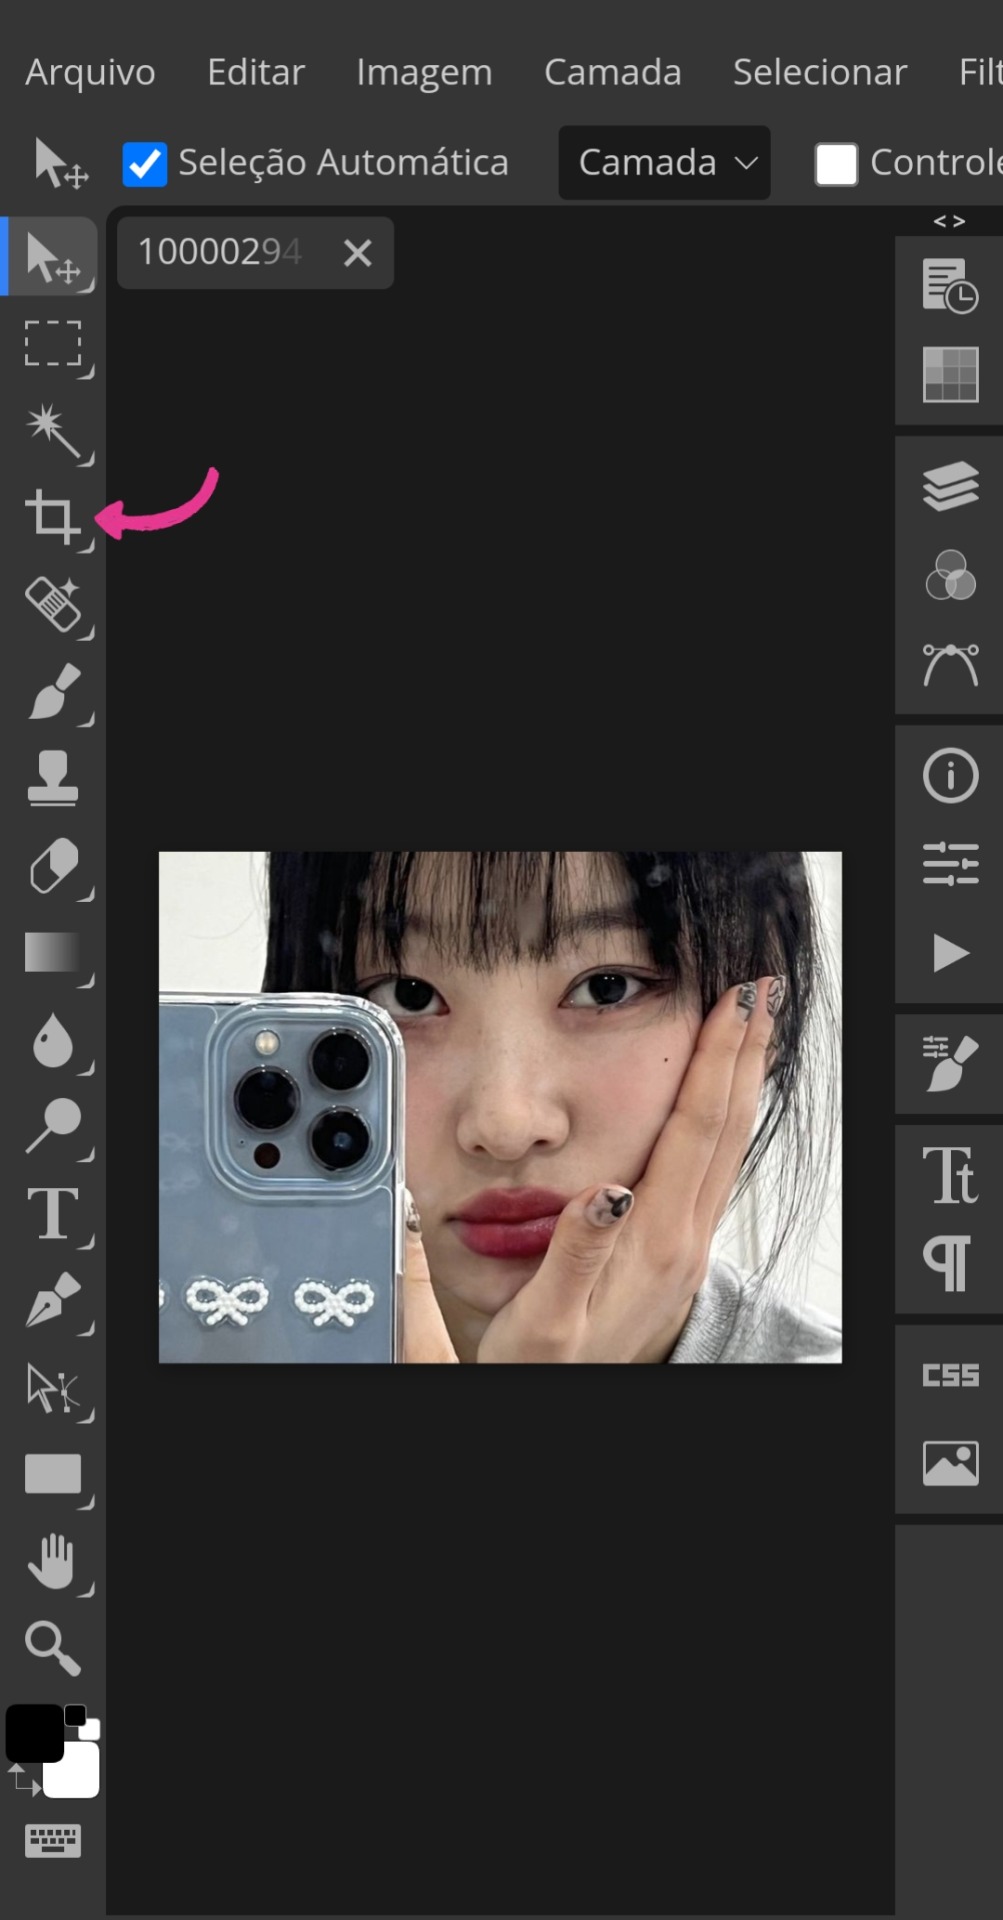
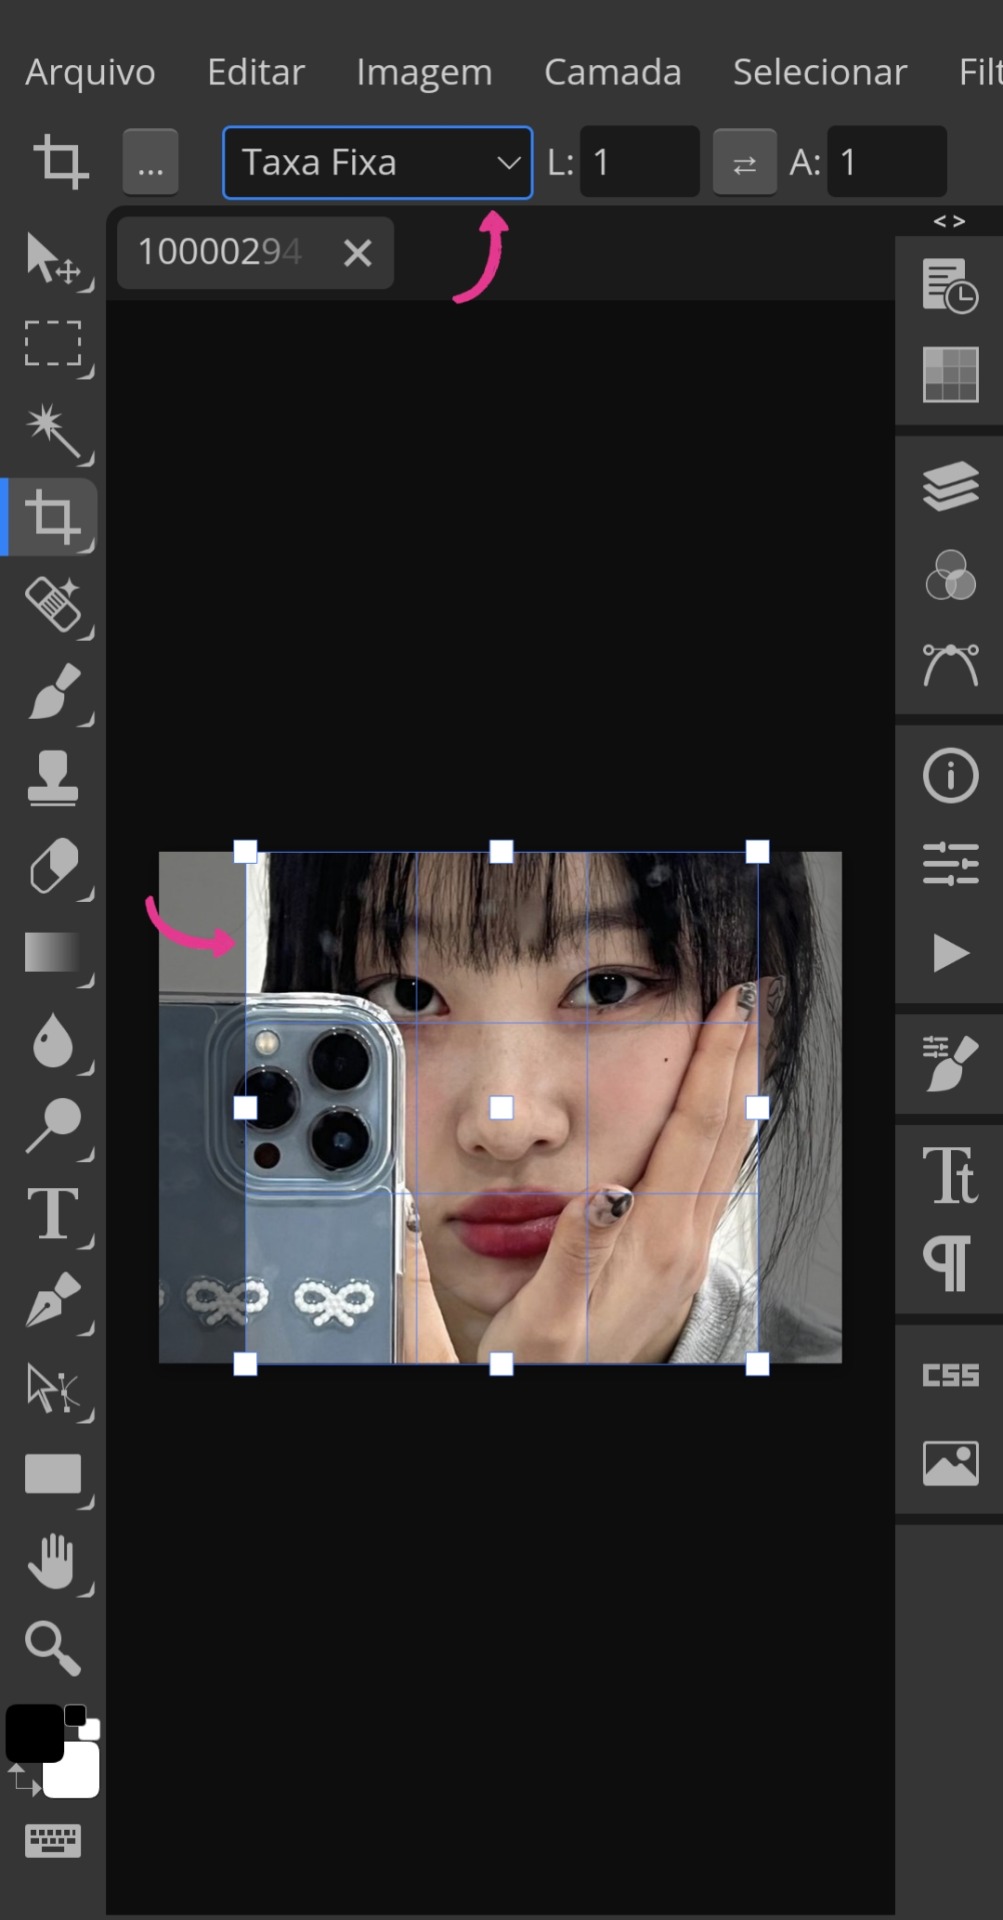
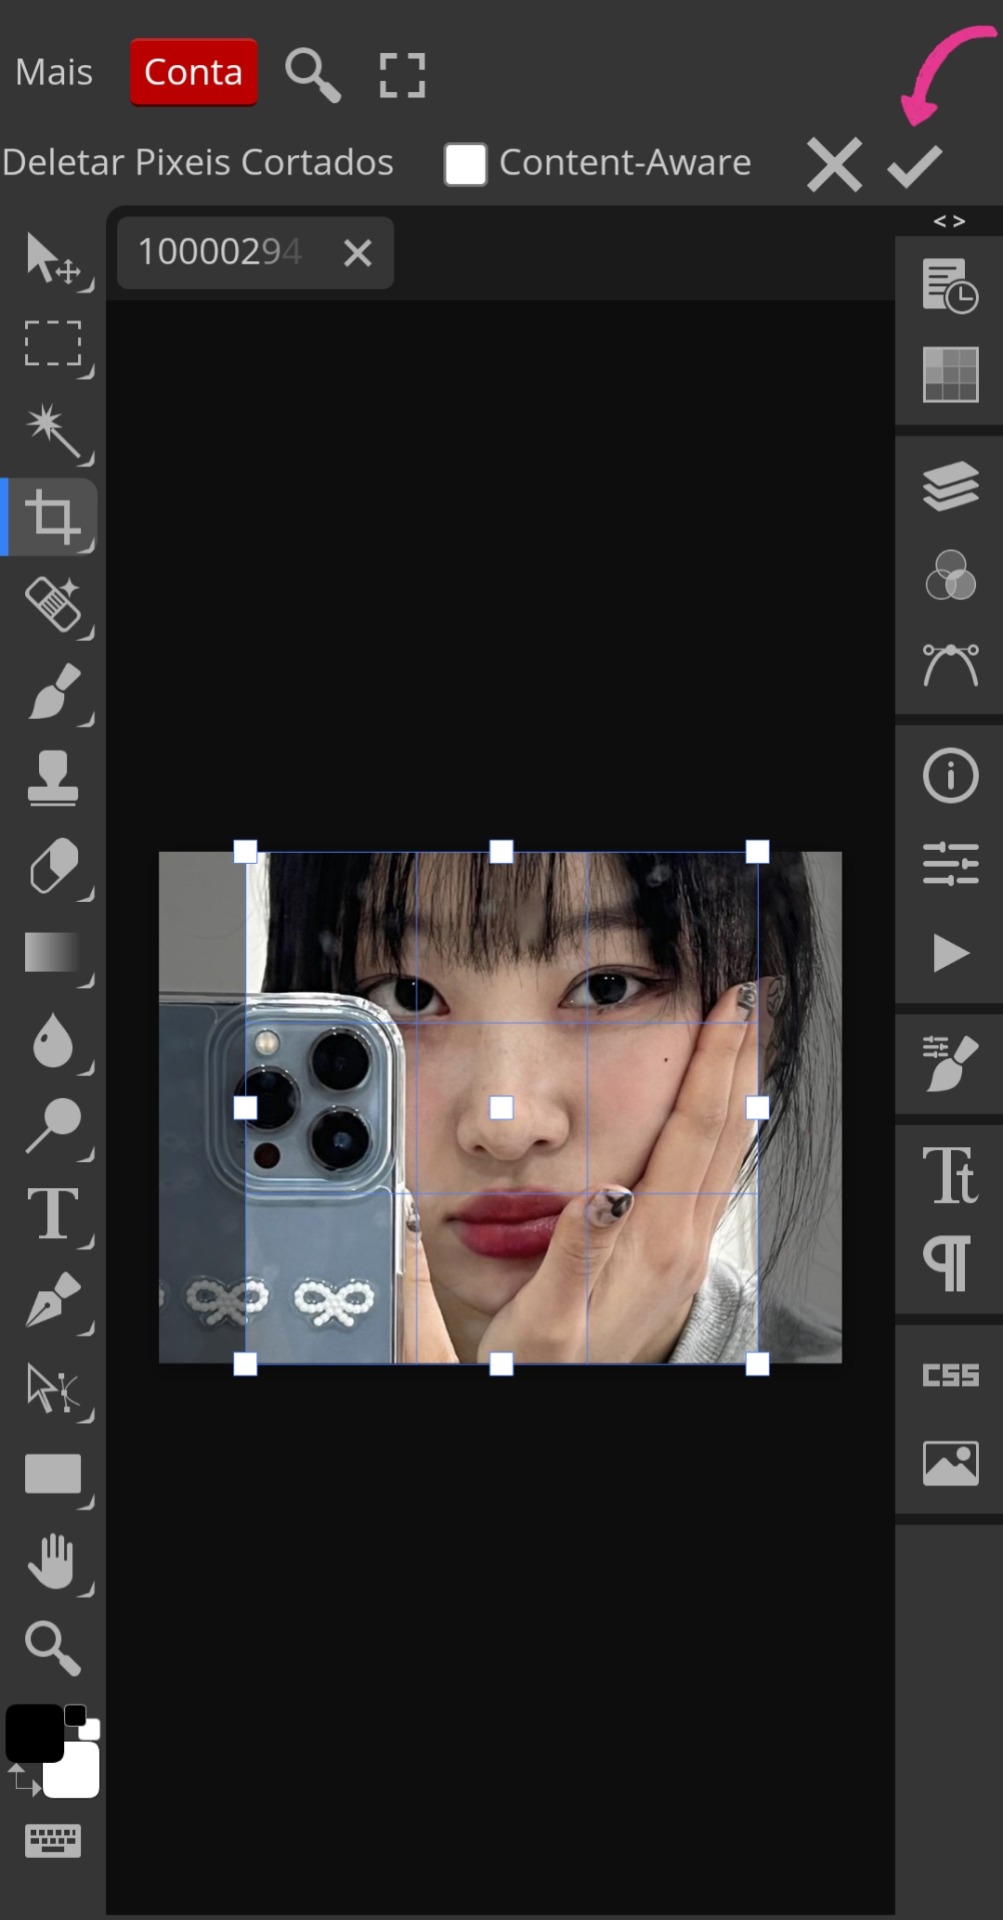
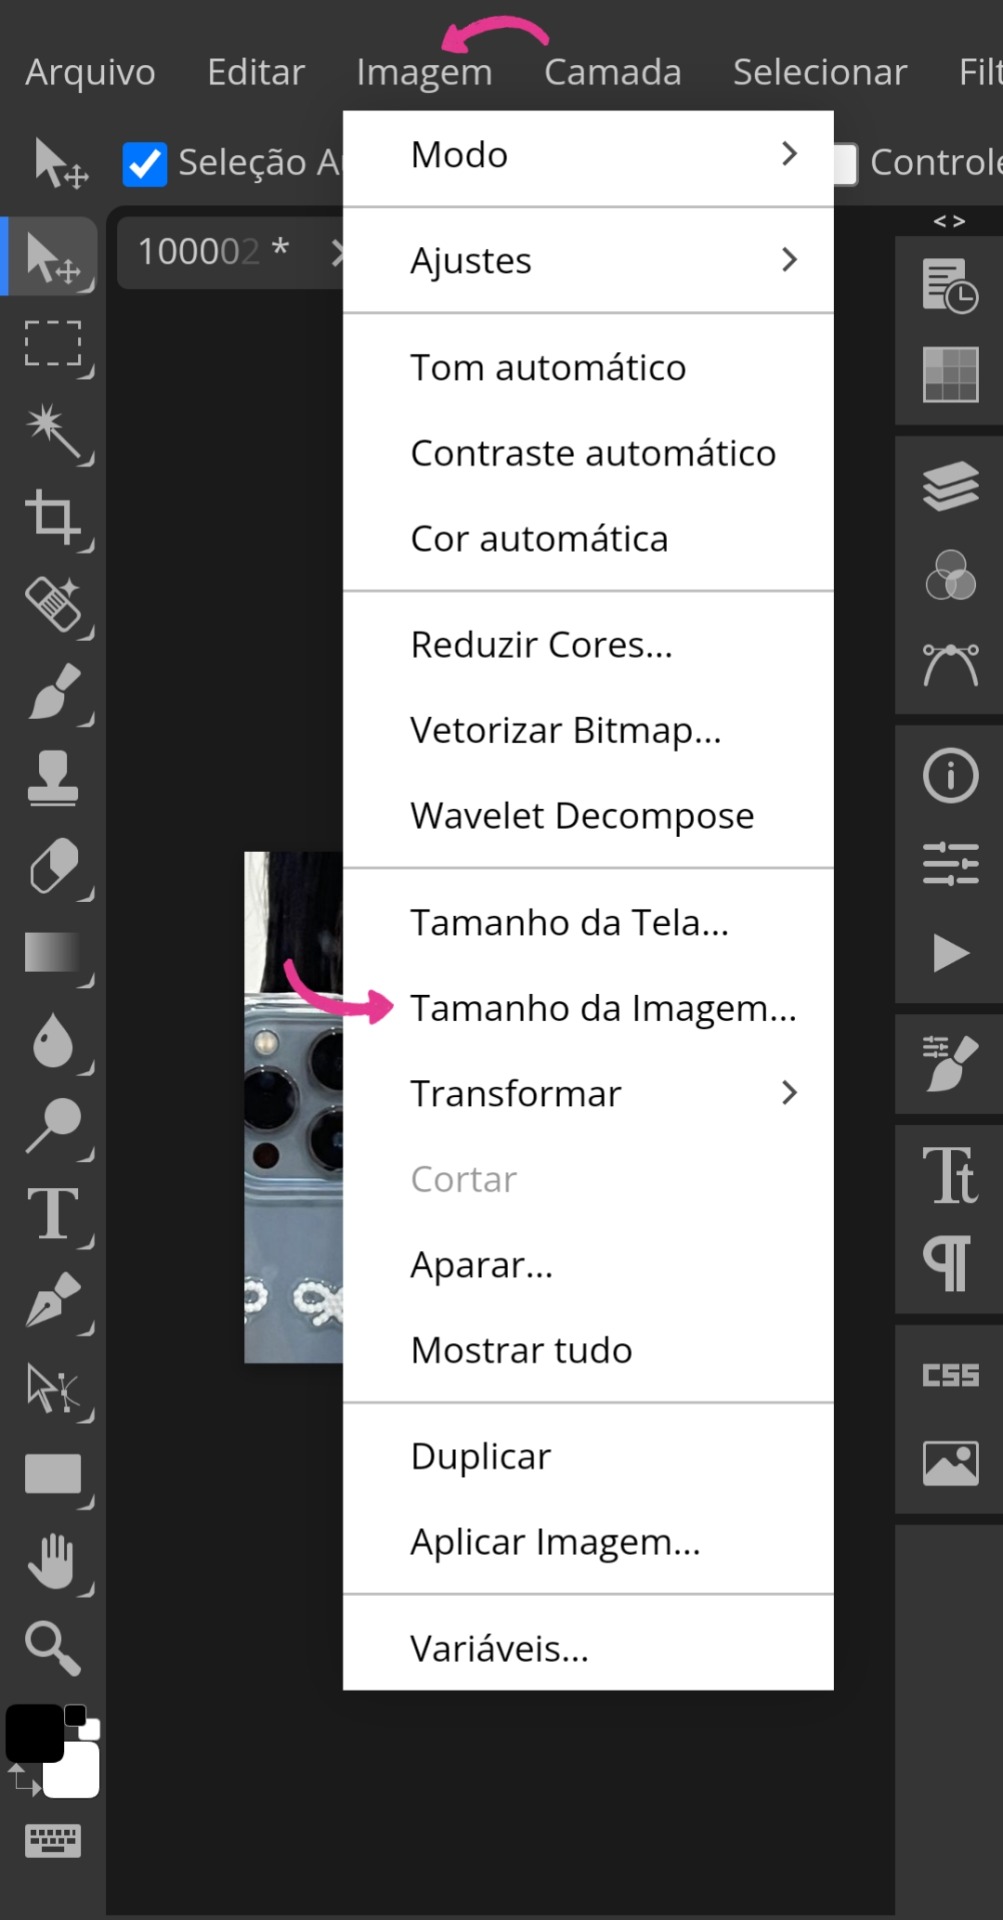
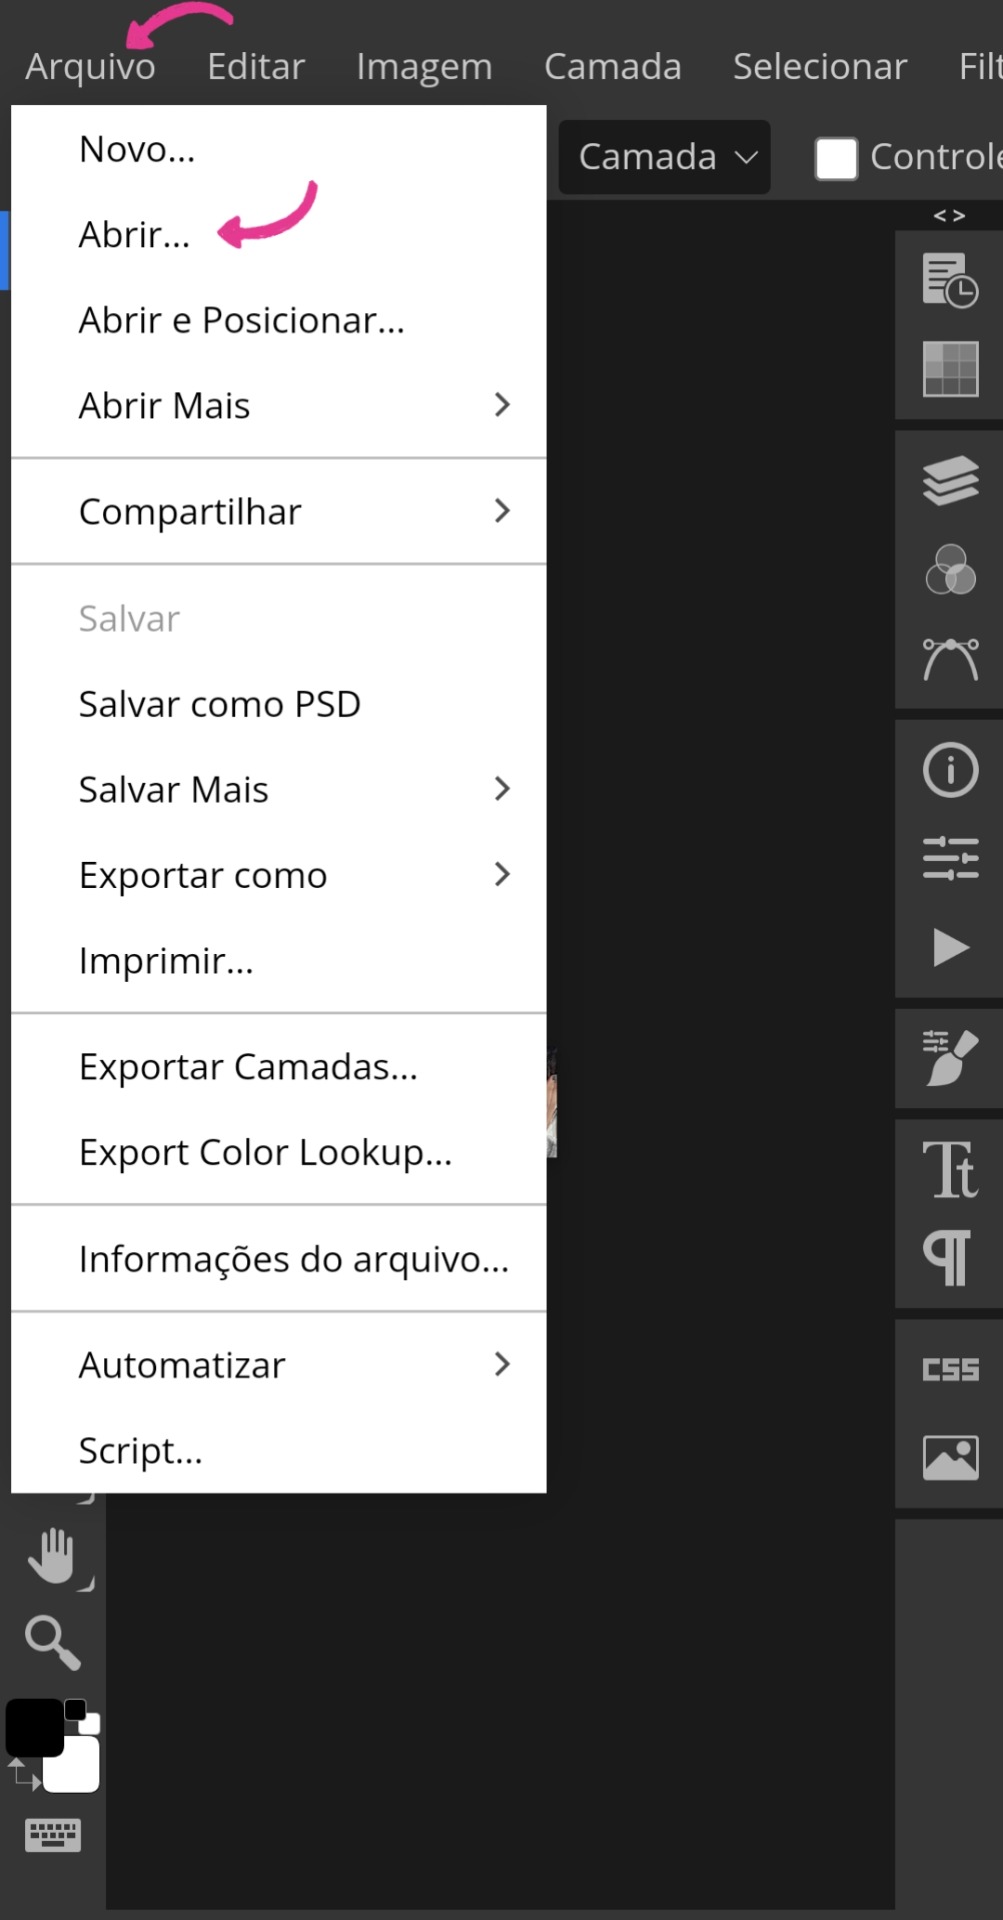
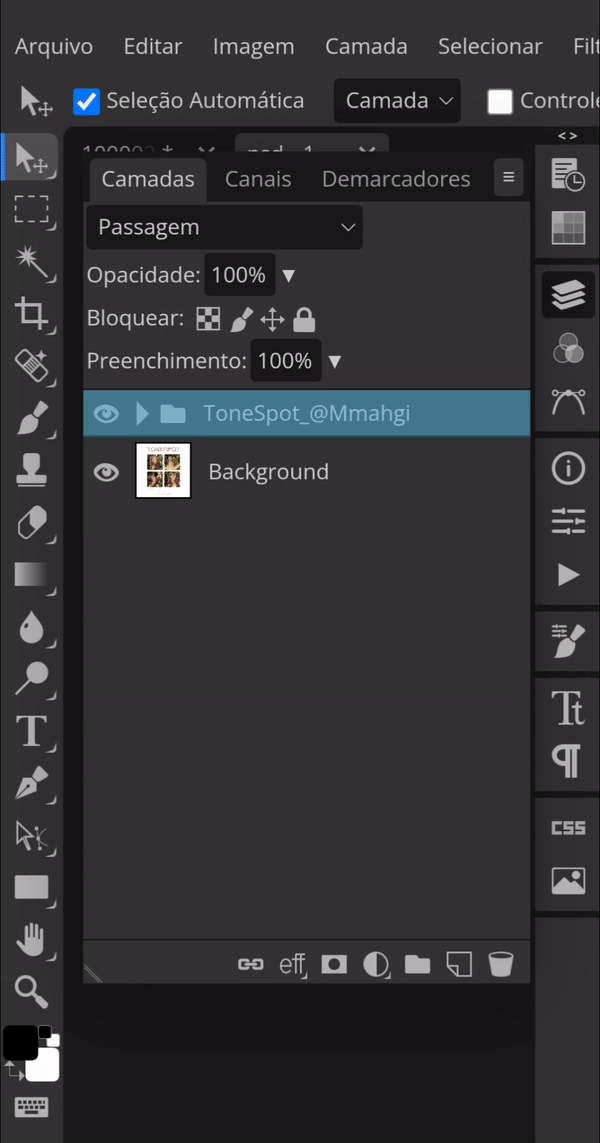
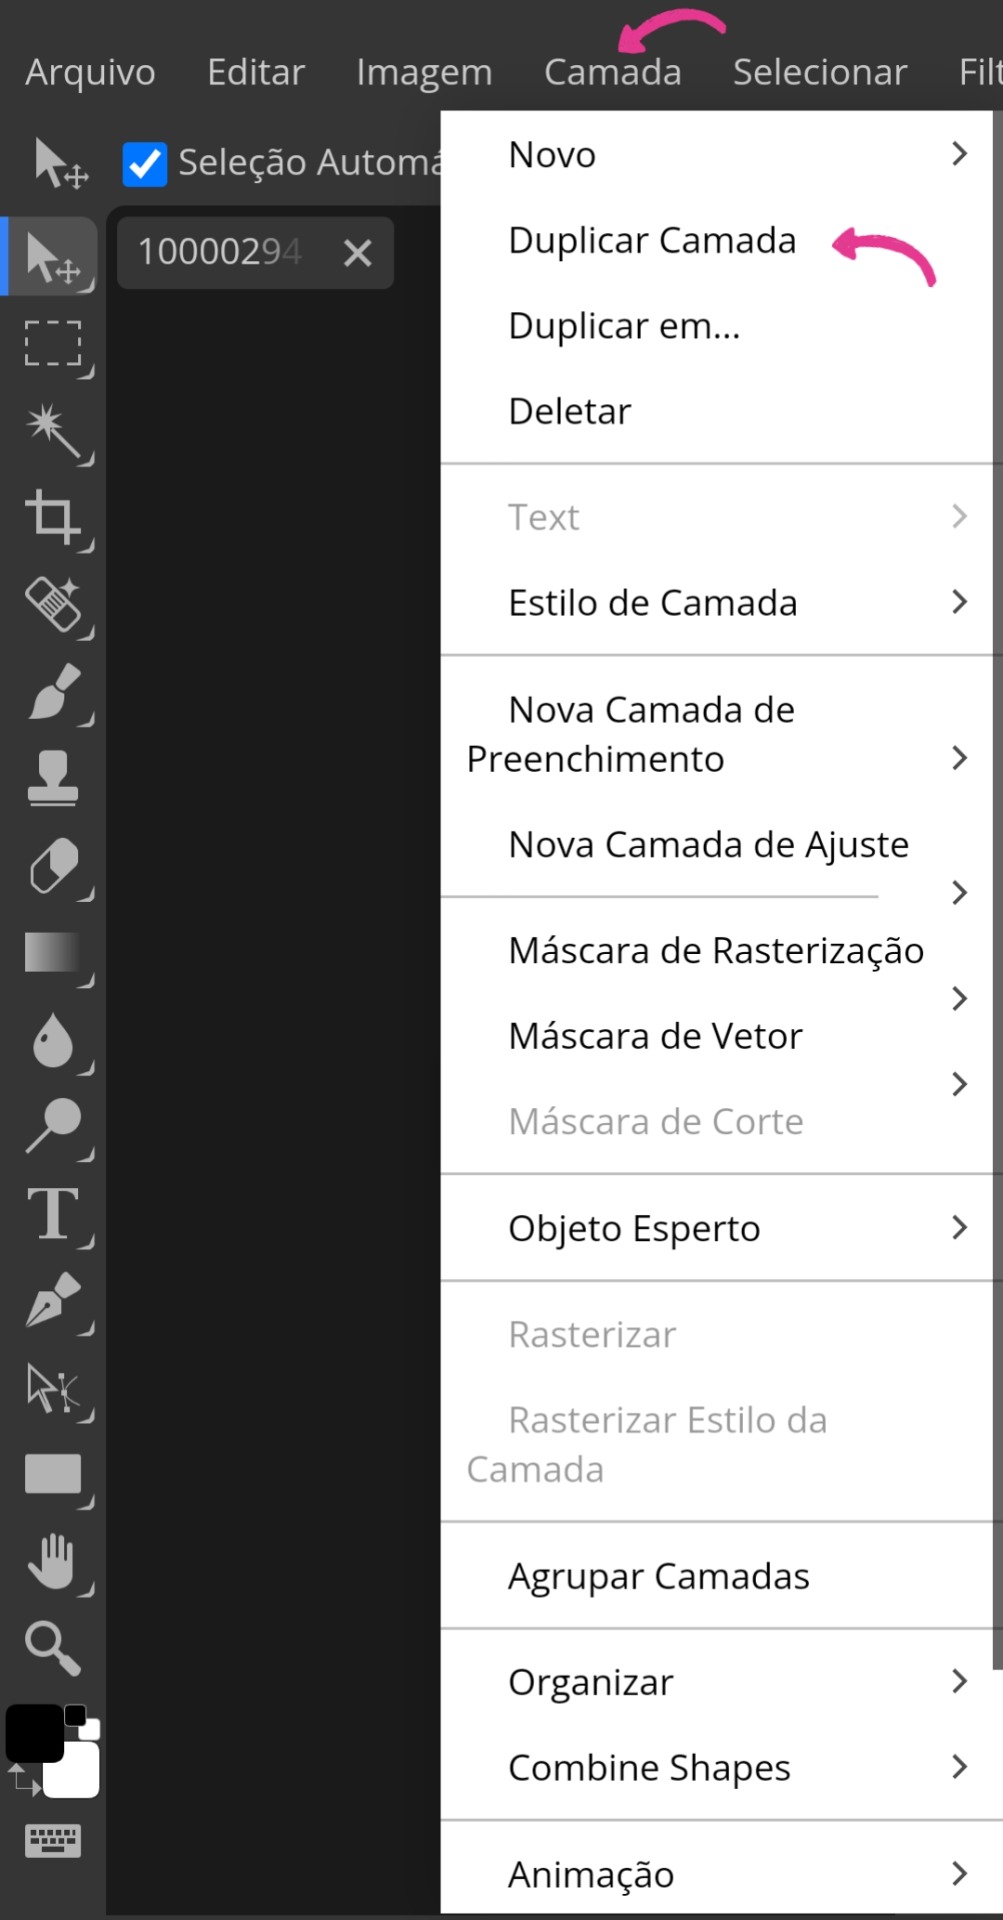
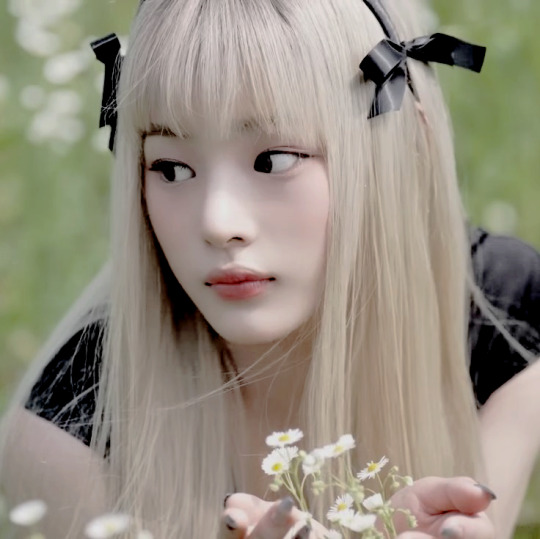
• Para começarmos, você usará o site Photopea. É lá que será feito tudo. Entrando no site, vá na aba lá em cima escrita "Arquivo", depois clique em "Abrir" e selecione a imagem que você irá usar. Com a imagem pronta, vamos para os primeiros passos da edição. Recortar a imagem para que ambos os lados tenham a mesma largura e altura é importante mais para frente. Então, ao recortar a imagem, selecione aquela tabelinha e troque "Livre" por "Taxa fixa". Ao arrastar as abas de cima para o lado (assim como na imagem 4), você só precisará clicar em "✓".
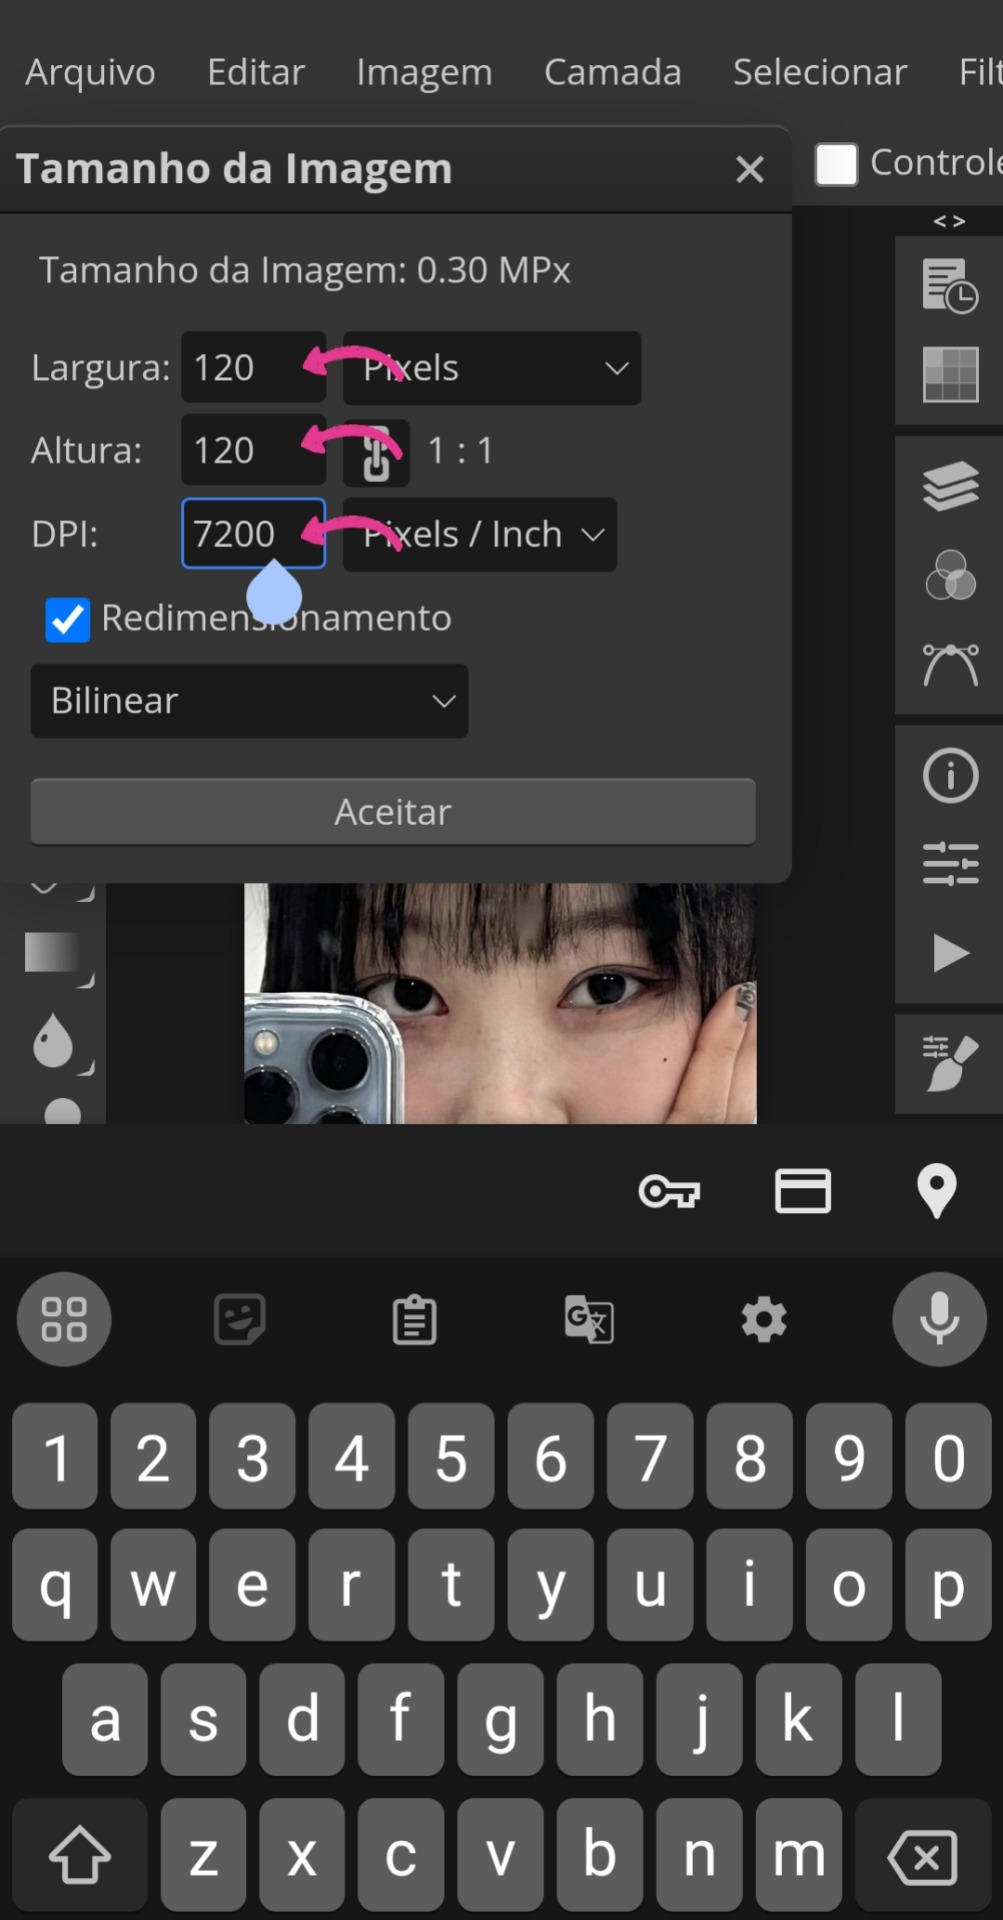
• Depois, você irá encontrar a aba "Imagem" também ali acima e, ao clicar nela, irá procurar por "Tamanho da imagem". Feito isso, aparecerá uma tabelinha onde você usará as seguintes medições: largura → 120, altura → 120 e DPI → 7200. Aí você só aperta em "Aceitar" para concluir.
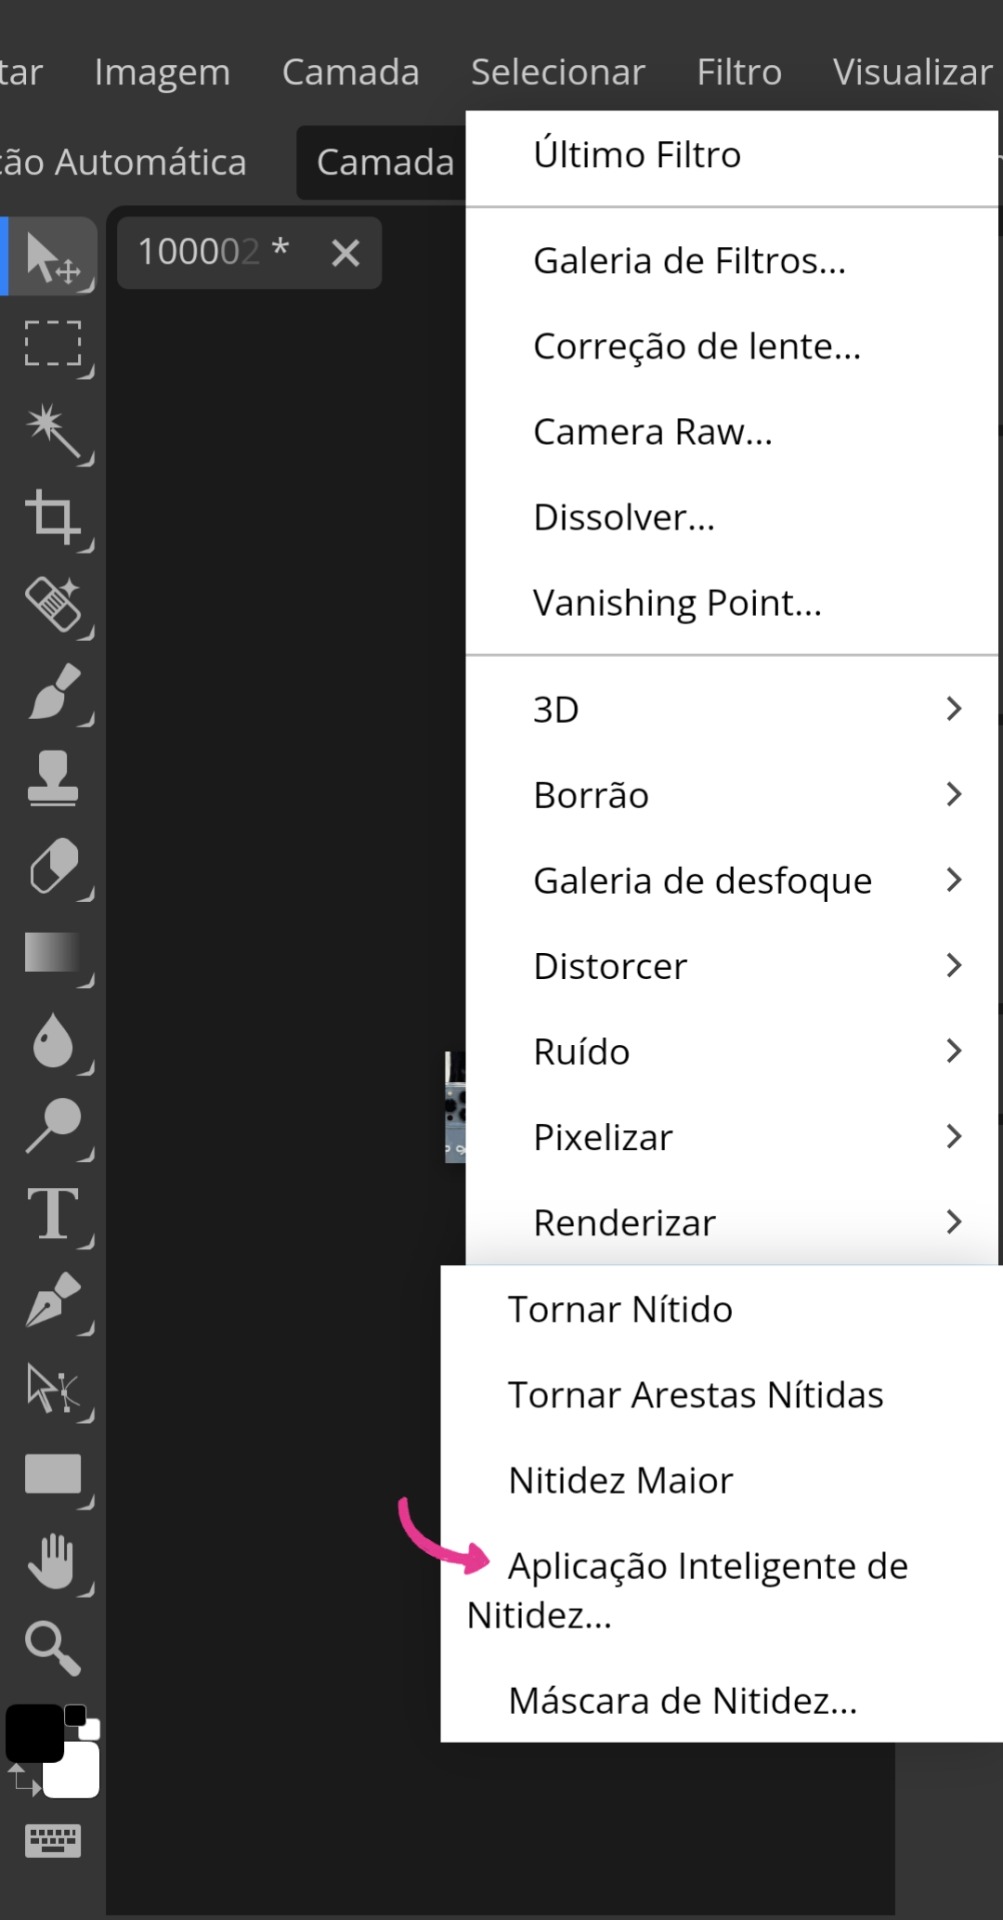
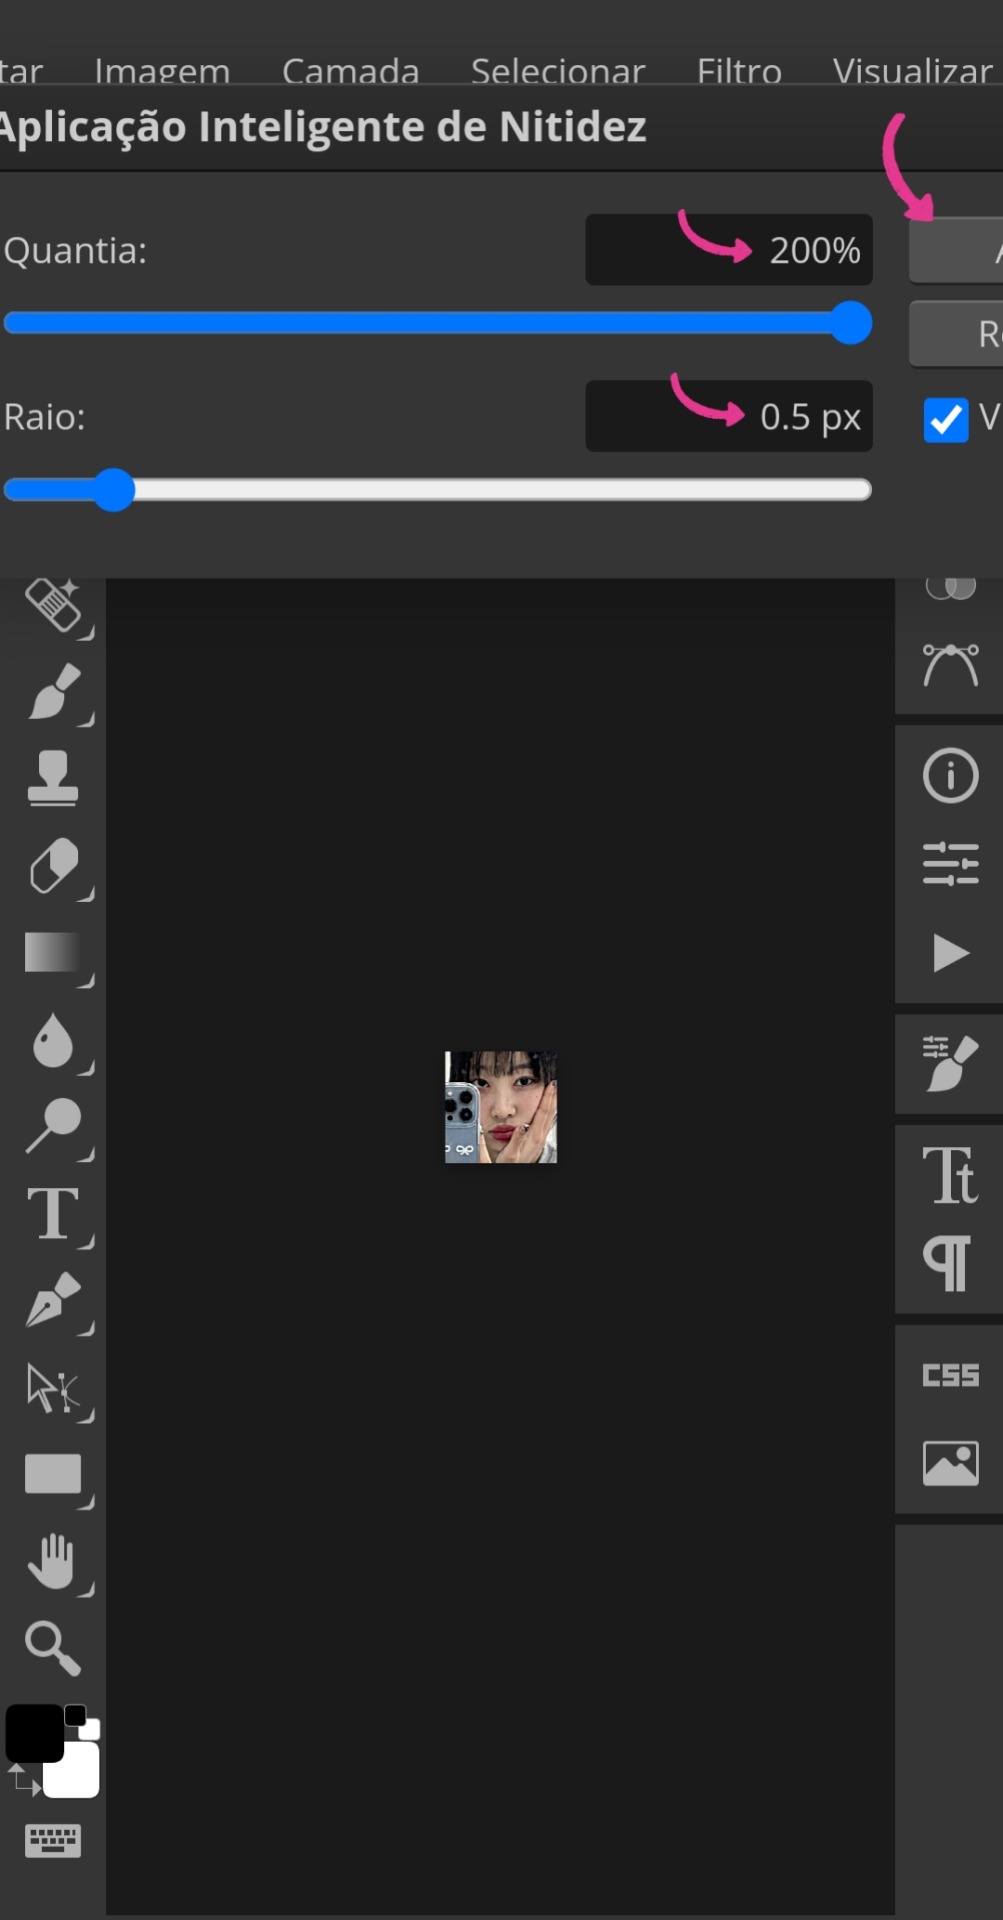
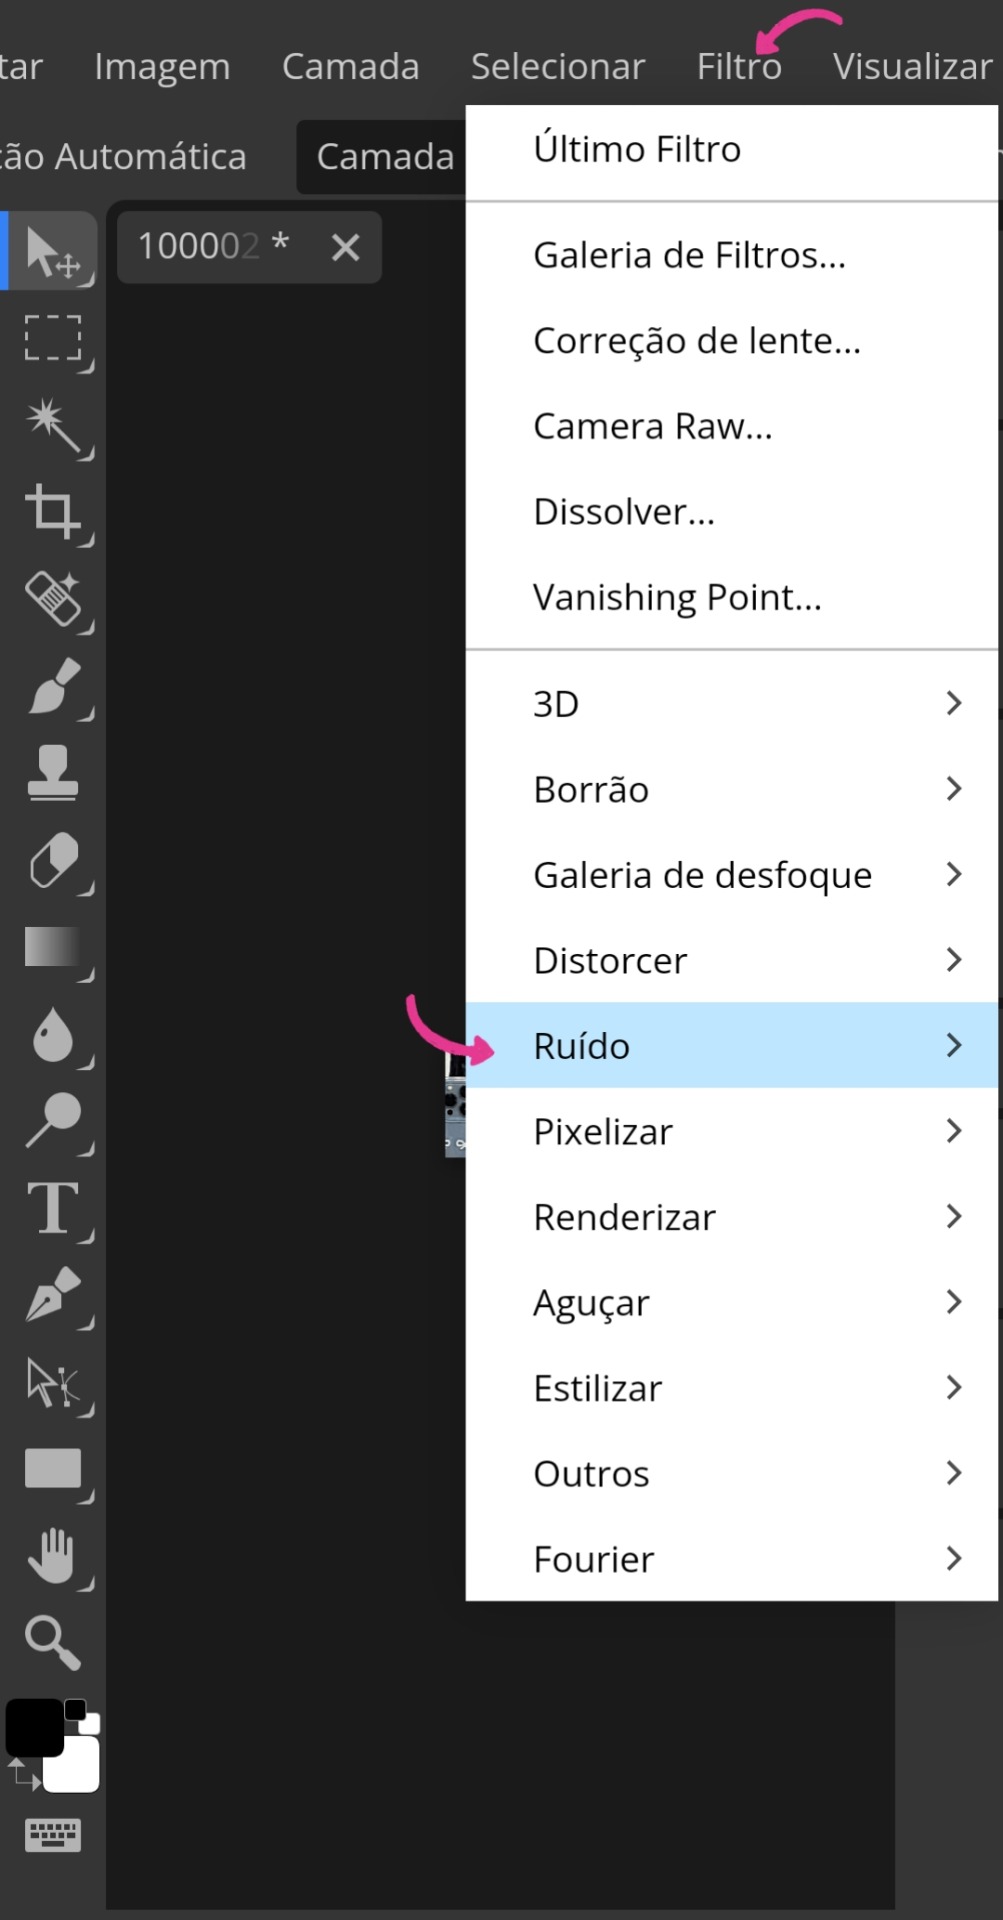
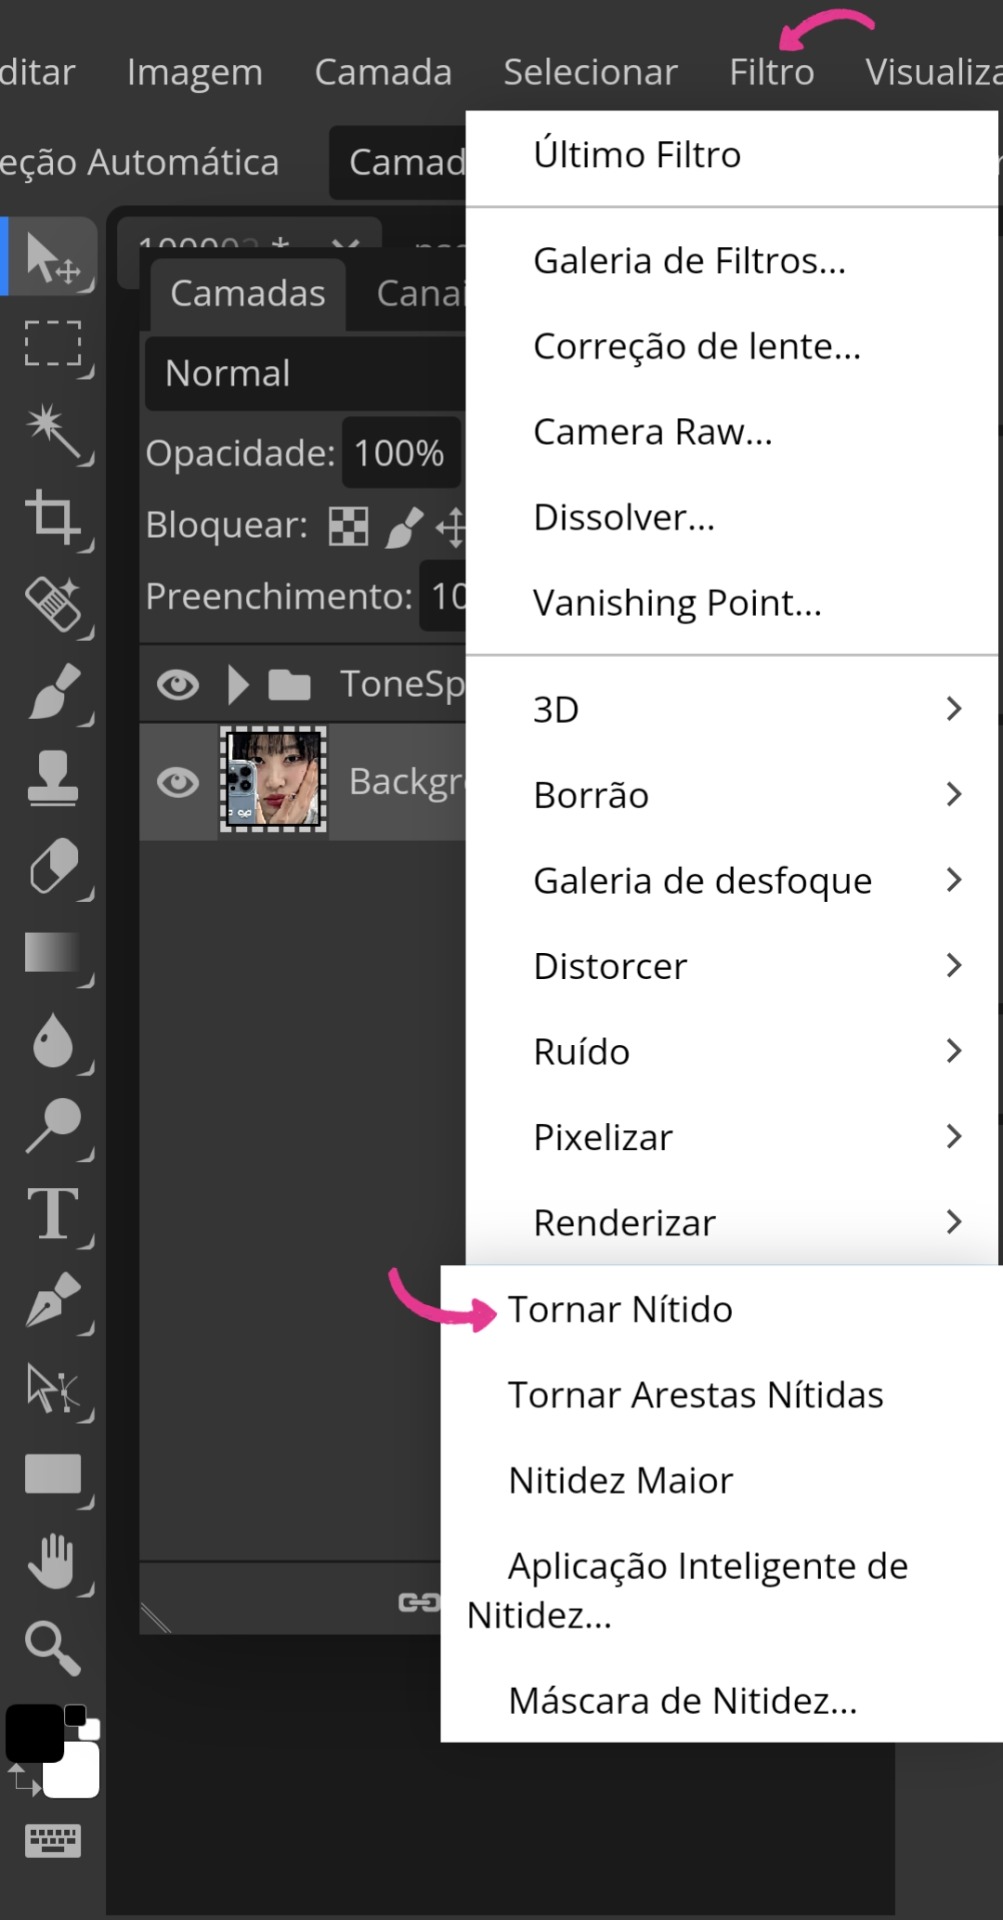
• Ainda nas abas superiores, você as arrastará até encontrar "Filtro". Ali, você irá em "Aguçar" e, em seguida, "Aplicação inteligente de nitidez". Depois, ajuste a Quantia para 200% e o Raio para 0,5 px.

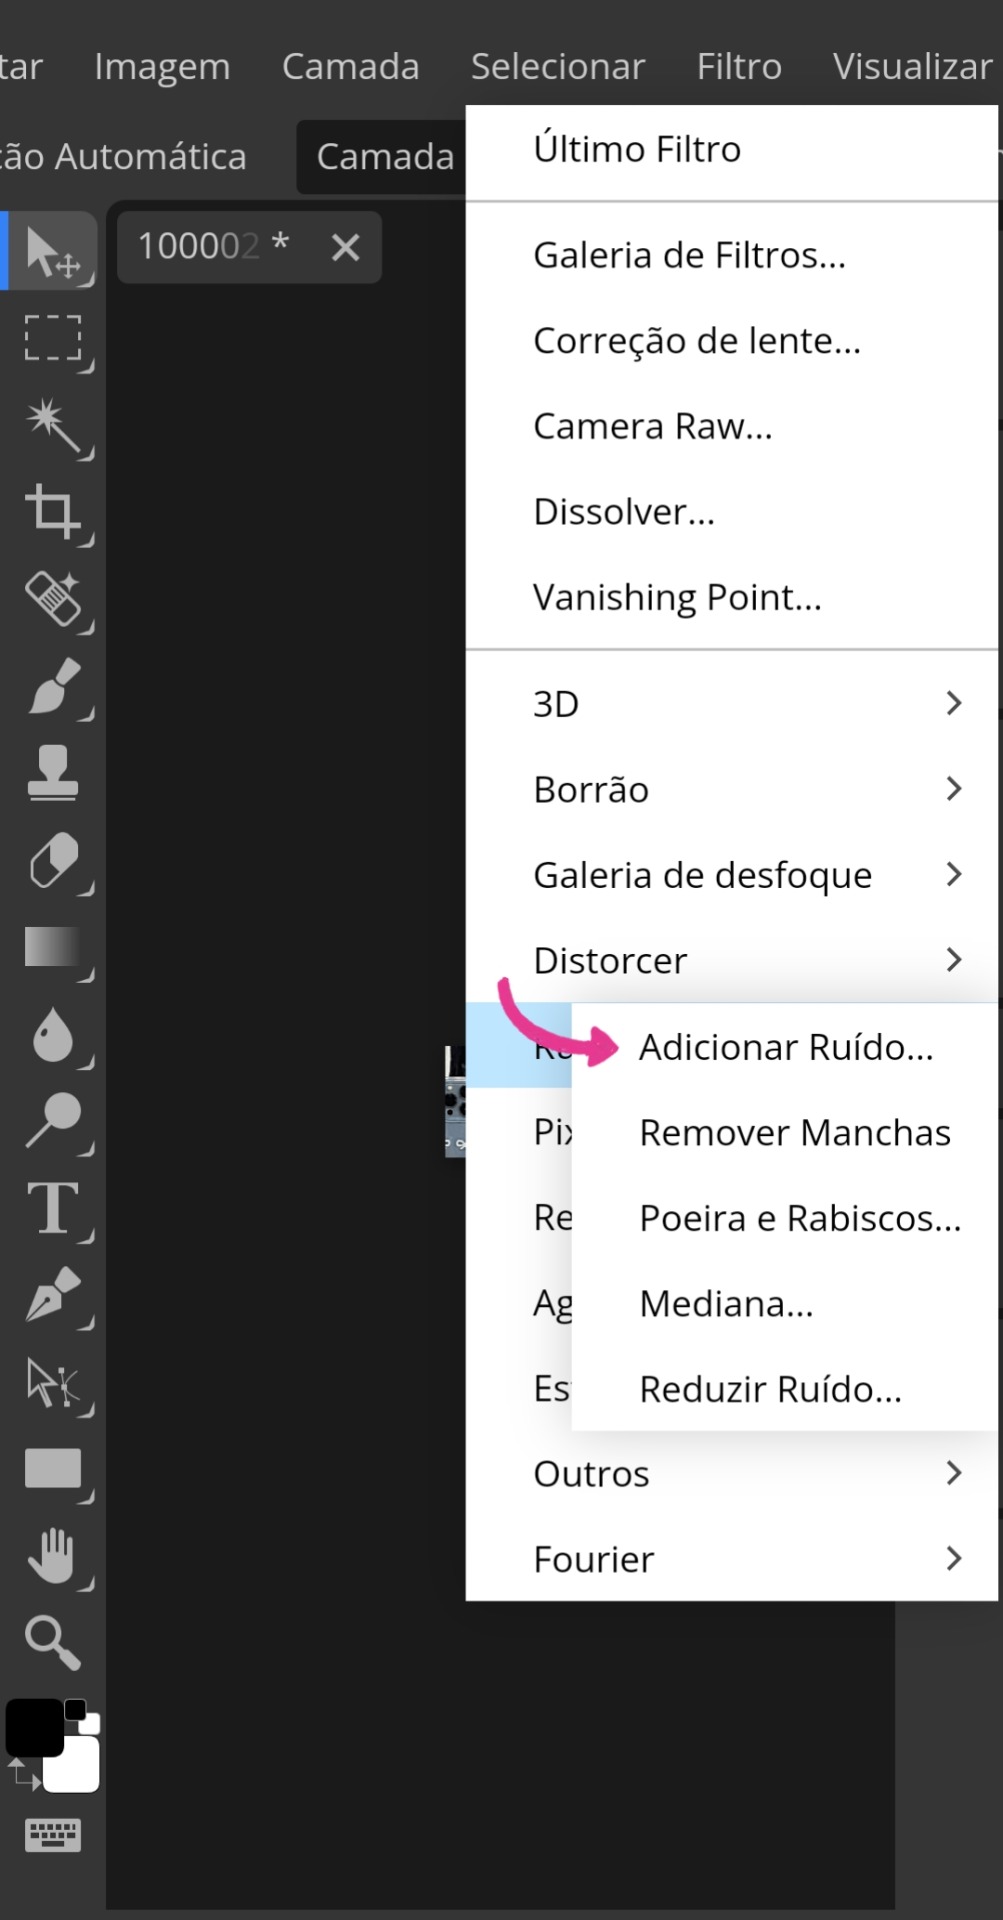
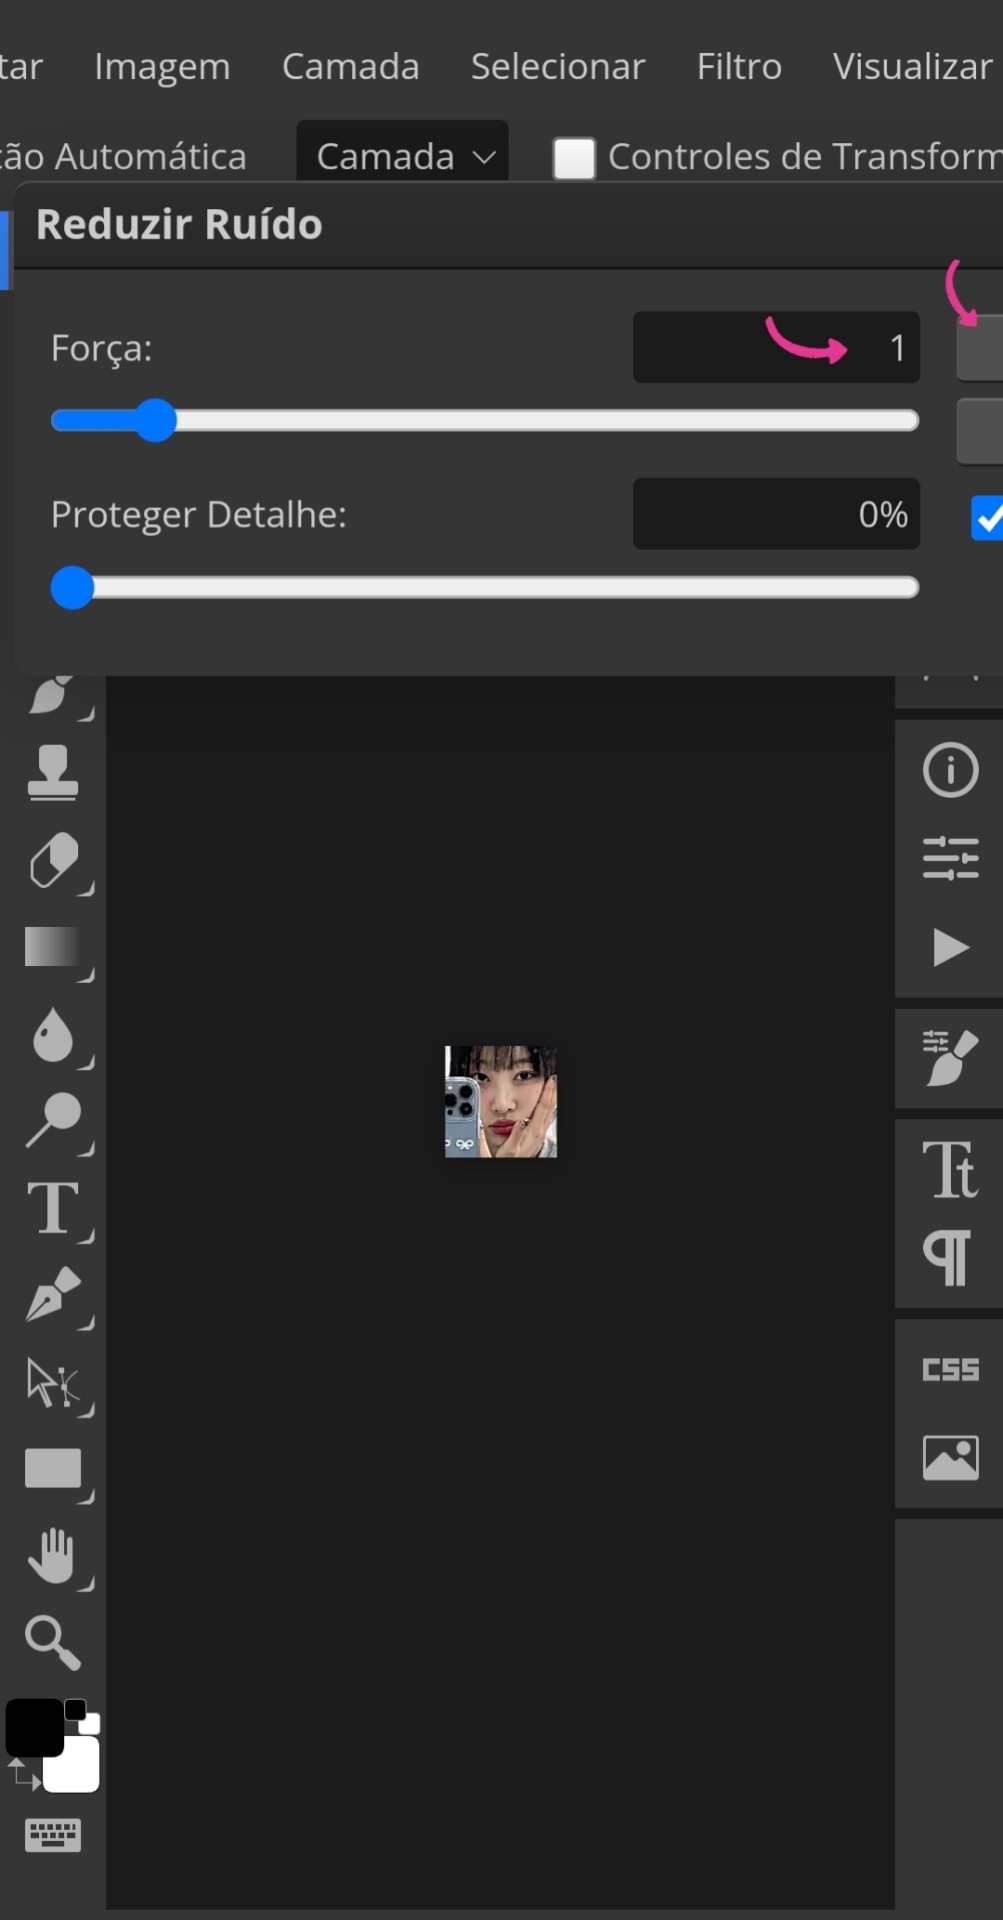
• Após aceitar e, ainda em "Filtro", você irá até "Ruído" e selecionará "Reduzir ruído". Nessa outra tabela, você deixará a "Força" em 1. (Vamos ignorar que eu marquei o errado na imagem 11)
• Com esses ajustes agora prontos, você voltará para as abas acima e irá até "Arquivo" novamente, mas dessa vez para buscar seu PSD (essa parte da aplicação do PSD é opcional. Caso não queira, pule para a imagem 16). Com o PSD em mãos, clique naquele ícone indicado ali no canto da imagem 14 e faça exatamente o que está sendo feito na imagem 15. Aproveitando para informar que meu PSD está disponível para uso no DeviantArt.
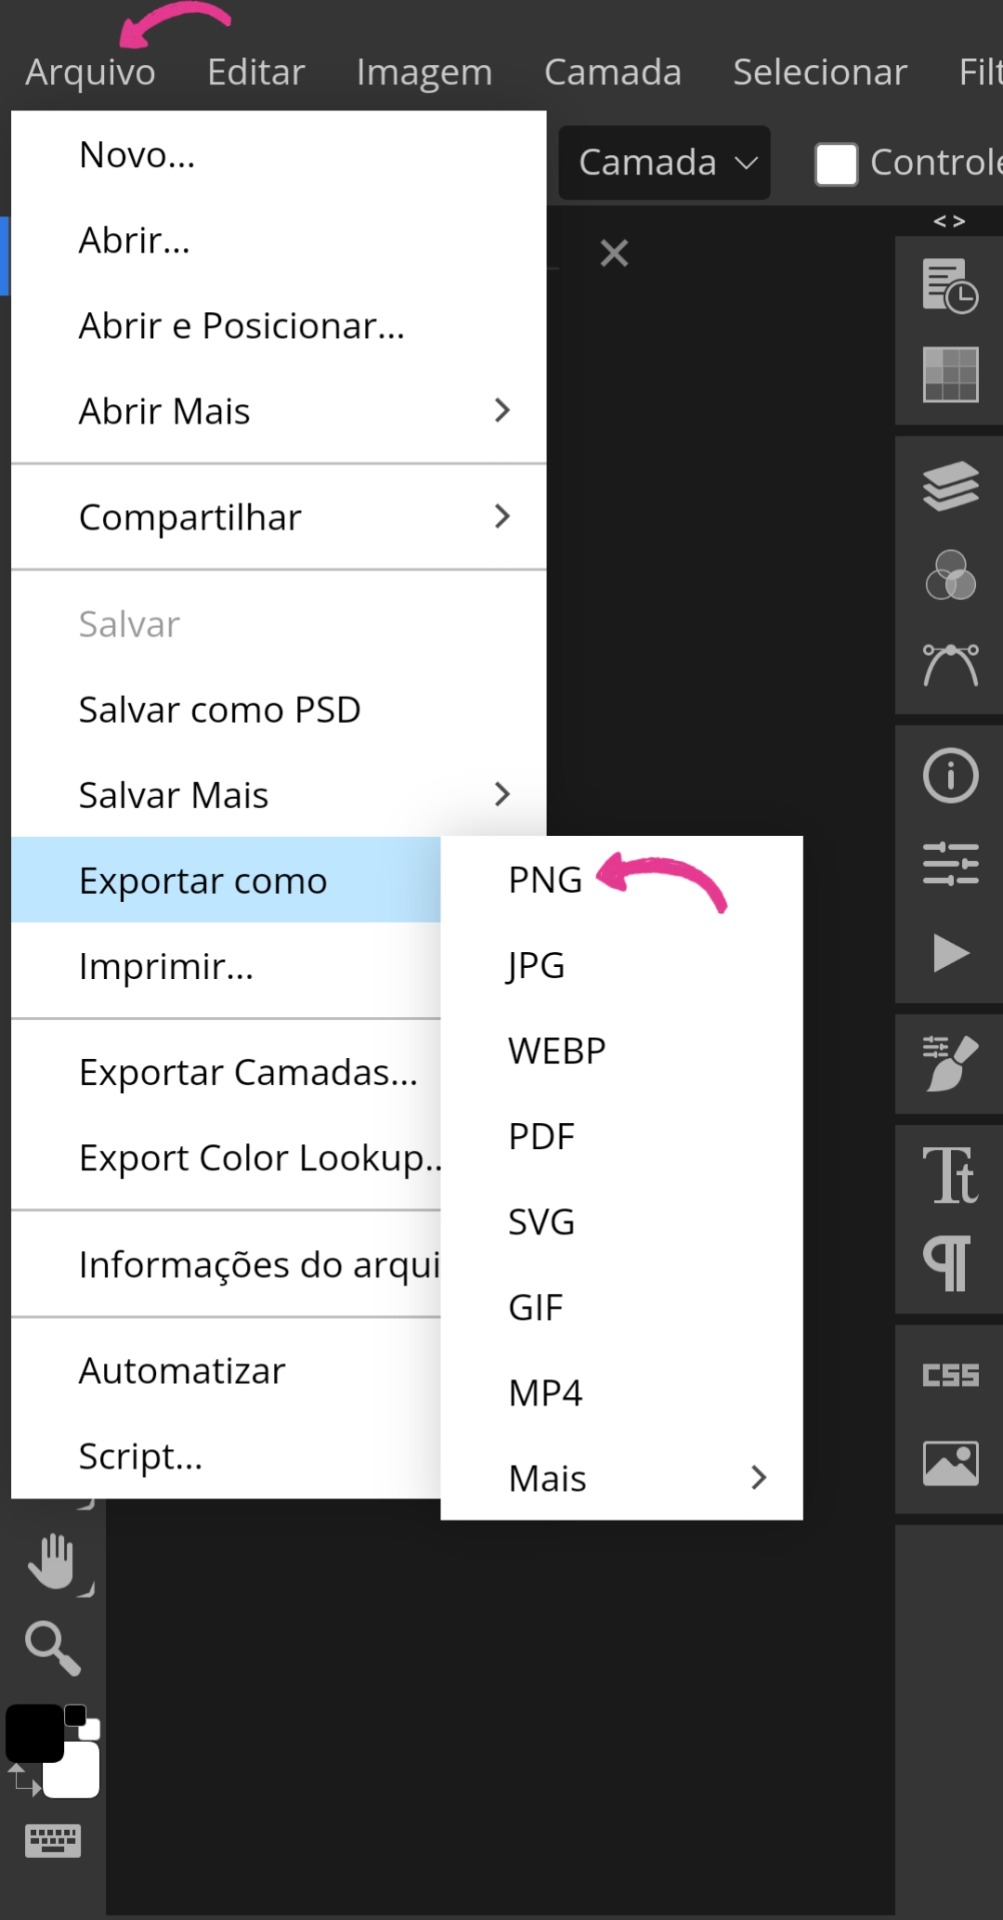
• Com o PSD ajustado na imagem, clique na mesma novamente para o último ajuste. Voltando à aba "Filtro", vá novamente para "Aguçar" e dessa vez selecione "Tornar nítido". A última etapa é a exportação, encontre a aba "Arquivo" novamente, mas agora selecione "Exportar como...". Para usar no Spirit, você precisa exportá-la como PNG ou JPG.

Geralmente, eu termino por aí, mas de vez em quando gosto de adicionar uma camada 3D. Então, faço o seguinte:
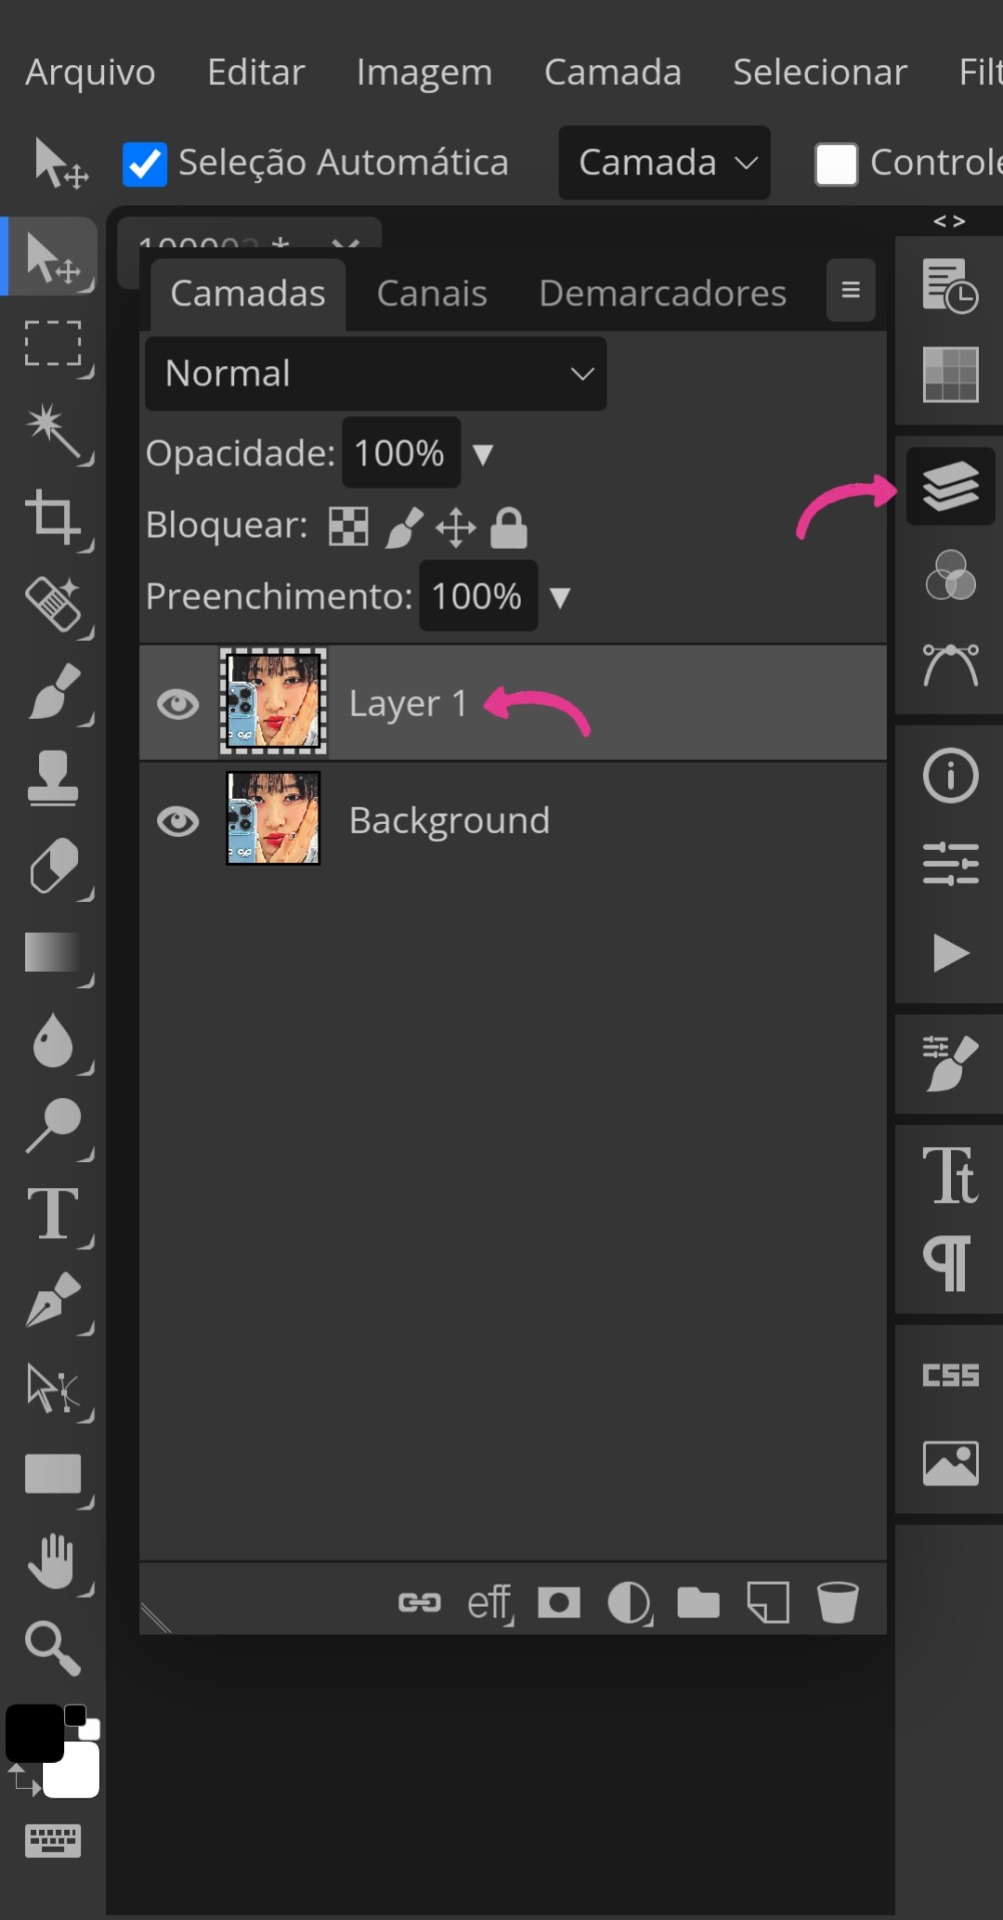
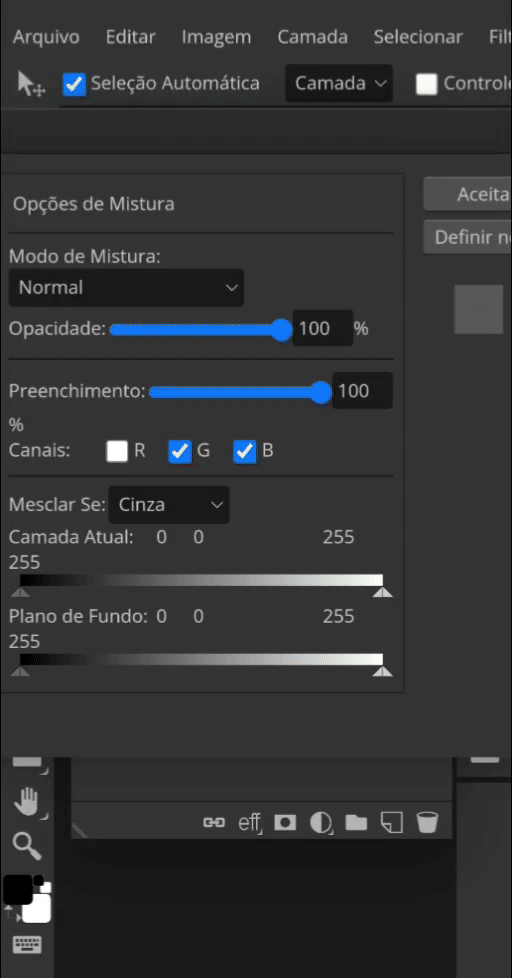
• Repito o mesmo esquema da imagem 1, mas desta vez pego o icon pronto. Vou até a aba "Camada" e clico em "Duplicar camada". Abro novamente aquele ícone (imagem 20) e clico duas vezes seguidas em "Layer". Feito isso, outra tabela maior aparecerá e, ao arrastá-la para o lado, surgirão essas três letras marcadas: R, G e B. Quando desmarcadas, cada uma delas dará cores diferentes para o efeito 3D. A letra R é vermelho com azul, a letra G é rosa com verde e a letra B é amarelo com roxo.
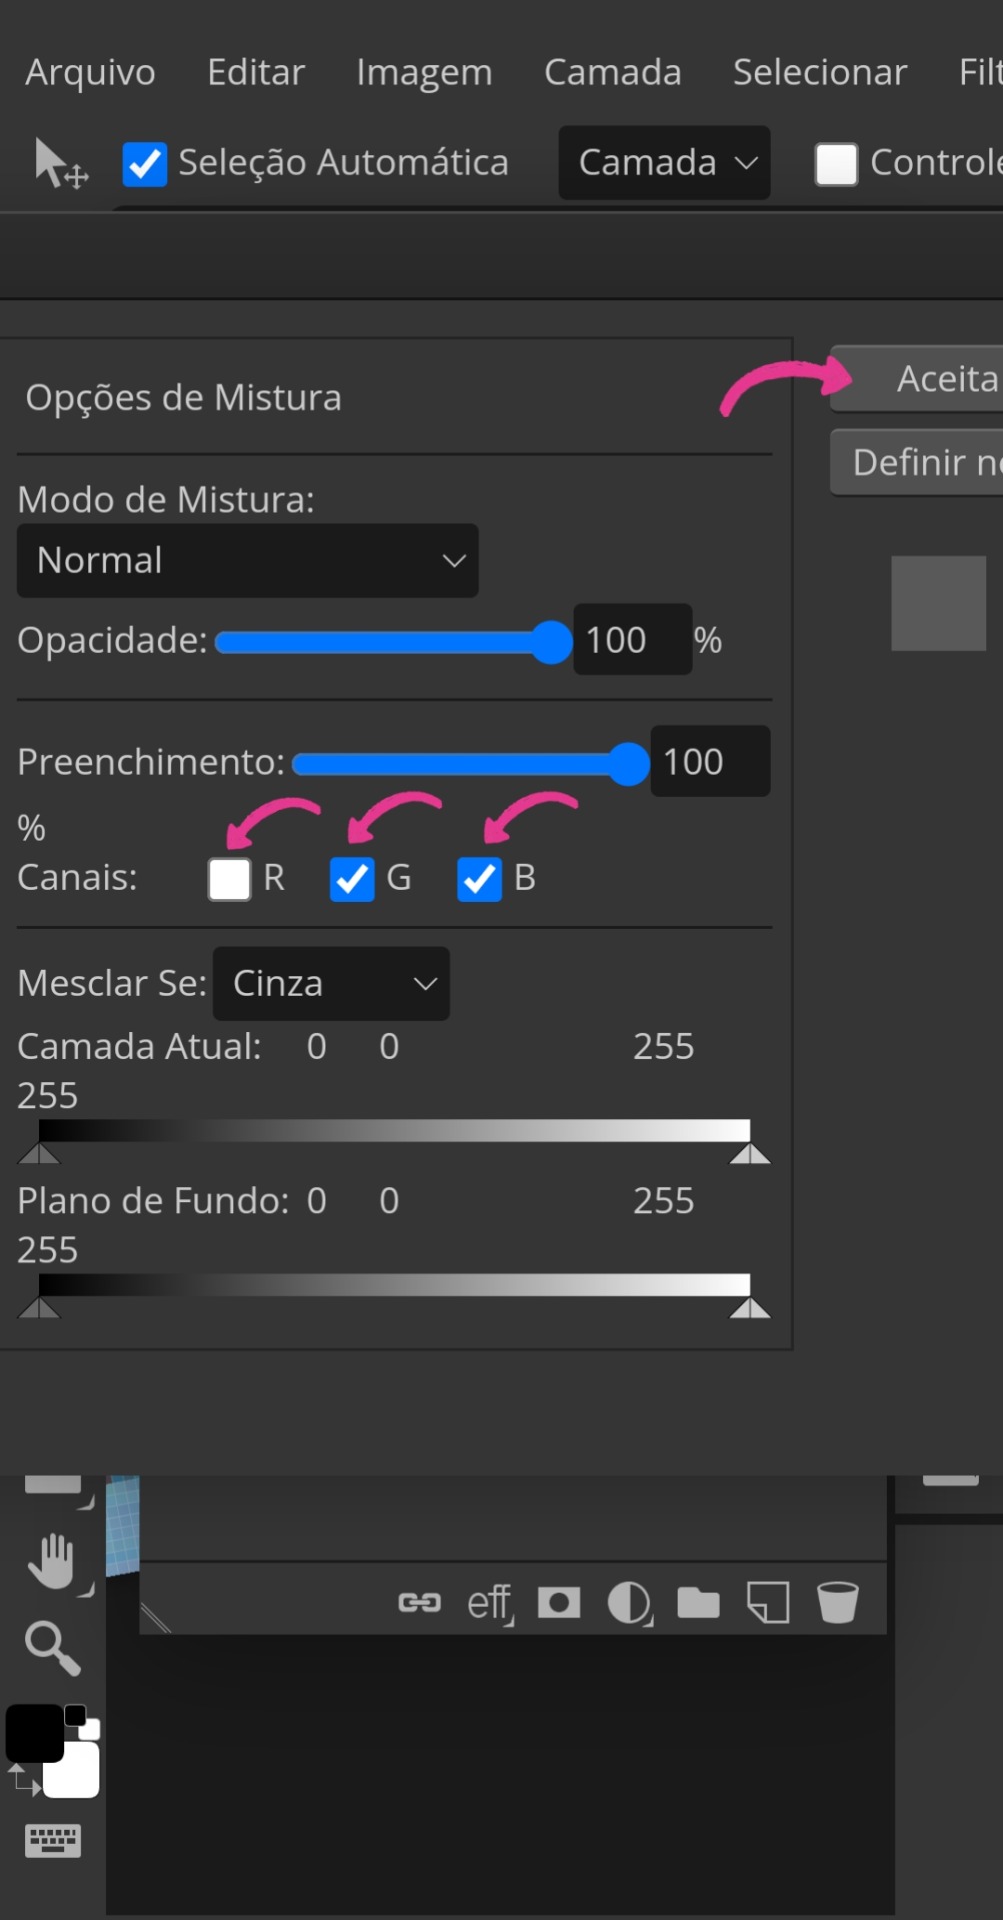
• Ao desmarcar a escolhida e aceitar, você dará um zoom bem próximo na imagem e, certificando-se de que ainda está na layer, puxará a mesma minimamente para o lado para então "ativar" o efeito 3D, conforme a última imagem ensina. O processo de exportação é o mesmo explicado anteriormente.

Não vou mentir, acabou sendo mais longo do que eu esperava kkkkj, mas pelo menos está detalhado para que vocês não tenham dúvidas. Espero sinceramente que seja útil para vocês e me deixem saber o que vocês acharam comentando aqui. Lembrando novamente que meu PSD está disponível para uso (não se esqueçam de me dar créditos se usarem).
Tchauzinho <3
#mahgi#icons 120x120#120x120#icon 120x120#120x120 icons#spirit icons#icons spirit#icons para spirit#social spirit#120×120 icons#spirit fanfics#icon maker#tutorial tumblr#tumblr tutorial#spirit
70 notes
·
View notes
Note
Random questions if you don't mind! <3
1- How you do these gradient colours in the title?
2- Where you do these headers for your hcs?
Thanks if you answer! You are very creative! :D
Heyy! thank you for the asks<3
1- the gradients is something very complicated to explain but ill try my best to just give a quick summary.
I first go and create my title without writing anything else, just the title, go to chrome and open the Tumblr website (make sure its in "PC version" if ur on mobile or else it wont work)
i edit the drabble and go to the settings, there are a "rich text" box, click on it and then click HTML.
ok, this is where it gets complicated
you will open another page called "text colorizer" write the title you want in the writing box.
there will be a box with "one color" click on it and there will be alot of options, click on the three or the other version you desire of the type of gradient.
there will be two codes when ur done picking the colors.
(tip: if you have a specific banner with specific colors, sometimes to make the title match the banners colors i go to color picker website and upload the image that i used on the banner)
ok, back to the code, you copy the last one.
i recommend you to go to text replacer and put ";" to replace with nothing, but its just a recomendation because it can bug :C
then you copy the replaced text go back to the Tumblr page, there will be a "<p> TEXT <p>" replace that with the code
and boom! ur done.
(it may appear a little "code not supported" but dont worry, it still works)
after that you can go back to the Tumblr app to add some details.
2- i do it on Alight Motion, i go to the custom size and put "1500 x 500" and then i put the images i want with some details! ✨ (i use the transparent background)
thats all and thank you for the compliment, i appreciate it<3
the websites i talked about:
if my explanation is too confusing about the gradient, theres a tutorial on YouTube! if your on mobile just do everything the person says in the "Pc version" option that chrome has.
xoxo<3
15 notes
·
View notes
Text
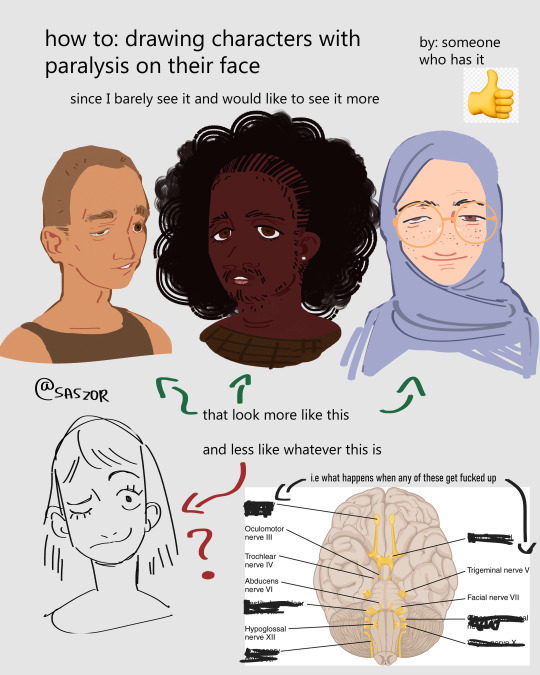

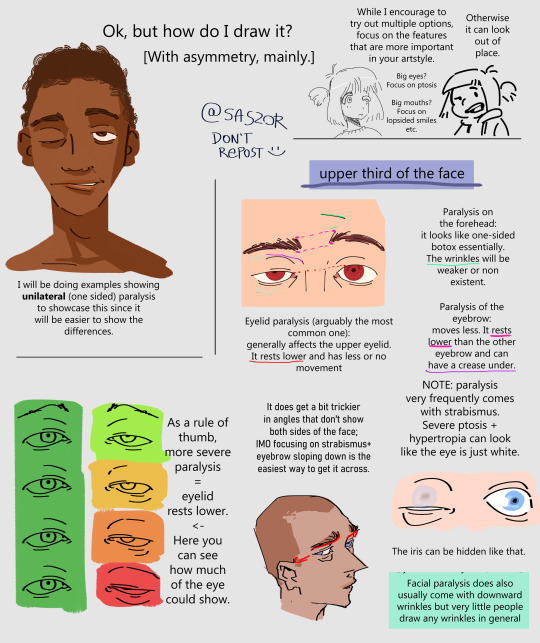
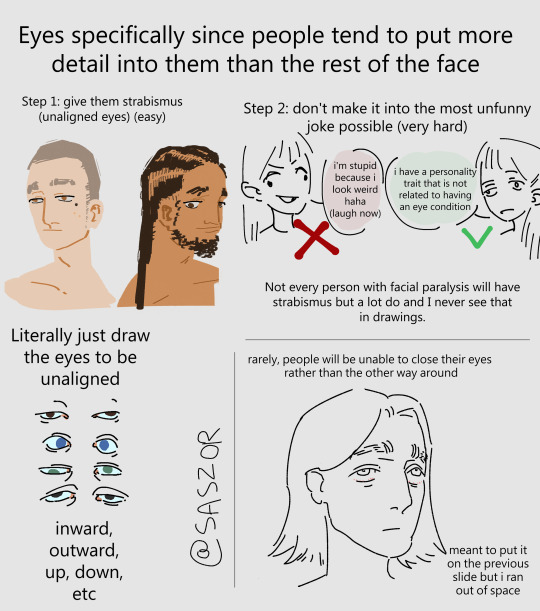
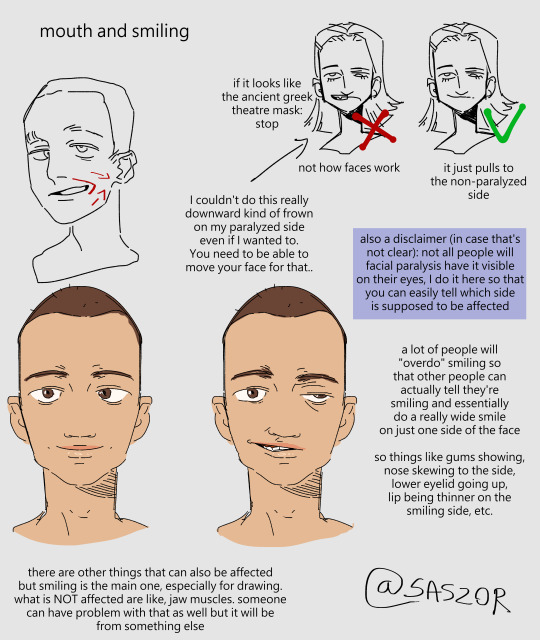
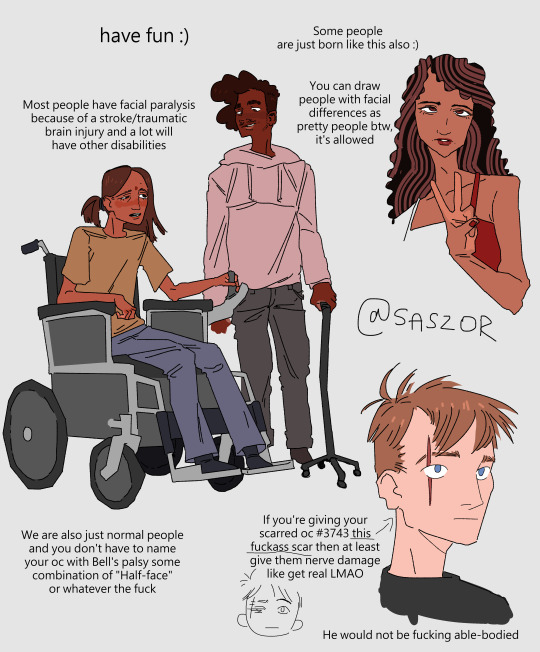
[ID in alt]
Tutorial on drawing characters/OCs who have some sort of facial paralysis. It doesn't cover all possible variants because I was using mirror as my main reference lawl
Keep in mind that this is an introductory drawing tutorial and has some generalizations in it, so not every “X is Z” statement will be true for Actual People 👍
Consider supporting me on ko-fi if you find this to be helpful.
#No 'omg mithrun dungeon meshi' notes that's not even what he has.#my art#artists on tumblr#disabled artist#digital art#id in alt text#art tutorial#drawing disabled characters#facial difference#disabled representation#disabled characters#digital artist#artwork#art on tumblr#art#body positive art#character art#disabled art#original art#personal art#illustration#drawing
24K notes
·
View notes
Text
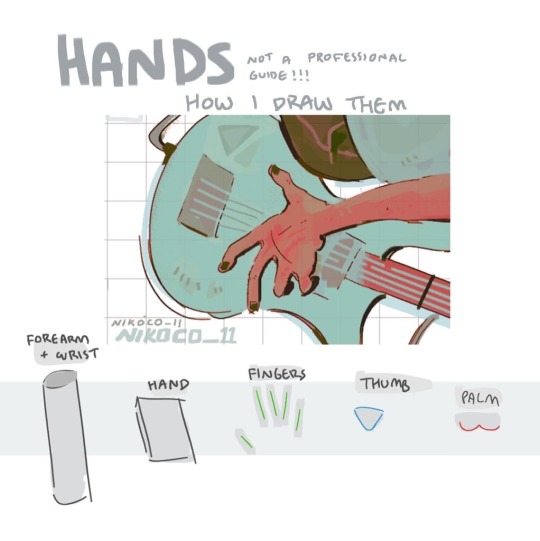


my recipe for drawing hands!
(small note that this is a shortcut that is more abt style and ease than anatomical accuracy. it helps to take time to really properly study hands, makes it easier to bend the rules a bit like this and have it still look good!!)
(learn rules b4 u break them or whatevah)
#qna#tutorial#guide#drawing tutorial#digital art#illustration#drawing#artists on tumblr#my art#clip studio paint
59K notes
·
View notes
Text


i've gotten a lot of very kind feedback about how i draw fat bodies, so i thought id make a little guide showing my thought process!! this is far from comprehensive, but maybe it'll be helpful to anyone who feels intimidated drawing plus size furs :)
if anything is unclear, please feel free to ask questions in the replies or reblogs!! <3
#digital art#artists on tumblr#safe fur work#sfw furry#art tutorial#art help#art tips#drawing reference#fat positive#body positive
10K notes
·
View notes
Text
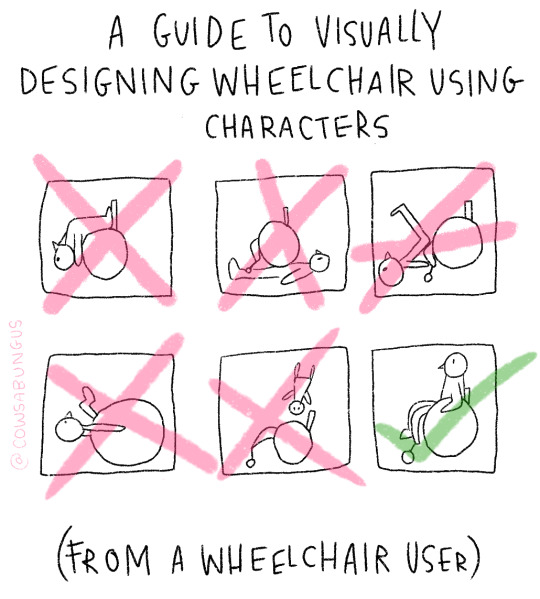
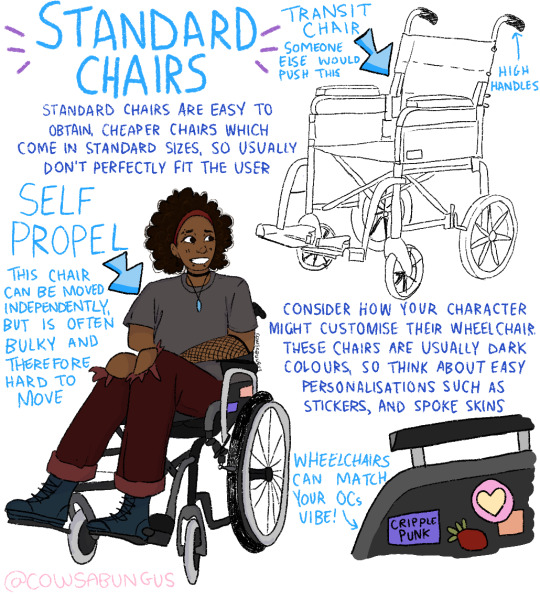
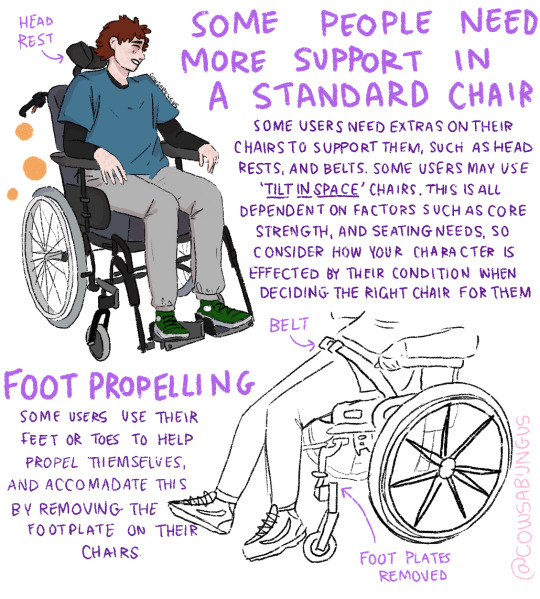

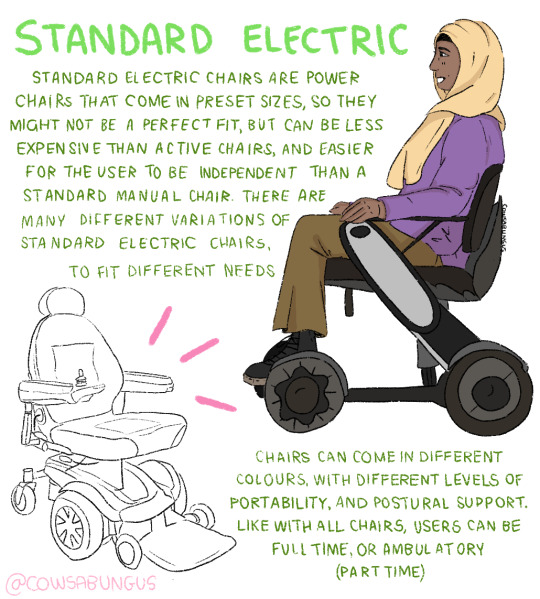

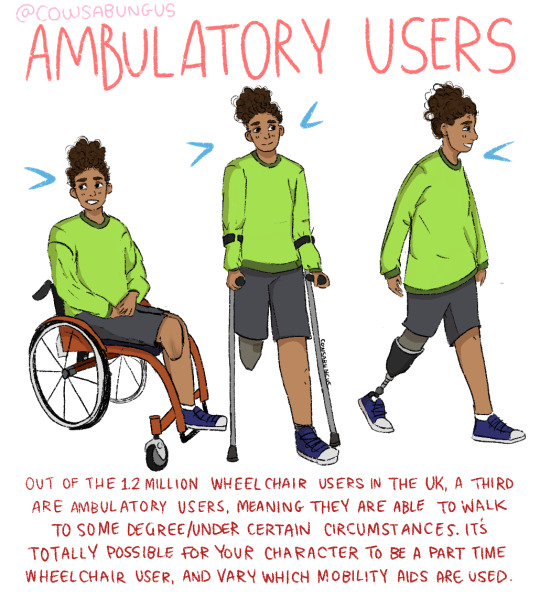
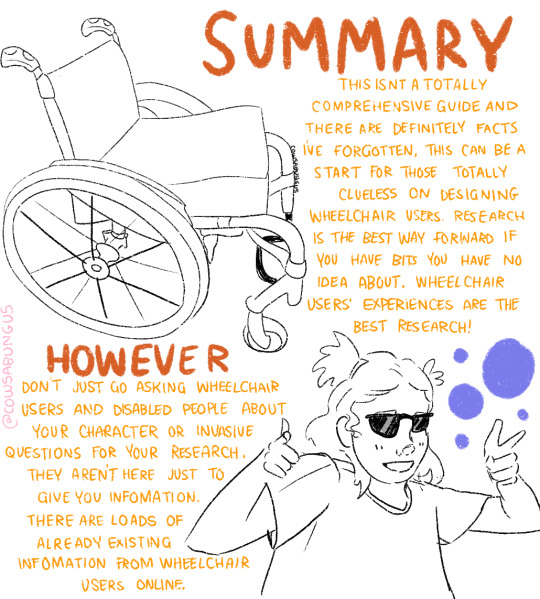
A guide to designing wheelchair using characters!
I hope this helps anyone who's trying to design their oc using a wheelchair, it's not a complete guide but I tried my best! deffo do more research if you're writing them as a character
#art#original art#artist#oc art#original character#queer#disabled#disabled rights#disability#disability pride month#tutorial#art tutorial#disabled character#design tutorial#drawing tutorial#Tumblr tutorial#character design#character illustration#concept art
113K notes
·
View notes
Text

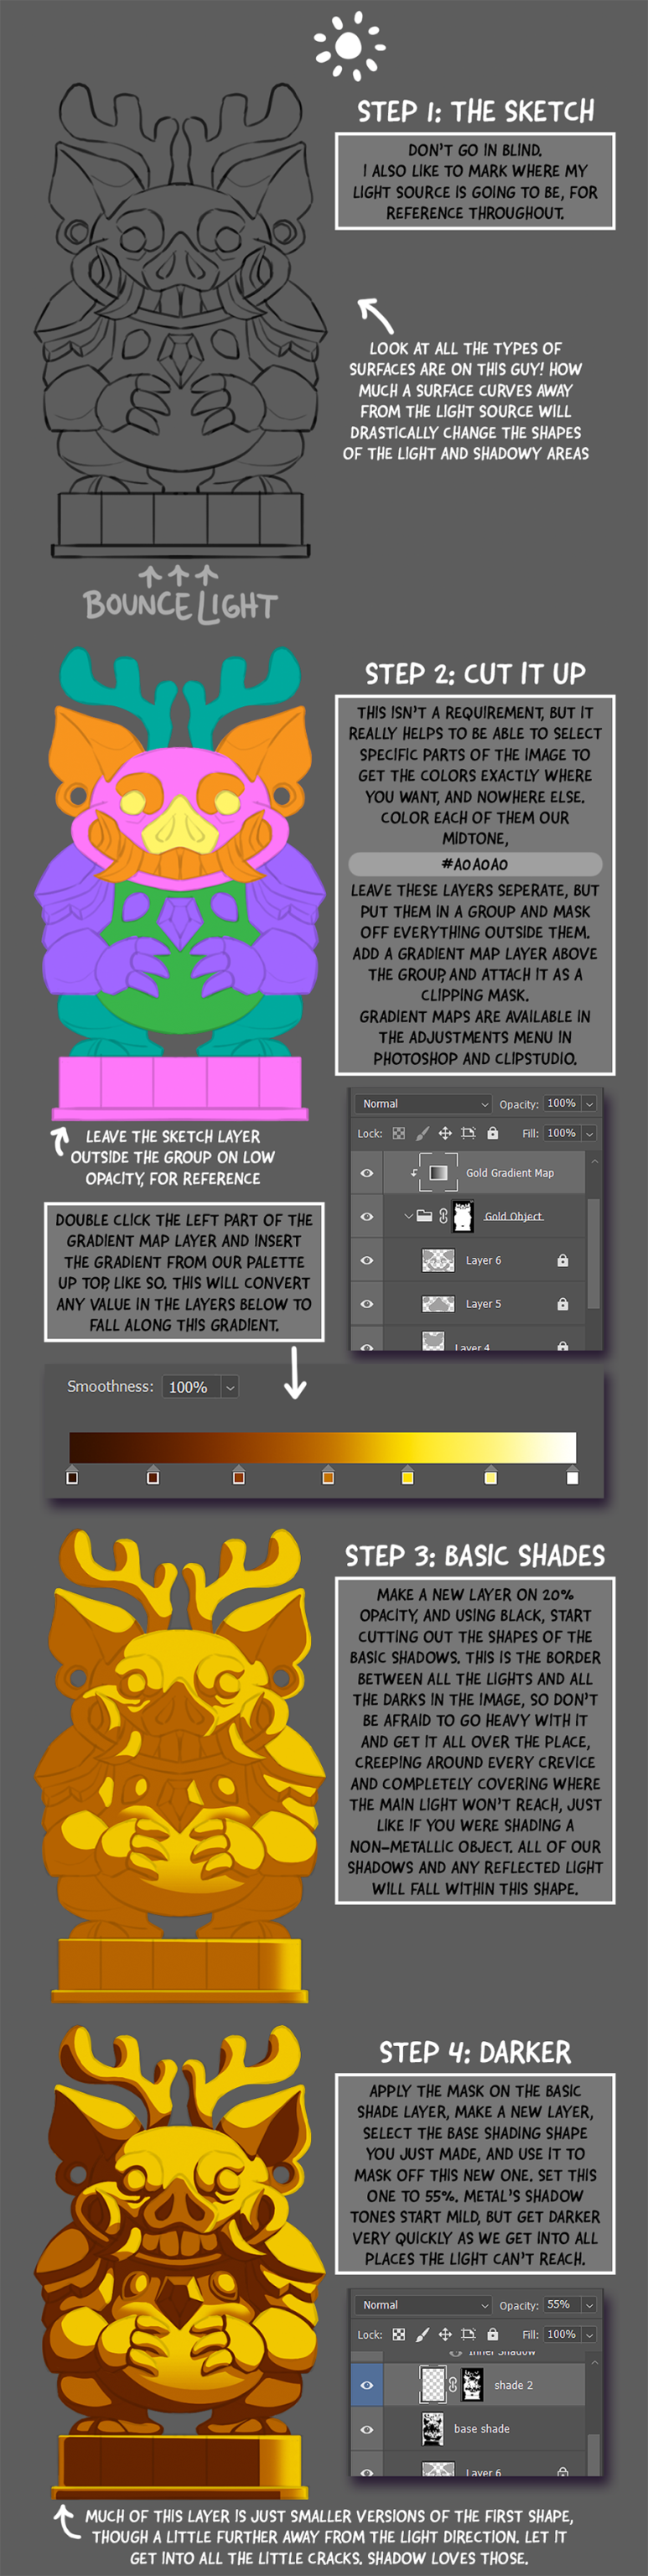
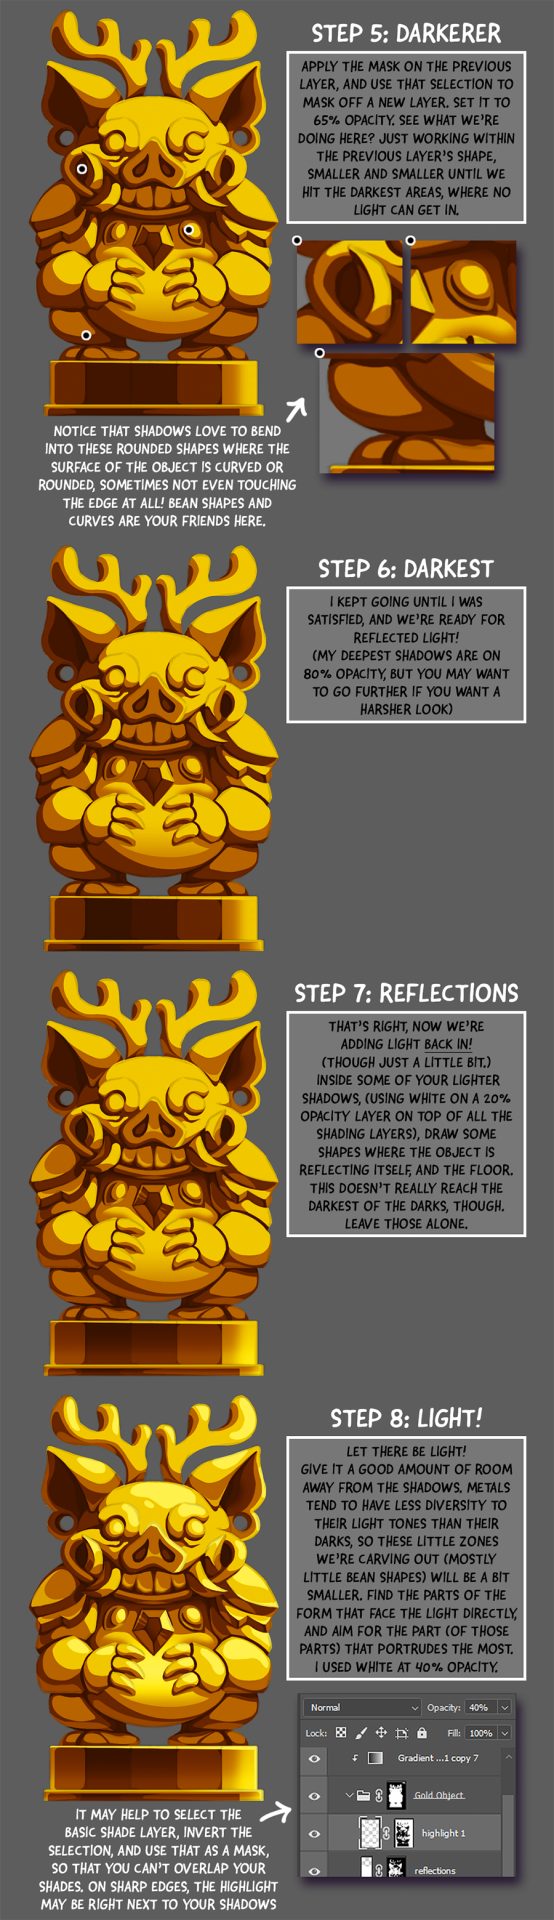
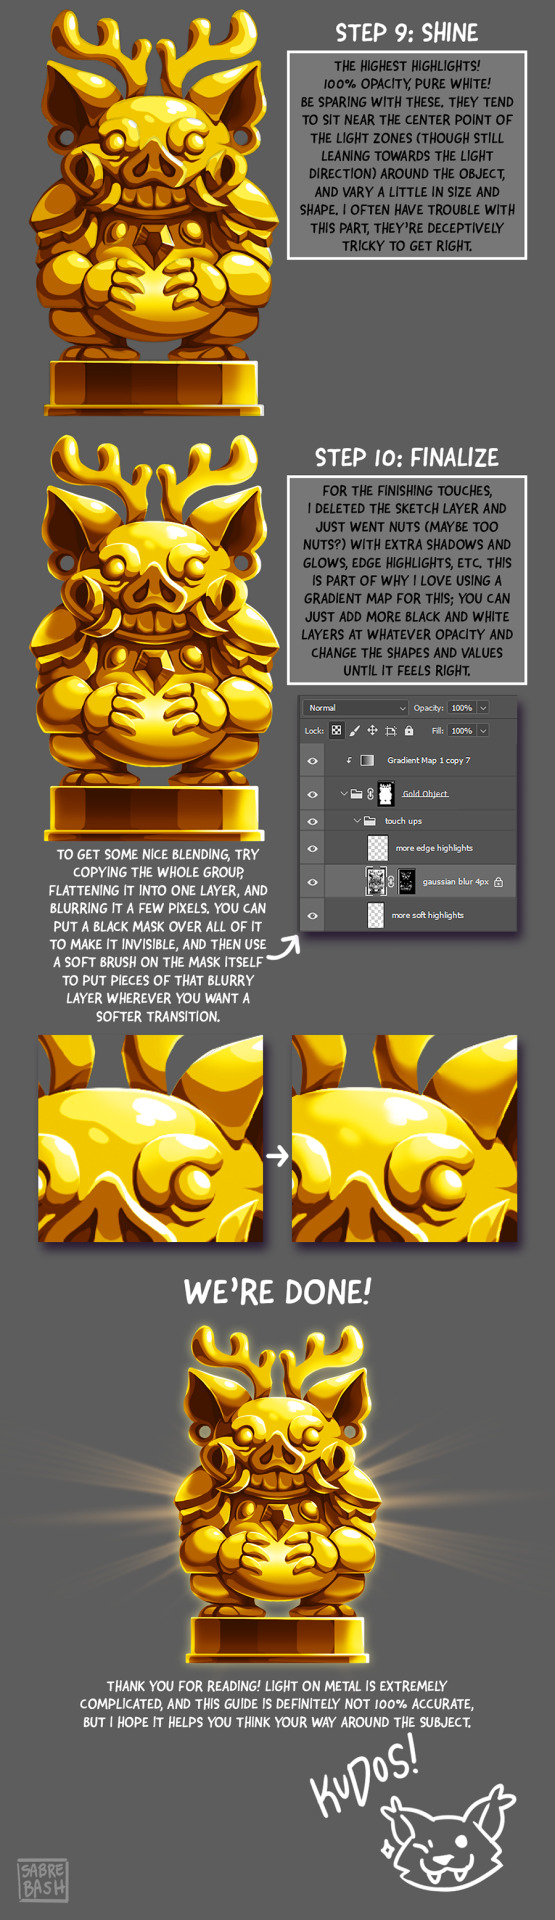
I have to draw a lot of gold and metal for my work, but wasn't happy with any of the metal tutorials i could find around. I prefer really specific instruction, so after some research i put together what i think works as a generalist's guide/tutorial. Not perfectly accurate, but i hope it's helpful!
#tutorial#tutorials#art#painting#artists on tumblr#reference#art reference#useful#art tutorial#art resources#tips#longpost
31K notes
·
View notes
Text
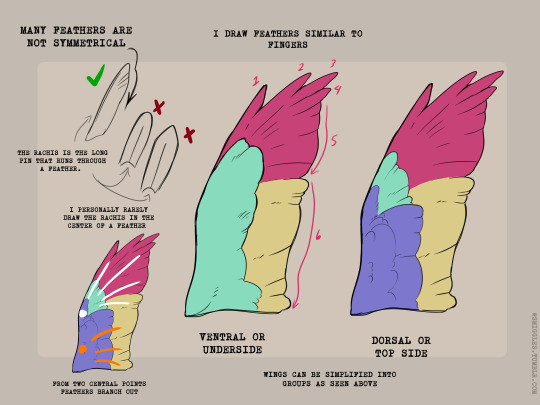

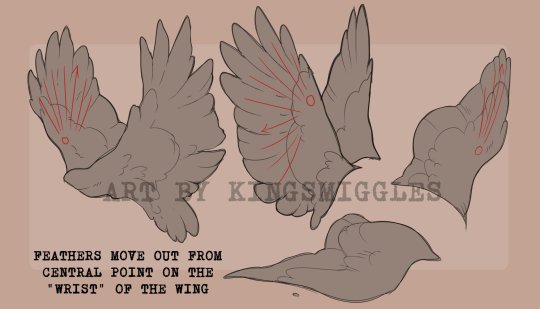
Wings anyone?
29K notes
·
View notes
Text
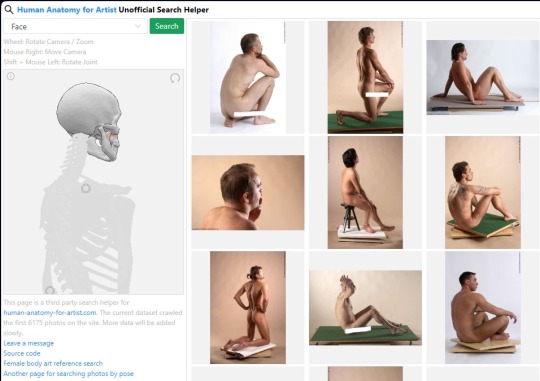
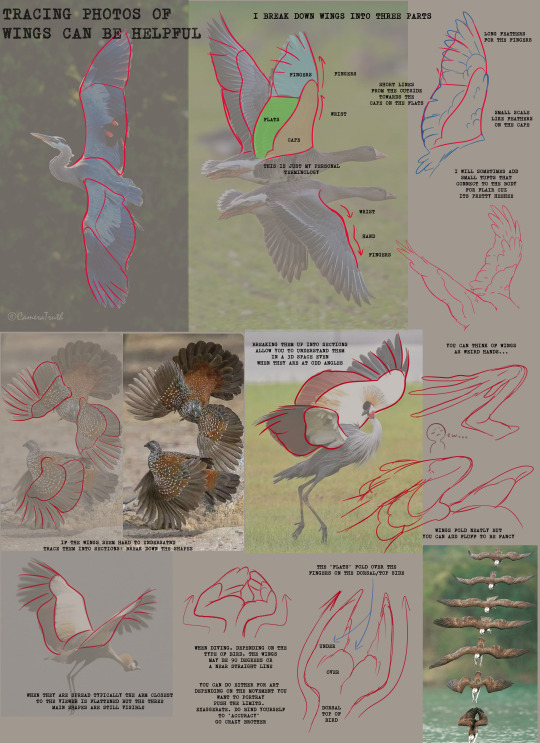
They also have an animal one that I linked a whole back on the same site !
26K notes
·
View notes
Text
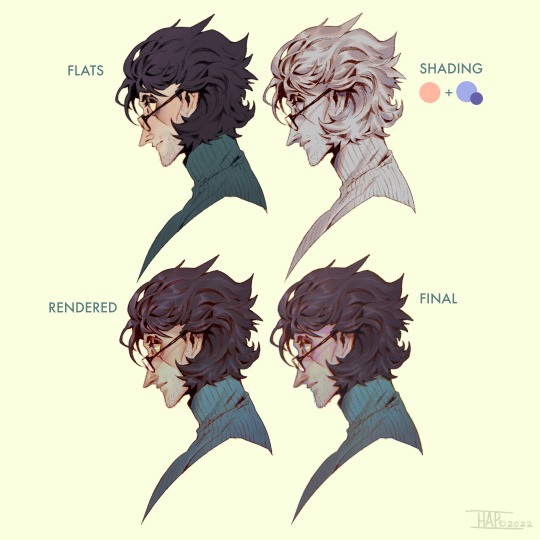
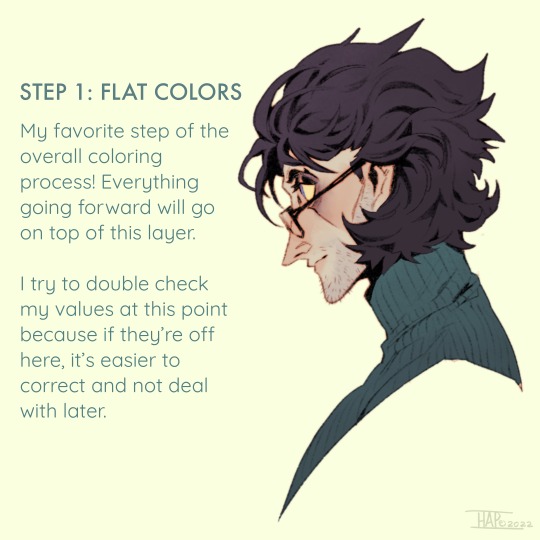
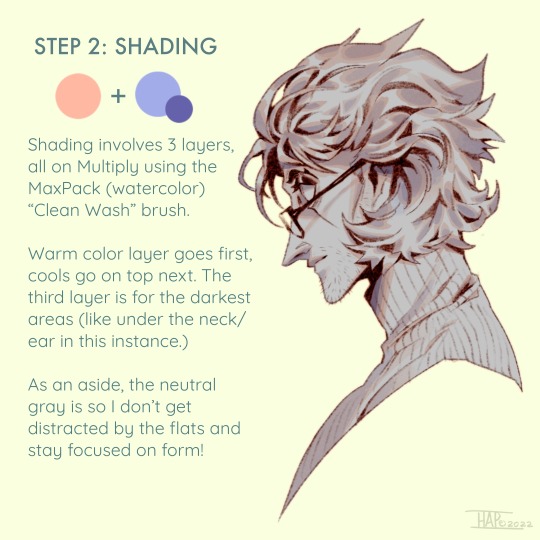
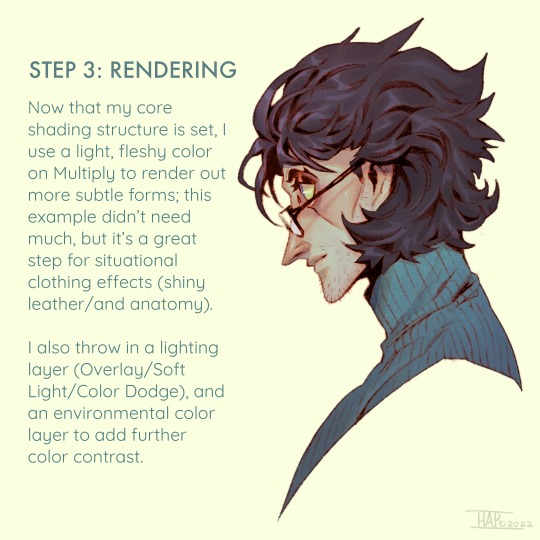
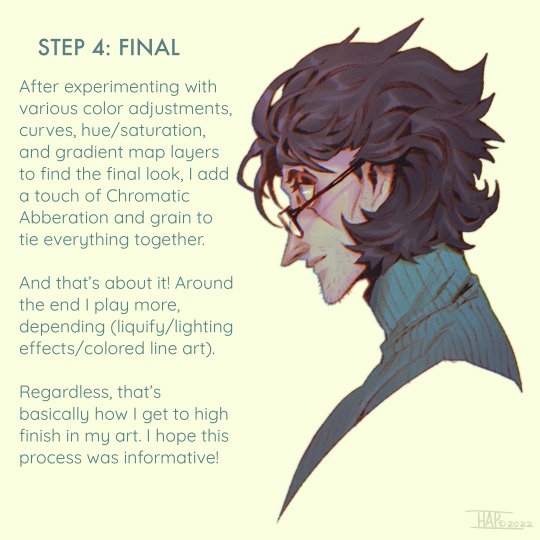
Rendering step-by-step (2022)
#kodasea#own art#2022 art#digital artwork#procreate art#art#artists on tumblr#art tutorial#step by step#shading tutorial#rendering tutorial#drawing tutorial#cold case crew#own character#cold case detective#lawrence#Still follow this basically! Although recently I've been playing with inching back the realism in the light logic/shadows a bit
4K notes
·
View notes
Text
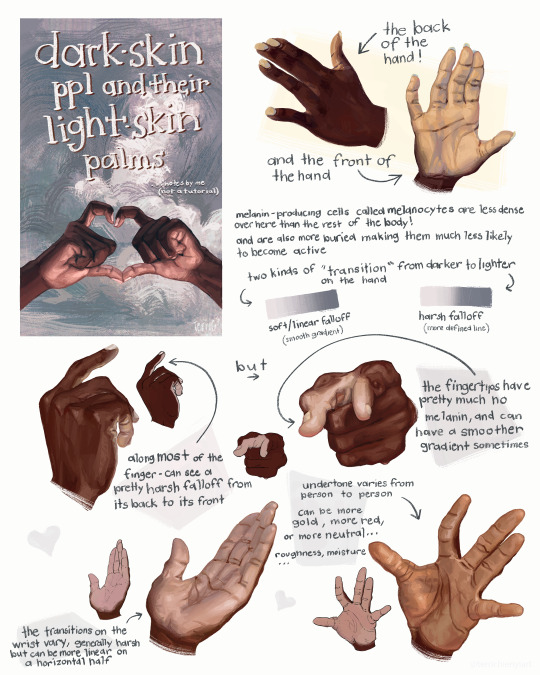
this is not a tutorial this is just me rambling
#art#art study#reference#painting#hands#digital art#illustration#bipoc#poc#black#black art#dark skin#information#art tutorial#art non tutorial#artists on tumblr#art tips#sketched this in january so its gotta leave my head someday
27K notes
·
View notes
Text
Tutorial de fonte degradê

Oi oi! Como vocês estão? Eu espero que estejam bem. Vim aqui hoje compartilhar com vocês um tutorial que, particularmente, eu achava ser um bicho de sete cabeças antes de aprender, mas na verdade é super simples; Como deixar a fonte do Tumblr degradê.
Então, para você que quer dar um charme a mais no seu blog, aqui estou eu sendo seu guia hoje!

Primeiramente, você terá que acessar ESSE LINK AQUI para toda a magia acontecer. Calma, eu sei que pelo layout inicial parece algo complicado, mas eu estou te prometendo que não é! Confia pô.


Está vendo esse quadro branco alí no canto? Pois bem, é nele que vamos trabalhar. Nesse exato espaço onde eu digitei 'tutorial de fonte degradê', é o local onde você digitará a frase de sua escolha. Esses retângulos coloridos ao lado são onde você escolherá as cores para criar o gradiente da sua frase.


Após escolher as cores, você clicará em 'run', e isso gerará um link que você deverá copiar.


Após copiar o link, abra o Tumblr no navegador do seu dispositivo. Depois de clicar para criar uma nova postagem, você vai ali nas configurações do post e role até encontrar esta parte destacada (segunda imagem). Você deverá trocar esse 'rich text' por 'HTML', conforme mostrado na terceira imagem.


Depois, você voltará para criação do post e colará o link que foi copiado anteriormente. Sim, vai aparecer esse travazap gigantesco e você pensará que não deu certo, mas se acalme meu pequeno gafanhoto, nada está perdido. Assim que clicar em vizualizar você já conseguirá ter a visão de que tudo deu certo e o dia foi salvo pela Mah!


Foi isso amores! Me desculpem se não ficou tão bem explicado. Tentei deixar detalhado o suficiente para que não restassem dúvidas, mas qualquer questionamento, fiquem à vontade para falar comigo. Beijinhos, se cuidem e até a próxima <3
ㅤ
#mahgi#tutorial#tutorial tumblr#social spirit#tumblr#gradient text#gradient#tumblr tutorial#kpop#messy#icons spirit#spirit icons#random#spirit fanfics
36 notes
·
View notes
Text


easy tutorial for how i made this simple stylized "nebula" from my 'head full of stars' piece. note that this is not the only way, or the best way to do it, it's just the way i did it (and i made it up). enjoy
btw this was made with my 8 colour palette 'supernova' which you can download free here. eyestrain warning maybe
30% off pixquare pixelart app with code 'tofu' 💕
pixelart guide | support me | commission me | buy a print | buy a sticker
#pixel art#pixelart#artists on tumblr#art#dark art#dark aesthetic#pixel#illustration#pixel illustration#pixel aesthetic#pixel graphics#pixel art tutorial#tutorial#stars#space#nebula#eyes#cw#eyestrain#scopophobia#art tutorial
4K notes
·
View notes
Text


Tutorial for drawing characters with Down syndrome!
DISCLAIMER... Please keep in mind that this is an introductory drawing tutorial and has some generalizations in it, so not every “X is Z” statement will be true for Actual People. It's more of an overview of features that are common in people with Down syndrome, not meaning to imply that every person with DS has all of them 👍 thanks.
If you draw any characters using this feel free to tag me!
Consider supporting me on ko-fi if you find this to be helpful.
#my art#disabled artist#artists on tumblr#digital art#id in alt text#art#personal art#drawing#drawing tutorial#drawing tips#ccartshare
35K notes
·
View notes
Text

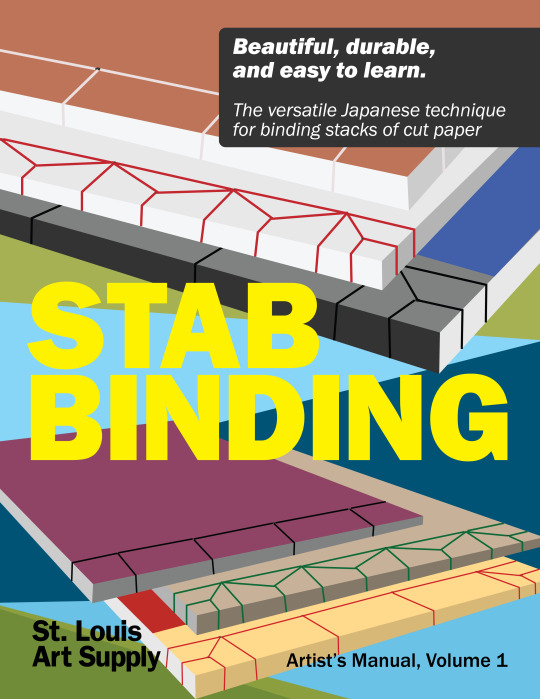

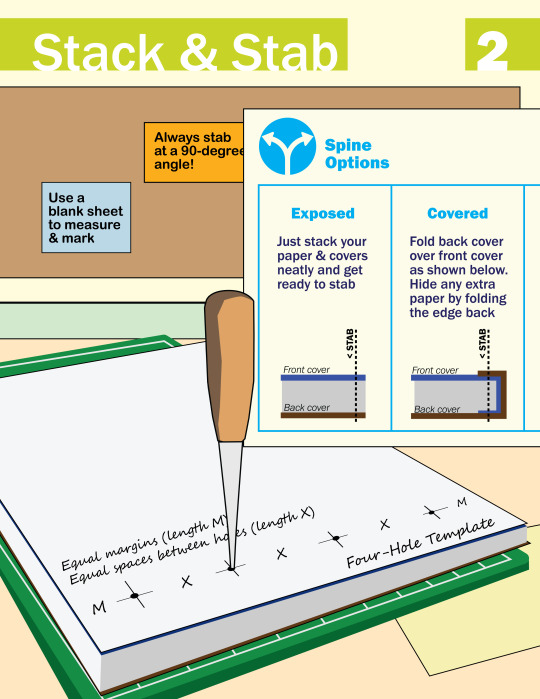

I made this zine last year to teach Japanese stab binding. It's a technique that every artist should know—with just a few tools, it's so easy to bind your own sketchbook or to make a physical version of your art/writing/etc. Download the PDF version (with bonus photos & tips!)
8K notes
·
View notes
Text
Just because it's digital art, doesn’t mean it has to look fake. Now more than ever, it’s so important to show that what we create is made by a human being ♥️
This is a preview of my latest patreon tutorial - find it here!
4K notes
·
View notes