#Tutorial: SC4
Explore tagged Tumblr posts
Visit Tumblr Blog
Explore Tumblr blogs with no restrictions, modern design and the best experience.
Last Seen Tumblr Blogs


Fun Fact
Hackers stole 65M passwords from Tumblr in 2013.
Text
Sunrader's tutorial is exactly what I was looking for:
Terraform Right Side Up | Flipping SC4 Terrains for Sims 2, by Sunrader Sims.
7 notes
·
View notes
Text
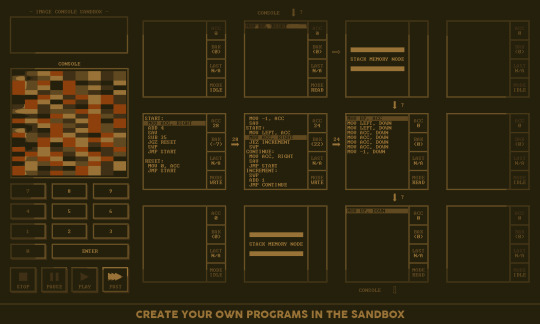
Yet Another Package Editor

Download the latest version here
YaPe is a modern package editor for DBPF (.package) files
Features:
Edit any package - FAST
List and edit resources in a package
Filter resources by type
Easy editors for several resource types
Supports opening ANY DBPF-coded .package, .dat, or .sc4 file
Easily reduce texture size, add/remove/recreate mipmaps, change texture format
Import textures by dragging, export DDS
Native on Windows and Linux
Why make yet another package editor?
Simply said, because SimPe can be kind of cumbersome especially on Linux, and package editors other than SimPe (s3pe, s4pe, iLive's Reader etc.) do not support Sims 2 resources.
To illustrate, I timed someone shrinking a texture (convert RawARGB32 -> DXT1, shrink 2x) in both SimPe and YaPe:
SimPe + GIMP: 1m 30s
YaPe: 10s
Originally this started as just a way to easily test if my DBPF library was doing the correct thing, but over time it has grown to become a half-decent editor suitable for more general use.
Tutorial / usage tips
Here I will explain how to shrink and convert textures in YaPe because that's what I imagine most people will use this program for right now, but of course you can use it for other things as well.
Let's get started by getting the program to look the way you want to: use the options in the top left to change the scale of the interface and switch between dark and light mode.
Now drag a package file into the program (don't worry about closing the sims except when you save the package), a list of resources in the package will be visible. You can find out what the abbreviations mean by hovering your mouse over them; in general I try to add tooltips like this to buttons or options that are unclear.
Don't be afraid to mess around and make changes! The changes you make are never saved unless you press the save button, so if you simply drag your package file into YaPe again without saving you will get your original package back (there is currently no undo function, but it is a planned feature).

All these resources are great, but we're only interested in the textures for this tutorial so let's set a filter. Right click on a texture (TXTR) and select "Filter on type".

Great! Now you can only see the textures we're interested in. You can disable this filter by unticking the "filter" option at the top.

Now click on the "TXTR" to open the texture, it will open a new tab in the lower half of the window by default. If your window is not very big (like mine is for this tutorial) you might have trouble seeing the texture and all the options. You can drag the tab around and put it somewhere else in the program, I'm going to put it on the right and make it a little bigger so we can see what's going on.

Okay, now we can see all the options, and well... there's a bunch of them. We'll go over some of the options that you'll likely want to use but feel free to experiment of course.

First, let's have a look at the texture viewer at the bottom: you can zoom in on the texture by holding control and scrolling, and you can change which mipmap is displayed by clicking the radio buttons above the texture.

But wait, this texture does not have enough mipmaps to show up in game! (post by @pforestsims) Let's fix that right this instant by clicking the "Add missing mipmaps" button in the middle.

Okay, now the mipmaps will show up in game, which is good... except that this mipmap is really blurry. (post by me) Luckily we can fix this really easily, just click the "Recalculate all mipmaps" button.

Much better!... except that we've created a new hidden problem: the leaves will disappear when zooming out in game (blog by lisyarus) but even this problem can be fixed. We can actually preview what the texture will look like when zoomed out by switching the format to DXT1 since DXT1 has binary transparency, just like alpha tested textures like leaves and grass.

Right, so the leaves have a bunch of holes that don't look right when zooming out, let's change that. Above the "Add missing mipmaps" button there is the "Preserve transparency" slider: try changing it to something like 120-170 and click "Recalculate all mipmaps", you can see that the transparency changes, if it's still too thin/transparent set the value higher and recalculate again and so on.

Have a look at all the mipmaps (zoom levels) and once you're satisfied with the transparency change the format back to DXT5.

This texture will now look great in game! But it is also quite large, so we can reduce the size 2x smaller without sacrificing very much in terms of looks (sorry to all the cc authors who love their large textures). Click the "Remove largest texture" button, which will make it so that the first mipmap becomes the largest texture effectively reducing the size by 2x. Like mentioned it does use the first mipmap so make sure to fix any blurry mipmaps first.
You can repeat the same process for the other textures in the package, and then we're done. Save the package by clicking the save button in the top bar, and have a look in game at your beautiful textures.
Another option is to drag images/textures you've made somewhere else into the program (with special support for dds files), for a full lists of supported image formats you can look here. (image-rs documentation) The image/texture will currently go into the firsts open texture resource tab because of UI framework limitations.
Here's a look at some of the other editor currently implemented:


Enjoy :)
195 notes
·
View notes
Text
Happy New Year to the Sims Community!!
I hope everyone has a happy, healthy and prosperous New Year!!
I want to say thank you to all the creators who work so hard make our games better and more fun. Thank you for all the pictures, stories, mods, fixes, tutorials, creations, conversions, clothing, hair, makeup, prosthetics and such as well as the beautiful and creative lots and SC4 terrains. Just everything that anyone has ever made or shared to make The Sims games more interesting as old as some are. Thank you for keeping them alive and being there to talk to about this game! You are all ROCKSTARS!! ⭐🎸
For all my followers, downloaders, viewers and post readers, thank you for always engaging with my stuff. You are all my motivation to share it with all of you. You guys are all full of AWESOME!
HAPPY NEW YEAR

13 notes
·
View notes
Text
Did you guys know you can now add roads to your hood with the new simPE? and it’s very easy? you could quite literally rework a huge terrain that you were stuck with, without having to fiddle SC4 with I just tried it and I am blown away. I could post a short tutorial if enough people are interested but it’s very simple.
#sims 2 custom hood#ts2#simPE#sims 2 legacy#SIMS 2 ultimate collection#ts2 community#sims 2 simblr#sims 2
3 notes
·
View notes
Note
Hi! As a sims 2 and sdv fan I was so happy to play with your hood when it was released. And nowadays I'm making a neighborhood myself and I was wondering, how did you make your small rivers look so good? I'm finding it really hard to give them organic edges because I'm finding the tools in sc4 and ts2 to not be very precise, and when I try to pull a vertex up or down slightly, it goes WAY up or WAY down. I would appreciate if you have any tips to give! Thank you!
Hi, glad you enjoyed playing the neighborhood! Editing the terrain was a very tedious process for me and took a lot of trial and error. First of all, I did pretty much all the terrain modifications directly within TS2. The tools in SC4 are way too inaccurate, plus the map there is mirrored and scaled.
For finetuning the elevation, I would recommend against holding the keys for raising/lowering, but instead to change the terrain one level at a time with separate button clicks.
To get the desired height, it can also be useful to not directly edit a certain vertex, but rather its neighboring vertices. When making rivers, for example, I would often lower some vertices in the middle of the river to "carve out" the riverbank to look more how I wanted it to be. You won't be able to tell from above that the river is super deep in the middle, so that's not an issue.
When you drag and select multiple vertices, there is also a key to "smooth" or "even out" all the vertices in the selection, bringing them all gradually closer to the average elevation and creating a more natural look. On my keyboard (German), this is done with the "P" key, but it might be something different on yours.
I also highly recommend the tutorial videos on The Jessa Channel on YouTube, which I found super helpful when learning how to make custom hoods. Hope some of these tips can be of use for you :)
8 notes
·
View notes
Note
Sorry, I am bothering you again. First, thank you so much for sharing the sc4 file! I was trying to create roads on the hill now for a 3x3 lot and either 3 squares or 5 squares of road would be sufficient. Simcity hates my efforts and gives me either 7 or 6 or 4 squares in TS2 (funny how 5 or 3 is not there....) Could I ask for your help again?
Hi! First of all, in my previous answer I mentioned "LotAdjuster" twice when I meant "HoodReplace". Apologies, they are completely different programs. Also, you're not bothering me, I like talking about this game, even if I'm not that tech-savvy about it.
About your question, I'm not sure I can help. Short answer: You can't make a 3x3 lot fit a straight isolated road perfectly. Long answer:
If you press and hold G in SimCity 4, it will show a yellow overlay and you can kinda see how the tiles will translate to ts2. Each yellow square is equal to a 1x1 lot in ts2 (10x10 tiles in lot view).

However, I don't fully understand how the proportions will translate when it comes to straight isolated roads like that, road squares/loops are easier to figure out. From what I understand, there's limitations and there are certain lengths of roads that can't be achieved easily. The same way you can't have two roads beside each other without at least one neighborhood tile between them. Someone else probably has a better understanding of this.
But it's possible to delete individual road tiles with third party tools. I never tried it, since it looks very complicated. Link to tutorial.
Another option would be to place down your lot, remove that specific road with HoodReplace, and place some of these decorative road pieces by criquette where the road was. But you would need to be careful about not moving the lot, since it would be technically not connected to a road and you could no longer place it in the same place after moving it.
2 notes
·
View notes
Text
LibreVast, my newest toybox 2D+3D workflow Quake-clone in town, devlog #0


More aesthetic references...


Loosely based onto this previous concepts...
Yes, I intend to make such a "Layered Z-axis 2D-to-3D workflow" copyleft first person "toybox" at my pace starting after next Monday, taking elements from Qodot (4), "BUILD2", "Red Eclipse" and "Aleph One" (the mainline open source Marathon port) legacies as to craft a new curiosity-driven experiences akin to a modular mashup between the puzzlers of "Narbacular Drop / PUNT / Portal / F-STOP / Frame" and the creative programmer havens of "Quadrilateral Cowboy / Zachtronics' / Hypnospace Outlaw".
And I do plan to have a thesis of a hyperlinked overworld multi-planar editor (Using one top-down overhead pane layers that interact with each other a bit like the OpenTTD / RollerCoasterTycoon-like 4D Golf editor I saw online here) following the 4x area rule (Great for converting to hexagonal and square-based tilemaps towards my Civ5CE + FreeCiv set & the SC4 + TS2 combo for example) that might take advantage of several new innovations I saw as of late. (EVALDRAW, N-dimensional Rotors, six great code snippets for Verlet Integration, Spatial Hashing, Contraint Solving... )
But until I get back home, the progression will most likely be halted much before my return. So until Monday September 18th or its very next day, take care of yourselves and farewell!
2 notes
·
View notes
Text
i really want to get back to building and decorating again but.... first i have to try to gather the strength and patience to open sc4 (and find all the tutorials again)..... to make the terrain i need for the modern au bss-inspired hood i want to plop the blorbos into...... 😑
#sc4 my behated. why is there no undo. why is everything mirrored. Why#but i need a map..... i need all the rings and room for the walls and canals and etc#and THEN i can build again 🫠#fun fact i did make a canon-set bss terrain at one point. my first attempt at terrain making#i got as far as putting down all the deco walls around the rings and then building 2 (two) lots#(one of them was the ferry bc my priorities were. very specific fhksfjksd;; the other was the tea shop 🤡)#mine#taos rambles
0 notes
Photo


Angol Fear from Soul Calibur 4 remade in Soul Calibur 6!
Check out how to make her yourself here! LINK
#Soul#soulcalibur#soul calibur#soul calibur 6#soul calibur 4#soulcalibur 6#soulcalibur 4#SC4#SC6#angol fear#angol#fear#mine yoshizaki#bonus#character#Create a Soul#creation#creator#tutorial#how to make#guide#seong#mi-na#anime#manga#the13thelysium
7 notes
·
View notes
Photo
sometimes things seem like a much better idea in my head...I think the Vervainwort Canal Items have won this round :/
#ts2 wip#i cant figure out these things to save my life#is the terrain not low enough? it's the sc4 file for vervainwort idk#i need a video tutorial lmao
2 notes
·
View notes
Text
New Game! Day 1?


On the tails of the Tutorial I posted yesterday on some advanced terrain creating in SC4 I thought it was about time that I start sharing my progress on my-currently-unnamed-medieval-game. Dallùbach still exists! But, man, I have been wanting to build a new game for so long and, as I’m feeling inspired these days, now is the time.
I have ALWAYS wanted a tiered, walled city map and was never able to get what I was looking for using just SC4, so I am beyond thrilled that I was able to get what I wanted by drawing out a map instead. You can see the start of the custom ‘hood deco I’m making for this as well! Each tier of the city will be surrounded by thick, crenellated walls, towers, gates and pathways and I think that that will present a fun challenge in and of itself. How do I make a city appealing for the dwellers when the “view” consists of walls and sky? Very different from Dallùbach! But this is something that many medieval people would have had to deal with in reality, so I’m really excited to slowly work on this.
Goals: I think I want to make some craggy mountains behind the city, make some stone facing for the sides of the cliffs, I am converting the map boulders from TS4 Henford-On-Bagley as I actually love that “world” and am definitely planning on leaning heavily into the stylized look for this game. I have lusted after the floating ice on @criquette-was-here’s Feverfew since Day One, so that is a must as well!
In the end, I hope you have fun watching me build this up bit by bit over however many centuries this takes me :)
194 notes
·
View notes
Photo

“Now that the children are asleep, I think I’ll head out for a bit.”
A panel from the tutorial comic (Exciting! Calibur Dojo) in Soul Calibur III’s Japanese manual, showing Sophitia with her sleeping children. Wait a sec, who’s the third kid? I figured Pyrrha and Patroklos were more or less blank slates at the time, but this sure is different. In Tira’s endings, you’ll only see two anyway. It seems that this discrepancy is on the artist.
I’m not sure which kid is supposed to be which.
If the title of this comic sounds familiar, there’s a translation of the one from SC4′s manual, featuring Cassandra teaching Hilde the gameplay, floating around the net. I may as well note that in this one, Cassandra plays the role of the newcomer with Sophitia being the veteran player. Maybe I’ll give this one a shot.
#soul calibur#soul calibur iii#sophitia alexandra#sophitia#i feel like patroklos might be the one with raised arms but he should be the younger of the two#just seems like something he'd do#oh no i just remembered that the official site for this game was a FLASH site#good news: ruffle works on the wayback machine#bad news: that site has sound effects (get used to the water noise or mute the tab)#this is a scheduled post; i probably shouldn't have been this composed at 4 AM
15 notes
·
View notes
Text
Hood Terrain - Monument Landing
Hi everyone! Hope you’re all doing well!
This is a decorated terrain that I made myself in SC4! I am super happy with it and wanted to share it with you guys! I’ve always loved @criquette-was-here canal and bridge sets and am a really amateur hood decorator but I wanted something inspired like the little town I grew up in that had canals just like this, so I present you with Monument Landing!
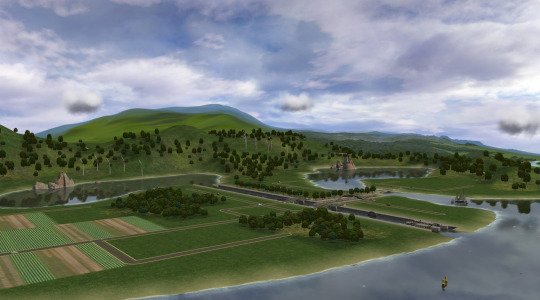
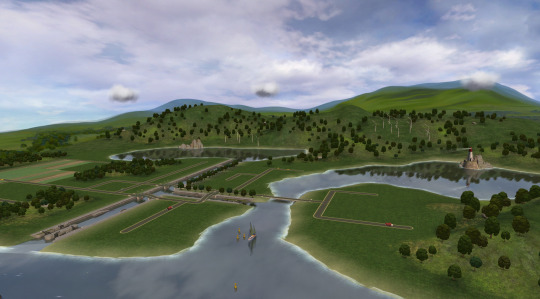
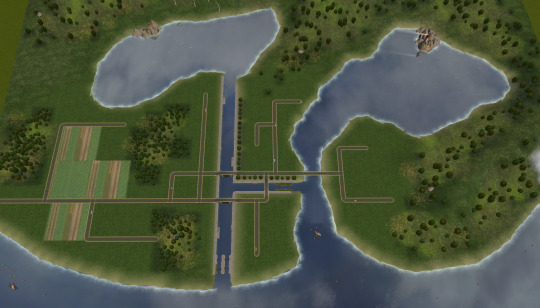
A few more pics and download links/info below the cut!
More pics:
Info:
This is a completely empty fully decorated hood. There are NO townies, NPC’s (Except those unavoidable like the hula zombie), Playables, or lots.
Download instructions:
You NEED to download the cc separately. It is not included. Once you download the cc, simply place the MTLD folder into your Neighborhoods folder.
Requred CC (NOT INCLUDED):
Trees
Canal Set
Bridges
Sky
Skyline: The actual one I use is the one made for Feverfew. You will need to download Feverfew, unzip and go to into downloads folder/feverfew hood cc/naturefeatures and grab the rural skyline feverfew edit. Just add that single file. You could use any other skyline you like, like those found here, I just love this one Criquette made :)
In addition, for those curious, I use this terrain replacement!
One last note - If you want there to be little sand around the water like I have in the pics, you’ll need to follow this tutorial!
Download:
You downloaded the cc, right?
Download Monument Landing hood terrain!
I hope you all enjoy! Let me know if you run into any issues, and I’d love to see what you do with it, so feel free to tag me in pics :)
Take care! Until next time
-Mike
#sims 2#the sims 2#ts2#ts2cc#s2cc#s2mm#the sims 2 neighborhood#the sims 2 hood#the sims 2 terrain#sims build#simblr#sims 2 build#dwtdtmonumentlanding
311 notes
·
View notes
Text
Tutorial: How to build a stream with lots in The Sims 2

@bayoubashsims asked me how I made the stream in my recreation of Magic Town in TS2, and I said I would write a tutorial. I’m not very good at writing them but I tried. Let me know if I missed anything.
What you will need:
Lot Adjuster (make sure you get the latest version)
A set of decorative rocks (I used the Castaway Stories conversions)
Optional:
Invisible Fishing Spot by netmicro
Things you need to know before trying this:
How to create SC4 terrains
How to use the modifyNeighborhoodTerrain cheat
_______________________________________________________________
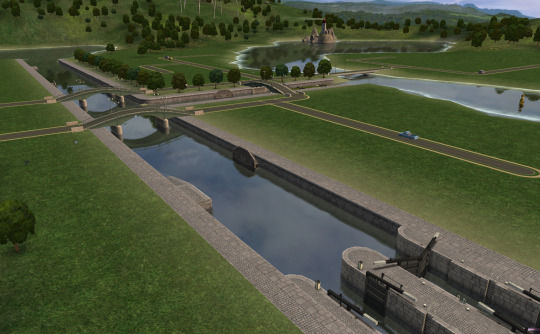
Part 1: Preparing the Neighborhood Terrain
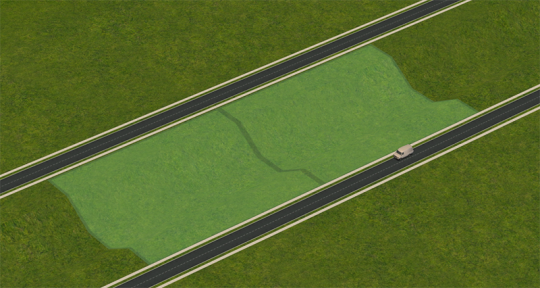
You can choose any SC4 terrain. It depends on what shape you want the stream to have. For this tutorial, I will create one. Make sure the terrain is not too close to water level, to prevent the neighborhood water from “flooding” the lots. For this river, I will build two parallel roads with a two-tile space in between them. This will translate into a 50-floortile space in The Sims 2.

Create a neighborhood in The Sims 2 using the SC4 terrain. Make sure a 6x5 lot fits between the roads, but don’t place any lots yet.

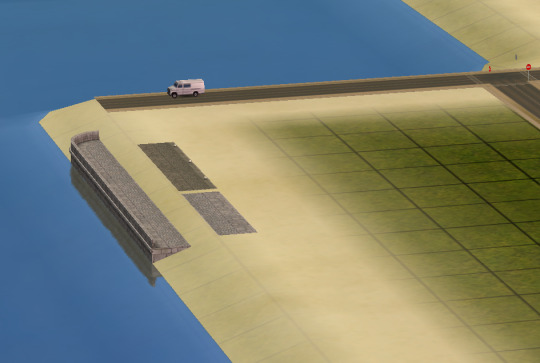
Now use the modifyNeighborhoodTerrain cheat to make a riverbed for the stream. It doesn’t need to have the final shape we want, as we will take care of that when the lots are placed. For now, it can just be a straight canal. Make sure to leave a a 1-square strip of flat terrain next to the road. Note: it doesn’t need to be as deep as shown in the picture, I corrected that later.

Part 2: Creating and editing the lots
Important: This part is optional. I just realized this after making the tutorial. ¯\_(ツ)_/¯ Please read more at the end of this part before trying the steps, you might not need to use LotAdjuster for this, depending on what you want to make.
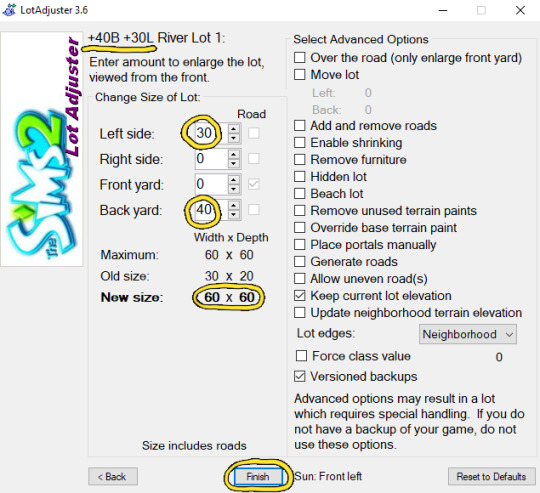
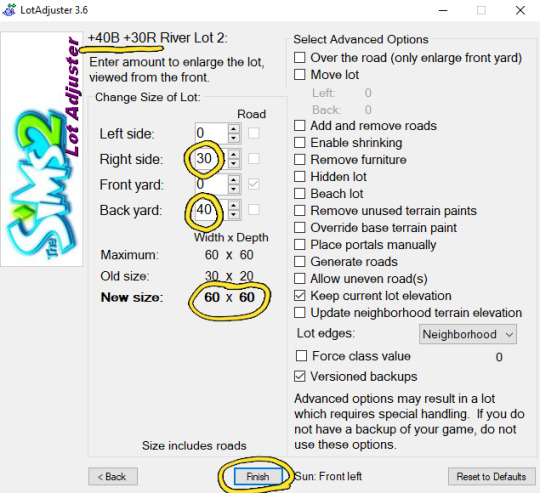
Place a 3x1 lot in the flat area. Give it any name you want, but I recommend including indications for the modifications we’ll make later with LotAdjuster. In this case, they are “+40B +30L” which means: “expand the backyard by 40 tiles, expand the left side by 30 tiles”. This is just a reminder, the name of the lot doesn’t actually affect how it will be edited.
Load the lot and place a single wall or fence. It doesn’t matter where you place it (probably best if it’s not on the road though), since it will be deleted later. This is so that we can work with LotAdjuster next. Save the lot.

Repeat the process with another lot which we’ll place next to the first one. Make sure this time you name it with the instructions with “+40B +30R”, which means the lot will be expanded to the right, to avoid overlap with the other lot. Place the wall, save the lot and exit the game

Open Lot Adjuster and look for the neighborhood and the first lot we created. Expand the lot following the instructions we wrote earlier, which can be seen in the name of the lot.
Keep in mind the road counts as 10 tiles in LotAdjuster. In game, the lot size will be 60x50 tiles (the biggest allowed). Click finish and then restart.
Repeat the process for the second lot, expanding the right side this time.
Open the game and load the neighborhood. The lots should look like this:
Load the first lot, delete the wall, and save. As you can see, the road is incomplete.
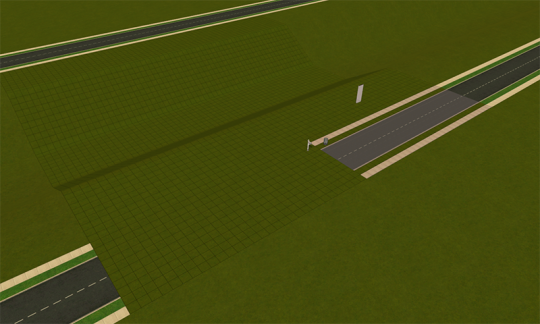
To reset the road, we need to move the lot somewhere else, then back to its original position. One way to do this is to move the lot sideways on the riverbed. This will leave a flat area on the riverbed, which you can fix with the modifyNeighborhoodTerrain cheat after you’re done moving the lot. When you load the lot again the road should be fixed.
Note: In the picture shown I did this with the second lot. For the first lot, you should move the lot to the opposite side.

You might ask: “Why did we bother making a small lot and expanding it instead of just placing a big one?” and the answer is you can absolutely do that, but new lots tend to even out the terrain, making it slightly flat. If your stream is going to be closer to road level, you might want to use a big lot from the start. If you want to have something that looks more like cliffs, I recommend the LotAdjuster method.
Part 3: Decorating the lots
I won’t get into too much detail about the decoration itself, this section is mostly basic tips and things to avoid.
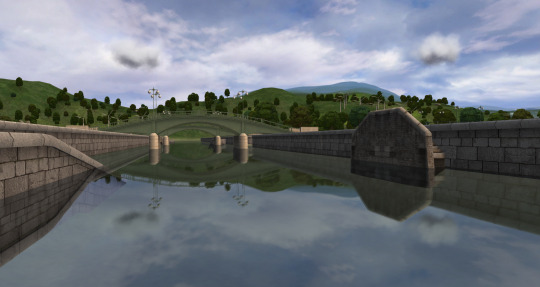
The first step is using the pond tool to create the river I recommend starting in the flat area at the bottom. If you have a water mod, like Nopke’s, you’ll need to place two pool tiles on diagonally opposite corners of the lot, to make the reflections work. You can hide them under rocks, flowerbeds or trees later.

The next step is using the terrain tools to get rid of the visible edges shown in the previous picture.
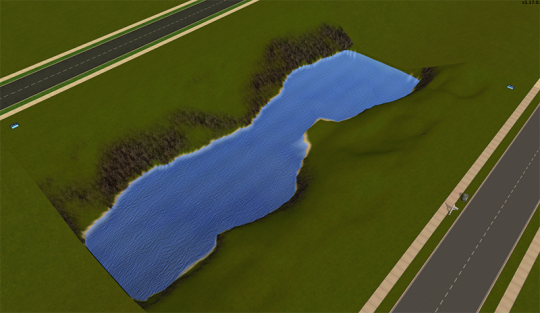
Important: Don’t use the lower terrain tool near the water. It will mess up the water level, as shown in the GIF below. If you want to add more water at the edges, use the pond tool.


After that, you can place the rocks. Enter the cheat “moveobjects on” to be able to place them on sloped terrain. I also recommend this cheat:
"boolProp allow45DegreeAngleOfRotation true/false”
It will allow you to rotate objects at 45 degrees, that way you can place rocks at different angles and make the whole river look more organic. Make sure to avoid “floating” rocks when you place them on the slope.
Use a terrain paint with a similar texture to the rocks on the edges.
I added fewer rocks in this example but you can add more if you want.

There’s always going to be a gap in the water between lots, the only solution I found is making it less obvious by covering some of it with rocks.

I recommend adding the invisible fishing spot (linked at the beginning) if you don’t want your sims throwing tantrums trying to find a spot that’s not covered in rocks.
After this, you can keep adding lots and decorating them however you please. I hope it was helpful!
Side note: I tried to make this tutorial incorporating neighborhood water into the lot, but honestly it’s more trouble than it’s worth and in the end it doesn’t look that great. The water moves too much and doesn’t reflect things correctly. The whole point of this tutorial is to make a stream with lots, and neigborhood water just doesn’t look great on non-beach lots, even with water mods.
229 notes
·
View notes
Text
Imagination-driven manifestation Workflow#1?
Noting down a FreeCiv+Civ5 to SC4 to TS2 content pipeline


I was simply brainstorming ideas alone and I could not help myself but tell you all for feedback and longevity. Did some quick testing for the SimCity 4 -> The Sims 2 workflow here and succeeded in some ways. (Had yet to fully figure the TS2 quality importation part but yk, much progress still!)
So I am looking to convert a handful of hexagonal grid maps (upsized to 288x144 for FreeCiv, with Sid Meier's Civilization 5 CE generation processes and community map scripts for the tilemaps chosen for my very own reasons...) and I devise that each of these regional grand strategy-scaled tiles cover ~10 small red tiles of both width and height. That way I can interconnect the games' height & biomes calculation some more... (The exact "region sectors" may depend from each tile with mid-sized green and large blue tiles for a few larger bitmap exports or something, I haven't chosen yet...)
After using Azgaar Map Gen's tools (submap & export previews will come very handy), QGIS (full model) & OSM (tileserver and geofiction additions), I will then smooth out some SC4 Mapper rough edges towards importing the relevant data as maps into SimCity 4 proper. Ideally I would then go onto towards construction of the TS2 neighbourhoods for my conworlds and get some such custom campaigns going.
Custom content packagings & libre documentation all across!
Control freak-ing my way with LibreOffice Calc (pages of filtered spreadsheets and Monte Carlo utilities) / Writer (stories, logs & playthrough fictions) / Draw (vector family diagrams & neighbourhood relationships + mental local maps) / Impress (short demos and video slideshows) / Base (Historical log timestamping, SimPE, CustomContent mod tracking & parallel play lore connections) with LibreOffice BASIC scripts & macros for fullest manifestation toybox shenanigans. With raw file archives and prints hopefully...
Ideally migrating those too towards nerdier software too like Vim, Emacs and overall customizing the full content generation workflow my very own way. But I can wait some for such. But yeah, I do desire to to tinker alot with everything in TS2, or at least the supernatural and the alien segments as far as integrating those nuanced divine agents into the neighbourhood more with my lore and custom content fluff. (Think 'Helluva Boss', 'Stellaris' and 'Star Trek' and you are in the right bull park thematically speaking)
A few more dedicated realms like some hellscapes, some heavens, some other foreign plane realms (including alien colonial worlds) would be great! Amongst much gameplay tweaks / fixes, customization (especially for my massive array of cultures/ancestries I add in like Shoshones, Inuits, Mayans, Samoans... you get it indigenous peoples) additions and other Quality-of-Life lore improvements.

This planetary scoped realm (world, named Angora, part of my wider 16^12 continuum) is pretty much the testing ground for that manifestation thesis.
By the way, any suggestions are welcome for this constructed world addventure-ing on-video... thing. Especially mod-making tutorials and existing CC mods to enrich the shared playthroughs.
2 notes
·
View notes
Note
Hi! First of all, huge thanks to you, your work for sims 2 and 3 is literally a game changer and it's amazing! I recently started a bacc on a standart Belladonna Cove SC4 terrain, and added your lotview terrain paint, and it keeps reseting z-axis orientation of the paint when I switch from one lot to another. I run SimPe on advanced mode and I also use your Pleasantview terrain paint, which works as intended, no resetting. What might be the reason?
Hi! Thank you <3
Hmm, that's interesting.
I suggest you try redoing the whole process for placing the deco in the hood, except try to put it somewhere really deep down in the hood terrain, then set it to its appropriate location in SimPE as detailed in the tutorial.
13 notes
·
View notes