#Using script studio tutorials
Explore tagged Tumblr posts
Visit Tumblr Blog
Explore Tumblr blogs with no restrictions, modern design and the best experience.
Last Seen Tumblr Blogs


Fun Fact
In February 2021, Tumblr had 518.6 million blog accounts.
Text
How cutiesai made 14 Days With You
I've received quite a few requests in the past asking how I made 14DWY, what resources I used, how I organised my lore, etc. — so I figured I'd make one big post and share it with everyone else as well! It features a buuunch of helpful stuff I wish I'd known when I first made 14DWY, so hopefully this will help others too!
⚠ This is all copied & pasted from a Discord post I made back in early 2024! I'll also be adding to it over time, so feel free to check back every so often! ^^

What engine do I use?
14DWY uses the Ren'Py engine!
There are two preinstalled games (called "Tutorial" and "The Question") that give you a basic rundown on how to use the program!!
Zeil Learning's video called "Ren'py Tutorial For Beginners" is also a good place to start for those who have no idea where to begin with Ren'Py!
I also really recommend these Ren'Py resources:
Lemma Soft Forums
Ren'Py Discord server
Ren'Py subreddit
Zeil Learnings, ElaineDoesCoding, Visual Novel Design, and Ess Ren'Py Tutorials on YouTube
Searching through the "Ren'Py" tag on itch.io for community-made assets and resources (make sure to give credit if you use someone's asset(s))!
Feniks and Wattson offer some really helpful stuff!!
Not Ren'Py related, but helpful for creating a VN:
Obsidian and Notion for planning and worldbuilding
Visual Studio Code and Atom (comes preinstalled with Ren'Py iirc?) for scripting/coding
Pixabay and Pexels for royalty-free images and stock photos
DOVA-SYNDROME for music
Clip Studio Paint (paid) and Krita (free) for drawing
Toyhou.se to store your littol guys (If you need an invite code, I have over 300 to give away lmao ^^ Send in an ask to @cutiesigh if you'd like one!)
An itch.io account to upload your game for free and share it with others
General tips to keep in mind:
Make games for fun, not for fame. Too often, I see new developers create VNs with "trending tropes" because they see how successful it is and want the same level of popularity. As harsh as it sounds, this only makes your game feel hollow and superficial, and players will notice.
When using Ren'Py, it's better to have multiple .rpy files rather than putting everything into one large file!! It makes organising and finding things easier, and if something gets corrupted... at least you won't lose everything!
Plan everything beforehand, but give yourself room to expand and implement new ideas.
Start small and slowly expand over time. Don't start off with an overly ambitious project, as it can be disheartening when you put all this effort into something just for it not to gain any traction. Also, be grateful for your earliest supporters, as they're the ones who will lift your project off the ground!!
This is a personal preference, but I recommend starting off with itch.io as your main distribution platform. Most storefronts take a cut from your donations and revenue, and sites like Steam require a $100 fee just to publish your game on their platform. Itch is free, and you can even toggle off revenue sharing in your profile settings! (I like to keep it at 10% though, because I'm grateful for everything the site provides ♡)
If you ever need help with Ren'Py, you're always welcome to join the 14DWY Discord server and ping me in the help channel!
467 notes
·
View notes
Text
A new script mod by fantuanss12!

I got to test this mod out and it's another fun but more interactive way of buying groceries! - desiree-uk fantuanss12! mod notes:
What does this mod do:
This mod added a grocery delivery service. Shop and wait until a delivery sim come with a bag. Accept delivery and open the bag, Get the items inside it.
How to use:
There are two way to access this service: 1. Select grocery store rabbit hole --> Request Grocery Delivery Service -Combo rabbit hole will be in Grocery Store... Pie menu
2. Select cellphone or home phone --> Services... --> Call for Grocery Delivery -If there's multiple grocery stores, a dialog will pop up and ask to select one -Can't shop if there's no grocery store in the world
Shop as usual and buy items. Wait until a delivery service sim come and ring the doorbell. Accept it like pizza delivery service. Sim will be charged 30 simoleons for the service.
The grocery bag is from The Sims 4 Cottage Living.
Others:
If the delivery didn't come:
-Use MasterController to check whether there's 4 pizza delivery service sim. Two for pizza, two for grocery (Game needs time to generate sims to fill the spot)
-Since the delivery system is almost the same as pizza delivery, try to order pizza to see whether they can reach the lot.
-There's report that in worlds with no roads, service sim may not show up but the grocery bag is somewhere around the lot. Try to search around the house.
Credit: Big thanks to twinsimming for phone coding help! Simmers on Discord and tumblr for testing Battery's script mod template CmarNYC's SimOutfitter tool ILSpy Visual Studio 2022 Multiple modder's tutorial. EA for the bag
Download from MTS!
370 notes
·
View notes
Text
How I ditched streaming services and learned to love Linux: A step-by-step guide to building your very own personal media streaming server (V2.0: REVISED AND EXPANDED EDITION)
This is a revised, corrected and expanded version of my tutorial on setting up a personal media server that previously appeared on my old blog (donjuan-auxenfers). I expect that that post is still making the rounds (hopefully with my addendum on modifying group share permissions in Ubuntu to circumvent 0x8007003B "Unexpected Network Error" messages in Windows 10/11 when transferring files) but I have no way of checking. Anyway this new revised version of the tutorial corrects one or two small errors I discovered when rereading what I wrote, adds links to all products mentioned and is just more polished generally. I also expanded it a bit, pointing more adventurous users toward programs such as Sonarr/Radarr/Lidarr and Overseerr which can be used for automating user requests and media collection.
So then, what is this tutorial? This is a tutorial on how to build and set up your own personal media server using Ubuntu as an operating system and Plex (or Jellyfin) to not only manage your media, but to also stream that media to your devices both at home and abroad anywhere in the world where you have an internet connection. Its intent is to show you how building a personal media server and stuffing it full of films, TV, and music that you acquired through indiscriminate and voracious media piracy various legal methods will free you to completely ditch paid streaming services. No more will you have to pay for Disney+, Netflix, HBOMAX, Hulu, Amazon Prime, Peacock, CBS All Access, Paramount+, Crave or any other streaming service that is not named Criterion Channel. Instead whenever you want to watch your favourite films and television shows, you’ll have your own personal service that only features things that you want to see, with files that you have control over. And for music fans out there, both Jellyfin and Plex support music streaming, meaning you can even ditch music streaming services. Goodbye Spotify, Youtube Music, Tidal and Apple Music, welcome back unreasonably large MP3 (or FLAC) collections.
On the hardware front, I’m going to offer a few options catered towards different budgets and media library sizes. The cost of getting a media server up and running using this guide will cost you anywhere from $450 CAD/$325 USD at the low end to $1500 CAD/$1100 USD at the high end (it could go higher). My server was priced closer to the higher figure, but I went and got a lot more storage than most people need. If that seems like a little much, consider for a moment, do you have a roommate, a close friend, or a family member who would be willing to chip in a few bucks towards your little project provided they get access? Well that's how I funded my server. It might also be worth thinking about the cost over time, i.e. how much you spend yearly on subscriptions vs. a one time cost of setting up a server. Additionally there's just the joy of being able to scream "fuck you" at all those show cancelling, library deleting, hedge fund vampire CEOs who run the studios through denying them your money. Drive a stake through David Zaslav's heart.
On the software side I will walk you step-by-step through installing Ubuntu as your server's operating system, configuring your storage as a RAIDz array with ZFS, sharing your zpool to Windows with Samba, running a remote connection between your server and your Windows PC, and then a little about started with Plex/Jellyfin. Every terminal command you will need to input will be provided, and I even share a custom #bash script that will make used vs. available drive space on your server display correctly in Windows.
If you have a different preferred flavour of Linux (Arch, Manjaro, Redhat, Fedora, Mint, OpenSUSE, CentOS, Slackware etc. et. al.) and are aching to tell me off for being basic and using Ubuntu, this tutorial is not for you. The sort of person with a preferred Linux distro is the sort of person who can do this sort of thing in their sleep. Also I don't care. This tutorial is intended for the average home computer user. This is also why we’re not using a more exotic home server solution like running everything through Docker Containers and managing it through a dashboard like Homarr or Heimdall. While such solutions are fantastic and can be very easy to maintain once you have it all set up, wrapping your brain around Docker is a whole thing in and of itself. If you do follow this tutorial and had fun putting everything together, then I would encourage you to return in a year’s time, do your research and set up everything with Docker Containers.
Lastly, this is a tutorial aimed at Windows users. Although I was a daily user of OS X for many years (roughly 2008-2023) and I've dabbled quite a bit with various Linux distributions (mostly Ubuntu and Manjaro), my primary OS these days is Windows 11. Many things in this tutorial will still be applicable to Mac users, but others (e.g. setting up shares) you will have to look up for yourself. I doubt it would be difficult to do so.
Nothing in this tutorial will require feats of computing expertise. All you will need is a basic computer literacy (i.e. an understanding of what a filesystem and directory are, and a degree of comfort in the settings menu) and a willingness to learn a thing or two. While this guide may look overwhelming at first glance, it is only because I want to be as thorough as possible. I want you to understand exactly what it is you're doing, I don't want you to just blindly follow steps. If you half-way know what you’re doing, you will be much better prepared if you ever need to troubleshoot.
Honestly, once you have all the hardware ready it shouldn't take more than an afternoon or two to get everything up and running.
(This tutorial is just shy of seven thousand words long so the rest is under the cut.)
Step One: Choosing Your Hardware
Linux is a light weight operating system, depending on the distribution there's close to no bloat. There are recent distributions available at this very moment that will run perfectly fine on a fourteen year old i3 with 4GB of RAM. Moreover, running Plex or Jellyfin isn’t resource intensive in 90% of use cases. All this is to say, we don’t require an expensive or powerful computer. This means that there are several options available: 1) use an old computer you already have sitting around but aren't using 2) buy a used workstation from eBay, or what I believe to be the best option, 3) order an N100 Mini-PC from AliExpress or Amazon.
Note: If you already have an old PC sitting around that you’ve decided to use, fantastic, move on to the next step.
When weighing your options, keep a few things in mind: the number of people you expect to be streaming simultaneously at any one time, the resolution and bitrate of your media library (4k video takes a lot more processing power than 1080p) and most importantly, how many of those clients are going to be transcoding at any one time. Transcoding is what happens when the playback device does not natively support direct playback of the source file. This can happen for a number of reasons, such as the playback device's native resolution being lower than the file's internal resolution, or because the source file was encoded in a video codec unsupported by the playback device.
Ideally we want any transcoding to be performed by hardware. This means we should be looking for a computer with an Intel processor with Quick Sync. Quick Sync is a dedicated core on the CPU die designed specifically for video encoding and decoding. This specialized hardware makes for highly efficient transcoding both in terms of processing overhead and power draw. Without these Quick Sync cores, transcoding must be brute forced through software. This takes up much more of a CPU’s processing power and requires much more energy. But not all Quick Sync cores are created equal and you need to keep this in mind if you've decided either to use an old computer or to shop for a used workstation on eBay
Any Intel processor from second generation Core (Sandy Bridge circa 2011) onward has Quick Sync cores. It's not until 6th gen (Skylake), however, that the cores support the H.265 HEVC codec. Intel’s 10th gen (Comet Lake) processors introduce support for 10bit HEVC and HDR tone mapping. And the recent 12th gen (Alder Lake) processors brought with them hardware AV1 decoding. As an example, while an 8th gen (Kaby Lake) i5-8500 will be able to hardware transcode a H.265 encoded file, it will fall back to software transcoding if given a 10bit H.265 file. If you’ve decided to use that old PC or to look on eBay for an old Dell Optiplex keep this in mind.
Note 1: The price of old workstations varies wildly and fluctuates frequently. If you get lucky and go shopping shortly after a workplace has liquidated a large number of their workstations you can find deals for as low as $100 on a barebones system, but generally an i5-8500 workstation with 16gb RAM will cost you somewhere in the area of $260 CAD/$200 USD.
Note 2: The AMD equivalent to Quick Sync is called Video Core Next, and while it's fine, it's not as efficient and not as mature a technology. It was only introduced with the first generation Ryzen CPUs and it only got decent with their newest CPUs, we want something cheap.
Alternatively you could forgo having to keep track of what generation of CPU is equipped with Quick Sync cores that feature support for which codecs, and just buy an N100 mini-PC. For around the same price or less of a used workstation you can pick up a mini-PC with an Intel N100 processor. The N100 is a four-core processor based on the 12th gen Alder Lake architecture and comes equipped with the latest revision of the Quick Sync cores. These little processors offer astounding hardware transcoding capabilities for their size and power draw. Otherwise they perform equivalent to an i5-6500, which isn't a terrible CPU. A friend of mine uses an N100 machine as a dedicated retro emulation gaming system and it does everything up to 6th generation consoles just fine. The N100 is also a remarkably efficient chip, it sips power. In fact, the difference between running one of these and an old workstation could work out to hundreds of dollars a year in energy bills depending on where you live.
You can find these Mini-PCs all over Amazon or for a little cheaper on AliExpress. They range in price from $170 CAD/$125 USD for a no name N100 with 8GB RAM to $280 CAD/$200 USD for a Beelink S12 Pro with 16GB RAM. The brand doesn't really matter, they're all coming from the same three factories in Shenzen, go for whichever one fits your budget or has features you want. 8GB RAM should be enough, Linux is lightweight and Plex only calls for 2GB RAM. 16GB RAM might result in a slightly snappier experience, especially with ZFS. A 256GB SSD is more than enough for what we need as a boot drive, but going for a bigger drive might allow you to get away with things like creating preview thumbnails for Plex, but it’s up to you and your budget.
The Mini-PC I wound up buying was a Firebat AK2 Plus with 8GB RAM and a 256GB SSD. It looks like this:

Note: Be forewarned that if you decide to order a Mini-PC from AliExpress, note the type of power adapter it ships with. The mini-PC I bought came with an EU power adapter and I had to supply my own North American power supply. Thankfully this is a minor issue as barrel plug 30W/12V/2.5A power adapters are easy to find and can be had for $10.
Step Two: Choosing Your Storage
Storage is the most important part of our build. It is also the most expensive. Thankfully it’s also the most easily upgrade-able down the line.
For people with a smaller media collection (4TB to 8TB), a more limited budget, or who will only ever have two simultaneous streams running, I would say that the most economical course of action would be to buy a USB 3.0 8TB external HDD. Something like this one from Western Digital or this one from Seagate. One of these external drives will cost you in the area of $200 CAD/$140 USD. Down the line you could add a second external drive or replace it with a multi-drive RAIDz set up such as detailed below.
If a single external drive the path for you, move on to step three.
For people with larger media libraries (12TB+), who prefer media in 4k, or care who about data redundancy, the answer is a RAID array featuring multiple HDDs in an enclosure.
Note: If you are using an old PC or used workstatiom as your server and have the room for at least three 3.5" drives, and as many open SATA ports on your mother board you won't need an enclosure, just install the drives into the case. If your old computer is a laptop or doesn’t have room for more internal drives, then I would suggest an enclosure.
The minimum number of drives needed to run a RAIDz array is three, and seeing as RAIDz is what we will be using, you should be looking for an enclosure with three to five bays. I think that four disks makes for a good compromise for a home server. Regardless of whether you go for a three, four, or five bay enclosure, do be aware that in a RAIDz array the space equivalent of one of the drives will be dedicated to parity at a ratio expressed by the equation 1 − 1/n i.e. in a four bay enclosure equipped with four 12TB drives, if we configured our drives in a RAIDz1 array we would be left with a total of 36TB of usable space (48TB raw size). The reason for why we might sacrifice storage space in such a manner will be explained in the next section.
A four bay enclosure will cost somewhere in the area of $200 CDN/$140 USD. You don't need anything fancy, we don't need anything with hardware RAID controls (RAIDz is done entirely in software) or even USB-C. An enclosure with USB 3.0 will perform perfectly fine. Don’t worry too much about USB speed bottlenecks. A mechanical HDD will be limited by the speed of its mechanism long before before it will be limited by the speed of a USB connection. I've seen decent looking enclosures from TerraMaster, Yottamaster, Mediasonic and Sabrent.
When it comes to selecting the drives, as of this writing, the best value (dollar per gigabyte) are those in the range of 12TB to 20TB. I settled on 12TB drives myself. If 12TB to 20TB drives are out of your budget, go with what you can afford, or look into refurbished drives. I'm not sold on the idea of refurbished drives but many people swear by them.
When shopping for harddrives, search for drives designed specifically for NAS use. Drives designed for NAS use typically have better vibration dampening and are designed to be active 24/7. They will also often make use of CMR (conventional magnetic recording) as opposed to SMR (shingled magnetic recording). This nets them a sizable read/write performance bump over typical desktop drives. Seagate Ironwolf and Toshiba NAS are both well regarded brands when it comes to NAS drives. I would avoid Western Digital Red drives at this time. WD Reds were a go to recommendation up until earlier this year when it was revealed that they feature firmware that will throw up false SMART warnings telling you to replace the drive at the three year mark quite often when there is nothing at all wrong with that drive. It will likely even be good for another six, seven, or more years.

Step Three: Installing Linux
For this step you will need a USB thumbdrive of at least 6GB in capacity, an .ISO of Ubuntu, and a way to make that thumbdrive bootable media.
First download a copy of Ubuntu desktop (for best performance we could download the Server release, but for new Linux users I would recommend against the server release. The server release is strictly command line interface only, and having a GUI is very helpful for most people. Not many people are wholly comfortable doing everything through the command line, I'm certainly not one of them, and I grew up with DOS 6.0. 22.04.3 Jammy Jellyfish is the current Long Term Service release, this is the one to get.
Download the .ISO and then download and install balenaEtcher on your Windows PC. BalenaEtcher is an easy to use program for creating bootable media, you simply insert your thumbdrive, select the .ISO you just downloaded, and it will create a bootable installation media for you.
Once you've made a bootable media and you've got your Mini-PC (or you old PC/used workstation) in front of you, hook it directly into your router with an ethernet cable, and then plug in the HDD enclosure, a monitor, a mouse and a keyboard. Now turn that sucker on and hit whatever key gets you into the BIOS (typically ESC, DEL or F2). If you’re using a Mini-PC check to make sure that the P1 and P2 power limits are set correctly, my N100's P1 limit was set at 10W, a full 20W under the chip's power limit. Also make sure that the RAM is running at the advertised speed. My Mini-PC’s RAM was set at 2333Mhz out of the box when it should have been 3200Mhz. Once you’ve done that, key over to the boot order and place the USB drive first in the boot order. Then save the BIOS settings and restart.
After you restart you’ll be greeted by Ubuntu's installation screen. Installing Ubuntu is really straight forward, select the "minimal" installation option, as we won't need anything on this computer except for a browser (Ubuntu comes preinstalled with Firefox) and Plex Media Server/Jellyfin Media Server. Also remember to delete and reformat that Windows partition! We don't need it.
Step Four: Installing ZFS and Setting Up the RAIDz Array
Note: If you opted for just a single external HDD skip this step and move onto setting up a Samba share.
Once Ubuntu is installed it's time to configure our storage by installing ZFS to build our RAIDz array. ZFS is a "next-gen" file system that is both massively flexible and massively complex. It's capable of snapshot backup, self healing error correction, ZFS pools can be configured with drives operating in a supplemental manner alongside the storage vdev (e.g. fast cache, dedicated secondary intent log, hot swap spares etc.). It's also a file system very amenable to fine tuning. Block and sector size are adjustable to use case and you're afforded the option of different methods of inline compression. If you'd like a very detailed overview and explanation of its various features and tips on tuning a ZFS array check out these articles from Ars Technica. For now we're going to ignore all these features and keep it simple, we're going to pull our drives together into a single vdev running in RAIDz which will be the entirety of our zpool, no fancy cache drive or SLOG.
Open up the terminal and type the following commands:
sudo apt update
then
sudo apt install zfsutils-linux
This will install the ZFS utility. Verify that it's installed with the following command:
zfs --version
Now, it's time to check that the HDDs we have in the enclosure are healthy, running, and recognized. We also want to find out their device IDs and take note of them:
sudo fdisk -1
Note: You might be wondering why some of these commands require "sudo" in front of them while others don't. "Sudo" is short for "super user do”. When and where "sudo" is used has to do with the way permissions are set up in Linux. Only the "root" user has the access level to perform certain tasks in Linux. As a matter of security and safety regular user accounts are kept separate from the "root" user. It's not advised (or even possible) to boot into Linux as "root" with most modern distributions. Instead by using "sudo" our regular user account is temporarily given the power to do otherwise forbidden things. Don't worry about it too much at this stage, but if you want to know more check out this introduction.
If everything is working you should get a list of the various drives detected along with their device IDs which will look like this: /dev/sdc. You can also check the device IDs of the drives by opening the disk utility app. Jot these IDs down as we'll need them for our next step, creating our RAIDz array.
RAIDz is similar to RAID-5 in that instead of striping your data over multiple disks, exchanging redundancy for speed and available space (RAID-0), or mirroring your data writing by two copies of every piece (RAID-1), it instead writes parity blocks across the disks in addition to striping, this provides a balance of speed, redundancy and available space. If a single drive fails, the parity blocks on the working drives can be used to reconstruct the entire array as soon as a replacement drive is added.
Additionally, RAIDz improves over some of the common RAID-5 flaws. It's more resilient and capable of self healing, as it is capable of automatically checking for errors against a checksum. It's more forgiving in this way, and it's likely that you'll be able to detect when a drive is dying well before it fails. A RAIDz array can survive the loss of any one drive.
Note: While RAIDz is indeed resilient, if a second drive fails during the rebuild, you're fucked. Always keep backups of things you can't afford to lose. This tutorial, however, is not about proper data safety.
To create the pool, use the following command:
sudo zpool create "zpoolnamehere" raidz "device IDs of drives we're putting in the pool"
For example, let's creatively name our zpool "mypool". This poil will consist of four drives which have the device IDs: sdb, sdc, sdd, and sde. The resulting command will look like this:
sudo zpool create mypool raidz /dev/sdb /dev/sdc /dev/sdd /dev/sde
If as an example you bought five HDDs and decided you wanted more redundancy dedicating two drive to this purpose, we would modify the command to "raidz2" and the command would look something like the following:
sudo zpool create mypool raidz2 /dev/sdb /dev/sdc /dev/sdd /dev/sde /dev/sdf
An array configured like this is known as RAIDz2 and is able to survive two disk failures.
Once the zpool has been created, we can check its status with the command:
zpool status
Or more concisely with:
zpool list
The nice thing about ZFS as a file system is that a pool is ready to go immediately after creation. If we were to set up a traditional RAID-5 array using mbam, we'd have to sit through a potentially hours long process of reformatting and partitioning the drives. Instead we're ready to go right out the gates.
The zpool should be automatically mounted to the filesystem after creation, check on that with the following:
df -hT | grep zfs
Note: If your computer ever loses power suddenly, say in event of a power outage, you may have to re-import your pool. In most cases, ZFS will automatically import and mount your pool, but if it doesn’t and you can't see your array, simply open the terminal and type sudo zpool import -a.
By default a zpool is mounted at /"zpoolname". The pool should be under our ownership but let's make sure with the following command:
sudo chown -R "yourlinuxusername" /"zpoolname"
Note: Changing file and folder ownership with "chown" and file and folder permissions with "chmod" are essential commands for much of the admin work in Linux, but we won't be dealing with them extensively in this guide. If you'd like a deeper tutorial and explanation you can check out these two guides: chown and chmod.

You can access the zpool file system through the GUI by opening the file manager (the Ubuntu default file manager is called Nautilus) and clicking on "Other Locations" on the sidebar, then entering the Ubuntu file system and looking for a folder with your pool's name. Bookmark the folder on the sidebar for easy access.

Your storage pool is now ready to go. Assuming that we already have some files on our Windows PC we want to copy to over, we're going to need to install and configure Samba to make the pool accessible in Windows.
Step Five: Setting Up Samba/Sharing
Samba is what's going to let us share the zpool with Windows and allow us to write to it from our Windows machine. First let's install Samba with the following commands:
sudo apt-get update
then
sudo apt-get install samba
Next create a password for Samba.
sudo smbpswd -a "yourlinuxusername"
It will then prompt you to create a password. Just reuse your Ubuntu user password for simplicity's sake.
Note: if you're using just a single external drive replace the zpool location in the following commands with wherever it is your external drive is mounted, for more information see this guide on mounting an external drive in Ubuntu.
After you've created a password we're going to create a shareable folder in our pool with this command
mkdir /"zpoolname"/"foldername"
Now we're going to open the smb.conf file and make that folder shareable. Enter the following command.
sudo nano /etc/samba/smb.conf
This will open the .conf file in nano, the terminal text editor program. Now at the end of smb.conf add the following entry:
["foldername"]
path = /"zpoolname"/"foldername"
available = yes
valid users = "yourlinuxusername"
read only = no
writable = yes
browseable = yes
guest ok = no
Ensure that there are no line breaks between the lines and that there's a space on both sides of the equals sign. Our next step is to allow Samba traffic through the firewall:
sudo ufw allow samba
Finally restart the Samba service:
sudo systemctl restart smbd
At this point we'll be able to access to the pool, browse its contents, and read and write to it from Windows. But there's one more thing left to do, Windows doesn't natively support the ZFS file systems and will read the used/available/total space in the pool incorrectly. Windows will read available space as total drive space, and all used space as null. This leads to Windows only displaying a dwindling amount of "available" space as the drives are filled. We can fix this! Functionally this doesn't actually matter, we can still write and read to and from the disk, it just makes it difficult to tell at a glance the proportion of used/available space, so this is an optional step but one I recommend (this step is also unnecessary if you're just using a single external drive). What we're going to do is write a little shell script in #bash. Open nano with the terminal with the command:
nano
Now insert the following code:
#!/bin/bash CUR_PATH=`pwd` ZFS_CHECK_OUTPUT=$(zfs get type $CUR_PATH 2>&1 > /dev/null) > /dev/null if [[ $ZFS_CHECK_OUTPUT == *not\ a\ ZFS* ]] then IS_ZFS=false else IS_ZFS=true fi if [[ $IS_ZFS = false ]] then df $CUR_PATH | tail -1 | awk '{print $2" "$4}' else USED=$((`zfs get -o value -Hp used $CUR_PATH` / 1024)) > /dev/null AVAIL=$((`zfs get -o value -Hp available $CUR_PATH` / 1024)) > /dev/null TOTAL=$(($USED+$AVAIL)) > /dev/null echo $TOTAL $AVAIL fi
Save the script as "dfree.sh" to /home/"yourlinuxusername" then change the ownership of the file to make it executable with this command:
sudo chmod 774 dfree.sh
Now open smb.conf with sudo again:
sudo nano /etc/samba/smb.conf
Now add this entry to the top of the configuration file to direct Samba to use the results of our script when Windows asks for a reading on the pool's used/available/total drive space:
[global]
dfree command = /home/"yourlinuxusername"/dfree.sh
Save the changes to smb.conf and then restart Samba again with the terminal:
sudo systemctl restart smbd
Now there’s one more thing we need to do to fully set up the Samba share, and that’s to modify a hidden group permission. In the terminal window type the following command:
usermod -a -G sambashare “yourlinuxusername”
Then restart samba again:
sudo systemctl restart smbd
If we don’t do this last step, everything will appear to work fine, and you will even be able to see and map the drive from Windows and even begin transferring files, but you'd soon run into a lot of frustration. As every ten minutes or so a file would fail to transfer and you would get a window announcing “0x8007003B Unexpected Network Error”. This window would require your manual input to continue the transfer with the file next in the queue. And at the end it would reattempt to transfer whichever files failed the first time around. 99% of the time they’ll go through that second try, but this is still all a major pain in the ass. Especially if you’ve got a lot of data to transfer or you want to step away from the computer for a while.
It turns out samba can act a little weirdly with the higher read/write speeds of RAIDz arrays and transfers from Windows, and will intermittently crash and restart itself if this group option isn’t changed. Inputting the above command will prevent you from ever seeing that window.
The last thing we're going to do before switching over to our Windows PC is grab the IP address of our Linux machine. Enter the following command:
hostname -I
This will spit out this computer's IP address on the local network (it will look something like 192.168.0.x), write it down. It might be a good idea once you're done here to go into your router settings and reserving that IP for your Linux system in the DHCP settings. Check the manual for your specific model router on how to access its settings, typically it can be accessed by opening a browser and typing http:\\192.168.0.1 in the address bar, but your router may be different.
Okay we’re done with our Linux computer for now. Get on over to your Windows PC, open File Explorer, right click on Network and click "Map network drive". Select Z: as the drive letter (you don't want to map the network drive to a letter you could conceivably be using for other purposes) and enter the IP of your Linux machine and location of the share like so: \\"LINUXCOMPUTERLOCALIPADDRESSGOESHERE"\"zpoolnamegoeshere"\. Windows will then ask you for your username and password, enter the ones you set earlier in Samba and you're good. If you've done everything right it should look something like this:

You can now start moving media over from Windows to the share folder. It's a good idea to have a hard line running to all machines. Moving files over Wi-Fi is going to be tortuously slow, the only thing that’s going to make the transfer time tolerable (hours instead of days) is a solid wired connection between both machines and your router.
Step Six: Setting Up Remote Desktop Access to Your Server
After the server is up and going, you’ll want to be able to access it remotely from Windows. Barring serious maintenance/updates, this is how you'll access it most of the time. On your Linux system open the terminal and enter:
sudo apt install xrdp
Then:
sudo systemctl enable xrdp
Once it's finished installing, open “Settings” on the sidebar and turn off "automatic login" in the User category. Then log out of your account. Attempting to remotely connect to your Linux computer while you’re logged in will result in a black screen!
Now get back on your Windows PC, open search and look for "RDP". A program called "Remote Desktop Connection" should pop up, open this program as an administrator by right-clicking and selecting “run as an administrator”. You’ll be greeted with a window. In the field marked “Computer” type in the IP address of your Linux computer. Press connect and you'll be greeted with a new window and prompt asking for your username and password. Enter your Ubuntu username and password here.

If everything went right, you’ll be logged into your Linux computer. If the performance is sluggish, adjust the display options. Lowering the resolution and colour depth do a lot to make the interface feel snappier.

Remote access is how we're going to be using our Linux system from now, barring edge cases like needing to get into the BIOS or upgrading to a new version of Ubuntu. Everything else from performing maintenance like a monthly zpool scrub to checking zpool status and updating software can all be done remotely.

This is how my server lives its life now, happily humming and chirping away on the floor next to the couch in a corner of the living room.
Step Seven: Plex Media Server/Jellyfin
Okay we’ve got all the ground work finished and our server is almost up and running. We’ve got Ubuntu up and running, our storage array is primed, we’ve set up remote connections and sharing, and maybe we’ve moved over some of favourite movies and TV shows.
Now we need to decide on the media server software to use which will stream our media to us and organize our library. For most people I’d recommend Plex. It just works 99% of the time. That said, Jellyfin has a lot to recommend it by too, even if it is rougher around the edges. Some people run both simultaneously, it’s not that big of an extra strain. I do recommend doing a little bit of your own research into the features each platform offers, but as a quick run down, consider some of the following points:
Plex is closed source and is funded through PlexPass purchases while Jellyfin is open source and entirely user driven. This means a number of things: for one, Plex requires you to purchase a “PlexPass” (purchased as a one time lifetime fee $159.99 CDN/$120 USD or paid for on a monthly or yearly subscription basis) in order to access to certain features, like hardware transcoding (and we want hardware transcoding) or automated intro/credits detection and skipping, Jellyfin offers some of these features for free through plugins. Plex supports a lot more devices than Jellyfin and updates more frequently. That said, Jellyfin's Android and iOS apps are completely free, while the Plex Android and iOS apps must be activated for a one time cost of $6 CDN/$5 USD. But that $6 fee gets you a mobile app that is much more functional and features a unified UI across platforms, the Plex mobile apps are simply a more polished experience. The Jellyfin apps are a bit of a mess and the iOS and Android versions are very different from each other.
Jellyfin’s actual media player is more fully featured than Plex's, but on the other hand Jellyfin's UI, library customization and automatic media tagging really pale in comparison to Plex. Streaming your music library is free through both Jellyfin and Plex, but Plex offers the PlexAmp app for dedicated music streaming which boasts a number of fantastic features, unfortunately some of those fantastic features require a PlexPass. If your internet is down, Jellyfin can still do local streaming, while Plex can fail to play files unless you've got it set up a certain way. Jellyfin has a slew of neat niche features like support for Comic Book libraries with the .cbz/.cbt file types, but then Plex offers some free ad-supported TV and films, they even have a free channel that plays nothing but Classic Doctor Who.
Ultimately it's up to you, I settled on Plex because although some features are pay-walled, it just works. It's more reliable and easier to use, and a one-time fee is much easier to swallow than a subscription. I had a pretty easy time getting my boomer parents and tech illiterate brother introduced to and using Plex and I don't know if I would've had as easy a time doing that with Jellyfin. I do also need to mention that Jellyfin does take a little extra bit of tinkering to get going in Ubuntu, you’ll have to set up process permissions, so if you're more tolerant to tinkering, Jellyfin might be up your alley and I’ll trust that you can follow their installation and configuration guide. For everyone else, I recommend Plex.
So pick your poison: Plex or Jellyfin.
Note: The easiest way to download and install either of these packages in Ubuntu is through Snap Store.
After you've installed one (or both), opening either app will launch a browser window into the browser version of the app allowing you to set all the options server side.
The process of adding creating media libraries is essentially the same in both Plex and Jellyfin. You create a separate libraries for Television, Movies, and Music and add the folders which contain the respective types of media to their respective libraries. The only difficult or time consuming aspect is ensuring that your files and folders follow the appropriate naming conventions:
Plex naming guide for Movies
Plex naming guide for Television
Jellyfin follows the same naming rules but I find their media scanner to be a lot less accurate and forgiving than Plex. Once you've selected the folders to be scanned the service will scan your files, tagging everything and adding metadata. Although I find do find Plex more accurate, it can still erroneously tag some things and you might have to manually clean up some tags in a large library. (When I initially created my library it tagged the 1963-1989 Doctor Who as some Korean soap opera and I needed to manually select the correct match after which everything was tagged normally.) It can also be a bit testy with anime (especially OVAs) be sure to check TVDB to ensure that you have your files and folders structured and named correctly. If something is not showing up at all, double check the name.
Once that's done, organizing and customizing your library is easy. You can set up collections, grouping items together to fit a theme or collect together all the entries in a franchise. You can make playlists, and add custom artwork to entries. It's fun setting up collections with posters to match, there are even several websites dedicated to help you do this like PosterDB. As an example, below are two collections in my library, one collecting all the entries in a franchise, the other follows a theme.

My Star Trek collection, featuring all eleven television series, and thirteen films.

My Best of the Worst collection, featuring sixty-nine films previously showcased on RedLetterMedia’s Best of the Worst. They’re all absolutely terrible and I love them.
As for settings, ensure you've got Remote Access going, it should work automatically and be sure to set your upload speed after running a speed test. In the library settings set the database cache to 2000MB to ensure a snappier and more responsive browsing experience, and then check that playback quality is set to original/maximum. If you’re severely bandwidth limited on your upload and have remote users, you might want to limit the remote stream bitrate to something more reasonable, just as a note of comparison Netflix’s 1080p bitrate is approximately 5Mbps, although almost anyone watching through a chromium based browser is streaming at 720p and 3mbps. Other than that you should be good to go. For actually playing your files, there's a Plex app for just about every platform imaginable. I mostly watch television and films on my laptop using the Windows Plex app, but I also use the Android app which can broadcast to the chromecast connected to the TV in the office and the Android TV app for our smart TV. Both are fully functional and easy to navigate, and I can also attest to the OS X version being equally functional.
Part Eight: Finding Media
Now, this is not really a piracy tutorial, there are plenty of those out there. But if you’re unaware, BitTorrent is free and pretty easy to use, just pick a client (qBittorrent is the best) and go find some public trackers to peruse. Just know now that all the best trackers are private and invite only, and that they can be exceptionally difficult to get into. I’m already on a few, and even then, some of the best ones are wholly out of my reach.
If you decide to take the left hand path and turn to Usenet you’ll have to pay. First you’ll need to sign up with a provider like Newshosting or EasyNews for access to Usenet itself, and then to actually find anything you’re going to need to sign up with an indexer like NZBGeek or NZBFinder. There are dozens of indexers, and many people cross post between them, but for more obscure media it’s worth checking multiple. You’ll also need a binary downloader like SABnzbd. That caveat aside, Usenet is faster, bigger, older, less traceable than BitTorrent, and altogether slicker. I honestly prefer it, and I'm kicking myself for taking this long to start using it because I was scared off by the price. I’ve found so many things on Usenet that I had sought in vain elsewhere for years, like a 2010 Italian film about a massacre perpetrated by the SS that played the festival circuit but never received a home media release; some absolute hero uploaded a rip of a festival screener DVD to Usenet. Anyway, figure out the rest of this shit on your own and remember to use protection, get yourself behind a VPN, use a SOCKS5 proxy with your BitTorrent client, etc.
On the legal side of things, if you’re around my age, you (or your family) probably have a big pile of DVDs and Blu-Rays sitting around unwatched and half forgotten. Why not do a bit of amateur media preservation, rip them and upload them to your server for easier access? (Your tools for this are going to be Handbrake to do the ripping and AnyDVD to break any encryption.) I went to the trouble of ripping all my SCTV DVDs (five box sets worth) because none of it is on streaming nor could it be found on any pirate source I tried. I’m glad I did, forty years on it’s still one of the funniest shows to ever be on TV.
Part Nine/Epilogue: Sonarr/Radarr/Lidarr and Overseerr
There are a lot of ways to automate your server for better functionality or to add features you and other users might find useful. Sonarr, Radarr, and Lidarr are a part of a suite of “Servarr” services (there’s also Readarr for books and Whisparr for adult content) that allow you to automate the collection of new episodes of TV shows (Sonarr), new movie releases (Radarr) and music releases (Lidarr). They hook in to your BitTorrent client or Usenet binary newsgroup downloader and crawl your preferred Torrent trackers and Usenet indexers, alerting you to new releases and automatically grabbing them. You can also use these services to manually search for new media, and even replace/upgrade your existing media with better quality uploads. They’re really a little tricky to set up on a bare metal Ubuntu install (ideally you should be running them in Docker Containers), and I won’t be providing a step by step on installing and running them, I’m simply making you aware of their existence.
The other bit of kit I want to make you aware of is Overseerr which is a program that scans your Plex media library and will serve recommendations based on what you like. It also allows you and your users to request specific media. It can even be integrated with Sonarr/Radarr/Lidarr so that fulfilling those requests is fully automated.
And you're done. It really wasn't all that hard. Enjoy your media. Enjoy the control you have over that media. And be safe in the knowledge that no hedgefund CEO motherfucker who hates the movies but who is somehow in control of a major studio will be able to disappear anything in your library as a tax write-off.
1K notes
·
View notes
Text
TMayNT Day 14: Favourite turtle movie.
The Rise one :P
Ok SO I disappeared because when I saw this prompt I wanted to finish this. Now to try and catch up, or at least continue TMayNT. If anyone would like to guess at themes and motifs I'd love to hear it because I remember putting a lot of thought into the initial concept ^^
More info about the creation of the video below:
So a lot of this isn't up to my personal standards BUT I'm proud of it because: I have started dozens of projects like this and almost never finished any. I am fighting my perfectionism and sporadic ADHD motivation. I believe I conceptualised this at the end of 2022 or early 2023 and reanimated/redrew the storyboard at least 3 times over the first half of 2023 before it was abandoned. Until now. Also I've never had a "camera" to play with before so I'm very inexperience with that.
It's a bit inconsistent: 1. because it was partially an experiment using Moho. It was my first time properly using it and I definitely need to look at some tutorials because I' strong armed it and made things a lot harder than I'm pretty sure I am not making the most of the features lol. Its also a vector program, which I'm not used to. 2. because I redrew the storyboard multiple times (and kept various aspects of it for the final ver) and then redrew it a final time after like a year.
So I credited those artists for popularising the meme but I actually have no idea where specifically I got the idea. I do not remember referencing any other "Is It Cold Outside" memes. I'm like 99% sure I sat down and wrote out a plan/script in word but it's possible I was inspired by or referenced someone specific and don't remember, so if anything is ringing any familiar bells please let me know.
I can't find the original sped up audio used in these memes but I believe this was the original original: https://www.youtube.com/watch?v=KorGLK9VXcU (If anyone can tell me more info about the audio used in this meme, let me know). Storyboarded on Clip Studio, animated on Moho, minor editing on Kdenlive.
#TMayNT#tmayntchallenge#save rottmnt#unpause rottmnt#unpause rise of the tmnt#save rise of the tmnt#rise of the tmnt#rise of the teenage mutant ninja turtles#rottmnt#rise season 3#rottmnt movie#rottmnt spoilers#spoilers#tmaynt day 14#moho animation#moho#rise leo#rise leonardo#rottmnt leonardo#rottmnt leo#rottmnt raph#rottmnt mikey#rottmnt donnie#rise raphael#rottmnt raphael#rise raph#rise mikey#rise donnie#rise michelangelo#rise donatello
306 notes
·
View notes
Text
Edgaring time!
Tutorial on how to make your own responsive Edgar :D I will try to explain it in really basic terms, like you’ve never touched a puter (which if you’re making this… I’m sure you’ve touched plenty of computers amirite??? EL APLAUSO SEÑOOOREEES).
If you have some experience I tried to highlight the most important things so you won’t have to read everything, this is literally building a website but easier.
I will only show how to make him move like this:
Disclaimer: I’m a yapper.
Choosing an engine First of all you’ll need something that will allow you to display a responsive background, I used LivelyWallpaper since it’s free and open-source (we love open-source).
Choosing an IDE Next is having any IDE to make some silly code! (Unless you can rawdog code… Which would be honestly impressive and you need to slide in my DMs and we will make out) I use Visual Studio!!!
So now that we have those two things we just need to set up the structure we will use.
Project structure
We will now create our project, which I will call “Edgar”, we will include some things inside as follows:
Edgar
img (folder that will contain images) - thumbnail.png (I literally just have a png of his face :]) - [some svgs…]
face.js (script that will make him interactive)
index.html (script that structures his face!)
LivelyInfo,json (script that LivelyWallpaper uses to display your new wallpaper)
style.css (script we will use to paint him!)
All of those scripts are just literally like a “.txt” file but instead of “.txt” we use “.js”, “.html”, etc… You know? We just write stuff and tell the puter it’s in “.{language}”, nothing fancy.
index.html
Basically the way you build his silly little face! Here’s the code:
<!doctype html> <html> <head> <meta charset="utf-8"> <title>Face!</title> <link rel = "stylesheet" type = "text/css" href = "style.css"> </head> <body> <div class="area"> <div class="face"> <div class="eyes"> <div class="eyeR"></div> <div class="eyeL"></div> </div> <div class="mouth"></div> </div> </div> <script src="face.js"></script> </body> </html>
Ok so now some of you will be thinking “Why would you use eyeR and eyeL? Just use eye!�� and you’d be right but I’m a dummy who couldn’t handle making two different instances of the same object and altering it… It’s scary but if you can do it, please please please teach me ;0;!!!
Area comes in handy to the caress function we will implement in the next module (script)! It encapsulates face.
Face just contains the elements inside, trust me it made sense but i can’t remember why…
Eyes contains each different eye, probably here because I wanted to reuse code and it did not work out and when I kept going I was too scared to restructure it.
EyeR/EyeL are the eyes! We will paint them in the “.css”.
Mouth, like the eyeR/eyeL, will be used in the “.css”.
face.js
Here I will only show how to make it so he feels you mouse on top of him! Too ashamed of how I coded the kisses… Believe me, it’s not pretty at all and so sooo repetitive…
// ######################### // ## CONSTANTS ## // ######################### const area = document.querySelector('.area'); const face = document.querySelector('.face'); const mouth = document.querySelector('.mouth'); const eyeL = document.querySelector('.eyeL'); const eyeR = document.querySelector('.eyeR'); // ######################### // ## CARESS HIM ## // ######################### // When the mouse enters the area the face will follow the mouse area.addEventListener('mousemove', (event) => { const rect = area.getBoundingClientRect(); const x = event.clientX - rect.left; const y = event.clientY - rect.top; face.style.left = `${x}px`; face.style.top = `${y}px`; }); // When the mouse leaves the area the face will return to the original position area.addEventListener('mouseout', () => { face.style.left = '50%'; face.style.top = '50%'; });
God bless my past self for explaining it so well, but tbf it’s really simple,,
style.css
body { padding: 0; margin: 0; background: #c9c368; overflow: hidden; } .area { width: 55vh; height: 55vh; position: absolute; top: 50%; left: 50%; transform: translate(-50%,-50%); background: transparent; display: flex; } .face { width: 55vh; height: 55vh; position: absolute; top: 50%; left: 50%; transform: translate(-50%,-50%); background: transparent; display: flex; justify-content: center; align-items: center; transition: 0.5s ease-out; } .mouth { width: 75vh; height: 70vh; position: absolute; bottom: 5vh; background: transparent; border-radius: 100%; border: 1vh solid #000; border-color: transparent transparent black transparent; pointer-events: none; animation: mouth-sad 3s 420s forwards step-end; } .face:hover .mouth { animation: mouth-happy 0.5s forwards; } .eyes { position: relative; bottom: 27%; display: flex; } .eyes .eyeR { position: relative; width: 13vh; height: 13vh; display: block; background: black; margin-right: 11vh; border-radius: 50%; transition: 1s ease } .face:hover .eyeR { transform: translateY(10vh); border-radius: 20px 100% 20px 100%; } .eyes .eyeL { position: relative; width: 13vh; height: 13vh; display: block; background: black; margin-left: 11vh; border-radius: 50%; transition: 1s ease; } .face:hover .eyeL { transform: translateY(10vh); border-radius: 100% 20px 100% 20px; } @keyframes mouth-happy { 0% { background-color: transparent; height: 70vh; width: 75vh; } 100% { border-radius: 0 0 25% 25%; transform: translateY(-10vh); } } @keyframes mouth-sad { 12.5%{ height: 35vh; width: 67vh; } 25% { height: 10vh; width: 60vh; } 37.5% { width: 53vh; border-radius: 0%; border-bottom-color: black; } 50% { width: 60vh; height: 10vh; transform: translateY(11vh); border-radius: 100%; border-color: black transparent transparent transparent; } 62.5% { width: 64vh; height: 20vh; transform: translateY(21vh); } 75% { width: 69vh; height: 40vh; transform: translateY(41vh); } 87.5% { width: 75vh; height: 70vh; transform: translateY(71vh); } 100% { width: 77vh; height: 90vh; border-color: black transparent transparent transparent; transform: translateY(91vh); } }
I didn’t show it but this also makes it so if you don’t pay attention to him he will get sad (mouth-sad, tried to make it as accurate to the movie as possible, that’s why it’s choppy!)
The .hover is what makes him go like a creature when you hover over him, if you want to change it just… Change it! If you’d rather him always have the same expression, delete it!
Anyway, lots of easy stuff, lots of code that I didn’t reuse and I probably should’ve (the eyes!!! Can someone please tell me a way I can just… Mirror the other or something…? There must be a way!!!) So now this is when we do a thinking exercise in which you think about me as like someone who is kind of dumb and take some pity on me.
LivelyInfo.json
{ "AppVersion": "1.0.0.0", "Title": "Edgar", "Thumbnail": "img/thumbnail.png", "Preview": "thumbnail.png", "Desc": "It's me!.", "Author": "Champagne?", "License": "", "Type": 1, "FileName": "index.html" }
Easy stuff!!!
Conclusion
This could've been a project on git but i'm not ready and we're already finished. I'm curious about how this will be seen on mobile and PC,,, i'm not one to post here.
Sorry if I rambled too much or if i didn't explain something good enough! If you have any doubts please don't hesitate to ask.
And if you add any functionality to my code or see improvements please please please tell me, or make your own post!
98 notes
·
View notes
Note
I’m a little curious , what do you use for making a VN? Any tutorials you used and any tips or comments?
I use a program called renpy alongside with visual studio code!🫶
As in tutorials Zeil Learnings on youtube has saved me, even google is a great help (for the costumized pronouns as an example, I just looked up how to code them and followed the scripts people wrote down).
I use clipstudio paint and procreate for the drawings, as a tip I could say that you can use procreate or any drawing or editing app to visualize how you want your game's aesthetics to look like before actually coding it; add the background, then the characters and a textbox that you can costumize however you want, once you like it enough you can settle with that <3.
I don't make the backgrounds myself, I get them from Uncle Mugen, literally such AMAZING free resources (ofc I'll credit them on the itch.io page). The most important thing is that you have fun writing the story and creating the game, see it as a personal achievement and try not to compare yourself too much to others, remember that YOU are the creator, you know how everything goes so you won't get the same thrill as someone who plays it for the first time without knowing the entire lore. (I should listen to my own advice for this HAHDHAH)
25 notes
·
View notes
Text
I've had a few folks ask me about creating a blog series on how I made the Premade Sim and Relationship Overhaul mod, and how they can do similar projects. This is the first of four or so blogs on the subject, starting at the beginning - creating new premade sims, including occults. Please note that these are intermediate level tutorials, and assume you are familiar with the basics of XML modding, Sims 4 Studio, and the Premade Household Tool.
--------
Creating New Premade Sims
The biggest tool in your arsenal of creating new premades is Denton47's Premade Household Tool, available here: https://modthesims.info/d/669907/ts4-premade-household-tool.html. It is a fantastic and very straightforward tool - you create your new premade sim (or make over an existing sim) in a save file, exit out of the game, and then open the tool and load the save, extracting the household. If this is an override of an existing household, you'd want to check a few boxes, if a new household, you don't need to. There are instructions on the actual mod page that are much more thorough so I'm just glossing over that here for the sake of time.
What you need to know is that, to add new premades, you need to assign them to a specific world either as a townie or as a resident of a specific lot. Assigning townies requires overriding a region description, and these overrides conflict*, so you will need to carefully consider what region you want to use. For example, my Aliens Reloaded mod uses Sixam to add townies in order to avoid conflicts, as Sixam is the aliens world. You can safely add multiple housed sims to the same region even with different mods/files, so long as they're assigned to different lots. If different households are assigned to the same lot, then generally only one will get successfully added. Please communicate to your mod users what region or lot you're using.
[*It may be possible to add townies to the same region via script injection - I am currently investigating this and will update this blog if I find a method.]
To ensure safety if someone does not own a pack, or if they disable a pack, please make sure to edit the group number of the world description and/or world file so it matches the pack the world is from - for example, Get to Work, or EP01, has a group number that ends in "03". The latest version of Sims4Studio will allow you to select the DLC in a dropdown and will automatically set the group number for you.
If you are making a special NPC or special NPCs, then to protect them from Neighborhood Stories and MCCC make sure to also set their household status to "Hidden" in the Premade Household Tool. You can edit this in the edit tab.
--------
Creating Two-Form Occult Premade Sims
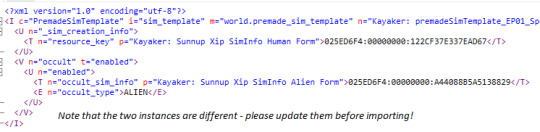
Occult sims are a bit more complicated to create than regular premades - especially if they have two forms, like aliens, vampires, mermaids, and werewolves. First, make sure when you save your save file they are in their human form. It is important to extract their household data using the Premade Household Tool when they are in their human form or else the extraction will grab the wrong information and they will spawn incorrectly with missing data.
Second, these sims need a few additional steps. They need premade household templates and premade sim templates to be added to them, and you also need to separately extract their human and occult form SimInfo data from your tray files using Sims4Studio or another program (just make sure to save them to your library first).
To extract using Sims4Studio, go to "Content Management" -> "My Library", right click on the household you want and export to whatever folder you're using. You will see three files exported. Human, Occult, and Sim. You only need the Human and Occult files. You can safely delete the Sim file.
These two files (Human and Occult) must be imported into a package file, preferably with your premade household and premade sim templates. Since the instance numbers of these two files are the same, please change them before importing, as importing these files without changing the instances will result in only one file actually making it into S4S.
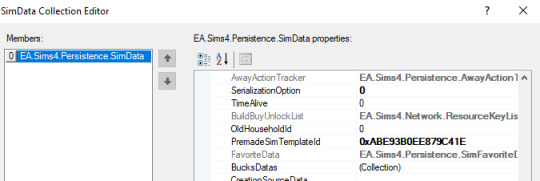
Here is an example of the editing you should do - paste the new unique instance between the exclamation points as shown. This should be a unique hash of some kind to prevent potential clashes:

The new SimData must be referenced in their premade sim templates like so:
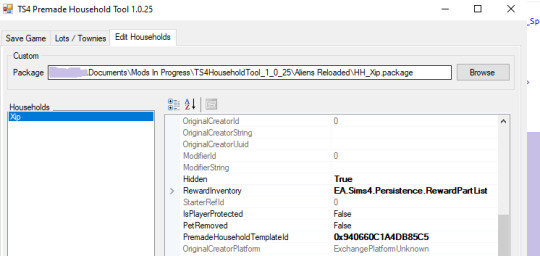
Once that is done, you'll need to open the household data in the Premade Household Tool, navigate to the Edit Household section, and paste in the instance number for your sim's premade household template into the household section, then go to Sim -> Gameplay Data -> Premade Sim Template to add in the instance for their premade sim template.
Please note that this process only works for creating a premade occult sim. There is, as of the moment I'm writing this blog, no way to create an occult sim with a specific look from a tunable sim template. So if you want to make a special two-form occult NPC that has a specific in-game purpose, you will need three templates - the premade household and sim templates to add your sim of choice to a new save, and a tunable template that will create a randomly generated sim with the proper traits and skills in users' existing saves (or if your premade dies or is otherwise unavailable/invalid).
Spellcasters are not two-form occults and, if you are creating a premade spellcaster, then you do not need to do the extra step with the SimData. If you are creating one from a tunable template, just make sure to add their spellcaster trait so they are recognized as a spellcaster as it isn't possible to add occult simdata to a tunable sim template.
--------
Occult Sim Fixups
Keeping on the subject of occults, you will likely notice that some data does not survive the process of the sim getting turned into a premade. Things like occult rank, perks, and unlocks will need to be manually set through different types of fixups. Spellcasters specifically are a bit of a pain and require a special process, as NPC spellcasters are not coded in such a way that they can actually learn spells and fixups (adding in additional data to "fix up" a sim) can only happen when they are actually added to an active household.
For Vampires/Werewolves: these fixups are best done via loots. If you are using a script file to deliver relationship loots on new save start (like my Premade Sim and Relationship Overhaul mod does), then you can have your vampires or werewolves deliver these loot from themselves to themselves and set their appropriate rank and unlocks that way (I will share more on this process later). Alternatively, you can assign them a self-deleting trait. Trait -> loot on instance -> have the loot set rank, etc -> have the loot delete the trait so it won't fire the next time the sim instances in.
For Spellcasters: spellcasters are coded differently than other occults. The most important thing to know is that only spellcasters in households that have been played at least once can do magic and everyone else is just faking it. "But why do spellcaster premades, townies, and the sages have spells when I add them to my household?" you might ask. That's because the devs gave them hidden fixup traits. You will need to do the same with your premade spellcasters. This fixup trait should have your spellcaster's rank, unlocks, and spells specified on it, and will take effect when the sim is added to an active household and is no longer considered a NPC.
For examples of how these fixup traits are supposed to look/work, please see any of the simInfoFixup_Magic_Spells traits. You can check them through tools like the XML Extractor, the TDESC Browser, or directly in Sims4Studio.
You can add extra loot to make these self-deleting, but I have not bothered as users won't generally see these traits unless they're messing around with MCCC.
Mermaids and Aliens do not require fixups, as they do not have skill trees unless you are playing with mods. If you are playing modded, generally the abilities are added through hidden traits, and you should assign these through the standard Premade Household Tool process to avoid potential errors on new save start if someone disables a pack (I will expand more on this in a later blog). The premade Aliens Reloaded aliens generally use this method.
--------
Milestones Fixups
Milestones fixups follow a similar logic to spellcaster fixups. Without mods, premades, townies, and NPC sims that have never been played do not have any milestones. Existing Maxis premades have fixups on their premade sim templates that add these milestones when the sim becomes played. However, this does not work quite so well for our purposes, as users without Growing Together get errors on new save start if you try to add milestone fixups via a premade sim template - even using the group ID trick. At present, only Maxis/EA premades can use this method safely.
I'd recommend instead using a self-deleting trait to assign the milestones via a loot. The procedure is trait -> loot on instance -> milestones loot -> delete trait. You can add a test to the loot on instance to make sure it only runs if the sim is in a played household.
Make sure the trait and your initial loot have the group number for Growing Together (EP13 = 00000036). If you have a milestone that belongs to another DLC (not Growing Together) it should be chained inside of the Growing Together loot, using an action to deliver a second loot with your DLC-specific milestone. The second loot should have the group number specific to that pack. Please be very careful when assigning milestones, as they are very unsafe and may cause save issues for users. Test thoroughly!
The next blog in the series, "Setting Premade Sim Relationships" tackles the topic on setting relationships between different premade sims on new save start and have more on pack safety and chaining loots. Available here.
11 notes
·
View notes
Text

[NEWS] Key Visual Reveal! and August Progress Report
Hello Everyone, we’re here to reveal our long overdue key visual!
Our key visual features the main characters, Katsuya, Atsuya, Megumi, Hayato and Tamami. We aimed for a heartwarming feel for this key visual and we hope it brightens up your day too!
August Progress Report
Subsequent to post Kickstarter campaign (despite not reaching our goal), we focused on collecting feedback and data by conducting survey and researching at the beginning of the month. Most comments and feedback received were constructive and we have organize a list of them to implement our game in the future. Here are some examples:
Background aren’t self-explanatory (solution: labels/indicators for location name)
Tutorials and Manuals are not clear for Steam players (solution: in-game manual is to be included)
Language interface problems (solution: reconstruction of the programming system) … etc.
Fortunately, many of them are simple to implement as long as we have the time. As our development progresses, there will be an update on each implementation accordingly. We’re very grateful to have received much support for and interest in our game MY DEAR☆LOVE.
Furthermore, as some of you might’ve known already, BlerdyOtome streamed our game on Twitch ♥ We’re very honoured to hear player’s thoughts and experience live since this is what we want to bring to the community. Of course, her insights have helped us analyze our game in a different POV so we can improve.
In addition, we also created our Ko-fi page for any of you who’d like to show some support! Click here to visit our Ko-fi page! We’ll sort out the details of each tier in the near future. In general, as a Ko-fi supporter, you’ll have access to exclusive contents such hi-res graphics and PSDs, BTS (behind-the-scenes contents) and name in credits for the game. We’re also planning on art requests for higher tiers as well. If you would like more of our contents or our projects, please consider supporting us on Ko-fi! We’d greatly appreciate your help.
As for the game development progress, we’ve worked on polishing the writing for the final demo as mentioned on our monthly goal. Not only did we finish the polishing, but we also have actually gone further into the writing for 2 chapters, as well as brainstorming ideas and outlining the script of our future project… Although this was very time-consuming, it was all worth the effort! Nonetheless, it comes with a price. Since we worked heavily on the writing, our progress on visual/graphic have slowed down. Our long overdue key visual was finally completed during the week, and only one and a half of the sprite(s)… are in progress. We’re not entirely satisfied with our schedule however life does get in the way sometimes. Anyways, we’ll be posting our monthly goal of September soon and we hope to progress further.
To wrap up, Happy Saturday!
✿✿✿
Thank you for supporting an indie studio like us; it makes a big difference as we would be able to create freeware and budget-friendly games for everyone!
Stay tuned and stay hydrated!
#my dear love#indie dev#indie game dev#indie games#otome#otome game#simulation game#otome games#vn#visual novel#interactive fiction
11 notes
·
View notes
Text
miscellaneous things i think could be good (or just funny) in a modern freakazoid reboot
dexter has a small friend group he plays dnd and other games with (because help him, this boy needs some legitimate friends)
more of dexter and freakazoid interacting with each other, being able to see how their internal communication works. bonus if freak can just. pop up on dexter's computer or phone to chat with him
a new villain or plot device based on generative ai, messing with freakazoid's sense of what's true and false (possibly deadpan? the early villain in the s1 finale?)
an episode on just how exactly to do a freakazoid reboot. freak himself is in the studio trying to find the best pitch to turn into a show, and even in the writing room, telling people that no, actually, he'd never say that, have you even SEEN the original show --
a whole episode's running joke of being sponsored by an mmorpg (with 20% off if the viewer uses the code RPGFREAK20XX). freak goes after the game's creators near the episode's end when he gets sick of the interruptions
valerie returns with a bit of a larger role, being steph's friend and possibly becoming the previously cut-from-production witch girl (because we need more women in this show)
short joke of freakazoid stopping a fight to tell someone who's playing a video loudly without headphones to stop it, it is DRIVING him UP the WALL. GEEZ
fanboy makes a return, and introduces his little sister: a freakazoid fan who's a little too into him and her favorite fandom ships. freak wants nothing to do with her, her brother, and her "intense interest with cargo and freighters"
cobra queen has an online shop where she makes snake-themed jewelry and does makeup tutorials. freakazoid is happy to support small businesses. he is not happy when she still uses her massive pet serpents to break into stores to steal things
gutierrez, with the internet taking off, also deals in developing software at apex. the new social media app they make leeches info from others to sell, but its main use is to find, tag, and track freakazoid wherever he goes
one of the villain's plans involve those fridges that come with a touchscreen and built-in wifi. imagine their surprise when freak is able to zap inside. he's on one of the shelves eating food and asking for condiments
an episode where lobe's scheme is based on one of those viral, seemingly silly mobile games everyone plays (flappy bird, candy crush, cookie clicker, etc). even the show's staff are taken with it. the narrator interrupts the program at one point to mention that he will no longer be announcing things because he's too busy playing the game himself
freakazoid learns about vr being a thing, and becomes a cryptid by popping into random games and streams. there's a whole short done like a found footage film or documentary based on people's attempt to find him
freak does a parody of youtuber apology videos for a segment, saying sorry to the viewer. by the end, it's clear he's badly reading off a script, and admits he doesn't even know what he's apologizing for
cave guy's plan for an episode being intimidating various scholars, professors, and newspapers to hide articles and research behind a paywall (which goes directly to him, of course). freak learns about it because dexter needs to write a paper for class, and needs to race against the clock to get his sources unlocked before its due
a short based on dexter trying his hand at streaming games. he ends up temporarily famous for his really well-done "custom freakazoid vtuber model" (it's just freak himself)
a short based on longhorn trying to get into nashville by becoming a music influencer. he does not get far
you-know-who has happily settled into his role as an internet creepypasta. there's an episode where freakazoid needs to follow a string of disappearances, linked with a recent internet "challenge" and posts trailing off after saying candlejack, which is harder than it s --
#freakazoid#freakazoid series#freakazoid!#cocoapost#ever since i finished watching the show i have had. ideas#i'd love to see a modern reboot with how the internet is nowadays#is it likely? maybe not#but i can DREAM DARN IT ALL#anyways if y'all have thoughts i would love to hear them
16 notes
·
View notes
Text
ChannelBuilderAI Review: The Ultimate Automated Video Creation Solution
Introduction: Revolutionizing Content Creation
In today's fast-paced digital landscape, content creators face immense pressure to produce high-quality videos consistently. ChannelBuilderAI emerges as a game-changing solution, promising to streamline the entire video production process—from scripting to publishing. After extensive testing across multiple niches, I’m convinced this platform represents a significant leap forward in AI-powered content creation.

Core Features and Capabilities
ChannelBuilderAI stands out with its comprehensive feature set, addressing every stage of video production:
Advanced Script Generation: Crafts engaging, structured narratives tailored to your niche (e.g., horror, business, or education).
Human-Like Voiceovers: 78 voice options across 12 languages with emotional inflection (excitement, suspense, authority).
Smart Visual Composition: Auto-matches visuals to scripts with 42+ art styles (photorealistic, anime, etc.).
Built-in SEO Optimization: Generates high-CTR titles, descriptions, and thumbnails.
Multi-Platform Publishing: Formats videos for YouTube, TikTok, Instagram, and more.
Real-World Performance and Results
I tested ChannelBuilderAI across three channels, and the results were undeniable:
History Facts Channel:
Output increased from 2 to 14 videos/week.
CTR jumped from 3% to 9%.
Subscribers grew by 287% in 45 days.
Motivational Content Channel:
Watch time increased by 420%.
Daily views skyrocketed from 1K to 18K.
Product Review Channel:
Conversion rates improved from 1.2% to 4.7%.
Affiliate earnings 5X’d due to higher engagement.
Why ChannelBuilderAI is a Must-Have for Video Marketing
Video marketing dominates in 2024, and ChannelBuilderAI gives you the edge:
1. Skyrocket Engagement
AI-optimized videos rank higher and retain viewers longer, thanks to:
Trend-aware scripts that hook audiences.
Professional pacing that reduces drop-off rates.
2. Dominate Social Algorithms
Auto-formatted videos for each platform (YouTube, TikTok, Reels).
AI-generated hashtags & captions to boost discoverability.
3. Scale Without Sacrificing Quality
Produce a week’s worth of content in hours.
Maintain consistent branding across all videos.
4. Monetize Faster
Perfect for affiliate reviews, product demos, and ads.
Agencies can offer video services at scale without hiring editors.
ChannelBuilderAI Pricing & Offers
Here’s a breakdown of each package and who it’s best for:
1. Starter Plan ($39) – For Solo Creators
Includes: Full access to AI scripting, voiceovers, and basic editing.
Best for: Beginners or creators testing AI tools.
ROI: Pays for itself in 1-2 videos (vs. hiring freelancers).
2. Gold Upgrade ($197) – For Serious Creators
Includes: Unlimited videos, 15 client seats, and HD rendering.
Best for: Full-time YouTubers or small agencies.
ROI: One client ($500+) covers the cost.
3. Elite Upgrade ($127) – Done-for-You Channels
Includes: 15 pre-built "cash cow" channels + multilingual support.
Best for: Marketers who want plug-and-play content.
ROI: Resell one channel for $1,000+.
4. Enterprise Tier ($197/year) – For Agencies
Includes: Whitelabel rights, 100 client seats, team collaboration.
Best for: Studios selling video services.
ROI: Charge $997+/month per client.
👉 See All Offers Here: ChannelBuilderAI Official Page
Who Should Use ChannelBuilderAI?
This tool is perfect for:
Faceless YouTube/TikTok creators tired of editing.
Affiliate marketers scaling product reviews.
E-commerce brands needing demo videos.
Agencies offering video services.
Educators turning lessons into engaging content.
Limitations to Consider
Learning curve: Takes 2-3 days to master.
Human review needed: AI isn’t perfect—always check outputs.
No free trial (but 30-day money-back guarantee).
Frequently Asked Questions (FAQ)
Q: Can I edit AI-generated videos?
A: Yes! The drag-and-drop editor allows full customization.
Q: Is it beginner-friendly?
A: Absolutely. Tutorials walk you through everything.
Q: What if I’m not satisfied?
A: 30-day refund policy—no risk.
Q: Does it work for non-English content?
A: Yes, 12 languages are supported.
Q: How often is it updated?
A: Monthly improvements keep it cutting-edge.

Conclusion
ChannelBuilderAI is the most powerful AI video tool I’ve tested. It’s not magic—you’ll still need to guide the AI—but it cuts production time by 90% while improving quality.
For creators, marketers, and agencies, this is a profit multiplier.
🚀 Ready to transform your content? 👉 Try ChannelBuilderAI Risk-Free Today 👈 you can also read a long version review by clicking here: ChannelBuilderAi review
or listen to this podcast:
2 notes
·
View notes
Text
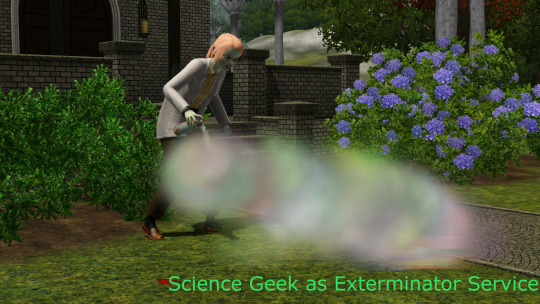
A new mod by fantuanss12!
fantuanss12 mod notes
What does this mod do:
This mod make the science geek service NPC the "exterminator service". Sims can hire science geeks from phone to remove roaches from the house, same as the exterminator service from The Sims 2.
Requirements:
This mod works fine on its own, but it is recommended to have/install:
University Life: The spraying animation use the street art animation from this EP, if it was not installed science geeks will just stomp on them.
Twinsimming's Pest Control Mod: This mod don't spawn roaches in the game, and it will be useless if this mod isn't installed.
Conflict:
This mod will conflict with mods that also alter: Interaction: ScenerioRoach.StompRoaches
How to use:
If there's roaches on the lot, sims can call science geek on phone/home phones, under services... pie menu. Costs 50 simoleons. Once requested, science geek will visit your lot and get rid of the roaches, and charge when they leave.
All roaches will be destroyed when they leave, disregard whether they can reach the roach.
All service sims will use the spraying animation.
Stomp Roaches:
This mod overrides the Stomp Roaches interaction. Stomping roaches will no longer be 100% successful, and the chance can be increased with athletic and martial arts skill.
Others:
-Allow sims to fire the science geek
-By default the tuning of science geek is hardcoded, this mod make it tunable. If you want all premade science geeks keep their role on world load change the pool count to 2
-I do not recommend to call the service when the game hasn't yet generate a science geek (simulated the service once). This won't be a problem in EA premade worlds
-Do not use the force NPC... Science Geek cheat on mailbox. It will permanently make the service be in requested state and nothing could be done
And happy Sims 2 re-release day!
Credit: Big thanks to Twinsimming for pest control mod and testing! Battery's script mod template ILSpy Visual Studio 2022 Multiple modder's tutorial.
70 notes
·
View notes
Note
what program do you use and/or which brushes for Alternia Beta Clones? /genq
Thanks for asking, I really wanted to talk about it! :D
(It's going to be a bit long so I'll put it in 'Keep Reading' xD)
To draw my panels, I use Clip Studio Paint. And for the brush, I use the basic nib (Plume G) with no anti-aliasing effect!
I also use 714 x 441 px format so that you can see the pixel effect better.
Why 714 x 441 px precisely? Er… actually, it's mostly due to a mistake when I made my first panels. Basically, I wanted to use a 600 x 400px format, and I must have made a mistake when creating the file! But I like the way it looks in the end.
Otherwise, I originally made the character sprites on Clip Studio Paint, using the same brush as before. But I quickly realized that it wasn't the most adaptable, and now I'm reworking all my sprites on Aseprite! It's a software specialized in pixels. I've also started doing some backgrounds there! (Like Eclass hive)
CSP :
Aseprite:

By the way, for the environments, I'm using a script I found on itch.io to make isometric boxes. (HERE)
For the video part, I edit on Movavi! And by the way, I don't compose my own music, I go through OpengameArt ( I update my credits document if you'd like to see the music I use).
And finally the video game part! For the moment I've only used renpy, mainly because I'm familiar with coding with it. It's not necessarily the most optimized if you ask me! I did the clicker on it, but renpy is better suited to visual novels! (maybe I'll put some visual novels in Alternate Beta Clone too?)
Otherwise, I'm learning how to use GameMaker and I'd love to make games on it, so let's see in the future! :D
(Note that Renpy and Game Maker are free, and there are lots of tutorials on the net! You can also find resources on itch.io)
#ask#ask me anything#homestuck#fantroll#alternate beta clones#aseprite#movavi#clip studio paint#game maker#itch.io#game development#mspfa#mspfanventures#hom3stuck
7 notes
·
View notes
Text
Interloper Devlog #0 - March 2025
I wanted to make this post to kinda get anyone who's interested up to speed on the current (as of March 17th 2025) status of the game.
A bit of preamble here to make a few terms clear.
I will be using 2 terms throughout this. Scripting, and Coding.
Scripting will refer to visual scripting such as drag and drop or spreadsheet scripting. Coding will refer to the traditional kind of coding where each line is typed out individually. While i firmly believe both are coding just in different forms, making this distinction will be helpful later on in the post.
I initially started this project on the game engine GDevelop which uses scripting. I've been using GDevelop for about 2 years if the 3 months of 2025 are included so I've gotten fairly good at it. I've never really been able to code until recently so i didn't have many options for game engines to learn, but GDevelop being regularly updated with a decent community was perfect for me.
I started development around the beginning of March maybe late February, and it was going fairly well.
I got dialogue working
A good modular menu system

Saves
Even a little arcade game

----------
But I quickly faced a problem that I've had with GDevelop many times before. I became completely overwhelmed! Not by the scope of the project or any feature i didn't know how to script, just by how big the scripting was.
The scripting page just becomes so long so quickly and it becomes tiring to look through. Now there is a decent remedy for this in GDevelop called "External Events" which let you split scripts into their own little segments. While this is good it only helps for so long, eventually you'll have some huge External Event (in my experience).
I figured I'd just deal with it and kept going, until I on a whim decided to try out Game Maker Studio 2. I had never been able to code before so I figured I would just poke around and give up like the many attempts at trying to code before.
But I didn't! I actually picked up GML (Game Makers coding language) very quickly. After only 1 tutorial (and half of one that I didn't really pay attention to) I was quickly able to make a little dialogue system that would not only display text but also show the corresponding face and emotion!
So after a bit of tinkering with coding in a 'test' project I decided I shouldn't waste this opportunity and went all in on Game Maker. I quickly made a new project and set up movement and interaction, I remade the dialogue system from the first 'test' project and even managed to give it scrolling text. I made a nice modular menu system and room transitions (with fading!)
---------------------
So to recap the current state of the game:
Working dialogue
Modular menu system (Easy menu making)
Room Transitions
Player Movement with collisions
As a bit of clarity this blog will be almost exclusively about Interloper with the exceptions being when my personal life cause changes with development. Such as PC troubles, moving, etc. etc.
Along with small posts here and there about art or music for the game I hope to make one of these at least every other month (although monthly is the goal). So if you're interested then the end of each month would be the best time to check here.
Finally so I can end this post, I will be moving within the next few weeks and thus won't be able to work on the game or post any substantial updates (quite the way to open a blog like this) I should have everything set up by the end of March / Early April. I am still aiming for a Devlog by the end of April assuming nothing goes wrong such as my PC breaking during transport.
Have a wonderful day!
3 notes
·
View notes
Note
How do you go about formatting your comics? I’ve always wanted to make a comic but formatting it has always been a struggle..
Also don’t forget to drink water and care for urself

Drink has been acquired! Grab yourself one too, it's "Vane might ramble too much" hours!
Keep in mind that my formatting is what works for me, so it might not work for everyone. I also use Clip Studio Paint (EX), so some bits might work for other programs, while some might not. I also can't for the life of me remember the difference between CSP Debut, Pro, or EX so I'm sorry if I mention features you might not have.
I'm gonna cut the post here, so it doesn't take up too much space on the dash :D
Alrighty! I'm not completely sure what you mean by format, so I'll just do a quick rundown of my process!
Script
I usually start with a script. It can be as loose or detailed as you want it to be, but mine usually are something like this:
Character A: "Says a word!" Description of scene or action
Character A: "Says more words!" Character B: "And more words are said"
I use gaps in the text to signify a panel break. So this would be two panels! Keep in mind your workload, and don't put in too many if you're not ready for it.
Sketch
After I finalize, or at least have a general understanding of my script, I get a canvas around the size that I think it'll be. I usually start out with about 1800x8000, but you can adjust it based on your needs.
I like to try and sketch out a rough idea of how I want the comic to flow. Using my script, I sketch out the panels and toss in where I think the text bubbles will go. Here's the latest Wanderer update as an example! (Yes I usually use the first draft sketches for the final product, don't worry about it lmao)
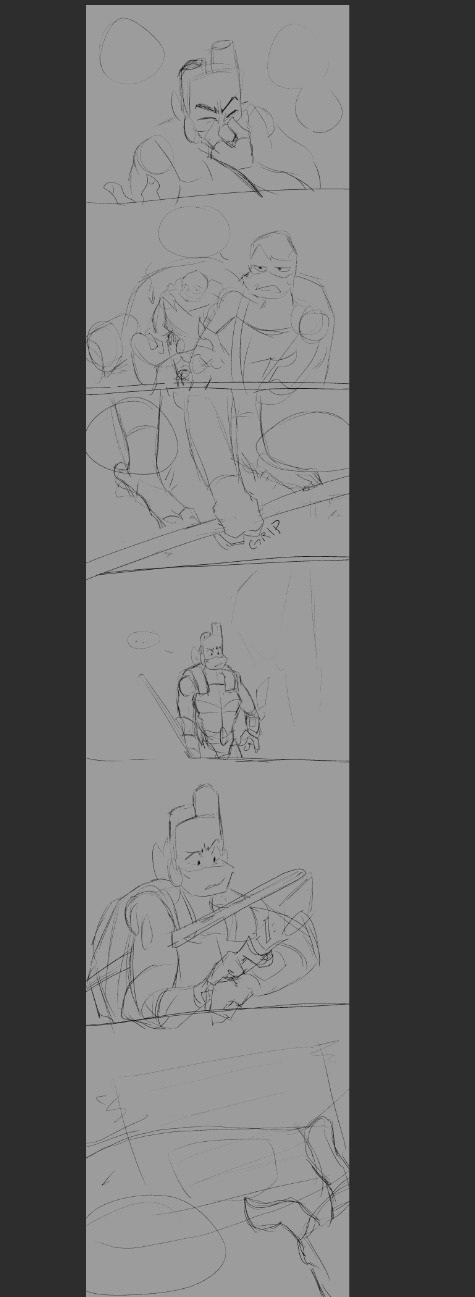
I do a sketch of the entire thing, which helps me resize as I need.
Panels
The panels were always the hardest part for me to figure out before I started working on Wanderer. Again, this is what works for me. It might not work for everyone, and this is also just how I set up this specific comic.
Let's get some boxes going. Go to the Frame Border option, and select rectangle frame.

It needs to be on create frame!
Click and drag one giant box over your sketch. I'm using an excerpt from the above sketch for example! You can click the frame layer itself, hold ctrl down and adjust the width of the box.
Delete this layer:
and move your sketch above the frame layer so you can see it!
Now we just split the panels up how you want them. Next to where you found the Create Frame option earlier, there should be a Cut Frame option. I personally use Divide Frame Folder, so everything is contained without bleeding through to other panels.
You can mess with these:
The "gutter" is just how much space is made between panels.
When making your panel splits, you can hold ctrl to snap to a 45° angle.
It might end up looking messy to the side, but each new frame folder will be like a new mini canvas for each panel. I find that color coding the layers helps me find which ones I need if I start getting too many.
Here's a look at what it might look like based on what I've done for just this example.
And if we go to the actual file for the upload...
It keeps everything nice and organized, imo!
Okay, I thiiink that about covers it. Text boxes/bubbles and the such are easier to find tutorials for, so I'm not gonna cover those unless people specifically want those. But I'm more than willing to divulge... most... of my secrets haha.
As always if I need to clarify anything, just ask and I'll do my best to clear it up! Best of luck on your comic making adventures!
34 notes
·
View notes
Text
With the insanity that Unity's recent decisions have caused, I, as an aspiring game dev/designer, am looking to see what else is available. We all know about RPG Maker, GameMaker Studio, Godot, and Unreal. But if you're like me and have little to no understanding of code and limited finances, here are alternative indie engines I've scrounged up:
Idle Game Maker, the one I'm currently working with, built by Orteil of Cookie Clicker fame
Bitsy, and an associated pixel art tool called Pixsy
Pocket Platformer, similar to Bitsy, and code-free
Rogue Engine- requires download, but apparently, there's a tutorial
GDevelop- both 2D and 3D engines, has tutorials, and even has an option to playtest games in development and provide feedback (I am definitely trying out this one in the near future)
Heaps.io-requires download, and this honestly looks a little over my head right now, but might be worth checking into when I get a better understanding of code
Stride- 3D games, requires download, has docs and instructions so you can learn quickly
Bevy- 2D games for browser and mobile
LibGDX- now we're getting into engines that can make REAL games, some of the games in their showcase are on Steam
Defold- according to their showcase, this was used to make that mobile game Family Island that you've seen in so many ads
Love- don't be fooled by the childish font on their home page, the games in their showcase look amazing
HaxeFlixel- apparently used to make Friday Night Funkin'???
Armory3D, which apparently uses Blender
Solar2D, and here's their showcase- looks decent enough
Solarus- I didn't recognize the name, but I know I've heard of this, I've seen Zelda fans use this one. You have to download their launcher to play the games on PC.
DOME, which uses its own programming language
FNA, which calls itself a "reimplementation of Microsoft XNA"- if you remember, XNA no longer exists, but Eric Barone used it for Stardew Valley. FNA has been used to make games like Rogue Legacy (it's a real game, I got it on Steam).
Monogame- a direct descendant of XNA, being used for Stardew Valley's updates, and used to make a whole host of other popular indie games including 2 of my favorites: Axiom Verge and Celeste (so yeah, I'm definitely checking into Monogame if it's still around by the time I learn C#)
RPG in a Box, which looks really blocky and rough, but appears to be a cheaper solution than RPG Maker, especially for those new to the field. I already paid for RPG Maker, so I don't know if I'll use this one, but I'm putting it here for anyone else who may want to try it.
Adventure Game Studio- not sure how difficult it will be to use, but I'm seeing some decent-looking games in their showcase
RPG Paper Maker, which, I guess, makes 3D games out of pixel art? Says it's free to use, but if you want to sell your game, you'll need to buy a license. Fair enough, I suppose.
Narrat, another one I am DEFINITELY going to try, at least while I'm still learning. Has its own, very simple, easy to read script that is a step above Idle Game Maker's script, but not quite as complicated as "real" programming languages. Make RPG's and put them on Itch.io.
Ren'Py, for visual novels (apparently Doki Doki was made with this!?!)
Decker, can be used for various kinds of applications, not much for game-making, but maybe with a little imagination....
Engine.lol- I'm, uh, not sure what this is, but could be good for generating ideas.
EbitEngine- describes itself as "dead simple," used to make Bear's Restaurant.
Raylib- no tutorials, no built-in assets, you MUST know how to code- but it looks like a no-frills engine if you do know how to code. I don't, so I won't be using it, but if you do, go right ahead.
PyGame, which apparently uses Python coding language.
And this article listed all these and a few more that I didn't list here because they looked too expensive or too complicated.
There's also a Pixel Game Maker on Steam. It's 90 bucks right now (ouch!) but if you can get it, it looks like it'll be worth it.
21 notes
·
View notes
Note
I'm thinking of trying my hand at some GBA Fire Emblem ROM hacking, and I was wondering, what software/program/whatever was used to make Sacred Echoes?
My workflow for Sacred Echoes ended up being pretty similar to how the original devs built FE8 - meaning I was mostly working with source code and the compiler with various command-line utilities to convert my asset files into a data format the GBA could handle. When I started the project in mid-2018, I already had some formal education and work experience in programming, so I was past the steepest part of the learning curve for these specific tools.
Please note that my methods are NOT the methods I would recommend for a first project unless you're already familiar with the software development process and using command-line tools. I went into Sacred Echoes knowing I would need to write a bunch of custom code to modify the game mechanics beyond what the beginner tools at the time allowed me to do, so I chose the more complex path. If you're looking for an all-in-one graphical editor that's more friendly to beginners, FEBuilder is amazing and constantly updated with new functions. Whichever method you decide on using, the FE Universe forum and discord are full of resources, tutorials, and helpful people, and I wouldn't have been able to succeed without them. Best of luck on your project!
That said, here's all the technical details and links to all the tools I used:
Sacred Echoes was built using a combination of GNU make (a build system used to automatically detect and compile changes to source code in large projects) and Event Assembler, a utility primarily built for editing the GBA Fire Emblem games. Event Assembler is used with a method called the buildfile, which is essentially a fancy text file with instructions for Event Assembler to insert source files into a ROM and linking different parts together. This meant I used different tools for creating each type of data. Unlike with a ROM editor (such as FEBuilder), I wasn't constantly saving my changes to the same ROM file, but instead freshly building it each time I made a change and wanted to test. This meant that if I messed up (very common when writing custom code), I could just comment out the relevant code or instructions in the buildfile and rebuild from source, rather than try to pick through the ROM by hand to fix issues.
There were cases where I would need to view and edit raw binary data with a hex editor (usually to find a pointer to compressed graphics or a data table); I prefer HxD for that.
For graphics, use any program that can edit and save .PNG files (I used MS Paint and GIMP), and then a tool for game graphics called Usenti to put them into a format the GBA can read. If you need to find and rip graphics from a ROM to edit them, GBAGE is the gold standard (and comes built-in to FEBuilder).
Maps are built from the tileset graphics using a program called Tiled.
For music, the GBA uses MIDI sequences, so any audio program with MIDI support works fine for that. (I used Anvil Studio). The MIDI file is then converted to GBA with a utility called midi2agb.
For unit data and other large data structures, I used a spreadsheet in CSV format, which can be edited with a program like Excel or LibreOffice Calc.
For map events and loading units, the GBA FE games use a scripting language called Event Assembler Language, which just gets written in a raw .txt file. A good plaintext editor like Notepad++ or SublimeText can help keep track of language syntax and keywords.
For assembly code, it is also written in a text editor, and then compiled to bytecode with devkitARM. Most of it I wrote in raw ARM assembly language (which is specific to the GBA's CPU), but in more complex cases towards the end of the project I wrote the code in the C programming language and compiled it with devkitARM.
To keep track of my source files and changes, and to make backups and version control easier, I just used GitHub because I already had an account, but you could also use GitLab or Bitbucket instead.
Finally, I used some tools made by the FE hacking community specifically for automating some tasks and formatting data - most of these are Python scripts, but some can be downloaded as compiled executables. I used "lyn", "TMX2EA", "C2EA", TextProcess and ParseFile, and AnimationAssembler. Ask on the FEU discord or check the forum's toolbox tag.
8 notes
·
View notes