#Windows 10 optimization program
Explore tagged Tumblr posts
Visit Tumblr Blog
Explore Tumblr blogs with no restrictions, modern design and the best experience.
Last Seen Tumblr Blogs


Fun Fact
There were a total of 171.5 billion posts on Tumblr in 2019.
Text
How to Free Up Space on Windows 10: A Comprehensive Guide
As your Windows 10 system accumulates more files and applications, it can start to slow down and become less efficient. Freeing up space not only improves your system’s performance but also extends its lifespan. In this guide, we’ll explore various methods to free up space on Windows 10, going beyond the basics to ensure you have a well-optimized system.

Table of Contents
Introduction
Understanding Disk Space Usage
Utilizing Built-in Windows Tools
Disk Cleanup
Storage Sense
Uninstalling Unnecessary Applications
Managing Temporary and Cached Files
Cleaning Up System Files
Windows Update Cleanup
System Restore and Shadow Copies
Using Third-Party Disk Cleaners
Handling Large Files and Folders
Moving Data to External Storage
Using Cloud Storage Solutions
Conclusion
1. Introduction
As modern software and files grow larger, managing disk space effectively becomes crucial. This guide offers practical steps and tips to reclaim disk space on your Windows 10 computer, ensuring it runs smoothly and efficiently.
2. Understanding Disk Space Usage
Before freeing up space, it’s essential to understand how your disk space is being used. Navigate to Settings > System > Storage to view a detailed breakdown. This will help identify which areas need attention.
3. Utilizing Built-in Windows Tools
Disk Cleanup
Windows 10 features a built-in Disk Cleanup tool designed to delete unnecessary files. To access it:
Type “Disk Cleanup” in the search bar and select the app.
Choose the drive you want to clean.
Select the file types to delete (e.g., temporary files, system cache).
Storage Sense
Storage Sense automates disk cleanup. To enable it:
Go to Settings > System > Storage.
Toggle on Storage Sense and configure settings to regularly delete temporary files.
4. Uninstalling Unnecessary Applications
Unused applications take up significant space. To uninstall them:
Go to Settings > Apps > Apps & features.
Review the list and uninstall non-essential programs.
5. Managing Temporary and Cached Files
Temporary files can quickly accumulate and consume disk space. Use Disk Cleanup or third-party tools to regularly clear these files. Browsers also store cached data, which can be cleared from the browser settings.
6. Cleaning Up System Files
Windows Update Cleanup
Old update files can take up substantial space. Disk Cleanup includes an option to remove these:
Open Disk Cleanup and select Clean up system files.
Choose Windows Update Cleanup.
System Restore and Shadow Copies
System Restore points and shadow copies can consume significant disk space. Manage these by:
Typing “System Protection” in the search bar.
Selecting the drive and clicking Configure.
Adjusting the Max Usage slider to limit space usage.
7. Using Third-Party Disk Cleaners
Third-party tools like CCleaner provide more comprehensive cleaning options. They can remove junk files, clean registries, and manage startup programs to free up space.
8. Handling Large Files and Folders
Identifying and managing large files is crucial. Use tools like WinDirStat to find large files and folders. Consider moving non-essential large files to external storage.
9. Moving Data to External Storage
Free up space by moving data such as videos, photos, and documents to external hard drives or USB sticks. Ensure you regularly back up important data to avoid loss.
10. Using Cloud Storage Solutions
Cloud storage services like OneDrive, Google Drive, and Dropbox offer substantial space. Move infrequently accessed files to the cloud to save local disk space.
11. Conclusion
Regular maintenance and mindful storage practices can keep your Windows 10 system running efficiently. Use the tips and tools outlined in this guide to manage and optimize your disk space effectively.
External Authoritative Sources
Microsoft Support: Free up drive space in Windows
CCleaner Official Website
How-To Geek: The Ultimate Guide to Freeing Up Space on Your Windows PC
By following these detailed steps, you can efficiently manage and optimize your disk space on Windows 10, ensuring your system remains fast and reliable.
#Windows 10 Performance#Disk Cleanup#Storage Management#System Optimization#PC Maintenance#Free Up Space#Windows 10 Tips#Specific Techniques:#Disk Cleanup Tool#Storage Sense#Uninstall Programs#Temporary File Management#System File Cleanup#Third-Party Disk Cleaners#Advanced Techniques:#Large File Management#External Storage Solutions#Cloud Storage for Windows#System Restore Management#Windows Update Cleanup#How-To Guide#Windows 10 Efficiency
2 notes
·
View notes
Text
My solution for bloatware is this: by law you should hire in every programming team someone who is Like, A Guy who has a crappy laptop with 4GB and an integrated graphics card, no scratch that, 2 GB of RAM, and a rural internet connection. And every time someone in your team proposes to add shit like NPCs with visible pores or ray tracing or all the bloatware that Windows, Adobe, etc. are doing now, they have to come back and try your project in the Guy's laptop and answer to him. He is allowed to insult you and humilliate you if it doesn't work in his laptop, and you should by law apologize and optimize it for him. If you try to put any kind of DRM or permanent internet connection, he is legally allowed to shoot you.
With about 5 or 10 years of that, we will fix the world.
#cosas mias#8 GB of RAM should be the MAXIMUM requirement for your games#anyting above that and you have to testify in court
70K notes
·
View notes
Text
Desperate PC Tenno calling for help!
Calling all the tech-savvy players here on Tumblr who may hopefully lend me and tech support a hand. Yes, the situation is that bad. More under the cut to spare a lengthy wall of text!
I've been experiencing totally random and sudden crashes with WF since a month and half, by now.
The game first freezes for less than a minute, then crashes to desktop bringing up the window to report crashes. This happens literally anywhere and anytime in the game. During mission, at the end of the mission, while idling in the Orbiter/base of operations, sitting in the pause menu, checking the settings menu. All kind of possible scenarios. Ah, and DX11 or DX12 make no difference either.
It's driving me - and tech support - insane. Because it is so HARD to pinpoint the root cause! Every log file so far has reported some kind of General Protection Failure (GPF) error followed by different numbers.
I'm running the game on a brand new, pre-built computer from Megaport. Which I moved to from my old potato of a PC back in late November. Specs are the following: Windows 11 Home (build 24H2) Intel Core I7-12700KF, 8x 3.60 Ghz + 4x 2.70 Ghz ASUS Prime Z790-A Wifi DDR5 NVidia GeForce RTX 4070 Dual Palit 12GB 2x 32GB Corsair Vengeance RGB DDR5-6000 1 TB SSD 1000 Watt PSU
I have done everything tech support has suggested me to do and: - Uninstalled and re-installed the game, - Update drivers. Being a new computer, everything is pretty much up to date. I had to do a clean install for the GPU drivers only using DDU, though, - Verified game files, - Emptied the shader cache on the drive game is saved to, - Repaired Steam library, - Lowered graphic settings, - Attempted to launch and run Warframe in Clean Boot mode to exclude background programs/services <- unsuccessfully; Steam didn't work at all (which I kind of figured would happen) and trying to launch the game straight from the launcher...triggered a download of the game files in the App Data folder on main (C) drive. O_o The random crashes don't even appear in the Windows Event Viewer. Nowhere to be found. And believe me, I have looked into every single category. I've been keeping track of the time(s) of the crashes but, alas, found nothing that could possibly be related to those. (also, I'm not a computer expert so perhaps I'm doing things wrong)
So far, the only weird thing I've noticed is...Most of the times there seemingly is a "break" in between each series of crashes. A few days at worst, 10-12 days at best. Yes, I checked even the Task Scheduler utility on Windows. Found no program/app that runs automatically that matches with the timing/days when the crashes have occurred so far.
Really losing my mind to this. It's frustrating, it's unnerving, it's making me genuinely terrified of playing the game. And the reason I got this PC in the first place was being finally able to play my favorite game without worrying about being unable to because of my old (and obsolete) machine! Because I don't know when the next crash shall decide to happen and oh boy it's gonna be so fun losing progress. Or having a couple of players reasonably angry at me for suddenly poofing as host. I'm really sorry about that, folks.
I'm already considering the option of total formatting this computer, should there be no other way. But not before entirely giving up. And maybe make things a little less complicated for tech support team.
I can't thank these guys enough for their help and most importantly patience over the past month and half. This mess has been handed to three different people already and a solution hasn't been found yet.
So, if there are fellow Tenno on Tumblr who have either experienced something like this before and found a fix or are just more knowledgeable about computers and whatnot, your help would be GREATLY appreciated. ;.;
EDIT: I forgot to mention a few important things! - Hardware temperatures are within optimal range while in game (CPU never above 65°C, GPU has been running ice cold and has rarely exceeded 50°C so far, RAM is chilling at 45°C average). - GPU memory usage averages around at max (peak) 77% on HWInfo. - CPU usage I honestly need to check! D: - Ran disk cleanup, scans with sfc, chkdsk and DISM (all through command prompts ran as admin) and no issues were found. - Checked RAM health as well with Windows' memory diagnostic tool. However, it seems to give many false positives even on perfectly functional RAM banks. Looking for a more reliable alternative. - Warframe is the only game that keeps crashing on this PC. I haven't been getting any with other games/programs (Hades II; need to test how Ultrakill performs) or any warning signs (BSODs, freezes, sluggish PC, etc) that could suggest hardware failure.
#warframe#I even made a post on the official WF forums but nobody bothered to answer#don't know where else I should ask for help
34 notes
·
View notes
Text


So, I have recently been inspired by @teaaddictyt to try out playing Sims 2 on Linux - more specifically Mint Cinnamon 22.1

...and the results speak for themselves! 😍 😍 😍

FOR CONTEXT: I have Optimized Lot Imposters on, all settings on High, INCLUDING shadows (which I've not had enabled for years!) and downloaded the Sea & Water Overhaul.
Now I have crashed the game but I am still in the deliberate stress-test phase. The crash happened after dipping in and out of 15+ lots quite quickly (as I was adding pool tiles to the lots) and I am IMPRESSED! 😇 😍


In comparison to Windows:
I wouldn't be able to run these settings without crashing and/or pink soup, and those settings were on low/medium.
I did use the Sea & Water Overhaul a year or so ago but it kept crashing my game, so I removed it.
My view distance was set to Small and it still crashed sometimes.
In fairness, I am still modding/cleaning up my Downloads folder - as is the way of Simmers 😂. It's possible I have something in my downloads that's causing the single crash I've experienced after a few hours of testing, but that's still SO MUCH LESS crashing/pink soup than Windows.
I like Linux, even disregarding playing Sims 2. It's very crisp, smooth and feels modern and more professional than Windows.
I should add that I was using Windows 10. I have installed Linux on a separate SSD to my Windows as not all the programs I need work on Linux.

If you want to have a look at Linux yourself for playing Sims 2, then check out Tea's video here.
If you want some more tech help regarding Linux, check out the channel on Tea's discord as well. Everyone's been very friendly, helpful and patient in trying to help out people's troubleshooting as quite a few of us have decided to dual-boot Linux alongside Windows.
I've got TS2 up and running but my next job will be getting all the modded tools setup.
36 notes
·
View notes
Text
“Ketamine is helpful for getting one out of the negative frame of mind,” Elon Musk told an interviewer last year. The unelected man currently gutting US federal programs isn’t the only one who thinks so. Ketamine, approved decades ago as a surgical anesthetic and long used as a party drug, is the off-label mental-health treatment of the moment. It induces a “trancelike” state of “sensory isolation,” researchers say, and may temporarily boost the brain’s neuroplasticity—which, in theory, makes mental ruts easier to escape. At the same time, ketamine abuse can be deadly, and the drug remains illegal to use without a prescription. (Musk says he has one from “an actual, real doctor.”)
WIRED spoke to the cofounders of an organization that offers ketamine-assisted leadership coaching in the San Francisco Bay Area. The two speakers are identified by pseudonyms, which they selected for themselves. Aria Stone has a doctorate in psychology. Shuang Shuang is a spiritual coach. The conversation has been edited for length and clarity.
Shuang Shuang: We fast-track coaching by really locking it in with the psychedelics. We deliver it to you on a cellular level.
Aria Stone: With ketamine, there’s a 24- to 48-hour window of optimization, when people’s brains are literally more neuroplastic, which is why this is a multiday experience.
SS: We call it an off-site, not a retreat, because we’re not retreating from anything. We don’t do them big—nine or 10 clients—partially due to the importance of confidentiality. Our clientele is primarily CEOs of Fortune 100 companies, CFOs, C-level founders of startups. All of them are in a pressure cooker.
AS: Those are the kind of leaders that come—people who have achieved so much in their life, and they’re like, “OK, what’s the next horizon? Because I’ve checked pretty much every box.”
SS: Here are all the loneliest people. They have to lead and go through so many things by themselves. They can come and see that they’re not alone, and let go of the burden of being so protected all the time. They just want to be people.
To screen clients, we ask about their medical and psychological background, whether they currently work with a therapist, and whether they’ve participated in a group program before. We would slow down around accepting someone with a significant trauma history, someone who is actively suicidal or has a history of schizophrenia or bipolar disorder, the latter of which can be contraindicated with ketamine.
AS: And since ketamine can certainly be misused, a history of substance abuse would also give us pause.
SS: Our off-site costs $2,600 for three days, plus a $350 fee for a medical assessment and ketamine prescription. Meals are included, but transportation and lodging are not.
AS: Over the course of a three-day off-site in the Mission, in a beautiful, open space with a tall ceiling, clients have two ketamine experiences. When you walk in, all of these BackJack floor chairs are in a circle. In the center are candles. We put a rose on every seat, and information about what to expect.
SS: The vibes are witchy.
The first day is about settling into that radical acceptance, welcoming what’s coming to us on ketamine. Our opening ceremony could include movement, dancing, getting into the body, or we might just talk to each other about what’s alive for us. We have an intention-setting session.
We check with everybody to see if we have their consent, from every part of their body, to receive medicine. Then our medical doctor and registered nurse distribute the medicine through a shot—it’s all intramuscular.
If it’s your first time using ketamine and you’re nervous about it, thank God! That’s the way it should be. But there’s also the option to not do ketamine at all: You thought you wanted to do it, and then when push comes to shove, you’re on your journey mat and you’re just like, “I really don’t want to do it.”
Ketamine and psychedelics are not a panacea. We know that it’s not for everyone. You don’t have to push yourself to do this new, innovative, cutting-edge type of therapy. Yes, there is great promise, and the data over and over again makes this area very frothy and enthusiastic. But it’s perfectly OK if you’re scared and anxious. Just listen to your body and heart.
AS: When we transition into the journey, we pull the BackJacks out.
SS: It’s pretty sweet. They have little nests, little beds. They’re all tucked in. They have blankets and pillows, and earplugs if the ambient music playing on the speakers gets too loud. They’re wearing eye masks, because ketamine is more of a dissociative medicine—there is this sense of naturally going inward and being quiet. There are a bunch of stuffed animals there that some people take for their journey.
AS: There’s this huge teddy bear holding a cup of the intramuscular ketamine.
We encourage clients to bring things that are meaningful for them—like a journal, photos of loved ones, loved ones that have passed, rocks. It’s just really loving, grounding, and open.
SS: It’s like an executive-coaching psychedelic slumber party.
On the first day we do a psycholytic dose of ketamine. It’s not exactly a psychedelic dose, but it lets you kind of just teeter onto the realms. The next day is a mid-dose. That day is all about medicine and integration, and there’s coaching around it.
AS: Four of us facilitate the off-sites. While people are on their ketamine journey, we’re all very attentive. We’re in silent communication with each other. Collectively, we’re really holding this space, seeing what emerges. I mean, we’ve seen over 100 ketamine journeys at this point.
SS: In a supportive clinical setting, the chance of having a bad trip is severely diminished. Also, I hold the faith that there’s no such thing as a bad trip. Rather, there are challenging or uncomfortable journeys.
Let’s say someone’s trauma comes through. One way that could show up is you are screaming, or a lot of energy is just ripping through your body. You’ll get off your mat and you’ll just want to run. You’ll think you’re in a dangerous situation. The first thing we do is make sure you’re in a safe hold so that you feel cared for. We’ll let you take your eye mask off. Some people need a handhold or would like to be walked around the room. All these things help bring you back to now.
The third day is all integration and coaching: “What does this mean for me? How did I feel? And how do I bring something positive from that journey into my everyday life?”
AS: And about a week and a half after, we have a follow-up virtual integration session, focused on the application of what they’ve learned to their leadership.
SS: One person came in not being able to feel their body. “I’m just a head, and this is my meat sack,” basically is what they said. After the off-site, they were able to pinpoint, “Actually, I feel like I can feel my chest. I can go to other places inside my body and be connected to it.”
AS: People are floating away at the end. They’re like, “I don’t want this to end. Can I integrate this way of being into my life?”
18 notes
·
View notes
Note
Looking at all your programming posts, I don't even want to ask you when you sleep, because I feel like you don't. Rather, what I want to ask is where do you get extra ten hours per day.
xD
This is very funny to me because the truth is I actually sleep a whole lot? I've been having chronic fatigue issues since a year or few before the pandemic hit so I'm generally always kind of tired, and my periods of activity are often punctuated by just going to sleep for 1-3 hours afterwards. Like, I currently work 5 hours a day for 3 days a week, and the first thing I do when I get home after work is sleep. Then on the fridays after my three day work week I typically sleep something like 12 hours or more because at that point I'm just deceased, a literal zombie with a hunger for naps instead of brains.
So no extra hours here I'm afraid! I also don't really get anywhere near as much done as it might sound like?? My brain just overthinks everything all the time and so I'll spend a week or few idly thinking about stuff like optimizing a blitting routine or doing FFXIV an outfit mashup or gpose or doing some electronics or retro computer project or the like, occasionally looking things up online or such to feed the rampant trains of thought and then maybe eventually reach a point where I somehow manage to condense all of that down to something that actually kinda works over one or more periods of a few hours.
Like, as much as I occasionally talk about the whole doing 8-bit indexed palette graphics in software over Windows GDI thing, I actually still haven't really gotten around to doing proper functional triangle drawing yet because I keep distracting myself with other stuff like SIMD tile blitting instead of getting around to figuring out how to best do bounds checking for fast bresenham lines in a way that also allows for filling the pixels in between them through integer linear interpolation. And instead of doing that, I'm distracting myself by thinking up ways to write a python script for converting 32-bit ARGB .png files to some kind of simple binary 8-bit colour format consistently, which in turn means thinking up structs to define the layout of the binary file headers and so on.
all while I still also have plenty of work to do at, well, work, haha.
honestly I wish I had an extra 10 or more hours a day - I constantly feel like I'm barely getting anything at all done because everything takes too much time to do and I just never seem to have enough energy for barely any of it.
12 notes
·
View notes
Text
yippiee!! i found a horribly clunky and slightly sticky xbox controller at the thrift store today for three dollars! it is new york jets themed and the cord is very long and the start button seems to be attempting to dissolve itself, but i now have an actual controller for pc gameplay yayayy
context bc realizing this sounds sad: i grew up with a wii and a wii only. i do not want to set up a wii remote with my laptop. that is way too much trouble. also, my sibling still uses the wii and i don't want to take a controller from them. i don't play many games, but up to this point i've just made do with keyboard and mouse (tho not always even a mouse, since i don't play on a desk so i don't have space for one). this works for most of the relatively simple games i usually play, but i'm getting into sonic and it's a little harder to play a speed/racing game on pc with just keyboard. in my opinion. so i found this!!!
anywayyyys got it running got it mapped to sa2 on flycast emulator and it works!!! has some issues with right joystick inputs, you have to press it quite forcefully, but i'm pretty hard on remotes especially in this sort of game so i didn't really notice it. i'm more used to nintendo controllers, and generally prefer those, but i will - and i can't stress this enough - take whatever i can get. i love hodgepodging together random cheap stuff into a fun and personalized experience, and tech is no exception. my whole computer at this point is a whole bunch of open-source programs and applications i think are neat, all glommed into a vaguely windows 10-shaped mass a la caddisfly.
proud to announce i have now passed one level of sonic adventure 2 👍wowzers. still figuring out the mechanics, it's definitely not the smoothest game to run on my pc esp with this remote, and there are probably some things i'll do to optimize my experience and get it running better, but it's fun! and i'm making progress! and this is a very easy and accessible option for me to actually enjoy playing games on my computer.
8 notes
·
View notes
Text
Thailand Permanent Residency
Thailand's permanent residency (PR) system is governed by:
Immigration Act B.E. 2522 (1979), Sections 37-47
Ministerial Regulation No. 20 (B.E. 2543)
National Police Office Orders
Cabinet Resolutions (periodic quota adjustments)
1.2 Constitutional Context
While Thailand's 2007 Constitution (Section 48) guarantees equality before the law, PR status remains a privilege rather than a right, granted at the discretion of the Interior Ministry.
2. Eligibility Requirements
2.1 General Qualifications
Applicants must:
Hold a non-immigrant visa for 3+ consecutive years
Demonstrate financial stability (varies by category)
Meet character requirements (clean criminal record)
Pass Thai language/culture evaluation (since 2021 reforms)
2.3 Annual Quota System
Country Caps: Maximum 100 persons per nationality
Total Quota: Typically 500-1,000 annually (varies by cabinet decision)
Priority Groups: STEM professionals, investors, spouses of Thais
3. Application Process
3.1 Step-by-Step Procedure
Pre-Application (6-12 months)
Maintain continuous visa status
Gather documentation (see 3.2)
Application Window
Opens late December for ~2 weeks
Must apply in person at Chaeng Wattana Immigration
Document Verification (3-6 months)
Background checks
Home visit by immigration officers
Interview & Exams
Thai language test (basic conversation)
Culture/history exam (20+ correct answers required)
Final Approval (12-24 months)
Published in Royal Gazette
PR certificate issuance
3.2 Required Documentation
Core Documents:
Passport + visa history
House registration (Tabien Baan)
Tax records (3 years)
Bank statements (6 months)
Category-Specific:
Employment: Work permit copies
Investment: BOI certificates
Marriage: Wedding certificates + spouse's ID
4. Rights and Obligations
4.1 Privileges Granted
✔ Indefinite stay without visa renewals ✔ Work without WP (in registered profession) ✔ Property ownership rights (with restrictions) ✔ Pathway to citizenship after 5+ years
4.2 Ongoing Requirements
Annual reporting (similar to 90-day reports)
Re-entry permits for international travel
Tax compliance monitoring
5. Financial Considerations
5.1 Hidden Costs
Legal fees: THB 50,000-200,000 for full-service assistance
Translation/notarization: THB 5,000-15,000
Expediting services: Unofficial costs may apply
6. Comparative Analysis
6.1 PR vs. Other Long-Term Options
StatusDurationWork RightsPath to CitizenshipPRPermanentFull (registered)5 yearsElite Visa5-20 yrsNoneNoRetirement Visa1 yrNoneNoBOI Smart Visa4 yrsRestrictedNo
6.2 Regional Comparison
CountryMinimum StayInvestment OptionCitizenship PathThailand3 yearsTHB 10M5+ years post-PRMalaysia5 yearsMYR 2M10+ yearsSingapore2 yearsSGD 2.5M2+ years post-PRVietnam5 yearsNo5+ years
7. Recent Policy Changes
7.1 2023-2024 Reforms
Stricter language requirements (now A1 CEFR level)
Digital application tracking (pilot program)
Quota adjustments favoring tech professionals
7.2 Proposed Changes
Wealth visa pathway under consideration
Fast-track PR for STEM PhDs
Dual citizenship tolerance study
8. Common Rejection Reasons
Incomplete documentation (68% of rejections)
Tax discrepancies (23%)
Failed background checks (7%)
Quota limitations (2%)
9. Strategic Considerations
9.1 Application Optimization
Pre-application audits of tax/visa history
Early language preparation (minimum 6 months)
Category selection based on strongest qualifications
9.2 Post-Approval Planning
Citizenship roadmap development
Asset restructuring to maximize PR benefits
Compliance system for reporting obligations
10. Conclusion: Key Takeaways
Thailand's PR system offers: ✔ Unparalleled stability for long-term residents ✔ Business advantages over visa-based stays ✔ Unique pathway to eventual citizenship
Critical challenges:
Stringent documentation requirements
Limited annual quotas
Protracted processing timelines
Prospective applicants should:
Begin preparations 2-3 years in advance
Engage specialized legal counsel
Align with priority categories where possible
The system continues evolving with:
Increasing professionalization of requirements
Technology integration in processing
Strategic immigration targeting of high-value residents
Note: All information reflects 2024 regulations and is subject to change via Interior Ministry announcements.
#thailand#immigration#lawyers#thai#visa#thaivisa#thaipermanentresidency#thailandpr#thailandpermanentresidency#immigrationinthailand#pr#thaiimmigration
2 notes
·
View notes
Text
Dev Log Mar 14 2025 - What's Taking so Long?
The Steam Deck version of Crescent Roll is moving along. The full game is playable, most of the audio issues have been resolved, but there's still the very slight teeny-tiny issue of WebKit being abysmally slow and we're sitting at only 10% CPU usage and 20FPS. Joy. We can fix it though. Without having to switch Web Browsers. I explained a bit before that the two options available for Web embedding are either Chromium/Chrome or WebKit/Safari, depending on your platform. Windows, Android and Xbox all have Chromium natively for you to use, Mac, IPhone, PlayStation, and Nintendo have WebKit, and then Linux and therefor Steam Deck don't have a standard one installed. We went with WebKit for Steam Deck because it's 200MB instead of 1.5GB and we have to bundle it with our game. When I said we can fix it, it's not that the actual game part of Crescent Roll isn't optimized - we actually did a pretty good job with all of the movement on-screen every frame - but there's some very specific things large surrounding it that we know are hurting performance considerably. Here a visualization of the call stack of a random average frame on the Main Menu from the Chrome profiling tools from my 10-year old i7-4770k machine:

The grey "Task" bar is the full length of the execution. The brown-yellow underneath are what run during the actual "Animation Frame" portion, then the Blue sections are Crescent Roll code, and Green is Phaser rendering code. So in this frame, it took 4.16ms for the full frame, of which, Crescent Roll used about 1.8ms to do its stuff, then Phaser took 1.5ms to do the render, and the remaining ~0.8ms was system stuff like GC and doing memory transfers to the GPU. 60Hz refresh rate would mean that you need to render in under 16 ms, so about 4ms for Windows Desktop means that I could theoretically get somewhere around 240fps if I let it run free. Which I mean, is pretty respectable. Why doesn't it run well on the deck? Technically, it's running okay, just not displaying okay. The internal game logic does all physics and animation calculations with lag compensation in mind. So whether you're getting 500 fps or 5, the in-game logic always calculates 60Hz. So sorry - no cheesing stage times with slow-mo. One reason the display is having issues is that it's single threaded. Which means we're not doing _anything_ in parallel. All of the game logic, graphics rendering, controller polling, etc. are all being done every frame in order every single time. The kicker is that we actually built the game to be able to do those things in parallel, but Javascript just doesn't have the concept of Threads for you to be able to just run whatever you want however you want. You have to implement Web Workers, which is essentially a completely separate program that you can't share memory with, forcing you to use a message bus, making life difficult. But not impossible, and that's all that really matters. Just splitting it in 2 would already get us a 25% improvement, and we could very likely do better than that. The other, slightly more major performance sink is that green bar for the Phaser rendering - that can be entirely eliminated at this point to cut the time in half. We've been replacing it piece-by-piece with our own code, and now, we're really just leaning on it for WebGL pushes at this point. Unfortunately, since it's an engine, there's quite a bit of extra baggage that it likes to do that we can't just turn off, so we're essentially running a lot of the same types of graphics calculations twice. Phaser is a perfectly good engine - don't get me wrong, but it's just superfluous for our use at this point, specifically for us.
So yeah - it's going to take another week or so to get that 100% sorted out. There's a patch incoming Monday for full Controller support and couple of minor improvements. In the meantime, you can swap to the beta branch on Steam if you absolutely must try the Steam Deck version now. No complaints about the speed though - I warned you.
2 notes
·
View notes
Text
An Education in Attraction, Chapter 13
Pairing: Reader x Gojo
Summary: It's spring when you start your Master's degree. As the flowers and leaves unfold, so too do your feeling for Gojo
Warnings: none
Previous Chapters: 1 2 3 4 5 6 7 8 9 10 11 12
Ao3: PlaidSparrow
Your mood remains neutral for the rest of the week leading up to classes, and you try to approach the second term with a cautious optimism.
The first day of your second term is hot and bright, the sun blazes through the window of your dorm and beats down through the cloudless sky on campus. It’s still summer in Tokyo, and the sun has come back with a vengeance after your stormy break.
After spending breakfast enjoying your friends’ company at a cafe off campus, the three of you walk towards your new building across the grounds. As you wind down the brick paths, strong branches block the worst of the sun and a light breeze drifts through the buildings, cooling your face.
Your first class of the day, Implementing Classroom Lessons, is in one of the newer buildings of the Education division- the warm brick walls and low entrances house the more intimate classrooms and lecture halls for the advanced teaching classes. As your trio searches for your classroom on the first floor, you recognise some of the other students in your program and are struck by just how much has changed since you began classes five months ago.
While you’d felt welcome on campus since the beginning, completing the first term and delivering speeches at the conferences has been a sort of crucible, binding your cohort of students together. Your group follows your peers to the correct room down the hall.
Full bookshelves line two of the walls and the front is dominated by a long chalkboard, giving the room an intimate, cluttered feel. While you initially hadn’t been fond of the scratch of chalk or the mess it brings, chalkboards have remained popular in high schools in Japan and you’ve come to associate them with teaching. The final wall offers high windows that look out onto the campus and bring in natural light.
You settle beside Saito near the front of the room and prepare a fresh document for notes before turning to face your colleagues and chat.
There’s a comfortable and warm energy in the classroom- it vibrates with the conversation of your peers catching up with each other and an overall enthusiasm to begin courses. The dusty smell of chalk and the old books makes the room feel homey.
A flash of silver on the periphery of your vision catches your eye. It could just be the bright white of an open notebook, but you know better. Your stomach drops and you train your eyes on the front of the room.
He’s magnetic though, and you glance back at Gojo for just a moment before he reaches the back of the room and slouches into a seat. He seems as unengaged with your classmates as he had last term. It's a stark difference from the animated speaking and camaraderie he offered you at the conference.
Even though this room is darker than the previous classroom you shared, he keeps his shades on and head down, even while he idly scrolls on his phone.
Soon after Gojo enters, your professor calls attention to the front of the room and passes around copies of the syllabus. You center your attention on the new professor and lose yourself in the material. Between the key dates and projects for this course, there's plenty of moving parts to prioritize over your former partner. The rest of the class passes quickly, a blend of instructions and lecturing from the professor.
By the time he dismisses your class you’ve completed several pages of notes and are already thinking of how to organize your time to meet the reading deadlines. You notice that Gojo's already left by the time you walk out the door.
When you head towards your second class, you can’t help but wonder if Gojo will be there too. It’s possible that he may have tested out of the Assessments class you’ll have next- after all, with three degrees already completed, he’s surely had more experience with exams and testing than anyone else in the cohort.
Luck isn’t on your side though. As usual, he enters the classroom nearly late, and finds a seat in the back of the room.
His presence isn’t enough to dampen your mood though- creating fair and accurate assessments is crucial as a teacher, and you’ve never had formal training on how to build a good test. You try to ignore his presence the best you can.
Similar to your first course, the majority of the period is dedicated to an initial lecture describing the importance of testing structures, the elements of design you will cover throughout the course, and how this class will build on the courses you’ve already taken. When your professor releases the class, you linger in the room to schedule the first review session with Kuzume and Saito.
Many of your classmates filter out of the classroom quickly, but you’re too engrossed in your conversation to notice that Gojo hangs back at his desk until you gather your things to leave.
Walking back out onto campus after a successful first day, you can’t help but feel energized and truly optimistic.
Your renewed vigor makes you eager to get a jump on your first assignments. Since it’s still the early afternoon you stop by the annex of the library and grab one of the smaller tables. The space is so much livelier than when you had visited over the break, student conversations and shuffling pages echo off the domed roof.
The table is soon covered with the syllabi, your planner, and your laptop as you try to organize your schedule for the coming weeks. You’d managed to stay ahead of schedule last term by managing your time carefully, and you’d like to be just as successful with this round of classes.
It’s easy to lose yourself in the stream of assignments and readings, and in the first week of the term, you allow yourself to be swept up in planning and school work. You meet with Kuzume and Saito for a “study group,” but so early in the term your session consists more of chatting and laughing together than actual review.
As the end of summer slowly draws nearer, your days get busier and your nights become long once more, filled with readings and careful note-taking.
Due to the nature of your classes this term, your professors are very hands on in the lectures and classroom assignments. You’re regularly asked to participate in discussions based on the initial readings and interact with your peers.
Most of your classmates offer their opinions and speak more openly with each other, but Gojo remains silent and distant. Since the symposium, you’ve given each other a wide berth, and you’re sure that as time passes, you’ll feel the loss of his friendship less keenly. Your busy schedule helps to keep him off your mind.
On Sunday following the first week of classes, you’re enjoying the afternoon in your bright and cozy room. The good weather has held up, and if the gray weather over summer break mirrored your gloomy mood then, this sunny day couldn’t be a better indicator of your mood today. You're trying to get through the next chapter of the text for the Assessments class, and even though you’re not feeling particularly inspired by this author, you’re eager for the new knowledge.
You take a moment to stretch, then light a candle. The section is due for class tomorrow, so you try to pull your focus back to the reading. You crack the book back open, but before you can begin to re-focus, there's a knock on your door.
Kuzume probably wants to grab lunch, and having something to eat will help you focus as you read. You grab your student ID and crack the door without a second thought, but the man standing in front of your room stops you in your tracks.
Gojo is here. Now.
You stare at him for a moment, mind abruptly blank.
“Hello?” you ask dumbly.
“Hey.” He peers down over the rims of his glasses. “Can I come in?”
13 notes
·
View notes
Text
NixOS Rice Journey
I've always considered myself something of a minimalist when it comes to function over form and beauty within simplicity, but there comes a time in every Linux user's life when they must rice.
Now, firstly, I want to acknowledge that @kfithen's recent ricing journey is like, 50% of the reason I went through with this (\shrug/ he had a good idea, what can I say?!). To be fair, the other 50% is the control and understanding that a good rice gives a person over their computer and environment. I want to know how everything works, and I want to be the person who makes it all come together really well.
I'm not really the type for flashy things or eye-catching rices / eye-candy (I've been using only I3wm for almost the entirety of my Linux history), so I want my rice to take a more subtle, simple approach. I use NixOS because I want my system to stay with me forever and only do what it needs to. I want to spend years optimizing everything I use until my OS reaches its minimal state. In the same way, I want my rice to display the elegant simplicity of nothing extra. I want some basic utilities and visuals that look nice, but aren't distracting.
Most of all, I want my rice to embody my own spirit, or at least what I strive to be. I want to put work into making something that does everything it needs to without encroaching on others. Ideally, I will be able to look at this every day for the rest of my life and it will help me feel secure in myself.
All that said, here's what I've done so far:
Migrated from X11 to Wayland
Switched to greetd and tuigreet for my displaymanager
Switched from I3wm to Sway
Setup Waybar to tell me what I need to know
Setup a custom desktop wallpaper (as opposed to the default Xfce wallpaper or Sway grey)
Setup vifm to view and manage my filesystem
Setup ivm, foot, mpv, etc. to replace xfce-given programs
Upgraded from NixOS 23.11 to 24.05
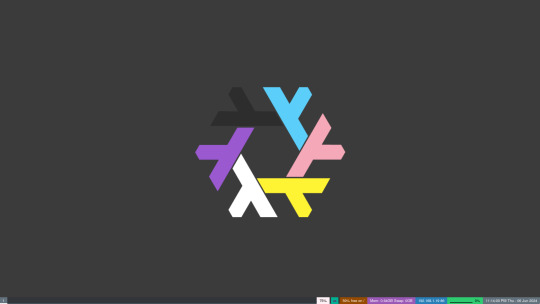
[Image ID: A (16:9) screenshot of my desktop. There are no windows open. The wallpaper prominently features a modified Nix logo in the center, taking up a little over a third of the vertical space. The logo has been modified so that each of the six "arms" corresponds to a stripe in the trans-nonbinary-flag; the top-right corresponds to the blue stripe at the top of the flag and the arms continue down the flag in a clockwise motion (i.e. blue, pink, yellow, white, purple, black). The background of the wallpaper is a dark grey that is light enough for the black arm to be visible. At the bottom of the screenshot is a Waybar status bar. On the left it shows (left to right) the sway workspaces, workspace name, and scratchpad; on the right it shows (left to right) the system volume (with wireplumber), the keyboard layout, the free space on the root partition, the memory and sway information of the system, the local ip address and wifi-connection strength of the system, the core usage of the system, and the current time and date of the system. The bar is styled with the default styles (for now). \End ID]

[Image ID: Another desktop screenshot. This one shows three windows open with the Sway window manager/compositor. One window, containing my home-manager configuration open in neovim (using the slate colorscheme), is the result of a horizontal split and lies on the left half of the screen. The right half of the screen is vertically split into two windows. The top displays an unstyled vifm, and the bottom displays the output of neofetch. The inner gaps of the windows are set to 10 in sway and there are no other gap configurations. \End ID]
So far, I've been focusing mostly on getting my system working again (leaving xfce completely left a big mark on my system, previously I was using Thunar and a billion other things I took for granted). I'm going through another terminal-based-stuff craze so I'm trying to do more and more stuff through cli and tui applications (flameshot -> shotman, xfce-img-viewer -> imv, xfce-video-player -> mpv, thunar -> vifm).
The only thing I've done cosmetically so far is the background. I wanted to get something that wouldn't clutter my screen if I ever implement transparency, so I didn't want to do anything too complicated. (I'll admit, my first thoughts were Homestuck, Lackadaisy, trains, etc., but those were way to complicated (save for some of the Homestuck stuff, that was good, I just didn't super vibe with anything)). I'm really happy with how it turned out though (the Nix logo is great for customization)! I think the trans-nonbinary-flag colors look great here and fit the vibe sickly. Also, it's Pride Month, so how could I not have something queer on my screen all the time?!?!?! (Well, besides Linux, and NixOS especially, that's queer already, lol).
This post is getting a bit long, so I'll quit my yappin' and end it off with a little summary of what I hope to do next:
Get some sort of transparency (what's the use in having that beautiful wallpaper if you can't see it, plus the background has a low enough complexity that transparency will actually work well)
Set some standards for theming/colors and put them in place (right now my Waybar and vifm especially just don't look right) (this one is going to require a lot of work, but there are also a lot of people who do this amazingly; plus, I've got some colors to work with already :), I really like the the "slate" vim theme and those trans-nonbinary colors are a great start as well, particularly that purple!)
MOAR TERMINAL (maybe try again with steam-tui, risk discord-tui, and re-examine links/lynx) (plus this really helps with fileviewer in vifm)
Try out nix-flakes (I really need to figure out what these things are, they sound right up my alley!)
Setup backups of my system / get all my configs into nix (the few that aren't already there) (I have some suspicion that nix-flakes might help with this)
Learn more (there's always more to learn!)
Welp, that's about it for now! See ya :3
3 notes
·
View notes
Text
Gif tutorial by Alinelovelace
Alright, I'll be doing 3 things here today:
1.) Sharing the programs and websites I use
2.) Showing y'all a tutorial on how I make my gifs (this is my first tutorial, so if anything doesn't make sense, don't hesitate to message me, send me an ask, or comment on this post!!!!!)
3.) Sharing some resources by insanely talented gif makers (because I learned how to make gifs by following tutorials)
It's probably important(?) to mention that I use a Windows laptop
A.) Programs and websites:
ezgif: to make my gifs and do light editing
You can make gifs with video clips or screen caps. I'm not advanced enough to use screen caps, though they're supposed to make gorgeous gifs. I use ezgif to make the actual gif and edit the timing (which I end up having to tweak on Photoshop but...)
I also like ezgif because no watermarks!! I will do anything in my power to get rid of watermarks from websites and editing programs because they bother the hell out of me!
Photoshop: for the rest of my editing
This is where I recolor and add text.
A great alternative to Photoshop is Photopea, which I've used before I "obtained" Photoshop. It's FREE and online, so you don't have to download anything! I highly recommend it if you really want to get into gif coloring !!!!
Currently, I get my videos from torrents (bc I have a wide selection for my family to watch on our tv). But I used to use the Xbox game bar on Windows to record the clips I wanted on online streaming sites (unfortunately there's not a whole lot up and running anymore), then cropped and cut them. If anyone's interested in that, I could probably post a separate tutorial for that another time :)
There's also screen cap websites out there and YouTube. And probably dozens of other ways to get videos that I don't know about!
Video cutter
If you use full length episode videos and don't know how to crop them on your laptop (like me)
★★★★★★★★★★★★★★★★★★★★★
B.) Tutorial:
I'll be remaking the first gifset I ever made since I've learned A LOT since then! It should be pretty simple since there's only one set of subtitles.
Another time, I could do an edit tutorial like my That 70s Show ones. It's just taking the same concepts as this tutorial though, and playing around with colors, fonts, and font placement.
1.) Find your video/screen caps:
Since I no longer have the video from my first gifset, I just googled "Mulder throwing pencils season 10" on YouTube. After finding the video, I copied the link and pasted it into a YouTube to MP4 site ((this site has never given me popups or tried to get me to download something that isn't my video file)).
2.) If your downloaded video clip is short enough, you can just stick it into ezgif. If not, you may have to cut it using a website or a computer program.
Ezgif.com -> video to gif -> browse -> select your file -> upload video
3.) After clicking upload video, you should find yourself on this page:
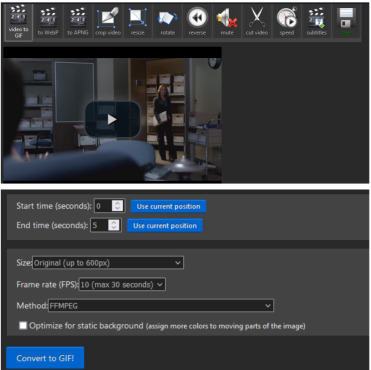
If you need to do any kind of video editing (cropping, rotating, resizing, etc) this is the place to do it! This is also where you make your gifs.
For the first gif, I don't need to change the start time, since I'm starting at the beginning of the video. 0 seconds is fine. But for the stop time, I'm going to play the video, pause where I want my first gif to end, then press "use current position" by end time.
I don't usually touch the settings for size, FPS, or method. If the gif doesn't have a lot of movement, I check "optimize for static background"
Then press convert to gif.
Here's the product I got. Since it's such a short clip, it moves a little fast for me.

I'm going to click "speed" which is below the gif. You're brought to this page:
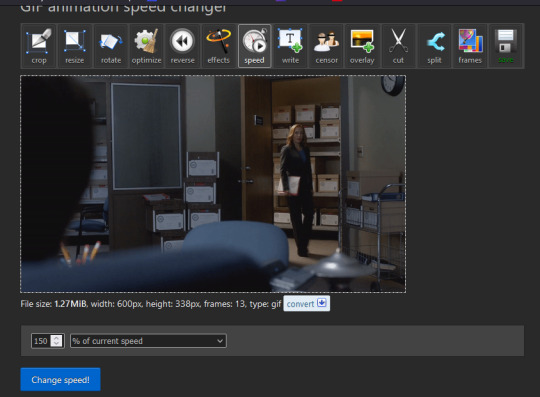
This is completely up to you for speed, but I find that between 60% and 85% end up looking good. If you don't like it, just change the number in the box and press "change speed". I ended up with mine at 65% of current speed.

A little better, right? The gifs that turn out best are 3 seconds to 10 seconds in my experience. This one is 1.5 seconds, so it's a little fast.
After that, rinse and repeat for every gif you need to make.
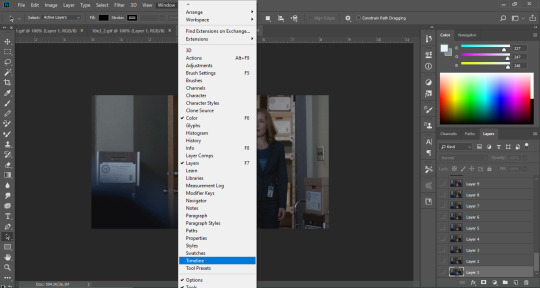
4.) Editing time! This is for Photoshop (if you use Photopea, I very much recommend this tutorial. It's very well explained!)
Go ahead and open all of your gifs once Photoshop is booted up. Then click window -> timeline
Now you have a handy dandy little timeline on the bottom.
The first thing you're going to do click play and decide whether or not your gifs are running at the speed you want. If yes, move on to next step.
If not: click on the three lines -> select all frames -> little drop down arrow. You should have a variety of times available to choose. Usually, I click other, then put somewhere between 0.04 and 0.08 seconds. Click play again. If you don't like it, try this step again.
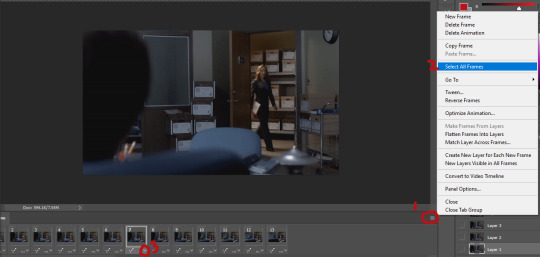
If you need to crop your gif, three lines -> select all frames. Press "c" on your keyboard and crop accordingly.
4a.) Color editing
This is where things get complicated. Just remember coloring is subjective and everyone does it differently. This is just an intro to the different tools most gif makers use to alter color.
You don't have to use all of these! I definitely pick and choose depending on how I want the coloring to look. When I'm making a gif set, my coloring isn't as adventurous as when I'm making an edit. It doesn't feel worth it to give away my settings for this gifset since it changes depending on the coloring and lighting of the scene.
All of these tools can be found under "create new filter adjustment layer"
• Brightness/Contrast
This one is the easiest in my opinion. It's pretty straightforward. The more you drag brightness the right, the brighter your gif gets. The more you drag contrast to the right, the higher the contrast is.

• Curves
This adjusts lighting with color values. It's another tool that's hard to explain. I just drag the little circles on the chart until it looks good

• Color Balance
Like every other setting, exactly what you do with this tool is up to you. Color Balance adjusts the overall tint of your gif. I recommend editing highlights, shadows, and midtones for the best results.

• Channel mixer
This one is one of the most complicated tools when making gifs in my opinion. It's best for getting rid of weird colored tints (think the blue coloring in Twilight). I'll just link a tutorial here for it. I don't make enough gifs to know how to explain it.

• Selective color
Hands down my favorite tool, though not only specifically for gif making. This tool allows you to select a color (reds, yellows, greens, cyans, blues, magentas, whites, neutrals, blacks) and edit each color group. For example: my skin in photos usually has a weird red tint. I can edit the reds in my photo using this tool to make it look less abrasive.
You just play around with the different colors and bars for each color until each color group looks good. I recommend hitting the highest value to see how the color changes/what parts of the gif are affected by the change.
In the instance below, I wanted to see how magenta affected the blue colors, so I dragged magenta to 100. Now, knowing what kind of color changes magenta will make to blue, I can adjust accordingly.

Messing around with the each color put me here:

• Vibrance
Another pretty self explanatory tool! Vibrance and saturation bars make the gif colors more colored and vibrant.

• Applying the filters to all frames
Shift click to select all the filters, and drag them above all the layers. They should now be applied to all the frames.
If not, select all frames with the three lines menu drop down like before -> click the little eye to turn off visibility, then click it again to turn it back on. You should be able to see everything now.
In order to carry the same colors from gif to gif, I take pictures of each setting and edit each filter adjustment layer accordingly. I side by side compare and make adjustments if the coloring doesn't match quite right. I'm sure there's a better way to do this, but I'm not experienced enough yet.


4b.) Subtitles
This part isn't too bad. For subtitle text, I use Calibri. Myriad pro bold italic and Arial are also really good options though!
• Text
Go to the sidebar and select text. Drag yourself out a box approximately where you want your subtitles. Type whatever you want. If you don't like where it is, click the move tool and drag it wherever you'd like.
Here are my text settings:

• Blending options
Right click your text layer and select "blending options" at the top. I edit stroke, which adds an outline. I also edit drop shadow, just because it adds a little depth to the text

• Applying to all frames
Drag the text layer to the top, just like you did with the adjustment filter layers when coloring. The same troubleshooting applies.
5.) Exporting
I know there's other ways to do this, but this is the way that makes the most sense to me.
Select all frames on the timeline -> file -> export -> save for web (legacy) -> save
With everything together, you go from:

To:


I had the subtitles in two parts because my first one had the subtitle in two parts (consistency).
Happy giffing!~~
★★★★★★★★★★★★★★★★★★★★★
C.) Resources:
This is a collection of resources both for Photopea and Photoshop
Photopea Resources:
Photopea giffing tutorial by @heroeddiemunson
Photopea gif coloring tutorial by @heroeddiemunson
Photopea removing yellow tint tutorial by @lacebird
Photopea gif making tutorial by @aragarna
Photopea gif making tutorial by @ashleyolsen
Photopea changing background color of gifs by @benoitblanc
Photoshop tutorials:
Giffing tutorial by @dqmeron
Subtitle tutorial by @itsphotoshop
Blurring gif backgrounds by @clubgif
Inverted colored text tutorial by @spaceslayer
Gradient text tutorial by @tawaifeddiediaz
Gif coloring tutorial by @logangarfield
Color consistency tutorial by @clubgif
Channel mixer tutorial by @zoyanazyalensky
11 notes
·
View notes
Text
Navigating the Complexities of Microsoft Licensing: A Comprehensive Guide
Introduction: In the realm of enterprise software solutions, Microsoft License stands as a behemoth, offering a vast array of products and services that power businesses worldwide. However, along with its extensive suite of offerings comes a complex web of licensing agreements and models that can befuddle even the most seasoned IT professionals. Understanding Microsoft licensing is crucial for organizations to ensure compliance, optimize costs, and harness the full potential of Microsoft's technologies. In this comprehensive guide, we'll delve into the intricacies of Microsoft licensing, unraveling its various components, and offering insights to navigate this complex landscape.

Understanding Microsoft Licensing: Microsoft License offers a diverse portfolio of products catering to different business needs, ranging from operating systems like Windows, productivity suites like Microsoft 365, to advanced cloud services like Azure. Each of these products comes with its own licensing requirements, which can vary significantly depending on factors such as usage scenarios, deployment models, and organizational size.
Core Concepts of Microsoft Licensing:
Software Assurance: Software Assurance is an optional offering that provides benefits such as upgrade rights, training vouchers, and support services, offering organizations flexibility and additional value.
Volume Licensing: Microsoft offers various volume licensing programs tailored to different organizational sizes and needs, including Enterprise Agreements, Select Plus, and Microsoft Products and Services Agreements (MPSA). These programs enable organizations to procure licenses in bulk, often at discounted rates.
Subscription vs. Perpetual Licensing: Microsoft License offers both subscription-based licensing, where organizations pay a recurring fee for access to software, and perpetual licensing, where licenses are purchased outright with no expiration date. Understanding the implications of each model is crucial for organizations in making informed decisions.
Product Use Rights: Microsoft's Product Use Rights (PUR) document outlines the terms and conditions governing the use of its products, including licensing rules, restrictions, and exceptions. Familiarizing oneself with the PUR is essential for ensuring compliance.
Licensing Models for Different Products:
Windows Licensing: Windows operating system Microsoft License are available in various editions, including Windows 10 Pro, Enterprise, and Education. Understanding the licensing requirements for each edition, as well as options such as Virtual Desktop Access (VDA) for accessing virtualized Windows environments, is essential.
Office and Microsoft 365 Licensing: Microsoft offers multiple licensing plans for its Office suite and Microsoft 365, catering to different usage scenarios and user types. Organizations must choose the appropriate plan based on factors such as user needs, compliance requirements, and budget constraints.
Azure Licensing: Azure's flexible licensing model offers pay-as-you-go options, as well as various subscription and consumption-based plans. Understanding Azure's pricing and licensing models, including factors such as Reserved Instances and Hybrid Benefit, can help organizations optimize costs and maximize value.
Compliance and Optimization Strategies:
License Compliance: Ensuring compliance with Microsoft License terms is paramount for organizations to avoid legal and financial repercussions. Regular audits and license assessments can help identify areas of non-compliance and mitigate risks.
License Optimization: Optimizing Microsoft licensing involves aligning license purchases with actual usage, eliminating redundancies, and leveraging cost-saving options such as Software Asset Management (SAM) tools and licensing optimization services.
Cloud Cost Management: For organizations leveraging Microsoft's cloud services such as Azure, effectively managing cloud costs is critical. Strategies such as rightsizing virtual machines, leveraging reserved instances, and implementing cost allocation and tagging practices can help optimize cloud spending.
Conclusion: Navigating the complexities of Microsoft License requires a solid understanding of its various components, licensing models, and compliance requirements. By familiarizing themselves with Microsoft's licensing terms, leveraging the right licensing programs, and adopting optimization strategies, organizations can not only ensure compliance but also optimize costs and maximize the value derived from Microsoft's technologies. In a rapidly evolving technological landscape, staying abreast of changes in Microsoft's licensing policies and leveraging expert guidance can empower organizations to navigate this complex terrain effectively.
Website: https://microsoftlicense.com/
#Microsoft License#مایکروسافت لایسنس#خرید لایسنس مایکروسافت#همکار رسمی مایکروسافت#لایسنس ویندوز اورجینال#لایسنس قانونی ویندوز#نسخه اصلی ویندوز اورجینال#نسخه قانونی محصولات مایکروسافت
2 notes
·
View notes
Text
FabFilter – Timeless 3 Version full 100% free download
Plugin Overview: FabFilter Timeless 3
Version: 3
Developer: FabFilter Developer
Website: FabFilter
Format: VST, VST3
Bit Depth: 64-bit
Tablet: Cured (Install and Run) | FLARE
System Requirements: Windows 10, 8, 7, or Vista 64-bit VST 2/3 host
FabFilter Timeless 3 is a highly flexible tape delay plugin designed for versatile sound manipulation. From simple echoes to intricate modulations, it offers a range of features to cater to your creative needs.
Key Features:
Vintage Sound: Delivers a vintage tape delay sound, satisfying everyday audio processing needs.
Effects and Filters: The stereo delay signal passes through five unique effects and up to six analog sound filters before returning to the input with adjustable feedback.
Interactive Controls: Well-thought-out controls and interactive delay and filter displays make programming custom delays straightforward.
Modulation System: Unique drag-and-drop modulation system allows easy adjustment of effects like ducking, wah, flutter, dynamic diffusion, and more.
Versatile Modulation: Create new modulation connections effortlessly by dragging and dropping with the mouse.
FabFilter Goodies: Includes FabFilter's signature features - perfectly tuned knobs, MIDI Learn, intelligent parameter interpolation for smooth transitions, interactive tooltips for help, CPU optimization, and more.
Ultimate Sound Processing Machine: With its unique effects, filters, patterns, and unlimited modulation possibilities, Timeless 3 can transform into the ultimate sound processing machine.
Verdict: If your plugins folder has been missing a delay effect, FabFilter Timeless 3 is the perfect solution. With a verdict of 10 out of 10, it's praised for its vintage sound, versatile modulation system, and the inclusion of FabFilter's signature features. Whether for simple echoes or intricate modulations, Timeless 3 is a highly recommended addition to your plugin arsenal.
#music#FabFilter#Timeless 3#audio effects#music production#sound design#delay plugin#FabFilter plugins#audio processing#creative effects#VST plugin#audio engineering#music software#time-based effects#modulation#audio manipulation#digital audio workstation#music technology#production tools#audio plugins#studio gear#electronic music#audio software#mixing and mastering#FabFilter Timeless#audio creativity#plugin architecture#music industry#production techniques.#software
6 notes
·
View notes
Text
Advanced Techniques in Full-Stack Development

Certainly, let's delve deeper into more advanced techniques and concepts in full-stack development:
1. Server-Side Rendering (SSR) and Static Site Generation (SSG):
SSR: Rendering web pages on the server side to improve performance and SEO by delivering fully rendered pages to the client.
SSG: Generating static HTML files at build time, enhancing speed, and reducing the server load.
2. WebAssembly:
WebAssembly (Wasm): A binary instruction format for a stack-based virtual machine. It allows high-performance execution of code on web browsers, enabling languages like C, C++, and Rust to run in web applications.
3. Progressive Web Apps (PWAs) Enhancements:
Background Sync: Allowing PWAs to sync data in the background even when the app is closed.
Web Push Notifications: Implementing push notifications to engage users even when they are not actively using the application.
4. State Management:
Redux and MobX: Advanced state management libraries in React applications for managing complex application states efficiently.
Reactive Programming: Utilizing RxJS or other reactive programming libraries to handle asynchronous data streams and events in real-time applications.
5. WebSockets and WebRTC:
WebSockets: Enabling real-time, bidirectional communication between clients and servers for applications requiring constant data updates.
WebRTC: Facilitating real-time communication, such as video chat, directly between web browsers without the need for plugins or additional software.
6. Caching Strategies:
Content Delivery Networks (CDN): Leveraging CDNs to cache and distribute content globally, improving website loading speeds for users worldwide.
Service Workers: Using service workers to cache assets and data, providing offline access and improving performance for returning visitors.
7. GraphQL Subscriptions:
GraphQL Subscriptions: Enabling real-time updates in GraphQL APIs by allowing clients to subscribe to specific events and receive push notifications when data changes.
8. Authentication and Authorization:
OAuth 2.0 and OpenID Connect: Implementing secure authentication and authorization protocols for user login and access control.
JSON Web Tokens (JWT): Utilizing JWTs to securely transmit information between parties, ensuring data integrity and authenticity.
9. Content Management Systems (CMS) Integration:
Headless CMS: Integrating headless CMS like Contentful or Strapi, allowing content creators to manage content independently from the application's front end.
10. Automated Performance Optimization:
Lighthouse and Web Vitals: Utilizing tools like Lighthouse and Google's Web Vitals to measure and optimize web performance, focusing on key user-centric metrics like loading speed and interactivity.
11. Machine Learning and AI Integration:
TensorFlow.js and ONNX.js: Integrating machine learning models directly into web applications for tasks like image recognition, language processing, and recommendation systems.
12. Cross-Platform Development with Electron:
Electron: Building cross-platform desktop applications using web technologies (HTML, CSS, JavaScript), allowing developers to create desktop apps for Windows, macOS, and Linux.
13. Advanced Database Techniques:
Database Sharding: Implementing database sharding techniques to distribute large databases across multiple servers, improving scalability and performance.
Full-Text Search and Indexing: Implementing full-text search capabilities and optimized indexing for efficient searching and data retrieval.
14. Chaos Engineering:
Chaos Engineering: Introducing controlled experiments to identify weaknesses and potential failures in the system, ensuring the application's resilience and reliability.
15. Serverless Architectures with AWS Lambda or Azure Functions:
Serverless Architectures: Building applications as a collection of small, single-purpose functions that run in a serverless environment, providing automatic scaling and cost efficiency.
16. Data Pipelines and ETL (Extract, Transform, Load) Processes:
Data Pipelines: Creating automated data pipelines for processing and transforming large volumes of data, integrating various data sources and ensuring data consistency.
17. Responsive Design and Accessibility:
Responsive Design: Implementing advanced responsive design techniques for seamless user experiences across a variety of devices and screen sizes.
Accessibility: Ensuring web applications are accessible to all users, including those with disabilities, by following WCAG guidelines and ARIA practices.
full stack development training in Pune
2 notes
·
View notes
Text
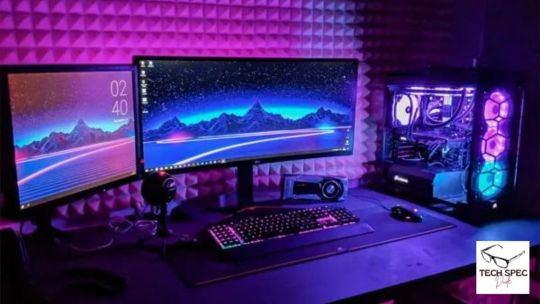
Should You Turn Windows Game Mode On Or Off?
You may have heard of Windows game mode and how it can affect your performance if you are not a gamer but if you are then we will be teaching you the benefits of having the game mode switched on.
What Exactly Is Windows Game Mode? Windows game mode is a special feature that is turned on by default on Windows 10 and 11 that automatically optimizes your Windows system to help the games you play get the best performance.
We know that Windows 10 and 11 are stuffed with nice user features and ways you can personalize your Windows operating system to your preferences but Windows game mode is certainly a great feature for you avid PC gamers.
What Does Windows Game Mode Optimise? When running Windows game mode it will help with several features that can interrupt your gaming:
Stops Restart Notifications Being a Windows user you will be aware that sometimes you are prompted for your Windows PC or laptop to be restarted once an update has been installed etc.
Well, having game mode turned on will stop these pesky notifications and won’t interrupt your gameplay.
Prevents Driver Updates Windows is a clever operating system in that it updates itself automatically in the background and will go out and find drivers itself to update your Windows driver.
But the issue with this is it can tax some bandwidth from your network and slow down your gaming especially if playing multiplayer games.
Not only this but it can cause your game to hang or black screen for some seconds or even freeze the game or crash it so another cool feature with having game mode on is it will stop Windows from updating the drivers while you enjoy your PC game.
Consistent Framerate Stabilization Now we all know what it is like to play one of the leading graphic card and CPU-intense games (yes we are looking at your Far Cry 6) and the framerate can bounce around depending on what other programs we have open on the Windows PC.
Limits Background Apps Resources With game mode turned on it will push all the system resources such as CPU power and RAM to your game to keep it running at its best This can help if your PC has lower-spec RAM or CPU or you have intensive programs running on your Windows such as Adobe Photoshop and Premiere Pro.
Well luckily for Windows game mode this won’t be an issue anymore on Windows 10 & 11 and it will huddle up all the resources and send them to your Game so they run nice and smoothly like they should while keeping a consistent frame rate.
Should I Turn Windows Game Mode On Or Off? If you don’t plan to use your Windows PC or Laptop then yes make sure you turn OFF windows game mode.
If you plan to use your PC for gaming then make sure you have the game mode turned ON to get the best performance from your PC games with the less interruptions.
How To Turn Windows Game Mode ON Or OFF Using Windows 10 & 11 The below steps will help you turn the game mode off and on no matter if you using Windows 10 or 11.
Press the Windows logo key on your keyboard and type “Settings” Alternatively click the Windows icon and choose Settings Type Gaming in the settings search bar Click on Game Mode Settings Now use the toggle switch to turn game mode ON or OFF
Conclusion When it comes to gaming which is one of the biggest ways to game then you will ideally want to turn gaming mode on if your PC or laptop isn’t already top of the range specced out.
We have answered everything you need to know about Windows game mode from turning it on and off, the advantages and disadvantages, and what makes game mode so cool for a free built-in Windows 10 & 11 feature.
ORIGINALLY FOUND ON- Source: Tech Spec Dude(https://techspecdude.com/windows-game-mode-on-or-off)

1 note
·
View note