#a set like the one pictured above usually costs around $20-$30
Text
Accessibility tip:
If you want to automate your home a bit, but you don't want any "smart" tech, you can just buy remote controlled power sockets instead

They are a lot cheaper and easier to set up and use than some home automation smart tech nonsense
They don't need an app (but some models come with optional apps and there are apps that are compatible with most of these)
Many of them use the 433mhz frequency to communicate, which makes most models compatible with each other, even if they are from different manufacturers
The tech has been around for a long time and will be around for a long time to come
You don't have to put any fucking corporate listening devices like an amazon echo in your home
Models for outdoors exist as well
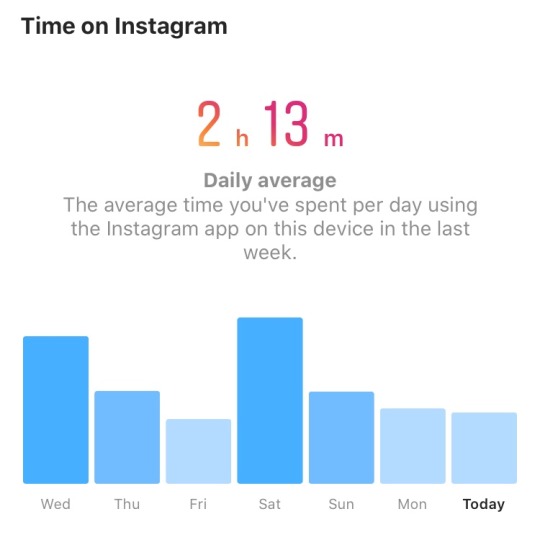
#accessibility#automation#tech#a set like the one pictured above usually costs around $20-$30#I got like 7 of these bad boys and 3 remotes#I can control basically everything in my room with these remotes#I got one remote on my office chair one on my nightstand and one by my door#this always makes me feel a bit like I am in Arnold's room from Hey Arnold!
30K notes
·
View notes
Text
Flyboard in India: Feel the Magic at the Watersport Hub, Goa

Flyboard in Goa: Are You Ready to Soar Above the Waves?
Ever dreamed of defying gravity and skimming the ocean's surface like a superhero? Well, it's time to turn that dream into reality with flyboard in India! Welcome to the ultimate watersport adventure in the sun-soaked paradise of Goa. In this blog, we'll dive deep into the world of Flyboarding, showing you how to experience the sheer exhilaration of riding a water-powered jetpack.
Discover the top Flyboard spots, find the best instructors, and get the lowdown on the latest equipment. From the adrenaline rush to the breathtaking views, we'll guide you through this unforgettable experience.
Experience The Thrills Of Flyboarding in Goa
Picture this: You're in Goa, surrounded by pristine beaches, lush palm trees, and the warm, azure waters of the Arabian Sea. What sets Goa apart from other beach destinations is the thrilling flyboard flying adventure it offers.
This high-octane water sport, combining elements of jetpacking and acrobatics, is a must-try for adrenaline junkies and adventure seekers. Imagine soaring above the sea, propelled by powerful water jets, executing mid-air flips and spins - it's an exhilarating experience you'll never forget.
The unique combination of natural beauty and the adrenaline rush makes Goa the perfect destination for flyboard enthusiasts. Whether you're a seasoned pro or a novice looking to try something new, flyboard flying in Goa provides an unmatched thrill. With experienced instructors and top-notch safety measures, your adventure is not only heart-pounding but also safe.
Best Time to Visit Goa for Flyboard Adventure
Goa, the sun-soaked paradise on India's west coast, offers a thrilling flyboarding experience that's bound to leave you breathless. To make the most of this adrenaline-pumping water sport, consider the seasons in Goa:
Winter (November - February)
Winter is the ideal time for a flyboarding adventure in Goa. The weather is pleasantly cool with temperatures ranging from 20°C to 30°C, and the skies are clear. The Arabian Sea is calm, making it easier to maneuver the flyboard. This season attracts adventure seekers from around the world, creating a vibrant atmosphere.
Pre-Monsoon (March-May)
Pre-monsoon, just before the rains arrive, is another good time for flyboarding. The temperature starts to rise, making the sea comfortable for this activity. However, it's advisable to book your adventure early in the day as it can get scorching in the afternoons.
Monsoon (June - September)
Monsoon in Goa is not ideal for flyboarding due to heavy rains and choppy seas. The adventure is usually put on hold during this season.
Tips and Guidelines to Prepare for the Thrill of a Lifetime
If you're a thrill-seeker looking to take your aquatic adventures to the next level, a flyboard experience is a must-try activity. To make the most of this exhilarating adventure, here are some essential tips:
Book in Advance: To secure your slot and potentially get the best flyboarding price, it's wise to book your adventure in advance, especially during the peak tourist season.
Wear the Right Attire: Opt for comfortable swimwear, sunscreen, and water shoes to ensure a safe and enjoyable experience.
Follow Instructions: Pay close attention to the certified instructors who will guide you through the experience. Safety is paramount, and listening to their guidance is crucial.
Timing Matters: Consider scheduling your flyboarding adventure during the early morning or late afternoon to avoid the scorching midday sun.
Capture the Moment: Don't forget your action camera to capture those awe-inspiring moments as you soar above the water.

>> Paradise cruise in Goa is one of the most popular activities in Goa. Are you wondering what is the cost of Paradise cruise?
Adventurous Activities To Try After Flyboarding Bliss
After an exhilarating flyboard adventure in Goa, the heart-pounding excitement doesn't have to end. Known for its scenic beauty and thrilling activities, Goa offers a plethora of adventure activities Goa to keep your adrenaline pumping. Here are three must-try adventures that will continue your adrenaline rush:
Scuba Diving
Explore the underwater wonders of the Arabian Sea. Goa's crystal-clear waters host a vibrant marine ecosystem, making it a diver's paradise. Witness colorful coral reefs, exotic fish, and even shipwrecks. Scuba diving in Goa is an adventure that allows you to discover the hidden treasures of the deep.
White Water Rafting
Challenge the rapids of Goa's Mandovi and Mhadei rivers for an unforgettable rafting experience. Feel the rush of the river as you navigate through the rugged terrain, making it a thrilling escapade for adventure enthusiasts.
Parasailing
Take to the skies and enjoy breathtaking views of Goa's coastline while parasailing. Soar above the sea, tethered to a speedboat, and feel the wind in your hair as you experience the perfect blend of adventure and serenity.
Dive Into our Affordable Packages For Flyboarding In Goa
Unleash your inner thrill-seeker with our exciting Flyboard adventure packages in Goa. Experience the exhilaration of soaring above the Arabian Sea, propelled by powerful jets of water. Universal Adventure packages cater to all, from beginners to seasoned adventurers. Our expert instructors ensure your safety and provide top-notch equipment.
Flyboarding (Calangute): ₹ 2,499 per Person
Grab your friends and family and make a splash in Goa with our affordable flyboarding price in India packages that promise unforgettable moments and adrenaline-pumping fun.
>> Where is the best place to flyboard?
Homeward Bound
Goa has earned its reputation as the watersport hub of India, and flyboarding is just one of the many reasons why. It offers a unique opportunity to soar above the sea and experience the thrill of flight while surrounded by the natural beauty of Goa's coastline. With its budget-friendly flyboarding price in India, it's an adventure that's accessible to all.
So, if you're looking for a memorable and exhilarating experience on your next trip to Goa, make sure to add flyboarding to your list of must-try activities.
Follow me on LinkedIn and Facebook for more adventurous places and packages.
0 notes
Text
fellow ADHD/chronic sleep issue friends: try SleepTown
Hey everybody! Sorry for the long post, but I wanted to spread the good word of this app, which has actually, legitimately changed my life. (this post isn’t sponsored lmao i wish)
I’ve had sleep problems for half my life. Around 8th grade, I lost the ability to make myself shut down for the night. I’d sit in front of devices, wanting to stop working or studying or messing around on the internet, but I couldn’t make myself. This was about ten years before I learned what “executive dysfunction” was, and about 13 years before I got diagnosed with ADHD, go figure.
So, when I was a student, I’d pass out at 4 AM, then wake up every morning feeling like I’d been hit by a truck. It was a running joke in college how I would sleep in public places, trying to snatch 15-minute naps here and there because of exhaustion.
After college, it got worse. I’m self-employed, so I stopped waking up in the morning at all. I worked until later and later times, until 3, 5, 7 AM. I woke up at 2 PM, then 4, then 6. Eventually, fully nocturnal and trying to reset my inner clock, I’d pull all-nighters and try to stay awake through the following days. Then I’d pass out for 14 hours, after being awake for 30 hours straight. Rinse, repeat, for years.
Due to sleep issues, I have: nearly driven off the road in high school, dropped classes in college, fallen into depressive episodes, developed a Vitamin D deficiency, gone days without eating, and lost friendships due to self-isolation. It’s been a blast!
I tried so many things to fix the constant grogginess, fatigue, and messed-up schedule. I tried a sleep study at the hospital, repeated blood tests to check for hypothyroid or anemia etc., melatonin, Zzzquil/other sleeping pills, the “multiple non-phone alarm clocks” strategy, a light-emitting alarm clock, and about six different apps, including that one that makes you solve math problems to shut the alarm off.
There’s one called Sleep Cycle that’s pretty good at what it does - it helped me feel less groggy when I woke up - but within a few days of starting it, I was back on my bullshit.
Then, about a month and a half ago, I downloaded an app called SleepTown. It costs two dollars. The concept: you set a goal for your nightly sleep parameters (mine is 12:15 PM to 8:45 AM). Before you go to bed, you hit the Sleep button.

After you hit Sleep, a construction site pops up and begins to build a cute cartoon building like the one above! If you leave the app after pressing Sleep, or if you don’t press Sleep before your bedtime, then the building is destroyed, leaving a sad-looking demolition project :(
So, you have to leave your phone alone. The next morning, the alarm goes off as scheduled. When you press “Wake Up,” and shake the phone for a minute to prove you are awake, the cute cartoon building will be completed and added to your Sleep Town! This is mine so far:

The app has various game-like features. You don’t know which building you’re going to get every night, so when you wake up, it’s like unwrapping a present. There are dozens of cute buildings to unlock, and achievement badges like building every kind of tent. Every seven days you meet your goal, you get a red ticket to help unlock a rare building (like the red-roofed library in the picture above).
There’s also a simple social feature. The pyramid in the pic is from me being in a Sleep Circle with a friend, meaning we have the same bedtime goals. This would be especially good for a couple who’s trying to get more regular sleep.
Despite the gamelike feel, though, it’s not an addictive app. It’s not designed to keep you fiddling around with it all the time and waste more time on your phone. It’s just gamelike enough to create a really good carrot/stick balance. Most sleep-related apps are only the stick, featuring louder or more relentless alarms - but that doesn’t make you excited to go to sleep on time.
This app makes sleeping feel like a fun, purposeful activity. I want to see which building I get, and it makes me really happy to see this town that I’ve been constructing through taking care of myself. And I don’t want to “let down” a building by destroying it.
It’s borderline ridiculous how dramatically my entire life has changed. Excepting a couple times I’ve stayed up for a social situation, I haven’t been awake past 1 a.m. for six weeks. I cannot believe how good I feel. I eat regularly. I have a meal plan and a calendar. I have hobbies and a work-life balance and I stick to (virtual, covid-responsible) hangouts that I make with friends.
It’s not totally failsafe. You CAN lie to the app and press “Sleep” while continuing to do things (except your phone, which will be locked down). I tried to do this a couple times. But I wound up feeling guilty about lying, because it felt stupid to want this little reward when I hadn’t actually met my goals.
In the same way, you CAN technically hit “Wake Up” and go back to sleep, but the shake-awake feature helps with that. I’d like it if they added something even more aggressive, like a step counter or something that won’t count you as Woken Up until you’ve taken 20 steps around your house or similar.
As it is, though -- I'm still groggy when I wake up at 8:45, but 1) keeping a regular schedule has lessened the grogginess and 2) when I wake up, I know for a fact I’ve gotten 7-8 hours of sleep the night before and I’ll feel fine in half an hour. So, in order to push past the groggy phase, I usually play a few chess puzzles on my phone or do a crossword, and by then I’m awake enough to get up.
I doubt this app will work for everyone, but I wanted to share it in case there is anyone else out there like me. Hope y’all are hanging in there, and happy sleeping :)
#adhd#sleep#executive dysfunction#feel free to reblog to potentially help ur sleep deprived friends!!!!!!!!!!#long post#looooong post#personal#about me
115 notes
·
View notes
Text
Peachtober | Day 14: Overgrown
Black!Reader x Monster Woo
Summary: Monster Woo is a simple man who sells flowers for a living and you are an Instagram photographer. Your models’ faces are better known than you yourself, but Woo wants to see what’s behind the camera.
Genre: Fluff
Moodboard and reaction requests open! Mstrlst in bio!

During a sunny Spring Day, a new shipment of flowers come in at 꽃벌 (play on words of flower and bee). It is the largest one since it is the start of the season. Valentine's Day is long gone, and White Day was a hit. All of the red and white roses being 70% of the seasonal inventory and now going back to its regular 40% since roses would sell no matter what season or occasion.
Youngwoo rolled up his burgundy sleeves to help the part time worker carry large sacks of fertilizer and dirt into the back while she balanced seedlings and vases under her arms and even atop her coily buzzcut.
“Naveah, once you’re done bringing in all the pots, can you start organizing them please?” He asked.
“Sure, Big Daddy.” She replied.
The tall man sighed, “I told you to stop calling me that.”
Naveah just smiled in response and continued to carry the rest of the product until the truck was empty. Then she began sorting pots by height and material while Woo worked on answering calls and writing down some new clients and jobs they were wanted for. A few weddings, a birthday, two divorce parties. One he turned down because they were planning on burning flowers, and he could never imagine putting his beautiful gifts through that.
A young woman about 20 or older came in dressed in purple slacks, heels to match, and a white shirt. Her typha colored hand reaching into her purse for her phone to check if she was at the right location.
She entered the store and Woo told the woman on the phone, “One second.”
“Hello.”
“Hello, I am Y/N and I run a photography blog. I was wondering if you would be interested in hiring me to take pictures of your flowers for advertising. I have experience with both still life and live models.” She said, setting her card down on the desk.
Woo picked it up and read the Hangul and the English translation. She was a photographer for sure.
“Why does your name seem so familiar?”
She gave a smile, “A few of my models have walked during Seoul Fashion Week this past bit cuz they saw my photos.”
He smiled, “Ah, right. It seems like with a face like yours, you would be the one in front of the camera.”
Y/N began to blush, “Oh, um. Thank you.”
The two just stared at each other and smiled for a moment before she spoke up.
“Well, I should get going. You have a phone call to get back to.”
Woo nodded, “Oh, right. Yes. It was nice meeting you and I will be in contact.”
The woman left and the florist finished the call, thankful they hadn't hung up. Y/N...jeez she was beautiful.
The sound of a glass vase breaking snapped the tall man out of his daze. He sighed and called out the worker's name before heading over to get the broom to hand to her.

After work, Woo locked up and said farewell to his worker before taking a taxi home. Before going to bed, he looked up the Instagram page that was on the card Y/N gave him.

She was really good. Like, it was so much better than he had expected. Pictures of flowers in vases and people and so many beautiful faces. A lot of her stuff was currently flower based. It seemed she didn’t delete the stuff from her early days either. The camera quality had gome up so much too. Woo couldn’t help but like one of them that made him think of a tattoo. Wait, no.
It was from 4 years ago! She was going to think he was a creep! No, no. Y/N wouldn’t do that, right? It was just a possible employer checking out an employee’s past work to see if it would affect his current business. He made up his mind. Woo would hire the beautiful black girl to work for his company. All of his current photos were taken by him and Naveah, so they weren’t that great. If they could up the photo quality of the inventory, then they would sell more.
The large man soon fell asleep thinking about what floral arrangements he would make for each tier. Each one was linked with a color, so he could make it monochrome. Or maybe most of that color. Y/N looked really cute in purple. Hair like an allium.
The next day at the shop, Youngwoo called her while setting up the flowers he would use for this week’s specialty arrangement.
“Hello, this is Photobomb Productions, Y/N speaking.” She said in English and then repeated it in Korean.
Woo smiled, “Hello. This is Youngwoo from 꽃벌. I would like to take you up on your offer of becoming our floral photographer. I have been meaning to take some new pics for some summer deals.”
He could hear her squaling out of excitement in the background and then she cleared her throat and talked professionally, “That is great to hear. What day or time would the photographic subjects be ready for me to photograph?”
“Today is Friday, so I will be busy all weekend. I can get them done by either Tuesday or Wednesday since I already have sketches. All I have to do it put them together.”
“Perfecto! How does Tuesday at 2pm sound?” Y/N asked.
Woo looked at his schedule, “I have a delivery at 1:30 in the afternoon, but I will probably have my worker handle that one.”
“I see. Alright, well, I will see you then. Do not hesitate to call me if we have to move it to Wednesday. Have a nice day.���
“You too.” Woo replied and the woman hung up.
“Who was that, Big Daddy?” his worker asked, carrying in a box of seeds to set up in the seed bin near the front.
He rolled his eyes, “That woman who came in yesterday. A photographer. She’s gonna take photos for us from now on. I’m gonna be up late drafting up a contract and then we’ve gotta--” The tattooed florist sighed. “I shouldn’t bore you with technicalities. Let’s get these arrangements done.”
“Let me bring over the vases.” The short haired woman said.
Woo looked at the workbench, “Neveah, where are the Calla Lilies?” he asked after her.
“We had two weddings that wanted them, so we are getting an emergency shipment in, but not until tomorrow.” She replied, making sure the seed packets fell flat before adding more on.
He nodded, “Right. Right. Um…” then he remembered the thought he had last night and went to a sky blue bucket and picked out a bulbous purple flower with a long stem. “We’ll use these today instead.”
And so for the next few minutes before the sign was flipped, the two made matching arrangements. Neveah had always wanted to do more now that her probation was up. Woo’s shop was known for flowers and arrangements, served weddings of all types and even funerals. The most important thing about it was who it employed, however. Former convicts and people who were needed someplace to work while on probation.
Youngwoo believed that everyone deserved a second chance and that humans could change, which is why he hired who he did.
“Ah, it didn’t come out as well as yours.” Neveah said as hers had a bit of a bend in the long stem and just seemed overall more messy than the one her boss made.
“Don’t worry about it. This is only the third one you’ve ever made, so I think you did really well. In fact, yours will go on the box instead of mine so people will see it first.” The man set hers onto the white wooden box in the window and placed his next to it.

Dark pink roses and sunflowers graced the top of the white vase with solid aster placed in here and there. The allium rested above each one like a proud head. They would stay in the front for the week and then they would be dead and turned into compost for a nearby flower nursery.
The woman smiled and then it was time to flip the sign. Business didn’t pick up until around lunch which was the usual thing. People buying either a single flower or a dozen on the way to a date. When Neveah left for the day, Yieun clocked in and hugged Woo having started this business together before she tried and failed to become an idol.
“Is the car filled up yet? Remember, I have to drop off some stuff for a business meeting and a 16th birthday today.” She said.
“It’s all packed up and ready to go. Feel free to double check, but it had been pretty quiet today.” He replied. “Ah, are there business cards still inside?”
Tuesday came, and Woo was nervous to see her again. They had talked over the phone for the past couple of days to finalize things. Y/N was really kind but he could tell how much her work meant to her. It was a small business that she was ultimately running on her own and often didn’t get paid for her time because people hardly ever took the arts seriously. Photography was no exception.
People thought it was just sitting in good lighting, point and click, which it wasn’t.
Woo had three different arrangements made for each color level. White, green, purple, and yellow. Each added the amount of flower types and the default price was a clear glass vase. A custom vase color/type would cost $3 extra. The second and third were in custom vases and set up in the workshop.
It was extra clean for today and there were no arrangements to be made. Mondays through Wednesdays were the slowest of the slow most of the time. That meant today was perfect for Y/N to come in.
She arrived right on time in a yellow long sleeve top tucked into a rainbow skirt and white and rainbow shoes. Rainbow accessories too, but carrying a duffle bag of work stuff.
Yieun was out on her current delivery, so Woo fixed his brows and hair before greeting her with a poliot bow.
“Hello, Y/N. How are you doing today? Have you eaten?” He asked.
“I am doing well, and yes I have. I went to a taco place. It was good, but the sauce stained the jacket I was wearing.” The woman sighed, tying her hair back before she set up everything.
It wasn’t the most glamorous thing, but Woo asked if he could watch. She said as long as he stayed behind the camera, it was ok. However, the man wasn’t watching the flowers, but instead watched how she worked. The way she bent over to get a better angle from her tripod and set up the lights.
She seemed so delicate, like she herself was a rose petal in need of much care. However, they way she pursed her lips seemed to go perfectly like thorns. The man knew she wasn’t thinking about him. Her eyes were on the flowers, but at the same time, Y/N was all he could think about for the past week.
Sometimes his imagination would try to run away with the idea of her, but that wasn’t fair to her. He barely knew her last name.
The shy and strong Woo was enchanted by the photographer. Ah, he wanted to say something to her. To ask her out, but she was so professional. This was just work for her, and he didn’t want to get in the way of her job. Still, wasn’t it worth a chance to at least get a proper answer instead of wondering “What if?”
“No, no.”
“Um, Youngwoo? Can you help raise this up a bit more?” She reached her brown hand towards the top of the light.
As the taller man helped her, he decided to just go for it, “Hey, um, Y/N. Feel free to say no, but I was um. I was wondering if you would possibly maybe want to go on a sort of kind of date with me?”
“Oh, um, sure. Right there is good.”
Woo tightened the stand, and she began taking pictures again.
“What kind of place were you thinking?” She asked. “Y’know, for our date? Dinner and a movie?”
“I’d like to take you on a picnic. I know it’s sort of cliche, but Han River is really nice and there’s usually some nice busking that goes on there.” He said was her felt his heart beat outside of his chest, “I am leaving the shop to Yieun and a part timer this weekend. We can do it then.”
Y/N smiled up at him as she stood on the other side of the arrangement, “Sounds like a plan, Youngwoo. I shall wear a dress.”
“You can wear anything you want. I’m sure you’ll look great.” The man answered earnestly.
A surprised smile before Yieun called for him. Woo said he’d be right back and went to go talk to his co-worker about what had to be done. It wasn’t much. Just a bit of organizing here and there and sweeping. Simple things that took a while.
“By the way~” She whispered. “Did you ask her out? Niveah said she’s all you talk about.”
“I did.” He replied, playing coy.
“And? Did she say yes?”
A smile broke out on his face, “She did.”
Yieun put her hands up for a high five and asked for details one their hands met in celebration.
The following days, Woo kept sending his friend photos for potential outfits. She kept telling him to ditch the dress shirts because he looked awkward in them. It was just a casual thing, so he went with some gray sneakers, khakis, and a black and white striped top. Because of the pollen forecast, he opted out of contacts and just wore his glasses. The most expensive thing he wore was his gold watch from a birthday.
He had decided on a simple picnic instead of the ferry for dinner. Maybe if things went well, but he didn't wanna look too far ahead. He knew of a spot away from the main busy area where a few weeping willows provided the perfect shade.
“Youngwoo-ssi!” Her familiar voice called.
The man was breathless as could be as Y/N walked towards him, her copper skin covered in a blue and white dress that allowed for her arm to be bare except for a gold and white bracelet. Simple makeup other than a pink matte lip that accented her smile.

They bowed and greeted each other.
“You look...amazing.” He couldn’t help but stared.
“Thank you. You look great, too. I think this is my first time seeing you without an apron on.” She replied.
Woo smiled in response, “Thank you. I have a super special spot for us. A friend told me about it.”
She smiled, “Sounds great.”
“Have you had any other clients lately?” He asked.
“Oh my gosh, so I had this really sweet woman come in yesterday with her pregnant wife so that we can do the pregnancy announcement pictures and stuff. This is fine. I had it set up and such for that because she made an appointment.”
The tall man smiled, “Oh, that is really nice.”
“However, she went into labor in the middle of me taking the photos.”
“She what?”
“Right?
Woo asked, “Did she not know she was going to give birth?”
Y/N shrugged dramatically, “I guess not, but luckily, my next door neighbor is in her last year of training to become a nurse. She helped to deliver the baby in my bathtub.” She laughed. “I spent most of the day cleaning it.”
Both of them laughed at the whole story. That’s what it was like to have an at home studio as a photographer.
“Ah, here it is.”

Behind the leaves of a willow tree, there was a perfect little alcove where a red gingham blanket was spread out and food was separated between the two in the form of sandwiches. Conversation flowed smoothly as the overgrown tree provided shade for the couple that fate decided to put together. They talked about work and of family.
Kim Youngwoo blushed when she complimented him on being a good person, taking in people society had rejected because of a series of bad mistakes.
He told her about how he just wanted to help people like him, how the U.S. basically deported him back to Korea because of--
“I don’t care what you did, Youngwoo.” Y/N said honestly. “You’re obviously not the same person you were back then, or at least you are doing much better. Besides, that isn’t the person I’m starting fall for.”
“Who are you starting to fall for?” Woo asked, hoping his heart was beating for all the right reasons.
She bit her lip and then looked up at him after hesitating to say the truth, “You.”
#Monster Woo#Woo Fam#Kim Youngwoo#Monster Woo x Reader#Reader x Monster Woo#Youngwoo x Reader#Reader x Youngwoo#Florist!AU#Black!Reader#Female!Reader#Photographer!Reader#Instagram#Fluff#cuteness#Peachtober#Inktober '19#Inktober#Inktober 2019
103 notes
·
View notes
Text
Being in the blogging business for around 8 years now I came to learn a lot. Let’s hear from the old bitter blogger about the difference between being an ambassador and being a customer. When you’re investing more than you’re gaining from the collaboration it’s not really a collaboration you’re looking for.
There is a new trend going around social media, especially Instagram. I’ve been getting collaboration offers on a daily basis even pre COVID times but now the amount of pseudo collaborations increased.
Hands down it is an incredible business strategy from the business point of view.
Everyone wants to be an ambassador.

Ambassador became an even more prestigious title than an influencer. Influencer posses some sort of responsibility for their actions whilst ambassador is just being paid for simply being.
Who wouldn’t want that?
Many brands use this knowledge to the fullest and offers these pseudo collaborations.
So what is a pseudo collaboration?
Well, it starts off by being contacted by a brand.
You’ll receive a ctrl+c ctrl+v message from a brand-name-scout. The message contains several cute emojis and addresses you as a gorgeous, pretty, cutie, love, honey, sweety, and if they really want to get you, even by your Instagram name.
It’s usually followed by a bunch of compliments about your fashion style, vibe, Instagram, or whatever. Then there is a lie about following or just generally noticing you for a while without ever seeing your insta story, like any of your posts, or even actually following you.
Now it’s time for an offer beneficial for you.
Usually, it’s free products, a way to earn a commission, or just the sheer option to be able to call yourself an ambassador. Every single brand out there offers a “support” like anyone really knows what’s that supposed to mean. I had several ones even offering me a travel trips, but never elaborated on it after my further questioning.
Now comes the hook with a “do you want to learn more?” question.
If you think I’m exaggeration for the story and I can’t be generalizing all of the collaborations offers into a simple standard form I wish you were right. Here are some of the screenshots of my current Instagram DMs:
You might think: “What’s wrong with that? They’re trying so don’t be mean. Just ignore them.” let me remind you how dumb Instagram algorithm is.
If your account is followed by bots, messaged by bots, liked by bots Instagram assumes you’re one of them or you got hacked by them. Sweet of them for trying to protect you thought, but holy hell did that made everything super complicated for me.
I got several messages from the brand scouts messaging me again because their previous account got deleted.
No shit Sherlock, it’s like you can’t keep creating accounts, following and messaging a bunch of people at once and ask for money anymore.
So now every time my account gets suspicious activity such as too many likes/follows/messages Instagram suspects my account got hacked. Each time they require I change my password and let me tell you I ran out of password ideas months ago.
That’s not the worst part though.
After each time I change my password I’m blocked for 7 days from liking, following, or adding tags to my posts and that sucks. Just to get a better picture of this issue I’m blocked approximately once sometimes twice per month.
The block comes hand in hand with a shadowban that lingers for god knows how long, meaning Instagram is not gonna support you in any way. That’s why I have around 40 likes on a posts with 47K followers most of which are bots anyway.
I loath Instagram app yet I spend hours a day on the hellish site and I’m not only one.
We spend so much time on Instagram anyway so when a chance to earn money form it comes along you’re tempted to take it. Brands know that.
Imagine you’re a small-town girl with around 400 followers on Instagram. You already feel pretty popular right?
Now imagine you get the messages I shared above but you get just one. Someone out there thinks you’re so popular they want you on their team, you are just like the big influencers, you get job offers for being an Instagram star. You’re the next Kardashian.
You can have all of the things they said to you BUT you need to do something for them first. You have to pay for it.
And here is the catch with all of the pseudo collaborations.
What they don’t say to you in their first message is what it’s gonna cost you.
Many offers you free stuff but you need to pay for the one-time shipping. Some brands offer you a unique discount of around 40-60% off so you’ll pay just a part of the price and you can call yourself an ambassador.
I don’t know about you, but I thought that was called the customer. You buy a product, you wear it and occasionally you take photo of it on your social media sites. The new term is an ambassador apparently.
I get why so many people agree to this kind of collaboration. It’s new for you. It makes you feel good and successful in your friend’s and families eyes. And there is that hopefully undertone of making money from it.
Aren’t the brands unprofitable when they give away discounts and free stuff?
In a theory, yes, but there is one thing all of the brands that messaged me had in common except for the audacity.
Overpriced products.
I got messaged by jewelry stores, fashion stores and gym equipment stores most of the time. I took the time and did my research on every one of them.
When a store sold jewelry, they had the same products as the rest of the jewelry stores I got contacted by. A small variety of around 8 products most of them sold out anyway. And let’s not forget the ridiculously high prices. You can’t charge a cheap Chinese necklace you can get on amazon or aliexpress for under a 1$ for 40$.
So even if you’re paying just around 30$ for your ambassador order they are still making a profit on your wannabe Instagramer need cuz they purchased said items for far less.
Well, I’m being a little miss know it all right?
How can I talk about pseudo collaboration like this when it’s all based on assumptions. Well you know me, I’m curious as hell and I actually went through 3 pseudo collaborations myself just to prove a point.
I literally spend money so I can tell you about it right now so here is how my 3 pseudo collaborations went like.
All of the ones I choose were jewelry based pseudo collaborations. With the corona times, post offices are overwhelmed with parcels. I ordered big parcels in recent times and they arrived with around a month delay. I figured smaller jewelry in an envelope form would be quicker to arrive and I was right.
Pseudo collaboration number one VONACHI:
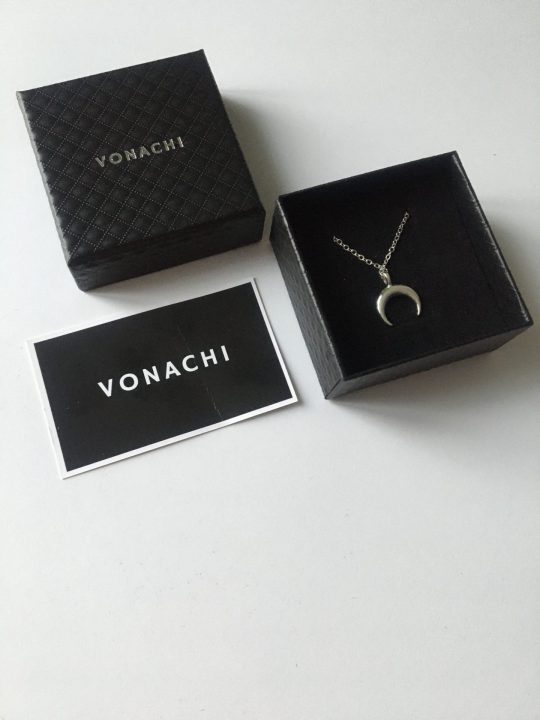
A simple yet luxurious-looking website with very few decent pieces of jewelry, offered me 3 free pieces to take a photo in and promote. I would also get a 60% discount code and every time my code would be used I would receive 30% of the money amount. Incredibly overpriced amount in the first place.
Here is the list of all of the benefits they offered.
The scout that approached me was very eager. They kept insisting I place my order right away. No time to waste.
To make it clear I got a simple code to apply in a check out that subtracted the price and I got the pieces for free. All I had to do was pay a 20$ shipping fee what seems like nothing but for 3 small necklaces, it is way too much.
Another thing that was odd was that I was required to take a screenshot of my order and send it back to scout. I guess to prove I was legit.
After bunch of further compliments and claims how excited they are to be working with me we ended our conversation.
If you think I was being reckless to give my credit card and home address to such a questionable site don’t be.
Honestly, I trust zero people, sometimes I don’t even trust myself. I used a card I have no to very little money on and I got it shipped to a work address.
My parcel from china arrived in around a month and a half. I got one black box with one necklace and the other 2 necklaces were in small plastic bags. I received a note about welcoming me to the program and asking me to contact vonachi’s official Instagram account for setting up my discount code and that’s exactly what I did. The official page responded after longer time period with just a “this is your code” message. I took a photo, tagged vonachi as a business partner, and shared my code. I did my part and I was never contacted by them again.
My 60% code is VONAMBNAT and as you might have guessed no one used it so far.
Or at least no one told me it was used. If someone were to use my code I would be contacted by vonachi and here is the problem. I’m supposed to trust them with their credibility cuz there is no other way for me to check it for myself. This is what it’s missing from the old Time collaborations of mine. I would get a tracking code, an account login, graphs, statistics, and one on one communication with a brand in my previous collaborations. But you know Golden times for influencers are long gone.
Now I’m left to just simply trust them.
Why would they ever confess someone used my code? If a customer gets 60% off and I’m getting 30% from already discounted item there is just a very little left for vonachi. They don’t say anything and get to keep my 30% share.
They didn’t put much effort into tracking system cuz they are not expecting their ambassadors/customers to make any sales anyway.
The products were not that bad. They came in a bit rusty and tangled but I was excepting much worse.
Hell, I was not expecting them to legitimately arrive.

Pseudo collaboration number 2: ENGELSINN
I initiated this pseudo collaboration myself. Engelsinn paid a significant amount of money to Instagram promoted post and that’s where I found out they are looking for ambassadors.
I filled out an application form.
This one felt more legit cuz they actually asked for followers count and all of the communication occurred via email. Automated emails but still it reminded me of good old days.
I was given a 40% discount code to use on my first order. The shipping was free but it still cost me another 20$ to get the product. Since placing my first order I got a 20% discount code “nat7x20” for my followers to get 20% off their engelsinn order.
When my code is redeemed 2 times I get one jewelry of my choice for free.
Do I even need to mention that I didn’t get any email since?
Well, that’s not exactly true I got 2 more emails each with another discount code I could use for 24 hours and buy more of their stuff. But none about redeemed code.
Engelsinn is a german based brand and living so close I got my parcel in around a week. I got myself a rose gold knot bracelet and I feel like a hypocrite but I actually really love this one and wear it every day. I know I wouldn’t get it if it wasn’t for the research but I’m glad I did.
Btw the ad about engelsinn looking for ambassador is still up there and it still says they have only a few places left. It’s been 2 months.

Pseudo collaboration number 3: CUZETTE
I got messaged by them on my Instagram and their offer was super confusing. They promised it all. 3 free stuff now, free stuff every month, paid trip to several destinations, and even 50$ voucher. The scout called me sweety exactly 9 times during our conversations. It was super annoying.
So I choose another 3 free items and paid another 20$ for shipping. When I asked about the 50$ voucher I was told I would need to refer 5 friends who would also become cuzette ambassador or delegate as they named it, to get the 50$. No info about the travel trips though.
I was told to contact the official page for more info but it took days for them to finally reply with nothing new just more compliments and excitement about the future. It’s been 2 months and I still haven’t received my order just as I was expecting.

Later on, I endorsed in conversation with several other brands asking for more info, looking for something different than standard copy and paste form. Unsuccessful.
Every time I asked how many ambassadors they have in their program the answer was always “around 3000“. Once again, you have 3000 customers and not 3000 ambassadors. If the only people who buy from you are people you ask to buy from you, you’re doing something wrong.
But your business plan is on point.
When I asked about who and where makes their products I was either met with a silence or a sweet talk about a responsible brand.
These brands are providing people with content. You get to take photos of the items you ordered and you get to be as creative as you want. In these COVID times so many brands had to cancel or postpone their collaborations with bloggers or Instagrammers. I saw huge travel/luxurious instagramers switch form hotel and travel collaborations to promoting kitchen wipes. Times are tough and you got to do what you got to do.
Yet these small businesses with hight prices are thriving?
You know it’s not about the product but about the potential.
Profiting on greediness.
So smart.
To prove my point even further I got to confess one more thing. I mentioned before that I manage Instagram accounts for different brands and among them is one fashion store. I was not only at the ambassadors’ side but on the scouting side as well.
All I had to do was search for people who looked like they would be willing to become an ambassador for our store and had decent amount of followers. I had saved message form and all I did was try to guess peoples names so the message seemed more personal. Once they agreed to a discussion I let my boss take the lead.
So yeah, try to really think about the offers you get.
Look at it from all points of view and ask yourself if it’s profitable for anyone else but the brand.
If you want to have offers pouring your way try adding #ad #spon #collab to your next Instagram posts. That’s how they look for their next ambassador.
Everyone wants to be an ambassador.
Pseudo Collaborations- Everyone wants to be an Ambassador Being in the blogging business for around 8 years now I came to learn a lot. Let's hear from the old bitter blogger about the difference between being an ambassador and being a customer.
#ad#ambassador#ambassador wanter#blogger#collaboration#collaboration offers#fashion blogger#fashion collaboration#gram#influencer#insta#instagram#instagram collaboration#instagram influencer#instagramer#jewelery#pseudo collaborations#reading#review#spon#story#wannabe ambassador#writing
3 notes
·
View notes
Text

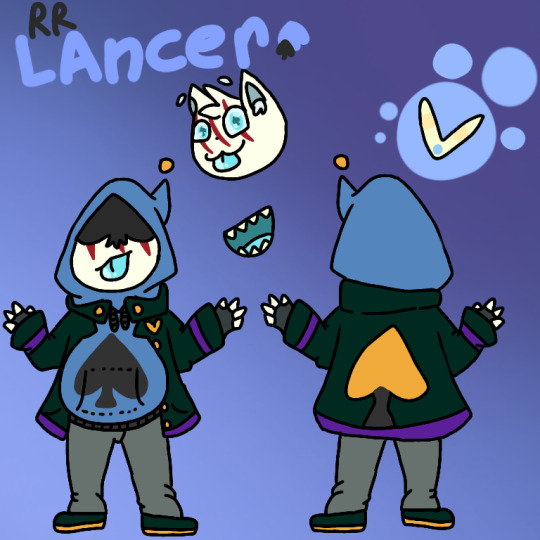


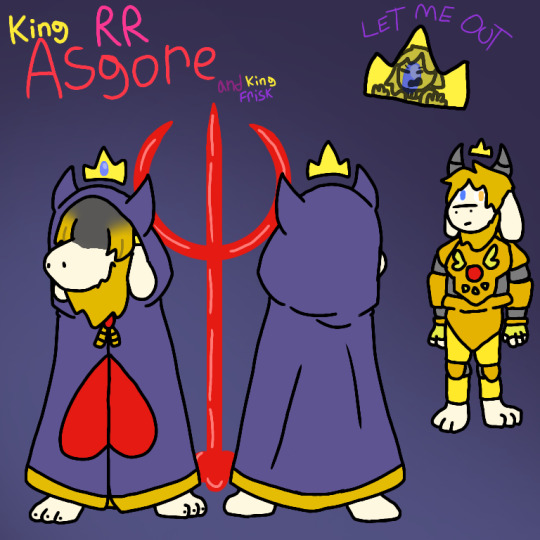

I made some small references for all the current characters in Rulesrune! Yay! They took forever and probably around 20 to 30 minutes each.
The Contest
This is a personal contest I'm holding since I will be away at camp for a whole week and will literally have no contact with the outside world. None. So why not hold a contest?
What you'll be doing
Pretty much I want to see a swap AU of Rulesrune but find it to complicated myself. So I'm holding a contest to see who'll do it best.
Don't worry you will get something! There will be a prize for the 1st, 2nd, and 3rd place winners!
All you have to do is design what you think Rulesswap would look like! That's pretty much the minimum. You don't have to do all the characters but the more the better!
Prizes
1st place will get rights to the Ruleswap AU and two free drawing requests from me as well as a drawing of your version of the characters
2nd place will get two free drawing requests and a drawing of their version of the characters.
Lastly, 3rd place will get one free drawing request and a drawing of their version of the characters.
Starting to finish
The start is right now! And the finnish is the 3rd of August. To enter, just use #Rulesswap ! This content is also being held in both deltarune au aminos, deltarune amino, undertale and undertale au amino and lastly my DA.
Character information.
This is to help you a bit.
In this AU it is MANDATORY for a Darkner to wear gloves when in the presence of a Lightner because when a Lightner and a Darkner touch bad thing can happen. Usually, the Darkner absorbs the Lightner, merging the two and making it impossible to separate them without killing one or both. Once a Darkner has absorbed a Lightner (this is usually not by choice) they can absorb other Darkners as well except they have a say in the matter since they're now "evened out".
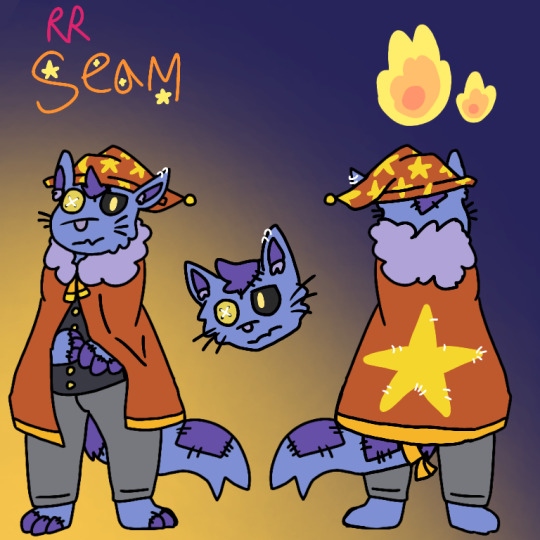
Lancer is a smol bean at first. Due to an unfortunate,unforgettable, and unforgivable incident with his father he has a clawed gash across his face. Due to this, he's now color blind. He tends to asks Ralsei and Rouxls Kaard if he'll ever see a rainbow again. Unfortunately, he probably wont. Now later on Lancer finds Susie injured and attempts to help her, not knowing the gloves rule. This, of course, results in them merging and he now sees Susie as his invisible friend. In battle he uses a boomerang and when knocked out an axe will spin above him. Thats just Susie being over protective.
Rouxls Kaard Was just as cheerful as all usual until the incident happened or what the dark world likes to call it "The fall of the spades". After Lancer had been injured, Rouxls took it appon himself to get even with the spade king and by even I mean strait up beat the guy to a bloody pulp and toss him off the side of the castle. Of course, this most definitely killed the king and the kingdom was not happy. Rouxls, knowing about the geat door, took Lancer and C.Round to the door to escape. The guards chased them and they barely made it in. From then on they lived with Ralsei. Things were fine at first until the merging happened. Lancer had gone off and Rouxls was worried where he had run off too. So he went to go look for Lancer, accidentally passing him and Susie. He then found Kris who was concerned or at least curious where their friend went. Rouxls, not able to turn down any child at this point, agreed to help Kris find their friend when they heard Lancer yell "Dad! I'm lost!" Rouxls, in a rush, grabbed Kris and ended up merging with them. Rouxls Kaard is now a very very silent person and seems to have some personal grudge against Ralsei now, as if he knows something that he didn't before. Rouxls with occasionally talk to his soul but its very rare for him to talk at all. Rouxls use to lance in his pare time so uh..thats kinda how he attacks I guess.
Ralsei is alot taller than usual. He's about 6 feet, maybe a little shorter. This makes him a bit intimidating but Lancer loves him as if he was his own dad. Ralsei is kinda quiet but will talk if someone talks to him first. He's pretty nice and tends to take care of things when Rouxls needs a break. After Rouxls and Lancer's merging with the Lightners him and Rouxls haven't gotten along. They tend to fight (usually not physically because Lancer would notice) fairly often and it causes alot of tension. Lancer thinks his dads get along great so they have to at least pretend to like each other when smol bean is around. Ralsei, though very polite, has someone wrong. Very wrong. Its hard to describe but lets just say hes not all that he seems. He's been caught by Rouxls trying to absorb C.Round and Lancer wich has increased the distrust. No one knows who Ralsei merged with but he hates talking about it and seems to have developed a fear of flowers. Mostly big ones. Ralsei, even though he has poor eyesight, thends to avoid wearing his glasses because when he dose he freaks out. Ralsei is fairly skilled in fire magic due to him practicing alot. He also has vines, though extremely rare. He usually avoids using them at all costs and when he dose its purely accidental.
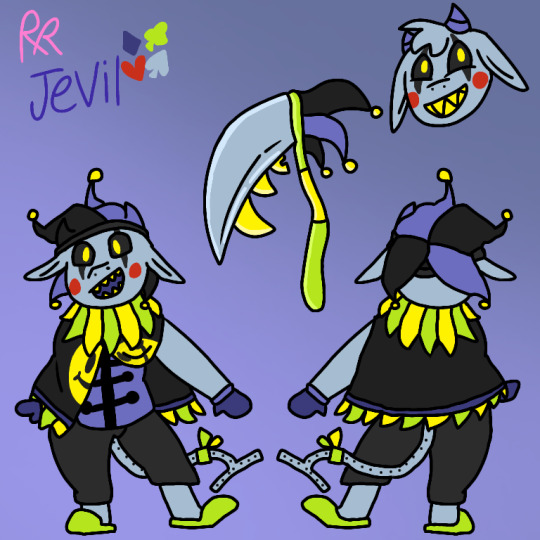
Jevil oh Jevil. Just as crazy as ever, maybe even more. He's still imprisoned but this time he wants to make a deal with you. He wants your soul. Jevil says that he can literally give you the world if you give him your soul. He'll sing about it during his fight and increasingly get more frustrated when you refuse. This Jevil loves to sing so more often then not he'll sing what he has to say. At the end if his fight, no matter how you defeated him, he'll turn into a scythe. Usually Lancer and Rouxls Kaard leave since they find the dungeon creepy but Ralsei will stay behind and take Jevil for himself.
Seam is the courtyard magician to the new king. Who's the new King? you'll find out later. He's a fairly straightforward cat and prefers to keep his magic acts as a profession. He admits that he misses Jevil but is to scared to go and see him again. He's afraid Jevil will be mad for imprisoning him. This leads Seam to be a bit jumpy since he thinks Jevil might have it out for him.
RK's C.Round dosent have much to be said about them. They fallowed Rouxls Kaard and Lancer to the great door. They lived with them kinda like a pet, keeping Lancer company and out of trouble. They're a great guard dog.
Asgore? You may be a bit confused. Why is Asgore in all of this? He's not even in the picture! Well do I have a story for you. You see, in the light world AKA hometown Asriel has been deemed missing since he went off to collage. Its been 3 years longer than he said and everyone was worried. So when Asgore went missing things got hectic. Undyne started doing more patrols and a curfew was set. Now, where do you think the last place Asgore was seen at was? It was the school. Asgore was helping fix some things and went to put something in the closet when he somehow entered the Dark World. There are multiple entrances and he just so happened to appear by the castle. The other kings had yet to be freed and the kingdom was in disarray so Asgore, being the kind hearted soul he is decided that he would be the new king. It took some convincing and research (as much as there could be) but he finally did it and the people are fairly happy.
Dogtrio is a set of 3 C/K.Rounds that work together. C/K.Rounds are more powerful in numbers. The one with the heart on his crown is their leader. He usually commands and heals the other two during battle. Together, combined, they can summon D.O.G. The acronym is unknown.
Robbert, Bobbert, and Elli are best if friends and like to change anyone. More specifically, they want to take down RK for killing the spade king. Unfortunately, they're just 3 idiots in a trenchcoat. The only lethal one is Robbert but he's so busy trying to make sure his friends don't fall off a clif or miss fire their bubble rocket launcher that he can't actually kill you. Bobbert is bubbly and kind and honest doesn't know what he's doing. Elli is mute yet kind and heals the other two when they get hurt.
Susie was absorbed by Lancer and is now considered his guardian. She protects him when no one else is around and helps describe colors to him. She'd go ballistic if anything happened to him.
Kris is just...Kris? They don't have too much do them. They don't talk and kinda just float around RK, waiting for the chance to escape. But they can't. They never will. It's slowly making them violent. Watch out.
Clover is just normal clover. They still haven't found a boyfriend yet.
#deltarune#deltarune spoilers#deltarune au#delta rune#delta rune spoilers#undertale 2#undertale?#rulesrune#undertale au#deltarune au's#Rulesswap
31 notes
·
View notes
Text
5 DIY Bedroom Makeover Ideas on a Budget
You’re in danger of this condition if you spend tons of your time reading decorating magazines or watching TV. the primary sign is that you simply end up drooling over images of beautifully redecorated rooms, outfitted with thousands of dollars’ worth of latest furniture and accessories. Then, as you realize you'll never afford this type of makeover on your modest personal budget with payday loans , feelings of inadequacy set in. You become depressed at the thought that you’re getting to be stuck watching your bare walls and dated furniture forever.

Low-Budget Decorating Techniques
1.Rearrange the Furniture
Rearranging rooms is that the main focus of the Use-What-You-Have school of decorating. Its founder, Lauri Ward, aims to assist people to create beautiful spaces with the furniture they need rather than buying tons of latest items. you'll see several examples in their gallery of rooms transformed just by moving the prevailing furniture. Room after room goes from drab and cluttered, to elegant and comfy – and in most cases, not a stick of latest furniture has been added.
Here are a couple of samples of old pieces put to new uses:
A Bookcase From Dresser Drawers. Apartment Therapy shows how a Chicago couple converted an assortment of free secondhand dressers to a custom-built bookcase. They removed all the drawers from the dressers, painted them white, and mounted them on the wall. Their books are grouped on these “shelves” by color.
Shelving From a Dresser. If you’ve turned your dresser drawers into bookshelves, the remainder of the dresser can still be useful – you'll add wooden planks where the drawers wont to be to make open shelving. At HGTV, you'll see an old dresser converted to a colorful case for storing books and games.
A Bar From a Bookcase. House Beautiful shows an antique bookcase that a replacement York couple repurposed to function a bar. It still holds a couple of books on the highest shelf, but the lower three house liquor bottles and glassware.
A Sink Vanity From a Dresser. If you can’t find just the proper vanity cabinet for your bathroom sink, you'll make one from an old dresser. HGTV shows an example made up of an antique dresser to suit a standard bathroom.
Also Read: Get Fast Loan Cash instantly
2.Shop Secondhand
Places to buy secondhand include:
Reuse Centers. If there’s a reuse center in your area, like the Habitat for Humanity ReStore, it should be the primary place you buy your home projects. These stores sell a good sort of material left over from new construction, also as materials salvaged from old buildings. you'll find furniture, appliances, and much of other home-remodeling materials for a fraction of retail cost.
Thrift Stores. Thrift shops aren’t only for clothing. Many larger thrift stores, like Goodwill, also sell home furnishings and accessories. Even at smaller thrift stores, you'll often find small pieces for your home, like lamps, glassware, and artwork.
Updating the existing accessories of your home not always require taking payday loans.
Craigslist. Your local Craigslist group is another good place to seek out home furnishings on a budget. Check the “For Sale” section to ascertain listings for furniture, appliances, antiques, and “household.” This last category may be a catchall which will include anything from a lava lamp to a gas grill.
3. Use Paper
Wallpaper as a Backsplash. Many modern kitchen renovations feature a gorgeous tiled backsplash as a focus. Unfortunately, this sort of tile is quite pricey – between $5 and $20 per sq ft. However, you'll create a durable and ornamental backsplash on a budget with splash-proof vinyl wallpaper. For about $40, you'll buy a 30-square-foot roll of wallpaper – enough to hide the entire backsplash area in most kitchens.
Wallpaper as a Headboard. The focus of a bedroom is typically the headboard of the bed. If your bed doesn’t have one, you'll add one on to the wall. Just cut a bit of wallpaper to the proper size and hang it behind the bed, and you've got an ornamental headboard that takes up no room in the least. Updating the existing accessories of your home not always require taking payday loans.

4. Add Woodwork
Picture Rails. an image rail is about above a chair rail – usually about on A level with the tops of the windows within the room. It’s called an image rail because it is often used for hanging pictures without putting nail holes within the wall. Instead, you attach a dangling wire to every side of the image and fasten the opposite end to a hook that hangs over the rail.
Wainscoting. Wainscoting is paneling that runs around the room about halfway up the wall. the foremost common type is beadboard – narrow panels with thin grooves running down their length. Other types include horizontal planks, frames built out from the wall, and board-and-batten molding, which are evenly spaced vertical planks with one long horizontal plank at the highest and bottom. At Young House Love, the Petersik's show how they installed board-and-batten molding within the hallway of their first home for less than $57.
5.Create Cheap Artwork
Posters aren’t the sole belongings you can frame – you'll obtain and frame the subsequent as well:
The pages of a colorful calendar
Pictures cut out of a magazines
Completed jigsaw puzzles
Pieces of patterned fabric, wallpaper, or paper
Pictures, text, and styles printed out on your home printer
Small keepsakes of any kind mounted during a shadow box
People often assume that buying artworks taking big cash same day loan.
If you see a bit of art you wish during a store or during an article, you'll often come up with a cheap thanks to reproducing it reception . as an example, at Young House Love, the Petersik's explain how they recreated some vintage subway signs that were selling for $1,600 each online. they only printed out the station names on their printer, glued the pages to painted wooden boards, and gave them a distressed finish.

So when you’re done, you finish up with an area that’s truly your own. It reflects your work, your ideas, and your style far more than an area you simply spent money on. And that’s something you'll actually feel great about.
#cash advance#payday loans#fast loan cash#cash loans fast#cash loans online#pay day loans#payday loans online australia
1 note
·
View note
Text
How to Make Jirou’s Earjacks
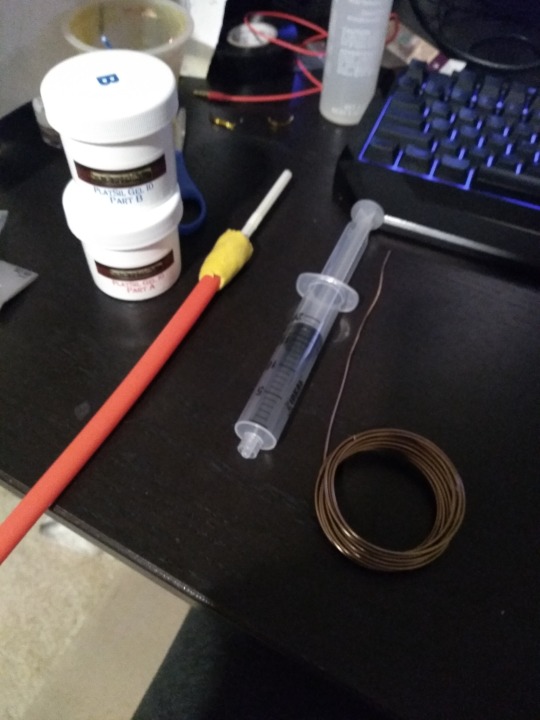
I figured I’d make a tutorial for those who want to make realistic earjacks that can be flimsy enough to twirl (1st image) and firm enough to bend for posing (2nd image). This was my first time experimenting with silicone and latex, so if you have any tips for me, let me know! Unfortunately I don’t have a ton of pictures because this stuff works quickly and I was in a time crunch for a convention, so i’ll tried to be detailed when needed (these images were a test run, the final result is on my Instagram at Sakine-cosplay).


Materials (with apprx cost):
1. Platsil Gel 10 silicone ($17) https://www.ebay.com/itm/M00511-150-MOREZMORE-Try-PlatSil-Gel-10-Pourable-Silicone-Rubber-Liquid-150-g/142987077241?hash=item214ab1a679:g:-FgAAOSw2JxboBja
2. Flesh colored pigment ($5) https://www.ebay.com/itm/Concentrated-Silicone-Pigment-Flesh-Peach-Platsil-Gel/372628136273?hash=item56c25e2151:g:G38AAOSwyedbIBG8 (If you’re skin tone is darker than this, I’d suggest searching for brown pigment, I couldn’t find a skin tone set to share, but just a little goes a long way so i’d suggest one of the two)
3. Mold release spray ($11) (I bought my Castin Craft spray at Hobby Lobby. Look for coupons online!)
4. Rubber straw ($4 for a set at Target)
5. Regular straw (free at many fast food restaurants)
6. Wire ($3 optional but necessary for posing) https://www.hobbylobby.com/Beads-Jewelry/Bead-Stringing-Chains/Beading-Wire/Aluminum-Wire---22-Gauge/p/JL85073 (I threw out the package, so i forget exactly which size it is. I want to guess size 20 or 22. Go to Hobby Lobby or your craft store and feel the difference. It should be easy to bend, but strong enough to hold its shape)
7. Amazing Mold Putty kit ($8-$20) You don’t need a lot, but they only sell one size for about $20. It’s good if you plan on using more in the future, however, I’m including a link I found that gives you 4oz for $8. If used wisely it should be enough. https://www.etsy.com/listing/594123659/make-your-own-silicone-mold-food-safe?gpla=1&gao=1&utm_campaign=shopping_us_ClayPaperScissors_sfc_osa&utm_medium=cpc&utm_source=google&utm_custom1=0&utm_content=16561831&gclid=CjwKCAjw67XpBRBqEiwA5RCocd4_HioObmZud-27R8H16b_djgqcI3uObN-7GqEf1Vq5AqGV_6hDexoC7REQAvD_BwE
8. Liquid Latex ($8 at Walmart)
9. Earring studs ($3-$5) (if your ears are pierced, it helps with support, if not, only use latex. WARNING: make sure the back of the studs are not super tight on the posts. Try sliding them back and forth and see if it glides. Loosen the backs manually if they are very tight by gently pulling it apart)
10. Earphone/Aux jacks (x2) ($1-$5 each) (I used two headphones jacks as long as they aren’t the L shape)
11. Wire cutters ($2-$5) or see if you can borrow them from someone
12. Tape and scissors (look at a dollar store, I used electrical tape for flexibility)
13. Small mixing cups (x3)
14. Popsicle sticks or something similar to stir
15. Sandwich baggies (2-3)
16. Very small disposable measuring cups (x2) (check dollar store)
17. Piece of carboard/plastic/newspaper to work on top of (it’s gonna get messy, a thicker material is best if you have it)
18. Q-tips (preferably the pointy ones they use on nails)
19. Vaseline (travel size should be cheap)
20. Hair dryer
(you can ignore the syringe in the picture. The amount of pressure it created inside didn’t allow me to use it with the material because of how thick it was, I replaced it with a baggy as a piping bag)
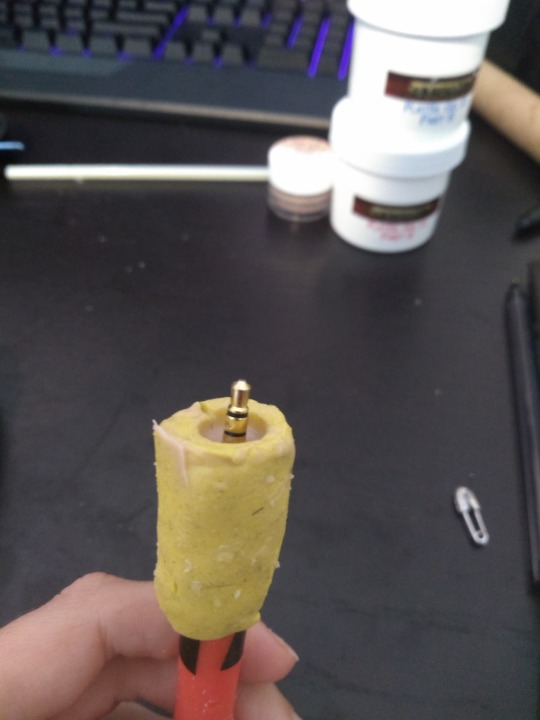
Step 1: Use the mold putty to create the earjack shape.
Since we are using a rubber straw (tube) to create the extended lobes, we need to enlarge the nub at the end (that yellow bit in the above image). If you look at your headphones/aux cord you’ll see the nub that that connects the wire to the plug is larger, so we need to make that so we can attach it.
-Take a small amount of your molding putty in a 1:1 ratio (equal amounts) and use your hands to mush them together and blend it until its a light yellow.
-Once evenly mixed, flatten it until its about 1.5″ (inches) wide (measure it out, you may under estimate how small an inch is) and then pull it until its long enough to fully wrap around the rubber tube. You don’t want it to be too thin, make sure it’s about 1/8″.
-Wrap it around the edge like shown in the above image. Smooth out the end that is covering the body, as if blending it into the tube (not where the tube ends, other side), that way its less likely any silicone will leak through later.
-Wait about 30 minutes or so until it hardens to a rubber like texture (try lightly pinching it towards the bottom and see if it tries to return to its shape)
- Once it’s done, you’re gonna have a bit of a difficult time wiggling the tube out of it. Be patient, just squish and pull it until its out (it should look similar to the one a couple images down).
Step 2: Align the wire to the center of the tube.
This part depends on how bendable you want them to be. For mine, I used wire that went down one fully for posing, and the other about a 3rd of the way so it could be adjusted by the ear if necessary and 2/3rds of it flimsy and flesh-like. You can also opt to not use wire at all, but you wont be able to pose it (although without wire will make it a lot easier to apply to your ears due to the lack of weight. Even for the flimsy one, I still use a little bit of wire just in case, but its not necessary). If you don’t want it to pose, skip step 2 and step 5.
-Using the wire cutters, either cut about 4″ of wire for a partial pose, or cut enough to match the same length of the tube for full pose.
-Find a small flat surface that you can tape one end of the tube to (small square of cardboard works well. You can probably use one of the containers your materials came in). Take the cut wire and tape it so it is standing vertically on the flat square as straight as possible (I’m sorry I dont have a picture of this). Try not to have the tape too far up the wire since it will be poured over with silicone. Try bunching layers of it at the bottom to reinforce it instead.

Step 3: Cut the tube
-Take the yellow jack nub you created and slide it over one end of the tube. Make sure there’s at least one full inch that hangs over the tube edge, that’s the part that will be filled in (so only 1/2″ should actually be covering the tube).
-With the yellow nub attached, take scissors and make a straight cut through the yellow nub and the tube all the way towards the end, but leave about 1/2″ at the end uncut. This will help make sure the tube closes evenly since it’s still intact (nubless cut tube shown above). Now you can easily take the nub off, but I suggest leaving it on whenever you can so the seams from the cut stay aligned.
Step 4: Apply mold release and liquid latex
This next process is what takes the most time to do.
-Following the instructions on the bottle, shake the mold release well and then spray a couple inches of the inside of the tube, covering the center and edges completely. I find it easier to do sections at a time and keep it held open under a fan until it dries since its hard to keep the entire tube spread open.
-Shake, spray, and let dry until you have the entire tube coated. Make sure to spray enough at the end that isn’t cut so the bottom doesnt stick.
-Repeat this at least one more time (3 times total to be safe). The silicone doesn’t let go of the rubber very easily and sometimes will prefer to rip off if there’s not enough mold release applied, so if you are patient enough, spray multiple layers along the center and edges of the inside.
- Once 2-3+ coatings are applied, make sure the inside seams and the top seam is also covered.
Unfortunately silicone doesn’t like to separate from the mold putty, even with the mold release, so we’re going to use a layer of liquid latex to cover the inside of the yellow nub. This is IMPORTANT because without a full coat, the putty will attach to the silicone and you will need to cut it off, which we don’t want. I usually went back and forth between adding layers of latex and spraying mold release depending on when they dried so they can be worked on at the same time.
- Take the nub off the tube. I recommend using the small mixer tool they include with the silicone to apply the liquid latex. Dip the tool into the latex and only add a thick stripe starting at one side (starting from one end of the seam to the other end on the inside of the tube). You don’t want to coat the entire thing in one go because its round and the latex will spread out and bunch in the center. Also, when applying, be quick about it since it starts to dry relatively quickly. If you’re smoothing it out as it dries, it can begin sticking to the spreader and mess up the coat. The latex on the spreader will dry, make sure to remove it before each coating.
-Once the first portion is dried, slowly make your way coating (and drying) until there’s an even coat all inside the nub. It doesnt need to be a thick layer as long as the entire surface is covered. If you add too much thickness if could dry unevenly and make it look lumpy, so try to keep it smooth.
-Apply a layer of latex to the top of the nub and along the seam (save the inside of the seam for last). Once the inside is done, the outside edges are done, then we can apply a coat to the seam area where the nub was actually cut. We save this for last because if the two seams touch (even when dry), they’ll want to stick, and we don’t want that yet. All of these areas are being coated because its going to get messy and its better to have everything covered so there’s no accidental sticking. The only spots we aren’t covering are the outside center and bottom of the nub since silicone shouldn’t reach there (although its still good to add a little to the bottom just in case)
-Once the seams have their layers dry, make sure to keep them spread apart, if they touch you may need to peel that portion off and redo it.
-Add a spritz of the demold spray to the inside.
Step 5: Attach wire and tube
- Take the uncut end of the tube and place it over the standing wire and feed it through until the end meets the taped stand (you can tape the tube closed if it makes it easier). Now the wire is inside the tube and the bottom should be as close to the cardboard as possible.
-Look through the top of the tube down the tub to see where the wire is. You can gently move the tube around until you see the wire is in the center (if the wire isn’t straight enough, bend it until it is), if the wire is leaning against the side, then it will puncture through the silicone since it wont be coated properly.
-Once you think its centered enough, tape the tube to the flat surface the wire is attached to. Make sure the bottom of the tube is as flat as it can be so silicone doesnt seep through. Tape around it thoroughly.
-With your tube sprayed down and the nub coated, wrap the nub back over the tube (1/2″ covering the tube, 1″ hanging over) and align the seams, BUT DONT press the seams together yet, keep the nub open. You can tape the bottom of the nub to the straw so it doesnt move around.
Step 6: Mold your ear
-Using the mold putty again, make another small 1:1 mixture. Depending how much you have left from the nub, use about half each to mix together.
-Once blended- flatten it a bit, choose an ear, and wrap it around the earlobe (If you are not doing earrings, this step is optional). You dont need to cover a lot of the ear, just make sure to get it around the base of the ear, and the front and back of the lobe. If you make it too tall/big, we can always cut it down a bit.
-Hold/press it to your earlobe for at least 30 minutes while it sets. The finished product are the yellow pieces in the image below (one for each ear, make sure to label them with a marker RF-Right Front and LF-Left Front for later)
- These are also made out of the putty so they also need coats of latex within the entire mold (thats why they look shiny).

Step 6: Prepare your station
Now that the tube itself is prepped, we need to get the rest of the station prepped because once you mix the silicone it begins to dry quickly, so we don’t want any mistakes.
-Make several precut tape stripes (10 to be safe) and have them ready nearby (about the length of your thumb)
-Lay out your newspaper/cardboard for your work area
-Take the cords/earbuds you’re using for the plug tips and cut it as close to the tip as possible (most likely need to cut where the nub starts, so you have a nub and a tip).
-Cut just over an inch off from the regular straw and set the larger amount aside
- Have your baggy, regular straw (inch), mixing cups (3), measuring cups (2), and mixing materials nearby.
- Mark each of your mixing cups/measuring cups as A, B, and C (no C for measuring cups). Do the same if you’re using Popsicle sticks, otherwise make sure you keep the mixing items separated).
-Lay down the tube so the open seam is facing upwards. You will fill it like this and tape it closed as you work.
Step 7: Mix the Silicone/pigment
We don’t have a lot of silicone, so we need to be careful with how much we use at a time. I actually had to buy a second batch since i was new to it.
-Using your measuring cups and separate mixing sticks, pour about a third of the corresponding container into it (Part A to A cup, Part B to B cup.
-Open your pigment container. A little goes a long way, so start with just a small dot at a time and mix it into the Part A cup. Your ears tend to be darker than you might think since it has red mixed in it (feel free to buy some red pigment flecks if you want, but i think its unnecessary for this since the silicone wont blend well anyway when applying it)
-Once you think you have your skin tone, add a bit more until its a tone darker. Mixing it with Part B will lighten it up again. It doesnt have to be a perfect match, but make sure its not too light or you’ll see a big difference (compare my skin to the test i made in the first image).
-Add half of A and half of B into the corresponding mixing cups. Now we have 1/2 in the mixing cups and 1/2 in the measuring cups. Since it tends to dry quickly, and you dont want to work too fast, we’ll use half of the mixture at a time. Once you finish the first half, you can quickly mix up the second premade half and finish it. But make sure to keep some off to the side, we’re filling the tube and nub separately. It will be the same color so there should be no blending issues.
-It can be done by yourself, but if you have an extra pair of hands, I highly recommend getting help.
Step 8: Mixing and filling the tube
Before taking these steps, I highly suggest reading through them first to get familiar with what you will need to do so you don’t waste time.
-Pour the Parts A and B from the mixing cups into the C mixing cup and use the C mixing stick to stir it.
-Stir quickly and thoroughly to make sure its blended. If you still think you need a bit more pigment, carefully add a bit more, but try not to do this so we keep both mixtures the same tone. It’s harder to do that when you add extra color separately.
-Once it’s mixed, carefully take the mixing cup and pour it into a sandwich baggy as close to the corner as possible using your mixing stick. Make sure to push all the mix to the corner so it’s tightly packed and can be used as a piping bag.
-Cut a very small hole at the corner of the baggy (small enough to fit within a regular straw opening. Which is very small. This way the mix won’t overflow out of it from a large opening). If you have a friend available, have them hold open the tube and be in charge of closing it as you pipe in the silicone. If it is only you, use one hand to hold open the tube while the other pipes it in. It will be messy.
-Starting from the bottom of the tube (taped), you’re going to open the nearest seam and insert the piping bag into it as far as you can and squeeze the mixture towards the end until it fills up. Basically squeeze until you see it coming towards the seam.
-Continue slow piping underneath the wire until it begins to fill to the top.
-As you pipe, let the seams close as evenly as they can and take a piece of tape and throw it over the seam to keep it in place. You can go over it with more tape after you finish. As you close the seam along the way, it will seep through the seam. That’s fine, you’d rather have too much mix instead of air bubbles from not being filled enough.Just try to smooth out the top of the seam from the mix so its only a thin layer of silicone instead of a gob. the tape will stick better and you can try to push the mix into the tube.
- As you pipe and tape up the tube, keep the wire in mind and make sure you’re piping under it so it’s not touching the tube itself.
-It’s likely you’ll run out midway. Now you can take an equal portion of A and B of the the premade mixture into cup C (Don’t use all of it, just enough to fill the tube, not the nub.). While that mixes, if you have a friend, have them fix up the tape and make sure the seams are smooth.
-Once the next batch it mixed, add it to the piping bag. If you noticed the old mix beginning to harden already, use the other corner of the baggy to pipe. Remember, cut a very small hole.
-Only fill up to the other end of the tube where the nub starts. Once you get to that point, you can tape that up as well as the press the nub seams together (make sure it’s pressed evenly for a seamless seam). Now that the tube is full of silicone mix, feel free to tape the nub together and add more tape to secure the seam.
-Once everything is taped up, let the tube stand vertically and lean it against something where it won’t fall over (I had a cardboard tube that fit over it to keep it straight while it leaned lightly against my monitor. Try to have items surround it to keep it standing straight).
- After about a half hour, it should be firm enough that liquid wont spill out (check any leftovers in the C cup and see how firm it is, it should be similiar), so you can now mix the remaining mixture and add it to a new piping bag (or a clean corner).
-Cut a very small hole. This time you will use the inch long straw to help pipe the mix through the nub from the top.
- With the hole cut, place the straw into the nub (make sure there's still enough sticking out so you can hold it.) and place the baggy tip (with its tiny hole) over the top of it. You will be filling it vertically from the nub opening.
-Pipe the mix into the straw and slowly bring it up as it fills. By using the straw, it ensures no air bubbles from where you left off. If you run low of mix in the bag, remember to squeeze out the mix trapped in the straw.
- DO NOT fill it to the top of the nub, stop short.
Step 9: Insert the jack tip
- Once it is 85% full, while still holding it vertically, take the jack tip you cut off earlier and slowly insert it into the middle of the mix from the top until only the metal it showing (image above). If you get some mix on the metal, you can peel it off, but try to keep it clean.
- Hold the jack tip steady so as much metal is showing while hiding the nub attached to it. This requires patience, you cannot let it move until it hardens after a few minutes. If you let it go, it will sink down. If you tilt it to the side to make it straight, make sure to check all the sides. It’s best to hold it by the tip if possible to ensure it stays int he middle and doesnt move.
Step 10: Opening the tube and touch ups
After about a half hour, you can check the top of the nub to check the firmness (remember, check the C cup to check the firmness without touching the actual pieve first).
-Once it is done setting, you can remove all the tape.
-Carefully and slowly begin to pry open the nub seam. You may need to cut it a little if its resistant.
- As you open the nub, the latex should peel off with the silicone. peel the latex off once detached.
-Very delicately, wedge open the seam for the tube. Depending on how even and how much it was sprayed will decide how easily it comes off. sometimes there are tough spots that want to stick, you need to slowly pull at it and use your finger to jab at the stuck silicone to nudge it off. If you pull too much it may rip, so pull and nudge. Take your time if needed, it will be a waste if you rush this part.
-As you gently make your way down, you can undo the tape securing the tube to the flat surface to free it along with the wire.
-Once it’s all freed, snip off the end to make it flat (use wire cutters to snip excess wire).
-As long as everything came out okay, you can use scissors to cut the seam excess. Boom, main body is done
(If you have bubbles, tears, or other issues, it’s possible to make a small of amount of mix, recoat the tube in spray, pipe a thin line down the center, and use that as a layer to cover up imperfections, but you need to make sure the skin tone matches up, so make sure you have references to match it. This isn’t recommended because it makes the earjacks thicker and only complicates it more, but when trying to cover imperfections in other ways, it didnt turn out smooth and it came out shiny which was noticeable. Use only if needed.)
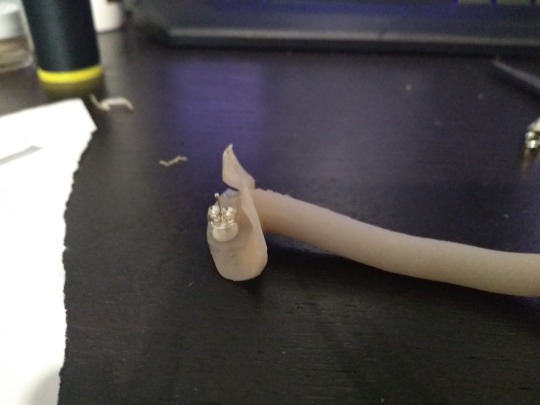
Step 11: Add the earlobes
-Now that the main body is done, use the same process for the ear molds. Make sure they are properly coated with latex, spray the demold in it.
-Make small batches for the ear and apply thin layers, one side at a time. If its too thick, it will build up and make it thick along the bottom instead.
-Continue on the front, back, and bottom of the ear until if has a decent thickness to it from several layers.
-Once done setting, remove it along with the latex.
-Take the main body and the lobe, and see how they should line up in the mirror for where you should attach them.
- Cut out a slit on the top of the end of the body where the lobe will be attached. This way it will sit in a small slit comfortably instead of on top of it.
- Mix more silicone to use as glue. You shouldn’t need that much. Add some in the sit before placing the lobe there, and around both of them to help blend the lobe of body together. Once done, it will look like the image above (minus the earring).
Step 12: Add the earring studs
-Go back to the mirror and see approximately where the stud should go on the inside of the lobe where it fits in your ear. If you don’t have earrings, skip this step.
WARNING: make sure the back of the studs are not super tight on the posts. Try sliding them back and forth and see if it glides. Loosen the backs manually if they are very tight by gently pulling it apart. It will be impossible to take them off if they are super tight, please check and adjust them before testing them out. Once they slide easily on the posts with minimal friction, then you can try them on and go from there.
-Make another very small batch of silicone and place the stud where it belongs on the inside of the front of the lobe. Use the silicone as glue to attach the stud all around it (make sure the stud is attached to the front so the pole can go through your ear and to the back). It should look like the image above when dried.
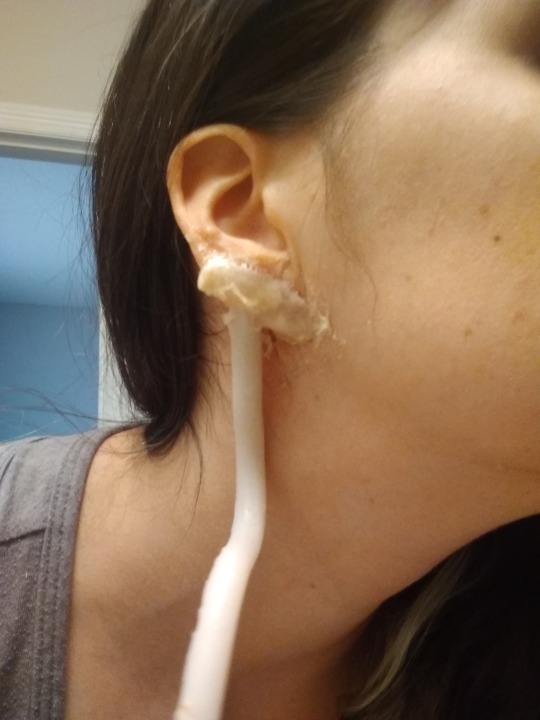
Step 13: Attaching the earjack to your ear
I know it doesnt look pretty, but your wig should cover it anyway. This also takes a long time (about an hour each ear from my experience)
-Pull your hair up away from your ears (wig cap is best)
-Generously apply Vaseline all over your ear (front, back, sides and bottom) and an inch or so around it by your jaw and hair line. This is the only way you will get the latex to come off without absolutely ripping all your facial hair off.
-Align the correct earjack to the correct ear.
-With a Q-tip (preferably the pointed ones they use on nails), take a bit of latex and apply it inside the edges of the lobe on both sides of the earring stud. Make sure not to get any on the earring itself, only the edges of the lobe
-With the wet latex, insert your ear to fit within the piece properly and push the earring through and secure it with the backing.
-With one hand, hold the lobe in place so the edges are as close to your ear as possible for the best seamless fit. Let it dry for ten or so minutes.
-Once the inside dried a little bit, take the Q-tip and apply a layer of latex around the seam on the lobe and on your ear. MAKE SURE to not add latex to the earring! otherwise you’re gluing it to yourself. You want the latex and your earring always separate.
-Let it dry using the hairdryer on cool. It’s best to wait until its completely dry before adding a new layer.
-Keep adding thin layers and letting them dry. Add latex along the seams in the front, along the bottom, and along the top where the lobe is suppose to blend in. You can add a little bit to the back as long as it does not touch your earring, you might want help with this part (If you’re not wearing earrings, just slather the latex on everywhere, but still in layers).
After layers upon layers, it’s done! Just repeat the process for the second one. Be careful though, latex will fall off after awhile if it moves around too much. The more layers and the more ear it’s attached to, the better, but I still had issues when using them. It’s not comfortable when they start coming off and hard to fix on your own if you’re at a con. When taking it off, just start peeling off the latex and take off the earring. It’s still probably gonna hurt a bit, but not nearly as much if you didn’t use the Vaseline. It’s not gonna be blend in very nicely, and make up didn’t work well for me, but rely on the wig to cover that and try to take front facing pictures.
For the flimsy ones, it’s a little easier. Full wired ears take more latex and more time to dry because of the added weight. (then again, the one i made was thicker overall so that probably didn’t help). For the wired ones, I suggest making a pose where you can walk around and have the wire rest against your collarbone. I kept the wire straight down until it was resting against me, then curved it up and forward like a U shape, then twisted the jack-tip from there. The U is what sits on your collerbone though which helps support it’s weight. To see some examples (if I posted them) you can see me finished cosplay at Sakine-cosplay on Instagram.
It’s not perfect, but it served me well for the con (as long as you have time in the morning). If you have any suggestions on how to improve it, let me know! If you have any problems or questions feel free to ask. And if you make some or any other silicone related projects you may have used this for, I’d love to see how they turn out!
#cosplay#props#makeup#costume#jirou kyouka#tutorial#my hero academia#boku no hero academia#earphone jack#mha#bnha#how to#my art#convention
11 notes
·
View notes
Photo


Storge Character Introductions - Meet Acheran!
In case you were wondering what all those cryptic pictures and captions have been the past couple days... Each one corresponds to one of the 5 main characters in my current YA Fantasy WIP - Storge! This is the first of a series of character introductions/mood boards!
Age: 20
Gender: He/his
Race: Avian - one of the bird-people that live in the canyon cliff city near Maaren. They have 4 wings, one large set at their shoulders and another smaller set at their lower backs and are usually a bit taller than the average human.
Occupation: Acheran is a charm maker - though he can’t perform magic, he’s excellent at sensing it in his surroundings and channeling it into the materials he works with in order to create his charms, which operate essentially like magical batteries. His wares are especially popular among the Atilan upper-class (as they’re the only ones allowed to have access to magic).
Physical Appearance: He has brown-red plumage with brighter orange and blue colors around his face and gives the general appearance of a red-tailed hawk. He wears loose trousers, as well as a vest and belt that have pockets and loops to hold his equipment, giving him the appearance of a walking trade-shop. He’s generally a bit disheveled and absent-minded about his appearance, much to his sister Chara’s chagrin.
Relationships: He doesn’t have many close friends because he’s painfully awkward and straightforward in most social situations, but he’s very close with Chara and eventually, the Laine siblings break through his shell. He’s not anti-social or socially anxious, but a serial introvert nonetheless.
Likes: Puns, being helpful, building and inventing new magical trinkets that will most likely go unused after he’s done with them.
Dislikes: Cleaning, crowds, and willful ignorance
Mannerisms and Personality: Acheran is primarily an artist, and lives for his work though he approaches it in a very scientific manner. He’s extremely curious about the natural world and practical applications of the magic he works with and loves solving problems. When he gets going on a project, he won’t rest until he’s figured it out or someone forcibly stops him and often forgets to eat and sleep as a result of this. Likewise, if something bores him, he’ll avoid it at all costs. He’s not chatty, preferring to talk to himself or think instead, though he’s often pulled out of his comfort zone. He’s also rather clumsy and disorganized, though he swears he knows *exactly* where everything is. Above all else, Acheran is a pacifist. He hates conflict and confrontation and prefers avoidance or a diplomatic route if at all possible.
A metal pole flipped out of Acheran’s grasp and smacked him in the face, remaining completely straight despite his best efforts to bend it with the tools he had built. Acheran unleashed a string of swears. “You. Stupid. Stick. If you don’t behave, I’m going to turn you into a knife handle. How would you like that now, huh? Idiot stick wants to hurt people. The dumb thing doesn’t want to be something useful. Nooooooo. It’s too self-important for that.”
Image Credits!
Character portrait - All my character portraits were done by the amazing Annabel @midnightblueart._ on Instagram! My best friend commissioned all 5 portraits from her and she did an absolutely incredible job! The Avian siblings in particular were really tricky and she was so patient and positive through the whole process. 30/4 recommend checking her out - she’s a fantastic artist and was really fun to work with!
Other images in collage - all of these are stock photos from the website upslash.com. They’re all free, creative domain pictures that you can download for whatever reason. Also super recommend checking that out and all credit goes to the respective posters.
More info about my WIP can be found on my blog’s page and by following the tags #storge and #storgewip. Ask if you want to be added to a taglist! More character intros are coming soon!
#storge#storgewip#Acheran#fantasy wip#writeblr#small writeblr#character introduction#character art#character aesthetics#character bio
5 notes
·
View notes
Text
Steven Sinofsky at CES
*Here we have industry veteran Steven Sinofsky visiting CES in Las Vegas for 2020, and his extensive, much-documented, multi-decade point of view is the best CES reportage that I’ve seen this year. The business about the "fragility" of the smart home is well-observed.
https://medium.learningbyshipping.com/ces2020-primordial-soup-of-innovation-208571f15c94
CES is a show where invention meets innovation — inventions are the ingredients of products, not necessarily products. An innovation is the result of an invention meeting the best execution of product, price, place, and promotion, usually taking many iterations from many companies.
(…)
The remainder of this report looks at 12 different technologies/categories and what I saw.
(…)
Folding Screens: It folds, so now what?
8K TV Is Here: That’s a lot of pixels
5G and WFi 6: So many frequencies!
Home Automation: So many nice touches, but…
Home Security: Consolidating
Health and Monitoring: Watch out!
Mobile Phones: Two screens
Transportation: So many choices
Smart Everything: There’s an app for that
Pro Photography/Video: Hybrid!
PCs: Pendulum swings back to power
Energy: Batteries!
(...)
Going all the way back to universal remote controls that could do magical things like open window blinds through X15 and now ZigBee and others, home automation has been the next big thing at CES for, well, forever. The journey continues.
Every once in a while something new is introduced that will be the technology that brings everything together and allows us to cross into that magical world of the Jetsons. This past two years have all been about Alexa (and to an arguably lesser degree Hey Google). This year the voice efforts were entirely ubiquitous so as to be uninteresting, but the problems have not been solved. If anything the problems continue to compound because nearly every device is getting or is offered with its own microphone and voice controller.
I feel like this year reinforced for me that the journey needs a break. While for techies and people with the time to futz, things can be made to work, the fragility is overwhelming. Unlike say a programmable remote or light switch that doesn’t work, a garage door opener or a sprinkler system that fails becomes a bigger problem requiring immediate attention. Clothes that don’t get cleaned or ovens that don’t turn on can be more than annoying.
This section was supposed to be a look at the marvels of new scenarios — there were plenty of neat new home devices, like entry doors with face recognition built into the door (how’s that for commitment to be around in 30 years?) or a wardrobe screen/mirror that knows what you have in the closet, or a plethora of remote controlled washing appliances. These are all nice and many solve problems people have today, but with a very high cost in a relatively short time.
The problem is homes are designed around a 10–20 year cycle, and tech does not yet work that way. My feeling, especially as I run a home like a laboratory for all this stuff, is that what is really holding everyone back is the focus on retrofitting. We have 75 years of modern homebuilding (thinking of the GE Carousel of Progress!) with codes, replacement parts, and more. Tech isn’t set up like this. Even modern appliances are hugely problematic (why is it that ovens randomly differ by like 1/8” between model years making replacement difficult, or why does when a washing machine break those parts never exist). Add in a tech factor and it gets much worse in much less time.
Some of us will pick one scenario and make it work — doorbells is the breakthrough one (see below). I have a garage door and connected up to Amazon Key and it is amazing. Except it only works half the time when I summon it through HomeKit.
I wanted to pick one example that seems so simple yet illustrates this point — the ubiquitous decora socket. This socket has been a marvel of safety and utility for generations. For a while home automation was suggesting to replace these with CAT5 wiring to lights, and then those homes are left hanging trying to figure out what to do for a remodel that doesn’t involve ripping out all the walls. At least line voltage always works. With USB seemingly taking over powering most everything imaginable (maybe DC and Edison were right!) many of us now have USB in these decora switches. They are easy but a pain to install, probably don’t match the other switches precisely.
Then along comes USB-C. Time to update those. And if you’re not an electrician or live in a rental good luck.
Then in a year, along comes USB PD so even those need updating.
These aren’t even for automation, just to connect to stuff.
I think the break we need to take is that someone, probably in Korea, is going to start commercial construction from a blank slate (like a forward-looking Carousel of Progress) and rethink how home or more likely offices should be built for automation. It could be that using what’s available today can work, but that will still be a big commitment.
On the lookout for devices that don’t require home construction, this year featured endless Roombas all extolling how smart they were at navigating your home.
(…)
Home Security, perhaps out of a modern but sad need, is an area that in just a couple of years has progressed marvelously. What started off as systems with door and motion detectors and a home base have blossomed into systems that ADT would not have been able to create for 100X the cost. Truly impressive.
CES is a perfect showcase of the integration or bundling/consolidation in the space. There was one startup that made the first smart door lock, taking advantage of Bluetooth, wifi, and the cloud. Many thought this would disrupt the likes of Yale, Schlage, and more (who never even came to CES until locks added radios.) Instead those companies through organic and M&A are leaders in locks now (a great story). Even relatively complex tech like biometrics is making its way into locks. The vulnerability of PINs is driving wave of locks supporting biometrics from all the makers (what is old is new).
But now locks are part of a bigger picture and consumers want integration — apps for locks, alarms, garage, gates, smoke/fire, and more are a ridiculous combination. That is like trying to get a zigbee solution to work or worse to make “automation scenes” work without a professional installer.
The product lines that have emerged, from SimpliSafe to ADT (yes them) and Amazon Ring (and more) are incredible. A huge part of this has been replacing complex integration at the edge over fragile radios with WiFi (when the power profile allows for it).
A great (but hardly only) example of this is the Ring product line, called Ring X. Inventing to integrate into existing infrastructure (24V electronic bells) the product has expanded to a “professional” level that requires (and leverages) homes to be more wired with CAT6. Doing so gets a doorbell, cameras, gate control, and lighting, and more. But this is a remodel. Will this work still in years? It could be because DC current is pretty predictable and likely that connectivity will be wireless down the road. Those choices seem like great bets. If you use more high end WiFi you’ve also experienced the joys of power over ethernet (Ubnt, or Eeero have kits).
Some parts of home security are more acute, like receiving packages. Every year there are new attempts at creating products to enable package delivery to unattended homes. This one made a showing this year and though it requires line voltage provides a viable alternative.
Across all the security systems, cameras themselves are starting to build recognition into the feature set. Many feel this is driven by the China market where these cameras and recognition are ubiquitous (and many devices are made.) It remains to be seen how this will play out globally. Huawei had this demonstration going on which the irony of a US showing of this by them was probably lost in translation. This is the photo above with me in it....
1 note
·
View note
Text
What-If The Rock Never Came Back?
The WWE after the unfortunate retirement of superstar, and champion Edge, was a baron wasteland shallow on talent. Arguably, a worse roster than the first couple of years post-Hulk Hogan in the mid-1990’s. Where at least then creative was willing to take risks and search for new guys to be that top Babyface, WWE didn’t feel the need to do that and instead relied heavily on John Cena and Randy Orton, and called in favors whenever they felt it necessary.
Chris Jericho, Kevin Nash, Triple H, The Undertaker dragged out of retirement with mixed results. Though Jericho was successful, the company pushed their chips in the middle of the table for the pasty Irishmen Shaemus. A wrestler who makes Roman Reigns look awesome in comparison. To put it bluntly, Shaemus was disgusting.
This era seemed all too hapless. Alberto Del Rio, a decent heel, talented wrestler won the Royal Rumble and faced the champion Edge in the third match on the WrestleMania card. Before 2006, winning the rumble meant you would main event WrestleMania. But, like all things, corporate meddling ruins a perfectly good thing for no good reason. If Vince McMahon doesn’t believe Del Rio to be main event material, then put somebody else over at the event. Nobody overthinks and under-thinks likes the WWE.
If there’s one thing WWE did right it was how they told the three-year story of John Cena and his feud with returning superstar The Rock. Starting off at WrestleMania 27, Cena gunning for The Miz’ WWE Championship. Though creative did allow Rock to bury both Miz and Cena, it is an otherwise small blemish on a well told, large scale story.
Miz deserves credit for getting himself over. His name is stupid. He has a very punchable face. His brash, egotistical demeanor built him up to status of champion. His fame from the Reality TV show MTV’s The Real World: Back to New York shotgunned him to stardom. He started appearing on Jimmy Fallon’s show and for the first time in a while WWE had an organic star. Cashing in his Money in the Bank briefcase on Randy Orton on a November 22nd episode of Raw after Orton defended against Wade Barrett.
Heading into ‘Mania, Miz was 133 days into what’ll end up as a 160 day title reign. Rock overseeing the festivities foreshadowed the larger tale in its beginning stages. The Miz retained twice that night. Once on a count-out, the other when Rock intervened and Rock Bottomed Cena from behind. The Miz left still the champion. But with Rock standing above his lifeless body after taking a devastating Spinebuster, followed by a People’s Elbow, the Miz’ push was effectively over as we transitioned wholly into the Rock-Cena feud.
Outside of The Miz, WWE didn’t really bulldoze anyone while building to their “Once in a lifetime” fantasy match. In fact, someone else rose to prominence during all of this. C.M Punk. The C.M stands for many things. Chick Magnet. Chicago Made. Punk dallied around in the second tier of WWE contending for the World Heavyweight Championship strap. Gaining wins over the likes of The Undertaker, Jeff and Matt Hardy, and Batista.
His intel gimmick was promoting his “Straight Edge” persona. Normally an Atheist, Punk portrayed himself as a cult leader absolving troublemakers of their sins. Wrapped around his fists is tape with big X’s on each hand. This is what club bouncers would do to underaged club attendants to notify bartenders not to drink. On his knuckles “Drug” and “Free” are tattooed. Punk lived this gimmick and cranked it up to 11.
Eventually, Punk’s gimmick ran out of steam and he was forced to go back to the drawing board. With his contract set to expire after 2011’s Money in the Bank, Punk was set to square up against champion Cena. In effort to juxtapose himself with the usually straight laced Cena, Punk decided to incorporate his real-life frustrations with WWE’s creative into a promo one night on Raw. Promising to take the belt with him out of the WWE showing no intentions of re-signing. Punk mentioned that Hulk Hogan, Rock, and Cena was good for was kissing Vince McMahon’s ass. He derided the fans for their superficiality. Harangued the McMahon Family for their stupidity. Punk wasn’t just an average run of the mill heel to be beaten. Punk portrayed himself as someone with a purpose.
How this was all packaged felt so unnatural fans actually believed Punk was leaving the WWE whether he won or lost. That even if he did win, he’d just leave as champion. With special guest referee Triple H watching, Punk defeated Cena (though Cena clearly had his foot on the ropes rendering the pin nullified, HHH didn’t see it) and absconded with the belt never to return...

He’d be back in eight days.
The new champion was fan favorite Rey Mysterio. A 5-foot, 6 inch Mexican luchador. His only main title was his brief reign as World Heavyweight Champion years ago. Just as fast Rey rose to the top he found himself in the mid card. Still, after defeating a lukewarm The Miz in a meh match the crowd become unglued. Their masked hero was given the push he deserved. Though it wasn’t on the grandest of stages it didn’t matter.
In less than an hour Cena would take the belt back from Rey.
One word: Bastards.
Why act like you’re giving the fans something they desperately wanted only to take it away so fast? Having Rey as champion meant nothing. He didn’t even hold it for a week.
Anyways, Cena is champion only to again fall to Punk at a match for Summerslam. Within minutes, Money in the Bank winner Del Rio would cash-in his briefcase and win the belt for himself. Del Rio was in the tournament Mysterio won for Punk’s vacant belt. He lost to Kofi Kingston in the first round. I understand why you can’t have a heel vs heel match for the championship, but of all the people to get one over on the conniving Punk why does it have to be the uninspiring Del Rio?
This was basically done to get Cena out of the title picture so he could let Rock go over at ‘Mania. Why does Rock need to win at ‘Mania you ask? Because we need a reason to do this again the next year. Why do we need to this same match again next year? Because fuck you.
Punk entered WrestleMania the champ, winning the strap back from Del Rio at Survivor Series. Punk would go on to hold the belt for 442. A returning Chris Jericho came in second in the Royal Rumble and earned himself a title shot, losing by submission. This was the highest profile win for Punk during his long reign.
Punk’s title reign came to an end at the hands of The Rock at the Royal Rumble to set up a rematch with Cena. While the first Cena-Rock match did gangbusters at the box office was well received critically, the second incarnation fell flat. We can’t really blame WWE for chasing the cash. That’s their prerogative as a corporation.
But say we lived in a perfect world? What-if Rock simply never came back?
Well, WrestleMania 27 goes down as perhaps the biggest disaster in the companies history since WrestleMania 9. That card was severely lacking in star power which is exactly why The Rock was needed to host. The top heel going into the event was a mysterious G.M who only made their presence known via email from a laptop next to the announce table.
WrestleMania 28, Cena likely goes into the PPV the challenger to face the champion Punk. Royal Rumble winner Shaemus (yuck) sadly beats World Heavyweight Champion Daniel Bryan in 18 seconds.
The biggest loser is Jericho. Given absolutely nothing to do, despite being incredibly talented and superior to Shaemus. In our timeline, Jericho earned his title shot by winning a Ten Man Battle Royal on Raw. That definitely doesn’t happen. WWE was pushing Shaemus HARD. In my perfect world, Jericho and Bryan have a show higher up on the card with the young heel Bryan going over.
But, as we’ve previously established. The WWE run by a bunch of talentless, thoughtless bastards who wage constant war with the people they are supposed to try and get money from.
For my preferred scenario, Bryan going over even with the secondary belt probably placates his rapid fans for at least a few more years.
Cena likely goes over Punk clean as a whistle after losing (via shenanigans) twice before.
From simply making The Rock disappear we’ve cost the WWE millions, elevated Bryan, and destroyed Punk’s illustrious lengthy title reign.
The second year of this scenario, instead of a “Worst Year of Cena’s Life” shtick, perhaps we’re treated to his best year. He main events every PPV, successfully defends his title beating back various heels. Cena’s title reign is unspectacular outside of the walls of WWE.

Okay, on second thought... Punk retains. He retains versus Cena, Jericho, Kane, Ryback, Orton, simply runs through the roster. At the Royal Rumble with no Rock to push Punk down a peg he retains heading into WrestleMania 29. The only hurdle he hasn’t overcome is The Undertaker and his WrestleMania Streak of 20-0.
Does Punk end The Streak? Should he? Oh, hell no! Punk probably had one foot out the door by then for a multitude of understandable reasons. Regardless, the money in this universe is pitting Streak vs Streak.
Our good friend Daniel, his reign eventually ends, but he isn’t shuffled so far down the card so his epic, long-standing push culminating in his crowning achievement in WrestleMania 30 is pushed back a year or two. Maybe in WrestleMania 31 it’s Bryan in Seth Rollins place cashing in his MITB briefcase mid-match to steal the World Heavyweight Championship from under Brock Lesnar and Roman Reign’s noses.

0 notes
Text
affiloblueprint
What Is It?
It is a membership site devised to help you understand affiliate marketing.
Short Review
An honest site, good training, mostly legit info, and they have way more value than most internet marketing products. Plus, their basic membership does not cost anything!
However, when you begin buying their packages, it gets pretty expensive, especially when you buy everything they've to offer. When you conider that the community is not a whole lot active, and support is a very small amount in comparison with alternatives.
Before making a decision, have a look inside their affiliates area and then judge if extremely effective best bet you have for you.
==> Enroll For Your FREE Affilorama Account!
Before You Buy
The very first thing we want to know is how Affilorama is actually structured. It's passed through numerous changes lately, and above current reviews don't reflect these changes.
The website is set using these a rather confusing way, dividing features into different packages, forcing it a little obscure the one that we would like to buy to get going making money. It's possible to try to break it down for you therefore's a little easier to understand.
An everyday (free) membership Affilorama should get you access some training videos, a members forum, and also their blog. These items are updated frequently, and there's a ton of information there. I wrote my original directory for Affilorama in 2014, but as of 2017, it's still active with questions, after, as updates. They are building for your long haul!
affilorama updated post
Update 2018
There was once four packages, raise paid, recurring membership fee. Now there is just a without charge organization, plus two other items you can buy. Is without question basically the "DIY" version, that is definitely $197. This is simply not DIY since you acquire the help of the running and community, but it's not "in serious trouble you", as while using the upgraded versions which is certainly an $997.
affilorama packages available
Affilorama has updated their package offers since I wrote my original review
Affilorama Premium is $67/month and is the same thing that I consider to be the "main feature" with this company. There'may be a 7 day trial for $1. Free membership is available nowadays
Affilotheme the help that people seek a premium WordPress theme used to be intended for $97, but these days is usually to often be available through the Affiloblueprint package.
AffiloBlueprint is $197 for lifetime access that is definitely the step-by-step system for newbies.
Affilojetpack are pre-made niche websites with content included, email swipes, likewise ready-made material. It's $997.
AffiloTools is a one-stop shop to track issues like competitors, rankings, keywords, and a number of other things. It's included along with your free membership.
Pricing Updates 2018
Ok, so what I've figured out is that there is three prices of membership. You join the FREE membership, that steadily the ability to access some features, and is often free. Then there may be the PREMIUM membership, with which has a $1 trial, and it's $67/month after that.
affilorama membership levels and pricing
What I Liked
Though I exist of criticisms of this particular program which I'll discuss below, overall, I believe this can be a legit program. Mark Ling really lays everything out before you join, the fact is that sets him other than 99% for all your serious "gurus" out there. Ling has a superb reputation with the exceptional affilo-stuff has been around since 2005.
Most products in this industry don't last within a year.
The site is member focused, includes a somewhat-active forum, and is constantly changing as time goes on, instead of a static PDF or video series that can stale with time.
I keep in mind the main thing I liked about Affilorama was the way in which lots of the videos were set up, with bulleted overviews, prime quality voice overs, and scripts you may download for each video. I do know loads of they on limited internet connections and video training isn't always essentially the most convenient.
Free Membership
There's greatly present on the free membership. I joined a very long time ago and am still able to use the forum, all the work outs modules, the official blog, and a large array of other things including hour long webinar sessions.
Navigate the lessons dependant upon topic
affilorama website lesson navigation
2. Read The Title Summary of Each Lesson, Organized By Topic
affilorama lesson titles and summaries
3. Watch HD Videos & Read About Each Lesson, Including Step By Step Pictures
affilorama lessons video
Since the original writing of this review, I like the way this script has restructured. Without having the $67 per 30 days membership, you possibly can concentrate on absorbing what they have to offer for free. That gives you the right amount of time to consider upgrading on top of AffiloBlueprint or AffiloJetpack.
By granting them you value rapidly, you will see what kind of company they are! And hey, if they supply like this stuff without cost, the paid stuff have to be healthier for 🙂
Get Your Free Affilorama Membership!
Goodies Included In Premium Offers
If you commit to go together with Blueprint or Jetpack you've got 1-year webhosting for 1 website. That's worth at least $100, and maybe more towards the quality despite hosting. You furthermore may explore owing to their "AffiloTheme' Premium Theme. A premium theme could cost between $20 and $100, in order that'is actually a acceptable too!
What I Didn't Like
"Outdated" Sections of Training
Though there is a lot of wonderful trainings in the gratis group, there are plenty real bombs to watch out for. While appearing for information on how to construct an internet site, I only found a bit about using Adobe Dreamweaver and creating content using HTML. Sure, there are a selection of the way for building website, but the easiest and most popular is WordPress. My #1 recommended product (see below for link) permits you to create WordPress website in about 30 seconds.
Considering you'll be able to select from over 10,000 different WordPress themes, including premium ones with fancy features, plus the normal process to customize your company site with different plugins, I did not why you'll use such as dreamweaver. WordPress is flexible, search result friendly, and highly customizable.
Low Member Activity
Right at the top of the list of appeals of going to a membership site just like a is generating help. There definitely here are a couple of active members, and actually moderators to aid with answering questions.
But from what I possibly could see, there didn't appear to be several activity going on.
affilorama forum
There are numerous instances of posts being replied to in three or four hours, however most activity seems to be over other times, even days or weeks old. I used to be on the website one evening and saw that there were only 16 members on!
Even though this is just my personal opinion, the posts I looked at didn't appear to be too insightful or warranting a discussion. In fact, I'm comparing this to my own end result of Wealthy Affiliate, containing plentiful active members, in conjunction with a live chat scrolling 24/7 a place that you may consider and carry instant answers.
Affilorama has the suitable idea yield members forum, but it only is devoid of numerous active members to get this to a great feature.
That's A Bad Idea #1: Copied Content
An enormous fear the workout that you will see discussed on other reviews of Affilorama is the use of PLR content and backlinking strategies.
Because it feels like an "easy way" that creates an online business, many people preclude stuff of making helpful, interesting content unfortunetly copy it from multiple places. True, there are actually legit ways to repeat content, and they rarely spark a legitimate, long-term business.
Aided by the ways is PLR content. It is a symbol of Private Label Rights and permits you to take content is due to a source tagged PLR, change it of any kind for your information fit, then do it in the own.
The concerns with that is multifaceted. One, everyone permission to access the same content. Two, this product is often written in a really generalized way that is neither interesting nor okay for the reader. Three, because it's not completely unique content, it's very hard to rank.
Many people say which you can "tweak" letting it to cause it to unique and pass Copyscape. My question to the child is, when you're a reader, are you able to detect when someone is BS-ing you online? Do you like along with generalized content or highly specific and insightful content?
Not surprisingly, if you need to spend enough time to research and re-write this stuff so they are unique, interesting, and helpful, you better yet not use PLR or merely write 100% original content.
In our own way to copy content is curation. By curating, you are taking other author's work (that allow you to achieve this), and offering a linkage to the unique source. Normally, mingle an "authority" on a topic by collecting legitimate information on that topic.
However, if you copy achieve article, there may be there's no chance that you're going to get ranked in Google for that content. No rank means no traffic. In the event you copy just a good bit and write your personal commentary for this (as curation must be), you will want to write down user generated content!
The Affilorama training helps it to be sound like that is simple to do and will sustain job as a web-based marketer less difficult. That's removed from the truth. Using content in this manner adds a new level of difficultly versus just writing the damn thing yourself.
That's A Bad Idea #2: Backlinking
Internet marketers can talk before cows arrive home about backlinking strategies but after all, Google explicitly says that artificial link-building is against their TOS and it'll end up at trouble.
Gurus went on and on about the benefits of Private Blog Networks. Countless products were released, revealing the ranking revolution, and the way it was easy attending to the #1 spot with PBNs…until that they will deindexed and anyone that used them was penalized. They've since recovered in popularity, but who knows when the following Google update will kill your PBN.
google deindex backlinks
I actually have personally grown One More Cup of Coffee to five,000 visits per 24 hrs with out a single backlink, so I actually have my own proof that links are not needed to experience a traffic generating website falsified income. It only takes longer, additionally it may also lasts longer too.
And by the age of the training on backlinks in Affilorama, I wouldn't trust it for our particular own website, and may't recommend it for yours!
Extra Fees
Considering what you'll discover, the worth swapped the varied packages you in finding will not be too crazy. However, there are certain considerations!
For only one, you must pay an autoresponder fee in addition to whatever it is that you buy, who can cost $20+ per month. Then, your hosting may not free after for a year of membership. Also, there is some confusion about "Affilorama Premium" and "AffiloTools".
Premium it happens to not be available on the company website, but it surely's listed as an extra feature, specifically that you get a 1-month free trial. The first price for premium was $67, so can we expect a $67 upsell most of us join Blueprint?
Regarding AffiloTools, it clearly says hence it's free for Affilorama Members, that being said we're told that we all experience a no charge study to be a part of Blueprint. So which can be it?
affilo bonus 2
affilo bonus 1
Affilorama Free VS Premium Updated for 2018
It's been quite a while since I wrote my initial review. I wrote this making a return to 2014, togerher with its now December 2018. Affilorama remains to be alive, so they collect new members and perpetuate improving a company. Personally, I are unable to find much activity this review, so I'll just turn the job over as-can possibly be now. I've updated the pricing info, and made an effort of the costless association simply by Winter 2018.
However, if I get sufficient comments within the comment section aiming a review the newer Premium membership in Affilorama, I'll join and test it out. Contribute to the discussion and let me know if you would like me to do this!
Last Note
I in fact wasn't delightful to have email offers from Mark Ling, cross promoting services and products from folks that I would consider scam artists. I've done a lot of reviews for my website, and am aware that lots of the "gurus" hang around the other and run promotions for some another. That's fine. It's how business is done online, and You'll be able to unsubscribe very easily.
Specially me, I used to be just disappointed to find out that the finished products owner was promoting a person who I personally find terrible. This method person often charges thousand of dollars for mentorships and exclusive programs. You familiar with ones - "Join cost-free webinar", after which they try to sell you a $10,000 mentorship package.
Final Review
Affilorama has an incredible no charge registration, and appropriately priced premium offers. They've a helpful community, and a quality product that I am able to proudly recommend.
Thumbs Up
==> Sign Up For Affilorama Here
However, they aren't my #1 recommendation!
Wealthy Affiliate vs Affilorama
Features Wealthy Affiliate Affilorama
Will it be easy to get help?
Private coaching available?
Are you able to Contact the Owners?
Is in fact a live chat?
Is known to be step-by-step training?
Are free websites included?
Is hosting included?
Are you able to try for free?
Definitely is a keyword-research tool?
Exists an affiliate program?
Do I recommend this? Yes No
My Overall Rating 10/10 7/10
Comparing Wealthy Affiliate To Affilorama
I can write a whole in-depth review comparing Wealthy Affiliate to Affilorama, but I'd love to fully things below on why WA remains my #1 recommendation after all these years
They update the workout frequently to bring to attention changes in online marketing, Google, and online marketing
We have no major upsells. The membership costs $49/month. END. OF. STORY
Hosting is offered in your membership price, for the life span whatever the membership
They offer cheap domains. $15 per year (no upsells), including FREE privacy, including FREE SSL
Live chat help for instant support, plus forum support for "slow cooked" answers.
Proprietary website boosting technology
SiteSpeed means no need for installing a caching plugin to purchase one site run fast
SiteComments for starting engagement in the comment small portion your company site
Spam filter without a desire for a plugin (fewer plugins means faster website)
Free weekly webinars on lots of topics (e_mail business, AMP, star ratings, SEO, etc)
Peer Review & Feedback: Get feedback on your service so aren't within the a "newbie bubble"
There are tons more things you can examine inside ourselves full Wealthy Affiliate Review. It's really ridiculous what they offer regarding the flat membership fee, and you cannot find another service has had an opportunity to come back even close.
But what would you say? Have you been connected to both websites? How you imagine they quite a lot of or similar? What sort do you prefer?
Oh, allow's do remember that this kind of page was purported to be an overview of Affilorama, not an evaluation to Wealthy Affiliate.
What on earth of Affilorama?
Various join? Why? Or at least…Why?
Should you tried Jetpack or Blueprint, what did you think that?
I'm really curious to look at what your opinions available the comment section! affiloblueprint
1 note
·
View note
Text
Morning Musume in NYC 2018, Friday
In the wee morning hours, I took the various trains to my hotel, and the walk from the nearest station to the hotel was a miserable affair, slogging through the slush on the sidewalk as rain poured down and the wind blew in what seemed like every direction at once, with my arms and hands in awkward positions, as I had to handle an umbrella, luggage, and a cane all at once. I met up with my friend at the hotel around 7AM, and we checked in our luggage (which cost money, because NYC), and had a discussion that, surely, no one would be mad enough to queue in this weather this early. The con had even issued an email saying that no one should queue until 9, due to the weather. I decided to scout out Javits, though, because I knew that wota gonna wot, meaning queuing stupid early no matter what. Sure enough, there was a nice line already growing at the convention center, so we joined the line around 7:30. This still put us in a good position, within the first 15-20 of the Mega line. We got to talking with a girl from Texas, and it became fairly clear that mosmt of the early queuers were MM fans, though though there were a few fans of the other artists. During all this time, rain and wind waxed and waned, so sometimes it wasn't too bad, and other times there was a bad chill.
Friday did not get off to a good start, for setting impressions of Anime NYC. We had a cramped schedule, as the MM autograph session and the concert guests panel were nearly back-to-back, and then our press interview with MM was scheduled almost right before the autograph session, and all of that was almost right after doors would open. So it was going to be critical that we got into the doors to get our autograph tickets ASAP, or we might lose the window to get our press credentials and hold the interview.
Well, doors opened significantly late. And then they had the Mega holders sit in line for the autograph tickets for about half an hour until all Mega and General attendees had been admitted and General had picked up their badges and then gotten in line for autograph tickets, so they could have a guy orally tell us the rules for tickets just one time (even though obviously people would show up after he did so). This meant we nervously watched the clock tick by and they refused to let us get autograph tickets for no good reason (just post the rules right by the table! It was all already in the con app, website, and booklet anyways!), getting ever closer to the time were we would just have to forfeit getting autograph tickets or forfeit the interview. Finally, they let the ticket gathering begin, and it's a damned good thing we queued early, as we grabbed our tickets and sprinted to the press office with just minutes to spare. Our fellow press members, who had waited until 8 or so to queue, did indeed arrive a few minutes late, though the guest staff handling us for the interview was extremely gracious to allow the delay. Apparently, the complaints about this nonsense were so noticeable that the con issued an apology that night and said that they would be changing their procedure for the autograph ticket queuing for the next day. So that shows that they do take feedback, which is much more promising.
We were informed that we would only be interviewing a subset of the group, as they were rotating members amongst the various press outlets. And then we did our interview, and it was pretty magical. Will link the result when it comes out. UFA retained editorial power over anything we'll publish, as usual. But one of the things that happened was that my friend was wearing a 12th gen FC shirt, which Chel honed in on and gushed over a bit.
My friend and I then rushed to prep for the autograph session: getting into cosplay. She went as Yokoyan in Minmin Rock n Roll, complete with pinning printouts of the cartoon cicadas from the MV all over. There are pics of her on Twitter! Originally, I was going to match her as an improbably tall Funaki, but then the Furari Ginza MV came out, and I just knew that I had to take advantage of the timeliness to be dapper!Dii. Unfortunately, having to change from "camp in miserable weather" clothes to cosplay clothes in the half hour between the interview and the autograph session meant that we couldn't bag-check, and couldn't get through the merch line, either. I ended up having the girls sign a Houston shirt.
My friend, though, stole the session just about, by having the girls sign some musical photobooks. As the line was in seniority order, she started by explaining to each girl that they had signed the Lilium photobook last time (in Houston), but she wanted to finish it out with Dii's signature, so in the mean time, they could sign this year's Snefuru book instead. And not only did every girl recognize my friend's cosplay (many even starting to sing the Minmikimikimikimiki intro lol), they just lost it every time at the photobook pic of baby!KSS!Lilium!Dii. It was great. Chel also had a moment of "wait, you were wearing a 12th gen shirt before???" and my friend reassured her that she was still wearing it under the safari shirt. The girls did recognize my cosplay as well, but I didn't have much to say to them, to my regret. I did ask Chel if she watches any American TV, and she said she had watched Spongebob just that morning. And I got Sakura to do the Furari Ginza dab with me.
Talking to everyone else about the autograph session, it appears that the girls (and management) were surprisingly accommodating, and most of us had really great interactions with them. Unfortunately, this meant that the line moved slowly, and they ended up running out of time, and some people with tickets could not get an autograph. Ultimately, I feel that I would have been okay with going down the line faster, so that more people would get their time with the girls, so I hope the managers keep stricter track of time in the future.
From there, we spent some time with the merch (they were selling the new single, fall tour T-shirts and towels, a NYC exclusive photoset, and member key holders), before queuing for the panel. We were early enough to get within the first 3 rows, and I sussed out from looking at the chair setup on which side that MM was going to sit, so we were very very close to the girls for the panel, and I feel like the girls recognized us. Plus, an audience member brought their baby on our side, so the girls kept looking over in our area.
I liked most of the decisions the con took with the panel. A moderator (an ANN writer) asking her own questions, and then selecting from a shortlist of questions submitted by audience members earlier. In the first rounds, she asked the same question of each guest (picking a single member from MM to answer each time).
When MM introduced themselves, they each gave their names, and then their favorite anime. Maachan said "My favorite anime is Disney Channel," L O L. Later, a non-MM fan said that they had mass respect for the girl who said Re: Zero was their favorite, as most of the other picks were mainstream rather than late-night stuff.
Shokotan really showed why she's a fan favorite, being so very enthusiastic and earnest with every answer, fully engaging the audience and sweeping them up into her energy. More importantly, she and Harunan professed their love for each other as fellow otaku. None for you, Dii.
Eripon talked about how, in contrast to the other guests, this wasn't their first time in NYC. But they were still surprised by the snow, lol. She also noted that MM doesn't really have anisongs, even though this concert was Anisong World Matsuri, lol.
Ayumi talked about what we should expect at the live, and especially pointed out the fist raise gesture she wanted us to do for not-Furari-Ginza.
Maria talked about what makes the Colorful lineup unique within MM's history, and she said that it was about the hot energy of their lives.
Hagababy talked about the hardest bit of dancing she had to learn, which was how to do turns properly.
And SOMEHOW they didn't let Chel talk. What.
Maachan was heavily jetlagged. And despite not getting to answer a question, she still stole a few great moments, besides the above meme-worth introduction. At one point, when they were passing the mic from Ayumi to Maria, the cord got in her face and she let out a cute squeak. Later, when the panel was discussing how Kageyama had been in the industry for decades, he mentioned that he first joined a band 40 years ago, and Maa started trying to count on her fingers what year/decade that would be, and Sakura was like "just stop that, that's embarassing," lol.
One thing that tainted the panel, though, was that all of the translators weren't great. Lots of answers were really clearly truncated, missing half of the material or more, and a few were outright bungled, giving the opposite of what the guests had said. Bleh.
And that concluded the MM activities for the day! We browsed the dealer's hall a bit, including picking up some Lady Kaga onsen flyers, and taking pictures in our cosplays with the big MM picture set up there. I was just beyond pooped and sleep deprived at that point, so after having a mid-afternoon dinner, we retired to the hotel.
#morning musume#morning musume 18#morning musume '18#mm in nyc#anime nyc#category: idols#category: fandom
4 notes
·
View notes
Text
How To Get More A’s On Your Spiritual Report Card
If you are anything like me, you probably have moments of what I call “spiritual ambition” followed by a hectic work week and busy daily responsibilities. You probably have the desire to grow in the gospel, and to be better each day, but you haven’t found a good way to be consistent.
Every year, you probably make a new years resolution to read your scriptures more, or be more active in the temple, or to do more in your calling. And when February 1st hits, you realize you have made no progress and forget about it entirely until the first weekend in April when General Conference gently reminds you that you’re falling a bit short. Of course though once May hits, you do the same thing until October. Well what if I told you that whatever it is you desire to improve, you can do it? You can see REAL progress, fast!
Now of course you are wondering, “what will this entail?” “what would it cost me?” And I am here to tell you the only requirement is your willingness to try, and it will only cost you your pride. Humility is key!
So heres how it works!
1. Make a list of goals
Personally I do better with examples, so heres a few goals I had listed when I started this.
> Say my morning and nightly prayers every day
> Read my scriptures daily
> Avoid temptations more often
> Repent daily
> Keep a regular journal
2. Develop an action plan to remember your goals
I decided that in order to reach these goals, I needed to set reminders to do them. When I first started this, I had classes at 7:30am and knew I needed to wake up by 6:30 in order to make those classes. So I set an alarm for 6:20 and labeled it “read my scriptures.” And as a safety net, I set another one 10 minutes before I know I usually go to bed, just to make sure I did it that day.
On my mirror I had sticky notes posted around it that said things like “did you think to pray?” And this helped me remember to say my morning prayers if I had forgotten. Sticky notes and visual reminders can be great help if you put them in good locations. The best places I have found are places of habit. If you know you get dressed everyday and look in the mirror, then the mirror is a good place to start. If you know you always grab cereal from the pantry, you can put it on the pantry door where you can’t miss it.
If you are struggling in a specific area with temptations or similar things, identify what your weakest points are, and set an action plan to avoid getting to those points. It’s easier to say no to the situation than it is to say no in the situation.
Something I found helpful in my goal of avoiding temptation was to buy myself a little CTR ring. So that every time I would look down, I’d be reminded of the goal I had set. I also changed my lock screen on my phone to a picture of the temple, which helped me remember my goals every time I looked at my phone.
Consistence is key. You can’t expect to see progress if you only think about the goals you set one time.
3. Decide which ones are most important and DON’T GET DISCOURAGED
In this life, perfection is still pending. We cannot expect to be perfect in one day. It simply cannot be. I had a list of many more goals than the ones I listed above. But I had to narrow it down and decide which goals were the most important ones to me at the time. I chose to work on the 5 that I listed.
The cool thing about spiritual goals, is that achieving one tends to help you achieve the others. So with that in mind, I want you to go back and look at the order of my list.
At first glance, it may seem out of order. It may seem like avoiding temptations might be more important than remembering to pray twice daily. It may seem like sinning is worse than forgetting to read my scriptures for a day or forgetting a prayer. But that’s exactly the kind of thinking that leads people to become discouraged and forget or quit their goals. How can one expect to go out into the world and combat evils of all kinds without first arming themselves? Trying to avoid satan’s traps without prayer and scripture study is like entering World War II with a nerf gun. You can sure fire darts, but the enemies will always be stronger. You will get shot. So when assessing your spiritual goals, make sure you are putting first things first.
Good prayer and scripture study habits create even better habits, help you in all of your other goals (spiritual or not), and create motivation and joy unlike any other. If you are not currently happy with your personal prayer and scripture study habits, place those things at the top of your list.

4. Create an accountability graphic of some sort
While identifying goals and developing an action plan are both good starts, you cannot stop there. Because days get busy, goals get pushed aside, and progress gets put on hold.
It can be super helpful to make a visual chart or graphic to track progress.
5. Review your progress daily
Each day, you should review your progress, decide how to improve for the following day, and if necessary, revise your goals or add ones to help you achieve the current ones.
Personally, I have found that daily accountability is key in achieving your desired outcome. In a world full of smart phones and intuition at your fingertips, it is time to take advantage. Use it to benefit you! Satan sure does a good job at that, so why don’t we? I have found it easiest for me to use an app, but everyone is different and has unique needs. Council with the Lord to see what kind of ways you can be accountable daily effectively.
I’m going to tell you about an app that I think works really well. It’s called Habit Share. In this app, you have the ability to create goals and list them in order. Underneath the title of these goals, 7 little circles appear labeled S, M, T, W, TH, F, S. each day you click on the bubble and mark it either green or red. (Green for yes i did this today, red for no i did not).
It calculates your overall percentage of green marks in each category, so you know how much of the time you are meeting your goals. There’s also an option where you can share the habit with a friend, and they can see your marks. So they can help keep you accountable if you feel comfortable sharing your goal with them.
The other neat thing about this app is that you can see your “streaks” (how many consecutive days you have made progress in your goal.)
6. Get adequate sleep
Satan does his best work when we are tired and burnt out. Part of putting on good spiritual armor is getting enough rest. The only thing worse than showing up to World War II with a nerf gun, is showing up with a nerf gun and being un-alert.

7. Inquire of the Lord
No matter how well you know yourself, the Lord knows you better. He knows how to help you, and He wants to! Pray daily for help reaching your goals. Use Fast Sunday as an opportunity to receive additional strength and guidance from the Lord.
I promise that as you do these things, and prayerfully consider what to improve in your life, you will see blessings and miracles in your life. I know because I did, and have since seen many friends experience the same! I have a testimony that when we are putting fourth our best efforts, Heavenly Father blesses us abundantly, and we see the hand of God more often in our lives.
If you try these things, and experience the miracles I testified of, please let me know. And don’t stop there! Let others know too!
1 note
·
View note
Note
Hi! I'm a high schooler with a passion for film who hasn't actually filmed anything yet. I'm planning to get started by just filming stuff and gaining experience over time. I want to buy gear (camera, lights, etc) so I can get started but it's an expensive investment and I'm unsure what I should get. Do you have any ways to figure out which gear is good for me?
Hello @jeffreydahmerofficial
There are lots of options when it comes to gear and it can be a bit of an investment. So I have put together a starter kit with some gear breakdowns, recommendations, and prices. The prices listed are if you are purchasing brand new equipment. You can most likely find used equipment or older models that work just as well for a lower price. In addition, some miscellaneous gear you can make yourself (dollies, steadicams, light bars…), if you are willing and able to put in the time and effort.
Film Gear Starter Kit
Cameras
DSLR - digital cameras are great starter cameras because they are cheaper, small, maneuverable, and produce good quality videos. You can even buy older models to reduce the price and still get good quality (You can also buy used.) Canon and Nikon are good cameras as are some Sonys, but I am partial to Canons. When purchasing, pay special attention to if you are purchasing the camera with or without a lens and what type of lens (I recommend a zoom to start out.)
Some good DSLRs:
Nikon D3300 ($350-500) - great quality image for a relatively low price. A lens is included, so you don’t have to worry about finding one separately.
Canon EOS Rebel T5 ($350-450) - any of the rebel cameras are good, but being newer (but not the newest model) the T5 is a great choice. It has decent low-light capabilities and comes with a zoom lens.
Nikon D5300 ($400-500) - with a better sensor, and a bit more customization opions, this Nikon is a step up from the D3300 with very little change in price.
Canon EOS 6D ($1,200-1,600) - a good substitute for the more expensive 5D Mark III. For the price jump, you get much higher image processing quality and great low-light capabilities.
Canon EOS 80D ($750-1,000) - much like the 6D, it has great low-light capabilities and great image quality, plus a maneuverable viewscreen
Camcorder - In terms of video quality, DSLRs can offer the same image quality as a camcorder at a much lower price. However, camcorders have a lot to offer as well. They have much longer recording time andare built for video, so it is much easier to hold one for long periods of time, despite DSLRs being lighter. They also have built in XLR inputs and neutral density filters, which means camcorder will automatically properly expose your footage without changing the frame rate. (Bonus: They look professional, which is helpful when working freelance.)
Some good camcorders:
Canon XA30 ($1,300-2,000) - a professional/semi-professional camcorder that is easy to use, has good low-light capabilities, a touch screen, and is relatively inexpensive for a camcorder.
Sony HXR NX100 ($1,500-2,000) - an entry-level professional camcorder that has HD quality video, good low-light capabilities, 2 XLR inputs, and 3 focus rings. It’s comparable to the more expensive Canon XF200.
Canon VIXIA GX10 ($2,500-3,000) - a “consumer” camera with professional video quality, this camcorder shoots in 4K. While it lacks some pro features, such as the XLR port, it is very portable and has optical zoom, a touch screen, (You can also get a nice kit that includes a mic, cables, backpack case, LED lights, memory card, and more for under $2,700.)
Canon XF300 ($3,000-4,000) - a professional camcorder great for run-and-gun as well as on a shoulder mount. It has a slightly larger, rotating viewscreen, 2 XLR ports, full manual and full auto modes, built in ND filters, and more.
Misc. Camera Gear
Tripod ($20-200) - a staple for any filmmaker. You can get cheap, lightweight ones for about $20. I recommend investing in something sturdier, so you don’t risk having your camera fall over because of a flimsy tripod.

This a vanguard tripod that is good for DSLRs. It’s lightweight and small, which is great for traveling, but it also can’t support heavier cameras, so when purchasing, look at the load to see if it can support the weight of your camera. You can find Vanguard tripods and similar brands for under $50, but some run a little higher.

This is an example of a heavy duty tripod with a fluid head for easy maneuvering. These tripods are extremely sturdy and can easily support the weight of camcorders and higher-end cameras. You can get a good one of these for around $150-$200.
Cases/Bags ($30-60) - get cases for everything: cameras, microphones, lighting, tripods, etc. You invested a lot into your gear. It is worth it to spend a little more to protect it and keep everything in good condition.
SD cards ($25-50) - I recommend 32GB or higher and make sure they are higher class cards. Otherwise, some cards may stop recording automatically with DSLRs because they can’t keep up with the writing speed.
Steadicam ($30-150) - professional steadicams are much more expensive, but you can find cheap and effective ones for DSLRs relatively easily. They give a cleaner handheld look that improves the look of your film immensely. They even have steadicams for smartphones!
Pictured Above: Roxant Pro Steadicam
Pictured Above: Ceari VILTROX WD-Z Steadicam
Microphones
Shotgun mic - a staple of you want good (or even decent) sound for your film. Unfortunately, a good mic is easily as expensive as a DSLR and requires more gear. With a shotgun mic, you need to also purchase an XLR cable, shockmount, and windscreen. Often it’s cheaper to purchase a kit rather than buy these separately.
Some recommended shotgun mics:
Rode VideoMic ($100-200) - A lower-end shotgun mic meant to be mounted directly onto a DSLR. It has decent quality sound, doesn’t need an XLR cable, has a built in shockmount, and is relatively cheap.
Audio-Technica AT875R ($150-200) - a cheaper semi-pro microphone that requires an XLR cable and phantom power. It’s smaller and has a wider pickup range, making it a good on-camera solution. It can also be mounted on a boom pole or stand. It is better for studio and indoor recording. Although it’s much cheaper, it holds its own against the Sennheiser MKE 600.
Sennheiser MKE 600 ($300-400) - powered by battery or phantom power, this is a good, well-rounded mic.
Rode NTG3 or NTG4 ($350-550) - the NTG series is very popular in the filmmaking world. While NTG3 is arguably better, the NTG4 is cheaper and still produces very good quality sound.
Lav mics - great for wide shots, interviews, outdoor audio and as second audio source. You can hide these guys relatively easily when booming is not an option. The great thing about lavalier microphones is they are relatively inexpensive and you can get good sound with a really cheap lav.
Some recommended lav mics:
Neewer 3.5mm ($5-10) - a super cheap lav that’s great for buying in bulk. It’s a bit harder to hide, but works great for interview videos.
Sony ECMCS3 ($15-30) - this is a sensitive, durable, and inexpensive lav that picks up sound from both sides.
Rode Smartlav+ ($50-70) - this practical, high quality lav hooks up directly to your smartphone, external recorder, or camera.
Sennheiser EW 100 ENG G3 ($700-800) - if you are willing to spend more, these are some of the best wireless lavaliers. They have great quality and can be easily hidden.
External Sound Recorders - crucial if you plan on moving your microphone far away from the camera. Booming is usually done using external sound, meaning the mic is hooked up to an external recorder rather than the actual camera. The sound is synced in post. (That’s why we have a clapper!)
Some recommended Sound Recorders:
Zoom H1 ($50-100) - One of the first Zoom recorders, this is one of the cheapest and most basic options. It’s compatible with micro SD cards, battery operated and has a built-in omni-directional mic.
Zoom H4N Pro ($150-200) - one of the most popular and highest rated external recorders, it’s well worth the investment. It has 4-channel recording, a larger screen, easy navigation, 4 hour battery life, and a built-in omni-directional mic. (I personally recommend this one.)
Tascam DR-40 ($150-200) - with a 15 hour battery life, this 4-channel recorder is a good rival to the Zoom H4N, but it’s extra features make it slightly more expensive.
Misc. Sound Gear
Boom pole ($100-300)- sound quality improves immensely when you are able to put the mic closer to the subject rather than mounting in on the camera. You can get a pole with the cord built in or without, which is slightly cheaper. (Full disclosure: I’ve used a monopod as a mini boom pole before. Not great, but it got the job done. This guy even turned a light stand into a boom pole.)
Headphones ($100-200) - specialized or noise-cancelling headphones so you can clearly hear the audio you are capturing on set and while editing. Earbuds work, but they are far from ideal.
Deadcat ($20-30) - minimizes wind noise, very helpful for outdoor shoots. Available for both shotgun mics and lavs. You can easily get this used for under $15, but new ones are more expensive.
Lighting
Lighting is necessary on bigger shoots, but for freelance and beginners, you rarely have your own lighting outside of a studio. Lights are expensive and most of the time, you won’t be able to use them without a crew (especially outdoors). When you do use them, you will most likely be much more experienced and either working for a company with lighting equipment, or running your own company.
I recommend purchasing a cheap photography lighting set to have some lights, but wait to invest in higher end lighting. A cheap lighting + green screen kit can cost around $100-200(I personally have 2 cheap umbrella lights and while I like them, I rarely use them.) That being said, below are some common types of lights and their general price ranges. Professional brands include: Arri, Lowel, KinoFlo, Limelite, and Ikan.
Softbox/Umbrella Lights ($200-550) - used mostly in studios and photography, they give off, you guessed it, soft light and have florescent bulbs. These are great when you need a quick light source, they are lightweight, and don’t easily overheat.
Can Lights ($500-1,000) - these are the classic lights you see on film sets. They can get very hot, but they are small, lightweight, bright, easy to assemble, and you can use diffusers, filters, and gels to customize the light.
LEDs ($1,000-2,000) - LED lights are the most expensive but also the most useful. They allow you to easily dim the light and change the temperature and they don’t overheat or use as much power.
Misc. Lighting Gear
Gloves ($30-40) - lights get hot and when you need to maneuver them up close, it’s safe to have heat-resistant gloves. Set-specific gloves are more expensive, but you can find cheaper options elsewhere that work just as well.
Bounce board ($5-10) - these can replace a fill light and help add a little more light to your scene without purchasing an expensive and bulky light. You can get collapsible reflector disc with white, silver, and/or gold for the price listed. Poster-board is another cheap alternative.
Gels, diffusers, and dimmers ($20-30) - If you don’t have an LED light, you can modify the color of a light source with gels. They work on any light source from industrial lights to household lamps and are very handy and inexpensive. (The price listed is for a kit of all of these products, but you can buy sheets of any of these for just a few dollars.)
Gaffers Tape ($5-10) - heat resistant and doesn’t leave residue. Gaff tape is used for just about everything on set from lighting, to setting marks, to taping down cords, to labeling.
I hope this helped and didn’t overwhelm you too much! Just a reminder: these are just some options based on what I see used in the industry. There is plenty of gear out there and plenty of cheaper solutions and substitutes for some gear. As always, it’s the filmmaker, not the gear that makes a good movie (but getting good gear is always nice!)
Best,
Jules
#ask box#my filmmaking tips#film gear#film equipment#cameras#microphones#lighting#lights#production#camera department#sound department#g&e
678 notes
·
View notes
Last Seen Blogs

thebellavita
The Bella Vita

miscellaneousmao
Miscellaneousmao

akira8810
題名未設定
redemptionfornothing
Szivárványunikornis szivárvány, szarv & ló nélkül

whanklee
whanklee