#and also i have multiple pdfs and a powerpoint going in the background
Text
are you even a law student if you don't have a gazillion tabs open
#caroline talks#it's for a clinic i'm working in. i want to scream.#i have literally five google docs open and my google drive and then a google slides and also my calendar#and also i have multiple pdfs and a powerpoint going in the background#and also. also of course. a bunch of pages linking to my state's general laws.#and then it'll be time for me to attempt moot court brief writing and THAT will mean a gazillion more westlaw tabs and also pdfs . . .. and#more google docs.#[sobs] please i just like working in one or two tabs at a timeeee
6 notes
·
View notes
Text
Colossyan Creator Review: The Best AI Video Generator?
New Post has been published on https://thedigitalinsider.com/colossyan-creator-review-the-best-ai-video-generator/
Colossyan Creator Review: The Best AI Video Generator?

In today’s digital age, video content has become essential to any successful marketing strategy, online learning platform, or social media presence. However, creating professional-quality videos can be time-consuming and expensive, requiring video editing experience and specialized software.
But there’s no need to fear: Colossyan Creator is here to help!
In this Colossyan Creator review, we will explore what Colossyan Creator is and its features to uncover what it’s capable of. I’ll even show you where to find these features so you can use them immediately.
From there, I’ll give you a step-by-step walkthrough of my experience generating this AI video using Colossyan:
Finally, I’ll end things with what I liked and disliked about the software, who it’s best for, and the top three Colossyan Creator alternatives I’ve tried.
Based on my experience, I can confidently say that among the various AI video generators I have tested. It stands out as one of the top choices due to its exceptional realism, professionalism, and overall quality. But I’ll have you decide whether or not it’s right for you!
What is Colossyan Creator?
Colossyan Creator is an AI video generator that simplifies the video creation process for content creators, marketers, and small business owners. With it, you can easily create high-quality videos without needing any technical video editing experience.
The AI video platform leverages machine learning and natural language processing to enhance the learning experience for video content creators. By combining avatar technology and rendering technology, Colossyan Creator produces presenter-like videos that are visually appealing and engaging.
Colossyan has a user-friendly interface and the ability to customize your videos fully. It also offers a wide range of features, like over 50 diverse AI avatars, over 70 languages, and the ability to auto-translate to dozens of languages with the click of a button. We’ll get deeper into all of Colossyan’s incredible features in the next section!
Colossyan Creator Features
Colossyan Creator offers a range of features that simplify the video creation process and enhance video content. These features can be divided into three categories:
Editor
Text & Speech
AI Avatars
Let’s take a closer look at these features.
Editor
Here are Colossyan Creator’s main features when creating videos:
PPT & PDF
Screen capture
Conversation
Collaboration
Brand Kit
1. PPT & PDF

Enhance your PDFs and PowerPoints by incorporating AI avatars and choosing from over 200 AI voiceovers.
On the home page of your account, import the file on the top right and start editing!
2. Screen capture

Produce screen recordings directly in Colossyan and incorporate them into your AI videos. This makes your message come across more clearly.
In the Editor, go to Background > Record > Open screen recorder to record unlimited minutes of your screen through the Colossyan platform to add it as your video background!
3. Conversation

Enhance viewer engagement by incorporating a storyline in videos featuring multiple Side View AI avatars engaging in conversation.

You can have AI avatars have an over-the-shoulder conversation with each other!
Within the video editor, add two AI avatars and go to Script > Conversation to insert a script for the avatars.
4. Collaboration

Invite and collaborate with your team within Colossyan to get videos done faster. From there, you can set permissions such as admin, editor, or viewer for each member. You can keep things organized by separating your workspaces between departments, clients, projects, etc.
To add and manage each member, log into your account and select your workspace name to view your options.
5. Brand Kit

Create a brand kit to save your brand styles. Then, use them seamlessly when producing your videos to maintain consistency. Create multiple for all of your clients.
In your Colossyan account, go to Brand Kits > New Brand Kit and add your styles (text styles, colors, logo, and fonts). When you create videos, these assets will be there for you.
Text & Speech
Here are Colossyan’s main features when it comes to text and speech:
Video with Subtitles
Languages
Automate Translation
AI Script Assistant
AI Prompt to Video
Text to Speech
1. Video with Subtitles

Add subtitles to your AI videos and increase engagement up to 40%! Within the Editor, hit Generate in the top right corner and turn on Subtitles.
2. Languages

Create AI videos in over 70 languages, including various accents and voices, for an international reach. You can change your avatar’s language in the bottom left corner within Colossyan’s AI video editor.
3. Automate Translation

Translate videos instantly to reach a global audience by selecting a language and adding variants. In the top right corner of the Editor, select the language and choose “Add new language variant.”
4. AI Script Assistant

Use the AI Script assistant (GPT-3) to generate ideas, enhance messaging, fix grammar, and boost video production in any major language. When writing a script within the Editor, hit “/” on your keyboard and select “AI Assistant.”
5. AI Prompt to Video

Turn your ideas into video drafts using AI Prompt to Video, ready to edit in minutes. Within your Colossyan account, select New draft > Prmpt-to-video.
6. Text to Speech

Use AI technology and human voices to generate authentic voiceovers in over 70 languages and accents. Type your script in the Editor and hit the play button to preview how your AI voice sounds.
AI Avatars

Colossyan Creator offers a diverse range of over 50 AI avatars for various content needs, including different genders, ages, and ethnicities. These avatars have natural movements, gestures, and expressions, enhancing the authenticity of video content.
To make things even easier, Colossyan Creator offers dozens of video templates, which can be customized with your text, images, and videos for professional-looking videos in minutes. You can even create your custom avatar and clone your voice in as little as 48 hours for a more personalized video experience!
With Colossyan Creator’s AI Avatars, you can eliminate the need for expensive filming, scheduling delays, and low video engagement. Instead, quickly generate compelling videos from simple text using AI avatars.
How to Create an AI Video with Colossyan Creator
Here’s how to start using Colossyan Creator to immediately make AI-generated videos using AI avatars. I’ll break this down into clear, step-by-step instructions based on my experience.

I started by going to the Colossyan Creator homepage and selecting “Get started free” on the top right.

Immediately, I was asked how I wanted to get started. I could start from scratch or select one of the 20+ templates they offer.
I decided to start from scratch for a clean start, but feel free to select one of the templates to give you a head start and save some time. The templates primarily revolve around business presentations.
Once I selected a template, Colossyan Creator greeted me with a welcome video from one of the co-founders, Dominik Kovacs. His AI avatar narrates the video, and he does a great job at giving an overview of the platform and how to get started with creating AI-generated videos.
Before diving in, I could also start a guided tour of the platform in case I wanted to learn more about all the features and functionalities. This is an excellent option for those who prefer a more step-by-step approach.

The interface was clean and user-friendly, with a clear section for inputting my script.
In the left panel, I could write the script manually or use Colossyan’s built-in AI assistant to generate a script. I opted to use the AI assistant, curious to see what it would come up with.

By typing in a “/” on my keyboard, I could correct grammar, shorten the script, soften or strengthen the tone, or brainstorm ideas for fine-tuning my script. In my case, I asked it, “Why is Colossyan Creator the best AI video generator?” and here’s what it came up with:

The AI assistant in Colossyan Creator is truly impressive. It uses advanced natural language processing algorithms to generate coherent and well-written scripts. I added this as my script.

Colossyan comes with additional features that are easily accessible:
Conversation: Add up to four avatars to have a conversation.
Upload audio: Upload a maximum file size of 1GB of audio rather than typing out your script.
Add pauses, animation markers, and emotion.
Change the pronunciation of words.
Choose a new voice.

When choosing a new voice, there were endless accents and other options. I could change the accent, age, tone, and scenario. Colossyan organized everything so I could edit my voice exactly how I wanted.

If I wanted to instantly translate my script into over 70 languages to reach a wider audience, I could do so on the top right.
I previewed my script by hitting the play button and making the necessary changes. Once I was happy with it, I selected “Avatar” on the top left to see my options.

Here, I could choose from a diverse range of over 50 different avatars and change the avatar’s appearance, position, emotion, and order. Colossyan laid things out very clearly, which made it easy for me to customize my videos.
There were lots of customization options to enhance my video even further:
Background: Use a solid color, stock image, upload a photo, or add a screen recording as a background.
Shapes: Add a flat geometric shape, change the color and stroke, and apply an animation effect.
Media: Add a stock image, add an AI-generated image, upload a photo, or add a screen recording.
Text: Add a title, subtitle, or body text.
Music: Add stock image background music or upload your own.
Transition: Apply transition effects between scenes.
Resize: Instantly resize your videos: 16:9 (YouTube videos), 9:16 (Instagram stories), 1:1 (Instagram post square), or set a custom size.
Customizing my videos with these tools was an absolute breeze. Everything is drag-and-drop, and elements can be added with the click of a button.
Here’s how my video looked before and after applying some customizations:

After previewing my video, I was ready to generate. I did this by hitting “Generate” on the top right.

Once your account is created, a 14-day trial will begin, where you can generate five minutes of video using Colossyan.

I could now manage the settings of how your video will export. This included the title, whether or not I wanted subtitles, the resolution (720p, 1080p, 1440p, and 2160p), how long it would take to generate (approximately six minutes), and the video size. All I did was change the title and hit “Start generation.”

After a few minutes, my video was generated, and I could view it under “Generated Videos” on my account.
Here’s how it turned out!
Overall, the quality is excellent, and I’m happy with how it turned out. However, people might be able to pick up that it was made using AI.
Pros
The benefits of Colossyan Creator are endless:
No signup or credit card is required to get started.
20+ video templates.
70+ languages.
50+ diverse AI avatars.
Dozens of professional and customizable templates.
User-friendly interface makes the tool easy to use.
It takes minutes to generate high-quality, professional video content.
Save money on hiring actors, renting a studio, or purchasing expensive equipment.
Apply more serious or excited emotions to your avatar.
Upload and incorporate PDFs and PowerPoint presentations.
Built-in screen recorder.
Have multiple AI avatars engage in conversation.
Collaborate with team members to get videos done quicker.
Create multiple brand kits and apply assets to your videos.
Automatic subtitle generation.
Instantly translate your videos.
AI script assistant prevents writer’s block, fixes grammar, etc.
Generate videos immediately using AI prompt-to-video.
Text-to-speech generates text into speech – no recording required.
Video transition effects between scenes.
There are endless resources: Bootcamp, webinars, blog, support, community, etc.
Cons
Some may recognize that the videos are made with AI
Customization options may be limiting.
Who Should Use Colossyan Creator?
Anyone interested in using AI to generate videos can use Colossyan Creator. However, there are specific types of people who benefit the most from using this tool:
Marketers: With 20+ templates and a user-friendly interface, marketers can create professional videos easily and save money on equipment and studio rentals. Plus, you can customize avatars with different emotions for more versatile marketing messages. You can also create multiple brand kits for clients to maintain consistency!
Content Creators: Colossyan Creator allows content creators to generate high-quality videos without expensive equipment or studio rentals. You can pump out engaging content in minutes. Plus, Colossyan provides content creators with all the tools to level up their creations with resources like boot camps, webinars, and a supportive community.
Educators: With the ability to generate videos instantly using AI prompt-to-video, educators can easily create engaging and informative content for their students. The automatic subtitle generation feature and translation ensures accessibility for all learners by providing captions in over 70 languages. Plus, the templates look professional for a polished learning experience.
Business Owners: Colossyan Creator is perfect for all types of videos that benefit businesses, like promotional videos, explainer videos, or training videos. The video transition effects between scenes add an extra touch of professionalism, and the templates look clean and professional. You can also create a brand kit to align your videos to your brand.
Social Media Managers: Colossyan has a vast library of templates perfect for social media marketers, where you can create eye-catching videos that will keep your audience engaged. Plus, the ability to apply different emotions to the avatars adds a personal touch to your marketing messages, making them more relatable.
Bloggers: Not everyone is big on reading, so Colossyan Creator is a game-changer for bloggers looking to enhance their content with dynamic videos. Upload PDFs and PPTs to convert written content into engaging videos in a few clicks. From there, add text, images, music, and animations to elevate your blog posts and make them stand out.
Teams: Collaboration is made easy with Colossyan Creator, allowing team members to work together seamlessly and complete videos more efficiently.
Top 3 Colossyan Creator Alternatives
While Colossyan Creator offers impressive video creation capabilities, exploring alternatives is always good. Let’s take a look at three of the top Colossyan Creator alternatives:
Pictory

Pictory is an AI-powered video generator that enables content marketers to effortlessly generate videos in minutes to get leads and boost sales.
Both Colossyan and Pictory are incredibly user-friendly and save users time and resources. However, the most significant difference between Pictory and Colossyan Creator is that Pictory does not offer any AI avatars, which could already be a determining factor for you.
Pictory and Colossyan allow you to upload your voice and convert it into an AI voice for projects. However, Colossyan takes things a step further by allowing you to create your custom avatar to go along with it.
In terms of languages, Colossyan Creator has a leg up. Colossyan offers over 70 languages that can instantly be translated, while Pictory only supports English.
Both platforms also offer templates, with Pictory offering over 50 templates and Colossyan offering over 20. Colossyan’s templates look cleaner and more professional with more of a presentation style, while Pictory’s templates are more stock image and video-based with more customizable subtitles.
There’s no question that Pictory and Colossyan have many similarities. However, if you are looking for a platform incorporating AI avatars and over 70 languages, I’d recommend going for Colossyan. Otherwise, use Pictory for videos with stock images and videos as their base and more customizable subtitles that stand out.
Read our Pictory Review or visit Pictory.
Synthesys

Synthesys is one of the best AI generators to create AI content at scale, including AI images lacking with Colossyan.
Both Colossyan and Synthesys have a similar number of AI avatars you can use in your AI-generated videos. Choose from over 50 avatars with Colossyan and over 60 avatars with Synthesys.
In addition, Synthesys has over 140 languages to choose from. This is significantly more than Colossyan, which only offers over 70.
Both tools also have branding in mind, allowing you to customize your videos with your brand colors, upload your logo, and more. However, Colossyan has more of an advantage with branding by enabling users to create multiple brand kits.
Finally, one prominent feature that comes with Synthesys that Colossyan lacks is its ability to adjust the AI voice tone, pitch, and speed. This is not an option with Colossyan Creator.
Synthesys and Colossyan Creator are both excellent for video generation with AI avatars. Synthesys offers more avatars, additional languages, and the ability to adjust voice tone, pitch, and speed. Colossyan provides hyper-realistic avatars, a built-in screen recorder, and the ability to create multiple brand kits and convert PDFs and PPTs into video presentations.
Read our Synthesys Review or visit Synthesys.
Synthesia

Synthesia is one of the best AI video generators using AI avatars that turn text into videos in minutes. It gives you access to natural AI voices in over 120 languages and over 140 AI avatars. With Colossyan, you get about half of that, as it offers over 70 languages and more than 50 avatars. You’ll also get three times the number of templates with Synthesia.
Both platforms are extremely easy to use, with intuitive interfaces requiring no technical skills. They allow you to upload brand assets and add stock photos and background music. Both also have built-in screen recorders that let you place your recording directly in your project without switching between applications.
Synthesia and Colossyan Creator are excellent AI video generators with essentially the same features. The only real difference is that Synthesia has more languages, avatars, and templates.
Colossyan Creator Review: My Experience
After experiencing Colossyan Creator and comparing it to other AI video generators, I can confidently say it is among the best on the market. The AI avatars are hyper-realistic, and the voiceovers sound incredibly natural.
I genuinely enjoyed navigating through the user-friendly interface. Without signing up, Colossyan walked me through how to make an AI video by choosing one of their 20+ templates. Their templates look clean and professional, offering a variety of styles suitable for different purposes.
Once I selected a template, making edits to both my avatar and the video itself was extremely straightforward. This was made even more accessible with the tutorial video from one of the co-founders and the guided walkthrough. Colossyan ensures that even beginners can create high-quality AI videos without technical skills.
And that’s just scratching the surface of what Colossyan is capable of! It also has a built-in screen recorder, 70+ languages to choose from, the ability to add multiple AI avatars to converse with one another, and much more.
I hope this Colossyan Creator review helped you decide on the right AI video generator for your needs. Whether you’re a beginner looking to create professional-quality videos without technical skills or an experienced content creator wanting to take your projects to the next level, Colossyan Creator is an excellent choice!
Frequently Asked Questions
What is Colossyan AI?
Colossyan AI is an artificial intelligence video generator platform that creates videos from text. It simplifies video creation for users of all experience levels, even those without video editing skills. With its user-friendly interface, creators can easily harness the power of artificial intelligence to produce engaging video content.
Is Colossyan Creator free?
No, Colossyan Creator is not a free tool. However, it does offer a free 14-day trial on the Enterprise plan in which you can generate 5 minutes of AI video.
#Accessibility#admin#ai#ai assistant#AI Tools 101#AI-powered#Algorithms#amp#animation#animations#applications#approach#artificial#Artificial Intelligence#assets#audio#avatar#avatars#background#Blog#bootcamp#Branding#Business#clone#collaborate#Collaboration#Color#colors#Community#creators
0 notes
Text
back-to-school tools

‘tis the season again, so here are some handy websites and browser extensions i’ve discovered over the past few years that’ll hopefully make this year a bit easier for you. i’m taking high-school-level classes, but a lot of these should help with college/uni work, too!
feel free to reblog and add your own recommendations :)
the only ones you have to install and/or sign up for have an asterisk, but note that they’re all free either way.
L A N G U A G E A R T S
planet ebook
this is my go-to for digital (and legal!) classic literature. i download the pdf files and upload them to places like one note to annotate, but epub and mobi versions are also available if you prefer those. no need to break your back over hauling textbooks and your required readings!
audible stories
this doesn’t have the widest selection of audio books, but it definitely has its uses! there are a lot of classics on there, which could come in handy for a literature or english class.
easybib
this is the best citation tool ever. i love that i can choose which style i want to use and what kind of media i’m researching with (books, journals, websites, etc.). if i need to, i can go in and edit any (citation) category i want, but that isn’t usually necessary because it can find stats that even i can’t while looking at the source. enter some info, copy ‘n paste the works cited list to your paper, and you’re done!
i recommend the web version and not the google docs add-on because the add-on doesn’t let you customize your citations
gradeproof* or grammarly*
these are both grammar/spelling checkers that provide plenty of stats, which are most useful for speeches. you can use these to see your character count, word count, number of sentences, syllables per word, words per sentence, readability, grade level, reading time, speaking time, etc.
wordcounter
this is a great alternative if you can’t/don’t want to install gradeproof or grammarly.
powerthesaurus
this is my go-to thesaurus... it has a ton of features if you go on the website (it’s not just for synonyms, though those are seemingly endless!). plus, if i don’t want to open a new tab, i can use the extension in my toolbar to see a brief list!
just a word of caution: look up any words you don’t know (because if you go far enough down the list, they’re not completely relevant anymore).
onelook
i use this reverse dictionary to find the word that’s on the tip of my tongue but i just can’t name (though it has a lot more features than that!).
cueprompter
this is the perfect teleprompter for any speeches you need to record (maybe for an online graduation? a virtual debate?).
xodo*
this is a great digital annotation tool (right in your browser) for those of you who don’t have an app like goodnotes on your ipad. you can upload files from your google drive, your device, or dropbox and draw on them, type notes, add comments, highlight, choose different underline patterns, add shapes/arrows, etc. all while customizing opacity, thickness, and colors. you’re also able to zoom in/out, change page width, rotate the page, change your layout (pdf, book, magazine), and choose a transition style.
A R T
canva*
i love this site to death---if you haven’t heard of it yet, what are you doing?? i can design everything from a resume to a powerpoint to a school dance flyer on this thing! there are beautiful templates to choose from, but if that’s not your thing (it isn’t mine either), then there are millions of photos, doodles, graphics, fonts, borders, backgrounds, etc. to choose from. plus, you can even upload your own content. (i designed the header for this post on there!)
F O R E I G N L A N G U A G E S
typeit
i hate having to remember all the keyboard shortcuts for special characters, so i just copy and paste from this international keyboard. choose a language, and you’re good to go. :)
audible stories
did i put this in two different categories? yes. audible stories has free audio books in english, spanish, french, german, portuguese, italian, dutch, and japanese! i recommend finding a children’s audiobook on there in your target language and pulling up an ebook online so you can improve your listening and comprehension skills. there’s no need to download any content, and it still saves your spot (even once you close the tab), which is a lifesaver!
duolingo*
i think we all know by now that this site is good for practicing your sentence-writing skills and gaining a little extra vocab. keep in mind that this only helps if you take notes on your mistakes and type answers out yourself as opposed to mindlessly clicking through multiple choice questions! duolingo stories are also great for working on your listening comprehension skills and some immersion.
linguno*
i use this site for conjugations because that’s its main asset, but there are other things you can look into if you like. i love that i can choose a section and a level (ex: a1 level one, a1 level two, a1 level three, etc.) or add my own list of words. the rest is super customizable too! you can also choose which tenses you want to work on and what set of pronouns you want to focus on (for example, european spanish uses “vosotros” while latin american spanish does not).
S C I E N C E
molview
build your own molecules or search ones that already exist to explore what they’re used for, their structure, their composition, 2-d/3-d models, formulas, molecular weight, etc.
ptable
this dynamic periodic table has a million features for each element, which makes it perfect for researching and figuring out why the table is laid out the way it is.
phet
this is basically a virtual stem lab---atom-builders, circuit-builders, wave simulations, and interactive tools galore! it covers physics, chemistry, biology, math, and html5, though i’ve only used first three categories, so i can’t exactly recommend the others.
M A T H
geogebra or desmos
these babies are graphing tools perfect for checking functions and all that jazz (they’re basically the exact same except geogebra has a couple more bells and whistles).
symbolab
use this to check your answers and review the steps if you’re stuck! when it gets into some nitty-gritty stuff, you have to have the paid plan to see some of the steps, but i think it’s helpful enough that you can stick with the free version. it covers pre-alg, alg, pre-calc, calc, functions, matrices & vectors, geometry, trig, stats, physics, chem, finance, conversions, etc. (i use this to avoid silly mistakes and the ixl rage that follows haha).
mathway*
this is very similar to symbolab except that it doesn’t show any steps at all unless you pay for a plan. you can use this for basic math, pre-alg, alg, trig, pre-calc, calc, stats, finite math, etc. as a cross-checker in case symbolab is being funky.
#back to school#back to school essentials#studyblr masterpost#bookmarks#masterpost#study tools#studying#studyblr#student
6 notes
·
View notes
Photo

PART ONE - IPHONE
part two here
So this is my first post that isn’t a stupid text post or overly bright photo of my stationary, so I hope you’ll like it! It will consist of two parts, one for the ios apps and one for google chrome extensions. Feel free to send me recommendations!
bolded = favourite, cursive = apps I use every day
Note taking and co
Pocket - very useful app to save websites, articles, posts etc and read them offline.
Keynote, Pages, Numbers - basics if you have an apple device. I actually like keynote better than powerpoint c:
Notability - Very popular app and it really is worth its money. Great for note taking, especially in class!
Evernote - On my phone for over 4 years now. The group feature is so great and I use it for preparing posts
Werdsmith - very clean and minimalistic app for writing, I use it mainly for creative writing.
Microsoft One Note - Simple app for note taking and making online notebooks.
Languages
Leo - a great dictionary in 8 languages. If you log in you can save problem words and make vocabulary lists.
Memrise - My favourite app to learn languages for free. I'm learning Japanese with it!
Duolingo learning languages for free is always fun and duolingo is so easy to use, it's even more fun! I use it to practice my Spanish.
Studying
Forest - Who doesn't know and love forest yet? It's such a cute application and I use it when I have a long study day/night ahead.
Brainscape - My to go app for flashcards. It has a giant library and it's easy to make your own. Honestly, I've been using it for 3 years now and I still love it.
Mindly - A very beautiful app to make mind maps. I use it for story ideas and school work.
MindNode - also an easy way to make mind maps.
Uberchord - learn how to play the guitar for free c:
TheSimpleClub - videos, and tutorials of all important school subjects, mainly in German, I think
Notenapp - keep track of your grades - German
Khan Academy - like the simple club but with a broader spectrum and in English.
Tide - promodoro app with nice background sounds & inspirational quotes
Swifty - learn how to code in a very fun and simple way!
Flow timer - another great promodoro timer (they are everywhere). I like the minimalistic look and nice colours.
Inspiration & Motivation
Vantage - Simple but beautiful designed calendar
Calm - Helps me calm down with breathing exercises backgrounds and sounds.
Elevate - games and exercises that help to keep your mind fit
Pacifica - an app that helps with anxiety and mental disorders with a very kind community
TED Inspiring, interesting and motivating videos on a wide variety of topics.
Others
Textgrabber & Scanner Pro - Essentials. Scans photos and grabs texts of pdf and other documents and converts them into word/text documents.
Sleeptown - From the makers of forest a very cute app that helps you keep a healthy sleep schedule. I try to use it but I forget it often, sadly.
Tydlig - not free but honestly the best calculator you can have on your phone! Beautiful and simple it makes math so much more fun!
Spark - organizes your emails (even from multiple accounts) and notifies you if something important comes in. Very neat design.
Moon - cute app that shows the phases of the moon depending on the date.
Plant Nanny - keep track of your water intake by watering cute plants (they have something similar for walking and keeping track of expenses!)
#nightlystudying#study apps#masterpost#studyblr#srudygram#studyspo#studygram#iphone#appblr#langblr#learning#studying#college#uni#school#study masterpost#studyblr masterpost#ios#apple#languageblr#language learning#study motivation#study#study inspiration#studyinspo#my edit#my posts#i am so proud#proud
17K notes
·
View notes
Text
Amazing Online Services That Can Save Your Time and Money
Due to the current pandemic, most of us are used to working from home. And when we work from home, sometimes we have limited resources. Sometimes, even the IT support could take a while to reach you. Also, if you are not an administrator, you may not have rights to install applications on your laptop. The purpose of this post is to cover how we can use online services or online apps to support our day-to-day work. Also, since the online apps that we have listed are free for trying out, this will also Save you Money. So, lets checkout how amazing the online services are and how we can save time and money with these web apps.
- Make your E-Signature / Digital Signature like a Pro
- Convert PDF to Word
- Link Multiple PDF Files Online and Arrange files as you prefer
How to make your E-Signature / Digital Signature like a Pro
If your workplace is requesting you to add your signature to soft copies, you may wonder how to add the signature without a dark background. Here’s how you do it.
Step Guide
- Using a Blue or Black pen, add your signature to a hard white paper (paper thickness 80GSM or more)
- Take a clear picture of your signature using a smartphone
Tips — Capture in the daytime with natural light. Try to reduce unnecessary background while capturing
- Transfer the picture of your sign to the computer using any of the below methods- Using data cable
- Email from phone to pc
- Use “Your Phone” app
- Upload to cloud storage Google Drive, OneDrive, Dropbox, and access from Laptop computer… etc
- Go to https://www.remove.bg/
- Login using your Google or Facebook account

You can also create an account by following the instructions in Signup page
- Upload the image of your Signature to the website

- Once uploaded, it will look similar to this

- Click on “Removed Background” to do the magic

- Now you can download the image using the buttons on the right side. For better quality, use “Download HD”
- Open the document, you need to add the signature. If it is word or excel, then you need to go to Insert>Pictures>This Device and browse for the image from the previously saved location and insert

- Now with the knowledge you have on work/excel you can move the signature image, resize it and send it behind the text

`
- Finally, you can get a clear signature on the document you need.

Hope these online services can save your time and money
Convert PDF to Word
If you are using the free version of Adobe Reader, there will be no option to convert PDF documents to Word/Excel or other formats. As an alternative, there are plenty of free websites that give you the opportunity to convert PDF to other formats. But most of these sites are covered with popup ads, or have limitations based on number of pages or file size. Therefore, I thought of sharing a site that actually works. With a quick guide to follow.
Site link - https://smallpdf.com/pdf-tools - Use at your own risk.
Once you visit the site, you will notice several file conversion options, such as:
- Convert Word, PowerPoint, and Excel files to and from PDF
- Change PowerPoint presentations to PDF documents
- Convert PDFs to editable PowerPoint presentations
- Transform JPG, PNG, BMP, GIF, and TIFF images to PDF
- Extract images from your PDF or save each page as a separate image
- Change Excel spreadsheets to PDF documents
- Convert PDFs to editable Excel spreadsheets
- Add text, shapes, images and freehand annotations to your PDF
- Display, print, and share PDFs online
- Insert page numbers in PDF with ease
- Remove one or multiple pages from your PDF
- Rotate one or all pages in your PDF
- Convert Word documents to PDF files
- Convert PDFs to editable Word documents
- Combine multiple PDFs into one unified document
- Extract pages from your PDF or save each page as a separate PDF
- Create your signature, sign your PDF and request people to sign
- Remove password, encryption, and permission from your PDF
- Add a password and encrypt your PDF file
So, let's try to convert a PDF file to Word format.
- Visit the site using the link shared above
- Out of the provided conversion formats, select PDF to Word

- Upload the PDF files that you need to convert

- Select “Convert to Word” and click “choose option”

- You will see the animation converting/reconstructing

- Next, download the file using the Download Button.

The downloaded file can be opened using MS Word.
If you choose other file conversion formats, the final downloaded copy will support the selected application.
Link Multiple PDF Files Online and Arrange files as you prefer
There are multiple websites that support PDF file merging, however most of those files do not allow you to change the file order. But recently I found a site that supports PDF merging and arranging for free. The steps on the website are very simple and user-friendly.
Site Link - https://www.ilovepdf.com/merge_pdf
Once you visit the site using the above link, it will give the option to upload multiple PDF files to the website.
Next, the site will show thumbnail previews, allowing you to move the files. With this option, you can arrange the files according to your preference.

Once the files are arranged in the correct order, click the “Merge PDF” button and follow the screen instructions. It will combine the files and download as a single PDF file.
Hope the listed free services can save your time and money. I will keep on adding more apps to the post which will support the process.
Read the full article
#CombinePDF#CombinePDFtocorrectorder#ConvertPDFtoWord#DigitalSignature#FreeWebbaseapps#freewebsitesthathelpsyouworklikeapro#MakeyourE-Signature#OnlinePDFtoWord#Onlineservicesthatcansavemoney#PDFtoExcel#Savemoneyonline#Savetimeonline
0 notes
Text
Can I Download From Articulate 360 On Mac
Articulate Rise 360, the popular elearning authoring tool, is a go-to solution for rapid-deployment training. And that includes Google Chrome on both windows and Mac, but you can also use. I'd also recommend taking a look at the information here in terms of working on a Mac with Articulate 360. There are a few tools that are native to Mac such as Rise and Peek - the other authoring tools are specific to Windows. Download free e‑books on all things e‑learning. I signed up for a free trial of Articulate, but don't have a Windows license because I use a Mac. Can I try the free trial at another time - I wasn't planning to have to buy a Windows license. Collect consolidated feedback from stakeholders on interactive training courses built with Storyline 360 and Rise 360. Perhaps with the new Office 2011 for Mac, Articulate can finally create the Mac version. We should contiue to request this as a need as using Windows on the Mac is not idea since we have to purchase 2 copies of Office (mac and windows). Peek 360 automatically uploads your screencasts to Articulate 360 when you're done recording. And you can download your screencasts from Review 360 at any time as MP4 videos or LMS packages. But Peek 360 also saves MP4 versions of your screencasts on your local Mac or Windows computer, which is especially helpful if, for example, your internet.
How To Download Articulate 360 On Mac
Can I Download From Articulate 360 On Mac Os
Can I Download From Articulate 360 On Macbook Pro
Can I Download From Articulate 360 On Macbook
Can I Download From Articulate 360 On Mac Computer
Articulate 360 is a well-known authoring tool for creating eLearning content. Today, we’ll take a look at what it can do and compare it to 6 other authoring tools in terms of capabilities.
» What is Articulate 360?
Articulate 360 is an authoring toolkit that allows you to create interactive eLearning courses. Each app in Articulate 360 helps you produce a specific type of content. For example, Articulate Storyline is best used to create full-fledged courses with interactive elements, while Articulate Rise allows you to make minimalistic web courses in your browser. And those are the two apps. Articulate 360 offers 8 services (including the Library) to make sure you can create content for any learning situation. For example, screencasts may serve as software simulations for learning complicated programs, while quizzes help test students to see how they perform.
Now let’s take a closer look at each of the apps in Articulate 360.
Storyline 360
Articulate Storyline is a standalone desktop authoring tool for creating eLearning courses. You compile a course from blocks and connect them with each other.
Sonicwall ssl-vpn netextender download for mac. I do this dance several times a week. Sometimes then when you restart the app it is still in that mode so you have to give it a few before you reconnect to your perfectly stable VPN node back in HQ.
Next, you fill each block with relevant content. It could be a media file, a quiz, a software simulation, or an interactive table. Making a course from scratch in Storyline could be complicated for an inexperienced user, but that’s where Content Library 360 comes in. The library has over 4,5 million assets: photos, icons, characters, and templates. For a shortcut, you can take a slide template, fill in the text, and add a few images.
Studio 360
Articulate Studio is three apps for authoring specific types of content. Presenter is a PowerPoint add-in that allows you to create interactive slide courses. Quizmaker makes quizzes and surveys. Engage is an app for making interactive tables, timelines, boards, and conversations. So basically, you can make the same content with Studio or Storyline.
The difference is that Storyline is a standalone app, while Studio requires PowerPoint. The two services are also different in their capabilities. For example, Studio doesn’t support custom interactions, software simulations, or native screen recording. You can import Studio files into Articulate Storyline, but not the other way around.
Or it can be installed later before you install Adobe applications. Jre for mac 10.6.8 download. Apple recently changed the way it includes Java in Mac OS, and with Lion, Java is no longer preinstalled. Adobe and Apple have worked together to ensure that you can install Java at OS install time. It is now an optional install that you must select.Since current Adobe installers and applications were built before these changes by Apple, Adobe software anticipates that Java is installed.
While Studio may feel limited compared to Articulate Storyline, it has its uses. If you work frequently in PowerPoint and are used to its interface, you can make awesome courses with Studio in no time. It’s also best used for making quick quizzes that don’t need a wide range of features, like surveys or questionnaires.
Rise 360
Articulate Rise is a web-based authoring tool, so it requires no installation. It is more minimalistic and offers a different approach to creating courses. Rather than customizing slides with interactions, you create pages from existing templates and fill them with text, videos, and images. Responsive courses automatically adapt to any screen size: tablet, smartphone, or desktop.
Replay 360
With Replay, you can record and publish screencasts. The recording process is simple and can be done in a few clicks. After you’re done recording, the video automatically appears in the Replay editor. Now you have an option to publish it to Articulate servers or render it as a .mp4 file on your PC drive.
Articulate Replay can also be used as a video editor, as it supports the most popular video and audio formats. However, it doesn’t have complex filters and features that professional video editors have, and it struggles with large video files. So it’s best to use it as a screencast recorder.
Peek 360
Peek is another option to record screencasts on PC or Mac. Unlike Replay, it doesn’t have an editor, so you can’t edit the videos you record. However, you can upload a recording to Articulate 360, and then either share the video with a link, download it as an MP4 file, or download it as a SCORM file if you want to use it in an LMS later.
In conclusion, use Peek if you want to share your screencast quickly without editing.
Review 360
Articulate Review helps you gather feedback from your content. When you publish to Articulate servers, you have an option to share it with other people, like team members or clients. They can leave comments for each individual block in the course, for example requesting you to change the character or make the slide more informative. This makes gathering feedback orderly and easy. Watch this detailed Articulate tutorial on Review 360:
Articulate 360 Training
This service offers live eLearning training from the Articulate team. Beginners can learn how to make courses and what they should focus on to grab the learner’s attention, and more experienced authors can learn about updates. Because the training is done in webinar form, the viewers can ask questions and get answers in real-time.
» What are the Alternatives to Articulate 360?
Articulate 360 is a strong authoring toolkit that offers various eLearning services. But what if you don’t need all the services? With so many apps available, you may end up using only a couple for making your content. If that’s the case, you might want to look for an authoring tool that offers a different approach. There are many course makers out there, and we’ve picked 6 free and paid tools that can be a great alternative to Articulate 360.
iSpring Suite
iSpring Suite is another popular authoring tool. It allows you to create digital courses, quizzes, visual interactions, and video courses. In terms of authoring, it’s similar to Articulate Storyline, but it offers more. A neat bonus that Studio 360 doesn’t offer is two tools for making flipbooks and dialogue simulations.
What makes iSpring Suite stand out is the speed at which you can create content. Thanks to the pre-built assets and templates available in the library, you can author professional-looking courses from premade PPT presentations without hassle.
Here’s what you can do with iSpring Suite:
› Create full-fledged digital courses;
› Create interactive quizzes;
› Make educational videos, like video lectures or software simulations;
› Use dialogue simulations for soft skills training;
› Turn existing PDF and Word files into digital books with flipping pages in a few clicks;
› Access the content library for thousands of assets: course templates, characters, backgrounds, objects, and more.
Adobe Captivate
Adobe Captivate is another popular authoring solution for professional eLearning developers. It’s a strong toolkit that allows you to create digital courses from PowerPoint files or make them from scratch in the editor. You can create multiple layers for each slide, and it’s easy to edit them on the fly once you become accustomed to the editor. This opens up vast design customization opportunities.
In its latest iterations, Captivate started to focus on interactive videos and VR. It’s one of the few eLearning tools that allow authors to create VR experiences that can be used for training.
Here's what you can do with Adobe Captivate:
› Turn PowerPoint files into eLearning courses enriched with videos, characters, images, and other interactive elements;
› Turn ordinary videos into interactive courses by inserting pop-up questions and media in the video feed;
› Create digital courses from scratch using Fluid Boxes — containers that keep text and media aligned whenever you drag or resize them;
› Create educational VR experiences and engage your learners in life-like scenarios.
Brainshark
Brainshark is two things: a web-based authoring tool for creating eLearning content and a platform for sharing it. When you’re done creating, you can publish the course on the Brainshark platform and share it with your employees. The results are stored in the platform and can be accessed for statistics by the administrators.
In terms of authoring, Brainshark is similar to Rise 360 because you make the content right in the browser, but the content presentation is different. With Brainshark, you can upload video recordings, podcasts, and presentations to compile a web course, or make a quiz using the web tool itself.
Here's what you can do with Brainshark:
› Create web courses to train and coach your sales teams;
› Integrate your portal with Salesforce or Microsoft Dynamics to get detailed statistics;
› Incorporate data from classroom training.
mAuthor
mAuthor is a web-based platform for developing eLearning content. You create courses using the authoring tool and then publish them on the platform. It’s also possible to save a course as a SCORM package if you plan to upload it to an LMS.
Thanks to the responsive design, you can always check how your course ends up looking on a tablet, smartphone, or desktop.
Here's what you can do with mAuthor:
How To Download Articulate 360 On Mac
› Create courses using the WYSIWYG editor;
› Use pre-built functional modules for different content types: quizzes, math functions, games, and more;
› Publish your content on the mAuthor platform, complete with roles, tasks, feedback, and progress tracking.
iSpring Free
iSpring Free is a lightweight PowerPoint add-in that allows you to turn presentations into eLearning content. Just like the name suggests, the tool is 100% free.
With iSpring Free, you can create two things: interactive quizzes and courses. The quizmaker tool offers two quiz formats: graded and survey (no grades). Both support 3 question types: multiple-choice, multiple response, and short answer.
You can publish the quiz on its own or add it to your PowerPoint presentation, just like in iSpring Suite. Additionally, you can add web objects and YouTube videos to the slides. Once your presentation is finished, you can publish it as an eLearning course to an LMS or a website.
That’s all iSpring Free can do. While there are not so many options compared to Articulate, it’s perfect if you’re looking to create slide courses quickly and for free.
Adapt
Adapt is a free web-based authoring tool. In order to use it, you first have to prepare your web server for installation, download the Adapt installer, and install it either on a server or your PC. If you’re clueless about this procedure, follow this step-by-step installation guide.
With Adapt, you can make questions, presentations, and assessments in your web browser. You do so by adding blocks to the course page and filling it with content, such as questions, assessments, or media files.
Adapt is pretty limited in terms of capabilities, and you don’t have access to a content library like Articulate and other paid tools offer. However, it’s free, and might be perfect if you’re looking to get started on eLearning authoring.
Authoring toolArticulate 360iSpring SuiteAdobe CaptivateBrainsharkmAuthoriSpring FreeAdaptTypeWeb-based & DesktopDesktopDesktopWeb-basedWeb-basedDesktopWeb-basedEase of UseInteractive ElementsCan use existing content*Mobile-Ready Content
Mac google chrome disable auto open pdf download. *These authoring tools can turn existing content, such as PPT and PDF files, into eLearning courses.
YOU MAY ALSO LIKE
›Top 10+ Learning Management System (LMS) Software In 2019
› Top 10 Webinar Software in 2019
› Top 10 Online Training Software in 2019
› Top 10+ Best Survey Software In 2019
› Top 10+ Best Marketing Planning Software In 2019
Articulate 360 Crack + Mac
Can I Download From Articulate 360 On Mac Os
Articulate 360 Crack is the world best storyline based slides designing program who enables you to resolve your all the type of issues of your storyline based slides designing where you can design & also import all the type of images Articulate Tool also enables you to design complex shapes for explaining the theory.
By Chuck Inglish)12.She Said (Prod. By Khrysis)13.Life Aint Easy (Prod. Mac miller mixtape download best day ever. By Blue of The Sore Losers)10.In The Air (Prod. By Ritz Reynolds)11.Play Ya Cards Right (Prod.
Articulate 360 License Code is really an efficient tool designed by the professionals who resolves your all the type of issues of your storylines documents slides designing. Articulate 360 Tool also enables you to manage the layout of your slides and also you can import images in your document.
Qualities Of Articulate 360 Activation Key
Articulate 360 Patch Keygen is a complete program who provides you all the things you need to know about Articulate 360 Adobe program who discovers your all the features.
This latest version of provides you Storyline 360, Studio 360, Replay 360, Peek 360, Rise, Content Library, Articulate Review, Preso, and also Articulate Live.
With the help of this tool, you can import and also export all the type of data in your storyline documents and also render the format.
It enables you to manage the font style of your documents and many other things.
You can use this tool on your Mac operating systems also.
How Can We Free Articulate 360 Crack Download?
For using this tool, you just download the complete setup of Articulate 360 Tool in the operating system from our blog.
When you completely download the setup of Articulate 360 Tool in your operating system.
You just simply install your completely downloaded Articulate 360 Tool in the operating system.
When the procedure of installation of Articulate 360 Tool is finished on the operating system.
You just simply run your completely installed Articulate 360 Tool in the operating system.
Wow, this latest version completely installed Articulate 360 Tool is running without any type of errors and bugs.
It’s time for using and Bingo.
Let’s Use and Enjoy.
Can I Download From Articulate 360 On Macbook Pro
Madona Linda
Articulate 360 Crack
Can I Download From Articulate 360 On Macbook
4
Can I Download From Articulate 360 On Mac Computer
Incoming Queries:
articulate 360 download
articulate 360 for mac
articulate storyline 360 crack download
activation key storyline 360
articulate storyline 360 crack
0 notes
Text
Speech To Text For Microsoft Word Mac

Mac Pdf Text To Speech
Free Speech To Text For Mac
Fonts For Microsoft Word
Activate Speech To Text Word
App name : Convert Text to Speech You want computer/your phone say something from Phone or PC? download this app, you can convert text to Speech in any language that Windows supported, Download Now !!! Features : - New design & user interface. - Save your speech to mp3, m4a, wav, and/or txt file. - Speech SliderBar control. - In Windows 10 build 14393 or later, now you can play speech in Background (due to windows limitation). but for earlier version you can try my workaround, type your speech => save to mp3 file => play with music player (eg. Groove Music). - You can open EPUB file. - You can open Doc/DocX, PDF, Rtf, Dot, ODT, html, and xml file. - You can open Subtitle file (e.g SubRip (.srt), MicroDVD (.sub), SubStation Alpha (.ssa, .ass)) - Control the volume and speed of speech. - Support for password-protected Word file and also for PDF file. - Added ability to search, sort and select in Library page. - 'How to download Speech' page to help download Speech language. - You can translate your text to any language, (powered by Google Translate) - Save AutoRecover - Search speech text visit my website ynsblog.azurewebsites.net From now on I am no longer supporting this app for Windows Phone 8.1, move to Windows 10 Mobile (Windows 10 if you have pc). thanks to all.
In years gone by, text to speech software was rather expensive, but these days there are excellent text to speech tools available free of charge. We're here to help you find the very best tools that will make converting written documents to audio files as easy as possible.
This video demonstrates how to enable and use the text-to-speech feature in Word 2016 for Mac. Excel 2016 for Mac Outlook 2016 for Mac PowerPoint 2016 for Mac Word 2016 for Mac Word for Mac 2011 Excel for Mac 2011 Outlook for Mac 2011 PowerPoint for Mac 2011 More. Less You can use the Text to Speech feature to hear selected text read aloud in a Microsoft Office for Mac file. Speech to text turn what you say to text. You can enter any sentence with keyboard. You open and save text file.
You can right click on the text and click Stop Speaking. You can press the key combination again to stop speaking. In the System Preferences window where you set the Voice and Key Combination you can also make the computer announce the time and warn you when a pop-up window appears. Go to a document or other text field and place the insertion point where you want your dictated text to appear. Press the keyboard shortcut for starting dictation, or choose Edit > Start Dictation. The default shortcut is Fn Fn (press the Fn key twice). You can use your voice to dictate text to your Windows PC. For example, you can dictate text to fill out online forms; or you can dictate text to a word-processing program, such as WordPad, to type a letter. Download this app from Microsoft Store for Windows 10, Windows 10 Mobile, Windows Phone 8.1, Windows 10 Team (Surface Hub), HoloLens. See screenshots, read the latest customer reviews, and compare ratings for Convert Text to Speech.
Text to speech software can be enormously helpful for anyone who's visually impaired, or has a condition like dyslexia that makes reading on screens tricky. It can also help overcome language barriers for people who read a language but don't speak it, or are in the process of learning.
Text to speech software is also ideal if you want to listen to a document while doing something else, if you find it easier to retain information you've heard, or if you want to sense-check something you've written.
Mac Pdf Text To Speech
Here's our pick of the best free text to speech software for reading either individual paragraphs or whole documents aloud.
1. Balabolka
Save text as a spoken audio file, with customizable voices
Lots of voices to choose from
There are a couple of ways to use Balabolka's free text to speech software: you can either copy and paste text into the program, or you can open a number of supported file formats (including DOC, PDF, and HTML) in the program directly. In terms of output you can use SAPI 4 complete with eight different voices to choose from, SAPI 5 with two, or the Microsoft Speech Platform if you download and install the necessary files. Whichever route you choose, you can adjust the speech, pitch and volume of playback to create custom voice.
In addition to reading words aloud, this free text to speech software can also save narrations as audio files in a range of formats including MP3 and WAV. For lengthy documents you can create bookmarks to make it easy to jump back to a specific location and there are excellent tools on hand to help you to customize the pronunciation of words to your liking.
With all these features to make life easier when reading text on a screen isn't an option, Balabolka is best free text to speech software around.
2. Natural Reader
Free text to speech software with its own web browser
Choice of interfaces
Natural Reader is a free text to speech tool that can be used in a couple of ways. The first option is to load documents into its library and have them read aloud from there. This is a neat way to manage multiple files, and the number of supported file types is impressive, including ebook formats. There's also OCR, which enables you to load up a photo or scan of text, and have it read to you.
The second option takes the form of a floating toolbar. In this mode, you can highlight text in any application and use the toolbar controls to start and customize text to speech. This means you can very easily use the feature in your web browser, word processor and a range of other programs. There's also a built-in browser to convert web content to speech more easily.
3. Panopretor Basic
Easy text to speech conversion, with WAV and MP3 output
Exports in WAV and MP3 formats
As the name suggests, Panopreter Basic delivers free text to speech conversion without frills. It accepts plain and rich text files, web pages and Microsoft Word documents as input, and exports the resulting sound in both WAV and MP3 format (the two files are saved in the same location, with the same name).
Free Speech To Text For Mac
The default settings work well for quick tasks, but spend a little time exploring Panopreter Basic's Settings menu and you'll find options to change the language, destination of saved audio files, and set custom interface colors. The software can even play a piece of music once it's finished reading – a nice touch you won't find in other free text-to-speech software.
If you need something more advanced, a premium version of Panopreter is available for US$29.95 (about £20, AU$40). This edition offers several additional features including toolbars for Microsoft Word and Internet Explorer, the ability to highlight the section of text currently being read, and extra voices.
4. WordTalk
An extension that adds text to speech to your word processor
Customizable voices
Developed by the University of Edinburgh, WordTalk is a toolbar add-on for Word that brings customizable text to speech to Microsoft Word. It works with all editions of Word and is accessible via the toolbar or ribbon, depending on which version you're using.
The toolbar itself is certainly not the most attractive you'll ever see, appearing to have been designed by a child. Nor are all of the buttons' functions very clear, but thankfully there's a help file on hand to help.
There's no getting away from the fact that WordTalk is fairly basic, but it does support SAPI 4 and SAPI 5 voices, and these can be tweaked to your liking. The ability to just read aloud individual words, sentences or paragraphs is a particularly nice touch. You also have the option of saving narrations, and there are a number of keyboard shortcuts that allow for quick and easy access to frequently used options.
5. Zabaware Text-to-Speech Reader
A great choice for converting text from websites to speech
Fonts For Microsoft Word
Good file format support
Activate Speech To Text Word
Despite its basic looks, Zabaware Text-to-Speech Reader has more to offer than you might first think. You can open numerous file formats directly in the program, or just copy and paste text.
Alternatively, as long as you have the program running and the relevant option enables, Zabaware Text-to-Speech Reader can read aloud any text you copy to the clipboard – great if you want to convert words from websites to speech – as well as dialog boxes that pop up. Zabaware Text-to-Speech Reader can also convert text files to WAV format.
Unfortunately the selection of voices is limited, and the only settings you can customize are volume and speed unless you burrow deep into settings to fiddle with pronunciations. Additional voices are available for a US$25 fee (about £20, AU$30), which seems rather steep, holding it back from a higher place in our list.
0 notes
Note
Hi Julia! Any tips in making a poster for a conference? What did you use to make your poster?
Hi Anon! I’m happy to help!
I use Powerpoint to make my posters (which can also be saved as a pdf file if necessary).

Here’s one of mine at 26% zoom (actual size next to me here!). (Sorry I can’t show any more detail; the stuff hasn’t been published yet)
You can adjust the size of the powerpoint to the desired poster size by going to File > Page Setup and then choosing “Custom” for “Slides sized for:”. Adjust the Width and Height and confirm the “Orientation” of your Slides is what you want (Portrait or Landscape). I used the following dimensions for my above poster:
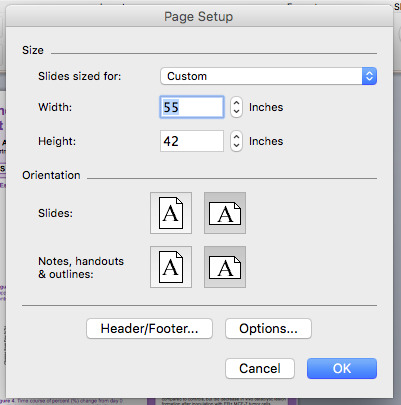
Determine your poster size before starting on your poster as resizing after the fact may crop some images/text.
Be sure to a) check with the size requirements as per the conference poster guidelines, as well as b) the maximum printing size for wherever you’re getting your poster printed at (places usually have a height maximum due to the size of their paper).
If you google image “academic poster samples” a bunch of posters pop up for you to draw inspiration on layouts, but in general it’s these main categories:
(Title, Authors, Affiliations, Institutional logos if desired)
Abstract
Introduction (can include separate sections of Background, and Purpose & Approach if desired)
Methods
Results (Figures/Tables/Graphs) - usually in the middle of the poster aka the center of attention
Summary of Results
Conclusions/Discussion
References/Bibliography (not required, only put if you have room or want to give a shout-out to your lab’s papers)
Acknowledgements and/or Disclaimers (such as funding sources)
Some other general tips:
Check out other examples of posters at your institution. Take a mental note of what you like/don’t like. Also check with your mentor or program if they have templates ready to go. Every institution will also have official logos you can use (or even a quick google image should do it, though ones provided by your institution will be of higher quality).
The figures/tables/graphs in the Results section are the most important and should be easy to read and understand. They should be of high image quality, have titles (one title can be used to described a group of related figures if applicable) and figure legends (that can describe the figure alone without the need for the reader to go through the methods or results). This should include explanations of all abbreviations, symbols (such as stats), what any arrows mean, etc. Essentially someone who has a basic understanding of your field and methods should be able to look at your figures and understand your entire poster. In addition, when you present your poster, you will be using your figures to guide you, so make sure they tell the whole story.
Also consider if you need any figures/diagrams as part of the Introduction, Methods, or Conclusions (say to explain a biological process or proposed theory or complicated protocol).
Fonts should be legible to the audience. 25 or 28 pt font is the smallest I’ll ever go.
I have a separate powerpoint file that I use to dump all my figures (even those i don’t end up using). It’s also a good way to organize the order (as ppt slides are easy to move around). I also don’t like to do any figure manipulations on my actual poster file (the less moving pieces on a file that large just makes life easier imo). I do all that in my figures dump ppt and then screenshot the final version for my poster. That’s just what’s worked for me though; you may find another method to be more streamlined.
The less text, the better. Enough text is necessary so someone reading your poster without you present will understand it, but not too much text to intimidate someone from approaching.
Get feedback and go through multiple revisions. Very important! I usually will have my PI look over my poster continuously at least 2 weeks before printing for feedback. For example, sometimes wording is really important, or I may miss a technical detail in a figure legend, and these nuances are best picked out by someone with much more experience (like a PI). Also you never know what your PI or mentor may not want you divulging to a general audience (for fear of being scooped).
And related, proofread to the best of your ability. Will you discover a typo an hour into your poster presentation that you didn’t catch before? Probably. Happens to all of us. That’s ok, but try your best to make sure your care and attention to detail shows.
Make it aesthetically pleasing. I know it’s all about the data and information of course, but also think human psychology and what catches someone’s eye–color*, organization, flow, neat lines, clear images, etc. If your poster draws the attention of someone who wasn’t planning on stopping by, then that’s one more person who got exposed to your hard work! (*Don’t always rely on color to organize your variables on graphs, etc; use shapes too, to be considerate to the color-blind)
Also keep in mind that some colors on your computer screen may look different (lighter or darker or fuzzier) when printed (depending on the paper and ink quality). It’s best to have some buffer time between when you need to leave/present and when you receive your printed poster for any issues related to a final print of your poster in case you need them fixed.
Somewhere in the poster (like at the very bottom) I like to put a disclaimer that states: “Thispresentation is the intellectual property of the author/presenter. Contact themat __my email__ for permission to reprint and/or distribute.” We had to do it for a conference I went to and I thought it was a really good idea. Doesn’t hurt, and somewhat protects me/my data.
Hmmmmmm I think that’s all I can squeeze from my brain! I hope it helped, or gave you inspiration for your own ideas! Let me know if you have any other questions, and good luck at the conference! You’re going to do great :)
(If anyone else has any suggestions to add, please do!)
323 notes
·
View notes
Text
300 Hour Online Kundalini Yoga Teacher Training Yoga alliance certified
300 Hour Online Kundalini Yoga Teacher Training Yoga alliance certified
This Yoga Alliance-certified course is open to anyone interested in using yoga as a tool to uncover deep truth, well-being, and healing. Taking a 300 hour online yoga teacher training with Full Circle Yoga School promotes transformation of mind, body, and soul. Get your yoga certification online.
https://www.fullcircleyogaschool.com/Spiritual and Mystical LifestyleTeaching in the traditional yogic methodology, we view yoga as a lifestyle, a science, and an art. Our course combines Kundalini Yoga as taught by Yogi Bhajan with modern mystical yoga practices with the colorful histories, traditions, and philosophies of the past.
A yoga teacher training with Full Circle Yoga School can deepen your understanding of Prana (life-force energy), energetic healing, spirituality, crystals, and essential oils. These elements are woven into practical and scientific courses on kriyas, anatomy, sequencing, meditations, and breath — all in an inclusive and accepting atmosphere.
Deep Personal HealingOur training doesn’t stop at a certificate. We’re committed to helping you grow and expand deeply on a personal level, so you can fully express yourself in every moment.
Many students experience rejuvenation from past experiences, detachment from emotional energies and a deep shifting of priorities. You will graduate from this yoga teacher training feeling expanded and empowered as an individual.
Immersion in Conscious LivingTrue yogic living teaches us to expand our consciousness and live a higher vibrational experience filled with beauty, presence, grace, and bliss. Abstaining from alcohol and coffee and eating a whole, vegetarian diet are just a few yogic practices we encourage students to follow during their online training. These small shifts can ignite enormous transformations in your home life that provide balance, peace, and wisdom on and off the mat.
Upon completion of the course, students will receive certification and a 300hr Yoga Alliance certificate through Full Circle Yoga School a Registered Yoga School (RYS).
Testimonial:
"I've just finished my Module 2 and I just wanted to say WOW, it was a lot, but I've just learned so much in those 2, it's amazing how I've managed to nearly get more information about things in those 2 modules than the entire 200 YTT course I did in Thailand with another school, it's just so detailed and the powerpoint presentations are amazing, the audios and the videos, just the whole content is spot on, teachers are available anytime, the whatsapp group chat always gets answered within minutes and it's just nice to know that the online training is not just online, it feels still very personal and is so authentic. I'm so glad this opportunity has opened up for me and I'm just super thankful and grateful to have the opportunity to learn from so many teachers, each on their own is so special in their personality and energetic level. Thank you so much for having me and teaching me all the things, which are also super important to hear for me in my personal life situation. Thank you. Thank you. Thank you." ~ Denise
BOOKINQUIRE“If you want to learn something, read about it. If you want to understand something, write about it. If you want to master something, teach it.”– Yogi Bhajan
Enrollment is currently open
THIS COURSE CONSISTS OF 40 MODULES
Regardless of the pace you choose to complete there will be weekly zoom group calls to connect, discuss, and cover course questions.
COURSE PREVIEWWHAT YOU LEARN During your online teacher training:
This 300hr Yoga Alliance registered course will profoundly expand your knowledge while deepening your practice of KUNDALINI YOGA.
30 POWER PACKED MODULES
Complete at your own pace
Yoga Alliance certified
Student and teacher support group
Same day answers and support to course questions
Traditional Kundalini Yoga with modern mystical infusions
Pre-recorded carefully curated modules
Video and printable PDF's
Graduate teaching multiple Kundalini Classes
Unlimited lifetime course access
E-RYT 500 trained teachers
Boost your immune system
Super Charge you energy levels
Lose weight & Tone Up
Elevate your mood & Life
Strengthen your intuition
Say goodbye to fatigue, stress, anxiety, & depression
300 Hour Online facilitator:(please read teacher bio for more info)
Jolie Wilson
Join our amazing Kundalini Online course for adventure, healing, and connection as you complete your 300 Hour Online Yoga Alliance Certified Yoga Teacher Training. Go beyond your idea of what Yoga is and enter into an Immersion Program that will shift you, lift you, and guide you to become the person you have always known you could be. This Yoga Alliance Teacher Certification course is for anyone wanting to learn how to teach Kundalini yoga in a confident, knowledgeable, and empowered way. This is an in-depth course that goes above and beyond what is required to be certified to teach, and is created for all those who are interested in changing their lives and in delving deeper into truth, health, and healing. This course is a training that fuses mind, body, soul.
We teach in the traditional yogic methodology, which views Yoga as a lifestyle, a science, and an art. We combine a detailed and in-depth study of modern kriyas with rich and colorful history and philosophy, as well as the lifestyle of Kundalini Yoga that offers balance and peace for life “off the mat.” Students will learn, practice, and teach a wide range of kriyas, fully grasping sequencing in Kundalini yoga. There is ample opportunity to deepen your understanding of Prana (life-force energy), healing, spirituality, and mysticism woven into the course with anatomy, sequence and breath, all in a space that offers the multi-faceted teachings of Yoga while honoring and respecting all religious backgrounds and beliefs.
Learn how to live fully and artfully in every moment, heal your life and others lives, let go of attachments and false beliefs, and rise up into your fullest self. True yoga (meaning “union”) teaches us to expand our consciousness and live in a higher vibrational life of beauty, presence, grace, and bliss. This is truly an opportunity to shake off what you are ready to leave behind in order to transform into the Empowered You.
Upon completion of the course, students will receive certification and a 300hr Yoga Alliance certificate through Full Circle Yoga School a Registered Yoga School (RYS).
INQUIREBOOKFull_Circle_Logo_Yoga_School.pngTuition:$2999 Paid in Full - This tuition includes all 300 hour online workshops, modules, lectures, zoom calls, and videos as well as your yoga alliance graduation certificate which can be uploaded immediately upon completion of all program modules and requirements. Payment Plans:$2999 one time payment in full$1033 in 3 payments scheduled at your convenience within 12 months - $3100 total$400 monthly over 8 months - $3200 total $270 monthly over 12 months - $3240 totalRequired textbooks: (most available on kindle)
1. Invincible Living - Guru Jagat
2. Additional materials are provided via PDF in the course
additional needed materials:~ Required Textbooks
~ Phone, Laptop, OR IPad
~ White yoga clothes
~ White head wrap, scarf, or head covering
~ Yoga Mat
~ Yoga Block
~ Yoga Blanket~ Notebooks with lined paper ~ Journal for daily gratitude journaling and writing ~ Writing instruments (pens/pencils)~ Highlighters
0 notes
Text
5 Things You Can Do With IM Checklists From Kevin Fahey
youtube
Get your IM Checklists Here!
Hey everybody, Marty Bostik here with a quick video for you that I think you’re going to enjoy.
I wanted to talk to you about five, five things you can do with a checklist and there’s actually more that you could do with it. But I wanted to give you an example.
And the reason I’m going to do this is yesterday I had sent out an email about Kevin Fahey. I am checklist, his gold membership, the collection of all of his checklist that is just a phenomenal resource. I, I can’t say enough about it because I’m actually already using it in some of my training materials and some of my upcoming, training videos in my membership site.
But what I wanted to show you was just, you know, a handful of things that you could do with a single checklist. And this is just one little checklist that you get access to out of all these different volumes.
So volume 26 was around lead sources. And what I thought I would do is look through the various checklist to see which ones would make a good training, a piece of training content. And I actually found quite a few, but the one that I went with is answering questions online. And what I did is I made a video out of it. I made an MP three audio out of it. I made a blog post out of it. I’m going to make an email out of it. Let’s see, what else did I do with it I actually did something else with it.
I can’t even remember now. I made a PDF out of it. Just a variety of things could be done. I thought about even doing a PowerPoint slide deck out of it, but that may be overkill at this point. The reason for doing this was to show you how to take one of these checklists and use it. So if you bought one of these, if you bought a membership for this, this thing already, that’s great. Hopefully this will help you a little bit.
He’s already got some training videos in there, but I wanted to show you how to use a resource like this and once you get it. And so many times I see people buying tools, they buy software and they don’t really know what to do with what they’ve got. And I got it for the, for a couple of purposes, one for helping me with my own content marketing and to be able to, to do things on a scale of stuff that’s already built, to be able to do things on a scale that I couldn’t reach before.
And so for my own productivity plus being able to use it in my creations and having the rights to give it away, sell it, rebrand it, change it up, that’s awesome because that, that, that opens a whole new playing field up for me to work from. And the same can can be done for you. So let’s talk about it.
Let’s talk about what’s inside here inside of this one checklist. So there’s each, each of his checklist volumes have multiple checklists and they’re in this progressive order of how you would, you would do things within each one. So the first checklist is talking about getting more leads from your blog, getting more leads from social media, organic search and so on. And it’s all around lead sources. So what I wanted to do in this example show you just a good size handful of things you could do from one piece of content.
Now here’s the checklist. Here’s what it actually looks like is checklist number 14, answering questions online. And I thought this one was appropriate because it’s something I do. I do get into discussion forums, I get on Cora, get on a number of sources and I answer questions for people and I thought this would be a really good relevant piece of content. So I literally took this particular checklist.
Get your IM Checklists Here!
I went ahead and rather than rebranding it and going to the trouble of putting all the new logo and stuff on it, I went ahead and put a footer link in here where somebody could go buy this checklist membership system. And that’s all done within a checklist that I, I’m going to give away. So everything’s broken down into 18 points in here was talking about mentioning links that are relevant and it talks about that within the first six points.
And then it talks about making comments. So then it’s got 0.7 through 11 over there. It talks about that. And then how do you use images when you’re answering questions and then you know, making sure you’re riding with, with style in what you’re doing. And by the time you’re done you’ve got this, this 18-point checklist of stuff that’s actionable all from this one volume.
And I want to show you real quickly what this has morphed into. So this is really cool. So there’s the editable word version of the checklist. I have also created, where’d I put it Lets see. So many browser windows. I can’t find everything over here. There it is. Alright, so here’s a PDF version of the checklist. Okay, so you could go do this on a document sharing site. Maybe you’re bundling this thing with something else, but you could include it there.
I’m actually going to include it in, in this, this email that you’re seeing the video embedded in here. if you are seeing this video elsewhere, that’s fine. You can, you can get back to here but, but there’ll be a link to it where you can get to these resources. You’ll get to the PDF version of this.
I’m going to give you the editable version of that checklist, which I’m allowed to do. I’m going to give you an MP3 version. I’m going to give you an MP 4 video file and I’m going to show you the blog post that I created all from this one stinking checklist. Man, just one that’s, that’s really super cool. So let’s go ahead and minimize this. Let’s take a look first at the video. So I used content samurai to create a video that is all of these, these bullet points.
Okay. The only thing I embellished here was like mentioning links that are relevant, these, these topic changes. All I did was embellished that just a little bit more inside of that discussion point there. So let me show you what the video looks like. I’ll let it play for a few seconds. Sites is not easy, but your website can become very successful in your leads can grow. If you go to sites like quora.com and answer people’s questions there in the end, provide the link of your website so they can visit it.
Answering questions online is a great technique to outgrow your site and persuade people to get to your original site. This is how you can do it. Mentioned links number one. First start my writing a brief answer to the question number two. Then to make the answer more detailed and clear, you can add relevant links in the answer. Number three. Number three, for this you have to choose relevant questions to your brand. So you get the idea. I used content samurai, which is a video creation, too old that I’ll also include a link for you guys, for the 14-day trial if you want to. But all I did was take the script for this video.
Alexa, hang up. Sorry guys. All I did was take the script copy from the checklist, paste it into content. Sam Ryan, it spit out a, a video for me and all, all I did from there was choose relevant video clips that are royalty free to throw inside of there. And even a little very subtle audio track in the background. So at the end of the day, I’ve got a two minute 42 second training video over here that I can use as a piece of content that came from the checklist. Okay, so that’s the video angle. I took that same video and I went out and I ripped the MP3 audio out of it.
So now I’ve also got driving traffic to websites is not easy. Like that same training video is now a training audio like quora.com and answer people’s questions there. So there’s another piece of content.
So then I created the PDF version of it that I showed you just a minute ago and also went over and created a blog post out of it. So I went and made a decent thumbnail, took the blog post. I changed up the title a little bit to say how to position yourself as an expert by answering questions online.
Get your IM Checklists Here!
And look what I did. I took the checklist, this look familiar, took the checklist, changed it, the font, put a hyperlink in here, created one outbound link to core.com that I talked about and I just create bullets. I just go through here and take these topics. Then I take all the bullets and by the time I’m done, I’ve got a decent blog post with 18 points to it.
Check it out. I also, let’s see, where’s it at Oh cool. Alright. So I actually syndicated this out to the Steemit network or hive network now where you can actually get paid for your content. So I actually made 16 cents off of this blog post, got pushed out here and you can see the comment of, Hey Marty, have you checked community like block considering posting from there.
I think it’d be better if this kind of content gets posted in the communities. Good advice. I’ll go do it. But I’ve had three people upvote those piece of content and now I’ve actually made money on it. All that came out of the checklist. So you can make the social post out of this. You might be a little long, it may be longer than you’d want to do for a post.
If I create an email from this, this is a training email, I could turn right around and take the same blog post the way I’ve laid it out here.
Instead of it being in a checklist fashion, I can go create an email, put this exact content in there in the email and attach or give them a download link to the checklist that they can print out, maybe the PDF version.
And then I’ve got a really decent content pack piece of, of an email there that I can turn around and keep using over and over again. And all of it came from a single piece of content on reusing it. So hopefully this will give you some ideas. Did I cover five of them I think I did. So we’ve got a blog post, we’ve got a video, we’ve got an audio.
We got a PDF and we got an email that’s five of them. Okay. Alright. So that’s just five ways you could make, like I said, the PowerPoint slide. If you wanted to, any number of things that you want to put out there, you could take this and actually go write the blog post and syndicated or write it somewhere else.
If you wanted to, maybe turn around and take three or four of these, put them together or take one of them, give it away as a lead magnet and as a bonus on the inside of that, maybe give them a two or three of the other ones. And then on the upsell, go sell the whole checklist system.
I mean, there was my God, there’s any number of things you can do with it, but, but you get the idea, you understand what I’m doing here. You can make an infographic from this.
This would be a good candidate for that where you use pictures to illustrate it, do a mind map with it. So hopefully you get some ideas of what you could do with this. So when you see this product, don’t just think, Oh my God, checklists are boring.
Get your IM Checklists Here!
What am I going to do with a checklist How is this going to help me? Well, you get some ideas on how that’s going to help you and what you can do with it. So I’ve got this infinite library now of things that I can combine and work with. Now if you guys want to pick up your own copy of it.
Kevin Fahey has it priced right now during this special launch. He’s actually got it where it’s a $3 trial and I’m going to show you the membership area real quick too.
So it’s $3 for the first five days, which you get access to everything that I’m going to show you here in just a moment. Okay And after that it builds at $17 and 95 cents a month. But what you’re going to get going on is, is any new checklists that he keeps adding, you’re going to get access to those.
The one offer that he’s got out there on the upsell side of this that I think is invaluable is complete access to all the prior volumes and some of his training courses. So what you get with this one is you get volumes 25, 26, 27, 28, 29 30. They’re all in rebranded formats where you can go through there and you can edit them in word format.
Well, here I’ll show you, let me just show you what it looks like. So volume 26 here inside of each of these, here’s the printable PDFs.
Here’s the editable word docs like you see right here where I can change any aspect of this and make it my own because you actually get the rights that are basically white label rights to these things at the time that you have that you get it.
My maps that lay out all the checklists and how they’re putting together a Google spreadsheet and then an Excel version of it. And then it kind of an interesting HTML interactive version. And then if you want to go through here and just pick one of these quick and dirty and print it as a PDF, you could open it right up and go print it out and you’re ready to go.
But each one of these are well thought out. There are some really good ideas and it’s an invaluable resource for you if you use it. Let me show you some of the other stuff you’re going to get.
So he’s also included some bonuses where his entire training course for the 20 K extras there and his commission five training course. And then he’s got a really, really good, I am new B Corp. So if you are a beginner and you’re just starting out online and you’re trying to learn how to make some money online, this is an excellent, excellent course for that.
So, so that’s all as a bonus right now that you get along with it and there’s a webinar coming up. He also gives you access to the vault, which is his prior trainings, which is a really, really good stuff. Some of his, his live webinars, I mean this, this is a treasure trove right here. So the gold membership comes with all that. I did a full review of it. Let me show you. So I did a full review.
Get your IM Checklists Here!
Here’s the video. It goes about 20 minutes long. I talk about everything that’s included in it, but in a nutshell, you could go through here and find out what you’re going to get. Okay. So you’re going to get, those volumes are going to get the webinar replays all the way since 2018.
He did go through before he relaunched it this time and he removed anything that’s no longer valid and deprecated, which is great. So it’s only viable good content that’s in there. There’s a really slick PLR training course that’s in there too, that, that’s extremely helpful. So here’s the, the full access to the gold training vault. What I was just showing you here is all of his different trainings that are built into, into the membership platform and then the private label, right so most of the time you get private label rights.
You can’t make the content your own if it, if it’s just a standard resale, right you can’t transfer the rights. Okay. That’s something you can’t do. So you transfer the rights to, to be able to transfer rights to other people either as the master resell rights and it can’t be resold on JV zoo or warrior plus. But what you can do is include this stuff. You can rebrand it, you can give it away, you can put it in your own video training courses.
You could put it in a membership site. You can even translate it into other languages, which hit me up. If you want to know how to do that, I’ve got tools to do that too. You can be, you can say that you’re the complete author of it. You can use it to build your email list. That’s kind of what I was talking about in the individual sheets where you send one of these out as a training email and you know, the, the list goes on can be used as blog posts or infographics.
What I was just talking about a minute ago, I made a blog post from one of the sheets and you know, it can, it can be rebranded resold. You just can’t put it on JVs or warrior plus no big deal. And then you know, you can add it as a bonus too, to a product if you want to. So here is the price breakdown and you’ll see all this if you go look at the full review video too, but just to give you the skinny on it is three bucks.
Get in there, you get access to all the stuff I just showed you for three bucks. If you like it, great. Go ahead and pay the 1795 a month. You get all his future. I am checklists that that go as long as you keep your membership going, you could go ahead and pay once to get 460 checklists bundles with the PLR rights.
Just like what I showed you a minute ago for one 97, which is a steal. I mean this, this stuff is, is prime premium content. So the I am VIP training is really good training where you actually get some one on one training, you get to ask some questions of him and Kevin will respond and, and work with you on a one on one basis as well as part of that.
Get your IM Checklists Here!
The 10 X traffic, I can’t really speak to that because I don’t know much about it other than it’s a down sale that’s available for you. But if you, if you picked up a copy today at a minimum, get the front end product. If you like the checklist, I would say before your five days is up. If you like it, come back and pick up the whole bundle right here. Okay. You could do that if you want to after you bought the front end product.
So in addition to that, I’m going to let you see this on the review page, but you’ll see the bonuses I’ve paired up with the specific volumes that you’re going to get inside of here. So I just, I wanted to call attention to that.
I’ll let you guys go through there and go through the whole review if you want, but pick up your copy wherever you see this orange and red button that’s right here and inside underneath this video I’m going to give you links. It’s going to be some reference links to that MP3 I was telling you about the video that I created from it, a link to the blog post so you can take a look at it and you know some of the other stuff that I’m doing, the PDF version, I’ll even give you the editable version of this since I have rights to do that.
I’ll give you that editable word version and you can get in there and change it up and play with it if you want to and see if it’s something that you like. But you guys go ahead and pick up your copy, hopefully get some really good ideas of how you can use it.
And I will be glad to answer any questions you got. You can reply back to here. Leave me a comment. If you’re looking at this video on YouTube or Facebook or wherever, and I will respond back to you. So you guys take care, have a fantastic day. I’ll see you at the top.
Get your IM Checklists Here!
Discover 5 Things You Can Do With IM Checklists From Kevin Fahey https://nathlafmarketing.com/5-things-you-can-do-with-im-checklists-from-kevin-fahey/
0 notes
Text
Heavy Metal - The Brief
This assignment is about ‘Heavy Metal’, the aims of this brief are to approach and resolve 2D and 4D problem solving through practical experiments, research and development. We are to respond directly to a literary source and produce graphics that are directly aimed at the target audience which in this case is Key Stage 2 students aged between 7-11.
In this brief we are focusing on the classic children's book ‘The Iron Man’ by acclaimed British author Ted Hughes, 1968. The book draws readers into a science fiction short story that explains the unexpected arrival in England of a giant “metal robot” of unknown origin, name or intentions who exercises mischievous behaviour on the rural countryside by consuming and destroying industrial farm equipment, before becoming aquatinted with a small boy and defending the world from a monster from outer space. Expanding the narrative beyond a representation of war, friendships, relationships and sub-conciousness conflict.
Deadlines:
A4 Production file/blog- 01/03/18
Final pdf, book cover and animation uploaded to Moodle-08/03/18
Requirements:
-All tasks completed and presented in A4 production file
-Reflective blog, documenting all workshops
-Collection of time-based outcomes, at least one animation
-Final 2D A4 Book cover
-Slideshow Powerpoint Presentation (acting as evaluation)
As a final outcome, I must produce a book cover of my own account and making for a illustrative version of The Iron Man book, along with a promotional animation to be used across multiple medias. Our aim of our book cover is to represent the importance of friendships and relationships across people from all types of backgrounds and upbringings, then to present it to the target audience.
As a starting factor of the brief I am going to take inspiration from artists Ian McQue, Jeffrey Alan Love and Stephen King. These 3 artists have devoted their passionate art works to their industry, Ian McQue being a talented illustrator was my main focus as i was looking for illustrative values having to design a book. His work was influential and interesting to research.
initial ideas)
The book we are focusing on and and producing a fresh book cover for is ‘The Iron Man’ which is a book that has been used for many years as a curriculum text for key stage 2 learners between the ages of 7 and 11. Therefore this age group is going to be the audience I have to design for, because of the audience being such a young age it is vital for me to make sure that the book cover is appropriate and sparks the interest of them. I have to bare in mind that the “monster” i am creating has to execute simplicity, kindness and is not scary looking. The Iron Man i am recreating also has to fit accordingly to the book, it has to look as if it can demonstrate the importance of friendships, relationships and bravery but also be able to cause destructiveness.
Initially, when I think of ‘The Iron Man’ the general idea that comes to spark my imagination is the film ‘The Iron Giant’ which is very similar story line to The Iron Man, and is generally most popular as a children's film, however the ending in ‘The Iron Giant’ has an incredibly different ending to that of ‘The Iron Man’. Although, the film is very different I think the design of the iron giant is very similar as it is a destructive monster but is designed in a friendly way to suit the young audience. When I design my own interpretation of ‘The Iron Man’ I think may look similar in a sense of looking kind.I like the idea of using singular block colours in different mediums, which is beneficial to me as my robot is made from different shapes, sizes and slightly different off set metal grey tones.
0 notes
Text
List Building Feedback Software With PLR Review and Bonus
List Building Feedback Software With PLR Review and Bonus
List Building Feedback Software With PLR Review and Bonus by Kevin Fahey – Your UNIQUE Chance To Own A Revolutionary Plugin That Puts Your List Building Efforts On Steroids
List Building Feedback Software With PLR Jvzoo Wso by Kevin Fahey Review
List Building Feedback Software With PLR by Kevin Fahey is best product
List Building Feedback Software With PLR allows you to add a popup to any blog and segment your subscribers into different lists and autoresponders. You can survey your visitors with up to 4 options including videos, text, images and anything else you want. Proven to deliver higher conversions and more subscriber engagement from delivering content that they actually want. A must have for any WordPress blog. During this launch special customers will get PLR Rights to the source code. This one-of-a-kind plug-ins allows you to utilize both the functions of an exit splash survey as a plug-in and a unique multi-choice opt in delivery system. Take a look at this quick video to see this plug-in in action.
You see, my really good friend Kevin Fahey has just launched a plugin that he has been privately using for the past 6 months to drastically increase sales within his own business.Now, he isn’t launching this as an Amazon plugin, I just saw it and realized it’s potential. That means, because you are on my email list you are going to be some of the ONLY Amazon affiliates to use this proven plugin.Within just 5 minutes and a few clicks of your mouse you can have an automated system on any/all of your Amazon sites that will build your list AND find out what products your visitors want to buy.Imagine how awesome it would be to have an email list of proven Amazon buyers that you know EXACTLY what products they want to purchase.All you would have to do then is send simple emails that take less than 15 minutes to write and cash in on hundreds of dollars worth of commissions!I highly recommend that you pick up this plugin and become one of the few Amazon affiliates out there to be using this incredible technology…This has got to be the best PLR offer of the century,Kevin Fahey is practilly giving away Private Label Rights to his premium list building plugin responsilble for generatnig thousands of quality leads into various lists. He explains everything in the demo and I’m super impressed.This is a dime-sale offer and it will close after a few days so don’t delay.The key to getting amazing sales is to find out what your customers want and then to give it to them.Well, today I am sharing with you the most amazing plugin that will allow to do just that on complete auto-pilot:My good friend Kevin Fahey has been testing this plugin for the past 6 months and has been using it to poll his own email list and web traffic. You know what happened when he did?His sales increased because he only promoted things that his list wanted.He worked less because he ONLY did the things that his ideal customer wanted him to do.He had more surety about his marketing path – no more guesswork needed.If you want those same things to happen to you, it’s no secret, you just need to tap into your ideal customer’s wants and needs.And this plugin does just that!Start focusing on your customer and watch your profits soar!
List Building Feedback Software With PLR Review and Bonus by Kevin Fahey – Your UNIQUE Chance To Own A Revolutionary Plugin That Puts Your List Building Efforts On Steroids will give you a lot of benefit.
Download List Building Feedback Software With PLR here :
List Building Feedback Software With PLR Review and Bonus by Kevin Fahey – Your UNIQUE Chance To Own A Revolutionary Plugin That Puts Your List Building Efforts On Steroids
List Building Feedback Software With PLR review
List Building Feedback Software With PLR
List Building Feedback Software With PLR OTO / Upsell :
Front End : List Building Feedback
Upsell 1 : IM Affiliate Funnel
IM Affiliate Funnel 2 is our top selling affiliate marketing training that will teach your customers how to make from $100 to $500 per day.Included inside is 17 Step By Step Training Videos, PDF Report, Email Templates, PowerPoint Template & 20 Done For You Affiliate Funnels.
Upsell 2 : IM Traffic
IM Traffic Facebook Masters is regarded as one of the most comprehensive Facebook ads training to ever hit the marketplace.Included inside are 37 Step By Step Training Videos & Case Studies, PDF Training, Spreadsheet Guides & Cheat Sheet Templates.
Upsell 3 : IM Product Launching
IM Product Launching 2.0 is the most complete training package that will provide your subscribers with everything they need to create and launch their own products.Included inside are 20 Step By Step Training Videos, 3 PDF´s & 2 Spreadsheet Formulas.
What We Stand For
High Quality Products
We believe our information marketing products deliver the highest quality of training and best learning experiences your customers will ever receive. Yes, we say this with true confidence. Each product we create comes from years of experience, testing and tweaking. From there we listen to our customers and the marketplace and deliver solutions that a fresh, unique and plain out right works. Each product takes the customer true a real step by step learning experience. There is no 20 minute quick fixes thinking your customer knows it all. Each of our training courses deliver between 15 – 32 training videos, PDF, Mindmaps, Checklist and more.
Keeping Our Affiliates Happy
Why? Well we understand there is a lot of products out there and if you decide to choose ours and help us grow our business we will do everything in our power to reward you. We pay prizes 24 hours after each launch and deliver instant commission for all our products. Each sales page is crafted by a professional copywriter and designed by our inhouse team to deliver the maximum conversion. Our sites on hosted on powerful dedicated servers with round the clock support and high level security. You can be assured there will be no launch hiccups.
Responsive & Friendly Support
Since 2008 we’ve a reputation for having the highest quality of support in the industry. Our 7 days a week “qualified and trained” support team can assist your customers with any issue they face. We’re patience with your customers and will give them the respect they deserve.
A Complete List Building Plugin���WP List Building Feedback comes chock-full of unique features to maximize conversions and give you the data that you need to build your list quickly. With the WP List Building Feedback you can:
Enable the plug-in sitewide or restrict it to just your homepage. Additionally, when you go to create new pages on your site, you will be able to enable or disable each individual page to run this plug-in.This is perfect for site owners who are hosting multiple products or multiple opt in pages on a single site and want to run exit splash pages on certain webpages but not on others.
Additionally, this plug-in allows you to host multiple exit splash designs and configurations all within a single site.In other words, if you want to create a page that had an exit splash pop up giving away a YouTube video marketing product and another page that had an exit splash pop up that was giving away an e-book on mobile marketing, you could with this plug-in. All you would have to do is create the splash pages within the plug-in’s easy to use dashboard and simply select from a pulldown menu on your individual “edit page” dashboard in word press.
As you know, customization is key for being able to tweak for conversions. That is why, you will be able to customize text, font, font color, splash page width, background color, and much, much more all from the comfort of a well thought out plugin dashboard. “Customize text, font, font color,
splash page width, background color, and much, much more!”
Since I wanted to make this plug-in available to as many marketers as possible, I have also ensured that this plug-in will work with any auto responder out there.All you have to do is copy and paste the HTML code that your autoresponder company will provide you with and you’re good to go. “Works with any auto responder out there”
Not only can you customize the look and feel of the splash page, but you can also customize your call to action button. If you want, you can make it text based and simply edit the text within the plug-ins dashboard. You can also use images for your call to action buttons if you have those available as well. “Not only can you customize the look and feel”
How To Utilize This Plug-in To Grow Your List
When you pick up this plug-in, you are going to get two very powerful tools for the price of one. Let me explain:
1) The first part of this plug-in that is going to become so critical to your success is its ability to survey your visitors and then show you that data in an easy to view form within the plug-in’s dashboard.You can use this tool to find out what visitors like or don’t like about your website. You can use this form to find out what visitors are looking for in terms of more information, or what type of content they would like to see on your site. In other words, this part of the tool is going to allow you to give your visitors exactly what they want. When you do this, you’re going to create lifelong, loyal followers, readers and subscribers.
2) The second part of this plug-in is that you are then going to be able to deliver multiple-choice options to potential subscribers.
Completely Risk-Free 100% Guarantee!!! Completely Risk Free For 30 Days!!!
If you pick up this plugin today and decide that it isn’t right for you and you would rather go back to doing things the old way, if you’d rather go back to that sinking ship instead of having this unique and powerful WordPress plugin at your disposal, then I will refund your payment in full – no questions asked.Please be sure to contact me within 30 days to receive your refund.
youtube
Download List Building Feedback Software With PLR here :
List Building Feedback Software With PLR Review and Bonus by Kevin Fahey – Your UNIQUE Chance To Own A Revolutionary Plugin That Puts Your List Building Efforts On Steroids
Get List Building Feedback Software With PLR Now! buy List Building Feedback Software With PLR now and you can save money and work hours. List Building Feedback Software With PLR comes with easy to follow instructions. You don’t need any technical experience to make these improvements. starts making you huge income month after month. List Building Feedback Software With PLR Jvzoo Wso by Kevin Fahey Review
Yes!! I want to get List Building Feedback Software With PLR :
related List Building Feedback Software With PLR
List Building Feedback Software With PLR oto, List Building Feedback Software With PLR software, List Building Feedback Software With PLR training, List Building Feedback Software With PLR tutorial, step by step List Building Feedback Software With PLR, List Building Feedback Software With PLR guide, List Building Feedback Software With PLR video, List Building Feedback Software With PLR download, List Building Feedback Software With PLR online course, List Building Feedback Software With PLR social media, List Building Feedback Software With PLR upsell, List Building Feedback Software With PLR slide, generating List Building Feedback Software With PLR, List Building Feedback Software With PLR
List Building Feedback Software With PLR Review and Bonus
#List Building Feedback Software With PLR Review and Bonus Review#List Building Feedback Software Wi
0 notes
Text
5 Ways to Keep a Global Brand Consistent
See if you can picture the logo of the most recognizable brand in the world. I’ll just give you two hints: script font and the color red.
This logo looks about the same as it did when it was first trademarked in 1893. The name of the product is reportedly so familiar all over the world that it is surpassed only by the word “okay.”
I’m talking, of course, about Coca-Cola, a company with an advertising budget that numbers in the billions. “Even with a massive ad budget, the sheer scale of this branding phenomenon would be unsustainable without an unwavering commitment to consistency,” writes North Carolina-based North Star Marketing in a brilliant blog post about why brand consistency matters. Here are the five reasons they cite:
Consistency helps you manage perceptions.
Consistency conveys your outlook and attitude.
Consistency eliminates issues surrounding brand confusion.
Consistency protects your investment.
Consistency builds upon previous successes.
This fits completely with a marketing mantra that I have preached for years: “Being consistent is better than being better.” How do you go about maintaining consistency for a global brand—especially one that doesn’t have a billion-dollar budget and isn’t quite as iconic as Coke?
Let’s start with what not to do. Don’t think you’ll be able to enforce your brand standards by inspection alone. Trying to be the logo cop or the brand police simply doesn’t work, especially as your company grows and expands. Instead, try these five universal tips.
1. Publish and Enforce Brand Guidelines
At Workfront, where I am the CMO, we have a 25-page Brand Guide that is maintained and distributed by our creative director. Everyone who contributes in any way to visual identity is given a copy and expected to adhere to the guidelines.
This PDF includes multiple examples of proper logo usage, with visual examples of improper usage as well, such as:
Do not change logo colors—only use approved logo and background combinations.
Do not replace or alter logo type.
Do not stretch or distort logo.
Do not use the logotype without the icon.
The guide also covers font usage, primary color palette, complimentary color palettes, supporting icons, typefaces, backgrounds, and photography, providing some contextual examples at the end.
Creating and distributing your own guide is only the beginning, however. You also have to enforce the guidelines—even for internal usage, even for something as innocuous as an HR poster. As soon as an incorrect logo is used in one place, someone else will see it and think that’s okay. And once that one little file is in circulation, it has a tendency to propagate itself.
2. Establish Brand Voice and Messaging
While it’s no less important, written brand messaging is harder to define and enforce than brand look and feel. Why? Because voice is so much more subjective than pinpointing a couple of PMS colors, where it’s either the right orange or it’s not.
On top of creating a style guide that attempts to define how to write for the brand, you may also need to hold a training meeting or two. As you’ve no doubt seen from your colleagues’ emails and social media updates, not everyone possesses that critical eye for written language.
Your style guide could cover things like:
Your brand promise and/or your mission or vision statement
Key messages that you thread into everything you do
Personality—Is your brand informal and conversational? More serious and authoritative? Fun and friendly?
Humor—Is your brand edgy and sarcastic? A little bit sassy? Or more on the funny, witty side?
Grammar and punctuation—Do you ever use trendy social speak (LOL), or is it proper English only? Are exclamation points acceptable? Do you use the Oxford comma or not?
Style—Are headlines sentence case or title case, and do they include punctuation? Do you use contractions or not?
Industry-specific spellings—Are there certain words or phrases that your company takes a stand on? In our industry, “on-premise solution” is commonly used, but we prefer the more grammatical “on-premises solution.”
Forbidden words—Are there words that you just never want to see associated with your brand, such as “deal” or “discount”? Make a list and add it to your style guide.
Once you’ve outlined the basics, there has to be some enforcement via an established review and approval processes. Anything that’s written to be public facing should be evaluated and approved by whatever group you’ve appointed to own that function.
3. Build a Repository of Approved Graphics
Everyone in your company is armed with tools like PowerPoint these days, and if there is a void, they will create their own assets using whatever they can find. Say you have a salesperson who wants to send a customized one-sheet to a prospect, and he wants it to look “professional,” but he doesn’t have the current version of the logo. It wouldn’t be unheard of for him to take a screenshot of the logo from the website and drag it into a Word document to create his own letterhead—with unpredictable results.
Do what you can to make approved logos, backgrounds, letterhead, and templates more widely available. And I don’t mean appointing someone in your team to field requests via email.
Your best bet is a digital asset management (DAM) solution, which I wrote about in depth here. One of the biggest benefits of a centralized digital library is that you have a single place for people to get approved graphics. When there’s an update to the logo or another file, you can permanently delete all old versions—or restrict access to them.
Of course, you still need to educate everyone on how to use the DAM, where to find what they need, and especially why it’s important to grab assets from the DAM every single time—rather than relying on that logo they downloaded to their desktop six months ago.
After the initial training, reinforce it by directing people to the DAM every single time they email you for an asset. It won’t take long for those email requests to slow down and then stop.
4. Automate Reviews & Approvals
The more you can automate and streamline your approval process, the easier it will be to keep on top of branding consistency problems. When your process is poor, things easily slip through the cracks, which could result in an off-brand graphic being used in a public-facing way. Then someone else spots that usage and thinks, “I guess it’s okay to use the logo in green now,” copies it, and the vicious cycle continues.
A digital proofing solution with automatic notifications and mobile capabilities not only makes it less likely for assets to get overlooked, it also drastically reduces the amount of time it takes to get the thumbs-up from all relevant stakeholders. For one example, the Northstar New Jersey Lottery Group was able to reduce their project approval turnaround time by a full 24 hours per project after onboarding the Workfront proofing product.
5. Rely On Audit Trails
With a comprehensive work management solution and/or digital proofing software, you have an audit trail to consult anytime there’s a branding issue and you want to pinpoint where the process broke down. You’ll be able to see if:
The CMO simply didn’t weigh in by the deadline, so it was published anyway, as per your previous agreement.
The creative director approved the project, but must not have spotted the branding problem.
The creative director asked for the correction, but it never got made in the final version.
Your voice and messaging gatekeeper was not invited to review the asset.
The VP who’s now complaining about that asset did review the piece but didn’t speak up about the problem when she had the chance.
One of a myriad of other ways that reviews and approvals can go wrong.
If you have an audit trail, you don’t have to waste time asking what happened; you know what the problem was. Now you have the opportunity to do a little bit of coaching to make sure it doesn’t happen again.
Another benefit of the audit trail is that it reveals the history of this asset prior to it reaching you. For example, I may be second-guessing a certain aspect of a design, but if I see that my creative director approved it first, I’ll pause before I speak up about it—saving us both some unnecessary back-and-forth.
Taste the Feeling of Brand Consistency
You don’t have to be working for a 130-year-old behemoth soft drink company to care deeply about brand consistency. In fact, the smaller and younger your firm is, the easier it will be to establish good branding habits from the beginning. Then when your brand goes global, which is inevitable in this Internet-driven age, you’ll already be a few steps ahead of the competition.
This article was first appeared on MarTech Advisor
0 notes
Last Seen Blogs

blue-mew
Hey y'all

kkomppa
is & is not

atom-heart-floyd
Atom Heart Floyd

hobsyllwin
I Can't Show This Shit to People ok

cozing
无标题