#and maybe during this process of possibly multiple rounds of edits i can figure out if i want to continue with her after
Text
Totally forgot that a dialogue option for Enthir involved him calling himself an Altmer. Babe you're a Bosmer.
"So they were like your kind?" (Very racist of our LDB)
"Like the Altmer? Yes, I would say their culture quite possibly rivaled out own." Said the Bosmer.
Clearly Bethesda had other plans for him originally.
#skyrim#tes v skyrim#tes skyrim#the elder scrolls v: skyrim#my shit#life adventures#skyrim adventures#im starting the current final act of serelynn. retunring to the thieves guild and making her way towards becoming guild master#i might set it up so the special jobs are ready for her so becoming guild master will be done with less waiting of the radiant quests#ill have to go back and insert more of those odd jobs of course#but i was already planning on that#and ill start the first leg of the refinement process.#which may come with a third playthrough and may help me write out the intro and not just skip ahead to kynesgrove#and maybe during this process of possibly multiple rounds of edits i can figure out if i want to continue with her after#she becomes guild master because alduin wont wait on her forever#plus the forsworn conspiracy beginning was canon for her. she just ignored him at first because she just slaughtered a man in the markets#so she was a little dazed#again. we will see what else i might want to do with her. maybe ill make a poll about it.
8 notes
·
View notes
Text
A starting place for self-editing your novel
I wrote this in a reblog to one of @boy-who-can-fly‘s posts, but as I couldn’t add any tags to that that would make it findable to more than just my followers, I figured I’d make the same content in an original post because YAY TAGS!
Without further ado...
1) Take a break.
Some authors have suggested taking a break for six or so weeks, but I find anything longer than three makes me too distanced from my story, and I have to work a lot harder to get back into my protagonist’s head. During this break, don’t so much as look at your story. Instead, focus on something else. Maybe growing your author platform, planning or developing another wip, or researching the publishing industry if publishing is the end goal for your book (this goes for both traditional and self pub). The point of this is that without some distance, it’s going to be a lot harder to see larger developmental flaws.
(this is a very long post, so the rest of the steps are below the break)
2) The first read-through.
After your break has ended, and you’ve got to be a little stern with yourself not to extend it farther than what you set, or else you’ll never return to it, do a readthrough. This means either just reading it off you’re computer or kindle, or going to somewhere like staples and getting it printed and spiral bound (this costs money, but I found it helpful down the line). Two rules: 1) no editing. 2) look at the first rule. This read-through is going to help give you a general sense of what is and isn’t working in your book; the problems you notice here are likely going to be the biggest ones. (if you want, you can combine this step with step three, but I found it more helpful to keep them seperate)
3) Outline.
It doesn’t matter whether you outlined before, or whether you decided to pants it. By the time you get to editing, you need to have an outline that’s reflective of what you actually put on the page. Go through your story, chapter by chapter, and for each new scene write down
what is your character’s goal in this scene
what is standing in their way
what is the outcome of the scene.
This list should not go into depth; one short sentece per point, MAX. That being said, make sure to keep things specific, so “MC wants to convice X to go with them to Y.” is going to be a lot more useful to you later on than “MC tries to convince them to go.” This outline is going to help you objectively look at your story structure, as you can see a lot more of what’s happening at once, without being quite so overwhelmed by the sheer mass of the words you wrote. Yes, this step can be a bit tedious, but it is so, so worth it.
4) Sort out what you need to fix, aka start making a game plan for your edits.
Now that you’ve read through your wip at least once through, and probably twice, you probably have a pretty good idea of what you need to fix. The key here is that right now, you want to be fixing on the global edits - the things that span beyond just a single scene or chapter. The reason why is that you don’t want to be spending hours perfecting a scene that you’re just going to need to cut later because it doesn’t advance the plot.
In a new document or spreadsheet (whatever you think will work better for you, I liked using a google doc), write issues you see with:
Each of your main cast (regarding character development, motivations voice, etc)
Setting/s (consistancy, realism for your world)
General worldbuilding (consistancy, things poorly explained/set up)
Main plot (following a given plot structure, building tension, etc)
Each subplot (how it intertwines with the main plot, plot structure, building tension, etc)
Other major things you noticed during your readthroughs
These things tend to be larger scope, and generally are worth addressing first.
5) Picking your edit.
Look at the list of edits, and see which one is going to cause the most ripples through your story. This is going to be the first thing you look at to fix. If there are more than one edits that will all have major impacts on the story, think about which edit would make the other ones easier.
For example, in my wip, Project Toxin, my plot was, well, a trainwreck and a dumpster fire’s love child. But my characterization for my MC was also a wreck. Still, getting the overall plot more in order would make it easier for me to edit my MC, so I chose plot first.
6) Make a game plan for your edit.
Before diving in and ripping through your first draft, come up with a game plan. Brainstorm possible solutions to the edit you’ve chosen, and look at what ripples it would cause. You want to make sure that what route you take isn’t going to upset something major or crucial to your story. Most likely whatever solution you choose will cause some other upsets, so just make sure to think through what makes most sense for your story.
For example, when working on my story, I was fixing plot first. Figuring out my game plan meant looking at my scene list and moving things around/adding/cutting content until I had a plot that was much more satisfactory, and that was, in my mind, not a wreck.
Possible game plans for different types of edits:
1. Plot:
Look at your scene list. What helps to advance the plot? What is dragging the pacing. Are there any elements that you are adding or cutting in your overall story that need to be accounted for? With this in mind, cross out scenes that you want to cut, move scenes around that need to come in a different order, add scenes that need to be added, and mark scenes that need to be combined into one.
2. Characters:
For each of your characters, look at their character development. It’s going to be hard to make them come to life better on the page unless you’ve got a grasp of who they are, even if you didn’t plan them out originally. If you have not, consider listing in a spreadsheet or google doc what their backstory is, what their goals are, why they want those goals, and what a few of their strengths and weaknesses are. Also think about their voice: what words do they use more often? Sentence structures? What do they sound like when they’re talking? Stuff like that. If your character is inconsistant, pick one version of them that you want to follow (knowing that they will likely change over the course of the story), and look at what parts of them you will need to change to accomodate that.
3. Setting/Worldbuilding:
I’ve put these together here as they’re somewhat similar. For poorly explained aspects of worldbuilding, look at where you might add in little details so you can better set that foundation (this is not usually a global edit). If things are inconsistant, look at what makes the most sense for your story, and like what we talked about with characters, alter the rest to accomodate that.
7) Making edits.
This is where you really get to dig in and really move things around. Using the edit you’ve picked and the game plan you’ve developed, go through scene by scene and make the changes. I strongly recommend having a seperate doc from your rough draft to store your second draft in. Currently, my process is to have both open at the same time, and if a scene is already fine, I’ll just copy/paste it over. At least for me, however, it’s usually not, and I’ll either make tweaks to fix it up, or, more often at this early stage, I’ll rewrite it. As an added bonus, I also find that rewriting it makes my prose a lot stronger, since I’ve grown so much as a writer since I originally wrote the scene.
Since you know your story better, you may find other elements that you want to change are improving as you edit. If not though, don’t worry - they’ll get their own editing pass.
8) Repeat steps 5-7
You made a list of edits you needed to make back in step four. Now, follow steps 5-7 to make all of those edits and changes.
9) Repeat steps 2-8
Two steps telling you to repeat in a row? Yes. The deal now is that you want to make sure you’ve cleaned up any global edits before moving on to anything smaller. If you’ve been thourough thus far, this will be a very fast step. If not, think of this step as a safety net. There may have been ripples that you didn’t notice earlier on, and it’s a good thing you’re catching them now.
10) Chapter edits
At this point, we’ve cleaned up all the big edits. Now we’re going to look at each chapter. Within each chapter, there needs to be a mini-arc. A beginning, middle, and end. This is the time to really focus on that. Also focus on things like tightening up prose, combining or compressing paragraphs, making sure you’ve adequately set the scene, etc. If you’re over the word count limit regarding your genre, also focus on cutting a certain number of words from each chapter to put your story back within those limits.
11) The little things
This is about combing through your wip to find all of the little errors that have made their way through edits. Typos, weird or incorrect grammar, useless adverbs, things like that. At this point, everything is on a more superficial level.
Beta Readers
Given that this has gotten quite long, I’m not going to go in depth about beta readers here, but around step 10/11, you’re going to start recruiting beta readers (you’re going to want to try and have multiple rounds of somewhere around 10 betas each, which is why having a good author platform is useful: recruiting is easier). Between each round, you’re going to look at their feedback and make the necessary edits. After several rounds of beta readers, you’re going to look it over a few more times, and then if you’re going the traditional publishing route, you’re going to query agents. If you’re going the self-pub route you’re going to look to hire a professional editor. If you’re not looking to publish, this may be the end of the line.
Good luck editing!
#writing#writing advice#writing tips#writing references#writeblr#writers on tumblr#editing#amediting#how to edit#novel editing#editing guide#novel writing#writing refs#editing references#editing refs#long post#developmental editing#big edits#major edits#killing your darlings#olive's writing vibes
46 notes
·
View notes
Text
A breakdown of the Revision 2020 Threeway Battle shader
Those of you who have been following this year's edition of Revision probably remember the unexpected twist in Sunday's timeline, where I was pitted in a coding "battle" against two of the best shader-coders in the world to fend for myself. Admittedly the buzz it caused caught me by surprise, but not as much as the feedback on the final shader I produced, so I hope to shed some light on how the shader works, in a way that's hopefully understandable to beginners and at least entertaining to experts, as well as providing some glimpses into my thought process along the way.
youtube
Recorded video of the event
But before we dive into the math and code, however, I think it's important to get some context by recounting the story of how we got here.
A brief history of demoscene live-coding
Visual coding has been massively opened up when graphics APIs began to introduce programmable fragment rendering, perhaps best known to most people as "pixel shaders"; this allowed programmers to run entire programmable functions on each pixel of a triangle, and none was more adamant to do that than a fellow named Iñigo Quilez (IQ), an understated genius who early on recognized the opportunity in covering the entire screen with a single polygon, and just doing the heavy lifting of creating geometry in the shader itself. His vision eventually spiraled into not only the modern 4k scene, but also the website ShaderToy, which almost every graphics programmer uses to test prototypes or just play around with algorithms. IQ, an old friend of mine since the mid-00s, eventually moved to the US, worked at Pixar and Oculus, and became something of a world-revered guru of computer graphics, but that (and life) has unfortunately caused him to shift away from the scene.
His vision of single-shader-single-quad-single-pass shader coding, in the meantime, created a very spectacular kind of live coding competition in the scene where two coders get only 25 minutes and the attention of an entire party hall, and they have to improvise their way out of the duel - this has been wildly successful at parties for the sheer showmanship and spectacle akin to rap battles, and none emerged from this little sport more remarkably than Flopine, a bubbly French girl who routinely shuffled up on stage wearing round spectacles and cat ears (actually they might be pony ears on second thought), and mopped the floor up with the competition. Her and a handful of other live-coders regularly stream on Twitch as practice, and have honed their live-coding craft for a few years at this point, garnering a considerable following.
youtube
Just a sample of insanity these people can do.
My contribution to this little sub-scene was coming up with a fancy name for it ("Shader Showdown"), as well as providing a little tool I called Bonzomatic (named after Bonzaj / Plastic, a mutual friend of IQ and myself, and the first person to create a live coding environment for demoparties) that I still maintain, but even though I feel a degree of involvement through the architectural side, I myself haven't been interested in participating: I know I can do okay under time pressure, but I don't really enjoy it, and while there's a certain overlap in what they do and what I do, I was always more interested in things like visual detail and representative geometry aided by editing and direction rather than looping abstract, fractal-like things. It just wasn't my thing.
Mistakes were made
But if I'm not attracted to this type of competition, how did I end up in the crossfire anyway? What I can't say is that it wasn't, to a considerable degree, my fault: as Revision 2020 was entirely online, most of the scene took it to themselves to sit in the demoscene Discord to get an experience closest to on-site socializing, given the somber circumstances of physical distancing. This also allowed a number of people who hasn't been around for a while to pop in to chat - like IQ, who, given his past, was mostly interested in the showdowns (during which Flopine crushed the competition) and the 4k compo.
As I haven't seen him around for a while, and as my mind is always looking for an angle, I somehow put two and two together, and asked him if he would consider taking part in a showdown at some point; he replied that he was up for it - this was around Saturday 10PM. I quickly pinged the rest of the showdown participants and organizers, as I spotted that Bullet was doing a DJ set the next day (which would've been in a relatively convenient timezone for IQ in California as well), and assumed that he didn't really have visuals for it - as there was already a "coding jam" over Ronny's set the day before, I figured there's a chance for squeezing an "extra round" of coding. Flopine was, of course, beyond excited by just the prospect of going against IQ, and by midnight we essentially got everything planned out (Bullet's consent notwithstanding, as he was completely out of the loop on this), and I was excited to watch...
...that is, until Havoc, the head honcho for the showdowns, off-handedly asked me about an at that point entirely hypothetical scenario: what would happen if IQ would, for some reason, challenge me instead of Flopine? Now, as said, I wasn't really into this, but being one to not let a good plan go to waste (especially if it was mine), I told Havoc I'd take one for the team and do it, although it probably wouldn't be very fun to watch. I then proceeded to quickly brief IQ in private and run him through the technicalities of the setup, the tool, the traditions and so on, and all is swell...
...that is, until IQ (this is at around 2AM) offhandedly mentions that "Havoc suggested we do a three-way with me, Flopine... and you." I quickly try to backpedal, but IQ seems to be into the idea, and worst of all, I've already essentially agreed to it, and to me, the only thing worse than being whipped in front of a few thousand people would be going back on your word. The only way out was through.
Weeks of coding can spare you hours of thinking
So now that I've got myself into this jar of pickles, I needed some ideas, and quick. (I didn't sleep much that night.) First off, I didn't want to do anything obviously 3D - both IQ and Flopine are masters of this, and I find it exhausting and frustrating, and it would've failed on every level possible. Fractals I'm awful at and while they do provide a decent amount of visual detail, they need a lot of practice and routine to get right. I also didn't want something very basic 2D, like a byte-beat, because those have a very limited degree of variation available, and the end result always looks a bit crude.
Luckily a few months ago an article I saw do rounds was a write-up by Sasha Martinsen on how to do "FUI"-s, or Fictional User Interfaces; overly complicated and abstract user interfaces that are prominent in sci-fi, with Gmunk being the Michael Jordan of the genre.
Image courtesy of Sasha Martinsen.
Sasha's idea is simple: make a few basic decent looking elements, and then just pile them on top of each other until it looks nice, maybe choose some careful colors, move them around a bit, place them around tastefully in 3D, et voilà, you're hacking the Gibson. It's something I attempted before, if somewhat unsuccessfully, in "Reboot", but I came back to it a few more times in my little private motion graphics experiments with much better results, and my prediction was that it would be doable in the given timeframe - or at least I hoped that my hazy 3AM brain was on the right track.
A bit of math
How to make this whole thing work? First, let's think about our rendering: We have a single rectangle and a single-pass shader that runs on it: this means no meshes, no geometry, no custom textures, no postprocessing, no particle systems and no fonts, which isn't a good place to start from. However, looking at some of Sasha's 3D GIFs, some of them look like they're variations of the same render put on planes one after the other - and as long as we can do one, we can do multiple of that.
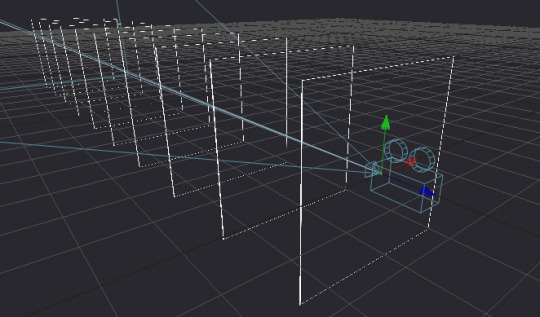
Rough sketch of what we want to do; the planes would obviously be infinite in size but this representation is good enough for now.
Can we render multiple planes via a single shader? Sure, but we want them to look nice, and that requires a bit of thinking: The most common technique to render a "2D" shader and get a "3D" look is raymarching, specifically with signed distance fields - starting on a ray, and continually testing distances until a hit is found. This is a good method for "solid-ish" looking objects and scenes, but the idea for us is to have many infinite planes that also have some sort of alpha channel, so we'd have a big problem with 1) inaccuracy, as we'd never find a hit, just something "reasonably close", and even that would take us a few dozen steps, which is costly even for a single plane and 2) the handling of an alpha map can be really annoying, since we'd only find out our alpha value after our initial march, after which if our alpha is transparent we'd need to march again.
But wait - it's just infinite planes and a ray, right? So why don't we just assume that our ray is always hitting the plane (which it is, since we're looking at it), and just calculate an intersection the analytical way?
Note: I would normally refer to this method as "raytracing", but after some consultation with people smarter than I am, we concluded that the terms are used somewhat ambiguously, so let's just stick to "analytical ray solving" or something equally pedantic.
We know the mathematical equation for a ray is position = origin + direction * t (where t is a scalar that represents the distance/progress from the ray origin), and we know that the formula for a plane is A * x + B * y + C * z + D = 0, where (A, B, C) is the normal vector of the plane, and D is the distance from the origin. First, since the intersection will be the point in space that satisfies both equations, we substitute the ray (the above o + d * t for each axis) into the plane:
A * (ox + dx * t) + B * (oy + dy * t) + C * (oz + dz * t) + D = 0
To find out where this point is in space, we need to solve this for t, but it's currently mighty complicated. Luckily, since we assume that our planes are parallel to the X-Y plane, we know our (A, B, C) normal is (0, 0, 1), so we can simplify it down to:
oz + dz * t + D = 0
Which we can easily solve to t:
t = (D - oz) / dz
That's right: analytically finding a ray hit of a plane is literally a single subtraction and a division! Our frame rate (on this part) should be safe, and we're always guaranteed a hit as long as we're not looking completely perpendicular to the planes; we should have everything to start setting up our code.
Full disclosure: Given my (and in a way IQ's) lack of "live coding" experience, we agreed that there would be no voting for the round, and it'd be for glory only, but also that I'd be allowed to use a small cheat sheet of math like the equations for 2D rotation or e.g. the above final equation since I don't do this often enough to remember these things by heart, and I only had a few hours notice before the whole thing.
Setting up the rendering
Time to start coding then. First, let's calculate our texture coordinates in the 0..1 domain using the screen coordinates and the known backbuffer resolution (which is provided to us in Bonzomatic):
vec2 uv = vec2(gl_FragCoord.x / v2Resolution.x, gl_FragCoord.y / v2Resolution.y);
Then, let's create a ray from that:
vec3 rayDir = vec3( uv * 2 - 1, -1.0 ); rayDir.x *= v2Resolution.x / v2Resolution.y; // adjust for aspect ratio vec3 rayOrigin = vec3( 0, 0, 0 );
This creates a 3D vector for our direction that is -1,-1,-1 in the top left corner and 1,1,-1 in the bottom right (i.e. we're looking so that Z is decreasing into the screen), then we adjust the X coordinate since our screen isn't square, but our coordinates currently are - no need to even bother with normalizing, it'll be fine. Our origin is currently just sitting in the center.
Then, let's define (loosely) our plane, which is parallel to the XY plane:
float planeDist = 1.0f; // distance between each plane float planeZ = -5.0f; // Z position of the first plane
And solve our equation to t, as math'd out above:
float t = (planeZ - rayOrigin.z) / rayDir.z;
Then, calculate WHERE the hit is by taking that t by inserting it back to the original ray equation using our current direction and origin:
vec3 hitPos = rayOrigin + t * rayDir;
And now we have our intersection; since we already know the Z value, we can texture our plane by using the X and Y components to get a color value:
vec4 color = fui( hitPos.xy ); // XY plane our_color = color;
Of course we're gonna need the actual FUI function, which will be our procedural animated FUI texture, but let's just put something dummy there now, like a simple circle:
vec4 fui ( vec2 uv ) { return length(uv - 0.5) < 0.5 ? vec4(1) : vec(0); }
And here we go:

Very good, we have a single circle and if we animate the camera we can indeed tell that it is on a plane.
So first, let's tile it by using a modulo function; the modulo (or modulus) function simply wraps a number around another number (kinda like the remainder after a division, but for floating point numbers) and thus becomes extremely useful for tiling or repeating things:

We'll be using the modulo function rather extensively in this little exercise, so strap in. (Illustration via the Desmos calculator.)
vec4 layer = fui( mod( hitPos.xy, 1.0 ) );
This will wrap the texture coordinates of -inf..inf between 0..1:

We also need multiple planes, but how do we combine them? We could just blend them additively, but with the amount of content we have, we'd just burn them in to white and it'd look like a mess (and not the good kind of mess). We could instead just use normal "crossfade" / "lerp" blending based on the alpha value; the only trick here is to make sure we're rendering them from back to front since the front renders will blend over the back renders:
int steps = 10; float planeDist = 1.0f; for (int i=steps; i>=0; i--) { float planeZ = -1.0f * i * planeDist; float t = (planeZ - rayOrigin.z) / rayDir.z; if (t > 0.0f) // check if "t" is in front of us { vec3 hitPos = rayOrigin + t * rayDir; vec4 layer = fui( hitPos.xy, 2.0 ); // blend layers based on alpha output colour = mix( colour, layer, layer.a ); } }
And here we go:

We decreased the circles a bit in size to see the effect more.
Not bad! First thing we can do is just fade off the back layers, as if they were in a fog:
layer *= (steps - i) / float(steps);
We have a problem though: we should probably increase the sci-fi effect by moving the camera continually forward, but if we do, we're gonna run into a problem: Currently, since our planeZ is fixed to the 0.0 origin, they won't move with the camera. We could just add our camera Z to them, but then they would be fixed with the camera and wouldn't appear moving. What we instead want is to just render them AS IF they would be the closest 10 planes in front of the camera; the way we could do that is that if e.g. our planes' distance from each other is 5, then round the camera Z down to the nearest multiple of 5 (e.g. if the Z is at 13, we round down to 10), and start drawing from there; rounding up would be more accurate, but rounding down is easier, since we can just subtract the division remainder from Z like so:
float planeZ = (rayOrigin.z - mod(rayOrigin.z, planeDist)) - i * planeDist;
And now we have movement! Our basic rendering path is done.
Our little fictional UI
So now that we have the basic pipeline in place, let's see which elements can we adapt from Sasha's design pieces.
The first one I decided to go with wasn't strictly speaking in the set, but it was something that I saw used as design elements over the last two decades, and that's a thick hatch pattern element; I think it's often used because it has a nice industrial feel with it. Doing it in 2D is easy: We just add X and Y together, which will result in a diagonal gradient, and then we just turn that into an alternating pattern using, again, the modulo. All we need to do is limit it between two strips, and we have a perfectly functional "Police Line Do Not Cross" simulation.
return mod( uv.x + uv.y, 1 ) < 0.5 ? vec4(1) : vec4(0);

So let's stop here for a few moments; this isn't bad, but we're gonna need a few things. First, the repetition doesn't give us the nice symmetric look that Sasha recommends us to do, and secondly, we want them to look alive, to animate a bit.
Solving symmetry can be done just by modifying our repetition code a bit: instead of a straight up modulo with 1.0 that gives us a 0..1 range, let's use 2.0 to get a 0..2 range, then subtract 1.0 to get a -1..1 range, and then take the absolute value.
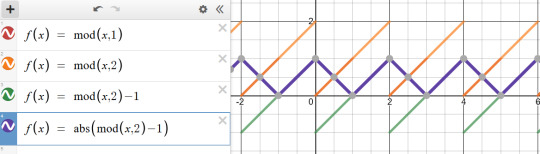
vec4 layer = fui( abs( mod( hitPos.xy, 2.0 ) - 1 ) );
This will give us a triangle-wave-like function, that goes from 0 to 1, then back to 0, then back to 1; in terms of texture coordinates, it will go back and forth between mirroring the texture in both directions, which, let's face it, looks Totally Sweet.
For animation, first I needed some sort of random value, but one that stayed deterministic based on a seed - in other words, I needed a function that took in a value, and returned a mangled version of it, but in a way that if I sent that value in twice, it would return the same mangled value twice. The most common way of doing it is taking the incoming "seed" value, and then driving it into some sort of function with a very large value that causes the function to alias, and then just returning the fraction portion of the number:
float rand(float x) { return fract(sin(x) * 430147.8193); }
Does it make any sense? No. Is it secure? No. Will it serve our purpose perfectly? Oh yes.
So how do we animate our layers? The obvious choice is animating both the hatch "gradient" value to make it crawl, and the start and end of our hatch pattern which causes the hatched strip to move up and down: simply take a random - seeded by our time value - of somewhere sensible (like between 0.2 and 0.8 so that it doesn't touch the edges) and add another random to it, seasoned to taste - we can even take a binary random to pick between horizontal and vertical strips:

The problems here are, of course, that currently they're moving 1) way too fast and 2) in unison. The fast motion obviously happens because the time value changes every frame, so it seeds our random differently every frame - this is easy to solve by just rounding our time value down to the nearest integer: this will result in some lovely jittery "digital" motion. The unison is also easy to solve: simply take the number of the layer, and add it to our time, thus shifting the time value for each layer; I also chose to multiply the layer ID with a random-ish number so that the layers actually animate independently, and the stutter doesn't happen in unison either:
vec4 fui( vec2 uv, float t ) { t = int(t); float start = rand(t) * 0.8 + 0.1; float end = start + 0.1; [...] } vec4 layer = fui( abs(mod(hitPos.xy, 2.0)-1), fGlobalTime + i * 4.7 );

Lovely!
Note: In hindsight using the Z coordinate of the plane would've given a more consistent result, but the way it animates, it doesn't really matter.
So let's think of more elements: the best looking one that seems to get the best mileage out in Sasha's blog is what I can best describe as the "slant" or "hockey stick" - a simple line, with a 45-degree turn in it. What I love about it is that the symmetry allows it to create little tunnels, gates, corridors, which will work great for our motion.
Creating it is easy: We just take a thin horizontal rectangle, and attach another rectangle to the end, but shift the coordinate of the second rectangle vertically, so that it gives us the 45-degree angle:
float p1 = 0.2; float p2 = 0.5; float p3 = 0.7; float y = 0.5; float thicc = 0.0025; if (p1 < uv.x && uv.x < p2 && y - thicc < uv.y && uv.y < y + thicc ) { return vec4(1); } if (p2 < uv.x && uv.x < p3 && y - thicc < uv.y - (uv.x - p2) && uv.y - (uv.x - p2) < y + thicc ) { return vec4(1); }
Note: In the final code, I had a rect() call which I originally intended to use as baking glow around my rectangle using a little routine I prototyped out earlier that morning, but I was ultimately too stressed to properly pull that off. Also, it's amazing how juvenile your variable names turn when people are watching.
Looks nice, but since this is such a thin sparse element, let's just... add more of it!
So what more can we add? Well, no sci-fi FUI is complete without random text and numbers, but we don't really have a font at hand. Or do we? For years, Bonzomatic has been "shipping" with this really gross checkerboard texture ostensibly for UV map testing:

What if we just desaturate and invert it?
We can then "slice" it up and render little sprites all over our texture: we already know how to draw a rectangle, so all we need is just 1) calculate which sprite we want to show 2) calculate the texture coordinate WITHIN that sprite and 3) sample the texture:
float sx = 0.3; float sy = 0.3; float size = 0.1; if (sx < uv.x && uv.x < sx + size && sy < uv.y &&uv.y < sy + size) { float spx = 2.0 / 8.0; // we have 8 tiles in the texture float spy = 3.0 / 8.0; vec2 spriteUV = (uv - vec2(sx,sy)) / size; vec4 sam = texture( texChecker, vec2(spx,spy) + spriteUV / 8.0 ); return dot( sam.rgb, vec3(0.33) ); }
Note: In the final code, I was only using the red component instead of desaturation because I forgot the texture doesn't always have red content - I stared at it for waaaay too long during the round trying to figure out why some sprites weren't working.
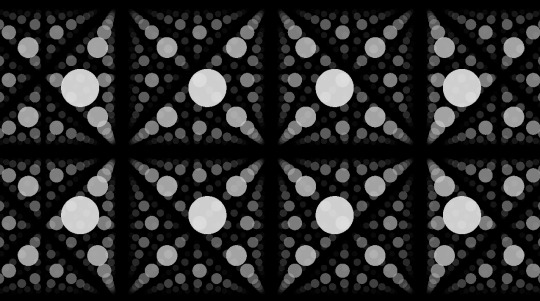
And again, let's just have more of it:
Getting there!
At this point the last thing I added was just circles and dots, because I was running out of ideas; but I also felt my visual content amount was getting to where I wanted them to be; it was also time to make it look a bit prettier.
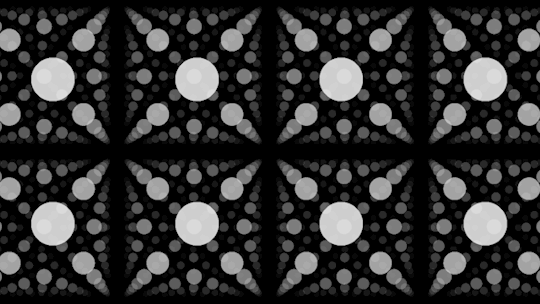
Post-production / compositing
So we have our layers, they move, they might even have colors, but I'm still not happy with the visual result, since they are too single-colored, there's not enough tone in the picture.
The first thing I try nowadays when I'm on a black background is to just add either a single color, or a gradient:
vec4 colour = renderPlanes(uv); vec4 gradient = mix( vec4(0,0,0.2,1), vec4(0,0,0,1), uv.y); vec4 finalRender = mix( gradient, vec4(colour.xyz,1), colour.a);

This added a good chunk of depth considerably to the image, but I was still not happy with the too much separation between colors.
A very common method used in compositing in digital graphics is to just add bloom / glow; when used right, this helps us add us more luminance content to areas that would otherwise be solid color, and it helps the colors to blend a bit by providing some middle ground; unfortunately if we only have a single pass, the only way to get blur (and by extension, bloom) is repeatedly rendering the picture, and that'd tank our frame rate quickly.
Instead, I went back to one of the classics: the Variform "pixelize" overlay:

This is almost the same as a bloom effect, except instead of blurring the image, all you do is turn it into a lower resolution nearest point sampled version of itself, and blend that over the original image - since this doesn't need more than one sample per pixel (as we can reproduce pixelation by just messing with the texture coordinates), we can get away by rendering the scene only twice:
vec4 colour = renderPlanes(uv); colour += renderPlanes(uv - mod( uv, 0.1 ) ) * 0.4;
Much better tonal content!
So what else can we do? Well, most of the colors I chose are in the blue/orange/red range, and we don't get a lot of the green content; one of the things that I learned that it can look quite pretty if one takes a two-tone picture, and uses color-grading to push the midrange of a third tone - that way, the dominant colors will stay in the highlights, and the third tone will cover the mid-tones. (Naturally you have to be careful with this.)
"Boosting" a color in the mids is easy: lucky for us, if we consider the 0..1 range, exponential functions suit our purpose perfectly, because they start at 0, end at 1, but we can change how they get here:
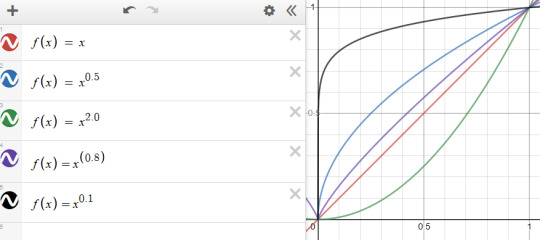
So let's just push the green channel a tiny bit:
finalRender.g = pow(finalRender.g, 0.7);
Now all we need is to roll our camera for maximum cyberspace effect and we're done!

Best laid plans of OBS
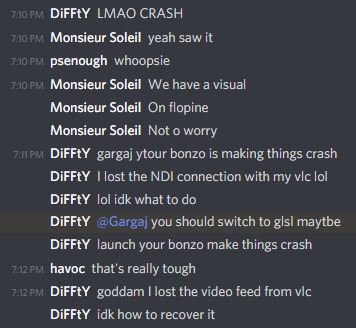
As you can see from the code I posted the above, I wrote the final shader in GLSL; those who know me know that I'm a lot more comfortable with DirectX / HLSL, and may wonder why I switched, but of course there's another story here:
Given the remote nature of the event, all of the shader coding competition was performed online as well: since transmitting video from the coder's computer to a mixer, and then to another mixer, and then to a streaming provider, and then to the end user would've probably turned the image to mush, Alkama and Nusan came up with the idea of skipping a step and rigging up a version of Bonzo that ran on the coder's computer, but instead of streaming video, it sent the shader down to another instance of Bonzo, running on Diffty's computer, who then captured that instance and streamed it to the main Revision streaming hub. This, of course, meant that in a three-way, Diffty had to run three separate instances of Bonzo - but it worked fine with GLSL earlier, so why worry?
What we didn't necessarily realize at the time, is that the DirectX 11 shader compiler takes no hostages, and as soon as the shader reached un-unrollable level of complexity, it thoroughly locked down Diffty's machine, to the point that even the video of the DJ set he was playing started to drop out. I, on the other hand, didn't notice any of this, since my single local instance was doing fine, so I spent the first 15 minutes casually nuking Diffty's PC to shreds remotely, until I noticed Diffty and Havoc pleading on Discord to switch to GLSL because I'm setting things on fire unknowingly.
This is fine.
I was reluctant to do so, simply because of the muscle memory, but I was also aware that I should keep the show going if I can because if I bow out without a result, that would be a colossal embarrassment to everyone involved, and I only can take one of those once every week, and I was already above my quota - so, I quickly closed the DX11 version of Bonzo, loaded the shader up in a text editor, replaced "floatX" with "vecX" (fun drinking game: take a shot every time I messed it up during the live event), commented the whole thing out, loaded it into a GLSL bonzo, and quickly fixed all the other syntax differences (of which there were luckily not many, stuff like "mix" instead of "lerp", constructors, etc.), and within a few minutes I was back up and running.
This, weirdly, helped my morale a bit, because it was the kind of clutch move that for some reason appealed to me, and made me quite happy - although at that point I locked in so bad that not only did I pay absolutely not attention to the stream to see what the other two are doing, but that the drinks and snacks I prepared for the hour of battling went completely untouched.
In the end, when the hour clocked off, the shader itself turned out more or less how I wanted it, it worked really well with Bullet's techno-/psy-/hardtrance mix (not necessarily my jam, as everyone knows I'm more a broken beat guy, but pounding monotony can go well with coding focus), and I came away satisfied, although the perhaps saddest point of the adventure was yet to come: the lack of cathartic real-life ending that was taken from us due to the physical distance, when after all the excitement, all the cheers and hugs were merely lines of text on a screen - but you gotta deal with what you gotta deal with.
A small sampling of the Twitch reaction.
Conclusion
In the end, what was my takeaway from the experience?
First off, scoping is everything: Always aim to get an idea where you can maximize the outcome of the time invested with the highest amount of confidence of pulling it off. In this case, even though I was on short notice and in an environment I was unfamiliar with, I relied on something I knew, something I've done before, but no one else really has.
Secondly, broaden your influence: You never know when you can take something that seems initially unrelated, and bend it into something that you're doing with good results.
Thirdly, and perhaps most importantly, step out of your comfort zone every so often; you'll never know what you'll find.
(And don't agree to everything willy-nilly, you absolute moron.)
10 notes
·
View notes
Text
Illuminate Research, Planning and Development
Image 1:

Photograph by Darlene Hildebrandt
I found this image to be quite interesting, yet can’t decide if I like it or not. I feel like the colour of the sky is slightly off putting, yet it fits in with the subject itself, being old and rusty. I do, however, think the light painting itself has been done very well.I found this image to be quite interesting, yet can’t decide if I like it or not. I feel like the colour of the sky is slightly off putting, yet it fits in with the subject itself, being old and rusty. I do, however, think the light painting itself has been done very well.
Image 2:

Photograph by Catalin Anastase
This is a really creative, fitting painting with light photograph. The light gives the image a sort of mythical look, as if it were taken from a fairy-tale. It looks as if the image is layered, multiple pictures of the same thing being put together to create this image. I think the sky is slightly too dark, but overall it works well.
Image 3:

Photograph by Dave Black
This painting with light is slightly different from the other images in terms of location. It has almost certainly been shot inside, and doesn’t show much in terms of background. I feel like there could maybe be some more light in certain areas, but is all round well done. This painting with light is slightly different from the other images in terms of location. It has almost certainly been shot inside, and doesn’t show much in terms of background. I feel like there could maybe be some more light in certain areas, but is all round well done.
Image 4:

Photograph by Simon Plant
This lighting in this image is has been done to a high standard, and I particularly like how the tree behind has also been light up. For me, I feel like the sky is slightly too dark, at least on one side on the photograph. This lighting in this image is has been done to a high standard, and I particularly like how the tree behind has also been light up. For me, I feel like the sky is slightly too dark, at least on one side on the photograph
Image 5:

Photograph by Tim Cooper
This is my personal favourite. The sky fits perfectly with the light and tone of the building, as it seems to be in a pastel kind of tone. I think the lighting has been done extremely well, as the image as a whole just works very well together and is aesthetically pleasing.
Image 6:

Photograph by Diana Ferguson
This is one of my own images using painting with light. I really enjoyed shooting this, and had great fun experimenting with the settings and how to move the light to create the best type of lighting. It was quite challenging trying to keep the light facing away from the camera, and moving fast enough to not get caught yet slow enough to light the subject. I shot this using one long exposure, no layering.
What is ‘noise’ and why does it happen?
Much like with sound where noise refers to auditory disruptions, within photography noise refers to the visual distortion. Noise looks like small coloured pixels or specks in your photograph and occasionally resembles the grain you can see in film photography.
Things such as sensor size, higher ISO and long exposures can be factors that bring about noise in images.
Noise generally tends to happen when the sensor heats up. For example, images with a higher ISO. The higher the ISO, the more the sensor has to work to let more light in, causing the temperature to rise. This is why the noise becomes more apparent each time you bump up the ISO.
Difficulties associated with night photography:
Camera shake.
This can be solved with something as simple as using a tripod and a remote trigger, minimising and contact with the camera that could cause camera shake.
Noise.
This can be solved by reducing the ISO and using a longer shutter speed, paired with a tripod, to compensate for the low ISO.
Images being out of focus.
This can be solved by manually focusing instead of relying on autofocus. If possible, light could be added to the subject to give you enough to see your focus point, then the light can be removed leaving the focus still set.
Shadows.
This one is slightly more challenging, as it may involve adding additional light to your subject. It could be done by diffusing light, bouncing it off a reflector so as it is not direct, or even just adding light straight onto the subject.
Difficulties associated with long exposures:
Camera shake.
Again, this can be fixed by using a tripod and a remote trigger to reduce contact with the camera.
Light flares.
This could be resolved by flagging any unwanted light, or even using a diffuser to lessen the light being captured by the camera.
Noise
Using longer shutter speeds and a lower ISO, the noise should be reduced.
Use filters
ND (Neutral Density) filters block out light being taken in through the lens, much like sunglasses. You would then have to adjust your camera settings to suite the filter.
Methods by which the effects of ‘noise’ can be minimised (pre and post editing):
Reducing the ISO
Adding flash or additional lighting will allow you so shoot with faster shutter speeds and a lower ISO.
Use a fast shutter speed if possible.
Keep your camera cool if possible. Noise is a reaction to temperature, so the cooler you can keep your camera the better. Try not to let it overheat.
Edit your images during post-production. There are many ways to reduce noise using software's such as Lightroom, Photoshop or Bridge. I found that Camera Raw in Bridge works best for me. Bumping up the Luminance (no higher than 20) and adding some Clarity really helps to reduce noise, although it ever so slightly softens the images.
Layering images. Noise is completely random, so layering images could help in reducing noise.
Noise reduction tools.
Equipment list:
Canon EOS 4000D
Tripod
Extra batteries
Lense (18-55mm)
SD cards
Notebook and pens for notes
Additional lighting such as a torch
Bags for storing the kit/umbrella in case of rain
An extra set of hands! (A friend to help when needed and also for safety)
Planning and Development:
The first stage of this brief is the research stage. I have researched relevant photographs and techniques so that I have a good understanding of what it is I am going to do when it comes to shooting.
I have also made a list of all the equipment I will need so that I have everything I need when I go out to shoot.
The next stage is to decide on what I would like my subject to be. I would like to shoot this in my home town, North Berwick, on the beach or surrounding areas (harbour, viewing points, benches, etc.)
Ideally, I would like to go home between the 30th March and the 5th April. This will give me time to scout out possible locations, take test shots and shoot my final image. I plan on shooting at dusk, so I will look up what time dusk is closer to the shooting date.
I would like to take some test shots during the day of things like; rocks, bushes, benches, posts, decorations and surrounding buildings.
Once I have my spot and time, I will make sure to give myself time to set up. Set up will include getting my tripod in place, getting the right camera settings, briefing my assistant on what needs done, and making sure all lights/batteries are working.
After setting up, I will use the window of time to shoot my subject, getting my model to light it, possibly myself lighting it too (using a timer or remote trigger).
After my shoot is complete and I am home, I will spend time looking over my shots to see if I have a final image and doing any editing if needed.
I will possibly look to do another shoot depending on how the first one goes.
Contact Sheets:


Final Image and Evaluation:

I really enjoyed shooting for this brief as well as researching for it. I had originally planned to shoot this down at the beach while I was home, but due to a change of circumstances, I wasn’t able to get to the beach. I then had to change my plan, and decided to shoot in my back garden. My original plan was to shoot a tree in my back garden. For this, I went out during the day to do some recce shots and to decide where I wanted to shoot from. Once I had figured out what I was going to do, I went out in the evening and shot the tree. Half way through, however, I found that I didn’t like how my images were turning out, and instead tried using the slide instead. This turned out to be a much better option, although looking back now I could have spent more time shooting the slide. I had my images looked over during class time and was told I needed to re-shoot. This was slightly awkward for me as I wouldn’t be going home again for a while, so I was able to leave the re-shooting until after I had finished with my personal project. I was able to re-shoot not long after my project was finished, and spent more time on it than the last time. The editing processes took slightly longer than I had expected, as I had to layer a few images together and used the brush tool to even a few areas out. I feel as though I could have planned and timed this brief slightly better than I did, and in the future I will pay more attention to planning, scheduling and getting test shot, but overall, I think I done reasonably well and am happy with my final image.
References:
Image 1 - https://digital-photography-school.com/light-painting-part-one-the-photography/
Image 2 - https://www.catalinanastase.com/lightpaintinglandscapes/h6844AC59
Image 3 - https://www.nikonusa.com/en/learn-and-explore/a/tips-and-techniques/lighting-techniques-light-painting.html
Image 4 - https://www.ephotozine.com/article/light-painting-and-photography-12297
Image 5 - http://intothenightphoto.blogspot.com/2013/03/painting-with-light-by-tim-cooper.html
1 note
·
View note
Text
Crusaders of the Dark Savant: Career Changes
My party, members now in their permanent classes, confidently marches out of New City.
When I started this blog, if I referred to “rose-colored memories” of past games, I would have been referring to times I played games in the 1980s or 1990s, when I was young and the games were new. These days, on the other hand, I could use the phrase to refer to games I played at the beginning of this blog. Writing today, I haven’t played any of the pre-Bradley Wizardry games in almost four years. Are my memories accurate? Is my admiration valid?
What I remember most about the original Wizardry, and to a lesser extent the second two scenarios, is a marvelous sense of tension in exploration and combat. Particularly since I was adhering to the series’s use of permadeath, every step forward felt like a risk. The further you got away from the safety of the town level, the more your hit points dropped, the more you depleted your spell slots, the greater the odds were stacked against you. These considerations created a tactical landscape that went far beyond the strict combat mechanics. In deciding whether to try to wipe out your enemies with just a MAHALITO, or to double it up with a MODALTO from another caster, you had to think beyond the immediate combat. You had to worry about the next combat, plus all the combats in your backpath on the way to the surface. Your spell slots were precious resources. You wouldn’t waste a high-level spell on an easy party, just to make combat go more quickly–you needed it for the unanticipated high-level group down the hall.
Wizardry VI completely upended the nature of combat tactics in the franchise while not significantly changing the combat mechanics themselves. You still plan everyone’s action ahead of time, then execute them (in tandem with the enemies’ actions) all at once. You still have limitations on spells, though “slots” have been replaced with magic points, and the spell system in general has been expanded. You still have a lot of variability in the difficulty of enemies that you encounter. The big difference is that you can save, and usually rest, in between combats. The focus is thus entirely on the individual combat rather than the entire landscape. It pays to err on the side of over-use of powerful spells just to make victory certain.
More about combat and magic in a minute, but let’s take a moment to check in with the party, which has undergone some changes since I last blogged. Last time, I was wrestling with the game’s class-changing system, including when and how often. Based on your comments, I realized that I had been thinking of it all wrong. I hadn’t shaken myself out of Dungeons and Dragons (second edition) mode, where dual-classing can create powerful characters, but it pays to get as high as possible in the first class before dual-classing because afterwards you can only level in the second class. Here, that’s not true. Once you acquire skills and spells, they’re part of your repertoire forever, and you can keep adding points to them even if they don’t make sense with your current class. A Dungeons and Dragons fighter who duals to a mage at Level 10 isn’t a fighter at all anymore until she reaches Level 11 as a mage, and even then she’s only kind of a fighter. In this game, even if you only spend one level as a mage, you’re at least partly a mage forever.
(The one big exception here is that your current class defines what weapons, armor, and items you can use. Thus, it doesn’t make sense to build someone’s sword skills to high levels and then dual to a mage, who can’t use a sword.)
Having been through several class changes, Esteban has a lot of weapon skills at his disposal, only some of which he can actually use as a bishop.
Thus, I began to think of my party more in terms of what skills I wanted the characters to have rather than literal classes. I spent some time changing, grinding, experimenting, and changing again, in some cases limited by minimum attributes, but generally able to acquire what I wanted. That included at least two characters with high-level mage abilities and at least four characters with healing abilities.
Ultimately, I wanted to end this session with my characters in their “final” incarnations (at least for most of the game). Every time you change a class, you reset the character’s attributes to the minimum requirements for that class. It’s tough to give up all that strength, speed, and so forth, and I imagine it’s particularly tough later in the game, when your foes are harder. As thrilling as it is to level up, I’d rather do it less often but in pursuit of more heroic characters.
One of my first changes was to make my thief a samurai. I can’t really remember why. But once I did, she acquired the “Kirijutsu” skill, and I absolutely fell in love with it. Every point in the skill makes it more likely that the character will strike a critical hit in combat, instantly killing an enemy. I don’t even care if the chance is really small; I just love that the chance s there. Thus, I cycled all my fighters through classes that imparted that skill, at least for a few levels. Three of them were able to change to ninjas for a while, which is a great choice because it has such high attribute requirements that, if you can make it in the first place, you don’t lose as many of your accumulated points.
Gideon strikes a critical hit on a Savant Guard. This never gets old.
I advanced in my new classes mostly by grinding in New City. At first, I did this primarily by sleeping in the street, which seems to attract an enemy party about 25% of the time. Later, I realized that if I used the wrong item to try to open a door in one of the buildings (I don’t even know what the right item is), it would reliably send at least one party of Savant Troopers or Savant Guards my way. These guys offer quite a bit of experience, but the problem is that they’re tough enemies. Troopers have lances that can drain stamina and paralyze party members. If I got three parties of 5 Troopers each, I was toast. Nonetheless, it was worth the risk, and I learned a lot about my available spells during the process.
When I was done (and this all took me maybe 8 hours combined):
Gideon had cycled through several levels as a monk (that was a waste of time) and several levels as a ninja before ending up as a lord again.
Noctura got some mage spells as a samurai for a few levels before she had high enough attributes to change to her permanent ninja class (she had been a thief originally)
Bix went from a bard to an alchemist to, finally, a mage. I know that’s not a lot of diversity, but the alchemist position at least afforded him some healing spells.
Svava went from a Valkyrie to a ninja to a ranger (that turned out to be mostly a waste) and back to a Valkyrie. I had to take her all the way to Level 9 as a ranger because it took forever to reach the Valkyrie minimums.
Esteban went from a priest to a ninja to finally end up where I wanted him as a bishop.
Prenele, who was already where I wanted her (alchemist) spent some time as a mage and a priest before returning her her original class.
I might have missed some. I seem to remember having someone as a psionic for a while before realizing the spells just weren’t very good. In any event, I realize that not all of these changes made sense or ultimately served any strategic goal, but remember I was just experimenting, and the best part is that there’s no real harm in trying out a class that doesn’t ultimately work out. The worst that happens is you gained some skills that you don’t bother to develop any further.
My Valkyrie mulls a class change. Her stats aren’t good enough for lord, bishop, ninja, monk, psionic, or alchemist.
Just before I started changing classes, some of my higher-level fighters started to achieve extra attacks in combat. They had already been at a point where they often struck twice during a single attack, but eventually they reached a level where they’d get an extra couple attacks at the end of the combat round. The odd thing is that they retained these extra attacks even after they changed classes and were busted back to Level 1 again. So I’m not really sure what governs these extra attacks. I don’t know, it’s probably in the manual somewhere, but the frigging thing is 70 pages long.
The exercise accomplished my primary goal of making a stronger party. Now I have four characters with Kirujutsu, and thus a chance at critical hits every combat round. More important, I have three characters capable of some mass damage spells.
It took me a while to figure out the spell system, and I’m a little fuzzy on parts. Each character has what amounts to a “mana” bar, but that’s a bit misleading because the bar is a composite of each individual status, and each individual maximum, within a variety of spell “realms.” The realms (fire, earth, water, mental, air, and divine) are different from the spell “schools” (mage, alchemist, priest, psionic), each of which has multiple spells in each realm. Right now, my mage Bix has anywhere between a maximum of 22 points (divine realm) and 47 points (water realm) in each realm. His actual spells are a combination of those learned during his time as a bard, an alchemist, and a mage.
When you cast a spell, the number of points available in that realm depletes. Your overall mana bar may look great, but if you’re out of points in the divine realm, there’s no more healing. It takes a long time, or several sleep sessions, to fully restore points in a realm, so my characters basically end up cycling through them. One combat, my mage will favor earth spells, the next he’ll focus on fire spells. It thus pays to have a couple of mass damage spells or a couple of incapacitation spells spread across multiple realms.
What I don’t fully understand is what determines the number of points available to the realms. It’s not based on your skills in the various magic schools, since those apply to all realms. (I think those points just determine what spells are offered to you at each level-up, but I’m not completely sure.) I think it has something to do with the literal number of spells you’ve taken in each realm. Thus, when leveling up, it sometimes pays to choose a spell you don’t really care about, but in a realm in which you want more power.
When casting spells, you have the option to specify a multiplier, from 1 to 7, which is a major consideration. A “Fireball” cast at the base level of 1 only does 2-10 hit points of damage to 3 creatures in a group. Cast at Level 5, it does 10-50 hit points of damage to 8 creatures in a group–but of course it absorbs much more magic. The consideration is there even in status effects like “Cure Disease” and “Cure Paralysis.” Not all disease, poison, paralysis, and other effects are created equal. You have to try to guess how strong it is and then override it with the right spell level.
Even here, there are things I don’t understand. First, you can’t cast a spell at Level 7 the moment you acquire it. But I’m not sure what determines what level you can cast it at. Your level in the class? Your skill? Your points in the realm? Some combination of these? It’s not even consistent. My Level 4 mage can cast “Chilling Touch” (a water spell) at Level 4 but can only cast “Cure Paralysis” (also a water spell) at Level 2. I know, I know: read the manual. But it’s really long and you guys will tell me what’s happening within 10 minutes of this posting.
Some of Prenele’s spell options. The dice indicate the spell level, including the nonsensical last die with seven pips on it.
During my grinding, I really learned to appreciate some of the non-damaging status effect spells. I had already been using “Sleep,” “Hold Monster,” and “Paralyze” quite liberally. The problem with these is that they only take an enemy out of commission for as long as you leave him alone. Once you attack him, the spell wears off. And since you can’t specify particular enemies to attack (just a group), it’s hard to keep everyone incapacitated. These work best when you’re facing multiple groups and you want to sideline two of them so you can focus on one group at a time.
Usually, I go right for the mass damage spells. I have a lot of those now, spread across multiple characters and multiple realms. My favorite is “Acid Bomb,” which damages everyone in a group and keeps damaging them for several subsequent rounds. But for causing more damage in a single round, I have (again, spread over multiple characters) “Magic Missile” (divine), “Whipping Rocks” (earth), “Fire Bomb” (fire), “Fireball” (fire), “Iceball” (water), and “Deadly Air” (air). I don’t yet have any spells that damage all enemies in all groups, but they’re coming.
A powerful mass-damage spell.
To get any serious power out of those spells, however, you have to cast them at high levels and sacrifice a lot of points. My spellcasters can only handle a couple of them before having to rest. What I’ve learned to appreciate are some low-level spells that cost less and greatly reduce the effectiveness of enemies. These include “Confusion,” “Blinding Flash,” and “Itching Skin.” Usually, I don’t like to waste time on spells that don’t show me the effects directly (which is why I never waste a round on “Curse” in D&D games, for instance). But here, those effects are not subtle. When an enemy party goes from a 75% hit rate to a 75% miss rate in one round, you know “Itching Skin” is dong its job.
A lot of single-enemy damage spells were also enormously useful during this process. As I moved from class to class, I didn’t always have the right set of weapons to equip my characters. Thus, spells like “Energy Blast,” “Chilling Touch,” and “Acid Splash,” all of which affect only one enemy at a time, became acceptable alternatives to melee combat. Because they only affect one enemy at a time, they have low casting costs, and you can get half a dozen or so before you need to rest.
So that’s been my last 8 hours. Now I feel better equipped to take on the unexplored areas. I’m still having no luck cleaning up those last few areas of New City, except one previously-locked door that yielded to a “Knock Knock” spell (and had a chest with some decent armor behind it), but by next entry I should have made a lot more progress on the main quest.
Time so far: 31 hours
source http://reposts.ciathyza.com/crusaders-of-the-dark-savant-career-changes/
1 note
·
View note
Text
Version 448
youtube
windows
zip
exe
macOS
app
linux
tar.gz
I had an ok couple of weeks. I was pretty ill in the middle, but I got some good work done overall. .wav files are now supported, PSD files get thumbnails, vacuum returns, and the Client API allows much cleverer search.
client api
I have added some features to the Client API. It was more complicated than I expected, so I couldn't get everything I wanted done, but I think this is a decent step forward.
First off, the main 'search for files' routine now supports many system predicates. This is thanks to a user who wrote a great system predicate text parser a long time ago. I regret I am only catching up with his work now, since it works great. I expect to roll it into normal autocomplete typing as well--letting you type 'system:width<500' and actually getting the full predicate object in the results list to select.
If you are working with the Client API, please check out the extended help here:
https://hydrusnetwork.github.io/hydrus/help/client_api.html#get_files_search_files
There's a giant list of the current supported inputs. You'll just be submitting system predicates as text, and it handles the rest. Please note that this is a complicated system, and while I have plenty of unit tests and so on, if you discover predicates that should parse but are giving errors or any other jank behaviour, please let me know!
Next step here is to add file sort and file/tag domain.
Next there's a routine that lets you add files to arbitrary pages, just like a thumbnail drag and drop:
https://hydrusnetwork.github.io/hydrus/help/client_api.html#manage_pages_add_files
This is limited to currently open pages for now, but I will add a command to create an empty file page so you can implement an external file importer page.
misc
.wav files are now supported! They should work fine in mpv as well.
Simple PSD files now get thumbnails! It turns out FFMPEG can figure this out as long as the PSD isn't too complicated, so I've done it like for .swf files--if it works, the PSD gets a nice thumbnail, and if it doesn't it gets the file default icon stretched to the correct ratio. When you update, all existing PSDs will be queued for a thumbnail regen, so they should sort themselves out in the background.
Thanks to profiles users sent in, I optimised some database code. Repository processing and large file deletes should be a little faster. I had a good look at some slow session save profiles--having hundreds of thousands of URLs in downloader pages currently eats a ton of CPU during session autosave--but the solution will require two rounds of significant work.
Database vacuum returns as a manual job. I disabled this a month or so ago as it was always a rude sledgehammer that never actually achieved all that much. Now there is some UI under database->db maintenance->review vacuum data that shows each database file separately with their current free space (i.e. what a vacuum will recover), whether it looks like you have enough space to vacuum, an estimate of vacuum time, and then the option to vacuum on a per file basis. If you recently deleted the PTR, please check it out, as you may be able to recover a whole ton of disk space.
I fixed Mr Bones! I knew I'd typo somewhere with the file service rewrite two weeks ago, and he got it. I hadn't realised how popular he was, so I've added him to my weekly test suite--it shouldn't happen again.
full list
client api:
/get_files/search_files now supports most system predicates! simply submit normal system predicate text in your taglist (check the expanded api help for a list of what is supported now) and they should be converted to proper system preds automatically. anything that doesn't parse will give 400 response. this is thanks to a user that submitted a system predicate parser a long time ago and which I did not catch up on until now. with this framework established, in future I will be able to add more predicate types and allow this parsing in normal autocomplete typing (issue #351)
this is a complicated system with many possible inputs and outputs! I have tried to convert all the object types over and fill out unit tests, but there are likely some typos or bad error handling for some unusual predicates. let me know what problems you run into, and I'll fix it up!
the old system_inbox and system_archive parameters on /get_files/search_files are now obselete. they still work, but I recommend you just use tags now. I'll deprecate them fully in future
/get_files/search_files now disables the implicit system limit that most clients apply to all searches (by default, 10,000), so if you ask for a million files, you'll (eventually) get it
a new call /manage_pages/add_files now allows you to add files to any media page, just like a file drag and drop
in the /get_files/file_metadata call, the tag lists in the different 'statuses' Objects are now human-sorted
added a link to https://github.com/floogulinc/hyextract to the client api help. this lets you extract from imported archives and reimport with tags and URLs
the client api is now ok if you POST with a utf-8 charset content-type "application/json;charset=utf-8"
the client api now tests the types of items within list parameters (e.g. file_ids should be a list of _integers_), raising an appropriate exception if they are incorrect
client api version is now 18
.
misc:
hydrus now supports wave (.wav) audio files! they play in mpv fine too
simple psd files now have thumbnails! complicated ones will get a stretched version of the old default psd filetype thumbnail, much like how flash works. all your psd files are queued up for thumbnail regen on update, so they should figure themselves out in the background. this is thanks to ffmpeg, which it turns out can handle simple psds!
vacuum returns as a manual operation. there's some new gui under _database->db maintenance->review vacuum data_. it talks about vacuum, shows current free space for each file, gives an estimate of how long vacuum will take, and allows you to launch vacuum on particular files
the 'maintenance and processing' option that checks CPU usage for 'system busy' status now lets you choose how many CPU cores must exceed the % value (previously, one core exceeding the value would cause 'busy'). maybe 4 > 25% is more useful than 1 > 50% in some situations?
removed the warning when updating from v411-v436. user reports and more study suggest this range was most likely ok in the end!
double-clicking the autocomplete tag list, or the current/pending/etc.. buttons, should now restore keyboard focus back to the text input afterwards, in float mode or not
the thumbnail 'remote services' menu, if you have file repositories or ipfs services, now appears on the top level, just below 'manage'
the file maintenance menu is shuffled up the 'database' menubar menu
fixed mr bones! I knew I was going to make a file status typo in 447, and he got it
in the downloader system, if a download object has any hashes, it now no longer consults urls for pre-import predictions. this saves a little time looking up urls and ensures that the logically stronger hashes take precedence over urls in all cases (previously, they only took precedence when a non-'looks new' status was found)
fixed an ugly bug in manage tag siblings/parents where tags imported from clipboard or .txt were not being cleaned, so all sorts of garbage with capital letters or leading spaces could be entered. all pairs are now cleaned, and anything invalid skipped over
the manage tag filter dialog now cleans all imported tag rules when using the 'import' button (issue #768)
the manage tag filter dialog now allows you to export the current tag filter with the export button
fixed the 'edit json parse rule' dialog layout so if you transition from a short display to a string match that has complicated controls, it should now expand properly to show them all
I think I fixed an odd bug where when uploading pending mappings while more mappings were being added, the x/y progress could accurately but unhelpfully continually reset to 0/y, with an ever-decreasing y until it was equal to the value it had at start. y should now always grow
hydrus servers now put their server header on a second header 'Hydrus-Server', which should allow them to be properly detectable through a proxy that overrides 'Server'
optimised a critical call in the tag mappings update database routine. for a service with many siblings and parents, I estimate repository processing is 2-7% faster
optimised the 'add/delete file' database routines in multiple ways, particularly when the file(s) have many deleted tags, and for the local file services, and when the client has multiple tag services
brushed up a couple of system predicate texts--things like num_pixels to 'number of pixels'
.
boring database refactoring:
repository update file tracking and service id normalisation is now pulled out to a new 'repositories' database module
file maintenance tracking and database-level file info updates is now pulled out to a new 'files maintenance' database module
analyse and vacuum tracking and information generation is now pulled out to a new 'db maintenance' database module
moved more commands to the 'similar files' module
the 'metadata regeneration' file maintenance job is now a little faster to save back to the database
cleared out some defunct/bad database code related to these two modules
misc code cleanup, particularly around the stuff I optimised this week
next week
Next week is a 'medium job' week. To clear out some long time legacy issues, I want to figure out an efficient way to reset and re-do repository processing just for siblings and parents. If that goes well, I'll put some more time into the Client API.
0 notes
Text
THE GREAT CRUNCHYROLL NARUTO REWATCH Continues with Episodes 8-14!
Welcome to the Great Crunchyroll Naruto Rewatch! I'm Kara Dennison, and I'll be your host this week as we make our way through all 220 episodes of the original Naruto. Last week, we covered episodes 1-7, and we continue this week with episodes 8-14.
This week, Team 7 pushes through on a bodyguard mission that is way above their pay grade. Naruto, Sakura, Sasuke, and Kakashi-sensei deal with a town living in fear, a ninja who's as pretty as he is deadly, and another who just refuses to die. And the new Genin continue their training with their toughest challenge to date: Chakra-assisted tree-climbing!
Before we discuss these episodes, let's check out some questions and comments you had from our last installment!
Several people asked if we would be doing a Dattebayo/Believe It count.
Kevin: As the person actually doing the counts, I am totally willing to add another to the list. Admittedly, this one would be a bit more difficult, since I would need to actually pay attention to find all of the instances, instead of just noticing when there are multiple Narutos or a bowl of ramen on screen, made more difficult by the subs seeming to be inconsistent with how the phrase is translated. Someone who actually speaks Japanese might be a better choice since they’ll catch it more easily. Regardless of who though, if we’re adding it, the earlier the better so that the counter can go back and get the count for all previous weeks.
We were also asked about doing reaction videos rather than write-ups. We'd love to do this! Unfortunately, the spread of our Features team across several time zones combined with how long it would take to assemble and edit videos like this means that we couldn't move at the speed we currently are! We hope you enjoy the write-ups as we go!
Remember, you can leave us questions in the comments for the next set of episodes, and we'll answer them together in the next update!
Now, let's see what the Crunchyroll Features team thought of this week's episodes!
We’re into our second week of viewing. Has anything happened to change your early-stage feelings about the series last week? On the flip-side, has anything happened to cement early feelings?
Joseph: Despite the fact that this leg of the series introduces the whole “spend the first 10 minutes recapping what happened during the last 10 minutes of the previous episode,” Naruto is surprisingly fast-paced. In many ways it reshapes my previous feelings about this being a total shonen crawl, because Naruto and the team do manage to learn quite a bit in under a dozen eps.
Paul: It's still too early for me to offer any specific criticisms about the show or its qualities. Naruto is still a shouty shonen protagonist, Sasuke is still the broody support character with the tragic backstory, and Sakura is, well, still the generic love interest. I hope she doesn't get left behind in terms of development and cool character moments. On the flip side, Naruto and Sasuke teaming up against Zabuza does cement my opinion that the fight scenes are pretty cool.
Peter: I forgot how fantastic the early dynamic amongst Team 7 was, especially how Sakura was every bit the little piece of shit Naruto and Sasuke were. I’m actually afraid of new plot developments now since I can’t recall exactly how long this equilibrium lasted before… Well… Maybe that’s why One Piece and Black Clover make me feel so nostalgic, both have similar character chemistry but have stretched it out for their entire runs.
Danni: This batch of episodes established some of the characterization that felt absent from the initial episodes. I like that we’re already seeing a friendly rivalry develop between Sasuke and Naruto rather than an antagonistic one. I’m looking forward to seeing that relationship grow.
Carolyn: There were still many moments when I felt quite bored. I can’t say why exactly, but the show doesn’t fully capture my attention. That being said, I was glad to see a lot less Sexy Jutsu and for the most part less pining over Sasuke. It’s starting to become more of what I seemed to remember. I’m very impressed with how driven Naruto is and how much he dedicates himself to his goals. He’s a much better-written character than I realized the first time I watched the series.
Jared: There was less of a pull on emotional storytelling in these episodes, although Inari’s backstory was a wild roller coaster. That continued the trend of this series really knowing when to make story bits impactful. I also liked Naruto and Sasuke’s rivalry becoming more friendly than the two of them being jerks to each other.
Noelle: These episodes are mostly refreshers for me, but it was nice to see Naruto and Sasuke’s rivalry really start to form, instead of the short initial bursts we got in the first few episodes. Now it really feels like there’s more of a competition. On the flip side, well, it is still a shonen show, and all that comes with that.
Nicole: Team 7 is really starting to come together. Naruto and Sasuke each have their desire to improve and be the best they can possibly be, but they won’t dare lose to one another! I wish Sakura did more though; yes, her control of chakra is exceptional, but I’d like to see her kick some ass too, please. Meanwhile, Kakashi remains my favorite character and I wonder if that’ll change as we watch the entire series.
David: I’m glad that there is some thematic meat to this arc. Naruto’s story is still relatively basic for the genre, but the dynamics of the bridge builder Tazuna trying to help his community while fighting against the much more privileged shipping magnate Gato are genuinely interesting. Zabuza and Haku are the main combatants but they are sympathetic, essentially also being tragically used by the real villain Gato. I wish Naruto and company were more closely tied to the conflict, but as it stands I’m impressed.
So we finished out the fight with Zabuza… and now we’re in the middle of the fight with Zabuza and Haku! What’s your take on the action in this batch of episodes?
Joseph: The first round of the Zabuza fight ends with what is probably the most exciting moment of the series so far: Naruto and Sasuke’s double-team trick attack that involves Naruto disguising himself as a massive shuriken to mount a sneak attack from behind. The physics implications alone send the mind reeling. I love this and some of the other key action beats, but I just have one beef: this early on, the move is too brilliant for Naruto. I just can’t even fathom that he came up with it knowing what we know about him at this point. It still kicks ass, though!
Paul: What pleases me about the action sequences is not just the presentation of far-out effects from the Jutsus, but also the little bits of business such as Naruto and Sasuke sharing a smirk when their Shadow Shuriken plan comes together. That reversal of expectations – from success to failure back to success again – is a dramatic structure that Naruto does well.
Kevin: In general, I quite liked the action. The end of Team 7 versus Zabuza showed off teamwork and ingenuity, Naruto versus Gato’s goons evolved the “Shadow Clones transformed into Shuriken” concept, and Sasuke versus Haku showed off 1-handed signs and Kekkei Genkai. The last one doesn’t necessarily have the most exciting action, but it develops the ninjutsu system nicely.
Peter: I’m once again awestruck how easy Kishimoto made this adaptation. They pull so many dynamic layouts straight from the pages of the manga. Sasuke’s windmill shuriken reveal was every bit as peak goth as I remember. With a lot of Shippuden and Boruto’s action more clear in my mind, it’s really awesome how many details have carried throughout the series. Also I totally forgot how bad Haku seems to eat it every time he actually gets hit. Two blows to the face and each time you get this lovingly animated neck snap and flop over.
Carolyn: I actually noticed a lot of thought processes going on that I found very interesting. Were those there last week and I just missed them? I enjoyed hearing Sasuke put pieces together to figure out what the course of action might be in the face of danger. Or Kakashi figuring out the fakeout death. I like that we get to see a little bit of the brains behind the brawn.
Danni: It felt a bit more slow-paced this time, like every move required a set of reactions followed by a complete explanation of what just happened. That aside, I appreciate all the trickery that’s been going into the current battles. It engages me to a point where I’m watching every battle trying to predict the moves right along with them.
Jared: These fights definitely ramped up the danger aspect compared to the first set of episodes. The teamwork shown from Naruto and Sasuke in the first Zabuza fight was great. I thought it was interesting that even though we’re still relatively early on, Haku’s jutsu was stuff that had never been seen before by even people like Kakashi, which I’d have figured would come later. Naruto and Sasuke both did get their moments of looking cool, so maybe Sakura will get hers soon? Hopefully?
Noelle: Really, the shuriken bit from the first fight was pretty great. Yes, it was cool but what I most enjoyed about it was that it shows that Naruto’s still learning. He may be stubborn, but he’s pretty adaptable too! That makes the small victories that come with it feel a lot more earned. As for the second fight, it is dragging a bit.
Nicole: That shuriken moment was totally brilliant, and the smirk both Sasuke and Naruto share as it catches Zabuza off-guard is gold! They worked seamlessly as a team, and this seems to be just the beginning of this beautiful teamwork. Getting to see their different styles is refreshing; Sasuke seems to do things in order, whereas Naruto is more of a experimental type of ninja. Sakura… well, we’ve yet to really see her in action, so can’t really say much about her. But getting to see how they work, how they think and how they’re learning as they go is pretty neat!
David: Unlike the first batch of episodes, where the action seemed like it had potential but was held back by stilted animation for the most part, the fights here are all fluid and impressive. The Naruto-shuriken gambit is incredibly cool, but even the more basic hand-to-hand combat between Sasuke and Haku is just a joy to watch. They have magic powers, but the fights still manage to avoid the ‘floaty’ feeling shows with magic-infused combat sometimes fall into - hits always feel like they have a real weight to them.
We also get a second viewpoint on the situation in the Land of Waves via Inari and his family’s history. How do we feel about that storyline?
Joseph: Episode 10 introduces one of my favorite low-key shonen tropes: the “jaded child who no longer believes in heroes”! I like the way this one plays out. Tazuna seems kind of shady when the squad first runs into him, but the story he presents about Inari and his family is really heartfelt, and cements this bridge as something worth fighting for.
Paul: I know I'm not supposed to want to drop-kick the small child who has been repeatedly traumatized by bullying, poverty, and the murder of his adoptive father, but if they wanted Inari to be sympathetic, they shouldn't have given him that awful hat. It looks like at any moment he's going to try to sell me crypto-currency or hector me about how the workplace wage-gap is a myth.
Kevin: The backstory was well constructed and made the characters’ motivations understandable, I just wish that I cared about Inari nearly as much as I do his dead foster dad. Did we really need a second kid for Naruto to impart wisdom on because the kid’s going down the same path as him? Wasn’t Konohamaru enough?
Peter: I’m sure everyone on the team who watched MHA before Naruto is starting to make some connections with Inari. Mostly I am, and always have been, fascinated with the world that Kishimoto has created. I heard he grew up in a military town, but I’m curious about what personal experiences led to him developing this world with such a laser focus on how the prejudiced and violence of adults pass down to their children.
Carolyn: This universe is not gentle to orphaned children, that’s for sure. It’s kind of sad how often they are treated badly for literally being traumatized. Also, screw that kid for throwing the puppy in the water.
Danni: Listen, I’m on board for any storyline where a monopolistic corporate a-hole is the bad guy.
Jared: I sure wasn’t expecting Inari’s backstory to feature attempted dog murder and then death by crucifixion and stabbing. Or the fact that this was going to be about class warfare. If anything though, maybe Inari will help bring the bucket hat back into style.
Noelle: Inari comes as the second of ‘kids that Naruto relates to’, and it’s slightly different than Konohamaru. I admit I don’t really care deeply for Inari, even though I certainly feel bad for him because his dad’s murder is a lot more brutal than I remember. It’s also a lot more ‘greedy businessmen are bad’ than I remember, I was definitely more focused on ninja action than the ‘existing power structures will backstab you’ part as a kid.
Nicole: So when are they gonna punch Gato? When is Gato gonna get his? I didn’t remember the Land of Waves being in such a dire situation. And I certainly didn’t remember Inari’s dad getting publicly executed! Yeah, Gato needs to go, ASAP.
David: The hero of the people being literally crucified by the unrelenting capitalist overlord was a little on the nose, but considering the entire theming of the arc already surprised me with its thoughtfulness, I’m not really complaining.
We’re also seeing lots of new moves! What’s been your favorite new Jutsu?
Joseph: My favorite Jutsu would have to be the way Naruto and Sasuke used the transformation move, which is something I’m sure was on a lot of minds during this batch. Beyond Jutsu, though, I gotta give a shout-out to some of the new concepts Kishimoto cooked up. I love the idea of tracker ninja and the notion of having to recover or destroy bodies before their ninja secrets can be revealed.
Paul: I don't know if it counts as a Jutsu specifically, but Kakashi using his Sharingan to copy (and surpass) his enemies' techniques was pretty dope, if only for the imagery of dueling water dragons.
Kevin: While it’s not technically a jutsu on its own I completely forgot about the “Shadow Clones turn into shuriken” combos, and I love seeing them. It’s a level of strategy that Naruto doesn’t normally employ, and I hope that there’s more stuff like it in the future.
Nate: I'm always partial to Naruto's training, in this case something super basic (for a ninja) like running vertically up a tree--the series always does a great job breaking down a technique so the characters can fully understand it, which then means that we understand it. Later, when the characters use the technique, they don't need to explain anything and can just let the action do the talking.
Peter: Naruto loves breaking its own rules. No sooner did they bother talking about hand seals than a character is introduced who can do it with 50% less hand. That said, some of the shit Sasuke pulls later on with seals is some of the most awesome fight choreography in anime. Also Kakashi’s use of sharingan is really bizarre at this point. I’m really curious what Kishimoto’s original plans for the doujutsu were before developing it (or not) later on.
Danni: Does the sharingan count as a jutsu? I hope so, because that’s my favorite. It’s the shinobi equivalent of the kid at recess going “I just learned all your moves and can deflect all of them now.” It’s way too OP. I love it.
Carolyn: So. Many. Clones. I don’t think it counts as jutsu but I am a definite fan of the pretend death needles.
Jared: Haku’s hidden jutsu of ice mirrors is rad from the sense of a technique that could seem as if there’s no means of beating it, but also you could have a nice side business by having a portable house of mirrors.
Noelle: It’s not really a jutsu, but I still love the sharingan. I also completely forgot about the shuriken transformation so that was great to see it again!
Nicole: That would have to be that one scene of Zabuza doing the Water Style Water Dragon Jutsu and Kakashi copying all of it like it was nothing. It was so cool to see all the hand signs in motion like that for the first time!
David: Haku’s ice mirrors genuinely frightened me as a child - I was completely convinced Sasuke was just going to die there back then. It’s still very cool now. Getting a hint of the more high-powered fights watching Zabuza and Kakashi go at it is also neat but I’m more impressed by the smaller powers I think.
And of course, to close things out, what’s everyone’s personal high and low points of episodes 8-14?
Joseph: I think I’ve made my high point clear enough: LIVING. SHURIKEN! As for the lows, Sakura is still getting the short shrift. Naruto and Sasuke are constantly growing, yet she remains far from the spotlight. There’s one moment where she approaches Tazuna and says she’s in charge of guarding him while Naruto and Sasuke continue to practice climbing trees. I don’t really see how she can help; shouldn’t she be back there training, as well? At this point she seems like an afterthought that’s used more as a wedge to place between two characters who don’t really require any additional tension.
Paul: Low point–Inari's mom being menaced by a pair of leering, sword-licking samurai goons. High point–Naruto delivering a righteous head-kicking to said goons. Sometimes the baddies just need to get roundhouse kicked into next Tuesday.
Kevin: High Point- Naruto asking Sakura for tree climbing help. First, I’m a sucker for shonen training, so seeing the main characters get a week to practice a new skill is great on its own, especially since we see the start of Naruto and Sasuke being actual rivals. Even better though, the show builds on the previous idea of teamwork being more important than anything else by having Naruto realize that he can improve more quickly by asking a teammate for help instead of (in this case almost literally) running into a wall.
Low Point- Sasuke in the Ice Mirrors. I know that he’s being pinned in and this is the first time that one of the kids is seriously in danger, but it’s also a problem that can be solved by covering your head and running in literally any direction to get out. Worst case scenario, you have a needle somewhere vital that it stopping you from bleeding out due to the needle being in the way.
Peter: Once again my highs and lows are mixed. I’m really loving the interactions between Team 7 but you can already feel a growing disparity between the characters that indicate it won't last. The relationship between Sakura and Naruto specifically is super rewarding. You discover they have a lot in common and she softens on him once she realizes he isn’t 100% a troublemaker. Him showing humility and asking for help is also A+ shonen stuff. Loved the “I’m not telling.”
Carolyn: I have been paying extra attention to the art style this week. I love the watercolor look of the backdrop and the occasional Ben-Day Dot style flashbacks. I also have been very much liking Naruto’s continued growth, being happy for Sakura’s success but still admitting his jealousy (emotionally mature in my book!) and coming to her for help. I continue to be surprised by how much depth he has when he isn’t being a punk. The low point, sadly, was still my girl Sakura. I swear I remembered her as being a stronger character but she just isn’t there, yet. She got much closer this week … when she had things to do. But then immediately followed that up by needing Sasuke’s approval before taking pride in her accomplishments.
Danni: The lowest moments in these episodes are easily the all-too frequent flashbacks. I know, they’re an easy way of filling extra time, but as a viewer I feel insulted! Please, trust your audience to have a memory span longer than that of a goldfish! That aside, I can’t tell you how psyched I got at the shadow shuriken throw Naruto and Sasuke pulled off. I live for tech like that.
Jared: This set of episode had to have at least 10-15% of them made up of flashbacks which felt like such a drag. Episode 14 is especially egregious with this since 10 minutes of it are just that for whatever reason. It didn’t help as well that the recap seemed to really nail what the series thinks of Sakura currently with that she just has the hots for Sasuke. Can Inari’s hat reminding me that I own a New Radicals CD be in between high and low moments? That said, the fights were a lot of fun, Haku proving that characters named that are cool and dangerous, and Naruto and Sasuke’s team up were all good moments.
Noelle: The fights were fun! Even though Team 7 is made up of kids and one (relatively young) adult, it’s good to see that the kids aren’t entirely outclassed. Normally you’d expect the adult enemies to steamroll them, but the team is holding their own, and adapting to new situations. It’s good, not just something stagnant. As for the low points, boy there were a lot of flashbacks! It’s standard, I know, but it felt a lot like padding, if that makes sense. Trust your viewer to remember something that happened recently! Also Sakura’s treatment, but that is well, unfortunately a genre staple…
Nicole: Low Point: Sakura not really doing anything. She is praised by Kakashi, but why hasn’t she really shown off what she can do? High Point: The overall growth of Team 7 as they trained and battled! Naruto asking Sakura for tips and then not sharing what she said with Sasuke was hilarious, but even in those moments of rivalry, they care for one another as a team.
David: High point: Again, the Naruto-shuriken strategy is incredibly satisfying to watch unfold. It is the first time it really feels like the show has not only a solid understanding of its own mechanics but also the cleverness to utilize it for cool and exciting moments. Low point: kind of cheating, but the half-episode of recap in episode 14 isn’t just boring, it is also horrendously placed. Right before that, Sasuke is trapped by Haku, everyone is in peril, and Naruto appears to save the day at the very end of the episode! There can’t be a worse way to follow that up than by riding that excitement and suspense directly into a recap of the entire show so far.
COUNTERS:
Ramen consumed so far: 2 bowls, 1 cup
"I'm gonna be Hokage!" count: 11
Number of Shadow Clones summoned: 52
And that's everything for this week! Remember that you're always welcome to join us for this rewatch, especially if you haven't watched the original Naruto!
Here's our upcoming schedule!
-Next week, on FEBRUARY 1st, we discuss EPISODES 15-21, with KEVIN MATYI hosting! Not only do we start the Chunin Exam arc, but we get our first FILLER EPISODE! THIS IS THE ONLY INSTALLMENT WE'RE ACCEPTING QUESTIONS OR COMMENTS FOR THIS WEEK!
-Then, on FEBRUARY 8th, we'll discuss EPISODES 22-28, with JARED CLEMONS as host! The Chunin Exam kicks into high gear!
-On FEBRUARY 15th, we'll discuss EPISODES 29-35, hosted by DANIEL DOCKERY as things heat up in the Forest of Death!
Thank you for joining us for the Great Crunchyroll Naruto Rewatch! Have a great weekend, and we'll see you all next time!
Have any comments or questions about episodes 8-14? What about our upcoming installment, featuring episodes 15-21?
-----
Kara Dennison is a writer, editor, and interviewer with bylines at VRV, We Are Cult, and many more. She is also the co-founder of Altrix Books and co-creator of the OEL light novel series Owl's Flower. Kara blogs at karadennison.com and tweets @RubyCosmos.
0 notes
Last Seen Blogs

amethystmoonsims
Amethystmoonsims


oldfashionandeverythinginbetween
old fashioned

weird0withcats
weird0withcats